 Hello! I’ve been sewing a new shirt for Craig… and feel quite bad actually because we
 bought this fabric for him during our visit to Japan last January… nearly a whole year ago! Yes, I feel terrible.
Anyway, now it has been made, finally, all done and dusted, better late than never!
Pattern: I even treated myself to a new mens’ shirt pattern! this is Burda 6874. My old favourite Burda 7767 is very very used now and a lot of the cutting lines have almost fretted away and a few are barely visible anymore. I’ve still got it and will use it for the collar variations, which have always been its best feature. This new pattern is very nice too; it is a basic yoked mens’ shirt pattern, quite slimline, more slimline that my old pattern! with two back variations, curved hemline, regular or hidden button band variations, long cuffed sleeves, a collar stand and collar which can be made as a regular collar or a button-down… and when it comes to that please don’t get me started on the widespread but incorrect use of the term “button-down” as it applies to shirts… my pet hate grrrrrr. Hint; it’s not about the shirt at all, but the COLLAR. If the collar buttons down onto the shirt, it is called a button-down shirt. If the collar does not button down onto the shirt, it is NOT a button-down shirt. Simples.

(deep breath) ok so this is clearly NOT a button-down shirt… as per Craig’s request I also made it with short sleeves and gave it a hidden button band. It’s interesting that the hidden buttons do not have even spacing under that band… the space between the second, exposed button and the next one down is shorter than the others… this made me a little nervous when I was stitching those buttonholes, I checked the pattern, and double-checked! and yep, it IS supposed to be like that!
 Also above; I decided upon welt pockets rather than patch pockets. No, they can hardly be seen in amongst that busy print. I’ve made my peace with that, at last, though that was the motivating factor behind my decision to topstitch throughout with black thread, to make all the details of the shirt stand out a little more.

I made up the pattern almost as is, with just a slight custom-fitting alteration for Craig, namely extending the underarm by 2.5cm, and that same width to each side of the sleeves at the underarm too. This extra width is tapered away to nothing by the bottom of the sleeve. It’s a similar alteration I always did to Craig’s Burda 7767’s too, but slightly different/less exaggerated since the fit of the new pattern is slightly different. Or maybe Craig has slightly changed? always possible I suppose!

All seams are flat-felled, including the armscye seams, and see here for my tutorial on how to flat fell a curved armsye seam (as below). I also did the yoke using that burrito method, so there was no need for hand stitching. Still had to hand stitch the inner collar facing down though… I don’t think the method has been invented yet that can eliminate that!

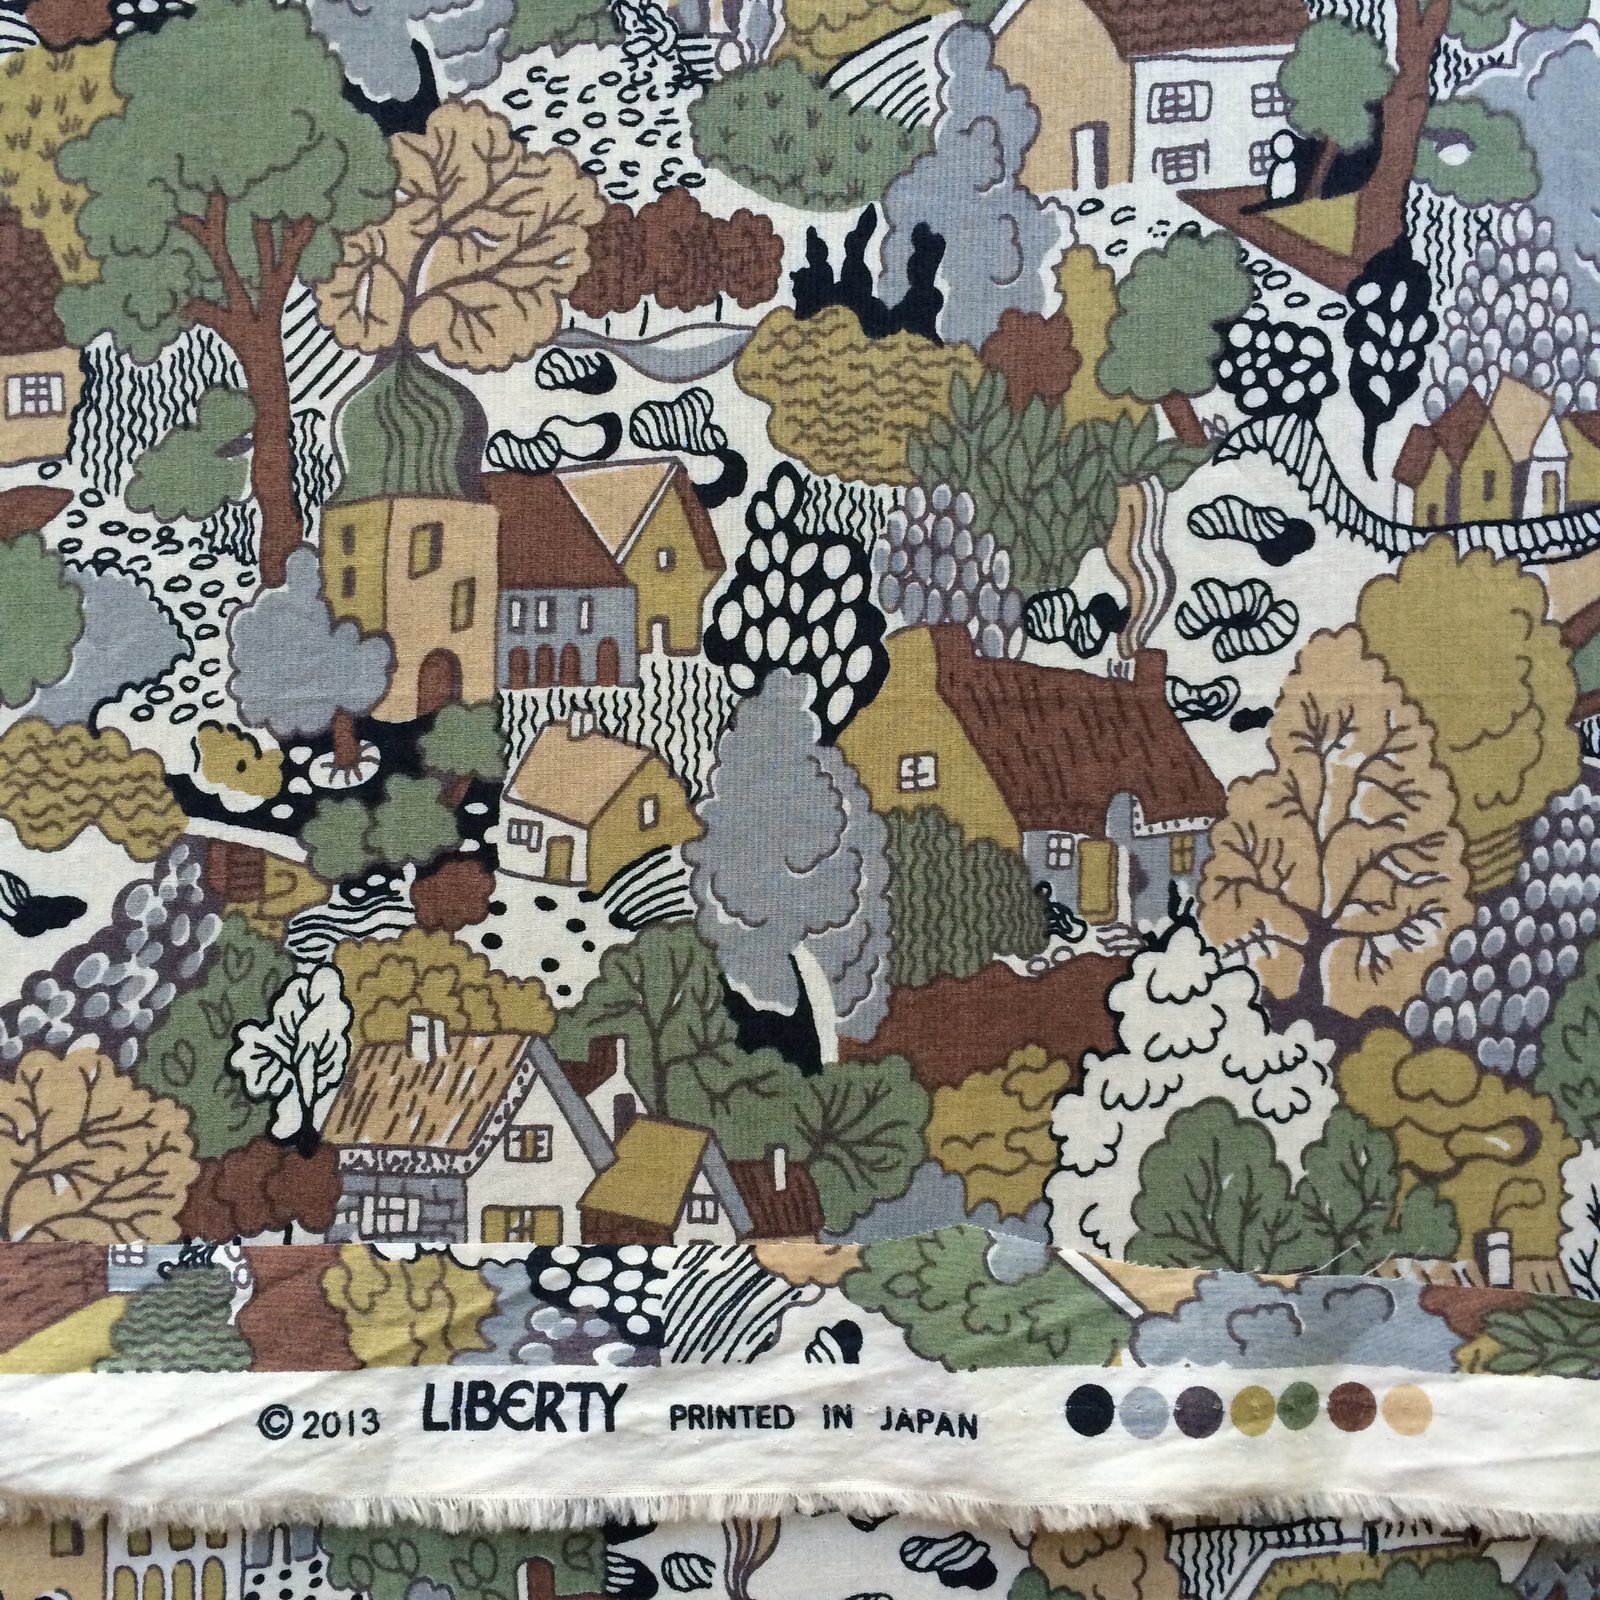
Fabric; Japanese Liberty tana lawn, bought from Check & Stripe in Tokyo, during our holiday last January. Craig chose it himself; the little village and woodland scenes are so lovely. Do I wish I had bought more, and even a little bit for myself YES!! but oh well. I did buy plenty of other fabrics for myself, don’t worry. But oh! Liberty such a true delight to work with… its so pliable, smooth, even; it passes through the machine beautifully, folds and presses so crisply and perfectly. I just wish I could sew with it more often!! The little unobtrusive black buttons are from Spotlight. I know, not very worthy, huh. Bit of a letdown. Well, it’s not like the buttons are going to steal any shows here. That beautiful print does all the talking!


what a perfect shirt – that fabric is so nice. And I don’t think I’ve seen a hidden button placket on a man’s shirt or maybe never noticed. In any case a nice touch.
What I will say is, beware the long sleeve version! The instructions for the sleeve placket are very Burdaish. My husbands one has been sitting now for about 2 months, waiting for be to try again to get them looking good! I don’t have enough fabric left I thing to draft my own….grrrrrr
I really hope I’m not overstepping here Sara/Carolyn, but I have a shirt placket tutorial over on my blog with a link to a template https://sewniptuck.com/2015/01/21/tutorial-sleeve-tower-placket/
If you don’t have enough fabric left what about a contrast placket? They really are a doddly to sew once you get them once!
Best of luck,
Lesley
Thanks Lesley, I will take a look. My husband is incredibly unadventurous however, so contrast plackets would be well beyond his comfort zone. I might have to stalk Spotlight stores to see if they have any fabric left….
Sara; I love Burda patterns for that reason, they make you think! although I did notice the placket looked a little light-on, and also I prefer an arrow-head placket. I was thinking I would stick with the one from Burda 7767 which is a goodie…
Lesley, thank you for that link! I will be sure to check it out and give it a go sometime 🙂
Beautiful sewing from a loving wife. Sandra Betzina once said on a video that if you go to all the trouble of making a welt pocket, make it in a contrasting color so everyone can see it. That would completely change the look of the shirt, though.
thank you Carol! although you re right about a contrasting welt pocket, would look a little distracting from that lovely print. Also don’t think my husband would like two obvious “bars” stuck across his chest either! 🙂
That fabric is wonderful! I have some liberty print fabric that is so beautiful and wonderful that I haven’t sewn it yet. Maybe this will inspire me. I’ve never heard that shirt collars that button down are called button-downs instead of the shirt. Maybe it’s a difference like jumper and sweater. I think in America button-down refers to any shirt that unbuttons down the front. Most American shirts don’t have buttons on the collar, though. Maybe they do. Hmmm. I’m going to have to research this topic further.
American here who totally agrees that a button down shirt has buttons that button the collar down. They were the original polo shirts.
What a wonderful shirt for your dear husband- and Liberty! It is so lovely to sew and to wear, isn’t it? The shirt is sewn so perfectly and I like all of the details like the button band and the seam line with the kind of gusset. And the beautiful flat felled seams.
I have made a men’s shirt only once but some shirts and shirt dresses with a collar stand for myself. This is the method I used without any handstitching: https://www.grainlinestudio.com/2013/04/12/archer-collar/
To say the truth, I don’ t know any other method 🙂
thank you SaSa! Yes, that is the method I use too, except I do the last bit by hand. There is that option to finally topstitch the facing down by machine, however without hand stitching first I’ve never managed to get that looking equally neat on both the outside and inside. I just do that final inner facing bit by hand now, it’s just quicker and easier, completely neat and invisible. Then, I topstitch by machine from the outside and it’s a far neater look than if I hadn’t sewn it by hand first 🙂
I will do that next time, too! I used to only put pins and topstitch. Like this, the inner facing is edgestitched at a distance of maybe 3mm. Surely with handstitching it will give a lovlier finish 🙂
P.s.: did you watch the video part? This is the interesting part. The inner collar stand is fixed at the outer edges with a burrito method which makes it quite neat and you are able to grade the SA in the corner quite well.
David Coffin in his book Shirtmaking has a fabulous way of installing the collar and collarband that can be done without hand stitching.
The best tip I can give you for attaching a collar stand to the neckline without hand stitching, is to pre-fold the seam allowance of the facing (the side that lays against the neck), before sewing the collar stands together. If you inspect the collar stand facings of RTW men’s shirt collars they go an extra step and stitch the folded edge at 1/4″ from the fold. I prefer to just press it sharply. Later when you are ready to topstitch the facing, keep that sharp crease precisely and directly above the collar stand shell, and using your straight stitch foot, edge stitch 1/8″ from the edge, catching both edges as you sew.
Hope this helps!
thanks John! Yes, I have used that method in the past, however I find that way to be a bit risky and so still will always hand slipstitch the facing down in place first before any machine topstitching. I’ve just found that without securing it first it just never does turn out quite as perfectly neat and tidy on the inside as I would like; so since i’m saving myself from unpicking and redoing, that handbasting ends up being a time saver for me too 🙂
Very cool shirt! I love the print and as usual, your craftsmanship is impeccable!
Love it, Carolyn. The fabric would make such a pretty skirt or dress 🙂
Simply a labour of love for ya hubby Carolyn – terrific effort and kudos to you for all those brownie points!!
I usually add a bias piping sans cord to my collar facing so that when I stitch in the ditch from the outside it always (read almost always!) nails the thing down!!
Mwah xx
Fantastic looking shirt, love the Liberty print and all your beautiful techniques to make your husband a Bespoke shirt.
Lovely details. Very nice.
Fabulous shirt – great details! I’m one for handstitching collar stands down first too, but wondered if you’ve ever tried glue basting instead? I’m keen to try that. Because I never do my collars up to the neck I’ve also started doing the stands the reverse way, and doing the outer collar stand last because it’s less visible – the facing is more visible as the collar flops open so that gets machined on first….
that fabric is fantastic….. Liberty fabric is gorgeous to work with. and so beautifully finished.
What a nice shirt. Good fabric choice with a great print. Philo
What a beautiful shirt! Perfect for the weather you are having – cool, smooth, and original. As always, Carolyn, I really admire your skills and the end products they produce.
Very cool fabric! 🙂
Great shirt – lucky fellow 🙂 love the underarm adjustment – the man has guns! plus, a man’s sleeve should be wider, IMHO. Love the shirttail gusset…
I thought I was going all out when I made 2 Tees for my husband for his 65th last month but a shirt!? That is way too out there for me – actually I haven’t even made myself one yet 🙂 I am getting to love the idea though and I’ve signed up for a course for some guidance on these critical pieces LIKE a sleeve placket. Your fabric for Craig’s shirt is SO delicious! I bet it’s just a crisp and light as it looks.
Hi! I’m a new follower of your blog and read all the way from Amsterdam, the Netherlands 🙂 Really love your blog, your productivity, style, your bravery and perseverance. Also you look fantastic if I may say so 🙂
I’m currently checking out all your blog history, reading everything of interest to me. I mainly sew with knits myself but lack bloggingtime nowadays… Looking forward to seeing and reading more of you 🙂
What a lovely shirt for your DH. I too hand stitch that collar part and despite all the info in the world can never machine sew it to my standards. I would certainly get fired from a job that required quality standards in that area….or maybe with enough practice I would get good enough. However, at one or at the ver most two shirts a year, hand sewing is just fine;-)
Lovely shirt! I love making men’s shirts. Thread Theory has a great method for sewing in shirt collars as well.
A beautifully made shirt! I am currently working on a long sleeved plaid cotton flannel shirt for my husband. They really do take a lot of work, don’t they?!? Similar story, he picked out the fabric in May…and I put it off all summer because it was summer. Winter is finally arriving in Florida, so, after a few hints from DH about how nice it would be to have a new flannel shirt, off I went! I’m down to the cuffs and sleeve plackets, so nearly finished. Thank you for providing so much inspiration!
OMG ! this fabric is so beautiful ! It’s made a cery nice shirt !
Very handsome shirt! You did a wonderful job on fitting. I enjoy reading about the details.
My first thought was Cassie when your fabric photo came through my IG feed… so what a nice surprise to see this handsome shirt made for your husband! And what a wonderful story full of memories it tells!! Always professionally sewn and completed, your work is so inspirational. Appreciate your sharing insightful thoughts and how you thought through certain steps….. why you chose to maybe do this or that… love learning from you!!! 🙂
I absolutely love this fabric! It is so challenging finding fabric for boys and men. I will have to add this pattern to my list of ones to buy. It looks so nice and tailored and I love the changes you made.
That is one gorgeous fabric! And the shirt turned out lovely, you can see the love that went into it 🙂 Really, all those super neat details, I love it! And thank you for the button down clarification, I didn’t know there was a difference between a shirt and a button down.
Beautiful shirt! I love the fabric and the hidden button band!
That is lovely fabric. I’d have been very tempted to keep it for myself….
I love a bit of top-stitching. It is a pretty cool shirt. I am not a fan of Burda patterns, not for the style but they are always too long on me: in the arm, shoulder, leg length, body length, hem length, I mean what else is there not to change? I take a full 4 inches out of the length on my Burda jeans but that looks like a good pattern. I’m small you are tall, we are all different which I why I love to sew my own clothes. Jo x
Yes you need more of that Japanese Liberty – it is stunning, as is Craig’s shirt!
That fabric is so perfect for a men’s shirt – I love that it looks like a fairly standard camo print from far away then as soon as you get close it’s got that intricate pattern.
What a lovely shirt! I don’t think I’ve ever seen a hidden button shirt for men either. The fabric is really beautiful, too.
Love it, have been making shirts for my sons for a while now and I think its about time daddy had one 🙂 so hard to find good patterns and good advice for sewing for men
Pingback: some shirts... - Handmade by Carolyn