Hello! I made a new pair of bathers for myself… and I’m chuckling to myself that I’ve gone kinda Bay Watch this year. Is Bay Watch even a part of the collective consciousness any more? hmmm I could be aging myself a bit with that reference?!
it’s only a year since I made my last pair of bathers but the fabric didn’t last as long as I was hoping. Oh well. I swim every day nowadays so maybe it’s not so surprising that they’ve worn out. And I have to admit that I don’t think this fabric is going to last l0nger than a year either. It already has that very stretchy quality that doesn’t bode well for future stability.
I used my old favourite “vintage” pattern – oh and it hurts to use that word since I bought it when it was new! of course McCalls 2772, that I’ve been using practically every time I make bathers. I just really like the style of this pattern, and when you’re happy with a thing then it’s ok to stick with it. The stretchy red polyester is from Fabulous Fabrics.
As usual, I made a skirt that I’ve stitched to the underneath of the bikini top to make a tankini version of the pattern. The whole back “skirt” is cut in one piece just using the upper curve of the bikini back as a guide and with the regular length of elastic attached to the top of it.
The first beach swim in the new bathers! and here’s to many more. When I was browsing fabrics I really wanted to find a cool print like palm leaves, or beach balls, or something with a mix of beautiful colours, or pretty florals, or wide stripes or something nautical. I found nothing at all that I liked in the print selection, this plain red was the only thing I even vaguely liked in the end. It’s ok, because I do love red, and it feels both cheerful and timelessly fashionable.
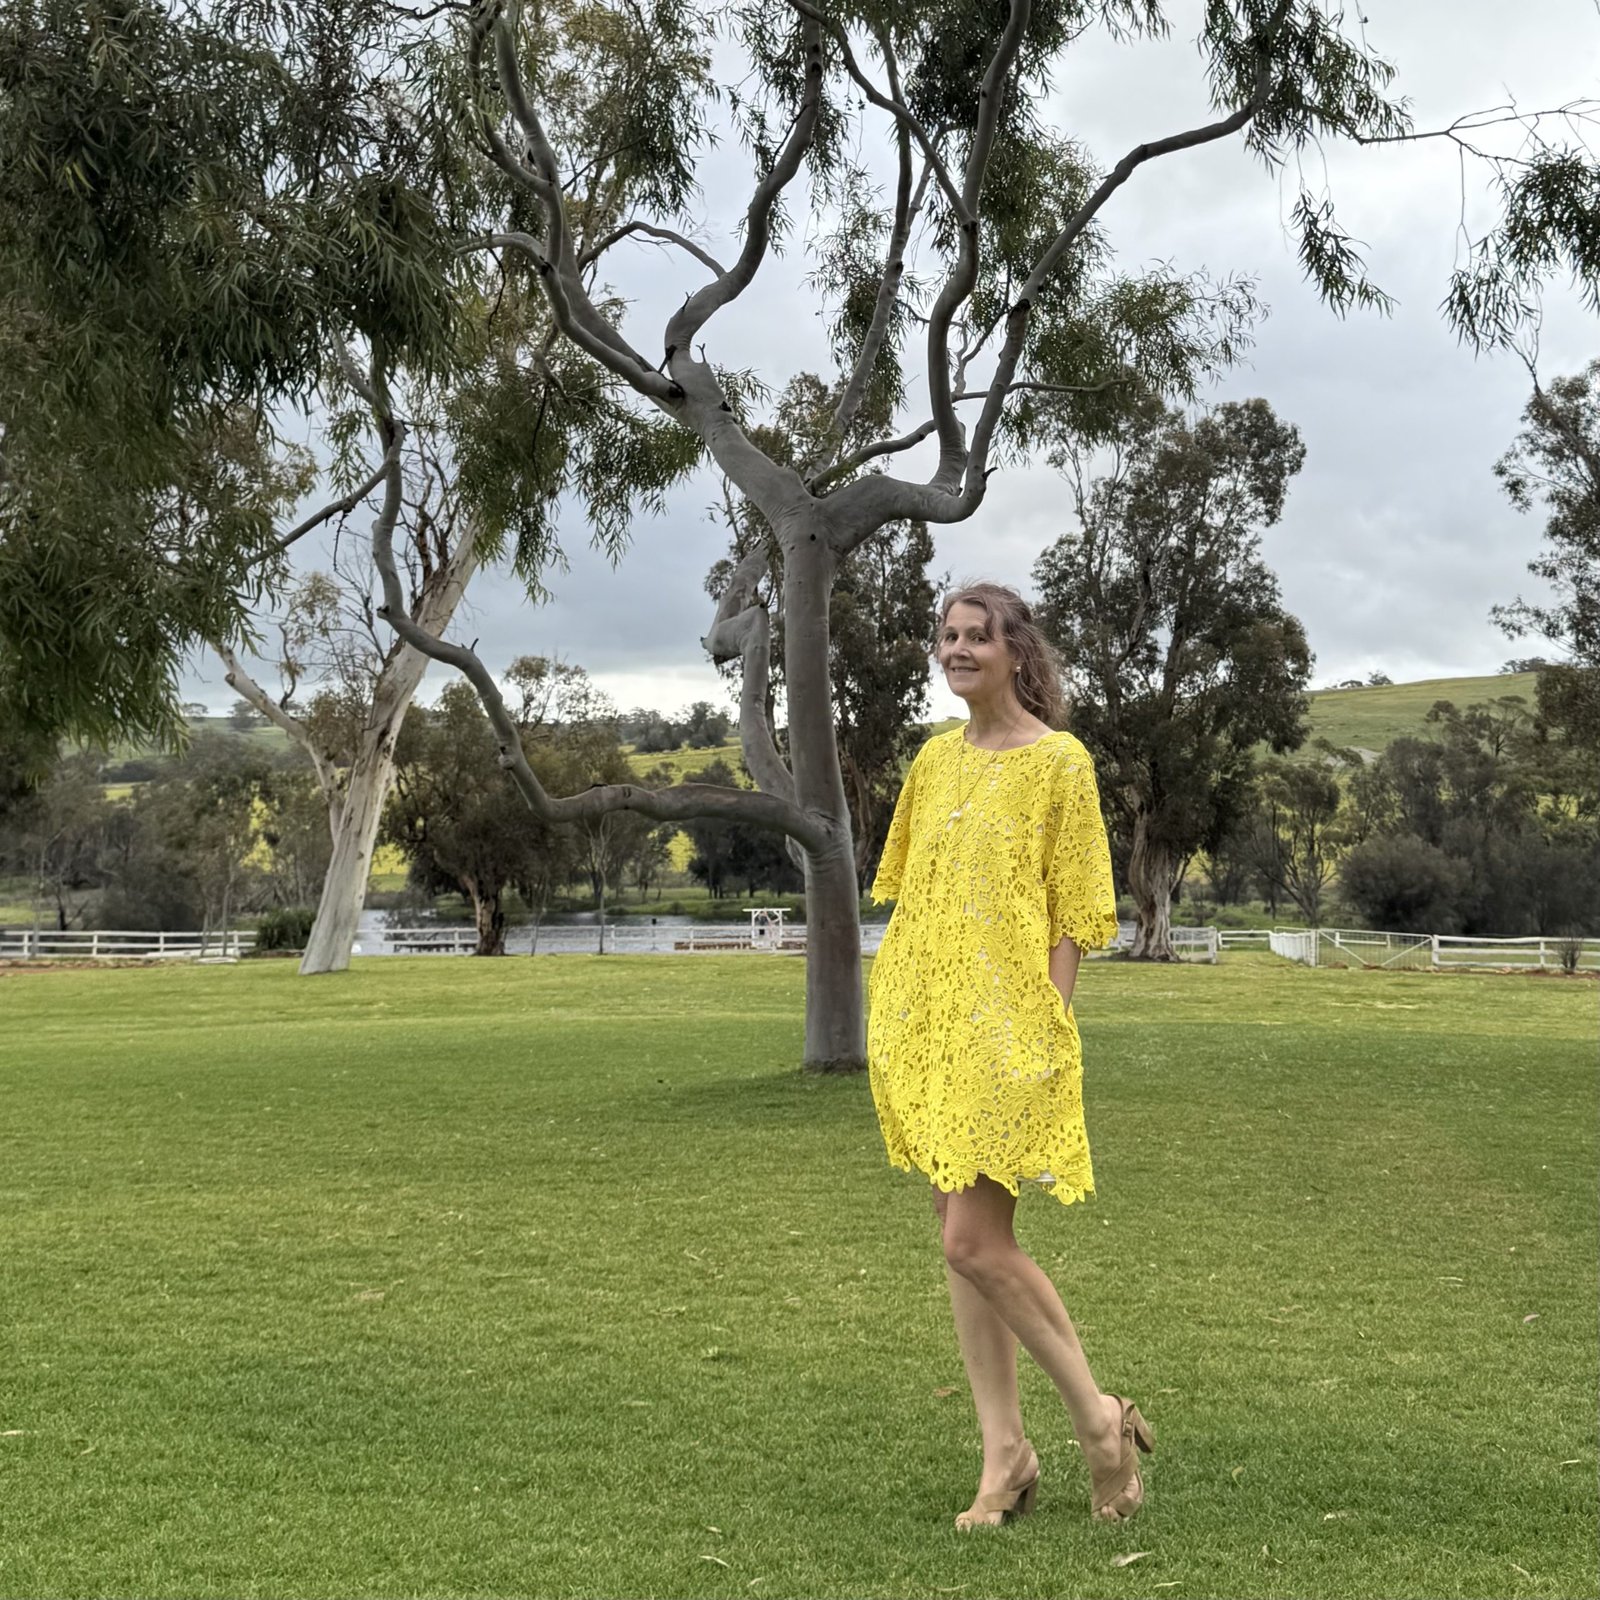
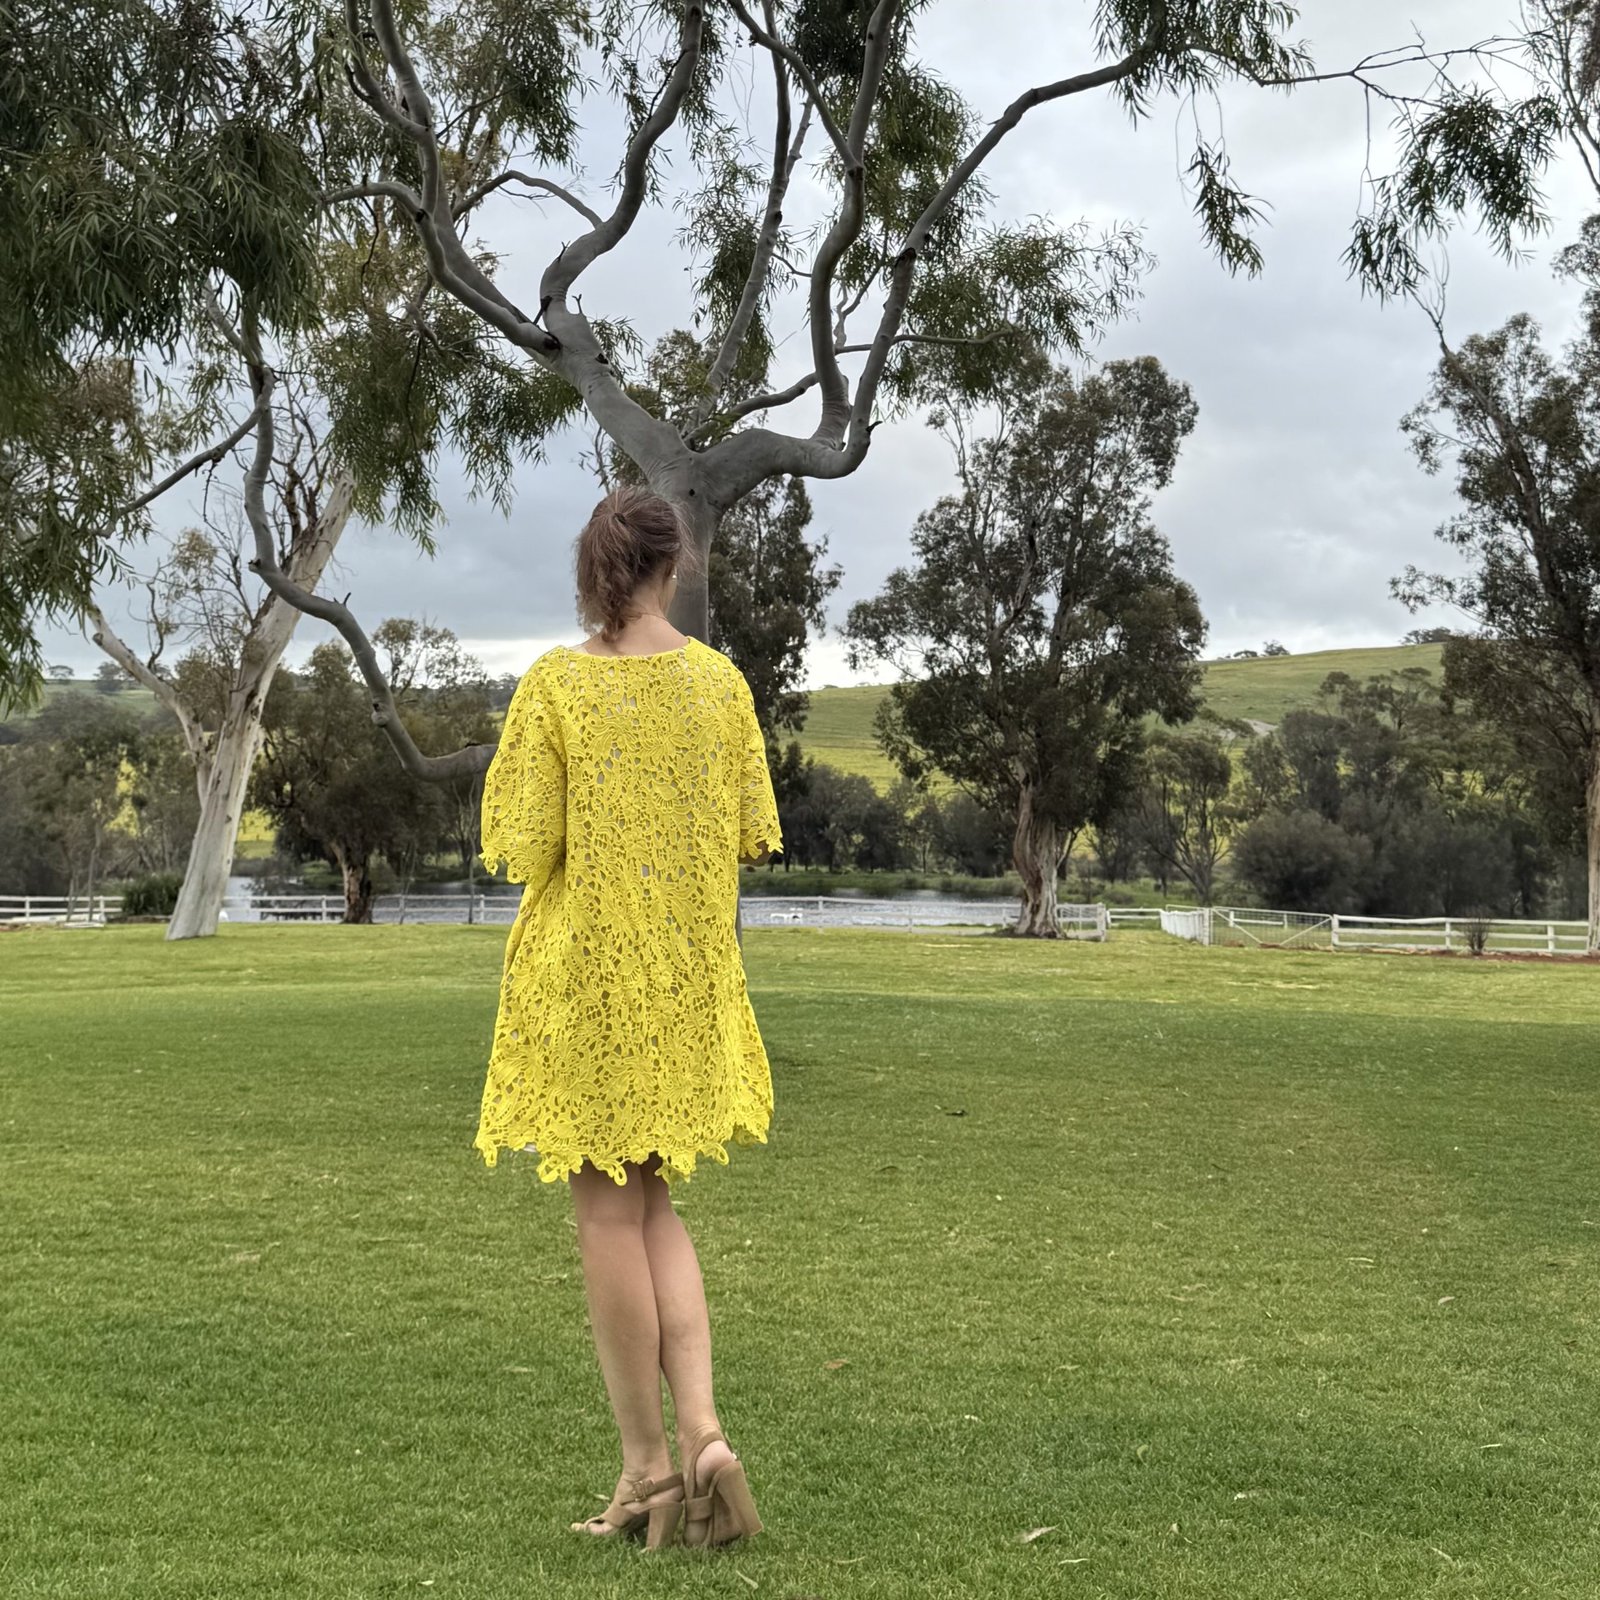
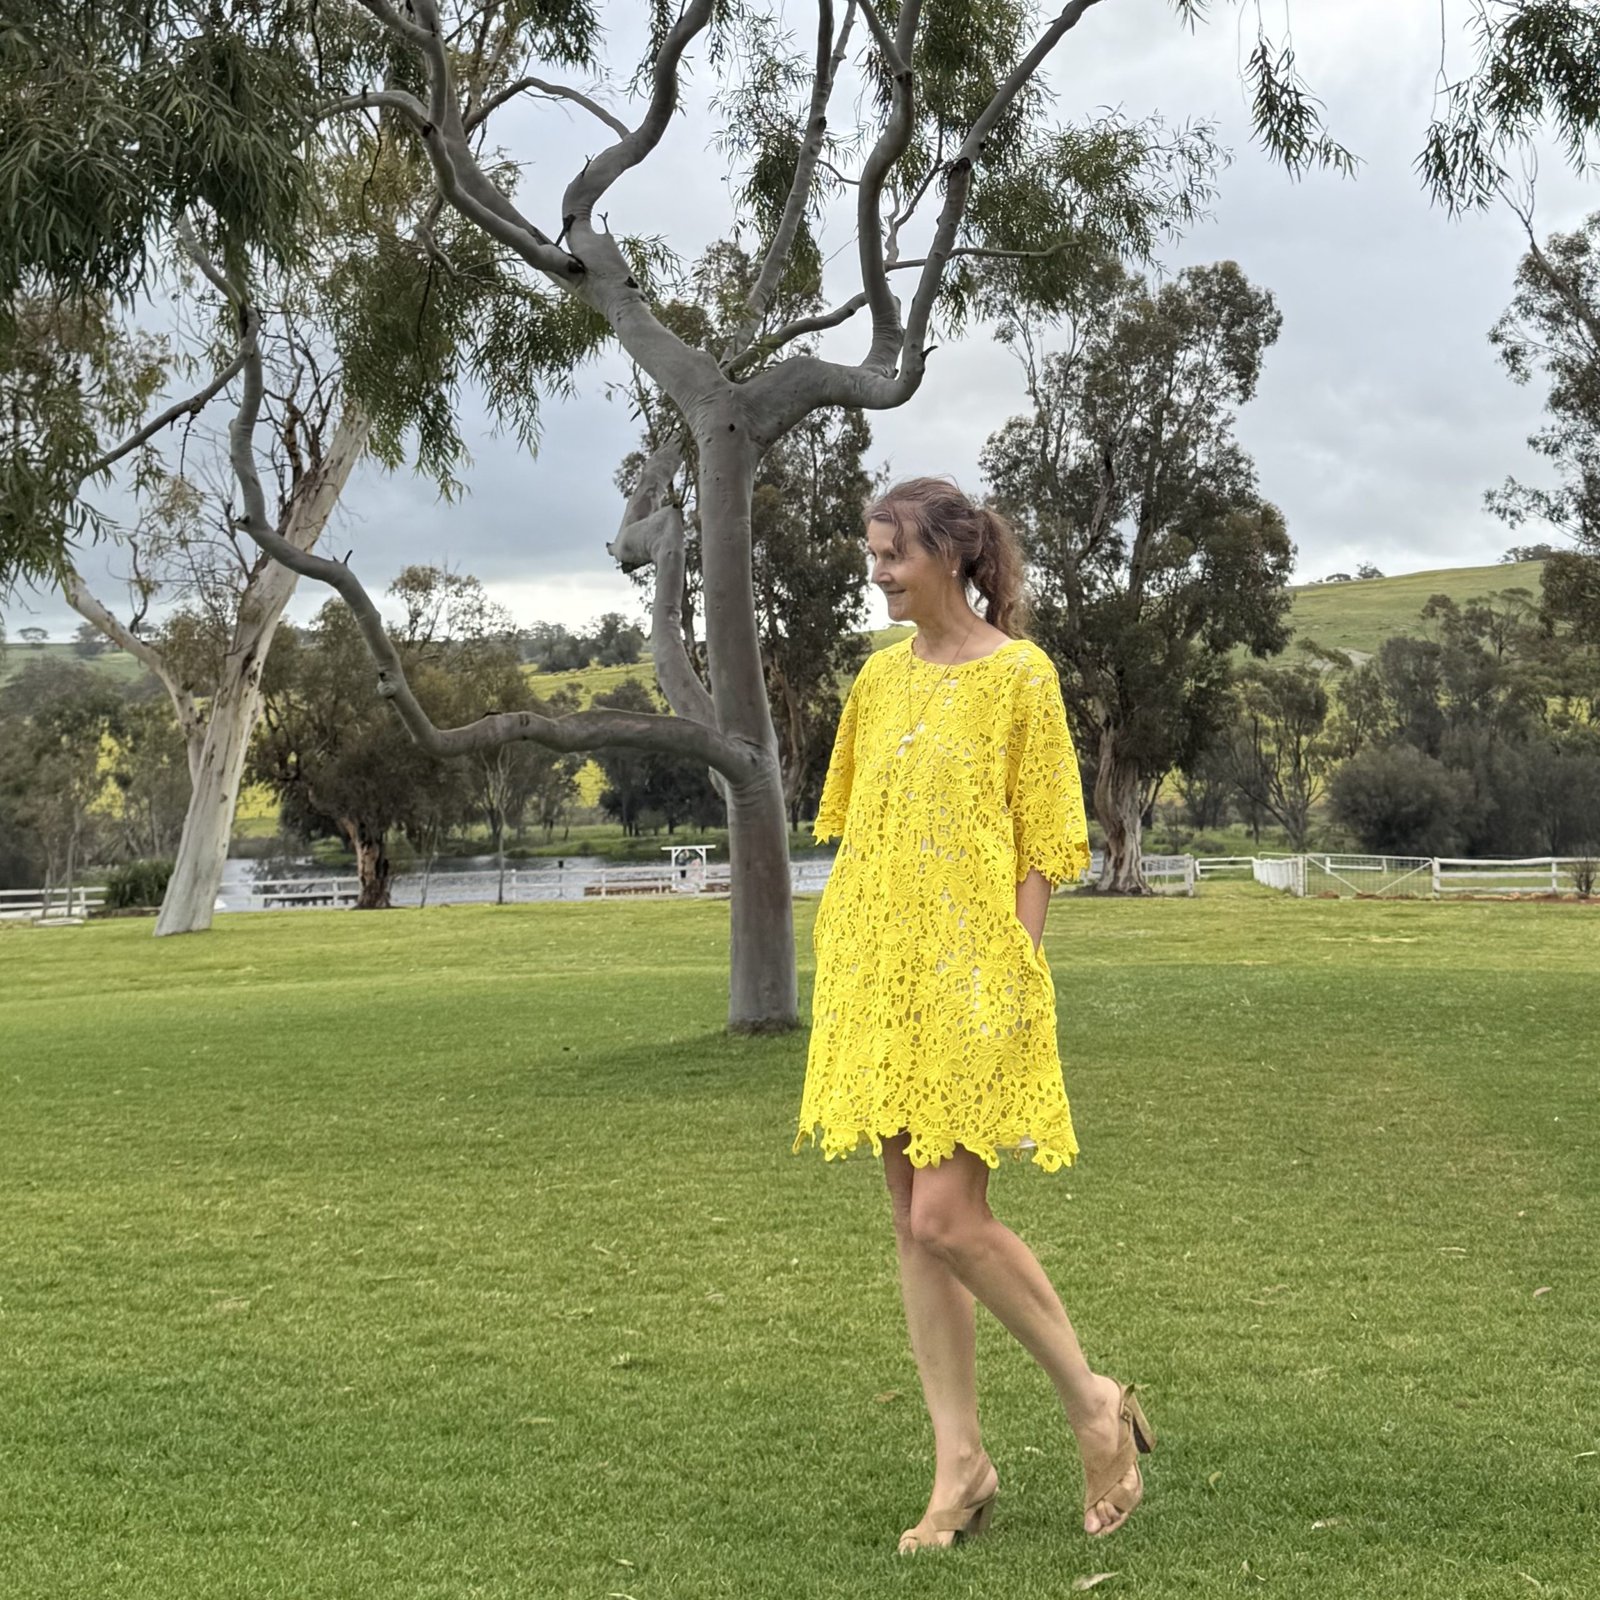
hello! Recently my lovely niece J married her long-time man and so of course I had to make a new dress for myself for the occasion… I was vaguely toying with the idea of shopping for fabric before I remembered two things: 1. as everyone in our family knows, J’s favourite colour is famously yellow, and 2. I have a piece of very yellow, and happily wedding worthy fabric in my stash already!
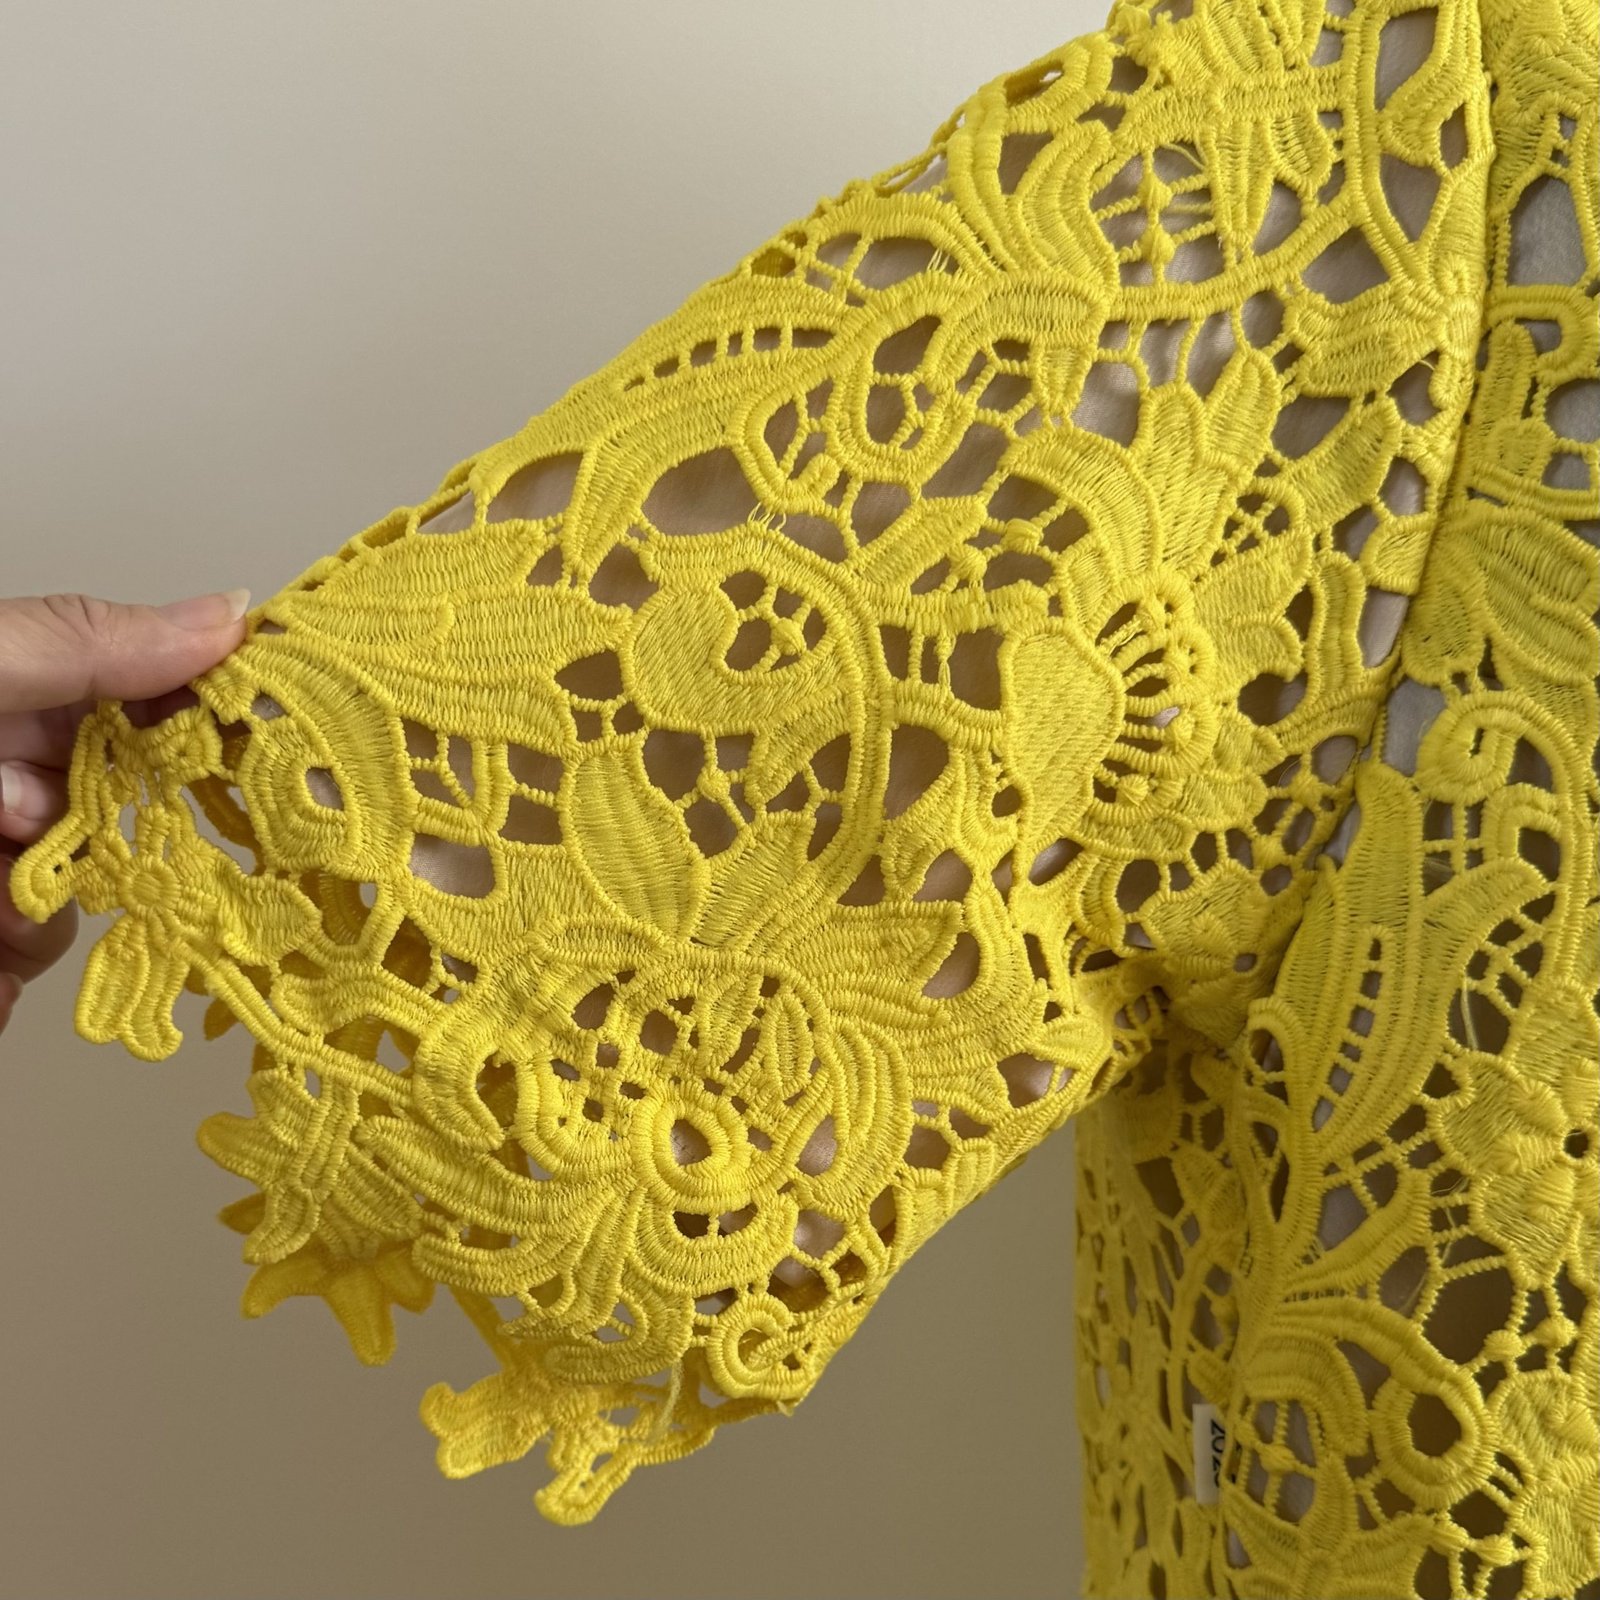
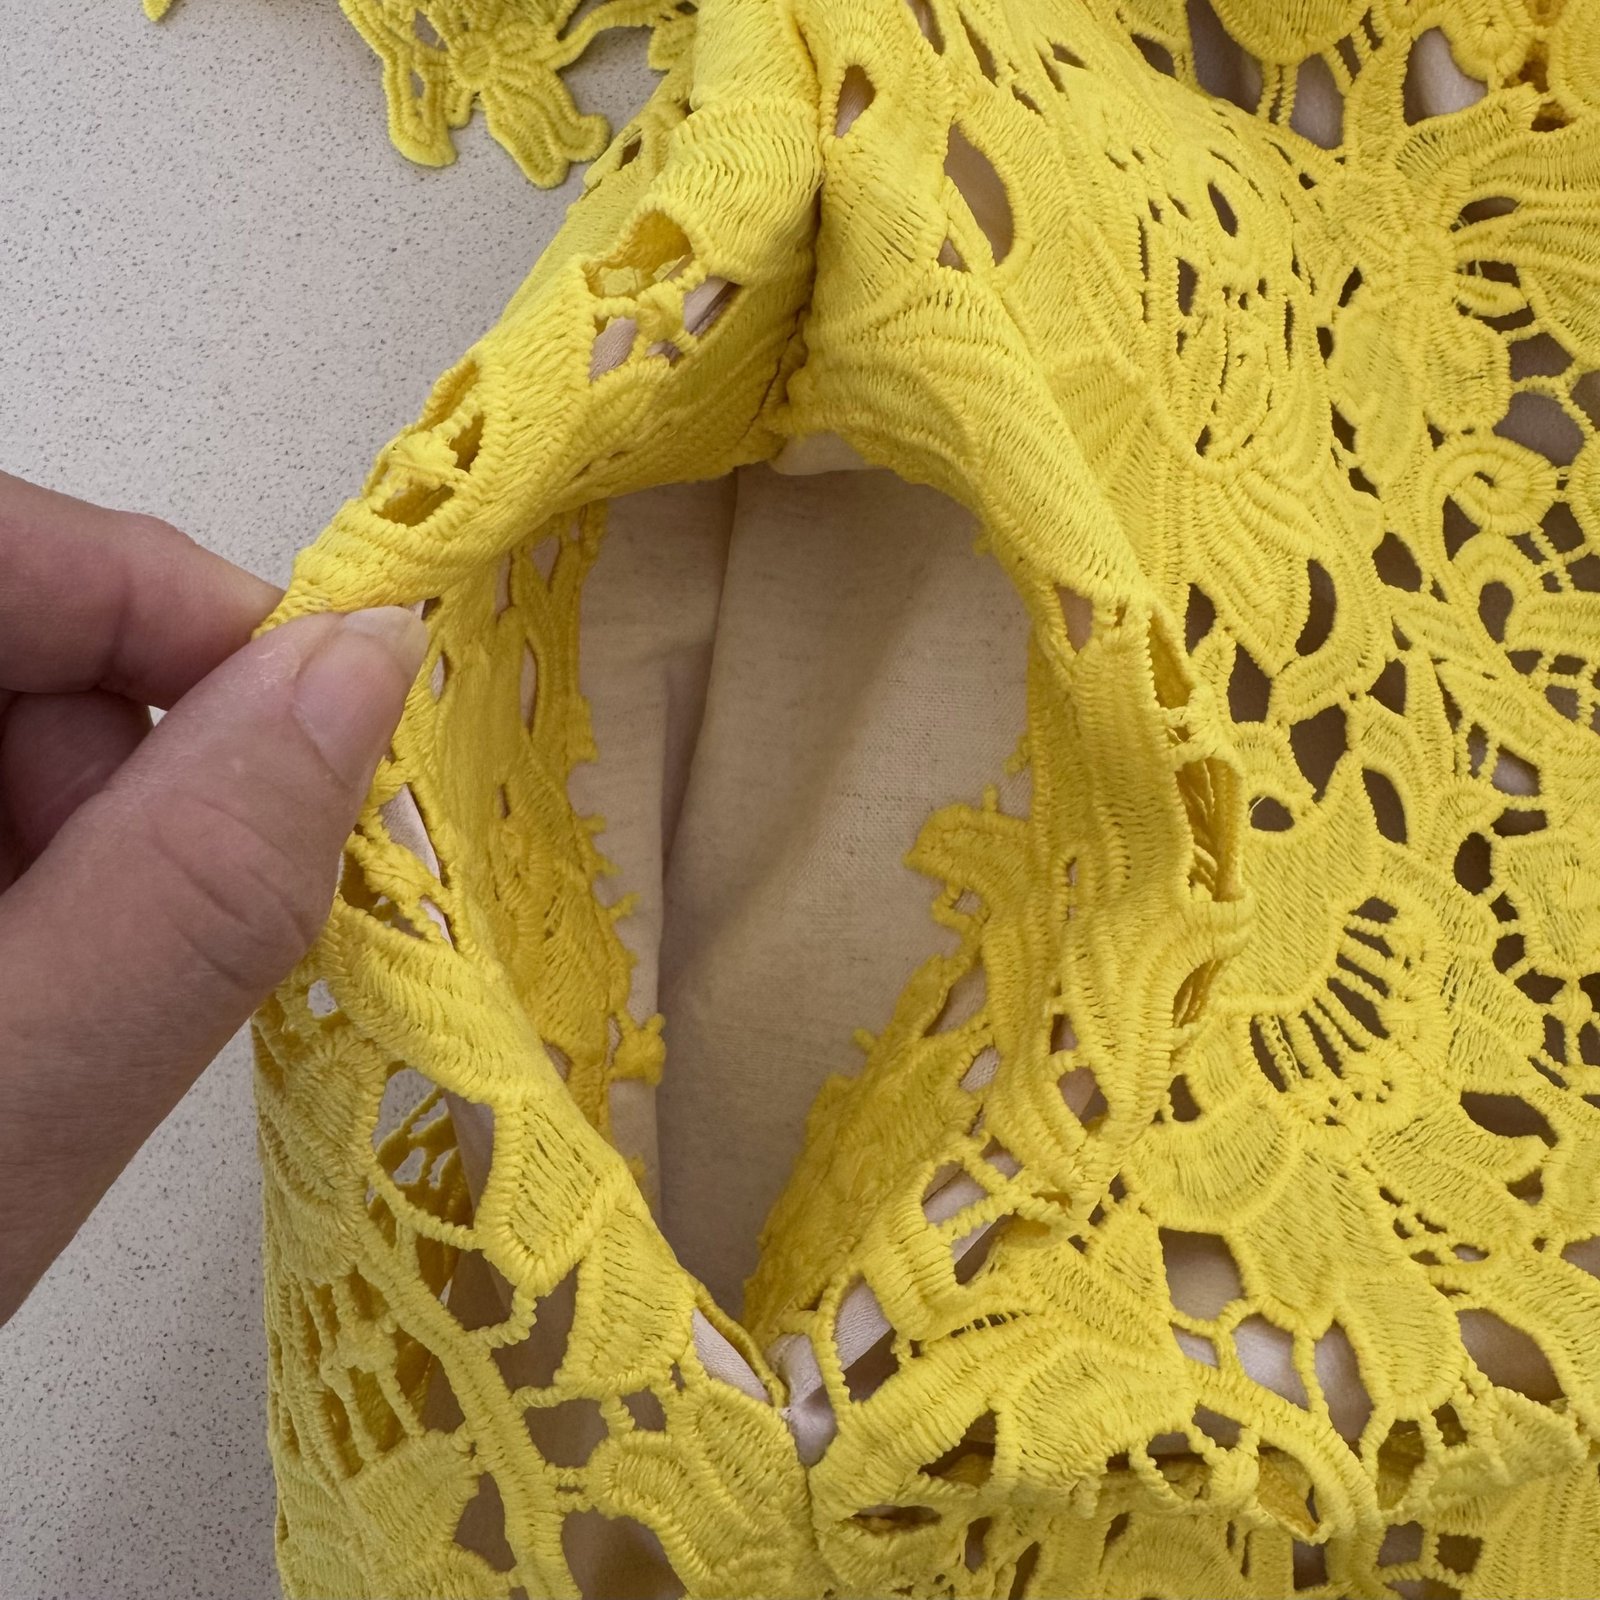
I bought this neon-bright yellow guipure lace from Mood Fabrics in New York City back in 2019, when I was over there with my friend Yoshimi… we met with other sewing ladies and they took us on a fabulous fabric shopping spree! Such fun. I wrote about it on my blog here… Originally I had envisioned making a little mini skirt from the lace but when the fabric was rolled out on the counter it turned out there was a pretty large chunk of the border cut out, so the salesperson basically threw that part of the fabric in for free. Meaning, I ended up with a lot longer length than I had needed. And obviously I couldn’t waste the extra bit by making that little mini, so it sat, awaiting some other project that could make use of it.Et voila!
I used the Closet Core Ceilo pattern with a few small modifications… namely; spicing the back yoke and back pieces together to eliminate that seam, including inseam pockets in the side seams, and I also cut it to be a bit more flared. Oh, and I also traced a size up – or maybe two? can’t remember now – for that fashionable oversized look. The hemline, which is of course the natural border of the lace, was determined by how much length I could get, and I also managed to get the sleeves on a border. It only took a little bit of pattern Tetris but I’m thrilled that I achieved what is one of my primary aims with any sewing project, which is to have minimal leftovers!
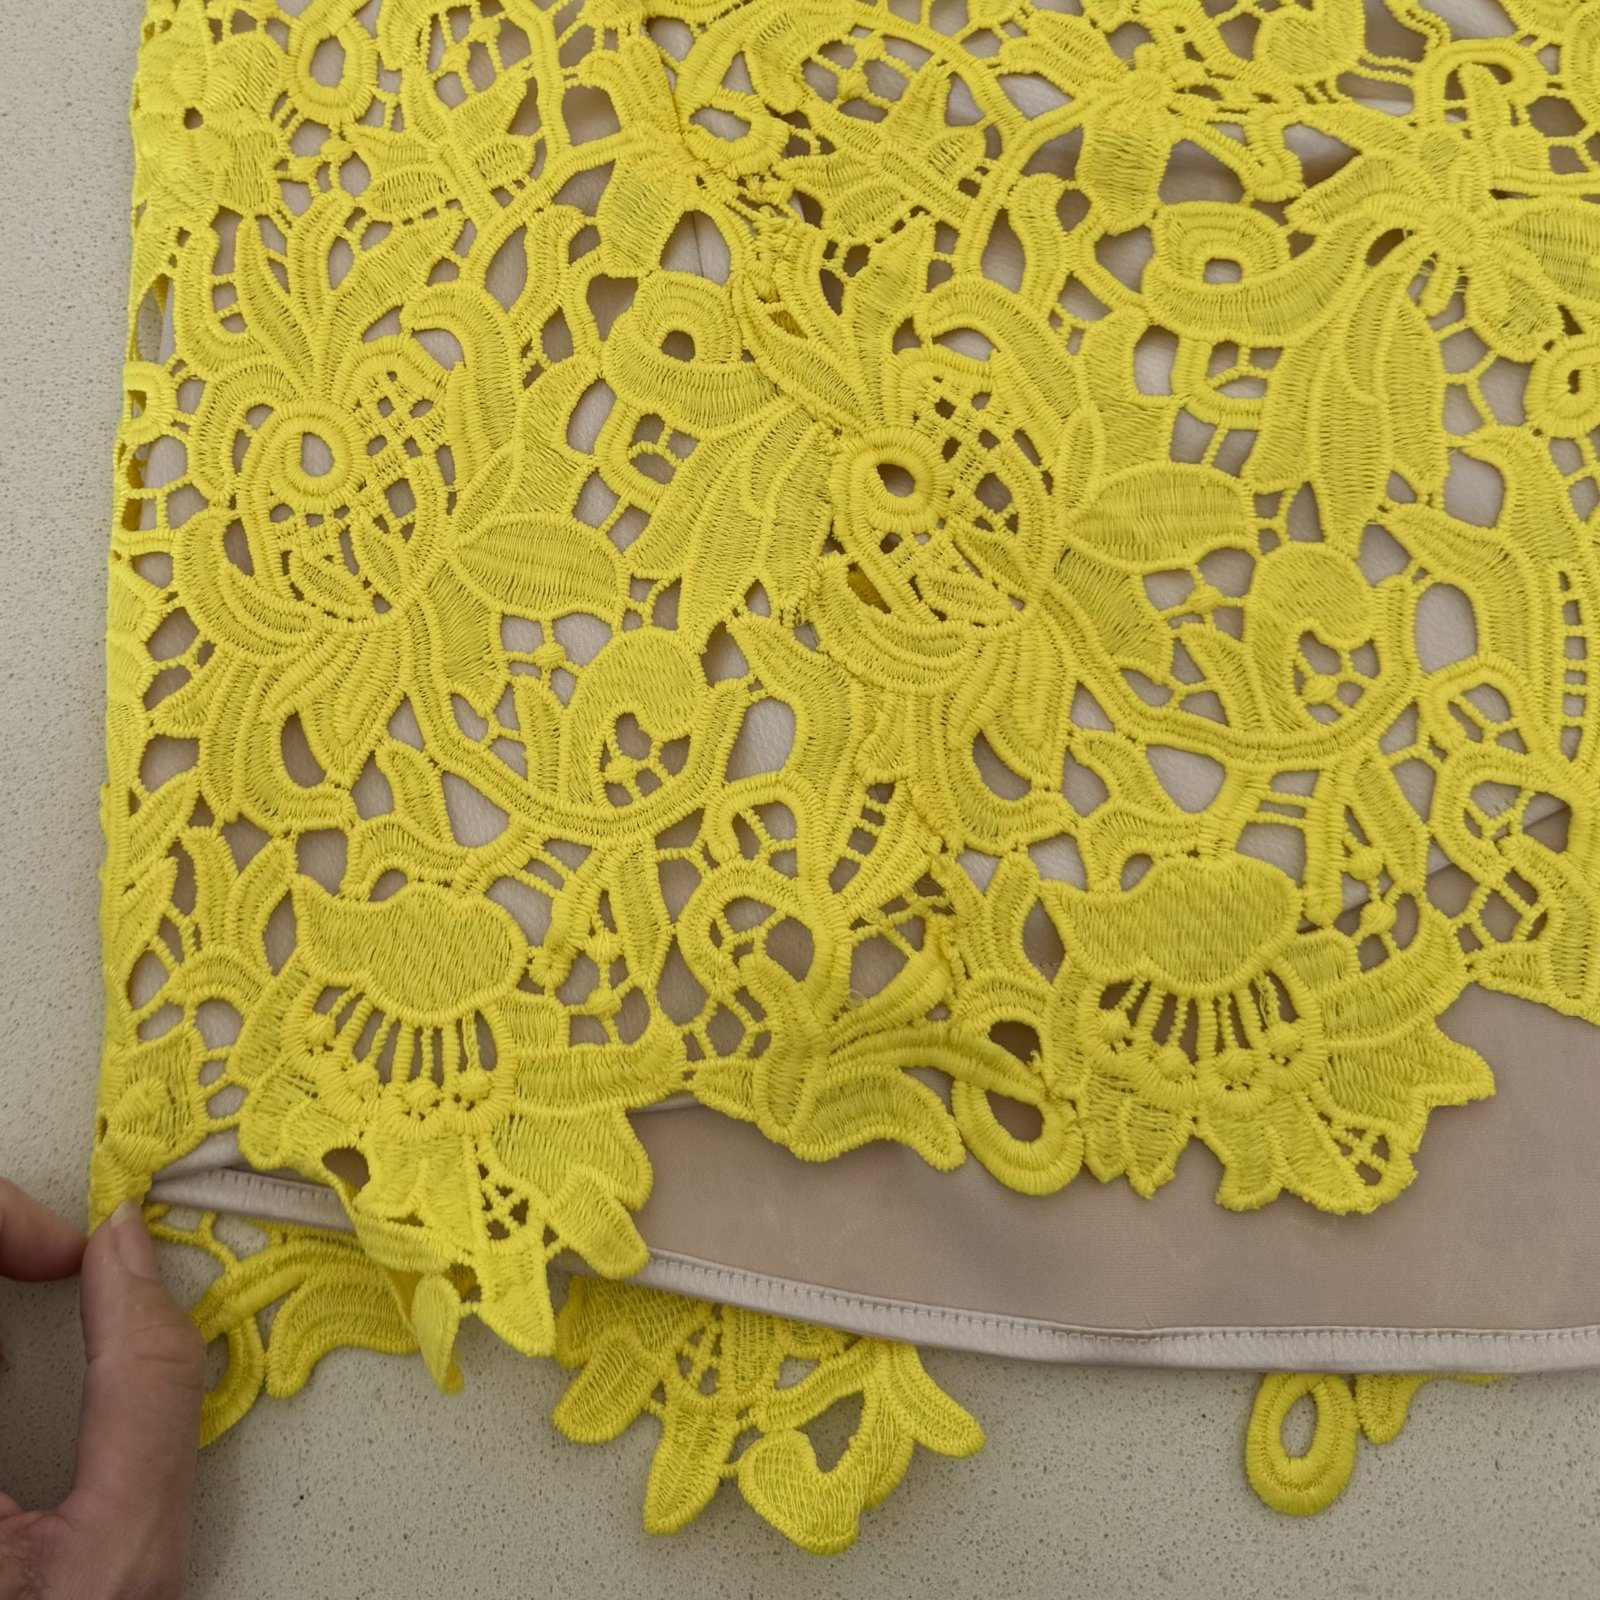
My dress is underlined completely with a pinkish/coffee coloured silk chartreuse that I bought from Fabulous Fabrics originally. I basted the lace and silk layers together within the seam allowance all around except for the side seams below the pockets, and then overlocked the edges before continuing to treat the two layers as one. The side seams below the pockets I stitched the layers separately and actually the lace is arranged so there’s not a “seam” in this part, but the lace motifs are arranged and hand stitched carefully so you can’t see a seam here.
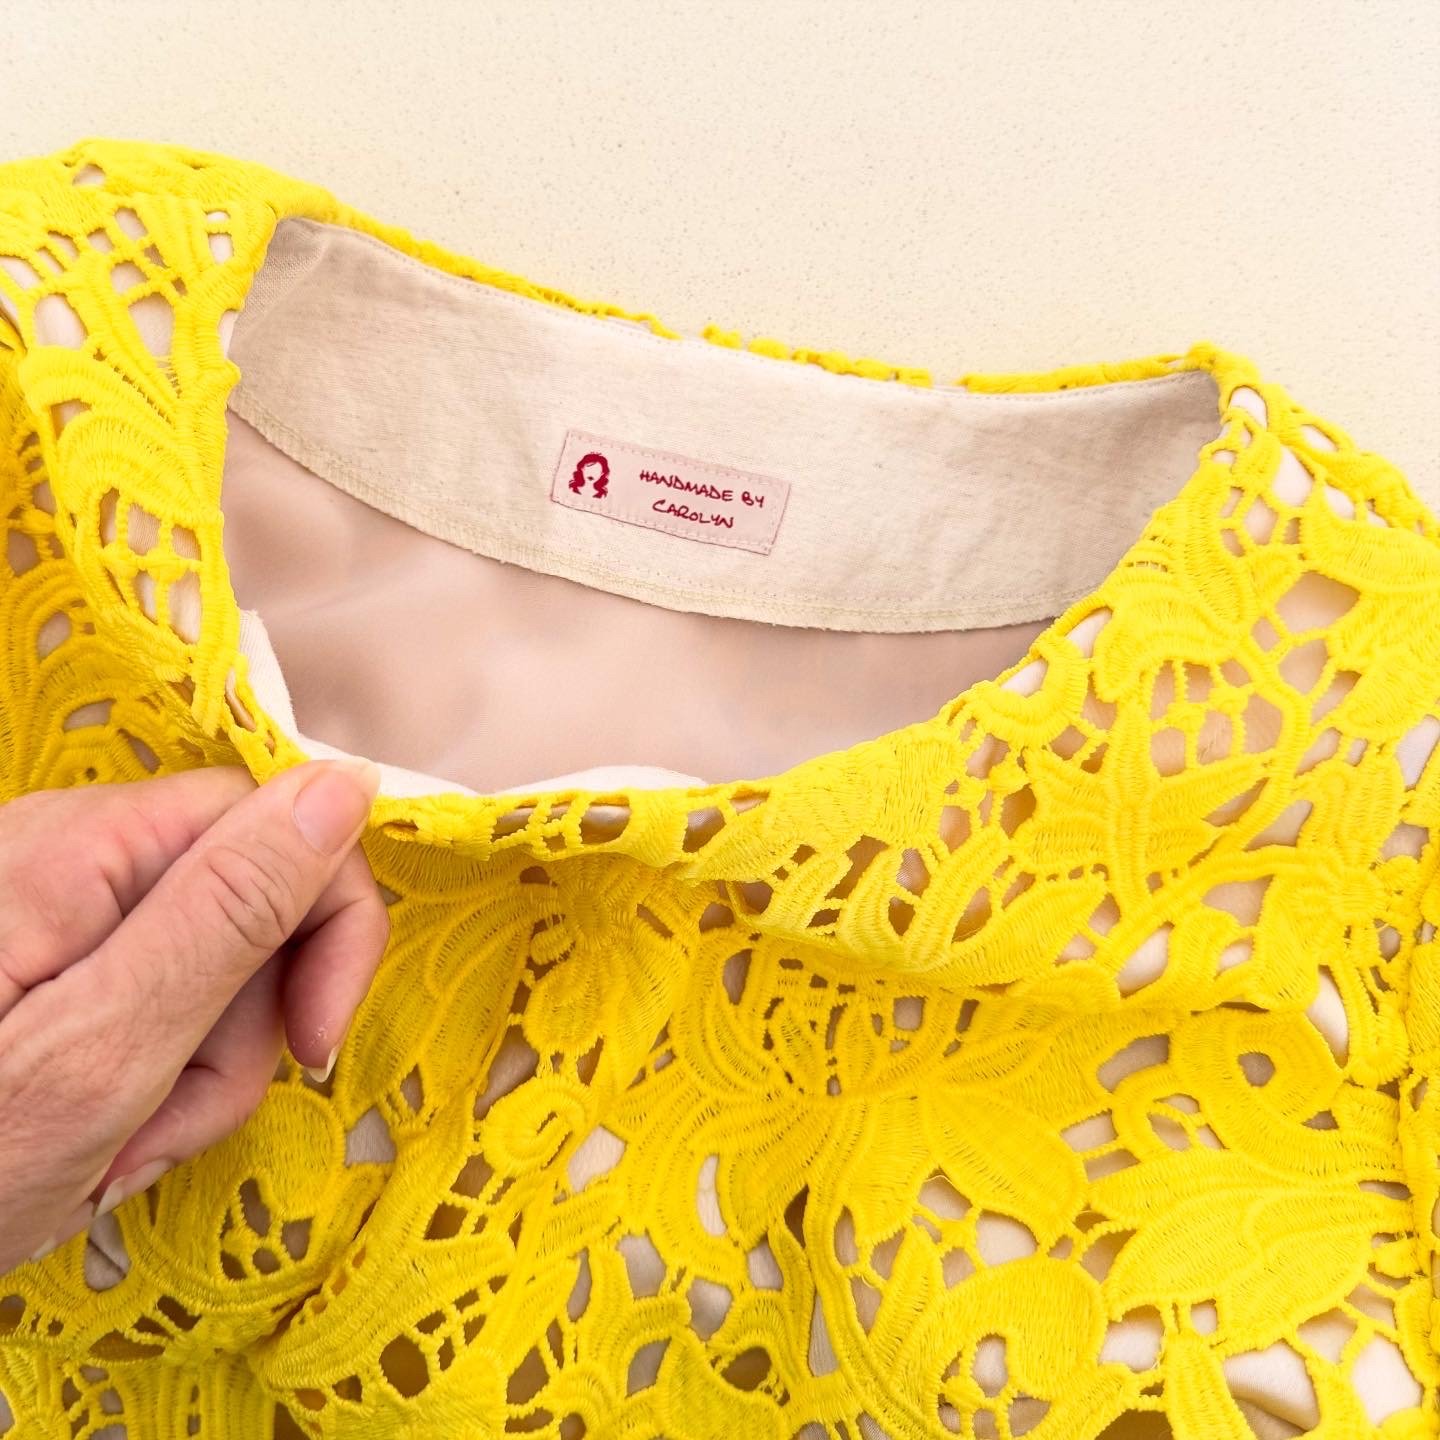
I cut the pockets and neckline facings from a natural cotton linen that I’ve had in the stash for years, saved specifically for this same sort of purpose.
I chose this because the silk charmeuse wasn’t going to be stable enough in these areas – actually the lace is very heavy, far heavier than it looks! I cut the lace front and back to have side seam extensions along the pocket area and stitched it down carefully to the pockets inside. So, when you’re wearing the dress the lace appears to go all the way inside the pockets, no flash of offensive beige to be seen, so it looks really nice.
The seams allowances around the neckline, especially the shoulder seam area here are seriously bulky, and I trimmed, clipped and understitched aggressively to get everything to sit nice and flat! I also went back later and stitched the facing to the silk underlining as far around and as close as I could get to the shoulder seams.
I’m including a picture of the happy couple because, although I did not make the dress, I did alter it to fit her and also did some minor repairs. This took three separate fittings and I took precisely zero photos of the process or anything. My only excuse is that I was also working on my own dress and stressing a little bit that I wasn’t going to get it all done on time.
Thanks to its oversized and loose nature, my dress was so comfy to wear and to dance in, and I was so happy about that! and just saying, I only wore these high heeled sandals for the ceremony and photos. For the reception on the same property I went to our car and switched over to my white sandshoes with little socks, brought for this very purpose. Much warmer, and fabulously comfortable for dancing! I also wore my new pink wool Sienna jacket for the cooler temperatures that came as evening fell too, but no pictures of that I’m afraid. Anyway, I hope I can get more use our of this dress, which actually turned out more lovely than I thought. 🙂
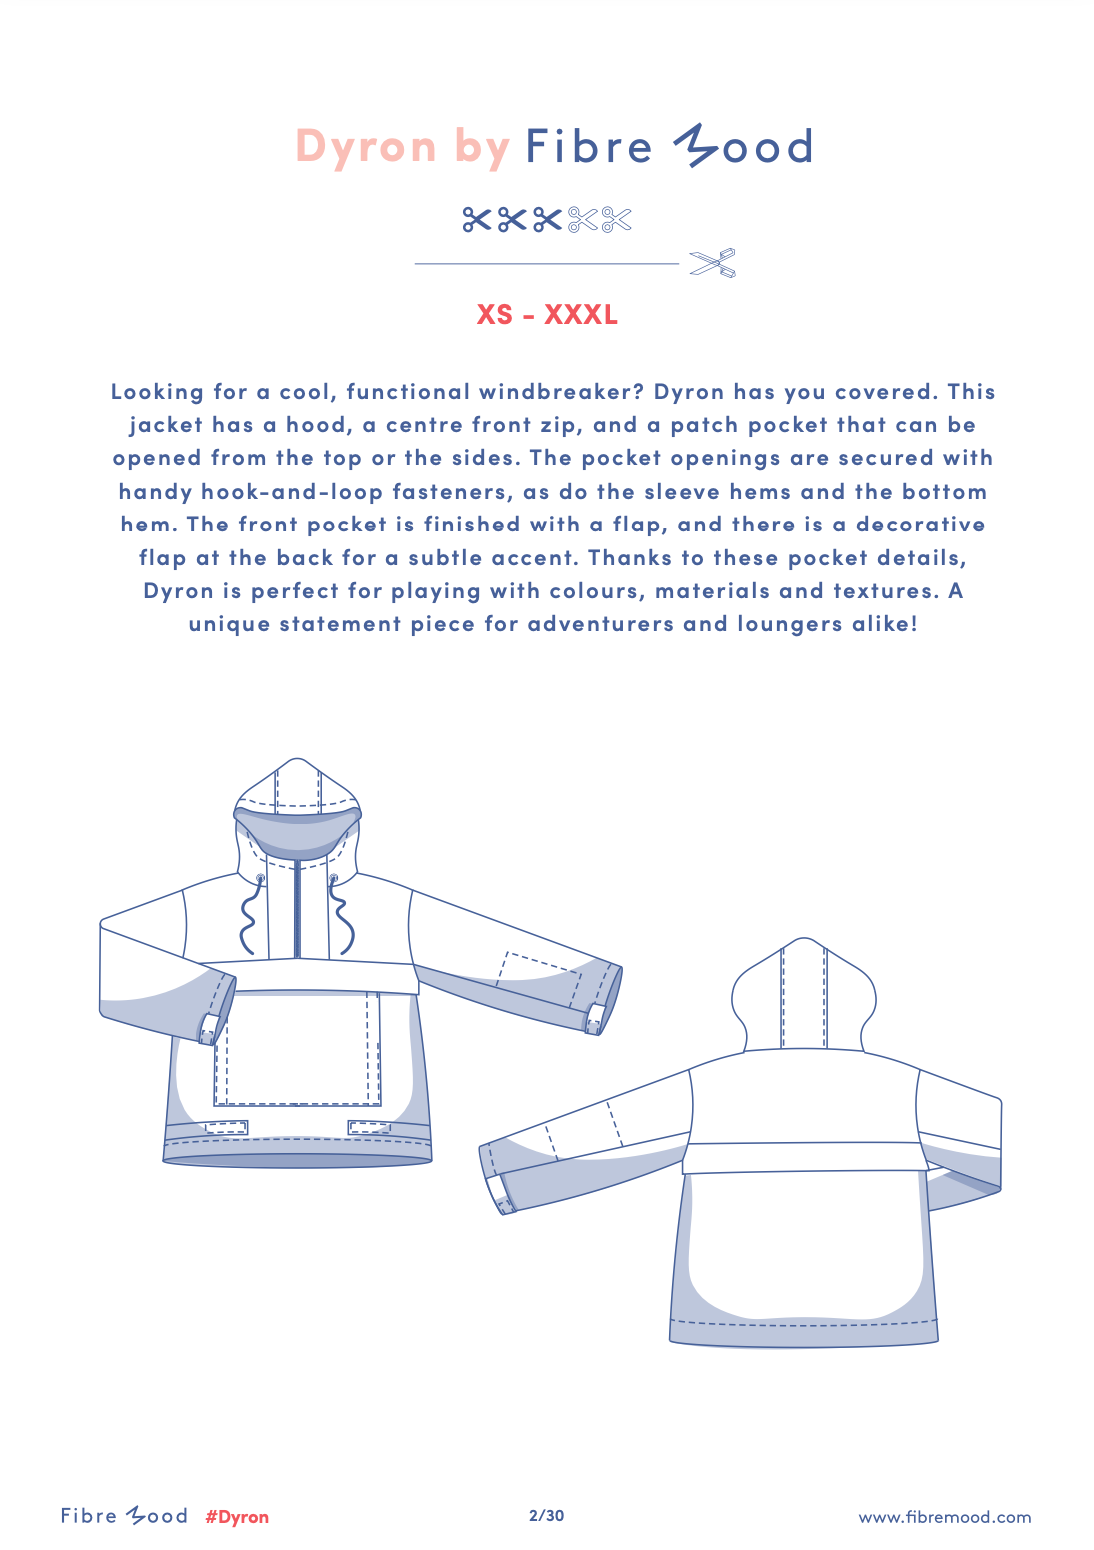
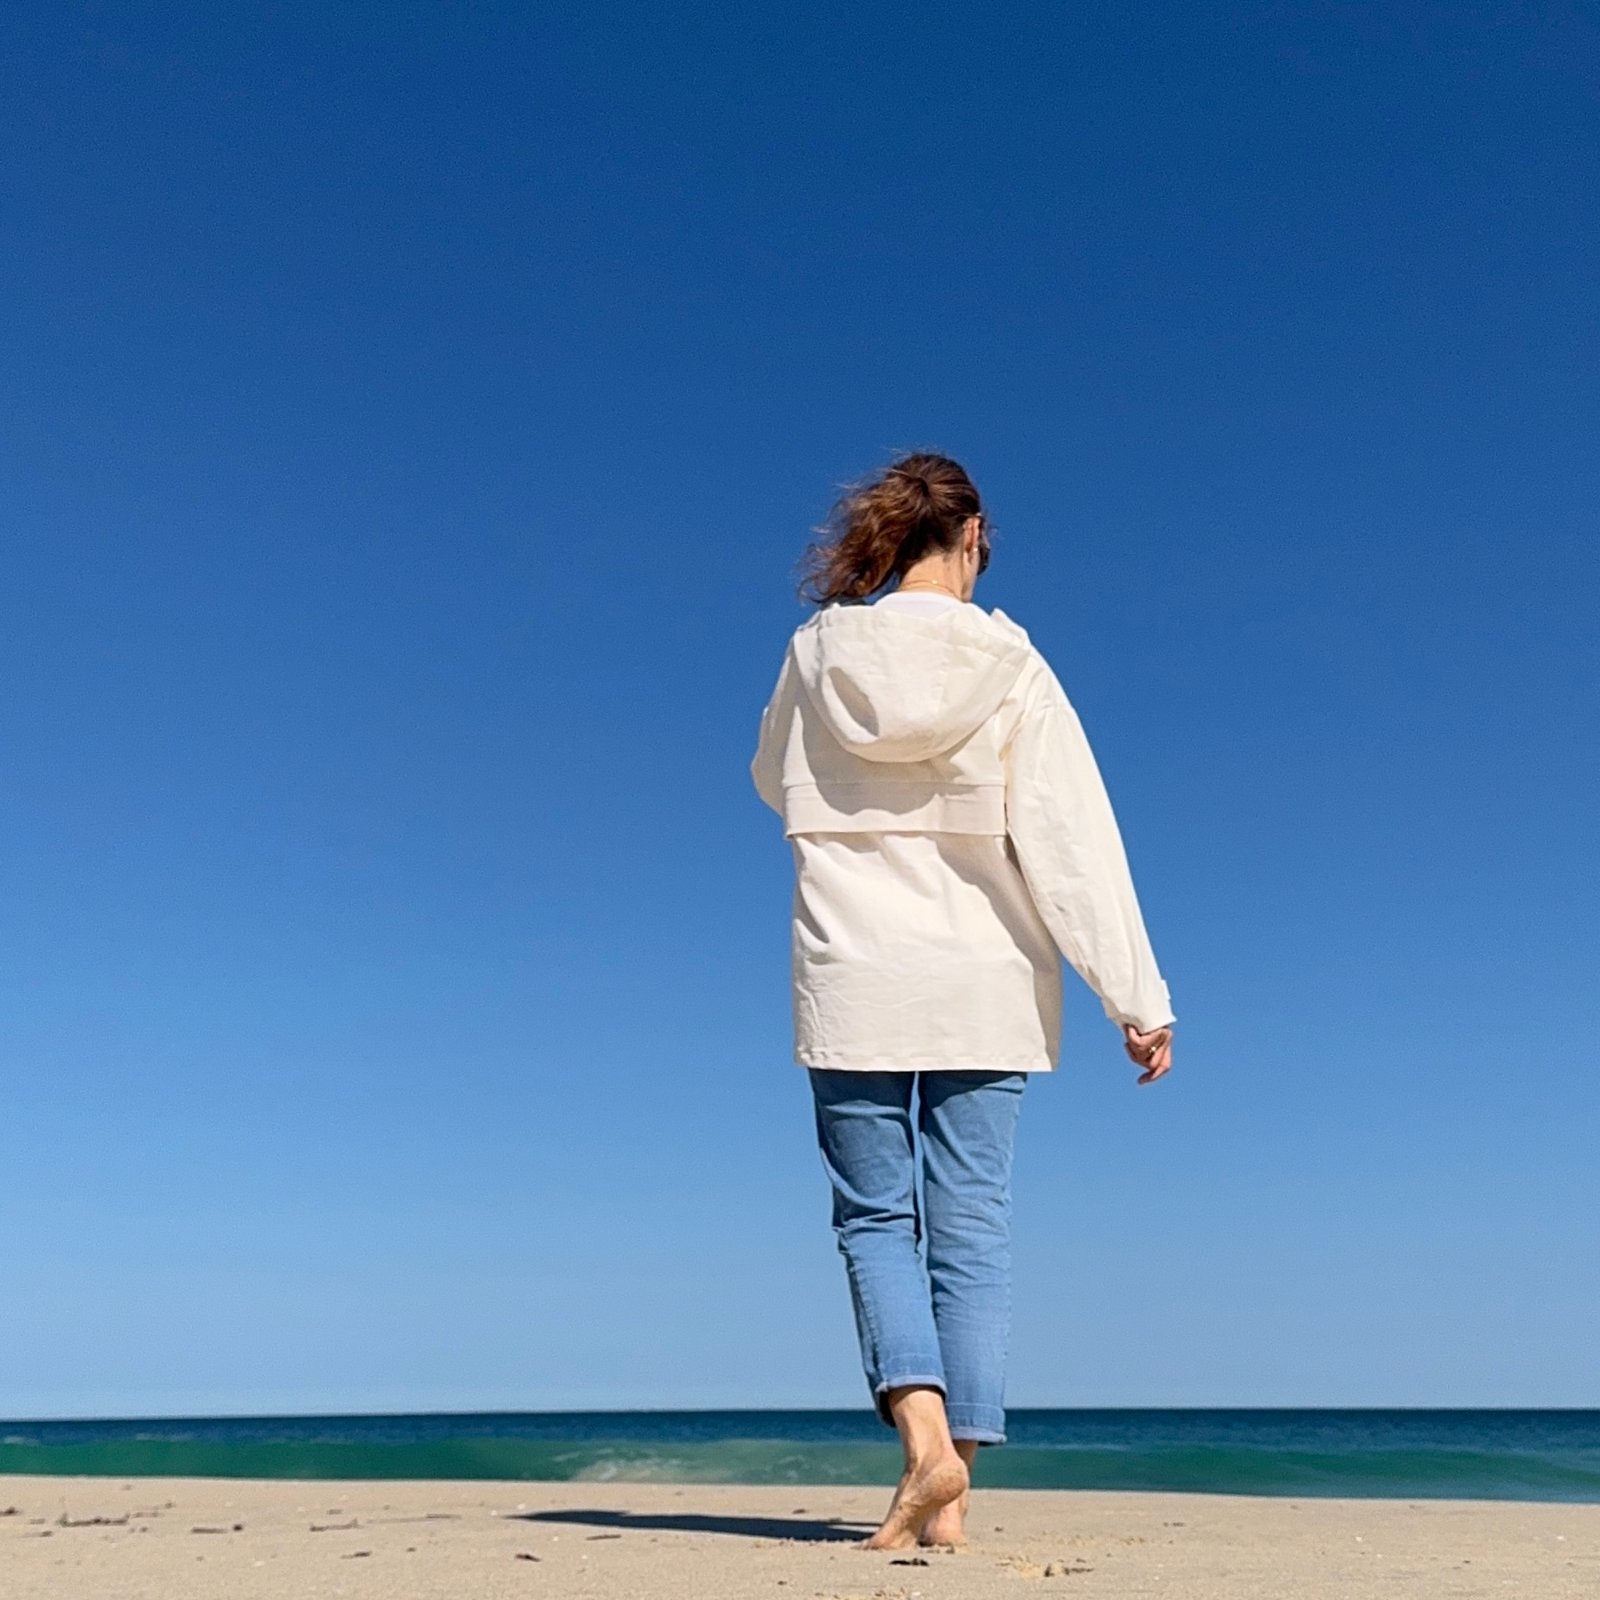
Hello! I’ve made a new hoodie for myself, and think it’s rather beautiful if I say so myself. Many years ago, when I started this blog, I would sometimes berate myself for being scared of wearing colourful clothing. I tried to break away from making too many white things. I think I’ve succeeded in training myself to wear more colourful clothing, but actually my love for plain white things, or really, ivory things, hasn’t gone away. I still have quite a lot of cream, white or ivory fabrics in the stash! When the new Fibremood Dyron hoodie pattern landed in my inbox I got out some of my hoodie-weight fabrics and found I had enough of this lovely winter-white corduroy to cut out the hoodie. I’ve been hoarding this corduroy for a looooooooooong time so it feels really good to enjoy it, at last!
I made a size small, haha. Yes, it’s huge.
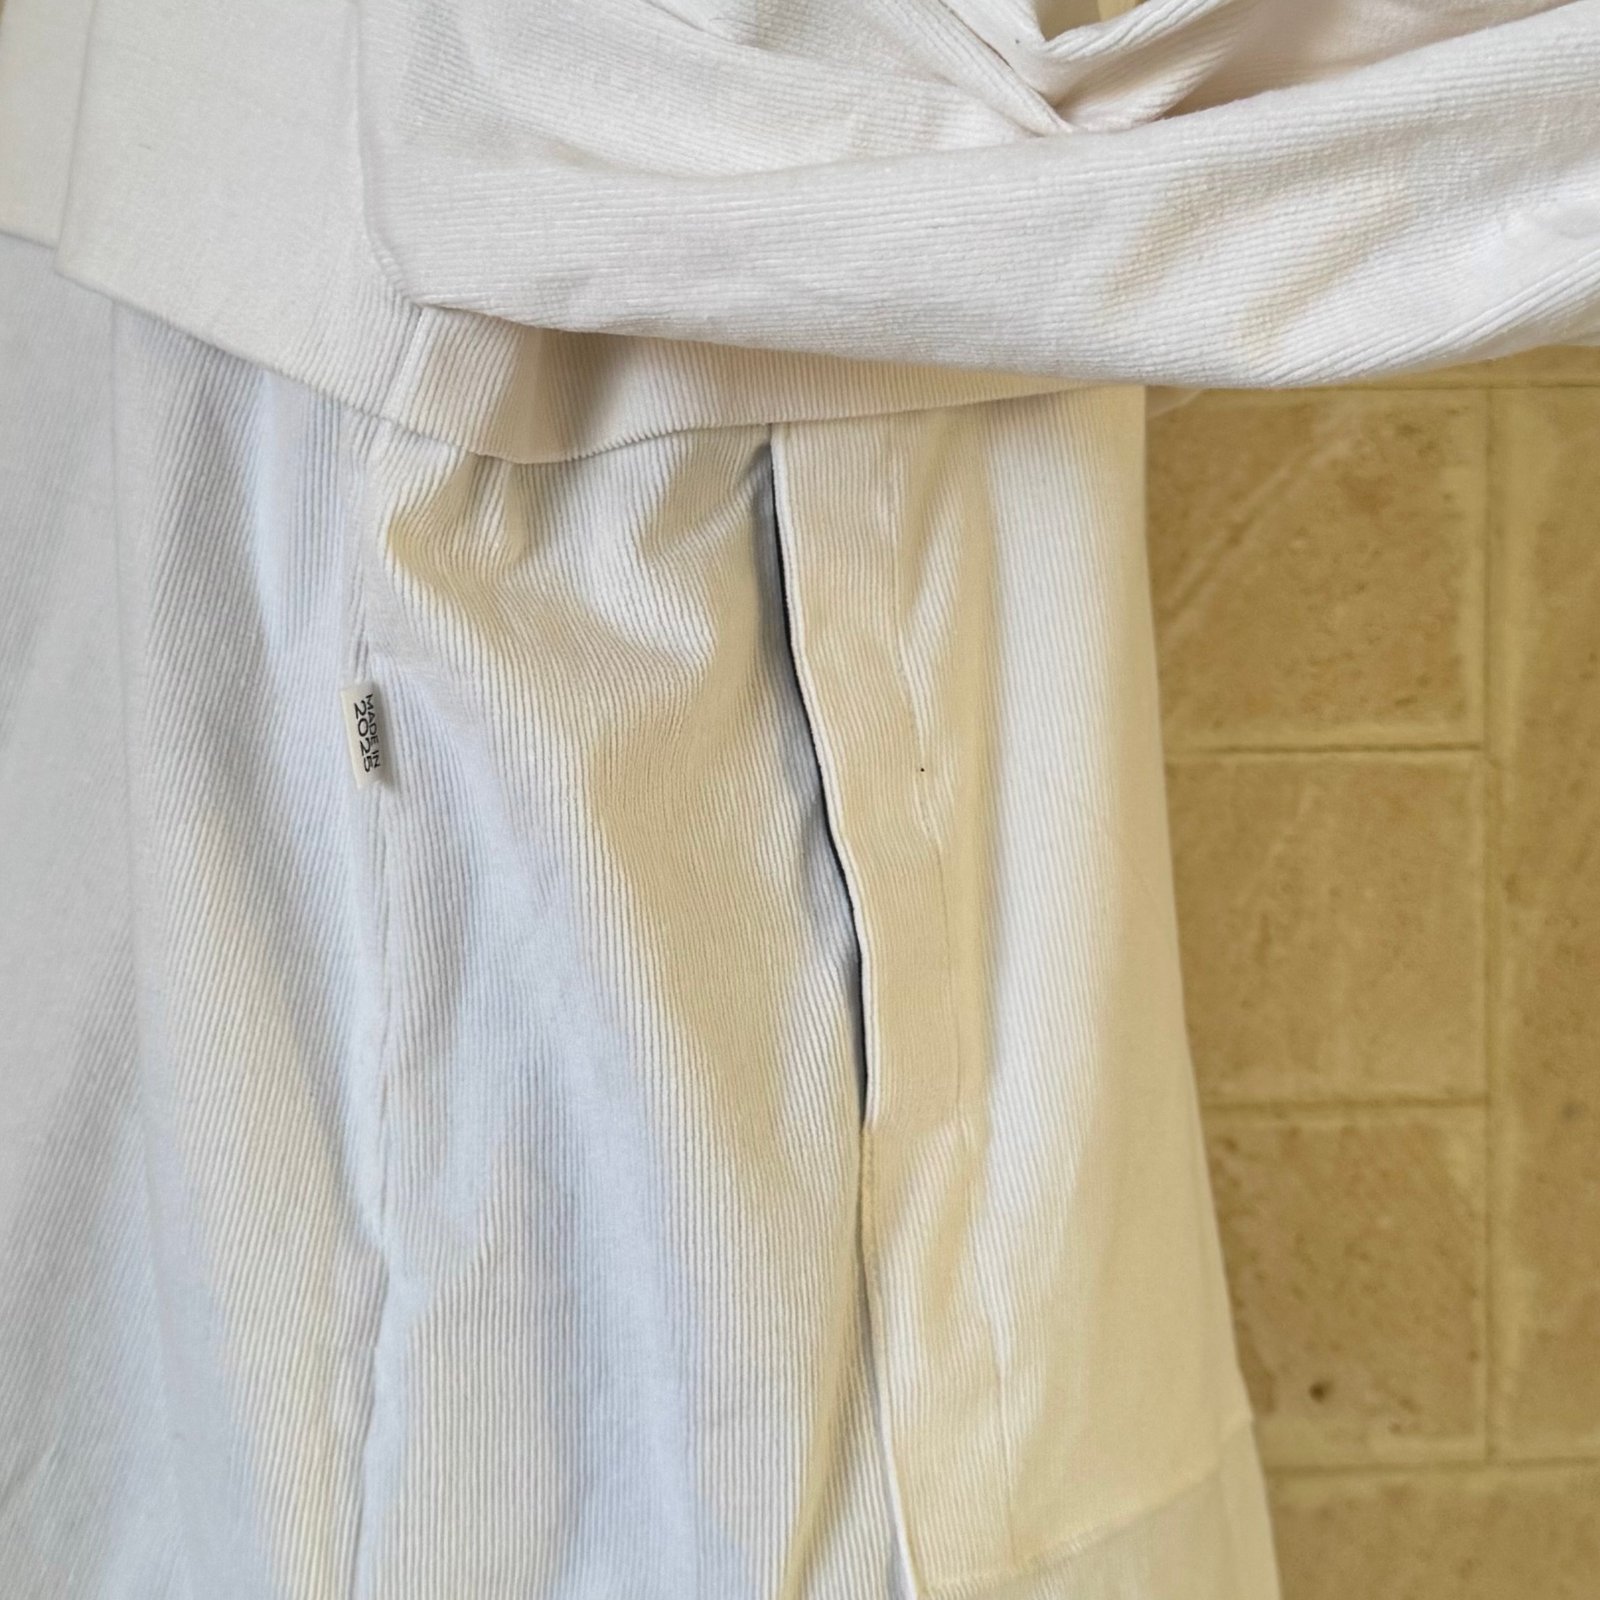
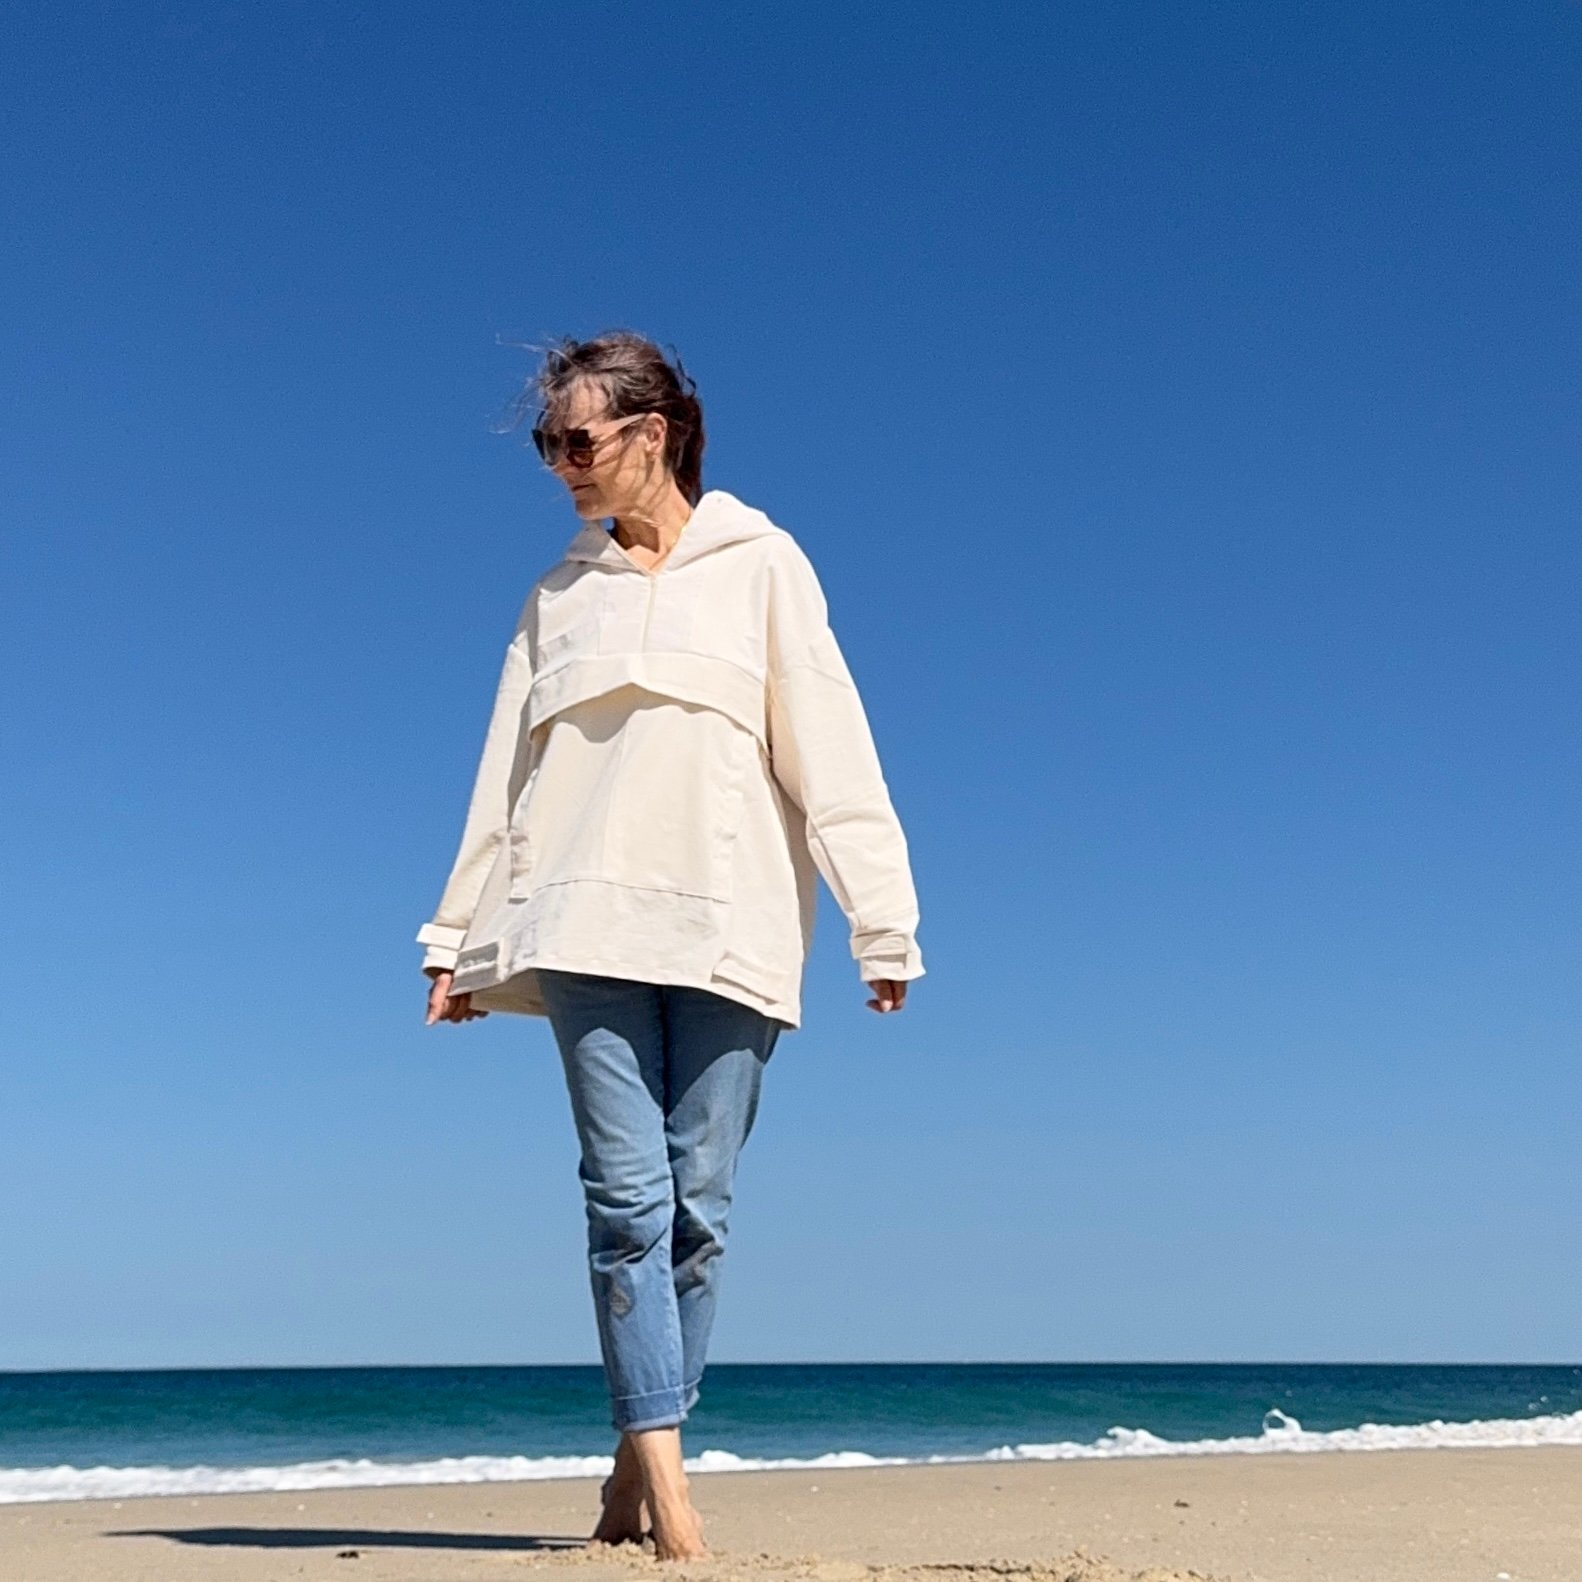
To be fair, the blurb does state that it’s deliberately styled as oversized, but still… I really love this design actually. I had an ivory zip in my stash already, fortunately, so I didn’t need to buy anything new to make the hoodie. As well as a zip, you needed velcro tape, which is the closure for both pockets, and is also on the sleeve tabs and hip/waist tabs. I only had black velcro, which worried me a little for a while. But it shouldn’t have. In the end I decided the black looked absolutely fine.
Speaking of those hip/waist tabs, to be completely honest they really are completely unnecessary, and are just a nuisance. In the end I unpicked the velcro tape and just stitched them permanently down.
This shows the front pocket with once of its side velcro closures. Inexplicably, this pocket also has a top opening with velcro closure too. This is kind of inaccessibly tucked right up underneath the “flap” so I don’t even really understand why it’s there.
The hood is lined with a matching cream coloured lightweight cotton, when I realised a double layer of corduroy was going to make the hood too heavy and stiff.
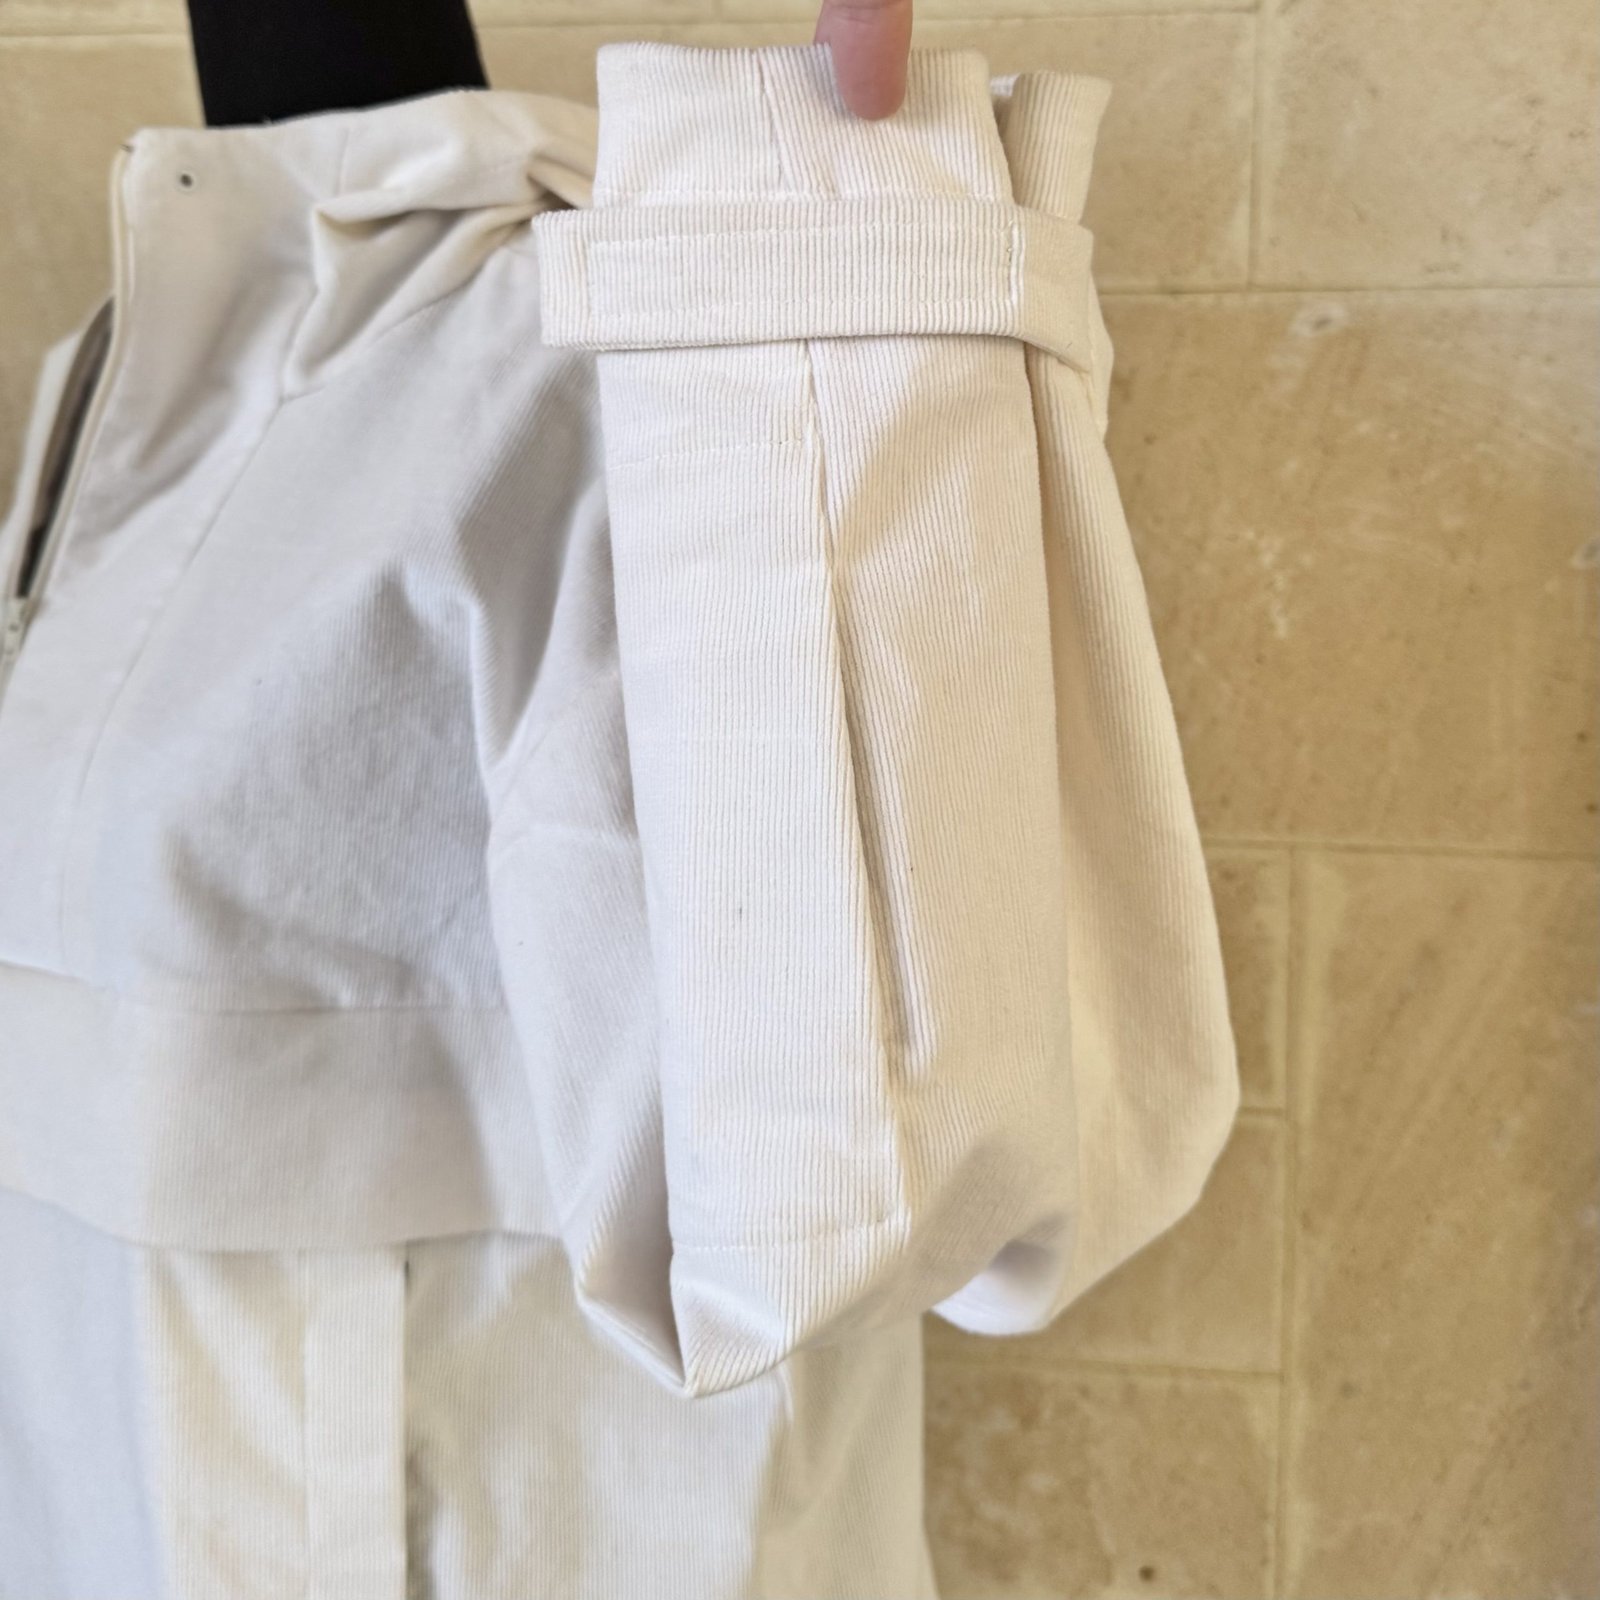
This is a rather clever sleeve pocket in the left sleeve. It’s inserted in one of the sleeve seams, and also has a velcro closure. I’m not sure what you’d use it for but it is big enough for a phone. So I guess that could come in handy.
Wearing it here with my really old, but favourite, Closet Core patterns Sasha trousers. I’ve been saying for ages I need to replace these, and the good news is that I have finally taken steps to make this happen. Stay tuned!
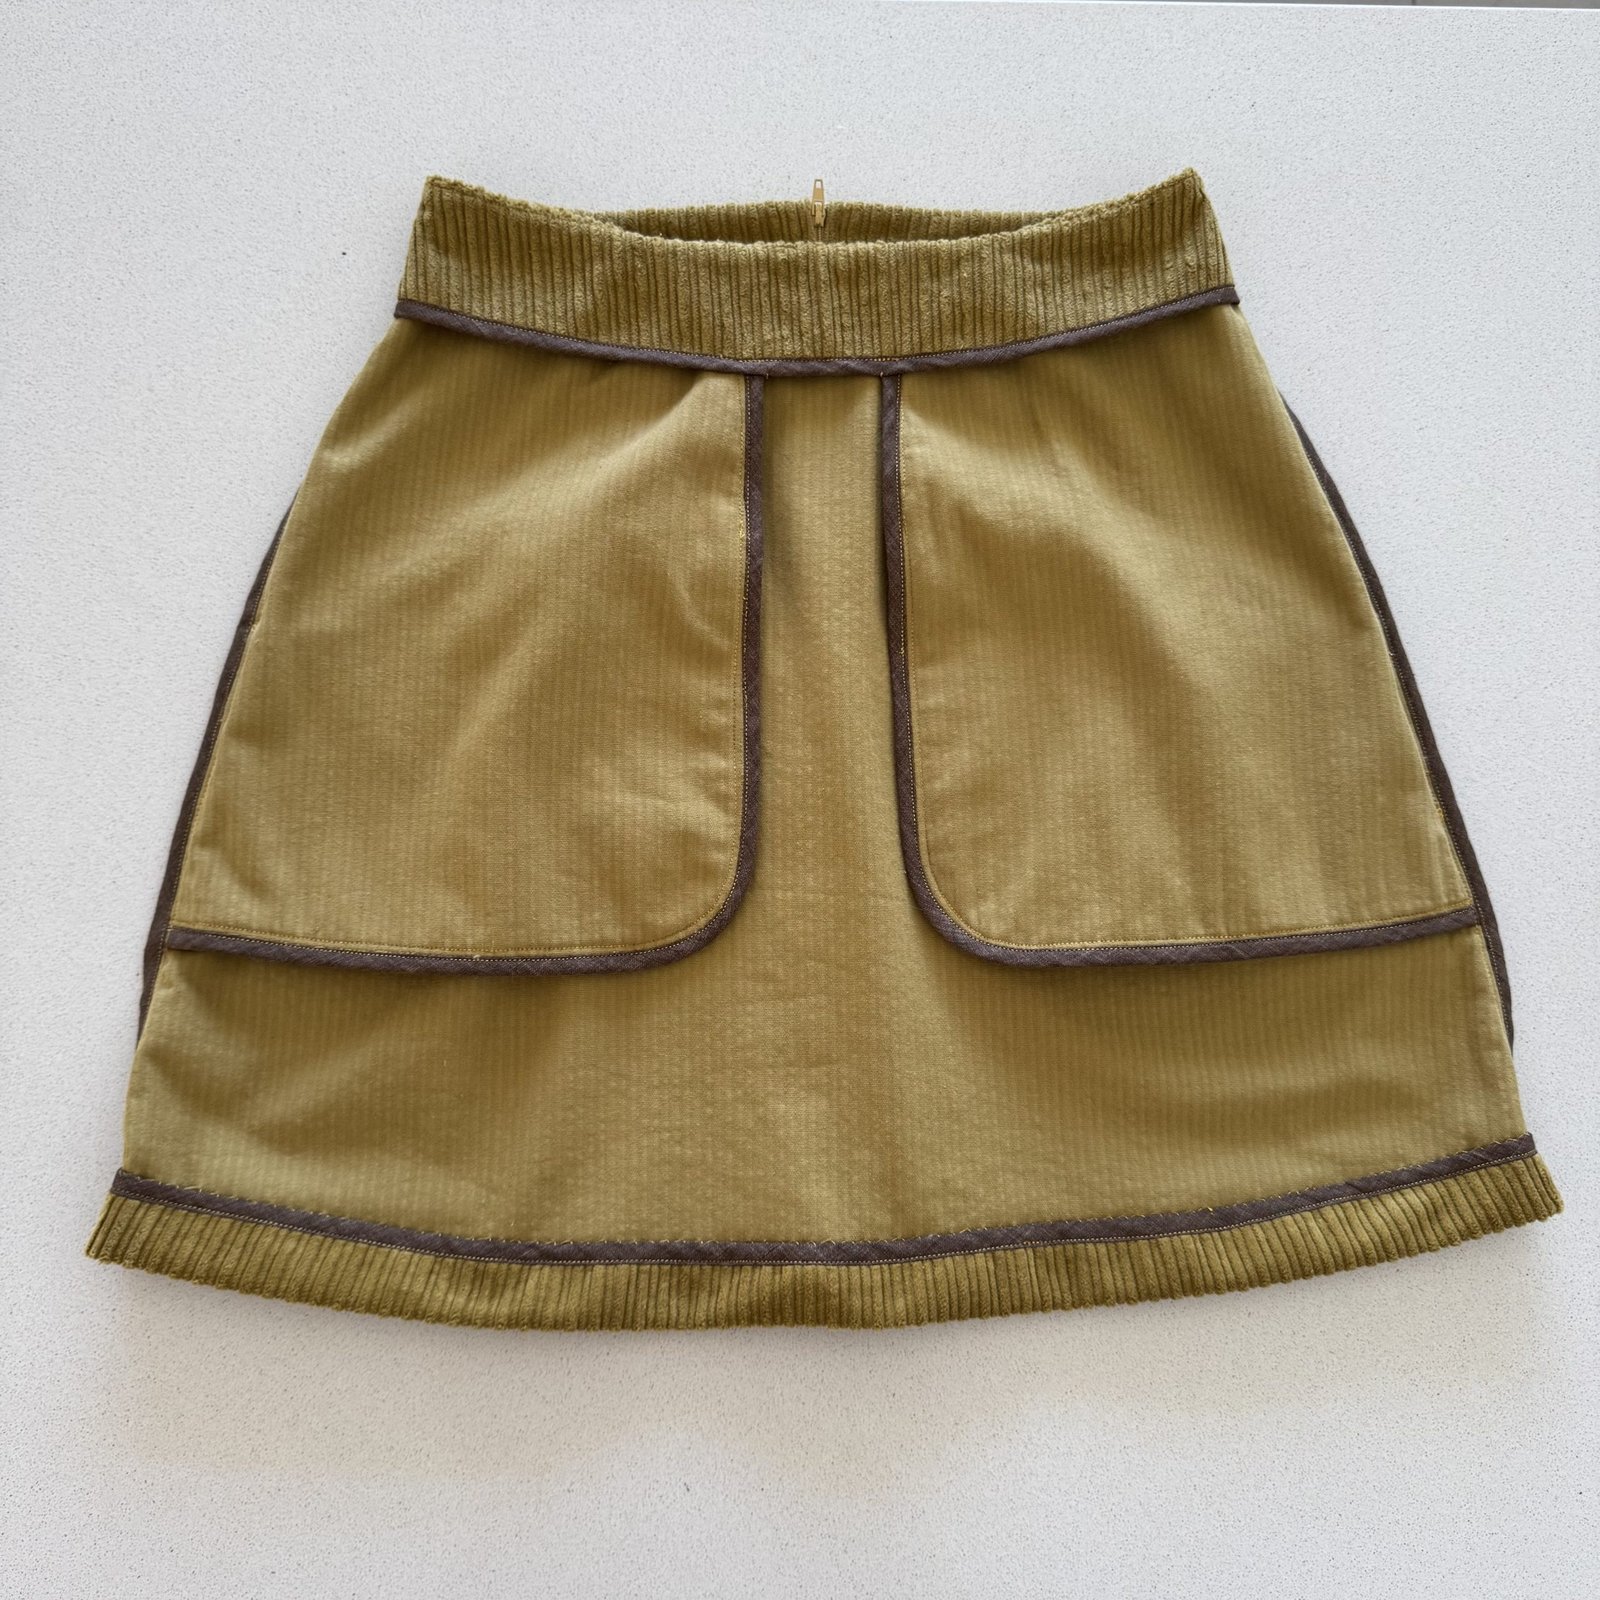
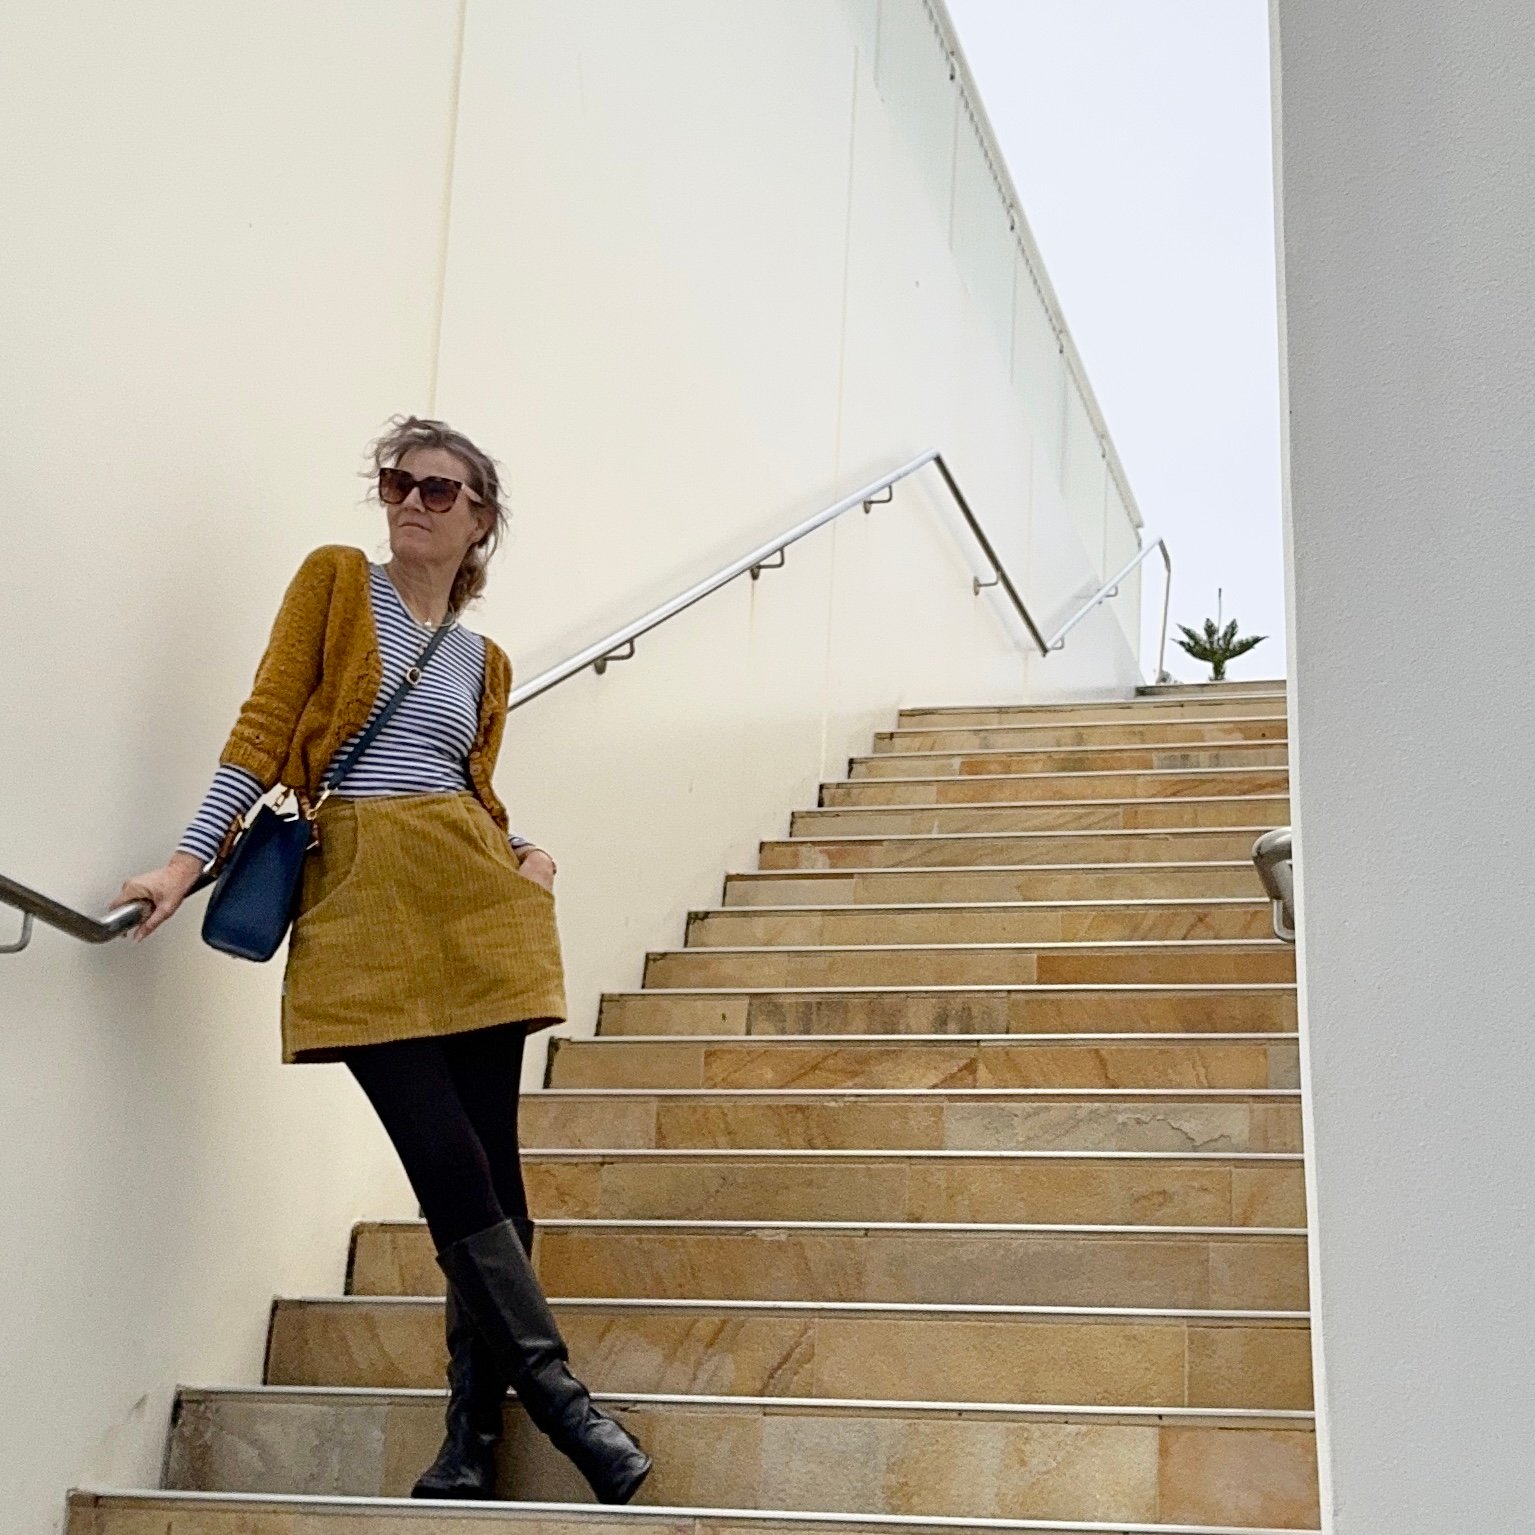
hello! I made a few new skirts, using a new pattern, the Acacia skirt. The pattern is a Peppermint magazine and Warp and Weft collaboration… available in the magazine for free, or as a pdf pattern from their website. It’s a cute little A-line miniskirt with deep deep pockets and a central back zip closure. Of course I’m always going to be interested in a winter miniskirt pattern with pockets! I couldn’t wait to try it out!
Unusually for me, I decided to make a sort of toile. It’s a wearable toile, of course. For this, I used a piece of fabric that was given to me by my Indonesian sister-in-law. It was fortunately the absolute perfect size to cut out the skirt!
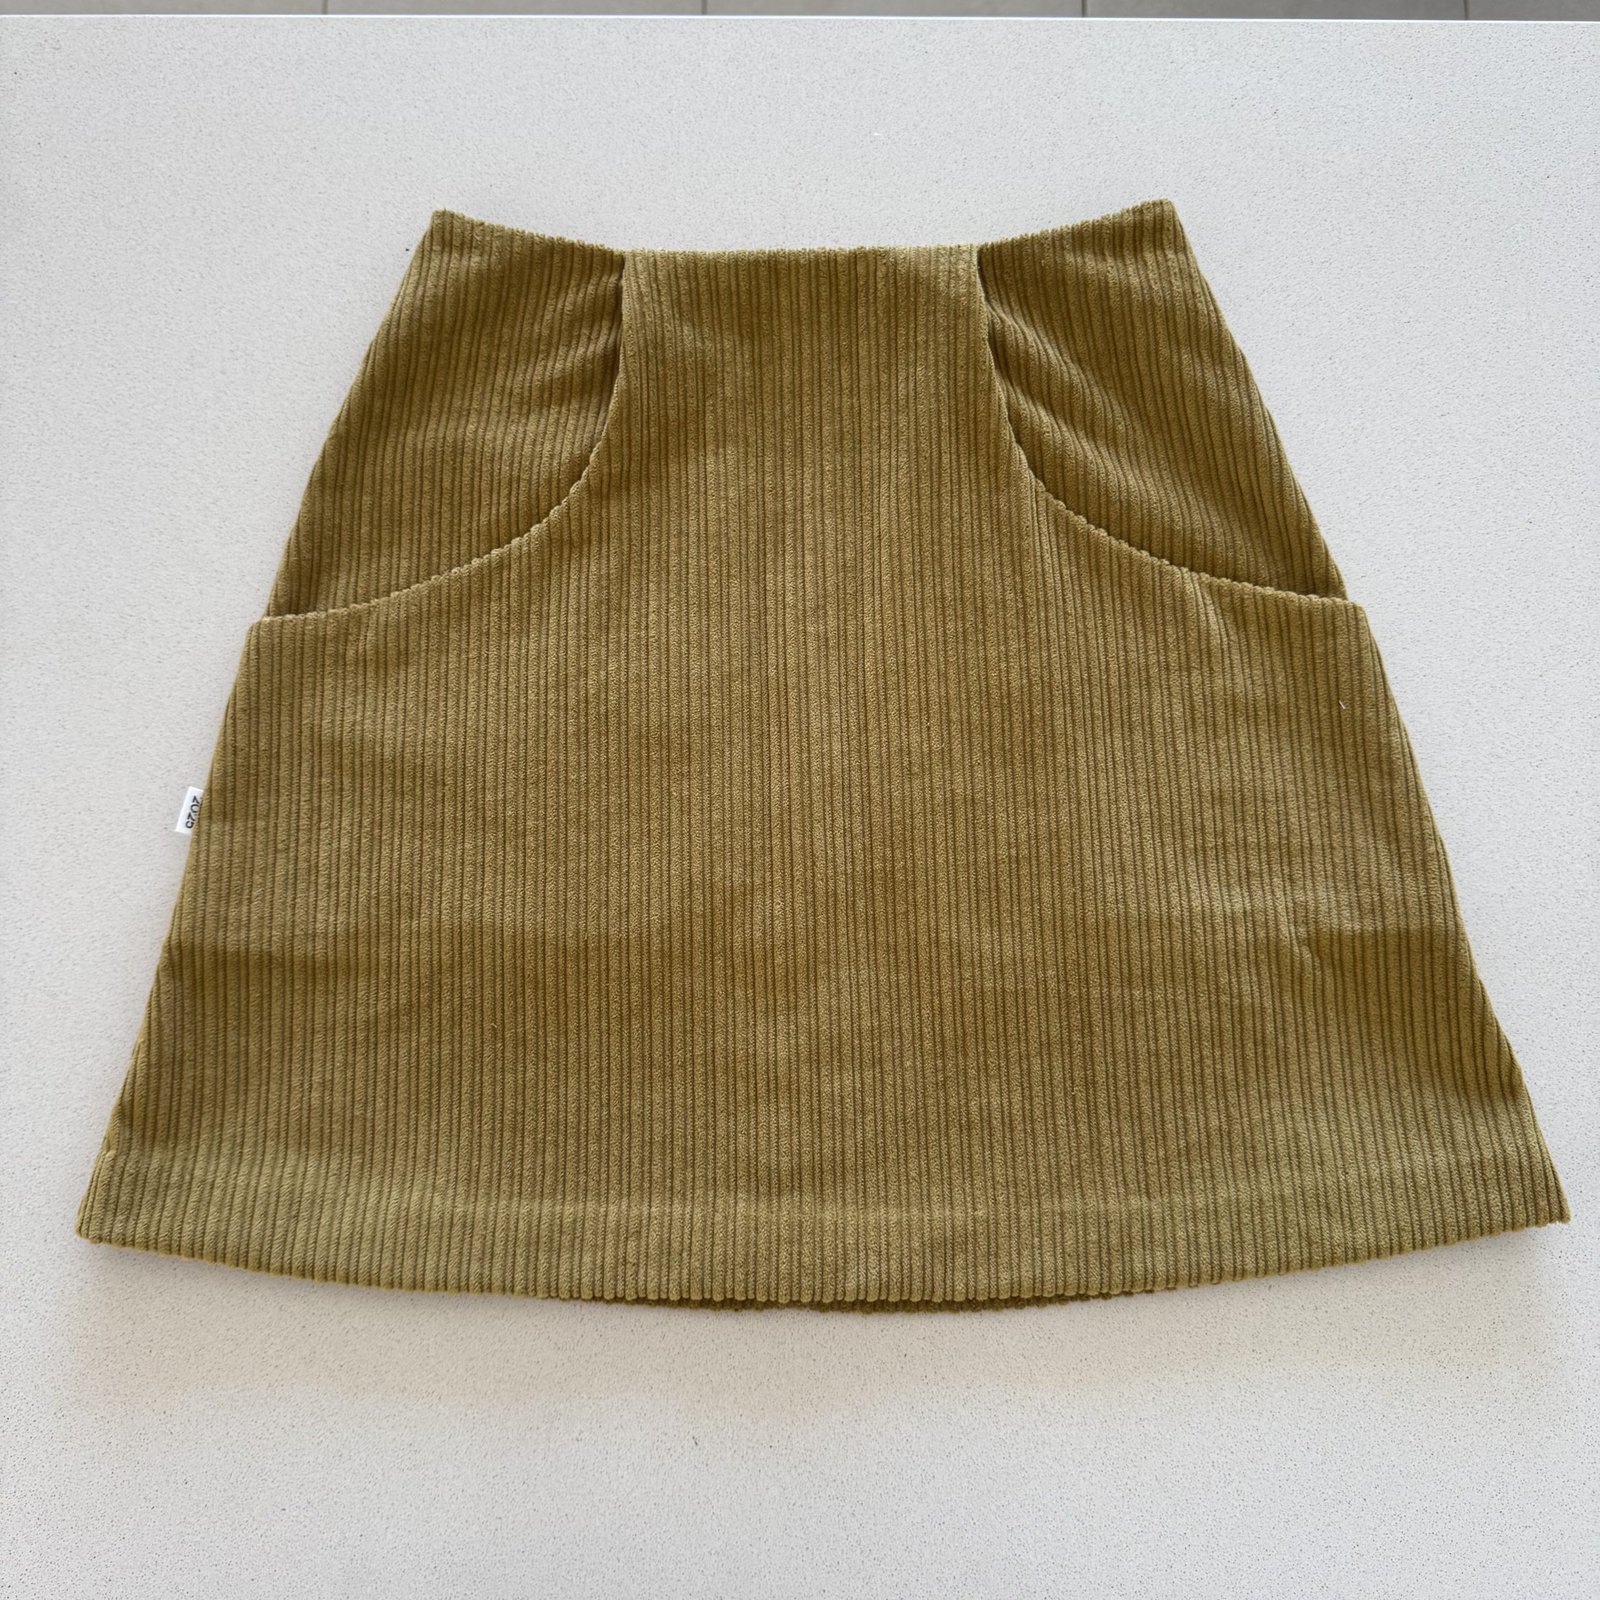
I really like this little skirt but I’m glad I made a toile, because I felt that the front was a bit flat for me, making it jut out a bit at the waistline. I unpicked the pocket joining seam and cut out a dart allowance from the pocket on the inner edge, and this worked really well. So I made this same adjustment when I made the real version, the corduroy one.
The wide wale corduroy I used for the “real” skirt is is colour Amber from Warp and Weft (available on their website here). I decided to do a “nice” finish to all the raw edges inside and applied a HongKong finish. For this I found a small scrap of lovely brown linen leftover from my patchwork dress. It was just enough to finish the skirt.
Corduroy is a little tricky when it comes to the seams lining up in the wales… and centre back seams are notorious for turning out pretty terrible, so I did this zip insertion by hand so it looks perfect. So glad I did this!
Initially, I added 10cm to the length of the skirt, I thought this would be necessary because the samples I saw did look quite short on the models… however after a few wears I have to admit that I felt like it was a little too long after all. Trust in the designer! I ended up lopping off that extra 10cm. I wouldn’t rule out adding length to the design again in the future, but a lining is absolutely necessary, imo.
Is it a little too short now? I’m not sure, maybe. It still has a reasonable hem so I could still add a little length back. Probably in the future I would add 5cm and then see how I feel about that.
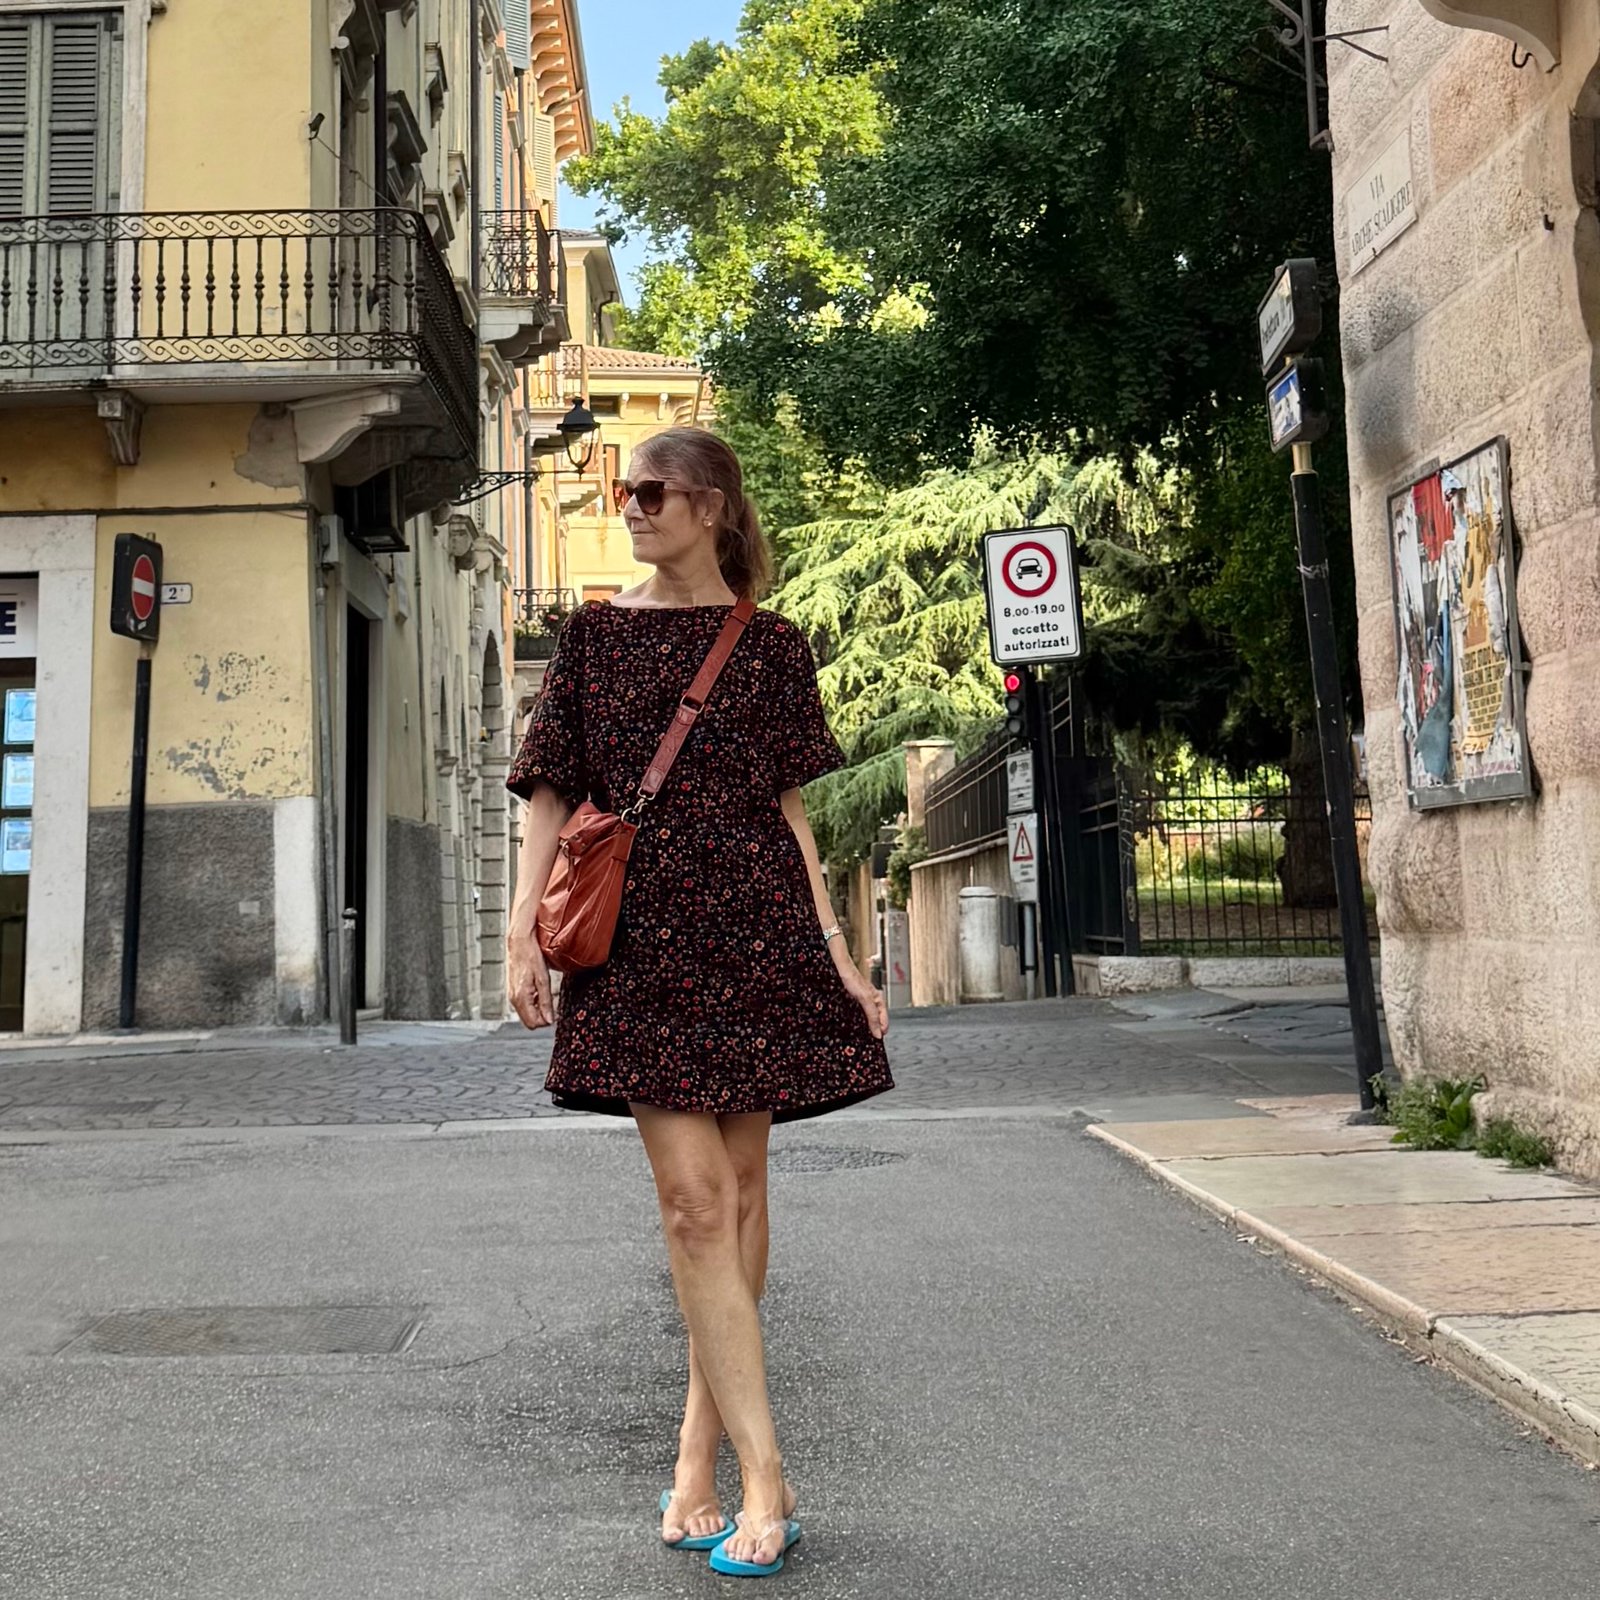
hello! We have very recently returned from a long hiking holiday, which involved some clever packing of seasonal extremes into a small suitcase with a 15kg limit. Challenge accepted! I shall now proceed to discuss my travel wardrobe and analyse its success. Or not.
Time away: 31 days
Where to: Italy and Norway. More specifically: Venice, followed by a week of hiking through the Dolomites and staying in Cortina, San Cassian, Colfosco and Campitello, followed by short stays in Verona and Milan. Then we travelled on to Norway, staying in Oslo, then another week of hiking around Geilo, Finse, Flam, Aurland and then a short stay in Bergen.
Season: early to mid summer, lol. I can only laugh here because we actually experienced the full gamut of weather from 0C and freezing hail, right up to blistering 40C days hiking in full sun.
Expected activities: lots of hiking! plus a few rest days in cities, specifically Venice, Verona, Milan, Oslo and Bergen
Colour scheme: I’ve found choosing a colour scheme as the very first step has made packing so much easier so this is integral to my packing strategy nowadays! I went with navy/denim blue, red and pink.
What I packed:
from left to right, top to bottom; all items are linked to their original construction post. The number of days I wore each thing is in brackets alongside it.
Thoughts: This was a loooong trip – one of our longest ever actually – with no opportunities for washing at all apart from the usual undies in the hotel room each night! So I packed as much as I could, always leaving just a little bit of room for shopping of course, and managed a different outfit every day! I really love this kind of outcome, satisfies the lover of outfit-variety that lurks within me. Fortunately this selection turned out to be an excellent one that covered all possibilities. Having said that:
We did not anticipate that Italy would experience an intense heat wave so early in the season, with unseasonal temperatures of at least 36C from 8am up until 10pm each day. It was extremely hot which made hiking a lot more challenging… and at the end of each day everything was a sweaty mess and had to be aired overnight. I found my hiking pants were only bearable if I rolled them right up above the knee,. My shorts were absolutely fabulous, though!
I never ever thought I would be wearing that pink miniskirt without tights, worrying that it was just too short for someone my age… however, needs must and I found that if it’s hot enough then anything’s possible! It was perfectly fine to wear it without tights in the city, in fact a lot of other people were wearing mini skirts in both Italy and Norway too so I fitted right in.
I neglected to bring a sunhat! doh! so I bought that striped hat in Torchello, Venice. It was chosen purely because it fitted in nicely with my colour scheme, and I wore it most sunny hiking days. Did not regret this purchase at all!
It’s funny, I always toss in my bathers and a pair of thongs “just in case” and quite often never wear them. This trip I needed both! For a start thongs were the only bearable footwear for city wear on the very hot days … and I wore the bathers multiple times when our accomodation had either a pool or a sauna.
Footwear always takes up the most suitcase space; so you have to balance needing a variety of footwear for different situations, against how much room you can spare in your suitcase for these space-hogging things. I’d bought new hiking boots and these took up a good quarter of my suitcase. Obviously these were a necessity though. I even decided to wear them on the trip home to free up the suitcase for some of my purchases. During the trip I often wished I had just one more pair of shoes; 3 is quite frugal for a trip this long. But I managed so it’s all fine really.
If I had to point to something surplus, it would probably be the lightweight red cardigan. I wore it several times, but could have easily gone without it. I was grateful for every single other piece that I had.
One exception to the no outfit-repeat is the corduroy dress … it did get worn on the plane in basically the same way with the red merino underneath each time, but I did try to mix it up a little otherwise! I wore it with the linen shirt underneath on one of the last days and absolutely loved this, will definitely wear this combo again. Most of the photos of this dress away on the trip are featured in my previous post, dedicated to the making of this dress.
I dug out a lot of older makes for this trip that I’d made many years ago. and rediscovered a love for some of those old things. Specifically the red velvet skirt, the chambray top and the pink twist top. I always try to wear all the new things I make fairly and completely, but I do also hang onto old things that I particularly love and occasionally take them out for a spin. Some things, while old, are just amazing and you cannot get rid of them, you know what I mean?
What did I see other people wearing: ahem, I’m going too split this up into Hiking Attire, and City Attire, since these are obviously very different things…
Italy, Hiking Attire: you can’t escape the fact that Italians love brightly coloured hiking gear and it seems to be just the tourists who opt for neutral colours. I saw lots of Italians biking and walking on the trail wearing gorgeous intense colours like bright orange, mustard, turquoise and cobalt outdoor gear, and it looks absolute fabulous too.
Italy, City Attire: women in the city are wearing elegant midi-length shirt dresses, big-skirted and belted at the waist; in white, lovely florals and blue/white chintz prints, along with white and raffia sandals, and big sunhats. Absolutely beautiful! Also the other extreme, mini skirts! with either oversized white T-shirts, blouses or tank tops, and white sneakers.
a good example… I took this picture because I want to copy that top sometime…
Norway, Hiking Attire: kind of the same as Australians, as in simple subdued neutrals like khaki, navy, black, grey and white.
Norway, City Attire; Norwegians are, like Italians, into the extremes of either long midi skirts in plains or florals mostly, or alternatively short skirts or shorts, and nearly always with white sneakers. They do seem to prefer a more subdued colour scheme overall, with neutrals like grey, cream, white, and stripes predominating. Aside from this, there’s a definite trend to wear denim separates, like a denim shirt and skirt, or ¾ jeans together. This is interesting to me since there’s a budding trend here in Australia for that same look right now.
this doesn’t represent daily wear obviously, I just took it because I think Norwegian national costume is so beautiful…
Purchases: I’m determined to knit a Norwegian jumper, so purchased some wool with that in mind. This is not actually Norwegian wool, but I’ve made my peace with that. There were tonnes of wool shops in Norway – it was amazing! – but I struggled to find something appropriate for the pattern I’d prepared before our trip … anyway, I felt lucky to eventually find enough colours and skeins in this Jensen yarn from Denmark. I’m holding myself to finishing this as quickly as I’m able! I have already cast on so off to a good start. 🙂
random holiday snaps:
Venice
we had gelato nearly every day!
hiking in the Dolomites
the best apple strudel I’ve ever eaten! we had it at the chalet in the above picture
this amazing apartment building in Verona famously has a flock live flamingoes living in the garden… so pretty!
wading in the Oslofjord, it was surprisingly hot in Oslo too
hiking out of Finse, Norway
between Myrdal and Flam
Sognefjord … yes, we climbed up to this spot too! below was our last hike out of Aurland, we got to a tiny cafe run by a goat farm that made their own cheeses, perched high up the side of the fjord… of course we had a cheese platter!
hello! long time no see! I’ve been very busy lately, being a diligent little jet setter and living out of one suitcase for an entire month … I do have a travel wardrobe post planned but it will take me little while!
Anyway, I made a new dress before I left and took it away with me. I’ve worn it quite a lot already! and managed to take a few photos out in the wild. Not that top photo though. The other ones 🙂
The pattern is the new Mirri pattern by Fibremood, a delightfully quick and easy thing to make; and I used a lightweight cotton corduroy bought from Spotlight just before covid lockdown if I remember correctly. I loved the pretty bright florals on black background, and luckily had “just” enough for this pattern.
feels pretty good even in 36C heat!
Surprisingly, it reads as kinda “brown” from a distance, probably because of the large-ish amount of orange and black merging together. Honestly I did not expect that effect!
The Mirri is supposed to be a summer pattern, of course; since the new European summer patterns are all released during our, southern hemisphere, winter… however I can still usually manage to wrangle something together that’s suitable for me, somehow, anyhow. As it happens, I’ve found this dress has been that rare happy and successful marriage between summer pattern/winter fabric… it’s loose enough to be breezy and therefore cool in hot weather, but then can be worn over tights and a warm merino top to keep you cosy in cold wintery weather too. Versatile!
It’s such an easy to make design there’s really not much to say. The neckline is finished with a bias cut strip and the pattern includes a lovely deep hemline facing, which I edged with the same orange linen bias binding. I think this looks so pretty. Designwise, it has deep side pockets and sleeve cuffs. Hmm, that’s it, really…
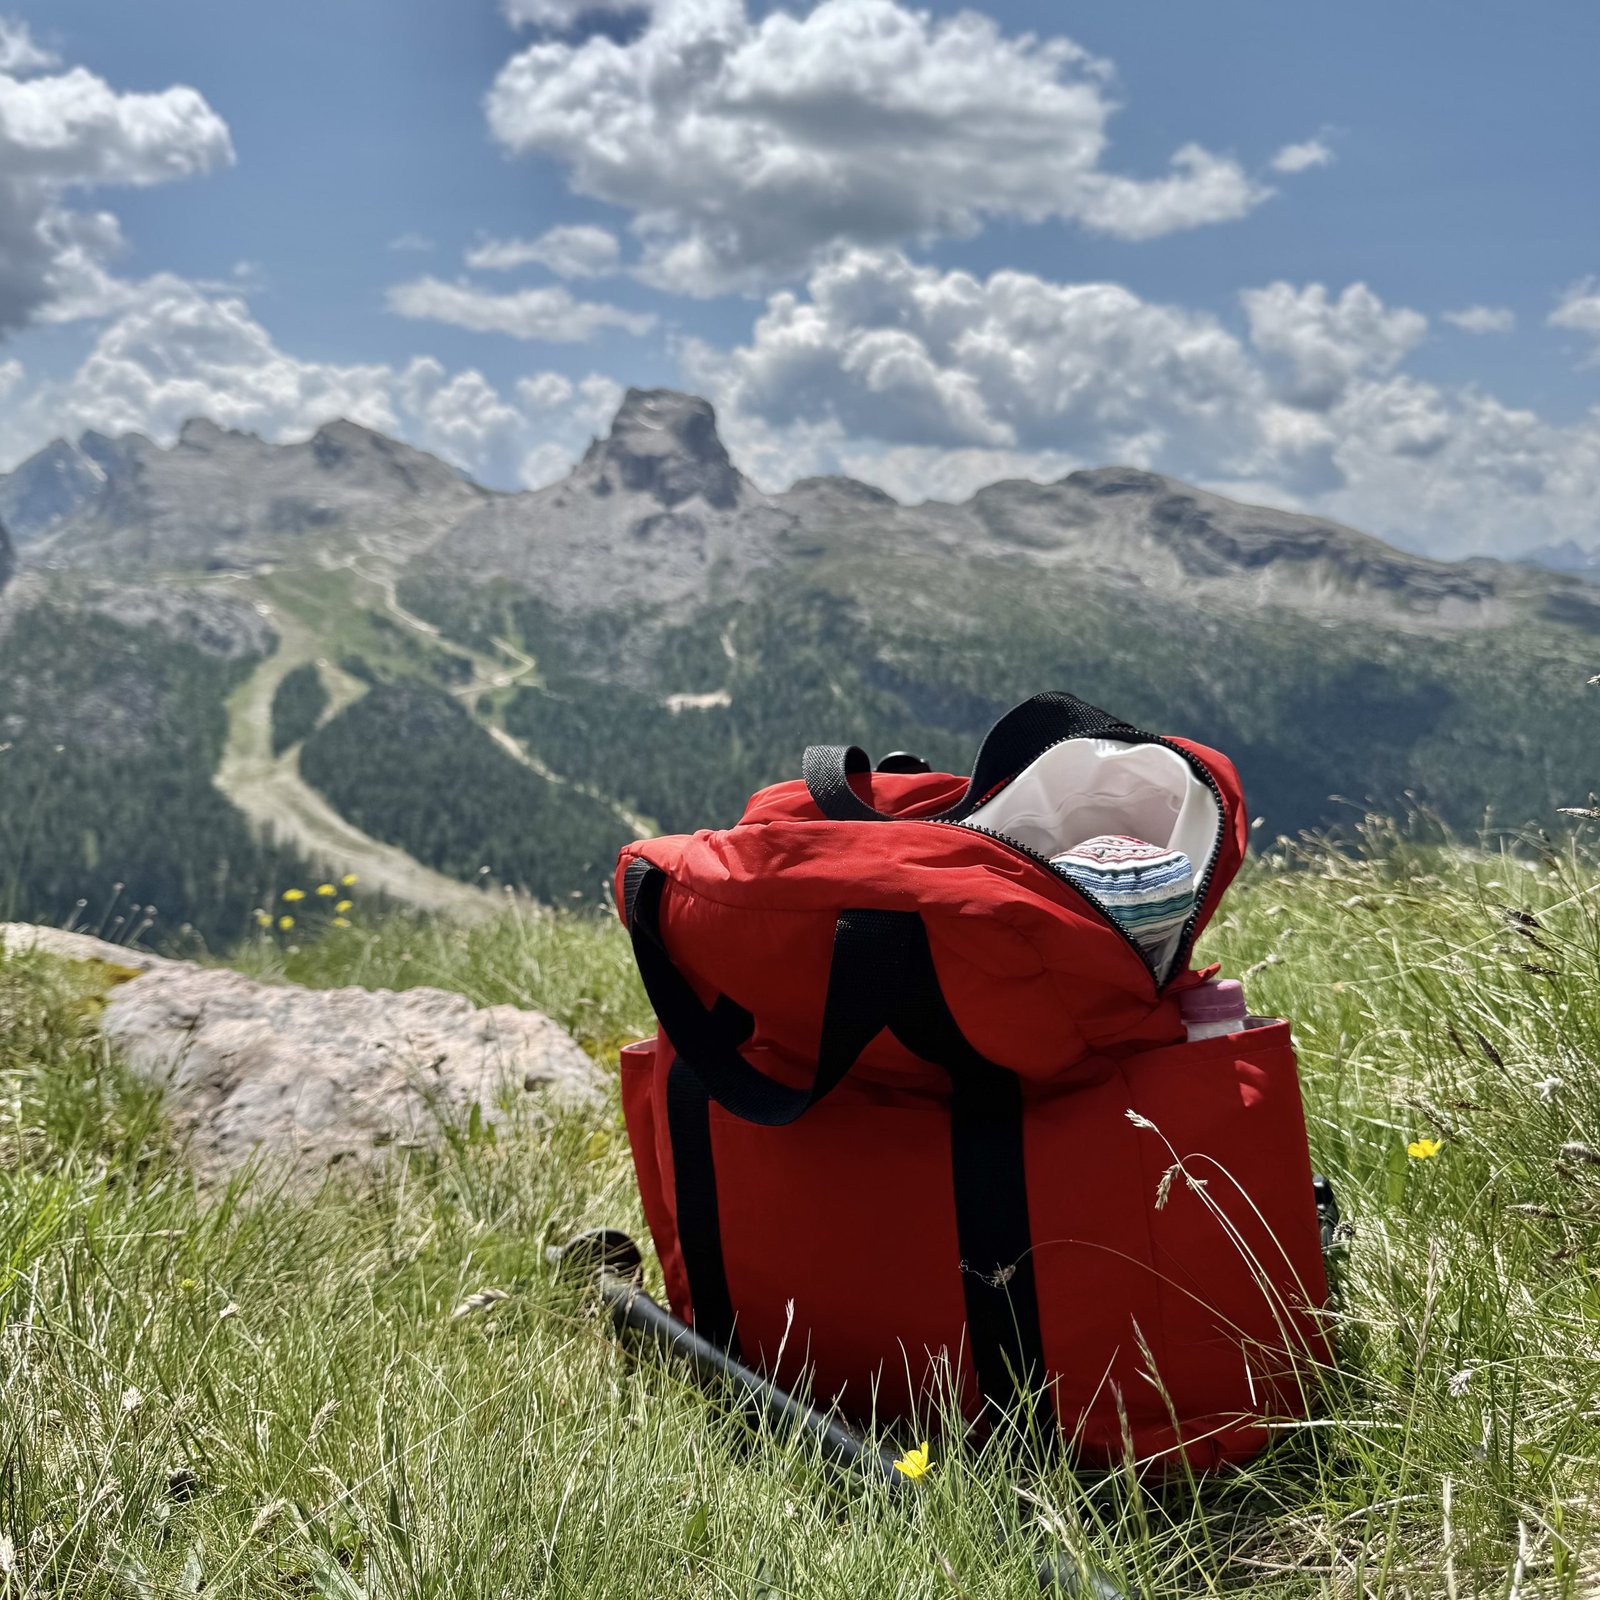
And, I made something else new on the eve of our departure overseas… a backpack. I’ve never really worn a backpack much during our hiking travels but decided it was high time I got one so poor Craig didn’t have to carry everything in his backpack! I used this tutorial called “DIY 3-pocket casual backpack” by a Korean channel, Tendersmile Handmade. This was an absolute terrific tutorial, very easy to follow and I loved the final result.
I made mine from a tomato red water-resistant stuff that I bought many years ago, I think from a Morrison clothing company fabric sale. I already had some white waterproof plastic fabric, leftover from when I made a whole lot of luggage for some of my family for Christmas one year (here). I also interlined with some wool wadding between the two layers for a bit of padding. All these materials were from stash, and I bought the strapping, zip and plastic hardware from Spotlight.
I altered the dimensions by a bit; specifically making mine 10cm “higher”, and so made the side pockets a little higher to compensate proportionally. My zip was also a different length, so all the dimensions of the side, bottom and top pieces are different actually. It really wasn’t all that difficult to work out though.
I couldn’t get a zip like theirs that zipped from the middle out, mine zips from each outside edge in. This wasn’t ideal, but didn’t make a lot of difference. I also stitched the lining down firmly to the seam allowance inside to keep it firmly in place as far as I could possibly reach; the bottom and top edges, and part of the side edges. The tutorial doesn’t tell you to do this but I imagine the lining would just kind of float around inside the bag in an annoying way if you didn’t anchor it to the bag in a few key positions.
The backpack worked out really great! and would have been actually perfect if it had been for one small modification… to have a shoulder strap as well so I could carry it comfortably as a cross body bag if I wanted to. I desired this variation so greatly that since I returned home I did indeed pop off to Spotlight for all the necessary bits and added one. This can be removed if not in use. As well, I added a “made in 2025″label, that I’d forgotten when I first made it. Voila!
So this bag did absolutely great duty and I enjoyed making and wearing and using it. It passed the waterproof test on one day of continuous rain and all my stuff inside remained perfectly dry. My water bottle fitted in the side pocket just fine. Having three internal pockets worked well for how I like to arrange my stuff. I did think it possibly couldn’t carry a superheavy load, but then I wouldn’t want to do that anyway.
hello! I’ve made a whole new outfit recently… it’s not so often that I can present a new, head-to-toe handmade outfit like this!
I bought this Minä Perhonen hessian on a previous trip to Tokyo, and after a suitable period of stash marination picked out Burda dress pattern, Burda 07/2018; 118. One I’ve used before, a true goodie based on its very tiny fabric requirements. btw, did you know that this very Finnish name actually belongs to a Japanese label? I didn’t; but I’d done some investigations prior to our trip and discovered this surprising fact. Of course then I had to visit the eponymous store and spent an agonising 30-60 minutes trying to choose just one of the beautiful fabrics. Difficult, indeed.
I settled on this cotton hessian with a multi coloured print of overlapping ovals. I loved this combination of colours; violet, duck-egg blue, teal blue, navy blue, lemon yellow and apricot. I thought it fitted in very nicely with my personal colour palette of true- to deep autumn.
Because of the wide weave and slightly rough texture I opted to line it, the first time I have done so for this pattern although the design is supposed to be lined. And now I have done so I can reliably report that the lining instructions are pretty sparse, bordering on unhelpful. They start out with one or two seams and then suddenly say something like “add lining”… ok maybe I’m exaggerating, but not by much! I ended up stitching the bulk of it in by hand. Of course this results in a very neat and tidy finish. I cut it it purposely to be a little generous, so I’m not concerned that those hand stitches are going to come under strain.
I cut the facings from a greige medium-weight linen from the stash. I used a different griege lightweight cotton from stash to bind the hem raw edge before stitching it by hand. The pale pink lining fabric was also in the stash, so my only required purchase was a new, “natural” 60cm invisible zip. I’m loving shopping the stash as much as I can! Gradually chipping away at it, honestly when I do get down to zero I’m going to throw a party!
I made a size larger than my usual for some reason. Not sure why I did this now because it’s a tad too boxy. Also, while the print is absolutely gorgeous, the hand of the fabric is both quite heavy and drape-y, a combination that I don’t really love all that much. Definitely not going to stop me from wearing it though!
Here I am wearing it for its maiden voyage, during me-made May.
Aaaand, I made a new pair of shoes! and fortuitously they go beautifully with my new dress. This style of shoe should look pretty familiar to anyone who regularly reads my blog, since I once again used a kit from leather needle thread. This particular woven, three-colour style is a new one though. I had lots of fun making these, as usual!
I have a kinda embarrassing confession though… it was in making these ones that I finally realised that I’d mistakenly been putting in the buckle upside down for some of my previous clogs, whoopsies. They are the correctly way up here, and for my most recent black ones too. My mustard clogs and teal clogs were upside down… fortunately it was actually pretty easy to unpick the pieces and reinsert the buckle in the right way around. I’m such a dolt, because I’d always felt they looked a little funny… well it all makes perfect sense now and the clogs look so much better!
hello! so as I mentioned in my last post we have just got back from a nearly month-long trip through east Asia, and just for fun I’m assessing the usefulness/workability of my travel wardrobe as usual…
BTW; if you’ve ever been to South Korea and gone on a tour to the DMZ, you might recognise that this picture is taken near the border between North and South Korea, near the entrance to the Third Tunnel. It’s forbidden to take photos at the lookouts and in the tunnel, and they ensure compliance by confiscating all your belongings before going in! however taking photos in the carpark here was allowed. More of my holiday snaps are at the end of this post, if this is more interesting than my clothing…
Time away: 21 days
Where to: South Korea and Japan
Season; early March to beginning of April, the early days of spring
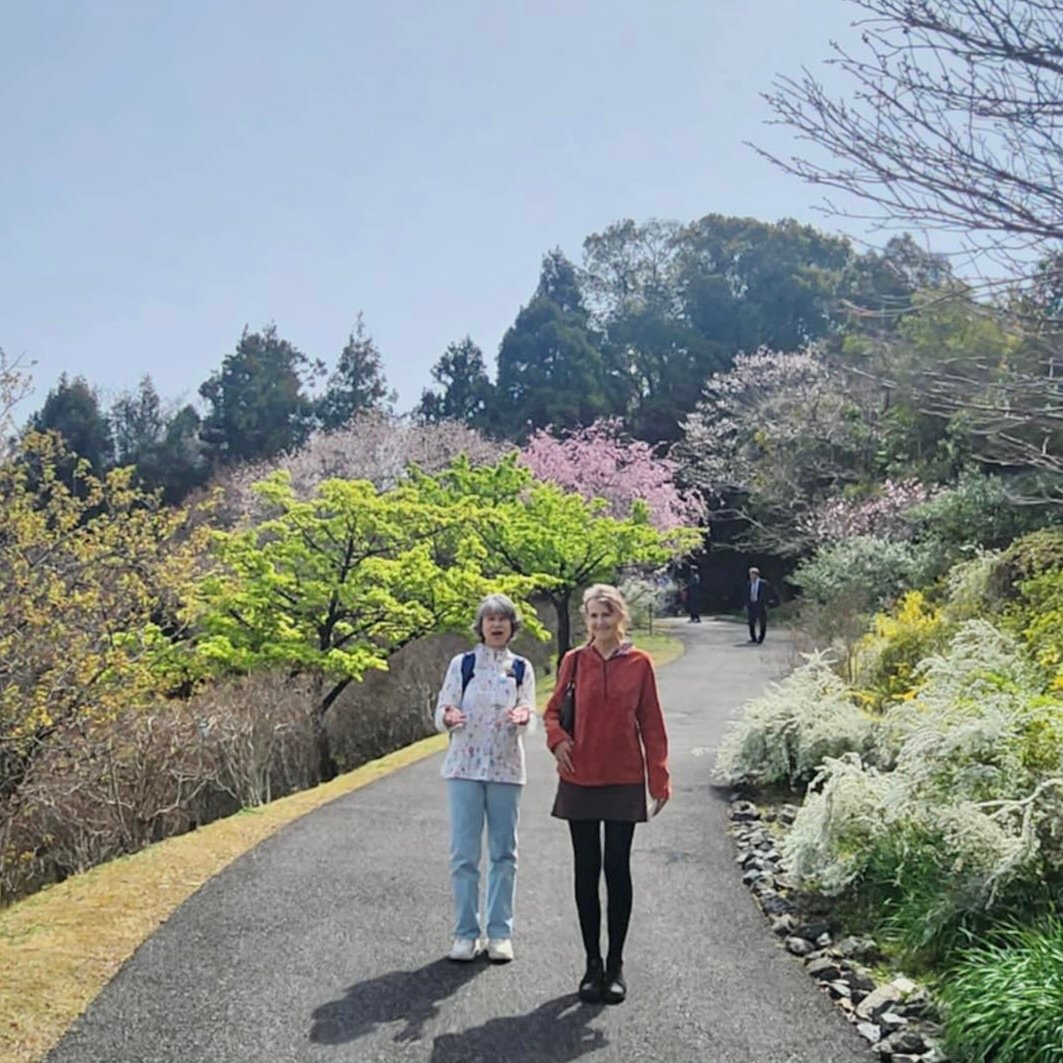
Expected activities: exploring new cities and towns, plenty of hiking, plenty of sightseeing, hanging out with my friend Yoshimi… we visited Seoul inc 1 day to the DMZ, 4 days hiking throughout Kunisaki, Hiroshima, Kochi, Kyoto just briefly, the Hida region outside Nagano, Tokyo
Colour scheme: mostly warm browns and autumnal shades
What I packed:
everything is made by me except shoes, bag, umbrella and gloves
from left to right, top to bottom; everything is linked to its original “making’ post. the number in brackets is how many days it got worn during the trip.
not pictured, my pjs, toiletries bag and underwear.
Oh! I forgot to mention in my previous post that I made 4 new pairs of black tights before going away, taking only 2 with me… but they’re really not worth a separate post. They’re practically identical to all the black tights I’ve made previously. Unbelievably I forgot to pack a pair of gloves so I had to buy those charcoal ones in Perth Airport before flying out, whoops! These are possum wool so are divinely soft and warm. I do not regret this purchase at all!
My daily outfits:
note; the first and last days were essentially worn for two days each because of our drawn out travelling schedule
Thoughts:
We’d been to Japan just one year ago so I deliberately chose a completely different wardrobe to take this time, with the exception of my indispensable white fleece top and yellow raincoat. I decided I just couldn’t do without these things! I was really happy with my more autumnal colour scheme, felt very different to the more spring time colours I would normally gravitate towards for a spring-time holiday.
I was determined to pack light, and took as little as I dared! I generally get quite bored with my choices after a trip like this and I didn’t hate everything by the end of it, so that’s a nice outcome. Everything got worn multiple times and went together pretty well too. I know my outfits look kinda the same a lot of the time, but there’s a range of different tops and skirts underneath those coats, I promise! You start out the day thoroughly rugged up and by lunchtime you’ve often stripped off some of those outer layers.
The weather forecast had hinted at rain, so I popped in that little telescoping umbrella; and it turned out that even when I had on my raincoat I’d use the umbrella sometimes too! For example, it’s actually hailing on us in picture 6 above! so it was nice to have the little bit of extra protection. Also you don’t always want to wear a raincoat, especially if you’re in a city, and then suddenly it’s pouring.
My long brown woollen coat looked so nice and stylish and was pretty fabulous in the windy cities, like being wrapped up in a snuggly cuddly blanket. It’s so voluminous that it also doubled as an actual blanket sometimes … comes in nice and handy when you’re spending long hours in transit somewhere. 🙂
For the first two thirds of our trip, I honestly thought the purple cardigan was going to be a giant waste of suitcase space… it’s pretty bulky and took up more room than anything else. It is also, however, toasty to the extreme and the last 4 days temps dropped down below zero with snow each day… and so out it sprung from the suitcase to blessedly justify its existence. I also half-doubted that the new striped T-shirt was going to be particularly useful either, however to my surprise a couple of days in Hiroshima and Kochi were quite warm and humid and I was glad to have a lightweight option after all.
I correctly predicted that I wouldn’t wear either my bathers or my thongs… but as usual I don’t really mind taking them because they don’t take up a lot of space, and I still hold out that you just never know if you might need them *shrugs*. Everything else I took was absolutely worthwhile and I was relieved that I had enough choices to keep my fussy self happy.
What did I see other people wearing:
well, Yoshimi has made some really cool jeans and beautiful shirts which was a joy to see!
hmmm, what else did I see? Lots of people wearing black, mostly. It felt very late winter with everyone hanging out for spring. Apart from in the main parks where the sakura is bursting forth in stunning profusion, one sees girls in either ball gowns or at least wearing lots of pink. It’s kind of de rigueur.
Something that stood out to me in the cities was that quite wide leg jeans seem to be fashionable right now; and with lots of cargo pockets, and just in general baggier, longer and loose-fitting clothes. People were also wearing lovely coats and trench coats which is really nice and kind of a novelty to me still. People don’t wear coats that much where I live, so I really love seeing them in other places.
Of course in Japan I always enjoy seeing kimono on the streets. For convoluted reasons, this trip I seriously checked out a lot of kimono and obi in department stores and was totally shocked at the prices. I mean, of course these are absolutely beautiful one-off pieces that feature weaving and embroidery of the highest quality, and I also know that you can buy cheaper second hand ones too… but well, the newer ones are really priced so high that it’s hard to imagine anyone being able to afford them, really.
Here are a few of my favourites…
this one above is my absolute favourite!
I really loved how this kimono and obi matched each other so beautifully…
In general, here are some of my favourite photos of the holiday…
Seoul forest…
climbing up to Seoul tower
pilgrimage to 10-31 Nonhyeon-dong, Gangnam-gu, Seoul
Yoshimi and me
we saw a tv crew filming in the park while we were there, and then Yoshimi sent me this, hahaha…
check us out…!
making a tiny snow duckling… I know I know, I’m such a dag
pilgrimage to Seoul forest
did we all watch squid games?! btw I would have failed this round…
matcha tea with Yoshimi
near North/South Korea border; ribbons of hope put up by South Koreans wanting to be reconciled with relatives in North Korea
Hiroshima. so moving…
loved this rooftop bar…
along Meguro river, Tokyo
hiking…
this was really cool and I’m so glad I read about it beforehand… in South Korea you can customise your own travel card. I picked one of my favourite pictures of our family, taken by Cassie’s now husband during our skiing holiday in Hokkaido a few years ago…
egg bread, a popular street food in Seoul, omg so yummy. I’m definitely going to try to make this!

 Hello! I made a new pair of bathers for myself… and I’m chuckling to myself that I’ve gone kinda Bay Watch this year. Is Bay Watch even a part of the collective consciousness any more? hmmm I could be aging myself a bit with that reference?!
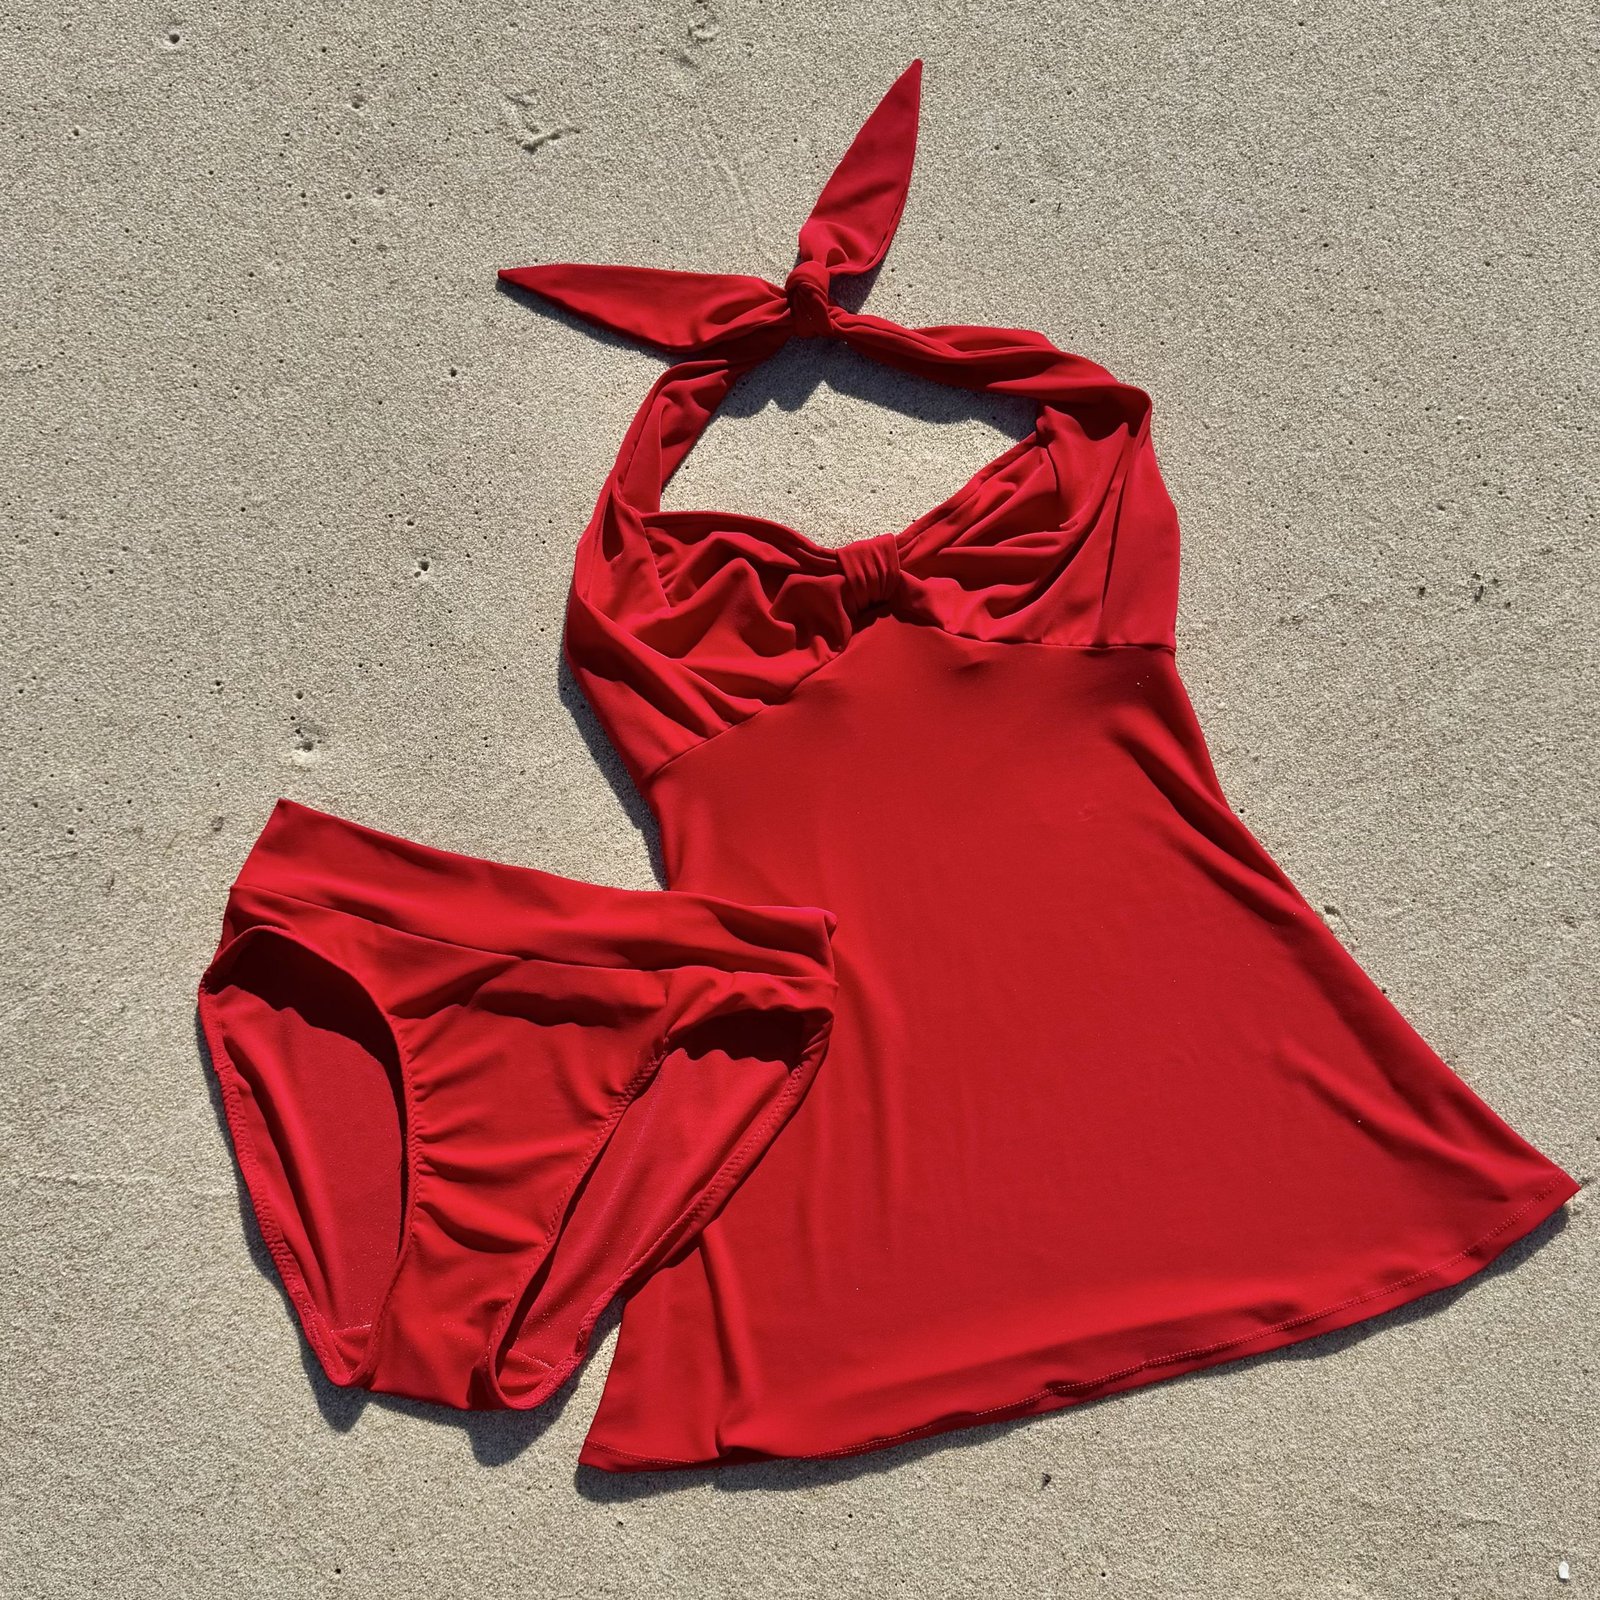


 hello! Recently my lovely niece J married her long-time man and so of course I had to make a new dress for myself for the occasion… I was vaguely toying with the idea of shopping for fabric before I remembered two things: 1. as everyone in our family knows, J’s favourite colour is famously yellow, and 2. I have a piece of very yellow, and happily wedding worthy fabric in my stash already!
 I cut the pockets and neckline facings from a natural cotton linen that I’ve had in the stash for years, saved specifically for this same sort of purpose.
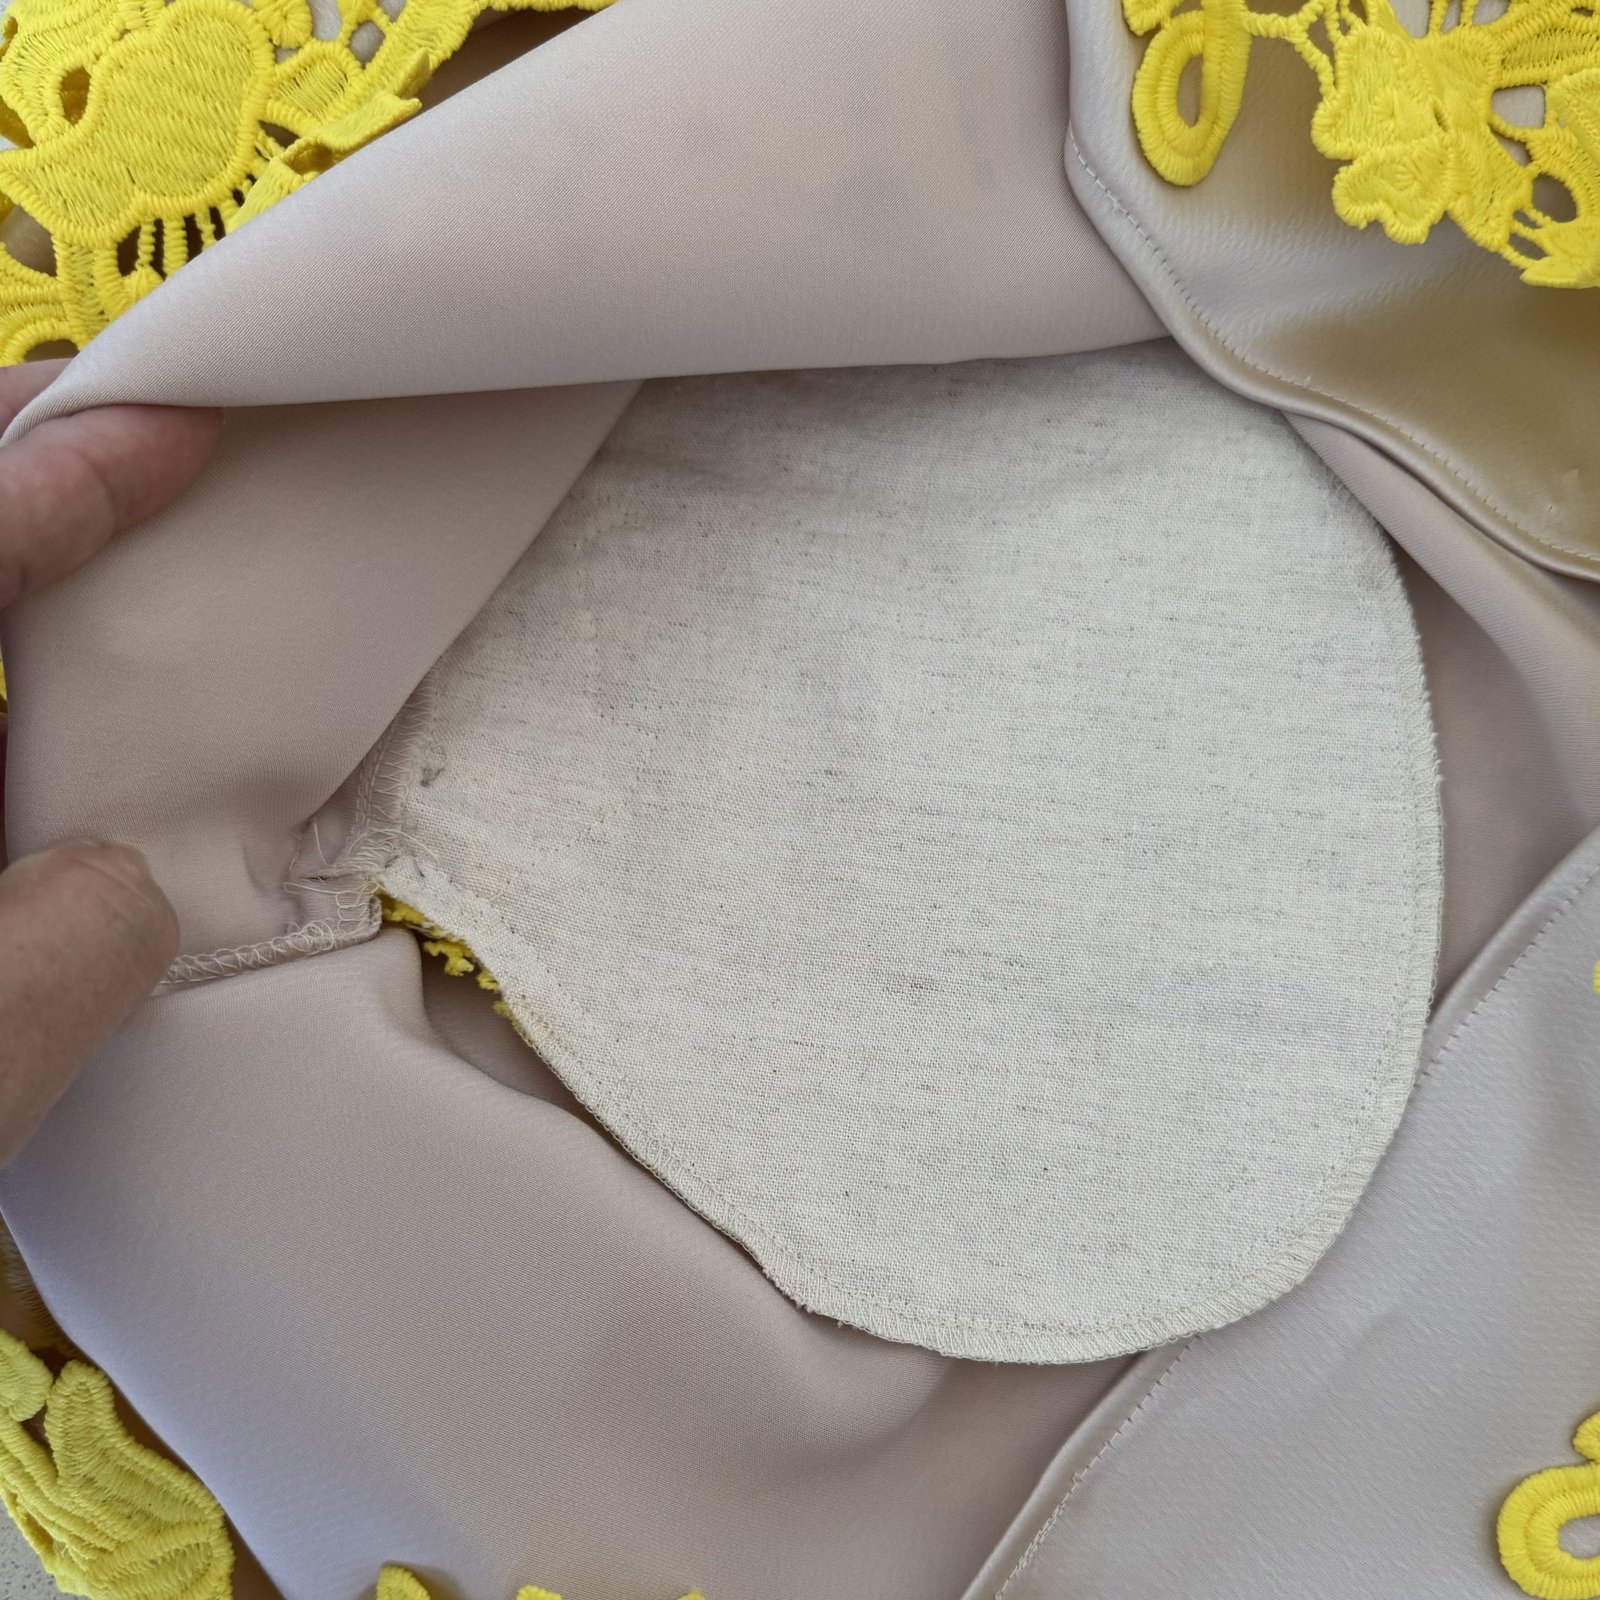
 I’m including a picture of the happy couple because, although I did not make the dress, I did alter it to fit her and also did some minor repairs. This took three separate fittings and I took precisely zero photos of the process or anything. My only excuse is that I was also working on my own dress and stressing a little bit that I wasn’t going to get it all done on time.

 Hello! I’ve made a new hoodie for myself, and think it’s rather beautiful if I say so myself. Many years ago, when I started this blog, I would sometimes berate myself for being scared of wearing colourful clothing. I tried to break away from making too many white things. I think I’ve succeeded in training myself to wear more colourful clothing, but actually my love for plain white things, or really, ivory things, hasn’t gone away. I still have quite a lot of cream, white or ivory fabrics in the stash! When the new Fibremood Dyron hoodie pattern landed in my inbox I got out some of my hoodie-weight fabrics and found I had enough of this lovely winter-white corduroy to cut out the hoodie. I’ve been hoarding this corduroy for a looooooooooong time so it feels really good to enjoy it, at last!
 I made a size small, haha. Yes, it’s huge.
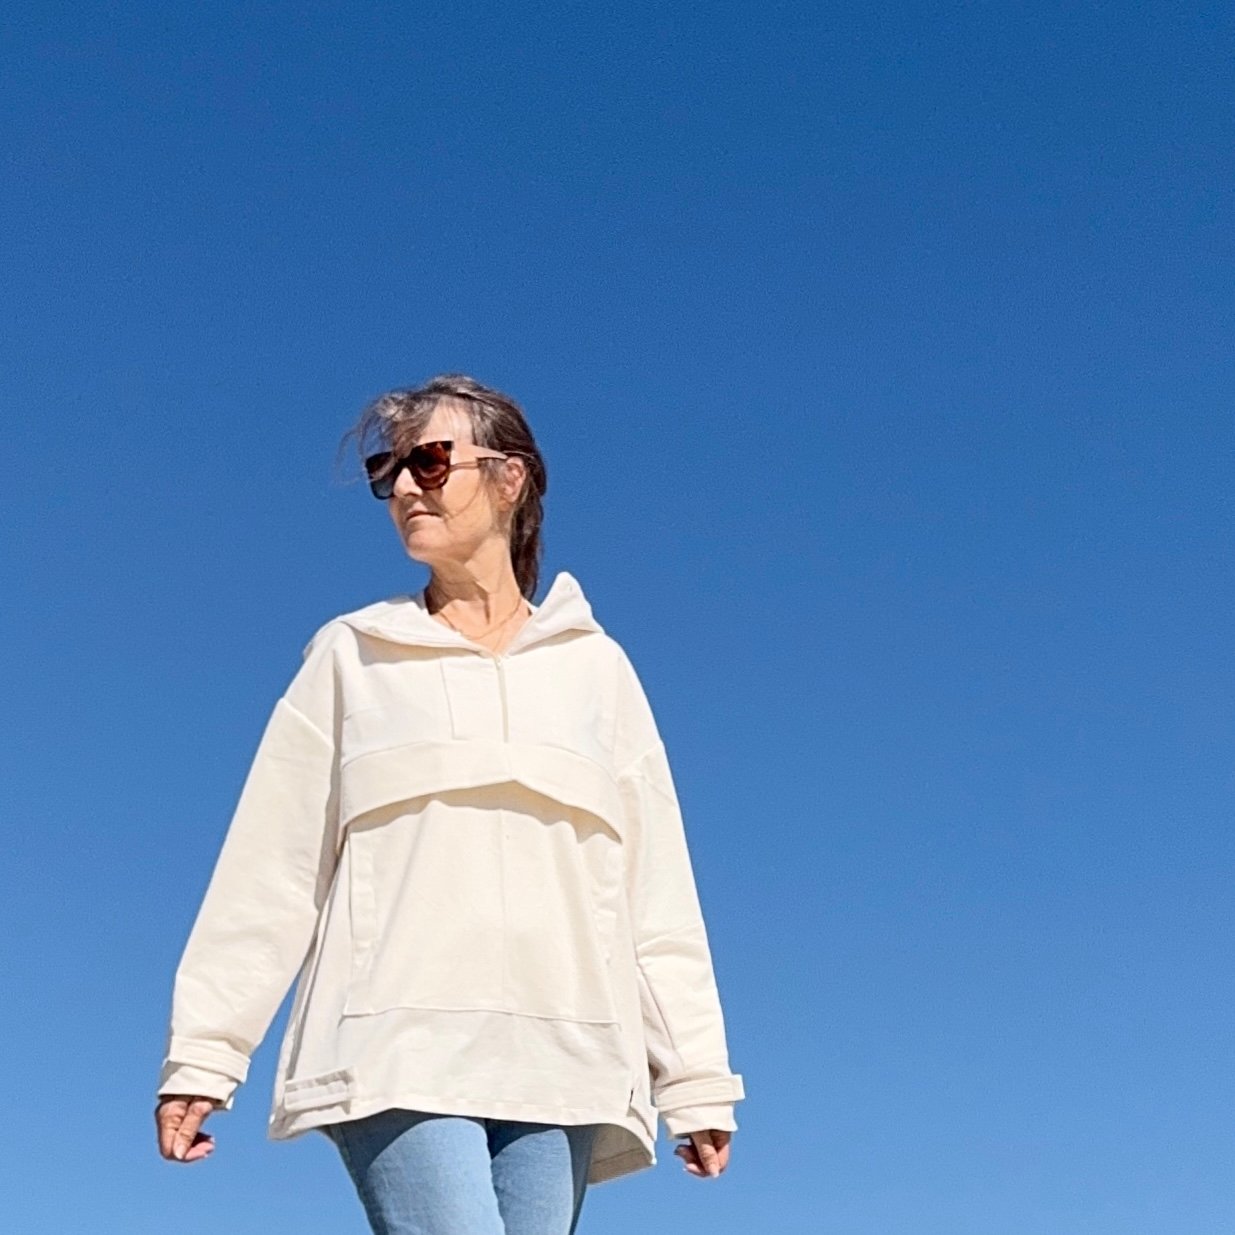
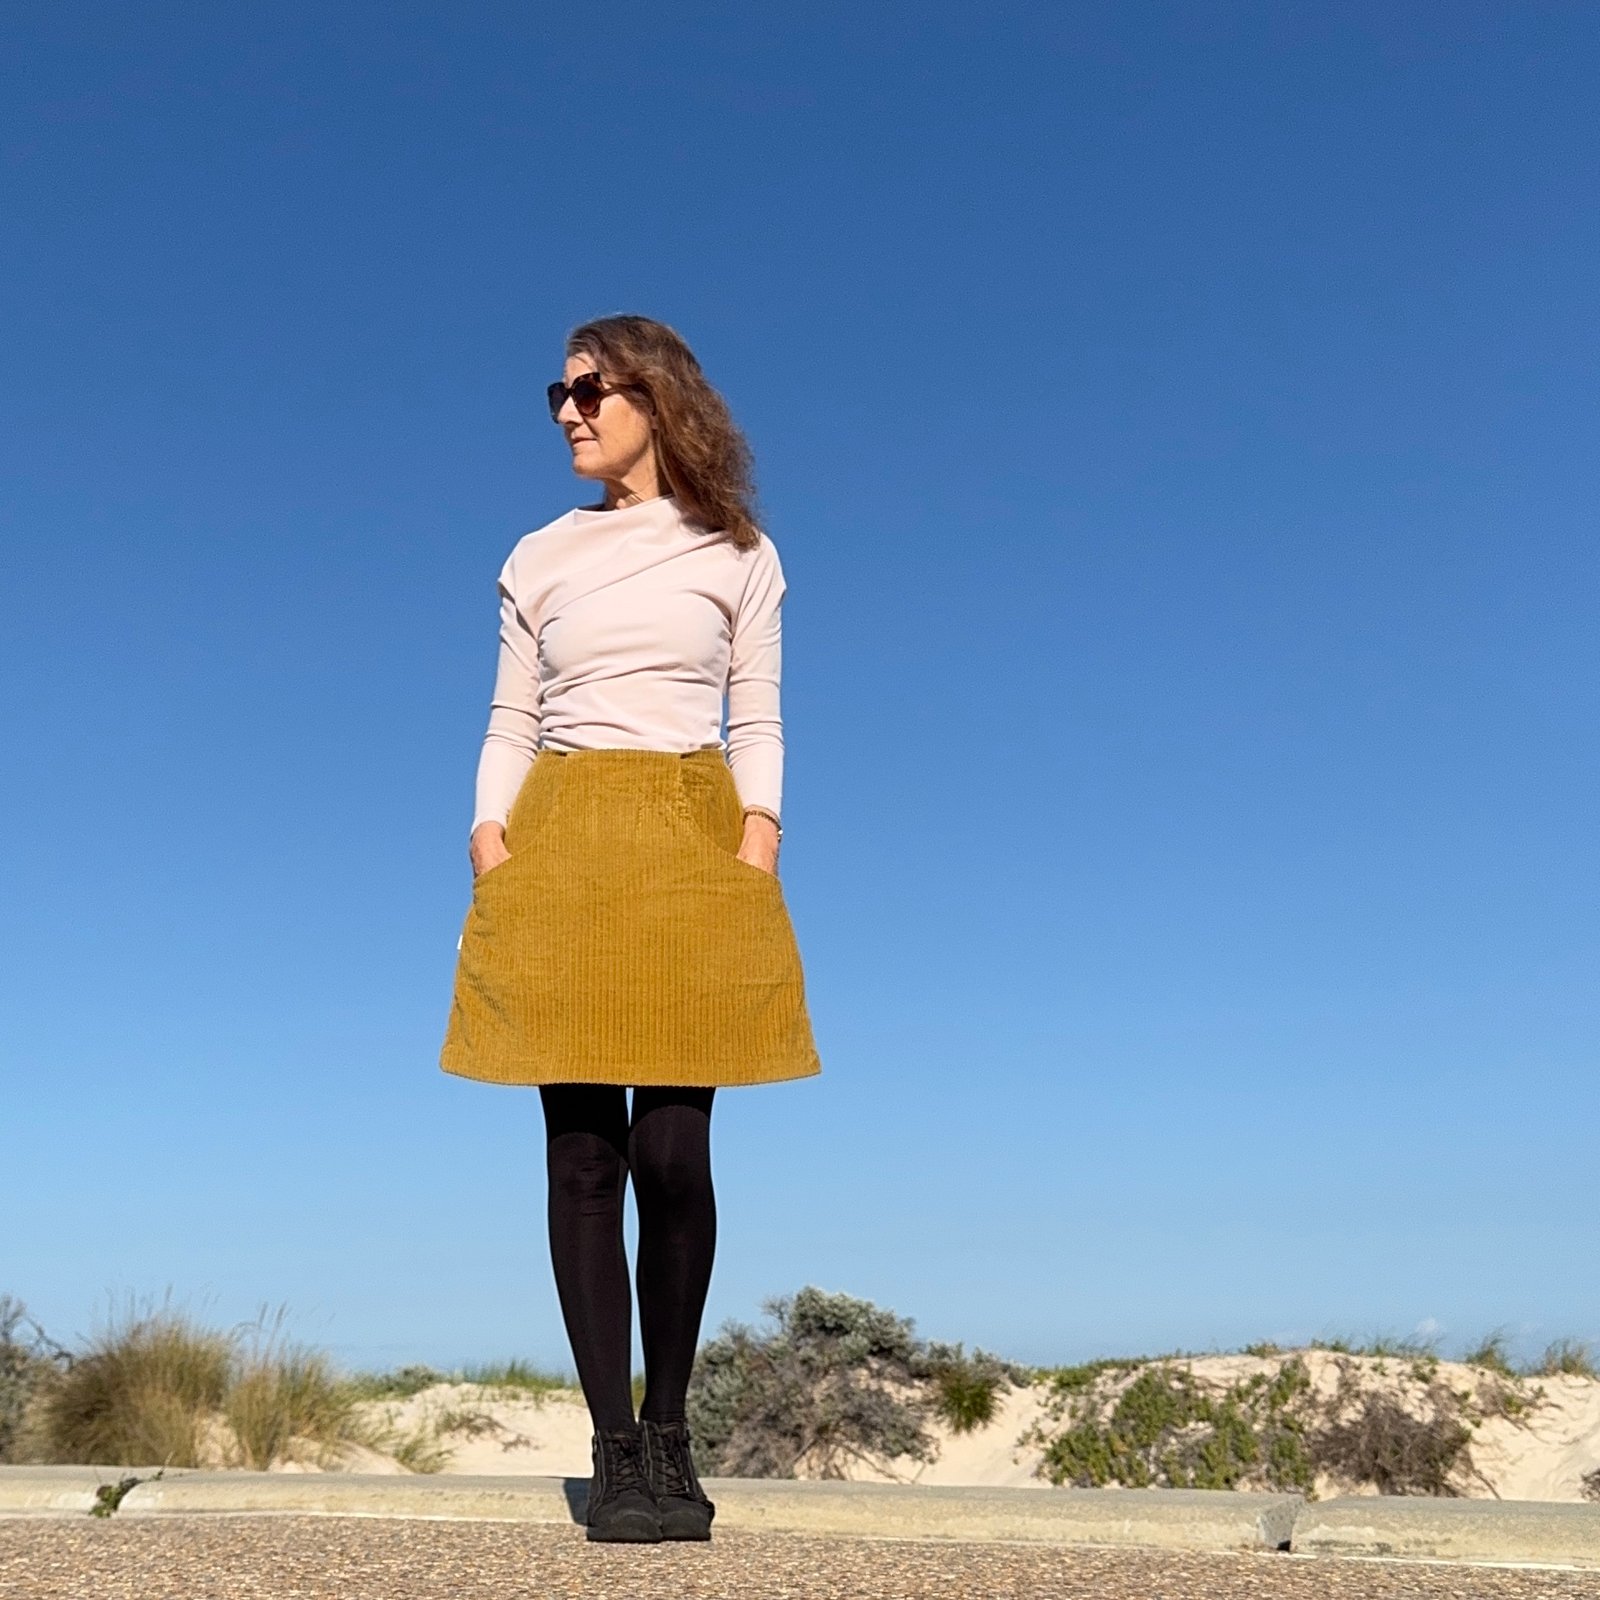
 hello! I made a few new skirts, using a new pattern, the Acacia skirt. The pattern is a Peppermint magazine and Warp and Weft collaboration… available in the magazine for free, or as a pdf pattern from their website. It’s a cute little A-line miniskirt with deep deep pockets and a central back zip closure. Of course I’m always going to be interested in a winter miniskirt pattern with pockets! I couldn’t wait to try it out!
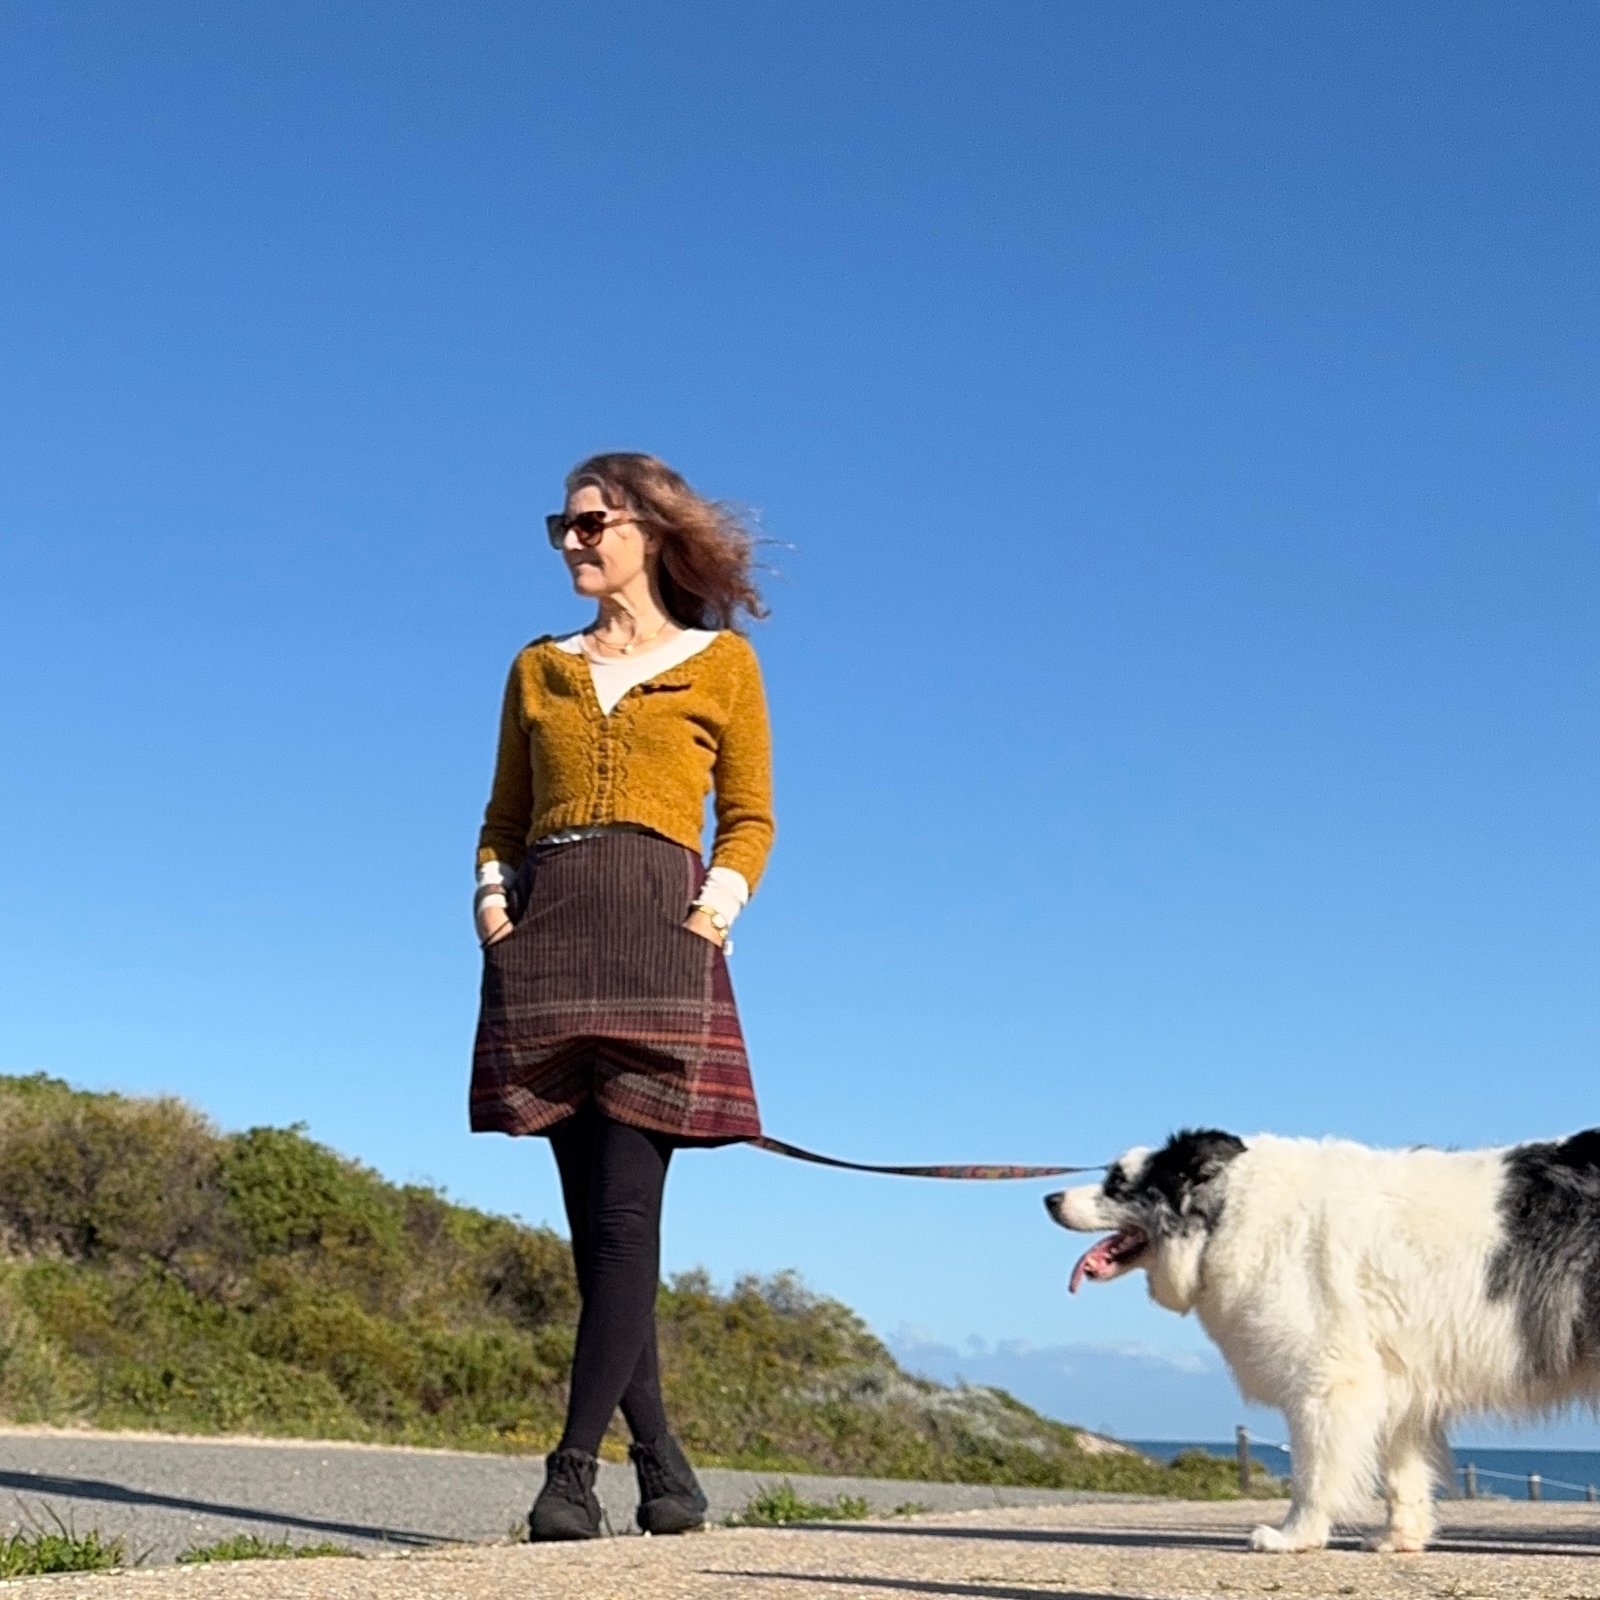
 The wide wale corduroy I used for the “real” skirt is is
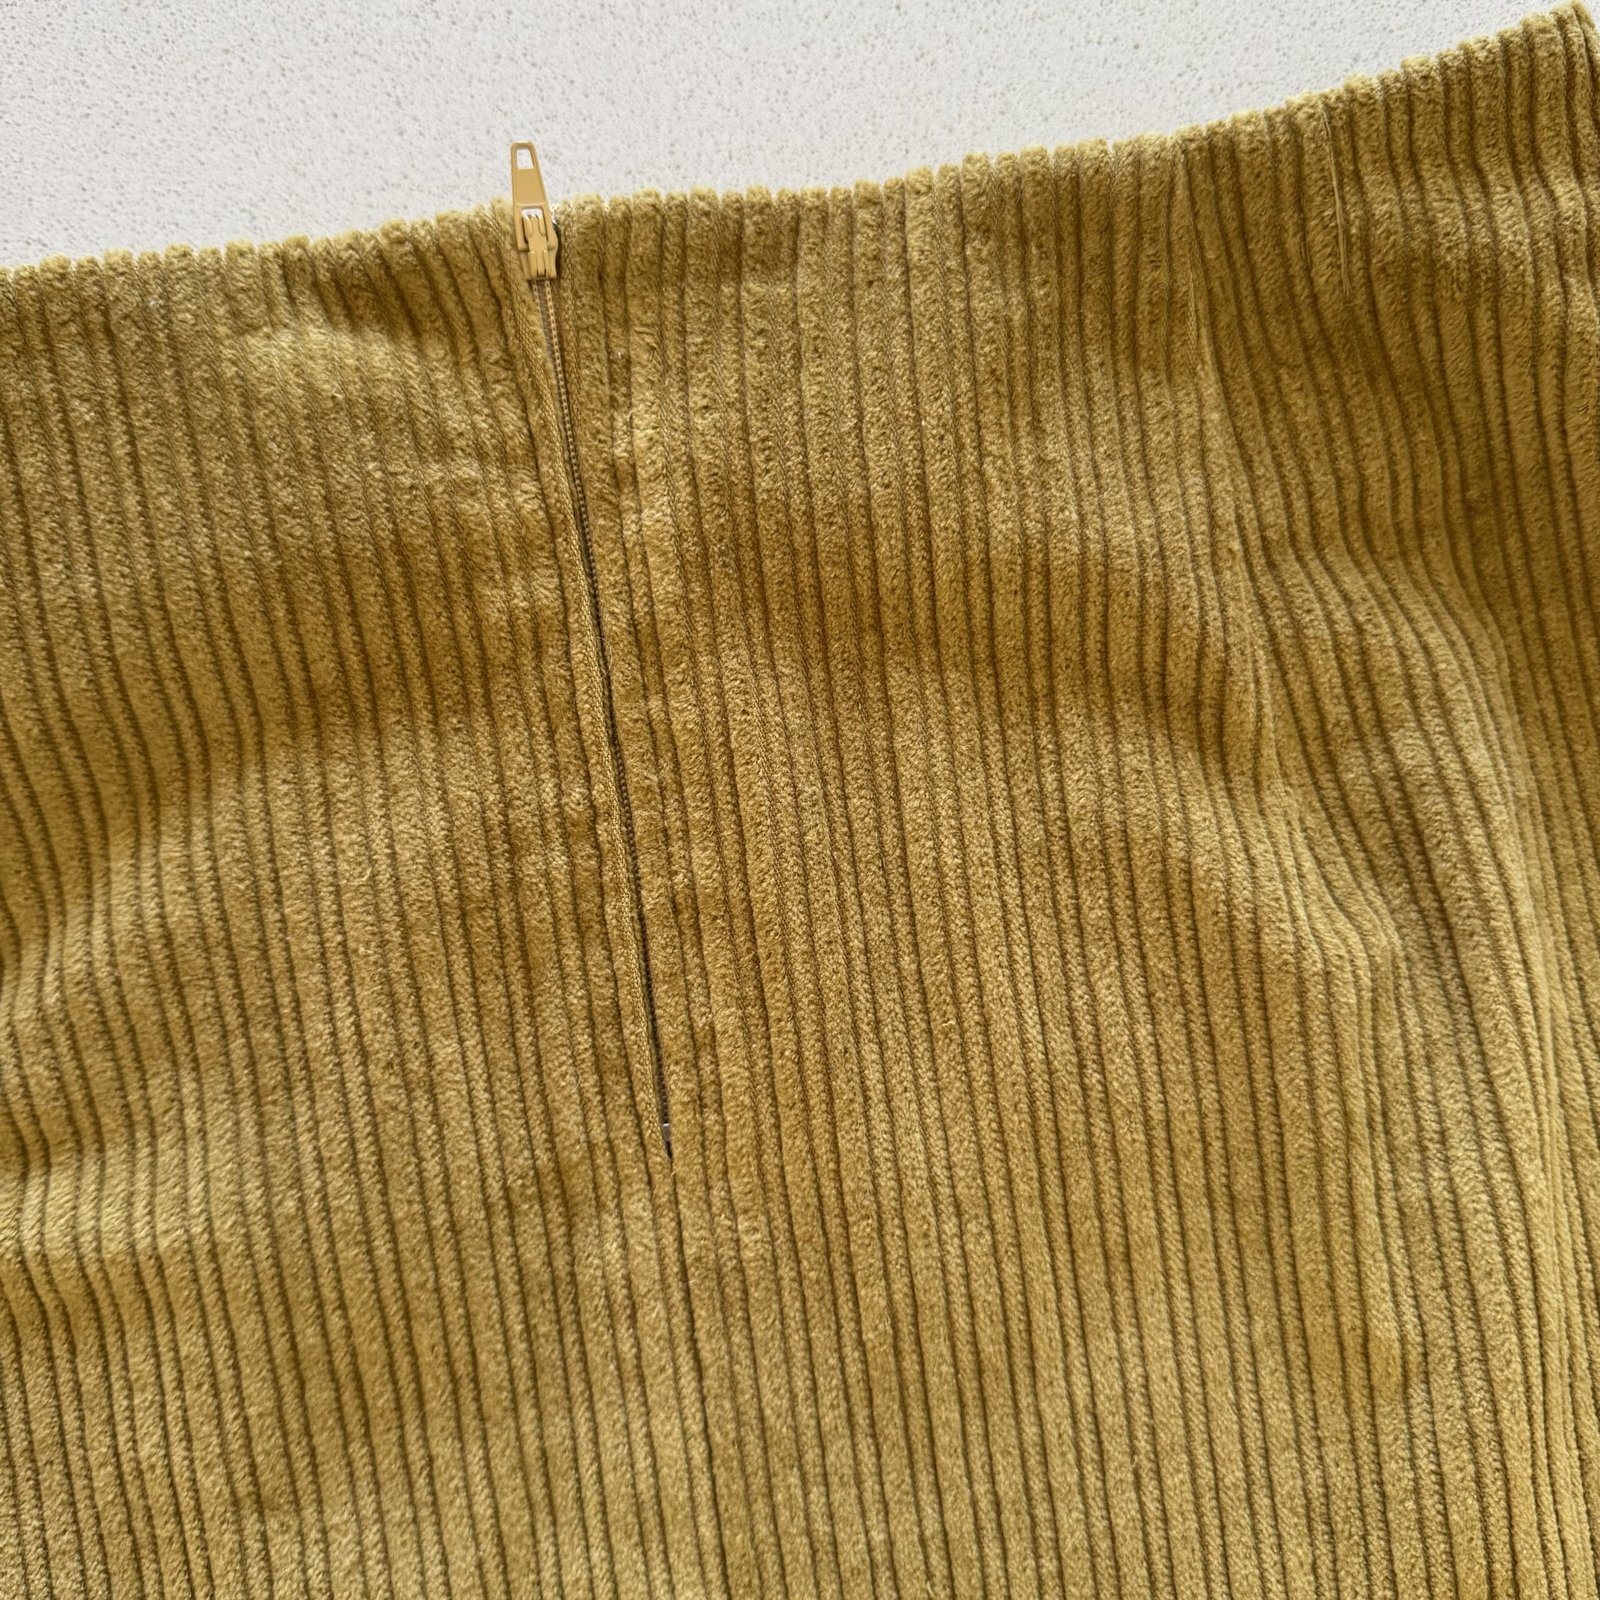


 It’s such an easy to make design there’s really not much to say. The neckline is finished with a bias cut strip and the pattern includes a lovely deep hemline facing, which I edged with the same orange linen bias binding. I think this looks so pretty. Designwise, it has deep side pockets and sleeve cuffs. Hmm, that’s it, really…


 hello! I’ve made a whole new outfit recently… it’s not so often that I can present a new, head-to-toe handmade outfit like this!
 I settled on this cotton hessian with a multi coloured print of overlapping ovals. I loved this combination of colours; violet, duck-egg blue, teal blue, navy blue, lemon yellow and apricot. I thought it fitted in very nicely with my personal colour palette of true- to deep autumn.