
To those who showed an interest in the swoosh welt pocket on my Tao blouse; thank you 🙂 and it was my take on this welt pocket for which Patty wrote a very in-depth tutorial. The fabric I used for my blouse is quite light-weight; allowing me to devise a simplified method as follows …
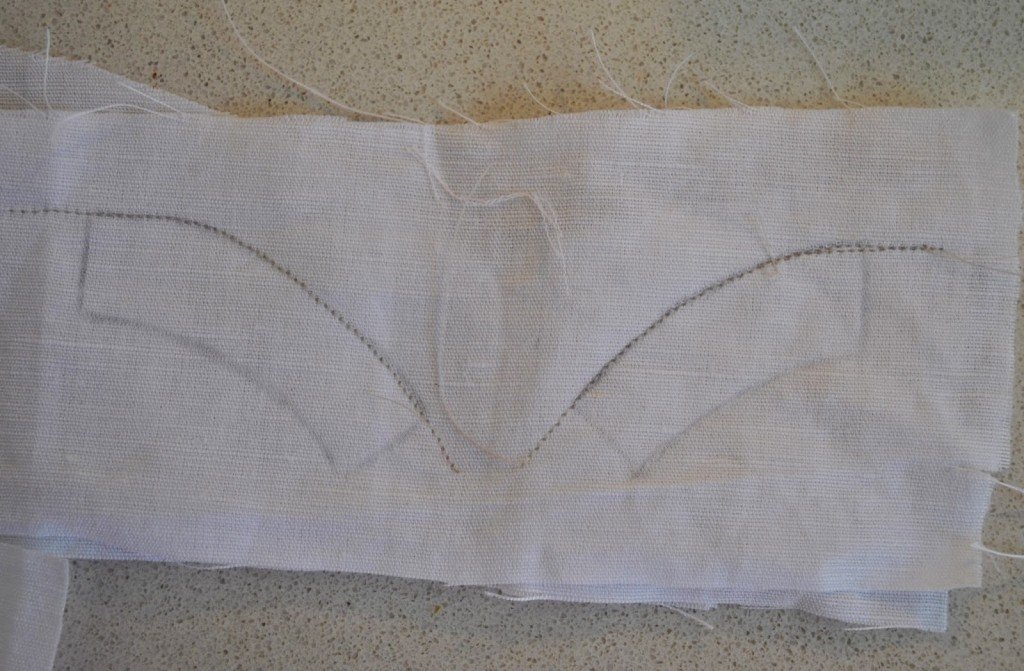
Sketch the shape of the welt. Then accurately trace the two halves onto a small piece of the fashion fabric with plenty of room around each, and including the overlap on both sub-sections. You could also just trace the shape in entirety, making it as a one-piece welt. With hindsight that would be a bit easier; but anyway it does look kinda cool as a two-piece welt…
Lay another scrap of fabric under the traced sections and stitch along the top curve, extending the stitching well past the pencilled lines to allow for seam allowances.

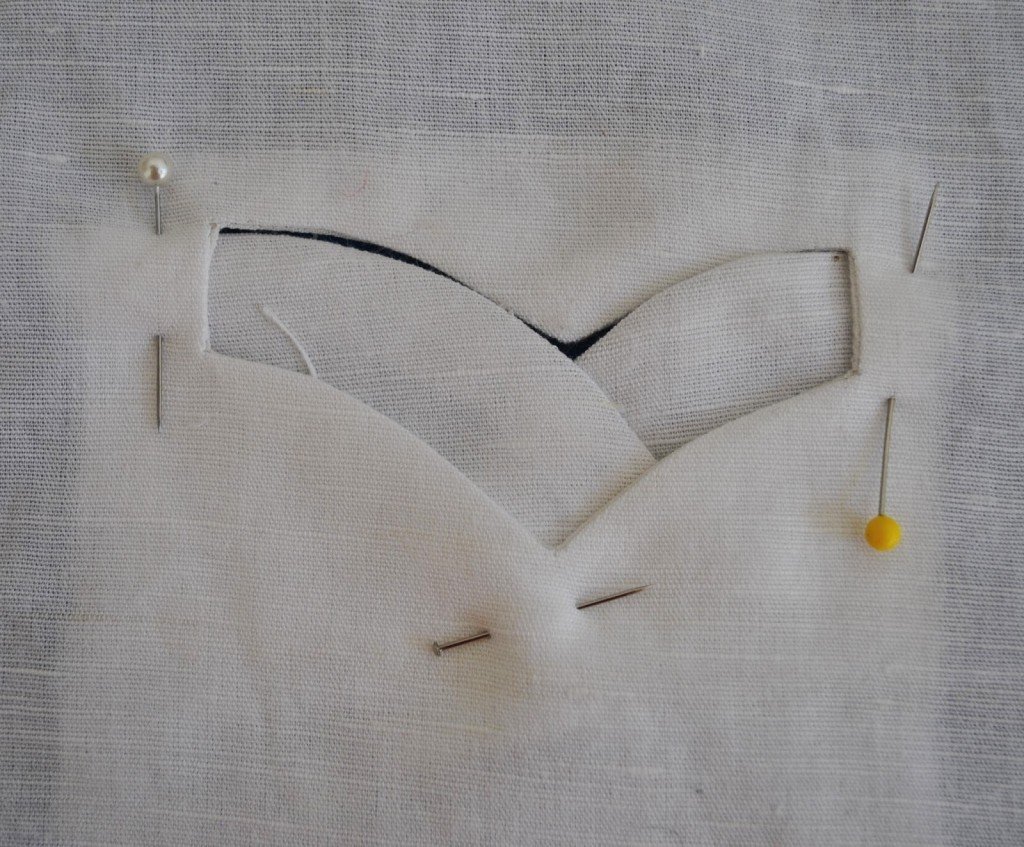
Trim, grade and clip seam allowances outside the stitching, turn out, finger press the curves out, and press flat.


Using the original sketch to check for placement, pin the left-hand welt into position over the right-hand welt. Open out the left-hand half and stitch it into place onto the other half; exactly over the previous stitching.


Determine where the welt pocket is to be sewn on the garment; mark its position. Cut a strip of iron-on interfacing big enough to cover the area of the welt, and apply this to the wrong side of the garment to stabilise.


Cut a rectangular piece of fabric for the pocket lining and trace onto it the welt shape, using the sketch from the first step. Position over the stabilised section of fabric where previously marked, and stitch garment and pocket lining together, following the perimeter of the traced welt.

Snip along inside the centre of the stitching, and out into the corners and turning points, grade and clip curves. Turn the pocket lining through to the inside of the garment, finger press out along the stitched curves, and press flat.


Pin the welt in position behind the pocket opening, and top-stitch along the short sides and along the lower curved edge.

Inside, trim the lower edge of the welt. Being careful to keep the garment free, pin the pocket backing piece to the pocket lining. Stitch around the edge, finish the edge either with overlocking, zig-zag stitching or pinking.


Last step, from the right side of the garment, top-stitch through all layers along the upper curved edge of the welt.


Thank you very much!!
I like this pocket – it's kinda cute and gives a unique look to the finished garment. Thanks for sharing how you made it. 🙂
Thank you thank you thank you ! Great tuto.
Brilliant! I'd be happy with just the outside without the pocket – looks very 30s-40s to me!
Great tutorial and such an effective detail! Lovely!
Beautiful!
C'est magnifique! This pocket is such a pretty shape and it's so interesting to see how it has been constructed. Thank you for making all the effort to post such clear tutorials. I've filed it away, for one day when I am sufficiently advanced!!
Gorgeous!
I want to make something now, just to put this pocket in.
love the curved welt, so clever!!
It very different and interesting!
Your blog is one of my favorites for style and sewing. This pocket is beautiful, very well done. Thank you for showing it and continuing to inspire me!
*BOOM!* that was my mind exploding… so cool 🙂
I don't know that I'd be brave enough to tackle this – but I love it!
Merci!
Thank you so much, this is really creative and clever x
Very cool!
I can really see this on a jacket or a skirt! You make this look so easy!
Very cute welt pocket. Thanks for the tutorial.
teşekkürler…gayet açıklayıcı olmuş…:)
Great tute! You are a talented lady 🙂
Thanks Caroline! My 'girl crush' is growing with every really useful, way beyond the basics that we already know tutorial that you put on your blog.
great tutorial thank you
I only can tell you…WOW Thanks for sharing the tutorial!
How coincidental – I was just looking at the original tutorial on the weekend but wasn't in the right frame of mind to attempt it! Soon I will give it a go, it is so pretty.
Very pretty – thanks for the tutorial!
Thanks u for the good work I learn from your experience today
Beautifully done! Now I’m dying to use this as a back pocket on jeans. I think it would add a lot of flair. I echo the others, thanks for taking time to share with us.
le plus qui fait d’un vêtement son originalité, bravo et merci d’avoir partagé votre créativité