Tag Archives: Tutorial

a cute little floral frock

Oh hey.  I made a dress. Wot a surprise!  No seriously, how cute is this dress?  Like, I think it’s rather cute, eh.

did I make my shoes too? why yes I did!  thanks for noticing!

 But of course what am I here for? but to provide the exact deets on how you can procure such hacked cuteness for yourself too.  AND; be happy about how you not only made it yourself but that if you do so, you’re also raising funds towards an excellent good cause too… and did I mention there is a competition? with prizes?!  No? well you could be in the running for a sewing machine, or an overlocker machine!  Check out all the deets here!!

So, a few months ago I was contacted by Rachel of the Foldline re taking part in this thing, the third annual sewing blogger “hacker” tour with Simplicity/McCalls.  Hacker?  yes, I can tell you’re immediately interested, since all of us who sew also LOVE to hack; butcher; ham-fistedly riff upon  add our own little “something” to a design, yeah? well, the tour is an initiative where proceeds raised from the sale of a small range of Eminently Hackable (TM) patterns nominated in the tour will go towards the Eve appeal charity… In all seriousness the Eve Appeal is a truly excellent resource to raise awareness of gynaecological cancers, and to provide a port of call for those wishing to seek information about the condition and the community.  The site helps people with where to go and what to do, who to call for medical and non-medical cancer advice and support, should that situation arise in their lives.  Like everyone else, I have very close friends and relatives who have gone through this dreadful experience, so I know sites like these can be a very soothing thing to turn to, when your closest loved ones just don’t know what it’s like or what to do…

I’m like, well GOOD ON Simplicity for being a part of this!   here is the list of Simplicity sewing patterns that are part of the hackathon for the appeal…

S8378 XXS-XXL
S8658 XXS-XXL
S8700 XS-XL
S8701 H5 (6-14) U5(16-24)
S8888 XXSl-XXL
S8929 XXS-XXL
S8930 XXS-XXL
S8991 XXS-XXL 
S8992 XXS-XXL

btw, the patterns I’ve listed above are all directly linked to the Simplicity website, but are NOT affiliate links,  I would always disclose an affiliate link and in any case have so far had a super impressive, grand total of ONE affiliate link in all my decade of blogging – my goodness, how time flies! – but anyway,  rest assured I am not making a single cent out of this!  it’s all going to the Eve appeal!

Anyway, I chose Simplicity 8658… which is a pretty nice, loose, basic raglan sleeved tunic top, with some optional ruffle action going on… and I made a dress.  Of course, one doesn’t have to “hack” the pattern, if you just want to make it up just as it, that’s fine!  However, I couldn’t resist a few tweaks, here and there, just because not only do I love a good hack-attack but also I do love a cute little summer frock and could see how this pattern could so easily become the CUTEST summer frock imaginable! and I think it turned out ok too!  … and I have thusly, and dutifully, documented any and all such tweaks in excruciating detail, right here because well, I am a blogger after all…  Bloggers, must blog.  It’s what we do  (shrug)

I used  this beautiful navy blue floral, cotton and linen single gauze from Minerva    to make my dress.  I’ve always waxed lyrical about how much I love navy blue and pink as a colour combo, so no need to bang on further,  it’s just… CUTE, that’s all.  Navy blue, and pink; am I right?  And the texture of this stuff is just as lovely as it sounds; almost exactly like nani Iro double gauze, except it’s a single gauze, so not quite as “cosy” which is a very good thing in our very hot summers! and still with the same, super soft and exceptionally lovely light-as-a-feather touch to it.  I love this fabric so much!

When I opened the pattern I was pleasantly surprised to find included a large sheet of grid paper, printed with 1″ x 1″ squares all over.  Obviously to make your pattern-hacking plans just that much easier!

After some thought, I decided to make the following hacks:

  • cut the back on the fold, as one piece
  • cut the front as two separate pieces, with an overlapping V-neck opening.  This would have little self-fabric loops and self-covered buttons to “close”.  Inverted commas around that “close”, because actually the V-neckline is wide enough that I can just pop it on over my head, no need to undo any buttons at all  #cleverNON?!
  • use the lower ruffle but lengthen it considerably so it actually transformed the tunic into a full-blown dress  #DOUBLEclever…NON?!!
  • put in pockets.  Because, obviously, pockets.

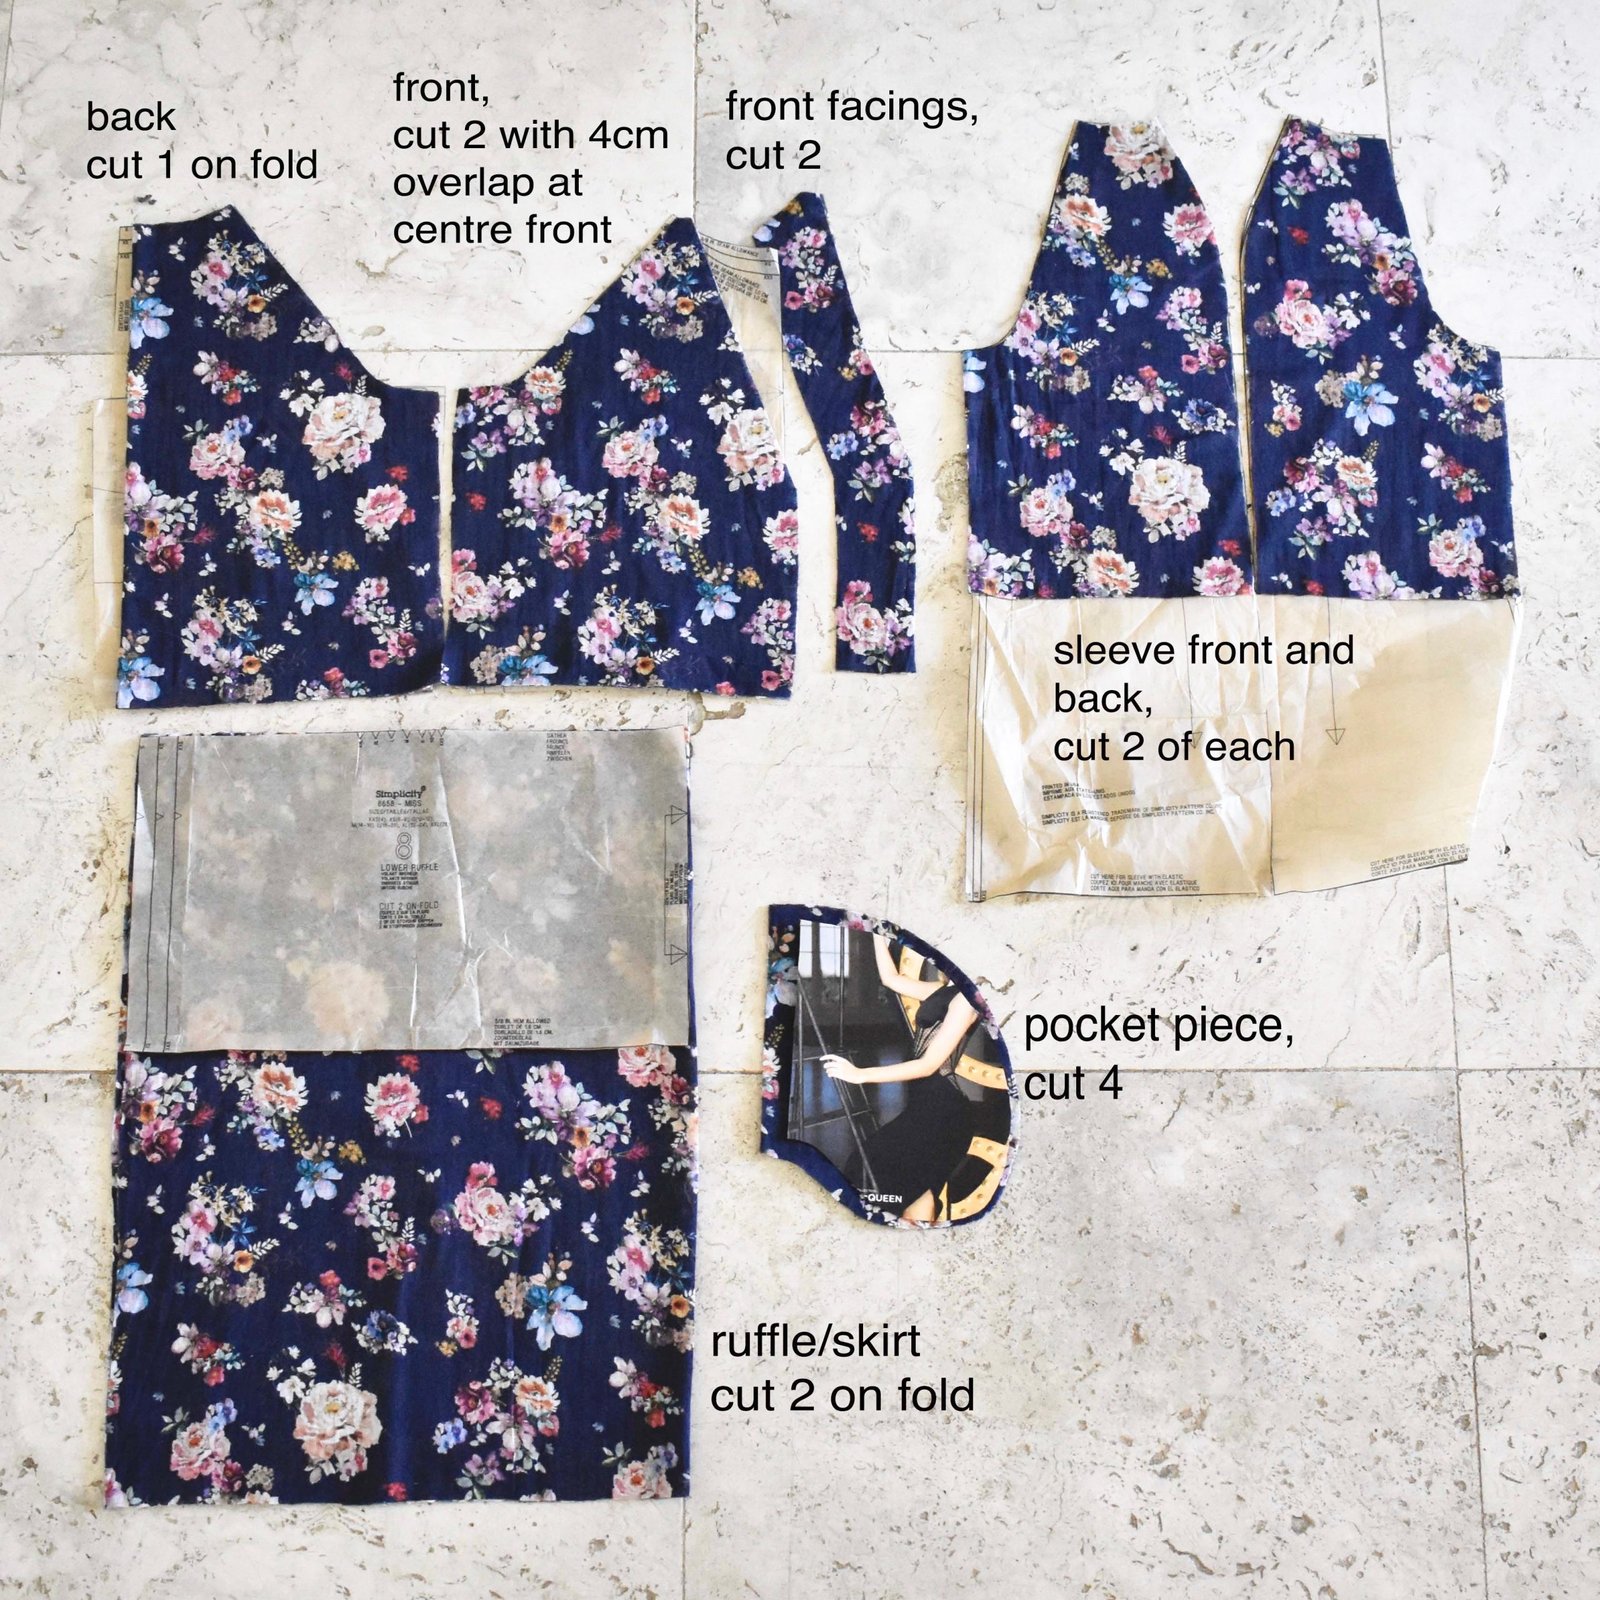
So above are my cut-out pieces.  Additional pieces to the pattern are the two front facings, which have exactly the same profiles as the front opening edges, at 5.5cm wide not including seam allowances.  I added a 1cm seam allowance to both the front opening edges, and the facing front opening edges too.  I applied lightweight iron-on interfacing to the facing pieces.  And, the pocket; which is basically self-drafted, though I can barely even write that with a straight face.  I laid my hand down and drew around it for heaven’s sakes.  It’s pretty big, because I have big ungainly hands.  This is seriously my most used pattern piece, of all time.  I use it in every single thing that I possibly can!

First step: stitch together the sleeve pieces, as directed.  I opted to overlock all seam allowances to finish, using my overlocker and navy blue thread.

Stitch the back sleeve pieces to the back piece.

Belatedly stay-stitch the back neckline (woops!)

Interface the front facing pieces and finish the raw edge on the overlocker (or HongKong seam, or bind, or turn under and hem, whatever)

Make a skinny rouleau or “spaghetti strip” for the button loops; by cutting a 3cm (1 1/4″) wide strip on the bias, folding right sides together and stitching to give a 6mm (1/4″) tube, turn right sides out  (a more detailed description on how to make rouleau strips here)

Cut into 5cm (2″) lengths for the button loops, and spacing them evenly; stitch them into place along the opening edge of the right front.

Lay facing pieces over the bodice front opening edges, and stitch.

Trim, and clip into the point.  Press open, under stitch.

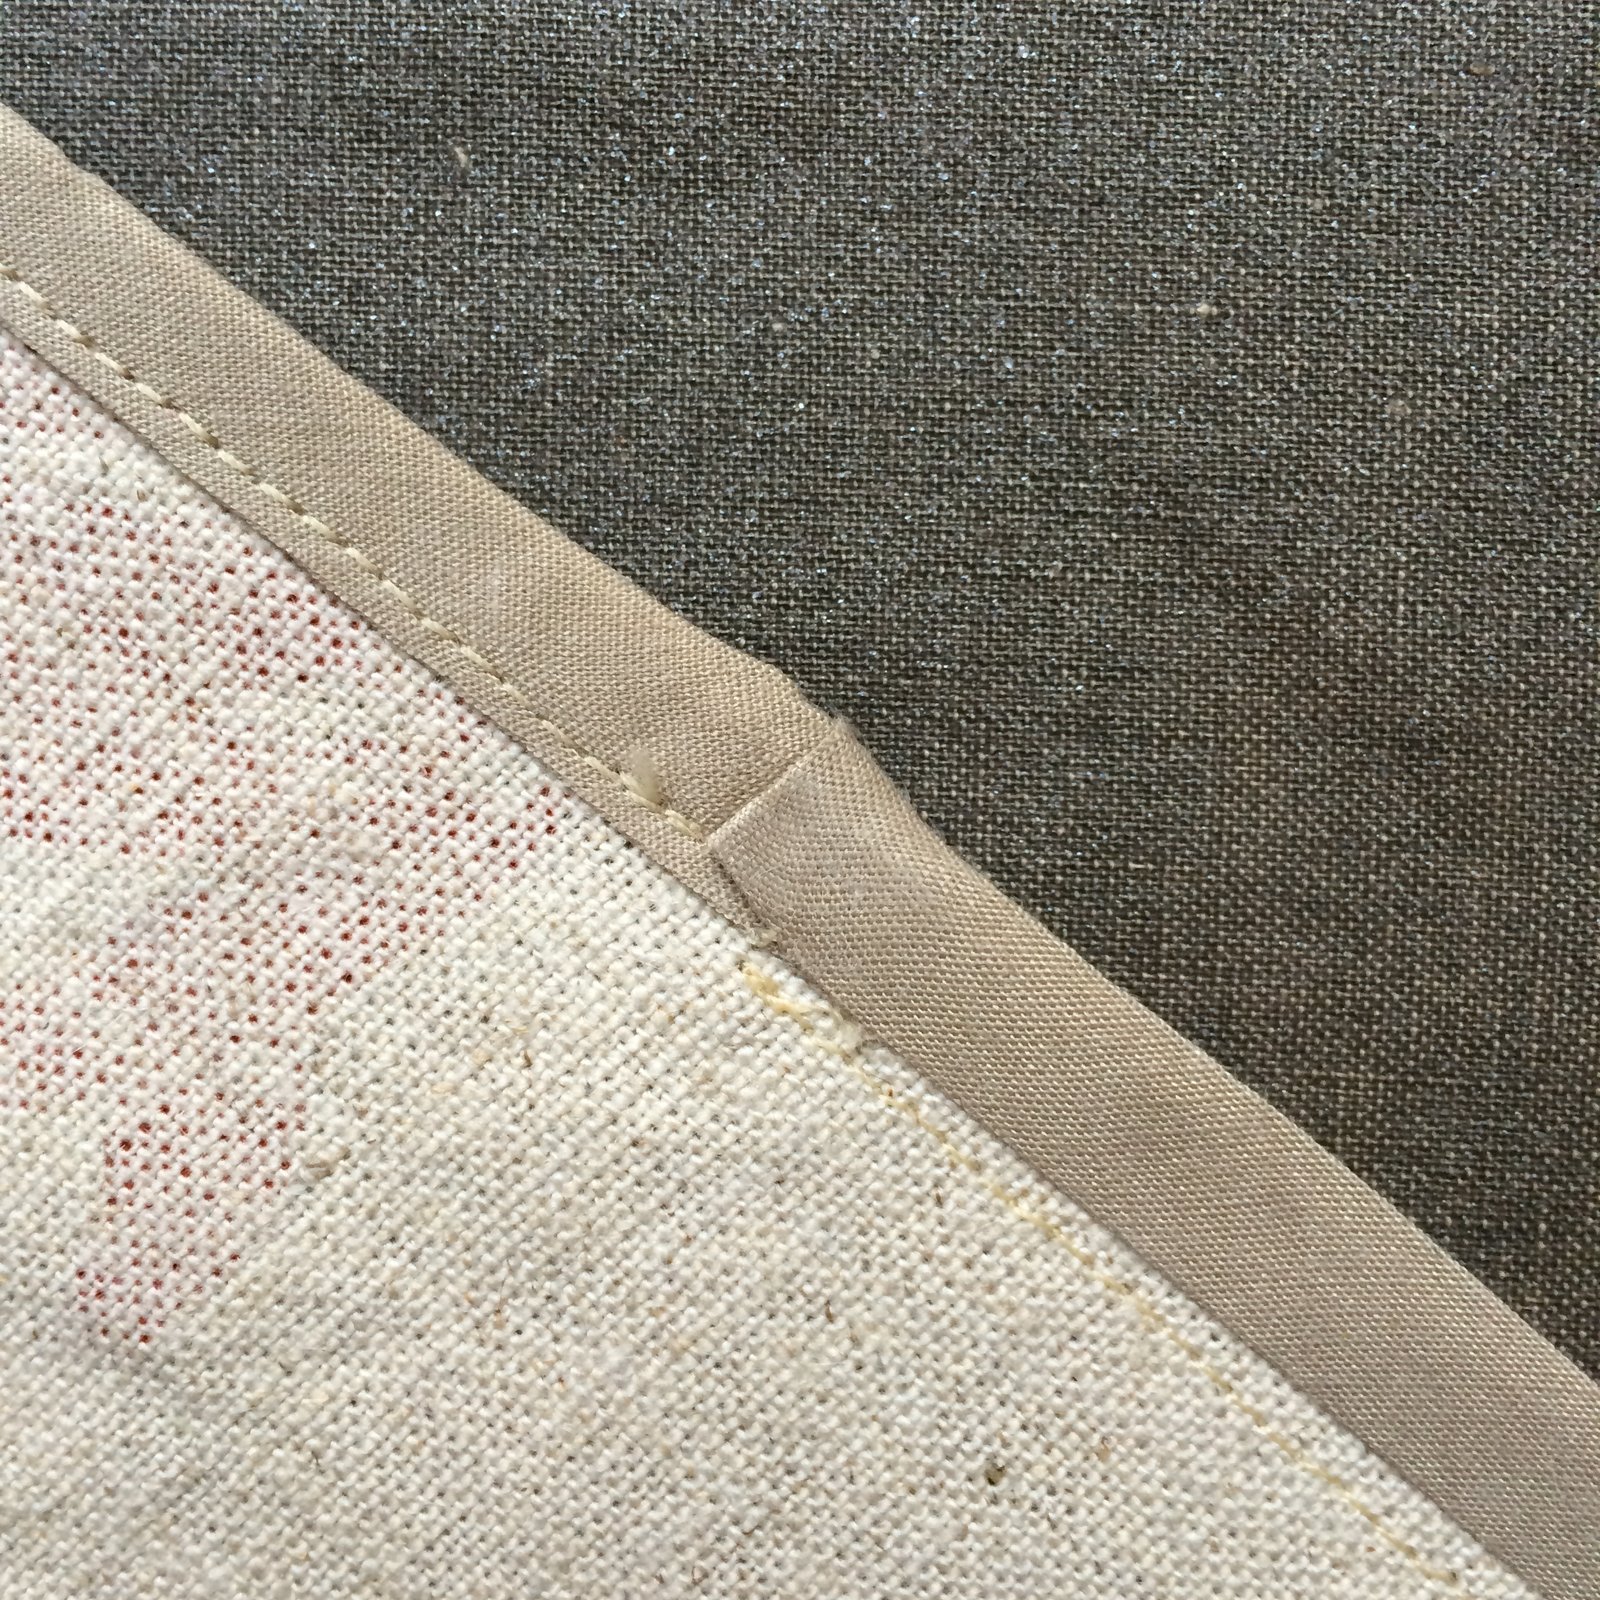
Cut a 2.5cm (1″) bias strip, and apply to the entire back neckline to finish, including both sleeves as well as the back piece  (this technique described in more detail in this post here).

Pin the front bodice pieces to the front sleeve armscye, abutting the neckline edge of the sleeve hard up against the front/front facing seamline.  Fold the front facing back over the front, right sides together, and enclosing the front sleeve between the two.  Pin, and stitch.  (apologies for the photobombing camera strap)

Trim corners, grade seam allowances, and turn out.

Attach buttons to the left front bodice piece, corresponding with the button loops.  I used self-covering buttons, purchased at this etsy store here; and covered them with the same floral fabric as I used for the dress.

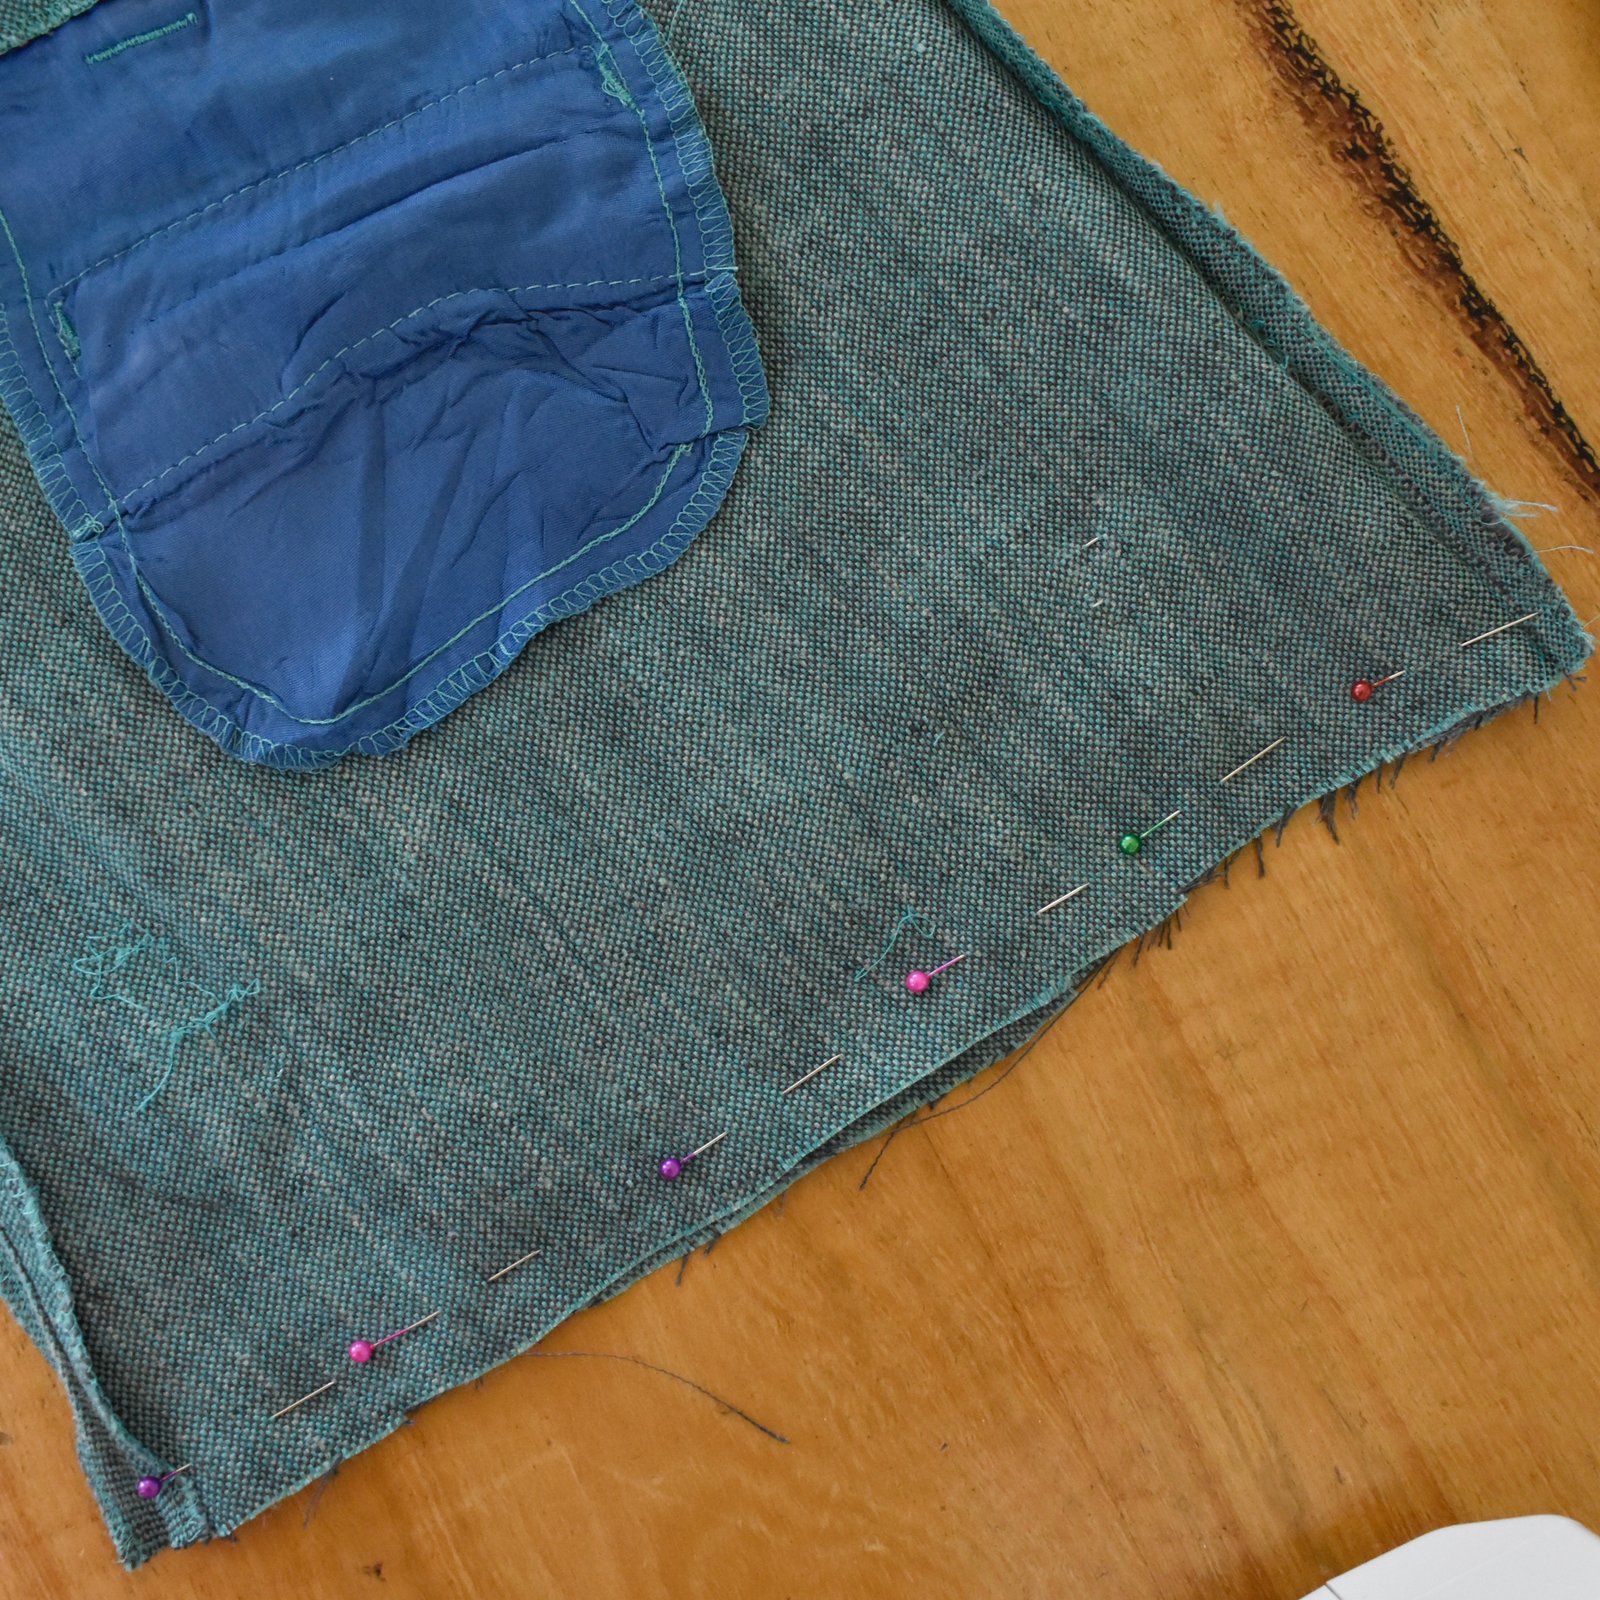
Measure where you prefer your pocket pieces to lie – this is a personal preference determined by your own arm length – and attach the pocket pieces to both  ruffle/skirt pieces, front and back.  Stitch side seams of ruffles, going around pockets  (inseam pocket insertion described more fully in this post)

Apply gathering stitch to top edge of ruffle/skirt, draw it up to fit the measurement of the bodice.  Stitch, over gathering stitches.  Hem sleeves and ruffle, and yay! it’s finished!!

I’m so happy with this dress! and really enjoyed brainstorming how I could transform the basic pattern to get the look I wanted.  Let’s be honest; hacking IS fun, and is always something to consider as part of the creative process for those of us who make our own clothes.  I would absolutely love if my dress here inspired anyone reading this post to perhaps join in with the hack-along… it’s open to everyone throughout the world! and what’s more runs all the way through January so there’s still plenty of time to get involved.  You can share your creation on social media and use the hashtags #hackalongday #hackalongparty #hackalongvintage in order to be in the running to win one of the pretty generous prize pool  … see all the deets here.

Please let me know if you do join in!

Here’s some more inspiration from the other bloggers taking part, using other patterns from the list, please do visit and check out the very creative and interesting hacks from these very creative and interesting ladies!

1. Thursday 26th September
Juliet, from Sew So Natural
https://sewsonatural.com

2. Thursday 3rd October
Abi, from Crafty Pinup
https://www.whatabimakes.co.uk

3. Thursday 10th October
Rachel, from The Fold Line
https://thefoldline.com/blog/

4. Thursday 17th October
Susan, from Susan Young Sewing
https://susanyoungsewing.wordpress.com

5. Thursday 24th October
Brittany, from Brittany Jones
https://www.brittanyjjones.com

6. Thursday 31st October
Bianca, from Sleepless in Bavaria
https://sleeplessinbavaria.com

7. Thursday 7th November
Amy, from Almond Rock
http://almondrock.co.uk

8. Thursday 14th November
Victoria, from Victoria Lucille Anne
https://www.victorialucilleanne.com

9. Thursday 21st November
Sara, from The Sara Project
https://thesaraproject.com

10. Thursday 28th November
ooo, that would be ME! haha

11. Thursday 5th December
Rumana, from The Little Pomegranate
http://www.thelittlepomegranate.co.uk/

12. Thursday 12th December
Emily, from Self Assembly Required
http://selfassemblyrequired.co.uk/

13. Thursday 9th January
Marie, from A Stitching Odyssey
http://www.astitchingodyssey.com

14. Thursday 16th January
Portia, from Makery
https://makery.co.uk

15. Thursday 23rd January
Barbara, Lisa and Louise, from The Pattern Pals
https://www.youtube.com/channel/UChdhdeKB7n39vstdMNGgX3w

16. Thursday 30th January
Jen, from The Gingerthread Girl
https://gingerthreadgirl.co.uk


Details:

Dress; Simplicity 8658 modified, single cotton/linen gauze
Shoes, my own design and made by me, details here


pinterestmail

how to make a tulle petticoat

… so, I mentioned Cassie’s engagement? and of course I’m completely thrilled to be asked to make her wedding dress!  Thrilled, maybe tempered with a little nervousness, shall we say? but still nonetheless thrilled.  I might even have been anticipating this very thing every since she was born!

Anyway, I’ve made a start… with a coupla petticoats.   Yes, petticoats, plural.  I shall now proceed to explain…

First of all; a stiff, tulle petticoat, to give plenty of volume and oomph to her bridal ensemble.

I’d read a blog post YEARS ago about making a petticoat but couldn’t find it, and so I just plowed ahead and made the above petticoat with what I could remember.  But I do hate not giving credit, so after hunting and following links for what seemed like ages I finally found it!! this post here by Sugardale.  I remember being very impressed with Sugardale’s post when I first read it, but I still somehow neglected to bookmark it or save any useful details that would enable me to find it again upon the occasion that I would need to use it.  But eventually I did find it.  And straight away realised that I had failed dismally to follow any of her instructions when making my own petticoat, so hmmm, there’s that! For example; Sugardale recommended an odd number of tiers, I made mine with an even number; Sugardale recommended working from the bottom up, I, in fact, worked from the top down.  Honestly? I don’t think these issues are a big deal, I think either, or even any way is probably going to work out just fine…

After making a muslin for Cassie’s dress – two actually – we determined the length of the skirt would be 87 cm.  I decided upon 4 tiers, with the following finished heights:  from top down; 20cm, 21cm, 22cm, 24cm… staggered heights just because I believe it looks better and more balanced to have the lower tiers wider than the upper tiers.

I did remember enough of Sugardale’s instructions to know that the tiers started at 2yds from and top and needed to double in circumference with with each tier down; and the tulle I scoped out in Spotlight had a width of 126cm (49.6inches)  So I calculated the following dimensions for my pieces:

Please note:  tier 4 only has 1 single 1cm seam allowance added to the height, since the bottom edge is the lower edge of the petticoat and doesn’t need a seam allowance.

You can see by my calculations and measurements of the tulle I bought, that one and a half cut lengths measures 189cm which I decided didn’t need trimming down.  Yes, my tiers were going to end up with a wider circumference overall than recommended, but I decided that a bit of extra volume was definitely not a bad thing.  It is in fact a very good thing!

How much tulle to buy?

So, according to my calculations; I was going to need:

(2 x 22cm) + (3 x 23cm) + (6 x 24cm) + (12 x 25cm) = 6.6m of tulle  Allowing for errors, I bought 8m of ivory tulle.

I used my rotary cutter and mat to cut the pieces as cleanly and as neatly as possible, and I cut and finished all gathering and stitching of each tier completely at a time before proceeding to the next tier, so as to not mix up the pieces.  I can tell you, by the time  you get to the bottom tier of 12 pieces, you do NOT want to get them mixed up!!

For the top tier, (circumference 189cm); I stitched it not fully closed, but leaving an opening of about 15cm from the top edge, so that Cassie can step into the petticoat.   The seam allowance either side of the split opening I simply folded down and topstitched it down on either side of the split.  I then ran a gathering stitch around the entire top edge and pulled it up to roughly fit Cassie’s waist measurement.  I cut a bias-cut strip of white cotton poplin, measured off Cassie’s waist measurement of 63cm and pinned to mark, and gathered the top tier (189cm) into this length.

After stitching each tier, I topstitched the upper seam allowance of each tier to the skirt above, approx 7mm from the stitching line.  I think this gives it a bit of strength, and lends a bit of pretty visual structure to this ethereal thing too.  Not that it’s meant to be seen, but well, you know…

Sophie checks out a weird THING

To finish the waist tie, I pressed the raw edges of the waistband strip into the centreline, then pressed the strip in half, and topstitched in place, about 2mm from the opening edge.

When putting the petticoat on, Cassie steps into the skirt, then the long ends of the waistband are pulled across from each other, wrapped around her waist and tied in a simple knot or bow.


It stands up by itself!

I stuck it up on the kitchen bench for a while, while I had to do something else, and I dunno, the sight of it gave me such a laugh!  Like a little tulle volcano, or something.  Mt Petticoat!!


Because bare legs against a scratchy tulle petticoat will probably become very uncomfortable very quickly, I also made a simple full circle petticoat to be worn underneath, using ivory cotton voile from Spotlight.


This is also 87cm in length, and for this I bought 4m and used every single bit!  I cut this length in half, and then cut the half circles for the two halves the skirt by the “fold into halves, then quarters, then eighths, then again” and cut across the lower edge to get a rough, but good enough curve; method.

The waist opening is made by cutting off the top, just 8cm from the tip.  When stitching together the two half circles of the skirt, I again made sure to leave an opening of at least 15cm so she can step into the skirt!!  and same as for the tulle petticoat, to finish the slit edges I simply pressed down the seam allowances either side of this slit and topstitched them into place.

To finish the waistband and for closure, I again made a bias cut strip of the same fabric, and stitched it to the waistline, leaving long tails either side, pressed the raw edges to the middle of the strip and stitched it closed, same as for the tulle petticoat.  By the way; I usually stitch this; right side of strip, to wrong side of skirt; this means when you fold the raw edges of the strip over you’re actually topstitching from the right side of the skirt, which of course ends up looking much neater from the right side. Which is just what you want.

For the lower edge of the fabric petticoat, I overlocked the raw edge to provide a stable and even width guide for hemming; then folded the overlocked edge under twice and topstitched it down.

The two petticoats!  I think they look so pretty together!

LATER EDIT:

I made a second, voile petticoat!  It’s exactly the same as the first cream coloured one, except it’s white; because I think I cleaned Spotlight right out of the cream, whoops!  This will be worn over the tulle petticoat and be like the lining to the dress.  So the layers Cassie will be wearing, from the inside out are:  voile petticoat, tulle petticoat, voile petticoat, DRESS!

petticoat… junction…

pinterestmail

mustard pietra shorts

Hack attack!

Despite initial appearances, my new shorts are actually based upon the Pietra shorts/pants pattern by Closet Case patterns… I loved this pattern immediately, loved the high waisted flat front with no waistband, and those cool side panels with pockets.  However, I was not quite so much in love with the elasticated back … or perhaps I should specify I was not quite so much in love with my own rear view in the aforementioned elastic waist version of the pattern?!

Yes, I did make up a test version with the elastic waist first … for version number one, I cut up an old linen dress given to me by Mum.  Unfortunately I decided I’m tragically allergic to elastic waistbands, with the one and only exception of pyjama bottoms.  Although looking at these pictures now my rear view is not as offensive to me as it was when I first looked at them!  at the same time, I am still much happier with the rear view of my second, non-elasticated and more streamlined version.

side view…

I was pretty sure I would be able to alter, modify, wrangle a de-elasticised waist with a bit of finagling… putting an invisible zip in the centre back seam and removing a whole lot of real estate from the back waist area, retaining that lovely flat front and pockets completely.

the front view looks exactly the same as the original, unsurprisingly since this is basically unaltered…

I shall now proceed to explain my butchery… and please note that these measurements laid out here are tailored to my own personal waist measurements and will obviously be different for other people.  Specific measurements for each of these modifications can best be determined from your own waist and hip measurements.

I removed 6cm from the waist of the back piece; and actually swung the side edge out towards the hem edge at the same time, adding a bit of flare to the back view of the shorts…

I also removed 2cm from the top/back edge of the side pieces, tapering off to nothing at the top edge of the pocket.  This wedge was also removed “mirror-image” from the front facing, shown already stitched on at the left…

I put a dart in the back piece… while my picture illustrates it to be 10.5cm, I actually stitched it a bit longer, closer to 11.5cm at its end point

… the dart is situated 10cm in from the centre back raw edge and is 3cm in width at its top edge

… I used the existing back waistband piece to cut my two new back waistbands to fit the new size…

… inserted an invisible zip into the centre back seam.  Note, the centre back seam is essentially unaltered, except that the back waistband now has a vertical centre back seam too.

Because I whimsically fancied something a bit different for the back of my waistband, specifically a V-shaped cut-out effect at the centre back … I put in the zip a bit lower and stitched the top edge in an angle like so…  Yes, I’m very much oversimplifying here, because making my two sides exactly identical actually took aaaaages and some super precise measuring.  I even unpicked one side completely and re-did it because it’s amazing how even 1 or 2mm difference will show up as a glaring inconsistency.  Hint; making a little paper template made it a lot easier to get everything perfectly mirror image; which yes, seems super obvious in retrospect!

corners trimmed and turned out…

I hand stitched the waistband self-facing down with tiny fell-stitches…

To finish; the side seams were pinned, and the already-understitched front facing was wrapped around over the top and over the back waistband piece.

Side seams were then stitched, corners trimmed and seam allowances finished etc. before pulling the whole thing right sides out.  And that’s it!


Oh! of course, the ever important fabric notes… this is actually just a super cheap cotton drill from Spotlight… I LOVE the orange-y mustard colour of course, SO MEEEEE! and the random vertical dashes.  The pattern sorta reminds me a lot of this felted wall hanging I made, many moons ago; my vision was of a sort of poem carved by an artistic cave man, in a language or alphabet wrought in colours and strokes of differing lengths and groupings.  This is still hanging up in our front room! and you can read more about it here

Details:

Shorts; both the Pietra shorts/pants pattern by Closet Case patterns
Drapey white top; based on the loose drape top no.1 in the Japanese pattern book “drape drape”, by Hisako Sato
Hat; Vogue 8844, in khaki drill
Plain white tee; Nettie tee by Closet Case patterns, white jersey

pinterestmail

some naice new clothes

I’ve been whipping up (k-chaaaaa!) some maternity clothes for Kelly… I’ve been making a lot “for others” lately, all this year in fact, or at least it feels like it! but I’m ok with that; for one thing; it gives me a chance to get that aspirational 30 wears out of my own wardrobe, and for another… well that’s reason enough, I think?  I have lots of nice clothes and I’m enjoying getting the most out of what I have lately  🙂  But I still want to sew! so it’s both fun and enjoyable for me to make clothing for my loved ones instead.  Kelly needs new clothes to fit her fast-changing body and is keen for me to make them, and I am more than happy to make them for her, so it’s a win-win situation for both of us. She recently had a birthday, and we headed out to Homecraft Textiles and Spotlight together and did a bit of shopping; my birthday present to her.

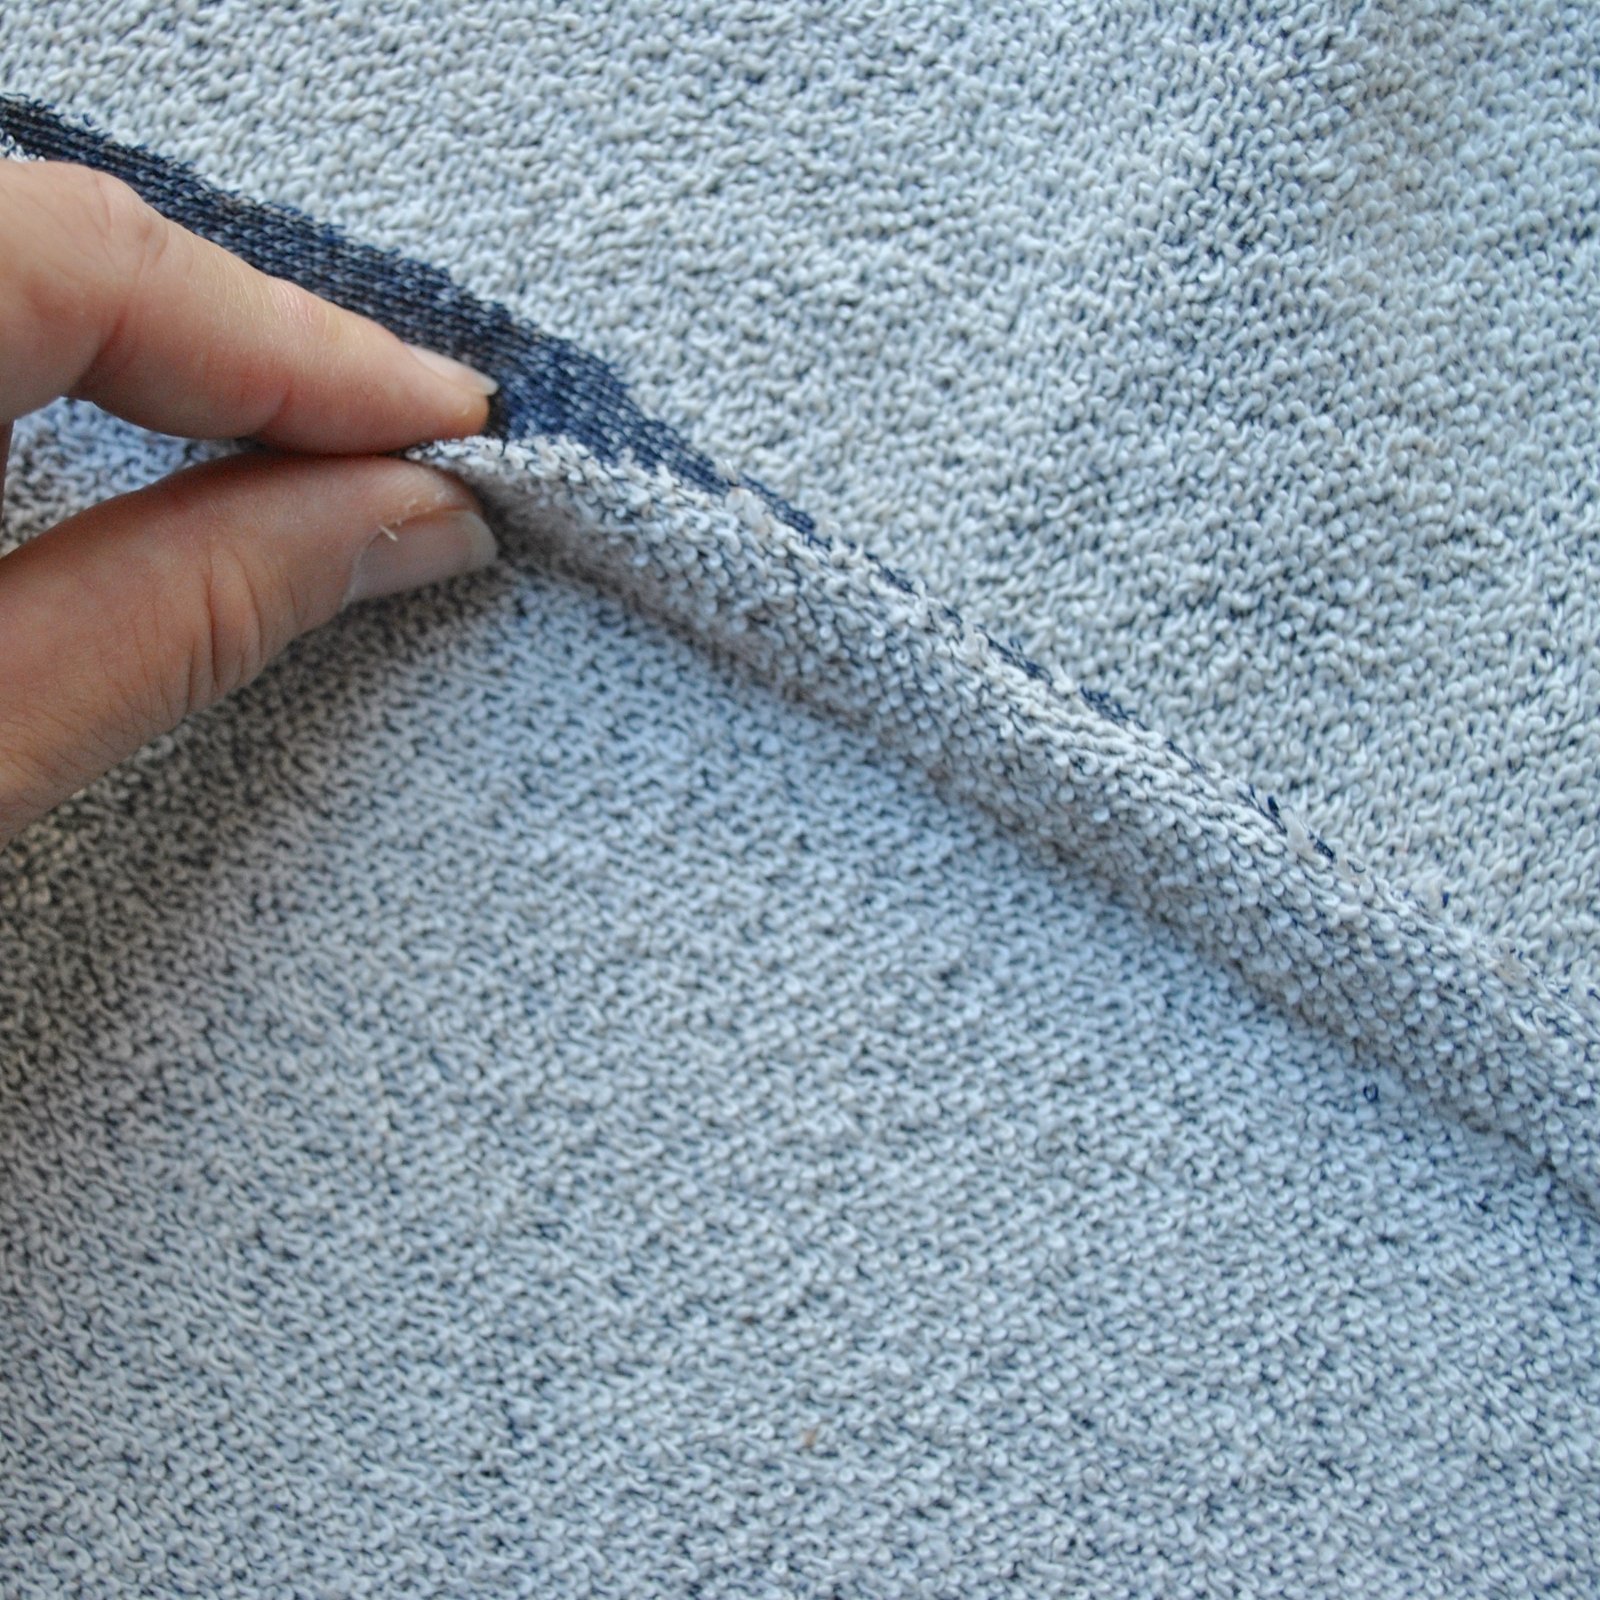
A lovely reader of my blog, Graca sent to me this maternity skirt pattern, Burda 7023, thank you so much Graca!.  First of all, I ran up a little test number, using a soft, grey and white cotton jersey sweat shirting, leftover from this hoodie I made for Sam a few years ago.  The leftover scrap I had was the perfect size for the skirt!  The sizing chart of the Burda pattern was a little weird; Kelly’s hip size put her between a size 20 and 22, the very top of Burda’s size range which seemed quite quite bizarre!  I eyeballed the pattern pieces and decided to size down to 18-20 for Kelly, and of course it fits pretty well so sizing down was a pretty good decision.  Also, of course the skirt is currently huge on her, not surprising given that she is in the very early stages of her pregnancy.  But we both feel it will be a good thing for her to have in the later stages of the pregnancy.

On our shopping trip for the real version we picked up a few very nice fabrics; including a truly gorgeous, creamy/ivory/grey cotton jersey – I bought enough for me to have something too! – and this absolutely drool-worthy rose printed stretch velvet.  I used the Burda 7023 skirt pattern to make the skirt, and “early-maternitised” it a little bit, so it’s more suitable for her to wear during this wintery, early stage of her pregnancy.  I did this by reducing the amount of gathered rise in that front portion of the skirt.  I also installed a drawstring in the front band, so she can pull in some of the extra width now, and let it out gradually as she expands over the coming months.

How?  Firstly; I ironed a square of iron-on interfacing in the centre of the skirt front facing section, and stitched a sort of double buttonhole/figure 8 stitching using a narrow width, short-stitch zig-zag stitching.  I used small shape scissors to cut X-shapes int he square centres of this stitching.  Next, I cut long strips from the ivory jersey I used for the little T-shirt top; these left unheeded naturally roll up in to nice little rolls of fabric.  These I stitched into the side seam stitching of the front/back waistband/facing/casing so the strips are hidden inside, and threaded the ends through my makeshift eyelets.

So, they emerge inside the front waistband of the skirt, and Kelly can pull the waistband in to fit now, and let it out as she grows.  I think this is quite an improvement on the original, which is left to stay big and loose and floppy no matter which stage of the pregnancy you are!

I also made the little top, using the Ebony top pattern I’d bought recently, totally for maternity purposes only of course.  Though I did get an extra one printed out for myself too! ahem…  Kelly has been wearing the striped, raglan-sleeved test version I’d made up, and requested it be streamlined just a little bit, so I brought in the “swing” of the side seams by about 2 inches at each side seam, keeping the side seams straight.  And it still has plenty of swing!  The next request was to bring it in even more next time! though I’m pretty sure the bit of extra room will come in very handy come breastfeeding time.

When making a T-shirt; I like to stitch the shoulder seams down towards the back, and also to stitch the neckline seam allowances down onto the shirt at the back only, like so…. I believe it stabilises this part of a T-shirt which is often subject to the most strain.

This is the regular, set-in sleeve version of the pattern …

btw, when it comes to stitching a hem or an elastic casing in velvet; its pile causes it to become the most annoyingly migratory stuff that slides over itself under the sewing needle, even even when you’re being super vigilant and slow, it just happens!  I found the best way to keep it firmly in place was to pin regularly, like at least every inch! and perpendicular to the seam, with the needle passing through exactly where you’re going to be stitching, and not removing the needle until you’re right upon it.  This seemed to keep everything in place nicely enough…

I already have some other versions in the pipeline, as well as a few as yet unblogged things awaiting in the wings; I need to get cracking and catch up!

pinterestmail

the A-line Perth dress; a short tutorial

Perth dress/blouse

So, I popped on my original Perth dress today and I realised this post is way overdue and I’ve been owing it for some time… I’m sorry for being so slack!

I have to admit that a reasonable number of the requests/comments I have received vis-a-vis our Perth dress pattern is that people like my “bouffy” brown prototype, above; and wish to know exactly how this one was made as opposed to the more streamlined final pattern version … I’ve generally taken to just describing it on a request-by-request basis since it’s really quite a simple modification ; but obviously a visual is preferable.

  1. basically; you take the lowest point of the side seam of both front and back, and pivot it out from the armhole point, adding 8.5cm (3 1/4″) to width at the lowest point.  Keep the pocket markings in the same place.

not to scale

2. the other thing about the prototype is that the collar is a little smaller, which I think visually is a good balance against the much more flared-out “skirt” part of the design.  In the final version of the pattern, I thought a more dramatically pointed collar was a better look with the more streamlined silhouette.  Collar stand stays the same.

again, zero scale considerations, sorry.  About 1.2cm (1/2″) is taken off the collar point itself and the difference tapered off to meet up with the seams on each side…

3. finally, I decided to tame some of the bouffe in back by extending the box pleat down from the yoke and top-stitching it down at about my waist level.

All of these modifications are, of course, optional and open to even further alteration if desired.  I love it when I see people adapting the design and making it their own! For example, just recently I saw @thesewingsociety had adapted the collar to be a club collar, which is super cute, oui?!

Anyway, I’d like to thank everyone who asked! I hope this helps a little, and maybe also gives everyone a few ideas for making a different version of the Perth for themselves!

It’s funny; because I personally didn’t like the brown version so much at first, thinking it just WAY too voluminous, to a fault; its only saving grace to me was the top half/neckline which of course I preserved exactly in my pattern.  However over time my brown version has very much wormed its way into my heart after all.  Yes, it is voluminous, but lots of volume in a summer dress has a certain charm of its own which I really really appreciate in very hot weather.  I like being able to “flap” my dress about to create a bit of a cooling airflow as I’m walking.  And of course the covered-up-edness of the top half is great for our full-on sun, meaning less of a need to slather on the suncream and less chance of getting sunburnt too.  In short, I’m really appreciating all my Perth dresses all over again!

the full bouffe!

pinterestmail

a knitting project bag

It’s sometimes quite difficult to think of gifts for Mum because she will say, without fail; please DON’T GET ME ANYTHING FOR MY BIRTHDAY.  But… I have to think of something!!!  Besides the fact that she’d probably be little bit upset if I actually did give her nothing, haha  😉

Mum is always knitting, and she’s still particularly keen on knitting socks… whenever she comes up to stay she brings her knitting, usually stuffed in some flimsy plastic shopping bag; and works on it pretty solidly, at all hours of the day or night.  And inevitably, she will ask to borrow my scissors and a wool needle… btw, I don’t mind at all hunting these things out for her, but really it would be so much better if she had them with her and at hand already.

Lightbulb moment… Mum was in urgent need of a knitting project bag!!

It’s only recently I even became aware that knitting project bags were a thing, after I discovered a few knitting podcasts on youtube… where knitting project bags are an absolute must have!  I’m a bit embarrassed to admit that my own knitting bag is just a daggy old, small shop tote thing, that shops put your purchases into… it can be seen in this post here.  It’s not very good, and Mum’s isn’t any better.

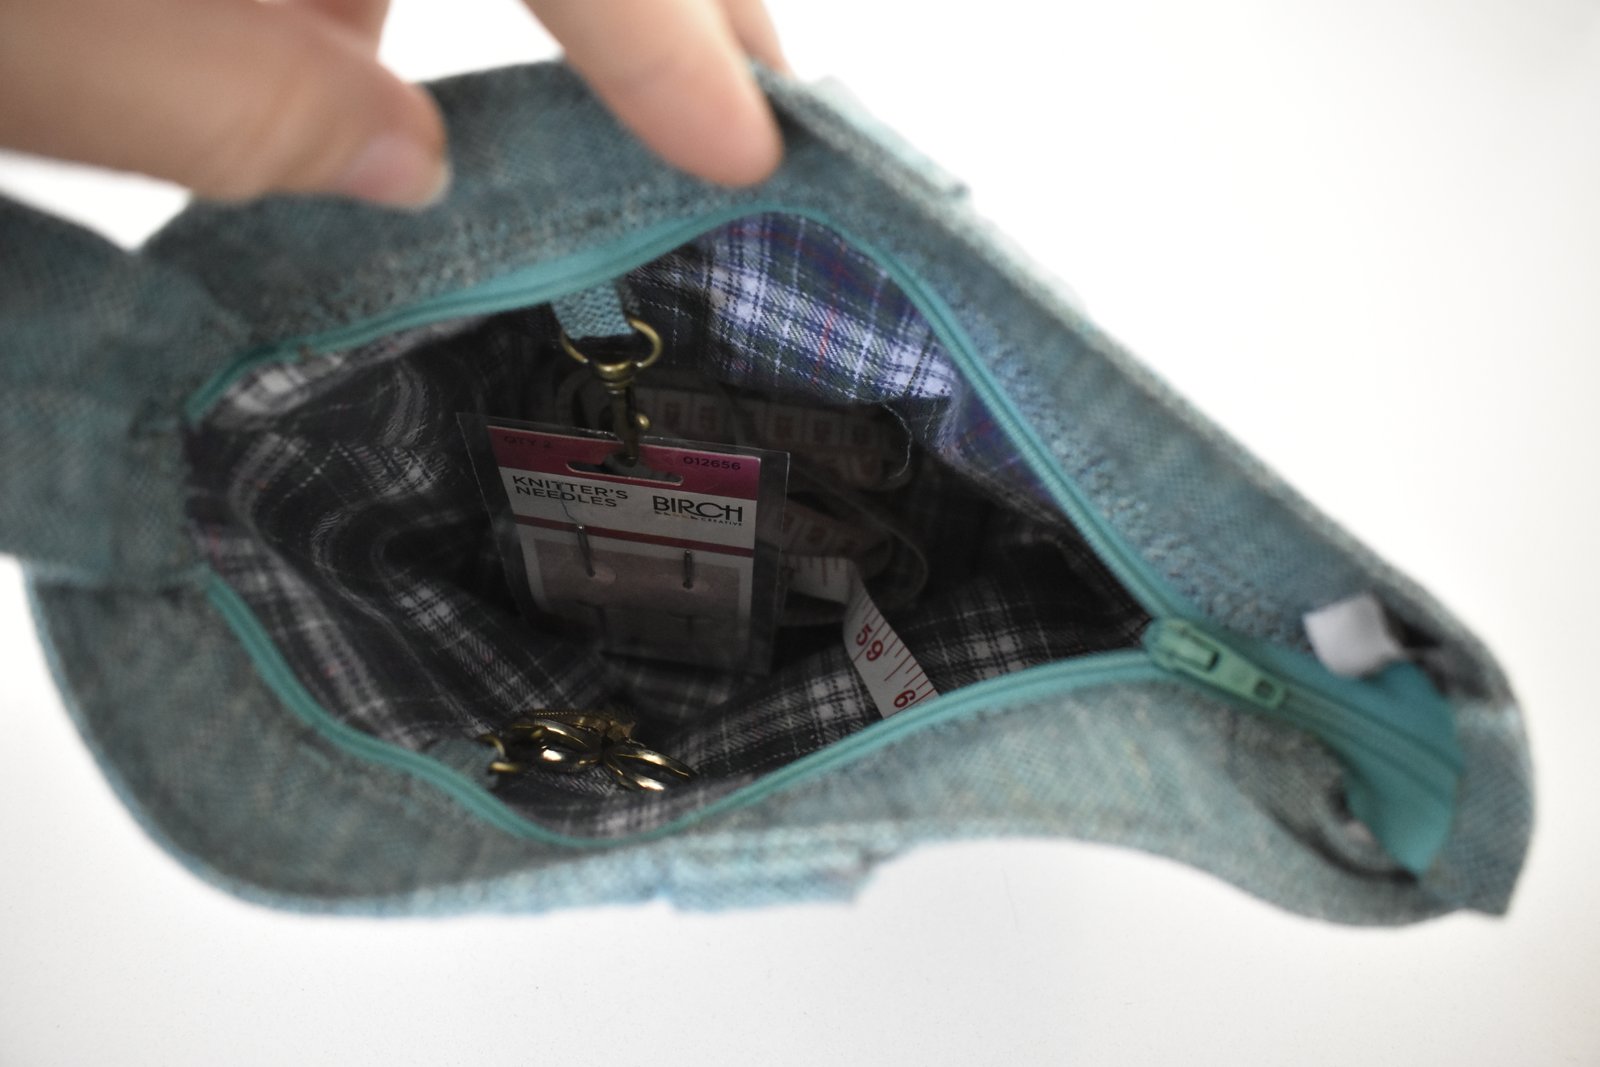
I perused Le Stash, and my hand fell on some lovely garden-green raw silk, mainly because I knew I had a matching zip in my zip stash already too.  The green silk turned out to be a pair of trousers, that Mum herself had originally give to me to use for fabric sometime.  She’d originally bought them in Italy, while on holiday, and got many years of good use out of them.  It occurred to me I could make a really good little project bag, utilising the trousers’ existing welt pockets and waistband…  bonus that this lovely fabric is boomeranging its way back to Mum in a new, and newly useful form.  Full circle! I selected some brushed tartan cotton for the bags’s lining, and inserted a new zip underneath the waistband facing inside, along with a wrist strap, so she can have the bag hanging from her wrist and still knit from it.  I think the really interesting thing about the bag though is the accessories; I added three little tabs inside, two with swivel clips, to which I attached a pair of scissors, and a pack of wool needles, and the third has a D-ring to which I’ve sewn a tape measure.  I left the original back welt pockets intact on the outside (above), so she can tuck small extra things into those pockets, things she might not want to go rattling around the inside of the bag.

I think she will have everything she needs!

I wrote a little tutorial, in case anyone reading this wishes to have a go at a similar refashion for themselves.  It’s a very useful thing for a knitter, whether for yourself or a gift for someone else, it’s easy and kinda fun to make, and I think it turned out quite cute too! In fact I would really like one for myself!

I used:

a pair of trousers with a waistband,
piece of brushed cotton for lining (around 52cm x 25cm),
stiff interfacing (52cm x 25cm)
30cm zip
2x 13mm swivel clips
1x 20mm D-ring

Extra accessories to finish; a tape measure, pair of scissors, pack of wool needles

To start with, unpick the side seams of your trousers, and cut out the seat.  Cut the waistband off at the side seams too, allowing the same seam allowance as the side seams.  Note; I then trimmed down my piece to about 52cm x 25cm (inc waistband) which made a bag with a finished measurement of approximately 20x20cm, and with a base of 20cmx8cm.

If your trousers have welt, or other pockets, that’s a bonus!  Cut a piece of lining fabric the same size and shape, using the trouser piece as a template.  If the fabric is on the floppy side, apply stiff fusible interfacing to the lining, and if your interfacing is anything like as unreliable as mine, it’s a good idea to stitch/quilt the interfacing and lining together to be sure they stay together as one layer.

Unpick and open out the lower edge of the waistband facing, and stitch up the side seams, including the waistband and waistband facing, in one continuous seam.  Stitch the lower bottom seam.  Likewise, stitch the side seam/s and bottom seam of the lining.

Determine the desired width of the bag bottom… this should be at least equivalent to, or even a bit wider than the bag opening.  I made mine 20cm.  Measure this length along the bottom edge of the bag, centred so that the excess on each side is the same.   Bring the side seam and bottom edge seam to meet, right sides together, and pin.  Determine the side edges of the base of the bag, by marking two straight lines at the end points of the bag base, perpendicular to the bottom seam.  (shown on the bag lining, below) Measure each carefully to ensure they are going to be the same length, if there are differences then adjust and re-mark until they  are equivalent.  Mine are 8cm long from pin to pin.

Stitch.  Construct the lining bag to be exactly the same.  Trim off the corners.  Pin the bag and bag lining together along the bottom side edges, wrong sides together, and stitch together along the previous stitching, ie. the short side edges of the base of the bag.

Turn the bag right sides out, so the lining bag sits inside the outer bag, attached at the base but not yet attached at the top.  You can optionally stitch the bag and bag lining together along the long bottom seam as well, however I found this to be quite fiddly…

Make the wrist strap and tabs for the bag’s accessories to hang off…  my
dimensions are:

strip 1: 8cm x 37cm
strip 2: 4cm x 10cm

Construct each as follows: fold strips in half lengthwise and press, open out and fold both raw edges in to meet the pressed centre line, press.  Fold the strip in half along the first fold line and press, topstitch close to each long edge of the strip.

Cut the narrower strip in half, giving two 5cm strips. Thread each through the closed top of a swivel clip, and baste raw edges together.   Cut 5cm off one end of the first, wider strip for the tape measure tab, thread this piece through a D-ring, baste.  Stitch the tape measure onto the D-clip.  The remainder of the wider strip will be used for the wrist strap.

Bag: open up the remainder of the waistband facing away from the waistband.  Pin the ends of the wrist strap to the waist band facing adjacent to either side of one side seam, baste in position close to the raw edge.  Take the zip, and pin each side of the zip to the waistband facing, aligning the top and bottom ends of the zip with the side seams of the bag, and ensuring the opening end of the zip is adjacent to the wrist strap, and with wrist straps folded back against the waistband facing; topstitch zips in place, stitching over the wrist straps.  Leave a gap of 1.5cm each side at the bottom end of the zip to enable the end to sit on the outside.  Trim the zip, leaving a 2-3cm tail.  Cut a small square of fabric and use it to wrap and enclose the trimmed bottom edge of the zip; fold, pin, and stitch it in place.

Open the zip; take the three previously made tabs with swivel clips and D-ring attached and pin them around the top of the lining bag, raw edges even, right sides together, and with the swivel clips/D-ring hanging down inside the lining bag.  Fold down the waistband facing enclosing the raw edge of the lining bag and top edges of the accessories tabs inside the old waistband.  Pin waistband facing back to its old position on the original waistband of the trousers.  Ensure the upper ends of the zip tape are tucked up inside the waistband, also check you are happy with the position of the tabs with swivel clips/D-ring before stitching the old waistband facing back in place.  This can be a little fiddly around the top and lower edge of the zip, but just take care and stitch as far as possible.

The final step is to clip a small packet of wool needles and pair of scissors to the swivel clips.

Aaaand, done!!!  Now, I really really want to make one for myself too!


pinterestmail

Christmas pressies; a sewing marathon

Tim and Kelly…

As usual, I made Christmas presents for my family… I started late October, so I was giving myself plenty of time, or so you’d think!  I’m a fairly efficient seamster, and I still only just finished a few days before Christmas!  it’s been a little intense and stressful, actually; every year I underestimate how busy the lead-up to Christmas is and how I just don’t get as much time to devote to sewing presents as I thought.  Plus, I’m a lot more finicky and particular – maybe excessively so?! about my sewing now too.  I think this is a good thing, but I have to accept that I’m taking longer to make things, and should start sooner!  Or maybe make less?

Anyway, it got done!  *phew

Listing everyting in the order I made it…

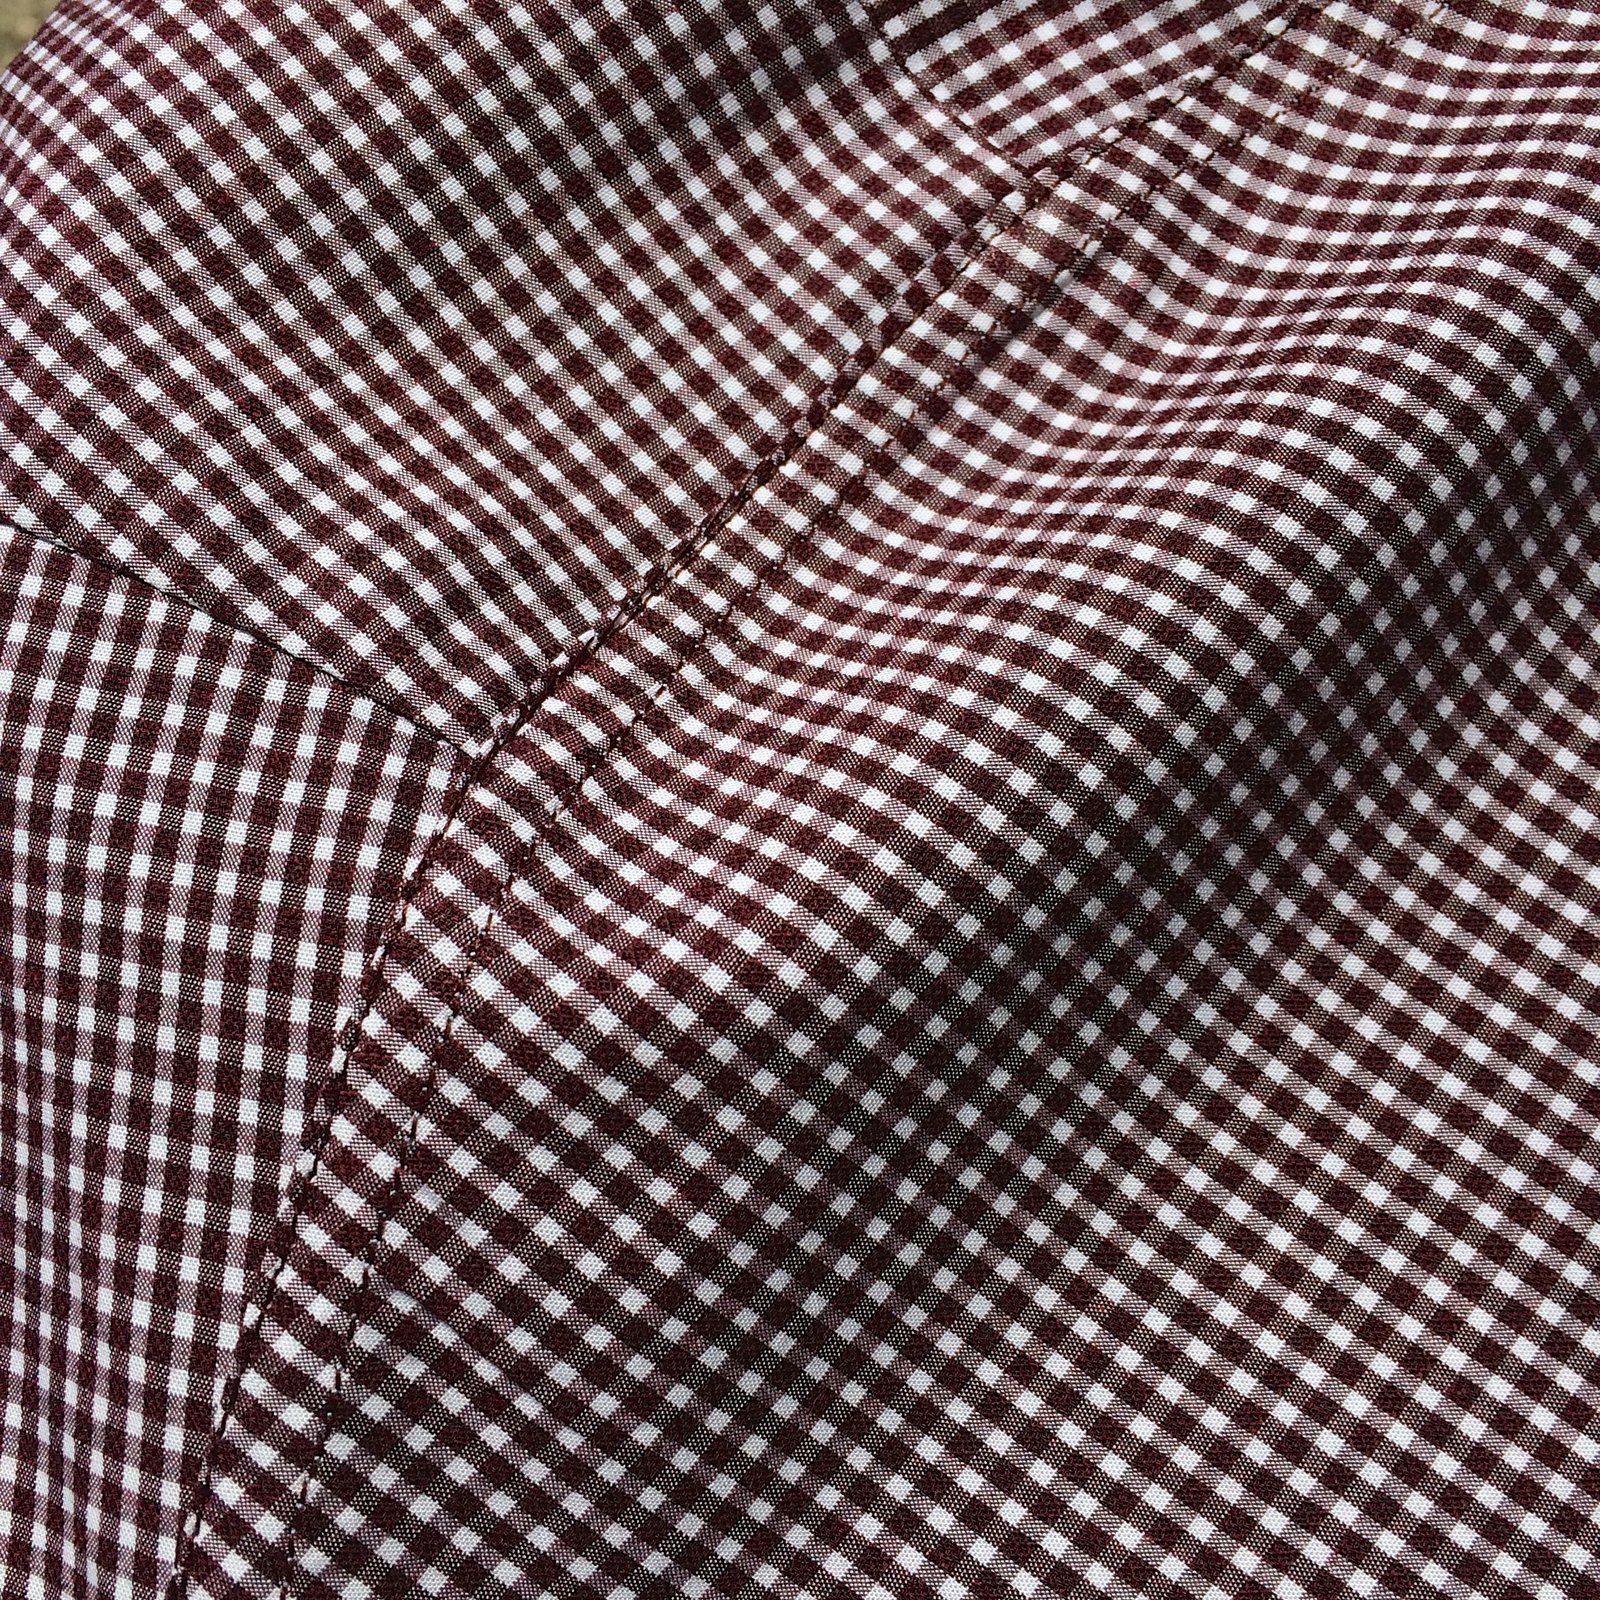
First thing to get made was a shirt for Tim… He has a job now where he has to look smart, so I decided to make a business shirt… I bought the really lovely deep maroon, mini-scale gingham cotton shirting from Tessuti’s in Melbourne, and used Burda 6874, my kinda go-to shirt pattern since I semi-retired Burda 7767.  d’you know I made that pattern 37 times… can you believe it?!  that tissue paper was wearing pretty thin in some places and in some other places I’d trimmed off the cutting lines altogether, woopsies!!

what sleeve placket…? of course I busted a gut matching those teeny little checks everywhere, took me two days before I could see straight again…

I made the buttondown version… see how the collar up there buttons down onto the shirt?  This is what qualifies it as a buttondown, folks!  I don’t wanna get all grumpy and pedantic here, being Christmas and all, but the number of times I’m reading about someone’s very lovely, but NOT A BUTTONDOWN shirt erroneously labeled as such and have to hold myself back, because we all hate a little lecture, right? I’m gonna stop right now otherwise I’m going to become that painful lecture-r.

this is the inside of the shirt… I’m pretty proud of my flat-felled seams… and I use the burrito method for the yoke so that’s all nicely enclosed too

All seams are flat-felled, using my own tutorials here and also this one here… yes you can flat-fell every single seam in a shirt! and it’s so much better and nicer… although I’m starting to realise that this is probably why what used to take me maybe two days to make a shirt…  now takes me double that time at the least! but anyway.  My guys appreciate the tailoring, so I’m happy that they’re happy.

Sam’s shirt…

I’m just SUPER happy with how my buttondown collars are looking nowadays!  It’s pretty hard to get that sitting just right and perfectly symmetrical; and I think after all the shirts I’ve made I’ve finally got it down…

Next up; I made a matching top for Kelly.  I’ve previously made matching tops for the two of them and noticed that they wear them together a lot! yes, it’s super cute…  I did a little bit of subtle inquiring as to whether matching clothes were still something they liked before I went there and got a positive response.  Alright then!

I had to be far less subtle about fitting it though!  I’d previously taken Kelly’s measurements for when I made a Kelly anorak for her… it’s impossible to do this without it being obvious! and made a block for her, using my Pattern Magic book to help me.  Yes, this is a pretty involved thing to do, requiring protractors and algebra and such-like! but honestly I’ve always found it to be a hugely worthwhile exercise when drafting new patterns.  Then I mocked up a quick plain bodice, and got her to try it on, and made the necessary changes.  In Kelly’s case, the block fitted but the armhole/bust dart had to modified considerably… the famous full-bust adjustment.  I regret now that I didn’t take any pictures of the mock-up bodice and the changes I made because it was a new learning curve for me that I wish I’d documented!

For Kelly’s top, I’d chosen the asymmetrical cowl top from Pattern Magic 2; the shape of the cowl is dictated by the shape of the facing.  It’s always a bit of a challenge to draft your own patterns, but well I love a challenge! and I knew the shape of this top would be super flattering for Kelly and suit her beautifully…  I cut the pieces on the bias and inserted a maroon invisible zip in the left side seam, so it zips down undone… however Kelly says she can squeeze into it without having to undo the zip which is cool.  I think the bias-cut is what gives it that little bit of stretch.

Next up! a business shirt for Sam! He has also started a new job which requires business dress everyday… I’d noticed a lot of young men wearing gingham shirts while we were in Melbourne… a good sign that gingham is super on-trend! so hot right now! which is basically why I bought gingham for both my boys in the first place.  It’s a bugger to pattern match though, even worse than stripes! gnnnnnnn  but oh well…

Again I used Burda 6874, flat felled seams throughout, same links as for Tim’s above… aaaaand so not much else to add.  Both Sam and Tim have been working out some lately, so I think I’m going to have to make some small adjustments to their shirts in the future.

Next up!  I made some little things for Cassie, she needs more work clothes so this was another practical gift really.  I made three things for her…. I just want to say here; it might seem unfair that I made one top plus TWO skirts for her, when compared to just one shirt for each of the boys, but it really does even out because the TIME I spent making these three little separates is actually the same as the time I spent on EACH of the boys’  shirts.  I know, crazy right?!  it’s all that tailoring bizzo that takes so much time…

Likewise, Kelly’s top needing a block made, plus the fitting muslin, plus drafting a pattern, also took about the same amount of time as making three tried and true things for Cassie!

Anyway; Cassie had already chosen this lovely crackle-y hand-painted cotton from the Fabric store in Melbourne while we were there, and I secretly bought the mustard gingham printed silk from Tessuti’s while she was looking elsewhere.  So the little top was a surprise!  The crackle print really is gorgeous, it is hand painted in Zambia and has that handmade naturalness to it…  LOVE this but pattern matching those hand-painted stripes was never going to happen!  of course they are all different widths and thicknesses which just adds to the charm of course.  I just shut down my inner-obsessive for a little while and did my best… at least I got the centre back seam to match!

The other little skirt is a cityscape print, maybe New York City by the looks of that Lady Liberty in there!  We’d seen the fabric in the upholstery section of Spotlight, so she’d known this one was coming too…

for both skirts I bound the lower hem seams using some leftover purple pin-striped linen, the leftovers from when I made this shirt for Craig a few Christmas’s ago.

I have also taken to binding the bottom edge of the zip and stitching it down to the seam allowances… often the bottom edge of a zip has a slightly scratchy bit which can be extreeeeeemely irritating when you’re wearing it… so I’ve taken to doing this whenever I made an unlined skirt with an invisible zip.  Such a small thing that greatly increases the comfort factor when wearing the skirt!!!


Oh! patterns!  I used the Inari tee pattern for the little top and Vogue 8363 for both of the skirts, and since I’ve made both of these patterns for her several times already they were super quick and easy to run up. For both skirts I added belt loops so she can cinch in the waistline a bit; in self-fabric for the Zambia striped one, and in black denim for the cityscape one.

Next up! a short-sleeved white shirt for Craig! also using Burda 6874 and a white cotton broadcloth from Spotlight, this was intended originally to be the same as this little shirt that I made for him a few years ago and which happens to be his most worn shirt … then just before making this I’d whipped up my little yellow/black&white lingerie set and had the gingham ribbon sitting out, and suddenly had this brainwave as to how I could use a bit more of it! I stitched the gingham ribbon carefully down the button line of the button placket, and used a little bit to trim the pocket.

To match this gingham detail, I lined both the collar and collar stand with some cotton gingham that I’ve had for aaaaages, and used black buttons to finish the shirt.  Note; IT’S A BUTTONDOWN SHIRT!  Also, of course it’s nowhere near a clone of the other white shirt any more but I still think he’ll wear it a lot…

Next up! a pullover/sweatshirt for Craig!  truth now… I was running out of time, and steam! and this fair near killed me!

Craig with a much much smaller Sam and Tim…

So, once upon a time, nearly twenty years ago, we went on a summertime camping trip down south and it was blooming’ freezing, our tent nearly blew away, we got rained on, hailed on and fair near froze to death!  In pure survival mode, Craig drove to the nearest town bought a red sweatshirt that he has since LOVED and worn about a million times, almost to bits since it’s getting reeeeeeally worn and threadbare now.  At some point he asked me to make a clone of the famous sweatshirt…

Of course it’s easy to clone a sweatshirt, but the challenge is in finding suitable fabric! I found this blue marled French terry in Spotlight, and while the colour is a teeny bit blah and the texture is not as nice as his original sweatshirt, it’s going to make a reasonable stop-gap until winter rolls around, the winter fabrics come into the shops, and hopefully I can find something nicer.  I busted a gut finishing off all the seam allowances off beautifully inside though… imitating the exceptionally beautiful finishes that were in the original.  For the pockets and bias binding I used some of the leftover navy/white gingham that I used for Sam’s shirt, above.  The pockets are French-seamed and the rest of the seams have an interesting amalgamation of HongKong bound AND flat-felled seams… not sure if my method is the same as in the original but I worked out a way to do it and took a few pictures along the way.

First, stitch the seams, then figure out which way you want the seams to be stitched down and apply bias binding to the topside of the seam allowance… ie. to stitch along the same stitching as previously you will be pinning/stitching along the UNDERNEATH,

OR alternatively you can save yourself a step here and stitch the bias binding on at the same time as you’re stitching the seam; your choice.

Press the garment seam allowances open, then press them to the side where they will be felled, with the bias binding on top.  From the other, right side, of the garment, pin through all layers.

With the right side facing up, topstitch the garment to the seam allowances plus binding, through all layers, just to the side of the garment seam…

view on the inside…

Keeping the bias binding free and clean, trim and grade the garment seam allowances…

Turn under and press the raw edge of the bias binding down so as to encase the seam allowances of the garment, pin in place.

With the bias binding facing up, and following the previous stitching as a stitching guide, topstitch the pressed edge of the bias binding down.  Since you’re using the previous stitching as a guide, the width of your double-topstitching will be nice and even from the outside.

Voila!  Such a nice neat finish!  at first I thought it might be overkill, but it is rather classy, if I say so myself; looks pretty good both inside and outside.  I will definitely be using this one again!

As seen above, I also applied bias binding all around the zip tape and stitched it down with double top-stitching the same way to match… this really does make a nice, neatly finished look when the zip is down.  Which it will be, most of the time.

And, last but not least!  I also made a few more little hardback notebooks… just fun little things, however I do know that the recipients do actually use notebooks regularly so I know they will be useful too!  I used mostly a mixture of leftover and old papers; from old scrapbooks, some with the children’s scribbles still on them!  I’m sentimental that way  😉 , various papers, musical paper, some pale coloured wrapping paper, writing stationery; just lots of different stuff.

The notebooks are covered variously with linen, velvet, printed cotton.  The one I made for Mum is covered with raw silk hessian.

So! Yes, it was quite a lot of stuff to make and I was working on it all like billy-o from touching down after Melbourne right up until I finished right on the wire only two days before Christmas…  I’ve been thinking about this… why am I taking longer to achieve less nowadays?  and I think it’s because I used to be happy and content with a slightly more unfinished approach… slapdash is maybe too strong a word? whereas now I am far more, possibly excessively? finicky and particular about perfect finishes on the insides.  I think I’m ok with this…  I feel like well-finished clothing is what I’m into right now.

However, to avoid the Christmas stress maybe I need to start making Christmas presents a LOT sooner!  Each year I start way ahead of time and think by doing so will relieve the stress, each year I get super stressed out and have at least one “I CANNOT DO THIIIIIIS!!” moment.  But I did.  And now for a break from deadlines!!

SaveSave

SaveSave

SaveSaveSaveSaveSaveSaveSaveSaveSaveSave

SaveSave

SaveSaveSaveSaveSaveSave

pinterestmail

kangaroo paws… and making a skirt with a side pocket opening; a tutorial

I made a new skirt using a pretty special piece of fabric… there’s a little story behind it.  It’s a handprinted organic cotton/hemp from Ink & Spindle with a really lovely kangaroo paw motif; designed by Lara Cameron and handprinted in Melbourne… mmmm everything in their range is SO yummy, it was reeeeeally hard to choose just one print…!  I bought a piece and sent half to my friend Lisa of Lisa’s Carolina… she had once shared a piece of lovely Dusk blue Alabama Chanin cotton jersey with me and we made something in the same fabric… and I thought it would be fun for us to do the same with some Australian stuff.  And it doesn’t get much more Australian than this!

Kangaroo paws are the state flower of Western Australian, so an apt pressie for an international sewing friend!  And I thought the colours so pretty and earthy; rich tomato-ey/paprika and warm dusky pink on a natural unbleached background… actually I’ve just checked the site and it’s called “desert red on sand”  Perfect!!  I cannot WAIT to see what Lisa makes with her piece!  🙂

Anigozanthos manglesii… picture taken by me of a particularly nice specimen in our neighbour’s garden.  Kangaroo paws come in many different colours now, however this red/green is our state floral emblem

I got to mulling over what to make with my bit…  a skirt seemed like a good choice for this full-bodied canvas-sy stuff.  I wanted no seams on the front and the back, because I wanted to make the most of the random print, and hunted out an old favourite Vogue 8363, a pattern I’ve used loads of times before.  But I didn’t even want a side zip closure either… then I got the idea in my head to make it to have pockets that perform double duty as the closure of the skirt.  Meaning… NO ZIPS!  I’ve made a couple of skirts like this before and knew this pattern could happily be adapted pretty easily to have this feature…  I’ve written a little tute below in this post on how I did it  🙂

Because this is going to be a summer-y skirt, I left it unlined and enclosed all the raw edges with HongKong binding, using a pale coffee cotton voile from Spotlight.  I also used this for the pocket lining and the waistband lining…

This skirt has taken me the LOOOOOOONGEST time to write a blog post for it… I’ve even worn it a few times…  which is a kinda fail for me since I have this thing that I shouldn’t wear something until I’ve written a blog post about it.  Naughty!  Partly because of my plan for the pocket closure tute, about which I’ve been terribly procrastinate-y.  Well I’ve finally done it now, at last.  Please do let me know if you find this useful and/or helpful… and if you use it of course!


How to adapt a pattern to have a side-pocket opening… this is a good feature since it negates the need for a zip AND you get the bonus of pockets, naturally!

skirt map

The pattern I used here comes with a slant-edged pocket pieces and either a CB zip or button front closure so it’s pretty easy to adapt the waistband and method of construction to accommodate the pocket closure.   However, even if your skirt pattern doesn’t come with pocket pieces you can still draw your own pocket pieces and adapt any skirt pattern to accommodate them… as long as you remember this VERY IMPORTANT NOTE:  your skirt pattern MUST be roomy enough in the hips so that you can comfortably shove your hands inside without making the skirt too tight by doing so  i.e.. NOT a figure-hugging body-con pencil skirt.  Though you can of course start with a figure hugging pencil skirt pattern; keep the waistline and just grade the side seams out at the hips to give you the pocket room you need… allow around 12cm at least of extra ease at the hips from a pencil skirt starting point.

My pictures demonstrate a skirt opening at the LEFT hip… for a right hip opening just flip sides!

The pocket (below, at right) has the same top and side edge as your skirt front piece, and the pocket bag (at left) has the slanting opening edge.  This slanting edge should be cut identically on the each of the topside edges of the skirt front itself also… If you’re drafting your own just ensure it has the width to accommodate your hands.  Also, the waistband is going to overlap at the top of the pocket… so cut the waistband piece long enough to go around your waist, plus at least the width of the pocket bag top edge.

For the L pocket only: mark with a pin a point A on both pocket and pocket bag pieces as indicated here, roughly 12cm (5″) from the top edge.

Finish the raw edge above this point.  I have finished mine with a bound HongKong finish, however a skinny hem or overlocking is perfectly fine.

Stitch pocket bags to each side of the skirt front along those slanting opening edges.

Press seam allowance open, grade seam allowances, re-press all seam allowances towards pocket bag, under stitch, press pocket bag under.  At this point, pocket bag and skirt can be basted together along the top edge.

Pin under-pocket piece to pocket bag piece along unfinished curve edge.  Stitch from point A to the side edge.  Note: the R pocket is pinned in the same way, and stitched along the entire pocket edge to the top edge.

Finish seam allowances. R pocket edge can be finished along the entire seam, L pocket must be left open above point A

For a HongKong finish, leave a little tail which can be turned under and enclosed within the binding as shown in the following pictures…

Stitch a bar tack at point A to reinforce and strengthen the pocket opening,

Align the skirt front/pocket bag over the under-pocket, keeping the finished edges together. … and baste all three pieces together along the side seam below the slanted pocket opening. This is the skirt front, finished, at this point join skirt fronts and backs together along the side seams.  Above the slanted pocket opening, the skirt back is stitched only to the under pocket piece for both R and L sides.

Attach waistband to the top of skirt, commencing from the skirt front/L pocket bag edge, encircling the waist and extending past the L side seam taking in the top of the LH pocket piece also.

Hand slipstitch the waistband facing inside in the normal way, and stitch press studs and/or a wide hook and eye on the waistband overlap…

Ta da!!


Details:

Skirt; modified Vogue 8363, upholstery fabric; worn with:

(at top)

Drape-y top; the loose draped top from “drape drape”, by Hisako Sato, details here
Hat: Vogue 8844, ivory corduroy, details and my review of this pattern here


(below)

Tee; modified Nettie, Closet Case patterns, details here
Cardigan; my own design modifications of Nettie, Closet Case patterns, details here
Raincoat; Kelly anorak, Closet Case patterns, details here
Shoes; made by me and my own design, details here

the skirt is a little longer here… This was its first length and is how I wore it for its maiden voyage… and then I took one look at my pictures and thought, hmmmmm.   I don’t know if it’s just on me, but I find knee length skirts are an instant frumpify-er… I like them to be EITHER a few inches above my knee OR to be full midi length, halfway down my calves, every time I’ve gone for a middling length I’ve regretted it.  Like, it’s gotta be one extreme or the other… but NEVER in between!  I think it’s just right now!

SaveSaveSaveSave

SaveSave

SaveSave

SaveSaveSaveSaveSaveSave

SaveSave

SaveSaveSaveSaveSaveSaveSaveSave

SaveSave

SaveSave

SaveSave

SaveSave

SaveSaveSaveSaveSaveSave

SaveSave

SaveSave

pinterestmail
Switch to mobile version
↓