Tag Archives: Pocket

progress on wardrobe capsule…

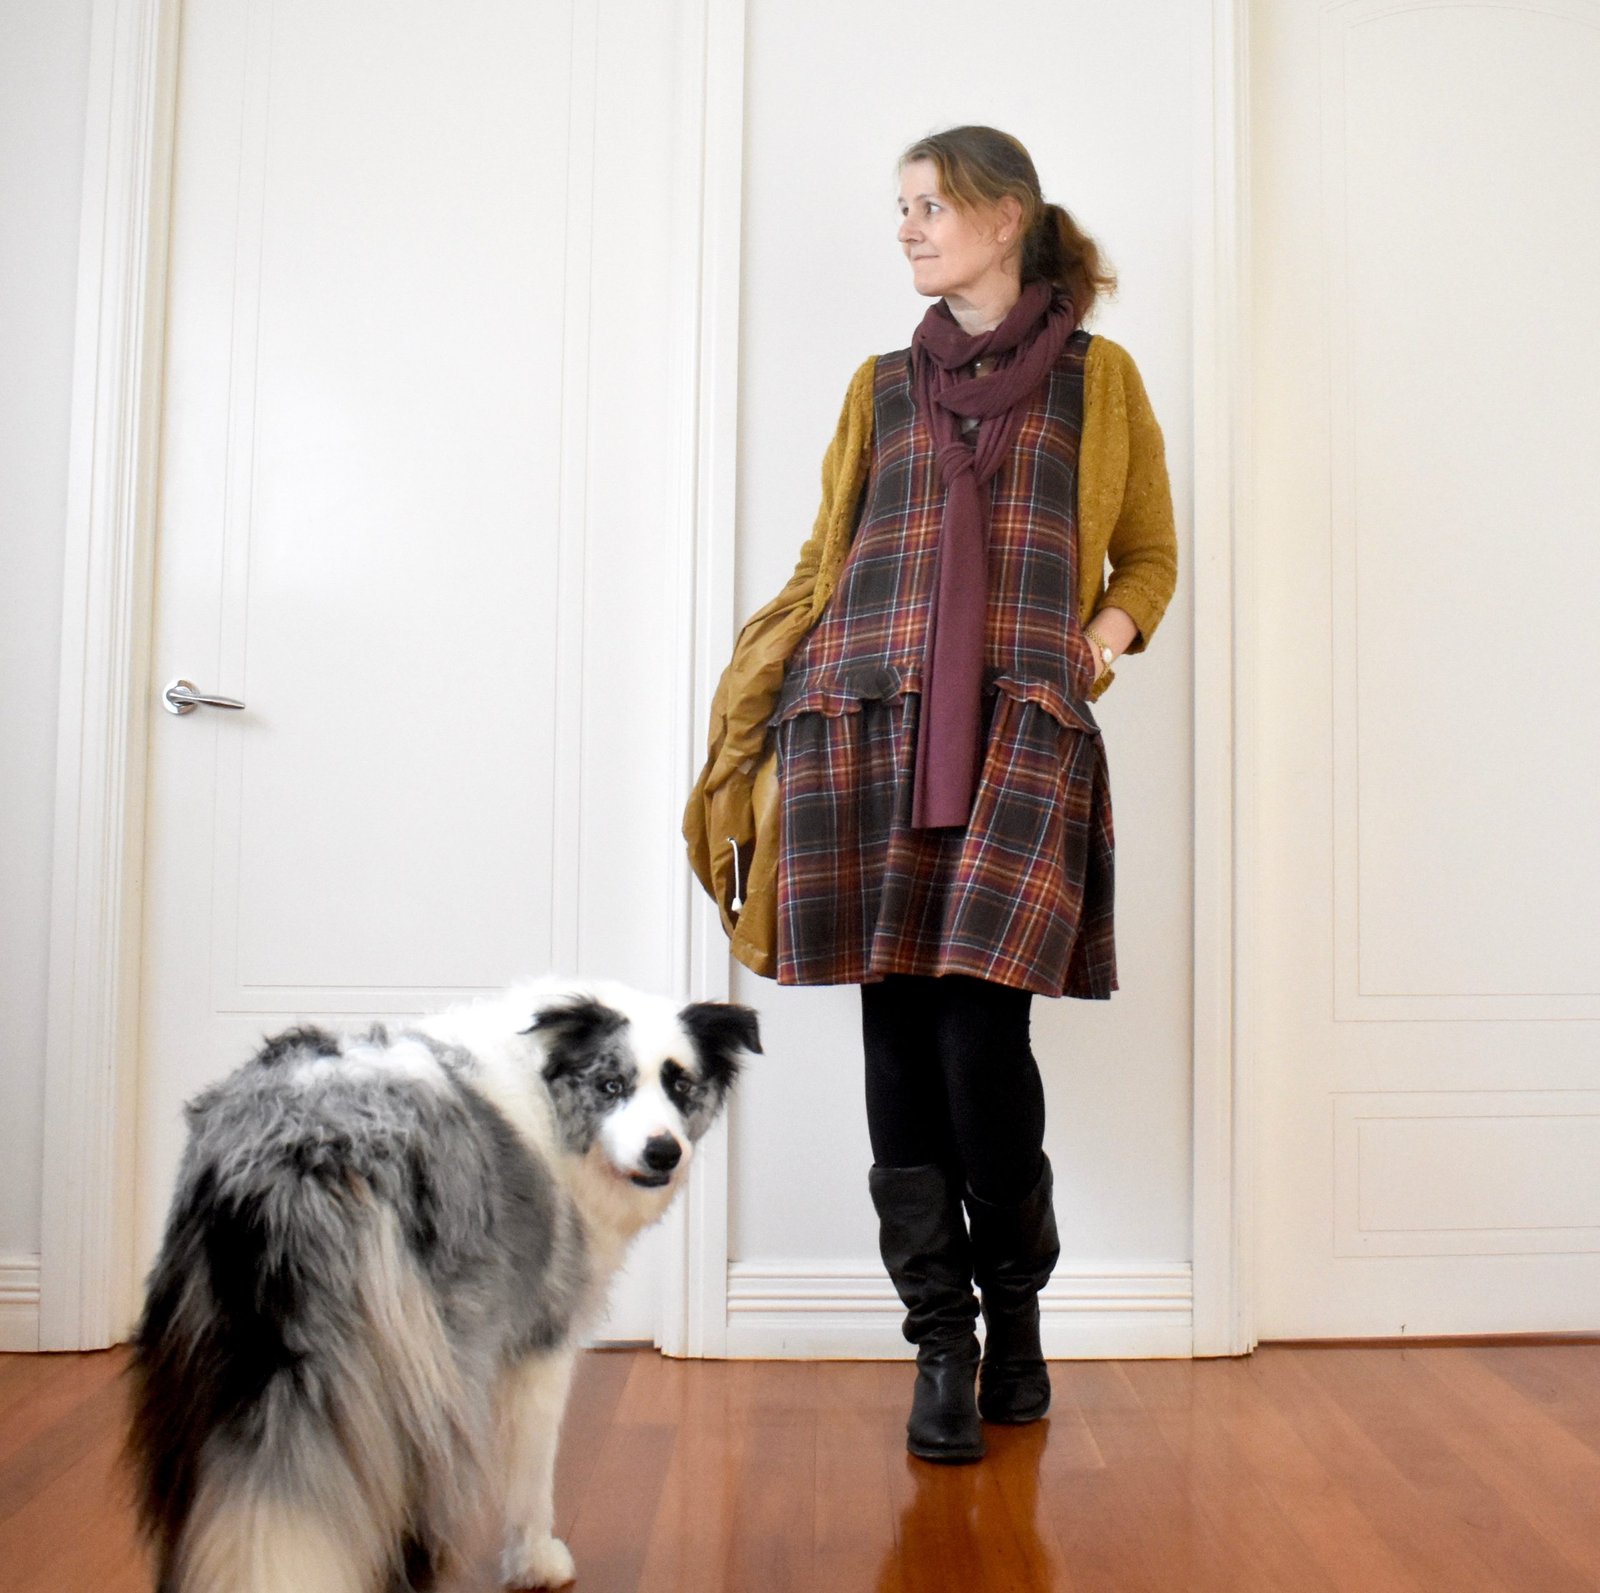
I’ve made some more things to add to my little make12/capsule wardrobe….

I think I got this rather smallish scrap of  very nice damask upholstery fabric from my friend N when she cleared out her stash… I fell in love with the pretty ocean-blue colour immediately and the scrolling curls in the damask reminded me of seam foam…  I thought there might be enough for a little skirt. And there was… JUST!!  as in, I literally had the smallest quarter handful of scraps leftover after I’d finished with it!

I started out by cutting my skirt block as well I could.  This left me with a micro-mini that would barely cover my knickers in wearing, so I put my university level mathematics to good use, calucating the exact width I could cut the side pieces into in order that they could fit around the entire hemline of the mini evenly and making maximum use of the very limited area.  And I think I did it!  I found that I could have a little bit of extra width on the last pieces to be cut, and I used these at the centre back, where I think it’s nice to have a little bit of extra length anyway.  So there is a very subtle high-low hemline going on at the back too, as well as a slight curving out of the centre-back seam which give the skirt a little “kick” at the back.

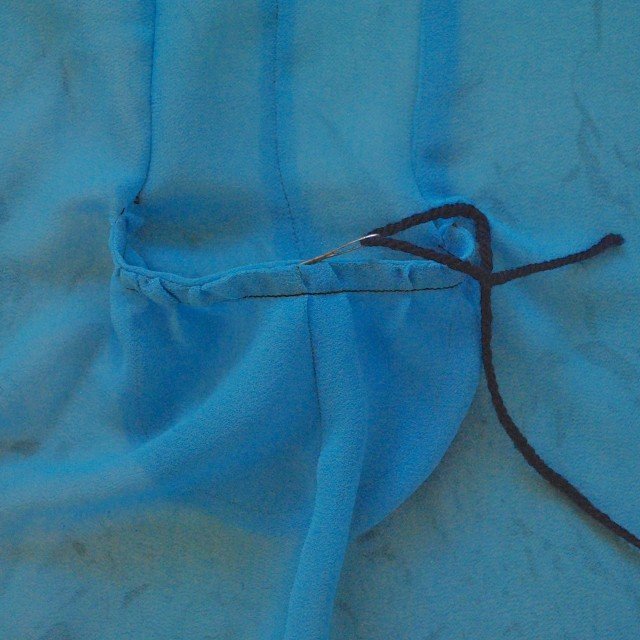
With a basically finished skirt, I realised I had a small rectangle leftover that I thought would be big enough for a pocket facing, so I slipped a little pocket in the horizontal skirt seam.

It has the aqua damask at the back of the pocket, for a nice uniform look when you peek into the pocket on the outside, and the remainder of the pocket is made of the cream coloured gingham I used for my recent little top, which I’ve just now realised I haven’t blogged yet  Whoops!  I will get to it!  it’s a prototype for Cassie’s and my newest pattern which we are working really hard on getting out very soon, I hope.  Anyway, the pocket lining is from the scraps from that.

Due to lack of fabric, I finished the hemline and the waistline of the skirt using a bias bound finish… this was cut from an old shirt of Craig’s.  So really, the only thing I had to buy new for this project was the zip!  I hand stitched the bias bound hemline but the waistband I topstitched on my machine.  The pocket is handstitched on the inside to the skirt.  I love both my labels; this green one is Japanese, organised for me by my friend Yoshimi.

pocket in action… and boy do I miss my white wall in the old house!!  I had to borrow this one from Cassie  😀

Next up!

I’ve had this too-big-to-throw away scrap of yellow cotton jersey leftover from when I made last year’s mini-skirt and I thought I’d be able to get a little T-shirt out of it.  However I was too optimistic! and no matter how creatively I arranged it, even a little top was not going to happen. Well, maybe it could, but not without horizontal seams like I did in the skirt and in my opinion, in a jersey this is just not a good look.

Anyway, obviously I turned to my favourite old standby for smallish cuts of jersey fabric and made a set of underwear… I used my old favourite the Watson pattern by cloth habit, and managed to get two pairs of undies for one bra, which is my preferred ratio.

 I did my usual adjustments to the pattern, like fully lining the bra as outlined in more detail in this post here.  Also, I always cut the front of the briefs to be one piece to incorporate the outer crotch, so as to avoid that awkward horizontal seam at the front.  All elastics and bits and pieces were already in my stash, and the little white bows were recycled from an old, also me-made, set from the past.  I always recycle the bits that I can!

These are the second and third things in my make 12/capsule wardrobe that I proposed for myself, using all fabrics/notions from my stash.  I kind still kinda wish I’d had enough of the golden-yellow fabric to make a top, because I really like the idea of a yellow top in this particular capsule, but I suppose I can still make a top at some stage in the future.  Obviously I’m going to wear the underwear a lot, so it’s all good really.  I’m super happy with the little skirt too, it’s exactly the kind of thing I will wear both winter and summer.  I’m pretty happy it has a pocket too!

Details:

Top; from Burda 4/2014/115, details here
Skirt; my own design, old leftover damask from a friend
Shoes; made by me, details here

Underwear; the Watson pattern by cloth habit, leftover yellow jersey

pinterestmail

adding the almighty pocket

So, recently I’ve been on a bit of a pocket binge.  You see, one has a phone which has rapidly become the ruler of one’s Life, and one has decided that this little autocrat needs to be on one’s person at all times.  So if something doesn’t have a pocket?  BAM! it’s getting one, like it or not!  Take that you pocketless fiends you!  Picture, if you will; pockets raining down upon Le Wardrobe, with lightning bolts and attendant thunderous cracks and booms as they attach themselves fiercely and fearlessly to the offending garments cowering on their hangers… ahem, my apologies.  Maybe I’ve been isolating too long.

Anyway, meet the victims:

please note; The Eye…

Firstly, my plaid Delice dress

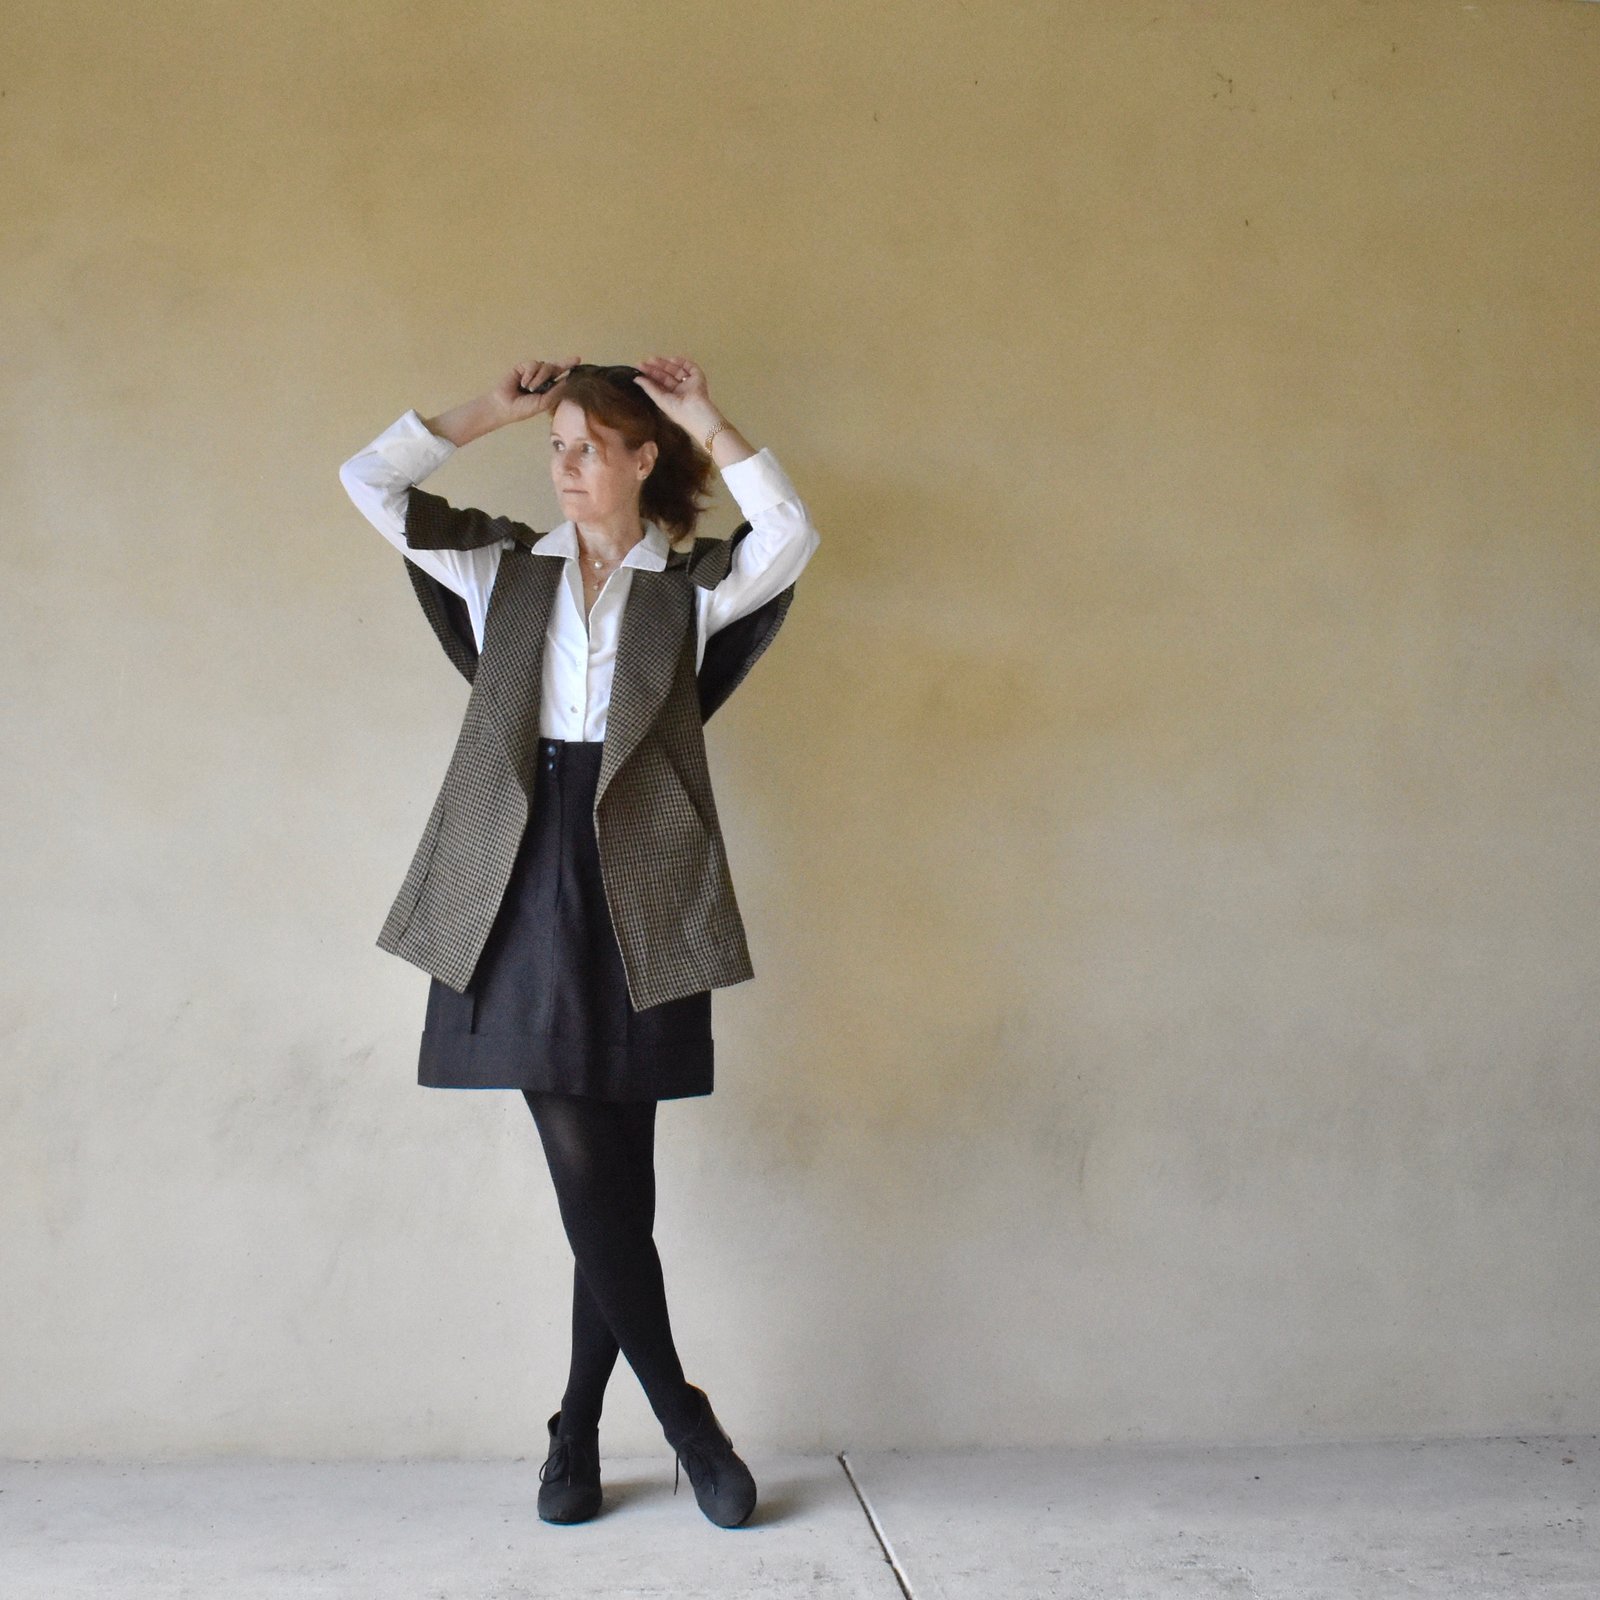
I’d already promised to myself that I would add pockets once I got around to it… it’s a loose-fitting little thing, and while the attempted side-seam pockets did not work I knew welt pockets would be fine.  I just needed to get onto it!  and finally, voila. I still had the pocket bags, and I cut welts on grain from the very tiny amount of fabric I had leftover.  Both welts and the opening area of the pocket were interfaced with iron-on interfacing for stability – this fabric is basically a brushed cotton flannelette and so it has pretty poor stability actually,  A pocket bag on a welt sans interfacing stood a good chance of becoming a gaping, saggy mess, so I used nice firm stiff stuff, and the pockets turned out a charm.  No I didn’t take any progress pictures.  Bad me.

Secondly, my rusty coloured Sabrina skirt


this has always been a little on the baggy side for a pencil skirt, I think I might have selected the incorrect size in the first place because I’m slightly terrified of making a thing too small or too tight; a problem which is practically unfixable, and the fabric was kinda precious to me.  I mean, if you make something slightly too big, that is a problem that is eminently fixable down the track.  Except that “down the track” never seems to come… anyway, flash forward to a few days ago when I realised that same slight bagginess could easily accommodate some inseam pockets.  So I went for it!  I did remember to take some pictures of this one for posterity…

Firstly cut out the pockets lining at the size of pocket you want.  Stitch to the skirt front seam allowance at the place where you want your pocket to be in a skinny seam allowance, and press towards the skirt front.

Cut the pocket itself from the self-fabric, with an opening extension that covers the width of your side seam allowance once it’s laid over the pocket lining.  My side seam allowances for this skirt are actually quite huge, showing that I really truly overestimated how much wriggle room I needed; but since that mistake resulted in such a good prognosis for future pocket insertion, I forgive past-me.  Trim to fit, and finish the raw edge.  Stitch to the back seam allowance, right sides together in a skinny seam allowance, and leave it laying towards the front.  Check the pocket piece and pocket lining piece are aligned perfectly.

Now open the two pocket pieces apart and gently rip open the skirt side seam.  Leave at least 1cm closed at both top and bottom edge of the pocket pieces, and then reinforce the side-seam stitching at these points both top and bottom with some quick forward/backward stitching so the seam doesn’t open any further.

Now; open out the back skirt side seam allowance and as far as possible, stitch the skirt back and the pocket piece together, using the previous pressed seamline on the skirt back as a stitching guide.  Be sure to keep the skirt front free from this stitching!!

Lay the pocket pieces over each other again, and stitch them together around the curved edge, commencing and finished the seam at the skirt side seam, taking care to not go over it and into the skirt itself.  Finish the raw edges as far as possible on the overlocker.

Now open out the side seam allowances away from the skirt front and back, and at the top and bottom edges of the pocket, perpendicular to the side seam: stitch the pocket to the front skirt seam allowance up to the side seam line, and the pocket piece ONLY to the back skirt seam allowance up to the same seam line.  These short seams are indicated in white on the previous picture.

Ta da!

And, while I still had the machine threaded with chocolate brown thread… victim number three.  This is a great little corduroy skirt, very simple and plain and useful.  Except that it had no pockets!  Problem solved!  For this one, simple patch pockets were the go; but slanted at what I find to a optimal angle for my hands.  I used some of the leftover corduroy from which I made my wide-leg Sashas, and even though it doesn’t look like it I spent ages and aaaaaages aligning them to be perfectly symmetrical.  Yes they probably look a bit weird but I have pockets so I care not.

That’s it for now, until next time!

pinterestmail

a pretty outfit (cielo and sixtine)

So I made an oh-so pretty, fluttery, flower-strewn outfit of the most perfectly spring-worthy persuasion! but wait…  am I not currently still on the downwards slope to the dark dank pit of winter?  well yes, so we are just barely into July, and I am OVER winter already.  *sigh*

Really I expect I’ll be making winter-y things soon but I just don’t feel like it right now, and I just want to think about fun summery things still.  Terrible, isn’t it?  Anyway, I bought this lovely rose-y rayon-linen in Spotlight, back when Perth was sort of half in isolation.  I’d been feeling very down, gone shopping for some essentials and just spontaneously decided buy something pretty and non-essential at the same time, to cheer myself up.  As it turned out, we had hardly any cases of the covid-19 virus in Perth, which is of course wonderful; but we were all as terribly worried at the time as if there were and buying something lovely lifted my spirits quite a lot at the time.

I cut out the ruffle-tastic new Sixtine skirt by Coralie Bijasson patterns and then had just enough left for a plain little top, which is the best counterpoint for all that ruffle anyway.  I’d recently had success making the Closet Case patterns Cielo top for Cassie so traced out the  next size up for me.  And I really love how they go together!  The Sixtine pattern is a simple, completely symmetric, true wrap skirt, with the most amazing ruffle and a half action going on.  Actually when I say ruffle and a half, that is quite literally what it is; there’s a ruffle, and then another half of that same ruffle on top.  Ruffle and a half! And my fabric worked out so nice! it is quite fluid and soft, which was just right for the ruffles; they have just exactly the right amount of body and zero limpness.The Cielo top is a great little basic, I can already tell I’m going to make stacks more.  Simple, but perfectly so.

I don’t really have much else to add, both these patterns are unambiguously straightforward designs with no tricks to speak of.  With the Sixtine skirt, I think you were supposed to place the buttonholes and buttons so the buttons popped out on the outside of the waistband when buttoned up, but I used very plain sheer flat ones from my stash, both ancient and inherited and not very pretty, so I positioned them so they button up on the inside of the skirt.

Oh, I also finished the lower hemline of both ruffles using the triple-stitched narrow hemline, explained in this post here.

I have one more sort of interesting thing I can say about sewing this; normally when you’re cutting things out from a print you carefully make sure all your pattern pieces are aligned with the “up” side in the same direction, yes?  Well I would definitely do that for fabric with a nap, but for a fabric with a print I’ve often preferred the look when I do not adhere strictly to this rule, but lay pieces so as to alternate up and down placement.  That way you avoid that “double-ing up” up of an identical motif that can look absolutely terrible and obvious when it occurs in a pieced garment.  Obviously this really only works if the print doesn’t have an obvious “right way up” design, but while it’s only a little thing it can make a noticeable difference.  As soon as I looked at my pictures here I could see a couple of instances where an upside-down motif is not too far away from a right-way-up motif, and if they’d been both oriented the same it would have looked strange.  So I’m glad!  I hope I explained that OK!

Anyway, I love this new ensemble and honestly can’t wait til the weather is hot again so I can actually wear it.  In the meantime perhaps I should start finally turning some attention towards more wintery projects  (sigh)


Details:

Top; the Cielo top by Closet Case patterns
Skirt; the Sixtine skirt by Coralie Bijasson patterns
Shoes; both super old now but still much loved

Later edit; so I added some pockets to this skirt! They’re patch pockets, with a slightly gathered top, drawn in by a little olive ribbon, which I happened to have in my stash.  They’re simple but of course useful.  Who doesn’t like a little bit pf practicality along with their floomph?!

Here’s a brief overview…

the pockets are cut to fit my mobile phone in, and are about 3cm wider at the top…

I snipped a little hole in the outer layer of the upper hem/casing..

the gathering ribbon emerges from this hole

align the raw ends of the ribbon inside with the raw edges of the upper pocket hem/casing

ensure the ribbon ends are stitched down firmly along with the pocket… gently pull up the excess pocket width at the top and tie off the ribbon…

camouflaged but not totally, and I think it looks kind of pretty when you do notice it   🙂

pinterestmail

Elementary, my dear Sherlock

Yes, I know; a complete mis-quote of an already mis-quote… *braces oneself for outraged Holmes enthusiasts*

But wot is this new thing I’m wearing ‘ere then?!  Is it a jacket…?  no, a cape…?  some tweedy, distinctly Holmes-esque thing, somehow exuding English-ness, an air of briskly strolling in the country, of hounds-at-dawn, roaming in-swathes of fog and mystically swirling mist, stalking the streets of London or out on the Baskerville moors?  Fittingly, I’m accompanied here by my very own hound, who while certainly a fearsome and diabolical creature at times, is however sadly lacking a Baskerville lineage.

So, I was mindlessly browsing Le Internet, checking out new-to-me pattern companies, something I am wont to do, randomly, late at night and way past my bedtime,… and clicked Add to Cart on the Cape-Sleeved Jacket by Trend Patterns.  Followed by… Purchase.  So daring!!

It’s a rather interesting and lovely style, not something I’ve seen anywhere else: a longline open jacket with notched collar and interesting “sleeves” that are more like an intriguing hybrid of sleeves and cape.  I searched my stash for a suitable victim, and unearthed a grey/black houndstooth-y check suiting; given to me yonks ago by ?I think? Mum, though I’m not totally sure.  It had exactly the right weight and style for this design, but the colour was pretty dead and cold and flat and looked absolutely terrible on me… so I squandered more time than I care to admit to, attempting to dye it.  It was a rather large piece, so I’d started out leaving it to soak cold in a large tub of yellow dye.  This had almost no effect, so I added orange for synthetic fabrics.  This had a tiny teeny little effect.  So then I dried the fabric, and cut out the jacket pieces, which made for a smaller bulk of fabric for the dye pot, and boiled it all up with the same dye mix.  Finally; SUCCESS!!!!

helping…

from left; original colour… after soaking… after boiling

The new shade of tobacco was rather warm and pleasing, and deemed acceptable.  Of course the big problem about dying pieces, already cut up; as opposed to one single piece of fabric, is that the pieces frayed a bit, and also got stretched out and distorted somewhat in the boiling/dyeing process, and so I’m not 100% confident that my final jacket is all that perfect or beautiful… but I did my best!  carefully steaming everything back into the shape of the intended pattern piece.


Lining;  fully lined with chocolate polyacetate lining fabric, from my stash, probably originally from Fabulous Fabrics since it’s a really nice quality.

below; see how the front armhole is open right up to practically shoulder level? I think it’s worth pointing this out since I actually had no idea it was like this from the line drawing and remained ignorant right up until it came time to add the cape facing…

That’s not a criticism btw, just an observation.  I really love my new Sherlock Holmes jacket, and I really loved making it too; but I’ve admit; it was not a particularly easy project.  Even given the fact that I complicated things for myself a. dyeing and b. deciding I absolute HAD to have in-seam pockets – which were a big success in the end if I say so myself.  I’m so glad I put them in.  Actually I can’t imagine a jacket without pockets of some kind.

How did I put in my pockets?  so I remembered to take a few pictures but not many, so hopefully my written explanation will suffice…  I cut the front armhole piece (below, at left) and the front panel (below, at right) as pictured; and in addition, a pocket opening facing piece (below, middle) with the same upper edge as the slanted edge of the front panel (at right)  I also cut a pocket lining (not pictured) from the same chocolate polyacetate lining fabric used throughout the jacket…  it’s the same size and shape as the pocket bag extension (at left) and with a slanted top edge equivalent to that of the pocket opening (at right)…

the pocket opening edge is that slanted edge showing out from under the square inner edge of the paper pattern piece, and that little extra piece is the pocket opening facing.  The facing is interfaced (see below), stitched along that slanted edge leaving a 1cm free at either edge of seam, and under stitched.  I cut a pocket lining using the same chocolate lining fabric that lines the whole jacket and stitched this on to the lower edge of the pocket facing.  Then stitched the pocket and pocket linings together around the long curved pocket edge.  The remainder of the jacket construction proceeds as normal, and the pocket is nicely hidden away between the jacket outer and lining

So; what was tricky about making this jacket…?  well, the steps are illustrated with photographs, not drawings; so if you’re the kind of person who often goes on the illustrations then it’s not always clear which pattern pieces or which seam you might be looking at in this photograph or that one….  and there are 27 un-numbered pattern pieces…  Maybe I’m just dumb, or losing it or something, but I’ve been sewing clothes for myself for over forty years and there were bits where I was scratching my head and had to read and re-read over a couple of times to “get” it.

It’s also pretty important to mark the marks, notches and dart lines carefully and securely.  As far as this project goes, this is where my brilliant plan to dye my fabric pieces fell apart a bit since a lot of these little marks were dislodged and lost while dyeing, and notches disappeared in fraying edges, and it was pretty hard to re-instate everything accurately.  To be honest, there were several times I felt like heaving the whole lot in the bin and starting over anew, with fresh new fabric, particular since I hadn’t even liked my fabric all that much in the first place!!

I think numbering the pattern pieces would have been a HUGE help, and then to use those numbers in the instructions.  Another thing, the instructions are…. kinda sparse.  The term “bag out” is used several times …  I’ve always been a little thrown by the term”bag out”.  I mean, I know what it is… basically just another way of saying stitch the outer and lining layers together.  See, I grew up under the tutelage of the long-term pattern companies like Vogue, McCalls and Burda; and “bag out” is not a phrase that ANY of them EVER use, as a rule.   Also, “bag out” is incidentally Australian slang for picking on someone, like rudely giving them a really hard time, so seeing it pop up in sewing instructions is always a moment for pause 😉

After all this; I actually quite happy with how my jacket turned out, and am even little keen to make it up again.  I think my attempts to dye the fabric just made the project a whole bunch harder than it needed to be, and I’d like to give the pattern a second chance, and to do it properly, make a really good and proper tailoring job of it next time.  I would also like to add a few more pockets, to the inside and the lining, like a mens’ suit jacket has.


Details:

Jacket; TPC13, the Cape-sleeve Jacket by Trend Patterns, grey tweed overdyed with orange dye
Shirt; the Closet Case patterns Carolyn pj shirt, white cotton, details here
Skirt; Burdastyle 10-2010; 136 (the Karl Lagerfeld skirt), in black suiting, details here
Tights; my own custom fit pattern, details here
Shoes, designed and made by me, details here

My cape-sleeve jacket feels so very very Sherlock Holmes to me that I couldn’t resist just popping over to London for a more appropriate photoshoot location….

jk, of course.  Hurrah for the wonders of photoshop!

pinterestmail

kangaroo paws… and making a skirt with a side pocket opening; a tutorial

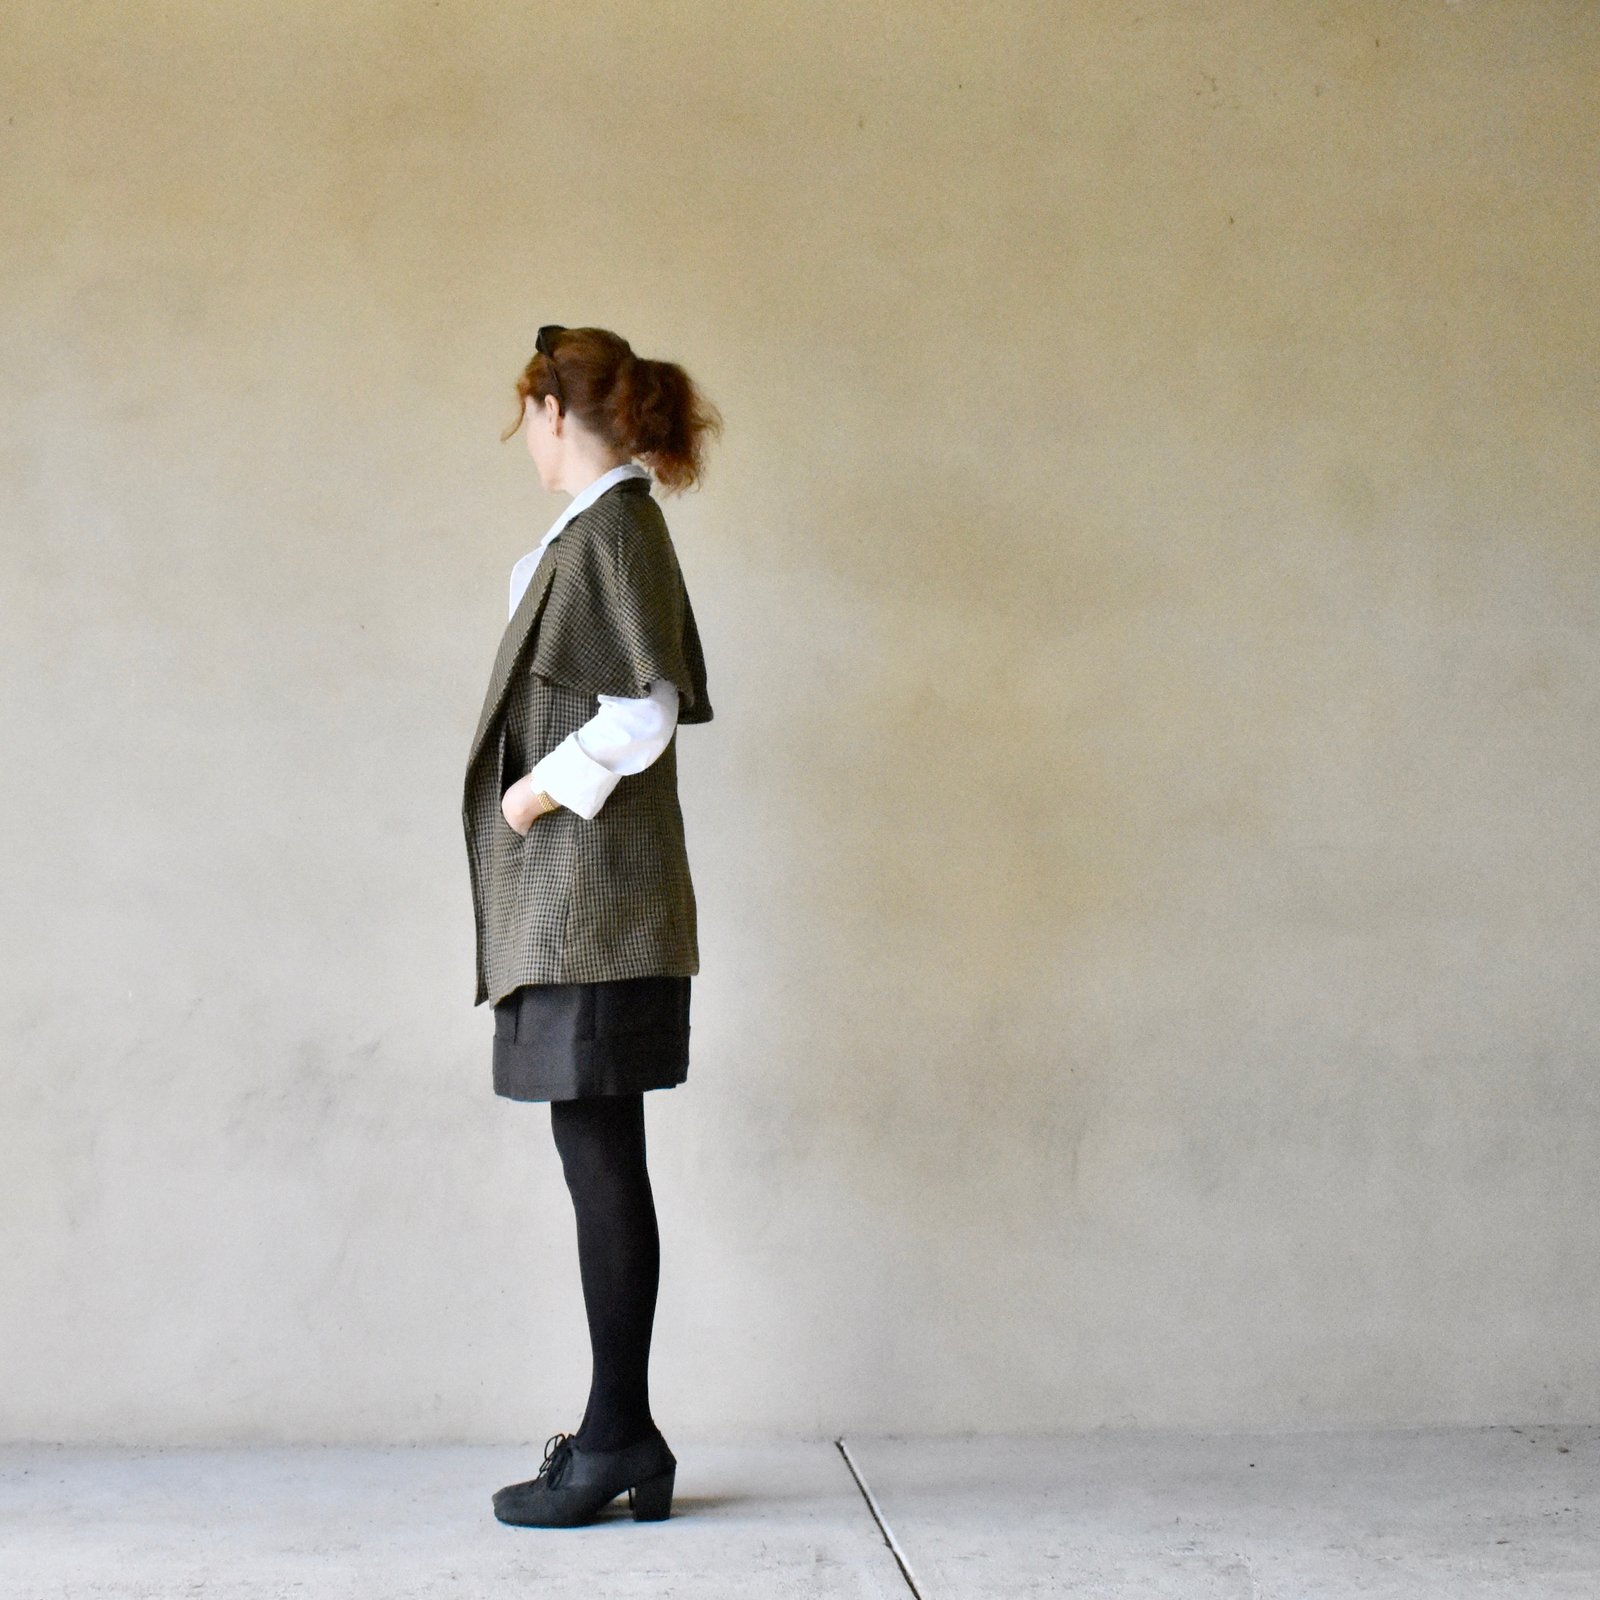
I made a new skirt using a pretty special piece of fabric… there’s a little story behind it.  It’s a handprinted organic cotton/hemp from Ink & Spindle with a really lovely kangaroo paw motif; designed by Lara Cameron and handprinted in Melbourne… mmmm everything in their range is SO yummy, it was reeeeeally hard to choose just one print…!  I bought a piece and sent half to my friend Lisa of Lisa’s Carolina… she had once shared a piece of lovely Dusk blue Alabama Chanin cotton jersey with me and we made something in the same fabric… and I thought it would be fun for us to do the same with some Australian stuff.  And it doesn’t get much more Australian than this!

Kangaroo paws are the state flower of Western Australian, so an apt pressie for an international sewing friend!  And I thought the colours so pretty and earthy; rich tomato-ey/paprika and warm dusky pink on a natural unbleached background… actually I’ve just checked the site and it’s called “desert red on sand”  Perfect!!  I cannot WAIT to see what Lisa makes with her piece!  🙂

Anigozanthos manglesii… picture taken by me of a particularly nice specimen in our neighbour’s garden.  Kangaroo paws come in many different colours now, however this red/green is our state floral emblem

I got to mulling over what to make with my bit…  a skirt seemed like a good choice for this full-bodied canvas-sy stuff.  I wanted no seams on the front and the back, because I wanted to make the most of the random print, and hunted out an old favourite Vogue 8363, a pattern I’ve used loads of times before.  But I didn’t even want a side zip closure either… then I got the idea in my head to make it to have pockets that perform double duty as the closure of the skirt.  Meaning… NO ZIPS!  I’ve made a couple of skirts like this before and knew this pattern could happily be adapted pretty easily to have this feature…  I’ve written a little tute below in this post on how I did it  🙂

Because this is going to be a summer-y skirt, I left it unlined and enclosed all the raw edges with HongKong binding, using a pale coffee cotton voile from Spotlight.  I also used this for the pocket lining and the waistband lining…

This skirt has taken me the LOOOOOOONGEST time to write a blog post for it… I’ve even worn it a few times…  which is a kinda fail for me since I have this thing that I shouldn’t wear something until I’ve written a blog post about it.  Naughty!  Partly because of my plan for the pocket closure tute, about which I’ve been terribly procrastinate-y.  Well I’ve finally done it now, at last.  Please do let me know if you find this useful and/or helpful… and if you use it of course!


How to adapt a pattern to have a side-pocket opening… this is a good feature since it negates the need for a zip AND you get the bonus of pockets, naturally!

skirt map

The pattern I used here comes with a slant-edged pocket pieces and either a CB zip or button front closure so it’s pretty easy to adapt the waistband and method of construction to accommodate the pocket closure.   However, even if your skirt pattern doesn’t come with pocket pieces you can still draw your own pocket pieces and adapt any skirt pattern to accommodate them… as long as you remember this VERY IMPORTANT NOTE:  your skirt pattern MUST be roomy enough in the hips so that you can comfortably shove your hands inside without making the skirt too tight by doing so  i.e.. NOT a figure-hugging body-con pencil skirt.  Though you can of course start with a figure hugging pencil skirt pattern; keep the waistline and just grade the side seams out at the hips to give you the pocket room you need… allow around 12cm at least of extra ease at the hips from a pencil skirt starting point.

My pictures demonstrate a skirt opening at the LEFT hip… for a right hip opening just flip sides!

The pocket (below, at right) has the same top and side edge as your skirt front piece, and the pocket bag (at left) has the slanting opening edge.  This slanting edge should be cut identically on the each of the topside edges of the skirt front itself also… If you’re drafting your own just ensure it has the width to accommodate your hands.  Also, the waistband is going to overlap at the top of the pocket… so cut the waistband piece long enough to go around your waist, plus at least the width of the pocket bag top edge.

For the L pocket only: mark with a pin a point A on both pocket and pocket bag pieces as indicated here, roughly 12cm (5″) from the top edge.

Finish the raw edge above this point.  I have finished mine with a bound HongKong finish, however a skinny hem or overlocking is perfectly fine.

Stitch pocket bags to each side of the skirt front along those slanting opening edges.

Press seam allowance open, grade seam allowances, re-press all seam allowances towards pocket bag, under stitch, press pocket bag under.  At this point, pocket bag and skirt can be basted together along the top edge.

Pin under-pocket piece to pocket bag piece along unfinished curve edge.  Stitch from point A to the side edge.  Note: the R pocket is pinned in the same way, and stitched along the entire pocket edge to the top edge.

Finish seam allowances. R pocket edge can be finished along the entire seam, L pocket must be left open above point A

For a HongKong finish, leave a little tail which can be turned under and enclosed within the binding as shown in the following pictures…

Stitch a bar tack at point A to reinforce and strengthen the pocket opening,

Align the skirt front/pocket bag over the under-pocket, keeping the finished edges together. … and baste all three pieces together along the side seam below the slanted pocket opening. This is the skirt front, finished, at this point join skirt fronts and backs together along the side seams.  Above the slanted pocket opening, the skirt back is stitched only to the under pocket piece for both R and L sides.

Attach waistband to the top of skirt, commencing from the skirt front/L pocket bag edge, encircling the waist and extending past the L side seam taking in the top of the LH pocket piece also.

Hand slipstitch the waistband facing inside in the normal way, and stitch press studs and/or a wide hook and eye on the waistband overlap…

Ta da!!


Details:

Skirt; modified Vogue 8363, upholstery fabric; worn with:

(at top)

Drape-y top; the loose draped top from “drape drape”, by Hisako Sato, details here
Hat: Vogue 8844, ivory corduroy, details and my review of this pattern here


(below)

Tee; modified Nettie, Closet Case patterns, details here
Cardigan; my own design modifications of Nettie, Closet Case patterns, details here
Raincoat; Kelly anorak, Closet Case patterns, details here
Shoes; made by me and my own design, details here

the skirt is a little longer here… This was its first length and is how I wore it for its maiden voyage… and then I took one look at my pictures and thought, hmmmmm.   I don’t know if it’s just on me, but I find knee length skirts are an instant frumpify-er… I like them to be EITHER a few inches above my knee OR to be full midi length, halfway down my calves, every time I’ve gone for a middling length I’ve regretted it.  Like, it’s gotta be one extreme or the other… but NEVER in between!  I think it’s just right now!

SaveSaveSaveSave

SaveSave

SaveSave

SaveSaveSaveSaveSaveSave

SaveSave

SaveSaveSaveSaveSaveSaveSaveSave

SaveSave

SaveSave

SaveSave

SaveSave

SaveSaveSaveSaveSaveSave

SaveSave

SaveSave

pinterestmail

side seam with inset strip and bound-edge inseam pocket; a tutorial

pocket

btw this fabric here is fulfilling a long held dream of mine…. a Marimekko dress!!  print is Pieni Unikko 2, 100% cotton, available here… yes, you can get Marimekko fabric in Australia!  More details on the dress in a future post to come…  🙂

Also, sorry for the unwieldy title but it’s the most accurate way of describing this technique, I reckon…

Anyway, recently I was putting in some inseam side pockets but I wanted to have a contrasting coloured strip set into the seam and carrying on seamlessly to incorporate a neatly bound edge to the pocket opening also…  how to do it? well here is my method…

This is illustrated for a dress but works equally well in a skirt, trousers or shorts as well, obviously.  pocket1

You have your dress (or skirt/trouser/shorts) front and back, the under pocket piece cut from the fashion fabric and a pocket liner piece cut from either lining fabric or the fashion fabric, and 1 1/2″ (4cm) bias cut fabric in a contrasting colour for the inset strip/pocket edging.  btw the measurements given here are for a garment cut with 1/2″ (1.2cm) seam allowances and will resulting in a 1/4″(6mm) wide contrasting strip, but the measurements can be varied accordingly for different dimensions as desired.

Stitch the bias strip to the skirt front, using a 6/8″ (2cm) seam allowance.  Press the strip to the side edge.

pocket2
From the underside, make two 1/2″ (1.3cm) snips (seam allowance width) through all layers at the top and bottom opening edge of the pocket.  Take care to not snip all the way to the previous stitching, but ONLY  the width of the seam allowance.

pocket3

Stitch the lining pocket piece to the bias strip in a narrow 1/4″(6mm) seam allowance.

pocket5
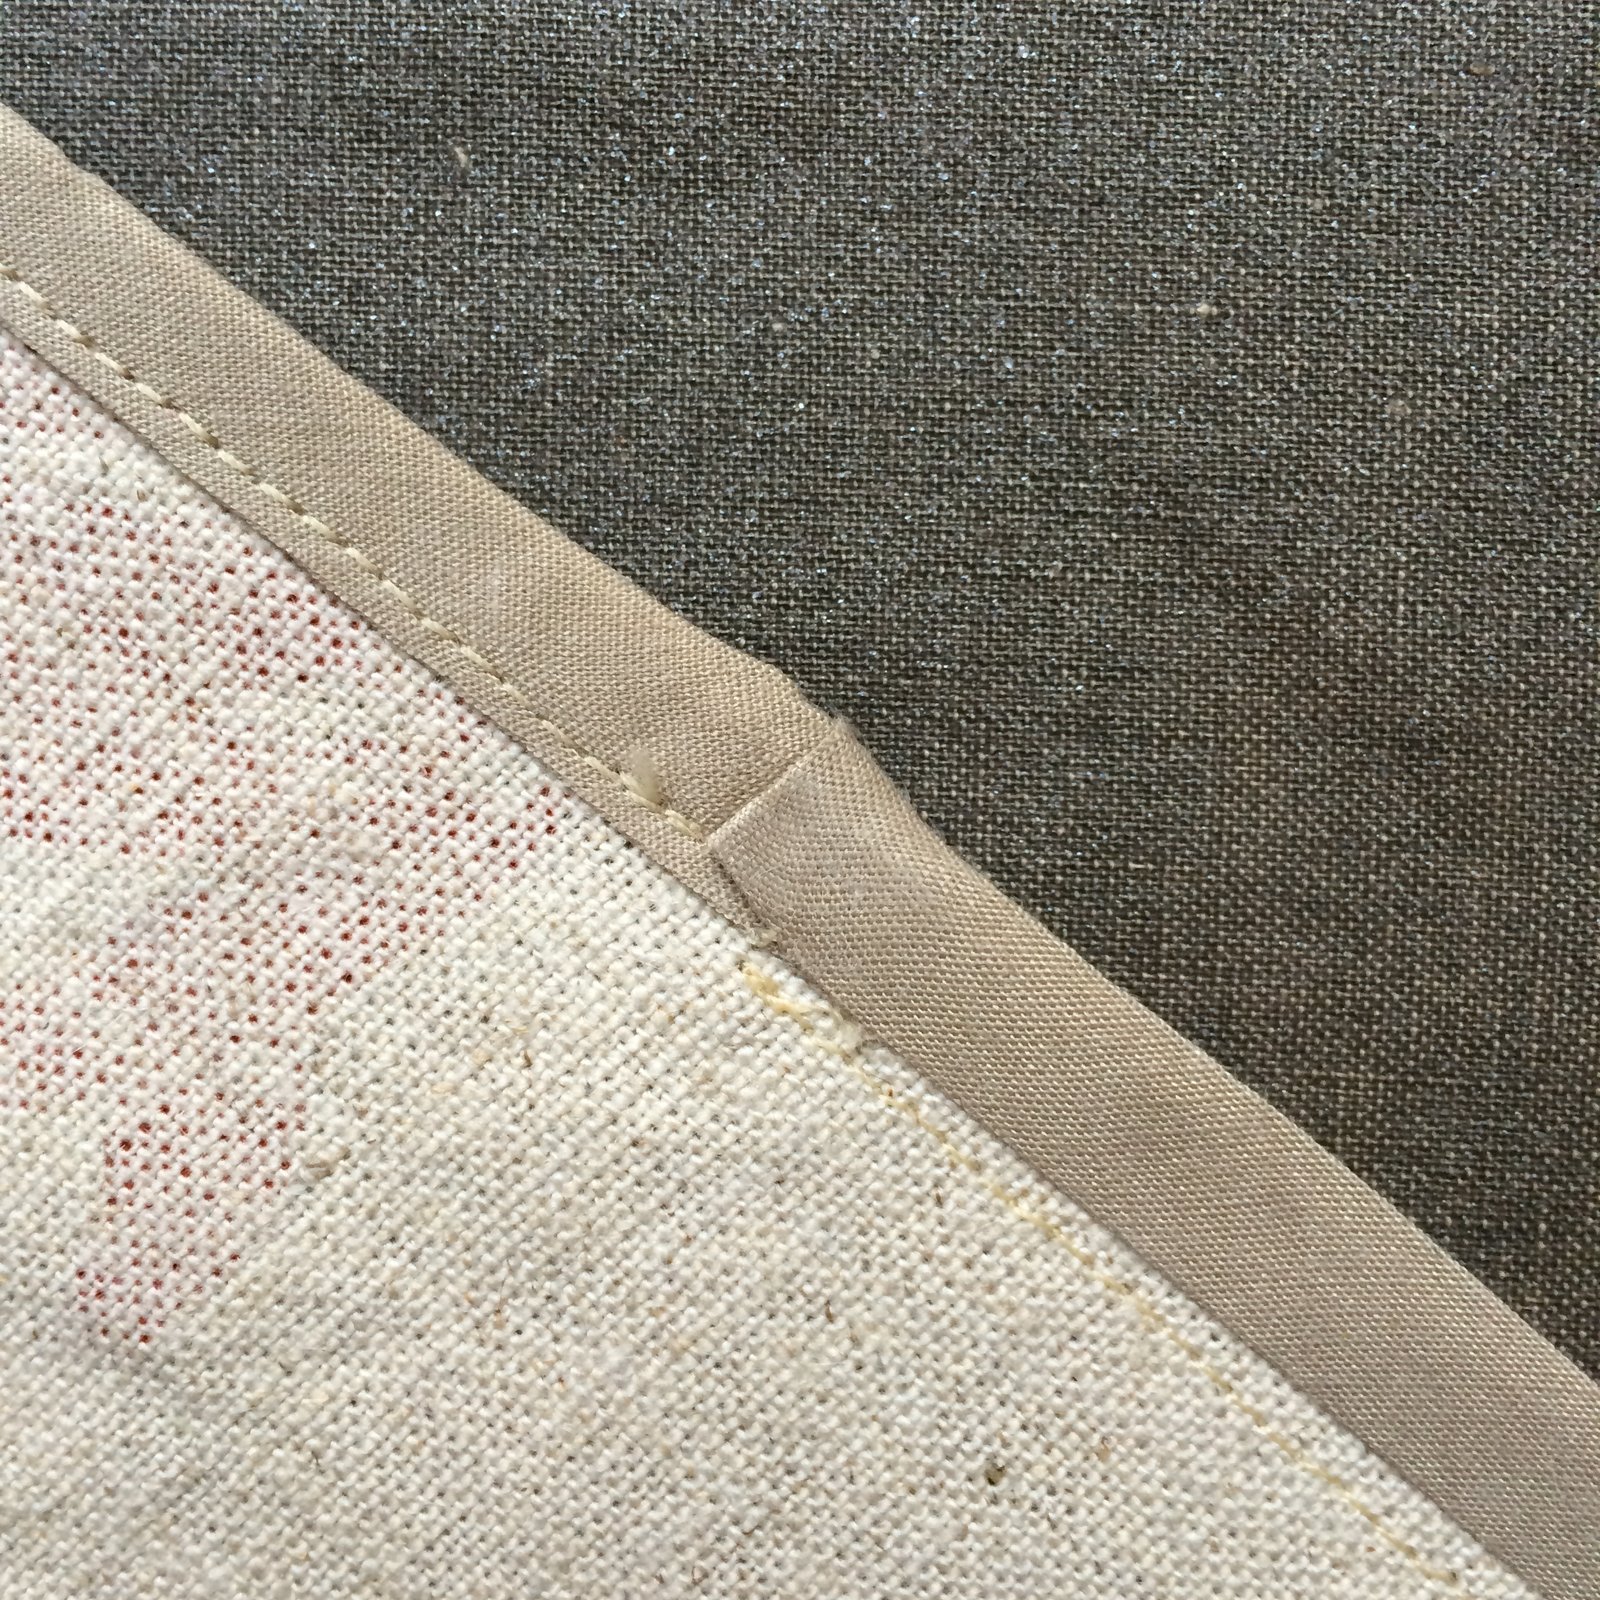
Press the pocket lining out, then turn it under the front piece and press, forming the 1/4″ (6mm) wide bound edge of the pocket.

pocket6pocket7

Use a matching thread and stitch in the ditch along the joining seam from the right side through all layers, securing the pocket lining to the front.

pocket8

Underneath, pin the pocket piece to the pocket lining piece around all inner edges, stitch,  Finish the edge as desired… I chose to finish the edges in a HongKong seam using the same yellow voile.

pocket9 pocket10
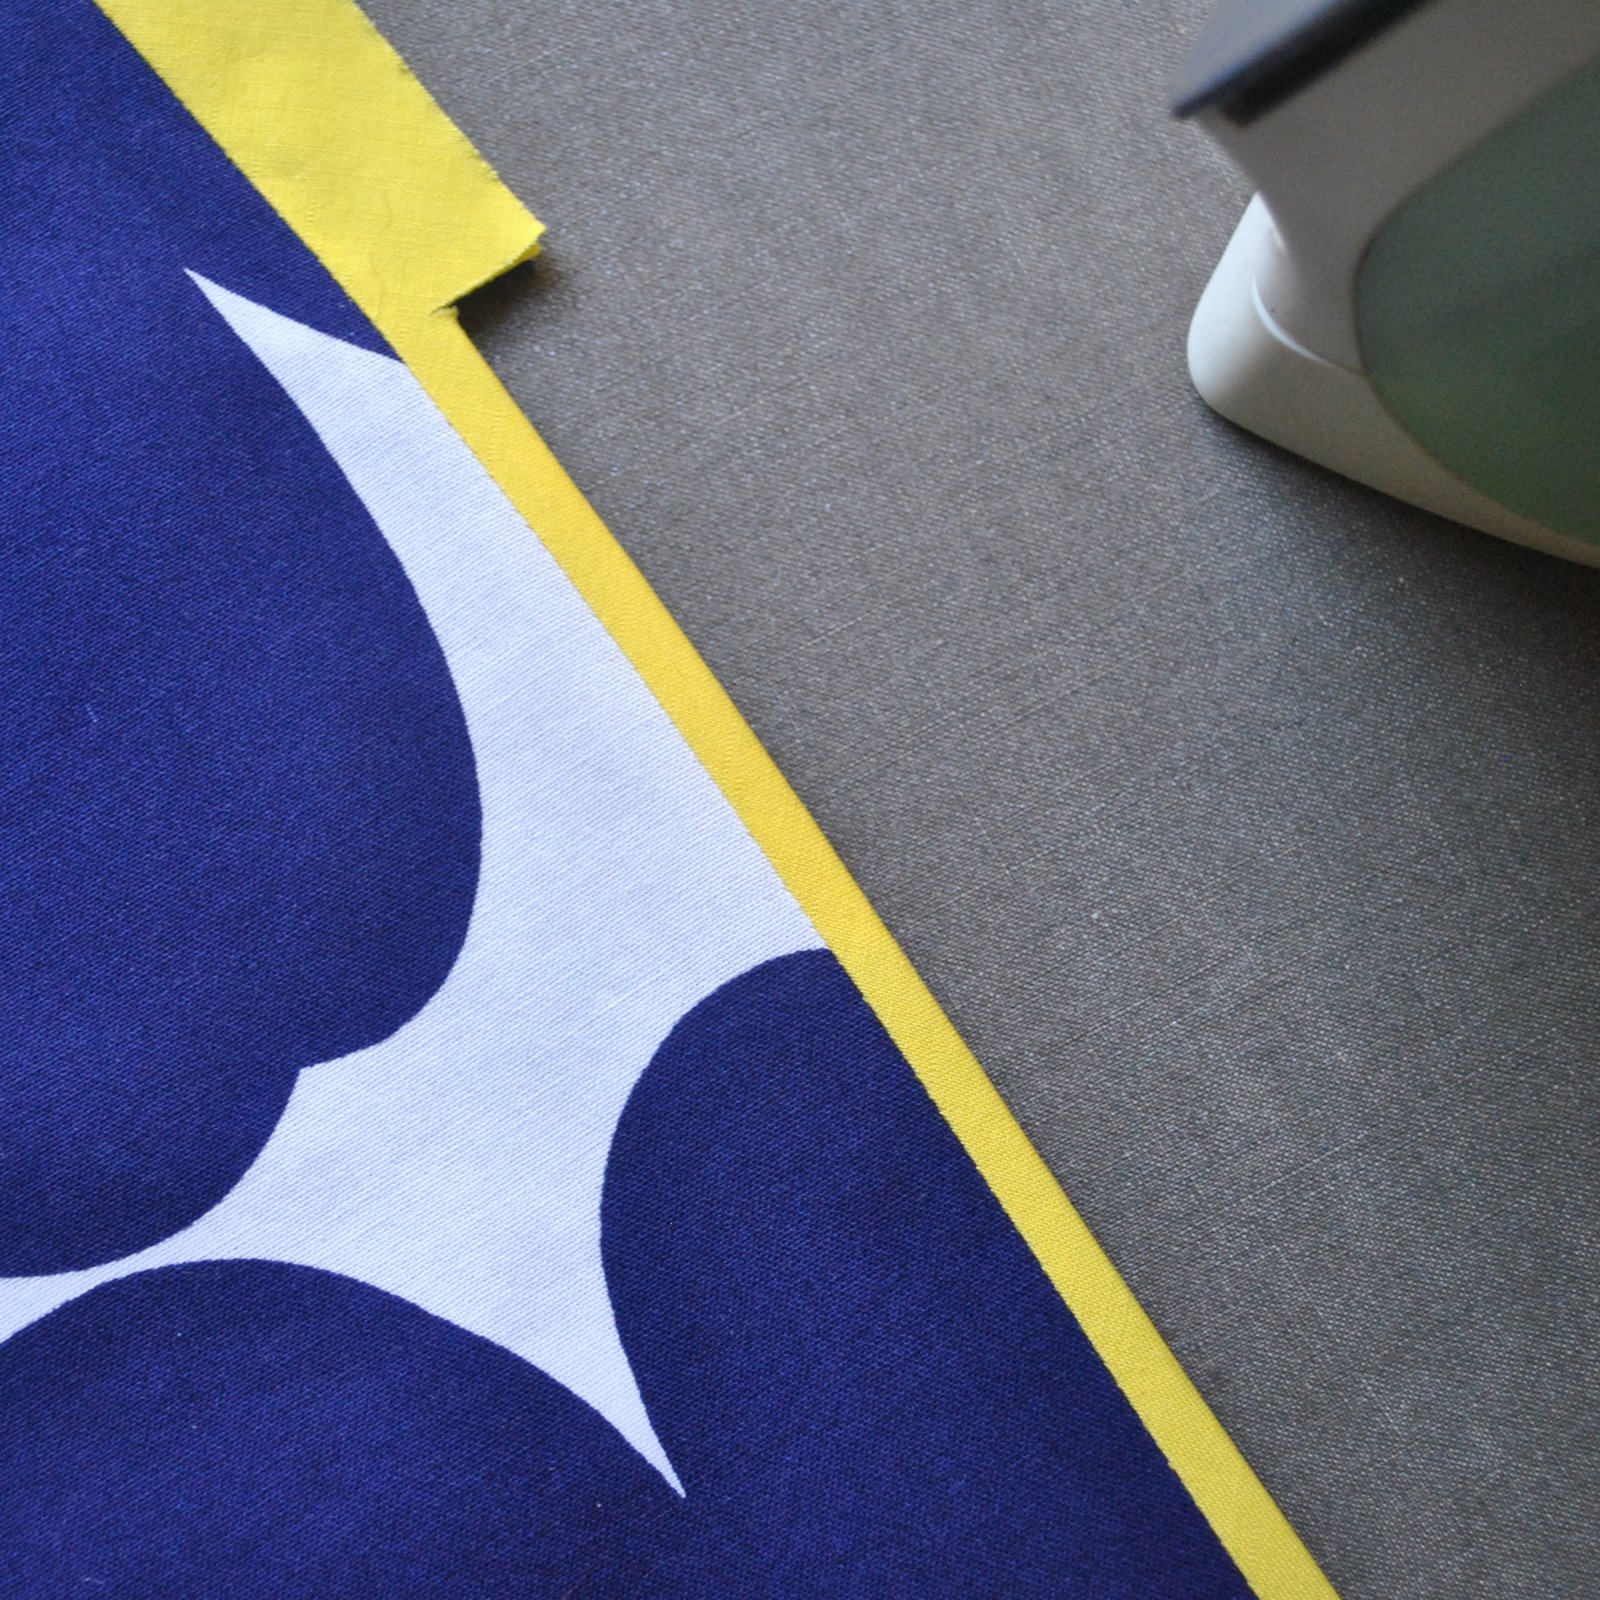
from the right side (with some irrelevant (white) basting along the side edge… not really necessary for this method)

pocket10a

Pin the back piece to the front piece at the side seams, marking the pocket opening points exactly with a pin.  Have the front piece uppermost, so you can use the previous, bias attachment seam as a guide while stitching; this is so you can ensure your contrasting bias strip comes out as a nice perfectly even width all the way down the side seam.  Stitch side seams in a 1/2″ (1.3mm) seam, passing exactly through those pin-marked points.  Reinforce the pocket opening edges with a few backward and forward passes with the machine at these points. Take great care to keep the pocket opening edge free between the two layers.

pocket11

And done!  When you turn it out, you will have a nice side-edge strip, which seamlessly goes on to edge your side inseam pocket.  Nice, yes?

As always, if you find this a useful and/or helpful tutorial, please do leave a comment saying so…  🙂

pocket12

pinterestmail

gathered pocket; a tutorial

gathered pocket
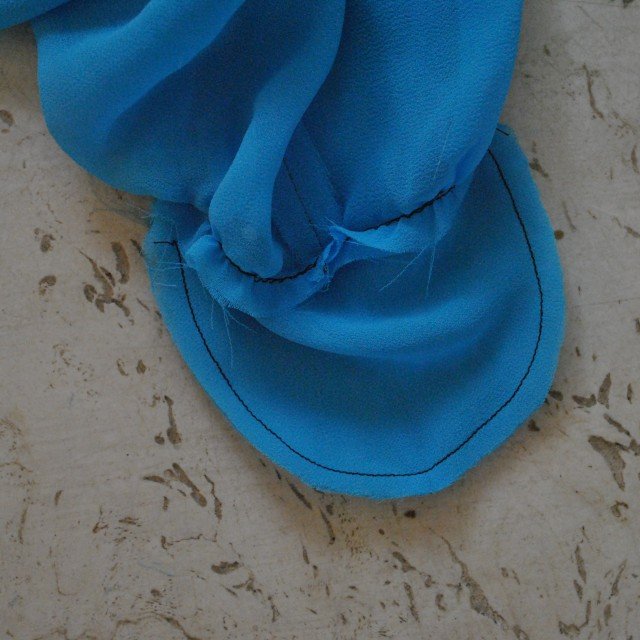
This gathered pocket sits inside and at the side edge of a loose-fitting garment such as an unfitted dress or tunic top, and can be adapted to go in a loose, flowy skirt also.  It is best suited to lightweight fabrics.

Firstly, making the pattern pieces…  start with an A-line dress pattern.  I used dress R from the Stylish Dress Book by Yoshiko Tsukiori; which has gently A-line side seams that curve outwards towards the lower hemline, but this design would work equally well for a straight, diagonal side edge too.

gp1

For both front and back pieces, both sides, draw in the above, straight lines;

blue line:  starting from the the innermost point of the armscye curve, vertically straight down to finish at the level where you wish for the top edge of the pocket to hit.  As a rough guide I find around 5cm (2″) above hip level to be generally a pretty good upper pocket point.

green line: horizontally, at the level where you wish for the top edge of the pocket to hit.  The “bagginess” of your pocket is a personal choice; as a guide; my green line is 15cm (6″) in length which coincided with the degree of “flare” of the dress at the hemline.

red line: vertical line from the outer edge of green line, straight down.  This is the new side edge of the dress/top.

orange curve; from the blue green intersection, draw a gentle pocket curve to intersect with the original side of the dress edge.  As a guide, I made my pockets 20cm deep.

purple line: vertical line from the lower edge of the pocket, up to the green line.  This is the centre fold on which you will cut the pocket piece.

The grey lines of the side front and side back represent the original lines of the pattern pieces.

gp1a

These lines define the new pattern pieces as show above; at left is the new side edge of the dress front and back, now defined by the blue line, green line and red line.  Only one side is pictured, if you want the pocket to be on both sides then obviously cut this profile both sides of the garment.  Side fronts ( 2), and side backs (cut 2) are defined by the blue line, orange curve and the original side edge (grey curve), and pocket pieces (cut 2) as defined by the orange curve, with a centre fold along purple line.  Remember to add seam allowances!

warning; hideous fabric alert… my apologies.  This blue stuff was a handy small scrap,  I also used black thread because I didn’t bother to change the thread in my machine  it stands out and can be clearly seen against the blue fabric…   🙂


gp2

Also, for the drawstring ties cut 4 strips of lightweight fabric on the bias; Mine are each 41cm (15 1/2″) long by 2.5cm (1″) wide.

Construction:

ties

Pocket drawstring ties;  stitch the long edge and turn right side out.  My tips and method for turning out skinny spaghetti strap ties can be found here

(below L) Stitch front and back together along the red line, press open.  Stitch side fronts to side backs along side edges, press seam allowances open.

gp3gp4

(above R)  Stitch side front piece to front along the blue line, finishing at the top edge of the pocket.  Repeat for side back piece to back.  Clip to end of stitching, press seam allowances to front/back.

(below L) Run a long, gathering stitch along the pocket opening stitching line (green line).

gp5gp6

(above R) Pulling up this gathering stitch slightly to fit, stitch a pocket piece along the pocket top edge in two separate lines of stitching, leaving a short 2cm (7/8″) gap in the centre between the two.

(below L) Turn pocket piece to the inside and gently press along stitching line.

gp7gp8

(above R) Inside, line up pocket lining and side front/back piece along the curved lower edge and stitch together.  Finish pocket seam allowances and side front/back seam allowances if desired.

(below L) Pin the pocket piece to the dress along the top edge of the seam; and, keeping the side front/side back free, stitch together with a row of stitching 1cm (3/8″) in from the top edge.  Effectively creating a 1cm width channel  between dress and pocket.  Insert a tie into each side of the channel, starting from the gap and coming out at each end.  Apologies for the scraps of yarn used in this little blue sample pocket, for the real thing I did make proper turned out bias strips, really!

gp8gp9

(above R)  Secure the tie ends in place by stitching a few passes of back and forward stitching on the outside of the dress, through all layers.

With the ties, pull up the excess width of the pocket edge to fit and tie in a sweet bow or whatever.

And done!

gp12

Thank you to everyone who expressed an interest in how I made these pockets;  I hope this is a useful and/or interesting tutorial.  If you find it so then please leave a comment and let me know.  🙂

floatytop3

pinterestmail

welt pocket in a shearling coat

IMG_8284
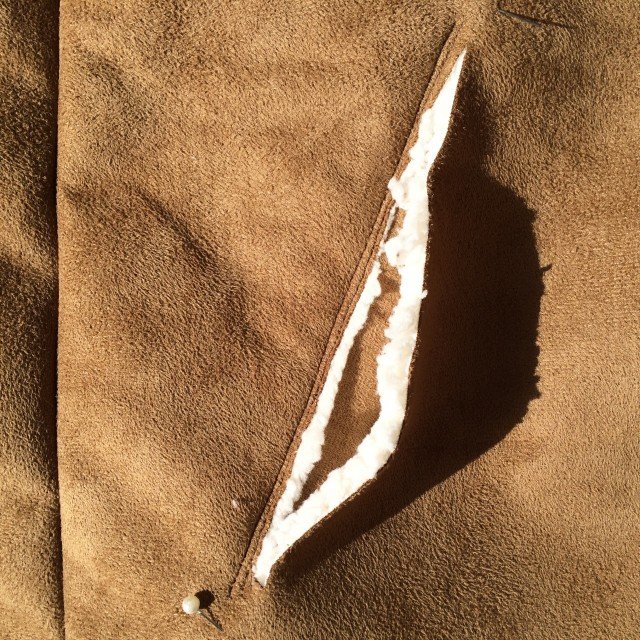
SO!  I’m currently making a shearling jacket to take to our much anticipated trip to snowier climes, coming up v v soon… eeeeeeeeeeeeeee! I can’t wait!!

Anyway, I’ve put a couple of welt-like pockets in, and found it necessary to devise a method just a tiny bit different from the usual.  So, I took a few pictures to show how I did it…

First, cut two pocket pieces in the shearling, two pocket pieces in a lining fabric, and two welts in shearling.  Cut the pieces biggish, at least a little bigger than you think you will need, just in case.  Remember the golden rule, you can always trim a little extra away, but you can never ever add it!  For the pocket lining I used an ivory cotton denim from the leftovers of my favourite flared jeans.

IMG_8242IMG_8243

Try on the coat and determine the position of the pockets, mark with pins.  Lay the two fronts together to transfer markings to the other front piece, and measure several times to ensure the markings are symmetrical.

Cut pocket opening between the marks, no less than 3cm shorter than the welt piece.  To give an idea of lengths; my welt is 20cm long and my pocket opening is 16.5cm… but my hands are pretty big and a small handed person may not need quite so big an opening  🙂

IMG_8244

Lay the shearling pocket piece underneath the top edge of the pocket opening, pinning the pieces together with an overlap of 1cm (below L).  Stitch from the top side, in a a double row of closely-spaced stitching. (below R)

IMG_8246IMG_8248

Finish the raw top edge of the pocket lining with overlocking stitch, then lay over the shearling pocket piece, aligning all raw edges and pinning the pieces roughly together near the top (below L).  From the outside of the coat, turn in the top edge of the pocket lining piece and pin to the pocket opening edge (below R).  From the outside of the coat and keeping the shearling pocket piece free, topstitch in a double row of closely spaced stitching

IMG_8249IMG_8250

Now stitch a few backward/forward passes of stitching along the two short edges of the pocket opening through all thicknesses.(below)


IMG_8254

Unpin pocket pieces from each other, and lay shearling pocket piece away from the welt, pin it up well out of the way… likewise, pin the pocket lining piece in position to the coat (below L).  Lay the welt piece, right sides together to the coat, underneath the pocket opening and pin; stitch together catching the pocket lining piece in underneath  (below R)   Note; it’s better to lay the welt closer to the pocket opening edge than pictured below right, as in with the welt raw edge hard up against the pocket opening… but I neglected to take a picture in the correct position, sorry!)

IMG_8256IMG_8257

Turn up the welt, pin in position, and again keeping the shearling pocket piece free but the pocket lining piece pinned in position; topstitch 6mm outside the previous stitching (below L)  Unpin the shearling pocket piece and lay it back against the pocket lining.  Now is the time to determine the finished, desired size of the pocket… try the coat on, measure and trim pocket pieces as desired; finish the raw edge of the pocket lining with overlocking stitch, and stitch pocket and pocket lining pieces together, right sides together.  (below R)

IMG_8262IMG_8263

Pin the welt up into position.  At this point, determine if it needs trimming or neatening up; I eyeballed mine and decided to trim 1cm off the long free edge; a purely aesthetic choice.  Once you’re satisfied with its proportions, topstitch it in position along both short edges with two evenly spaced rows of topstitching.

IMG_8264

And… pocket done!  At this point, I actually decided the pocket itself was still a little too big, and trimmed and re-stitched the curved edges… no biggie, it’s pretty easy to do this, even at this late stage since it’s tucked away inside the coat.  That’s a personal choice!  Also, technically this is not a pure welt pocket but a sort of faux-welt pocket really… maybe you could call it a sort of patch cover over a welt-less pocket?!  😀

I hope this tutorial is useful to someone, please do leave me a comment to let me know if you have found it helpful.  Like everyone, I do love comments!

IMG_8266

pinterestmail
Switch to mobile version
↓