Tag Archives: Tim

an Icelandic hoodie for Tim

*another week of furious knitting later*  and I’ve made an Icelandic hoodie for Tim, my birthday present to him.   He chose the Grein design on p108 of Knitting with Icelandic Wool, the knitting book I bought while in Iceland, but wanted it to be a zip-up hoodie.  
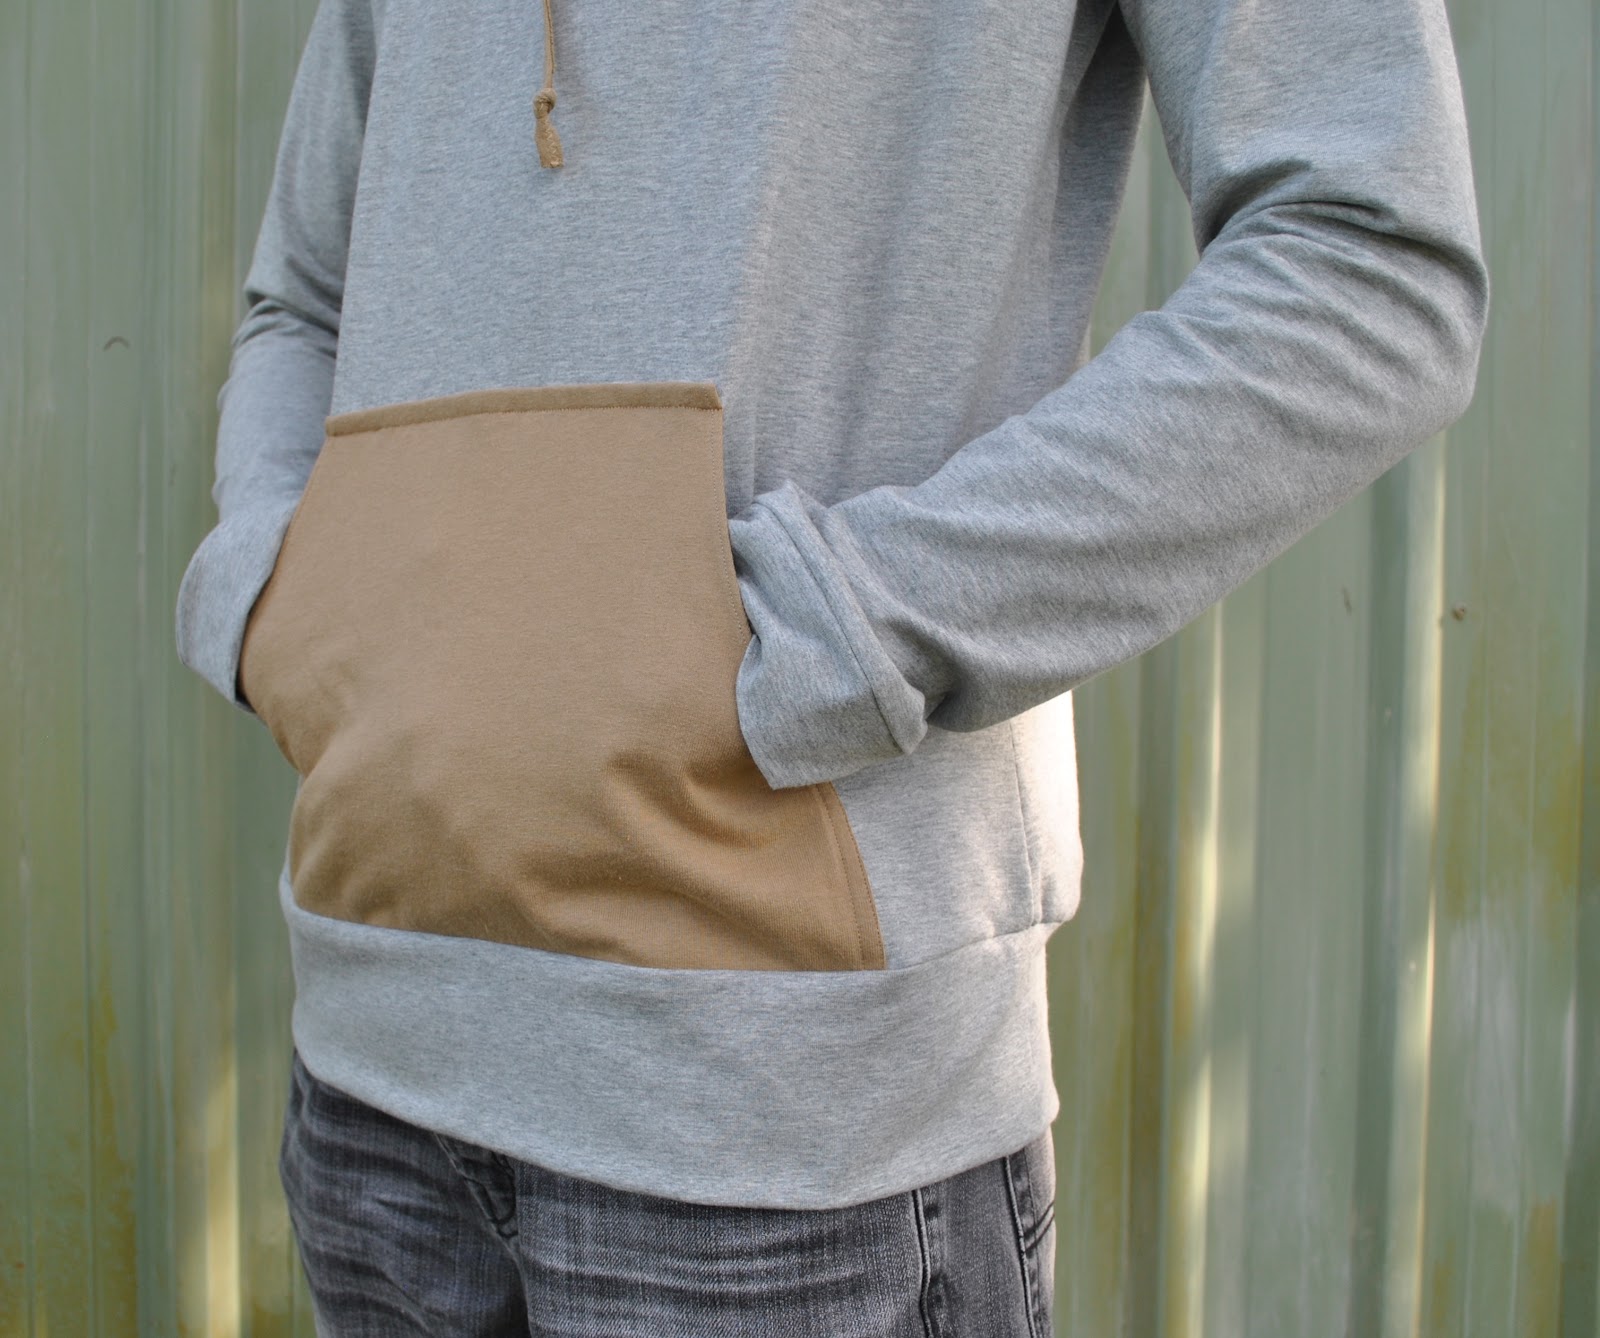
I guess I should have seen that coming;  a hoodie is far more his thing, and since obviously you want them to want to wear it, I complied.  It’s not hard to convert the jumper to a hoodie, but it’s a little bit more work and takes about one extra ball.  The hoodie is still knitted in one piece like Sam’s jumper with two short grafted seams underneath each armhole.  However, instead of knitting in the round I just split the front in two, continued knitting on for the hood, and afterwards neatened up the opening front edges with one row of single crochet. Finally I sewed in an open ended zip (Spotlight) by machine.  Which means yes, unlike Sam’s jumper which was mostly a blissfully heavenly affair of mindless non-stop knitting, in this case I had to turn around and do purl rows as well.  Not quite as quick and mindless as knitting in the round, something I find to be an enjoyably zen-like meditative exercise.  I had to actually think about it, harrumph…
The book doesn’t have any adult sized hoodies that I could use the pattern for – and can I just say, what were they thinking?! – so in consultation with Craig’s Icelandic hoodie that we bought over there I knitted Tim’s the following way:

After finishing the yoke pattern and before knitting the neck hole ribbing, you have 72 st on the needle and wrong side facing…
change to 4.5mm needle, P one row, inc 1 st in centre of row (73 st)
(K1 P1) repeat until last st, K1
(P1 K1) repeat until last st, P1
rep last 2 rows once (4 rows of ribbing)
change to 6mm needle;
(P1 K1) twice, P1, K to last 5 st, (P1 K1) twice, P1
(P1 K1) twice, P1, P to last 5 st, (P1 K1) twice, P1
rep last 2 rows until work measures 35cm from last rib row
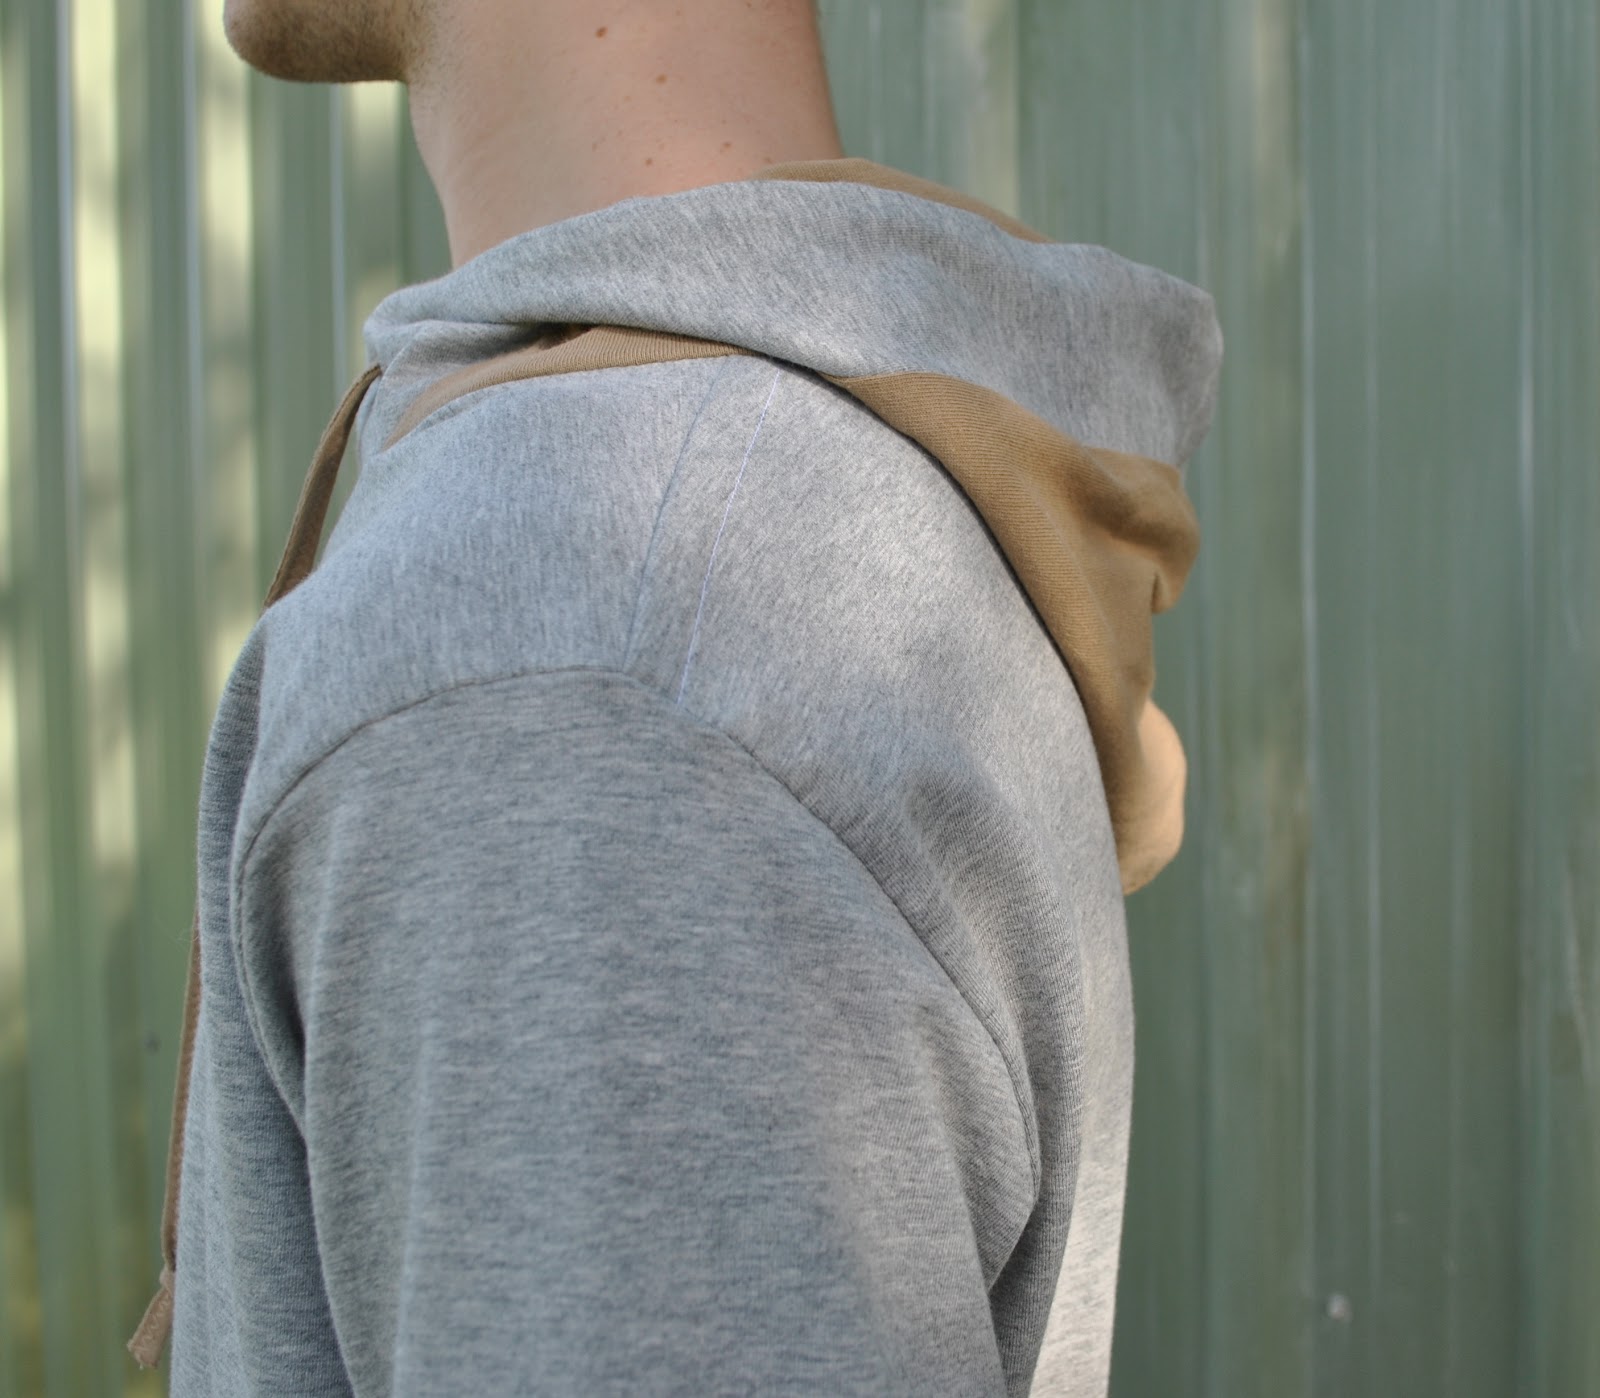
divide row in half, fold halves wrong sides together, and graft stitches together.
This gives you a plain stocking stitch hood with a wide moss stitch border.

I used Alafoss Lopi, in the colours, from left:
indigo (9959), light indigo (9958), light denim heather (0008), ecru heather (9972) and black heather (0005).   

Actually, using that ecru heather, a leftover from Sam’s jumper, was a punt.  The white-ish parts of this jumper were supposed to be ash heather, a pale grey,  however I ended up having to use most of the that ball for Sam’s jumper.  And since I ended up with more of the ecru heather leftover than I did of the ash heather, I used that, hoping that there might be enough to do the pattern in this jumper.  The gods were smiling upon me, because there was, just enough!
Funny barely amusing story; the night I was getting close to the end of the ecru heather strip I stayed up til, like 12.30 or 1am or something crazy like that, knitting like a mad thing, because I just could not stand the suspense; would I have enough of the ecru heather, or would I not??  I HAD to know!!
The relief when I did was, er, palpable.
Yeah, my life is filled with gripping moments like that  😉
And now, well!    I only finished the hoodie today and I’m actually dying to leap straight into a new knitting project, like, right now! start a rather special new design that I came across recently.
But my wrists are aching.   🙁
Maybe a little break is in order .

pinterestmail

Three pin-striped shirts

My Christmas present to my boys this year is a tailored shirt for each one; in pin-striped linen with contrasting white collar, cuffs, and buttonbands, and a double welted breast pocket with looped button closure.

Three shirts in addition to Cassie’s outfit and Craig’s birthday shirt.  Phew!  These have kept me super busybusybusy, nose to the grindstone sewing machine for the last few weeks since we got back from Melbourne!  This is the first year I’ve made three long-sleeved shirts for Christmas, the past few years I’ve made things a little easier on myself by slipping at least one short-sleeved one in there.  The cuffs and little sleeve plackets are quite a bit of work, and a short sleeved shirt feels almost quick and easy by comparison.  In the past I’ve always given each item I make its own post, and particularly because of the amount of work that goes into a highly tailored item like a man’s shirt, I kinda reckon they deserve a post each; but this time I just couldn’t with that.  It’s all been just too much!

All three shirts are made using Burda 7767, with the personal fitting modifications for each of my men that I’ve fine-tuned over many many shirts.  How many of these am I up to??  Must be over 30 of them by now, I think.  

Craig’s is a white with purple pin-stripe and brown-y purple buttons, Tim’s is a charcoal with white pin/stripe and black buttons, and Sam’s is a white with blue pin-stripe and caramel-coloured buttons.  All three pin-striped linens are from Tessuti’s in Melbourne, bought during my recent girls’ weekend away with Mum and Cassie; and all the buttons are from Fabulous Fabrics.  The  white contrasting fabric is a silk/linen mix bought from Fabulous Fabrics.  I’ve totally hoarded this lovely and quite expensive stuff for aaaages and had toyed with bravely cutting into it for one for my own SWAP projects, but decided that my boys deserved the best… (deep breath, must learn to let go of precious fabrics) Fortunately I should still have enough to make something for myself.  Bonus!
All the seams are flat-felled; I used my own tutorial for flat-felling a curved seam to get a nice finish along those sleeve caps.  Craig’s shirt has a long curved hemline because it’s more business-like, and the boys’ shirts both have straight hemlines with a lapped split side seam.

My review of this excellent pattern is here

pinterestmail

Gemini

Gemini, the twins.  
Of course my boys are not twins obviously, they are separated by several years and have one sister in between them too.  But they are both Geminis!  That picture cracks me up btw… so brotherly…  😀

So, of course the other shirt was for Tim, our eldest son!  He had a birthday recently too  🙂
The fabric for his shirt is the same that I used for Sam’s but in a different colourway; a medium weight striped cotton drill in black and cream stripes from Spotlight.  The cream background is a touch deeper in colour than the slightly lighter ivory colour that is on Sam’s navy blue and ivory shirt.
I went with an on-grain pocket this time, just for one different visual detail between the two shirts.
The other details are all almost identical: epaulettes, a smaller, slightly rounded collar, 

sleeve plackets cut on the bias.  The same buttons.

The yoke cut in two halves on the bias, with the yoke facing cut as one piece for stability reasons.  Close up, you might notice that on Tim’s shirt the black “arrow” is centred on a black stripe, whereas with Sam’s the negative space white arrow was centred on the negative space white stripe.  Little details like that tickle my fancy  🙂

Sam’s

Flat-felled armscye seam allowance as described hereflat-felled sleeve and side seams with a split hem, as detailed in the previous post.

Details:
Shirt; Burda 7767 modified, black and white striped cotton, my review of this pattern here

So, two more shirts.  Phew.  I feel like I could just about make these in my sleep now! but two in a row is just about my limit; toward the end of the second one I am getting a little shirted out and need to cleanse my palate by making something completely different before thinking about any more shirts.  Variety (in projects) is the spice of life, non?
Fortunately, my next, er make that, current project is super frivolous and super fun and I am having a ball with it.  Very very very silly and self-indulgent.  I’m having so much fun with it, that I have already roared roughly halfway through and I only bought the fabric on Saturday!  And I don’t even need it for several more weeks!!  I absolutely must slow down.  But eeeee!  It’s such a crazy and ridiculous thing, and I cannot wait to wear it and show it!

And I’m totally embarrassed that I mixed up Gemini and Cancer… when I did Cancer last month, honestly I didn’t even realise I had got it wrong until yesterday when I was browsing through birthday cards in the newsagent.  I think I got confused because my boys both have birthdays in June and are Gemini, and I just thought to myself, well that is going to work out nicely and then made a mental leap that ok then May must be Cancer and didn’t twig that Cancer came after.  You can tell I’m not too crash hot on horoscopes.

pinterestmail

Chocolate with a little zing; Tim’s Christmas shirt

I made a shirt for our eldest son for a Christmas pressie…
using Burda 7767 (surprise!!) and some lovely deeply sludgy, purply-chocolate linen bought from the Fabric Store in Melbourne during our September visit there, and I found the perfect turquoise buttons and matching thread in KnitWit.
Tim is quite a snappy dresser and cares about his wardrobe, he likes clothes that have that distinctive modern-hipster look; classic lines but with odd details and a slightly grungy edge.  This pattern does have very classic lines, and I thought the unexpected neon jolt of the turquoise buttons and matching thread I used for topstitching throughout adds the edge that the shirt needs to steer it firmly away from boring (from a young man’s point of view) “classic” territory and shimmy it into the “hipster” sphere.
To really bring the vivid turquoise visually into the spotlight; I added buttons galore and OD’d on the topstitching, going for double top-stitching throughout, wherever a button or topstitching could be put, there it went!
I added two bellows breast pockets.  The pockets have angled lower corners and the pocket flaps have contrasting curved lower edges, for a bit of visual non-matchingness… something quirky, therefore hipster.  

The sleeves have a separate folded-up cuff with double buttonholes and buttons for decoration.

The armscye seams are flat felled on the inside using my tutorial for flat-felling a curved seam here to achieve this neatly, and the side seams are French seams.  The lower edge is curved and finished with a narrow hem.

By the way; this shirt is a true button-down shirt.  

This other shirt that I made for Dad is NOT an button-down shirt… see the difference?  

A button-down shirt is of course one in which the collar buttons down onto the body of the shirt….  NOT a shirt which simply buttons to put on and take off the shirt, for heaven’s sake.  A coupla months ago Club BMV sent around an email advertising a course for sewing a tailored shirt, which is all well and good and probably an excellent course… however the blurb waxing lyrical about the “classic button-down shirt” was accompanied by a photo of a shirt that was clearly not a button-down shirt.  I’m sure I’m not the only one who was pained to the core at the sight of it.  I’m very glad to see they’ve rectified their error now though.

Details:
Shirt; Burda 7767 modified, my review of this pattern here, made of purply-chocolate linen

pinterestmail

Slender Man

Have you ever played Slender?
Hands down.  Scariest.  Game.  Ever!
Our family has been playing this free-downloadable a bit…  and if you can first-time play this in a darkened room without emitting even one girly scream….? well actually I do not believe anyone can!
When I was a kiddie growing up Halloween was completely unknown in Australia.  When I had my own children we’d heard of it by then but it was not observed at all.  Nowadays it is creeping in! stalking up on us like Slender Man upon its prey….  😉

And Tim wanted to be the Slender Man.
Of course one is interested in what one’s children are interested in, right? and the funny thing is that my adult children and their friends have Halloween parties and love to dress up, any excuse for a party….!  So yeah.  
I even went out today and bought some mini Mars bars too, in case we got some trick-or-treaters…. hoo boy, I am mellowing out; hehe!

I made a Slender Man mask.  It is as close a copy as I could get to a morph mask.  I made it using a white poly/lycra from Fabulous Fabrics; very light and thin and stretchy stooff.  The front has a “chin” and I put in a short zip at the back to help put it on over his head.  The zip I had leftover from when I was making these little jeans purses.

The verdict: True story…
I looked up and he was suddenly there, in the room, and I admit to a small double take.  
I’m like, “ooh that’s spooky, Tim.”
Silence.
“Tim?”
More silence.  Brief moment of freaked out hesitation… 
“Tim!?”
Finally he says, “yeah, so whaddya think?”
I’m like, ” Whoar, don’t scare me like that!!”

Later edit: don’t worry, Tim did not go door-knocking… this outfit was worn to a private party only  🙂
pinterestmail

‘nother hoodie

I’ve been on such a sewing bendahh lately!! making loads of stuff for the family as well as myself.   Must be the influence of spring; new growth in the garden and blissfully warm days lend themselves to thoughts of rejuvenating, renewing; everything in one’s life.  I’ve been cleaning out cupboards, sorting through wardrobes, and adding new clothes to our lives…  🙂
Somebody stop me!!
So I’ve made hoodies recently for Craig and for Sam; and Andrea observantly noted that I do have another man in my life; our eldest son Tim.  😀   I love making things for my boys (as well as my girl, of course) but I feel especially super proud when I see my boys heading out in stuff made by me.  Seems more of a stamp of cool-approval.  imo it is easy to make great girl-y stuff, but it is a much bigger challenge to make stuff that gets the thumbs up from a young man.
I used the same pattern copied from an old RTW one; and size-adjusted for Tim’s lanky build.
Tim looks really handsome in grey, and I still had some of this grey marle jersey from KnitWit.  It is the same fabric I used for my clipped wings top as well as my grey jersey lingerie set.  Luckily; the store has had this in stock for months, which is utterly fab since I’ve nipped back to buy just a little bit more twice now!  I cut out all the hoodie pieces of this fabric and got halfway through construction.  Then had overwhelming and crippling doubts that it was all going to be a bit too unrelentingly pale, featureless and boring, and so at the last moment I re-cut the hood and pocket pieces from a khaki/caramel coloured cotton jersey and used these instead.  I bought the khaki jersey from KnitWit as well, last year some time.
The hoodie has a kangaroo pocket, and the sleeves and lower edge were finished with a long folded ring-band using this method.  Tim wanted the sleeves over-long, so the band method is a good way to add length to a sleeve without having to remove the length required for a hem.  

The hood/drawstring-collar was constructed using this method.

I’m really pleased with the two-tone result.  When Sam saw it he asked for a two-tone one too…. so I had to promise that his next hoodie will be like this too…  (sigh)
And: the very last leftover pieces of this pale grey marle cotton jersey was yesterday subjected to a dye-bath…. hehehe;  and I am super thrilled with how the colour has worked out  :))  Results to appear here soon!

pinterestmail

The DNA Tower

Please allow me to introduce to you, the DNA Tower.  
Hehe, I am being sorta touristy on the blog lately! but not completely since obviously Perth has always been the backdrop to my life… 
The DNA Tower was built in the early 60’s, and I have lots of fond memories of my brothers and me having the time of our lives pelting up and down the tower as fast as we could, while Mum and Dad boringly sat with the picnic on the grass nearby.  And since we would come home so tired all we could do was to fall into bed early, then I’m sure the DNA tower was equally beloved by Mum and Dad as well…!
When my own children were little they loved running up and down the tower too, so each whole new generation repeats the same routine.
Nowadays, the tower is much beloved by fitness fanatics too.
So I am enjoying my me-made May photos at the mo’… employing a few Perth landmarks certainly makes the photo-taking, always the most challenging part of the, er, challenge for me, a heck of a lot more exciting and interesting.  And happily this is another spot that is basically on the way home from dropping my son Sam off at uni, which is part of my current daily routine.  He is learning to drive, and guess who gets to be the driving instructor?!

Picture taken around 11am;  Temperature at the time 19C.
Overnight low: 11C; Today’s high: 21C
Fine and sunny

Details:
Top; top “a” from the Japanese pattern book Unique Clothes Any Way You Like by Natsuno Hiraiwa, white cotton, details here
Jeans; Au Bonheur des Petites Mains PLH08002, strawberry pink non-stretch cotton denim, details and my review of this pattern here
Cardigan; knitted by me, the Fitted Cardigan 04, version 1 with the lace edging and three-quarter sleeves, in Jo Sharp Soho Summer DK Cotton; colour Calico (shade 216), details here
Thongs; KMart

In an almost complete hat-trick of me-made sightings in my household…
Last night Cassie wore a cocktail dress made by me, to a party 
Cassie’s dress; Vogue 1105, silk charmeuse

Today Craig again wore again the blue linen shirt I made for him, and Tim wore the shirt I made for him for Christmas
Craig’s shirt; Burda 7767 modified, blue linen, details here
Tim’s shirt; Burda 7767 modified, blue check crinkly stuff (a blinkin’ nightmare) details here

pinterestmail

Tim’s shirt

I made a shirt for Tim; again Burda 7767 (blush).  And I’m embarrassed to confess that there are still a couple more versions of this in the wings too… sorry!  I hope lots of mens’ shirts will not get too repetitive… in my own defence they are all just a leettle bit different from each other in some way.  I hope that is noticeable.
But back to this particular one…
I’ve noticed that Tim, and lots of young men now, are all wearing their shirts a lot more shrunken in appearance to the classic “men’s shirt” silhouette.  More fitted to the body, and with shorter and smaller sleeves.  So I tailored this shirt accordingly; and in case you’re wondering, Sam didn’t want for his shirt to be “trendy” like this although I actually did make his a little more narrow in the body than previously too.  
I made the sleeves shortish and when he opened his present asked him if he would like them hemmed fashionably even shorter but he said he liked them this length.
I went with snaps for closure, and left off any tabs – there is a good reason for this; below.  The arrowhead pockets and their square-cut flaps are cut with the grain and are matched against the shirt background but with no attempt at fancy bias stuff; again, a perfectly good reason for this is coming right up.
The reason for leaving off my “regular” young mens shirt details? well, to use a technical term… this fabric was a blinkin-nightmare to work with, and almost killed my enthusiasm for men’s shirts entirely.  I seem to make a habit of choosing very sewing-unfriendly fabrics (like here) for Tim’s shirts but he always professes love for them and wears them a tonne, so in the long run I’m just happy that he is happy!
The problem with the fabric? crinkly and stretchy.  A totally hideous combination for tailoring.  You’d think I’d have learned by now, right?  I always tell myself it will be easier; this time, and then it never is.  My best attempts at making two identical shoulder tabs were so dissimilar I just couldn’t put them on the shirt, and just the pockets and pocket flaps were enormously difficult… getting that irregular stretchy check to match up.  I know, sounds ludicrous to say that the humble pocket flap almost defeated me, but there it is.  I even made up a set of pocket flaps and tabs in a different fabric, but decided in the end they just looked wrong.  Honestly Sam’s shirt was a walk in the park compared to this one.  I fair dinkum revelled in that non-stretchy fabric!
But this fabric was the stuff I just knew Tim would love in his new shirt, I could just picture him in it, and knew that it would sew up into the kind of cool shirt that he would probably pluck out himself if he spied it in a trendy, young mens’ boutique.  So I just had to go carefully and get there in the end, through sheer determination. 
Needless to say there is no flat-felled seaming on this thing.  Raw edges all overlocked, and simply top-stitched down just like that.  And applying the hammer to the shirt when putting in those snaps felt goooood…
And you know what? Got those darn checks to match up, eventually!

pinterestmail
Switch to mobile version
↓