

I thought I’d share my method for making my own shoe pattern, in case it helps anyone else interested in self-cobbling? is that even a word?? This is for if you don’t have access to a last or haven’t bought any special equipment yet but are just experimenting, trying shoe-making on for size, dipping your toes into it so to speak… 🙂 It’s the same principle as those custom-fit duct-taped dummies that everyone was making about four years ago (remember those?) except for your feet!
Anyway…
Materials; a thin plastic bag, masking tape, permanent marker, scissors, and a shoe with a fit you really like. And paper for drawing the pattern on.


Put the shoe in the bag, your foot in the shoe, or in the other order! and commence cutting lengths of masking tape and wrapping them tightly around your plastic-bagged, shod foot all the way around to underneath and all over, covering the toe too. You don’t have to have your foot in the shoe of course, but it helps the shoe to keep its shape without collapsing in on itself… you’re trying to tape it up TIGHT! and also I actually found it a tonne easier to do the taping with the shoe on; meant I didn’t have to hold it to keep it steady, for one thing…


Overlap the tape by at least half its width with each “pass”, and cut the tape short and start a new bit rather than having “folds” or uneven bumpy bits. Or at least keep any folds in the tape at a minimum. The important thing is to keep everything as smooth and as flat as possible, and to have total, solid and smooth coverage. A good amount of overlap is to ensure there are no weak bits that could split apart when it’s taken off.
Once you’ve got a firm, smooth, fully taped-up shoe-foot, carefully wriggle off the shoe (not easy) and inspect it for any weak or un-taped bits that you might have missed, like below right. Fix these up now.


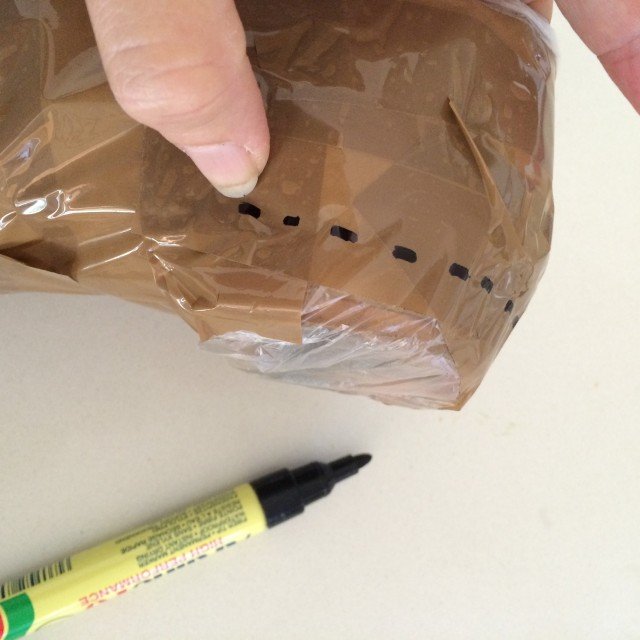
With a felt-tip permanent marker, feel around the lower edge of the shoe, determining where the ridge of the sole meets the upper, and mark it in as accurately as possible using small dashes or dots. Also draw in the upper line of the shoe, the centre back seam, and the desired seam lines of your shoes. I spent a pleasant few hours researching different shoe styles and there are many many many varieties of lace-ups alone! so hard to choose just one. I went for an easy style and imitated the seam lines on a pair of Cassie’s Converse which I now know (thank YOU Wikipedia) is actually the classic Oxford shoe design.


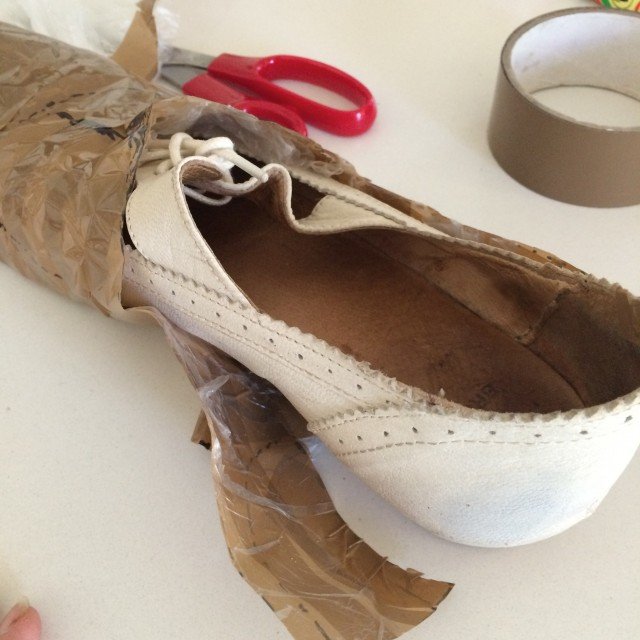
Now it’s time to carefully snip the taped “mummy” shoe away from your real shoe. Take great care not to damage your shoe! Snip along the lower line where the upper joins the sole, and separate the two. Once you’ve cut the central back seam of the shoe it should be easier to ease the shoe out of its “mummy” a little, to lessen the danger of scratching it with the scissors.

Cut along all the marked seam lines.

The toe of the shoe is usually a 3D rounded curve, snip into the curve so the piece can be laid flat. When you cut this piece in fabric to make your shoe, the excess will need to be eased into the sole lining.


Lay the tape pattern pieces down and trace around them onto paper and bob’s your uncle!! The tongue is just a simple U-shape, cut to the same length as the lace up section. By the way those two long curved pieces that go on either side of your foot are called the vamp. This pattern has no seam allowances of course, they can be added at this stage or not, a personal choice, just be sure to mark on the pattern pieces whether it is there or not.
I used my right shoe so marked all my pieces with a big R to show which side up they go together as a set. Obviously, the same pieces will be used for my left shoe as well, just that they will all be laid upside down.
And that’s it! pretty simple really. I have to add, this pattern should be thought of as a starting point, and it’s well worth making a mock up pair of shoes in not-very precious fabric to test it out before you launch into cutting into a precious piece of leather or something… you may well find that the shape of it is not exactly what you want for your shoes and shave off a fraction here, add on a slight wedge there. It’s always better to be safe than sorry!
Anyway, I certainly hope this method proves useful to someone else too. Happy self-cobbling!
Thanks Carolyn! You totally hot me into shoe making. After seeing you’re red pair I ordered a shoe making book that should arrive today and I already checked out Web shops that sell all the supplies. There are German Web shops specialized on that! How great is that?! Right now I’m still moving all my stuff from the old to the new apartment and setting everything up, but I cannot wait to get into shoe making! Thanks so much for the inspiration and for the tutorial, I’ll totally try that out!
Oh I would love to know which one! I know one in Britain (http://icanmakeshoes.com/) but would love to know more (+ probably shipping from Germany to Holland is slightly cheaper than from Britain to Holland as they do not have to cross the pond).
And I totally forgot to say how ingeneous your shoe pattern making is. Did you have any issues with the pattern being too big though, because you fitted it over an existing shoe? Or did you somehow correct for that?
Erika; the pattern would be a shade big which is why it should be treated as a starting point; I recommend making a mock-up first from not-too-precious fabric 🙂
Honestly Caroline, you’re absolutely bonkers! Extremely talented and creative but bonkers nevertheless – LOL!
Great! I’ll have to give this a go and see if I can at least come up with something to wear around the house.
Thanks so much for the tutorial!! Shoe making is also one of my goals for 2016!! It would be really great to see a step by step of the assembly process as well. Can’t wait to try this out!
I would be so happy just to get taped shoes I think I would call that Finished! Hahaha. Thank you so much for this guidance. I am scared of making shoes but you really inspire me to try it. What freedom that would be!
This is HARCORE crafting, C!
I am storing this up to have a go later in the year. Thanks!
absolutely Fascinating,
Just found this via Pinterest today. Thanks for the info.
Thank you!
I tried to make shoes, following this tutorial ( https://annaleshistoriae.blogspot.com/2013/08/adventures-in-medieval-shoe-making.html ).
I made first this one ( https://millerebonds.piwigo.com/picture?/481/category/3-bricolages ) which has problem, I made a mistake when cutting the tape, then this one ( https://millerebonds.piwigo.com/picture?/484/category/3-bricolages ), really better, but there are still some problems.
I use my foot, and put tape directly on socks. I found what is important, is to have a rigid sole (with some thick carton) and then put tape around this sole and the foot.
But there is still some errors. Circumference of the sole must fit with circumference of the pattern.
The tongue is the vamp, not the sides.
hello Dear Carolyn
can you shoe how to make medical shoes or sandal for people whom have flat feet.
thank you