Monthly Archives: March 2016

You are browsing the site archives by month.

dark chocolate suedette

sideIMG_7763burdastop
I’ve made a new little top.  And I’m so happy with it in my outfit! far more than I thought I would be  🙂  Making the little top was almost a spur of the moment thing… see, I’m going out tonight and a few days ago suddenly started to think seriously; what smart/casual outfit with shoes would fit my Year of Handmade?  I’ve got tonnes of lovely dresses but didn’t think any of my current handmade shoes would cut the smart/casual mustard with any of them… aaah first world problems!  anyway long story short; bit of brainstorming later and dreamt up this outfit.  Had the skirt and the shoes already and just needed the top to pull it all together and be the icing on the cake… or should that be the chocolate topping on the cream?  Probably.


DSC_2668

The neutral colours with a variety of textures in my outfit are very pleasing to me: the suede-y deep chocolate brown vs. smooth glossy creamy-ivory satin skirt, vs softy fluffy chocolate and ivory felt in my shoes.  And smooth pine for the base of my shoes.  I feel rather modern and new-age cool.   Almost trendy.  LOL!  Yeah, funny thing; it’s been a long while since I’ve felt this sharp in my handmade clothing!!.

The fabric in my top is faux suede, from the Fabric Store in Melbourne, bought during a trip there with Mum and Cassie.  I have loads left too… not a bad thing since it’s kinda gorgeous!

back

Pattern; Crop Top 127, from Burda magazine 2/2015.  It’s quite a cute little design, boxy with lots of straight choppy lines long and dramatic diagonal darts at the front and boxy angular sleeve seams.  And then the smooth curve of a high-low hemline to break it up.  The bias-finished armholes and neckline are clean and neat.  I do like a bias finished edge!  I used black cotton for this since I didn’t have any chocolate brown.  The top as per the magazine is completely open at the back! instead I chose to seam mine, leaving a slit with a little button and loop closure at the top.  I covered my embroidery cotton loop with tightly spaced blanket stitching along its length, so it’s strong and neatly finished.

details

Adjustments; the pattern is in petite sizes, and in the past I’ve found that the Burda petite bustline sits just a little high on me … I lowered mine very slightly just by making the dart shorter.  I also added 6cm in length to the bottom hem all round, because it looked like it was going to be a tad on the too short side.  And I’m so glad I did!!!  It would have been waaaaaaaaaay too short on me!   Even at this lengthened version, I feel in constant danger of exposing the underthings.  Have to be careful not to lift my arm up too high!  I’m wearing my mocha Sierra bra though, which I  think is a good fit for this expose-errific top… why? because it’s brown, and quite a longline bra and also since I made it very very plain it actually reads more like a cropped camisole than a bra, if anyone happened to glimpse it.  So I’m glad I’ve got that already too.  Honestly, everything in the outfit matches just like they were all made intentionally to go together.  I feel very harmonious  🙂

Smart casual outfit? that pleases me? fully handmade? Tick, tick, and tick!

Details:

Top; Burda magazine 2/2015; 127, chocolate brown suedette
Skirt; Burda magazine 02/2014; 106; cream satin, details here
Shoes; handmade by me in wool felt and pinewood, details here

fulllength

pinterestmail

how to make your own shoe pattern

shoepattern

I thought I’d share my method for making my own shoe pattern, in case it helps anyone else interested in self-cobbling? is that even a word??   This is for if you don’t have access to a last or haven’t bought any special equipment yet but are just experimenting, trying shoe-making on for size, dipping your toes into it so to speak… 🙂  It’s the same principle as those custom-fit duct-taped dummies that everyone was making about four years ago (remember those?)  except for your feet!

Anyway…

Materials; a thin plastic bag, masking tape, permanent marker, scissors, and a shoe with a fit you really like.  And paper for drawing the pattern on.

shoepatternsp

Put the shoe in the bag, your foot in the shoe, or in the other order!  and commence cutting lengths of masking tape and wrapping them tightly around your plastic-bagged, shod foot all the way around to underneath and all over, covering the toe too.  You don’t have to have your foot in the shoe of course, but it helps the shoe to keep its shape without collapsing in on itself… you’re trying to tape it up TIGHT! and also I actually found it a tonne easier to do the taping with the shoe on; meant I didn’t have to hold it to keep it steady, for one thing…

sp2 sp3

Overlap the tape by at least half its width with each “pass”, and cut the tape short and start a new bit rather than having “folds” or uneven bumpy bits.  Or at least keep any folds in the tape at a minimum.  The important thing is to keep everything as smooth and as flat as possible, and to have total, solid and smooth coverage.  A good amount of overlap is to ensure there are no weak bits that could split apart when it’s taken off.

Once you’ve got a firm, smooth, fully taped-up shoe-foot, carefully wriggle off the shoe (not easy) and inspect it for any weak or un-taped bits that you might have missed, like below right.  Fix these up now.

sp4sp5

With a felt-tip permanent marker, feel around the lower edge of the shoe, determining where the ridge of the sole meets the upper, and mark it in as accurately as possible using small dashes or dots.  Also draw in the upper line of the shoe, the centre back seam, and the desired seam lines of your shoes.   I spent a pleasant few hours researching different shoe styles and there are many many many varieties of lace-ups alone!  so hard to choose just one.  I went for an easy style and imitated the seam lines on a pair of Cassie’s Converse which I now know (thank YOU Wikipedia) is actually the classic Oxford shoe design.

p6 sp7 IMG_0764

Now it’s time to carefully snip the taped “mummy” shoe away from your real shoe.  Take great care not to damage your shoe! Snip along the lower line where the upper joins the sole, and separate the two.  Once you’ve cut the central back seam of the shoe it should be easier to ease the shoe out of its “mummy” a little, to lessen the danger of scratching it with the scissors.

sp8sp9

Cut along all the marked seam lines.

sp10

The toe of the shoe is usually a 3D rounded curve, snip into the curve so the piece can be laid flat.  When you cut this piece in fabric to make your shoe, the excess will need to be eased into the sole lining.

sp11 sp12

Lay the tape pattern pieces down and trace around them onto paper and bob’s your uncle!!  The tongue is just a simple U-shape, cut to the same length as the lace up section.  By the way those two long curved pieces that go on either side of your foot are called the vamp.  This pattern has no seam allowances of course, they can be added at this stage or not, a personal choice, just be sure to mark on the pattern pieces whether it is there or not.

shoepattern


I used my right shoe so marked all my pieces with a big R to show which side up they go together as a set.  Obviously, the same pieces will be used for my left shoe as well, just that they will all be laid upside down.

And that’s it! pretty simple really.   I have to add, this pattern should be thought of as a starting point, and it’s well worth making a mock up pair of shoes in not-very precious fabric to test it out before you launch into cutting into a precious piece of leather or something… you may well find that the shape of it is not exactly what you want for your shoes and shave off a fraction here, add on a slight wedge there.   It’s always better to be safe than sorry!

Anyway,  I certainly  hope this method proves useful to someone else too.  Happy self-cobbling!

pinterestmail

cherry red sneakers

cherry senakeres1
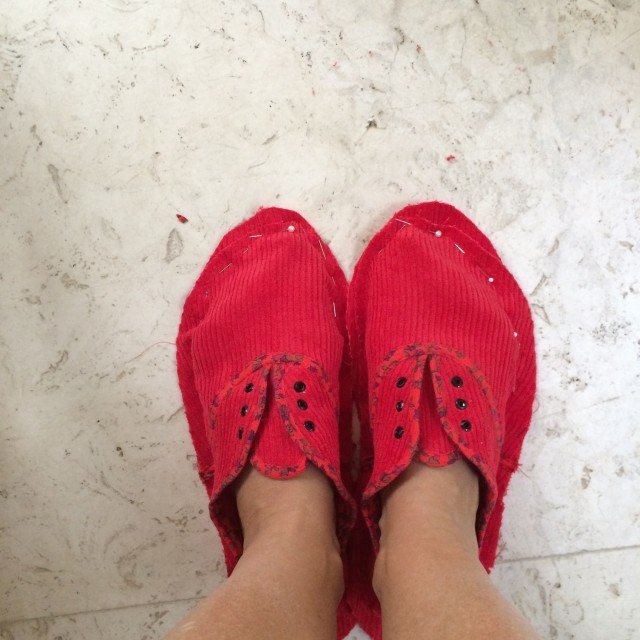
Woa, crack out the sunnies!  So, my second pair of sneakers.  Bit bright, eh?!

Pattern, drafted it myself.  I’ve written a little tutorial on how I made my pattern, coming soon.

Fabric; cherry red cotton corduroy, bias binding; a red small-print floral.  Both these fabrics from my mother’s stash when she did a clean out a while back.  Black bias binding that goes around the bottom edge; made from some quilting cotton from my stash.  Black eyelets from Spotlight, black shoelaces from Coles.  Inners; cut from an old yoga mat, stabiliser cut from thin cork (old placemats), rubber soles (matting from Bunnings).  Glue is all-purpose PVA from Bunnings.

IMG_0766 IMG_0773

Construction; stitched the uppers together first, stitched them to a corduroy “sole” with a wide border (above).  Padding: glued corduroy to bottom of the yoga matting inners cut to fit, trimmed off the edges.  Glued the shoe upper to the padding, wrapping the wide border down and under, snipping around corners, glueing it underneath.  Glued a thin cork sole cut to fit underneath.  Black bias binding, folded and pressed upper edge, left lower edge wide and raw.  Glued folded top edge of binding around the bottom edge and folded under, snipping around corners and glued the excess width underneath the cork. Last thing; cut and trimmed the black rubber sole to fit, glued it underneath. (below)

IMG_0846

As far as the construction of these ones goes, I’m satisfied.  They’re tough, and will hold together just fine, and they work.  Meh, *shrug*   All in all, they’re ok, and not a fail.cherrysneakers2

However, my materials; yoga matting is not an ideal inner sole, really.  It’s been good to play with, for learning purposes; but I think it’s time I shopped around for something more sturdy and hardwearing.  And I’ve discovered it won’t glue properly to anything other than fabric.

Anyway, here’s the thing; I reeeeeeally want to move onto some of my better materials, like my precious small stash of leather, for instance.  My ultimate goal is to make leather shoes for winter.  These last two pairs of shoes have actually been but mere trials.  And tribulations…? debatable!

cherry sneakers

pinterestmail
Switch to mobile version
↓