
have you guys seen COLOSSAL… ?
 Bet you can’t guess where I am here… Yeah, I know, it’s a tough one. Some locations are just so obscure and far off the beaten track, but I do like to seek out these especially quiet and sleepy, tucked-away little spots to highlight here on ye olde blog… GO me.
Yeah, so I’ve made a Sydney jacket… I bought the pattern from Tessuti’s in Melbourne back during my March trip away there with Mum, Cassie and my niece Tiffany; and have finally got around to giving it a whirl… I think I first saw this design on Sue, at one of our meet ups and was instantly interested. It’s a pretty nice design with a true shawl collar and not just your usual body with two set in sleeves. This is like my wearable muslin, if you like.

I used a very blankety-like wool-mix from Spotlight, which I think is definitely a lot more “mix” than “wool”, haha! but that’s fine by me! I tossed it in the machine when I got home and it washed up beautifully, absolutely zero shrinkage and just a bit of light “fluffing”, which was equally ok with me; in fact any and all fluffing is totally welcome in all my winter clothing, thanks.
I agonised for ages over which side to use; one side was more vibrant but “flatter” with a more pronounced twill to its appearance; the other side is fluffier, and with more muted colours. I loved both sides equally! and couldn’t decide… finally I asked Craig and Cassie to choose for me. They both voted vibrant OUT, fluffy IN. Hurdle number one; cleared!
It’s a lovely fabric really, warm and cosy and with that richly colourful blocky weave, the perfect drape; and I loved the idea it for this particular jacket pattern… however! the Sydney instructions have a big bolded announcement on the first page… IMPORTANT: Not suitable for woven fabrics that fray when cut What is my chosen fabric? only like the most fray-able of fraying fabrics ever invented by mankind. Typical of me, so stubborn. I’m like… Oh, I’m not supposed to use a fray able fabric? JUST WATCH ME THEN mwahahahaha.
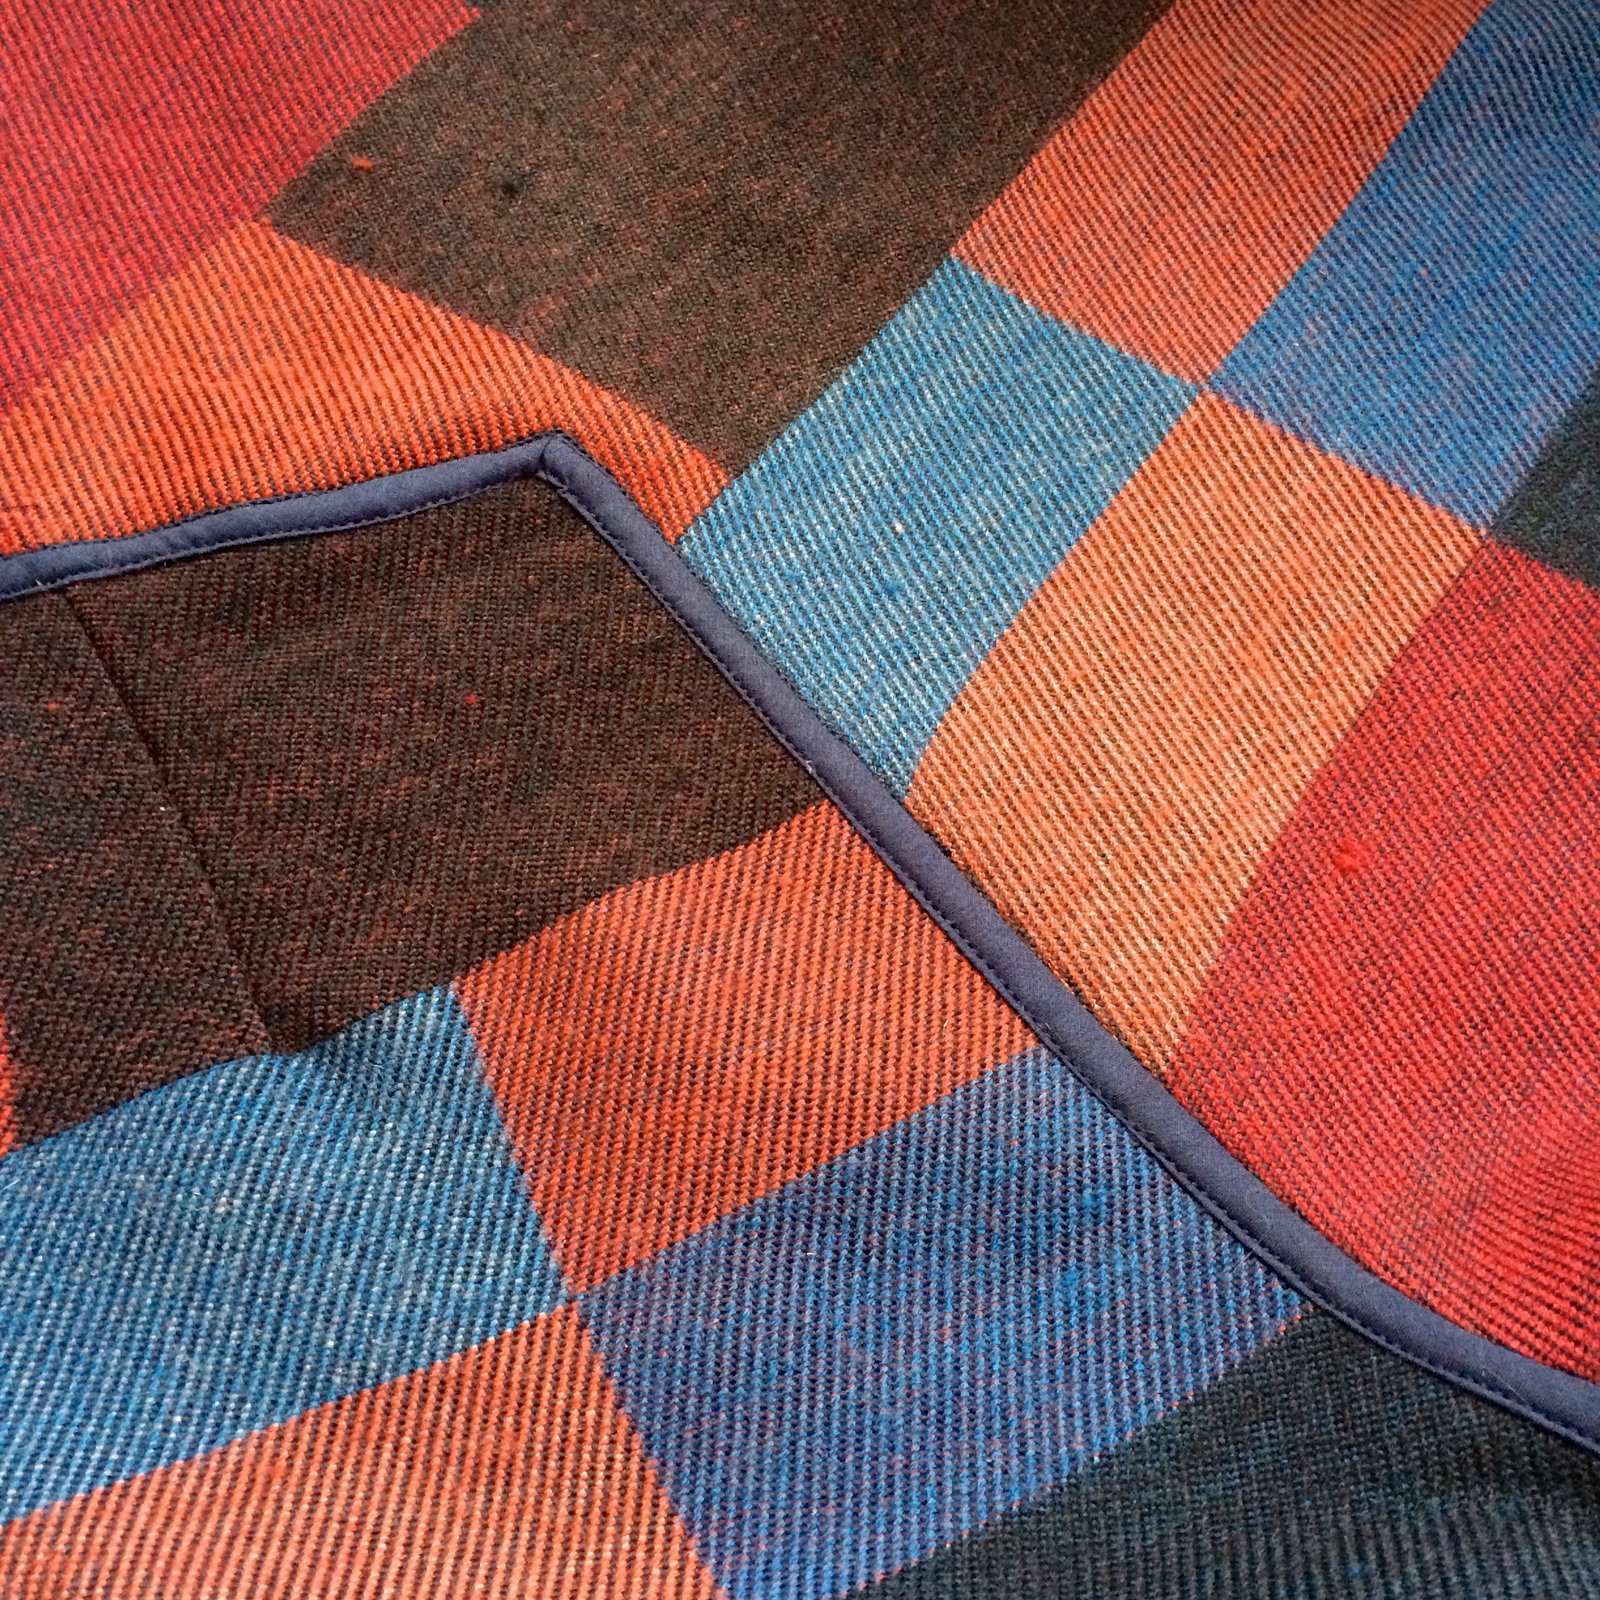
Solution; I edged the visible raw edges with bias binding… oh I’d bought a mid blue poplin for my bias binding, but it was a bit bright.. so I sludged * it up nicely with a bit of iDye in Brown, to make a nice deeper dirty blue; a much better colour for my fabric. I think it turned out a rather nice match!
Hurdles two and three; cleared!

new colour, with scrap of the original colour on top…

*”sludged” as a verb. along with the associated adjective “sludgy”, are technical terms used a lot around here… where Brown dye is employed liberally and frequently to tone down the overly bright colours beloved by commercial fabric designers and that form about 99.99% of commercially available fabric, so they better suit those of us who look hideous in said brights.
What else is there to say? I lengthened the sleeves to bracelet length… I really like them at this length, and even though I wasn’t very serious about it at first I absolutely love my jacket now it’s finished. It’s rather Lagenlook, yes? I’ve worn it two days in a row since I finished it… and that’s just about unheard of for me! who pretty much has to mix it up some every day… There’s just something about this rather simple yet inherently dramatic style that prompts the adoption of random flamboyant poses. My enthusiasm for photoshop going only so far, you’ll just have to imagine the appropriate backdrop in each case…
exhibit A, supersleuthy spy… the scene: nighttime; the main gallery of the Louvre in Paris, a dim light glistening off the polished parquet floorboards, while painted masterpieces look on silently

exhibit B: busy woman-about-town hailing a taxi on the streets of some mega-metropolis no, not in her garage, oh no not at all) the scene; outside the New York stock exchange, close of business, important business-y types milling about on peak- hour sidewalks

exhibit C: Victoria’s Secret model strutting down the runway.. except she forgot her wings and is instead clad in rather unsexy but warm, warm winter woollies in lieu of the cute little bejewelled bikini. Or alternatively; Rio de Janeiro’s Jesus… or a tightrope walker…


Because the wrong side/underneath of the fabric shows around the neckline I applied the bias binding on the inside of this centre back seam here instead… it’s not super visible, under my hair and all, but you know… I made a little hanging loop too…

So that’s it!… oh wait, one last thing to add; and that’s my method for dealing with a frayable fabric in a pattern that calls for un-frayable fabric. In this pattern the seaming is the simplest method possible; seams are formed by overlapping the raw edges and simply topstitching in place… and using my method you first bind the upper raw edges with bias tape, so you end up with all the seams thus highlighted throughout.
First step; overlock the raw edges of the underneath edge… the bias binding will be applied to the upper edge only.


Cut bias binding strips 2.6mm (1″) wide… this allows for a seam overlap of 1cm (3/8″) For patterns calling for a wider overlap, the same method applies, just cut the bias binding strips correspondingly wider i.e., for a 1.5cm (5/8″) overlap, cut bias binding strips to be 3mm (1 1/4″) wide.. etc.
Stitch bias binding to the upper side raw edge in a 6mm (1/4″) wide seam.


Press over and around to enclose the raw edge.
Position the upper side edge over the underside raw edge, with the overlocked edge even with the bias binding edge. This corresponds to a 1cm (3/8″) overlap, as required by the pattern.


Topstitch the two pieces together by stitching in the ditch, or if preferred, just inside the bias edge.


Topstitch a second time, with a second pass of stitching a scant 3mm (1/8″) just inside the folded bias edge of the upperside.
For the opening edges, lower edge and sleeve edges; I simply applied the same bias binding and slip-stitched it down inside just like a regular bias-bound edge…
 Voila! Jacket made the same way you’re supposed to, and using the forbidden fabric to boot! Ha!


Details:
Jacket; the Sydney jacket by tessuti patterns, wool-mix blanket fabric from Spotlight
Top; twist top from Pattern Magic by Tomoko Nakamichi, green stretch, details here
Skirt; Jade skirt by Paprika patterns, in red stretch knit, details here
Tights; self-drafted, details here and my tutorial for making your own custom-fit tights pattern here
Boots; Roberto del Carlo, from Zomp shoes

SaveSave
Fabulous! The fabric makes this jacket zing! I always have wondered how to do that binding on the side seams so thanks for showing that. I love using forbidden fabric – just adds to the sewing puzzle which is so satisfying. I think you will want to wear this a lot despite your desire to mix it up everyday 🙂
thanks Beth! and for the compliment on my seaming technique, that’s quite the compliment coming from you! I’ve already worn the jacket several times now, so it’s paying itself off nicely 🙂
I audibly gasped when I saw this post. Everything is just so beautiful and looks fantastic on you. This has truly inspired me to finally sew my own Sydney Jacket.
thank you so much Rory! that’s so sweet of you to say 🙂
Perfect fabric choice ! I also made mine in a woven. I didn’t think of bias binding. I did manage to quite easily adapt the pattern using a combination of selvedge edges and three thread overlocking and changed the pocket construction to enclose the edges.
thanks Andrea!
Oh you are such a rebel! And the binding really adds to the coat.
haha, thanks Vicki! 🙂
Oh this is awesome. The sludgy bias is a wonderful addition.
thanks so much Sewingelle 🙂
I love seeing your rule breaker ways. This Sydney is FABULOUS.
aw, thanks so much Anna! xx 🙂
Cool outfit again! And poses
thank you! 🙂 xx
It’s fabulous! And that binding is so neat! I don’t blame you wearing it 2 days in row!
thanks Sarah xx 🙂
Oh this is fabulous and I love all the bias binding – it really adds some cachet to your jacket.
thanks Sue! yes, where there’s a will there’s a way… xx 🙂
What an excellent solution to the fraying problem. I used a sort of fraying fabric for my Berlin jacket and just double topstitched it, hope it lasts!
thanks Siobhan! hmmm, I hope so! my particular fabric was REAL bad though and needed some heavy engineering to fix the Fray 🙂
Your jacket is just fabulous! It looks so much better than what is shown on the pattern cover. It is fun and colorful. Love it!
thank you so much Tomasa! 🙂
This looks amazing! Thanks for sharing the tip on fraying fabric. I love how thoughtful your sewing process is.
thank you very much! that’s so nice of you to say 🙂
I love the picture at the top of this post–it looks amazing! I love your whole outfit. The jacket totally has that WOW factor!
thank you very much Shirley! 🙂
Love your jacket it appeals to me the most out of the ones I have seen. Love the slugginess and thank you for the tip with the seaming.
thank you Sharon! 🙂
Very inspiring post with lots of how to added! Thank you!
thank you Anne! 🙂
Breathtaking! Your jacket is so much better than the original, vibrant in color, perfectly styled and an excellent fit! You are such an inspiration!
thank you very much Carmela! xx 🙂
I love that binding technique – how clever. Hope you get some good wear out of it, wherever you are. Jo x
thanks Jo! I’ve worn it several times now, so it’s paying itself off nicely 🙂
Brilliant! Great way to use this fabric.
thank you! 🙂
What a great coat! I’d be wearing it EVERY DAY if it were mine. Everything about it is wonderful. And it suits you perfectly. You’re always so inspiring. Brava!
thank you so much Barbara! 🙂
Genius way of dealing with the edges!! Love the finished product.
thanks Helen! 🙂
I’d say you’re having waaaaay too much fun in your photos, but that would be a lie, LOL. I LOVE these pics!
You know…you kill it every time. Impeccable sewing, innovative tips, great styling….love it all!
haha, we both no there’s NO SUCH THING as too much fun, yeah?! 🙂
This is, as always, glorious! I really like the binding. It’s a nice touch. And your photos are bonkers…in the best possible way!
thanks Evie… life is too short to not have some fun in it, yeah? 🙂
I always THINK I’m going to do a bias binding finish on my seams but when it comes time to do it I back away and resort to my trusty serger to do the “fast” job for me but I LOVE them when I see them. They are so classy. I’m a big fan of Tessuti – I just finished their Pia Dress in a lovely cozy cotton double gauze and love that pattern I’m sure I’ll make more next spring.
thanks so much Kathleen! This is my first tessuti pattern and it’s a good one! reckon I’m going to have to seek out some other ones in the future too! xx 🙂
Vers entertaining Carolyn 😀 You really can do anything in this jacket! It looks great too! The color of the bias binding matches the beautiful fabric so well and the fabric works great with the pattern! Great job 🙂
thanks so much Katharina! xx 🙂
This is absolutely gorgeous!! I love your fabric & can see why you had to break the rules so you could use it! It all looks so neat finished this way too.
thanks Kathryn! I felt like the blanket was perfect for it! so I’s so glad I worked out a way to use it 🙂
Lovely solution to the “now buy 10m of woolen binding” which seemed like it might bankrupt one! Gorgeous and cosy, hope you get some cold days before we launch into the heat 😉 from Syderney
thanks Lesley! haha, still some cool days ahead which would normally be BAAD, but I do love this jacket… so it’s all good 🙂
The fabric is great, so your choice of the hard way is understable! 🙂 The result is great!
thank you! 🙂
I loved this the minute I saw it on IG! now seeing all that perfect seam binding I am amazed! yup I remember all too well the “important” notice I too deemed unimportant
good article post. The jacket is perfect for you. the ladies are very fond of fashionable style with a jacket. I have some very warm jackets for winter. besides some of the shoes I use run on snow evenings, this is great fun. I have some other interesting information about warm blankets and quality shoes. they have some very good products, please visit the site here http://www.texelana.nl/donzen-dekbedden to get other information.