
Now, I promised to write this tutorial to show my Mum how I applied this finish to her top… and others expressed an interest too; thank you so much to everyone else who did… I finally did it, yay 😉
Mostly I would use this finish for a neckline that is wide enough to need no zip or button opening, as pictured above. Another example of its use is for a hemline such as the skirt demonstrated here. I’m making this in a totally inflexible fabric with about zero give, PLUS the design has such a sharp curvature around the bottom edge a regular turned-up-twice hem is quite difficult to execute neatly. The bias binding finish is a good solution for this 🙂 It results in a clean, banded finish on the inside of the garment, with one row of 1cm (3/8″) topstitching visible on the outside of the garment.
This method is just one of several ways of doing this kind of finish, I prefer this way because I find it the quickest and easiest, results in minimal fabric bulk, and minimal mucking around.
Firstly, make a strip of 2.5cm (1″) wide bias cut fabric long enough to fit the opening to be finished, plus at least 20cm (8″) extra. Best fabrics to use are something woven that is very thin, fine and lightweight, like cotton voile, silk or handkerchief linen; in an unobtrusive colour toning in with the fabric. For Mum’s cotton top above I used the self-fabric because it is quite light; for the blue suedette skirt I used a scrap of leftover silk-like microfibre.
Right sides together, pin around the edge to be finished, and stitch in a 6mm (1/4″) seam, leaving a gap between start and finish of around 15cm (6″) and ideally tails of at least 20cm (8″) 

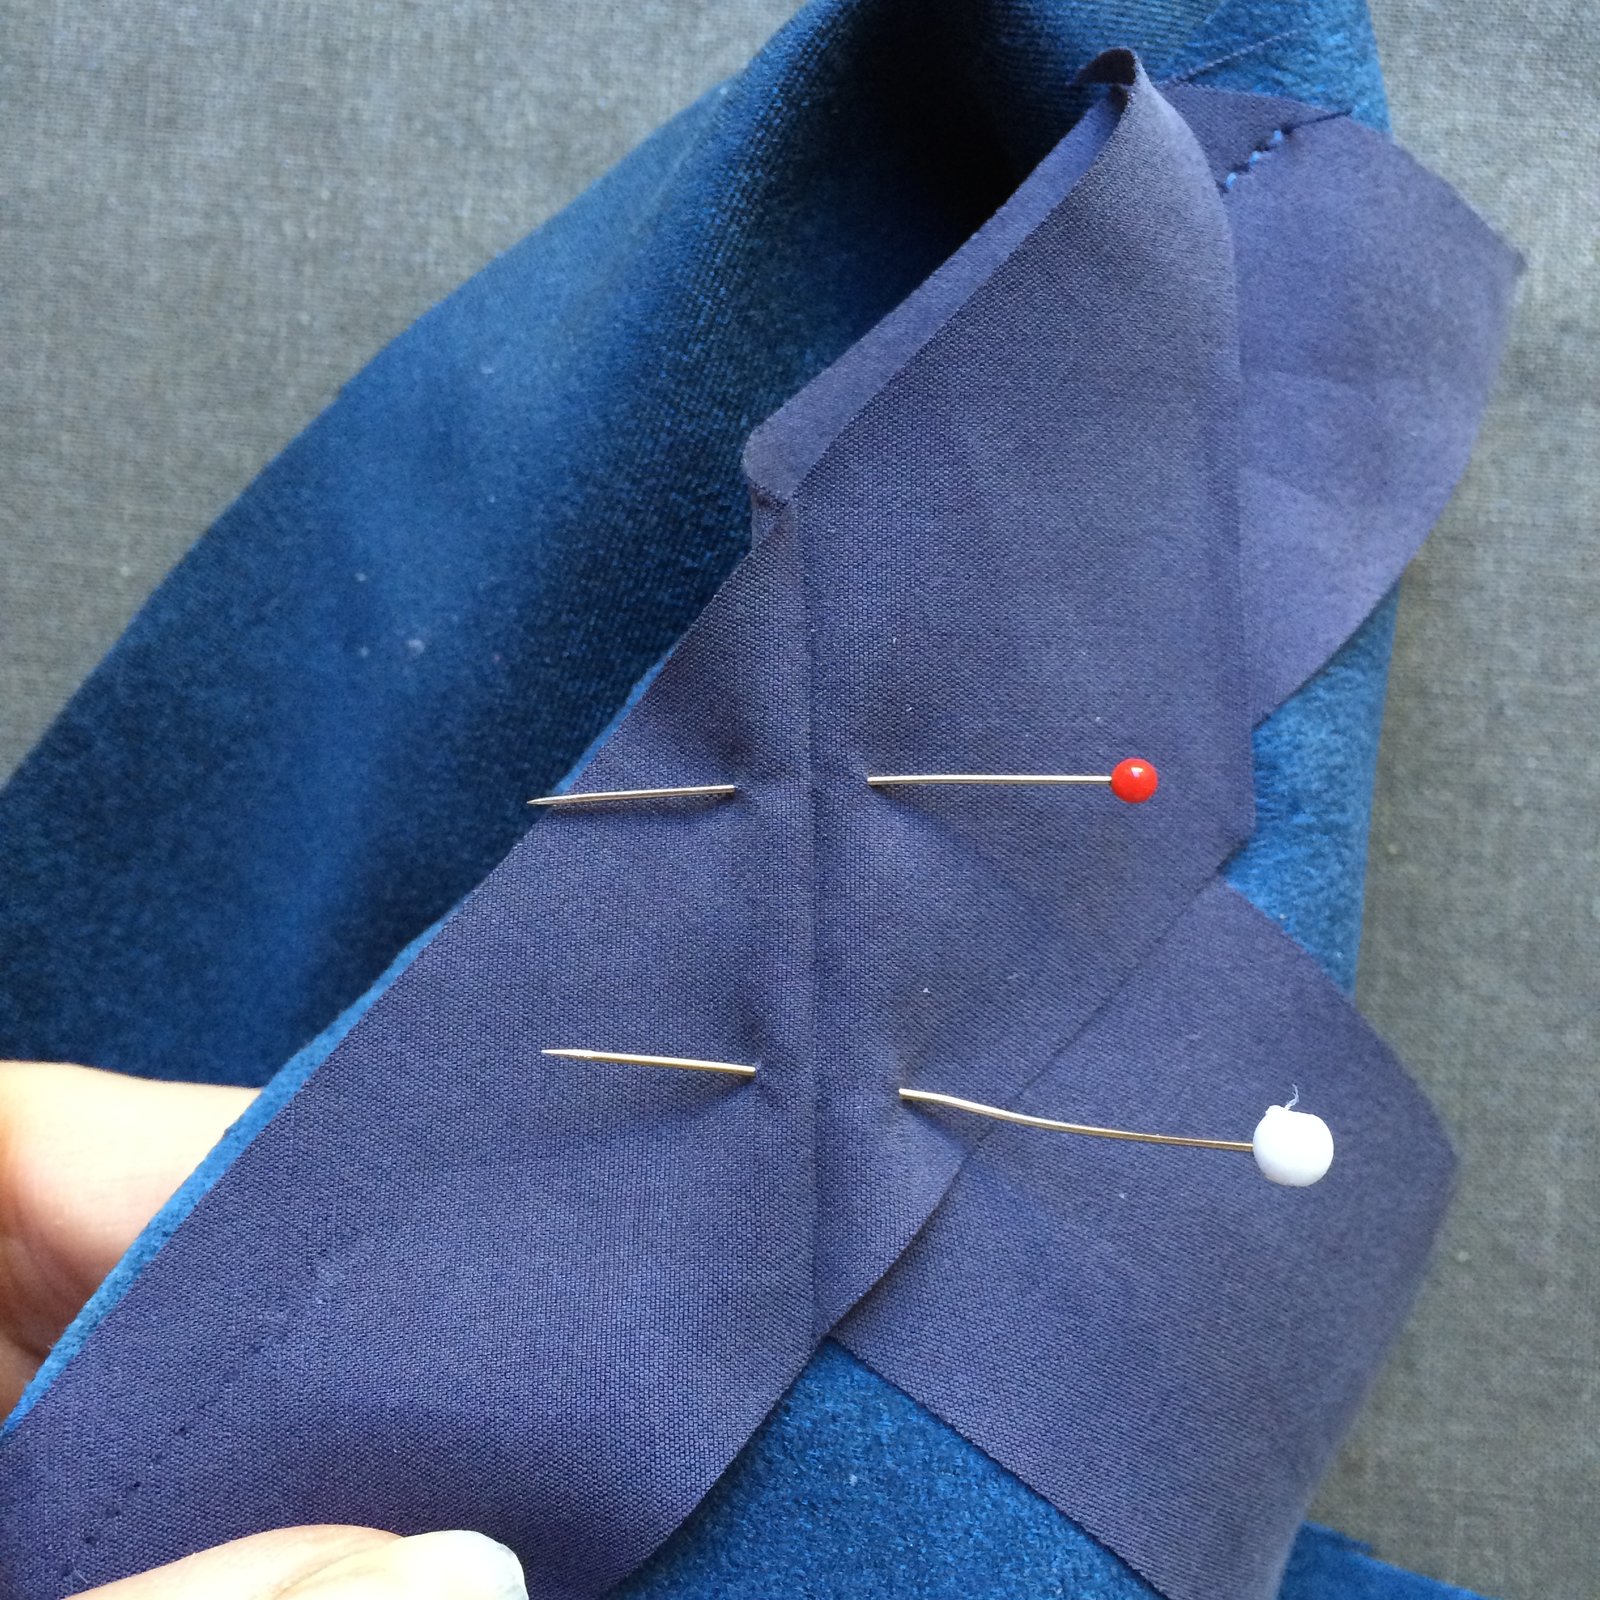
Fold and press the strips to meet together on the bias. I find it best to leave a very tiny gap, like 1-2mm or so, between the pressed edges. Don’t have any explanation for this, just that it works better when it can stretch into it just a touch. Keeping everything straight and right sides together, pin along the folds, stitch, and trim. Press seam open.


Stitch up the gap to complete the bias strip attachment to the edge. Press the bias strip, bias strip seam allowance, and garment seam allowance away from the garment. Understitch these three layers together close to the seam line, keeping just the garment layer free.


Turn the garment wrong side up and press the bias strip back onto the garment, keeping the seam line just inside the pressed edge.

Turn under a 6mm (1/4″) seam allowance on the bias strip, press and pin in place. Topstitch 1cm (3/8″) in from the garment edge. Done! and the nice thing is that you won’t ever be able to see where the strip starts and ends 🙂


Thanks Carolyn for sharing this technique! the result is sooo neat 🙂 I usually join both ends at a 90° angle and not a 45° one, but it ends up a little bulky sometimes. I’ll make sure to refer to your tutorial next time I have to finish an opening this way
thank you for this super tuto !
Omg your stitching is so gorgeous and precise! Thanks for the tutorial – it looks fabulous and I much prefer this way of doing things over the patterns that get you to join the bias into a circle before you begin. I hope my edgstitching/topstitching can begin to look this good one day!
Thank you. This is great!!
Thank you for this tutorial! I also use this technique a lot and especially for hemlines – but mostly because I often cut my skirts too short so I can’t loose any additional length while hemming 😀 What I like to do is to secure the bias strip by hand in the last step, instead of topstitching it in place – I just love the clean and seamless appearance you get this way (especially on thicker fabrics). But I never thought of understitching the layers together before turning the strip up, that is a really good advice and it looks so neat! I’m gonna to that from now on 🙂
I think bias binding is one of the loveliest techniques as well as a practical finish. Your stitching is beautiful!
Oh my word, you’re good. Your tutorial is clear, precise and very helpful. thanks!
Great tutorial. Thank you!!
Very nice tutorial!
Beautiful, thank you
As a long time reader I happened to read your tutorial right as I was making a blouse. Tried it right away on the neckline and it looks beautiful 🙂 especially the understitching of the bias before turning makes for a neat finish.
Thanks for sharing!
Pingback: rows of little white cottages - Handmade by Carolyn
Very neat! Great tutorial…..thank you.
Thanks Caroline! I’m going to do this around the sleeves on a sleeveless shirt dress I’m making next month. I love this finish – never would have thought of it for a hem but it’s so nice! The tip about understitching before turning the bias strip up I think makes a big difference too.
I’d not thought of understitching this finish. How delightfully neat and tidy! Thanks for the new trick in my repetoire.
Beautifully done…& beautifully written too, so thank you for taking the time to include this Carolyn. Just read your “wonky cottage” post too. I bought the same jersey just 4 days ago – SO cool! Your daughter looks great in her new outfit! 🙂
You make it look easy!!!! How come mine comes out wonky! Oh well – keep practicing.
Whao! Very impressive, such neat stitching! The 45 degree ends are a winner for sure, will do that next time. Thanks for the tutorial!
Such a beautiful finish and your preciseness with stitching so close to the edge is inspiring.
Yes, this is the method that I always use, and it works every time. I’m not sure my stitching is as neat as yours though!
Great tutorial and I officially pinned it to my Sewing Techniques Pinterest Board for later use. Thanks for sharing!
Just lovely! Thanks for posting this!
Another Carolyn
Thanks for sharing!
Thanks for posting. Beautiful and simple finish.
Thanks for the tutorial. Your method gives a really neat finish and I shall be referring back to it in the near future.
What a great tutorial! The result is impeccable. Thanks for sharing.
Aha! Understitching is the magic wand of sewing – making all layers behave even before pressing! I thoroughly enjoyed your explanation and clear photos, thank you, thank you! I can’t wait to try this neat technique!
Hi, The tutorial is really good. Can you tell me how you manage to get the binding on the garments to lie so flat with no puckering?
Thank you, this is such a lovely finish.
I LOVE this!!! Thank you so much for taking the time to write this tutorial. I will definitely be using your technique. 🙂
Carolyn you absolute darling, I am teaching this technique at my sewing class on Tuesday night so anyone falling at the wayside can be directed here!! I love this technique especially if I am playing fabric roulette and don’t have enough fabric to cut full facings. Jo x
Thanks so much for this. I’m a bit late to this party, just catching up on my blog reading. I often use bias in a similar way for necklines, armholes and hems but because I use a bias tape maker when I get to the join there are so many folds at so many angles, it’s been a bit hit and miss. Your third blue photo was a light bulb moment for me…so simple and Justhaving that little bit of a gap which will stretch to fit neatly was another explanation of what experience has shown me. Thank you again!
Thank you. It helps me work easier.
I know this is and older post, but I want to thank you for such a clear and clean looking finish. I bought a pdf pattern and they were instructing to cut a 1 7/8” strip for this application. I said no, no, no. lol. This is going to be my new go to.
I’m just starting to sew again after not Sewing since the 80s. I am 80 and I’m enjoying a lot of the lovely unstructured patterns that I’m finding. My question is, can the technique be used instead of using the neckline interfacing that come with so many patterns?