Tag Archives: Burda 8511

A visit to the Art Gallery…

Paid a visit to the Art Gallery of WA today, to view an exhibition and also to celebrate a birthday of a dear friend in our group…
I won’t mention the name of the artist because to be blunt I thought the works were quite hideous and grotesque although on a small (very small) positive note they did make food for thought.  All I could think touring through the exhibits is how on earth the artist was getting funding to put out the work, because the works were very costly and labour intensive.  They were sculptures, mostly very realistic “monsters” made out of silicone and adorned with real human hair and glass eyes to look like horrible deformed creatures out of a very unethical geneticist’s chamber of horrors of cloning/genetic experimentation gone wrong…  just shudder-ous (not a real word, just describing my reaction)  Our tour guide was excellent, raising discussion questions about the future of genetic research and experimentation into issues such as cloning and surrogacy and how far we human beings are prepared to go in these areas, and how much more accepting are our children of scientific “fiddling about” with the natural order of things than the current generation.  These are issues that I, with my scientific background, am already fairly familiar with and have already had some debate …
Viewing this exhibition has made me wonder about the point of art, all over again.  Beauty or politics?  Political art is so far removed from artistic art that I wonder if we should find some other category for it to reside in…  I personally thought this artist’s talents would be put to better use for humanity manufacturing limbs and prostheses for landmine victims (say) or amputees and that is the pragmatist’s view…  but then the scientific debate is important, and how important is the art in the role of stimulating that debate?   There was no beauty and we are accustomed to expecting some beauty in our art.  I do like some beauty, sorry.

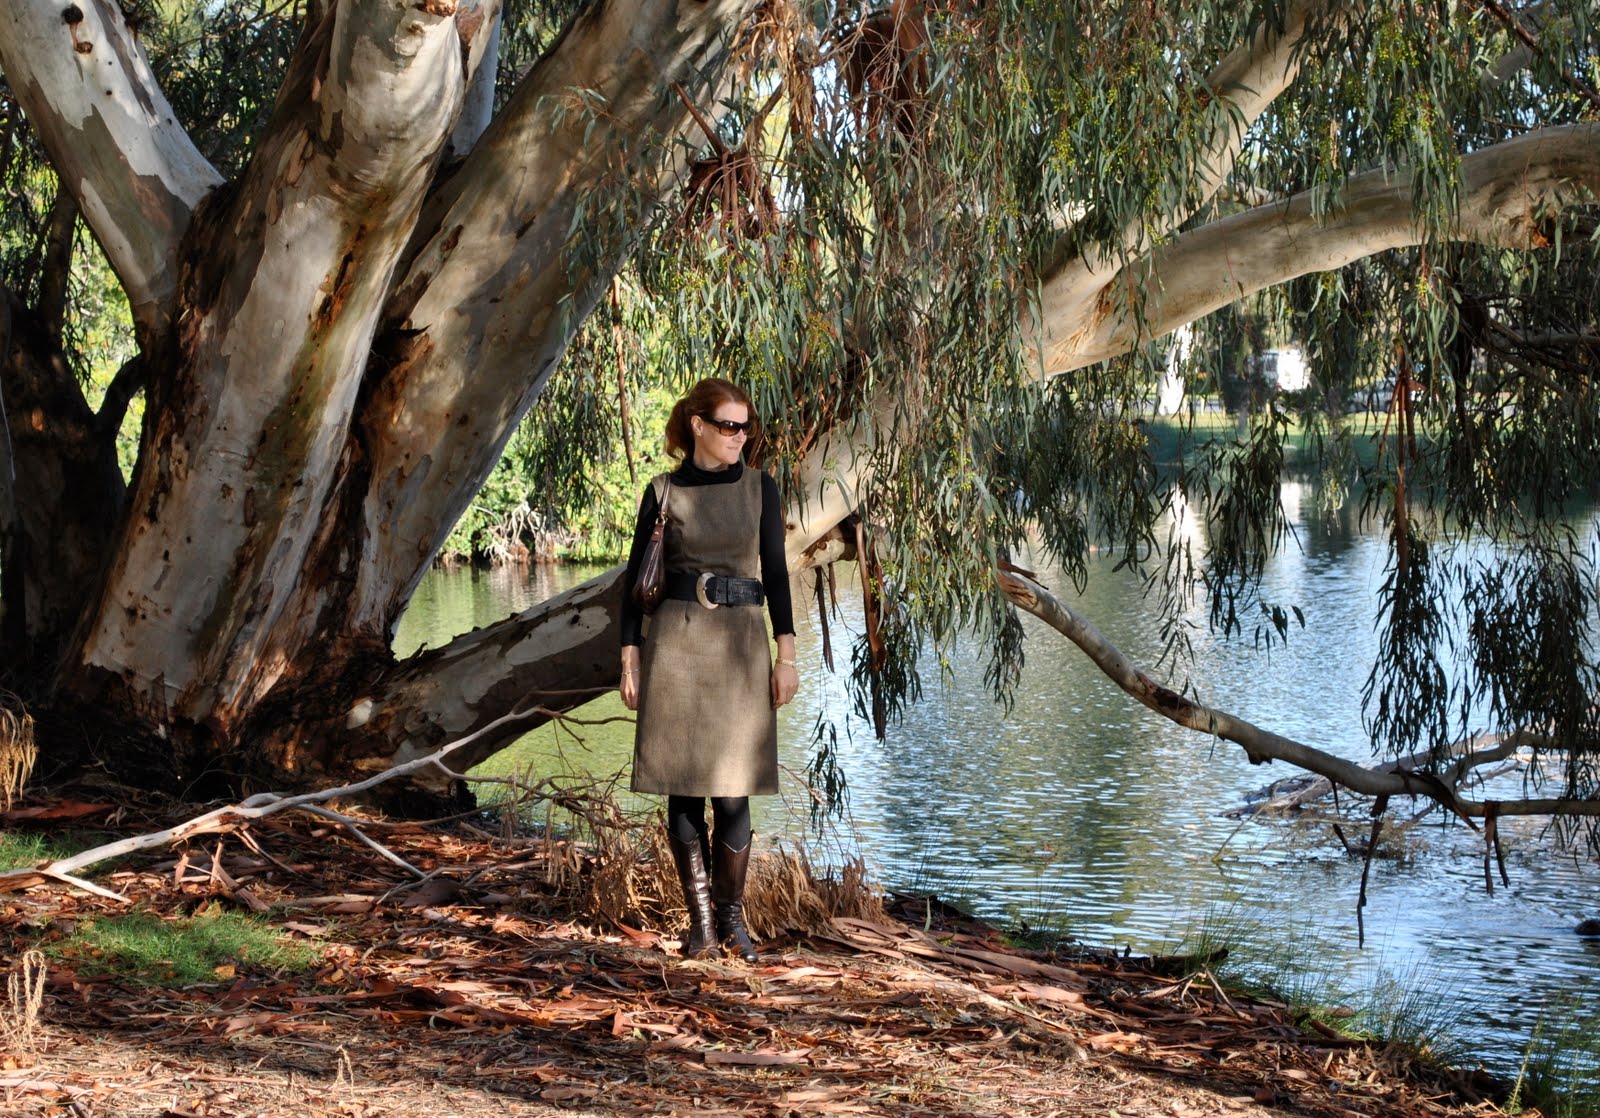
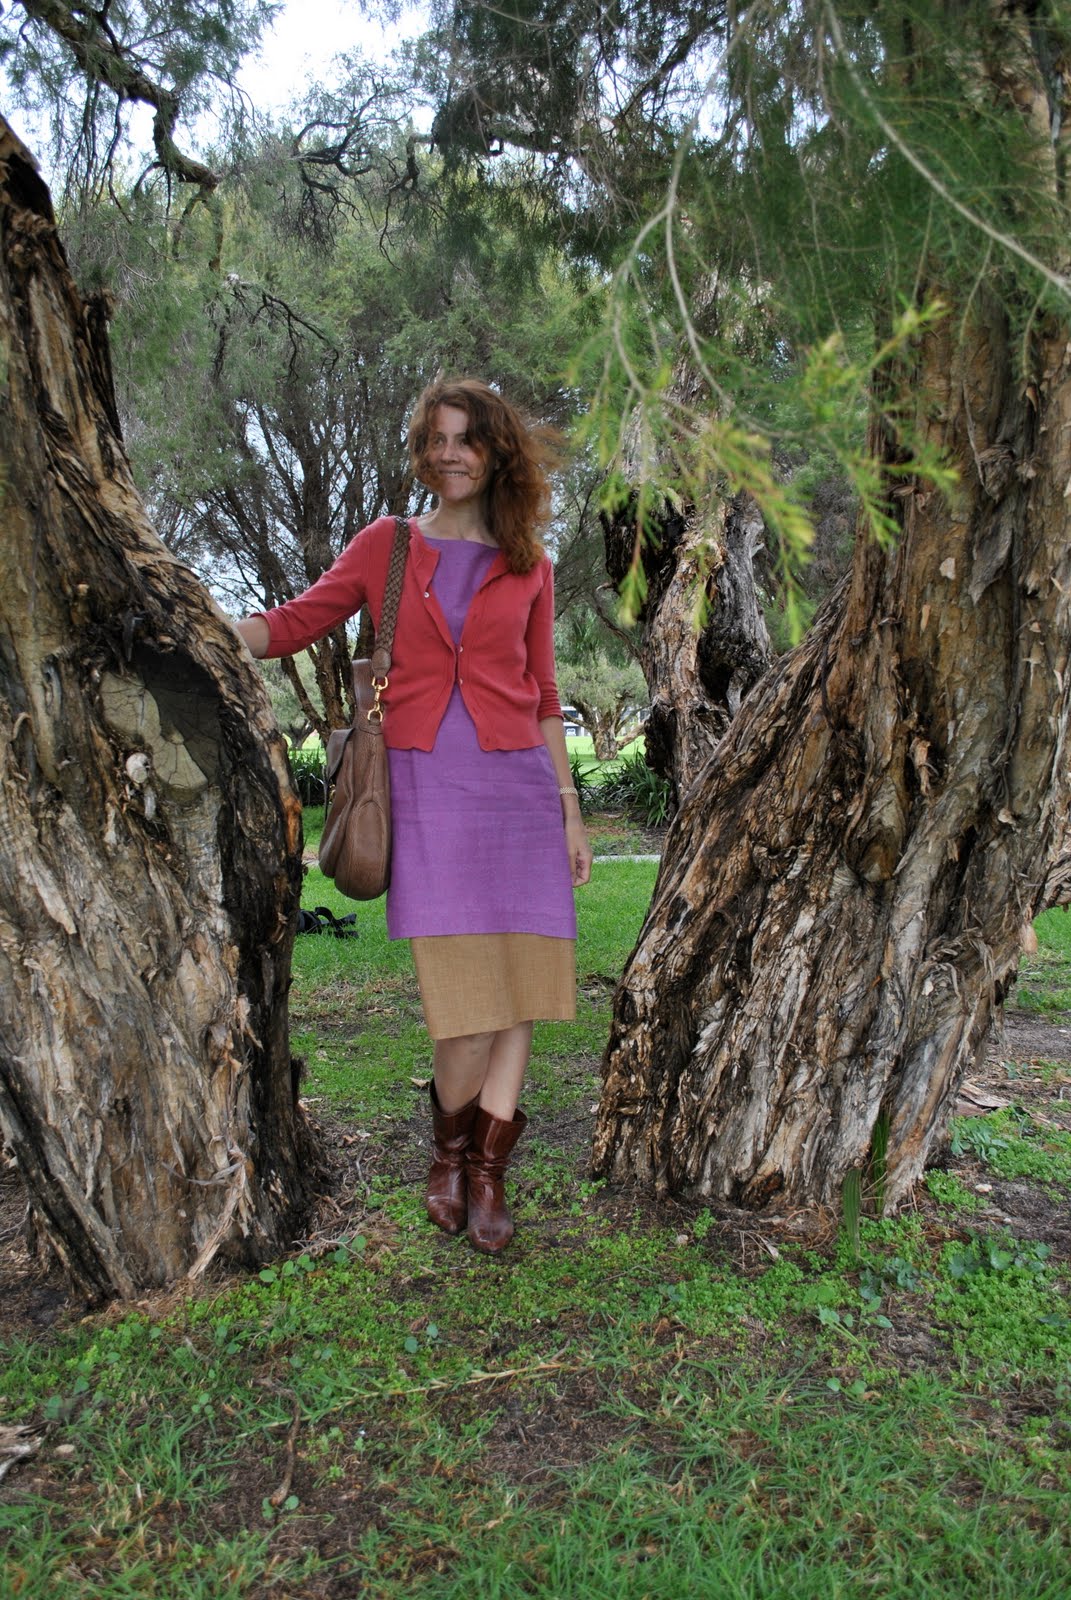
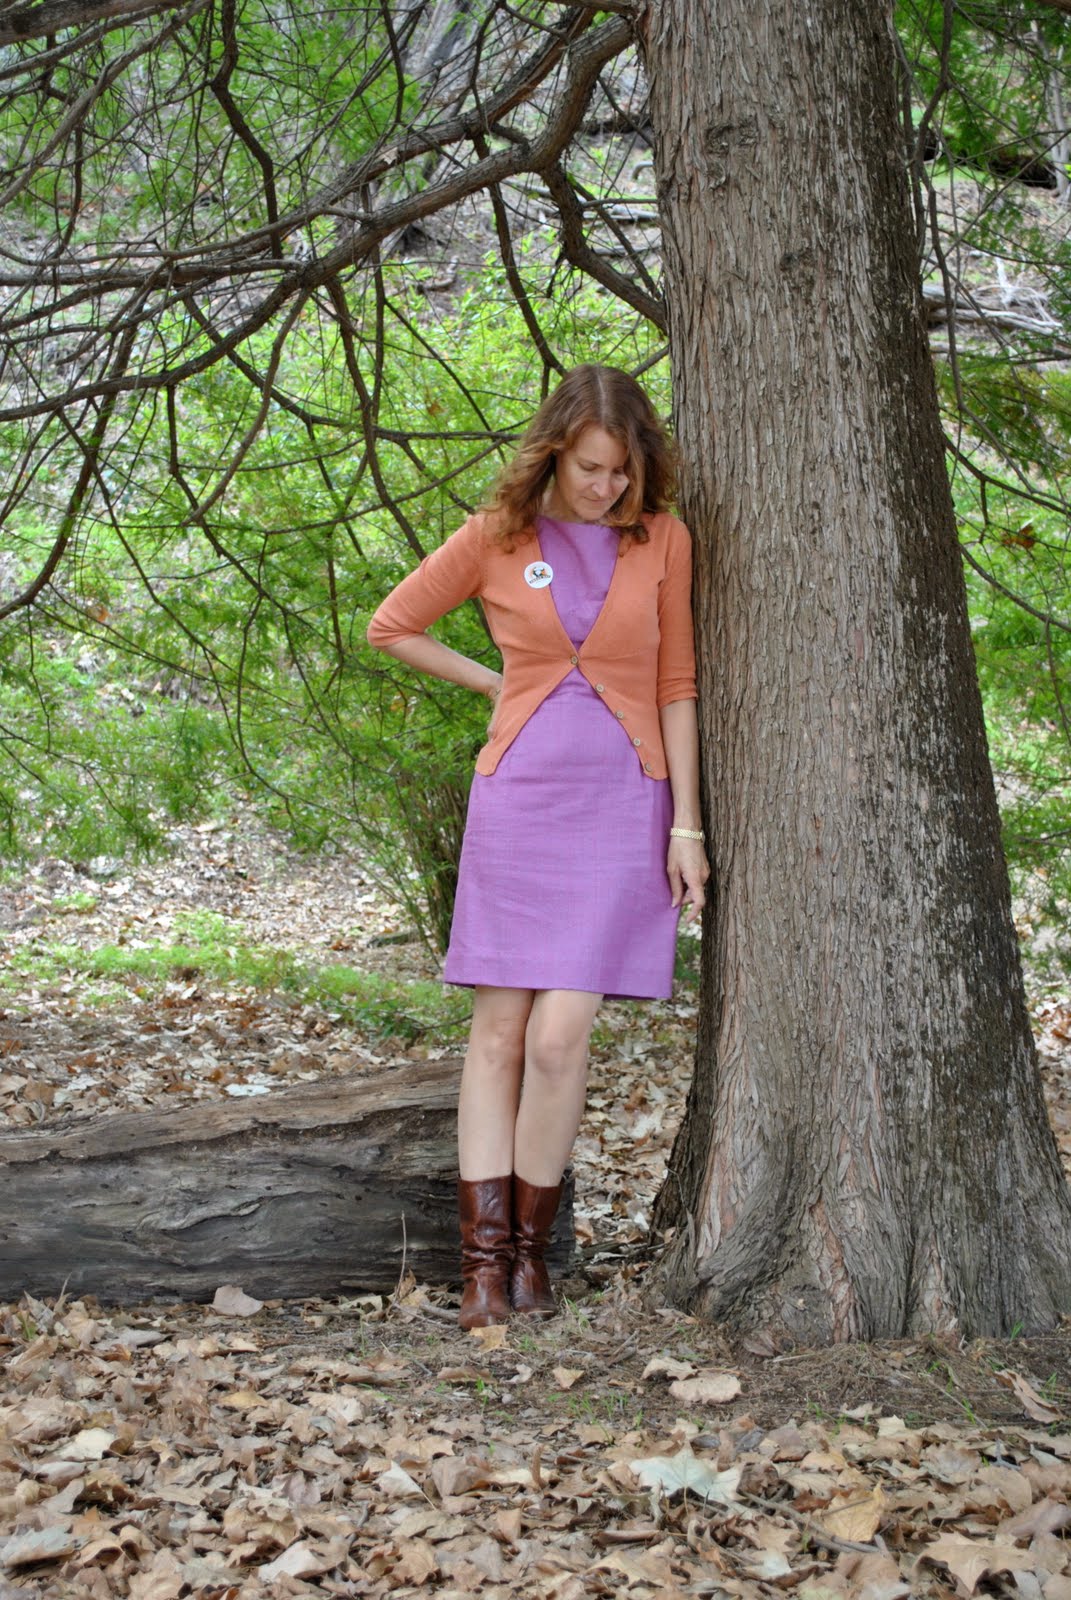
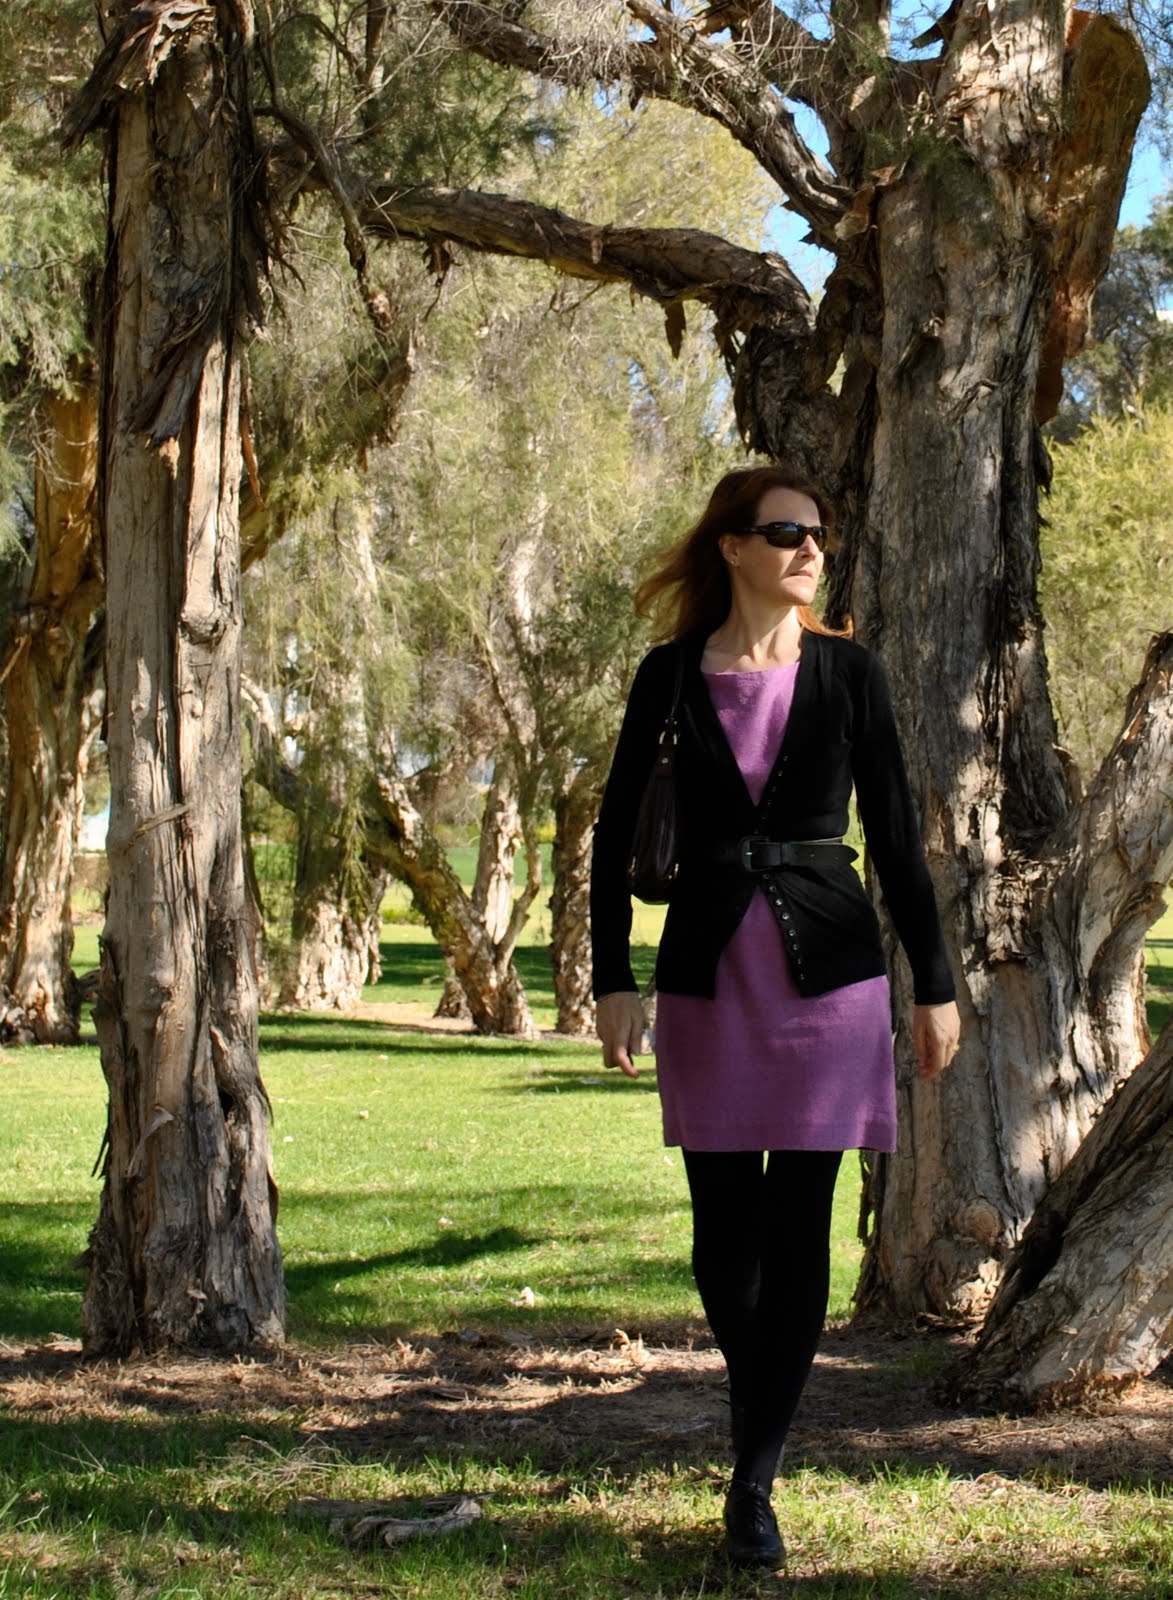
A definite feeling of spring in the air, today is practically hot!  Am feeling a bit too wintery in this outfit even…  I’m starting to think about the upcoming Self Stitched September.  Should I try to go all self stitched, or (as is my usual habit) incorporate a few store bought basics?  Maybe I’ll start out going all self-stitched and see how I go.  And as for taking my photo everyday… this will be a time challenge.  But I’m still excited about it.

Details:
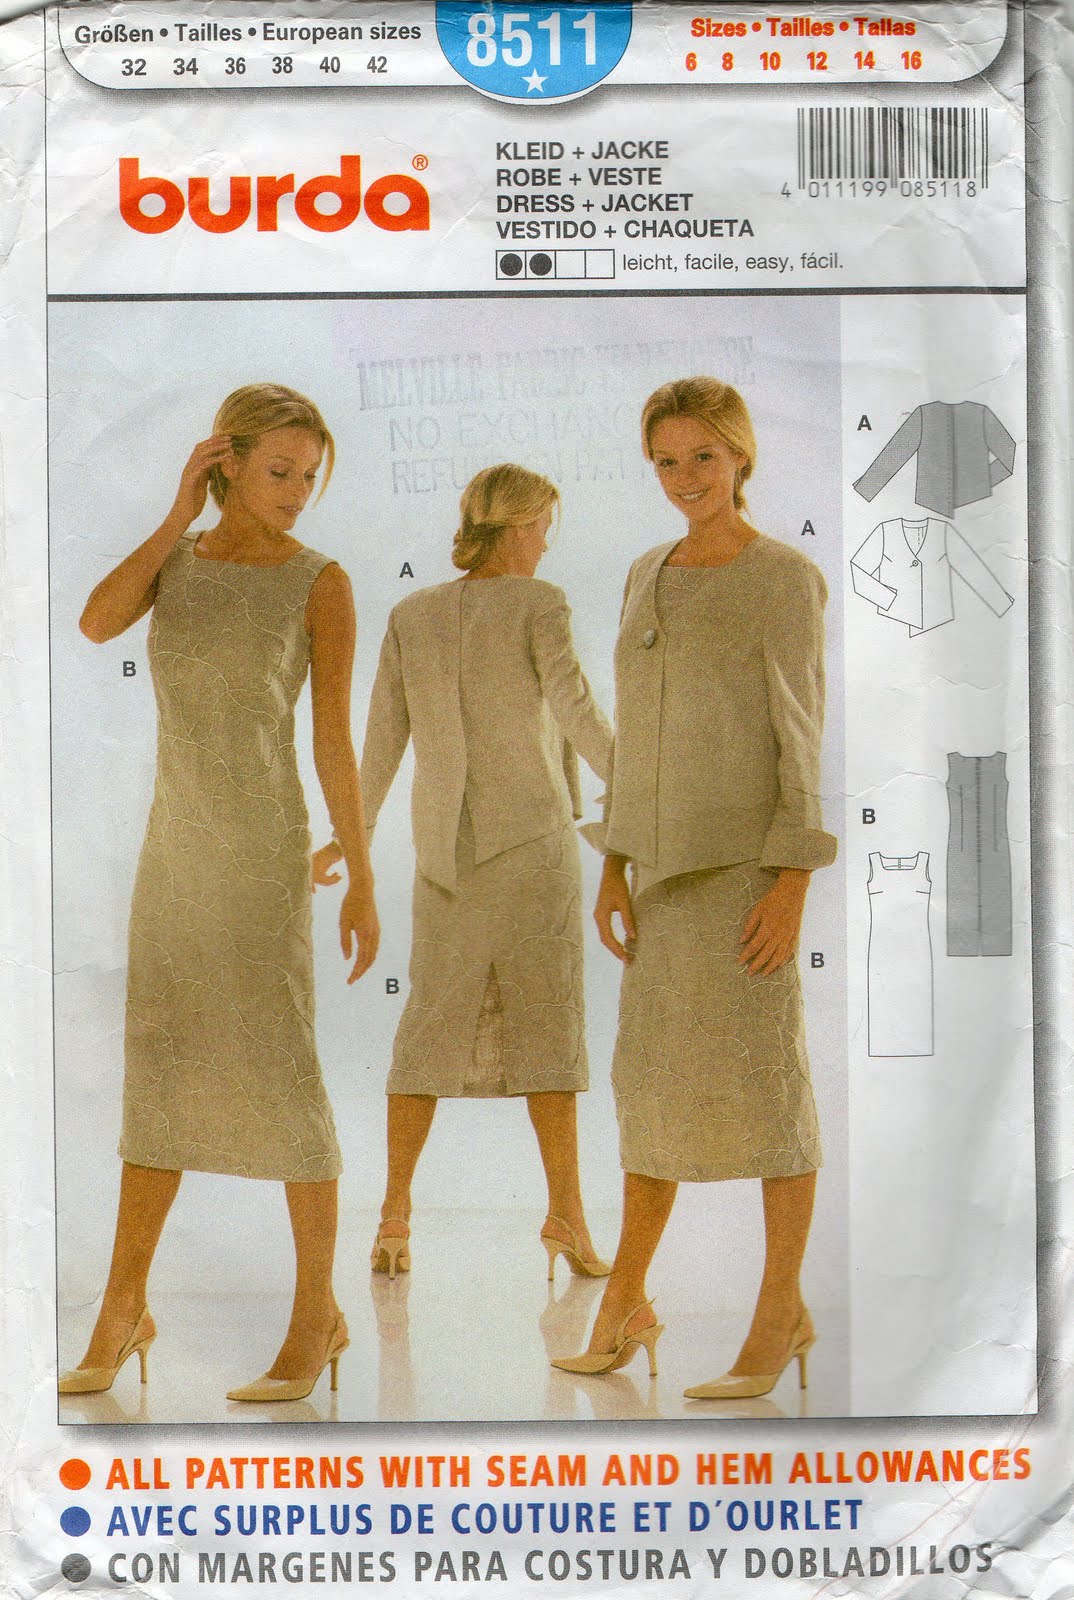
Dress; Burda 8511 with some modifications, purple silk hessian
Cardigan; Country Road
Belt; had since a teenager
Tights; Kolotex
Booties; Django and Juliette, from Zomp
Bag; Gucci

pinterestmail

Tobacco wool sheath

I made this tobacco wool-mix dress using Burda 8511, with fitting modifications about two years ago.  The modifications were namely creating two long and deep front darts, deepening and lengthening the back darts, and bringing in the side seams.
I think this is a great sheath pattern, obviously as I’ve used it four times already (to see the other versions I’ve made click on the Burda 8511 in the labels below), but it does suffer from being a bit shapeless.  Every time I’ve made it I’ve modified it quite a lot, just to get some shape into the thing.  I guess though this is why we buy these paper patterns or attend workshops to make up our own slopers or whatever; so we can get a basic workable shape to start us off, with which we can then play with from thereon.  Add our own exciting details as the whim strikes us.  The joys of dressmaking, no?
I made this for a winter dress, so the top half of the bodice is self-lined, with bemsilk lining the rest of the dress; super warm…  This way I’m wearing it today is the way I was customarily wearing it two years ago and I think maybe it’s time to dress it up a little differently?  Yeah well, we were all into pinafore dresses back then but perhaps it’s time for a new interpretation?  I’m not sure if I look “hot”, or just “not”.  Thus the long shot above, as I have a sneaking suspicion this tree is a much nicer aesthetic prospect than me in this outfit…
To be honest, lately in the dressing department I’m feeling very mojo-less and need something to boost me out of this flatness.  Any styling suggestions, anyone?
This morning my husband and I went out to breakfast together, which was real nice.  We don’t do this sort of thing very often…  It was quite cold then, but now I’m roasting as I’m looking out at bright blue skies again, and had to smear on the old sunblock before I went out for my walk later.  btw, how do you like my random picture for the day?  Pelicans are usually such somnolent birds, so I was lucky to catch this one wheeling away from the shore on his ungainly take-off; his huge wings flap flap flapping ponderously to get his big heavy body off over the water…  He was a beautiful sight.

Details:
Dress; Burda 8511, with some modifications, brown wool mix
Skivvy;  Metalicus
Tights; Kolotex, David Jones
Boots; Sempre di, from Zomp shoes
Belt; Emu leather
Bag; Gucci

pinterestmail

Need a deluge; now


Please take my word for it that my hair looked quite nice before I got to take this photo; an sudden evil wind struck up out of nowhere and I went from looking unusually chic, smooth and polished to my usual messy-haired self…  and I even used a hairdryer this morning.  I don’t know why I bother.
After a quick attendance at a Biggest Morning Tea (for cancer research) this morning and a few errands I have Dynamic Liftered my whole garden and now have my fingers crossed for rain!  (for those unacquainted with Dynamic Lifter, it is pulverised chook poo)  You can imagine the rich heady aroma now wafting through our open windows…  I thought rain was forecast for today, but about five minutes of light drizzle and that’s been it…  desperately need a downpour to water in that smell!
As I’m typing this, brilliant sunshine is bursting through the few patchy clouds remaining in the sky to taunt and tease me.  Oh, I love the sunshine, don’t get me wrong, I’m not complaining about the divine weather we are having, but… we need some rain!  
Does anyone know a good rain-dance?

Details:
Dress; Burda 8511, purple/blue silk hessian
Cardigan; Morrison
Shoes; Timberland
Bag; Gucci

pinterestmail

Toasty warm layers

So you can probably tell by my windswept hair in this photo that the weather today is a blustery foretaste of winter to come here in Perth!
On a whim this morning while trying to decide what to wear, I put this op shop skirt on under the purple heather dress and it felt so warm and cosy I kept it on.  And I really like how the three striped layers of colour looks from top to bottom of this outfit.  Previously I wouldn’t have thought of wearing a skirt under a dress but I think it works in this case when both are straight and plain and in lovely toning colours.  They look a little off-parallel here, but trust me, that is the wind effect and the hems actually line up quite well indoors!
And remember when I announced I would be replacing the lining of this skirt because of its annoying tendency to cling to my legs?  Well today being so brisk and all, the lining-clinging-to-the-legs feature of this skirt turned out to be a plus.  Toasty warm legs!  The lining’s going to stay after all!

Details:
Dress; Burda 8511 with minor adjustments, purple hessian silk
Skirt; Salvation Army op shop ($2!)
Cardigan; Country Road
Boots; Enrico Antinori
Bag; Gucci

pinterestmail

Mauve and apricot

It’s wonderful when you go to the wardrobe and discover a dress that you had almost forgotten you had.  And this is a new dress, it’s not that long since I made it, shame on me.  Must be getting forgetful, first sign of old age…?
I love this colour combination of the purple-y mauve with soft apricot orange, whispers “autumn” to me so well.  Later in the supermarket when I donated to the ANZAC’s and got this sticker, it happened to go so nicely with my outfit, fortuitous, no?
I met up with some friends for morning tea this morning, had a few errands afterwards and rounded up the day out with a revisit to Ricarda with my daughter so I could get a closer look at the clothes I saw in the parade the other night; up close I marvelled even more over the cut and construction of those lovely garments.  Of course the prices made us gasp, but if they weren’t expensive then they wouldn’t be so exciting, right?

Details:
Dress; Burda 8511, shot silk hessian
Cardigan; Nine, from Labels boutique
Boots; Enrico Antinori from Zomp shoes

pinterestmail

Heather purple dress, part 3

So, now for the final installment of the making of this dress.
At this point it’s just a bit of finishing off to go; sewing the lining to the zip tape, and doing the hem.  It doesn’t sound like much, but hems are not to be rushed into, especially on a plain-ish dress like this one in which a wonky hem would stand out like a sore thumb.  The very simplicity of the dress’s style means that the hem has to be perfect, as there are no design details to draw the eye away from imperfections, not even a print on the fabric.
So I sew the lining on to the zip tape by hand.  A comment kindly directed me to a site where I could learn how to do this feature by machine… (haven’t checked it out yet) but I had already finished it by this stage!  

And the hem…  When I want it to be perfect there is no other way than this…  Remember when your mother got you to stand on a chair and slowly rotate while she measured and pinned your hems…?  I still do this for my daughter’s dresses but a person can’t help but shift weight a tiny bit from foot to foot, and move their hips, even the smallest amount and it really throws off your hem measurements, the beauty of Bessie is that she’s rock steady.

After I’ve trimmed the hem allowance to 5cm (I pull the dress onto the ironing board to do this), overlock the edge, pin up and press, I trim the lining to be the same length as the pinned-up hem of the dress proper.  Then I fold the lining up on the inside 1cm, press, fold up another 1cm, press, then sew it by machine.  This results in a lining hemmed exactly 2cm  shorter than my dress length, which is perfect…

I make some bias binding out of voile…

And attach this by machine to the edge to cover the overlocking stitches, press the bias edges under, then finally slip stitch the hem invisibly into place…

Voila!

I feel like a bit of a fraud modelling it as I’m not wearing it today and I don’t intend to wear it until autumn.  I am wearing the scarf (which I also made over the weekend) and shoes today, but with a different dress!
Truth be told, I finished this dress two days ago; I did say I’d been sewing like a demon, I’ve also finished my next two re-fashion projects which are lined up for those Wardrobe Refashion posts, man I’ve got to slow down…  Good news (?!) is that our office computer is up and running so I can get onto a mountain of office work as of this week…  yay (in a small, depressed voice)…

Details:
Dress; Burda 8511, modified, purple hessian silk
Scarf; turquoise silk chiffon, self-made
Shoes; lasoffitadi Gjilde, from Zomp

pinterestmail

Heather purple dress, part 2

I last left off this exciting saga (ha ha) with the front and back sewn to their facing/linings at the armhole edges and neckline, and the seam allowances clipped and graded.

I then turned the front and back pieces right side out, eased the seams open and pressed, then understitched the facings on the curved part of the seams.  I hope everyone understitches their facings, I think it makes a huge difference to keeping those facings on the inside where they should be, and not rolling out to the outside.  It’s difficult to see in the photo, (I’ve made it a big photo to help) but my unpicker and the pencil are pointing to the understitching seams.  You can’t really sew all the way up to the edge of the seams, because you are trying to sew up a tube and that’s impossible, at least on my machine, but just understitching around the curves results in a much cleaner, nicer edge that sits flat.

Now for the shoulder seams.  I sew the front and backs together, at this point I either congratulate myself on careful measuring getting those gaps exactly the same width, or I’m kicking myself I didn’t measure precisely and check properly (see part 1); nowadays I am super accurate with this part as I’ve come to grief here before…. don’t want to talk about it, but it means redoing those arm and/or neck seams again….

Then I carefully clip the corners a bit (not too closely if the fabric is a real fray-er, like this silk is) in the photo above the left side is clipped but not the right, press open with my fingers (not an iron), turn the facing shoulder seams in and pin closed, then handstitch the facing shoulder seams closed…  in the photo below I’ve stitched the right seam and just pinned the left side.  In the photo you can also see one of my sewing assistants who often helps out by plonking herself down right in the thick of things at some crucial step..

Now for the zip…  I overlock the edges of the left side seam (if you’re a left-hander you might prefer to have your zip on the right side seam, probably one of the reasons you’re a dressmaker is so you can have this feature where you want it rather than where commercial clothing manufacturers have decided for you)  Then I physically try on the dress and pin it closed down the side seams to check just where I want them and mark front and back with pins…

Then insert the zip along these markings.  I perhaps should have taken more photos during the zip insertion process, but I always get in a bit of a zip-insertion zone at this stage and didn’t think to pick up the camera.  Anyhoo, I put the zip in, sewing from top to bottom both sides… then after this sew the seam below the zip, again from top to bottom.  Do others do it this way also?  I find if I do one side of the zip top to bottom, the the other side bottom to top, and/or the dress seam bottom to top, it’s very difficult to avoid little lumps or bumps in the seam. I think it’s because the upper and under fabric pieces shift due to tiny variations in the rate of the feed dogs on the under side compared to the rate you control the fabric feeding into the machine…  Any thoughts anyone?  It’s taken me a few imperfect zips that require unpicking and re-doing to settle on this rigid “top to bottom” rule that I never break now…  Here is the zip inserted, and the pins you can see are the lining pinned to the zip tape on the inside (photo of this further below)

Then I sew the right side seam following my markings, both the dress and the facing/lining top to bottom, and overlock/finish this seam…  (I know this looks a little tight on Bessie but the truth is that she’s a tad bigger than me and although I’m struggling to close the zip on her I have plenty of breathing space when the dress is on me… another trial and error thing I’ve learnt to adapt to)

Here is the photo of the inside of the dress so far, with the lining pinned to the zip tape ready for handsewing…. Does anyone know how to do this by machine successfully… that’s a holy grail for me, as it always ends up looking like a lumpy mess when I’ve tried and needs re-doing.  Until I can learn how to do this I’m handstitching for a perfect finish..

Finishing stages of the dress in a few days…

pinterestmail

Heather purple dress, part 1

I have been sewing like mad over the past few weeks, what with the kids on holidays and I’ve got a break from my office work as we’re in the process of switching over computer systems, and I’ve nearly finished all of my autumn sewing plan.  I finally finished my trench coat the other day; the belt buckle situation was a real hold-up, but I went op-shopping with my daughter and I picked up a nice heavy-ish brass one (attached to a ghastly PVC belt, I wouldn’t chop up a leather belt but PVC, hey, all bets are off!)  I only have one item left to do on my plan and that’s the heather purple sheath dress.  It was my husband who suggested I take some photos during the construction process and put them up here as a kind of progress report.  After all, even my mother probably doesn’t want to look at photos of me every day! so I thought, good idea…. I think I’ll do this on alternate days for a while.
For my sheath dress I’m using Burda 8511, one I’ve used before four times.  My first version I thoughtlessly put in the Good Sammy’s bin during a fit of cleaning madness, the second version is here, the third here, and the fourth is a winter dress I haven’t posted about on this blog yet.  Although the third version is a loose shapeless dress, on each of the other versions I have fine-tuned the fitting of this dress and am quite happy with the simple chic of this style.  For this one I want it to be quite formfitting.
I’m using hessian silk, from Fabulous fabrics, which has a sort of rich magenta warp with a sky blue weft, the final effect is a sort of dusky purple.  For the lining I’m using mauve bemsilk, and I’ve got a 46cm “eggplant” invisible zip.
Variations I am doing on the pattern:
1. As this is to be an autumn/winter dress I’m lining the whole thing.  (this is a bigger variation than it initially appears!)
2. The back is laid on a centre fold, eliminating the central back seam, and I’m relocating the zip to the left side seam.
3. I’m shaping my own neckline
4. The dress will be fitted to be way more form-fitting, as the original pattern is pretty shapeless. (again, a biggie)
5. The dress will sit above knee, so no need for a rear central slit.

Here are some of the pattern pieces, cut out.  The front neckline (at left) is still uncut as I haven’t decided whether to make it rounded or square at this point yet (often a last-minute decision!)  On my sewing plan I drew it as quite high necked, but then had second thoughts… I’ve also cut out full dress lining pieces.
As I am doing a whole dress lining, I’ve extended the facing pieces and made a composite facing/lining out of self fabric and bemsilk.  (This is something I worked out successfully from the last time I made this dress)

Here are the facing/lining pieces; the front (at right) has been joined and edges finished (overlocked and topstitched down) and the back facing + lining are pinned ready for seaming (the whole bit at the top above the pins will be cut off with the seam!).  The shaping and darting markings haven’t been transferred yet.

Here I have pinned the front and back pieces onto Bessie and marked my own fitting darts.  These were perfected in my previous efforts using this pattern.  Sorry, I’ve realised just now that some of the pins I used are small headed and so invisible in these photos! Doh, camera skills, please…

And here is the front piece with darts sewed in.

These same shaping darts are sewn in the lining also, although here I have sewn them approximately 5mm shallower on each longitudinal dart, for ease of movement.  Then the front lining and front are pinned together at the neckline and armhole edge and sewn, likewise the back and its facing/lining piece.  
At this point it is essential that the seams start and finish 1.5cm in from the raw edge (my unpicker is pointing to illustrate), and that the gaps at the top for your shoulder seams are exactly the same width front and back.  This is real important.  If they are not exact, there will be tears.  Just saying.

The front (at right) has been sewn, and the seams graded and clipped, you can see I’ve decided on a demure curved neckline, and the back (at left) is just pinned.  
At this point I stopped for the day, not because I wanted to, but because the family was starting to grizzle from hunger…  must be dinner time already.
More in a couple of days..

pinterestmail
Switch to mobile version
↓