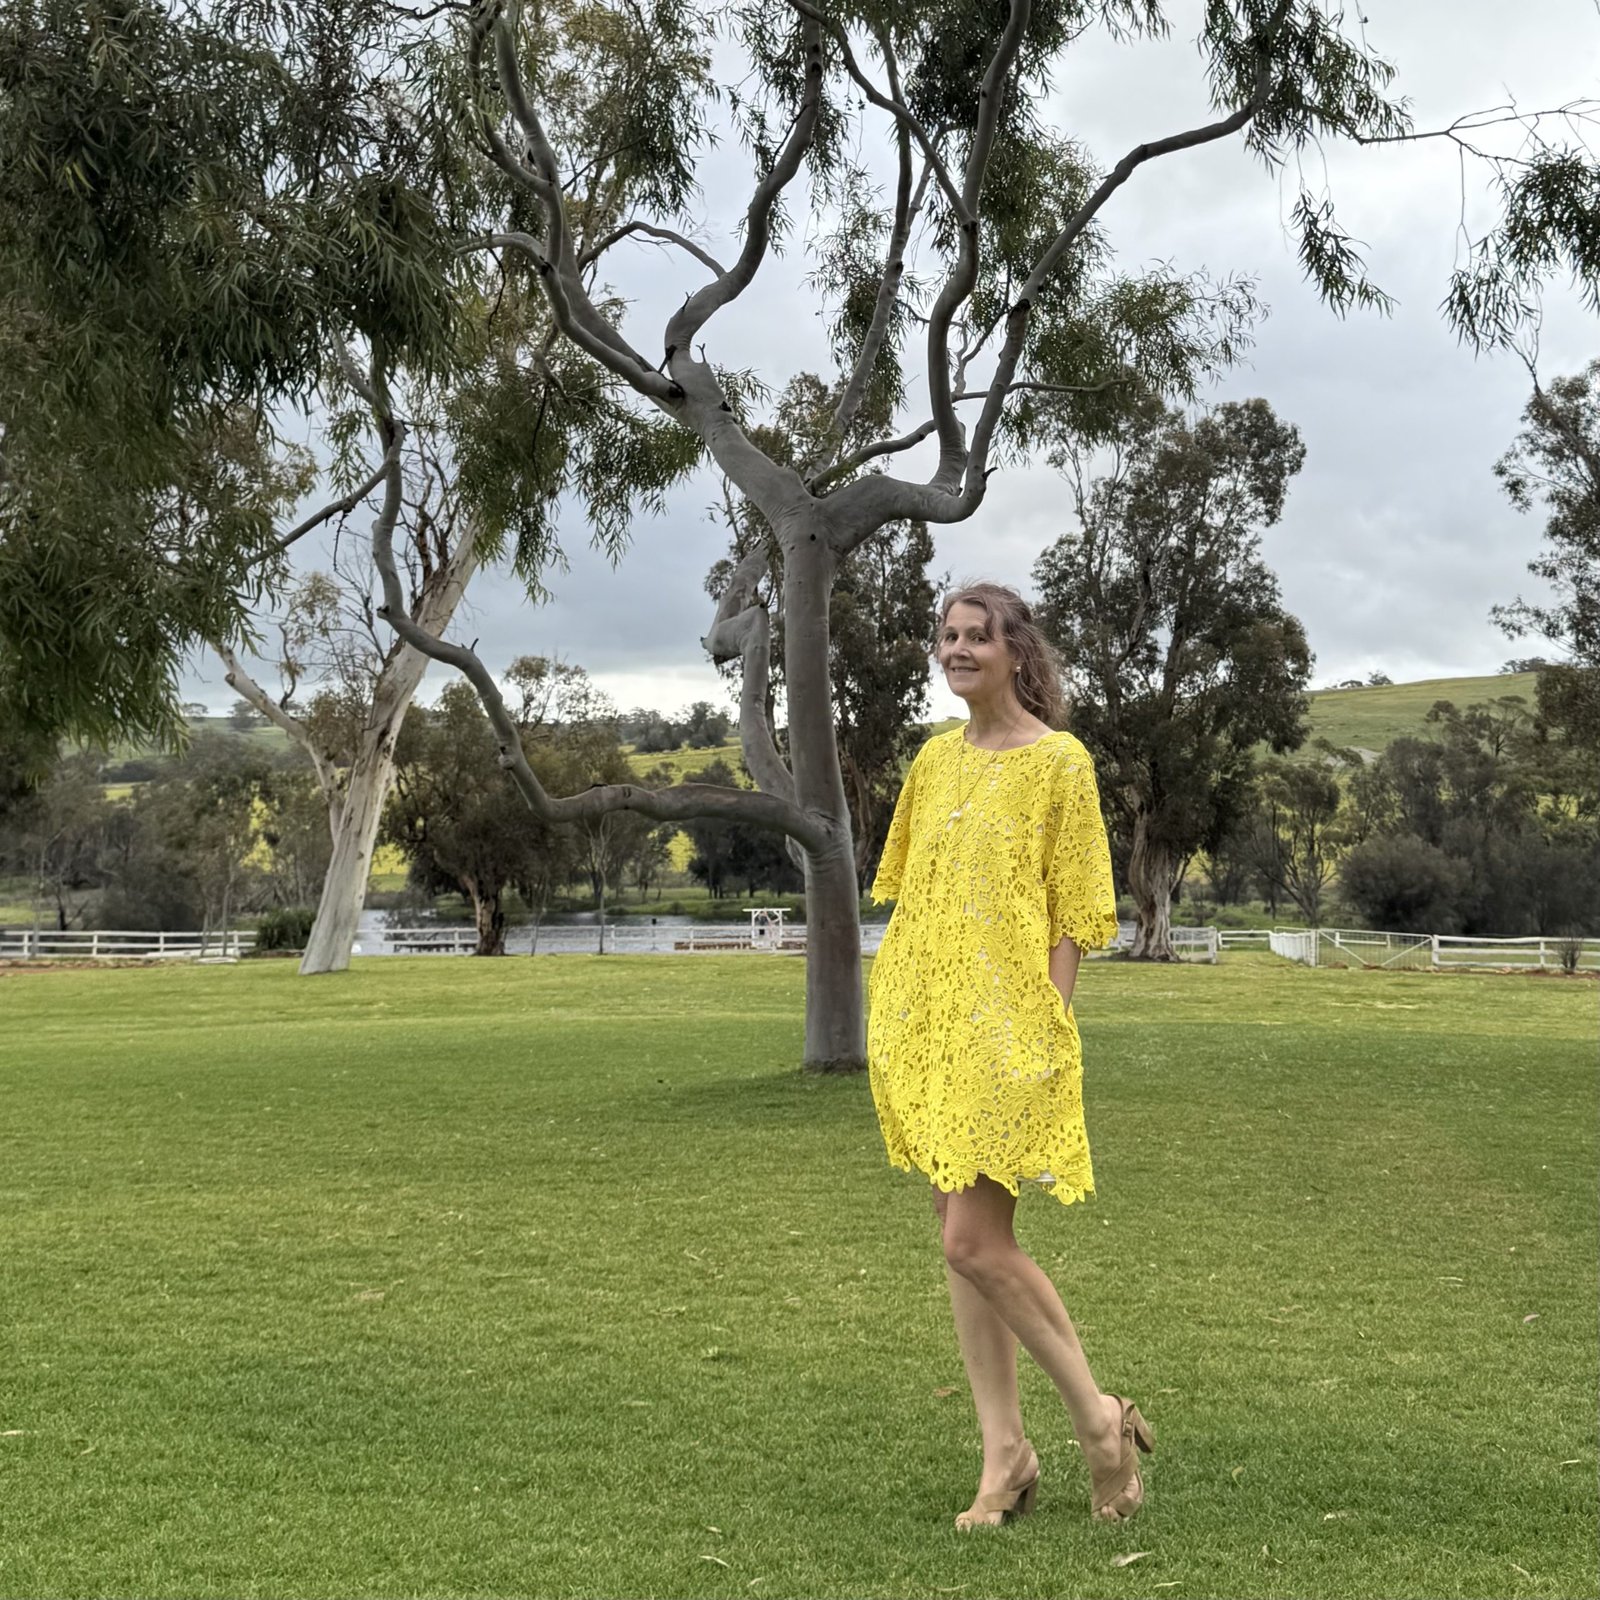
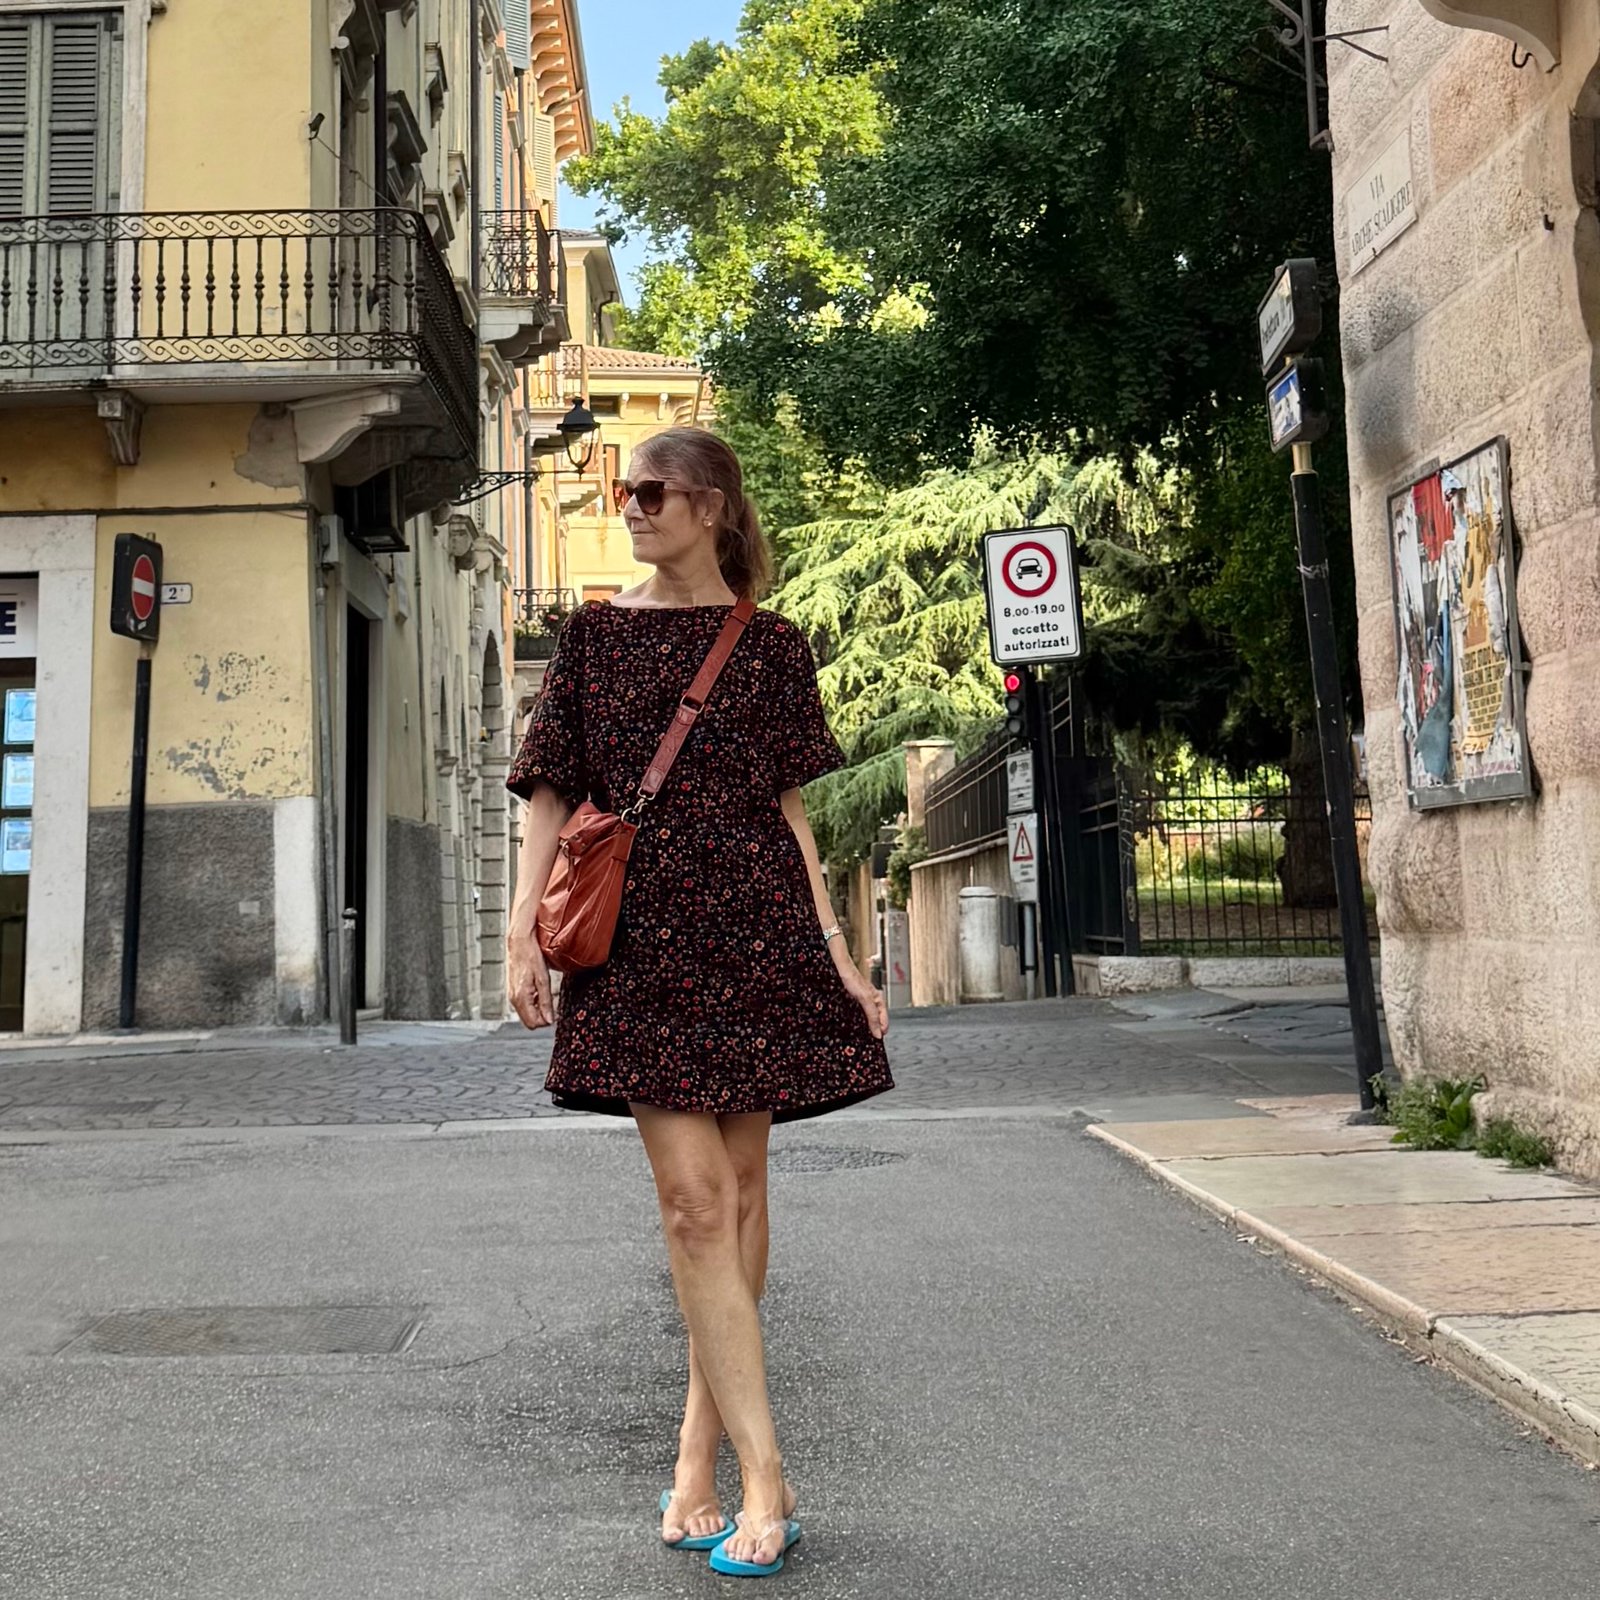
 hello! Recently my lovely niece J married her long-time man and so of course I had to make a new dress for myself for the occasion… I was vaguely toying with the idea of shopping for fabric before I remembered two things: 1. as everyone in our family knows, J’s favourite colour is famously yellow, and 2. I have a piece of very yellow, and happily wedding worthy fabric in my stash already!

I bought this neon-bright yellow guipure lace from Mood Fabrics in New York City back in 2019, when I was over there with my friend Yoshimi… we met with other sewing ladies and they took us on a fabulous fabric shopping spree! Such fun. I wrote about it on my blog here… Originally I had envisioned making a little mini skirt from the lace but when the fabric was rolled out on the counter it turned out there was a pretty large chunk of the border cut out, so the salesperson basically threw that part of the fabric in for free. Meaning, I ended up with a lot longer length than I had needed. And obviously I couldn’t waste the extra bit by making that little mini, so it sat, awaiting some other project that could make use of it.Et voila!
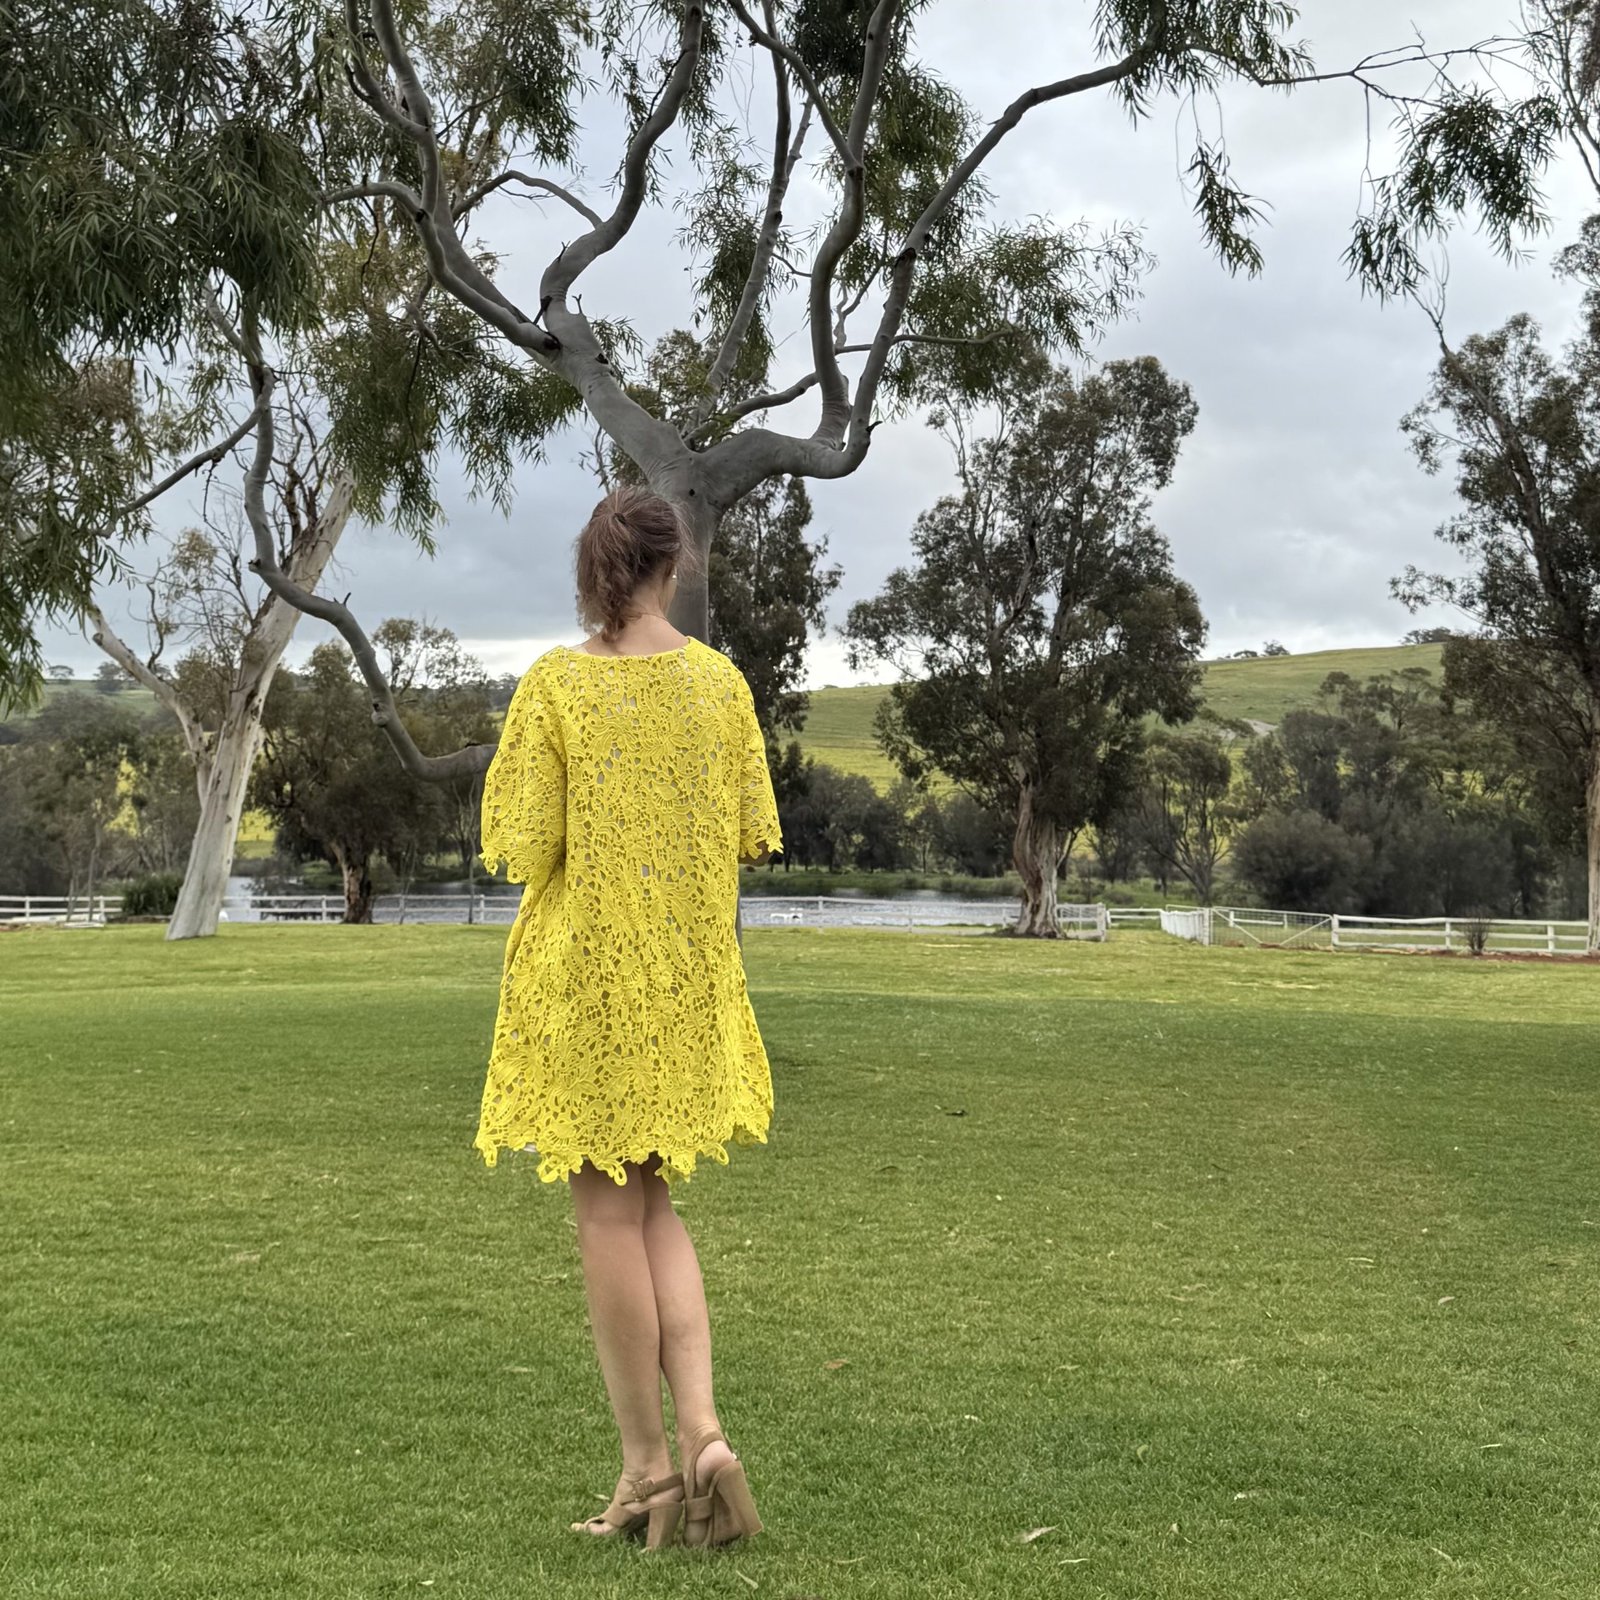
I used the Closet Core Ceilo pattern with a few small modifications… namely; spicing the back yoke and back pieces together to eliminate that seam, including inseam pockets in the side seams, and I also cut it to be a bit more flared. Oh, and I also traced a size up – or maybe two? can’t remember now – for that fashionable oversized look. The hemline, which is of course the natural border of the lace, was determined by how much length I could get, and I also managed to get the sleeves on a border. It only took a little bit of pattern Tetris but I’m thrilled that I achieved what is one of my primary aims with any sewing project, which is to have minimal leftovers!
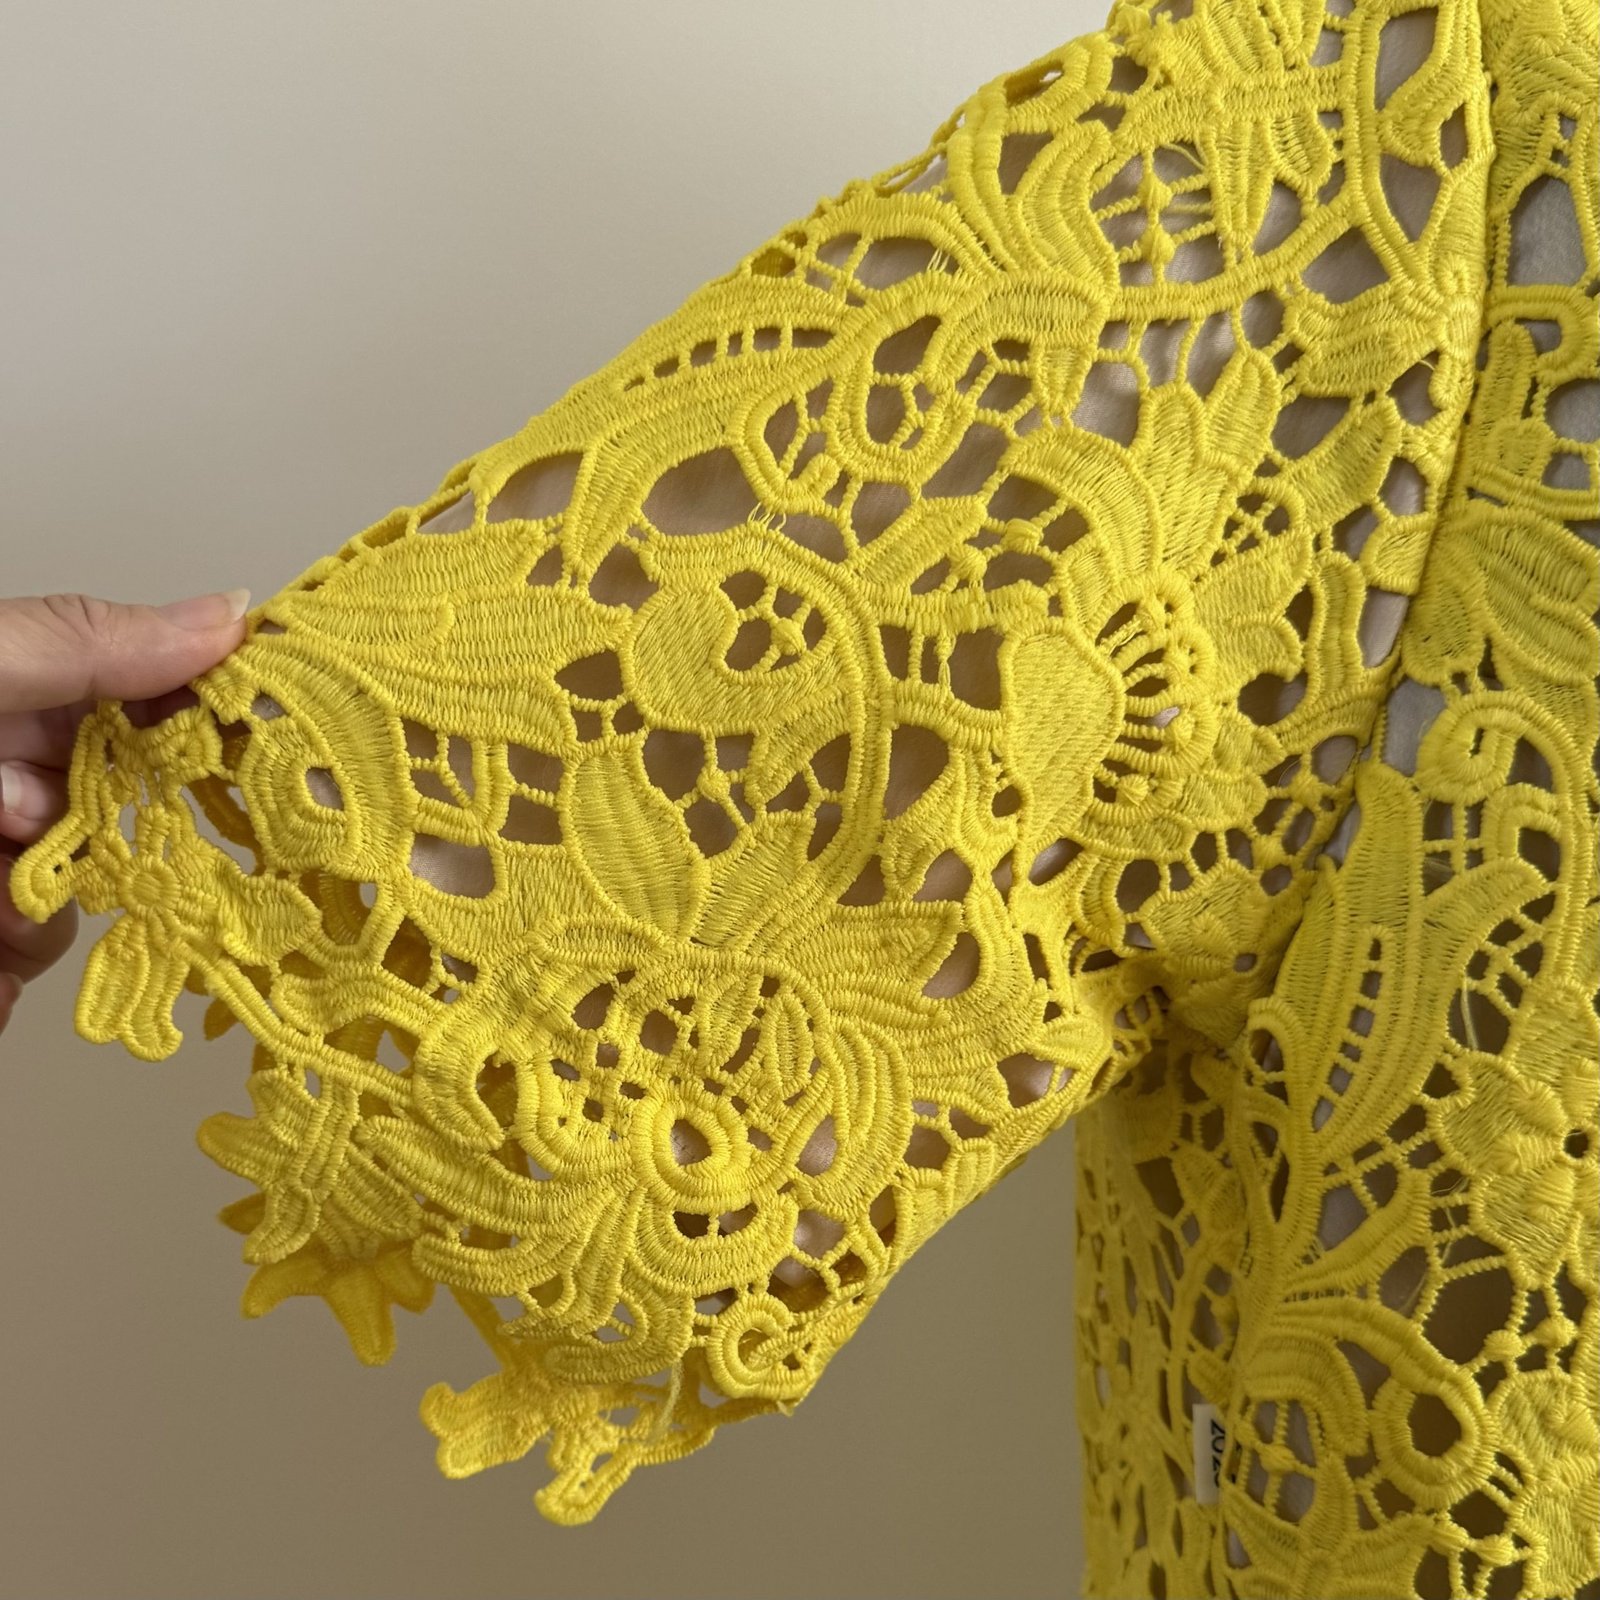
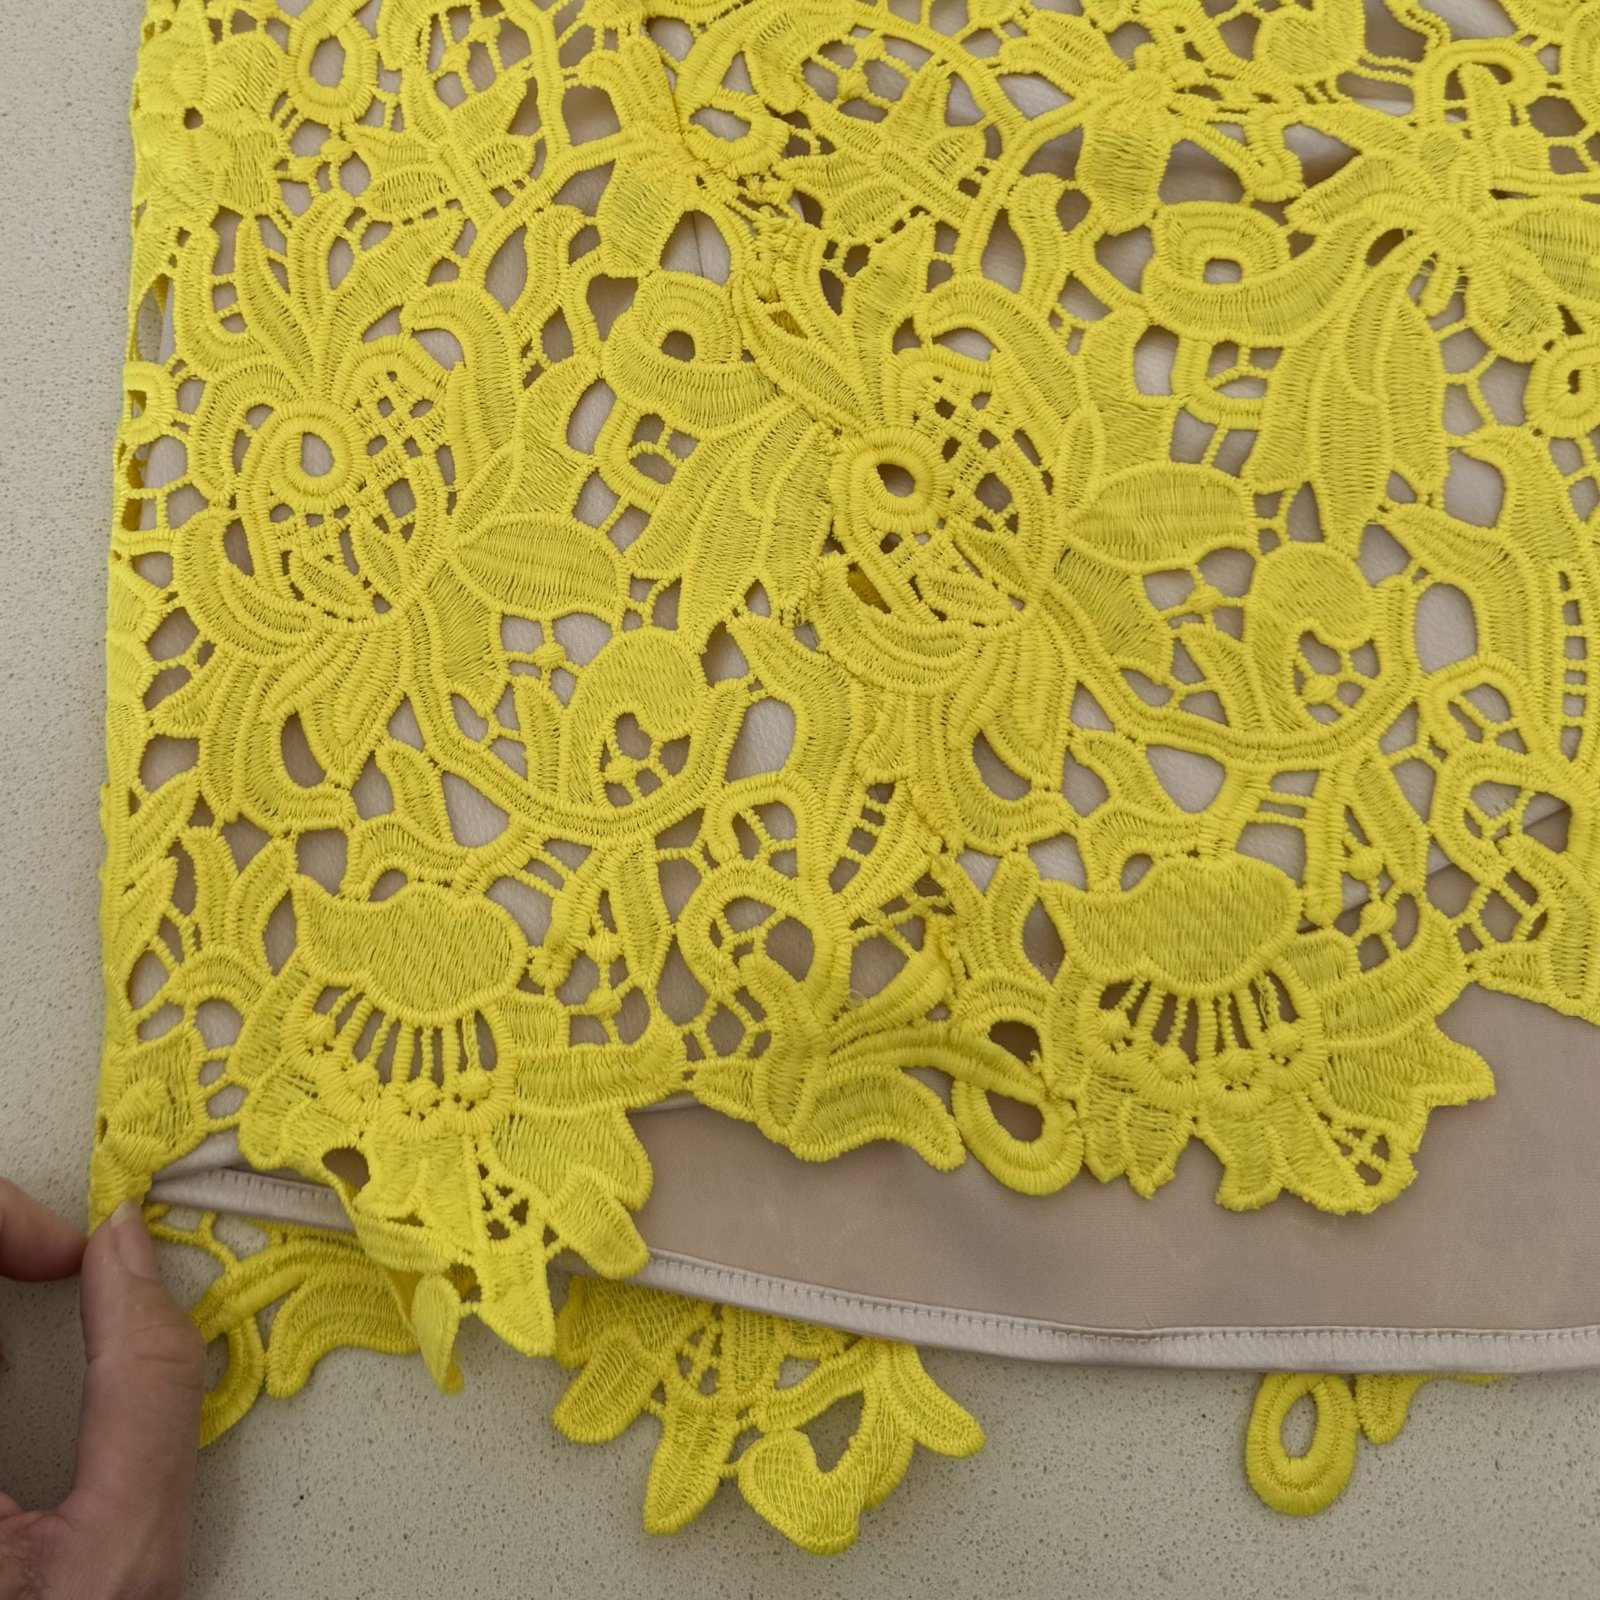
My dress is underlined completely with a pinkish/coffee coloured silk chartreuse that I bought from Fabulous Fabrics originally. I basted the lace and silk layers together within the seam allowance all around except for the side seams below the pockets, and then overlocked the edges before continuing to treat the two layers as one. The side seams below the pockets I stitched the layers separately and actually the lace is arranged so there’s not a “seam” in this part, but the lace motifs are arranged and hand stitched carefully so you can’t see a seam here.
 I cut the pockets and neckline facings from a natural cotton linen that I’ve had in the stash for years, saved specifically for this same sort of purpose.
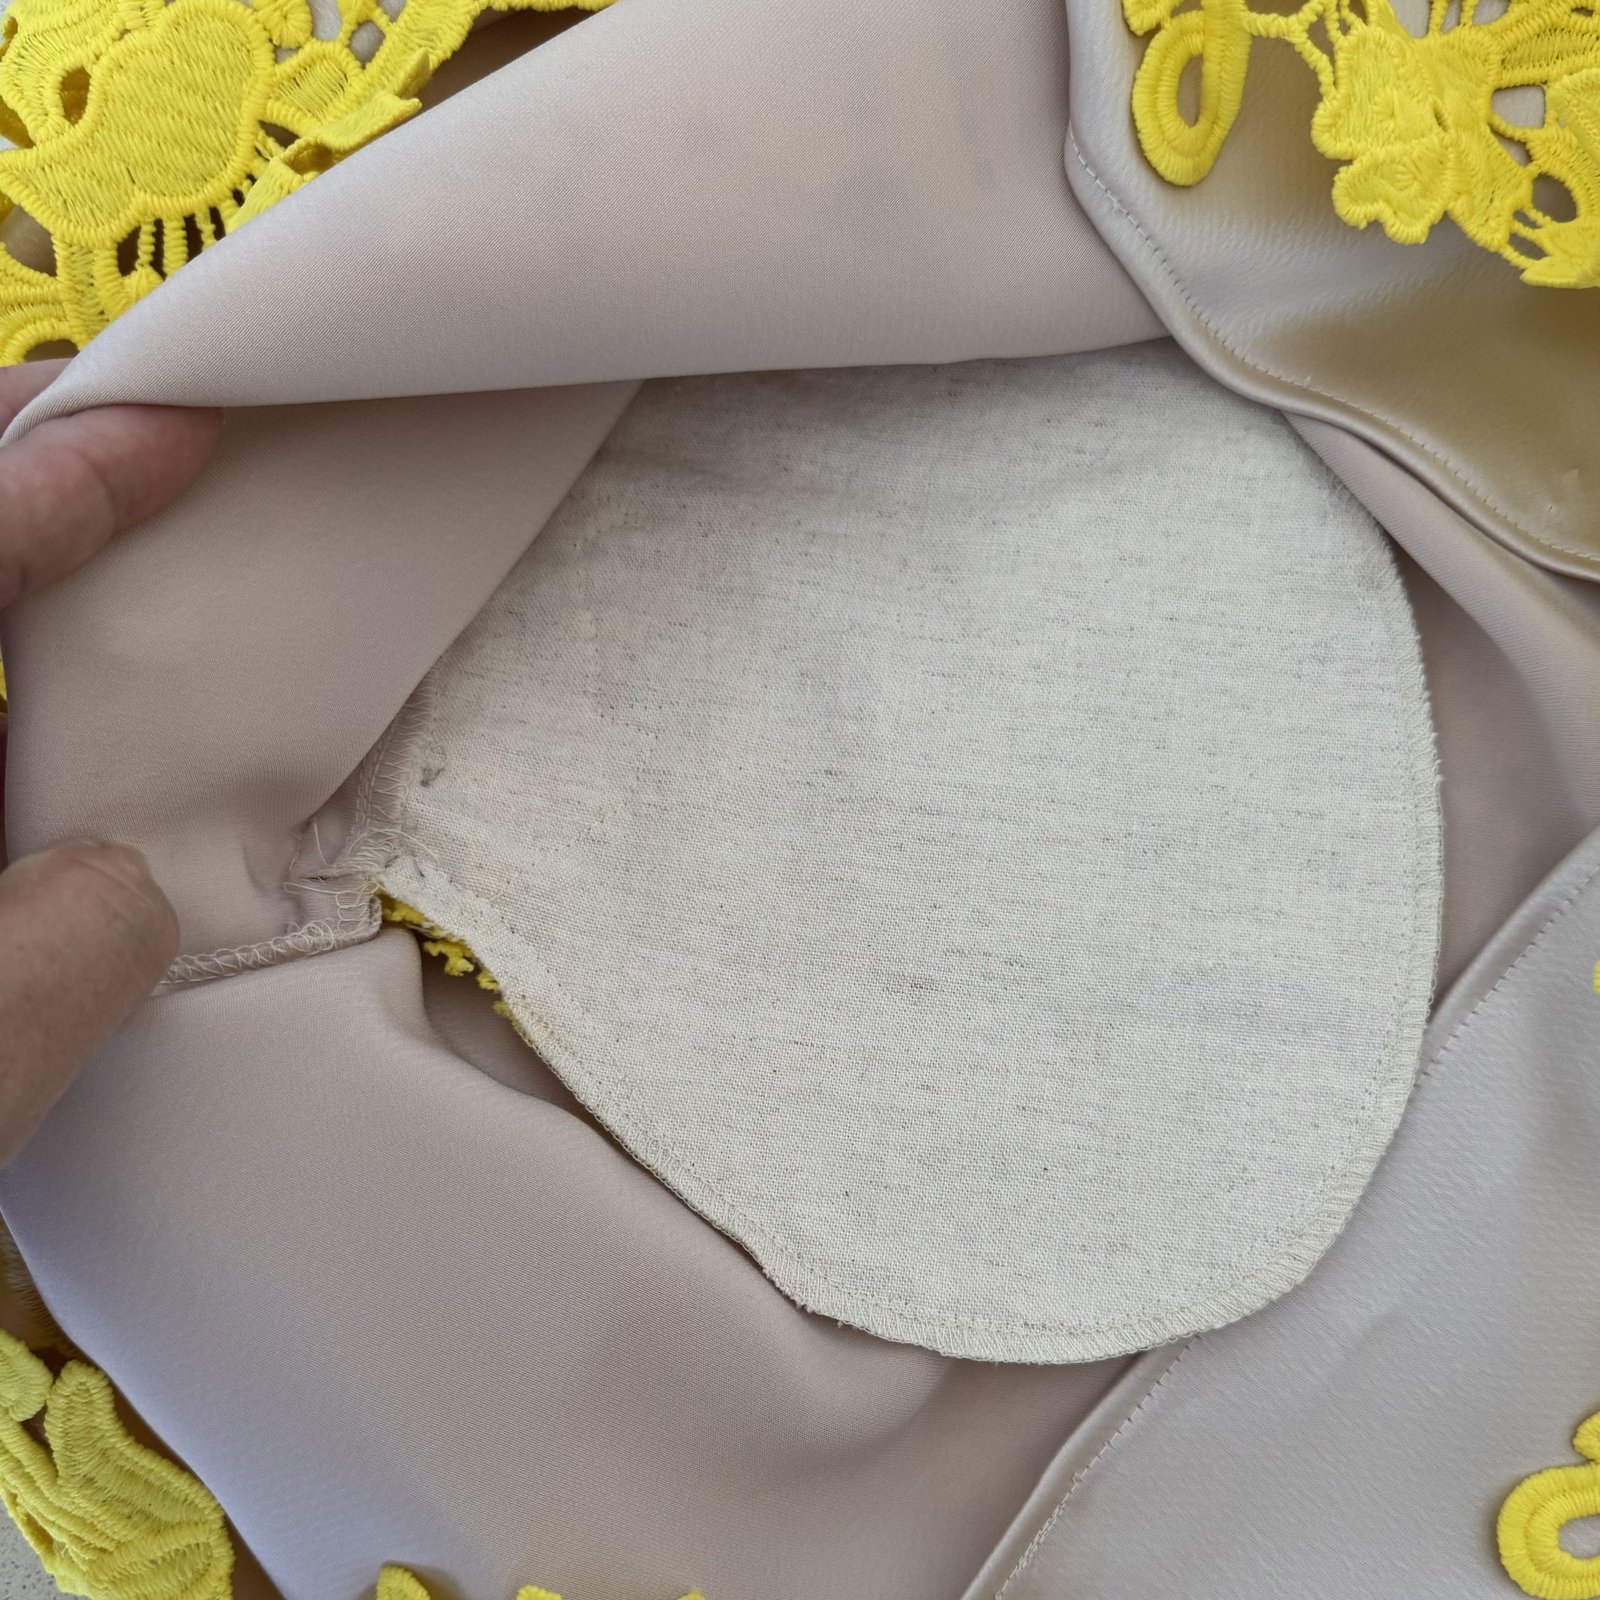
I chose this because the silk charmeuse wasn’t going to be stable enough in these areas – actually the lace is very heavy, far heavier than it looks! I cut the lace front and back to have side seam extensions along the pocket area and stitched it down carefully to the pockets inside. So, when you’re wearing the dress the lace appears to go all the way inside the pockets, no flash of offensive beige to be seen, so it looks really nice. 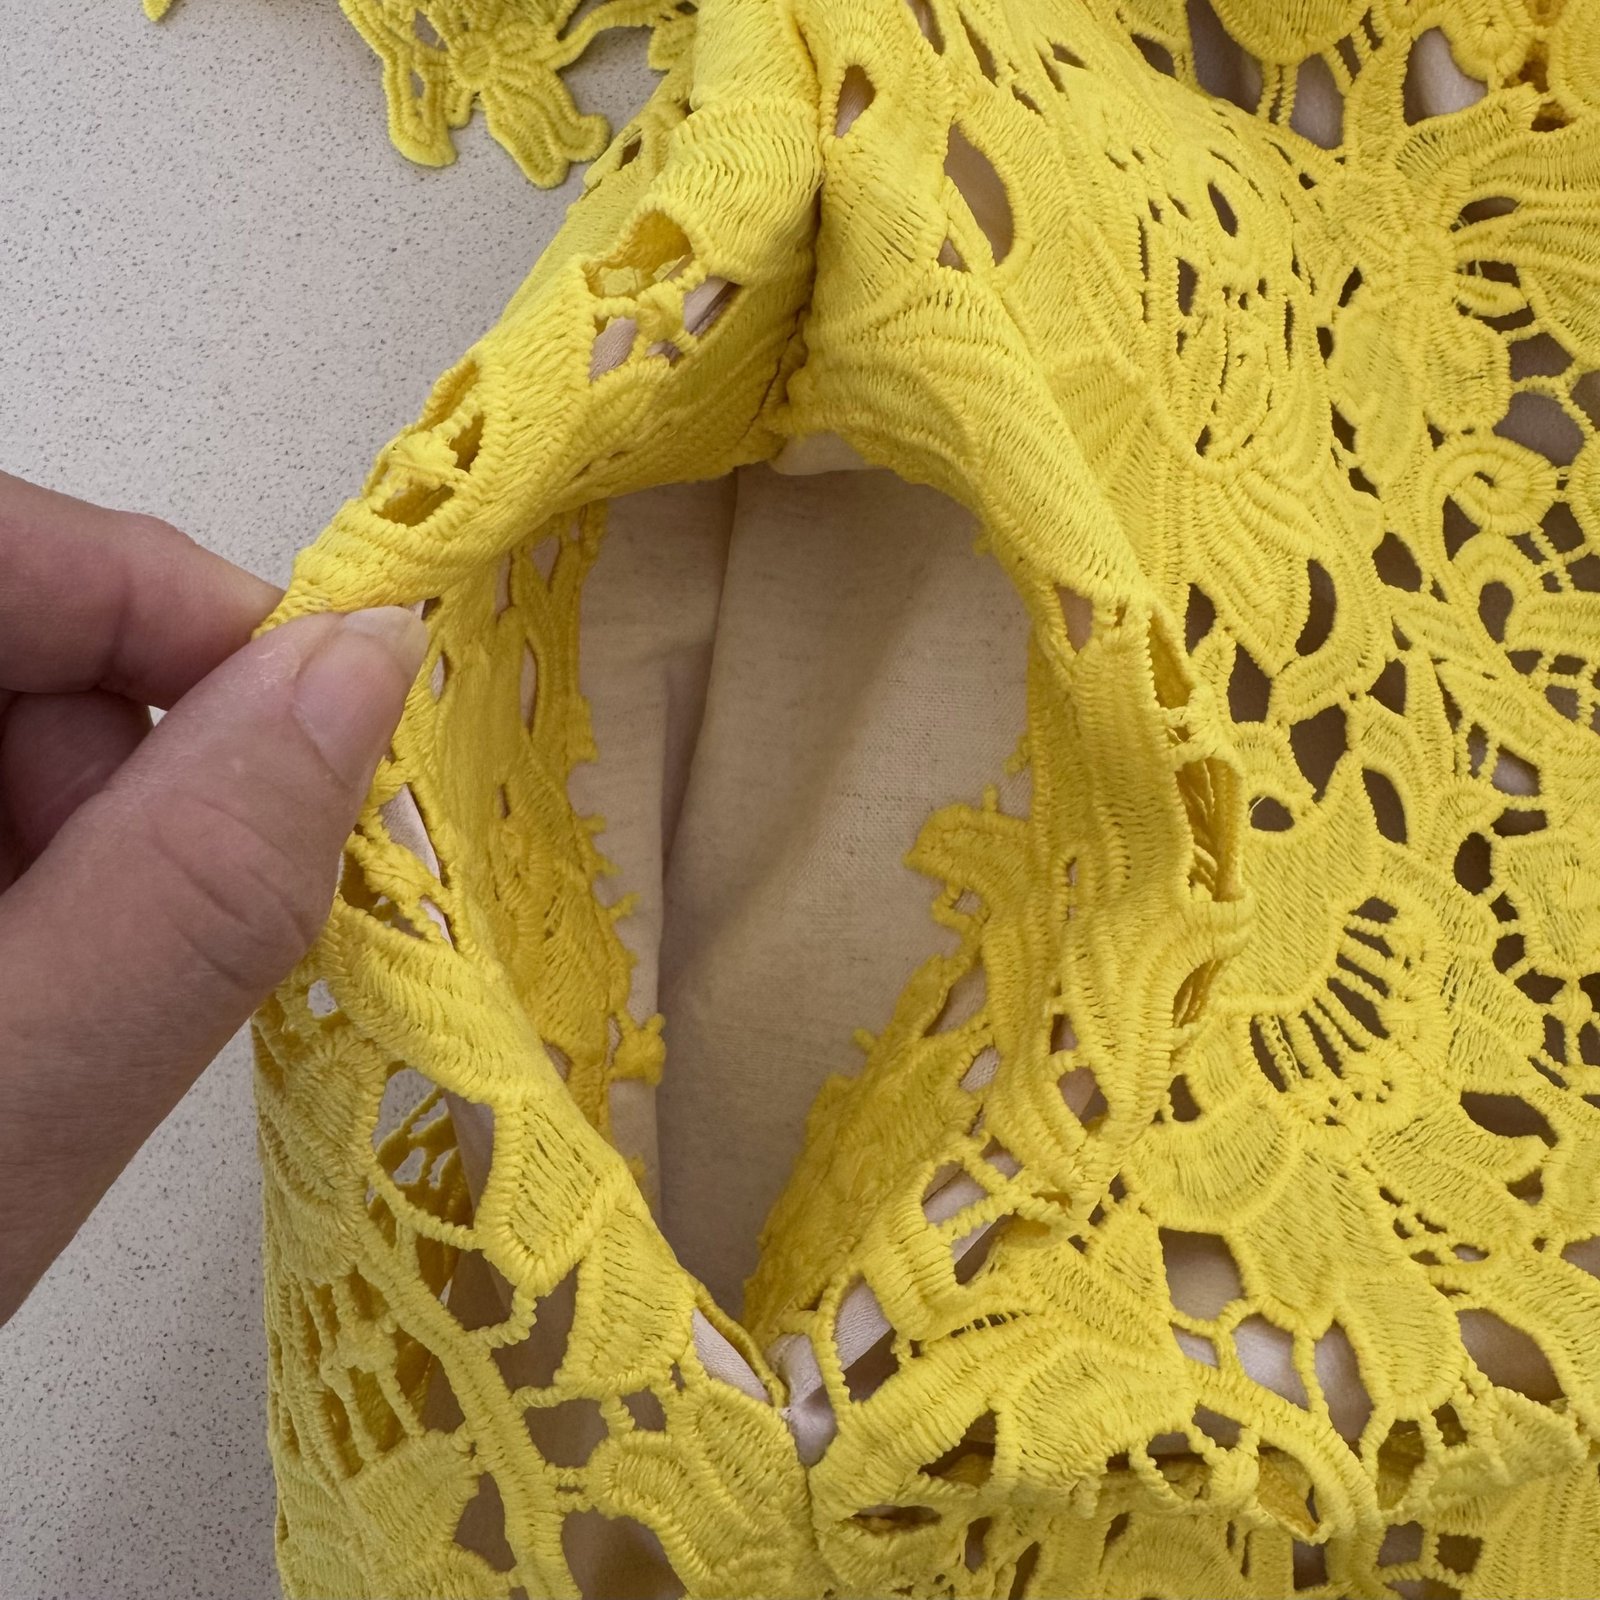
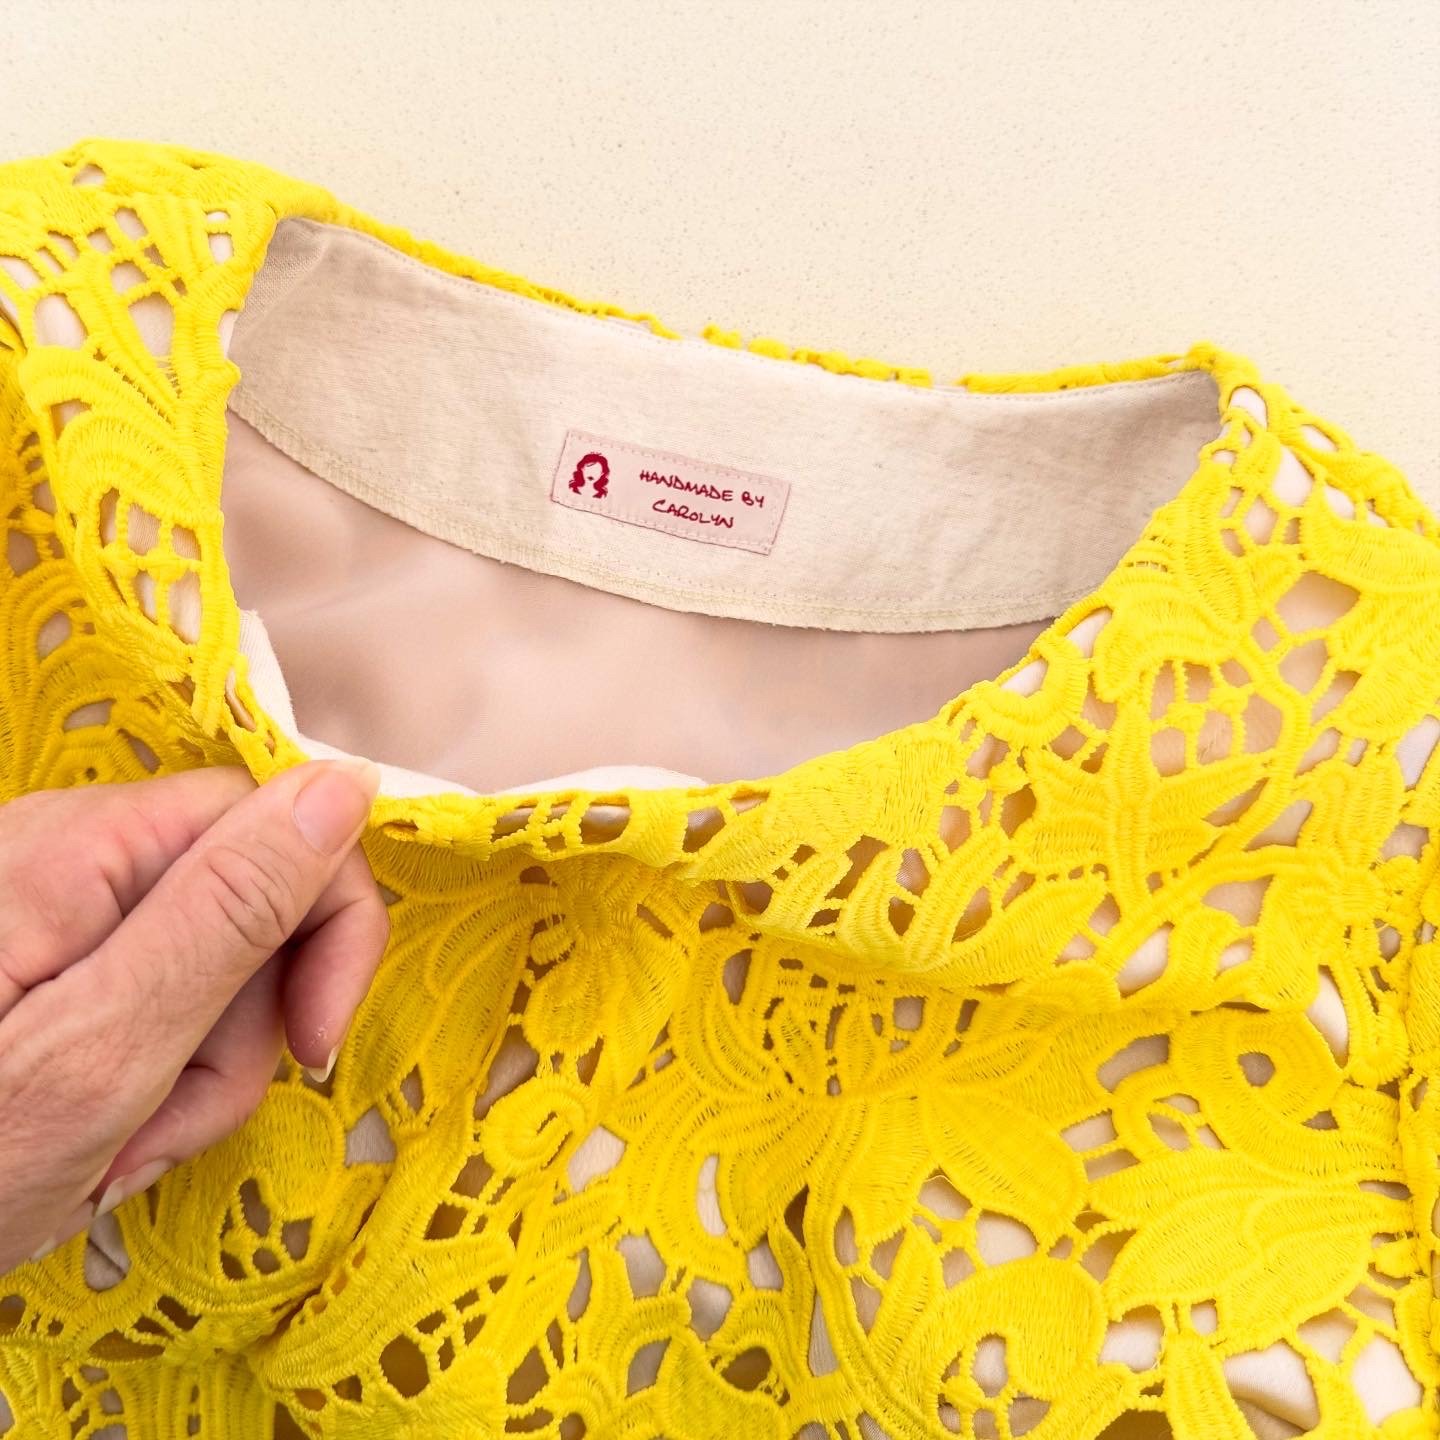
The seams allowances around the neckline, especially the shoulder seam area here are seriously bulky, and I trimmed, clipped and understitched aggressively to get everything to sit nice and flat! I also went back later and stitched the facing to the silk underlining as far around and as close as I could get to the shoulder seams.
 I’m including a picture of the happy couple because, although I did not make the dress, I did alter it to fit her and also did some minor repairs. This took three separate fittings and I took precisely zero photos of the process or anything. My only excuse is that I was also working on my own dress and stressing a little bit that I wasn’t going to get it all done on time.

Thanks to its oversized and loose nature, my dress was so comfy to wear and to dance in, and I was so happy about that! and just saying, I only wore these high heeled sandals for the ceremony and photos. For the reception on the same property I went to our car and switched over to my white sandshoes with little socks, brought for this very purpose. Much warmer, and fabulously comfortable for dancing! I also wore my new pink wool Sienna jacket for the cooler temperatures that came as evening fell too, but no pictures of that I’m afraid. Anyway, I hope I can get more use our of this dress, which actually turned out more lovely than I thought. 🙂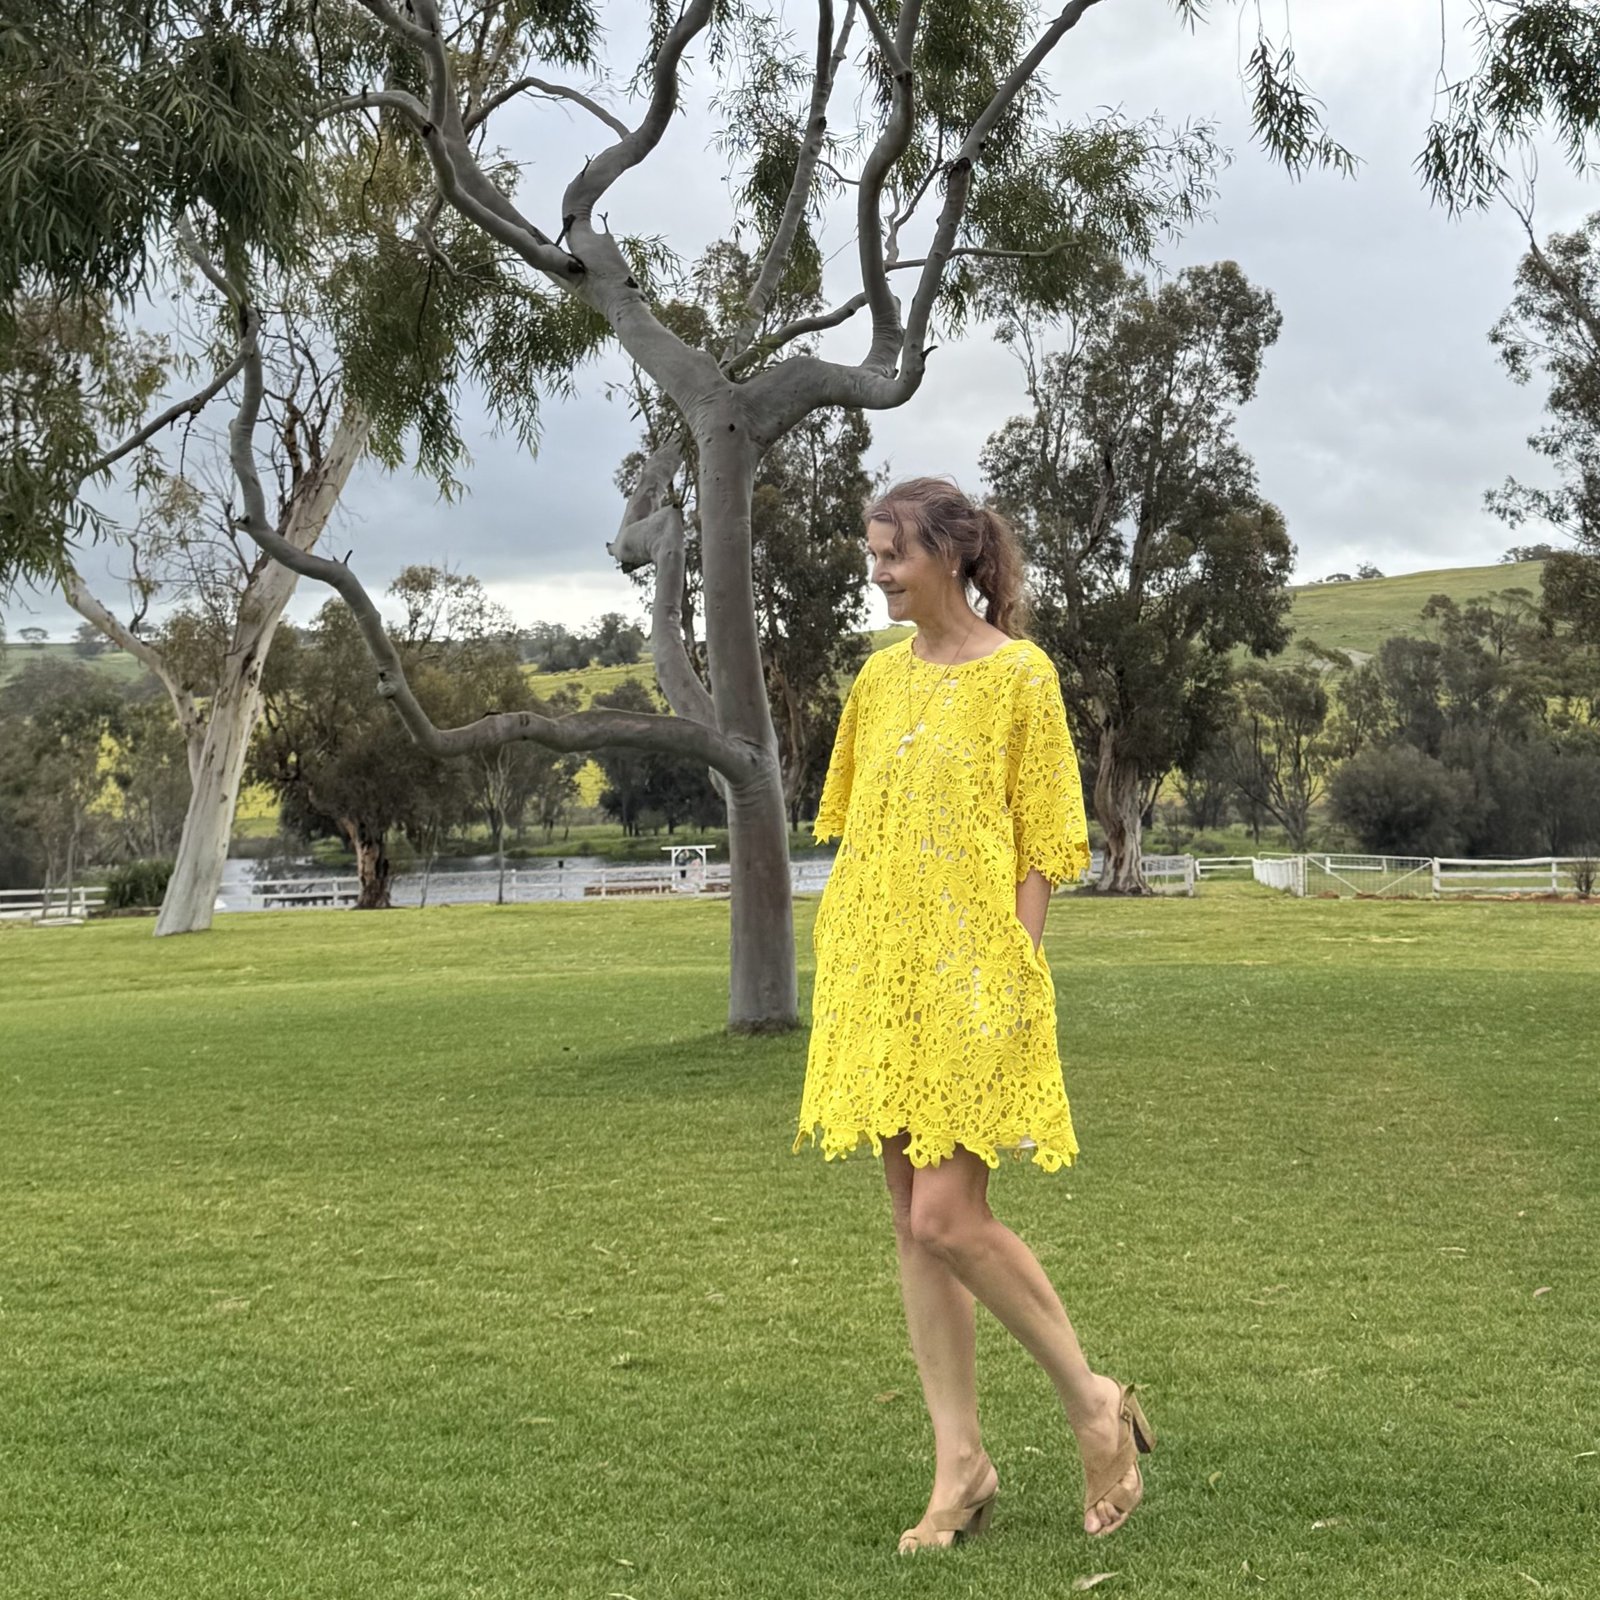


 It’s such an easy to make design there’s really not much to say. The neckline is finished with a bias cut strip and the pattern includes a lovely deep hemline facing, which I edged with the same orange linen bias binding. I think this looks so pretty. Designwise, it has deep side pockets and sleeve cuffs. Hmm, that’s it, really…


 hello! I’ve made a whole new outfit recently… it’s not so often that I can present a new, head-to-toe handmade outfit like this!
 I settled on this cotton hessian with a multi coloured print of overlapping ovals. I loved this combination of colours; violet, duck-egg blue, teal blue, navy blue, lemon yellow and apricot. I thought it fitted in very nicely with my personal colour palette of true- to deep autumn.


 hello! I made a fun new little dress…
 I cut the collar and cuffs from a neutral linen that I’ve had in my stash even longer. I think this is from Calico and Ivy originally; it’s been very useful over the years for just cutting pockets, facings, and other bits and bobs that require a sturdy and neutral coloured fabric.


 hello!
 Unfortunately there wasn’t enough to do every single seam and edge like I have done in previous examples of this method but I just did as many of the more prominent bodice seams before I ran out of it.
 I know I’ve used this pattern quite frequently but it really is such a beautiful dress design that I don’t see myself every tiring of it any time soon. Of course I really should branch out more and I’m resolving to try more new patterns this year and not fall back so often on the old favourites. In the meantime though, some of my recent as yet unblogged projects have failed this resolution already whoops.
 I wore this along with my


 Taking off all those long (long) lengths of bias cut channelling took quite a long time, made even more painful with the memory of how carefully I had stitched them on in the first place to perfectly line up the channels with the lines of checks, as well as switching up threads depending on whether I was stitching on a black row or a cream row, this additionally making it more difficult to see the stitches I was unpicking. I know, I wonder about my own sanity too, sometimes…
 Anyway. Iteration Number Two was essentially the same dress sans the elasticated channels. I reused the same shoulder straps to be a halter neckline and allowed the otherwise unaltered dress to hang like so. I actually quite liked it like this and wore it with a little T-shirt underneath a few times.

 In the end, Iteration Number Three, the final iteration, was very straightforward to achieve. I settled upon a modified version of a dress from the Japanese pattern book Stylish Dress Book by Yoshiko Tsukiori, specifically dress R. My final version is more narrowed at the top end, and with the yoke also narrowed in width and the neckline substantially more “filled in”. I also left off the sleeves through having absolutely no more of the check fabric anyway, and finished the armscyes with self-made black bias binding. I removed the original inseam pockets – and a big thank you to past me for overlocking all the raw edges separately from each other! – and repositioned them appropriately for the dress’s slightly new form. The yoke is black cotton denim, cut from the leftovers from my wide-leg jeans from last year, and lined with plain black poplin. I did decorative white topstitching just for fun, and added a completely frivolous and not-useful-at-all coin pocket to the front yoke, also for fun. I also reused the “made in 2024” tag that it had from its inception.

 please excuse the totally gratuitous Clara pic…


 I used the very last of my “made in 2024” tags in the little breast pocket. Honestly, the dress was actually cut out in and partially made in 2024. So, 2024 or 2025? It’s kind of a “saddle” project really, spreading itself from last year to this one. I think I can use the tag with a clear conscience. 🙂
 I laid the dress pieces on the cross, and the front overlay on the bias, and used some of the leftover bits to cut extensions to the front overlay so the ties are a bit longer, about 10cm or so. I really like them this longer length.
 As per our pattern, I flat felled the side seams, which I always think looks really nice. You can see here that I used red thread to sew the dress up; this is because it was in my stash already and I didn’t want to buy new thread. I thought this would be fine, and it is really. I hand-stitched the hem.
 A casual passerby would never see any of the bias binding finishes on the inside of the dress, but these give me a lot of joy too. I bias-bound the pocket edges, and the back neckline and armhole edges are bound according to the pattern. Gingham makes the prettiest bias binding! Because of this I actually cut up the entirety of the leftovers and made it into bias binding that I can use on a future project, so please look out for that!
 It was hideously windy on the beach this morning which makes the above pictures a realistic portrayal of my day, however it does make everything look a little wild. Thus, a still picture where the dress is not being blasted to bits. Honestly, the things I do…

 Hello, Christmas makes!! To be honest though my output is quite modest this year, I haven’t gone overboard with the making of Christmas gifts unlike previous years. Just a few little things…
 I’d mostly made this black felt bunny a few years ago, using the Luna Lapin pattern book. He was kinda my first test of the pattern before
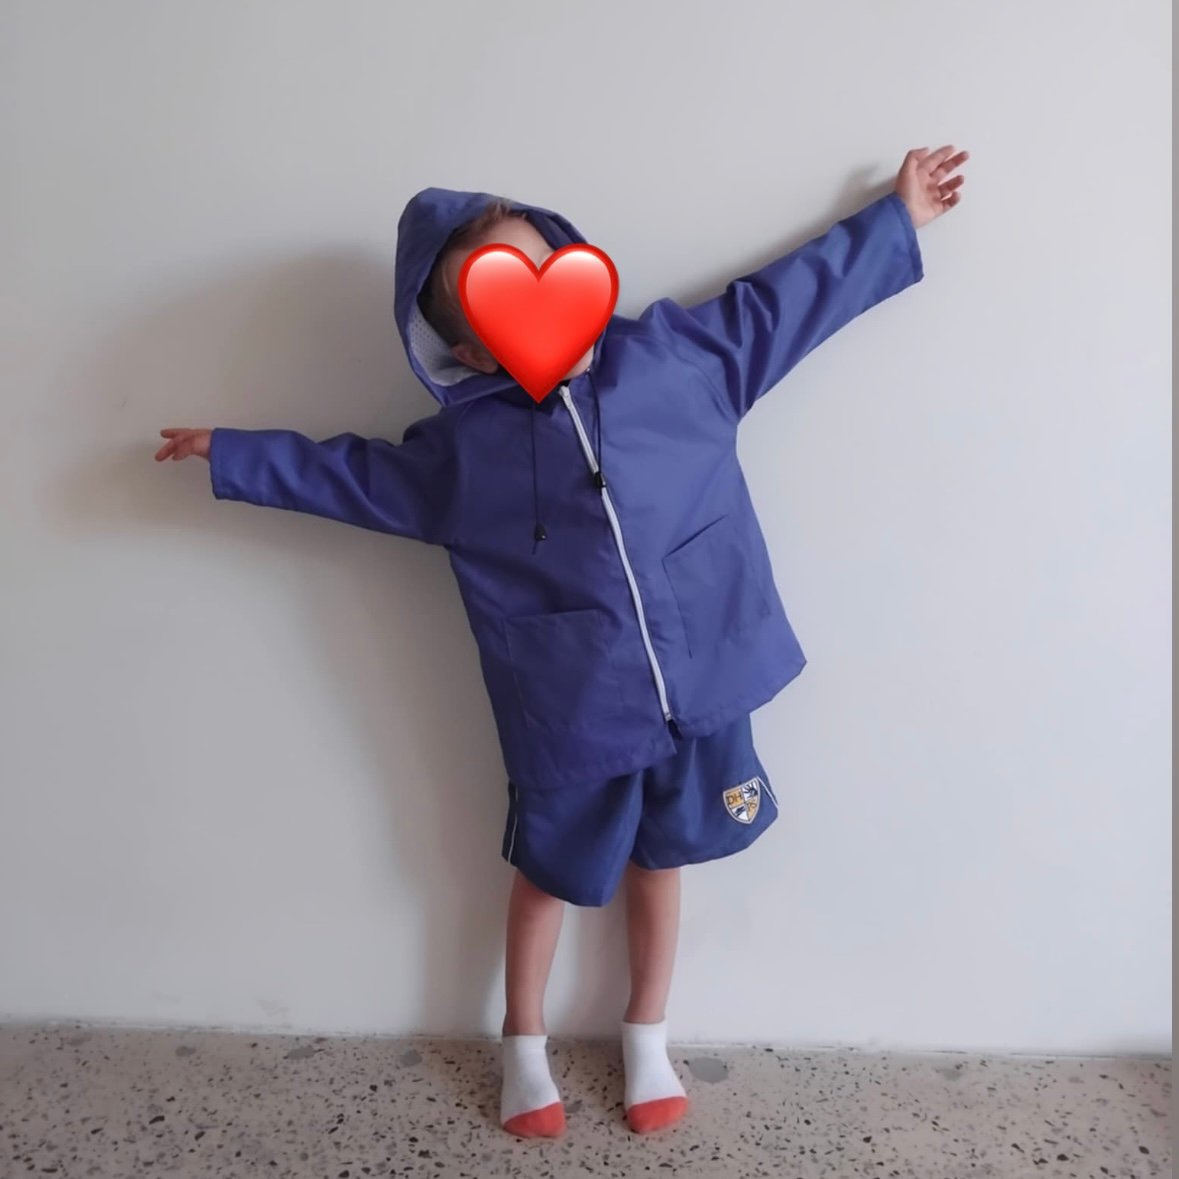
 I also made Arthur’s bunny a new outfit. I didn’t have his here to model it so Gilbert’s bunny has been roped in for the job. It’s a summer outfit; comprising a Hawaiian shirt and board shorts.
 I had to include this picture of the shirt-making burrito! the instructions don’t have this but I figured why not make it as neat as possible. I used sew-in press studs for the shirt in lieu of buttons; they’re just easier and you don’t have to worry about ruining your tiny little shirt with a bad buttonhole. The fabric is leftover from my first Myosotis dress. The board shorts are white linen and blue linen that I dyed myself using a natural indigo dye bath. Actually, the leftovers from my recently made Mestre shirt.


