Tag Archives: Top

Some basics…

Nothing in this post is write-home-about exciting, but I have been laying down some handy layering basics for the cooler days that will be coming up …. sometime? …  ðŸ™‚  I’m thinking ahead, to autumn.  Planning, you know.  Being organised   hehehe 🙂

Remember this dress?  I put it on recently and my husband announced kindly but firmly that he thought it was weird.  His words sounded its death knell.  I have put this on once or twice since I made it and each time felt sorta… well yes, now you mention it, weird is exactly the right word.  I finally acknowledged that the fabric was wrong for the design, too thick and heavy and with too much body to drape gracefully enough.
My bad.  I now know that with a lot of the Pattern Magic 3 designs you do need reeeeally drape-y fabric (hmmm, I think I’ve said that before; once or twice, or ten times…) On the plus side I still like the bodice part of the dress and I had also used the leftovers of the same fabric to make a successful little T-shirt sooooo;
bit of butchery re-fashioning later…

and now we have…
I added waist bands and armbands.

and…

and…

not from the dress, but squeezed from the fabric leftovers …

T-shirt 1: I added waist bands and armbands to the bodice of the dress.
T-shirt 2: dyed with 1/4 tsp iDye in Crimson.  I’m very happy with this Tshirt, both its shape and the lovely cranberry colour.
T-shirt 3: dyed along with the “bat” Tshirt in iDye in Brown, then in the leftovers of the iDye Crimson dye-bath of T-shirt 2.  I love the tawny port colour it turned out, but there’s something “funny” about the proportions.  I wish now I had scooped the neckline a little more than I did.  Maybe this will just be an “underneath cardis and jumpers” kind of a Tshirt…
Tshirt 4: the first T-shirt made from the leftovers after the dress, using the same fabric and the same pattern as these other T-shirts, and it hasn’t been shown it here before….  It has a banded neckline and sleeve bands, and a turned up, hand-stitched hem.

I also made this using the last leftovers of bright cobalt blue fabric (same as the “bat” shirt) and it went into the iDye Crimson dye-bath simultaneously with the cranberry T-shirt 2 above.  I love the deep royal purple colour that it is now; will layer well with the jewel tones of the other T-shirts for some groovy colourful winter layering, when the time comes  ðŸ™‚   The texture of that cheap n’ cheerful fabric has to be one of my favourite knits ever.  I just wish it had come in ivory, rather than that intense blue colour.  Just think of the dyeing possibilities.  They would have been infinite  ðŸ˜€

Apart from the first Tshirt pictured, which is the original bodice of the dress on p18 of Pattern Magic 3 by Tomoko Nakamichi, the others are made up using the pattern formerly known as Burdastyle 06/2011, 120 first written about here.  In order to get a nice fit that pattern has been shaved and sliced and diced and completely and utterly altered until each and every seam-line is different from the original.  As well, I don’t use the neckline facing pieces at all.  As for the zip?? well forgetaboutit ….So I guess it can’t lay claim to being Burdastyle 06/2011, 120 anymore.
But my carved-up version is a great fitting T-shirt pattern now…  ðŸ˜€  Yay for that!

pinterestmail

Top; Gone a bit Batty

My latest project.  Do you like the name?  I know, right?  I could get a job at Anthropologie, thinking up delightfully poetic tag-lines for the clothing, for sure.  I am sometimes capable of romanticism, and dreaming up evocative monikers, conjuring up a magical wonderland way of thinking and engaging the senses in a positive way.  I could have gone with something along the lines of Black Magic, or Chocolate Swirl or Liquorice Twist.  Nicer, yes?  But a twisted sense of humour prevents me from behaving all “delightful” all the time.
Besides, have a look at it, spread out on the lawn, recovering from its dye-job.  Decidedly bat-like, I think.

So, this is one variant of the design from p47 of Pattern Magic 3, by Tomoko Nakamichi.  Like much of Pattern Magic 3 so far, I thought this a very easy project.  My thoughts with this one, a very drape-y knit is essential to allow the pointy bits to flop down into each other attractively; and when you put it on you have to pull and fold the layers to sit just so or it can look a bit weird.
Side views:

It started out its life this colour below, and then subjected to 1/4 tsp iDye, in Brown.  I initially bought 2m of this brilliant blue fabric which as well as being very cheap had the added advantages of being very light, very drape-y and 100% cotton.  However I only have room in my life for one bright blue top and so dyeing was always on the cards for anything made out of the leftovers. 

And yes, I have been doing a lot of dyeing lately.  Actually, to say I have run a dyeing marathon would be no exaggeration.  I’ve been on a fair dinkum dyeing bender!!
But results of the exciting dye-fest will have to wait until pictorial evidence has been collected.  You have been warned…
I finished the neckline and armholes by simple turning under the raw edge and topstitching with a twin needle.  This is a great and very easy finish for knits, not as polished a finish as the banded edge, but the perfect choice for something like this top where bands would have visually been too much detail on a top that is already chocka with textural detail.  Those little shark fins at the hips are as much detail as the eye can take in my opinion, and the plainer the rest of the garment the better.

Details:
Top; from Pattern Magic 3 by Tomoko Nakamichi, bright cobalt blue cotton jersey dyed with iDye in Brown
Shorts; modified Burda 7723, of yellow embroidered cotton, details here
Sandals; Misano, from MarieClaire shoes

Over-exposed and super highlight-ed to show up the folds better… and doesn’t this make the sky look amaaazing??

pinterestmail

My darling Clementine

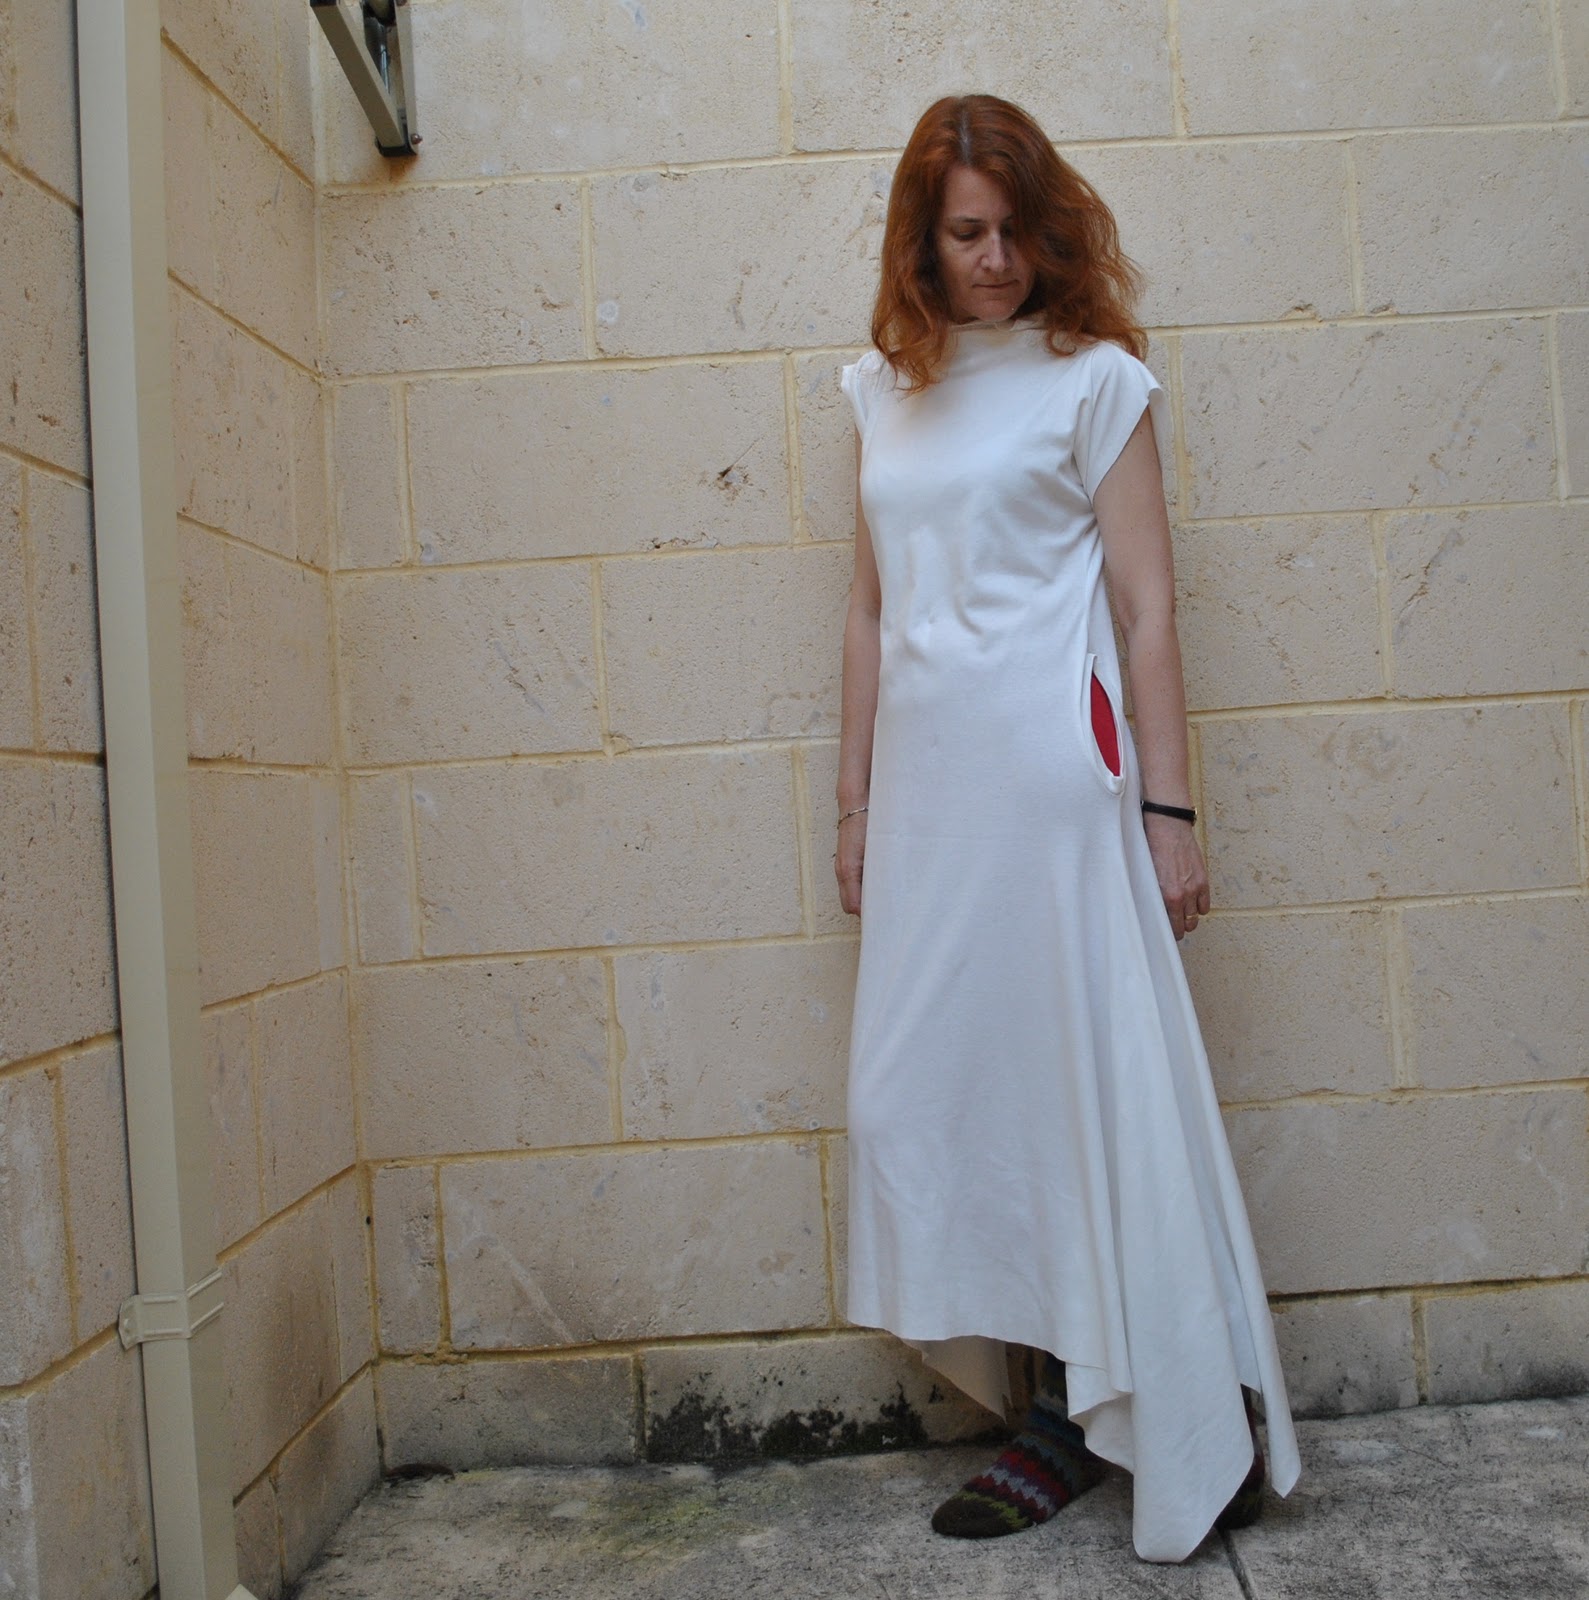
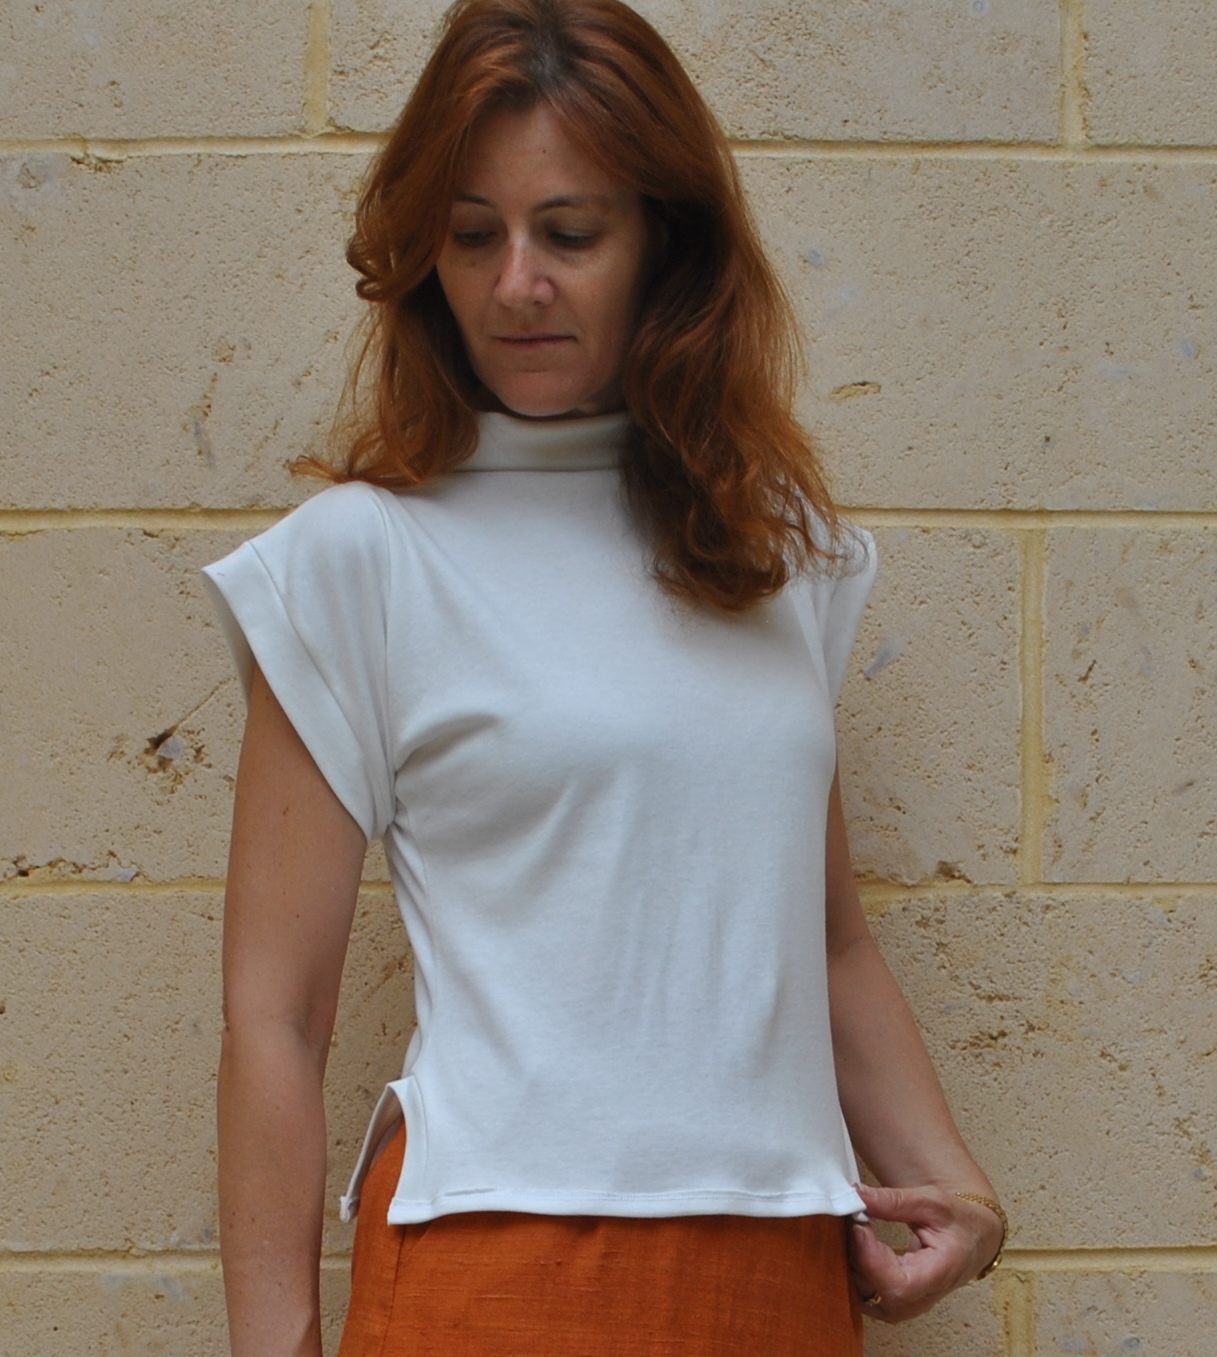
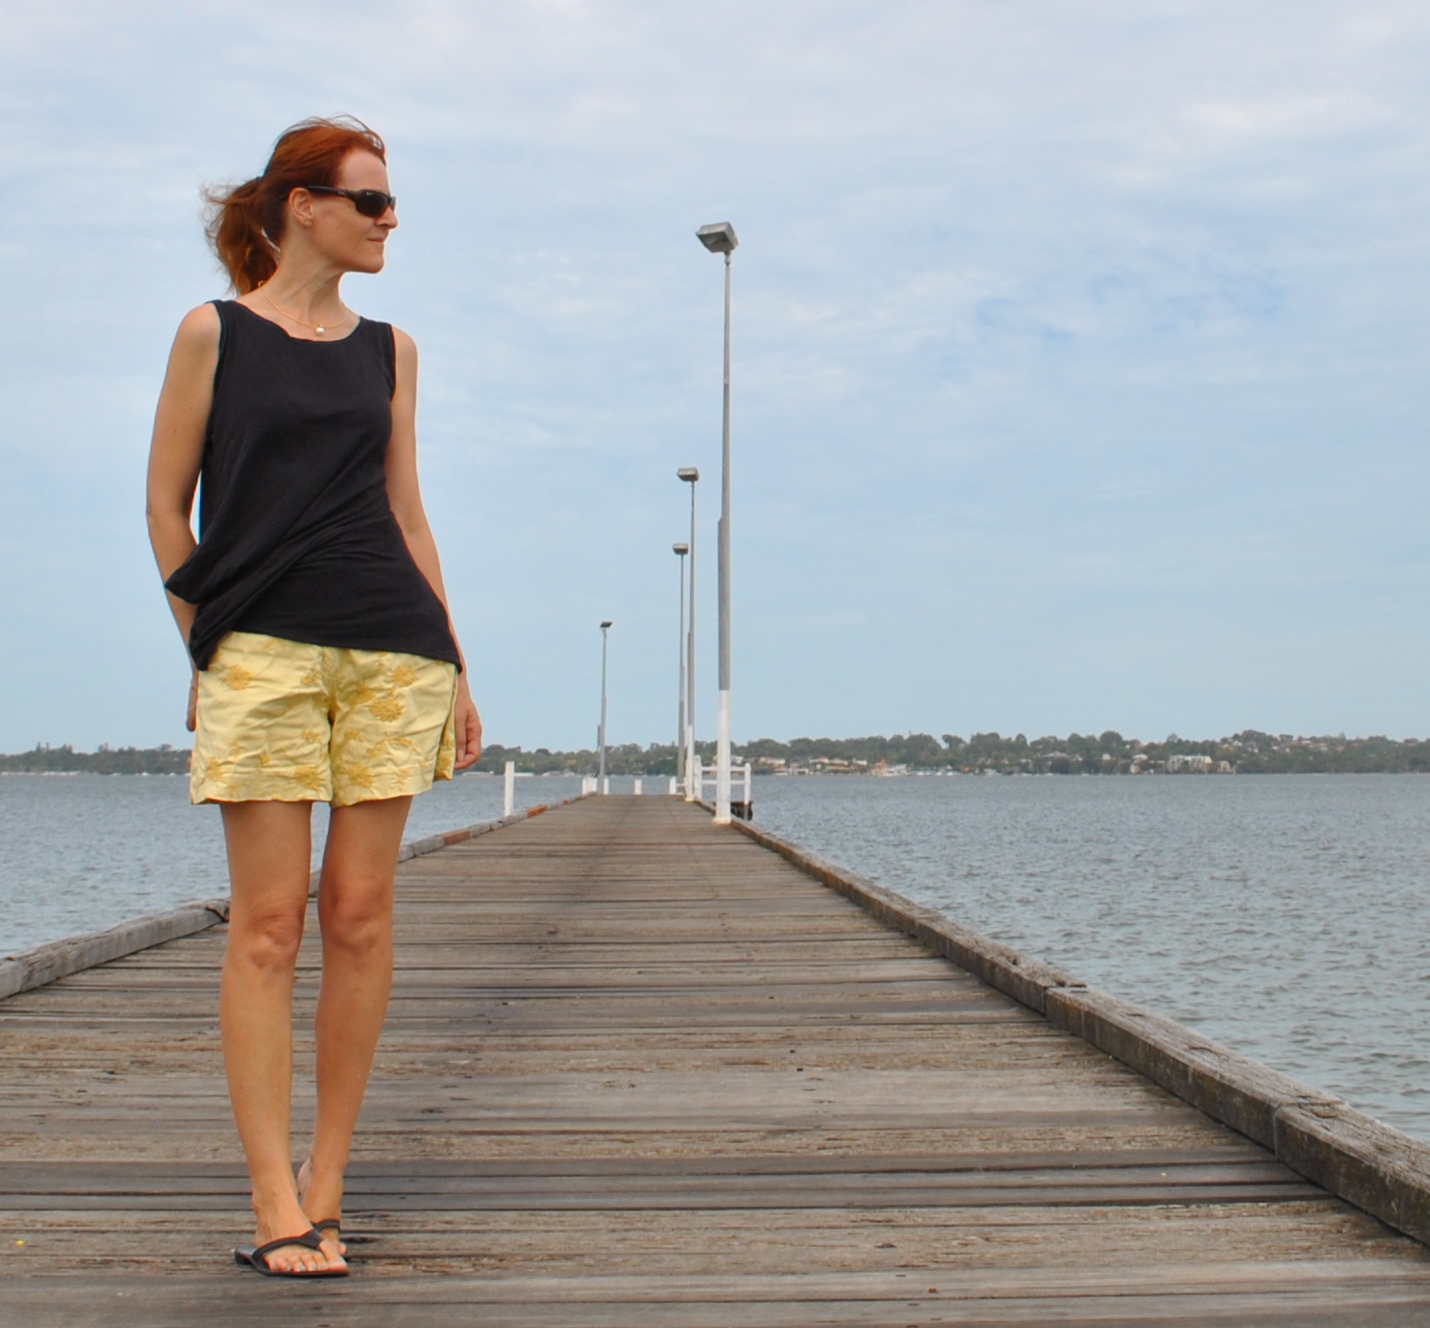
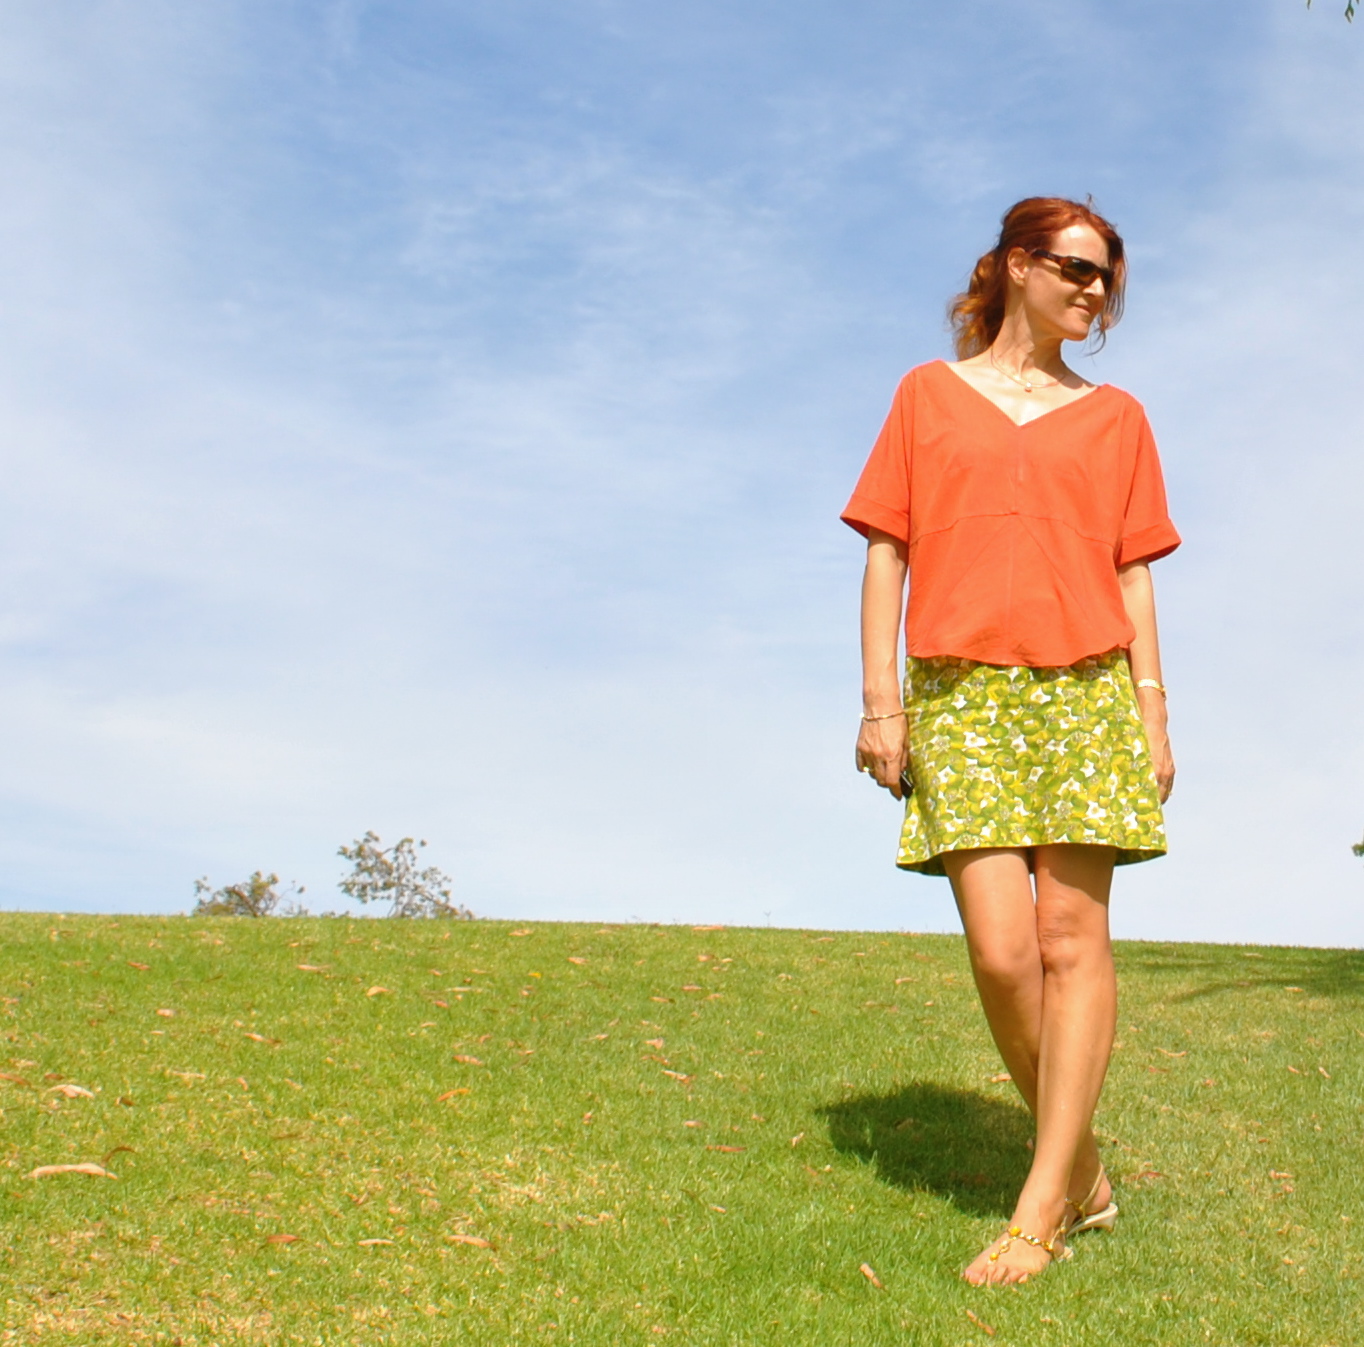
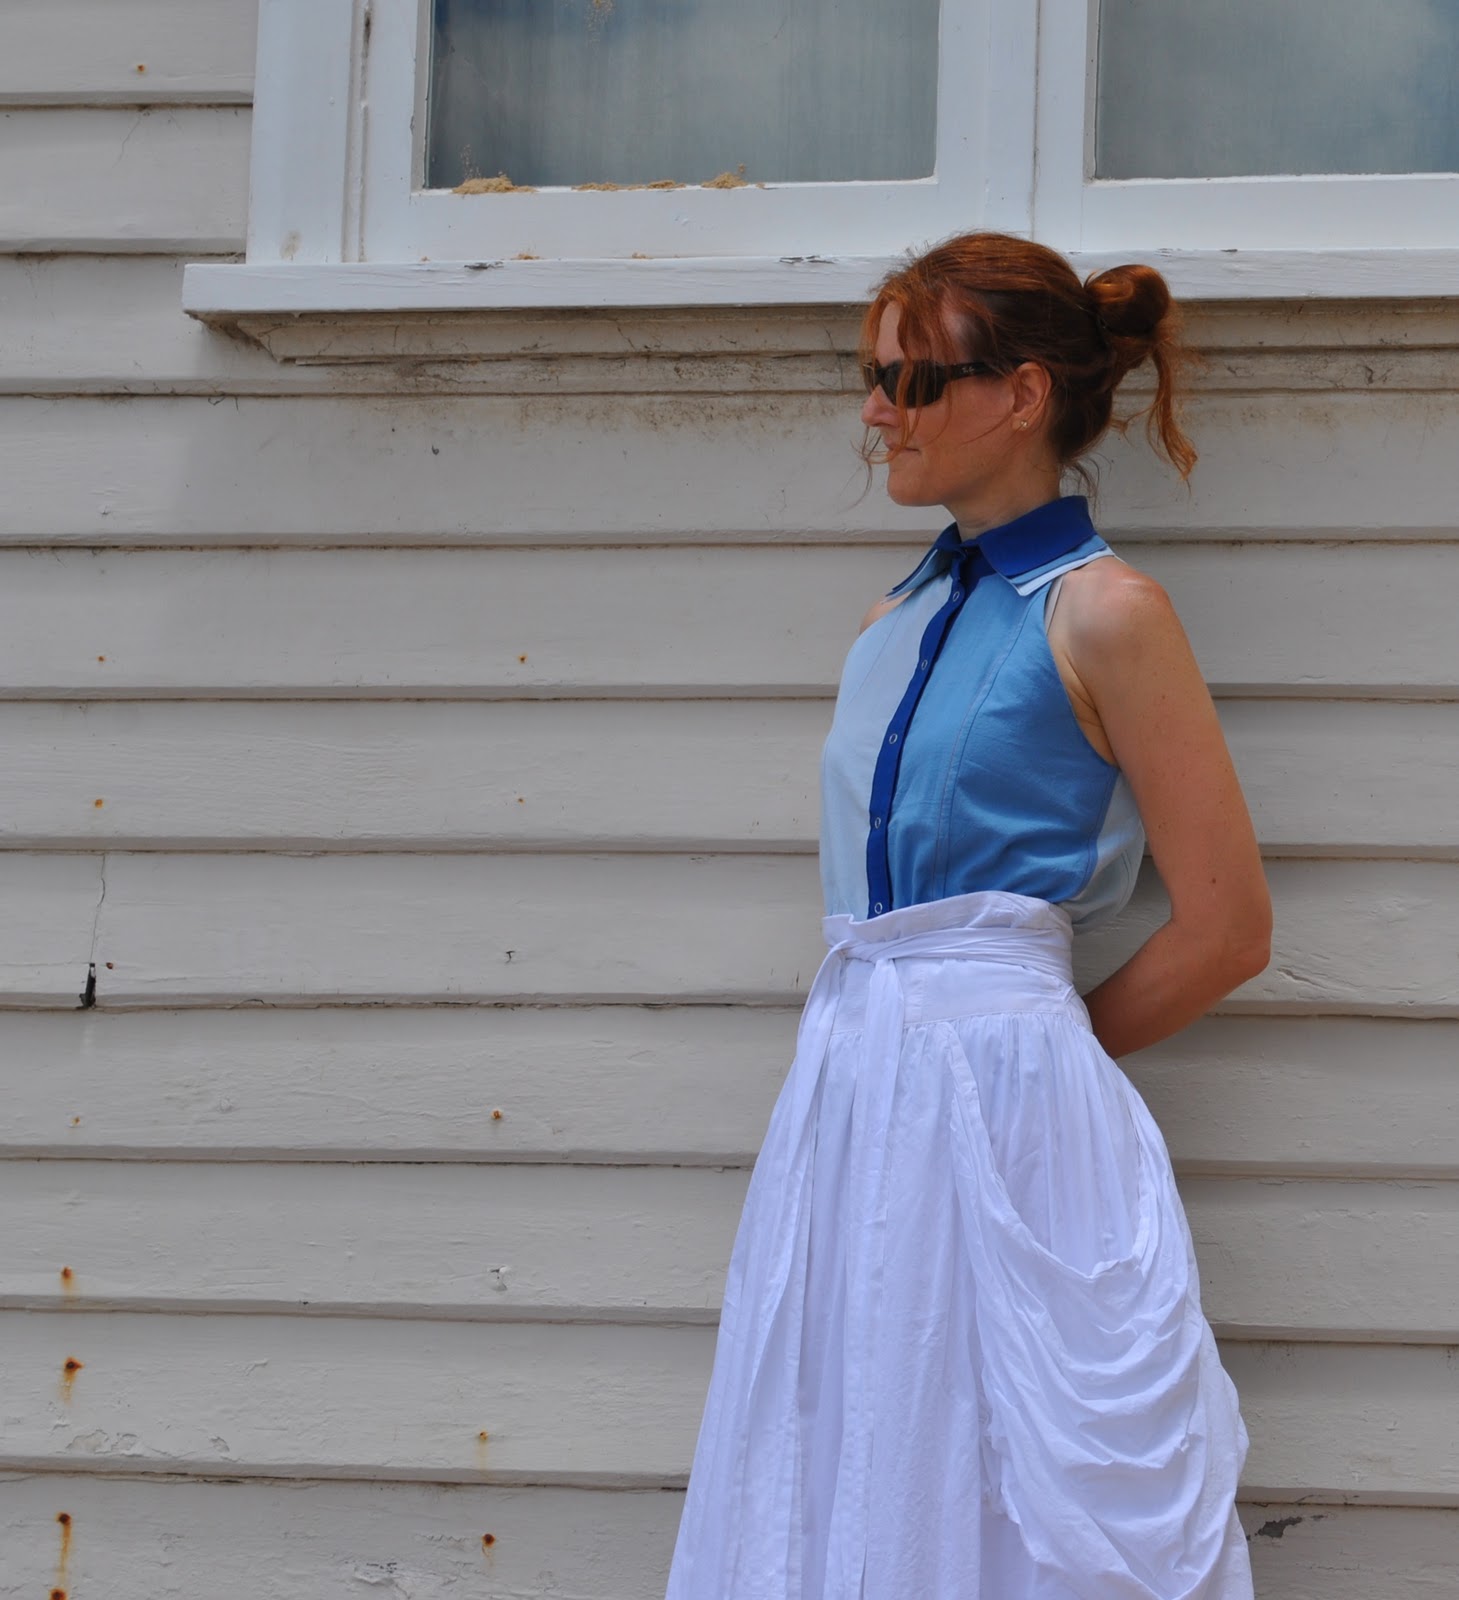
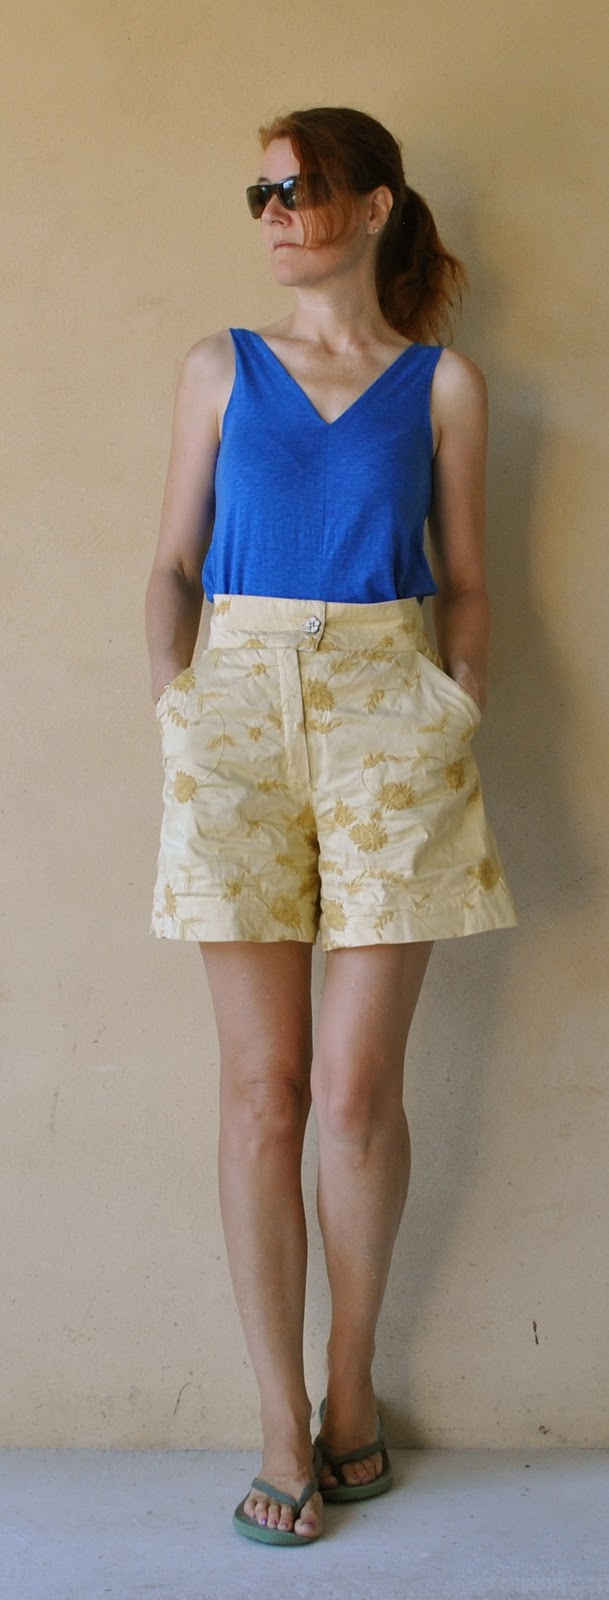
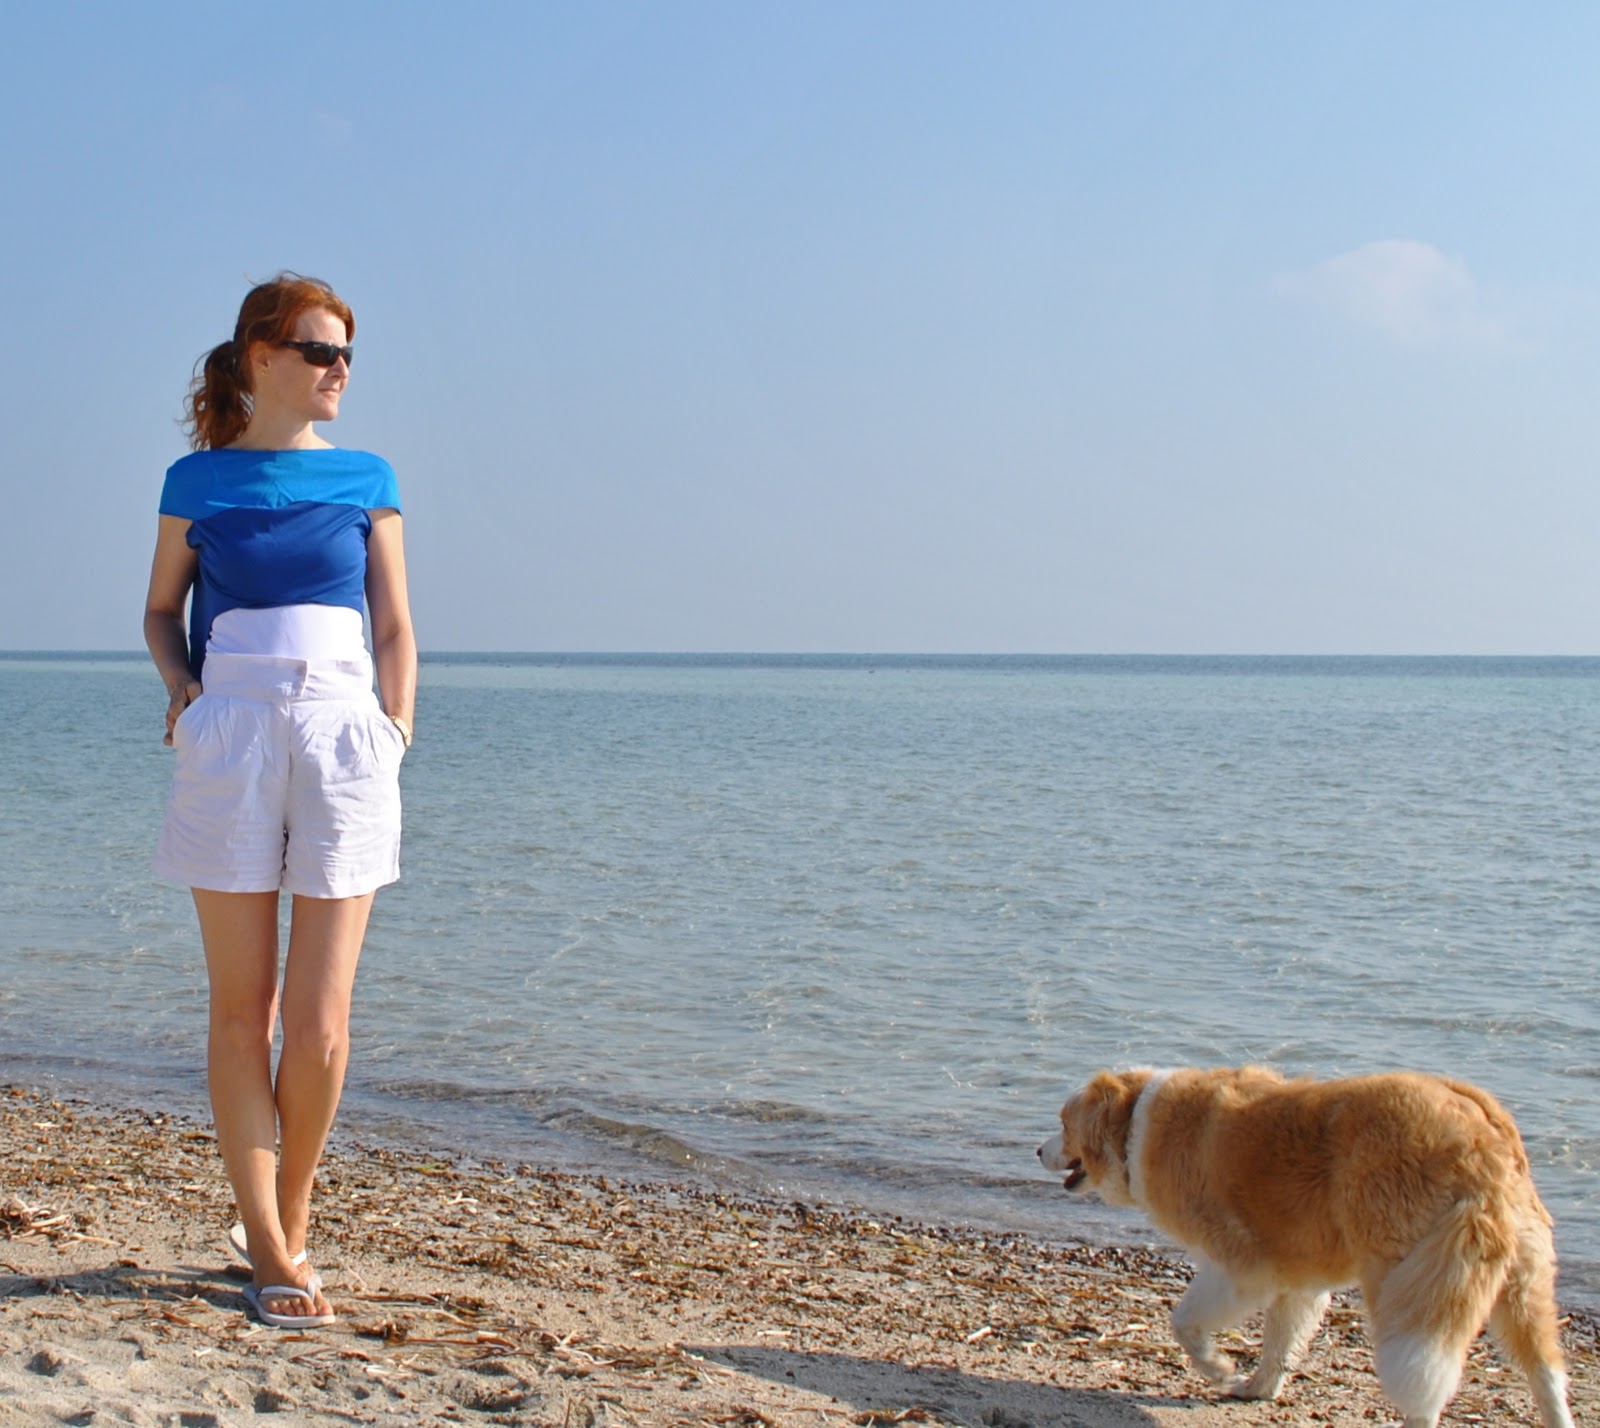
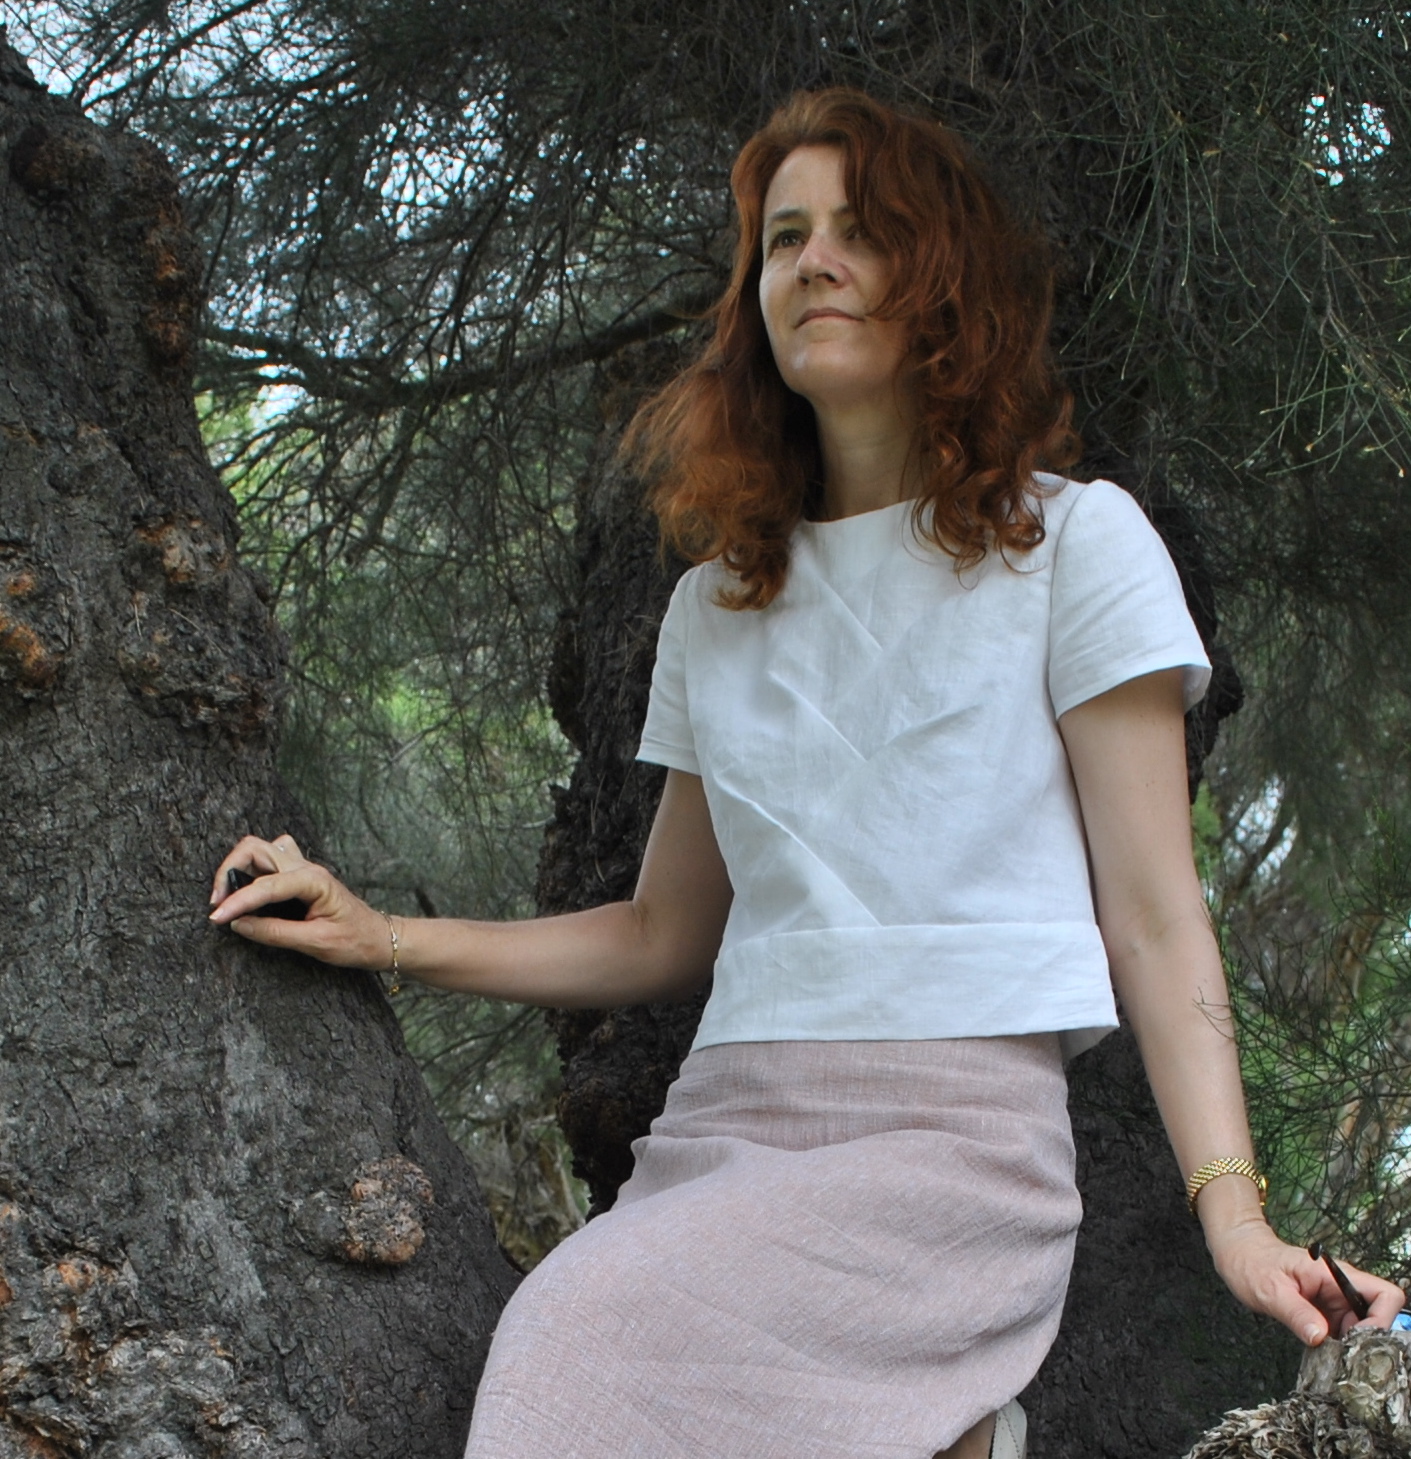
I have made a new top! 
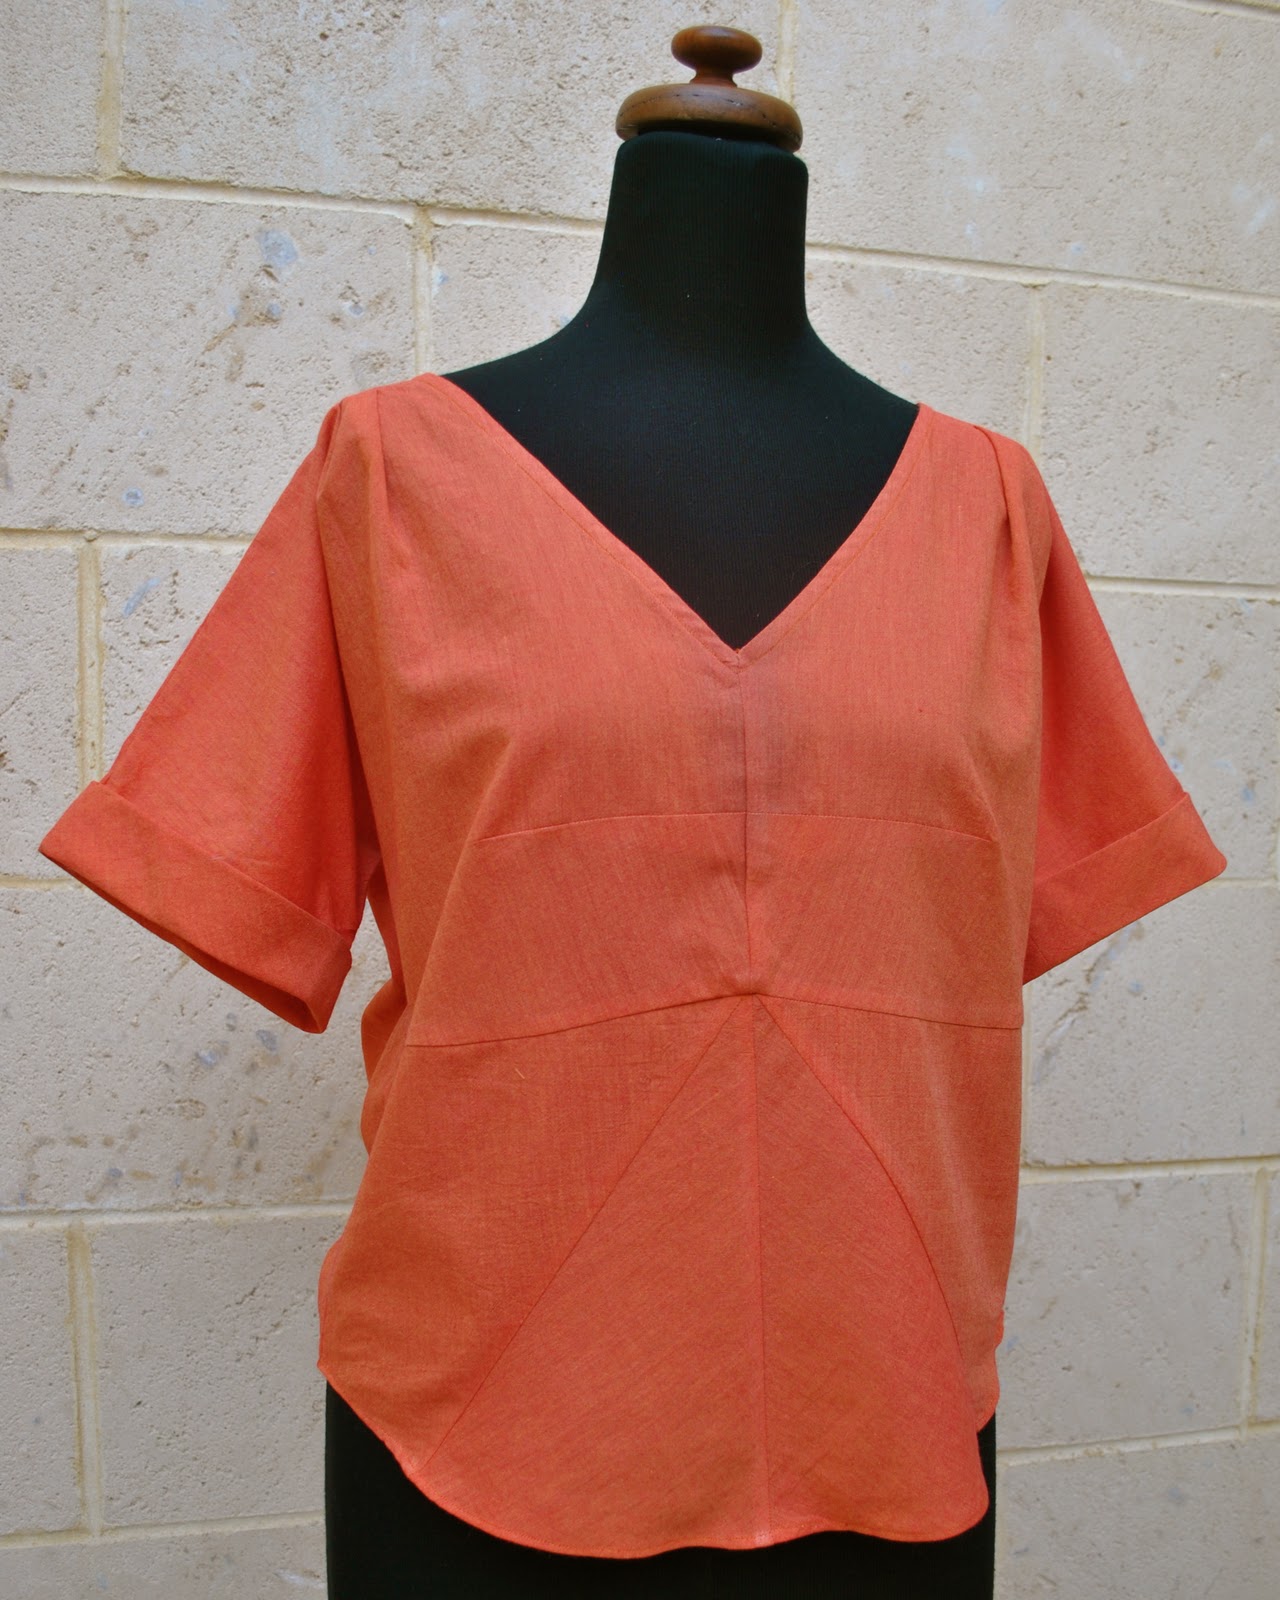
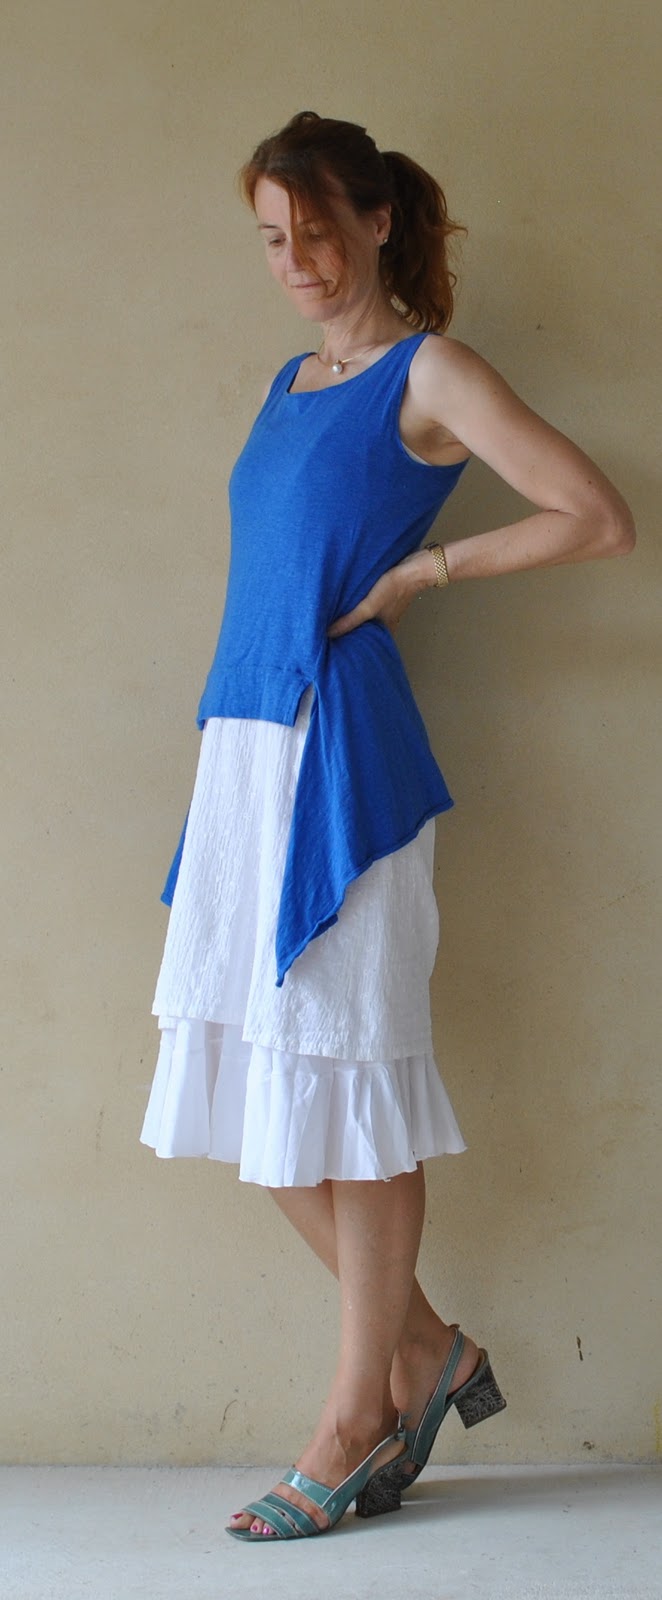
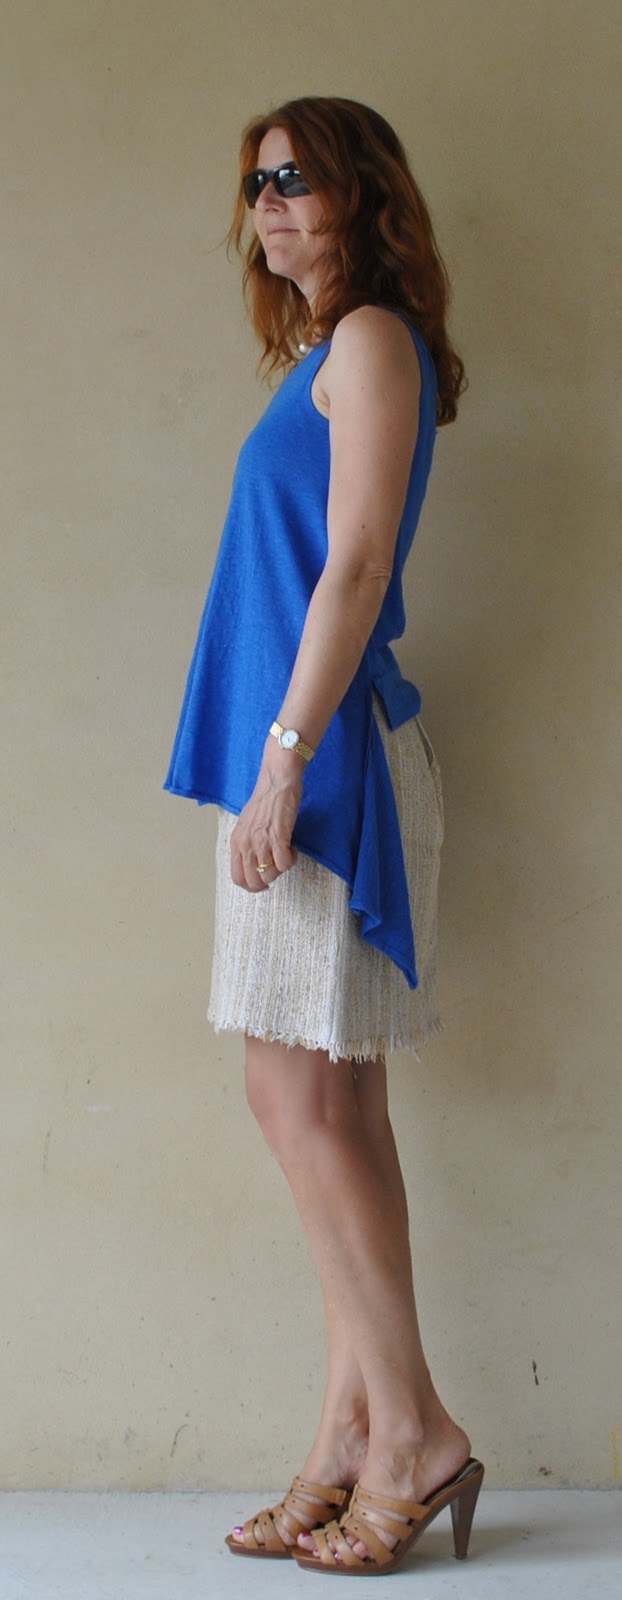
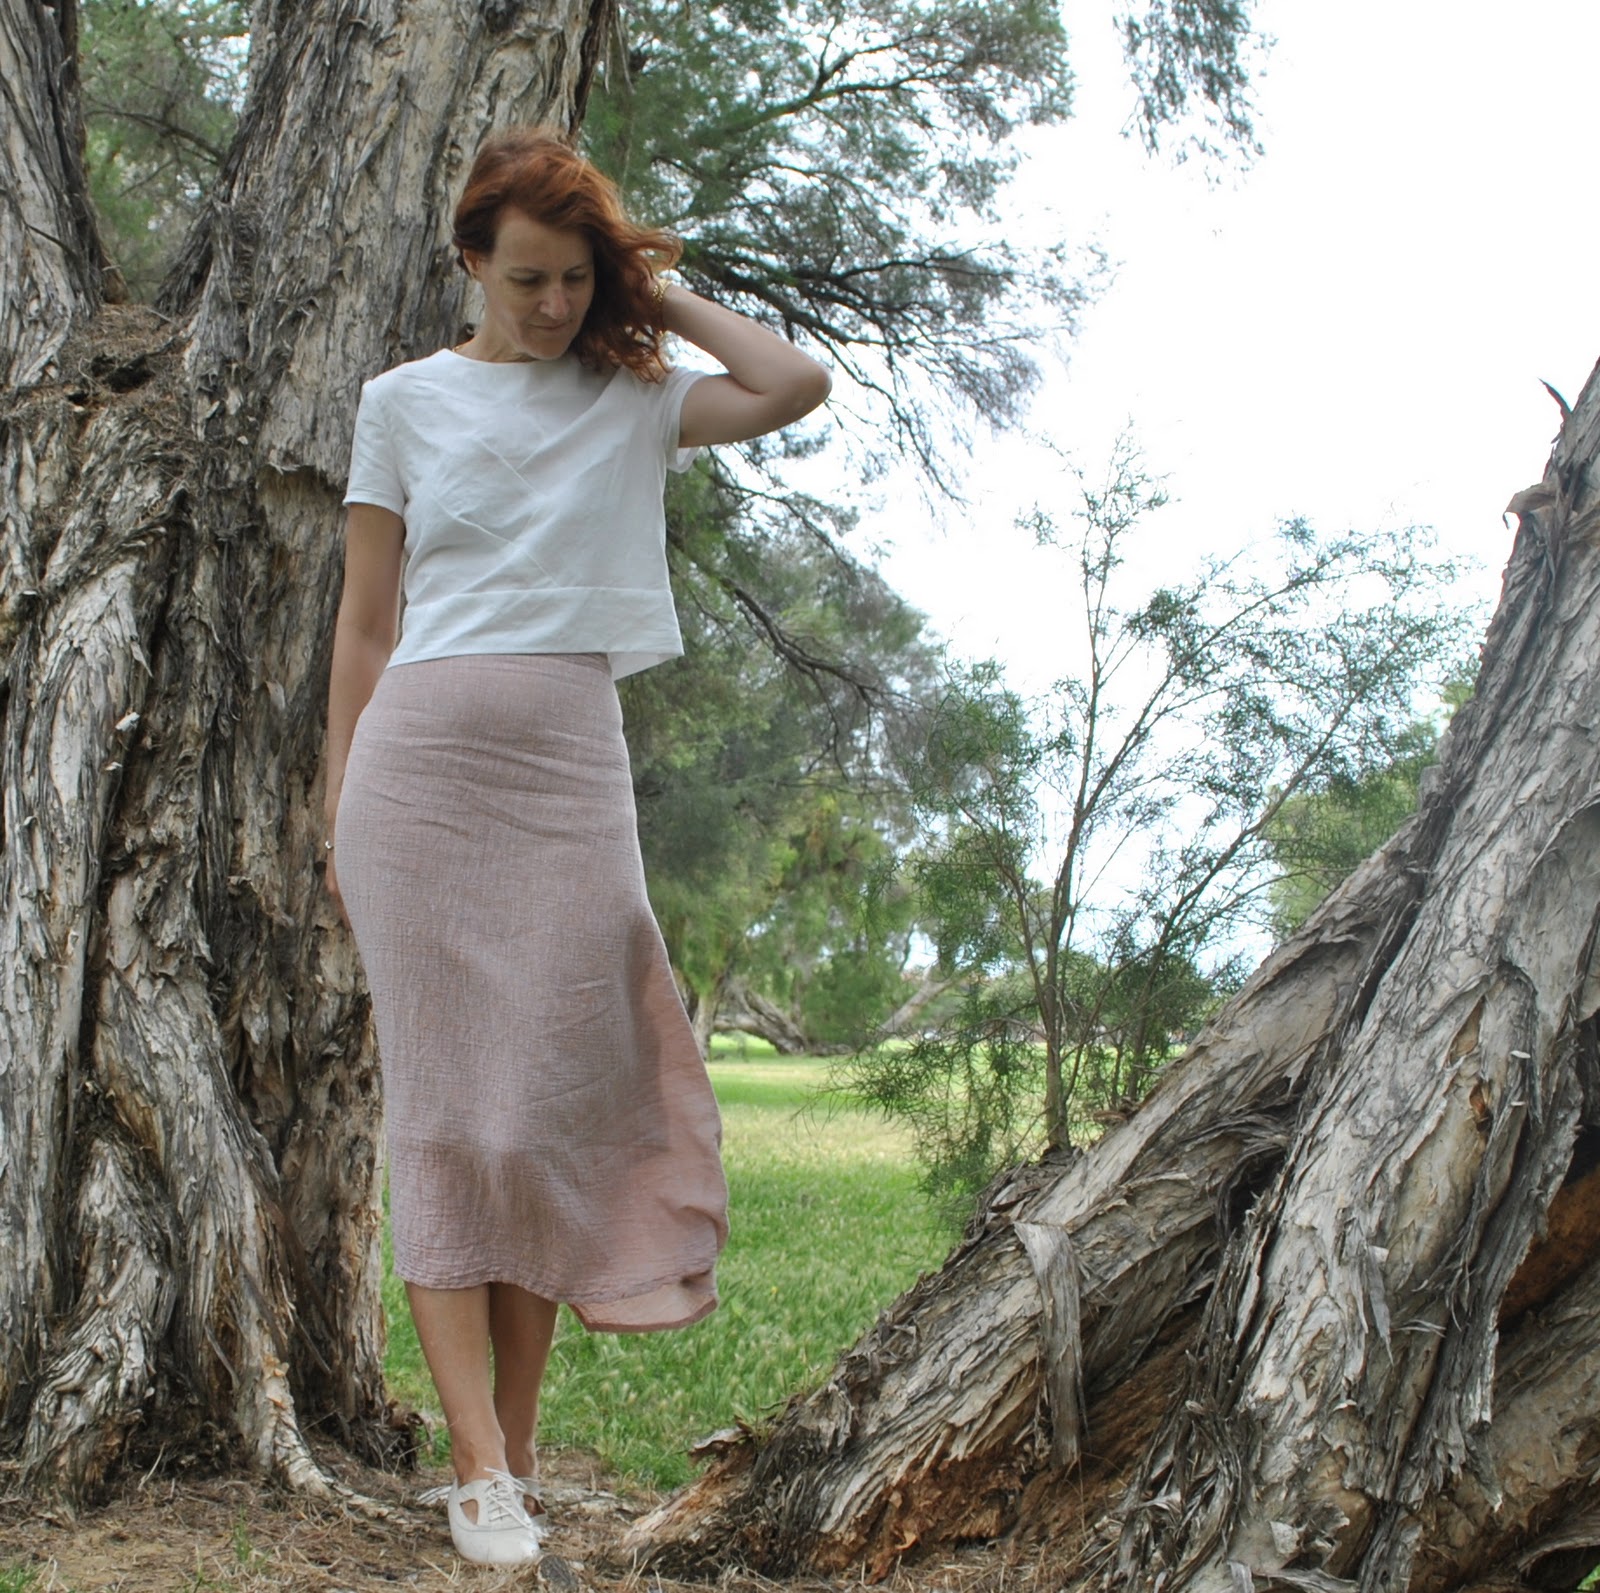
A nice floaty loose top perfect for our fiercely hot summer days.  And we’ve sure had a few stiflers lately  :S so I will be wearing it immediatemente.
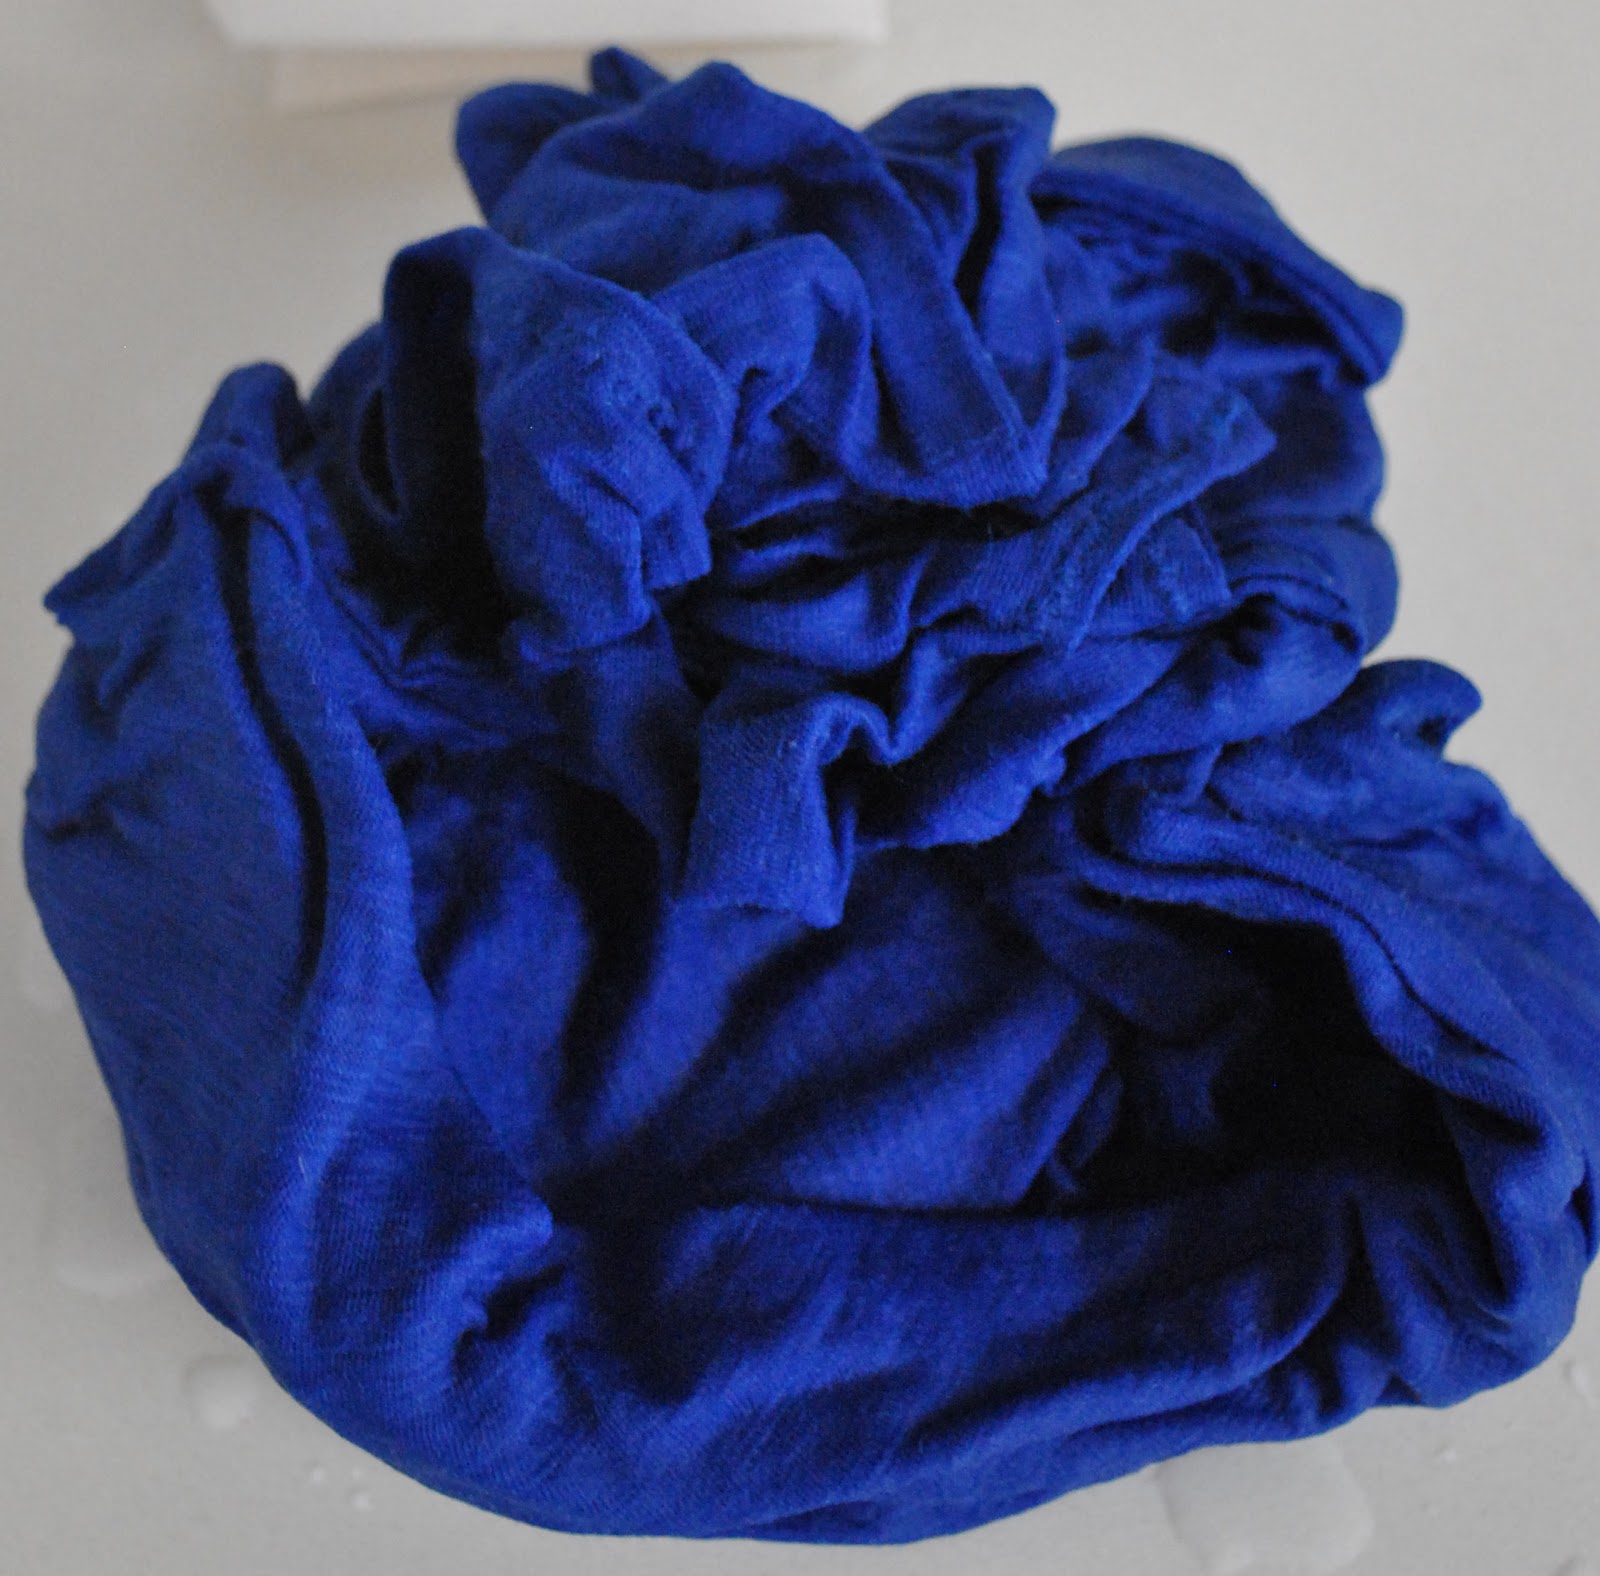
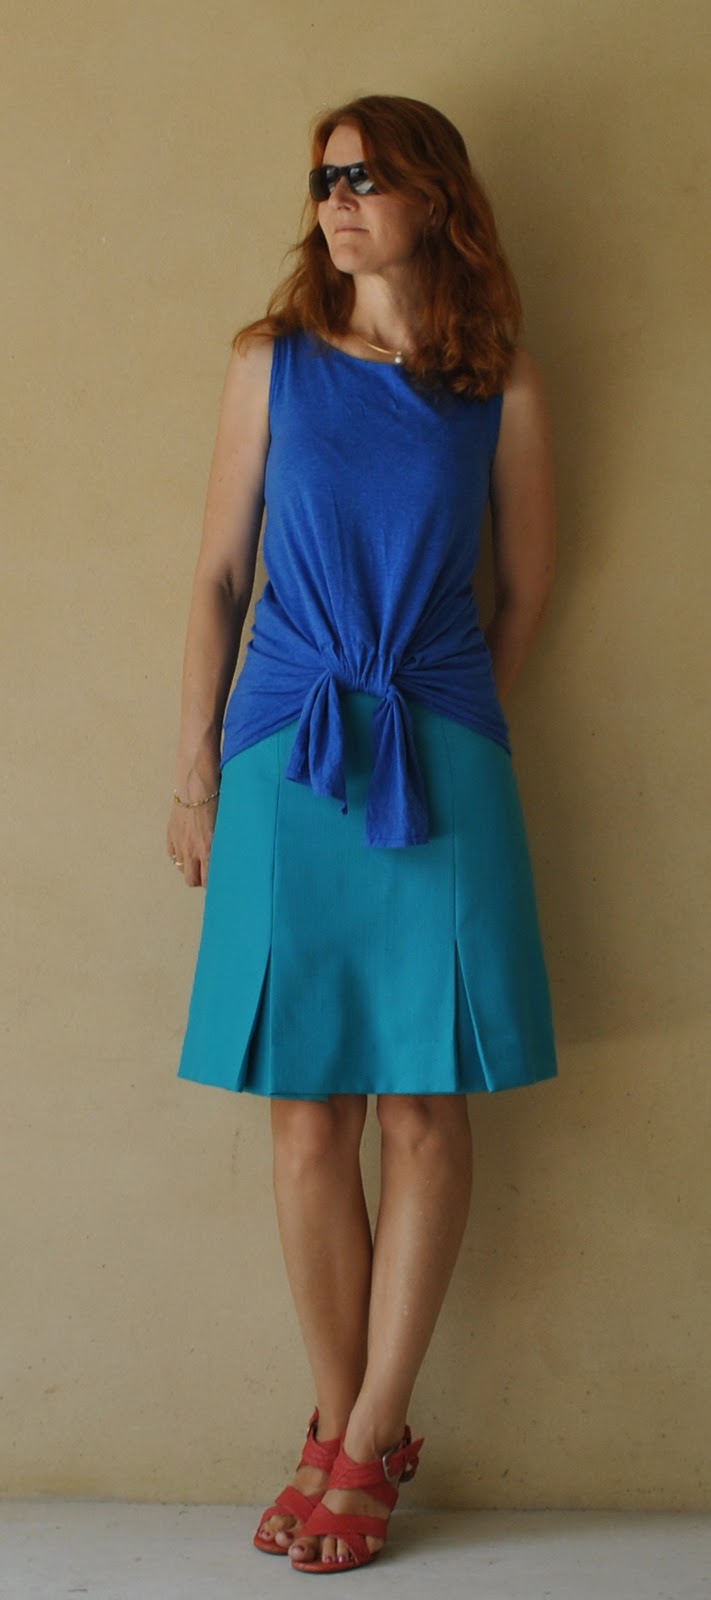
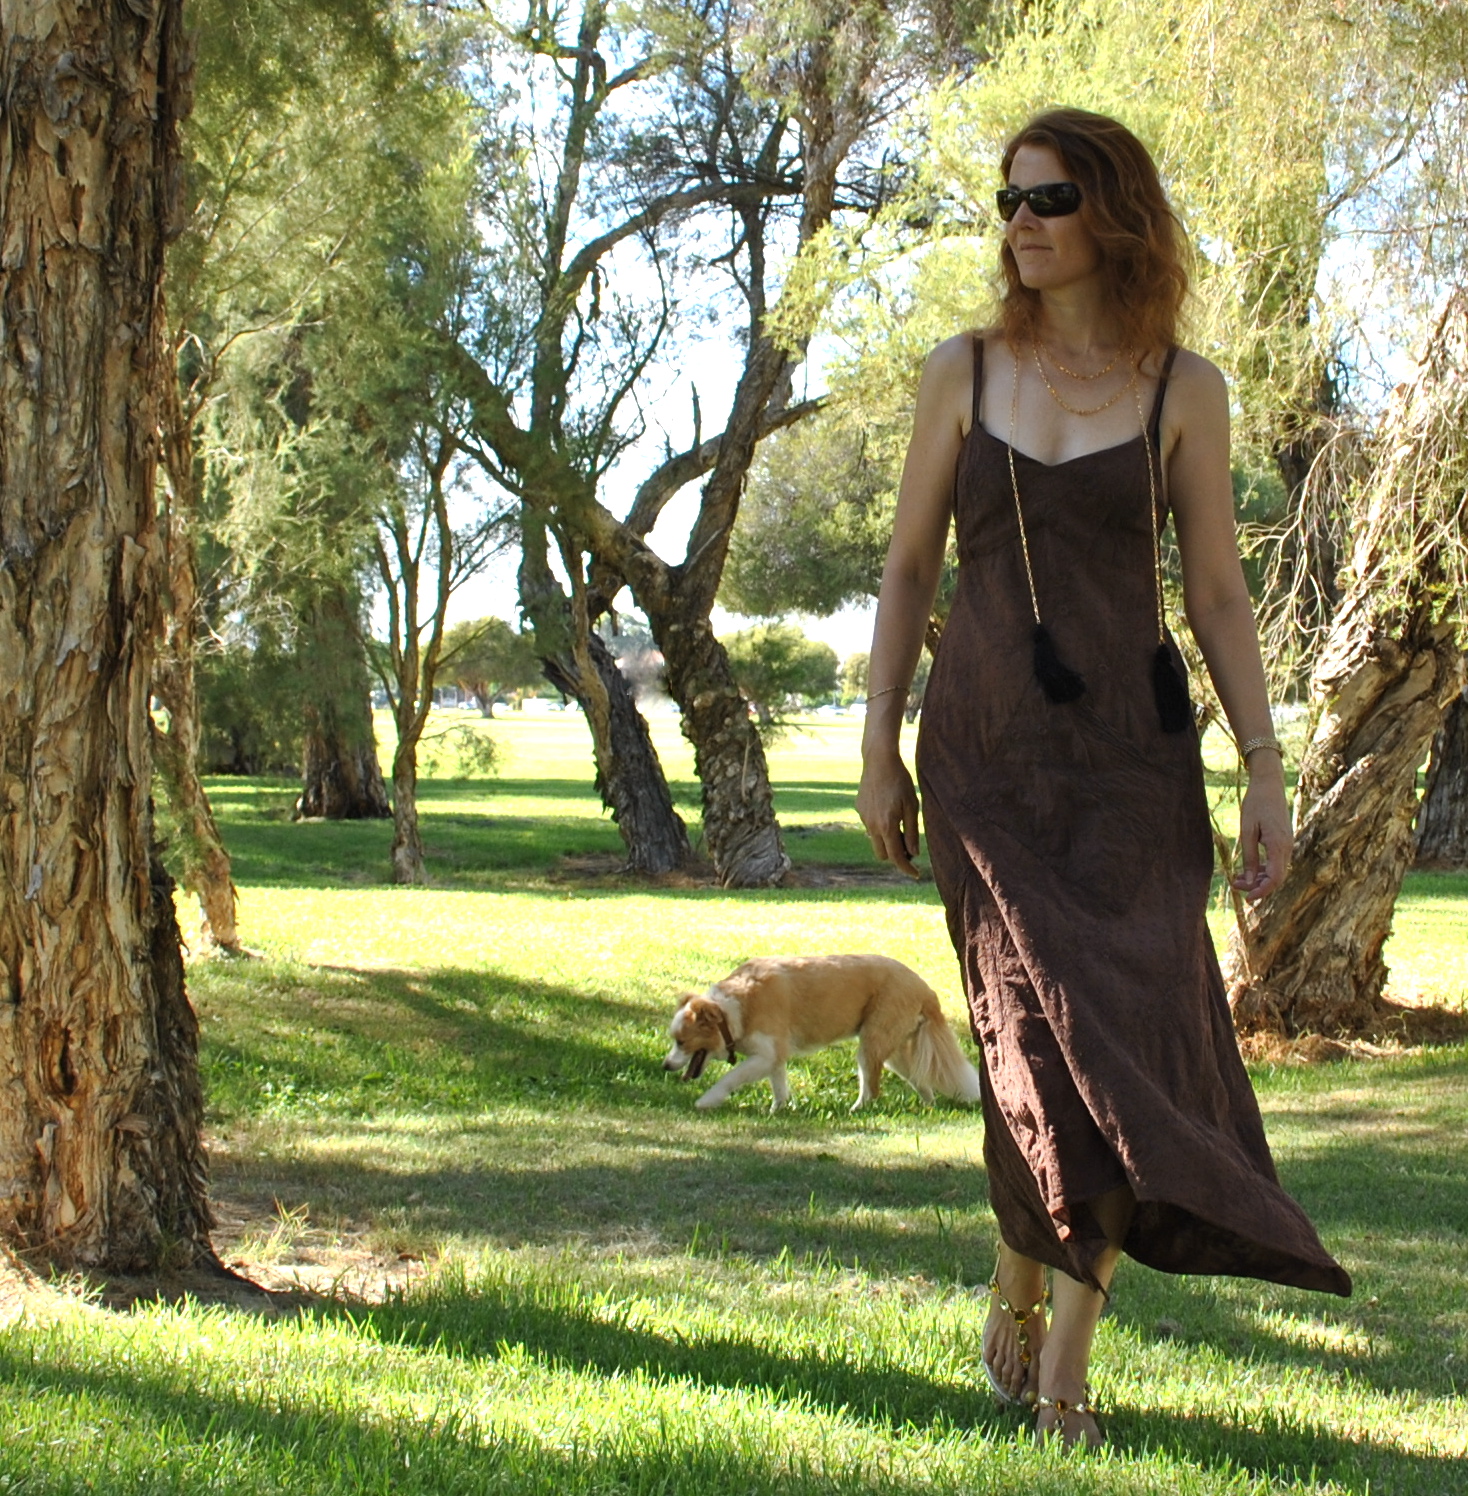
I used Rowan shot cotton… again.  This colour is Clementine (and please note I am wearing it with my little lime-print skirt, hehe! gettit?)
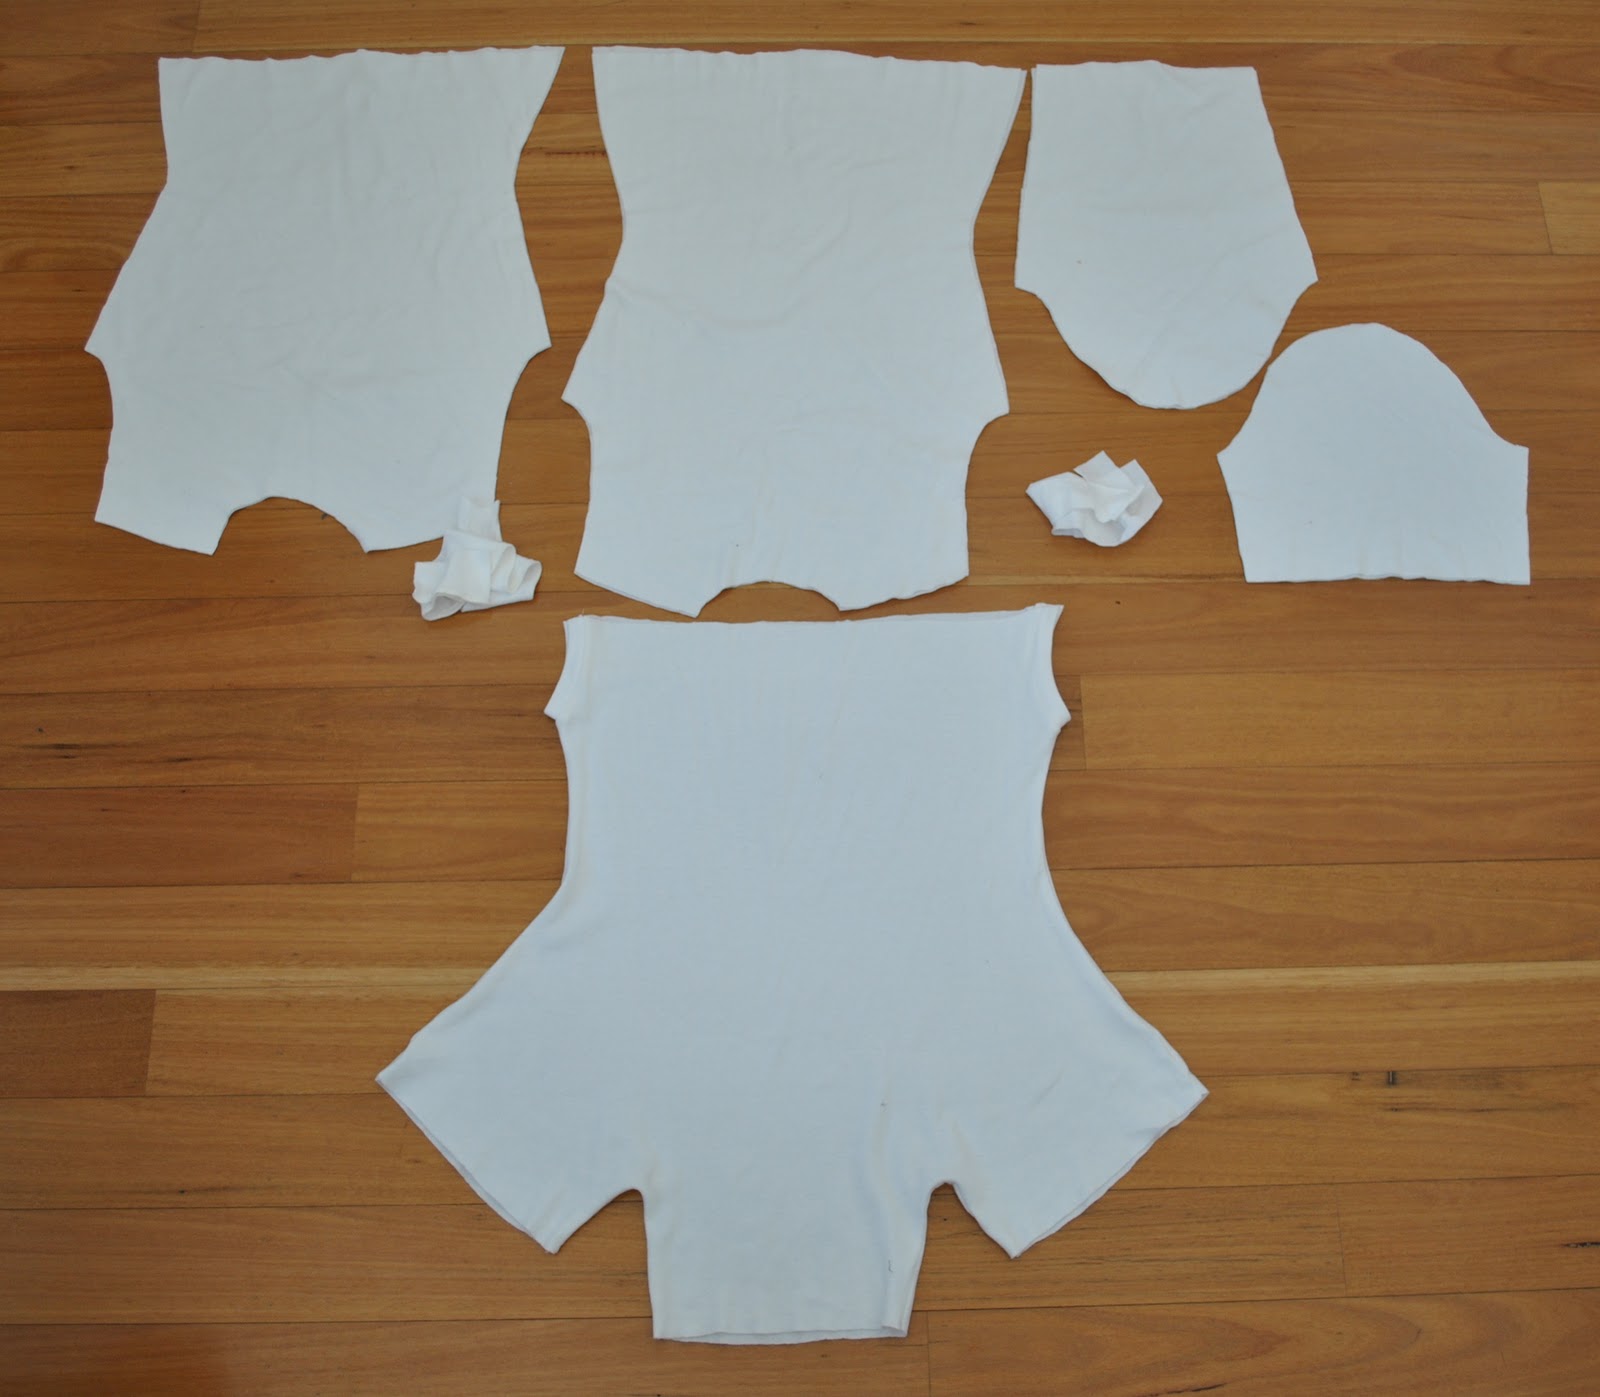
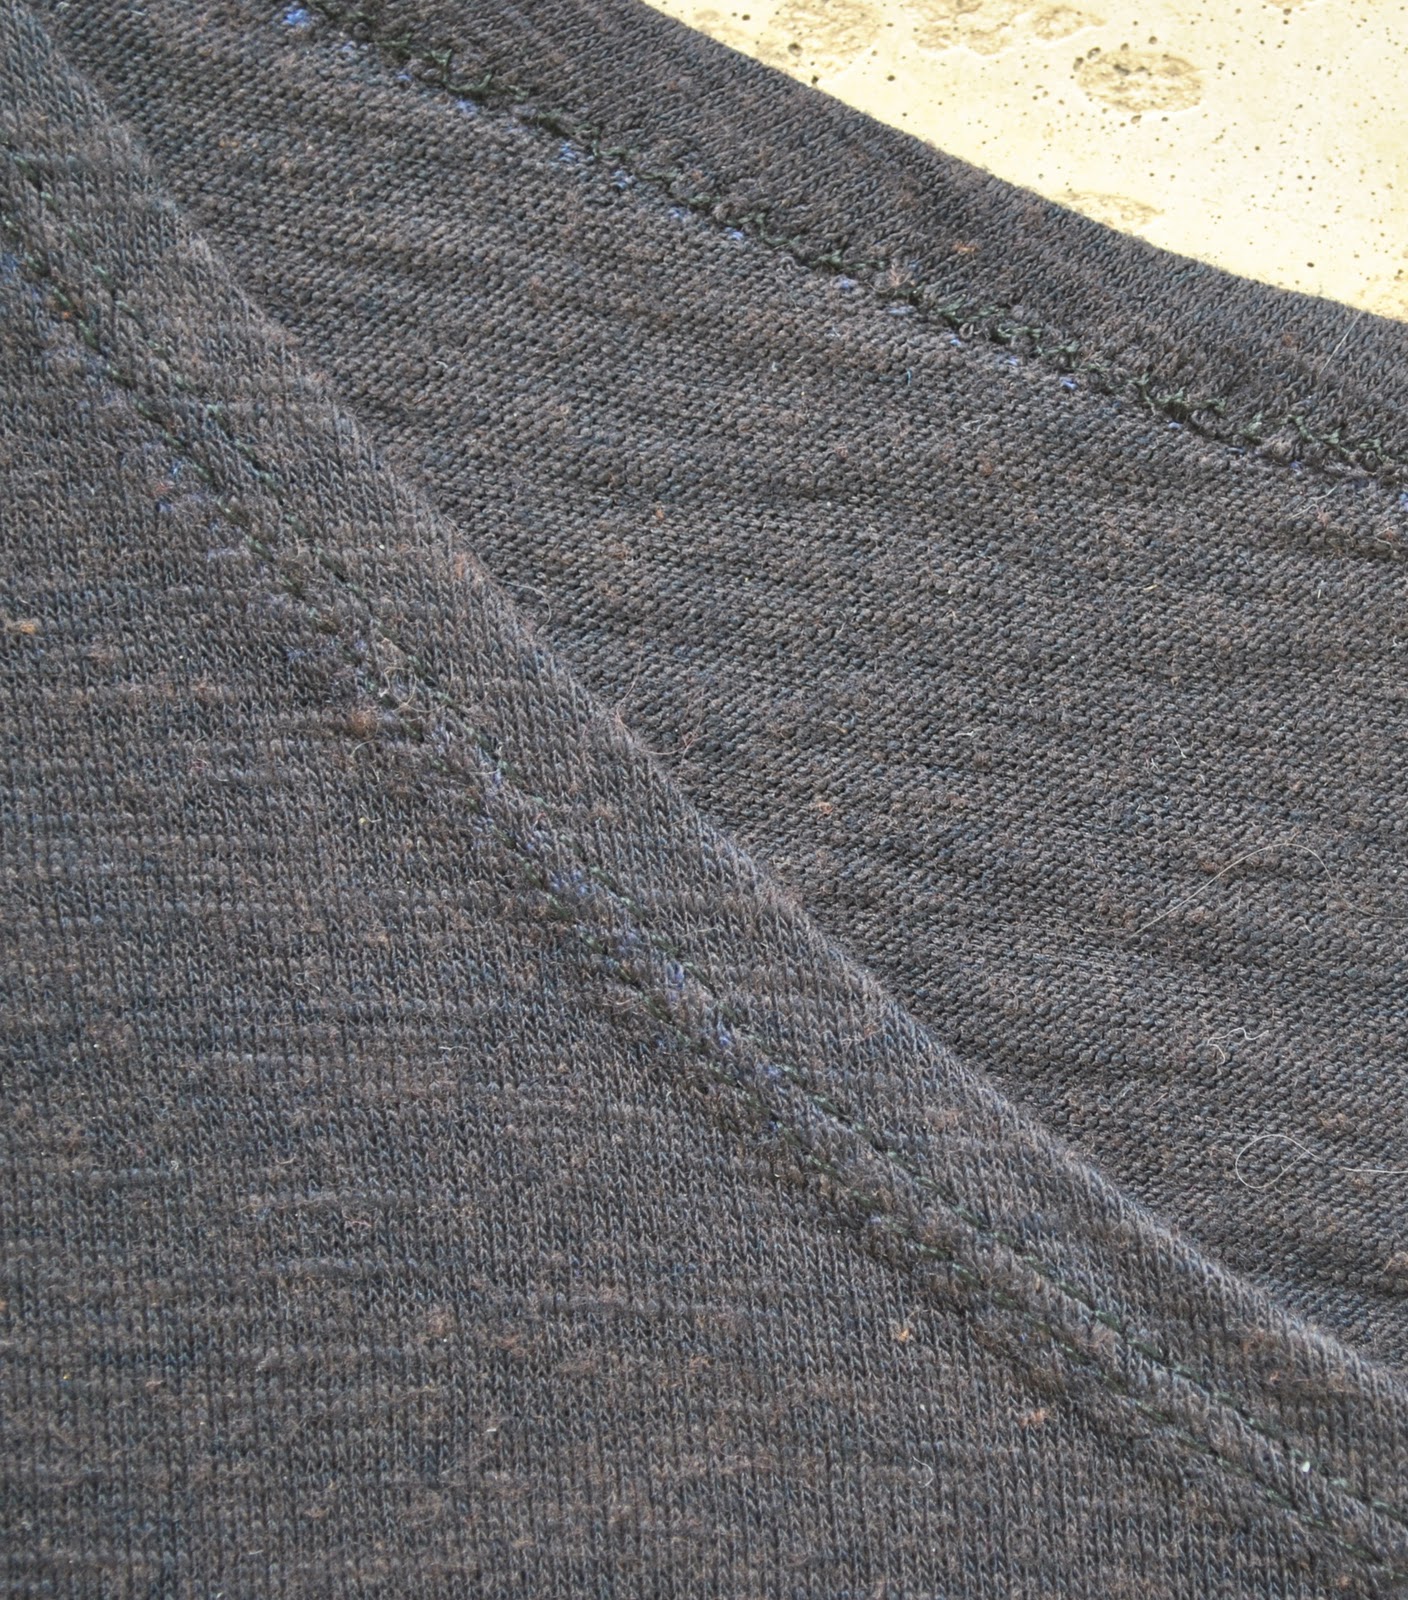
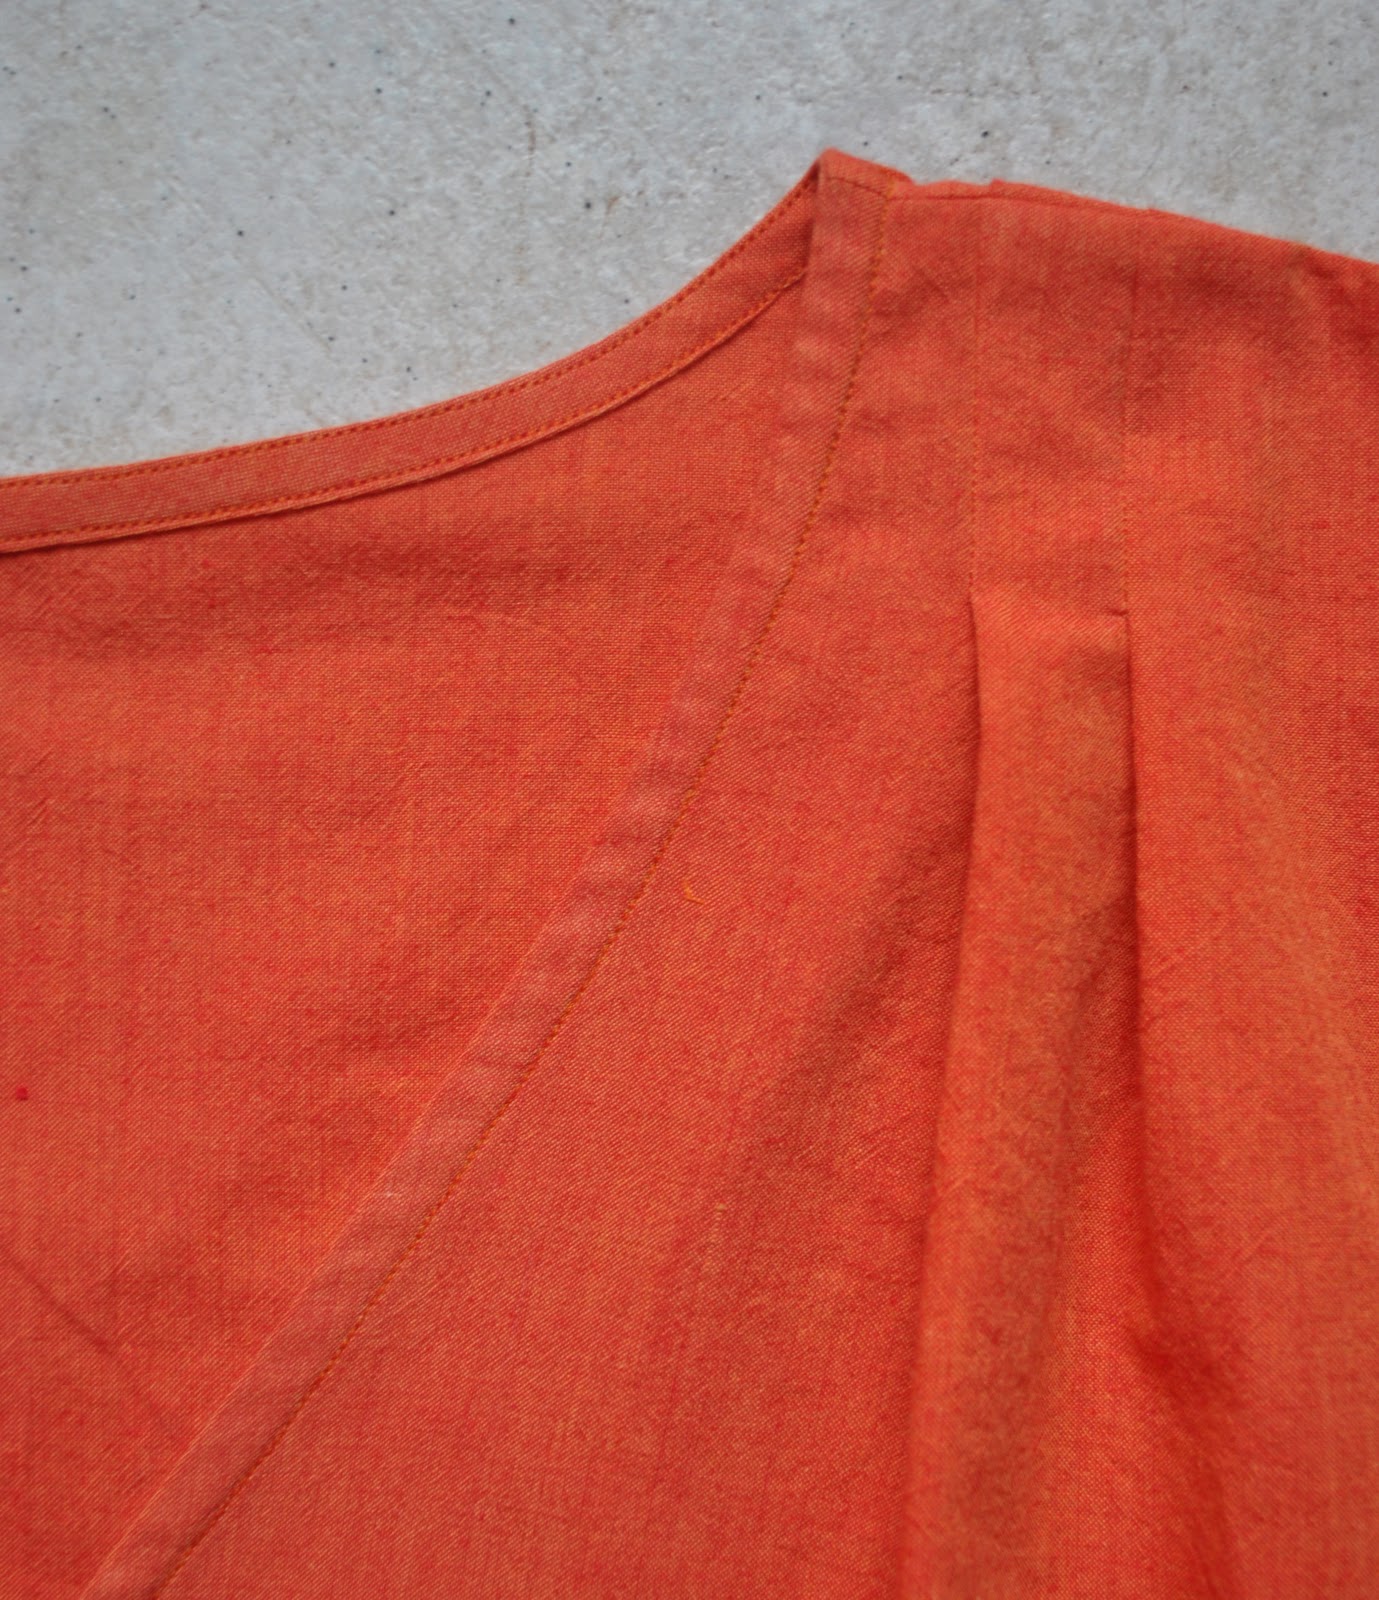
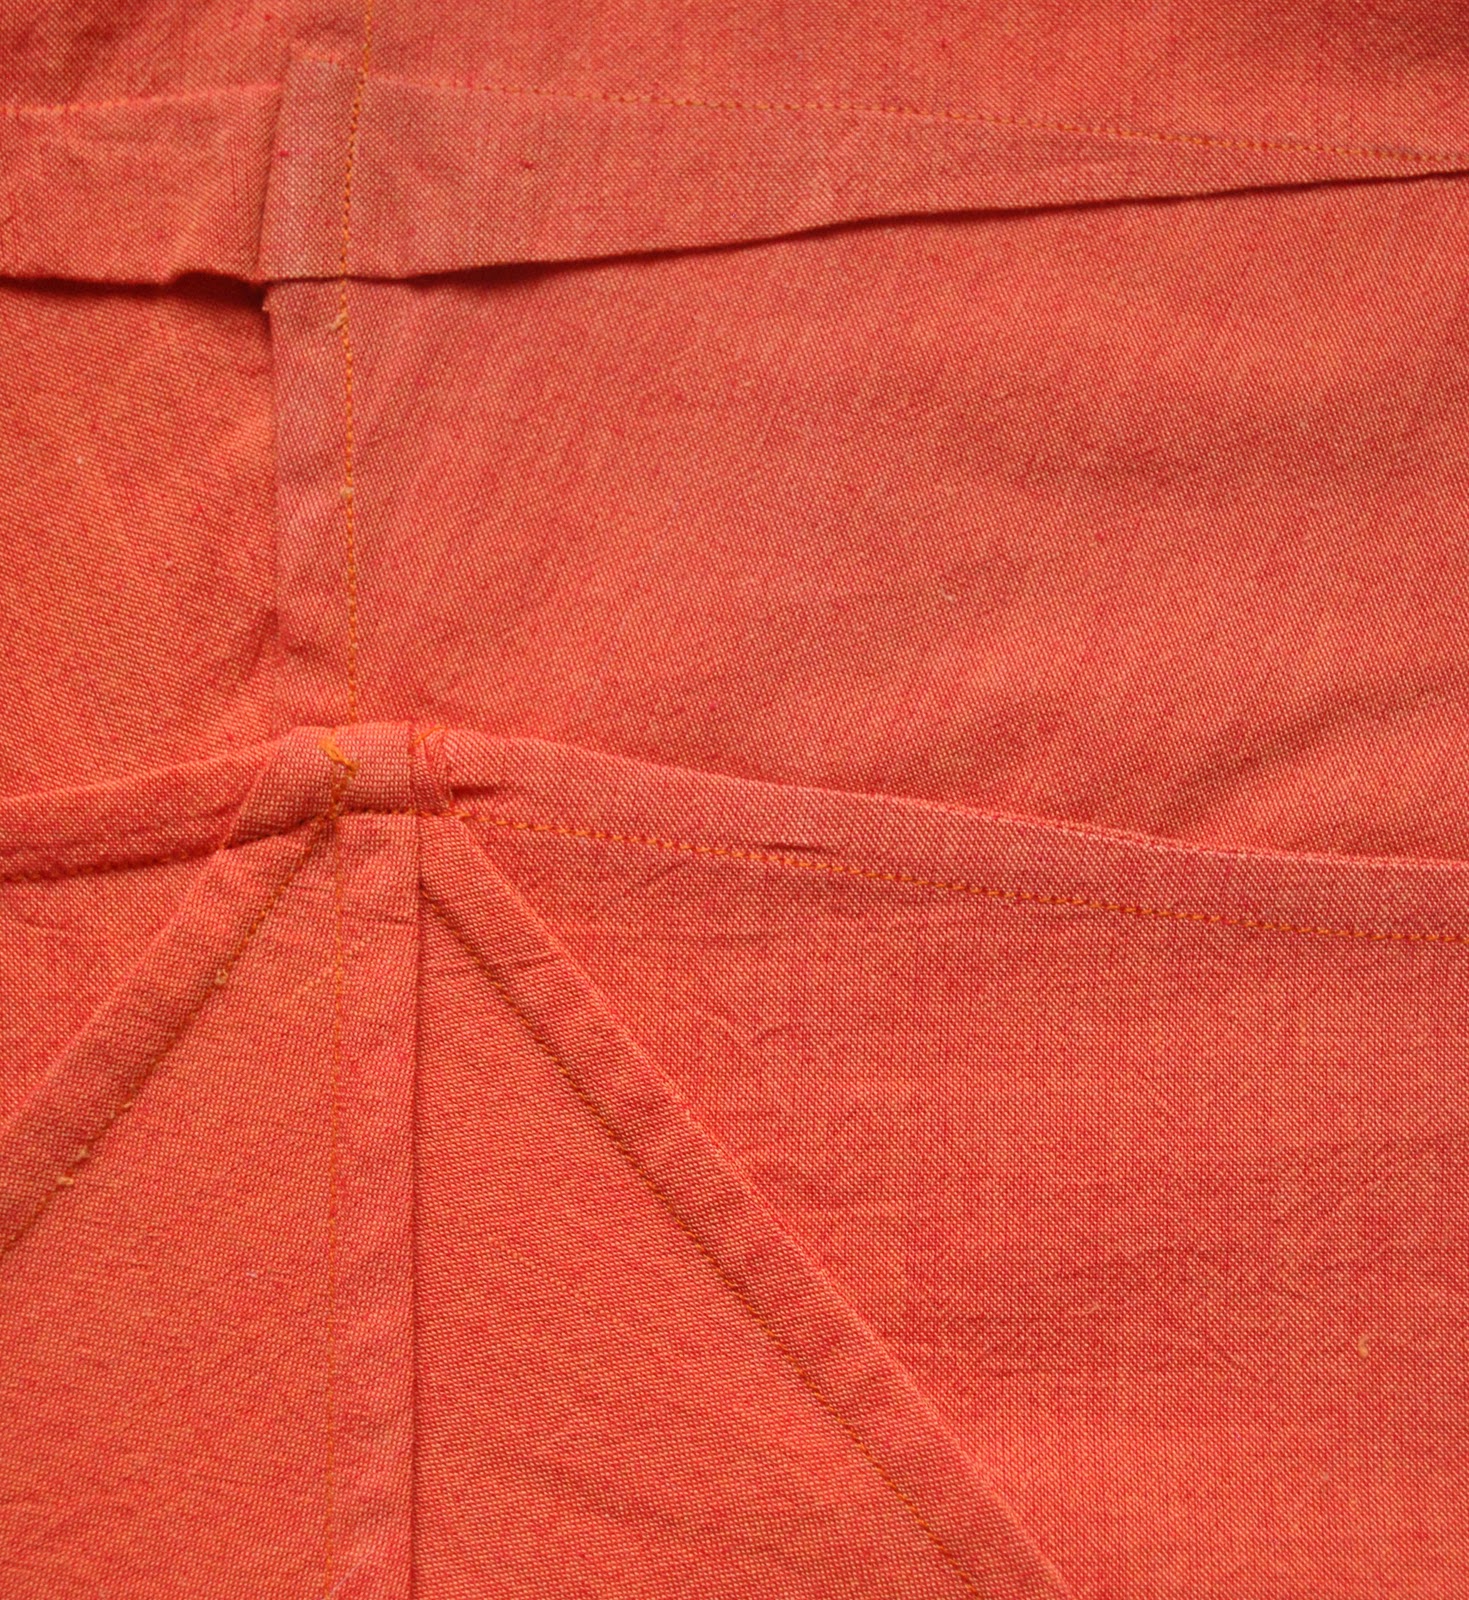
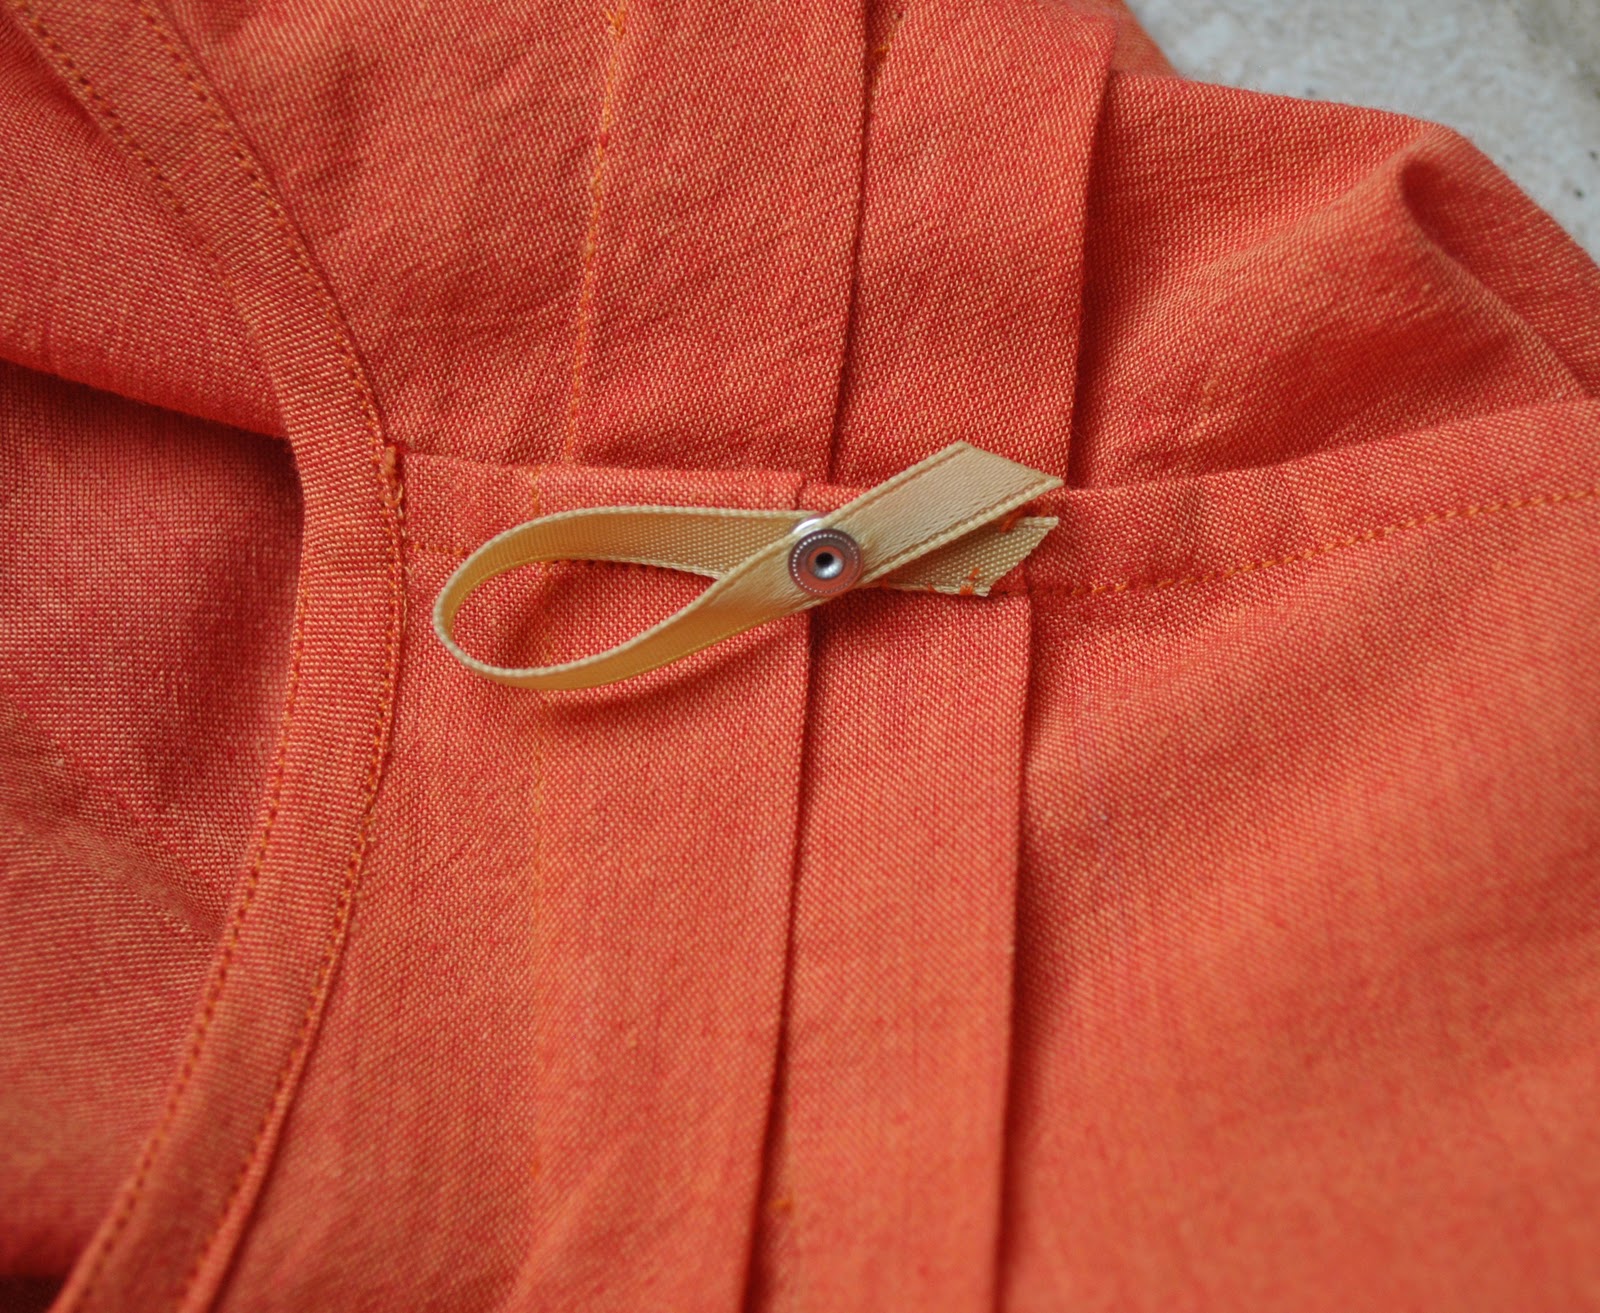
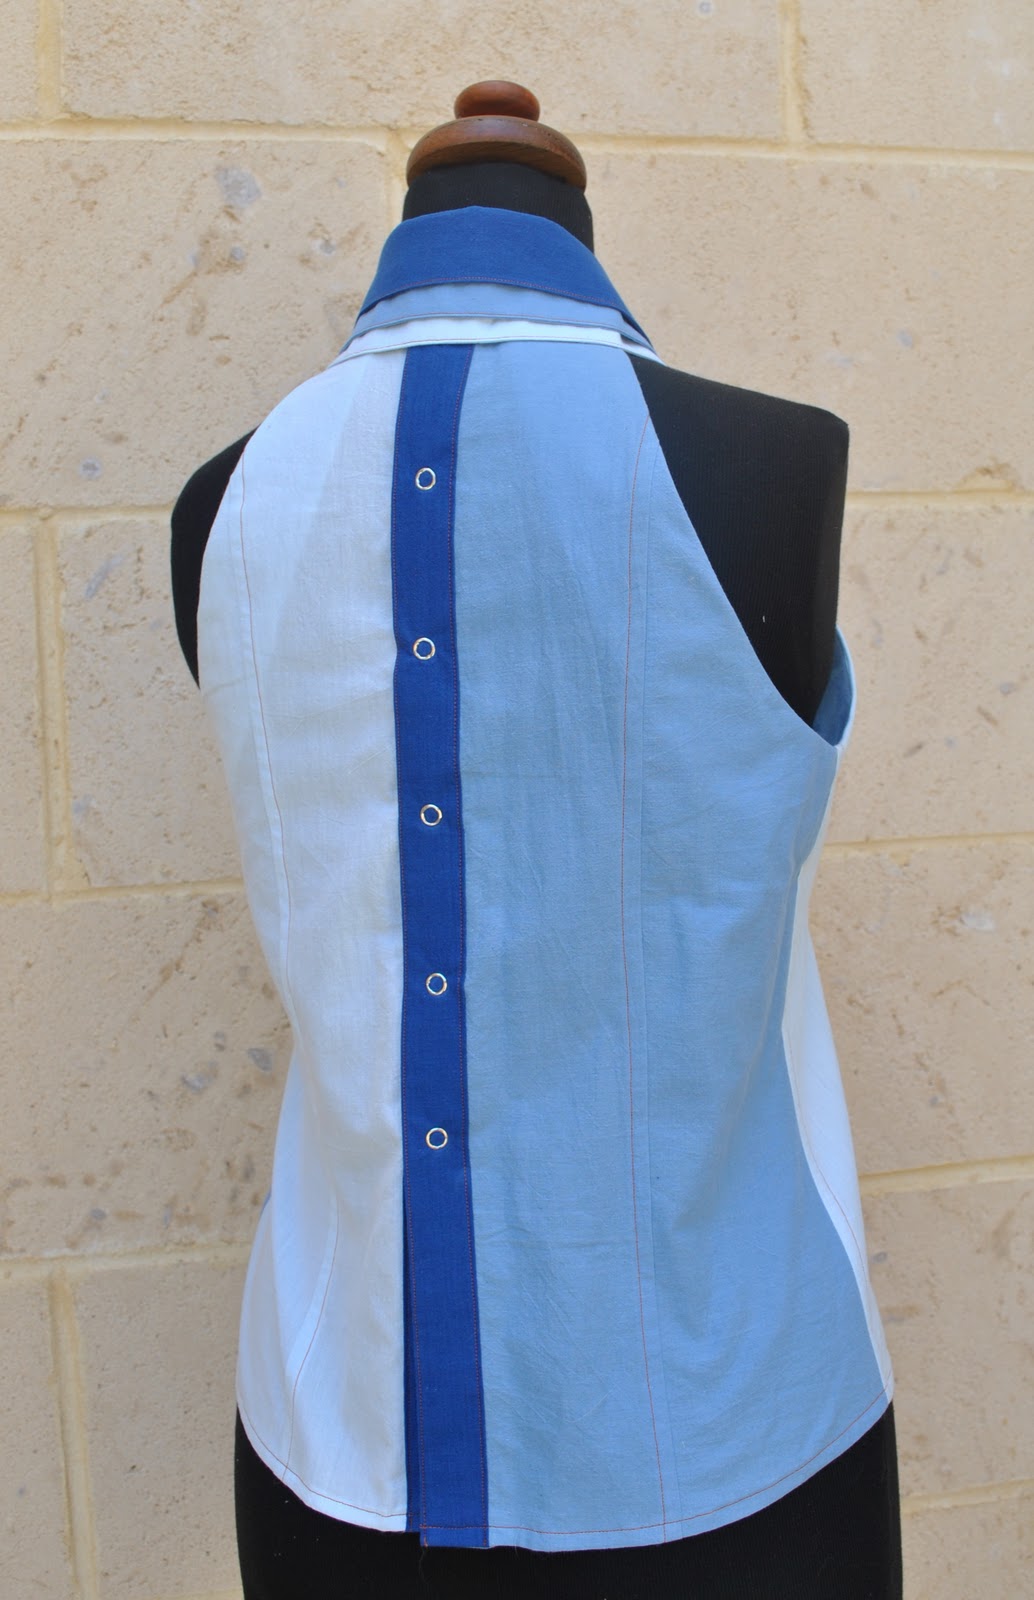
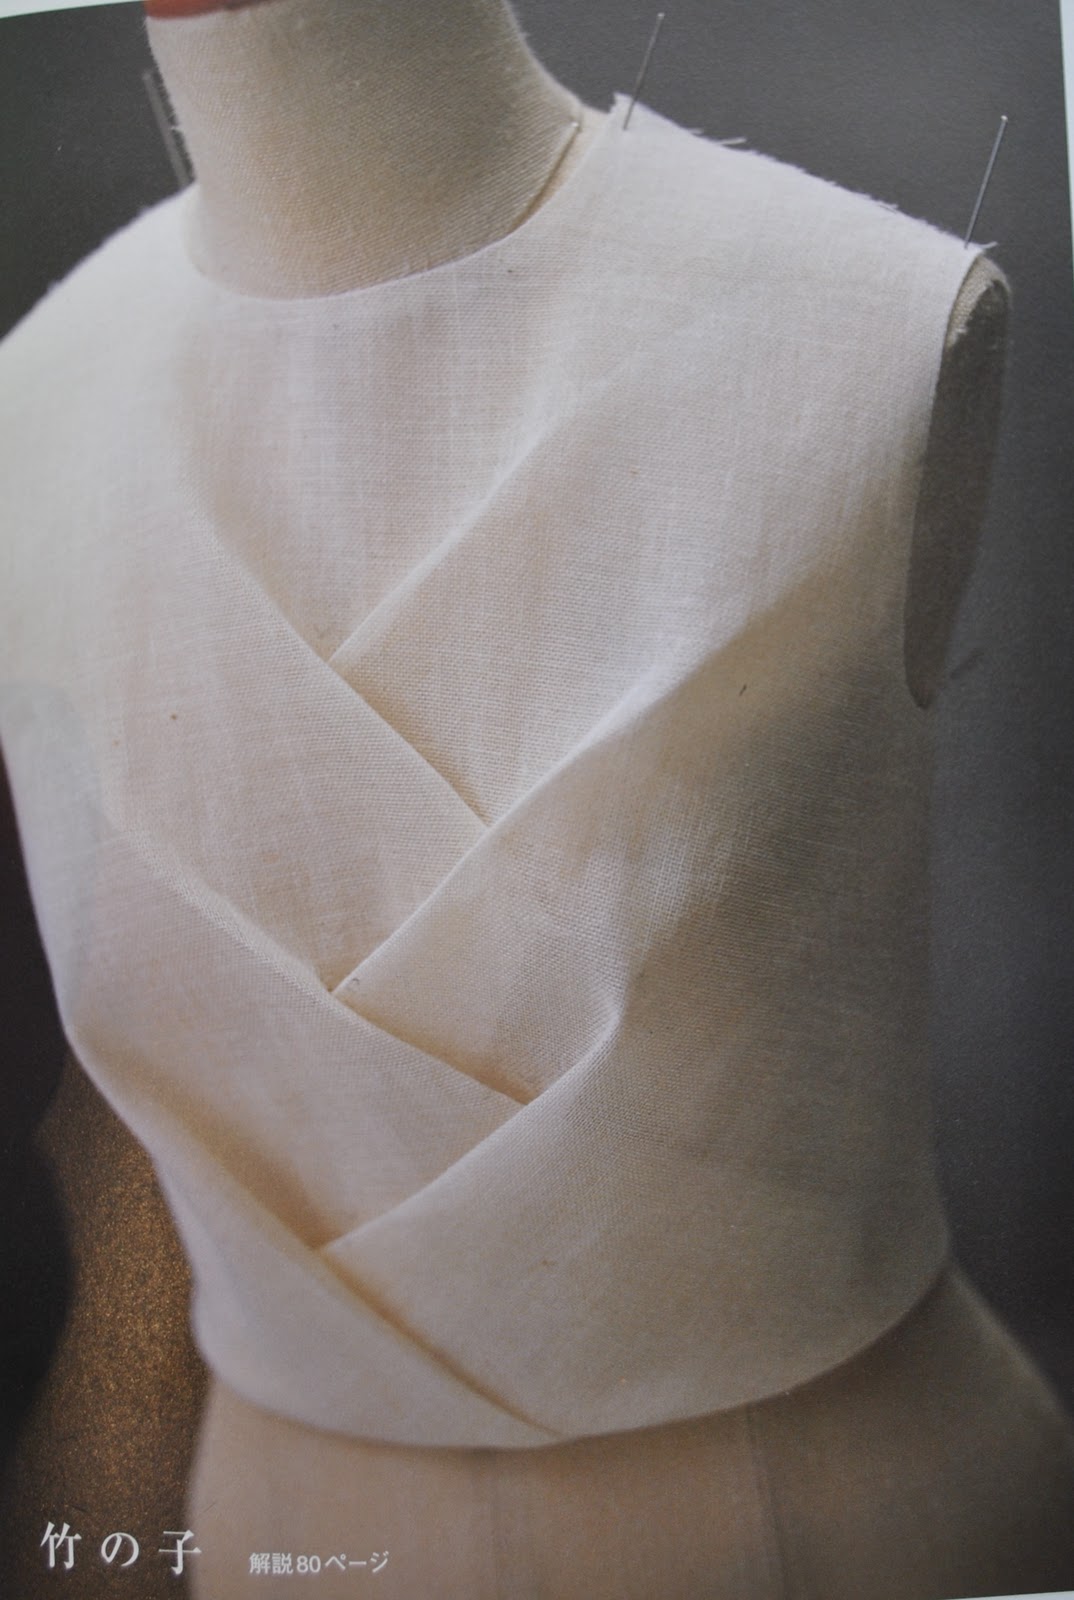
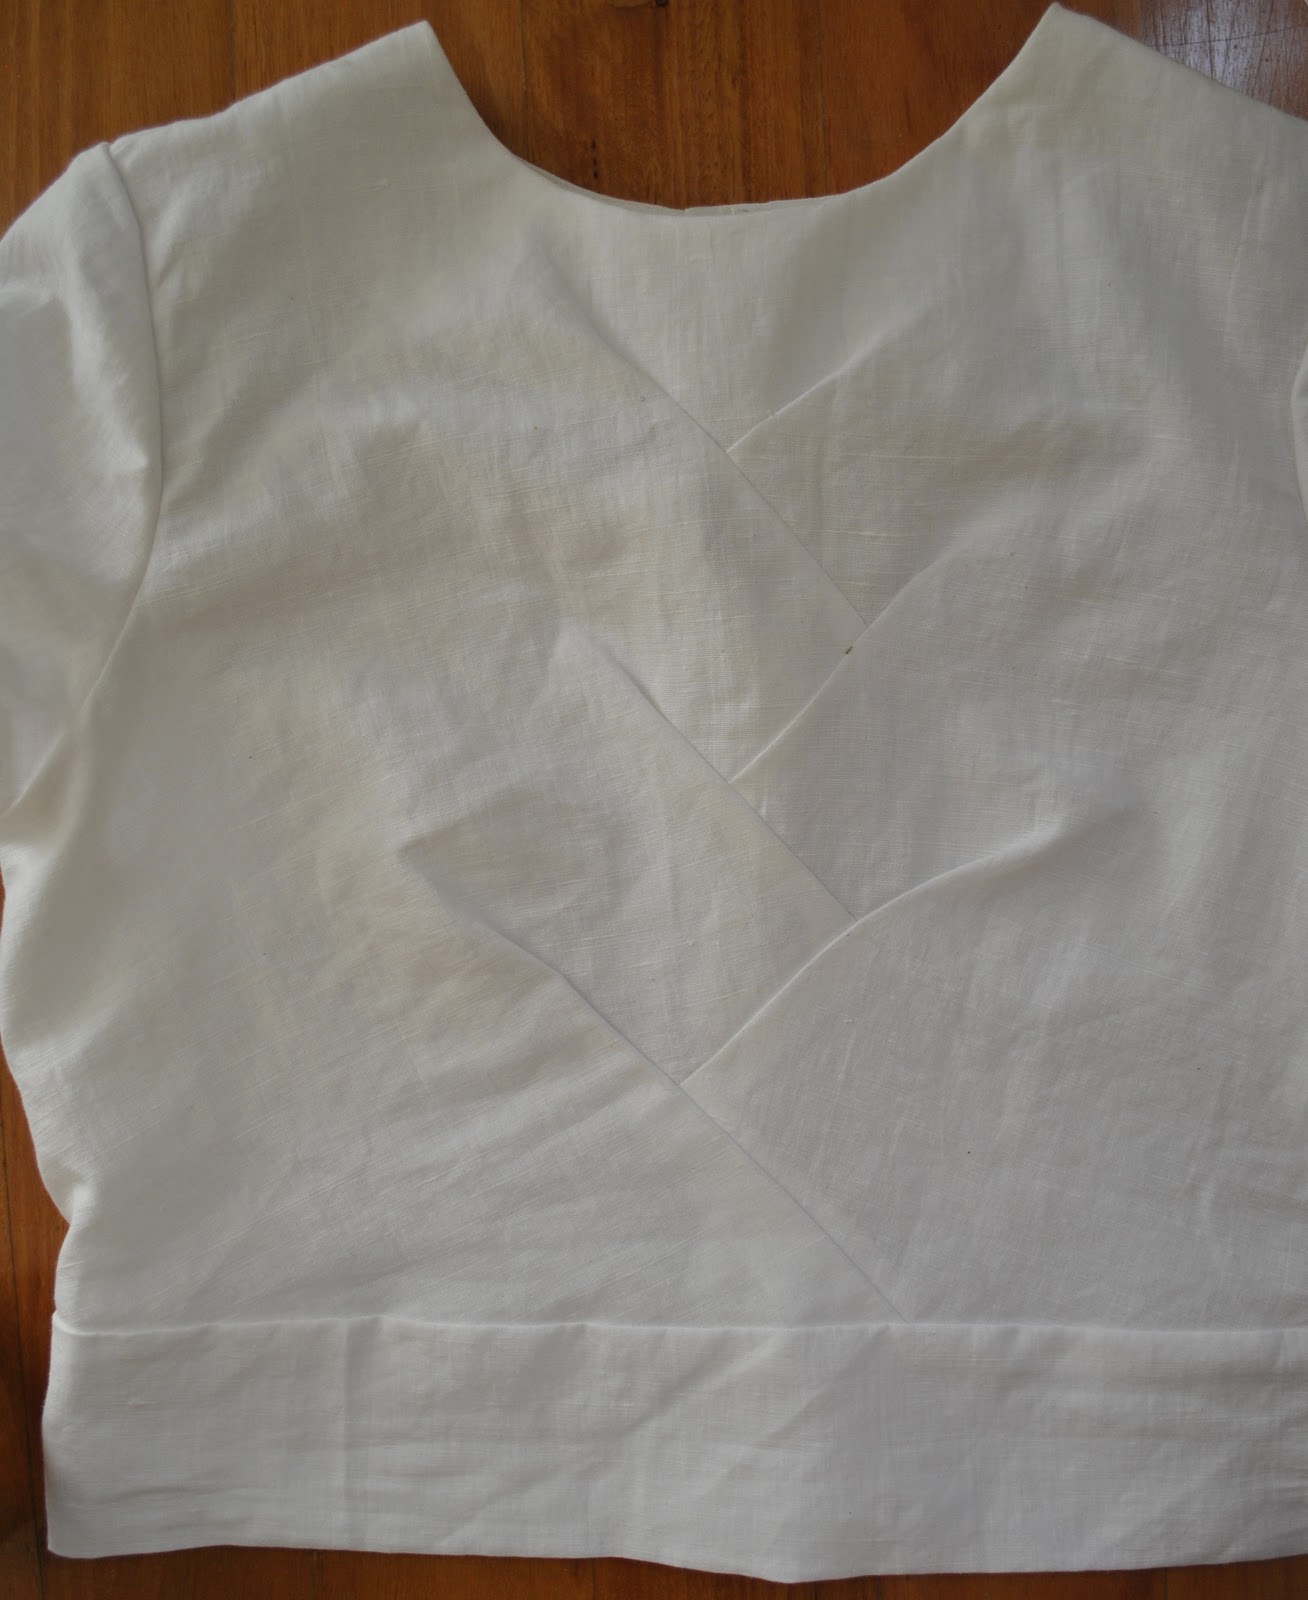
I am so addicted to this fabric!  It is gorgeously light, an almost not-even-there type of fabric.  Which is great for this particular pattern.  Why?  Well, the pattern specifies French seams throughout, and has a number of convergent seams.  Like where there are pleats on both front and back, joining together at the shoulder seam, and particularly! that centre front bit, where there are six French seams all converging to a single point in a star-shape, and themselves all being joined in a final French seam too… if your fabric was even a little bit bulky I would class this a quite a tricky area to get looking nice, and particularly situated where it is, right boom in the centre front of your top it pretty much has to be perfect!  Luckily this shot cotton is so marvellously light it wasn’t too horrible a job, and I think I got it looking quite neat and tidy.
Of course you don’t have to do the French seams here if you wanted to make life easier for yourself… which I stubbornly do not  ðŸ˜‰
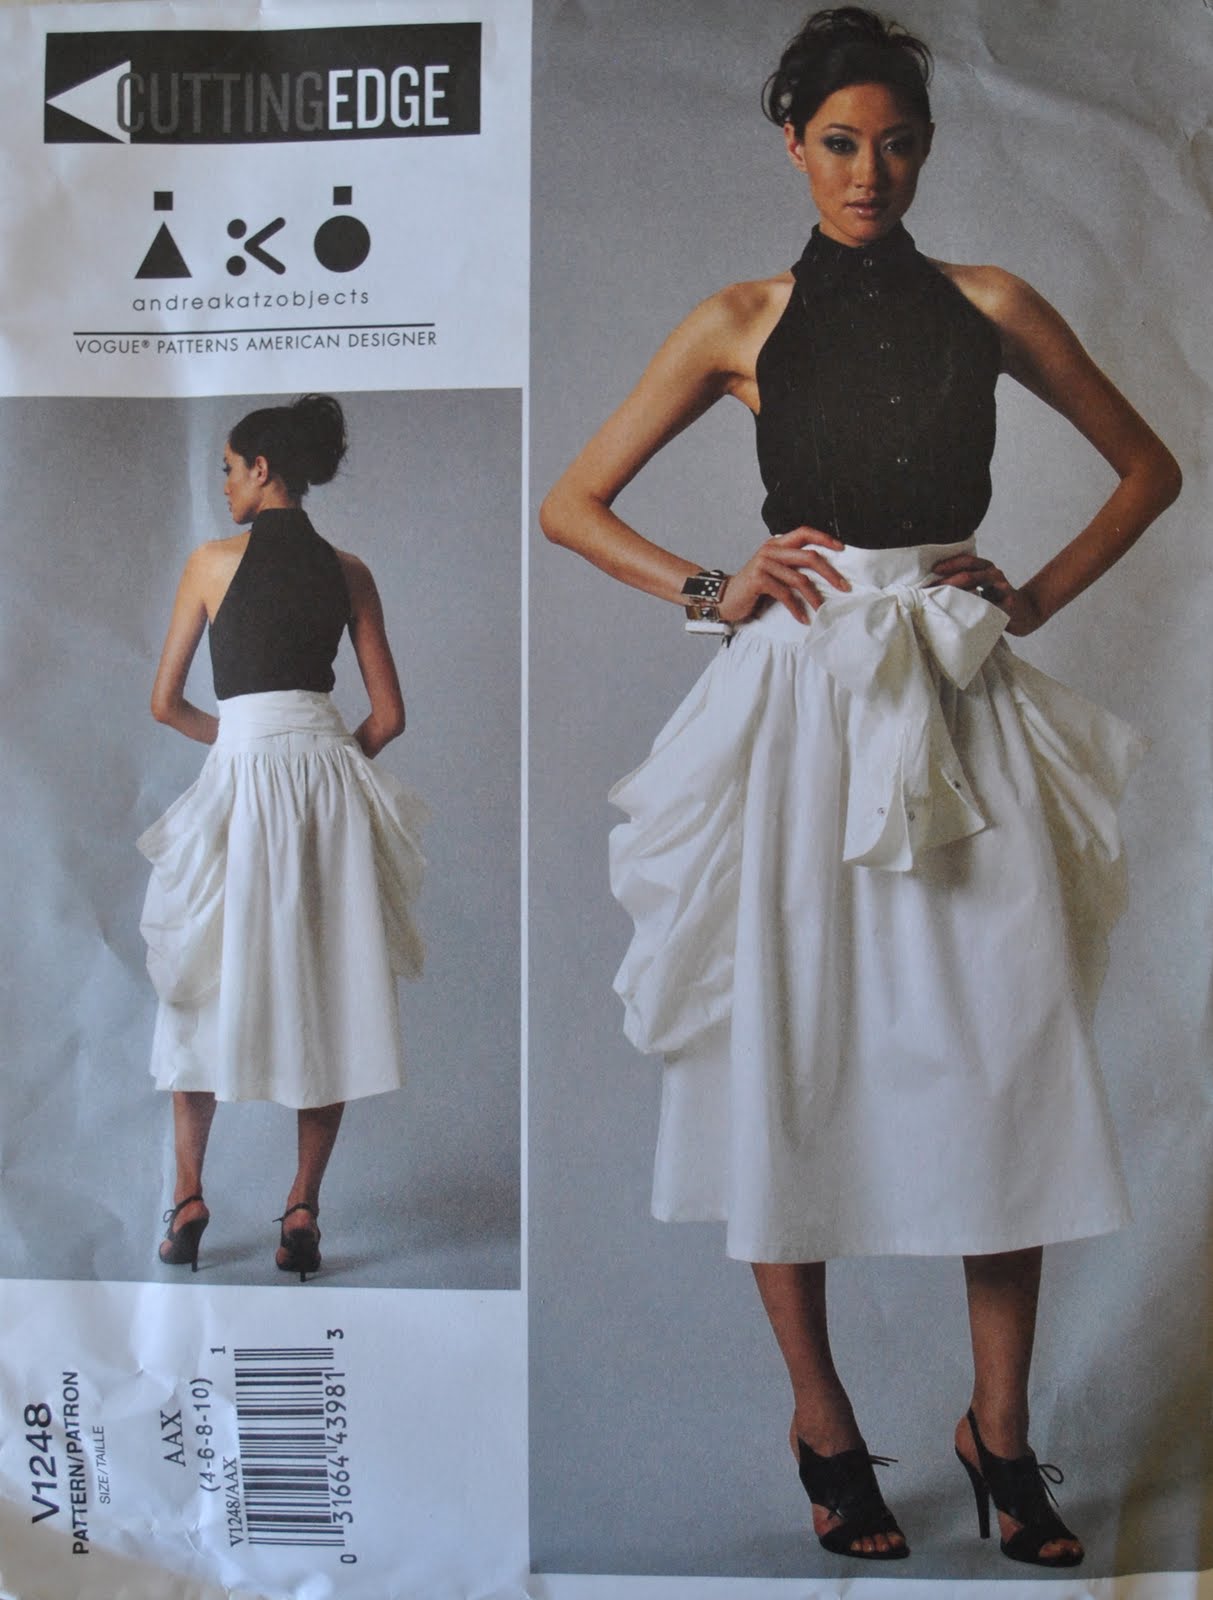
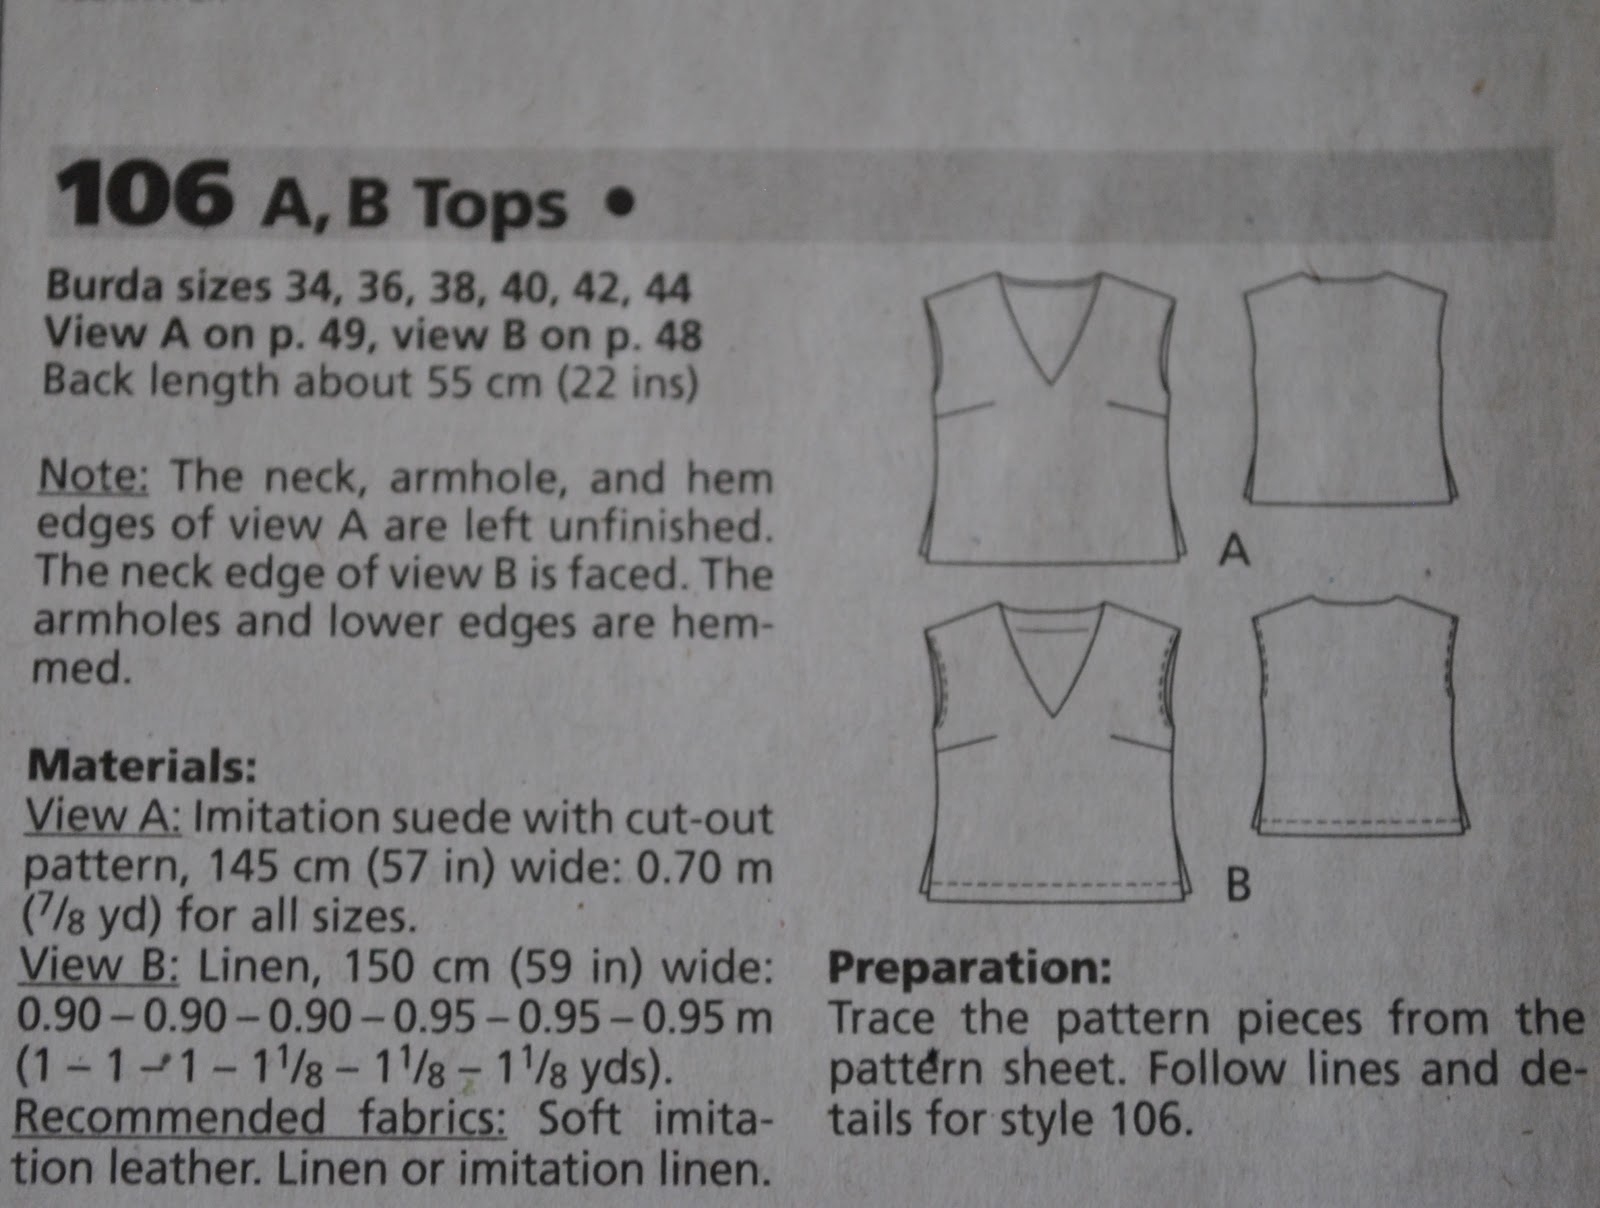
I used a newbie-to-me pattern Vogue 1247.  This was a Christmas present from Sam; but I’m still adding the cost of it to my little 2012 personal-clothing-expenditure ledger, since in reality I chose, sourced and bought it myself!! and he just “gave” it to me.  We are very practical when it comes to present-giving in our family…
This pattern is classed as Average; a rating which was a little head-scratching to me.  I guess maybe the instructions for finishing throughout with all French seams made them decide to up the difficulty rating a notch, since I can’t really think of any other feature that could make this pattern anything other than a very easy project easy imo!
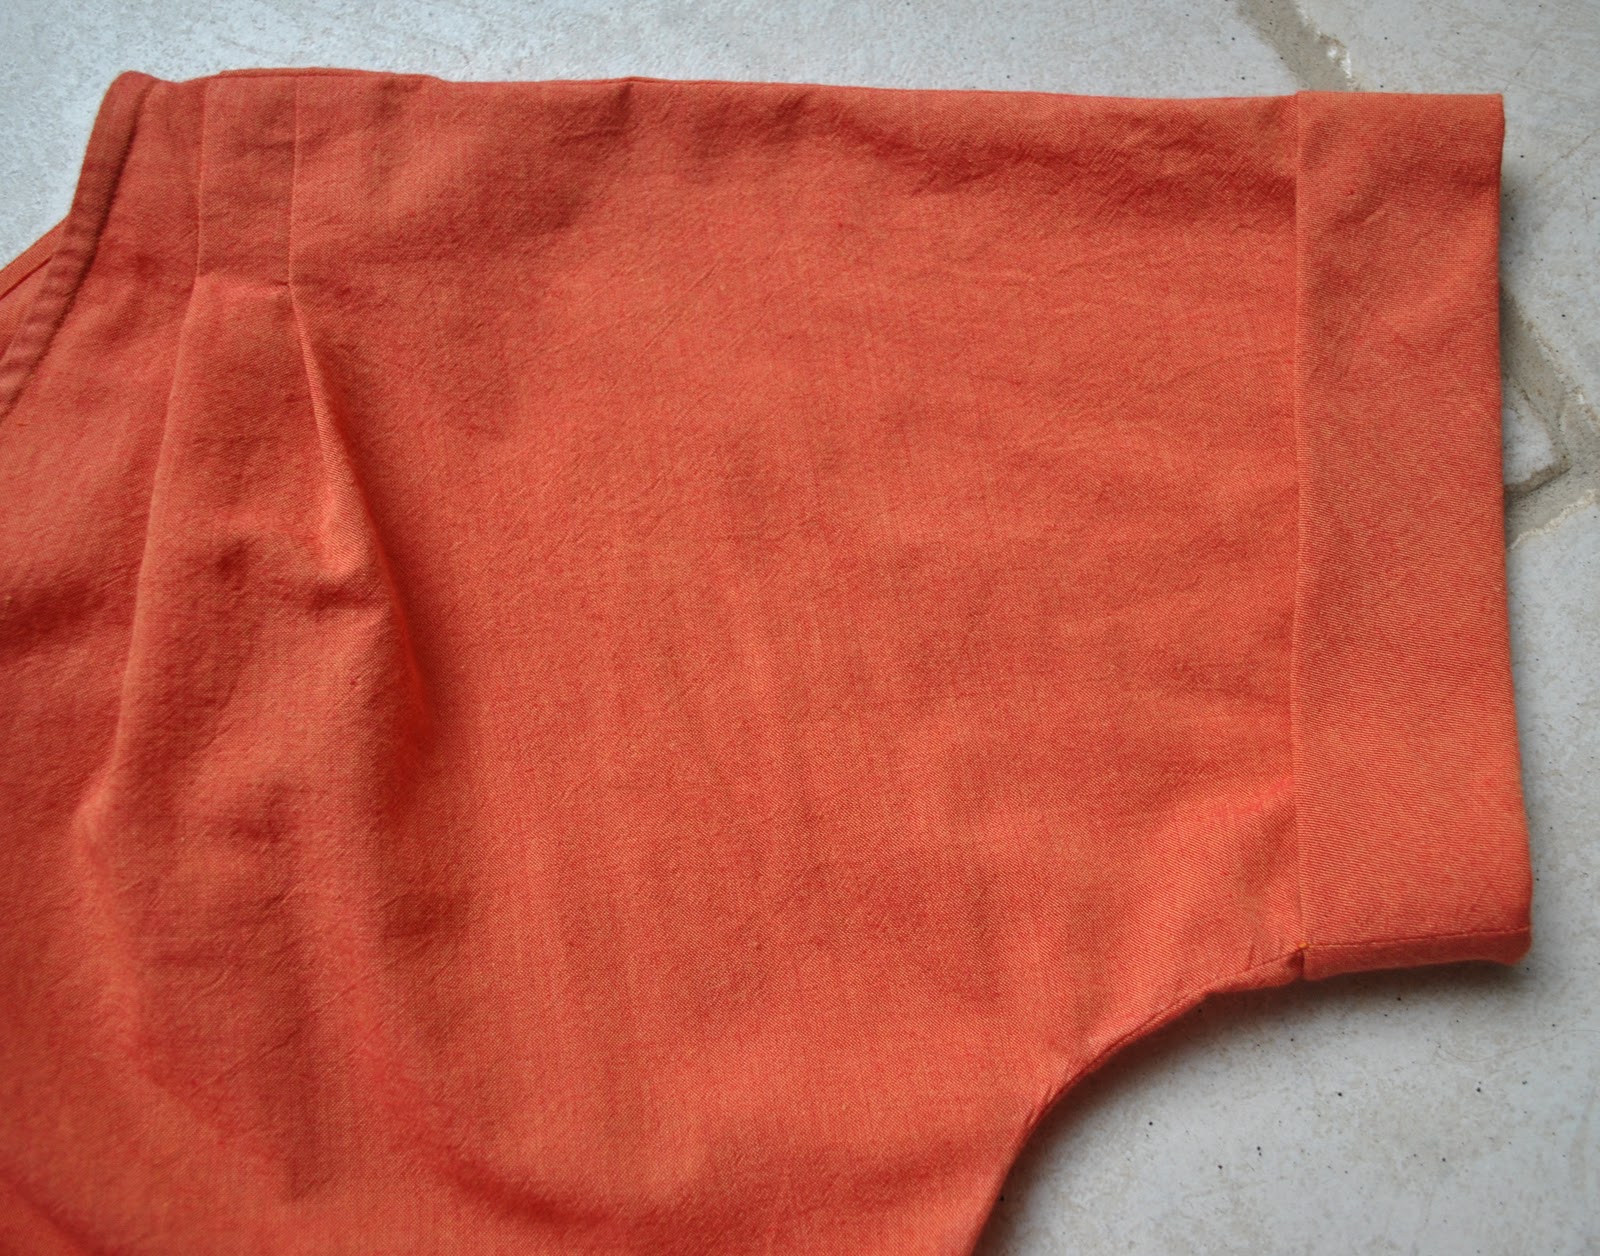
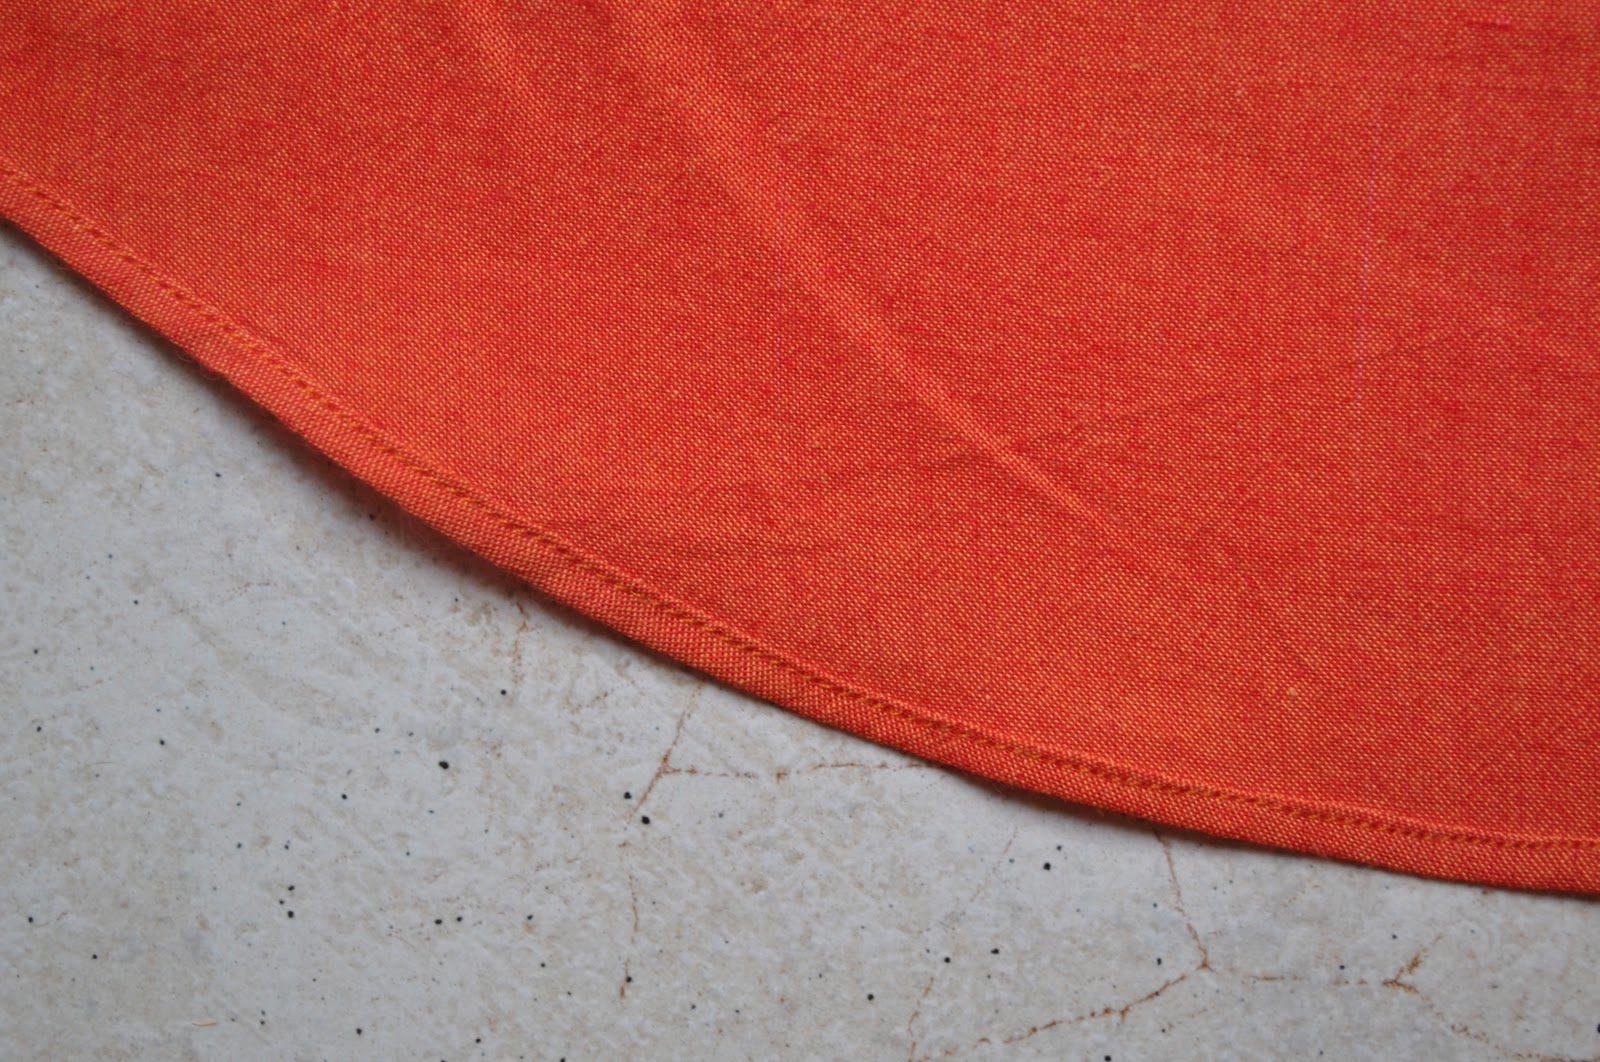
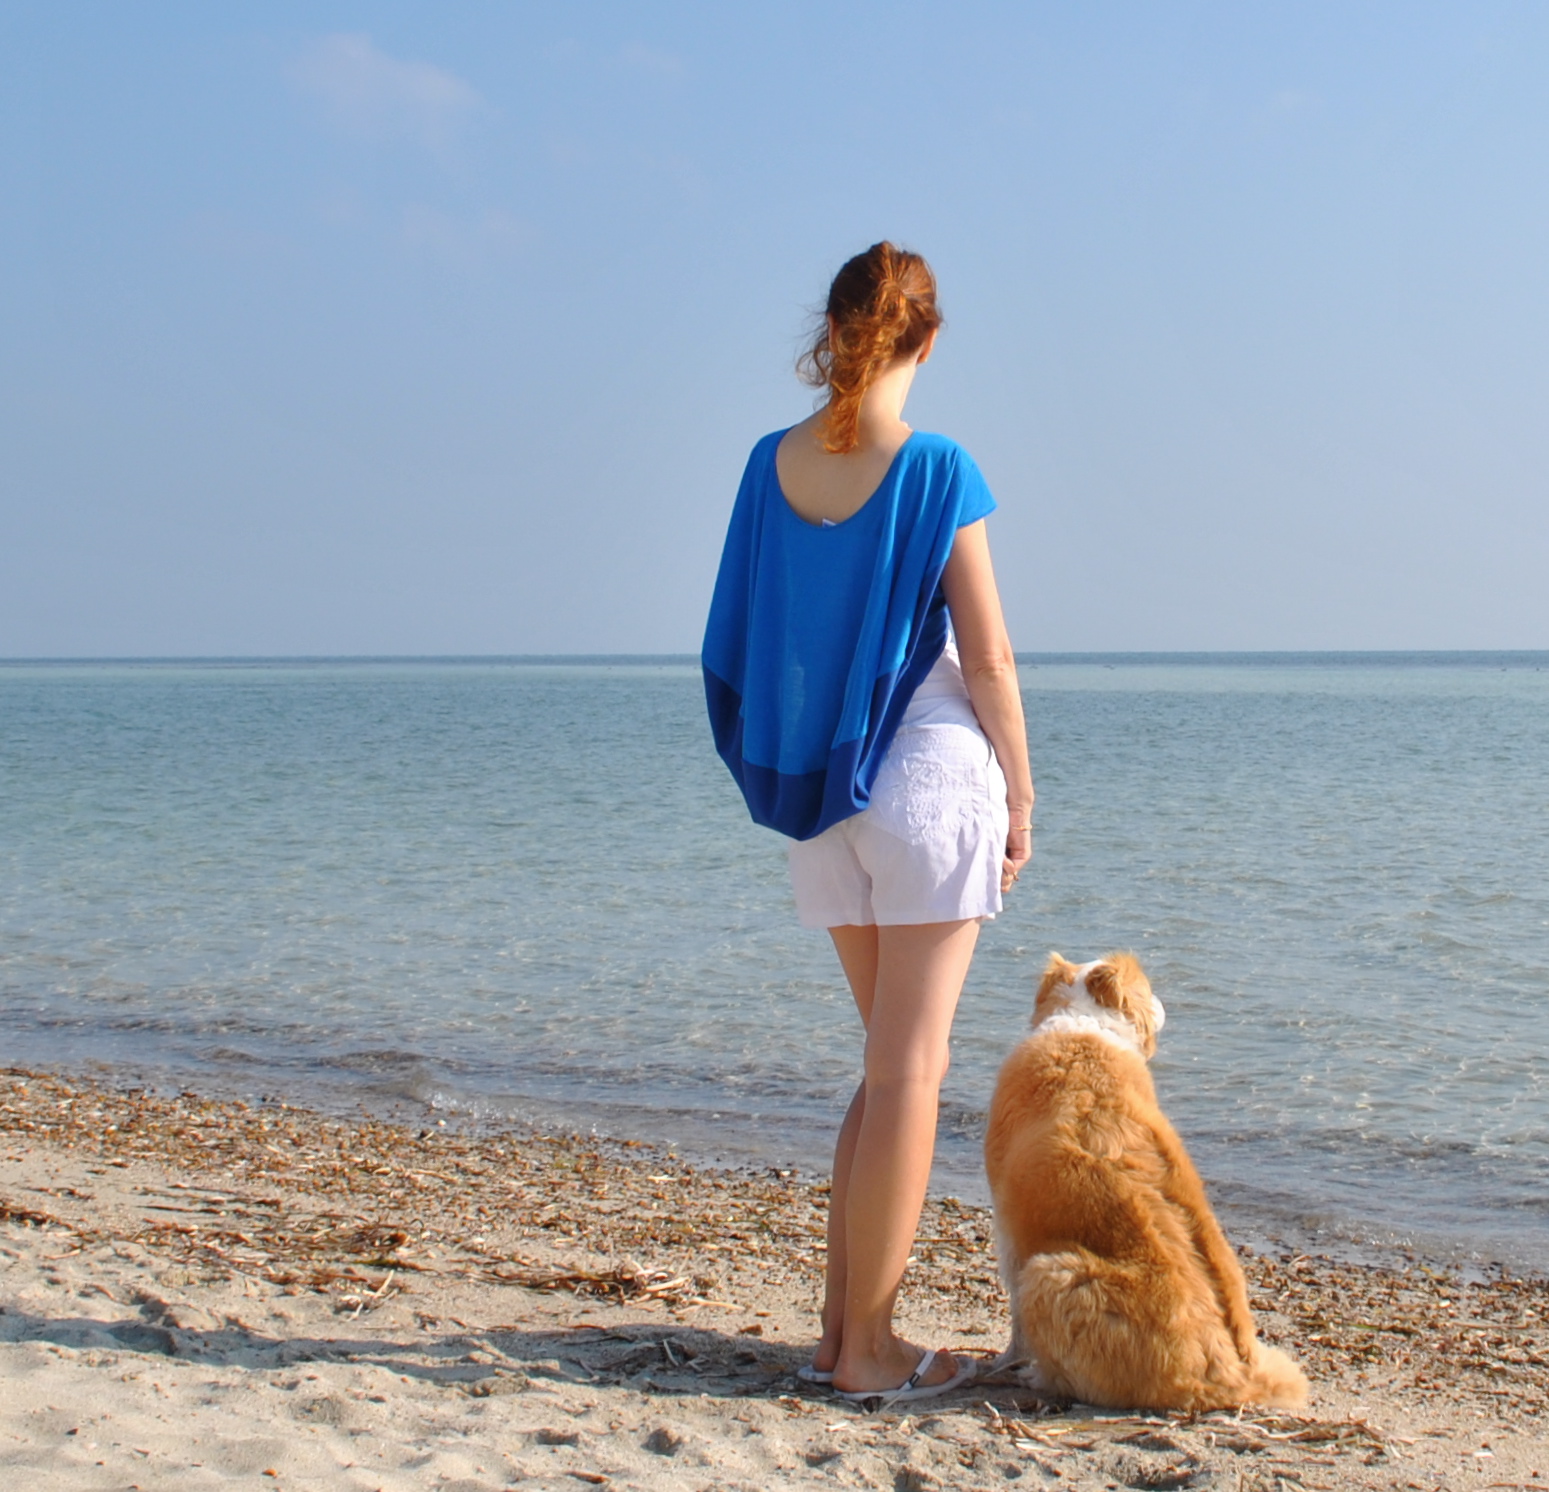
The neckline is finished with a narrow self bias strip…  Noice, no? at right; that convergence of French seams from the inside view

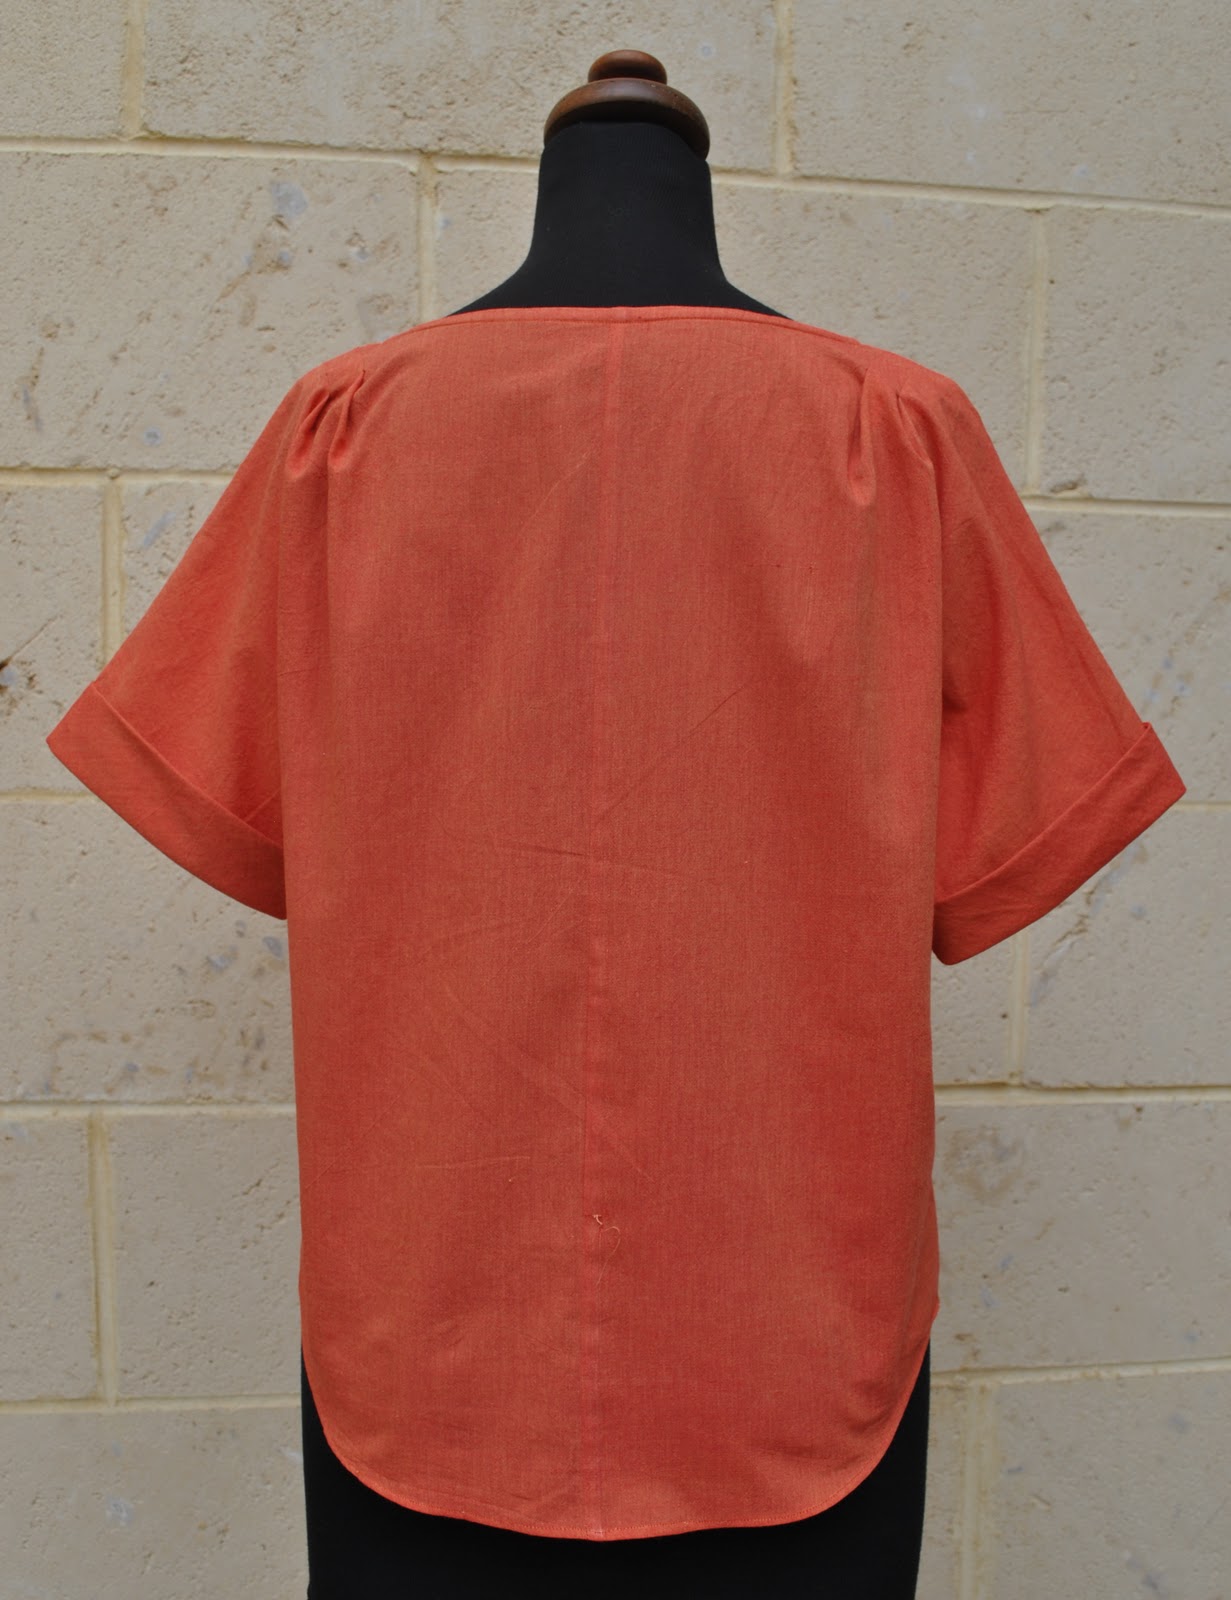
I really like the bias-cut facings, folded out over those kimono sleeves….

Narrow hem…

Since the neckline is quite wide I slip-stitched lingerie holders to the shoulder seams to keep those straps outasight, these were a gift from the very lovely Yoshimi… thank you so  much Yoshimi!

Probably this top would be far more fabudabulous on a lady with.. er, more fabudabulous assets, but I’m still pretty happy with how it looks on me.  I am planning to make the little skirt too, and will review that separately.
Ciao, bambini!

Details:
Top; Vogue 1247, shot cotton in Clementine, from here
Skirt; Vogue 7303 modified, lime print cotton
Sandals; anna, from MarieClaire shoes

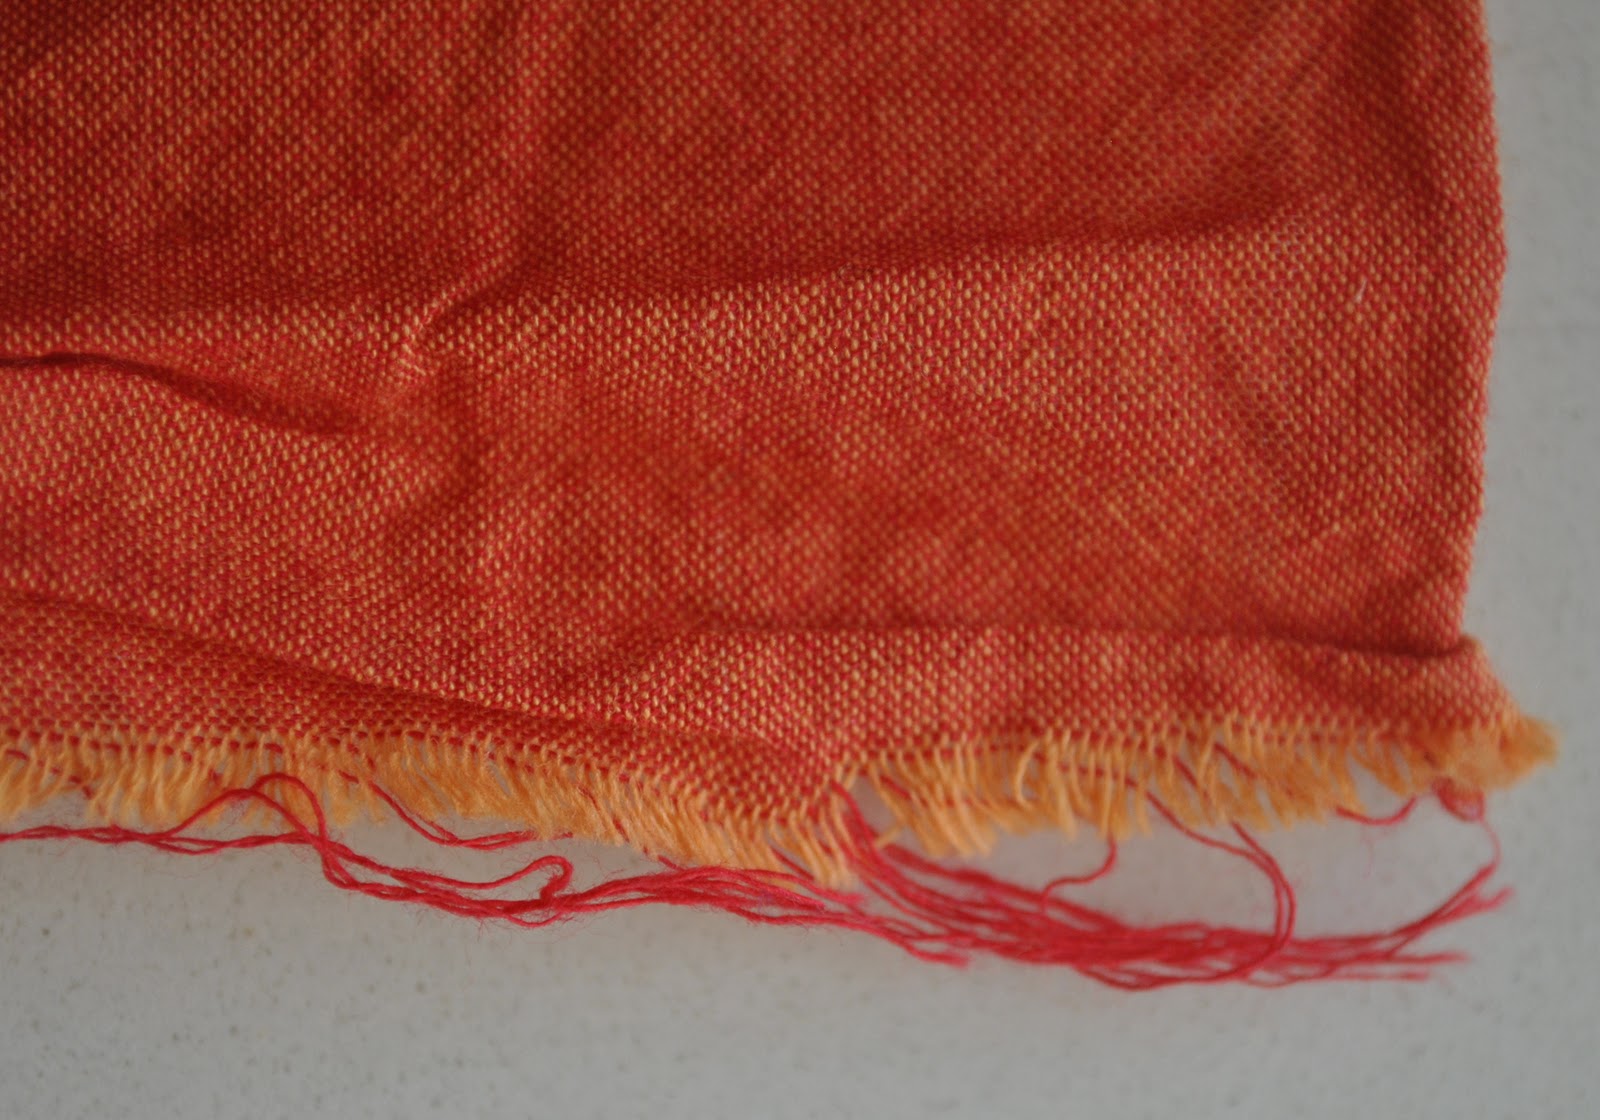
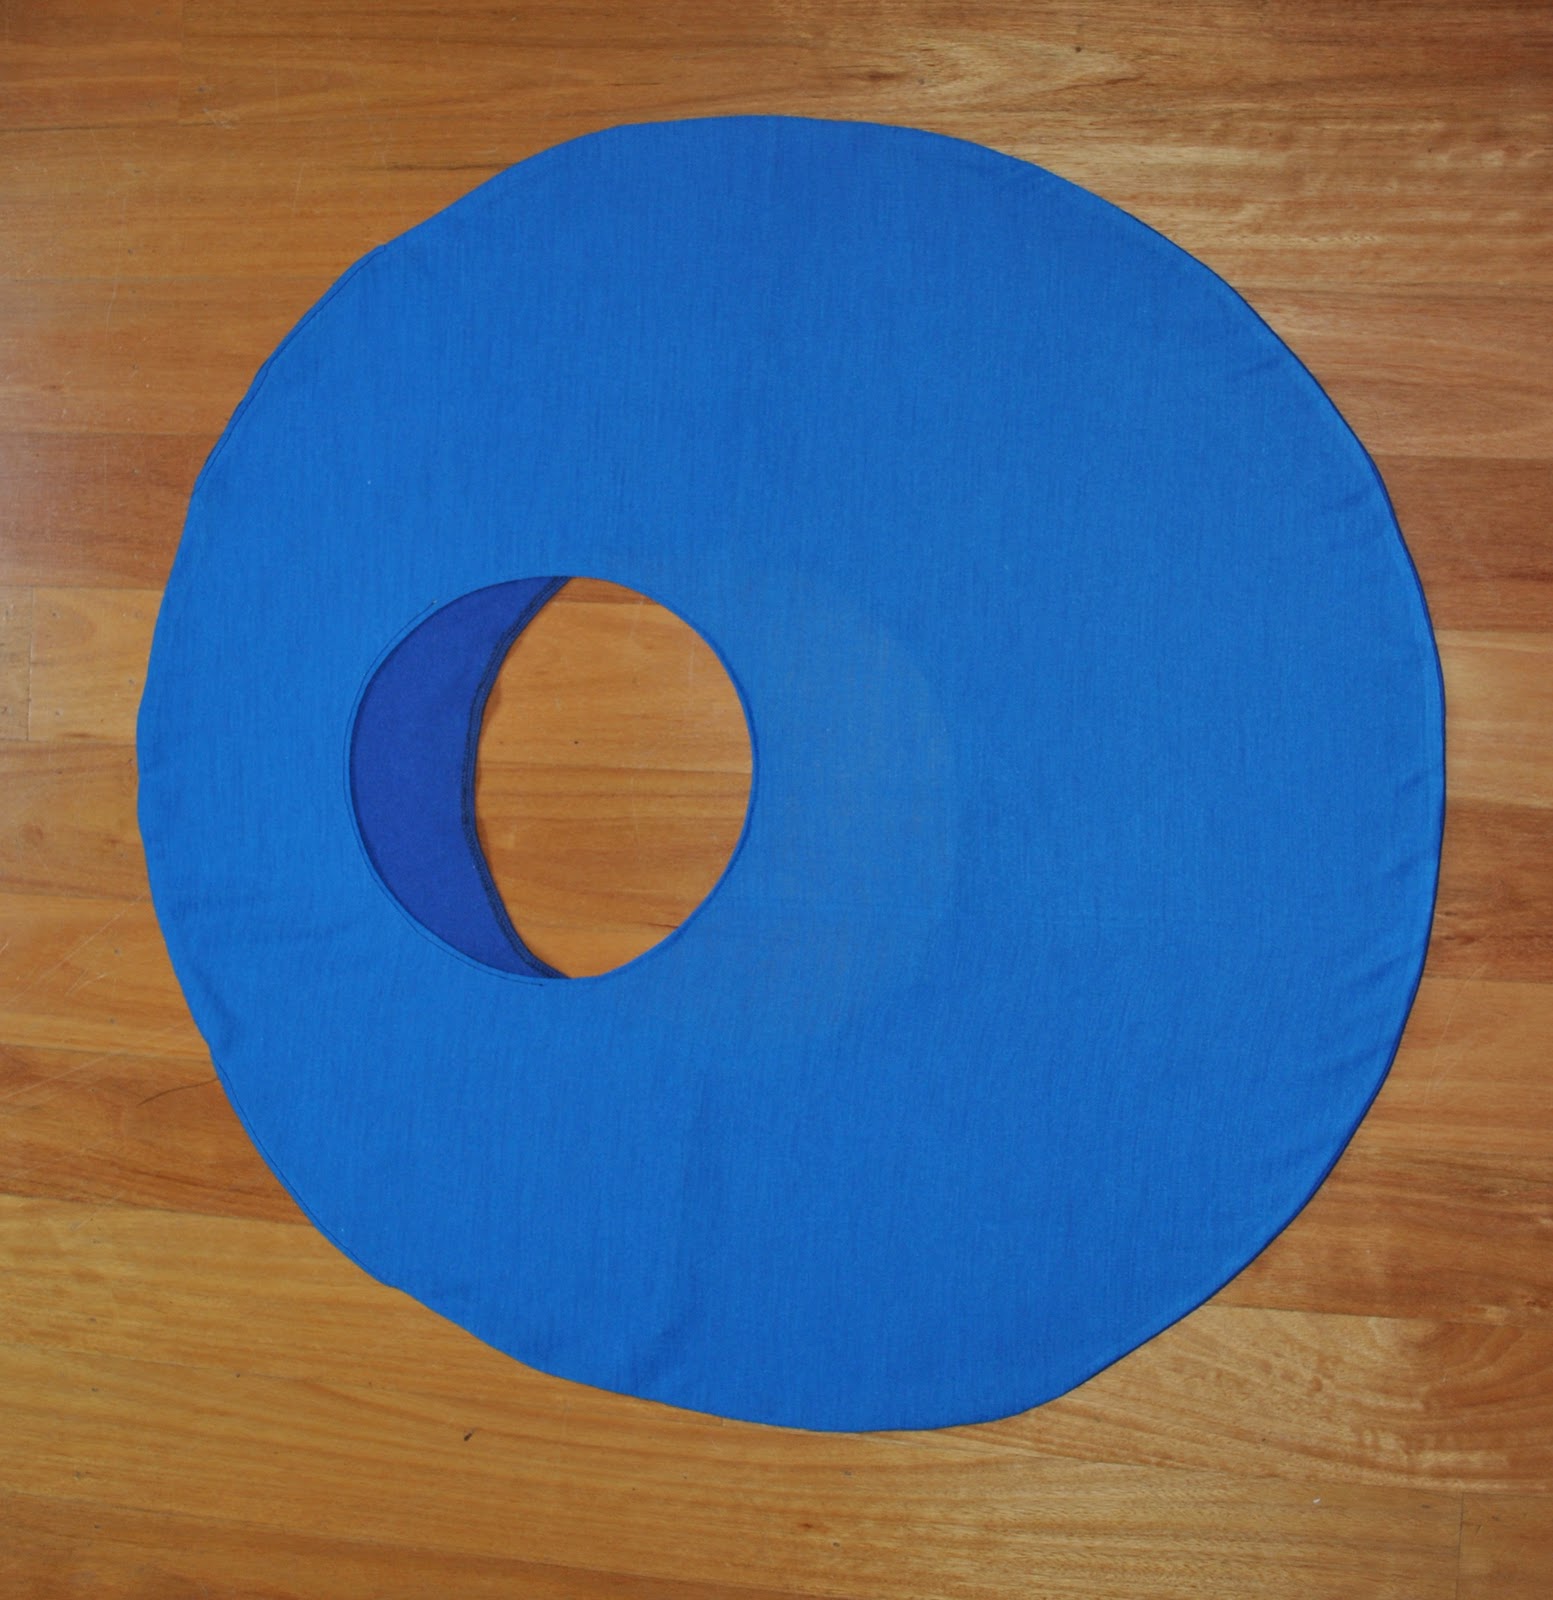
And that colour?  See below the happy marriage of a light pumpkin warp juxtaposed against a truly neon orange weft; giving rise to that beautifully citrus-y iridescence..

Pattern Description:
Very loose-fitting top; wide V-neckline, kimono sleeves with fold-back facings, the body of the top falling softly from shoulder pleats, interesting geometric seaming on the front creating a nice textural feature.
Pattern Sizing:
6-12, I made a straight 10 (Later edit in response to a comment: this is my usual choice, and I would say the sizing runs true to other Vogue patterns I have made up.  It is supposed to be a loose-fitting top!)
Did it look like the photo/drawing on the pattern envelope once you had finished  sewing it?
Yes
Were the instructions easy to follow?
Yes.
What did you particularly like or dislike about the pattern?
I really like the very loose and unstructured shape of this top, and the fact that it will be delightfully floaty and cool for our scorching summers.  It’s pretty easy to make up.  And one just slips it on over one’s head with no closure, making it soft and simple to wear.   The interesting reverse-situation of the bust darts and the convergent seams at the centre front are nice subtle design features, and best showcased in a plain solid-coloured fabric imo.
And since I did choose a plain solid-coloured fabric with no nap this also meant I could lay the pattern pieces down either side up, allowing a far more efficient pattern layout and leaving myself with plenty of leftovers!
Fabric Used:
Lightweight shot cotton
Pattern alterations or any design changes you made:
No alterations.  I added lingerie holders at the shoulder seams; that very wide neckline means strap exposure would be a given otherwise!
Would you sew it again? Would you recommend it to others?
I will like to sew this again  (I always say this and then it could be years before I do! however I would like a few more of these in my wardrobe, if not right this minute then certainly in another colour in another season.  
My only advice is that if you are going down the path of French seams throughout as recommended in the pattern, then a thin and lightweight fabric is essential; all those French seams converging together are quite bulky on the inside, and would be difficult to get nice and neat in anything thick.  Of course you could always leave off the French seam finish on that horizontal central seam if your fabric was not co-operating…
Would I recommend this to others? yes!
 Conclusion:
I love it!  The design of this top strikes me as very fashion-forward.  Something about the spare minimalism of the silhouette, the sharp lines of that geometric seaming, the beautifully drape-y kimono shape.  I could imagine this particular top design on a high fashion catwalk.
pinterestmail

Blue-collar crime

The charge; gratuitously making for myself the same shirt, a second time. Namely the Vogue 1248 triple collared shirt.  Well, how many collars does a girl really need?? (tsk tsk)
No plea entered, as the defendant is so clearly guilty as charged.
Sentenced; to wear it during a humid 37C day and attempt to look cool, calm and collected for a picture.
Verdict for that one; hmmm…  what do you think?
OK, I’ve made another loose ‘n light little triple collared shirt.  Again??  And so soon after the last effort?  I seeeee.   Shouldn’t you be starting on some of those (ahem) piles of other new patterns, awaiting your attention?
Well those three collars were just begging to be constructed in three different colours, no?  I was simply itching to give it a try… and after all that Christmas shirt-making I had just the right selection of leftover scraps to piece together what I envisioned would be a kinda cool look.  Not just tri-coloured collars, but a tri-colour shirt, like allover
I really like this sort of patched look.  The blocks of various blues together reminds me of those refashioned denim jeans garments that you see; made of cutting up and re-patching together old blue denim jeans to give a mixed up patchwork of varying shades of indigo.   It also reminds me a little of another look I admired in Celine pre-fall 2011, below.  Still going with that refashioned denim jeans vibe;  I’ve topstitched all the seams in orange.
The shirt is all shot cotton, bought here.  The left front and right back are Sky, the leftovers from this shirt, and the darker blue sections are True Cobalt, the leftovers from this shirt.  The right front and left back are of a very pale blue named Ice; and technically speaking this might not qualify as a leftover scrap.  I bought this about two years ago with the original intention of making another shirt for Craig, but the very pale baby-blue colour did not find favour… so I have gradually been using it up bit by bit for facing, pocket and lining purposes in other projects, but so far it has not been used in any publicly viewed part of a garment!  I managed to cut the pieces for this shirt out of what is left after all that nibbling.  So, does that make it a leftover, or not??
This cotton is thicker and more robust than the thin voile I used for my first cafe latte version of this shirt pattern, so the collars do not sit as flat together.  But on the other hand, the snaps on those buttonbands feel a lot more secure, and less likely to rip the fabric.  Speaking of the buttonbands; I wanted the third blue fabric to feature here, so the four of them have been constructed as separate wraparound bands that sit up over the body of the shirt.  That took a bit of extra fiddling and measuring, but nothing drastically difficult.

(below right; from Celine pre-fall 2011, source)
All the seaming in the body of the shirt is flat-felled, and the raw edges of the armhole facings have HongKong finishing, using bias strips cut from the Ice shot cotton.

Details:
Shirt; Vogue 1248, different shades of shot cotton, in Ice, Sky and True Cobalt, my review of this pattern here
Skirt; Vogue 1248, cotton voile, my review of this pattern here
Thongs; ??  crappy blue and white rubber things nicked from my son’s wardrobe.  I think he must have grown out of these years ago… 

pinterestmail

Blue bunches top; 6 different ways

I thought this little top, from p58 of “Pattern Magic 3” by Tomoko Nakamichi (seen first here), might be a versatile little thing from the very first, since I tried wearing it both frontwards and backwards and it looked equally OK both ways…  And then I started playing around with it and found that it could literally be worn in six different ways, and I don’t just mean jamming it randomly into six different outfits!  although I did put together six different outfits too….  just because it is fun, y’know  ðŸ™‚

At left; the top worn in its intended form as it appears in the pattern book, that is with the round neck and ties (or “bunches” as I think of them) at the front, and the V-neck at the back…… And at right I am wearing it back-to-front and with the V-neck at the front and the ties hanging down at the back.  Oh, I know the details are covered up some in this picture but well I had to throw in just one slightly winter-y option into the mix!   And really I’m just trying to show how the top is all-seasonal, layering with light cardis during the cooler months too… (if you want to see this “way” fully and without a scarf and cardi over the top it is shown better here)

Also, the bits that form the “bunches” can be taken out and folded down against the body, and then the top can be tucked into a high-waisted garment.  This way it just looks like an ordinary little plain tank top.  I dunno if it is just me but I do think the round-neck at the front (at left) is a tad more dressy while the V-neck looks more casual.

Lastly, those “bunch bits” can be left loose and free, and the top takes on even more different and interesting shapes.   Again, I think the V-neck and the longer length at the front (on the right) is somehow a more casual look.

Interesting, huh?  Who would have thought that one little top could work in so many ways?
Oh, what am I wearing today?  I am wearing the fifth outfit; “all out” and with the round neck and shorter length at the front (just above, and on the left)  I reckon it looks pretty funky like this too…
Which “way” do you like the best?

pinterestmail

Dreaming, of chocolate

Y’know how you see some patterns, and you’re like, oh so easy!! but you go ahead and buy or trace-out or copy-as-exactly-as-possible anyway?  
That’s how I felt with this Tshirt pattern; top 106 from Burdastyle magazine 06/2011.  I just liked the shape of it, exactly as it appeared in the magazine; the subtle kimono sleeve, the boxy looseness of it.  So I hauled out the ol’ tracing stuff and spread out the sheets and traced out this very very basic Tshirt/dress (you can make it a bit longer, and surprise! it is a dress! in true Burda magazine style, they elongate top patterns and give it a different number, making out it is a whole new pattern) even though all the while wondering that there was really nothing to it and maybe I was wasting my time and my tracing plastic.  And my final thought; there really is nothing to it!  Too easy!
However; made up, I am still enamoured of the cute shape and the very easy-to-wear and flattering kimono-sleeve.  I will make this top up again, and properly next time.  Because I admit it, this particular example is far from… well, gorgeous.  To be honest, I think it is soon to become my bed-time attire, … woooh, such a glamour puss, no?!  
But, here is my reasoning … remember this sundress? (below right)  It has been a hot weather staple for quite a few years and I have finally bid it adieu.  The zip pull was finally paintless, the straps had come adrift and been reattached with zig-zagging (discreet, but still unacceptably visible upon close inspection) a couple of times each, and the fabric is … old.  I eventually realised it was not doing me any favours at all…  But I still loooovee this colour, and there was plenty of fabric in the dress.  
The thing with using old fabric for making new clothes is that; well obviously you are using old, and worn, and many times washed fabric, and usually that all shows and not to advantage either!  Old fabric gets thin, stretched and mis-shapen in some parts of a garment and not others, and so has limited application for smart new items.  But I still like to use old textiles as much as possible, saving the planet and so on and so on.  Assuages the guilt of my eco-conscience, if you like.
The neckline of this Tshirt here is slightly higher and not-as-sharply-V as the pattern, and instead of facings for which surprisingly there was not enough fabric, I made bias strips to finish the neckline and sleeve edges.  Since the original dress was cut on the bias, so the Tshirt is too.  And it is a little shorter than the pattern stipulates, again due to fabric shortage.  And even though this is just going to be a jammie top, the shoulder seams are flat-felled and the side seams are French seams.  Well, one may as well practise where one can, right?
Y’like?

Details:
Top; Burdastyle magazine 06/2011, 106 modified slightly, chocolate brown bobbled and embroidered cotton, a refashion of a sundress also originally made by me
Trousers; (hmmm, these are getting pretty old too…) self-drafted, based on a pair of old jeans, of white linen, details here

pinterestmail

Crescent moon

Now my new little top here is a very quick and easy, yet still interesting design.  And like all the designs from the Pattern Magic series; very very clever too, and another example of a “why hasn’t anyone thought of this before” sort of a garment.  This one from Pattern Magic 3, by Tomoko Nakamichi.
The names of the designs are so interesting, are they not?  Some of them are so full of imagery and poetry.  Like this one for instance.  When the garment is laid flat you can see at once the inspiration for its moniker.  Crescent moon.  How clever and beautiful.  Just typical of Japanese design and their artistic sensibility towards shapes and images in nature; a concept I really relate to.
For this I used some more of the leftover jersey scraps from the bundle given to me by my friend C, from her late mother’s stash.  I had to cut and join the darker blue fabric to get a piece large enough, but that is OK since it is the bottom layer and the seam just looks like an underarm side seam whilst you are wearing it.  To finish; the raw edges were overlocked, turned under once, and topstitched down from the outside.
I love the way that when you are wearing it, from the front it just looks like you are wearing a rather ordinary cropped little Tshirt, with maybe just the stripe as its lone interesting feature.  However as one turns around, it transpires one is wearing an elegant little draped cape, with a flattering, widely scooped back neckline.
And since capes are “in”, albeit for the northern autumn/winter scene right now, I’m serendipitously fashionable too.  In a summery southern hemisphere sort of a way…
Rather chic, yes?

Details:
Top; from Pattern Magic 3 by Tomoko Nakamichi, two different colours of cotton jersey scraps
Shorts; Burda 7723, white linen, details here
Camisole (underneath); Country Road
Thongs; Mountain Designs

pinterestmail

Bamboo shoot

…that is the name of this top; my latest foray into Pattern Magic, by Tomoko Nakamichi.
The folds/tucks on the front of the design are like the new shoots on bamboo, spraying out to each side in graduated offset arcs.
I chose to make this design into a little top with short cap sleeves, a buttoned up back, and a wide loose waist band; necessarily a shortish top because of the constraints of my fabric.  Yup, I was using up scraps, as per usual!  From this linen shirt I made for Craig… (I know it may seem like most of my clothes are made from scraps, and I have to admit a fair whack of them are!  The thing is, I loathe waste with a passion…  and have been known to hoard scraps for years…. hehe.  Some day I will have to round up in one post the projects I have made, purely from scraps)  
Anyhoo;
I like this style of blouse, it brings back strong memories to me of the blouses we used to wear in our winter school uniform, over our plaid wool skirts.  Except our school blouses had a collar and were buttoned up at the front, naturally.  This top is quite loose, so I can leave all the buttons done up except the top one and slip it over my head.  This means only the top button needs doing up behind my neck, which is good, since I discovered that doing up that middle button requires a solid command of yoga…  And about that; I’m thinking it is about time some new moves were introduced into the Yoga repertoire along with saluting the sun, and the down dog and all that; may I suggest “lady doing up her back buttons/zip”?  I think that would be a pretty useful new move, yes?
The  neckline is faced, the side and shoulder seams are flat-felled, and the armhole seam allowances are finished with HongKong seaming.  The buttons are the little shell buttons that I bought in Tokyo, whilst out shopping with Yoshimi, Novita and my daughter Cassie, so I felt it was quite right that I use Japanese buttons for a Japanese designed garment.  Fitting, yes?  The buttonholes on the button band are vertically aligned, whilst the buttonholes on the waist band are horizontally aligned, this is a little feature that I recalled from my old school blouses, and wanted to have it in this blouse too.
The darts/folds were a little tricky.  In the photograph in the book, it doesn’t look as if there is any stitching yet, but just folded in place.  When I first stitched mine in place they didn’t look nearly as nice… so I unpicked and re-stitched and pressed them one by one, slightly inside their seam allowance,  so the stitching is hidden just inside the fold, about 3mm.  This seemed to do the trick, and looks more like the picture in the book.

Details:
Top; based on the “bamboo shoot” design in Pattern Magic, by Tomoko Nakamichi, finished blouse of my own design, white linen
Skirt; skirt “m” from Unique Clothes Any Way You Like, by Natsuno Hiraiwa, pink linen/cotton, details here
Shoes; Bronx, from Zomp shoes

So, with regard to the Pattern Magic series, I have some further comments it might be worth noting here for others wishing to make use of these excellent and very innovative design books… I have made up a few designs from all three books now and in my opinion the third book has by far the easiest projects; being both very easy to fit (they’re all stretch-knit, and really, who can’t fudge fit a stretch?) and also that they are all in the form of complete and finished garments.
A lot of the designs in the first book are in the form of design concepts, a fabric manipulation “idea” that one can take and build on; apply to some nebulous garment, the exact form of which is entirely up to the individual.  I like this flexibility, but it does take extra thought and some dressmaking experience to self-draft those little extras that are needed to get yourself a finished and wearable item.  For example, take the sleeves on my new top here… the Pattern Magic book does have dimensions for a sleeve sloper to get you started.  I discovered in my very early experiments in this book that the sleeve needed tonnes of adjusting to make it work for me.  Eventually abandoned the given sloper and made my own (the one I used here) based on the measurements of my bodice sloper and partly on sleeves in patterns I already had.  I found that the one in the book had a very shallow sleeve cap, that was like a straitjacket on my ginormously hefty arms … Actually I’m joking there.  I’m not hefty by Australian standards at all, but when I am working with Japanese patterns I often feel a bit, er, well huge… by comparison.  Let me put it this way, when I am tracing the designs from Unique Clothes Any Way You Like, by Natsuno Hiraiwa, I use the largest size, whereas in Vogue patterns I am a 10, and even then I always take in several centimetres off the waist.
Don’t get me wrong, this is not a complaint about the books!  I love these Japanese pattern books with a passion, they are completely without parallel in the pattern world and I just wish more of our “ordinary” patterns would take note and branch out a bit.  Get out of that rut.  Just thought I would say more about my experiences here in the hope it helps anyone else wishing to make something out of these excellent books.

pinterestmail
Switch to mobile version
↓