Monthly Archives: April 2010

You are browsing the site archives by month.

Orange and khaki combo

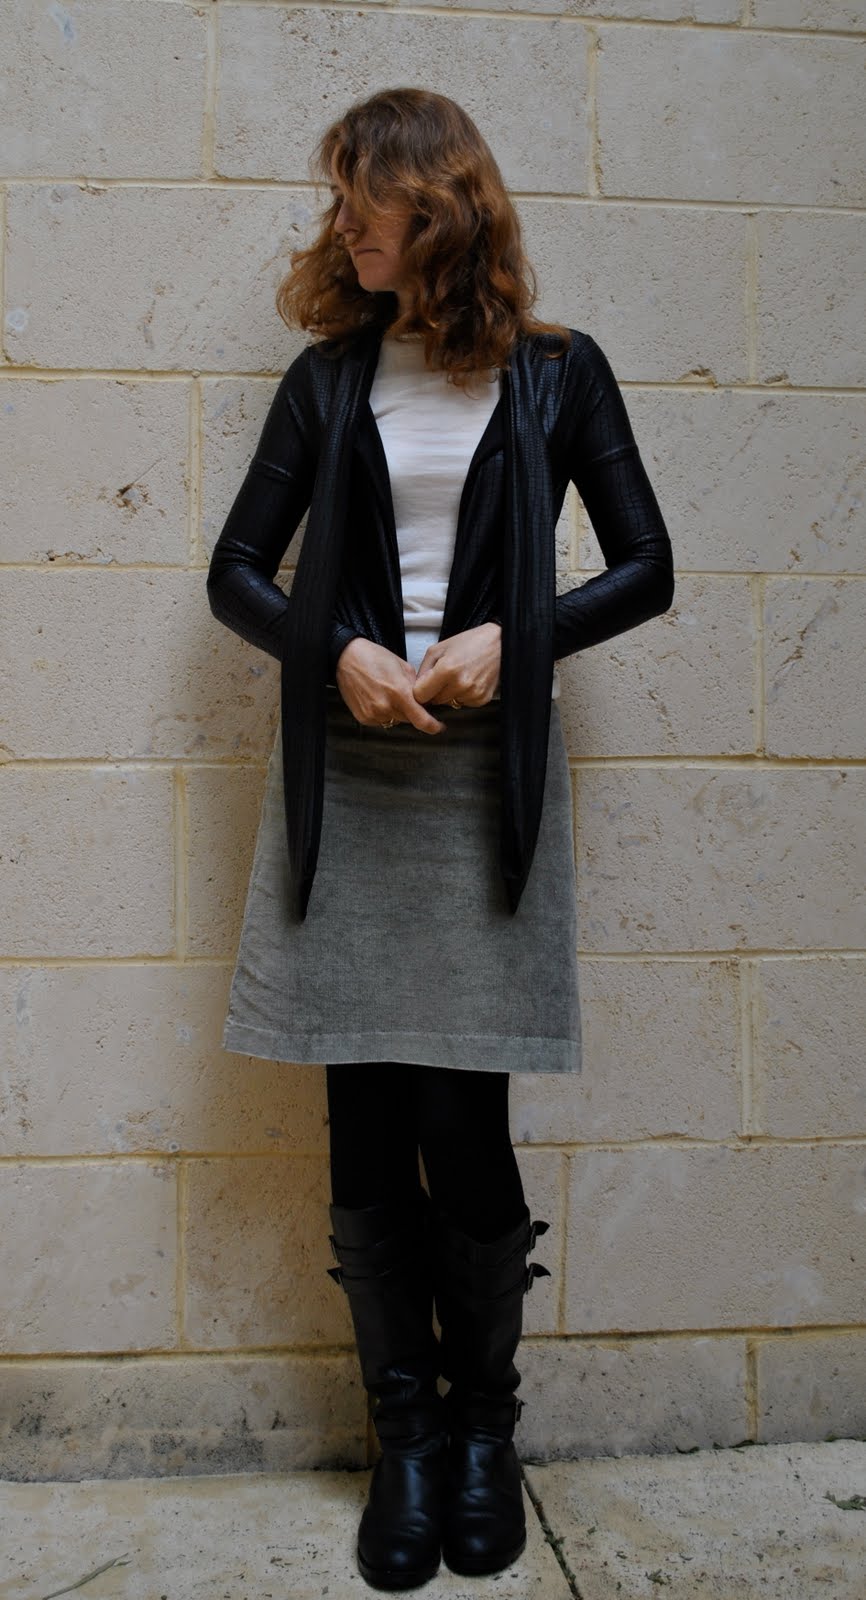
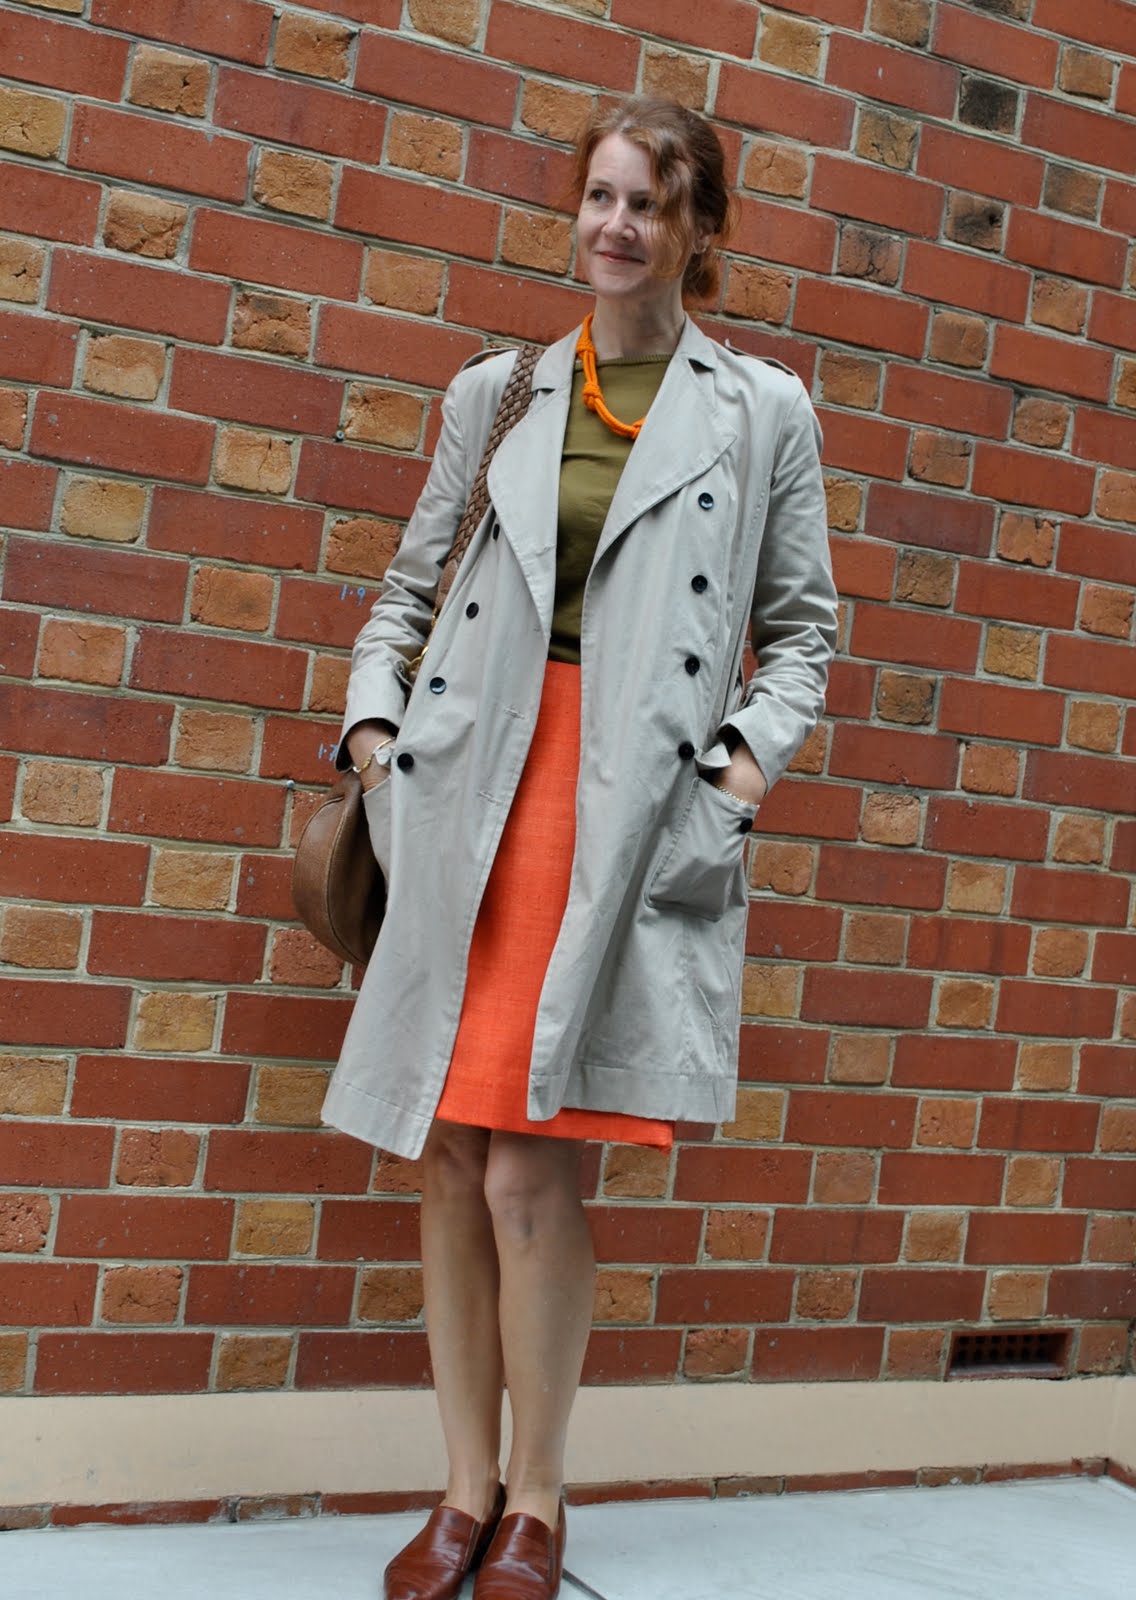
Went into the city this morning with my daughter, and since it was a bit blustery I leapt at the opportunity to wear my trench coat… and am excited about wearing it a lot since it was so comfortable and cosy.  Crazily, I went through my wardrobe for ages this morning, unable to decide what to put on.  My husband laughs incredulously when I tell him stuff like that… “But you’ve got so many clothes!”  yes, but I still wail about having nothing to wear on a regular basis.  Ridiculous, I know.  Perhaps it’s time for a clean-out.
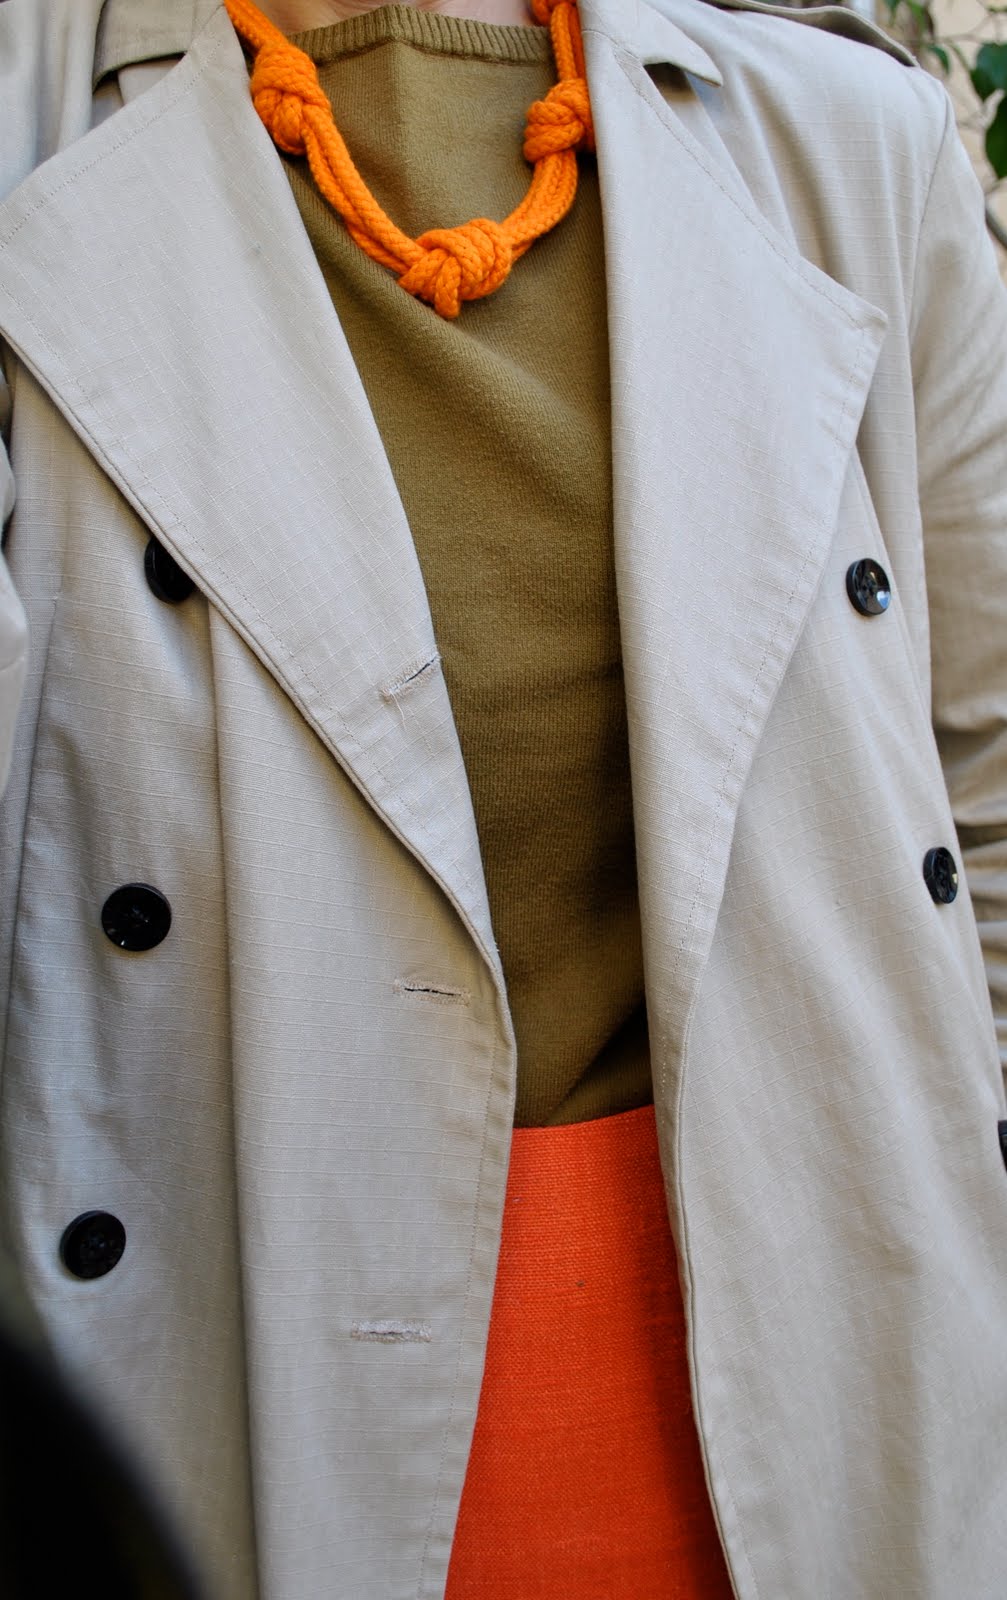
I’m particularly happy with the colours of my outfit today; yeah, it was inevitable that my new knotted necklace would get worn at some time with my burnt orange skirt.  I love this combination of orange with khaki and beige.  My mother has been telling me to wear colours like these for years.  They remind me a little of the outfits that men who like to hunt wear in the US; they would be all decked out in their camouflage gear, but with a neon orange vest on the top.  I was told the orange vest was so they wouldn’t inadvertently shoot each other whilst hunting.  But then why the camouflage, I wondered?  Kind of hilarious, when you think about it…
This little olive top I’m wearing I’ve had for about ten years.  It’s getting a bit thin and mis-shapen and a few times I’ve contemplated tossing it into the Salvos pile, but I’ve kept hanging on to it because of its colour.
My daughter took this photo and the reason I look so peculiar is I’m dying of embarrassment that someone is going to come around the corner of Wesley Church (the lovely brick backdrop) and see us; I loathe people seeing me have my photo taken… I’m too shy and need to be alone.
The other photos I took today I’m keeping for tomorrow; I have some interesting sewing-related observations on famous couture to talk about, but enough from me for now and I’ll be back with more later…

Details:
Trench coat; Burda 7786 modified to be double breasted, stone cotton
Top; Cue, had for about ten years
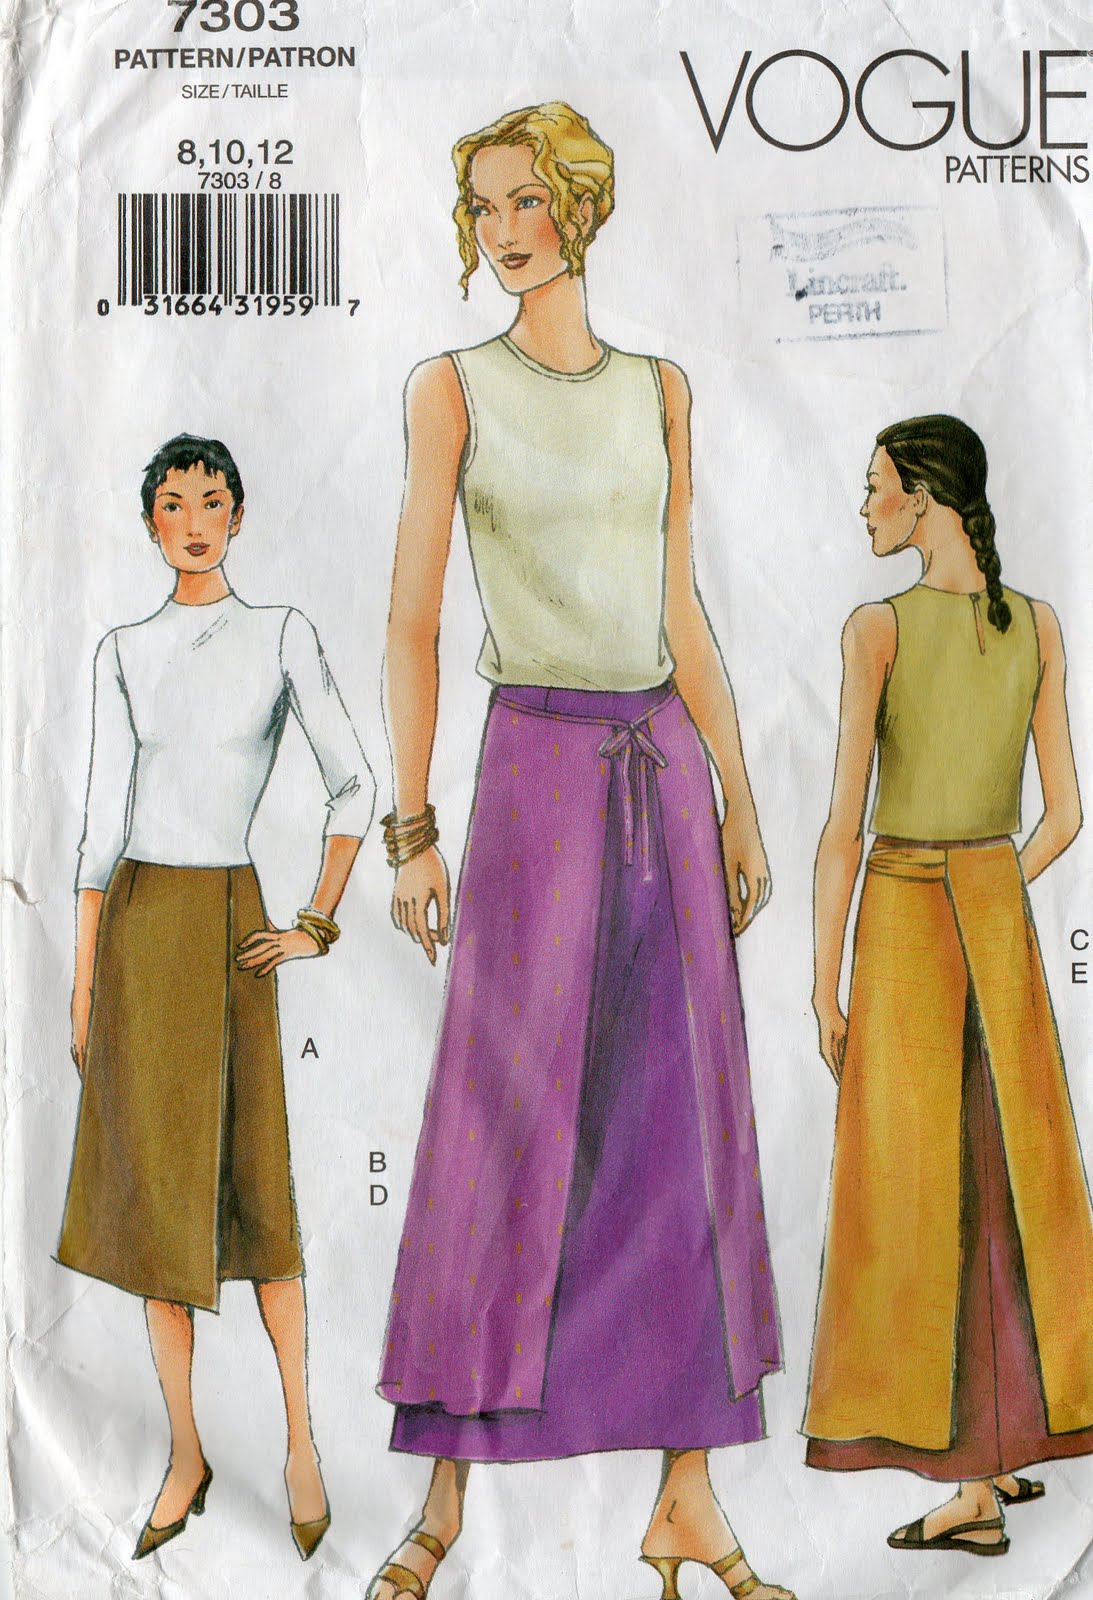
Skirt; Vogue 7303, burnt orange silk hessian
Necklace; made by me
Shoes; Betts & Betts Brazilian collection, had these for about twenty years
Bag; Gucci

pinterestmail

Polyvore

Fashion should be fun!  And Polyvore is one place that is for sure injecting a whole heap of fun back into fashion.  I read about this on one of my favourite blogs, Ann.  So I sashayed over (in an internet sense) to check it out.  Wooee!  And Ann did warn us in all fairness; this is a seriously addictive site!  I’m going to have to set a limit on myself here…

I made up an outfit that in a dream world I would wear out to a casual lunch with my gal pals.  In reality I own no clothes that look anything like these items.  Apart from maybe the grey marle camisole, the most boring and basic item.  But a girl can still dream!  Also … in reality, I like to make my own clothes and have no intention of buying any of these garments.  I only buy ready-made once in a blue moon, usually from the same few local shops or as souvenirs from a holiday.  And I find my inspiration from high end fashion shoots mostly, or stylish people I see on the streets, rarely from RTW internet shops which I pretty much never look at.  I’m only interested in other seamstress’ blogs etc on the internet.  But, for a commit-free fashion play-time, this site has sucked me in, big time.
When I was randomly selecting and rejecting these virtual items to go into this little virtual ensemble I felt the artistic excitement a stylist must feel, when faced with piles of endlessly beautiful clothes with which you get to play with to put together “looks” for a fashion shoot; you can go for as beautiful, as colourful, as wacky, as goth, as elegant or as twisted as you choose.  You can really go to town here and play dress-ups to your heart’s content.  What’s not to like?  Check it out and enjoy!

pinterestmail

“Black-adder” cardigan

I finished this cardigan just before we set out on our trek but didn’t get time to do a post about it.
Do you remember me mentioning some rubber/plastic coated jersey knit, stamped in a kind of scaly print that I thought would be ideal to finish off my python print satin outfit, but it wasn’t?  (I know, shocking grammar, there has to be a better way of phrasing that…)  Gorgeous and unusual fabric, fell in love with it at first sight.  A tough-but-still-chic-looking leather alternative to satisfy even the most ardent PETA supporter.  I think I’ll be wearing it a lot this autumn/winter!
Ultimately this was a very easy project, sewn together completely on my overlocker and took all of about twenty minutes to put together once cut out.  I didn’t think to take any “during” photos, but I’ll provide a few construction details in case anyone wishes to reproduce this one for themselves.
So I had 70cm of this stuff and decided to make a little cardigan out of it.  I took one of my existing cardigans which I like the shape of, laid it flat and smooth as possible onto paper and drew respectively around its back, front and sleeve, adding a 1cm seam allowance.  

When I tried to lay these out on my fabric the fun began and I had to have a good long think about what was possible.  There really wasn’t enough fabric to make a full length cardigan, so there was compromise.  This end result is proof that even if you don’t have quite enough fabric to fit your vision, if you are determined and persevere and think outside the box about using all your fabric to best effect, you can still have a good outcome.  And I was determined…!
The body pieces had to be cut shorter to about waist-length.  Paradoxically this still left plenty of long strips on the edges, so I used these for the waistband, sleeve bindings, and also to add a long collar/front tie to the neckline.  I didn’t use pattern pieces for these strips, just measured myself, pinned and adlibbed.
The wrist bands are made by serging your wrist strip along its short edge into a tube.  Fold this in half wrong sides together around the circular middle of the tube.  Pin to the right side of your sewn-together sleeve and serge around the raw edges.

The waistband strip is folded in half along its long axis wrong sides together, likewise pinned to the right side of the bottom edge and raw edges simply serged together.  My waistband strip wasn’t quite long enough for proper squared edges, so I sewed the ends on a narrowing curve as they ended at the front edges, and I really like the look of how this turned out.  I got the idea for this from one of my Metalicus cardigans.

The raw edges of the fronts and the long tie collar posed their own finishing problem.  No finish seemed to look right: visible serged edges looked a bit unprofessional; topstitching looked horrendous and my ordinary machine hated the rubbery plastic finish, it kept sticking in the machine; rolled and hand-sewn edges wouldn’t have worked because this fabric does not crease or fold.  So eventually I unearthed a bit of leftover black silk jersey (leftover from this dress, made about five years ago, yes, I often keep scraps that long!!)
I had just enough to cut out two front pieces and a strip the same length as my neck piece (er, the same length once I pieced together three smaller strips, that is).  Sewing these to their corresponding fashion fabric pieces right sides together at the edges, turning right side out, then treating as one piece seemed to do the trick nicely.  I apologise that they look a bit cat-hair-y in this photo.  I did say the fabric had been sitting around a while…!  And you can probably make out the selvedge holes along the edge of the silk jersey, I really did have only just enough fabric!  Yeah, I could have bought a bit more fabric, but by now I was on a minimal-wastage mission…

And so my new cardigan.  Today has brought a tiny taste of winter to Perth (thank goodness we had fabulous weather for out trek!), so I’m dressing a bit wintery-like.

Details:
Cardigan; own design, scale print jersey knit
Top; Ezibuy
Skirt; Vogue 7303, olive green corduroy
Leggings; Metalicus
Boots; Sunday, Andrea & Joen, from Uggys in Dunsborough

pinterestmail

AT (After Trek) update

I’m back from our “holiday”!  I’ve just looked at my last post BT (before trek) and noticed that I wrote we were trekking 120km.    120km?  How disgracefully inaccurate.  The correct and official distance of the Cape to Cape is 134.5km.  That extra 14.5km is not to be dismissed lightly.  Particularly not if it counts as some of the very long, very soft sandy beaches and very steep sandy dunes we scaled.  Or the very rocky stretches of coast, which have one leaping gazelle-like (ha ha!) from boulder to boulder.  Or the very steep hills leading to the tops of, like, every potential lookout, heaven forbid we should miss out on even one scenic outlook, no, no skirting about bases of hills for this trek, each and every elevation simply must be scaled, yessirree.  All of this with 16kg backpacks on our backs.  Yeah.
I do love camping.  I planned our meals down to the nth degree and I’m happy to say we walked into Dunsborough having just consumed our last morsel, pretty much.  (Dunsborough?  Oh yeah, we did the trek back-to-front, starting at Augusta and finishing at Dunsborough!  Not that that makes any difference…)
If I’m honest there were times we questioned our sanity in doing this trek, but it’s also true that we now feel on top of the world that we have done it.  I feel fitter and stronger than I have in a long time.  It was the biggest physical challenge I’ve faced in my life, but we are both so proud of ourselves and so happy that we met the challenge and were equal to it.
On top of that we were privileged to walk through some of the most beautiful scenery imaginable.  Pristine white beaches, piles of huge rust-red boulders scattered together like an abandoned giant-child’s marble game, tall forests of fresh, green coolness, fields of blackened tree trunks adorned with new green foliage after a bushfire…  And 99.9% of the time we had it all to ourselves with not another soul in sight.  Each day we came across no more than a handful of people, tops.  Not counting the three towns of Prevelly, Gracetown and Yallingup that is, and even they were very quiet considering it was the school holidays.  We wondered where everyone was, whether people now all go to Bali for their holidays…
Anyhoo, I apologise for the general holiday ranting and rambling and lack of hand-makingness about this post.  Just a few, hopefully non-boring photos (lots of people hate holiday snaps with a passion so I promise not to force heaps and heaps upon you)  There is a tiny element of “handmade” in my past week.  The shorts I’m wearing here are my gabardine shorts re-fashioned from my daughter’s old charcoal puff-skirt first posted about here.  I’m pleased they have proved themselves to be tough and practical.
Back to normal posting tomorrow.  I’ve noticed that while I was out of internet action Wardrobe Refashion has proposed some big changes!  I wonder how this is going to pan out…?
pinterestmail

Easter sojourn

Hey peeps!
No photo today…  This is a quick note that we are off on a trek for a week and I’ll be away from my blog.  In fact away from all electronic stimuli, totally, 100%.  Yippee!!
We’ll be walking the Cape to Cape walk, which is 120km up the south west coast of Western Australia, carrying our own tent and all our own food etc.  Needless to say I won’t be wearing any jazzy clothes or high heels!!
I’ll be back to civilisation by next weekend, and back to normal hand-making business…  I’m already looking forward to seeing what all of you create.

Happy Easter everyone, and wishing you all a safe and pleasant weekend with your loved ones. 

pinterestmail

Menswear; linen shirt no. 3

Here is my husband’s new shirt.  It was made using Burda 7767 (again, such a great pattern!) with the fit variations I perfected making the last shirt.  I altered the collar size slightly; the pattern comes with three collar variations and this one is midway between the two smaller options.  I also rounded the pocket and added a pointy arrowhead collar flap.  The other day I saw a man’s shirt with a single welt pocket and a button with a tiny fabric loop; it looked really cool and I’ve filed it away for a future shirt…
The double topstitching here has a slightly different gap this time.  I’m super happy with my topstitching in this version, it’s as close to perfect as I can get it.  Topstitching is a real meditative process; you’re hunched over the machine, eyeballing your first row of stitching and just mentally gauging and controlling that second row at an dead even gap…. almost as good as yoga.  Except yoga you’re supposed to be concentrating on nothing.  And with topstitching you’re full-on concentrating.  OK, not quite the same.  But it’s still kind of the same outcome, a calm stillness in which all other stimuli is blocked out.
Hmm, sewing as a therapeutic meditative tool; yeah, moving right along…
I used linen, part of the batch that I bought online a few months ago.  I chose caramel brown contrasting thread and blotchy brown and cream, tortoise-shelly like buttons as a contrast.  I just love brown and blue together.  I think he will be able to wear this shirt as a business shirt, because it’s linen and quite classical in its detailing, but it will still look fine as a casual shirt, because of the colour; sort of reminiscent of the classic Levi’s chambray shirts.

Details:
Shirt; Burda 7767 with minor variations, mid-weight “crown blue” linen

pinterestmail
Switch to mobile version
↓