
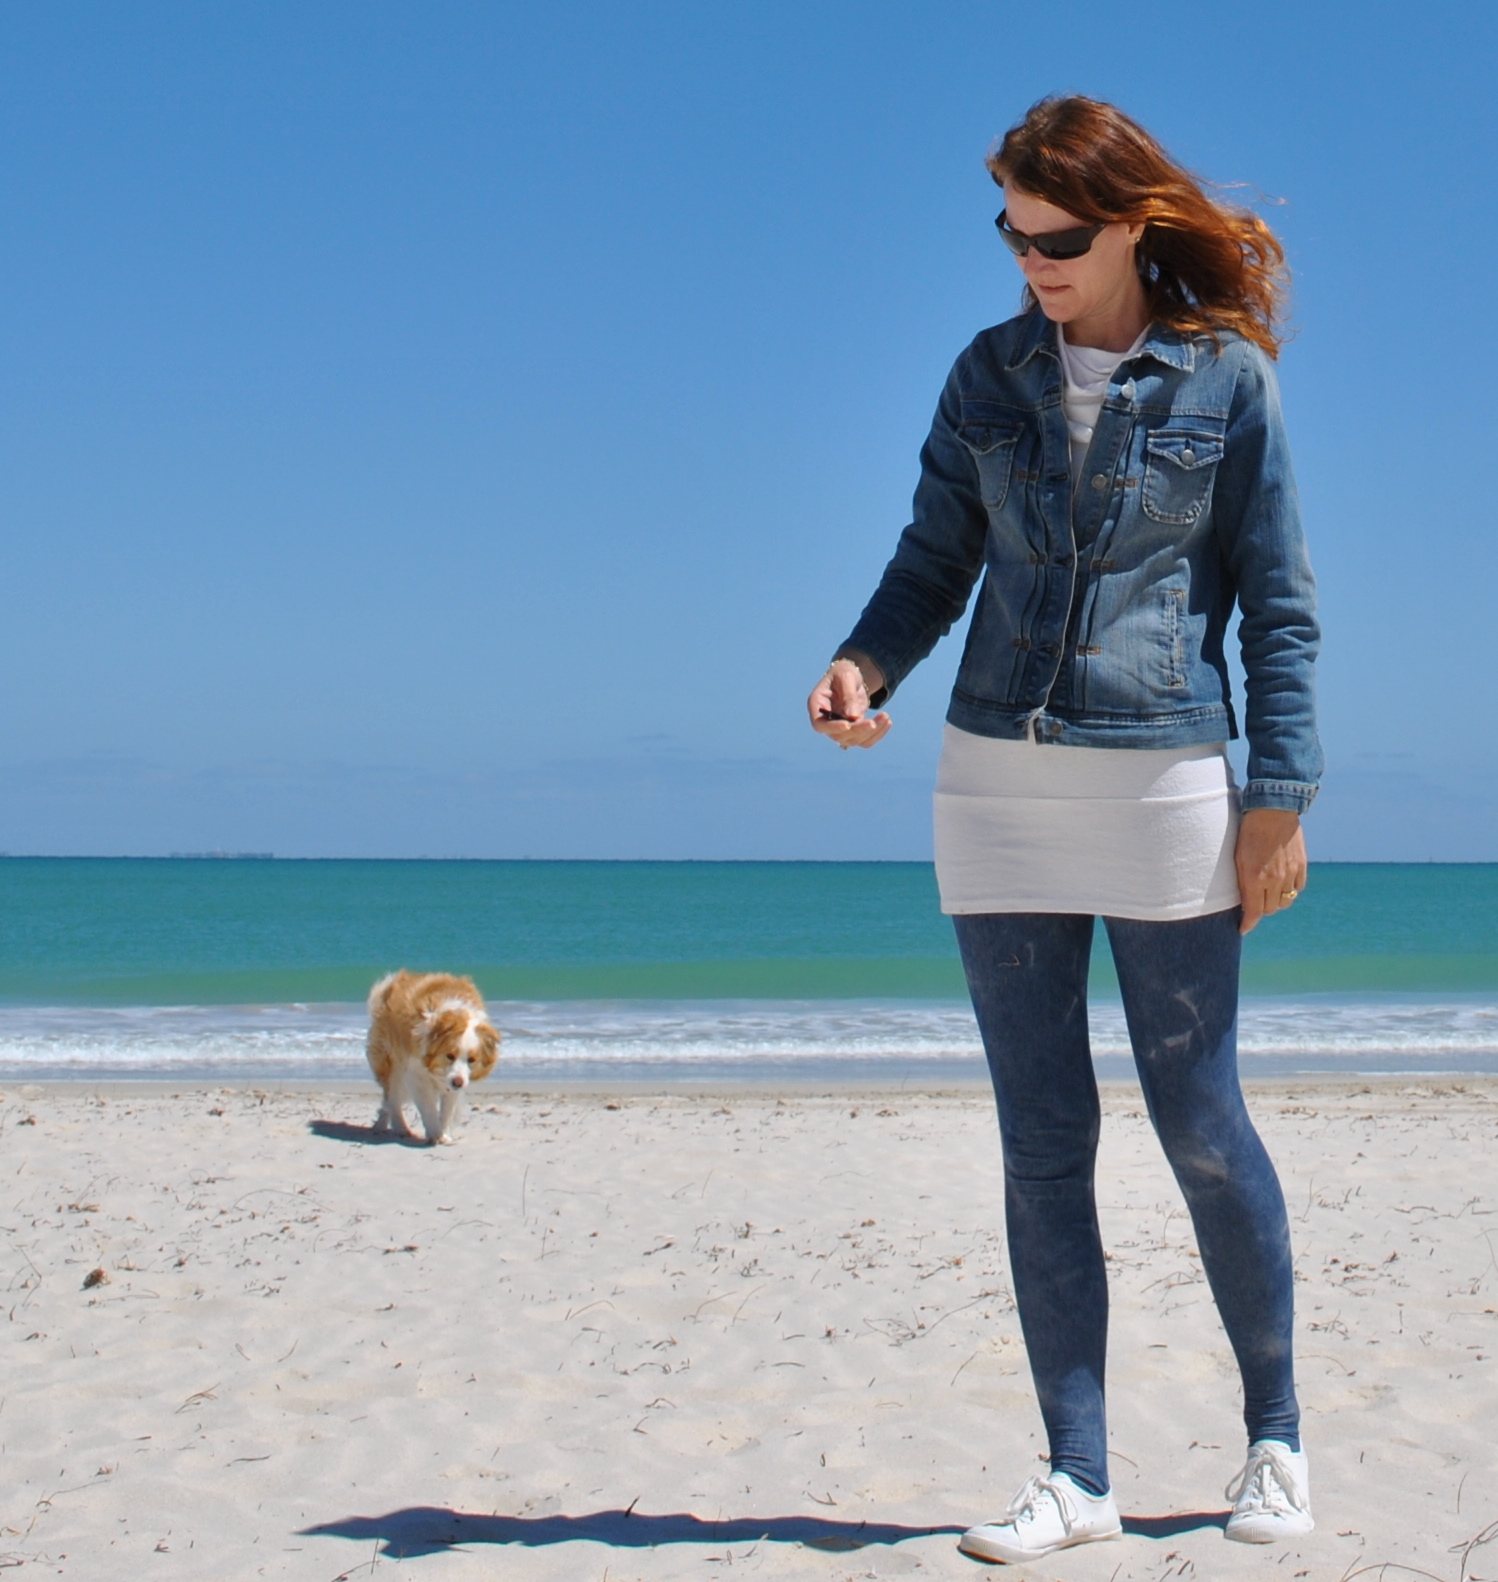
Before I went to Melbourne I had bought from Fabulous Fabrics some wonderful stretch jersey, printed to look like distressed denim, and I knew it just had to be tights…
When I made my last tights I had a few requests for a pattern on Burda style, so this time I put together a little tutorial on how to draft for yourself a leggings or tights pattern that is customised to fit you perfectly.
This project is suitable for two way stretch knits only, that is fabric that stretches BOTH crosswise and lengthwise.
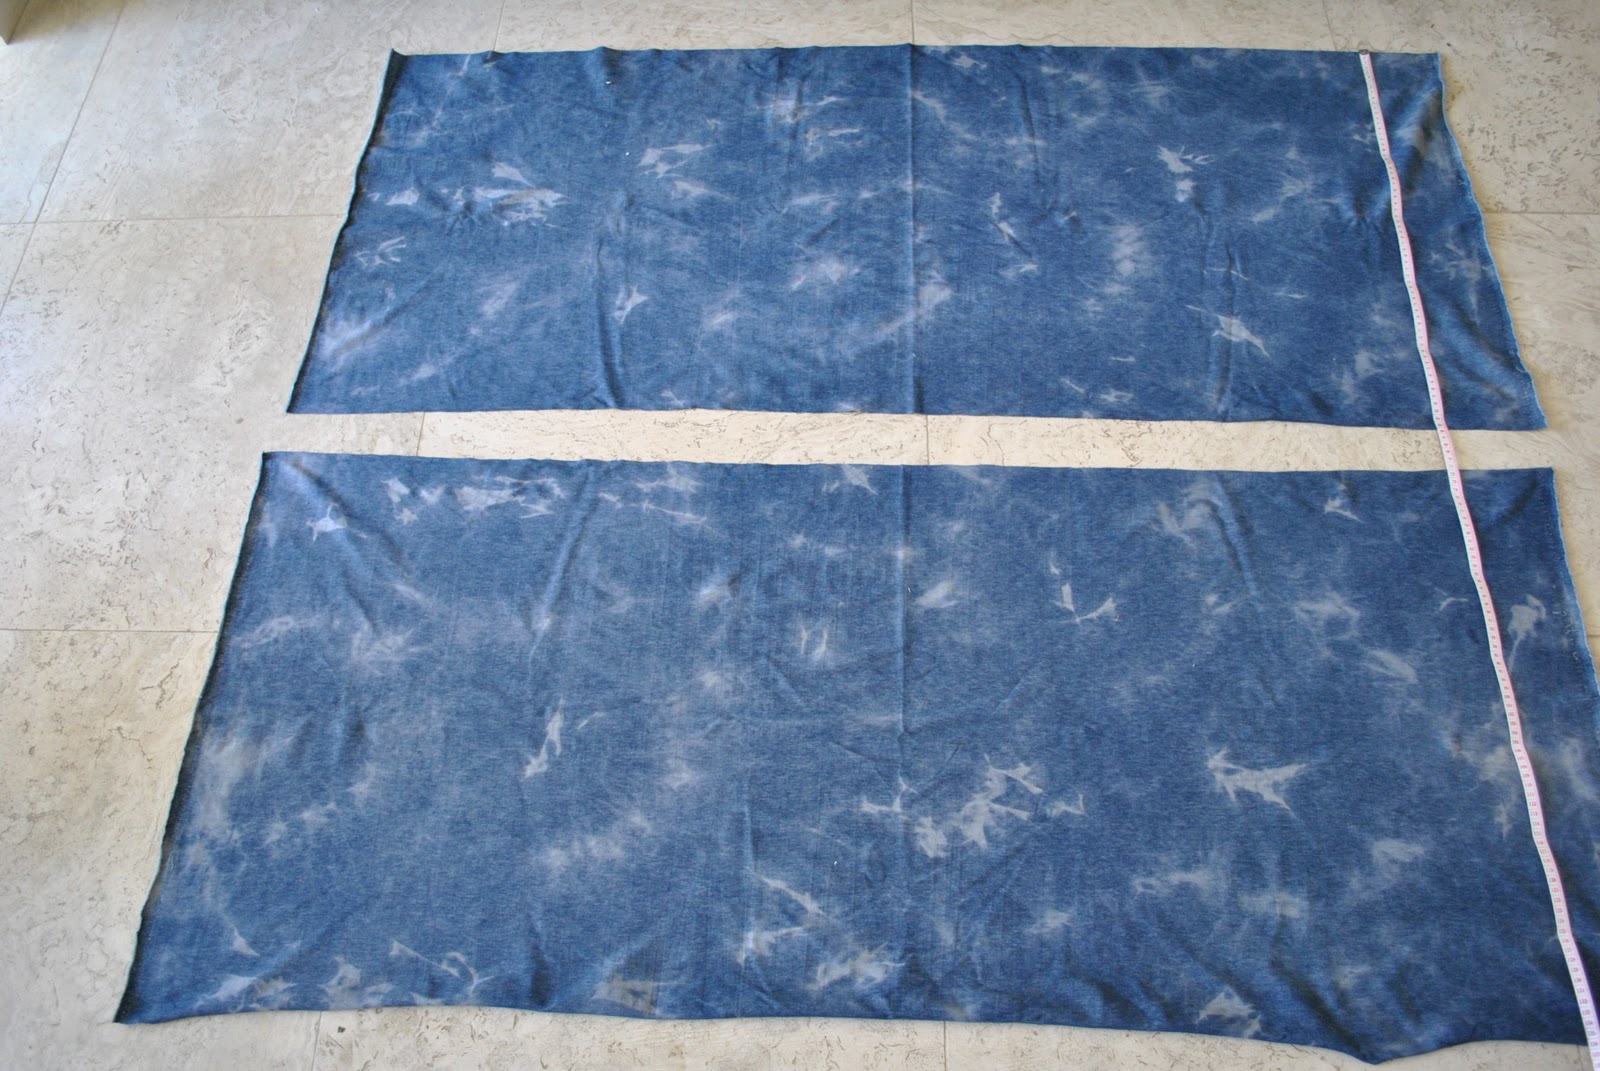
Firstly you must take your measurement around the top of your leg at crotch level. This will be the widest point of your leg piece. Whatever this measurement is, double it. This is how much fabric you will need to buy. (once you have worked out your pattern you may be able to buy less for future tights projects; by flipping your pattern lengthwise on the fabric if the print allows you this flexibility)
If you’re not very experienced at fitting and/or pinning to yourself it’s a good idea to get someone you trust to help. Put on some leggings before you start, or some other skintight garment.
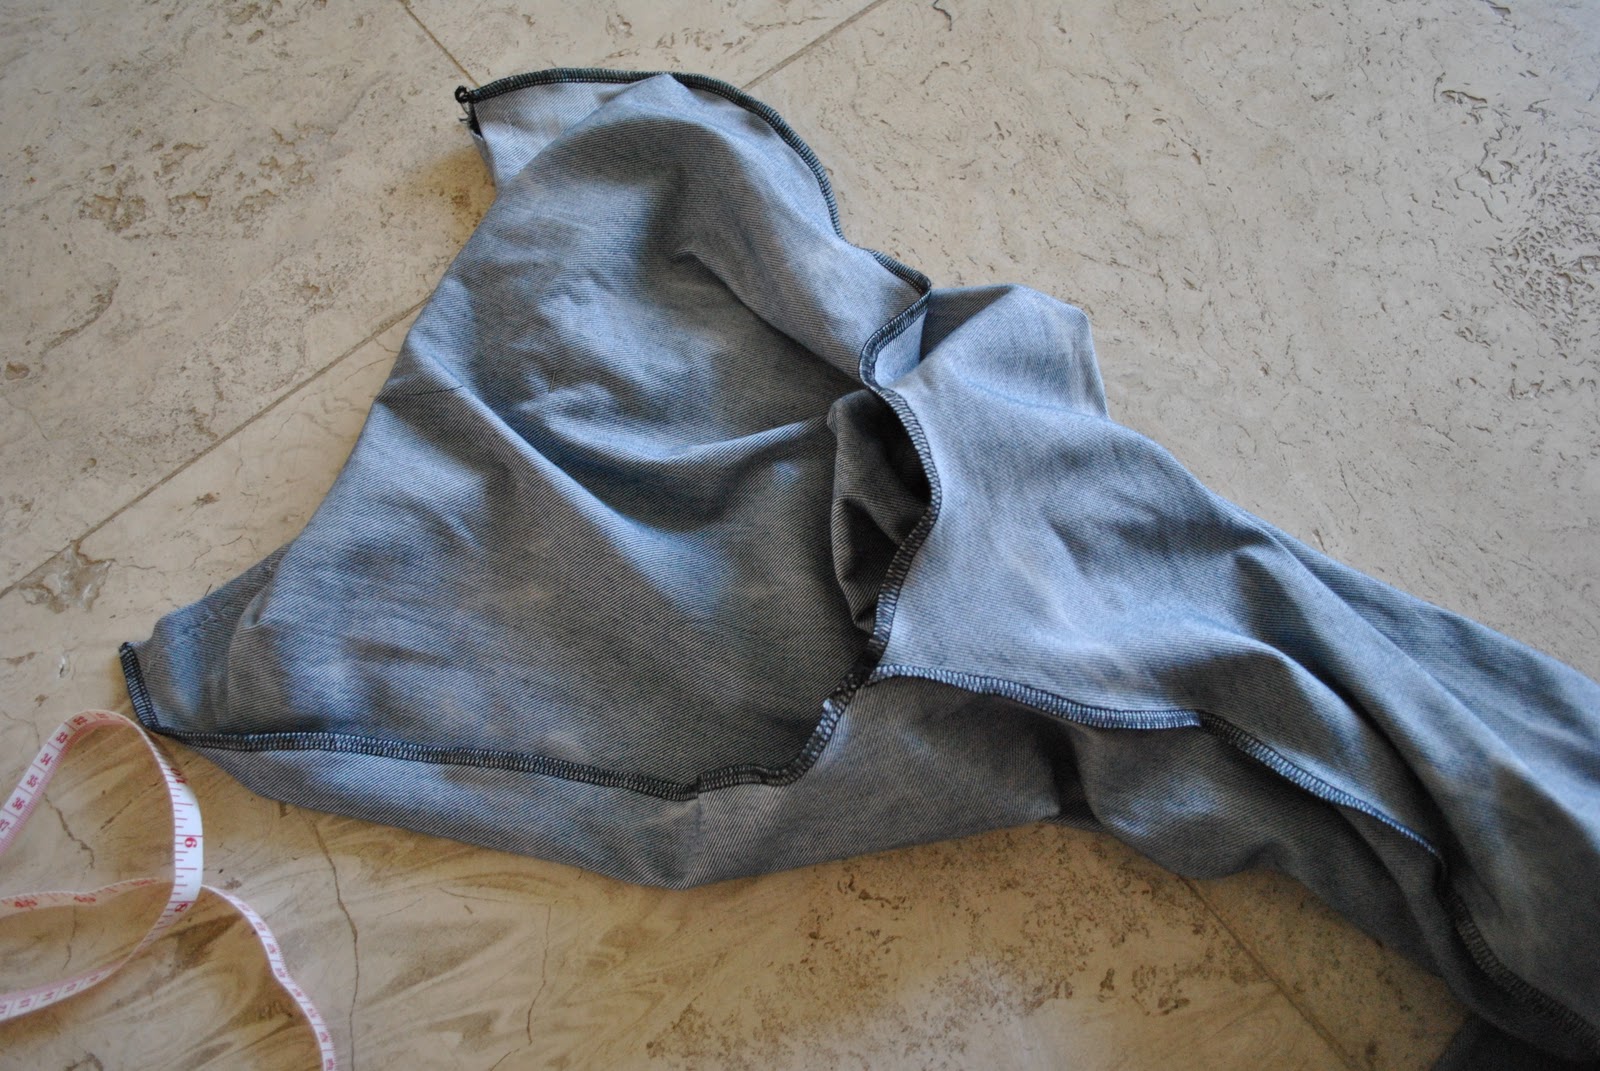
Lay your fabric down and cut it in half, cutting from selvedge to selvedge.
(Note that for this example the grainline will be running around my body, as opposed to up and down my body. If you want your pattern print to go the other way, then you will have to layout and cut your fabric pieces accordingly)
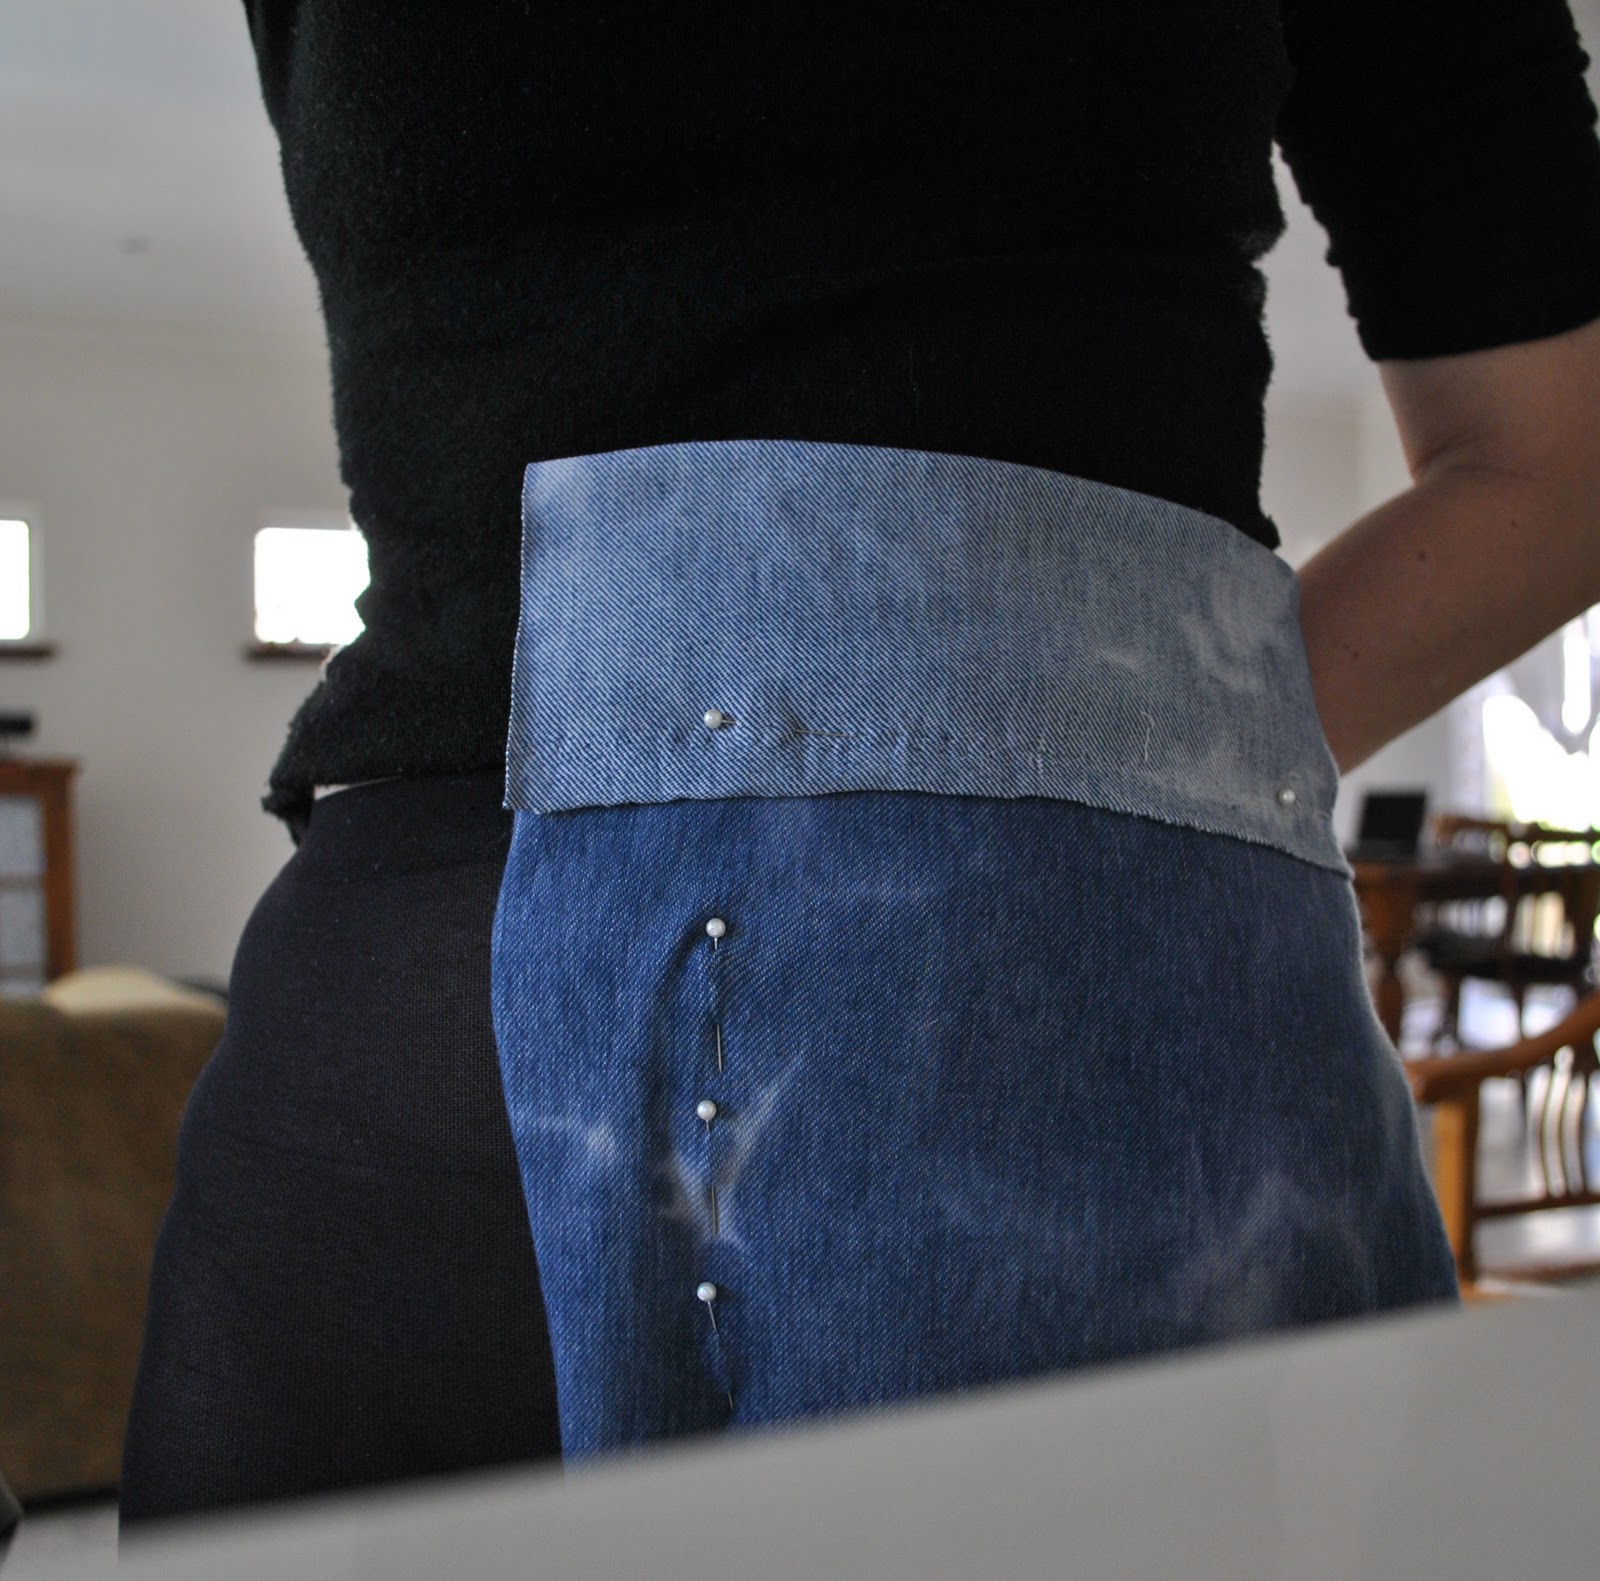
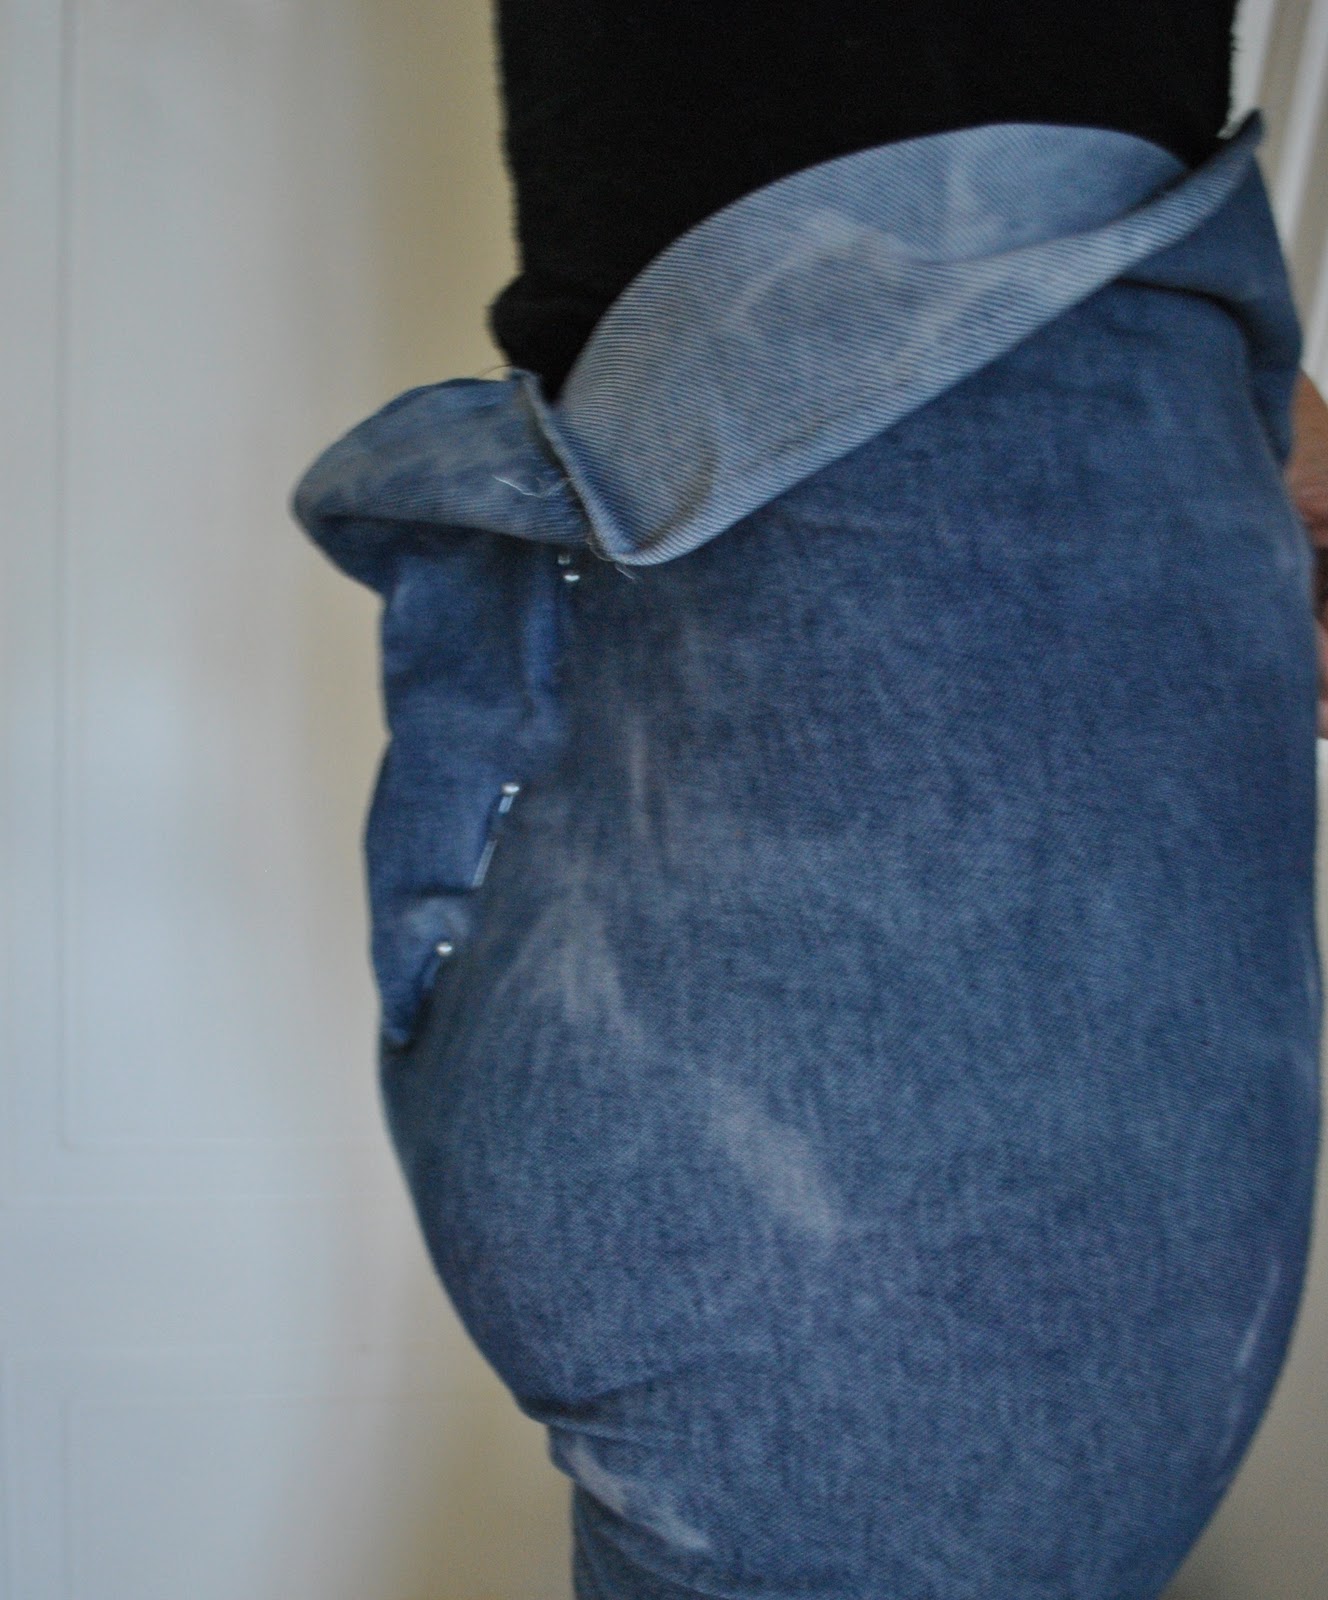
Take one of these and fold over one selvedge to allow for a generous amount of excess and pin this fold loosely in place. I folded over about 9cm (3.5inches) Wrap this fabric around one side of your hip, pinning the folded over edge at about waist level. Don’t aim for tight-fitting at this point, you just want the fabric to be hanging evenly down from your waist level, with the excess fold of fabric over your waist level at the top for your waist casing later. Pin the fabric to your leggings in a vertical line down the centre front (use your leggings seam as a guide). Do the same at the back. The back bit is kind of tricky, but don’t panic about super accuracy. You are aiming for as close to middle line as possible and vertical. Use a mirror to check the your pins both front and back are in as straight as vertical line as possible. Do not be super tight at this stage either, a bit loose is desirable for reasons I’ll explain later. I’ll call this part the “abdomen pinning”
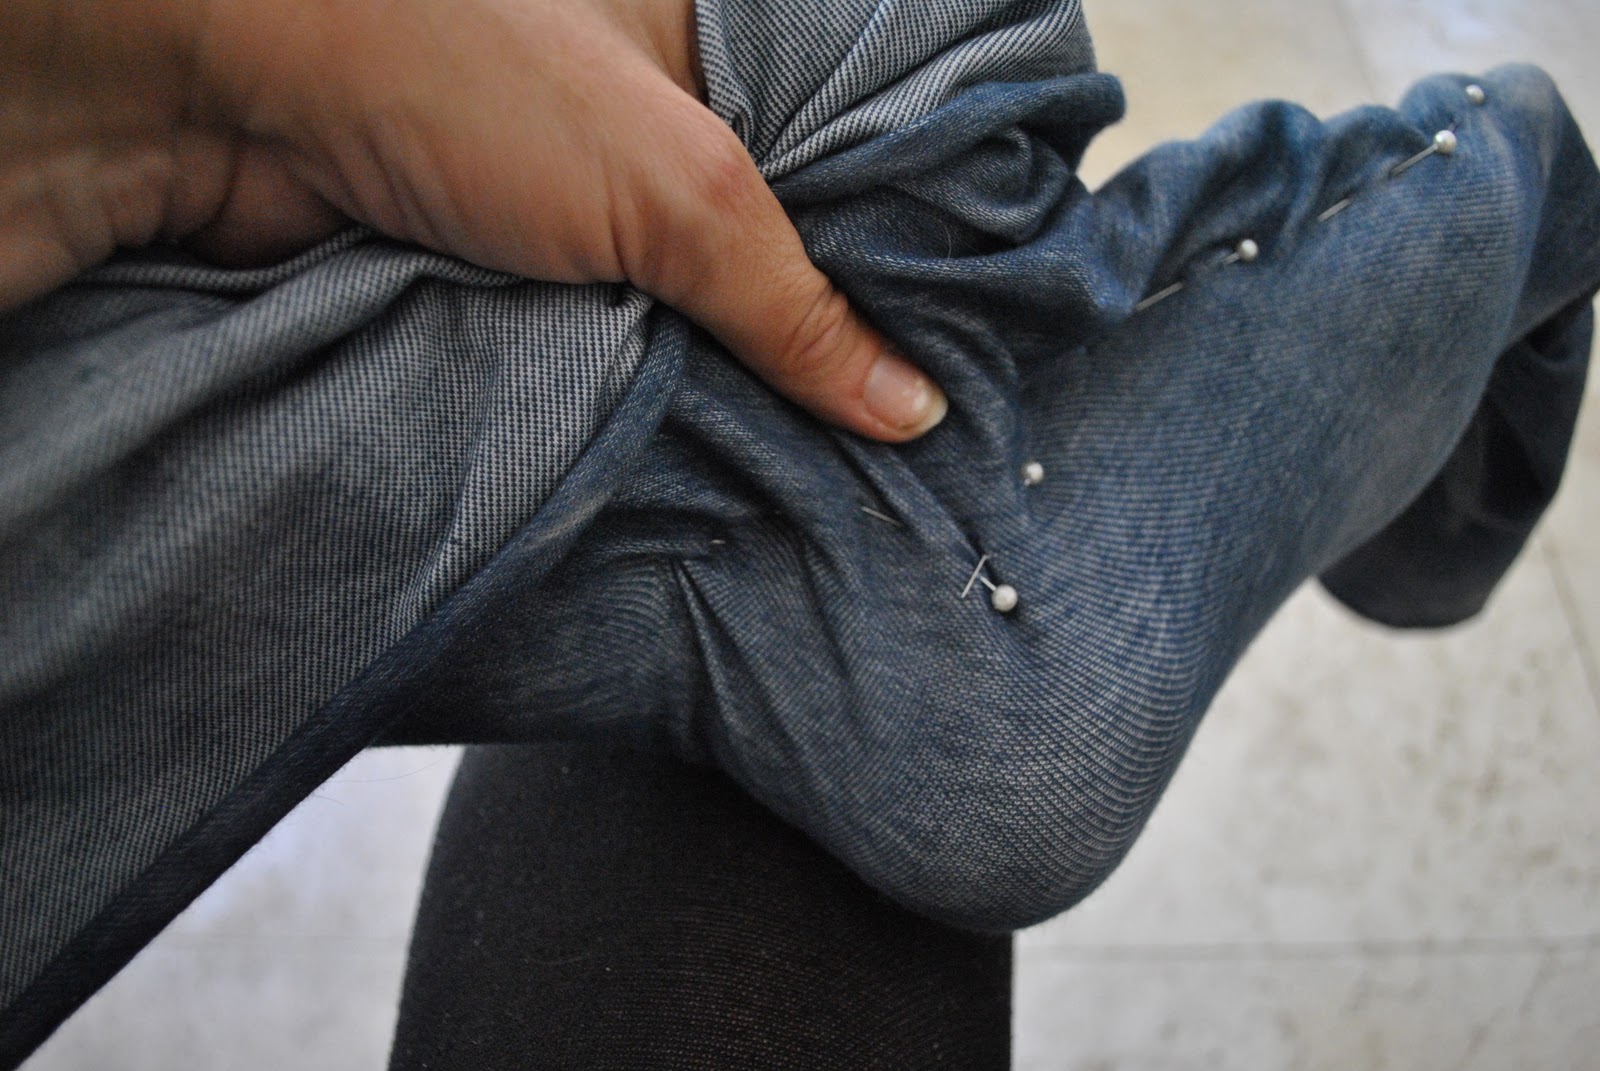
Now pull in the fabric firmly around your upper leg and in at the crotch, and pin. I recommend you use a safety pin at this point for obvious reasons…
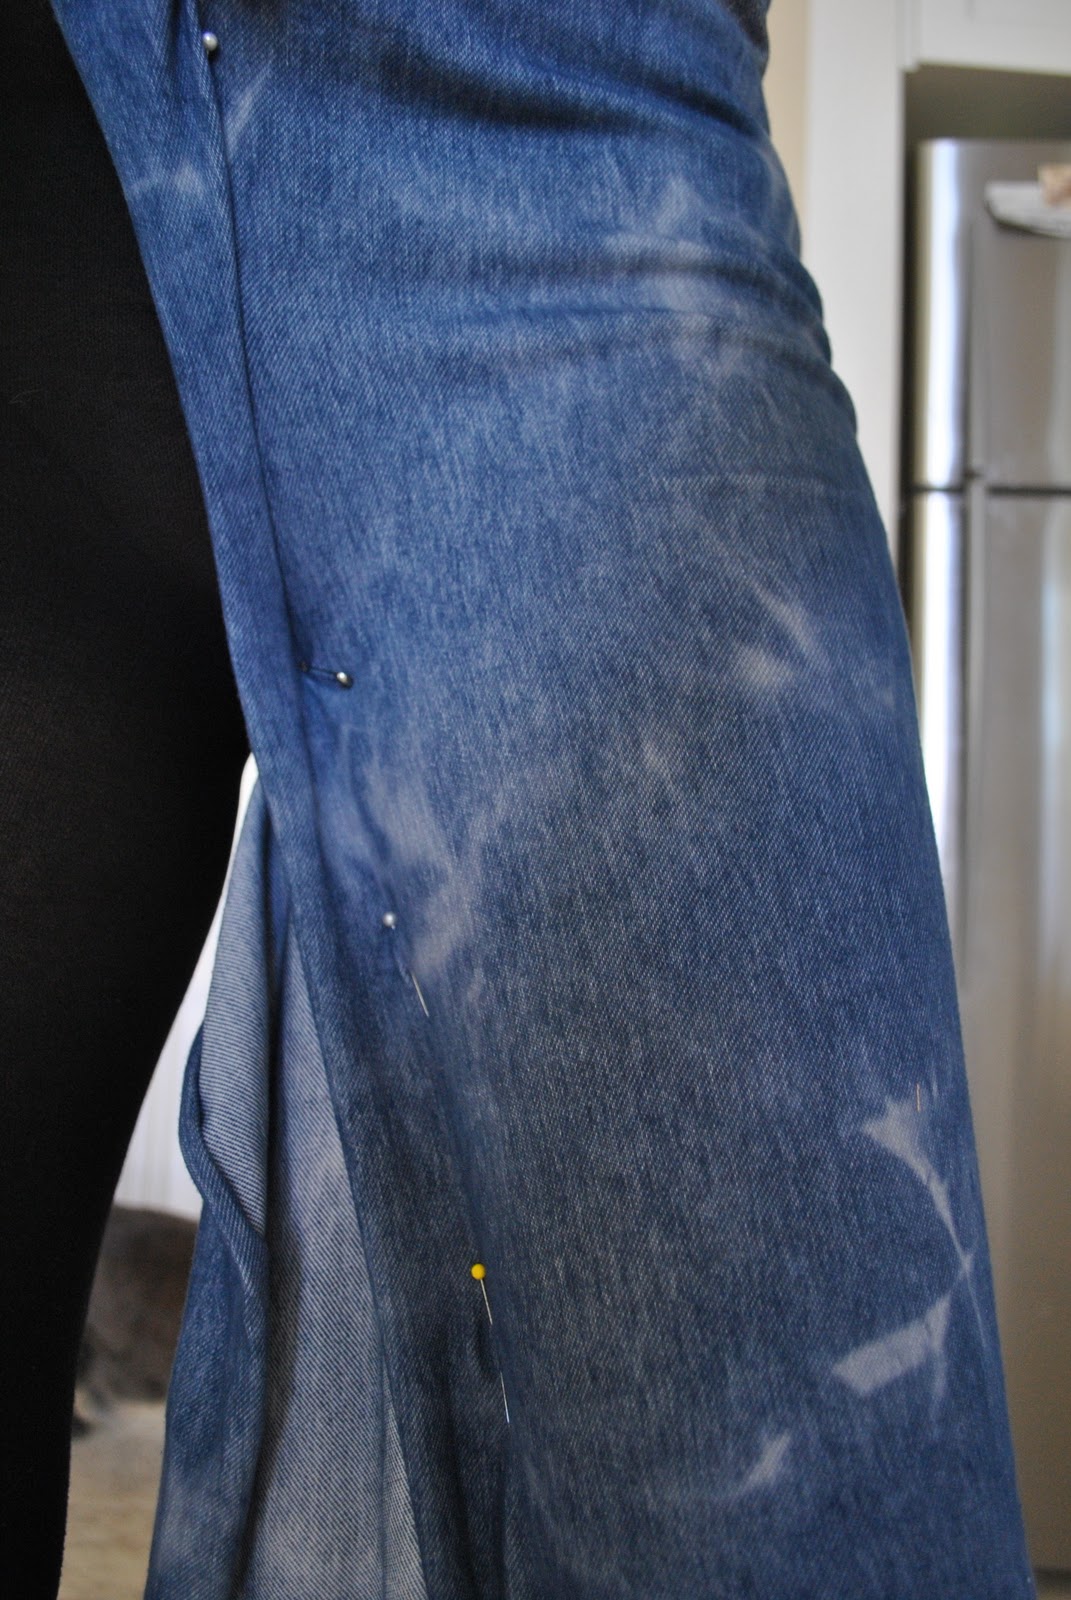
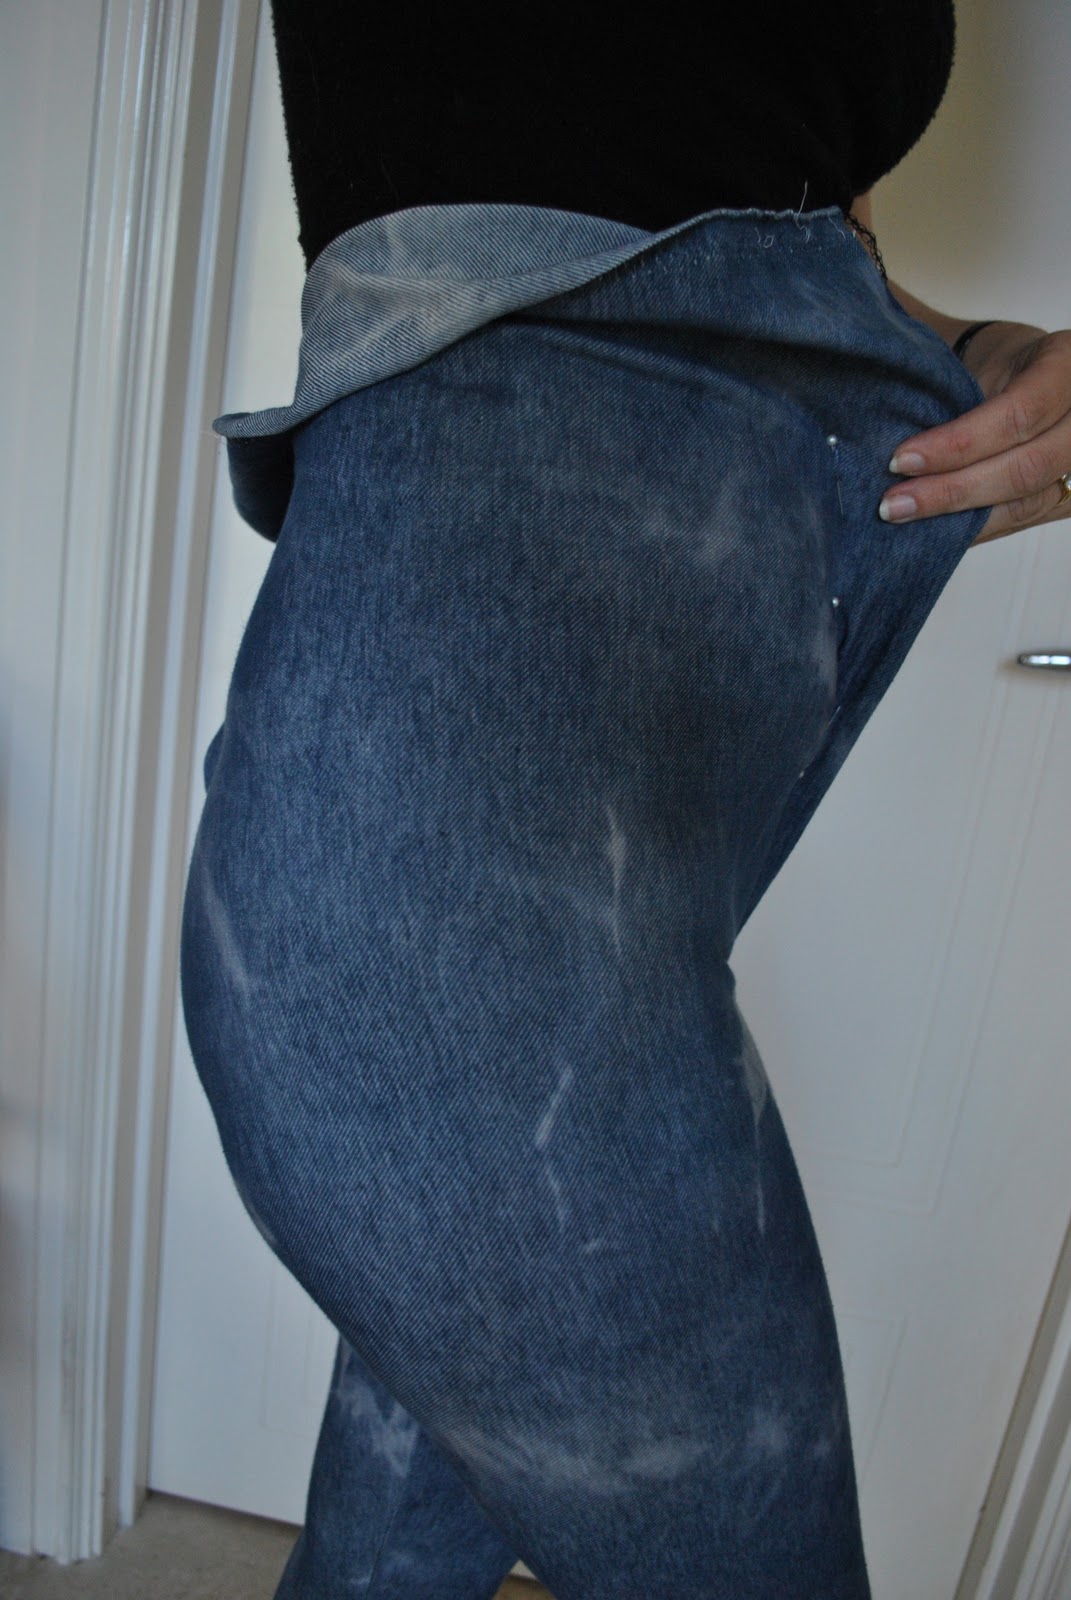
Start pulling the edges of the fabric together around your leg, and working from the top down pin together down the inner leg seam. From this point on make the fabric quite tight and check constantly in a mirror that the fabric is sitting smoothly all the way around the leg. From now on down you are aiming for close-fitting and smooth.
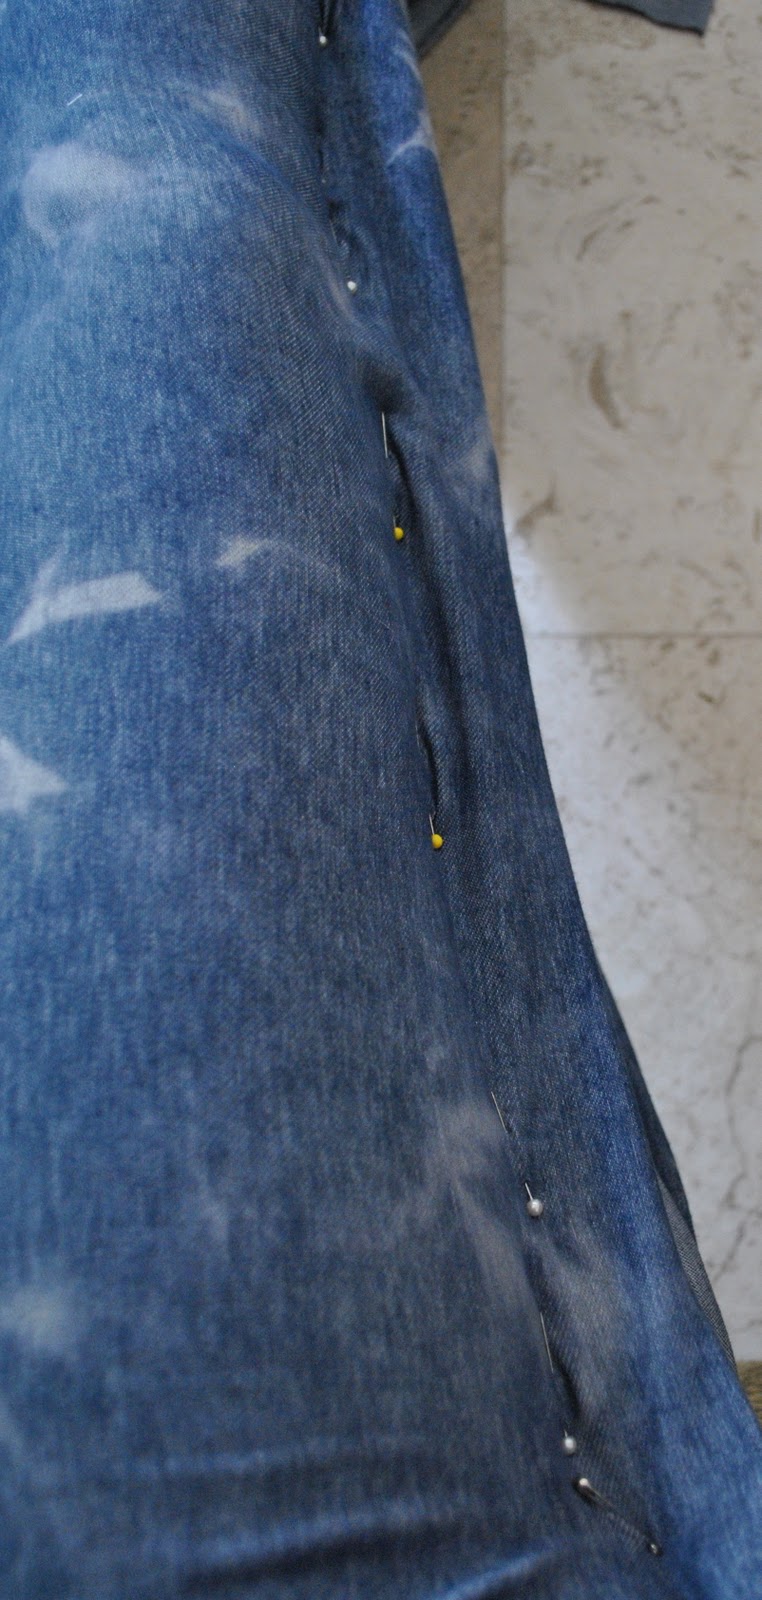
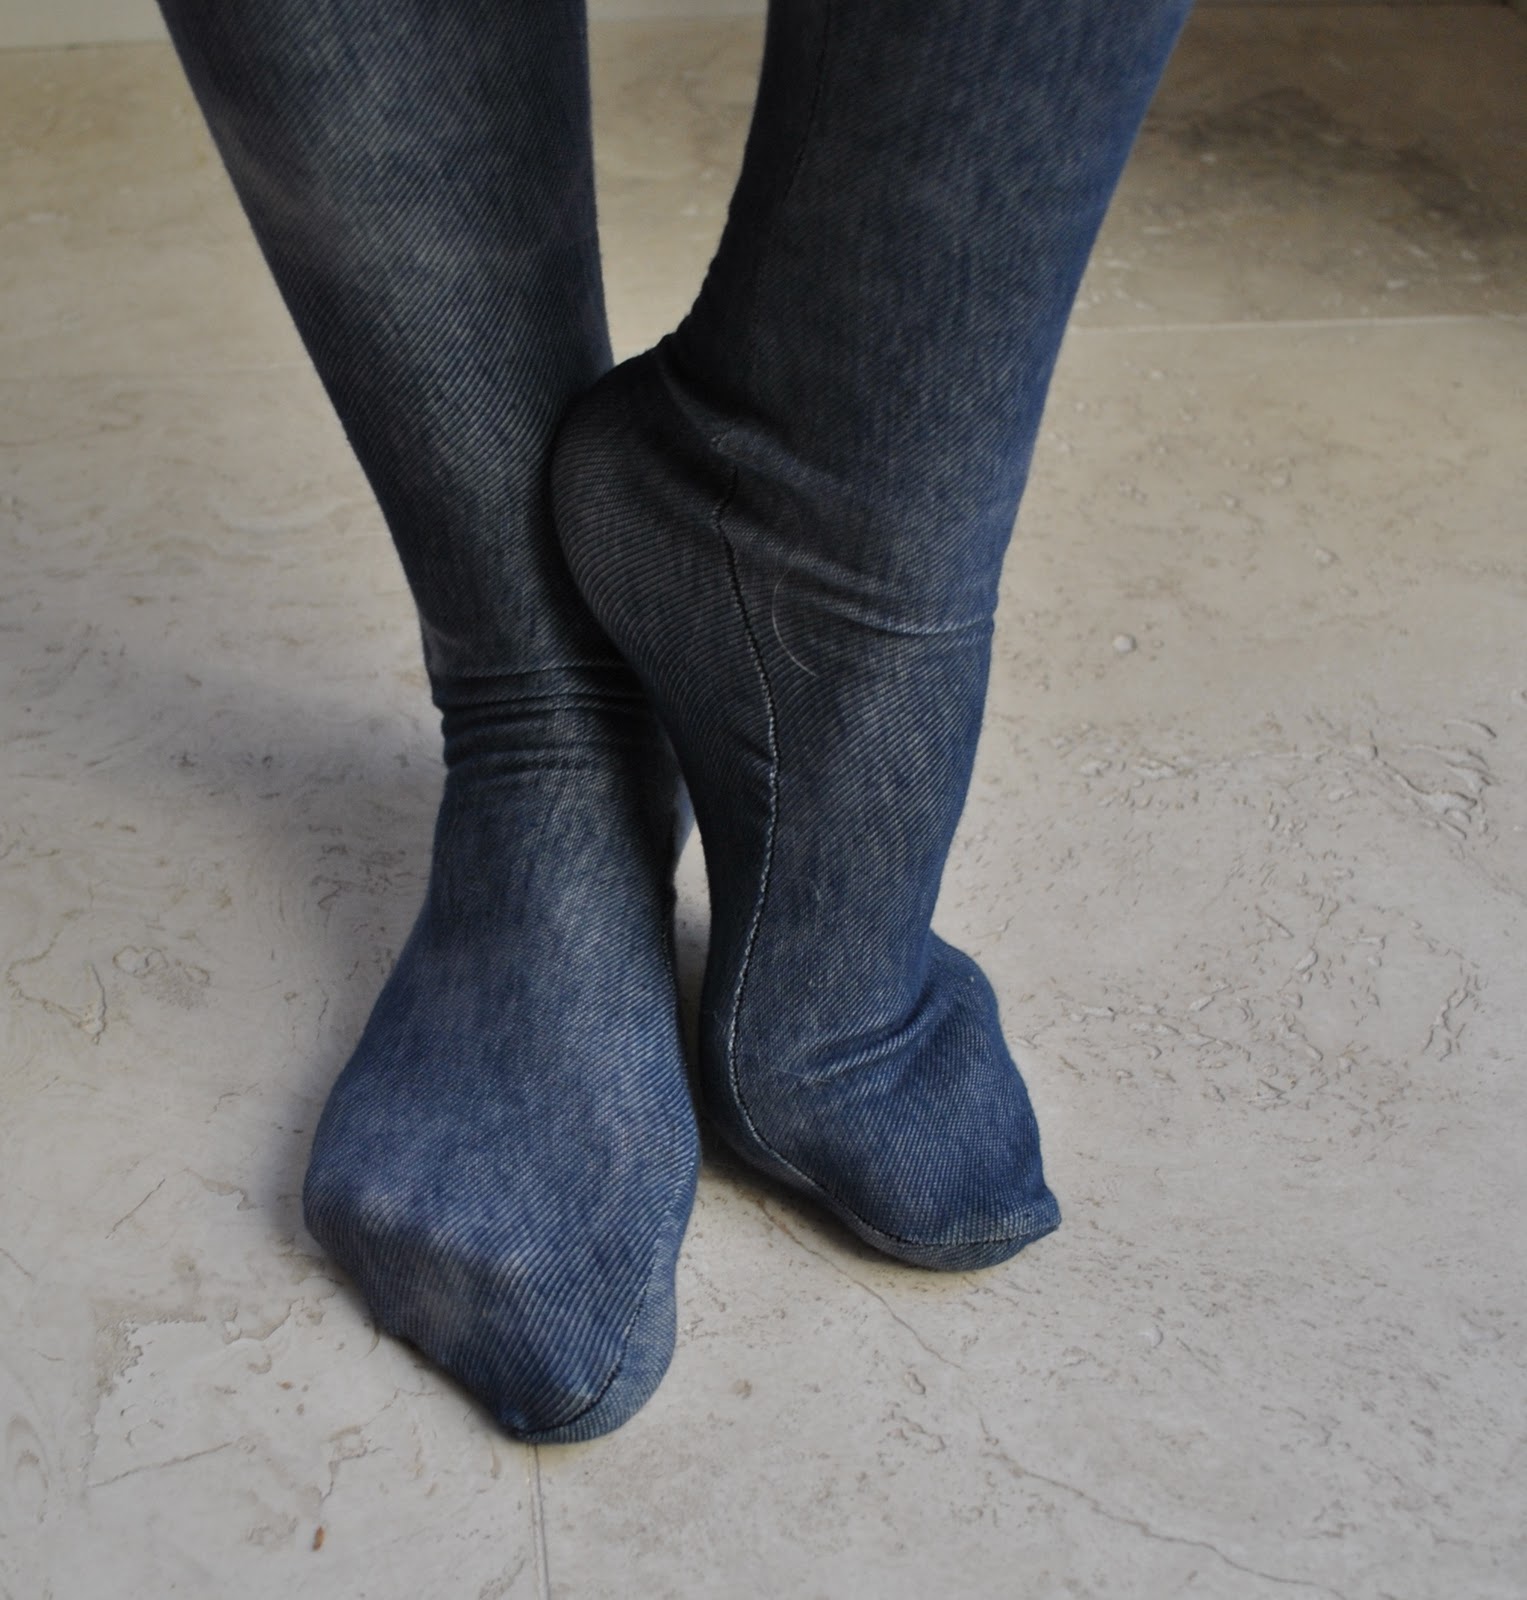
The heel and ankle are the trickiest bits to accomodate. I’ve got smoothest results when the fabric is pinned with a right angle turn at the inner ankle level. See in the picture, the inner leg seam is pinned down vertically to just below (about 2.5cm, or 1inch) the ankle bone, then I’ve made a right turn to start pinning down the inner side of my foot. Pin securely and tightly at these points, again aiming for tight and smooth above all else. Pin down the inner side of the foot to your big toe, then turn again and pin across the top of your toes, finishing your pinning at the fold on the outer edge of your foot.
Now unpin the “abdomen pinning” from your leggings at the top, and replace each pin carefully back in the same spot in the fabric as you separate it from the leggings you are wearing. Now carefully slide the whole thing off. Try not to lose any pins in the process. (this is why loose-fitting around the abdomen works best…)
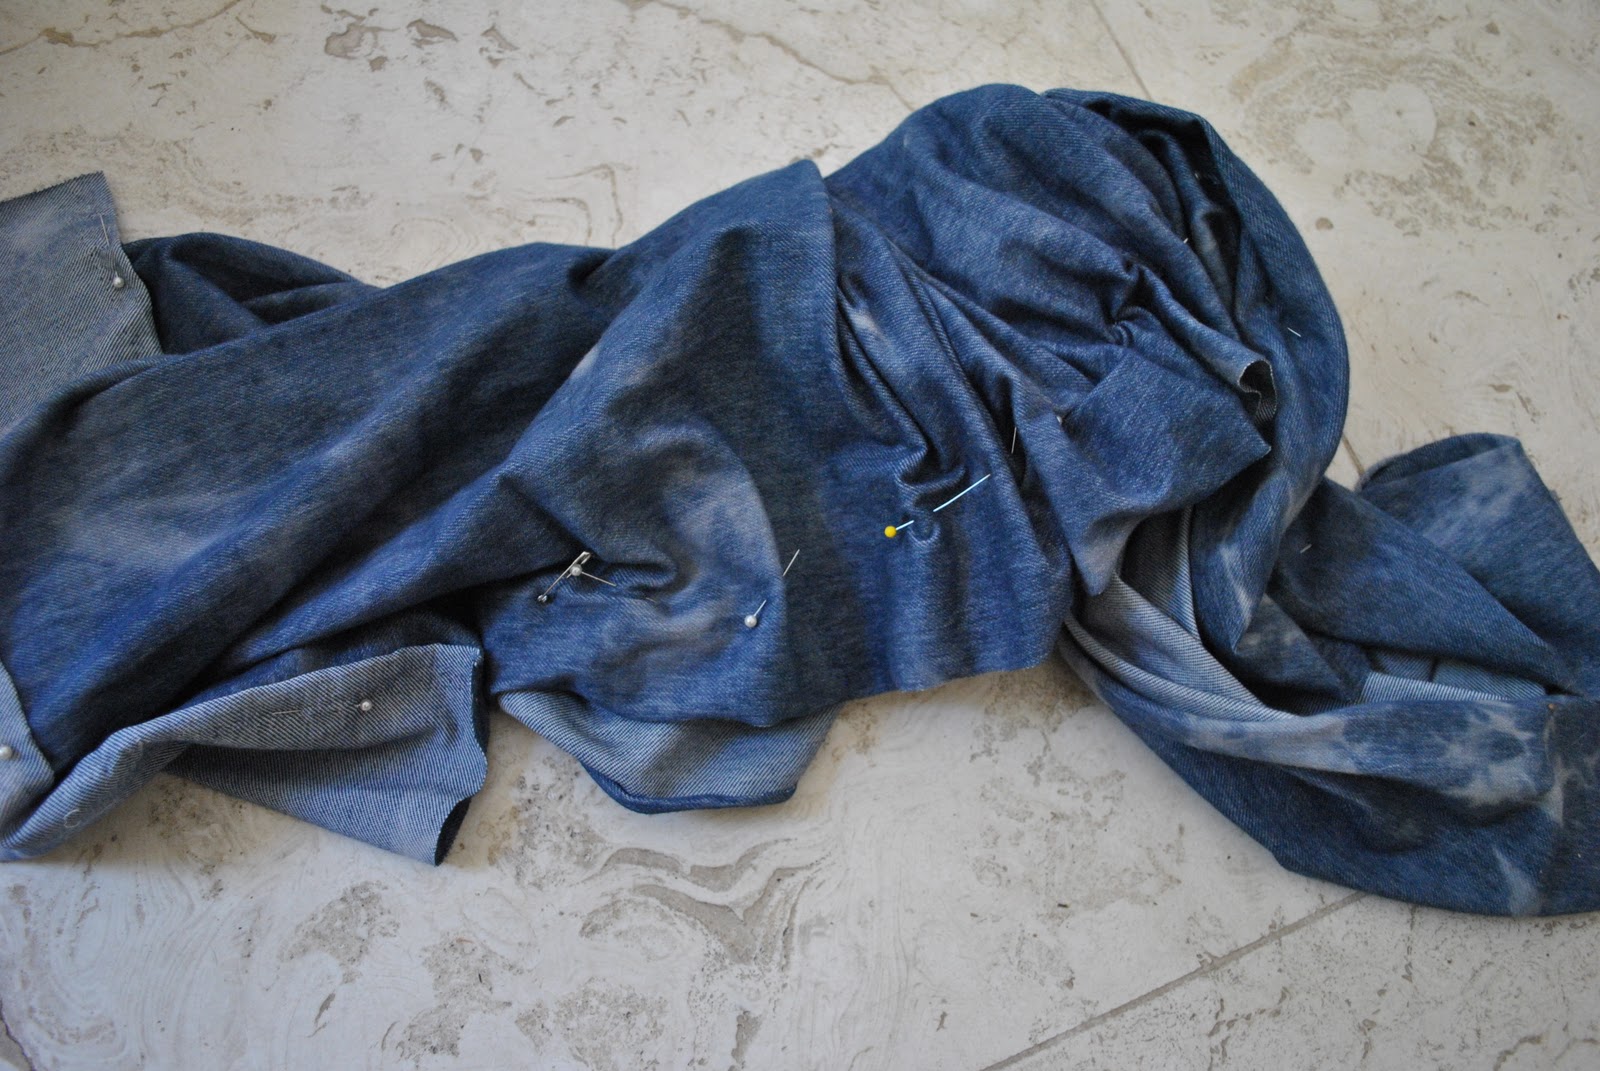
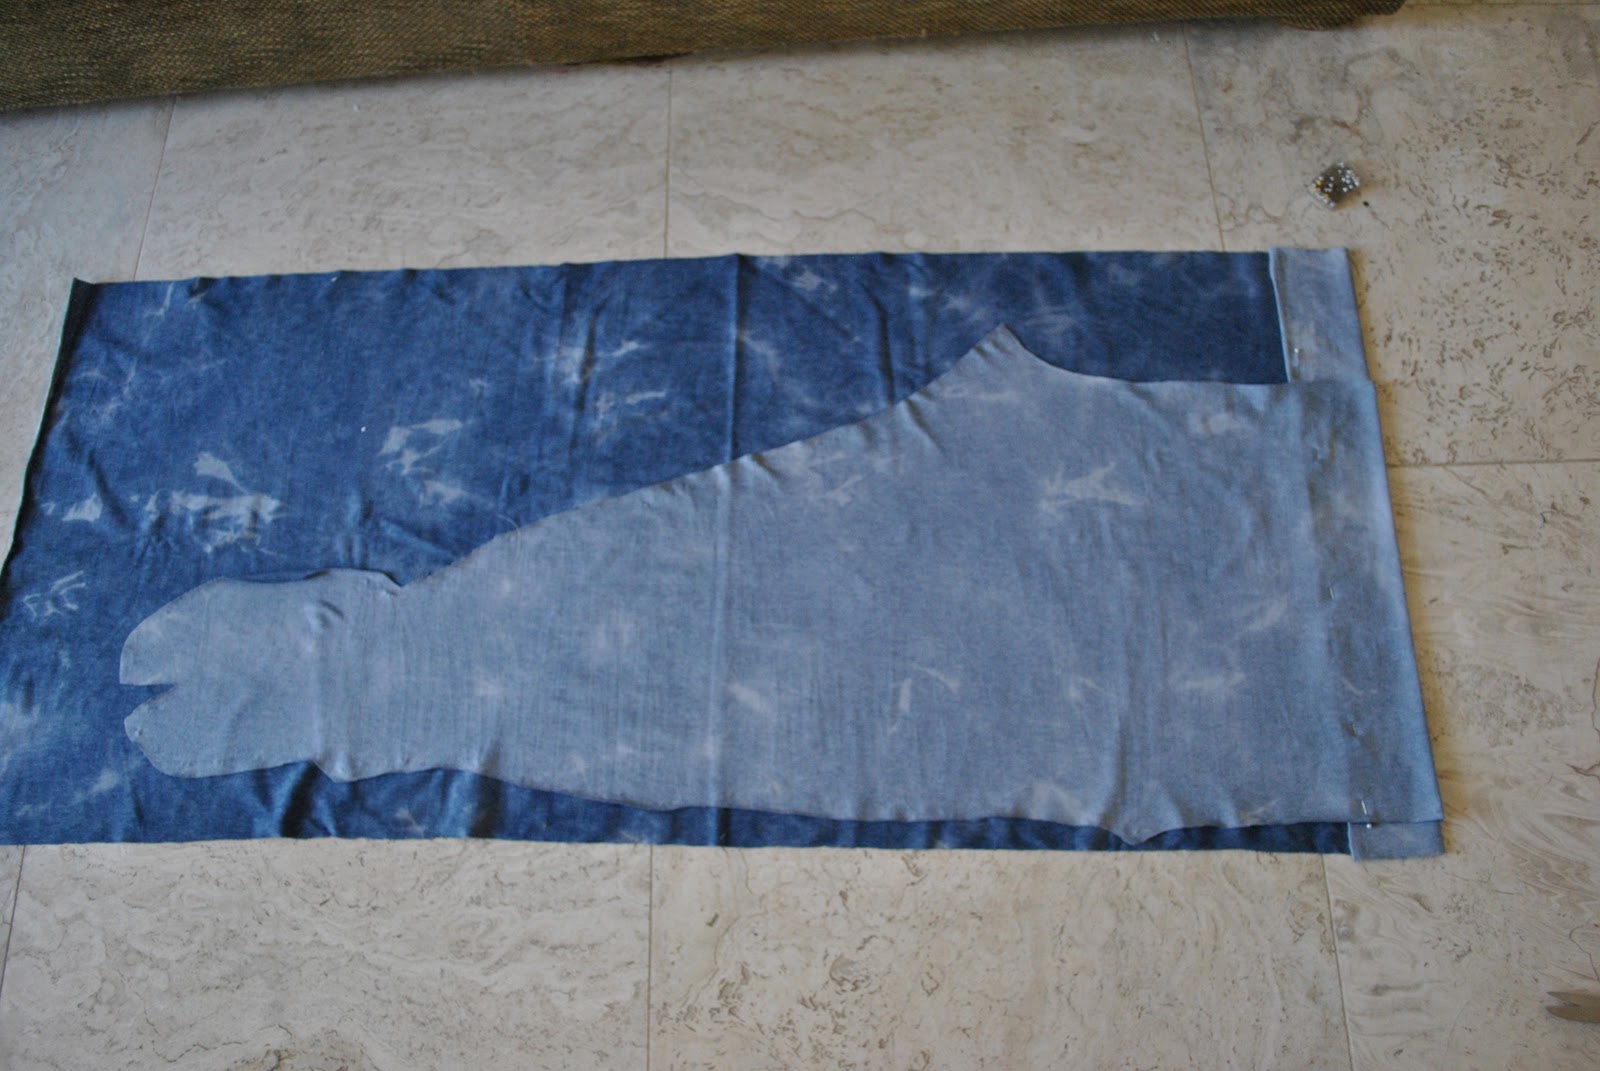
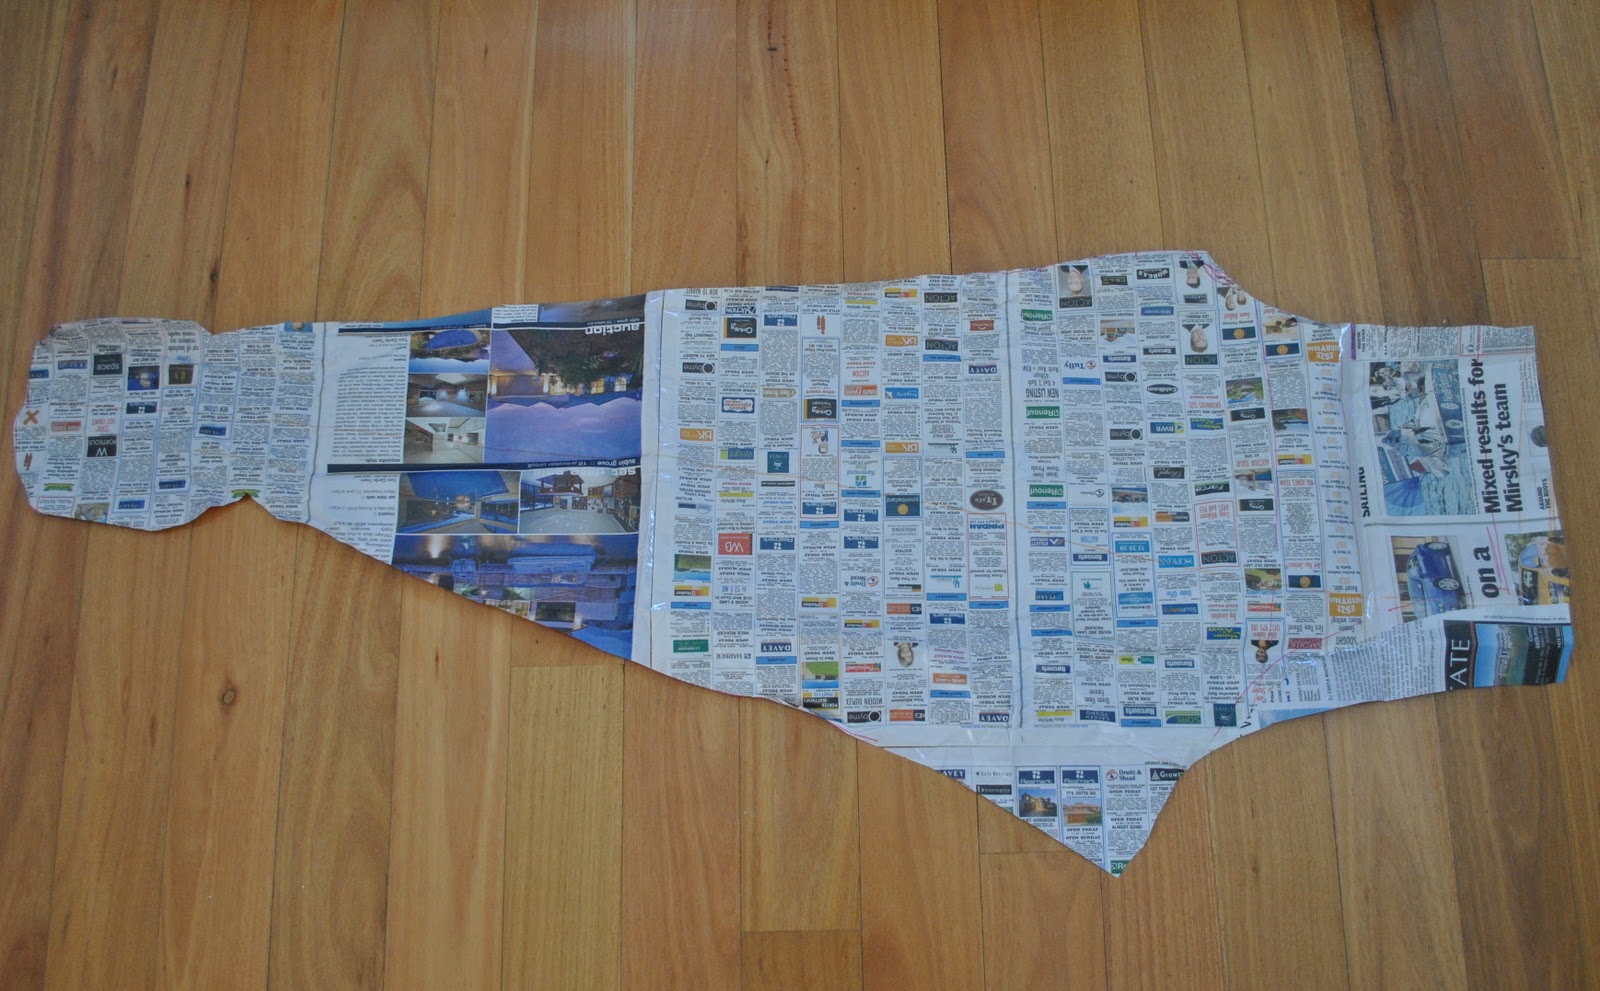
Open up the leg, marking each pinning point with pins on both sides as accurately and as exactly as possible. Leaving about 1cm (3/8″) seam allowance cut around your pinned lines, cutting a smooth curve down and around to each crotch point. And voila, you have a leg! Take a deep breath and try not to panic as you look at your leg pattern. I know it looks shocking if you’ve never seen it flat like this! Have a cup of tea to congratulate yourself for having got this far…
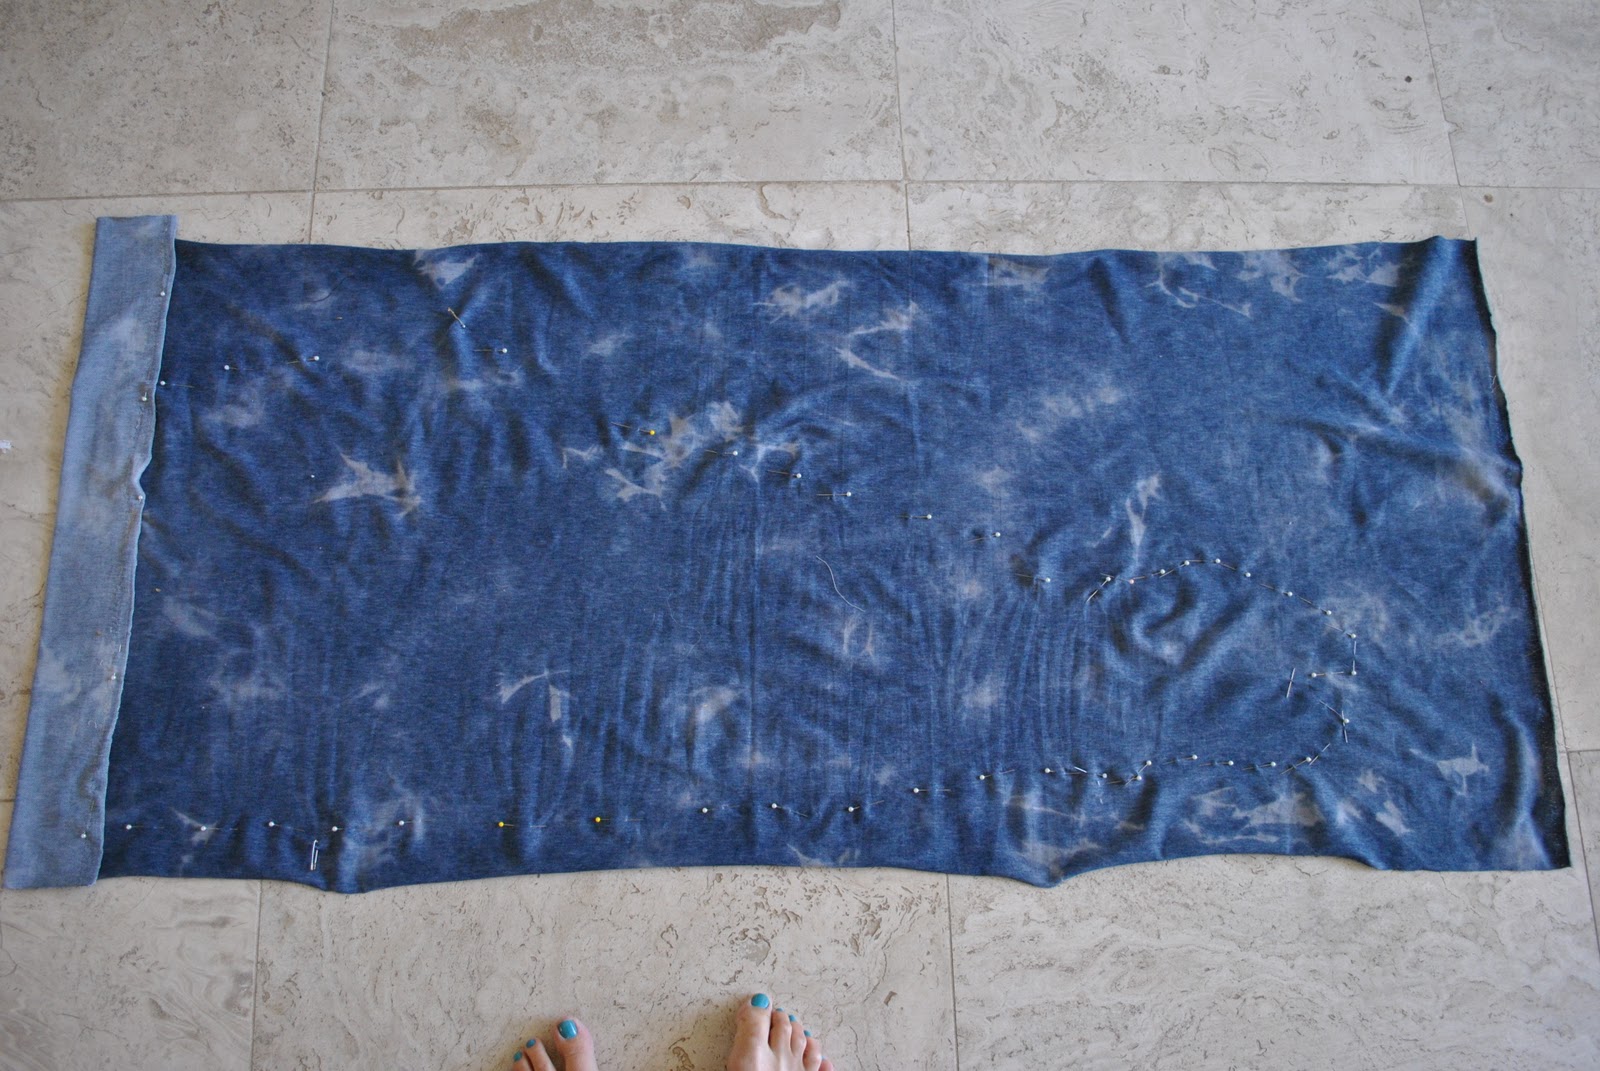
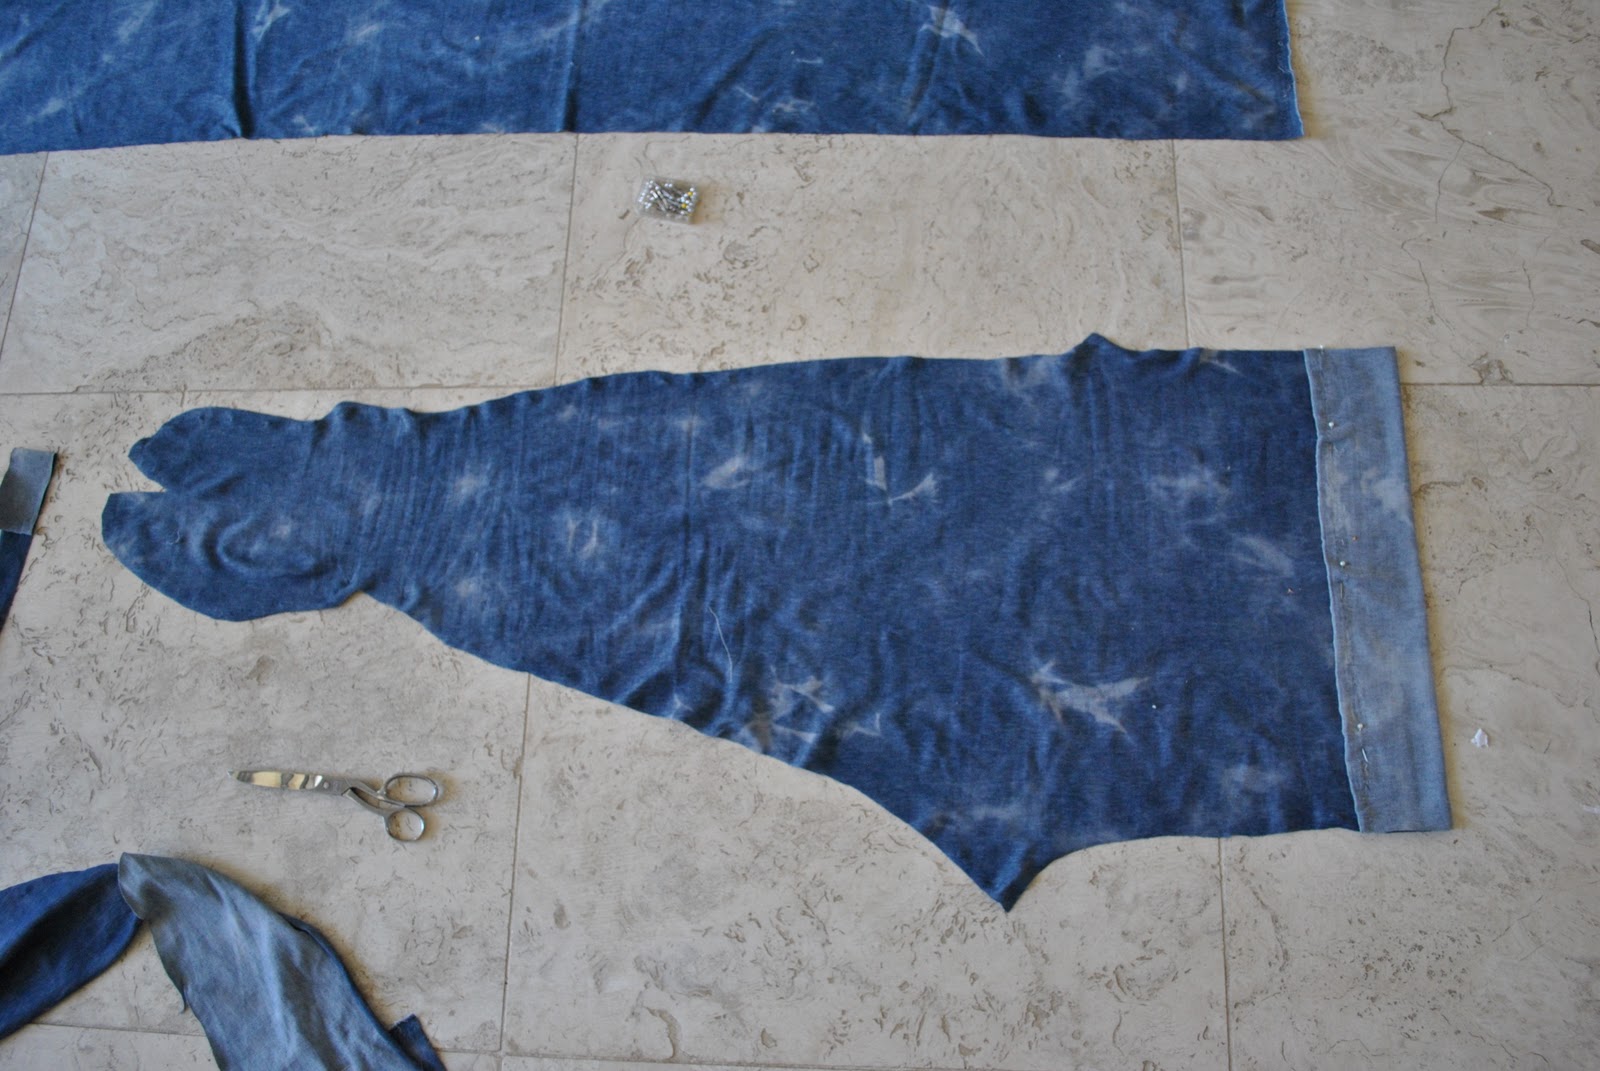
If you have any reason to believe your legs are different to each other, then you should do this whole process for the other leg too. Otherwise, just lay this leg piece right sides together on the other half of fabric and cut out another leg. It’s a good idea to make a paper pattern for your customised tights at this stage too, you know, so you don’t have to go through this whole rigmarole a second time…
Pin, and sew up the inner leg seam of each leg. Either serge as I did, or use the stretch stitch specifications for your particular machine. Do from the big toe to the outer foot edge as a separate little seam.
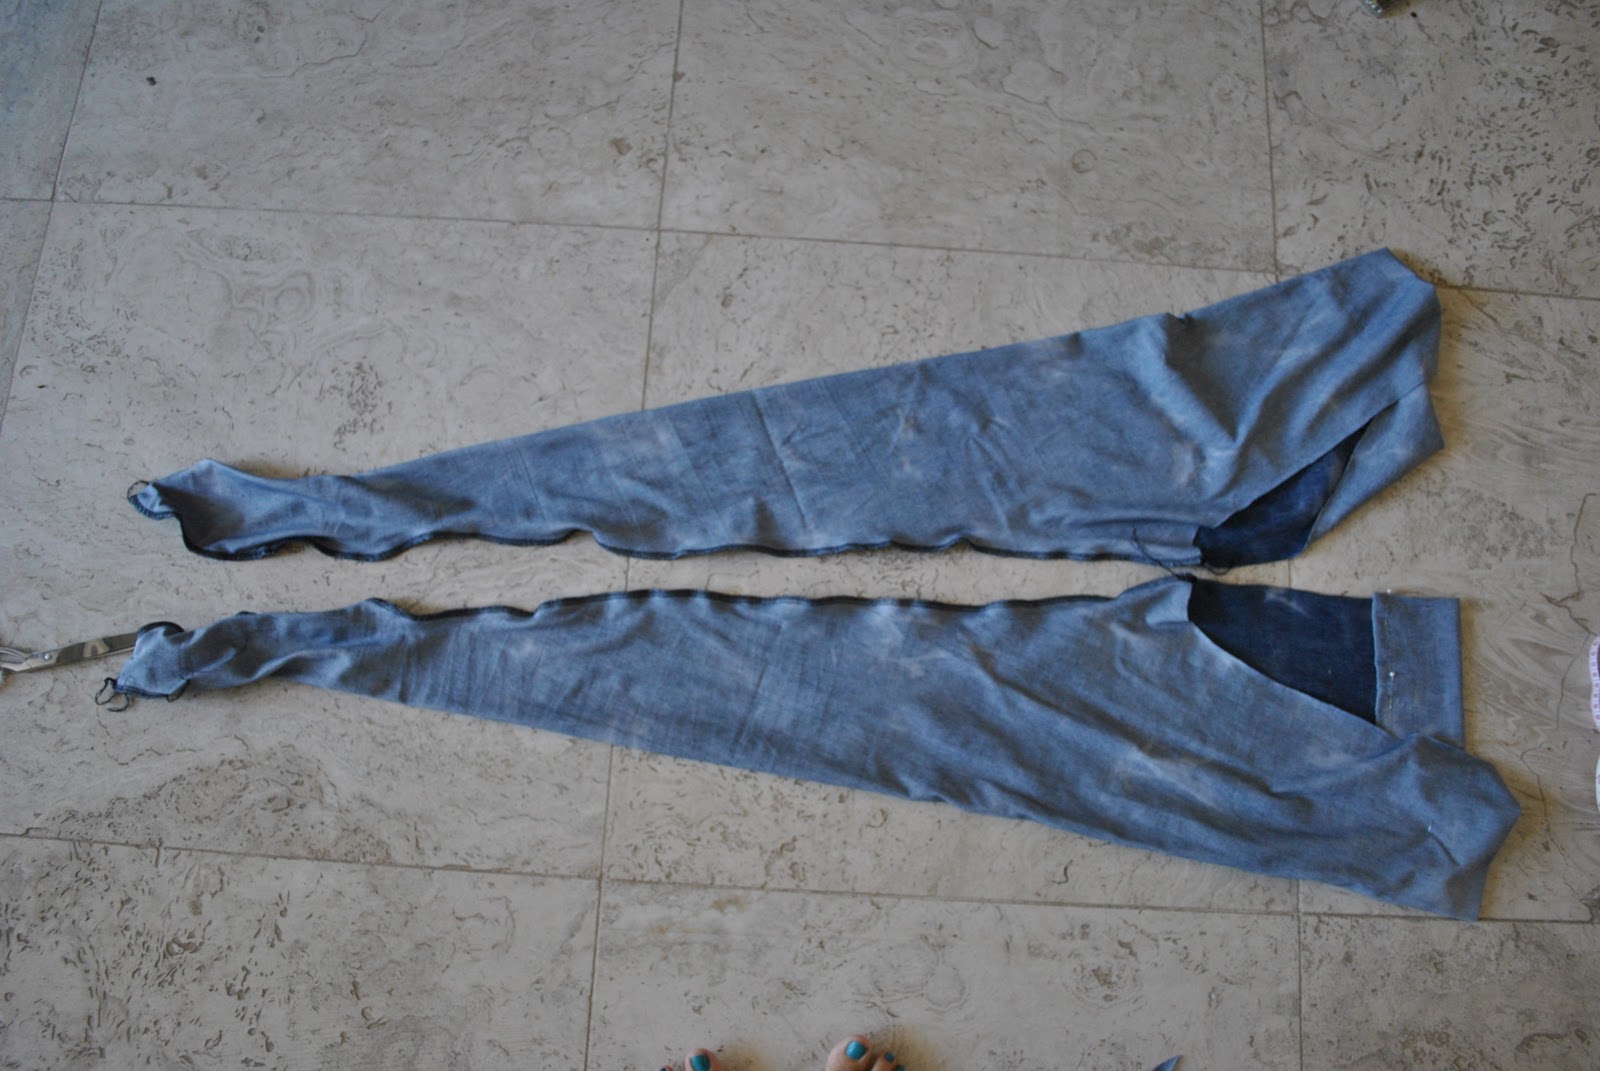
Try each leg on; just to check. The tightest part for most is getting the heel through the ankle section of the tights… and you will probably have to adjust that inner leg seam to sit straight and true.
With right sides together, and fronts and backs together, sew the two legs together around the crotch seam. Reinforce with an extra row of machine stretch stitching.
Try the tights on. Now is the time to adjust and tighten the abdomen area; the waist will probably be too big and loose to work as tights. Pull it in nice and as tight as you prefer at the centre front and centre back seam; pin and stitch. Using the offcuts, similarly adjust the waistline of your paper pattern, taking away this amount at the front and back of the top of the pattern.
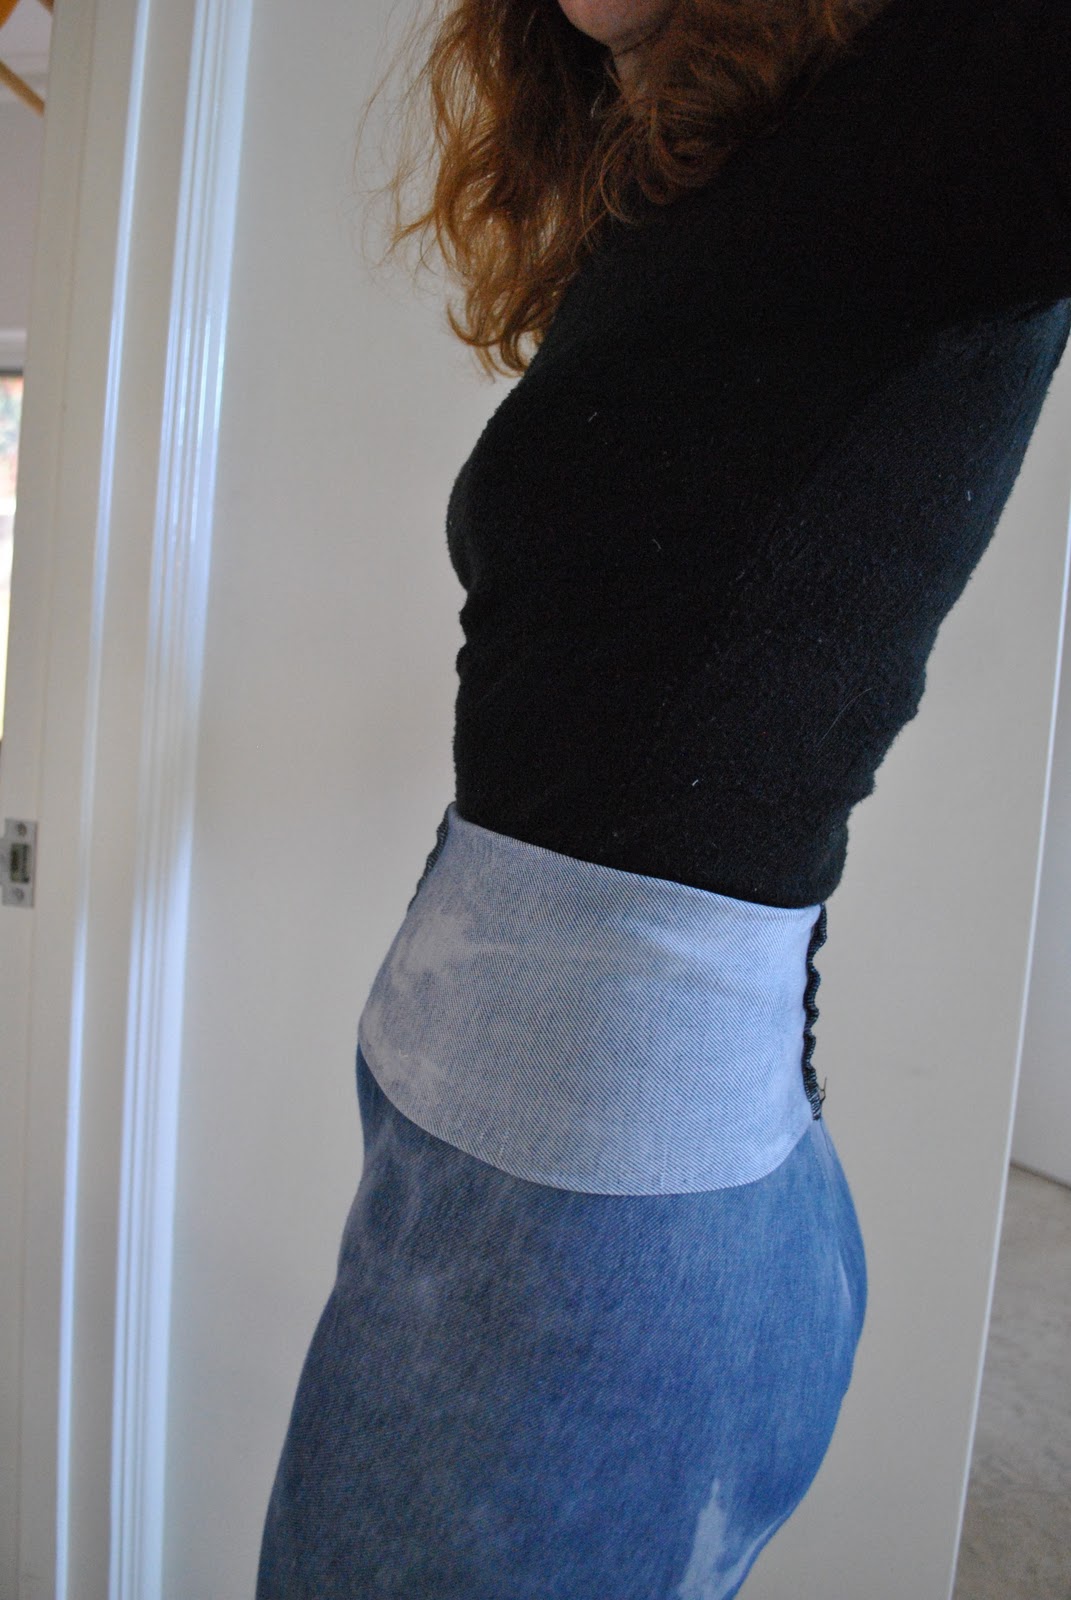
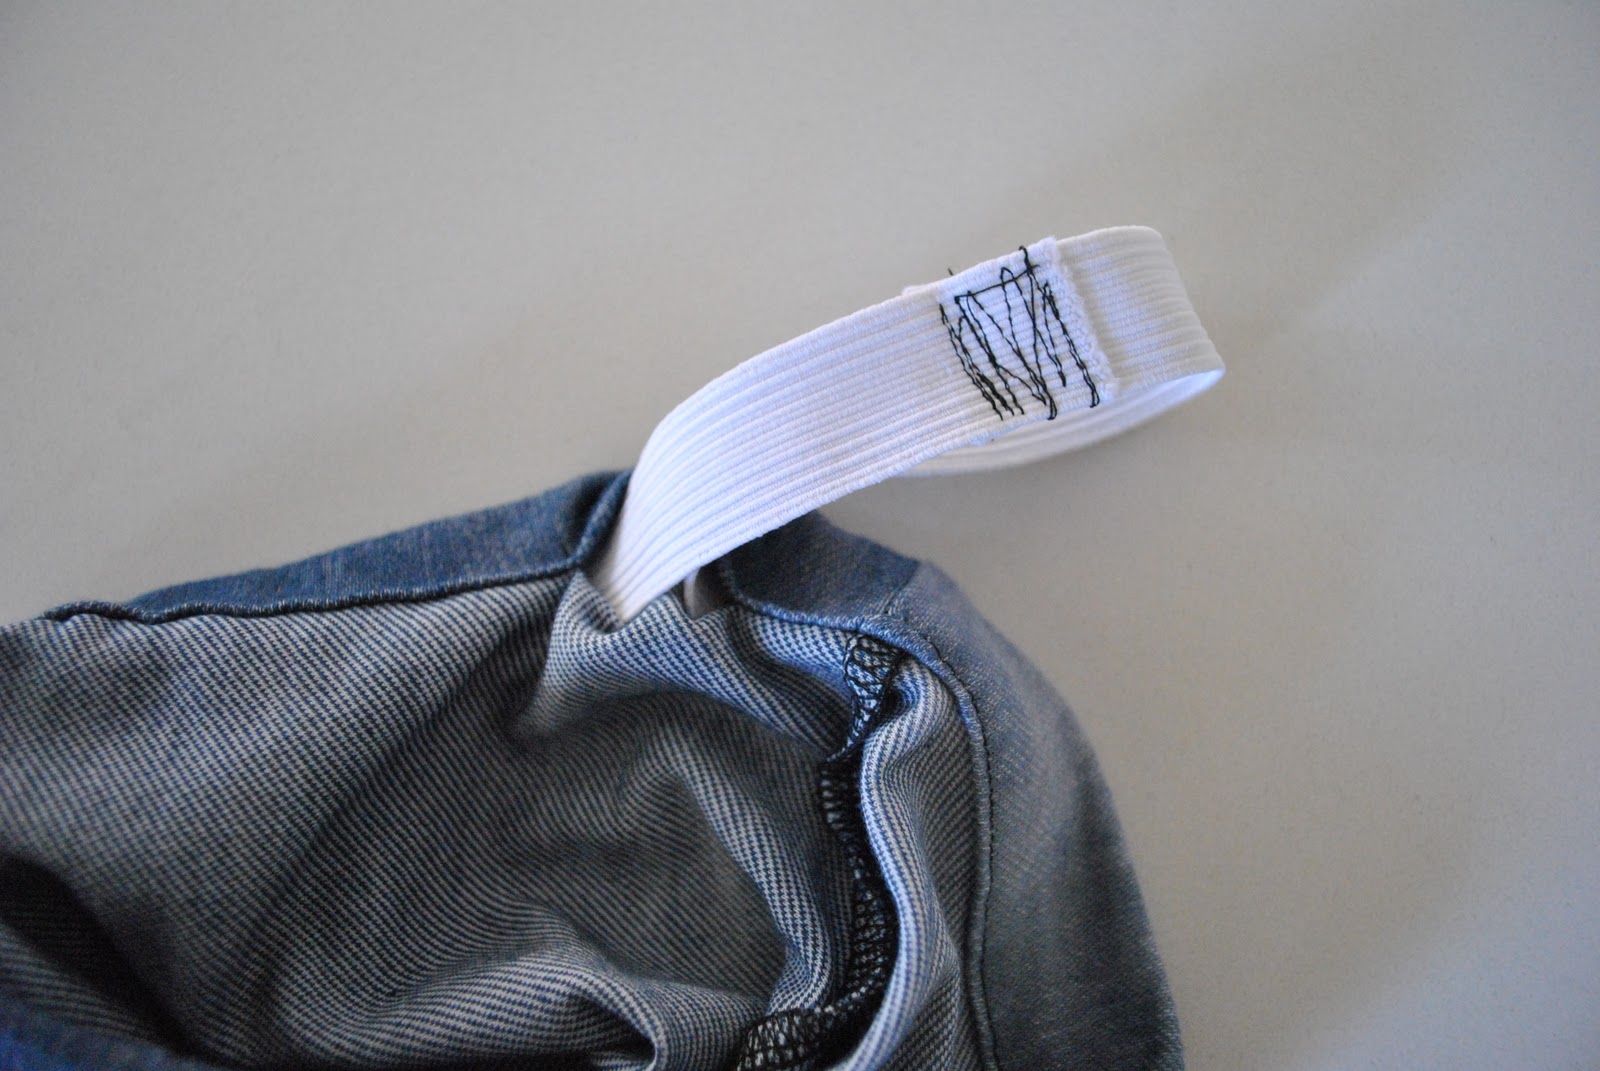
Now it is the time to sew a waist casing for your elastic, do this in the normal way as you would for any elastic waistband. To keep the elastic straight in its casing, I always sew a line of vertical stitching over the casing with the elastic inside along the centre front seam and also at the back. Furthermore, I sew a cross at the back of the waistband, or some similar marking, so I can tell at a glance which is the back of the tights when I am pulling them on to wear.

Oooo! This is fantastic, thank you so much for posting this.
Wow this is awesome! Thanks for sharing. (and for stating that you should get "someone you trust" to help, hehe!)
MODELmumma
Firstly, what a beautiful location for your photographs – the colours are divine …. secondly, awesome tutorial – very clever indeed!
Admirable tights, and a terrific tutorial. Thanks.
What a good idea to make thighs yourself. And you look great in them!
This is fantastic. Thank you so much for posting this. I got some fabrics in my stash that this would be good for.
Angela
Wow fantastic. Thank you so much for this tutorial. I looove tights!
THANK YOU!!!! I've been waiting for this post since you mentioned it awhile ago. SO excited to make my own leggings!
As usual, you totally rock. Thanks, Carolyn!
Wow!!! I wonder if I am brave enough to try this …. thanks for the labor of love …
Two clarifications : you used two way stretch, not four way stretch jersey, right?
And, the stretch is up and down your leg, not around your leg, correct? I guess that way it won't bag at the knees, ankles, and heels?
Third question : if you just want leggings, you would stop the process at the ankle? Is this the only adjustment?
Great post. Is that Cottlesloe Beach?
This is a fantastic tutorial. This is not just leggings…. it's Tights 🙂 I love them and can't wait to try making one for myself.
Love the tights! thanks so much for the tutorial.
what an awesome tutorial! note to self… train man-of-house as pinning assistant…
Thankyou for your comments!
Now, Caroline; 1. I used two way stretch fabric. I've never heard of four way stretch fabric, sorry!
2. The grainline on these tights is around the legs, NOT up and down each leg. This is the normal layout for stretch fabric pants and bathers, in my experience
3. If you want leggings, then just chop the fabric at 1cm below ankle length (or your desired length) and hem, a much easier project. The foot and ankle part is the trickiest section of these tights to get right.
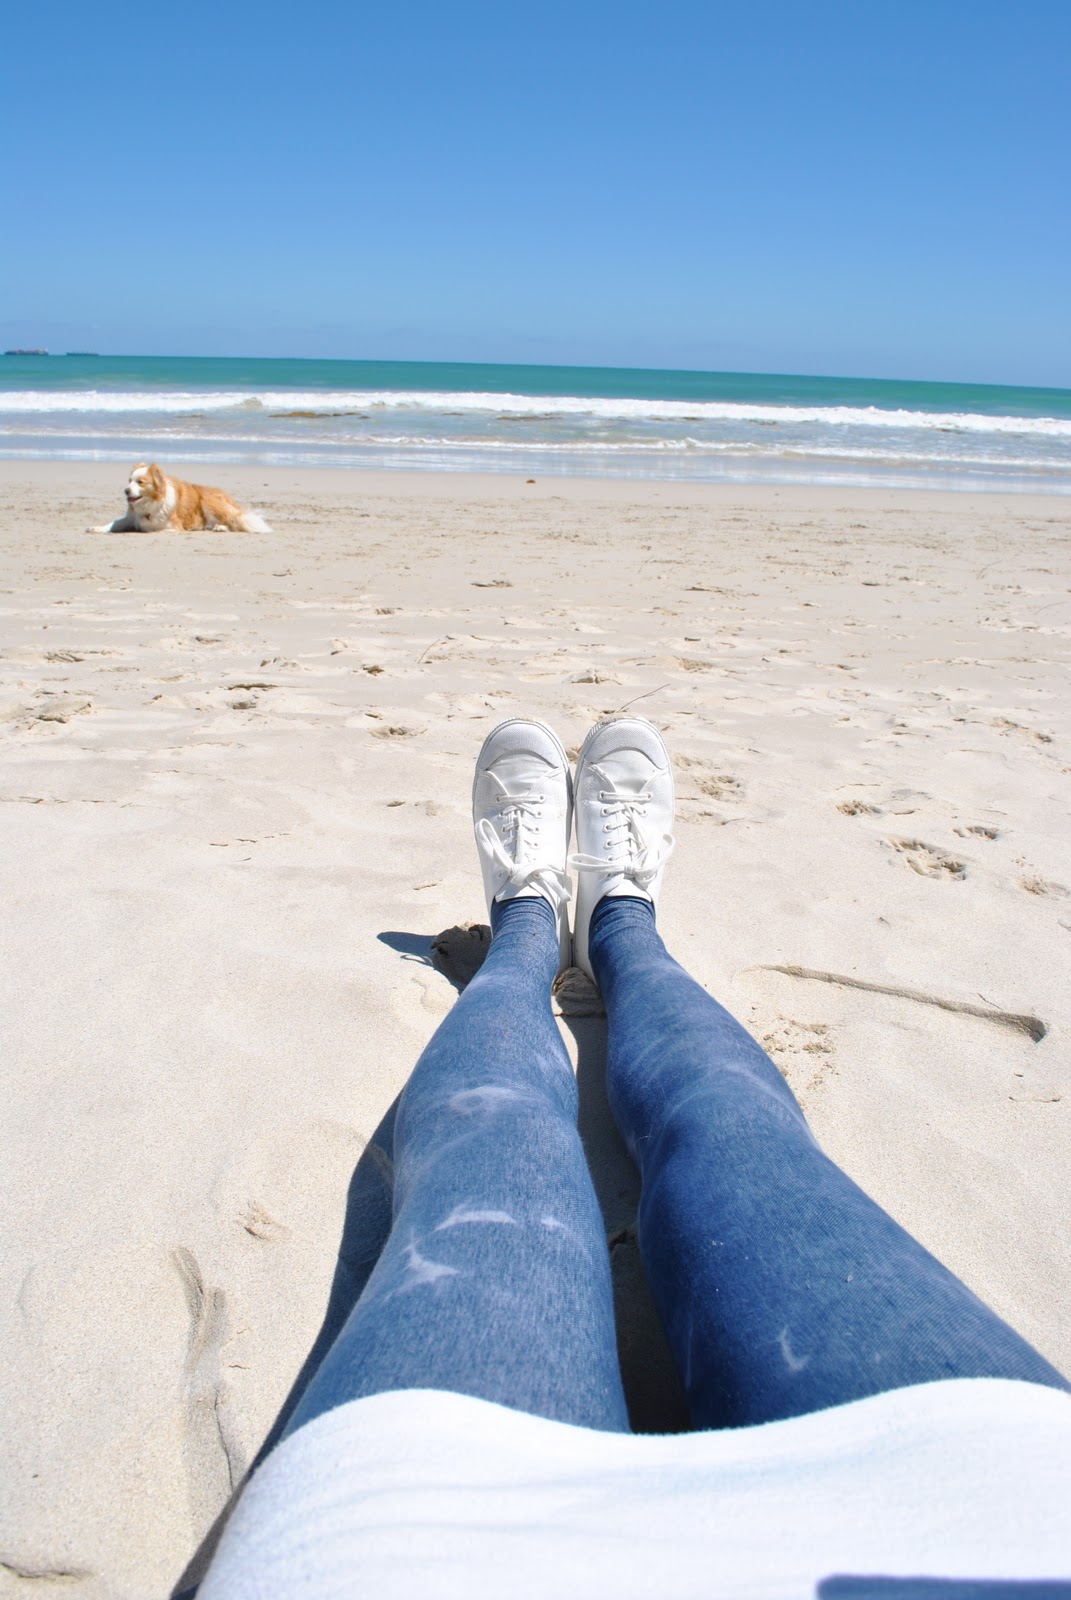
And Gail; no, this is not Cottesloe beach. I love that beach but I wouldn't be allowed to take my dog to that one. This is officially called Dog Beach (yes, really) and it is opposite Mosman Park.
Wowza!
Adds new meaning to the expression: "being hot at the beach."
One of the many ways you make it good to be me.
(Admiring Hubby)
Beautiful sentiment:)
Ooo, cool! I wonder if the ten year old could be trusted to help with this…
I think Caroline is asking whether there is stretch in both the length as well as the crosswise grain; I believe it has both, right? I think tights wouldn't work very well in a fabric that didn't. (Some people refer to a fabric that only stretches across-grain as 2-way stretch, while a fabric that stretches in all four directions would be a 4-way stretch.)
I was just puzzling over how to make these myself!! Thanks for the help, the foot portion was confusing me so much.
Ahhh! This is exciting! I've been wondering for awhile now whether it was possible to make your own tights. Thank you so much for posting this, can't wait to try it out!! 😀
I think these tights look amazing and I especially love them with these little white sneakers! So cute!!
Could you adapt these to work as thigh highs?
Great!
So very cool. Somehow I missed when you posted this originally. I wonder how hard it would be to get my girls to be still for me to do this.
How did I miss this post, but with winter heading our way, I really need to look into this! Thank you for the tutorial.
thanks for this great tutorial!
Just what I've been looking for! …and also because I'm heading to Melbourne I want something warm and covering my ankles which is where leggings just don't work with ballet flats. Thank you so much!
I've just bookmarked this! What a great method to make something that you know will fit. Now to make sure I have some appropriate fabric to make some up before next winter comes!
Very cool. If it wasn't so much work I'd make a lot more, but for now I'll stick with my Nononsensetights! Thanks for posting this guide… it will probably be useful for Halloween!
شركات عزل خزانات بالرياض
شركة رش مبيدات بالخرج
شركات نظافة بالرياض
شركة العميري لتنظيف اسطح وخزانات بالرياض
شركة تنظيف فلل بالرياض
شركة كشف تسربات المياه بالرياض
شركة القحطاني لنقل العفش بالرياض
شركة كشف تسربات بالرياض
شركة نقل اثاث بالرياض
شركة تخزين عفش بالرياض
شركة تنظيف خزانات بالدمام
شركة كشف تسربات بالمدينة
شركة كشف تسربات بالدمام
شركات مكافحة الحشرات فى الدمام
شركة تنظيف بالأحساء
here
here
here
here
here
شركة القمة للتنظيف بالرياض
شركة تنظيف خزانات المياه بالرياض
تنظيف فلل بالرياض
شركة تنظيف بالرياض
شركة تنظيف منازل بالرياض
كشف التسربات بالرياض
شركة تنظيف فلل بالرياض
شركة تنظيف مسابح بالرياض
شركة عزل اسطح بالرياض
شركة زهرة لتخزين أثاث بالرياض
شركة نقل اثاث بالرياض
نقل اثاث
شركة مكافحة حشرات بالرياض
كشف تسربات المياه بالرياض
شركة تسليك مجارى بالرياض
شركة الشامل لتنظيف البيوت بالرياض
شركة تنظيف منازل بالرياض
شركة كشف تسربات المياه بالدمام
شركة رش مبيدات بالدمام
شركة تخزين اثاث بجدة
this is so cool – thank you for sharing! I really want to try making some tights this winter – I am always having to fuss with my RTW ones, but since I wear mostly all dresses and skirts, tights are essential to stay warm. never thought of making my own. great tutorial, thanks again! 🙂
i think im going to copy this! i cant seem to find comfortable tights (unnatural fiber) and they all seem to be too tight on the thighs. also i just noticed that your hubby comments on your post – how very very cute 😀
شركة تسليك مجارى بالجبيل
شركة تسليك مجارى بالاحساء
شركة تنظيف بالجبيل
شركة تنظيف بالعيون
شركة تنظيف بالهفوف
شركة تنظيف خزانات بالدمام
شركة تنظيف شقق بالدمام
شركة تنظيف فلل بالدمام
شركة تنظيف مجالس بالدمام
شركة مكافحة حشرات بالاحساء
شركة مكافحة حشرات بالجبيل
شركة تنظيف بالدمام
شركة مكافحة حشرات بالدمام
شركة رش مبيدات بالدمام
شركة تسليك مجارى بالدمام
women's leggings
We have a newly adopted 13 year old daughter whom we just had baptized and christened as an infant thru the infant baptism program at our parish.We did the traditional white gown and bonnet on her[made by a relative for her] with white tights and white mary jane shoes.her tights had six rows of ruffles sewn across the back and a pair of white rubberpants sewn into the waist.her diaper was cloth,and the tights with the rubberpants in them looked very cute and infant like under her gown.when she makes her First holy communion she will wear the tights and rubberpants with her communion dress.
Sounds kinda scary with the rubber pants. How did that go over with your new daughter?
شركة تنظيف بالرياض
شركة تنظيف فلل بالرياض
شركة تنظيف شقق بالرياض
شركة تنظيف خزنات بالرياض
شركة مكافحة حشرات بالرياض
شركة تخزين اثاث بالرياض
شركة ت تسليك مجارى بالرياض
شركة تنظيف مجالس بالرياض
Previously leggings used to come in only white or black. But now you can buy People leggings in all possible colors that match your tops. Leggings are loved by many of all ages because it very comfortable and is more durable than any other clothing. When you want to go out somewhere in a hurry, you always pick leggings rather than any other clothing because leggings always look attractive.
thanx for share
Thanks for these instructions. I never wear stockings but there is a period in autumn and spring that is too cold for bare legs, and too warm for normal tights or leggings.
I bought some micro mesh leggings (like these instagram ones) on ebay a few years ago, which are perfect for these in between seasons, but they are 1. barely long enough even for my short 5’2″, and 2. hard to find anymore. I bought some micro stretch mesh with plans to make some more, including some with feet, but have been putting it off. Your instructions will work perfectly.
Aww… this is truly an awesome tutorial… it’s just that I hate pinning things to myself and drafting patterns… I would much prefer a ready-made pattern. Really, great job, though. Maybe I’ll try it one day. I really do need to make my own winter stockings, as the ones in the style I need are only one size locally.
thanks alot for post
[url=http://nour-clean.com/%D8%B4%D8%B1%D9%83%D8%A9-%D9%85%D9%83%D8%A7%D9%81%D8%AD%D8%A9-%D8%AD%D8%B4%D8%B1%D8%A7%D8%AA-%D8%A8%D8%A7%D9%84%D8%AF%D9%85%D8%A7%D9%85//]شركة مكافحة حشرات بالدمام
[/url]
[url=http://nour-clean.com/%D8%B4%D8%B1%D9%83%D8%A9-%D9%83%D8%B4%D9%81-%D8%AA%D8%B3%D8%B1%D8%A8%D8%A7%D8%AA-%D8%A8%D8%A7%D9%84%D8%AF%D9%85%D8%A7%D9%85//]شركة كشف تسربات بالدمام[/url]
[url=http://nour-clean.com/%D8%B4%D8%B1%D9%83%D8%A9-%D8%AA%D9%86%D8%B8%D9%8A%D9%81-%D8%A8%D8%A7%D9%84%D8%AF%D9%85%D8%A7%D9%85//]شركة تنظيف بالدمام[/url]
[url=http://nour-clean.com/%D8%B4%D8%B1%D9%83%D8%A9-%D9%86%D9%82%D9%84-%D8%A7%D8%AB%D8%A7%D8%AB-%D8%A8%D8%A7%D9%84%D8%AF%D9%85%D8%A7%D9%85//]شركة نقل اثاث بالدمام
[/url]
[url=http://nour-clean.com/%D8%B4%D8%B1%D9%83%D8%A9-%D8%B1%D8%B4-%D9%85%D8%A8%D9%8A%D8%AF-%D8%A8%D8%A7%D9%84%D8%AF%D9%85%D8%A7%D9%85//]شركة رش مبيد بالدمام
[/url]
[url=http://nour-clean.com/%D8%B4%D8%B1%D9%83%D8%A9-%D8%B9%D8%B2%D9%84-%D8%A7%D8%B3%D8%B7%D8%AD-%D8%A8%D8%A7%D9%84%D8%AF%D9%85%D8%A7%D9%85//]شركة عزل اسطح بالدمام[/url]
[url=http://nour-clean.com/%D8%B4%D8%B1%D9%83%D8%A9-%D8%AA%D9%86%D8%B8%D9%8A%D9%81-%D8%AE%D8%B2%D8%A7%D9%86%D8%A7%D8%AA-%D8%A8%D8%A7%D9%84%D8%AF%D9%85%D8%A7%D9%85//]شركة تنظيف خزانات بالدمام
[/url]
[url=http://nour-clean.com/%D8%B4%D8%B1%D9%83%D8%A9-%D8%AA%D9%86%D8%B8%D9%8A%D9%81-%D9%85%D8%AC%D8%A7%D9%84%D8%B3-%D8%A8%D8%A7%D9%84%D8%B1%D9%8A%D8%A7%D8%B6//]شركة تنظيف مجالس بالرياض[/url]
[url=http://nour-clean.com/%D8%B4%D8%B1%D9%83%D8%A9-%D8%AA%D9%86%D8%B8%D9%8A%D9%81-%D8%AE%D8%B2%D8%A7%D9%86%D8%A7%D8%AA-%D8%A8%D8%A7%D9%84%D8%B1%D9%8A%D8%A7%D8%B6-%D9%85%D8%B9-%D8%A7%D9%84%D8%B9%D8%B2%D9%84-%D9%88%D8%A7%D9%84//]شركة تنظيف خزانات بالرياض مع العزل والتعقيم[/url]
[url=http://nour-clean.com/%D8%B4%D8%B1%D9%83%D8%A9-%D8%AA%D9%86%D8%B8%D9%8A%D9%81-%D9%81%D[url=http://nour-clean.com/%D8%B4%D8%B1%D9%83%D8%A9-%D9%85%D9%83%D8%A7%D9%81%D8%AD%D8%A9-%D8%AD%D8%B4%D8%B1%D8%A7%D8%AA-%D8%A8%D8%A7%D9%84%D8%AF%D9%85%D8%A7%D9%85//]شركة مكافحة حشرات بالدمام
[/url]
[/url]
[url=http://nour-clean.com/%D8%B4%D8%B1%D9%83%D8%A9-%D8%AA%D9%86%D8%B8%D9%8A%D9%81-%D9%81%D9%84%D9%84-%D8%A8%D8%A7%D9%84%D8%B1%D9%8A%D8%A7%D8%B6//]شركة تنظيف فلل بالرياض[/url]
[url=http://nour-clean.com/%D8%B4%D8%B1%D9%83%D8%A9-%D9%83%D8%B4%D9%81-%D8%AA%D8%B3%D8%B1%D8%A8%D8%A7%D8%AA-%D9%8A%D8%A7%D9%84%D8%B1%D9%8A%D8%A7%D8%B6//]شركة كشف تسربات يالرياض[/url]
[url=http://nour-clean.com/%D8%B4%D8%B1%D9%83%D8%A9-%D8%B1%D8%B4-%D9%85%D8%A8%D9%8A%D8%AF-%D8%A8%D8%A7%D9%84%D8%B1%D9%8A%D8%A7%D8%B6//]شركة رش مبيد بالرياض[/url]
[url=http://nour-clean.com/%D8%B4%D8%B1%D9%83%D8%A9-%D9%85%D9%83%D8%A7%D9%81%D8%AD%D8%A9-%D8%AD%D8%B4%D8%B1%D8%A7%D8%AA-%D8%A8%D8%A7%D9%84%D8%B1%D9%8A%D8%A7%D8%B6//]شركة مكافحة حشرات بالرياض[/url]
Hey Carolyn,
Thank you for this post – I would be able to make winter leggings for myself.
Could you recommend fabrics for warm winter leggings? I am a little confused when browsing for suitable fabric.
This is great, thanks so much for sharing! I made a pair this afternoon with 4-way (50-75%) stretch knit from So Sew English. I love them!