Tag Archives: Pants

paper-bag waist

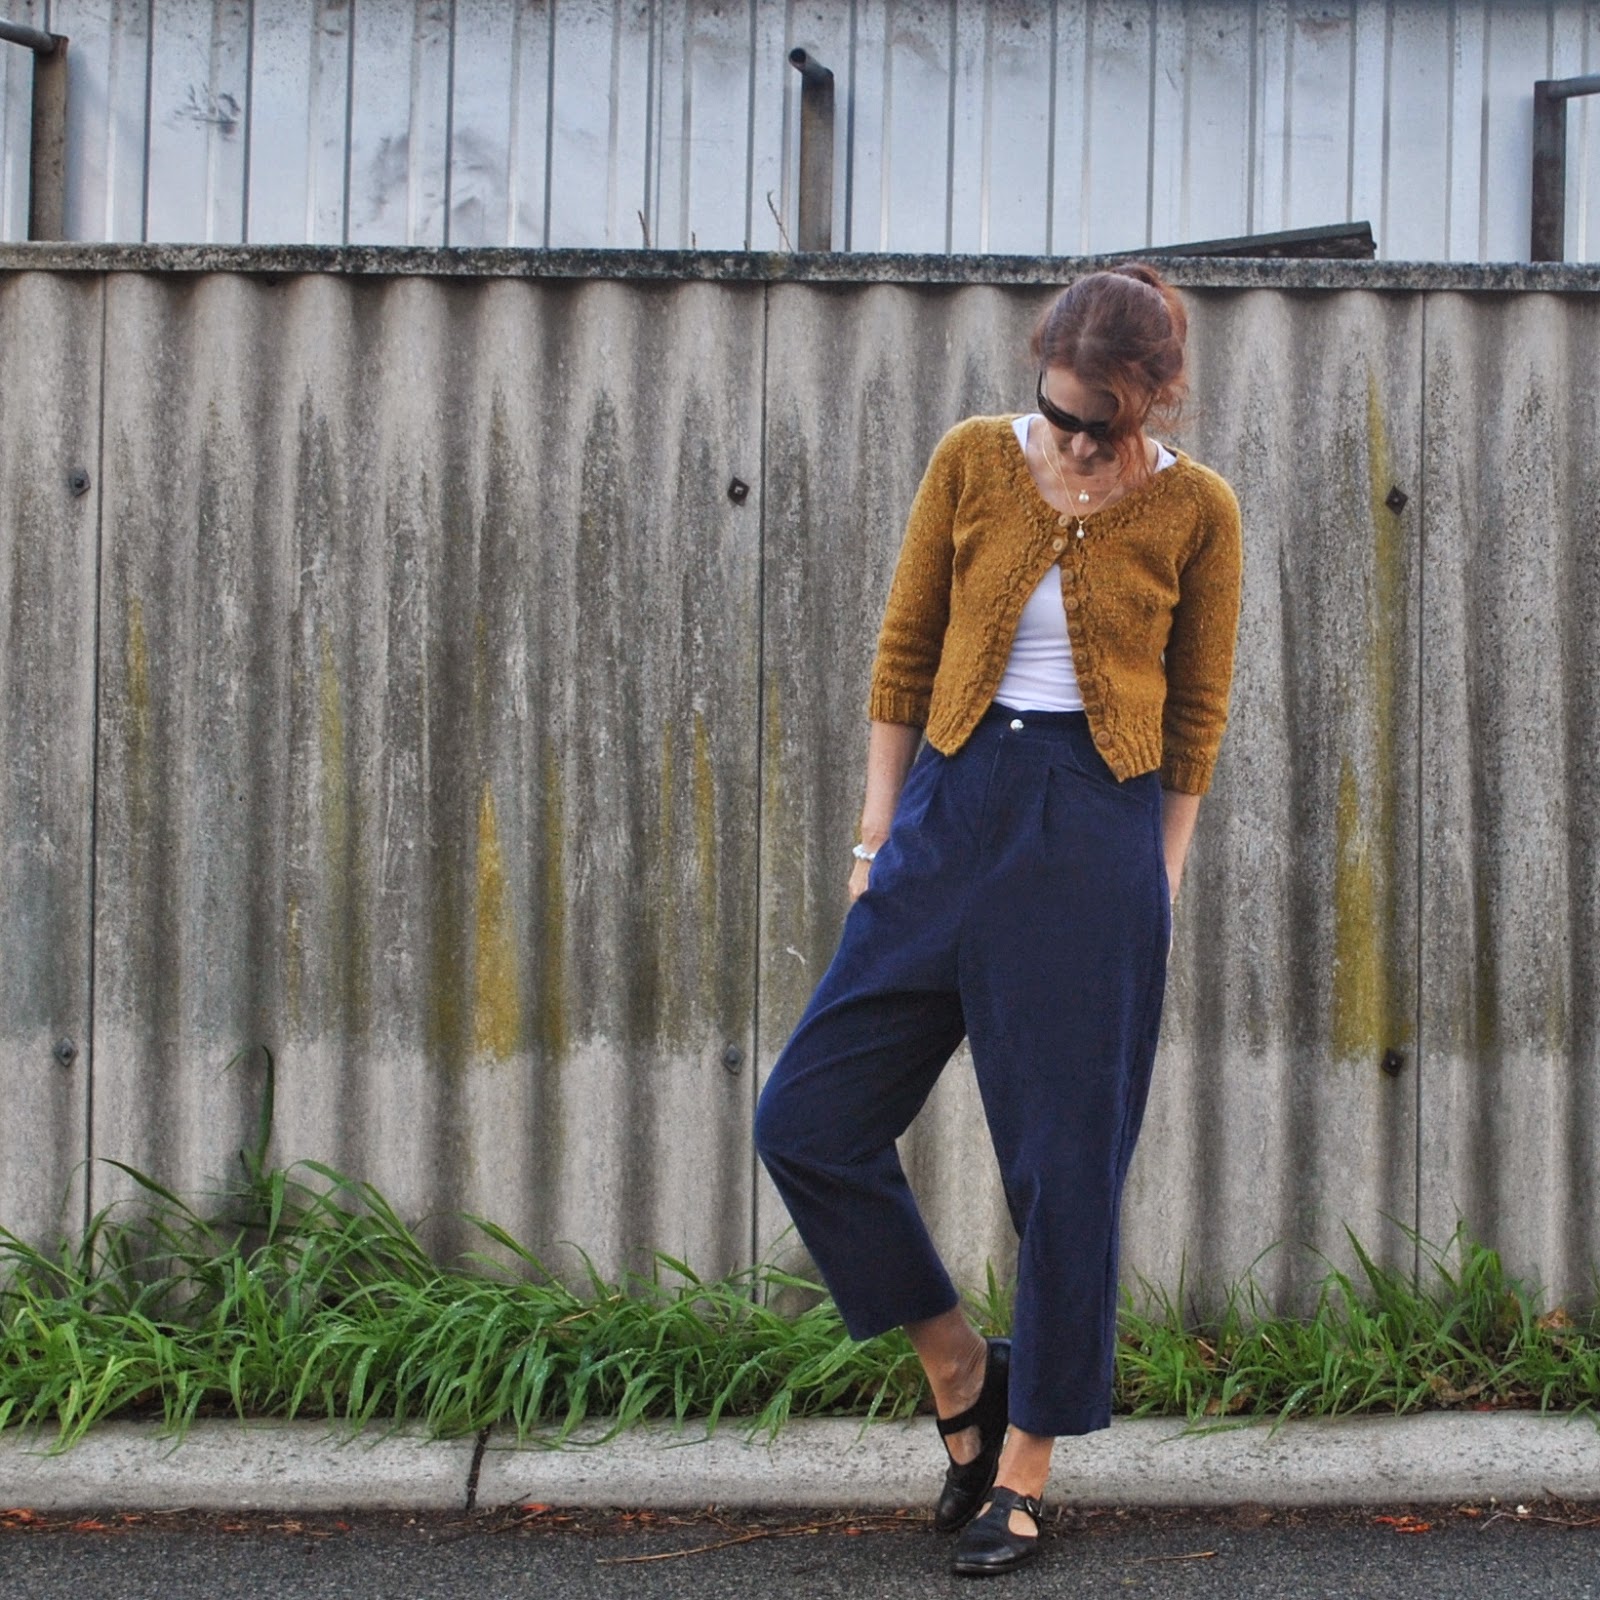
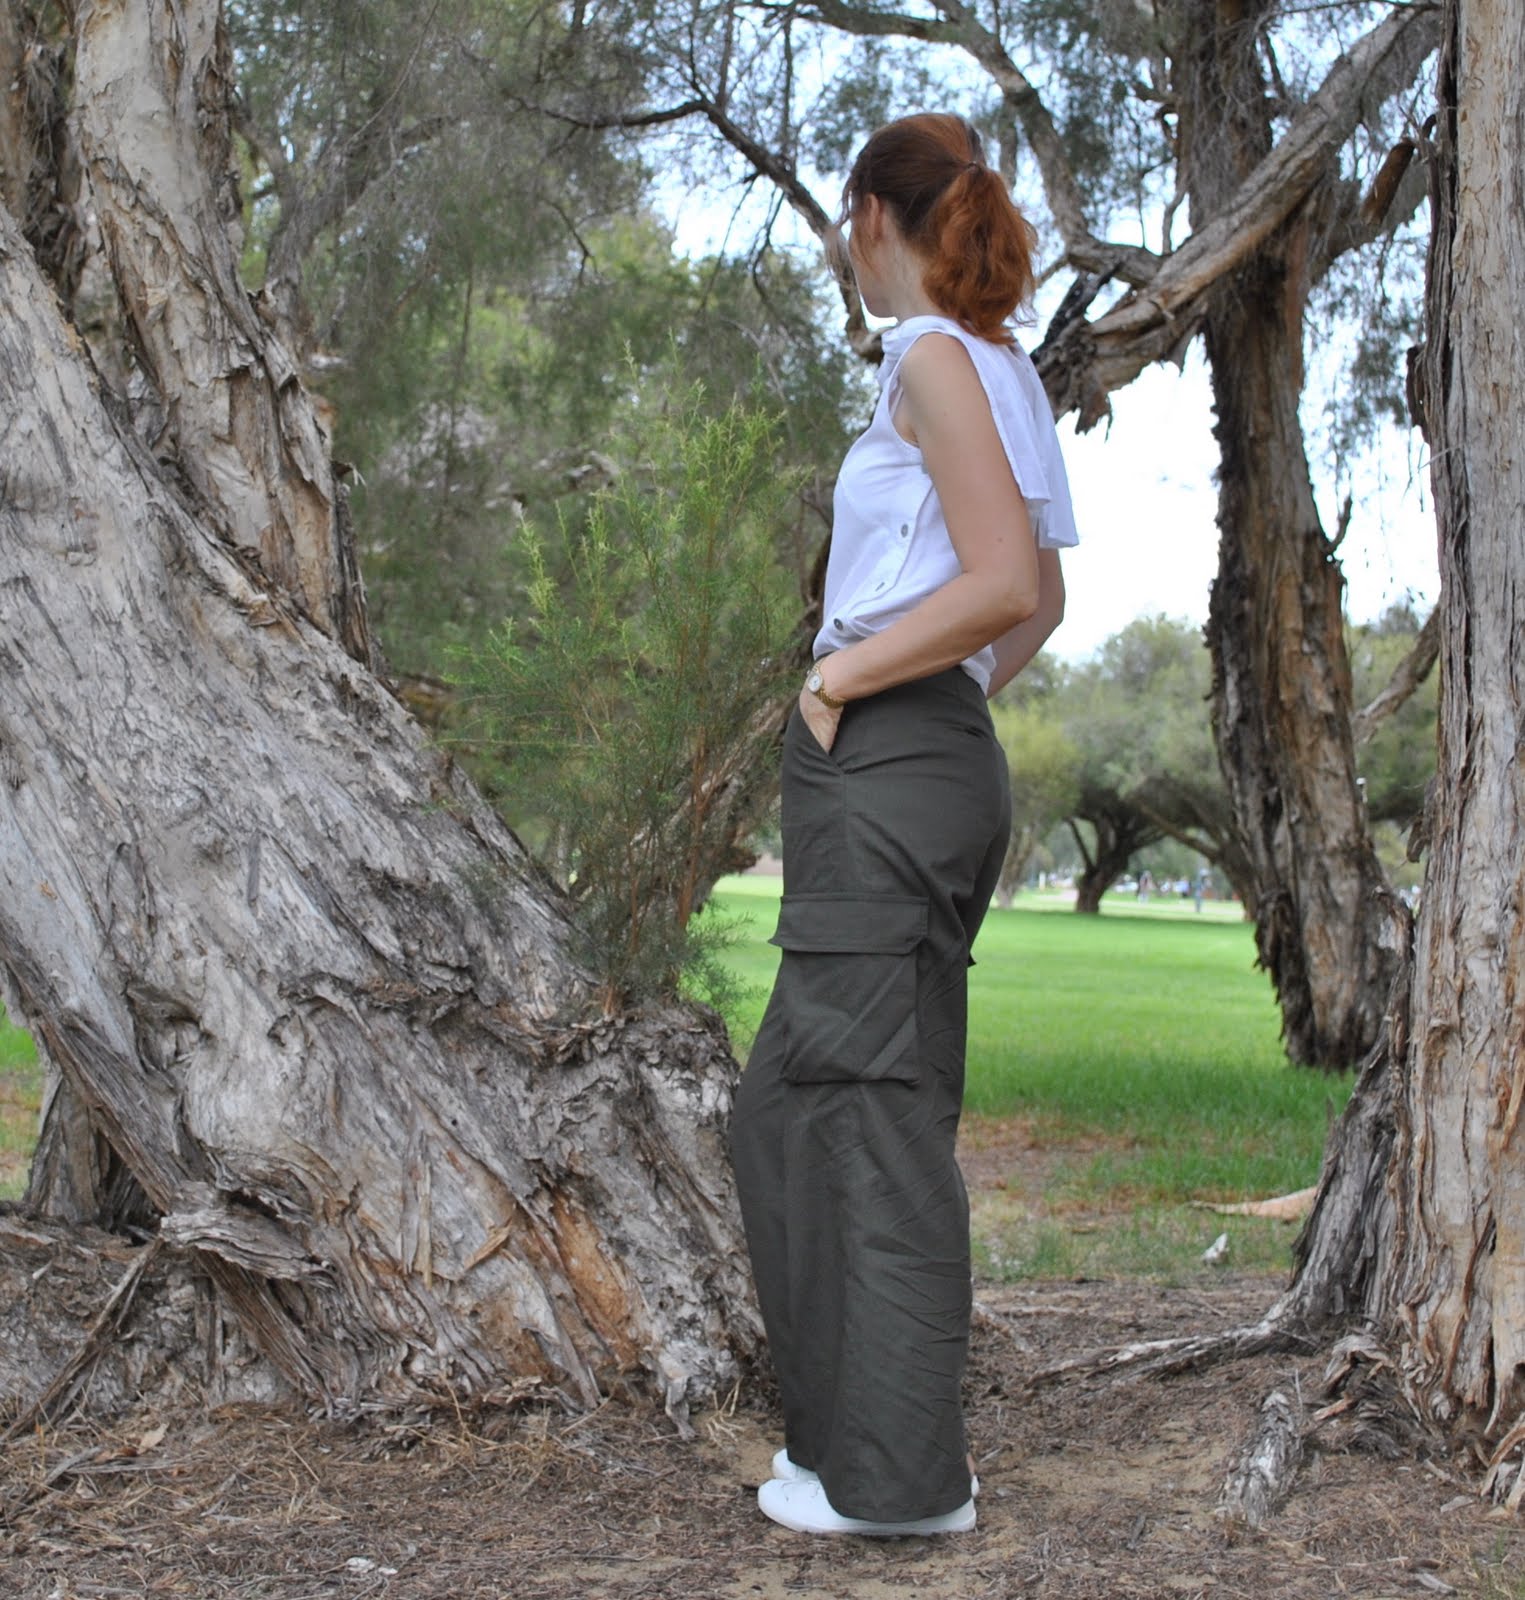
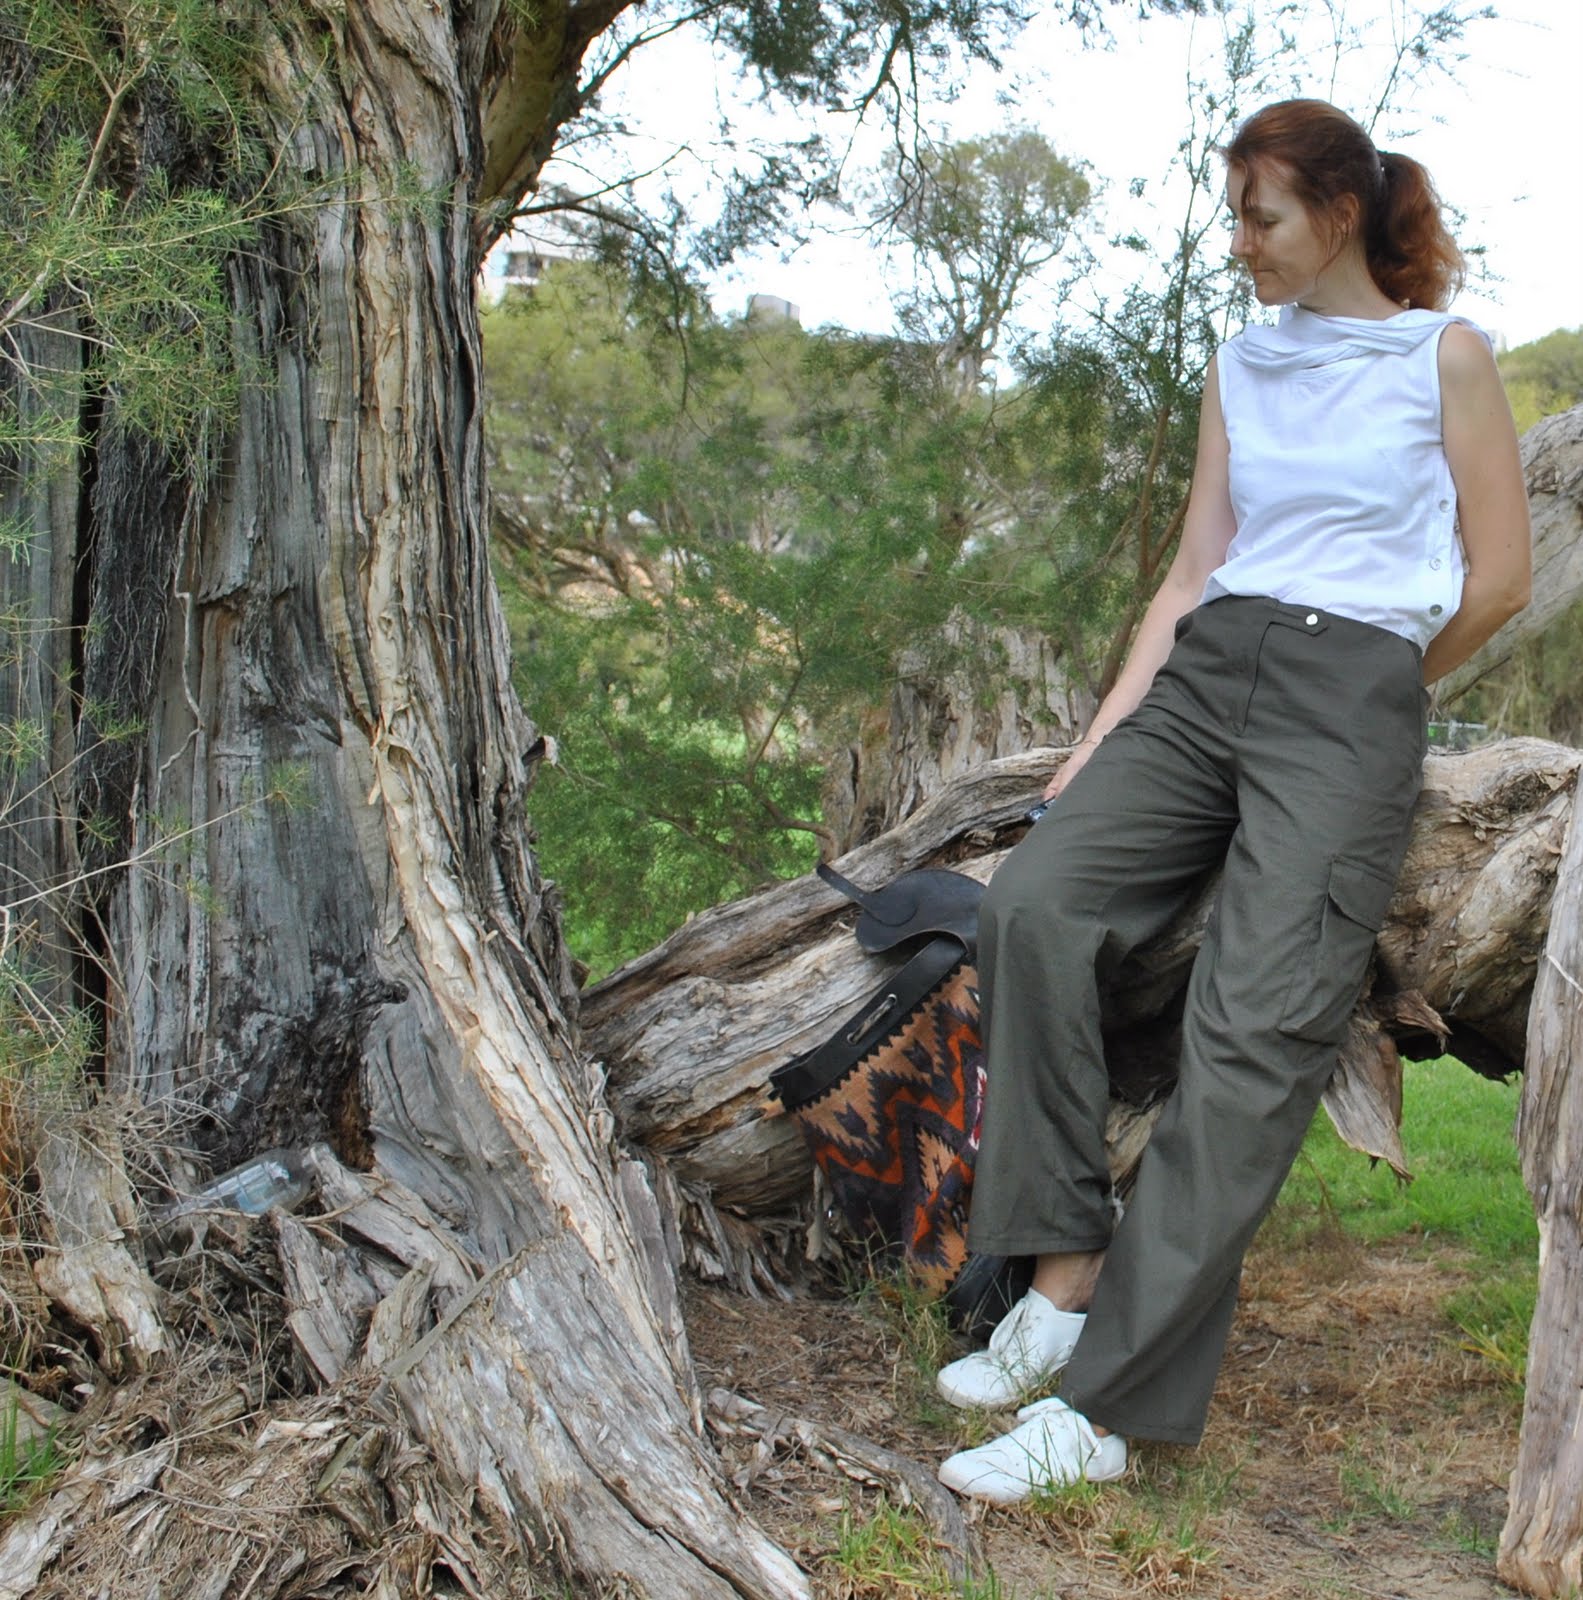
I’ve just made these ridiculously comfy trousers!  perfect for lounging around while you do your work-from-home thing in these newly strange and scary times.  I adore them unreservedly.  Well, it’s the paper-bag waist, have had a soft spot for them since the 80’s… incidentally, you know how they say that if you remember a trend the first time around then you should scrupulously avoid it the second time around?  Well, what a load of tosh!  There’d be no trends left for us if we followed that crazy advice!

Because yes indeedy, this is actually a familiar little style that pops its head up pretty frequently to the joy of us who do love for our trousers to be comfortable but at the same time have an abiding aversion to an elastic waist.  Personally, I reckon the paper-bag waist isn’t so much of a “trend” any more but can rightfully claim the classic tag.

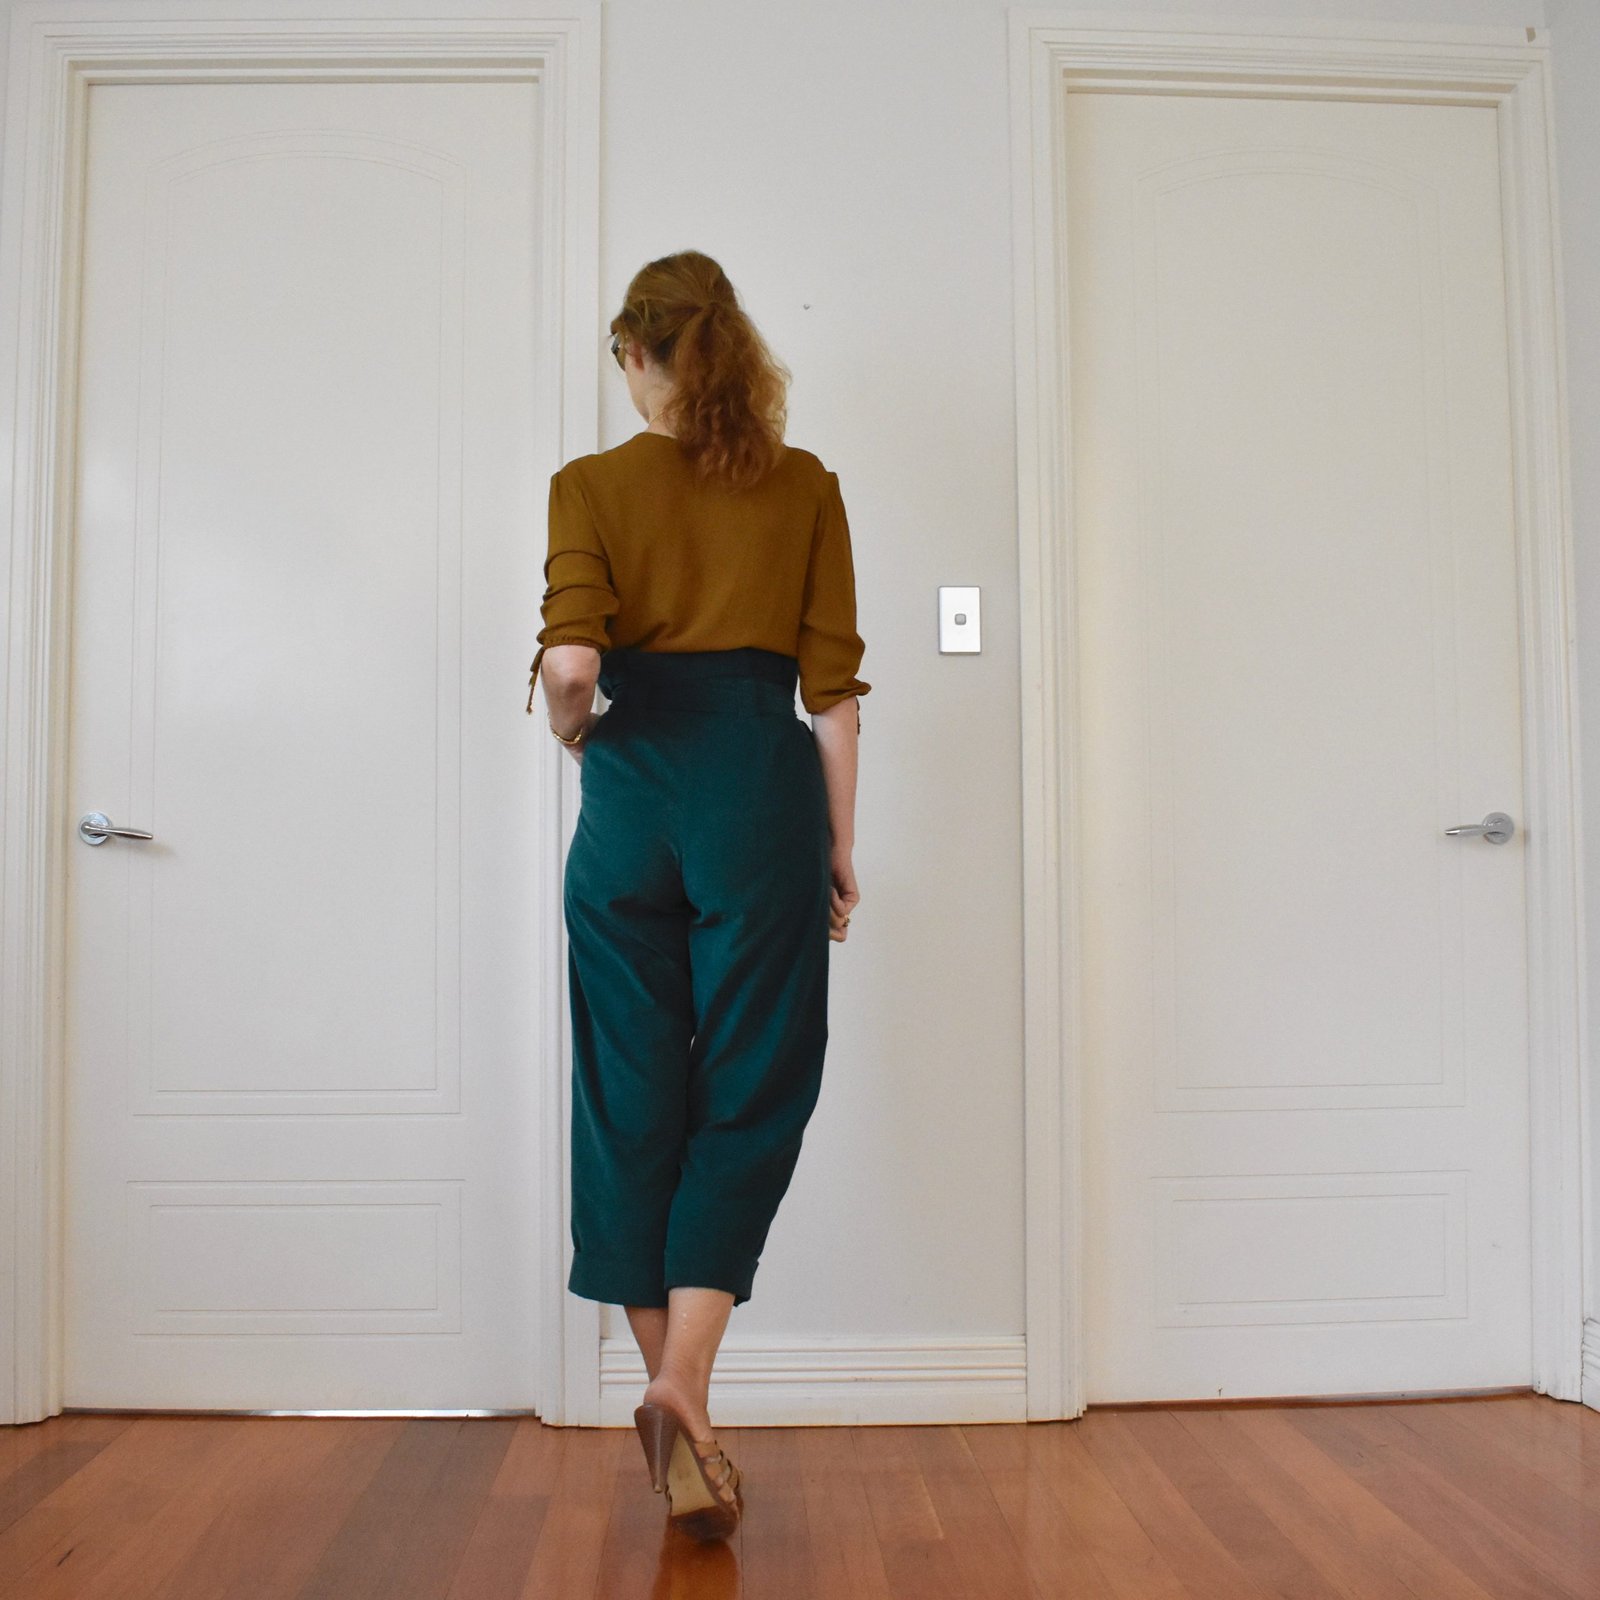
I made them using this really gorgeous, quite thin, bottle green cotton corduroy from Minerva Crafts… it’s absolutely beautiful stuff. Then again I’ve always been a huge corduroy fan, it’s one of my favourite fabrics of all time actually, for winter things I mean.  It’s like velvet, but better; easier to sew and wear, and to care for too.  I ordered quite a lot of this colour way and I have enough leftover for a simple little dress or a tunic or something.  Hmmm. brain clogs a whirling!!

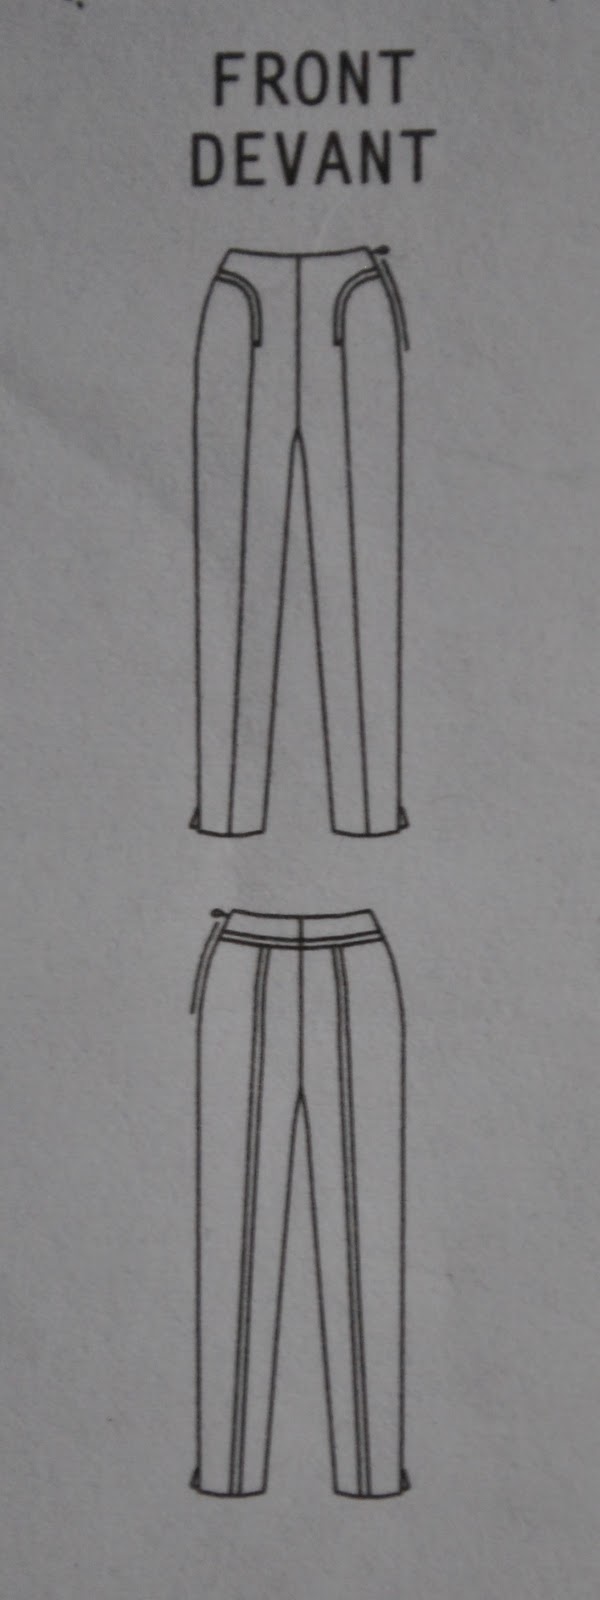
The pattern is the Jasmin trousers, by Fibremood.  Fibremood releases a great little range of patterns each season for women and children, I really look forward to their releases and love checking them out.  Each issue caters to a range of sewing levels, usually featuring some easy-wearing basics and styles that are both chic and comfortable, and a nice scattering of surprises with every issue.  I thought this style was one of the surprises, but I just found myself homing in on it straight away!  🙂

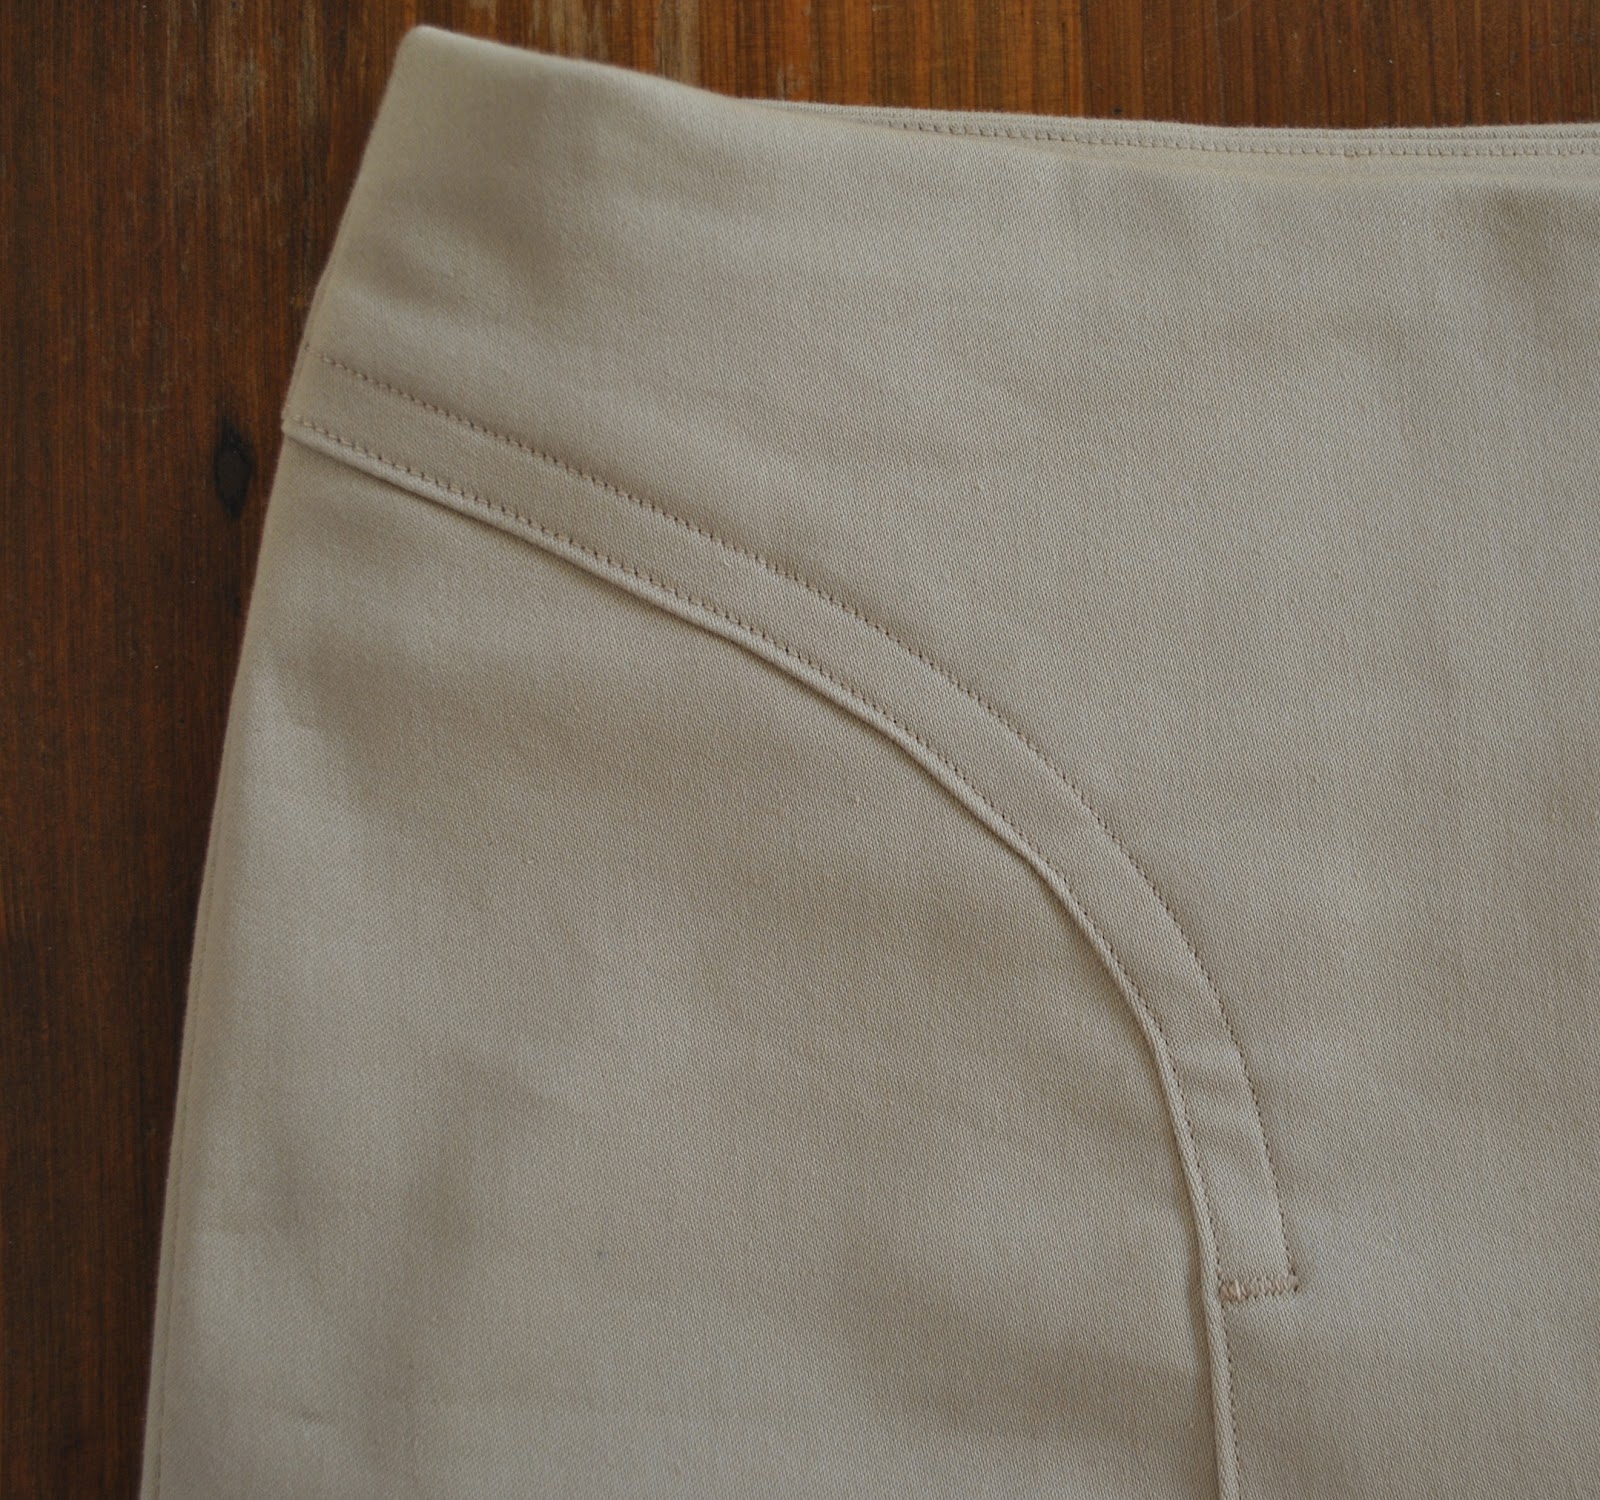
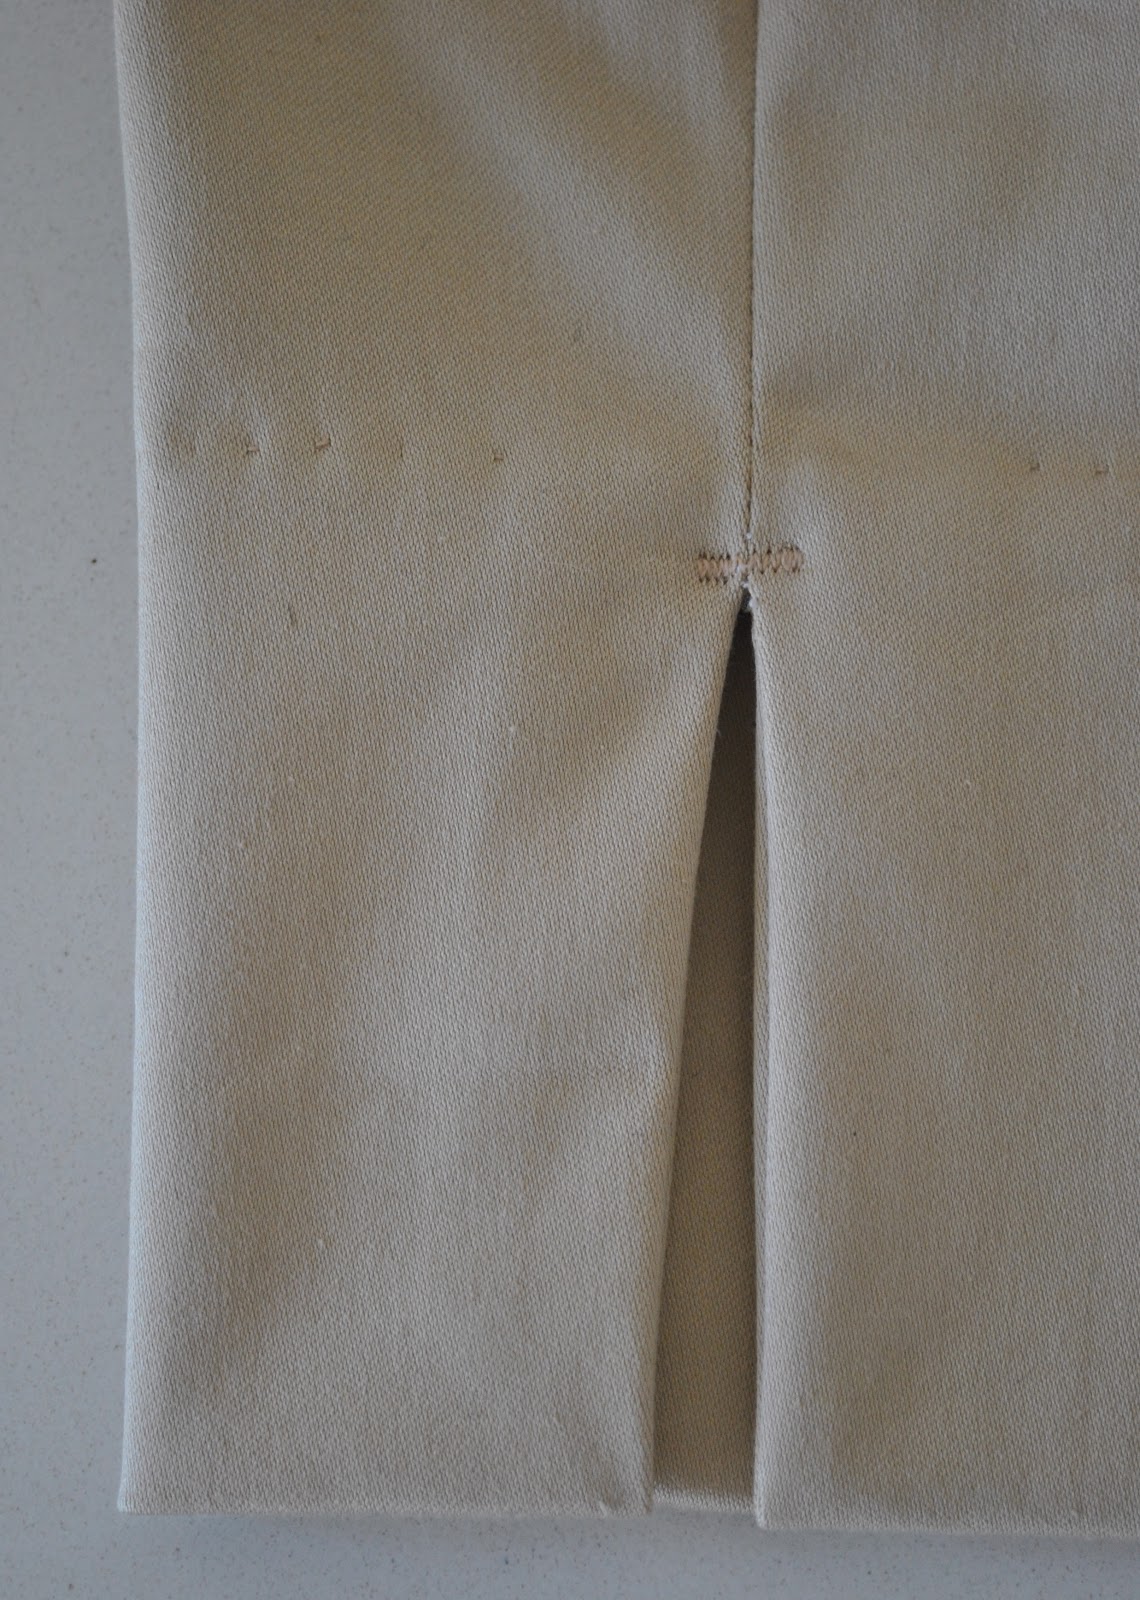
These ones have very up-to-the-minute, turned-up cuffs on cropped legs, a good amount of room in the seat without being excessively baggy – remember these?  although I ended up adoring those too, once I’d taken them in a bit!!  The Jasmin trousers are easy and straightforward to make and I thought the fly front very well explained.  I often find it helpful to draw and cut out a stitching guide for the topstitching of the fly front curve if a pattern does not provide it, and this one doesn’t; however it’s a simple matter to draw one up.

The pockets are nice and and roomy enough.  I hand stitched the top edge of mine to the waistband facing edge.

I love how the paper bag waist is cinched in with a big wide self-belt to define the waist.  Acting on instinct I cut my belt out for the biggest size with a plan to shorten it later if it proved too long.  It may or may not be ok, partly because I don’t have the required D-rings of the right width to finish it, and I didn’t really want to head out to Spotlight during these isolation times, just for D-rings; so I’ve had to resort to just tying the belt in a knot.  I might shorten it still but just going to see how it goes for a little while.

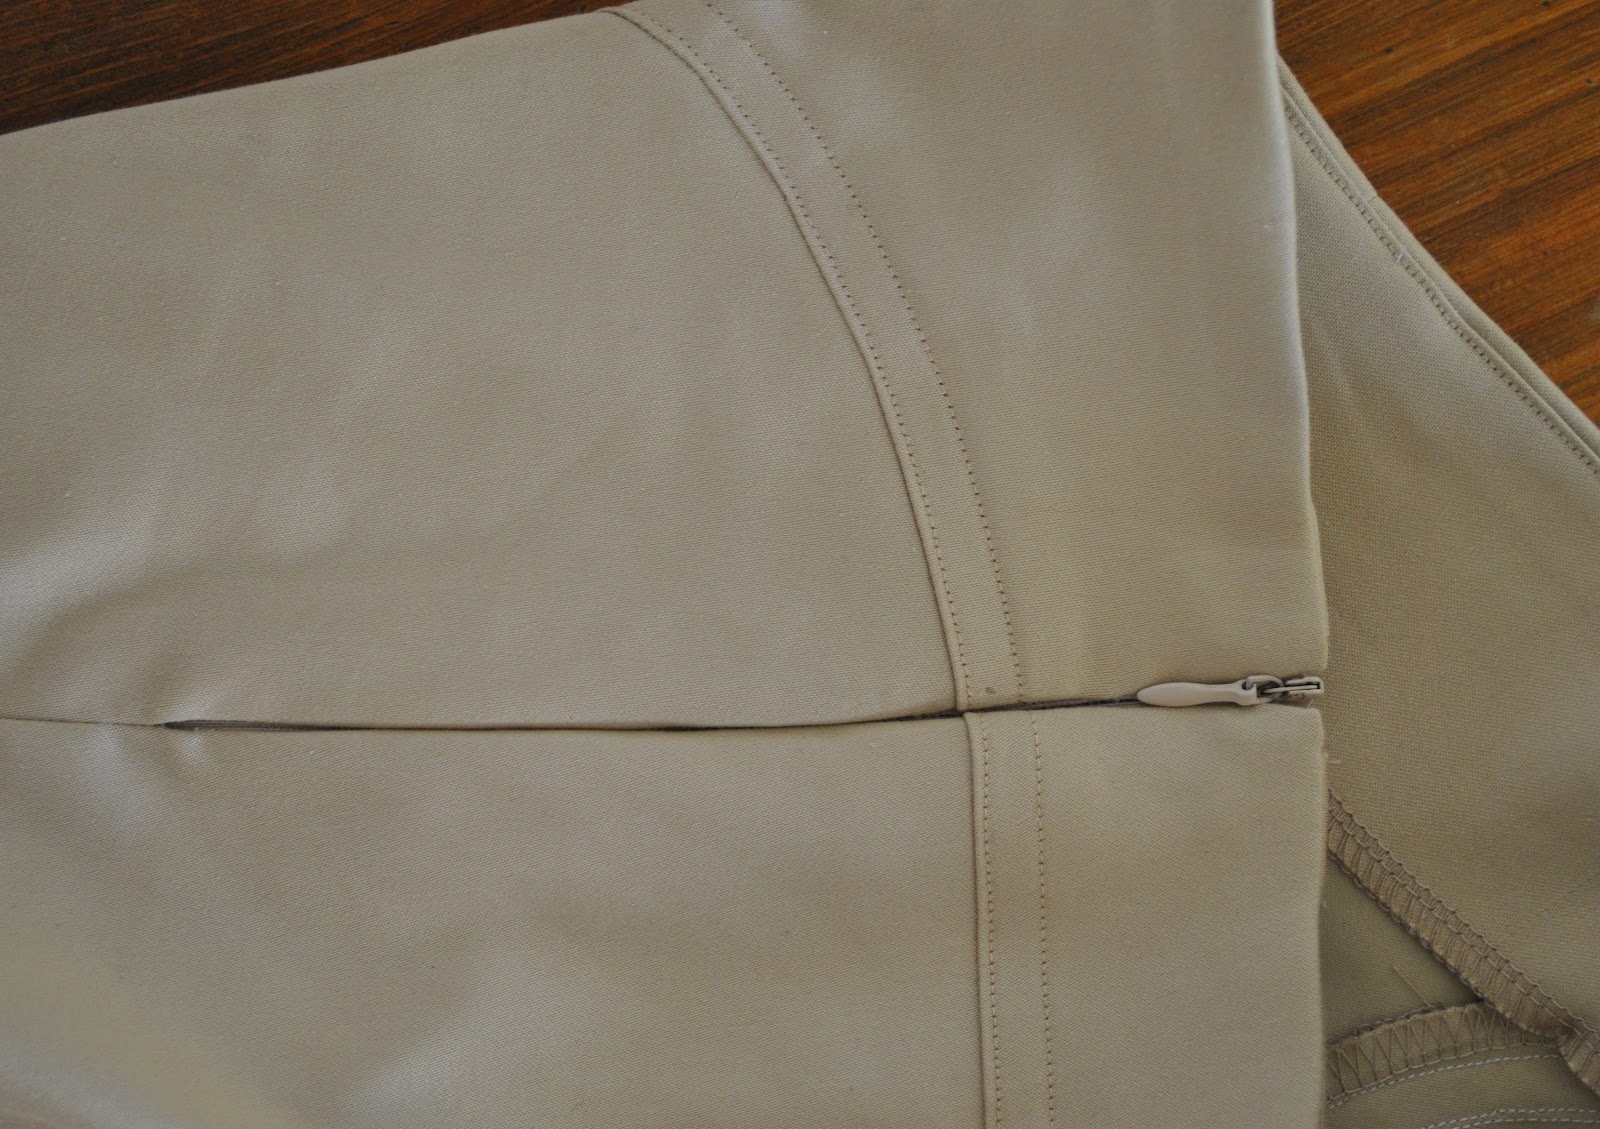
I happened to have a perfectly matching zip in my stash! which is super lucky because I meant I didn’t need to go out for that either.  🙂  This is one I inherited from Mum yonks ago, and it had a real vintage tag.  Sometimes I worry about truly vintage zips, that they’re going to break straight away, from being rusty, or brittle.  It seems fine so far, and it doesn’t have to take any strain so I’ve got my fingers crossed!

wow… I can assure you that all that random fluff is actually quite invisible to the naked eye!

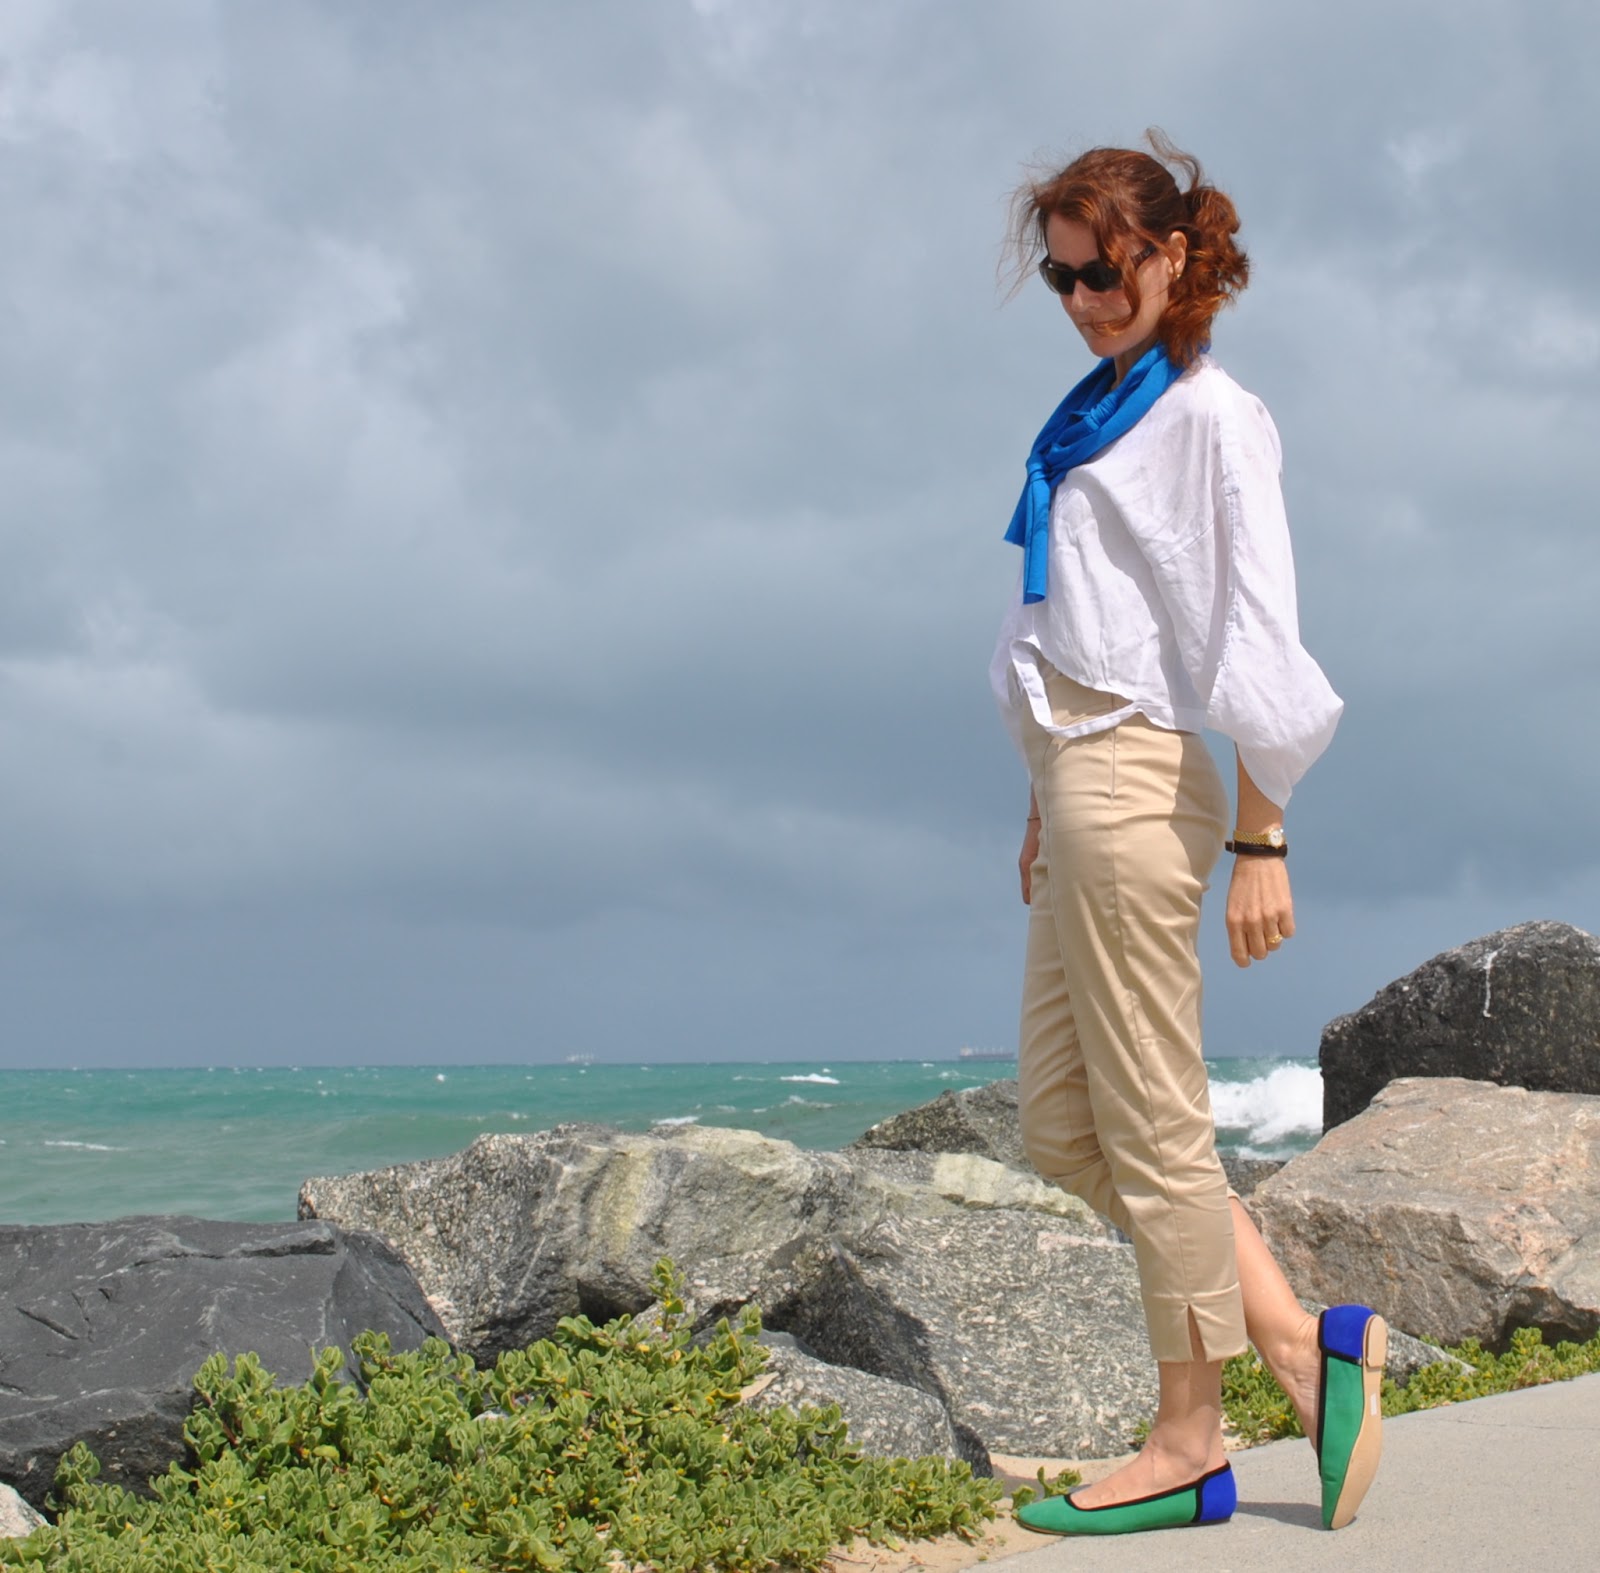
I just couldn’t resist the Paper Bag Shot!  It’s a pretty rare thing where I have ever had to stand or walk with a covering over my head like this and actually I found it quite difficult to keep my balance!  Was very disorienting, and made me wonder about learning to balance without the visual cues of your surroundings…

Anyway; I LOVE my new trousers, and they’re wonderful for comfortable working from home on the couch.  My own work has dropped off a little lately, but I have taken up learning a language to fill in some of my extra time.  I’m using the Duolingo app on my phone, a free one; it’s a great little system, sending me daily reminders so I have to keep up the pace.  What language, do I hear you ask… I’ll give you one guess…

🇯🇵

Well, of course, Japanese!  It’s super difficult.  I think the only thing I’m going to learn to say with any real competency is “Professor Maria can speak Japanese and English”  This should stand me in good stead for the future, a future in which I hope I can go over there for fabric shopping again!  Let’s think positively!


Details:

Trousers; the Jasmin trousers by Fibremood, in green corduroy from Minerva Crafts
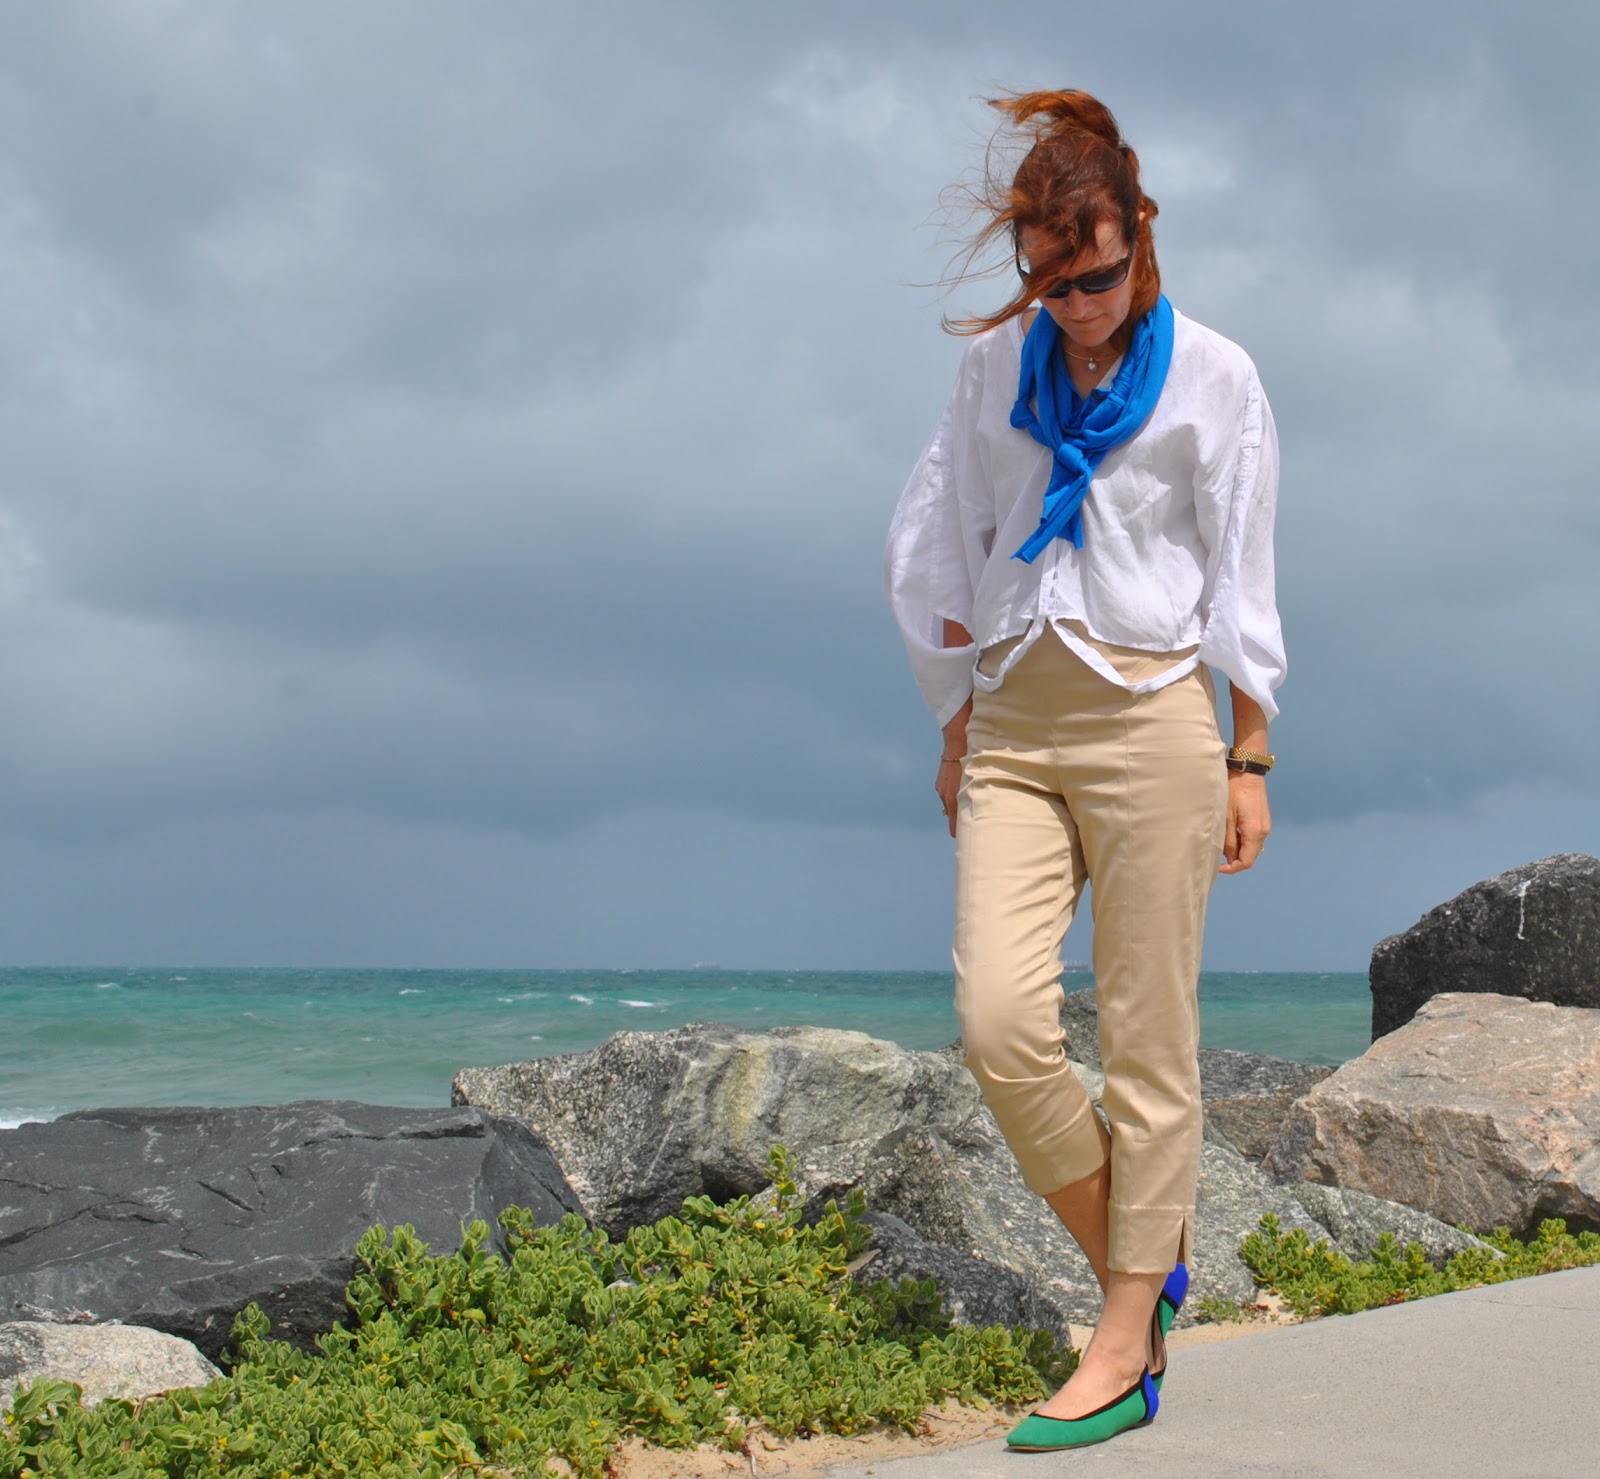
White top; the nettie, but Closet Case patterns, details here
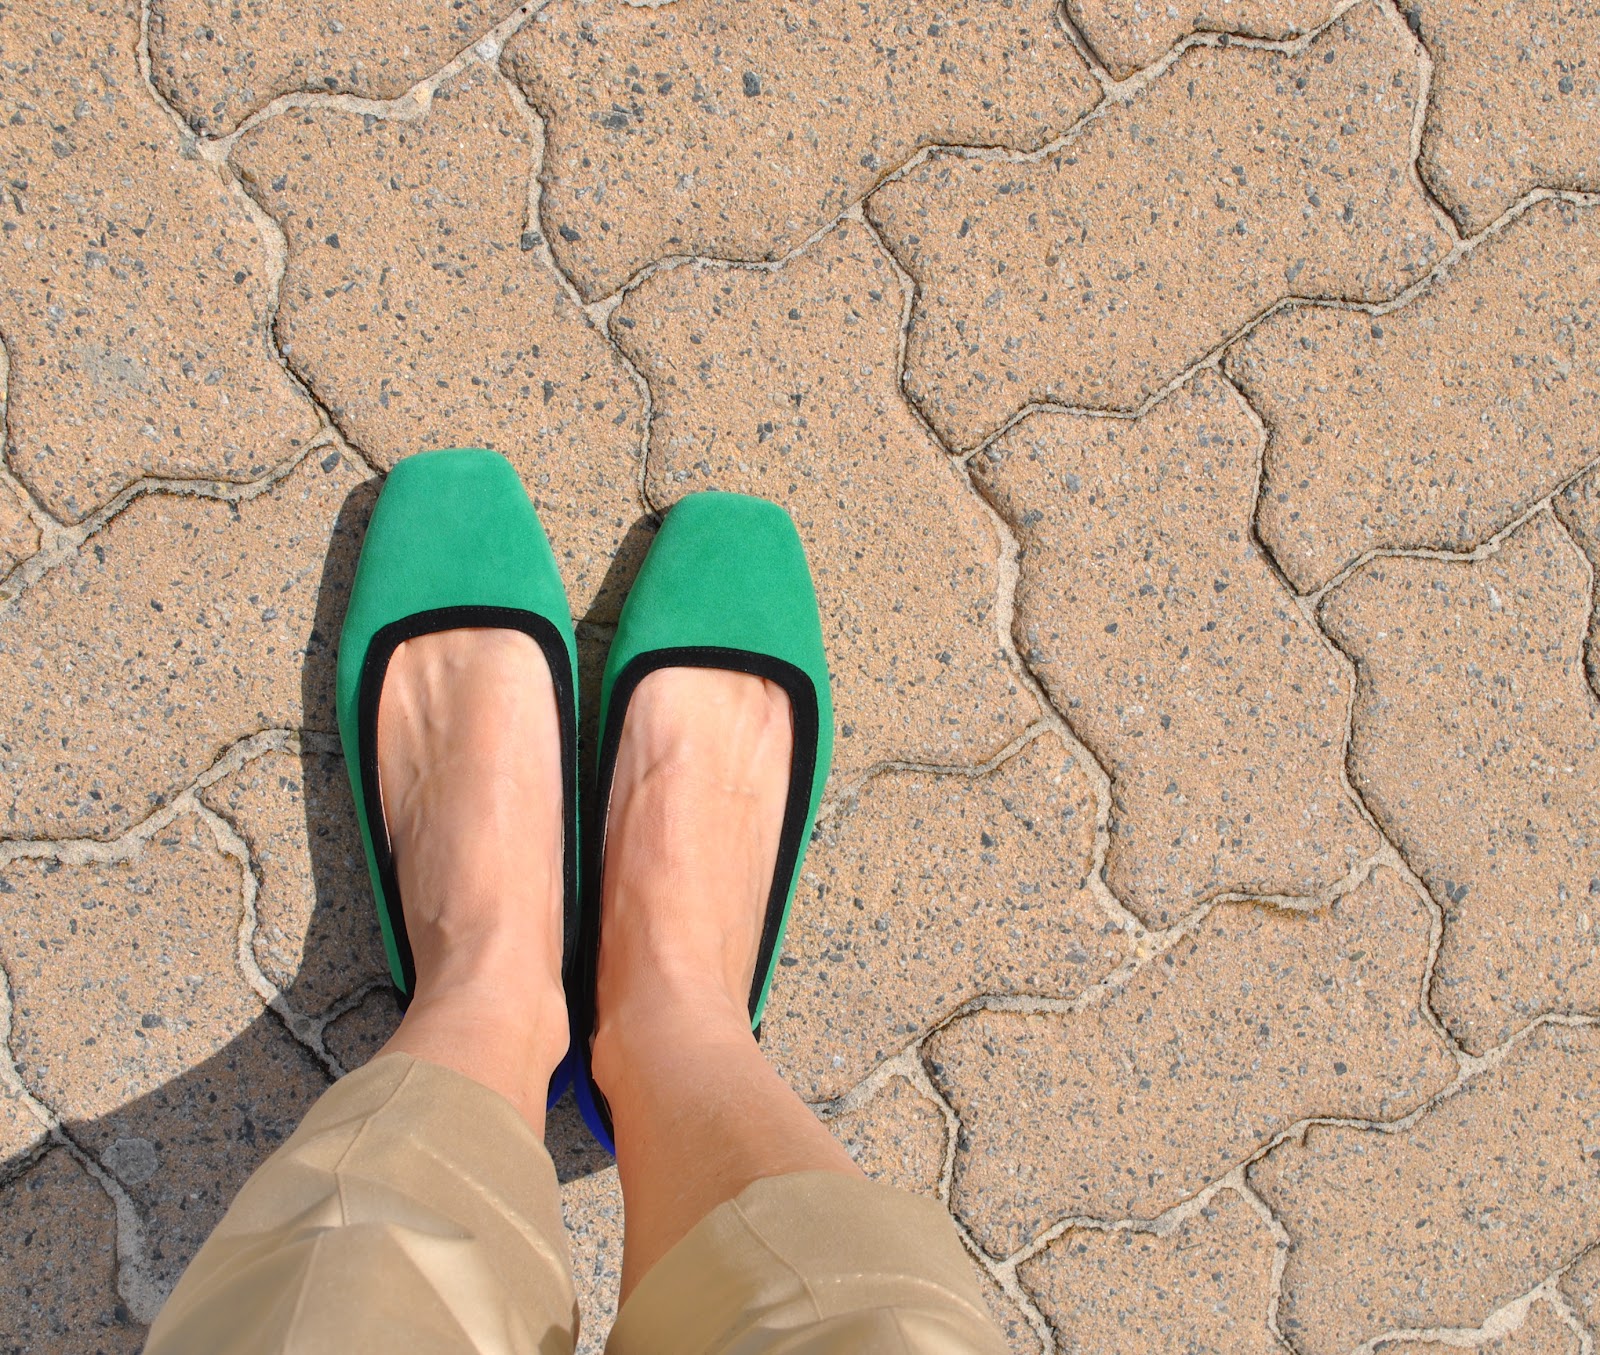
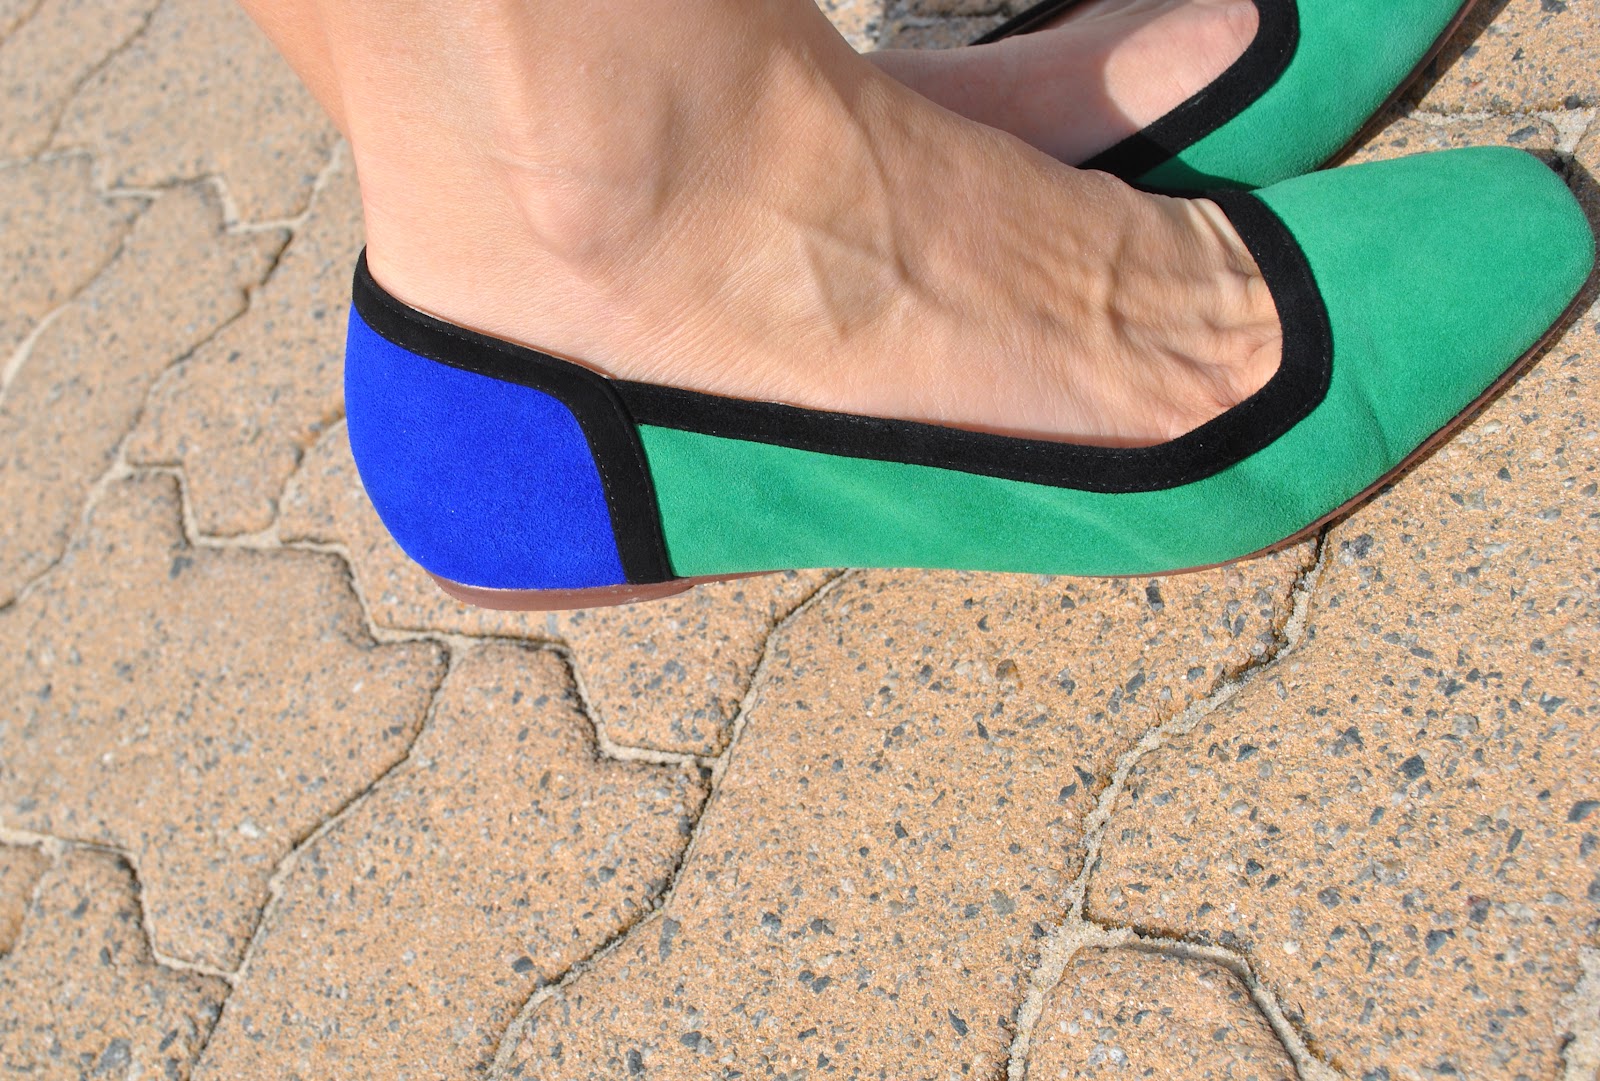
Beige shoes; designed and made by me! details here
old favourite mustard top; the Sudley blouse, by Megan Nielsen patterns, in a silk crepe from Tessuti, details here
Sandals; from an oppy, many yonks ago

Note; was even harder to paper-bag balance in heels!

out in ze wilde….

pinterestmail

… a couple of pairs of pants for Cassie…

I’ve made two new pairs of pants for Cassie!  Sarah of french navy now asked for me to test her newest pattern, the Calyer pants and I instantly saw they would fit a need in Cassie’s wardrobe very nicely… since they encompass the criteria for pants that are both smart and classy enough for the office, as well as comfortable enough for her to wear about at home too.  They’re pretty much perfect for her lifestyle!  btw, the bones of this post has been sitting in my drafts box for a few weeks now…  time has just got away from me!

The pants have a slightly dropped crotch, a roomy seat, tapered legs, and a flat front waistband combined with an elasticated back waistband.  Elasticated waistbands are normally an anathema to me, but these ones actually look pretty nice, since the band is a. very wide  and b. has a pretty, almost shirred appearance, which in turn c. gives visual interest at the back.  The back would be pretty plain without it, I think.  They also have nice little hip pockets, and the pattern caters for two front views, a pleated front and a flat front.  I made both!  On different pants, I mean.  So, I just got a visual of a pair of pants with one pleated front and one plain front.  LOL!  Although now I’m wondering how that would go… hmmm… maybe a bit too out there.  But now I’m curious.  Honestly I don’t know how these things pop into my head sometimes…

The black pair has the pleated front, obviously.  For these, I used a heavy, silk-like stuff that was inexplicably on the $4 table at Fabulous Fabrics… back when they actually had a $4 table that is.  They don’t have it any more  *sad face*  Anyway, it’s absolutely GORGEOUS stuff.  Upon discovery, ah what a joyous moment that was! – I bought quite a lot of it, stashed it, and have heroically and selflessly given up some to make these pants for Cassie.   I could be heroic and selfless because I still have a small mountain of the stuff left for me  😉

When she tried them on, she immediately said how much she’d like them in dusky pink too.  Say no more!!  Pink is so hot right now!!!  I hopped in my car just about immediately and zoomed off to Fabulous Fabrics to buy something pink.  Well, seemed like a pretty good excuse, yeah?  The dusky peach colour of this slight stretchy ponte is utterly divine.  I initially cut out another pair of the pleated front in the pink too, but ended up unpicking and altering them to be the flat front version.  Cassie loves them, and says she’ll be wearing them, like 24/7 as the weather cools down.  That’s what I like to hear!!

Dutifully ticking off my “make something for someone else” for the month…

…bonus… cute kitty feet!!!!

Details:

Tops, both Country Road.  Come to think of it, I think she stole that blue one from ME!!

Pants; the french navy now Calyer pants, in a (black) heavy, non-stretch, silk-like woven, and a (pink) medium-weight, medium-stretch ponte

SaveSave

SaveSave

SaveSave

pinterestmail

baggy blue trousers

My new trousers are kinda weird.  They are seriously baggy and they have a seriously dropped crotch.  But they feel sooo luvverly on! I think I’m going to like them, in their weirdness, even though I know I look a bit kooky in them.   *shrug*
See, every now and again I’m seduced by an unusual but super-cool Japanese pattern, the kind of cool thing that looks awesomely cool on cool people.  And then am brought back to earth with a bit of a bump when I look at myself in the mirror and am reminded: I am not very cool.
Ah, well I can but try, haha.  The thing is, these are the comfiest trousers evah, as in incredibly awesomely comfortable, as in like wearing an old pair of trackydacks or pj bottoms, kind of comfortable.  Cool people know a thing or two about comfort, it seems.  Well, apart from the ones that wear skinny jeans, obviously.
My trousers are pattern No. 13, the Tapered Trousers from “she has a mannish style” a Japanese pattern book by Yuko Takada, and  I could see from the picture that they had a seriously dropped crotch,  which is just what you would expect in a “woman wearing a man’s pants” style.  So I did something very unusual for me and made a rough muslin.  My husband was a little bemused but Cassie gave them a big thumbs up, assuring me that lots of cool arty kids wear this kind of thing at uni.  This was both encouraging and, um, at my age; also a bit not, ahem!

Whatever, I ploughed ahead regardless; and ta da!
Technical blah-dy blah:
I made them in a deep navy-blue cotton corduroy from Spotlight, and cut the pocket linings and waistband facing from a pair of Sam’s old pj’s from the refashioning bag; nice soft and well-washed, navy-and-white plaid cotton flannelette.  I used a navy jeans zip, and a jeans-style, hammer-in stud for the button.  The pattern had patch pockets on the back, but since precisely zero of my husband’s trousers, not jeans, have patch pockets, I put in double welt pockets instead.  This gives a far more authentic “menswear” look, imo.

My measurements put me at size ML to L, however I found the waist/waistband in this size to be seriously oversized, by 10cm at the very least!! even taking into account that you make a tie with D-rings to cinch in the back of the waist, paper-bag style.  So I removed a tonne of extra width in the waist, while still trying to retain the boofy, oversized pants vibe of them.
I drastically enlarged the front pockets, by about double.  Seriously, the originals were so tiny you would not be able to fit barely anything in them, let alone hands.  I’m used to having to enlarge my pockets on patterns but these were teeny.  I very much liked the way they were constructed, with self-fabric facings and with a French seam to finish.  I think the finished pockets look really nice, both inside and out.

I’m not keen on the way the fly front was constructed, with the fly pieces cut separately only to be sewn back on immediately, leaving you with an unnecessary and bulky seam in the centre front.  I really cannot see any advantage in this, and prefer for the fly pieces to be cut-on.  And will do it in that way in the future.
btw, I have read reviews for this book saying that not all the instructions are given for a pattern; well they actually are but not always on the same page as your pattern.  The book only gives the instructions for doing a thing, like a fly front, once and once only in the book.  For example, the instructions for doing a fly front are given on p71, with the Semi-flare Culotte instructions.  It does mention this in the Tapered Trousers instructions, but since they are in rather small print in amongst the Japanese characters then it’s understandable why people might have missed that.  All the actual sewing instructions are illustrations, very clear and quite easy to follow.
So; in conclusion? I like my new trousers although, well to be honest I am a wee bit nervous of them, being so cool and all.   But I think my street cred will survive wearing them.  Actually, they remind me a bit of pants we used to wear in the early 80’s… omigod, did I just admit to that?!  Eeeeeek!  Street cred in tatters!

I think when you read a lot of sewing blogs and online forums and what-have-you, like I do, you can get swayed by the very popular notion that Fit and Figure-Flattery are the King and Queen of Sewing.  As in, everything has to skim your body just to the perfect degree, not too tight, not too loose, and be perfectly right for your figure type.  Hey, there’s absolutely nothing wrong with that at all; I buy into those rules all the time myself too.  Just that, sometimes it is fun and nice to stretch yourself beyond those rules, to make and wear something that is not particularly fitted, is not particularly figure flattering, and is just stylistically interesting and cool and fun and kinda weird.  And comfy.  Fashion should be fun, after all.  I think it’s ok to try out new and unusual stuff once in a while.

And they are so warm and comfy, I’m going to love every minute that I have them on.  Well, every minute that I’m not worried what people might be thinking.  
Did I mention they are comfortable?

Details:
Trousers; the tapered trousers 13 from “she has a mannish style” by Yuko Takada, navy blue cotton corduroy
Tshirt; Closet Case patterns Nettie, with short sleeves and a breast pocket, in thin white jersey, details here
Cardigan; Miette, hand-knitted by me in Debbie Bliss Donegal Luxury Tweed Aran, in Gold, details here
Shoes; Enrico Antinori, from Zomp shoes

pinterestmail

Bared ankles and showcased shoes

O hey peeps!
Today I am sporting new capri trousers, and a pair of new ballet flats!  This may not seem a particularly momentous thing to announce, but aack-choolly… I am recklessly smashing through two new-to-me fashion ceilings in one fell swoop!  
Whoaomigoshholdthephone!
I used to worry that I was too tall and not cute enough for the capris/ballet flats look.  But y’know what?  I’m kinda newly loving this look quite a lot lately…
My capris are made using Vogue 1115, and the fabric is a pale sand-coloured stretch sateen remnant from the Alannah Hill fabric outlet in Melbourne, bought during a visit two years ago….  hmmm, high time it was made into something, non?  Well, I think this fabric was just waiting for this very pattern, like Cinderella waiting for Prince Charming.  Or was it that she was waiting for the glass slipper?  Hmmm, not sure the analogy is holding itself together there…  anyhow, the remnant happened to be exactly the right size to just perfectly fit the pattern pieces.  And they all lived happily ever after  😉
I love the top stitching details, with the little bar tacks.

I chose this Chado Ralph Rucci pattern partly because it is rated Advanced/Plus Difficile, and I just love trying out challenging patterns.  However, a seamster of only a few years experience should not be put off by the Advanced rating; it only takes one quick scan of the pattern sheet to realise that this only applies to the matching top …. the pants could hardly be simpler!  Particularly if one chooses to leave off the full lining.  I live in Australia.  It gets hot here.  One chooses.  🙂
The only other change I made was to cut the legs pieces longer, to enable me to fold up a deeper hem and so therefore to sew the side seam slits to be longer.  I really like the look of the hem slits, I think they are really cute and I wanted them to stand out!
I might be a teeny bit disappointed that the pattern posed no challenges, but I am not disappointed with my new capris.  According to the fashion mags, trousers this season are falling neatly into two distinctive silhouettes; either over-long and flared 70’s style (tick!) or with higher hemlines to expose a slim ankle a la Audrey Hepburn.  Tick!  And a nice thing about capris is that the higher hemline beautifully showcases the shoes.  Like these lovely colourful little ballet flats from Misano.  
These are soooo ultra cute, yes!?

Details:
Capris; Vogue 1115 with the lining left off; sand-coloured stretch sateen
Shirt; my own design, made from an old pair of white linen pants, details here
Scarf; knotted strips of jersey, first shown here
Shoes; a gift from Misano

Following is my review of the pattern, if you’re interested  🙂

Pattern
Description:
Lined,
tapered above ankle-length pants, have seam details, side slits, zipper and
back yoke.
Pattern
Sizing:
American
sizes 6-12; mine are a size 10
Did
it look like the photo/drawing on the pattern envelope once you had finished
sewing it?
Yes.
Were
the instructions easy to follow?
Very
easy!
What
did you particularly like or dislike about the pattern?
There
is nothing not to like!  I love
absolutely everything about these pants…  I really like the curved seamlines down each leg, and the double topstitching detail with a little bar tack.  I adore the hemline side seam slits.  Subtle, classy and cute!
One of the reasons I chose the pattern is because it is an advanced/plus
difficile pattern, and I love challenging patterns.  However that rating must only apply to the matching top, because the
pants are super easy!
Fabric
Used:
Stretchy sateen
Pattern
alterations or any design changes you made:
I
left off the lining because the climate I live in is not conducive to lined
pants!
I cut
the trouser legs a little longer so I could fold a deeper hem and therefore sew
the side slits to be longer, because I really liked this feature and wanted
them to stand out more.
Would
you sew it again? Would you recommend it to others?
Without a doubt;
and highly!  I am looking forward to
sewing up the top sometime too.
Conclusion:
A
very nice pattern; easy, with classic lines and a very current silhouette.  I am very happy with my new
capris.  Seriously, I cannot
believe now it has taken me this long to hop onto to the capri bandwagon…
pinterestmail

Hiking pants

I’ve finished my new hiking pants!
And I likey.  These feel so so comfortable, almost good enough to sleep in, and they also feel quite tough and practical, to withstand the demands of being out in the bush.  And pretty soon they are going to be put to the test, so we’ll see how they go…
They are made from khaki rip-stop cotton, pre-washed twice to shrink and soften it up as much as possible.  I’ve learnt from past experience that this stuff is real hardwearing because it is very densely woven, which is fab.  You want that for hiking pants.  But its a good idea to toss it in the machine for a couple of heavy duty hot cycles before you go blunting your good dressmaking scissors and sewing machine needles on it.
I used a pattern from Burdastyle magazine issue 10/2010, pants 110.  Previously I have made up the shorts version of this pattern, so I knew already they fit well and were very comfortable to wear.  And I really like the streamlined style at the top of the pants, with no waistband and no bulky darts or pleats at the front.
My version of these pants have a few minor variations to the pattern, as follows:
Firstly, I cut the pants legs to be perfectly straight rather than tapered in to the ankle.  This was made super easy for me to do with this fabric, as it is self-marked in a grid pattern, so from mid-thigh level I just cut straight down to the ankle, following the lines on the fabric.  Easy peasy.  I also left off the ankle bands and simply hemmed the bottom edges.  Oh and I added about 10cm to the leg length, and am very glad I did.  Would have been ankle freezers if I had not, methinks…
Secondly, the pattern only had four pockets; two slanted side hip pockets and two welt pockets on the back, which are pretty small and in practise hardly ever get used for anything.  How many ladies out there actually put anything in those little back welt pockets?  Hmmm?  I’m betting no one…  Situated right on your bottom cheeks as they are, putting stuff in those pockets makes for a lumpy bumpy funny-looking rear view, as any lady knows, so really they are a purely decorative thing… so I added two roomy cargo pockets on the outside leg, details here.
Lastly, I used snaps for the closure in lieu of buttons, as these just seem sturdier and more practical for when you’re out in the bush.  Snaps are not going to come flying off and get lost in a sand dune, and need re-sewing on out in the middle of nowhere.

Details:
Pants; Burdastyle magazine 10-2010-111 with a few minor variations, khaki cotton
Top; top “a” from “Unique Clothes Any Way You Like” by Natsuko Hiraiwa, white cotton, details here
Shoes; Country Road
Backpack; souvenir from Santa Fe

Pattern Description:
Flat fronted, mid-rise trousers with faced waist, fly front, slanted hip pockets, back single welt pockets, underlap with button for internal closure, outer tab with button for another waist closure.
Pattern Sizing:
34-42, I made a size 36 at the waist, tapering out to a 38 at the hips.
Did it look like the photo/drawing on the pattern envelope once you had finished sewing it?
In essence, although I made a few variations.
Were the instructions easy to follow?
Yes.  I had previously made the shorts version of this pattern, and the instructions are pretty much the same, so it was a second go at it.  When I made the shorts I found the instructions for the waist facing attachment to be quite confusing, but I had it all worked out by this time!
What did you particularly like or dislike about the pattern?
I liked the unbulky streamlined top of the pants, and the loose comfortable look and feel of them.  It’s a pretty straightforward pair of pants, goes together well, the pattern works, and they fit me like a dream.  I wanted a pair of cargo pants, and I think this pattern adapted really well to give me that look that I wanted.
The magazine version has the legs gathered into an ankle band, making the legs kind of “bloomer-y”; I didn’t really like this and omitted this feature from my version.
Fabric Used:
Rip-stop cotton
Pattern alterations or any design changes you made:
I added about 10cm in length to the legs and also cut them to be straight from mid-thigh level down to the ankle, rather than slightly tapered as in the pattern.  Also, as mentioned above, I left the lower legs loose and un-gathered and omitted the ankle band.
I added big cargo pockets with flaps on the outside leg seam.  So now they have six pockets!
I used snaps in lieu of buttons.
Would you sew it again? Would you recommend it to others?
If I need another pair of loose comfortable casual pants I would definitely use this one again!  I love these pants.  And yes, I do recommend this one to others.
Conclusion:
Love my new pants!  They are so comfortable and I think they make a reasonably cute pair of cargoes.  I’m putting them to the test out bush soon, so I’m hoping they will stand up well to a few days of hard knocks.

pinterestmail

Fisherman’s Rib 2-piece

Another blast from the past for today.  Actually this photograph is marked “Father’s Day” so should have come before the previous oldie I put up here, as this date puts Tim at only 2-3 months old.  He is held by my husband (wearing a jumper I had knitted for him, too!) and flanked by Craig’s Dad and Grandad, so this is a four generation photo.  Quite cool, no?
Tim is wearing a pale green outfit I had knitted for our new baby whilst I was still pregnant.  It is in fisherman’s rib; thus turning me off this stitch for many years, man, you know how I’m into quick knitting projects…!  Come to think of it, I’ve not knitted another fisherman’s rib project since…
  The outfit was from a Patons baby booklet and comprised pants and a cute little fisherman’s jumper, with a half tab button front and a little collar.  Oh, but it was cute!  The buttons I used on the front were little wooden toggle buttons, hand-carved by my father, and were adorable.  I still have some of the leftover buttons in a little paper bag, marked “Timothy’s buttons”.  I’ve never done another project worthy of them….
I don’t know where this little outfit is now.  I thought I had passed it on to one of my sisters-in-law but it seems to have disappeared.  This makes me a little sad.  But I know I shouldn’t attach too much sentimentality to “things”.  After all, I’ve got the most important, er “things” here with me still, meaning the men in my family.  Right?  Right.

(if you want to see what this cute little bubbsie looks like now, go here)
(On another note; you can just see a glimpse of the collar of the shirt my husband is wearing underneath, which has since been refashioned here)

pinterestmail

Khaki scarf; a refashion

I took the Tshirt below and followed my own tutorial to make this new knotted scarf.  Though for this one I cut the front in two pieces and the back in three…  
Nothing earth-shattering, but will be a useful little thing to go with the other khakis in my collection…
I love khaki/olive, obviously; one of my best neutrals.  This was my daughter’s old Tshirt, and when she gave it the heave-ho I baggsed it; immediatement.  That last word is Franglaise, a form of butchered French/English, a language often employed in this household… er, by me mostly.  I do have this bad habit of making up words and sometimes even talk in weird, vaguely European accents, particularly after a few drinks.  I haven’t on this occasion.  Had a few drinks, that is.  So got no excuse, really.
Back to the scarf…
The Tshirt in its original form was one of those really badly constructed ones that would not lie straight, and developed strange twisted folds if you tried to fold it flat along the side seams when hanging it up on the clothesline.  This is because the sides were cut and sewn just a little bit off.  Grrr… my pet hate.  Look how it used to be, below… soooo skewiff.  So I was pretty elated to be given the opportunity to take the scissors to it. 
Now it has a new lease on life, and will not cheese off this laundress ever ever again.  Hehehe….

Details:

Top and cardigan; Country Road
Pants; drafted by me, white linen
Scarf; refashioned from an old Tshirt
Thongs (flipflops); Mountain Designs

pinterestmail

Chambray shirt

After finishing my chambray/denim dress I had a leetle bit of the fabric leftover, too much for scraps, not enough for another garment.  I had enough for the fronts of this shirt.  So then had to go back for some more fabric to cut out the entire shirt…  (and now still have a tad of the fabric leftover,  mama mia, a recurring vicious cycle, how to use constructively and efficiently all the leftovers…?!)
I made this shirt using Burda 7767, my go-to menswear shirt that I’ve made up seven times in all now for the men in my family, this is such a great easy pattern…  Obviously I sized it to fit me this time…  other variations were to add two breast pockets with flaps, sleeve tabs to enable me roll up the sleeves (probably permanently), and to use snap closures throughout in leiu of buttons. I like the more casual “jeans-y” feel the snap closures give to a denim shirt.  Although these particular ones from Spotlight were just hell to put in, I strongly suspect the wrong “tool” was enclosed in this particular batch, and unfortunately I couldn’t locate the correct tool which I know I have floating around in my haberdashery collection somewhere…  but I was impatient to finish the shirt so just made do with the one provided.
Obviously the other variation I made to the pattern was to have the fronts lapping over the opposite way to a men’s shirt…  it would be nice to know the reason behind this strange custom.  Does anyone know the reason why mens’ shirts button up in a different way to womens’ shirts????  I’d really like to know…
I made these white linen pants last summer? or the summer before?, I make a new pair every year so they all kinda blend in… to see them properly and in full length go here
Don’t you just love the clouds?  We are expecting some rain soon, woooheee, finally!  Everyone here is desperate for rain!

Details:
Shirt; Burda 7767 with minor modification, blue chambray
Pants; self drafted, white linen
Shoes; Country Road

pinterestmail
Switch to mobile version
↓