Tag Archives: Sam

Sam’s shirt

I made a shirt for Sam…
Hmmm, sounds extremely deja vu-y given that this is what I nearly always make for them, for seemingly every occasion requiring gift-giving.   But you see, all my boys are sweet enough to appear genuinely pleased to receive my shirts as gifts, and what is more, actually request them.
To have my shirts in demand is such a nice ego-stoking state of affairs, ahem.  Plus I do so much enjoy the tailoring process.  Yes, really… 
So how could I not comply with their wishes??
Using Burda 7767 (shock!) with modifications, and he came with me to Fabulous Fabrics himself (genuine shock!) and chose the checked fabric and the wooden buttons to go with it.  This fabric is a polycotton, non-stretchy but with a permanent crinkle in it.
Fair warning; excessive chit-chat about pattern matching coming up…
Below; the back yoke… when one is working with checked fabric like this, it is imperative to a rabid obsessive like me that that slight concave curve of the upper back edge be spaced evenly across as well as for the straight lower yoke edge be exactly even across the seam-line, and for the stripe to not disappear very slowly down into one side of the seam, which especially in a crinkly fabric like this can happen almost without you noticing… and require unpicking and re-doing, ahem.   Anyone who has sewed with stripes and checks has visited that one before, I’m sure.
Probably why I have this lazyman’s preference for solids when tailoring…

Also, just an aside, when I am using less stable fabrics, such as this crinkly fabric, to make tailored shirts; I cut the two yokes one with the grain and the other cross-grain as pictured below.  I find this gives a bit of extra stability in an area of high strain.

Purely decorative buttons, one on each sleeve hem.

I went to enormous pains to match up the check pattern on the bias-cut arrowhead pockets as it relates to their corresponding bias-cut arrowhead flaps.  They are perfect, if I say so myself.  I’m not even going to mention how much minute twiddling, precision-pressing  and adjusting this took…  oh wait, I just did  ðŸ™‚  LOTS!  Also please note that the two pockets and their flaps are exact mirror images of each other.  Over Christmas Day lunch I started what I thought was a very interesting conversation with some female relatives about this sort of dressmaking minutae…   until I noticed them glazing over fairly early in the piece and stopped.  Incidentally, do other seamsters find that variations in the structure of clothing is a compelling and perfectly good topic for conversation, and that it is inexplicably hard to incite any passion at all in “ordinary” people who take their clothing totally for granted and don’t notice nor even care about the All-Important Details?!    sigh, I guess this is why we blog…

So, back to the shirt at hand… oh, and by the way, please note the collar has purr-fectly symmetrical pattern placement.  Thank you.
And tabs, matching mirror images of each other.

Okaaay then, that’s it.

pinterestmail

Old things…

… this will be the very last of my “old things” posts.  I promise.
I’ve done a mammoth sort-through of the photos and I think this is it!  (heaves a sigh of relief…)

Firstly, since this is the only garment in this post still in our possession (apart from the Grim Reaper come burqa outfit, that is); a cardigan I knitted for Craig.  It is knitted in the fair isle method.  Above is a picture Craig took of me wearing his cardigan on a holiday last year (isn’t he sweet, giving his cold inadequately-dressed wife his nicely pre-warmed cardigan to wear, hmmm?  What a gentleman!)
And some close-ups of the cardigan I took today…
showing the right front, and at right the wrong side of the fair isle knitting… (as is correct, the yarn is carried over at the back with no weaving in, only if the distance is four stitches or less…)

Now, some costumes…
Sam as “Link”.  I thought he was so cute in this.  He loved this little outfit and often wore it just for everyday wear.  (if you would like to see what this cute little jigger looks like now, go here…)

Sam, as… guess who?  Hehe, the famous Harry Potter, natch, compete with broomstick and Hedwig the owl.  
On that note, a black cloak is such a useful thing to have in the dress-up box.  It can be the basis for so many costumes.

Here is the same robe again, worn by Cassie as Hermione, complete with Garfield Crookshanks the cat… I threw together the skirt and tie as well, but they do not bear close inspection…!)

(I’ve shown this picture before… but here it is again just to illustrate the versatility of the plain black robe as a costume), Tim and two of his mates as Grim Reapers.  I made all three of their costumes.

Tim’s same costume again, this time worn by me to an Arabian Nights party.  I didn’t want to hire an outfit and I didn’t want to make some bejewelled thing I would never wear again, and as every single female I have seen in the Arabian region is dressed something like this, so I was like, yeah this’ll do.  I naively assumed other girls would have the same idea…  As it turned out I was literally the only female dressed (I thought) anywhere near authentically!  Also the only one not heavily sequinned and baring plenty of belly-flesh…  I confess the costume was abandoned when we decided to start dancing!  Don’t worry I had a skirt and top on underneath…

So, away from costumes now, and a ball-gown of my own design that I made for balls in years gone by (Sorry for the headless shot but my face and my hair look awful in this picture…!)  It is silk organza, overlaying silk and silk jersey layers, three layers in all.  It had a beaded and embroidered neckpiece, both beaded and embroidered by me, that is…

A dress I made for Cassie for her graduation dance at the end of primary school.  It was a simple turquoise cotton halter neck dress, the fabric had metallic gold lines randomly strewn across.  I also made her jewellery, of turquoise glass fish beads and strands of gold wire.

Some rather lovely (if I say so myself) wide-legged white pants that she wore almost constantly for a summer, and a little white broderie anglaise blouse.  Both my own design.

Going way back, and this shirt is from a Vogue designer pattern that I believe my mother still has my copy…  I know I also made and am wearing here the small-waisted and very flared skirt from the same pattern too…

I made both the skirt and top and also my necklace here.  The top was an experiment, I flipped the shoulders out in a twist to get this cowl-like effect.  It used to get a lot of compliments, believe it or not! (my friends are very kind)  We are sitting on one of our sofas in its first slipcover, made by me too…  (now looks like this)

Some more dresses.  I really regret now I never got any good pictures of these two.  The white and red one was rather nice; it was a dress, but looked like a matching skirt and camisole when I was wearing it, as it had layers in several graduated lengths.  My own design.  The patchwork dress, also my own design, took lots of planning; I bought the fabrics separately and cut and pieced them together, then made the dress.  It has smaller squares at the top, graduating to larger squares around the midriff, and then down to the largest squares at the hemline.  It is all on the bias, with a handkerchief hem, and I loved it!

A drop waisted, handkerchief hemmed dress of white dotted swiss voile, pictured against a famous backdrop.  I still have this Vogue pattern too, actually…

And that should be all folks!
From now on, I will only be showing newly made stuff here….

pinterestmail

Weddings, parties, and other special events…

… seem to be the only times we ever took any photos of our family.  So thank goodness for those!  
I didn’t do a heck of a lot of sewing when I had three tiny children.  I do have an excuse.  I had three tiny children…
But I did manage to churn out a few little things.  Oh including, come to think of it, the quilts for all our beds.  They were major.  So I guess I still got a lot done.
Here are some other things:
Book Week wasn’t a big thing when my children were little like it seems to be now.  But I recall a few sporadic requirements for costumes.  I didn’t make this fabulous dog costume, loaned from a friend, but I did make the little top and pinafore that my grubby little daughter is wearing in the background.  Another TopKids pattern.

Here on the left is an outfit made just for Sam (see, he didn’t miss out!), a tartan button-up shirt and some navy corduroy jeans with some of the tartan using in the detailing, to make it a co-ordinating “outfit”.  I was into “outfits” for my kids back then, and always made tops and bottoms to match each other.  Both were using TopKids patterns.

Following are three little dresses I made for my daughter, using the same Simplicity pattern, a very nice design which had a button-up front bodice, and a sash inserted in the side seams to cinch in the waist with a lovely big bow at the back.  Or a rough knot of some kind, depending on how busy her mother was that morning… 

I customised the pink gingham version with lace edged pockets.  It was one of my favourite dresses for her at this time. 

The blue one here had gold stars printed on the fabric, and I sewed on a single star shaped button at the top, like a brooch.  In this picture, her first day at pre-school, she is standing beside a white wooden chair that Craig made, and I painted.  It was made of jarrah, so it weighed a tonne!

And my brother and sister-in-law’s wedding… I made the two bridesmaids dresses and the flower girls dress.  And yes, now I do wonder at my own sanity at attempting this feat when I had all those little children underfoot at home…  but I managed it!  (Sorry about the grainy picture, but this is the only one I have of all three of us)

(This isn’t necessarily illustrating any extra in the way of handmade-ness, but I included it because I just really love this picture.  This is my wonderful family, including my parents, my two brothers and my two sisters-in-law)

 The two bridesmaids dresses were from a Vogue pattern, and had boned bodices, with a lovely and very flattering folded portrait neckline.  I hand-sewed on all that gold lace, and miraculously got the motifs to fit perfectly on the two different sizes so I would not have to chop any in half.  Cassie’s little flower girl dress was adorable, and had a miniature sweetheart neckline, big puffy sleeves, cascading ruffles down the back of the skirt and a big bow tied in the small of her back.  Sigh…  both my dress and hers have been passed on, and I only have C’s dress (the other bridesmaid), which is pictured below.  It is a bigger size than Bessie who is modelling it here, thus necessitating Cassie’s hand you can see there unobtrusively pulling it in at the back to illustrate what it actually looks like when it fits the wearer.
Of course now I look at it and see multitude little imperfections, but at the time I was pretty darn proud of myself.

pinterestmail

Oh, this old thing…

… and a few more old creations.  (Don’t worry, these are drawing to an inevitable endpoint, as I go forwards through time and eventually wind up at “now”, at which point these posts will finish and you will be seeing new stuff only…  It’s just that one of the goals I set myself was to document as much as I could of my handmade things in this blog, so bear with me here.  This is a finite process…)
This is our little family (Sam on the way) in more stuff I made; Tim’s (Topkids) overall has been seen before here.  I made my dress, completely inspired by the dress (below) in Beetlejuice, do you remember this?  I basically fell in love with this loose long floral dress and set out to make myself close to an exact copy of it for myself.   Fortuitously it worked well as a maternity dress too.  I felt lucky that dropped waist blouse-y Laura Ashley numbers were quite fashionable during the years I was producing children…
The blue floral dress with lace trim that Cassie is wearing is a TopKids pattern.

Below is a four generation picture; my grandmother, mother, Cassie and me.  Cassie is wearing a dress made to the same pattern as the blue one above.  It is interesting how the very different fabrics used give each dress a completely different feel; this one seems kinda “smart” while the floral and lace above give a far more “pretty and dressy enough for a party” feel, no?  Perhaps this tiny set of two dresses makes up another miniature rogue’s gallery (like yesterday), seeing the different looks you can get from one pattern by varying minor details; in this case the fabric.

This little romper is literally the only thing that I made for my own children and passed on to other little relatives that was returned to me (!) but unfortunately without the little blouse I had made to go with it.  It had a really cute pink blouse to wear underneath, with a Peter Pan collar and full batwing sleeves gathered into elasticated wrists.  The little floral romper here has a zip up the centre front and tabs with pearl snaps on the pockets and shoulder straps.  From TopKids patterns.

Below is a  picture of Tim and Cassie on Tim’s fourth birthday (Sam is around by now, but is not in this picture!)  Cassie is wearing a dress that was truly one of my favourites, out of all that I had made for her!  It was of a lovely floral brushed cotton in very pretty shades of blue, green and violet, and had a sailor collar of soft ivory brushed cotton, around which I topstitched on a pale blue satin ribbon edging to enhance the sailor-y look.  I loved seeing her in this dress…. she looks so pretty, doesn’t she?

Below; I am with Tim and a fairly brand new Sam in a baby sling… Tim is wearing a red-and-white fair isle jumper knitted by my Mum, and I am wearing a blue, turquoise, red and pink cardigan with black and white geckoes that I knitted from a pattern, the details of which are unknown, sorry.  It is knitted entirely in the intarsia method, with each section of colour in each row, in individual balls (ie, that is 15 different balls for some rows…), and is possibly the most complex thing I have ever knitted.  Each row of the pattern was different from each other row, as you can imagine.  Even the two sleeves were different from each other!  The main of the knitting is in stocking stitch, but the red and pink sections are in reverse stocking stitch…  my modern-day me is actually pretty impressed with my olden-day more-patient me.  
I am embarrassed to admit that I went on to lose all appreciation of my own time and effort, and painted the entire interior of a house while wearing this thing, which explains some tiny spots of white paint now adorning the front.  Also it has gone camping with us (and I recall wearing it 24/7 including sleeping in it on one particularly cold camping trip) and it has been a bed-jacket too.  I still have it, but needless to say don’t really wear it anymore.  It has slightly felted, through bad washing.
(Later edit; in reply to some comments, it’s a bit hazy in my memory now but I’m pretty sure I made this before I had little kiddies underfoot… just no pictures!)

below; the wrong side, showing the intarsia method of knitting used…
pinterestmail

Burda 7767; a rogue’s gallery

A while ago, Myrna suggested that I do something about rounding up together in one post the number of variations on a pattern that I have made up; as a sort of “hey, look at the number of different looks you can get from just one pattern” kind of a post.  Thank you, Myrna!
I thought it was a terrific suggestion, as I do re-use favourite patterns a whole bunch of times, probably painfully and boringly so from the point of view of people who like to go for new and exciting patterns with every garment.  But to redeem the boredom of going again and again with the same old same old patterns I usually introduce a little something to a pattern to get slightly different garments each and every time.
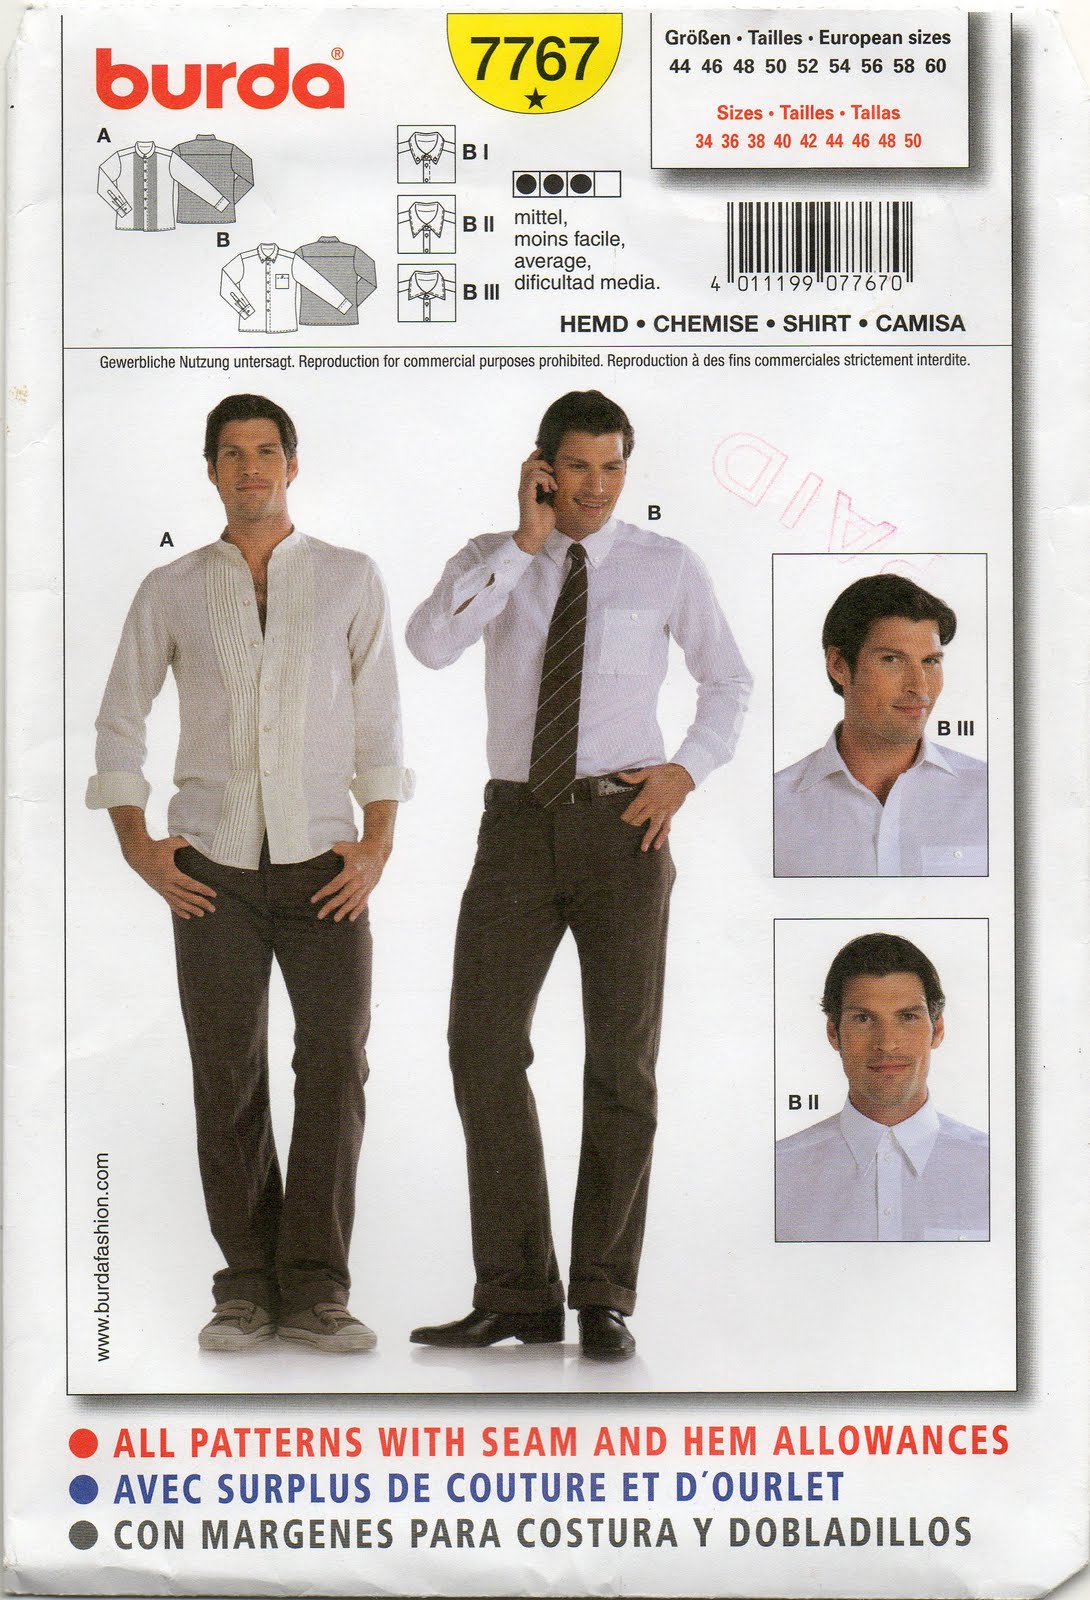
One pattern I have used a lot is Burda 7767, a basic men’s shirt pattern.  Now agreed, it’s very basic, and seamstresses after a challenging sew usually avoid basic patterns like the plague.  Advanced seamstresses often prefer to go for something with a few exciting variations or twists already incorporated in it.  But just think, a basic pattern is often the best for playing around with and once you have mastered basic sewing techniques you can introduce your own features.  So much more fun!  I do prefer DIY-ing my own features to being spoon-fed a design; and from the sewing-challenge point of view incorporating your own ideas can be a bigger challenge than even the toughest Vogue Advanced pattern, and you will feel more like an actual “designer” in control of your own ideas.
Most of the shirts I have made from this pattern have been for the menfolk in my life; my husband and my two sons.  OK, I admit I have also made one version for me too, hehe…  and unfortunately men love for their stuff to be kinda unadorned.  But you can still squeeze a few little variations in here and there and as long as it is not too asymmetric or “weird” your menfolk will probably consent to wear it…
So here, without further ado, is my gallery of Burda 7767 (so far…)

The first version: just to the pattern with no bells or whistles, pink linen, navy blue topstitching and navy blue buttons.  I was sewing this one as a birthday surprise so couldn’t do any actual fitting.  It turned out a tad too tight under the arms for Craig, but not to worry, Tim has it in his wardrobe (he is not the kind of guy who feels his masculinity is challenged by a pink shirt) and I have borrowed it tonnes of times too.

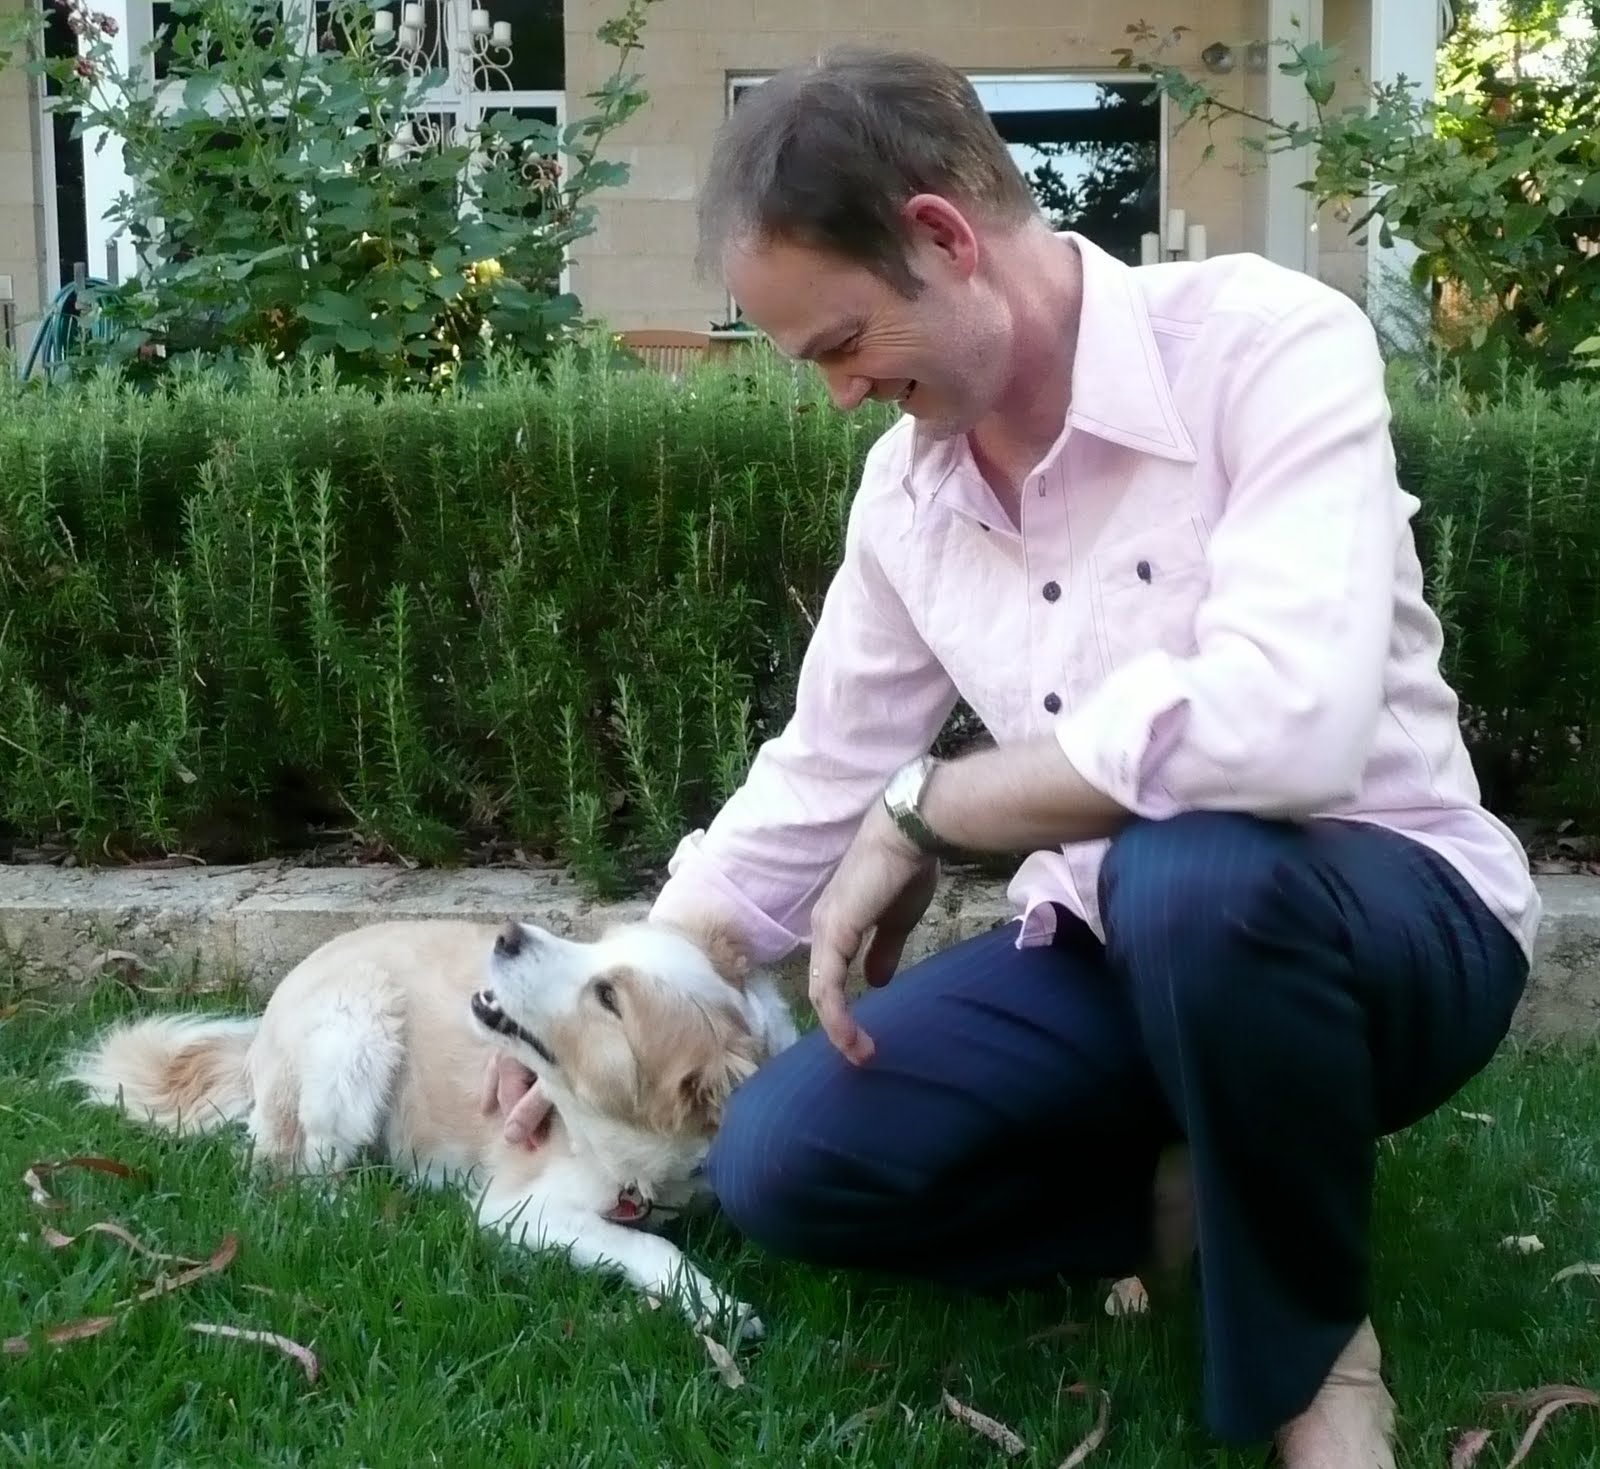
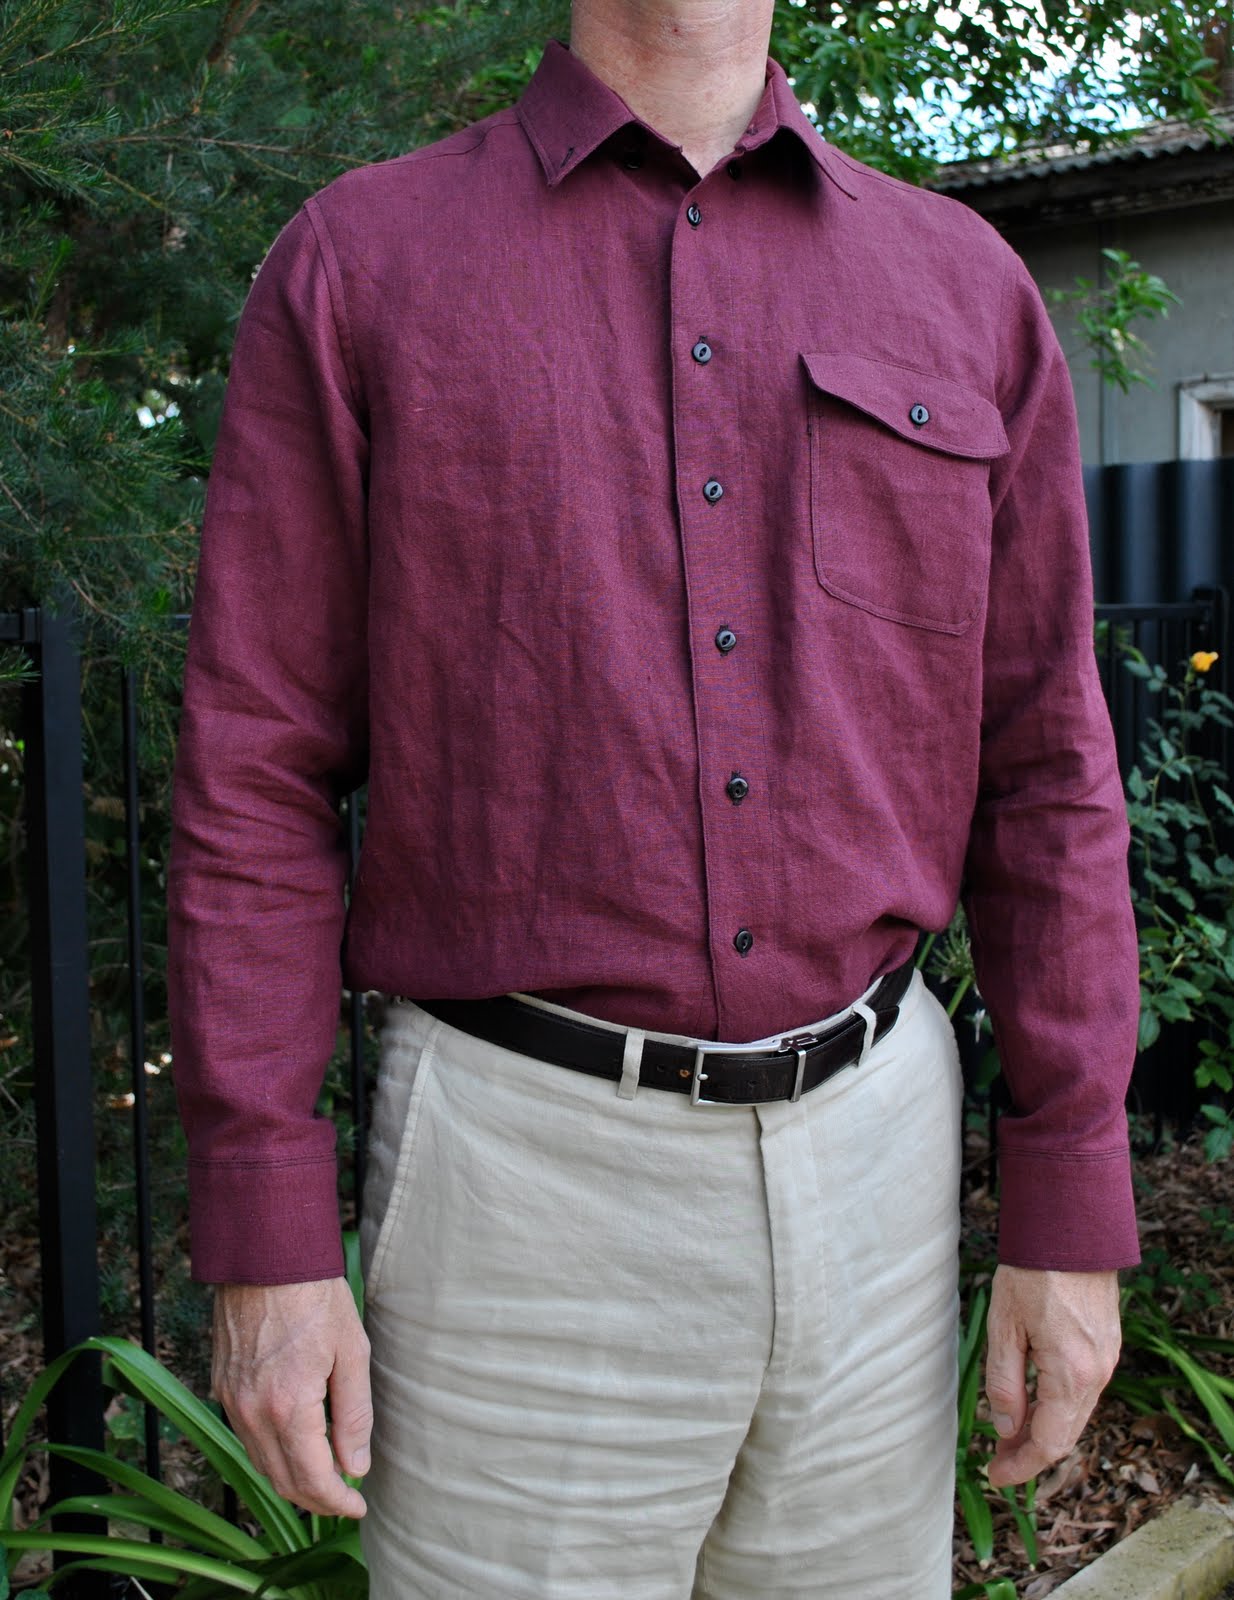
Version two; maroon linen, with black contrasting topstitching and buttons.  Variations, a curved pocket flap, curved pocket edges, narrow spaced double rows topstitching.  I’ve also borrowed this one on a few occasions, hehe (it’s a good thing my husband is so generous with his wardrobe, hmmm?)

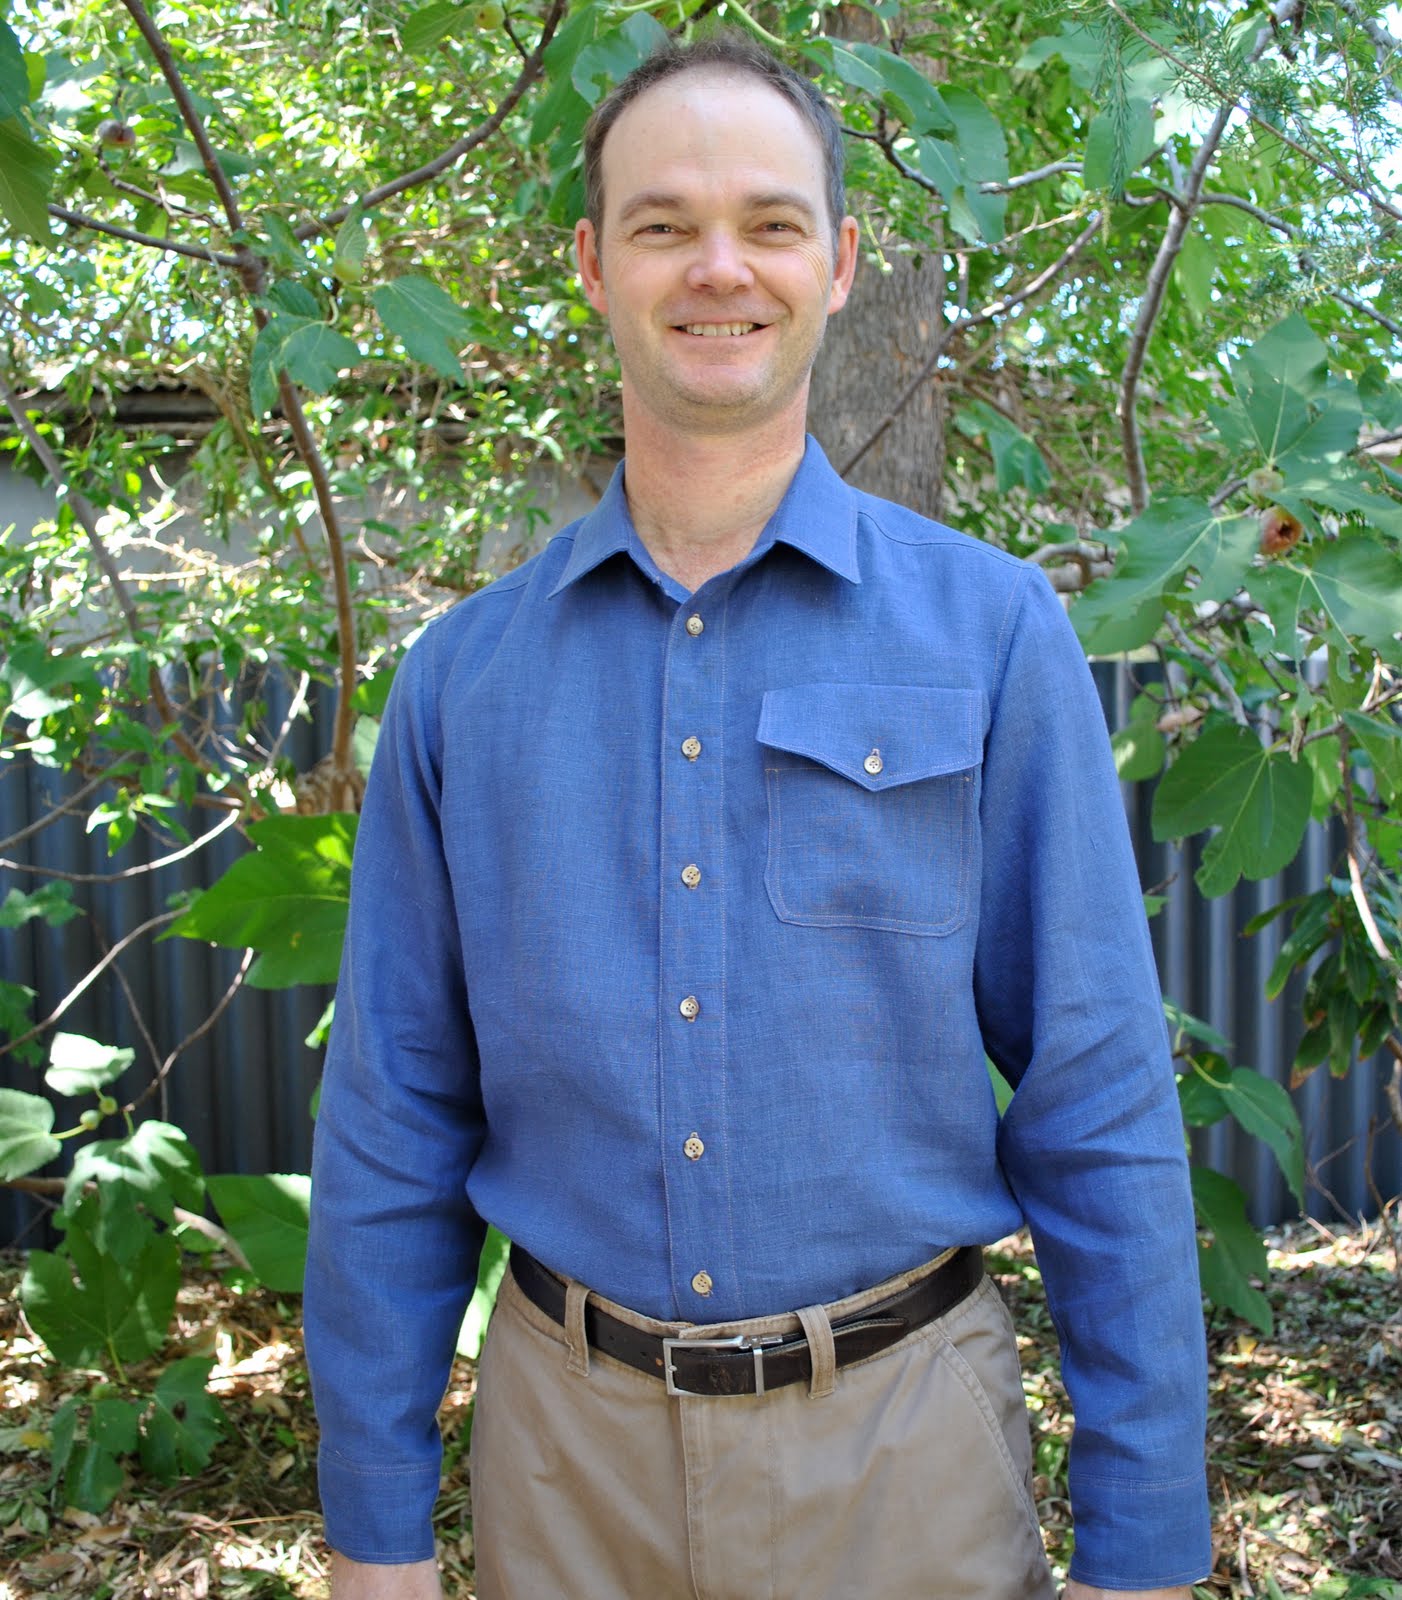
Version three; blue linen with light brown contrasting topstitching and light brown mottley bone buttons.  Variations, arrowhead pocket flap, curved pocket edges, wider spaced double topstitching.

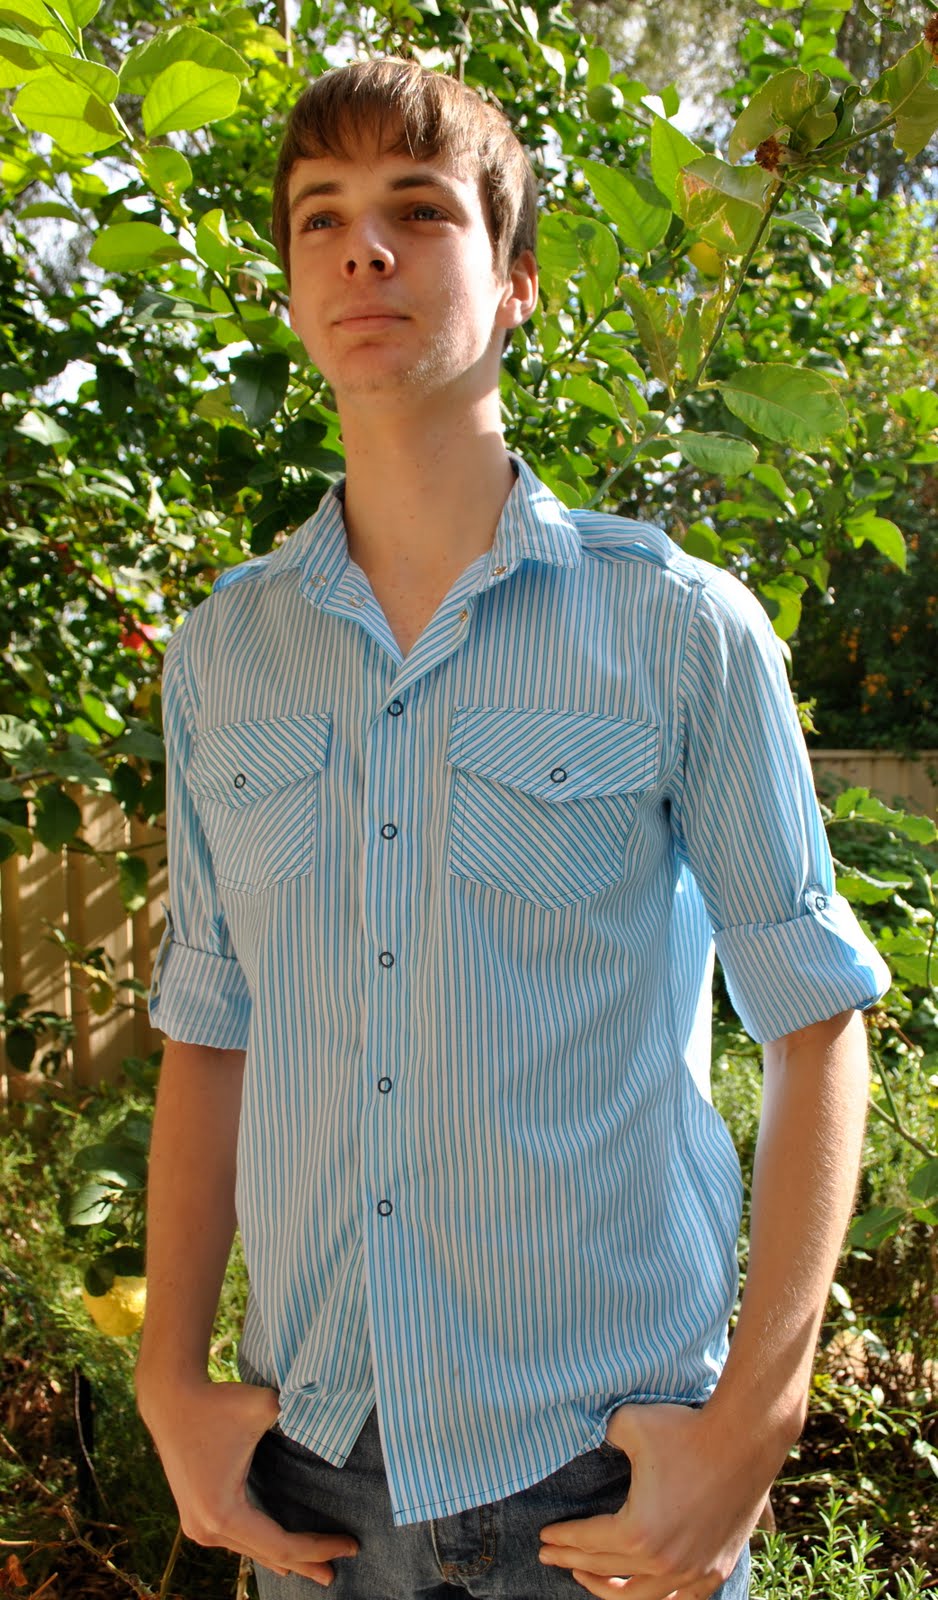
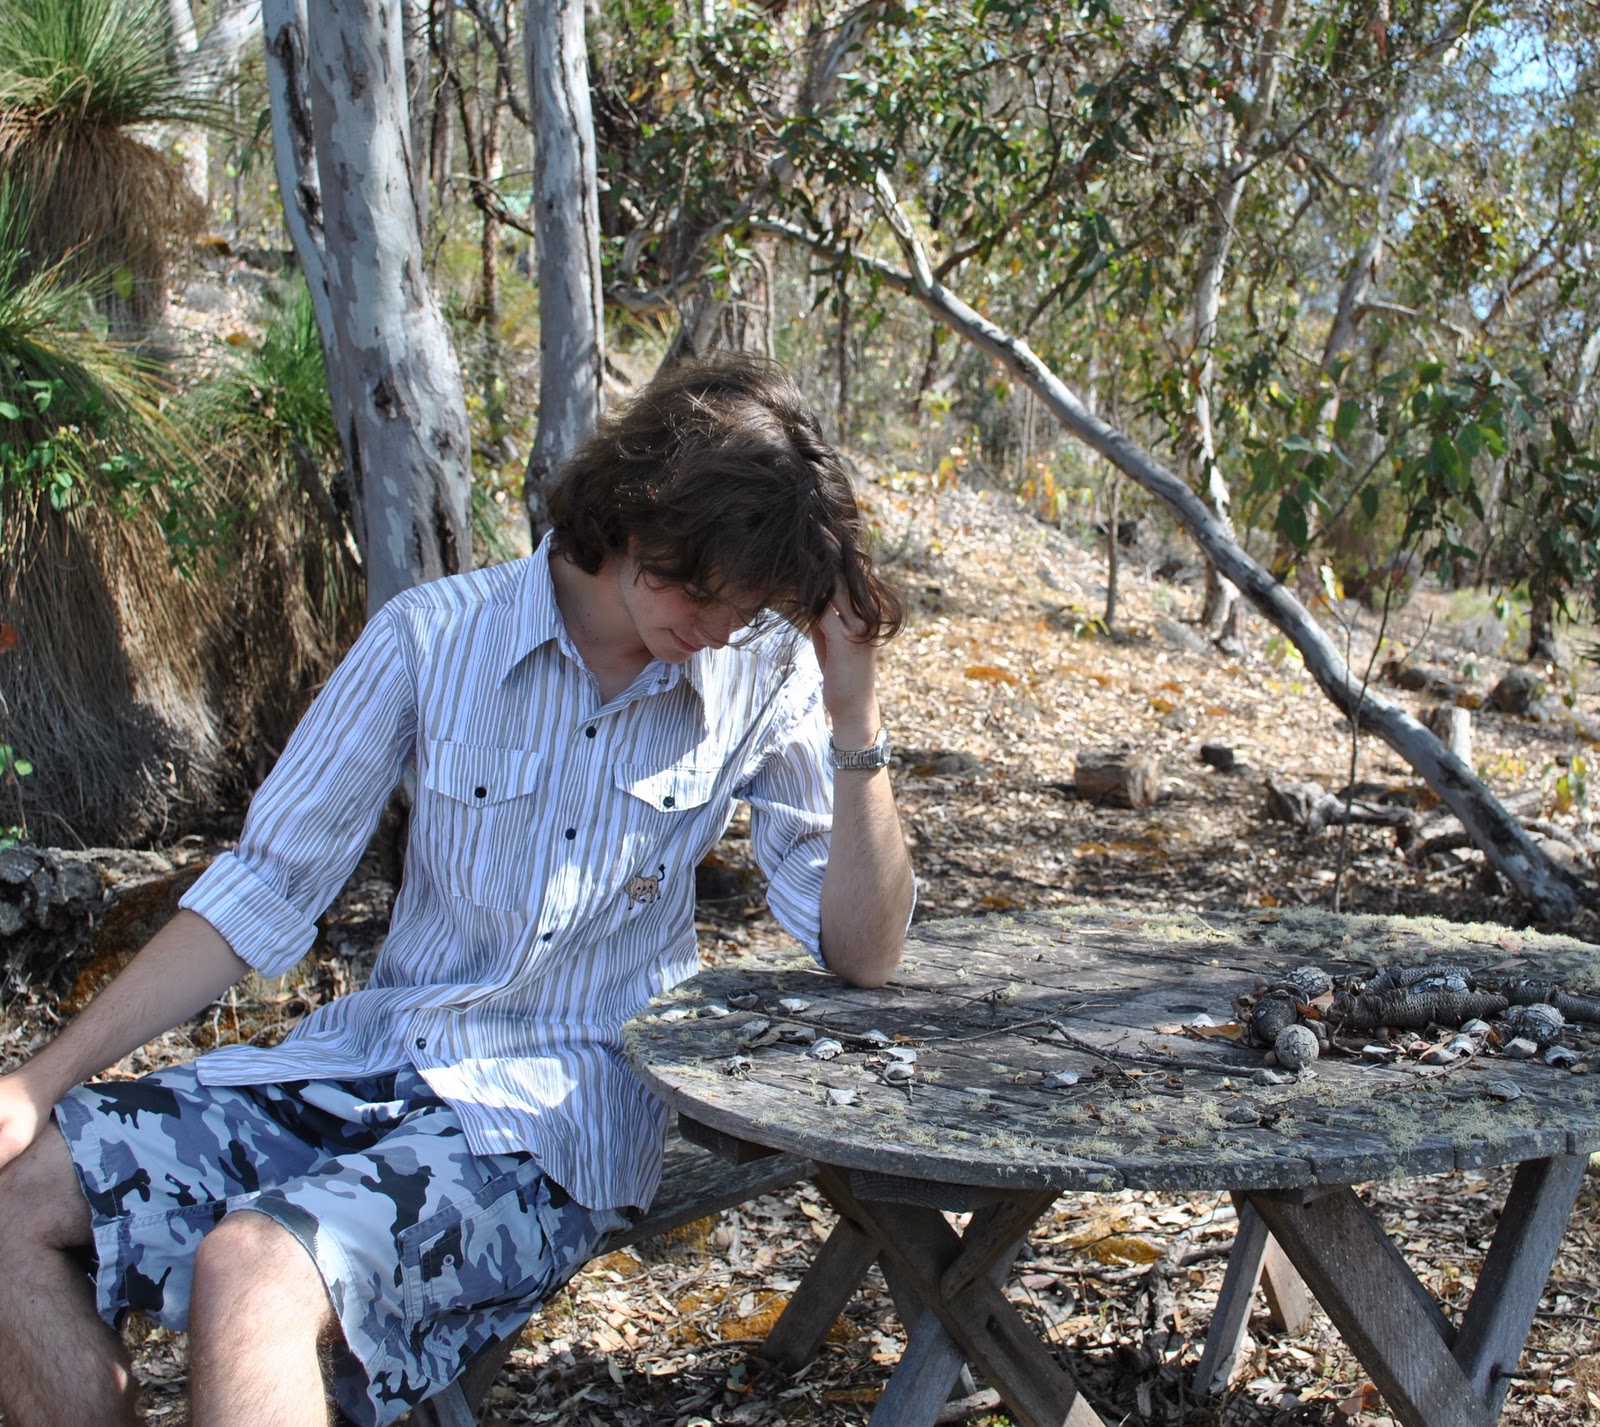
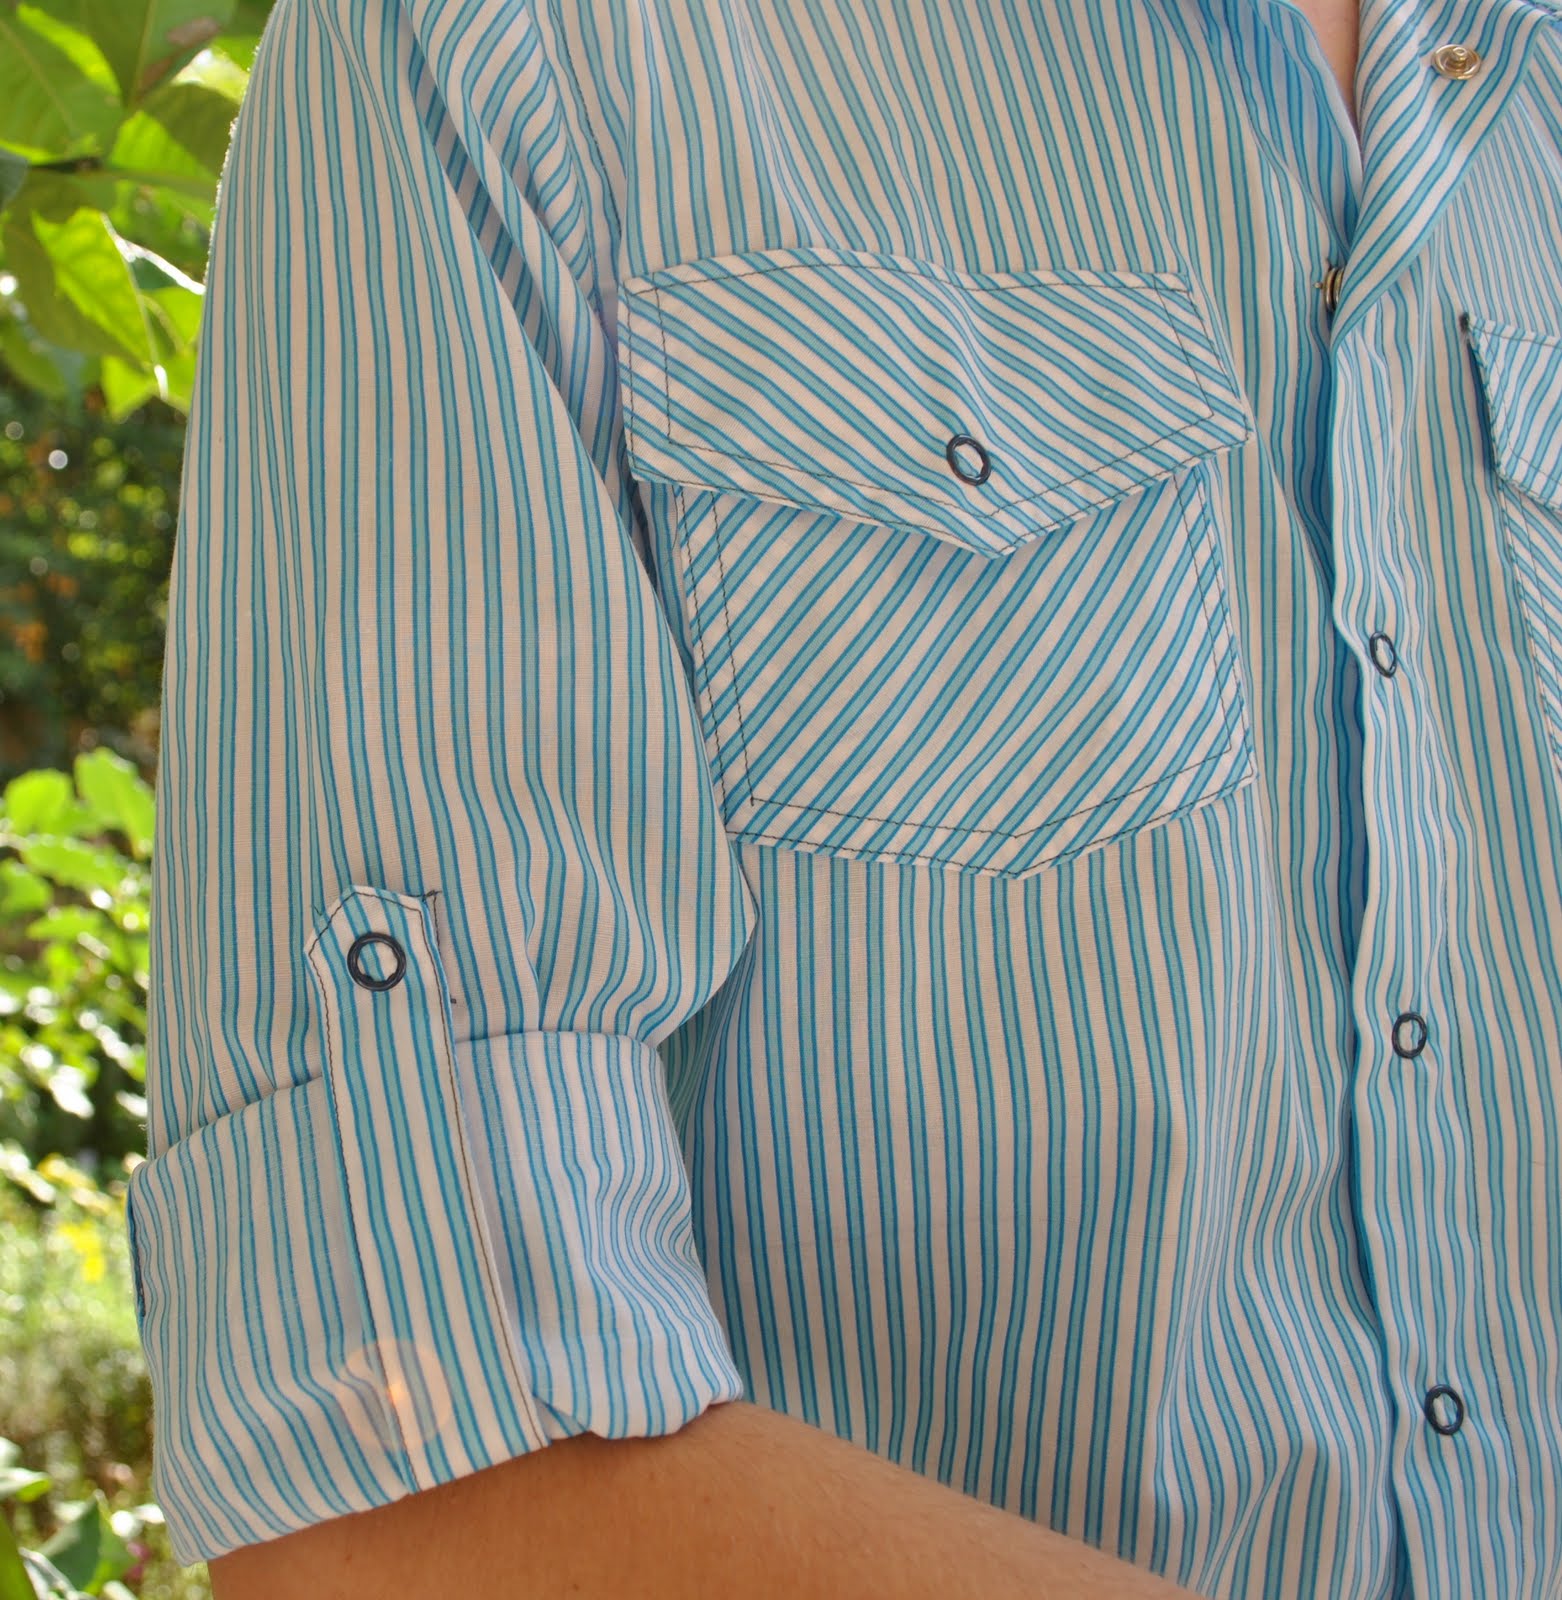
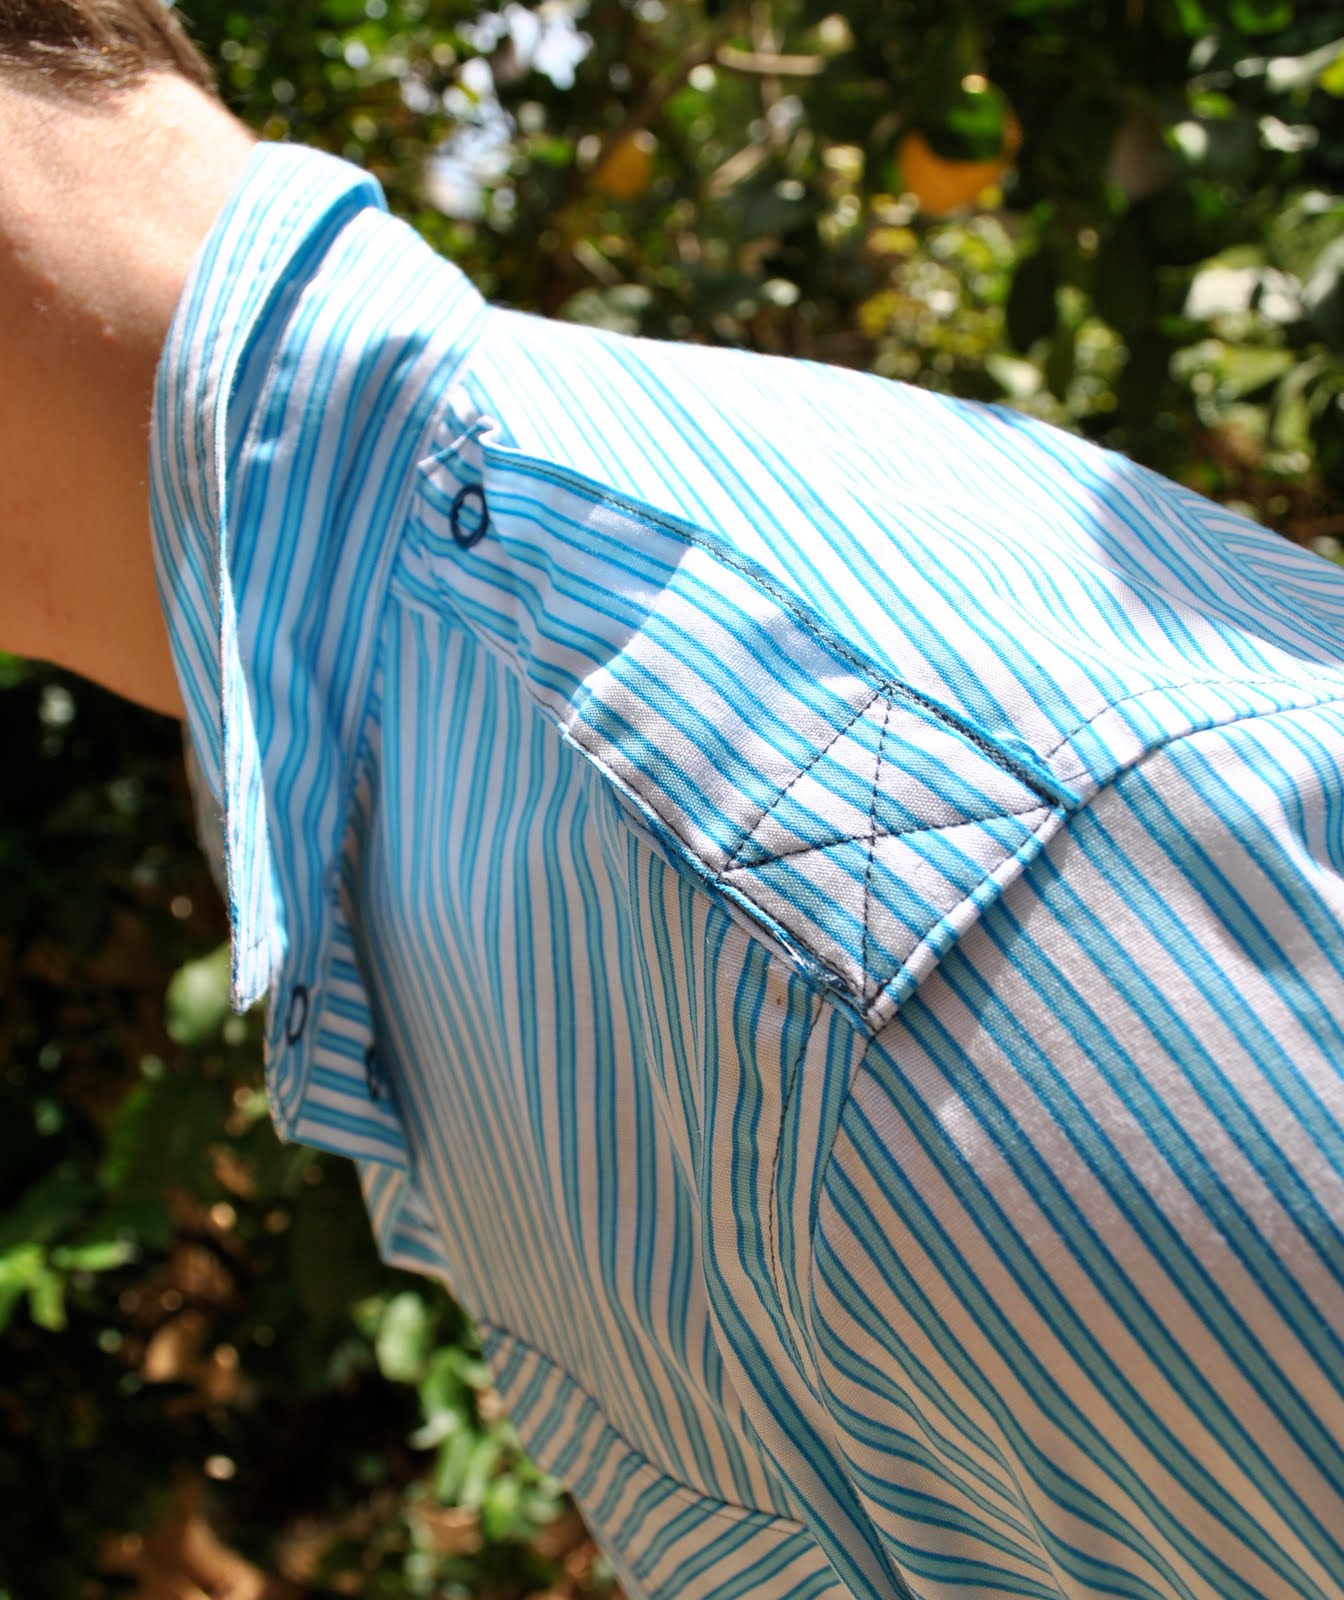
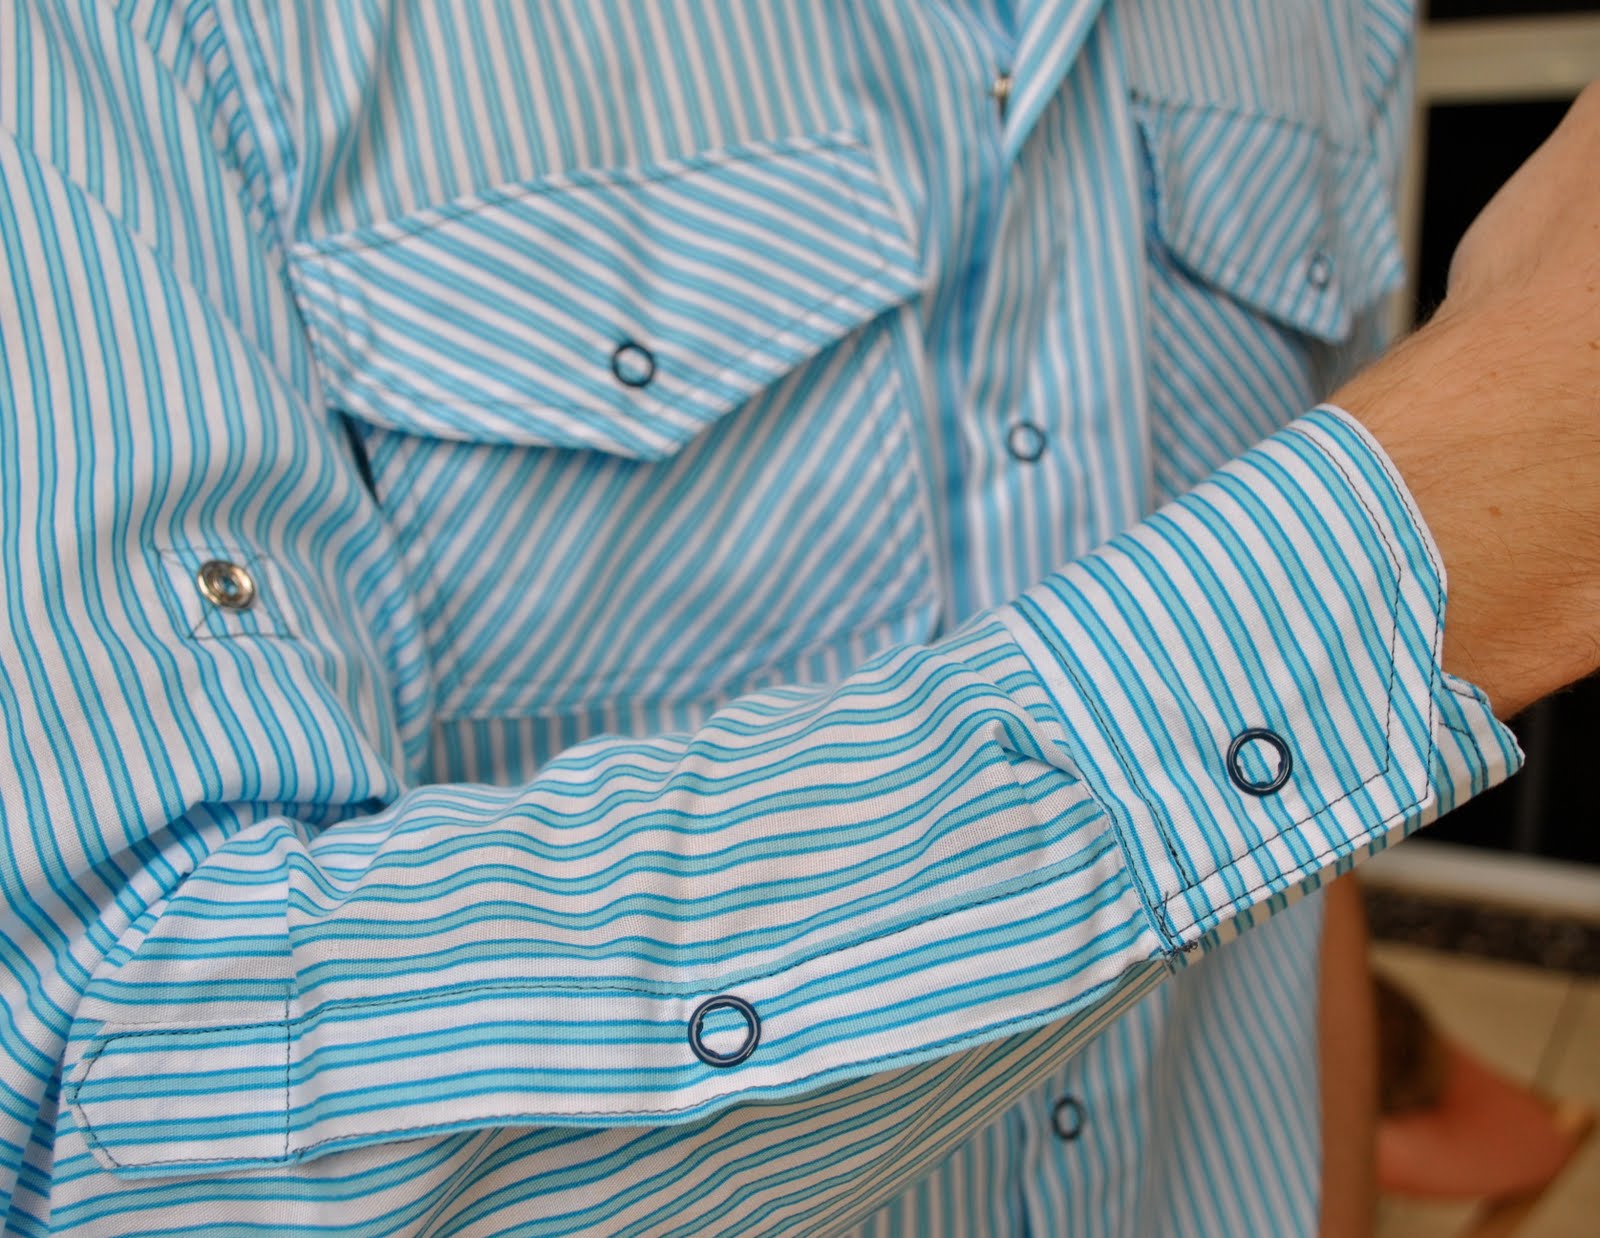
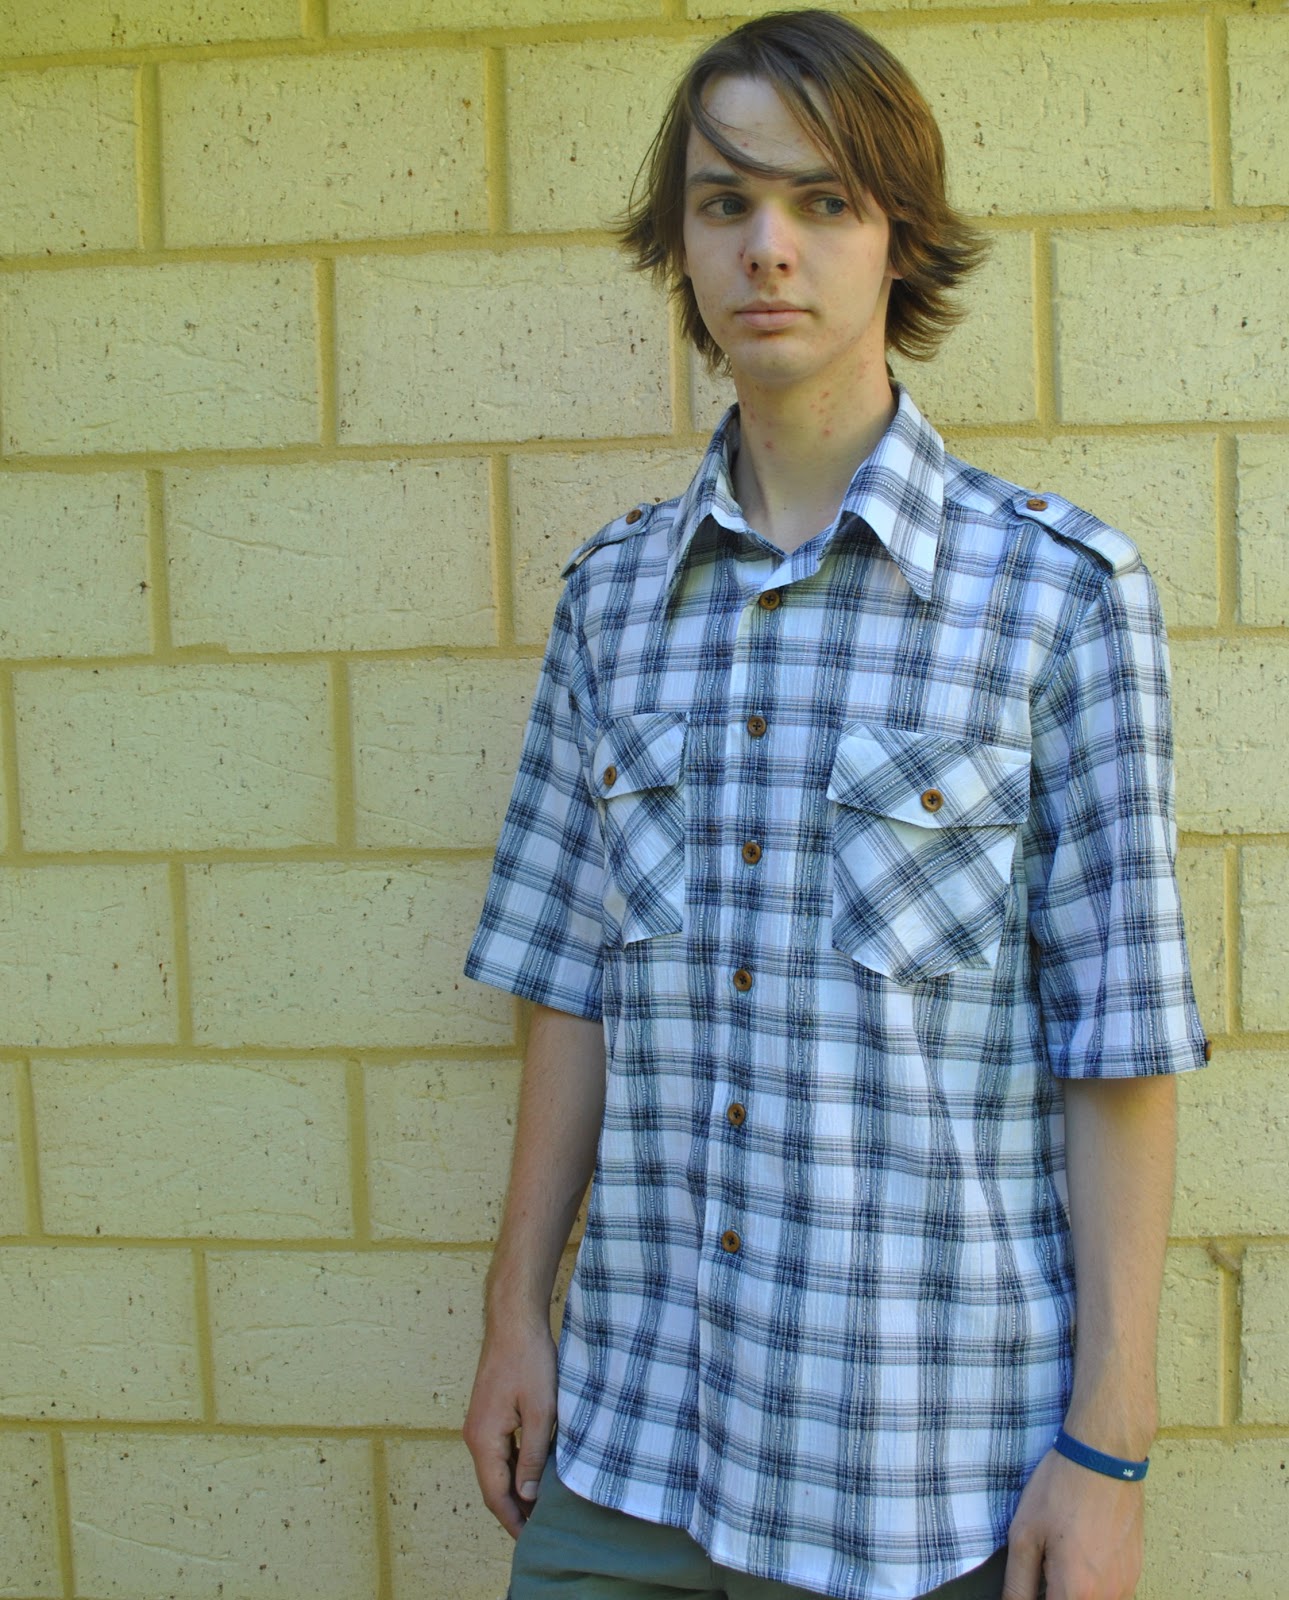
Version four; for Sam, turquoise and white striped cotton with contrasting navy blue topstitching and navy blue snaps.  Variations; double bias placed breast pockets with arrowhead bias placed pocket flaps, shoulder tabs, inner sleeve tabs (so the sleeves can be rolled up like pictured) and snap closures throughout.

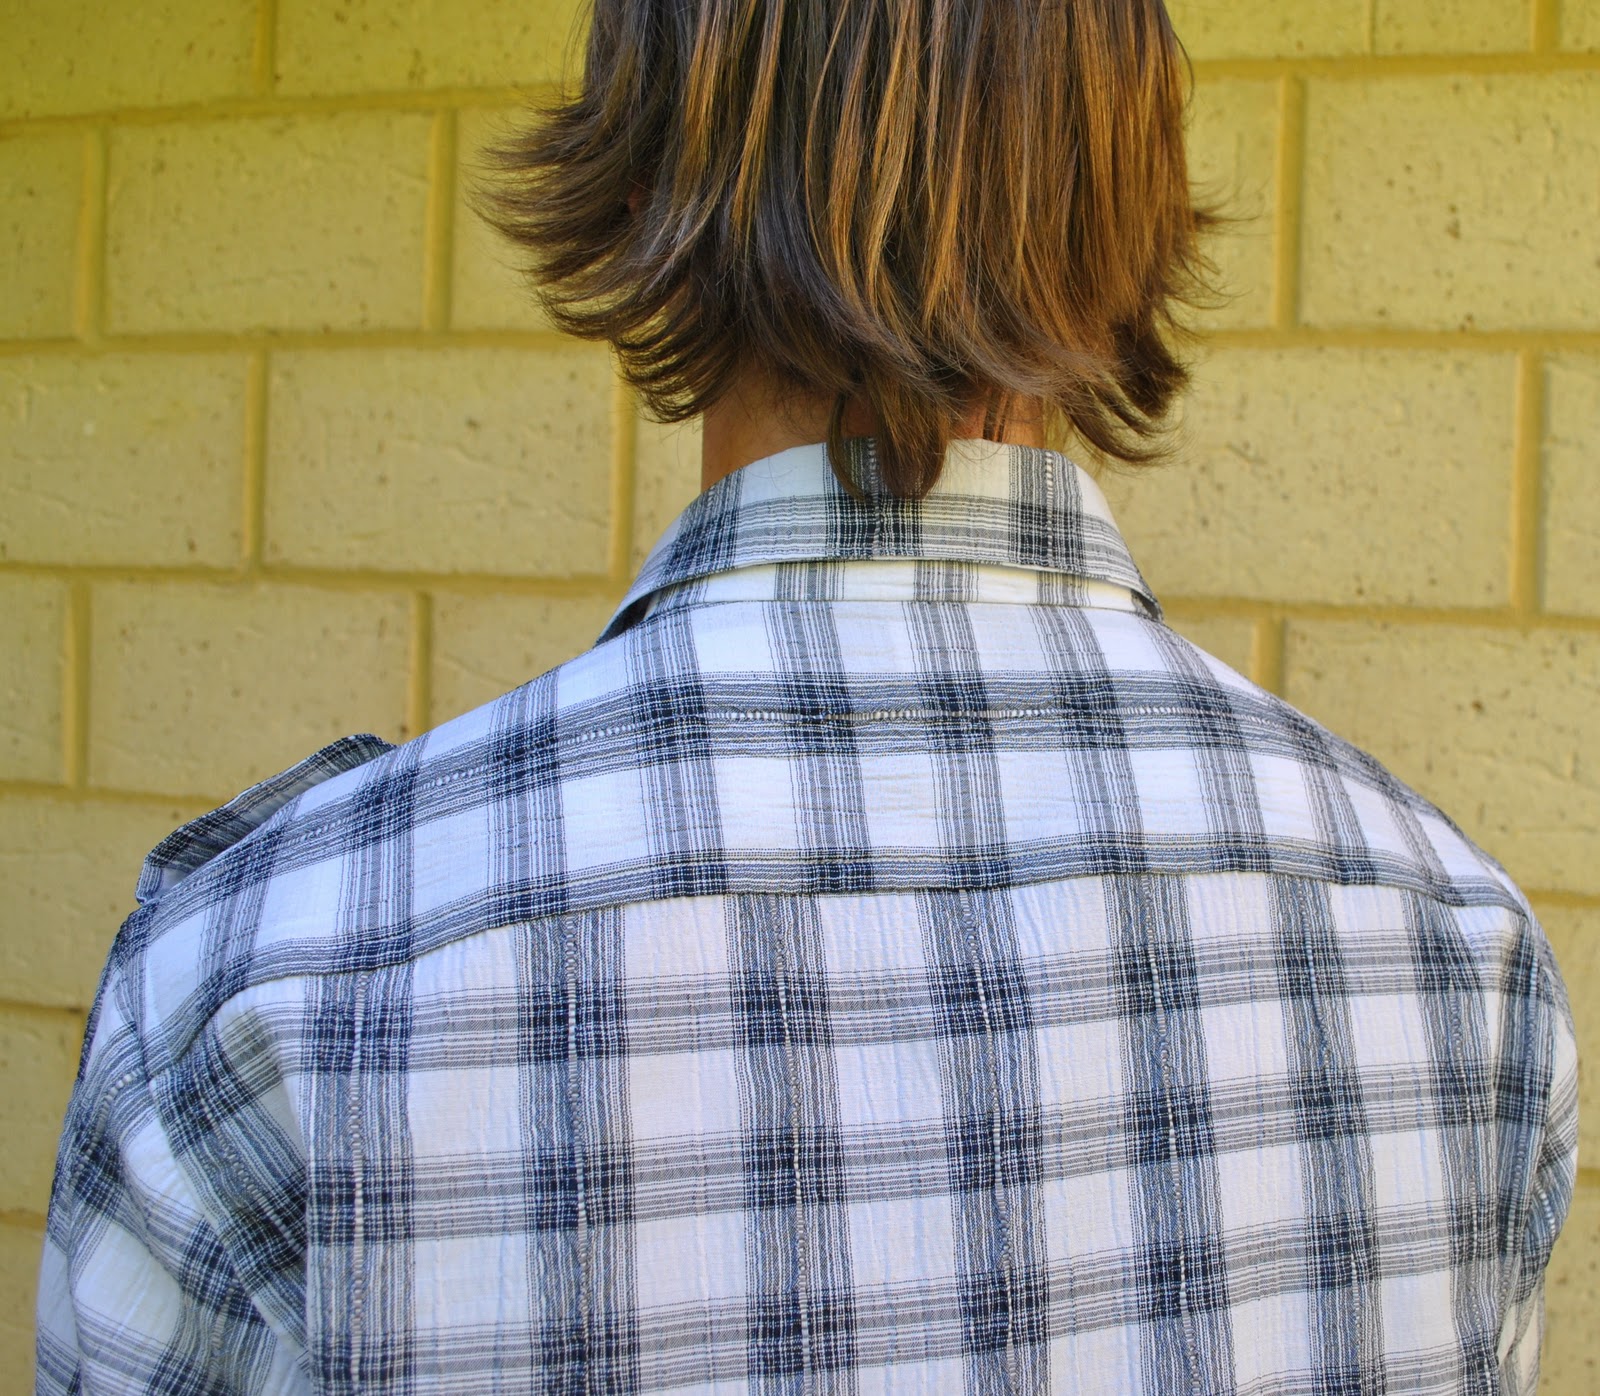
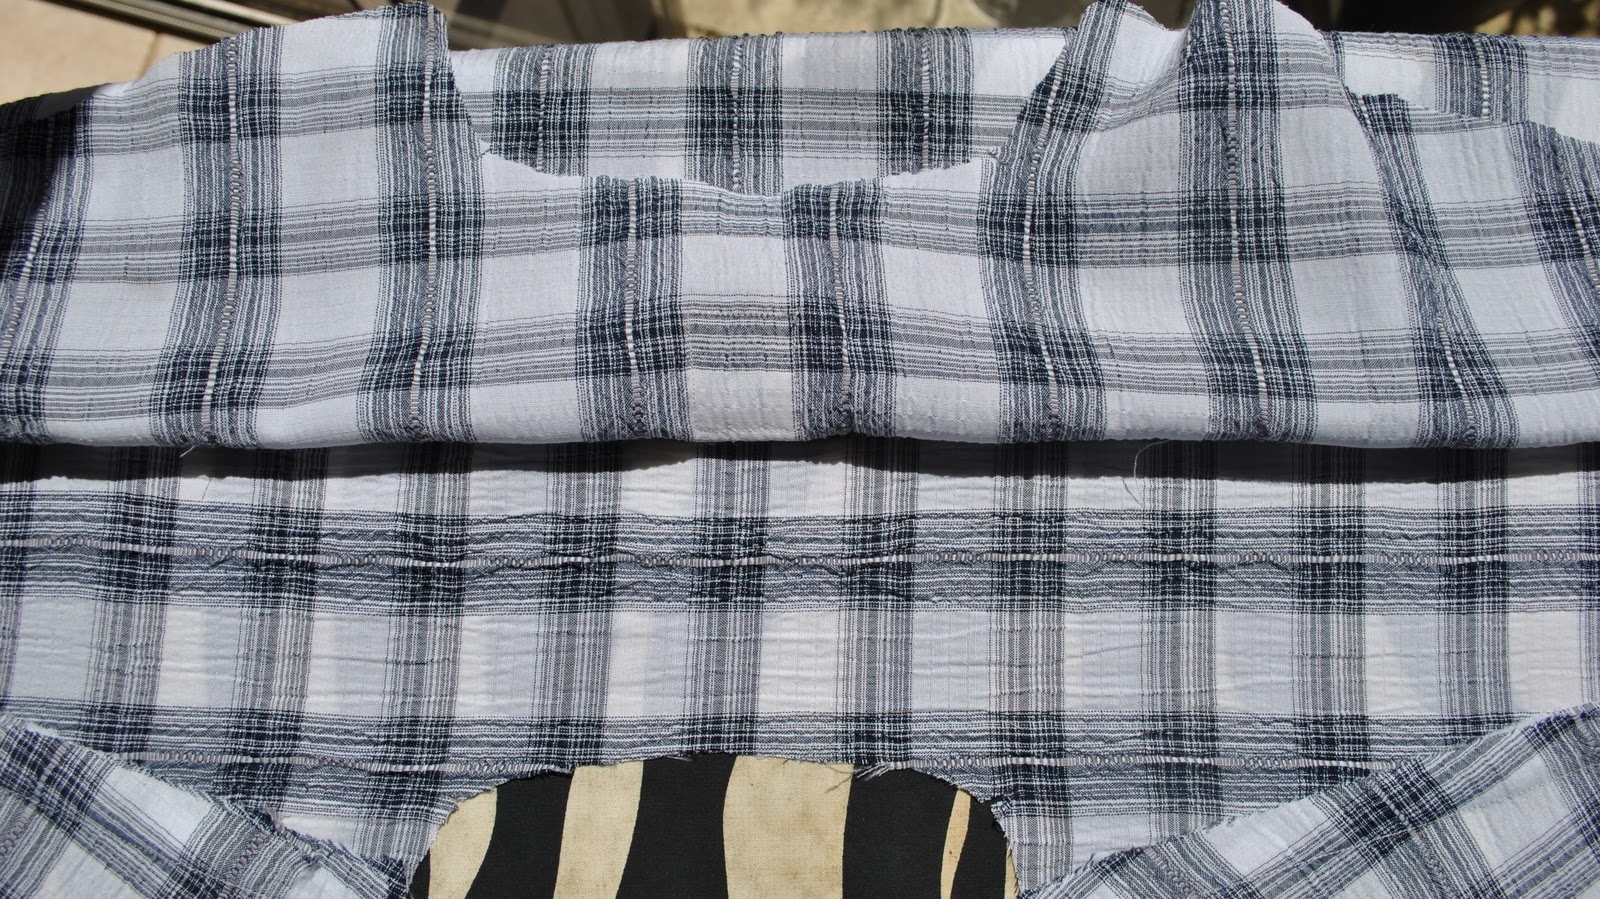
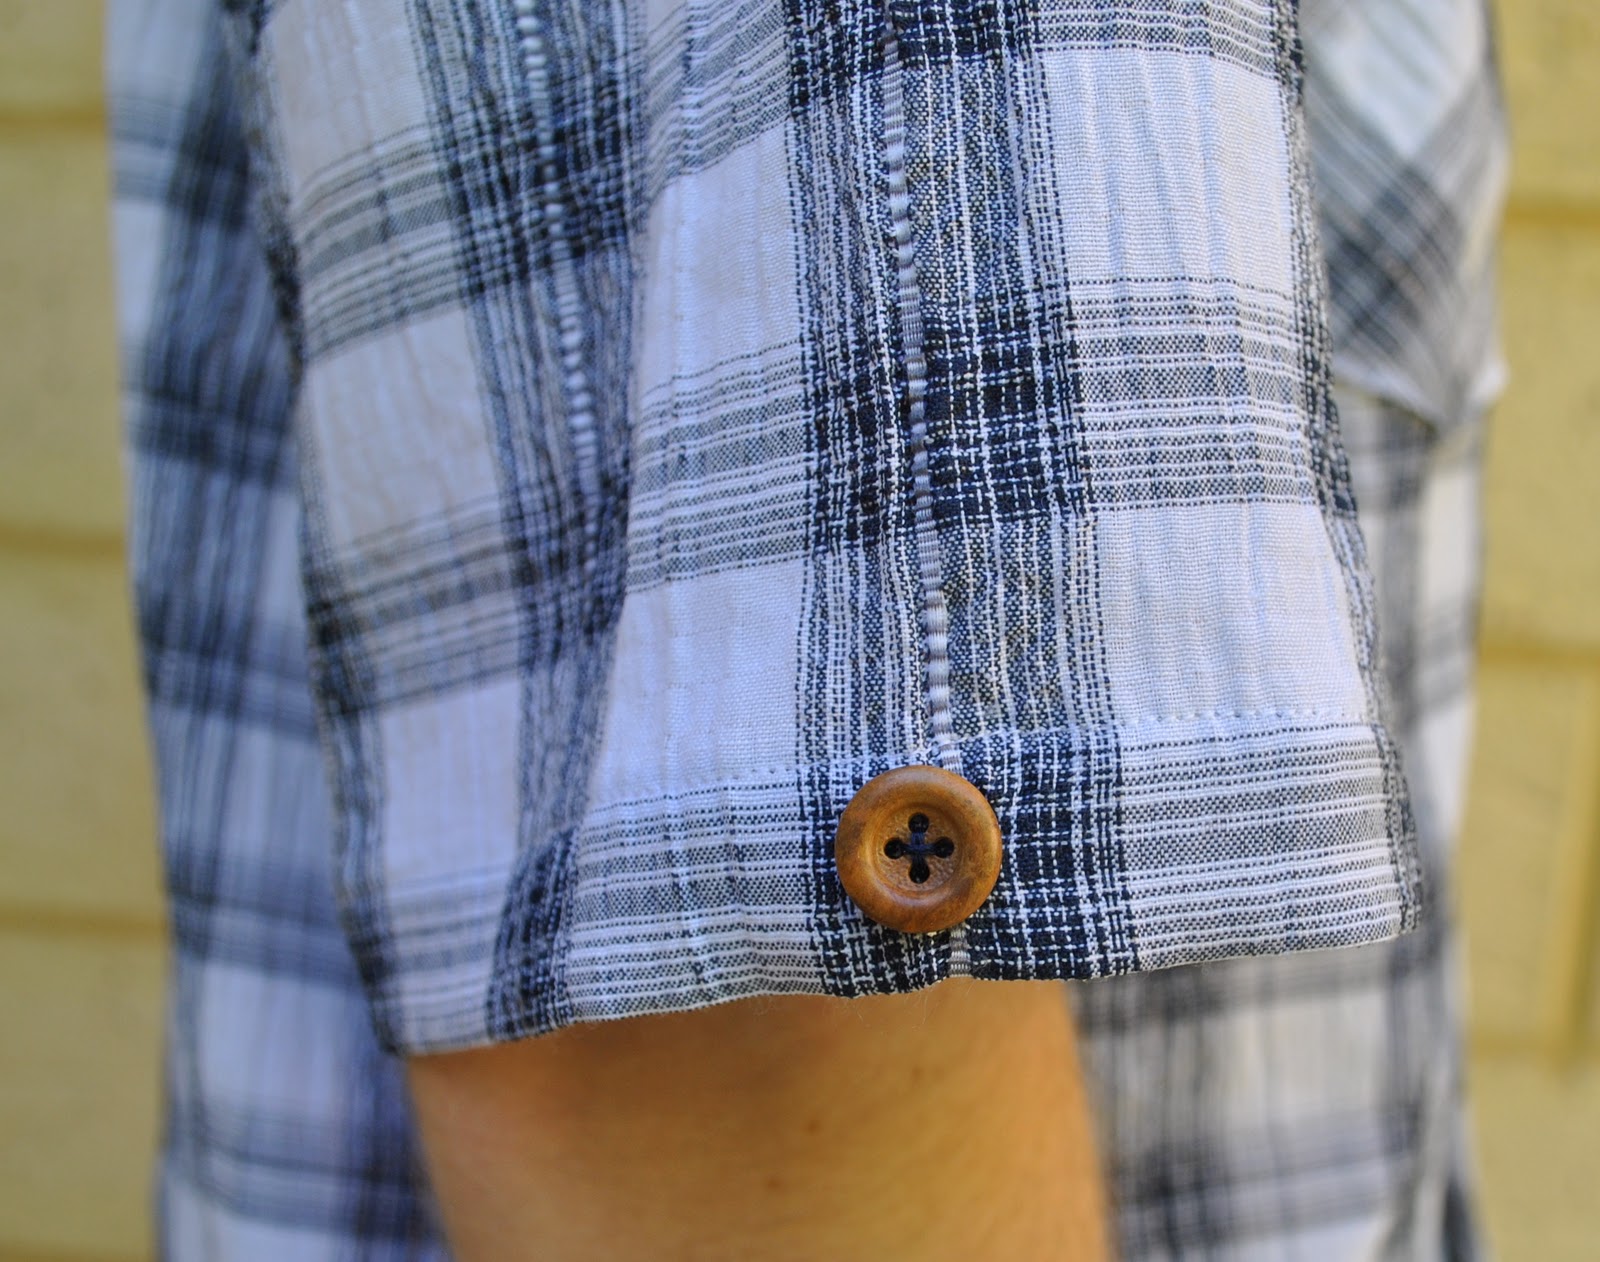
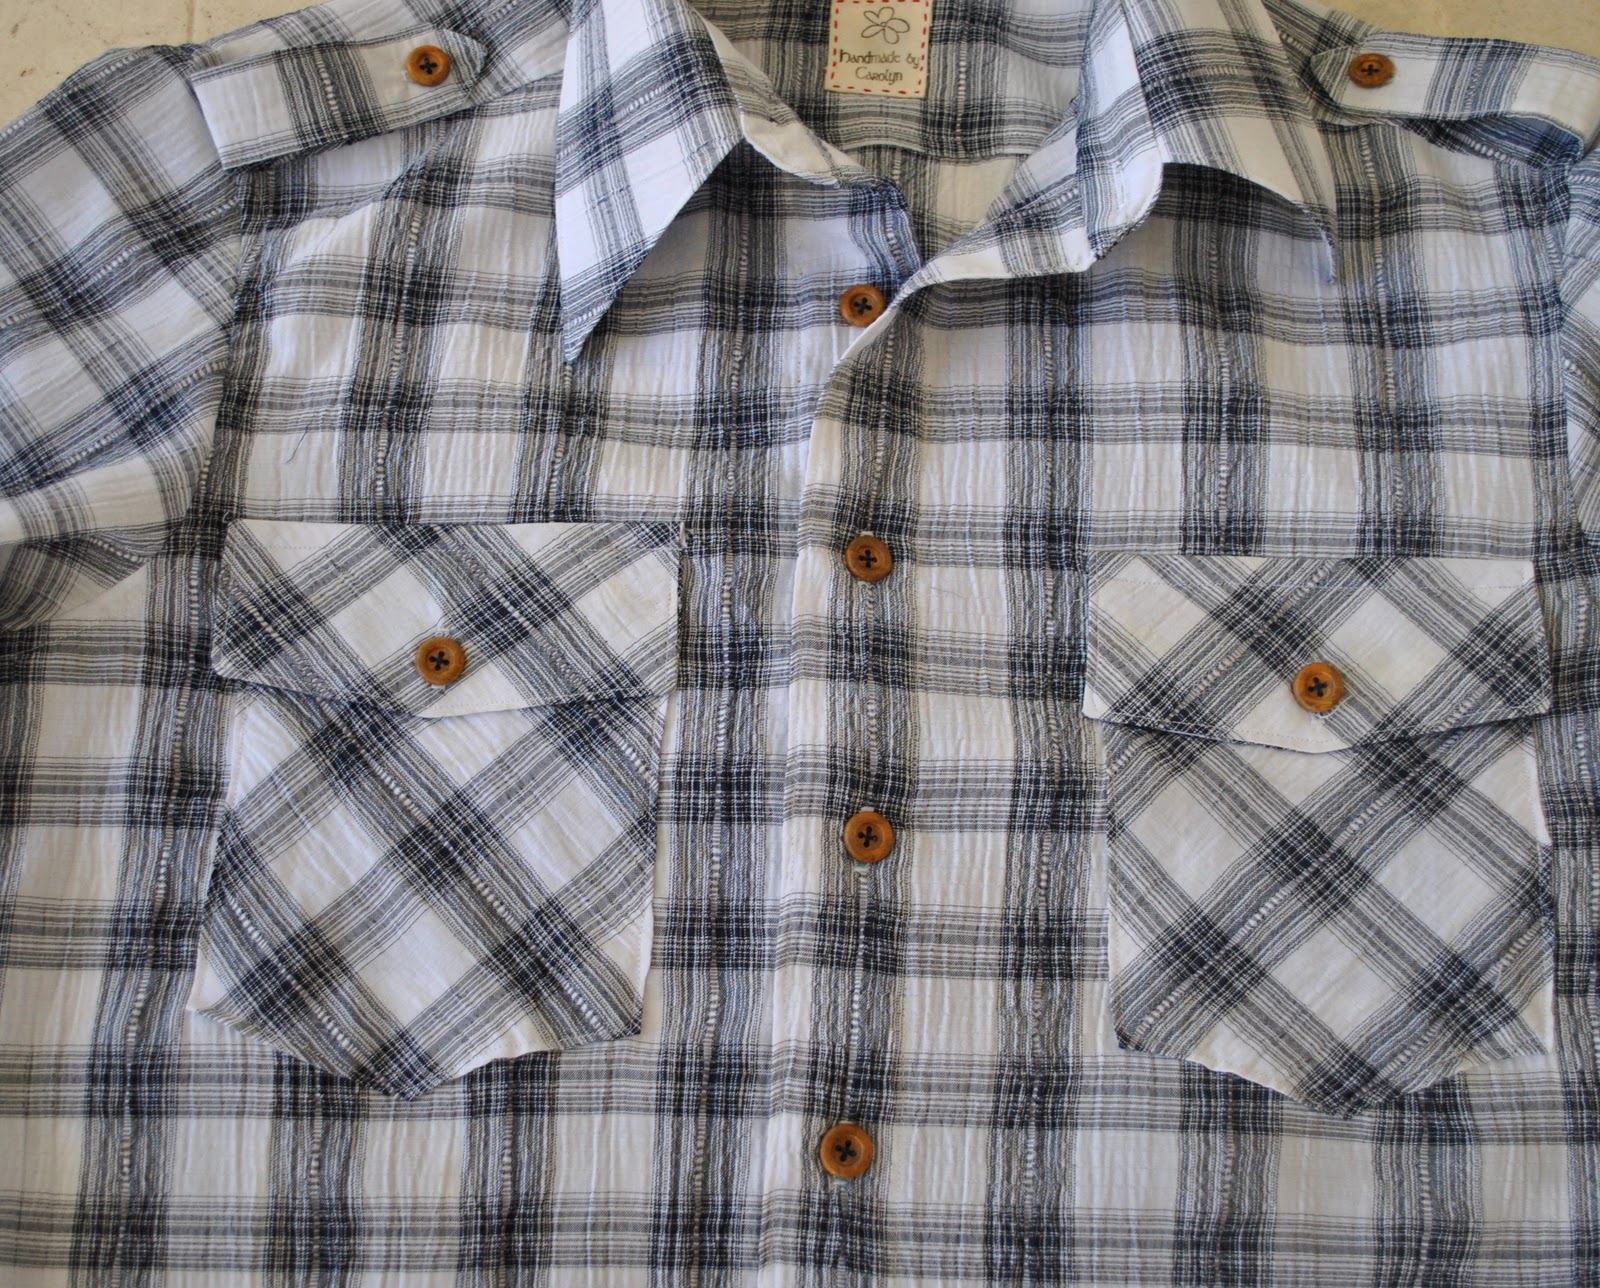
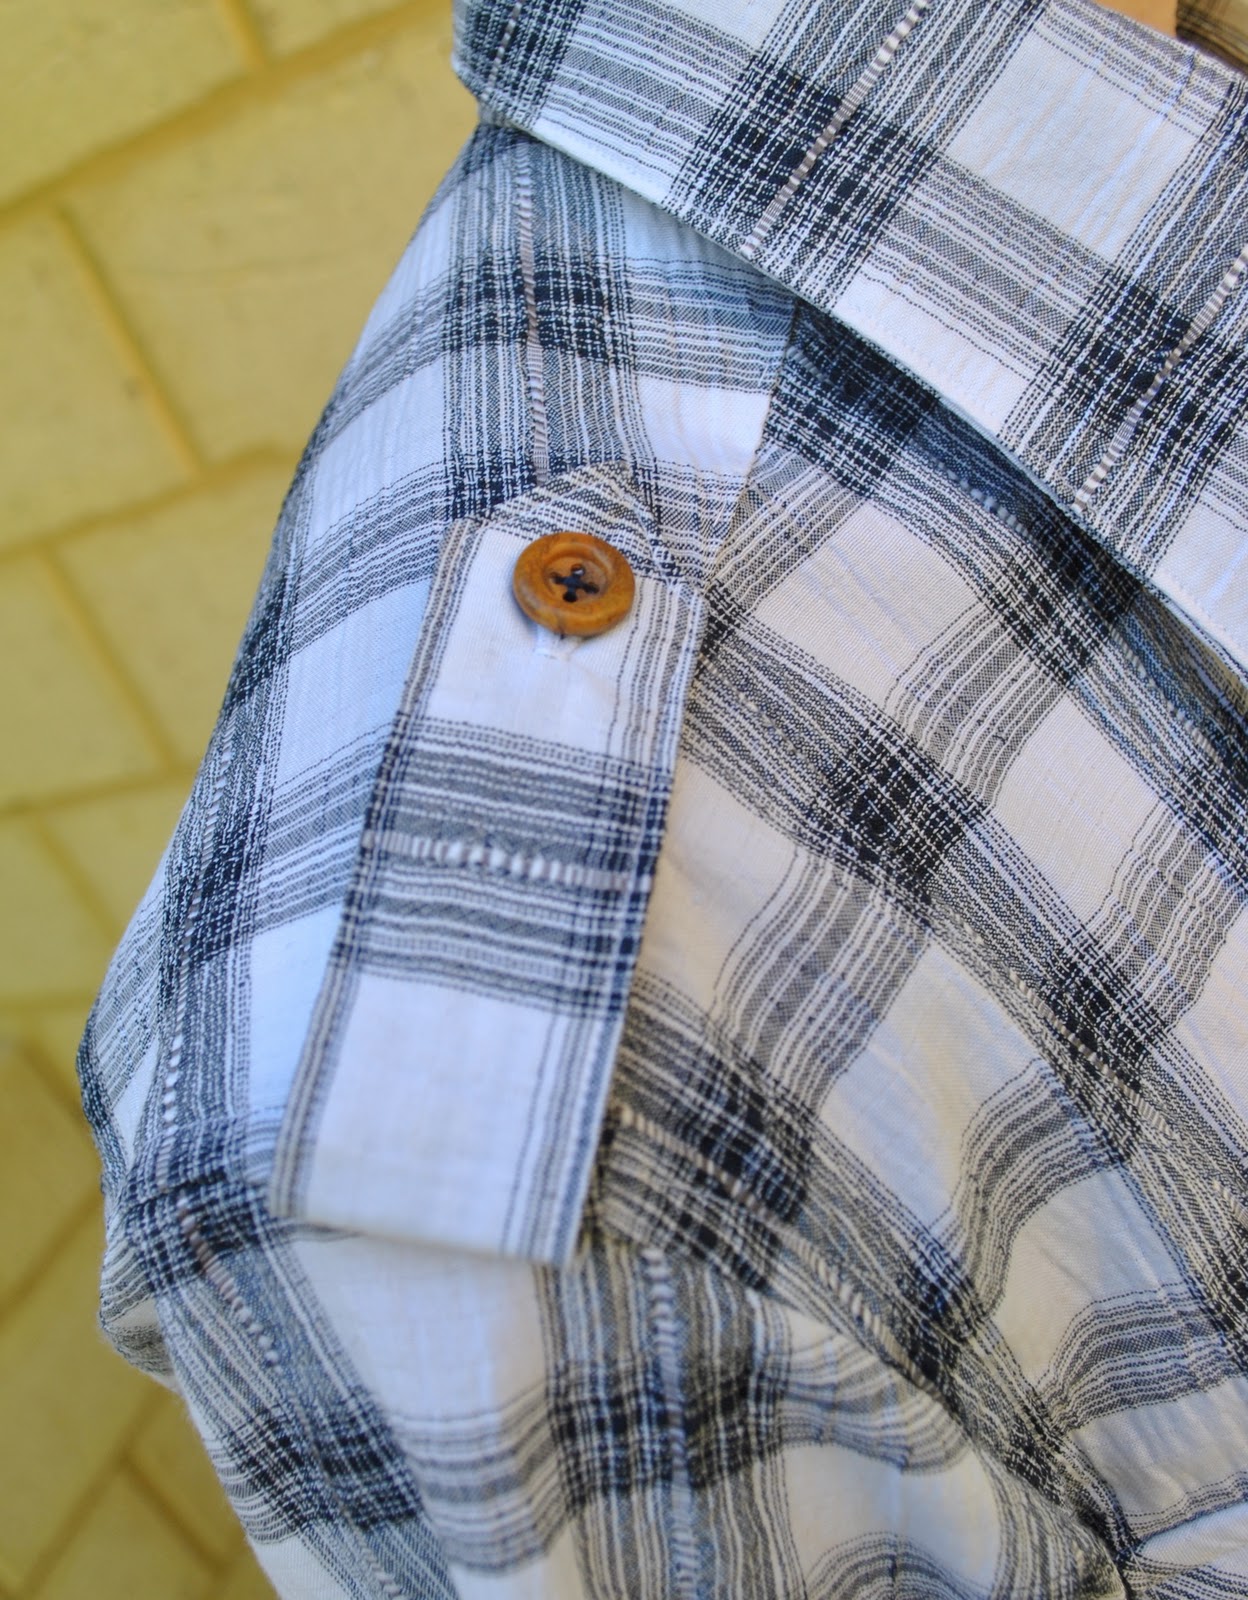
Version five; for Tim, blue, black and white plaid flannelette, with navy topstitching and navy blue snaps.  Variations, pieced pocket pieces (to take advantage of that interesting plaid), bias placed arrowhead pocket flaps. shoulder tabs, inner sleeve tabs and snap closure throughout.

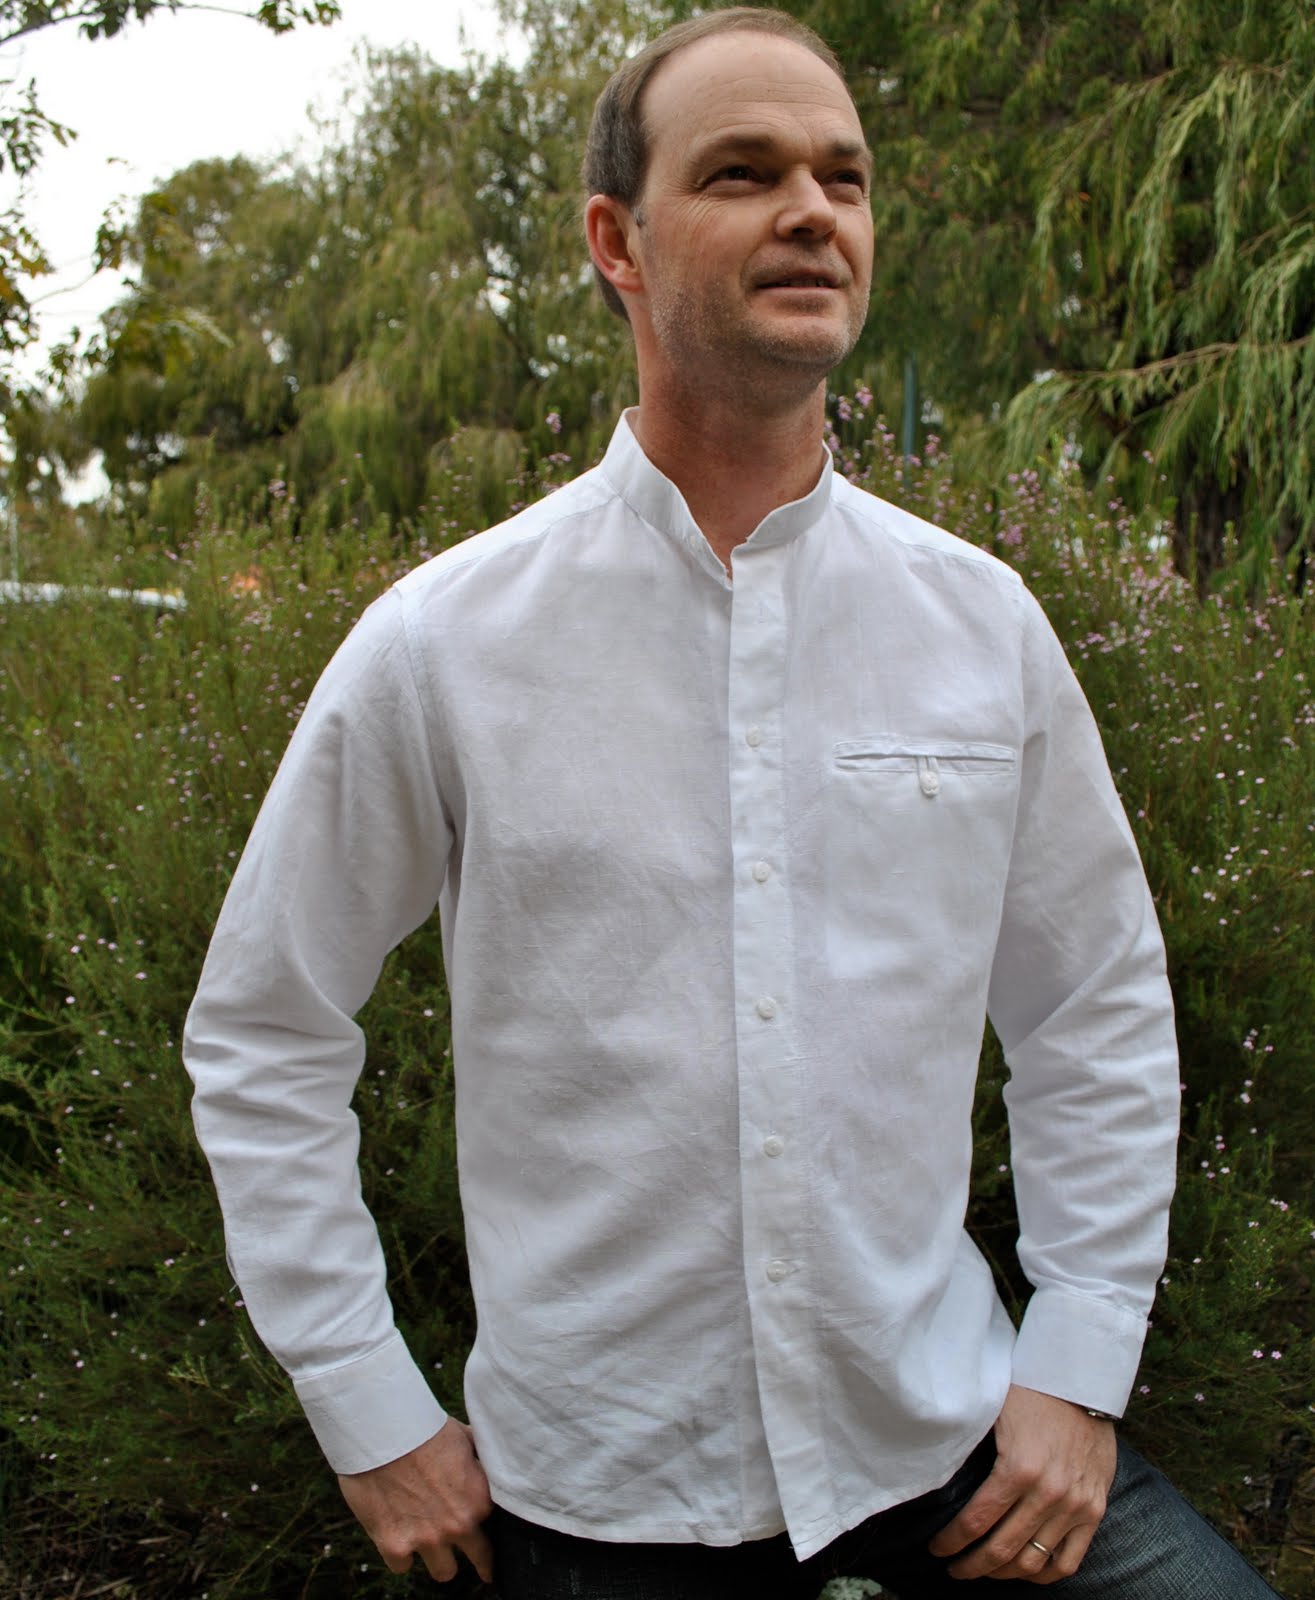
Version six; for Craig, white linen, white topstitching and buttons. Variations; one double welt breast pocket with looped button closure, no collar, curved lower hemline.  Yup, I’ve borrowed this one a tonne too…!

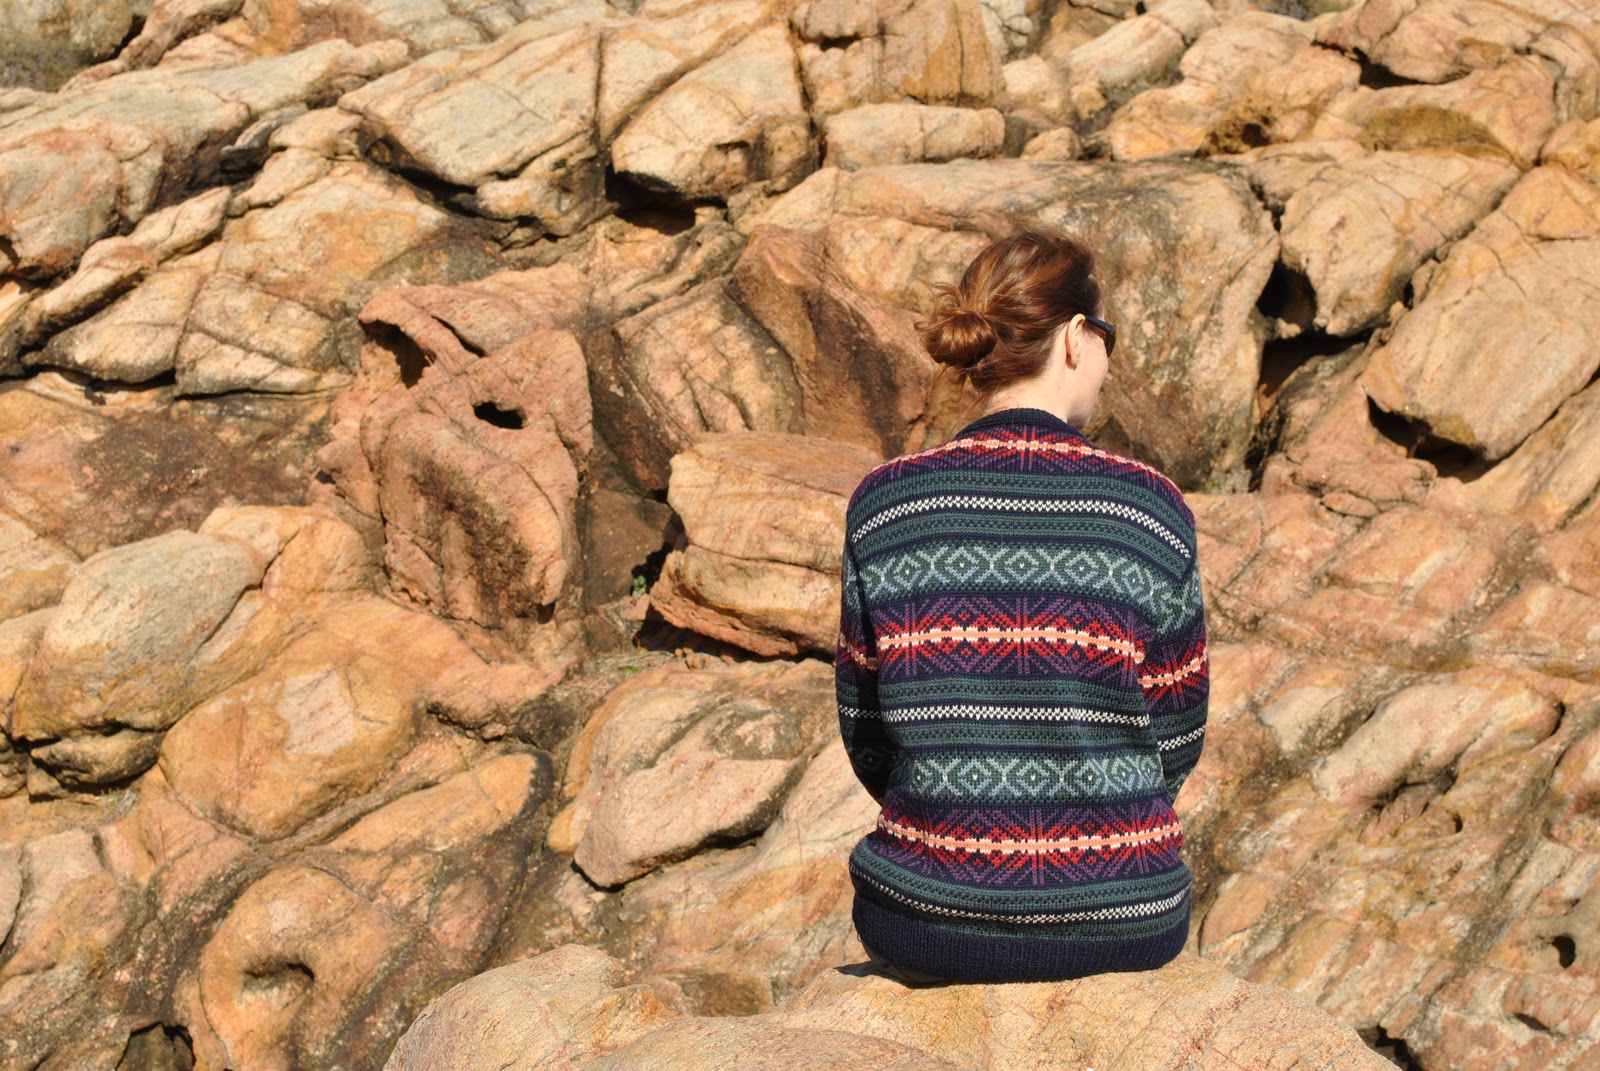
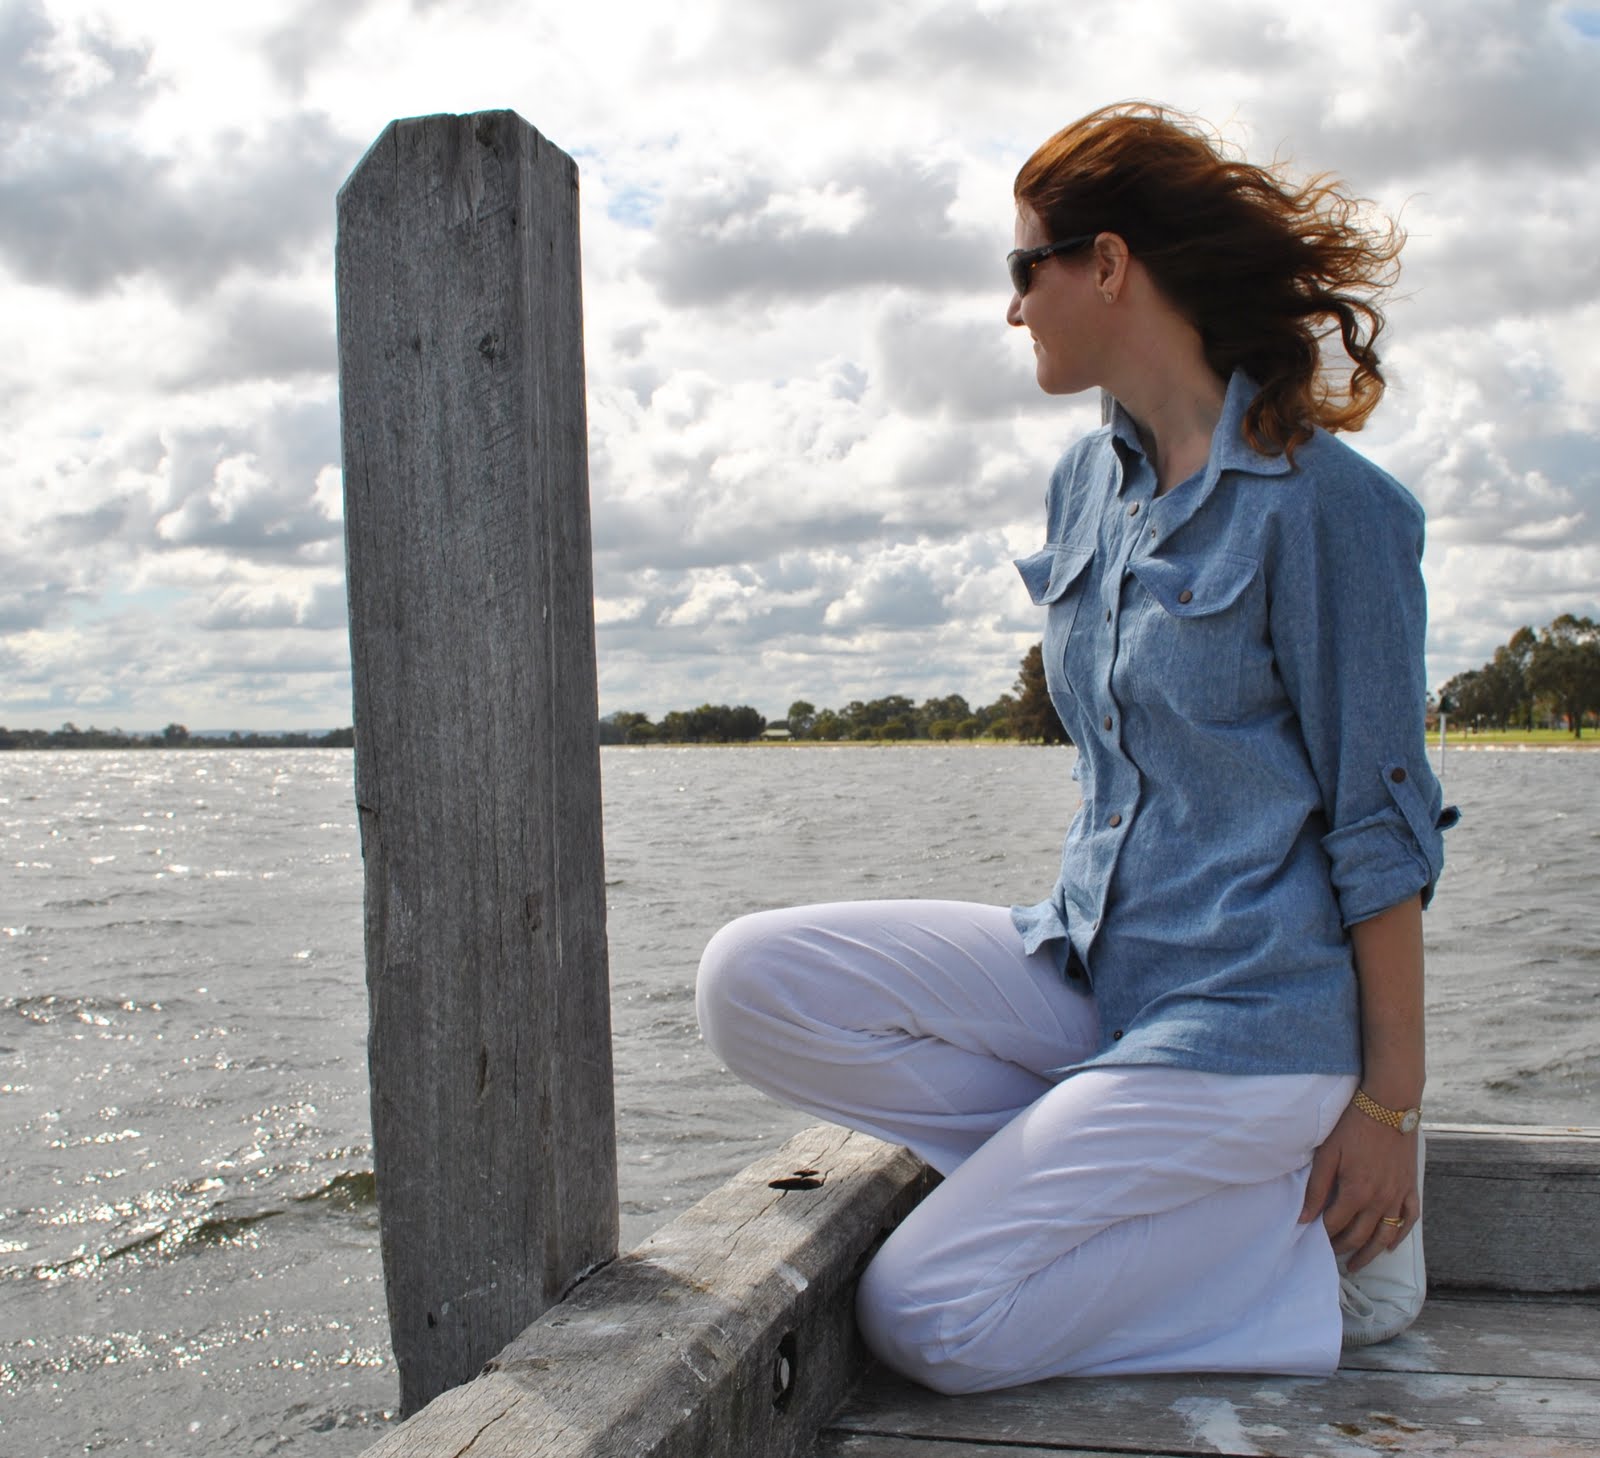
Version seven; (blush) for me…, blue cotton chambray, white topstitching and copper-toned snaps.  Variations, double breast pockets with arrowhead pocket flaps, shoulder tabs and inner sleeve tabs, curved lower hemline.

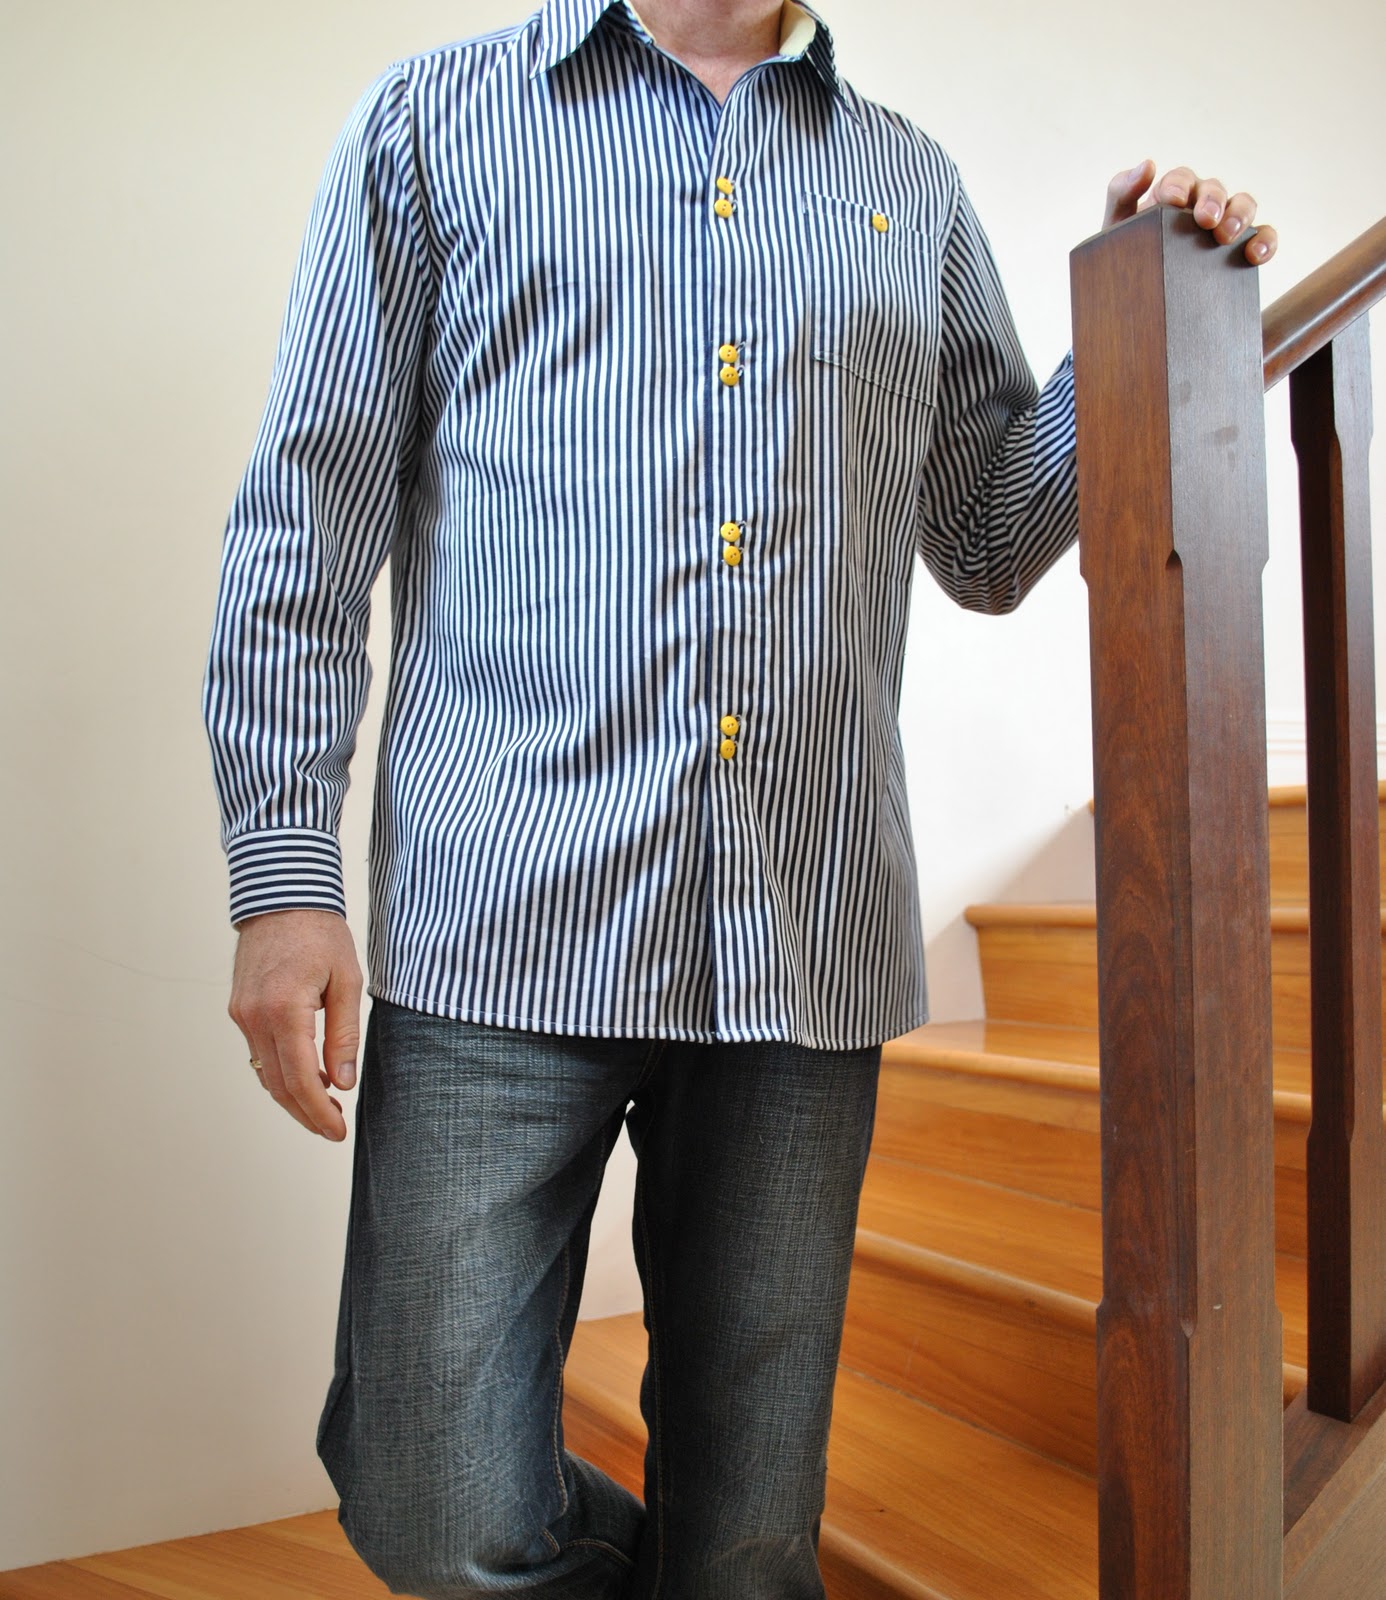
Version eight; for Craig, navy and white striped cotton, yellow cotton, white topstitching and yellow buttons.  Variations, contrasting fabric for collar stand lining and sleeve cuff lining.  Buttonholes sewn on the diagonal, and grouped together down the buttonband in pairs, curved lower hemline.

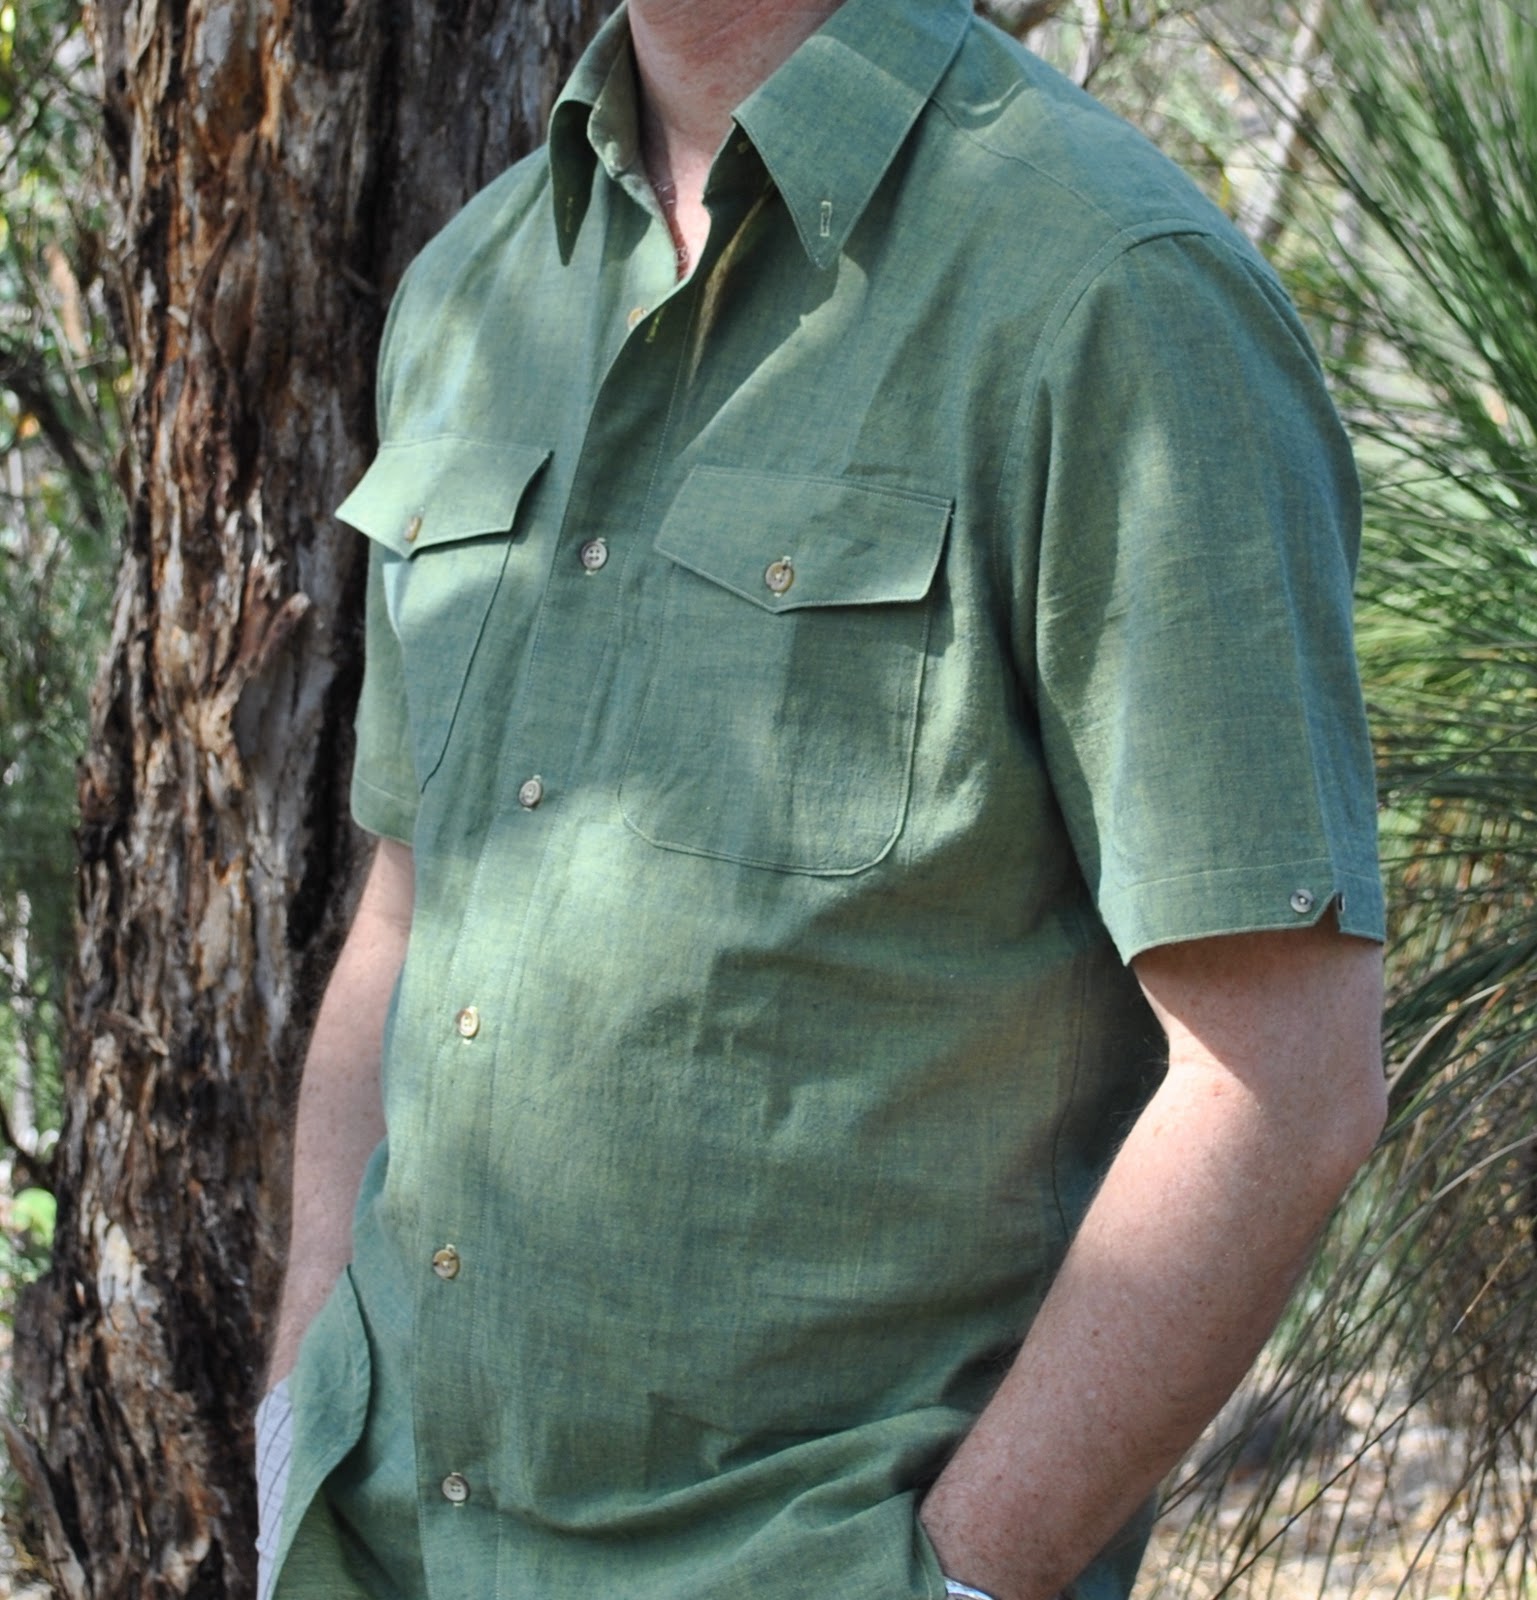
Version nine; for Craig, green shot cotton, contrasting yellow topstitching, brown mottley buttons.  Variations, of summer weight cotton, with short sleeves, double curved edge breast pockets, arrowhead pocket flaps, curved lower hemline.  Did an interesting little triangular cut-out feature thingy on the ends of the sleeves

Version ten; for Tim, beige, black and white irregularly striped “scrunched” cotton, with black topstitching and black snaps.  Variations,  sleeve tabs, motif ironed onto pocket, double breast pockets, curved pocket flaps, snap closure throughout, curved lower hemline.

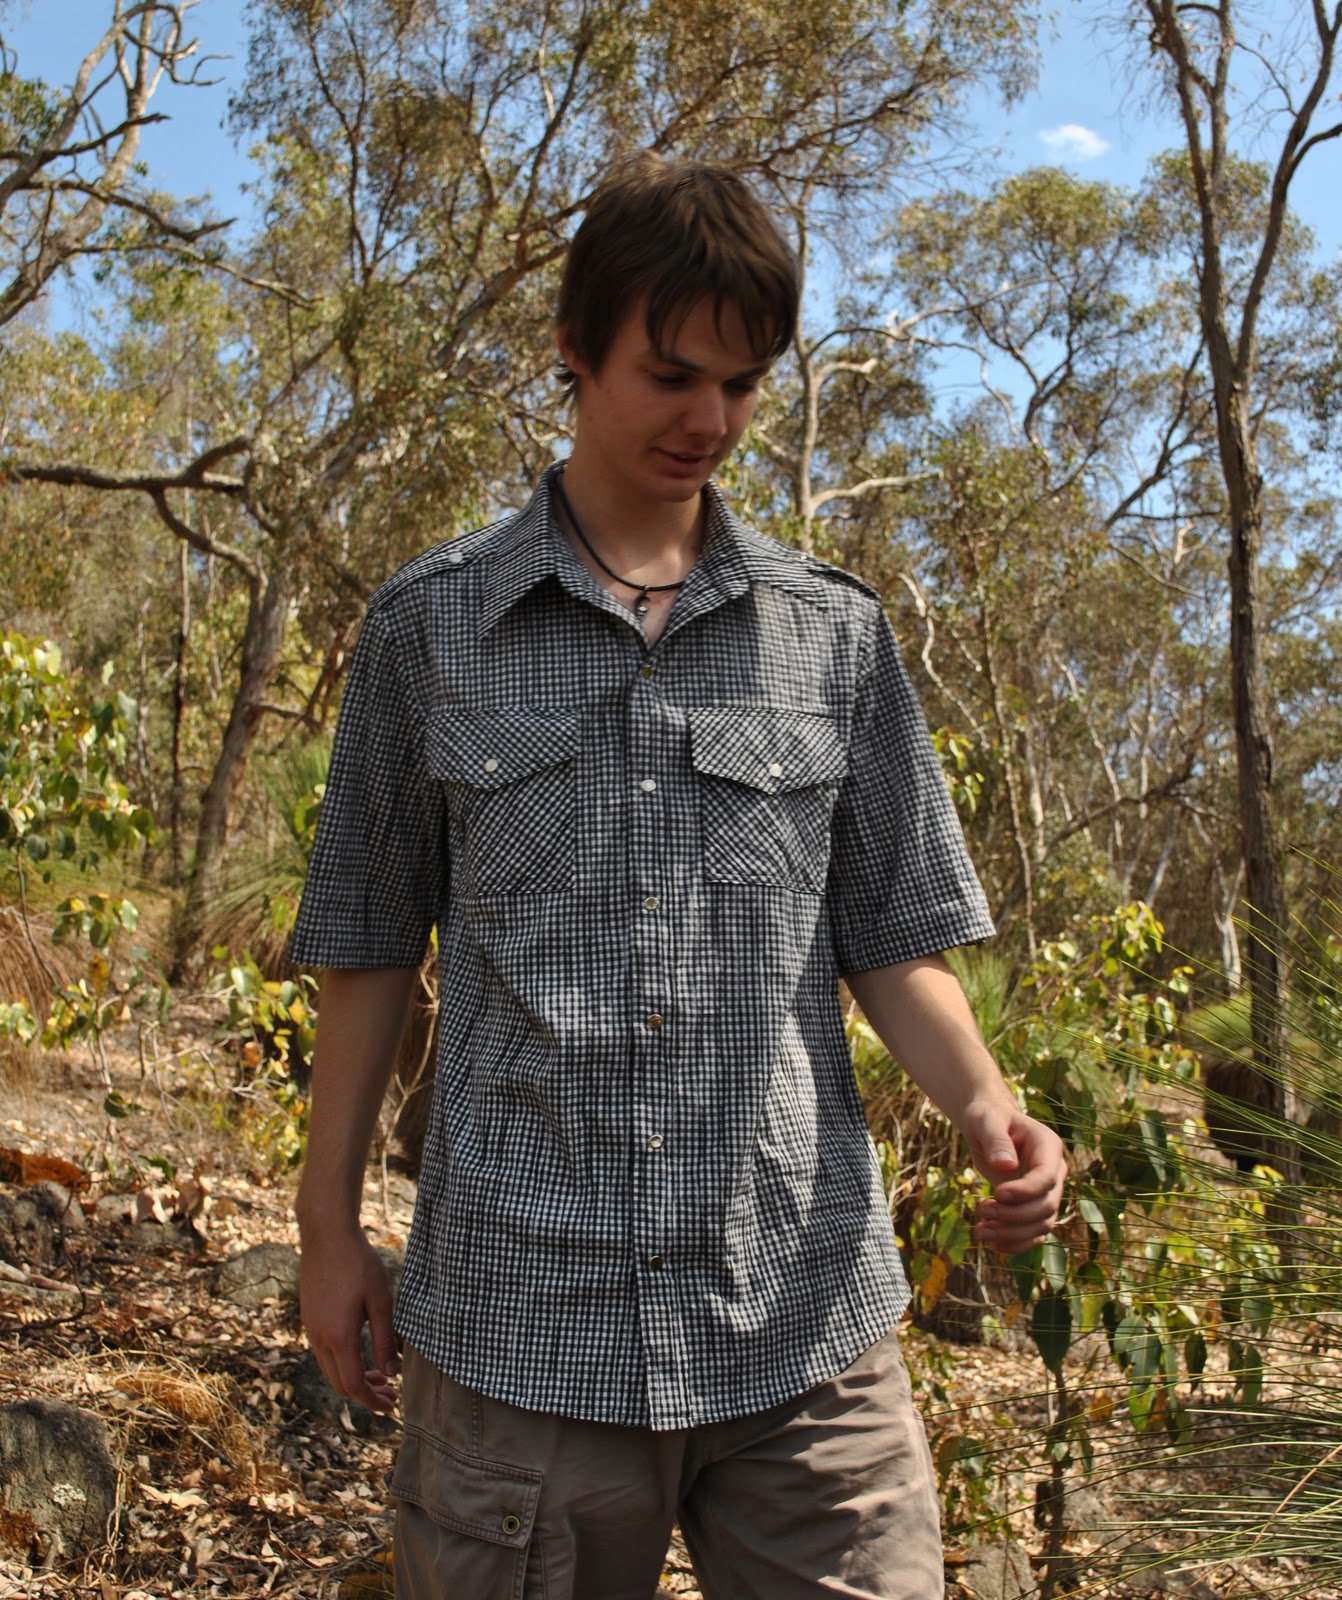
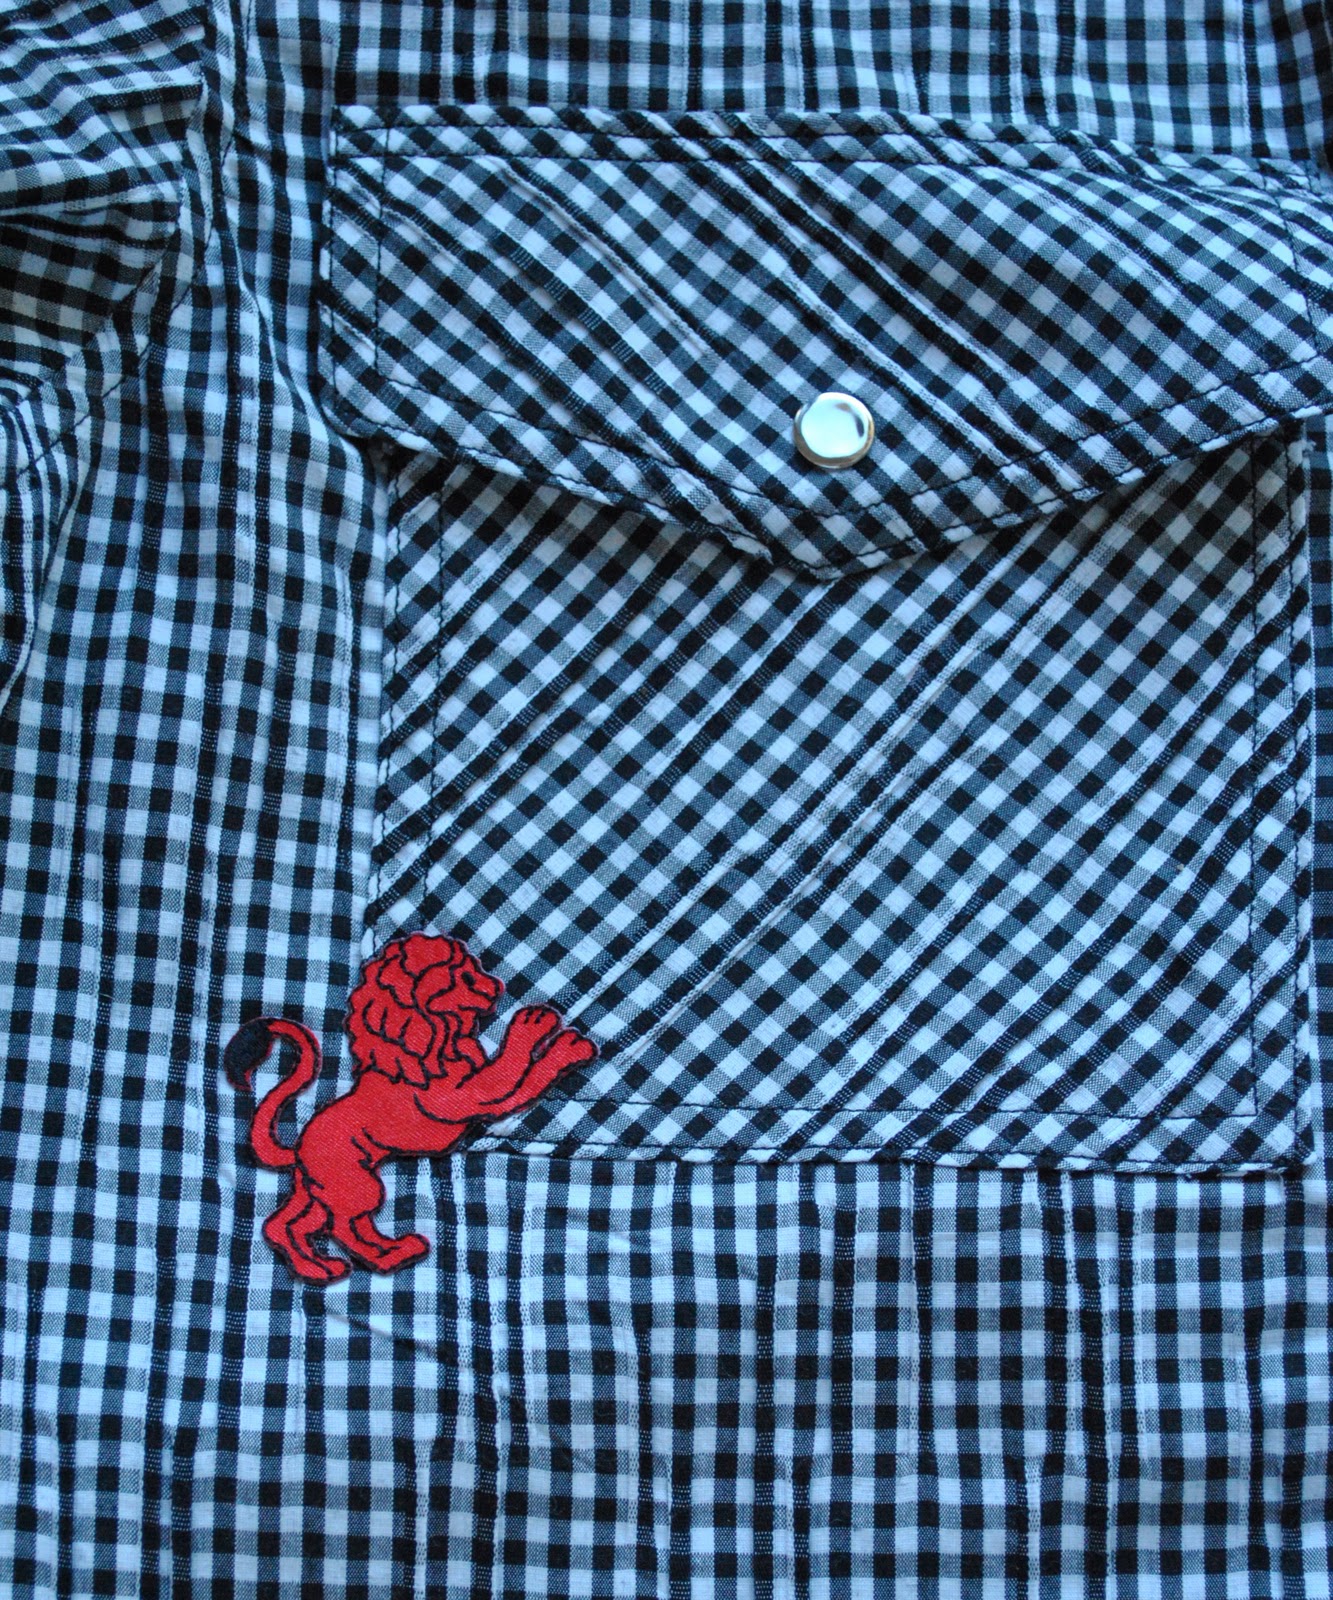
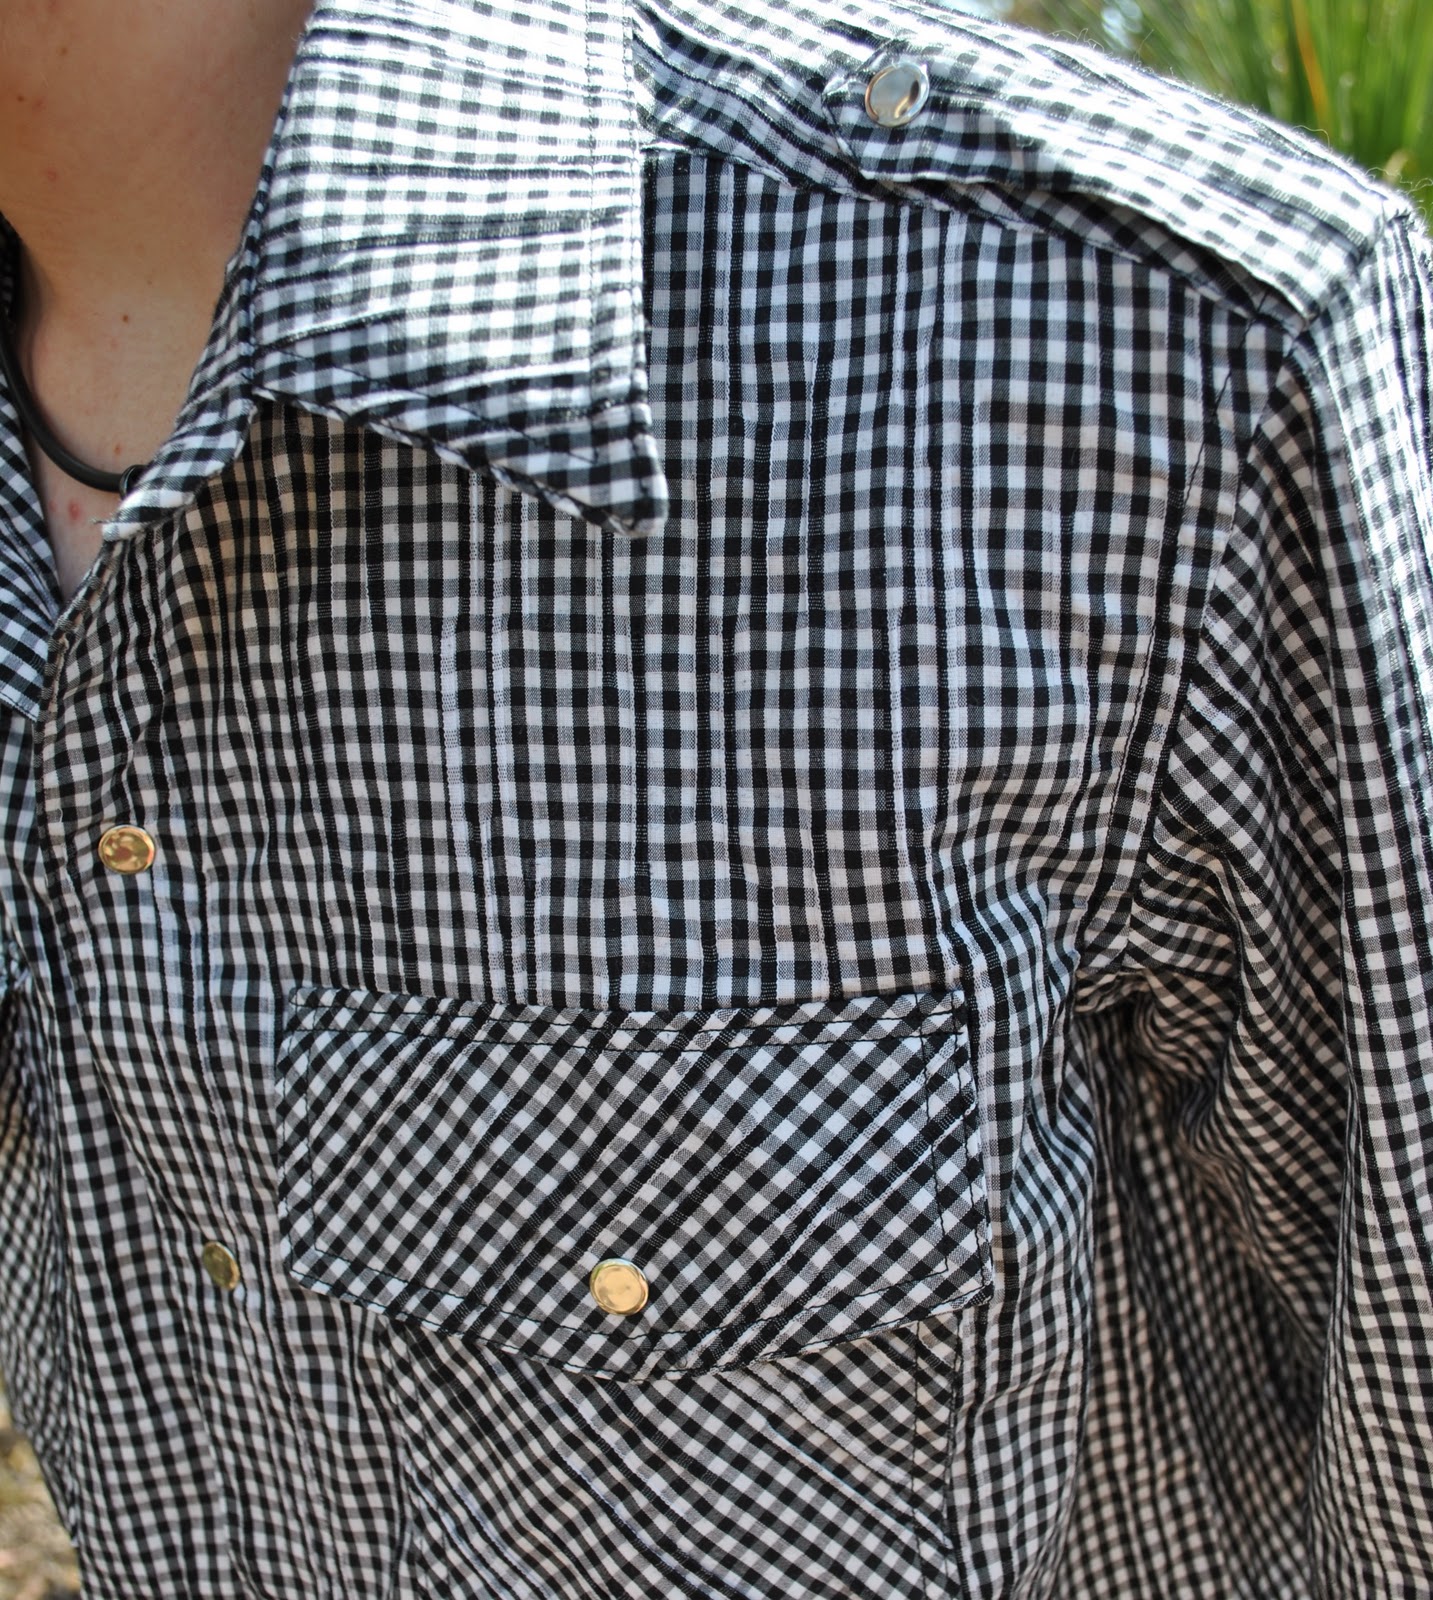
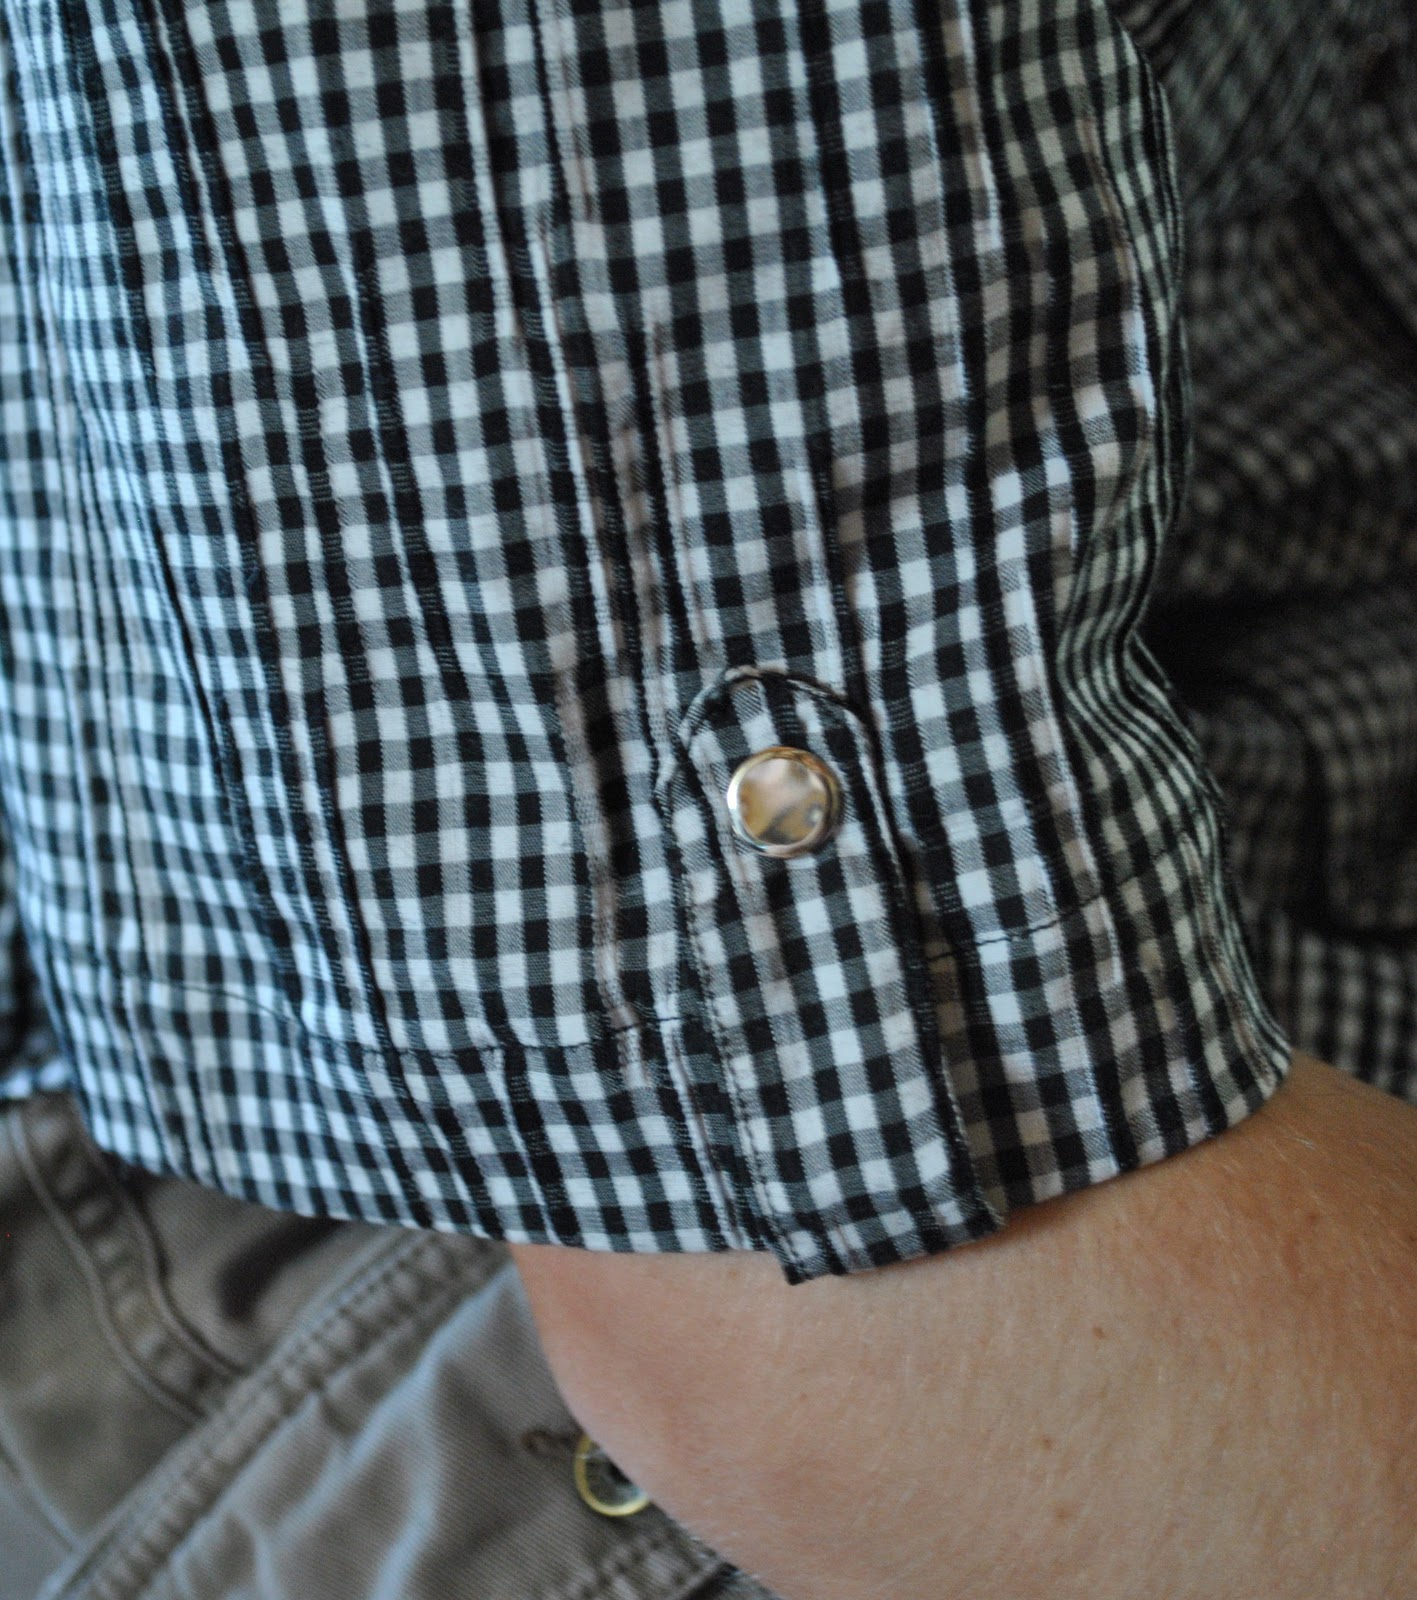
Version eleven; for Sam, black and white check “scrunched” cotton, black topstitching, silver snaps.  Variations, short sleeves with a little tab with snap closure on the edge of the sleeve hem.  Shoulder tabs with snap closure.  Pocket motif.  Bias cut double breast pockets, bias cut (but the opposite way) arrownhead pocket flaps, curved lower hemline.

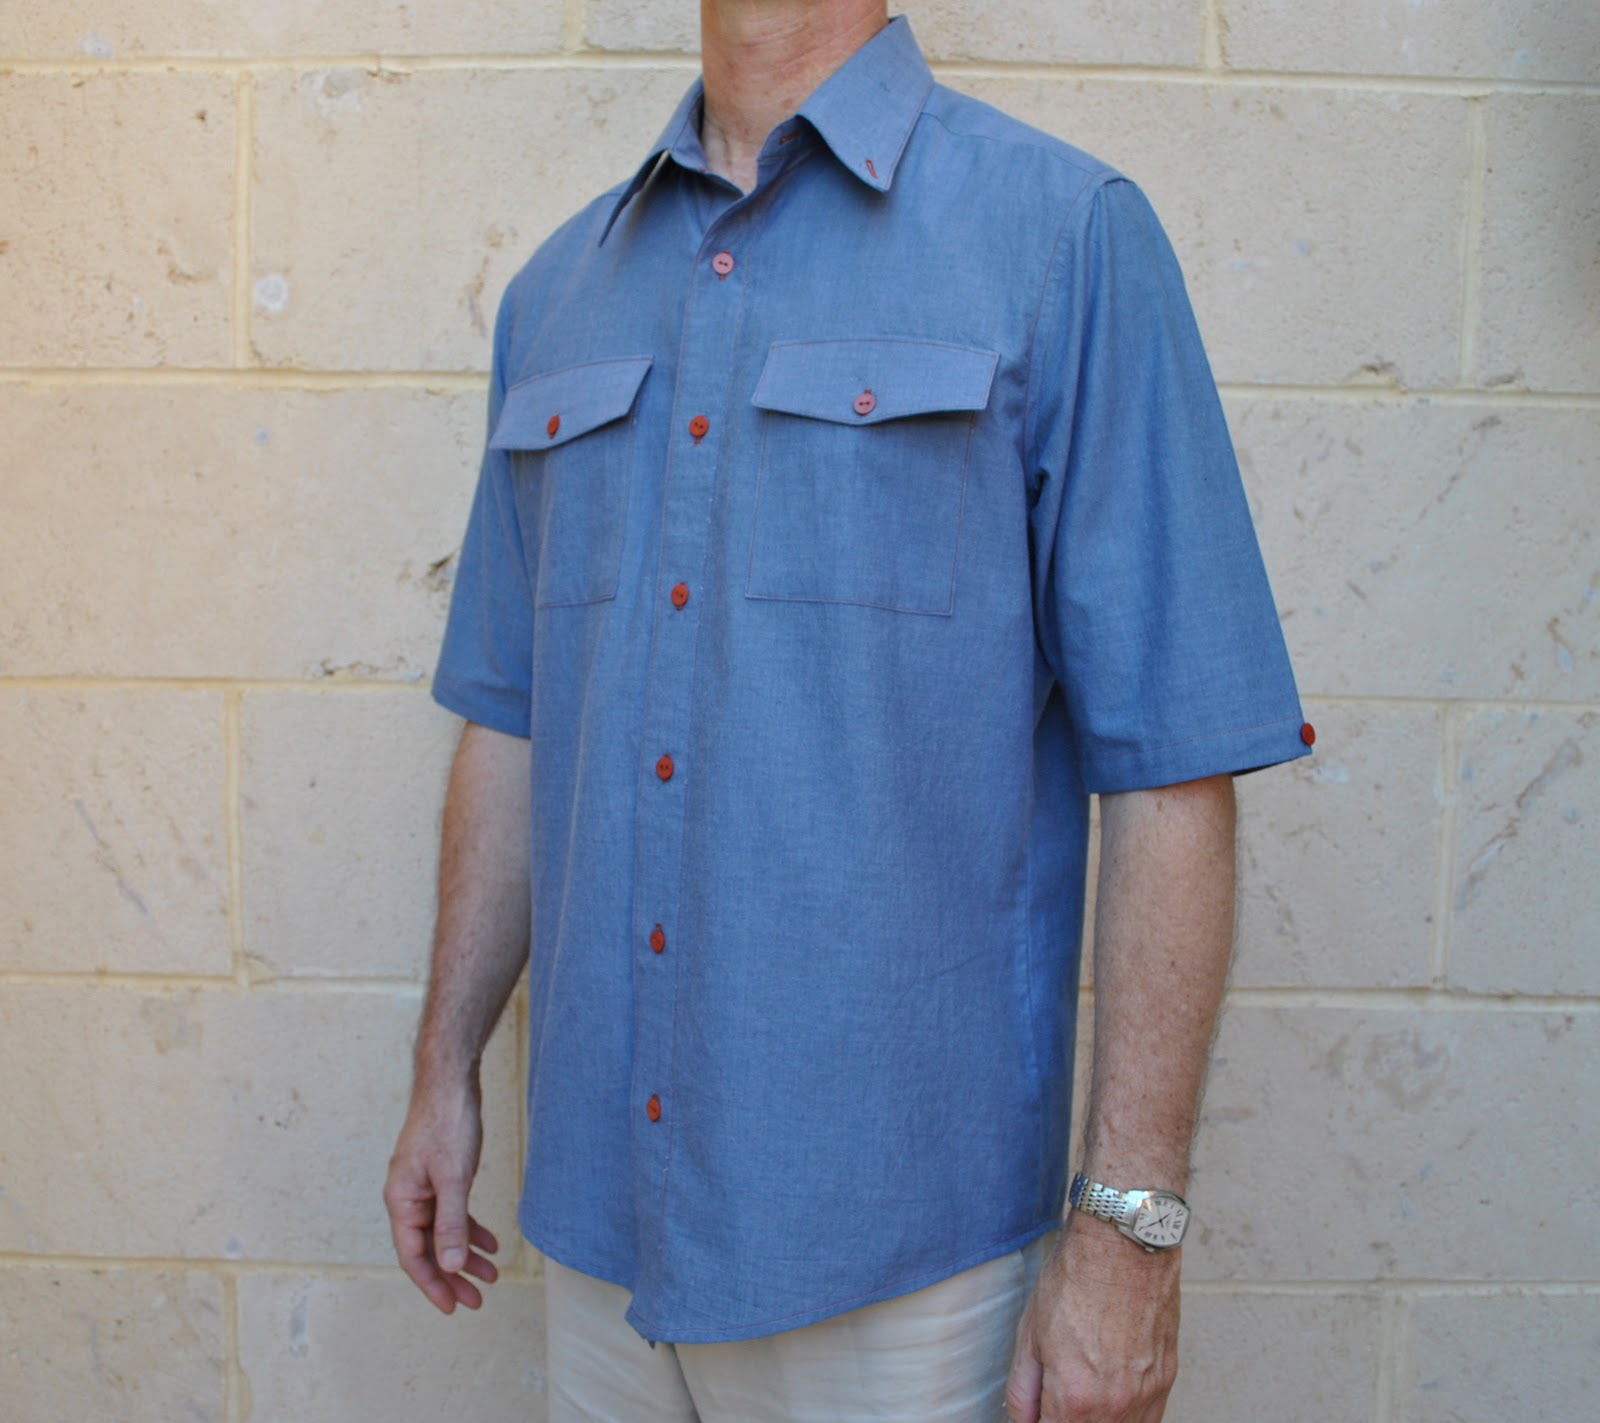
Version twelve; for Craig, blue shot cotton, rusty red topstitching and buttons. Variations, short sleeved summer-y version, buttons on sleeve ends, double breast pockets, flattish arrowhead pocket flaps, curved lower hemline.

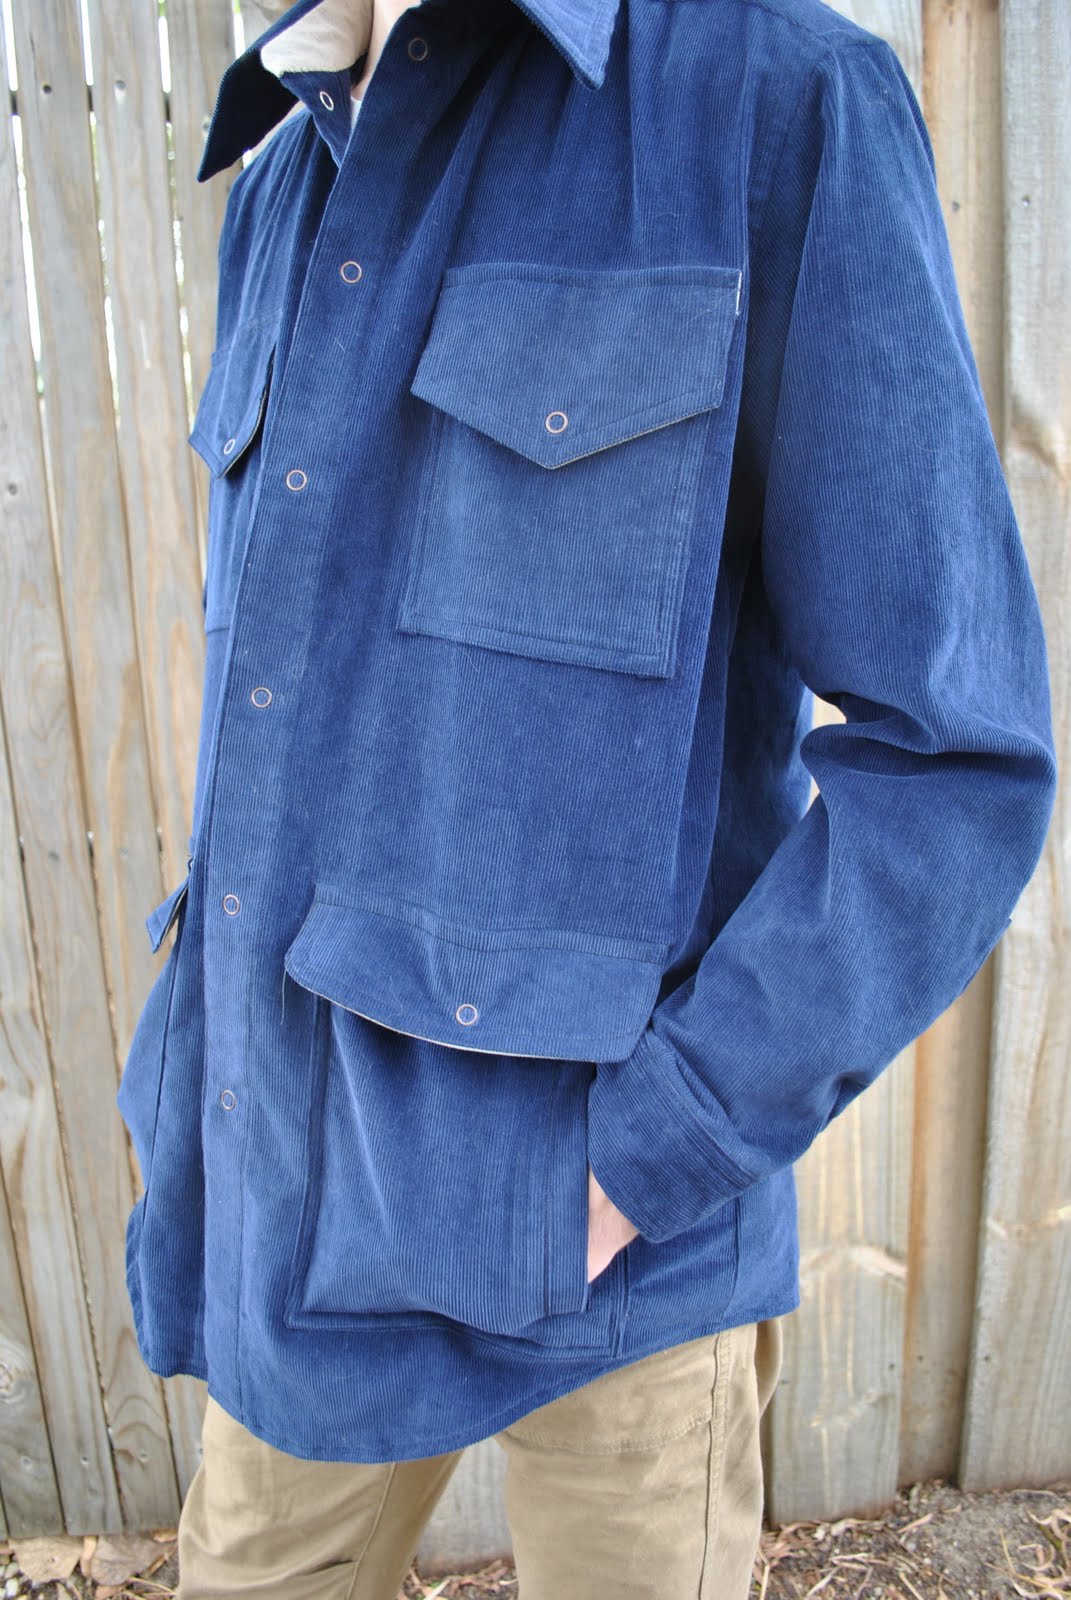
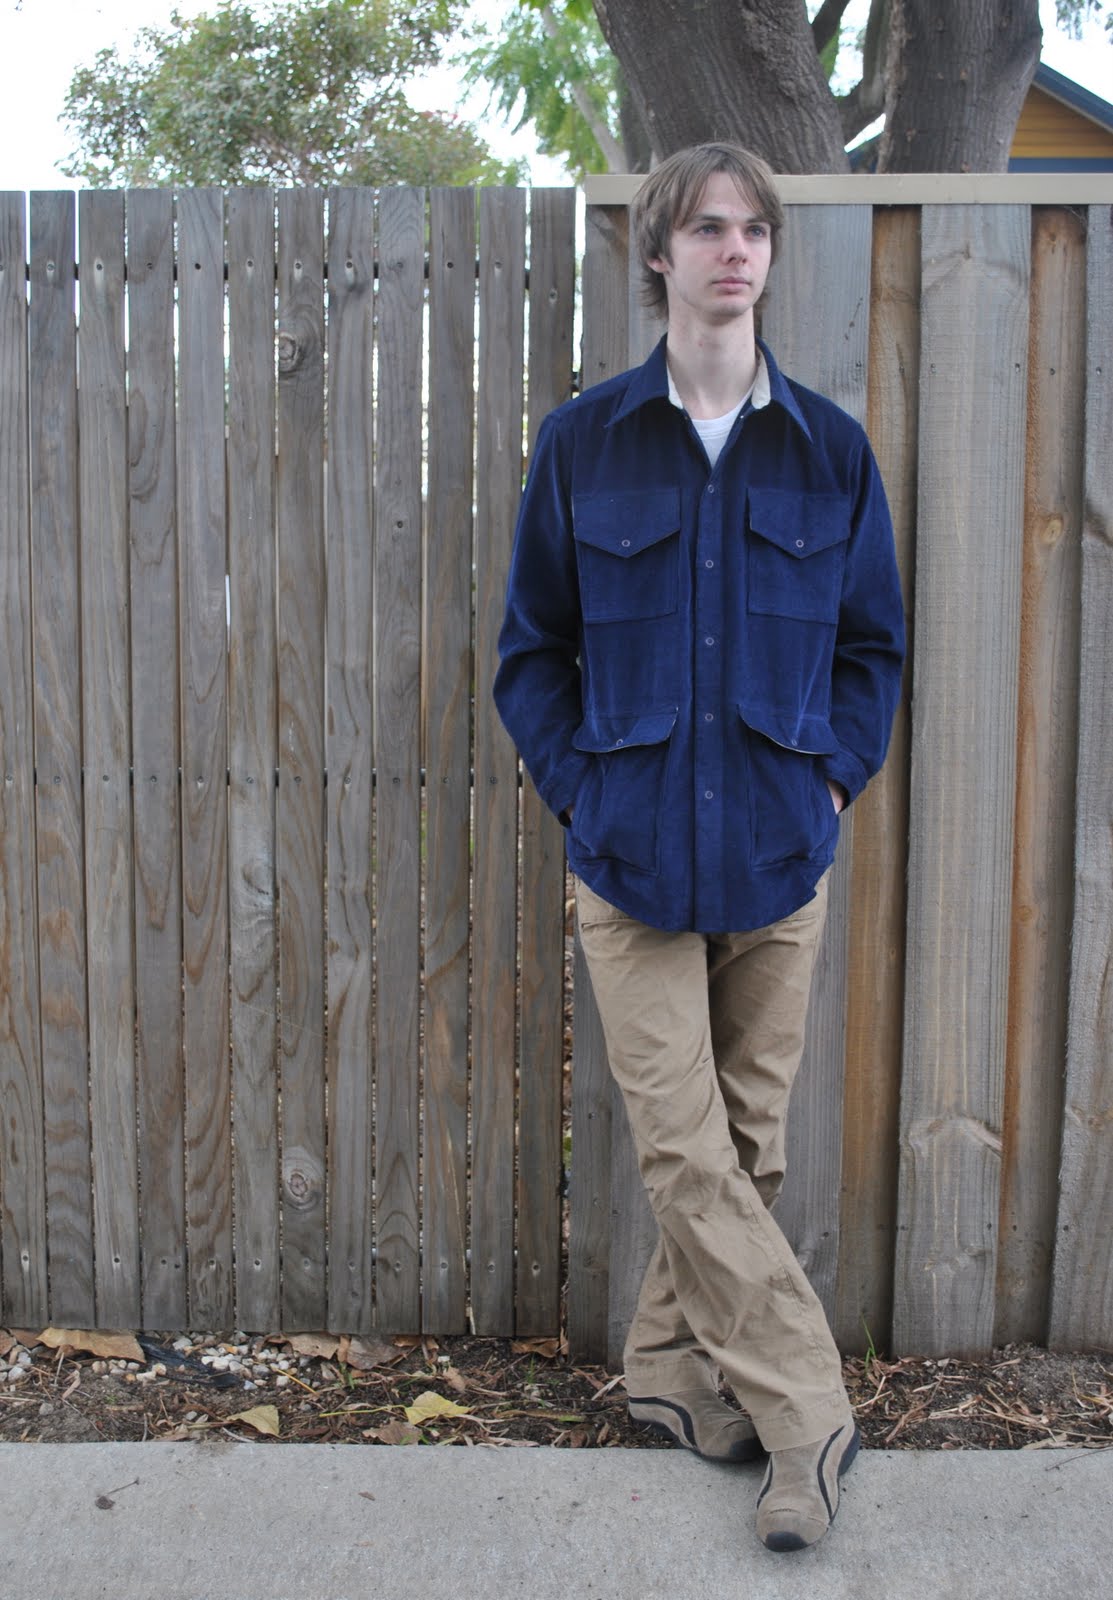
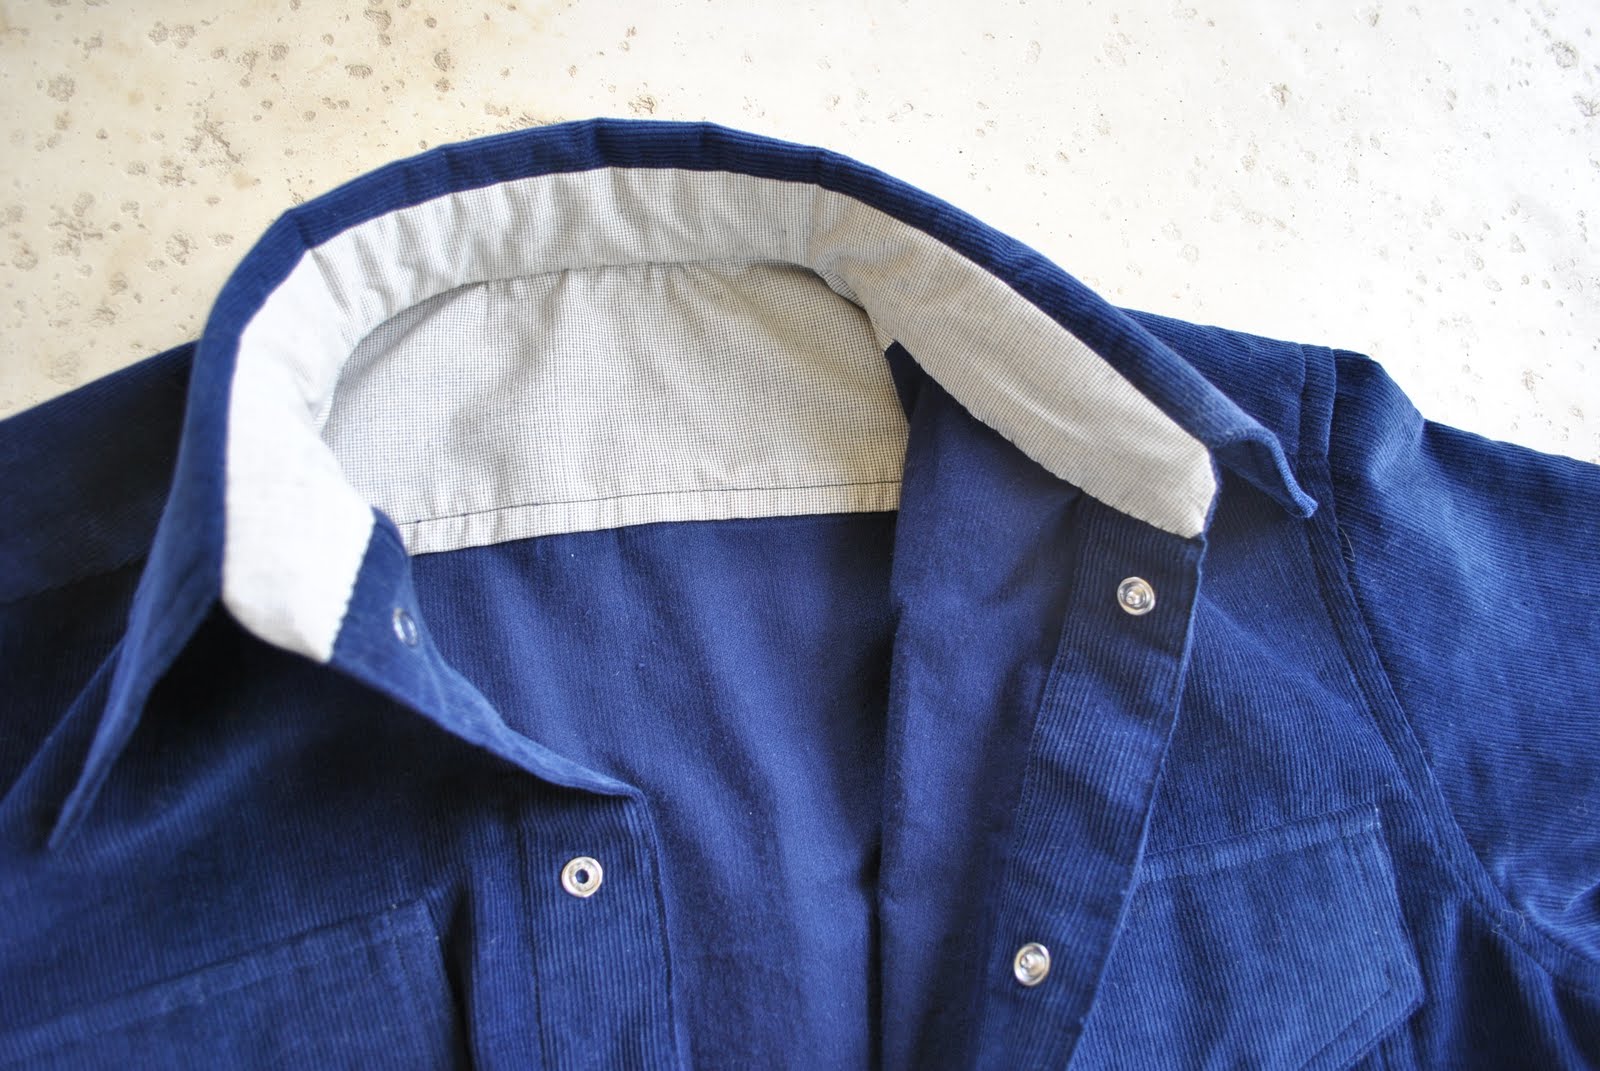
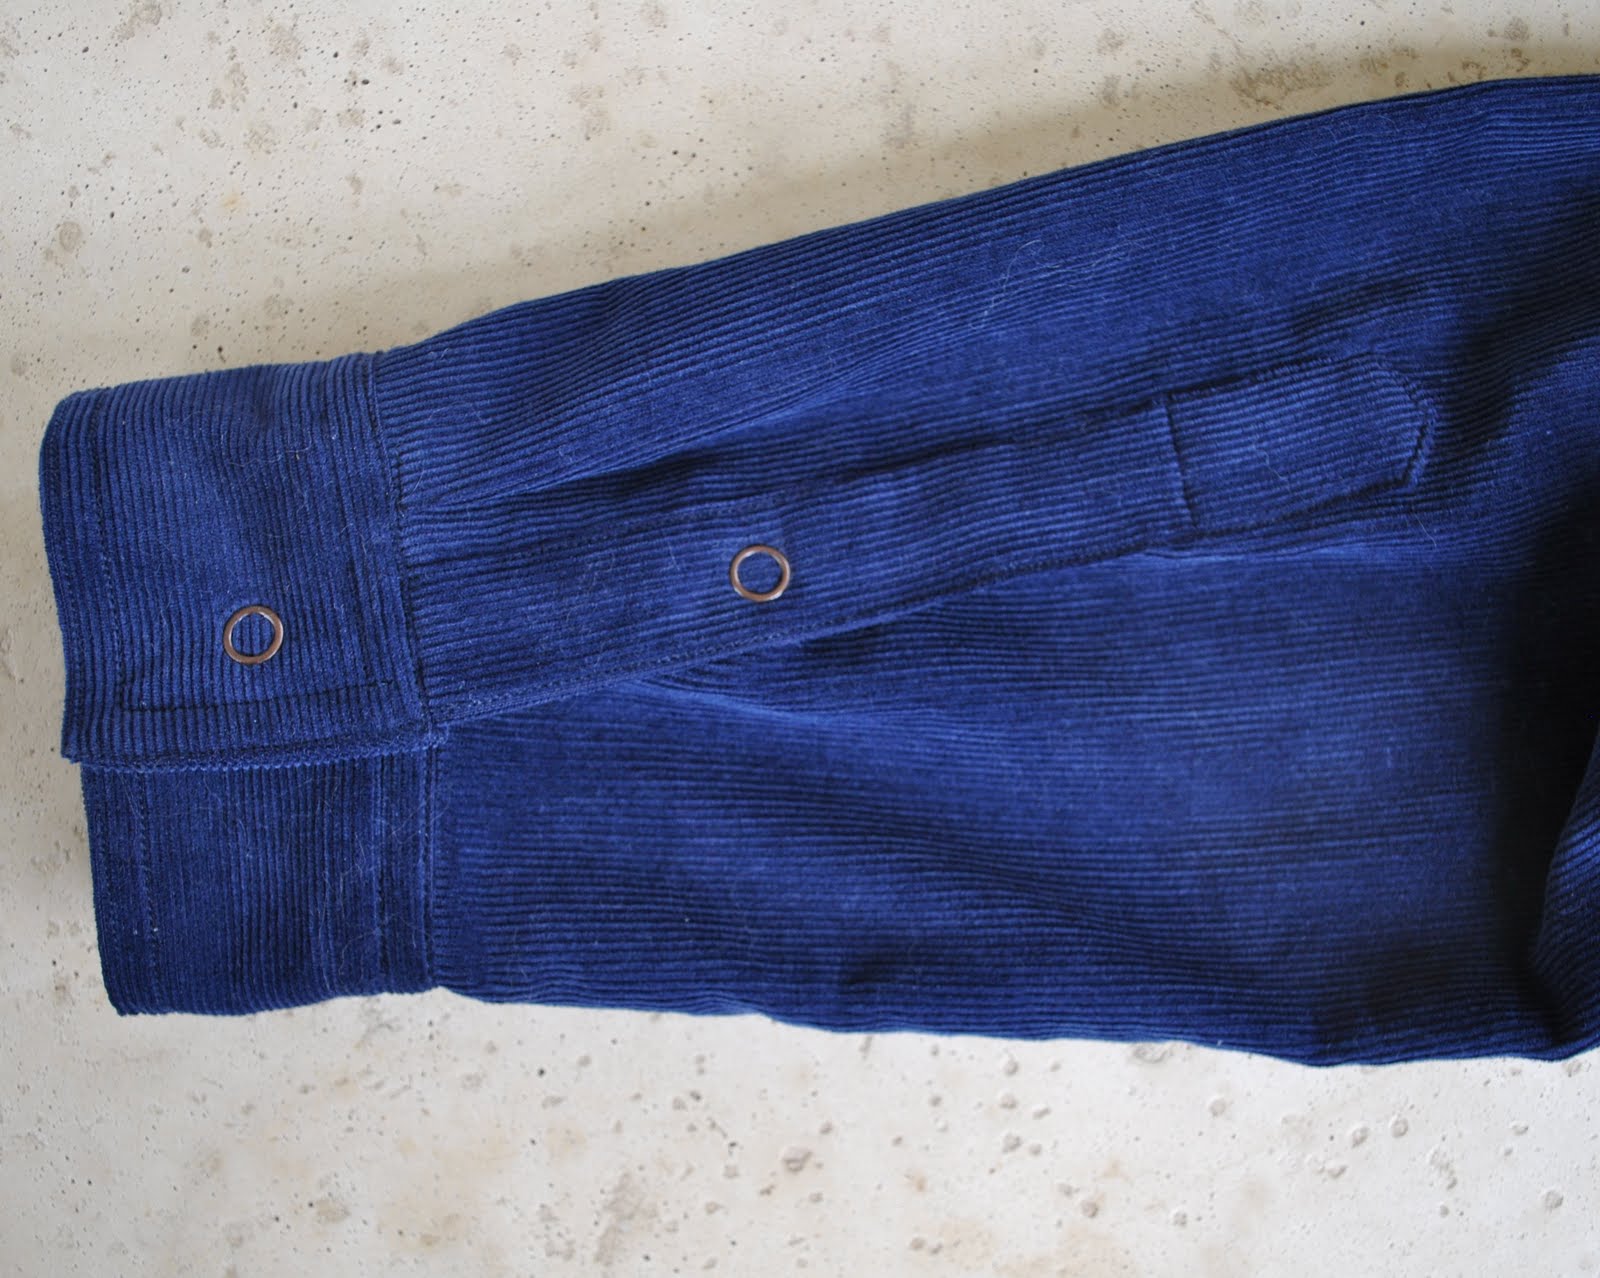
Version thirteen; for Sam, navy blue corduroy, navy topstitching, brown snaps.  Variations, made it a tad bigger and longer and out of corduroy to make a jacket-y thing. Double breast pockets, deep arrowhead pocket flaps, curved lower hemline.  Contrasting beige cotton for lining the collar stand, pocket flaps and pockets.  Copied some very cool double hip pockets here that I had seen on a jacket in the surf shop.  Both my boys love these jackets btw!

Version fourteen; for Tim, beige corduroy, brown topstitching (a mistake, should have chosen matching thread…), brown snaps.  Variations, as above, with the double hip pocket thing.  Contrasting blue linen for lining the collar stand, pocket flaps and pockets.

Version fifteen; not surprisingly, I have another one cut out and awaiting my attention!  This one for me.  Stay tuned for this next one…

I hope you’ve enjoyed this little overview of the very versatile Burda 7767, and can appreciate why it is one of my favourite go-to’s!

pinterestmail

Sam’s shirt/jacket

So I finished off the pockets on Sam’s birthday shirt/jacket last night, and did take those few snaps of the pockets to show here because I was so happy at how they turned out, but the light was not great for taking a photo of Sam modelling the whole thing.  So now it is, and I have.
It is made out of thin navy blue non-stretchy corduroy, using the old favourite Burda 7767 with a few modifications… the addition of two breast pockets with arrow head flaps, and the double welt/patch pockets I showed you yesterday.  And a curved hemline.  And I used brown snaps instead of buttons.  The collar facing, yoke facing, flap facings and welt pocket lining are all in a contrasting cotton, woven in a tiny plaid design of beige and black.
So here’s the thing…  I don’t know if it qualifies as a shirt or a jacket, or both.
It is made using a shirt pattern, and can be happily worn buttoned (snapped?) up and on its own… thus earning itself a “shirt” label.  
But also; being made of sturdy corduroy fabric, and also wearable unbuttoned and open over other shirts with his hands shoved in the pockets, it comes off as kinda jacket-style… thus attaining “jacket” status.
A hybrid.  
There must be a name to properly describe garments like this without having to resort to the hyphenated.

my tutorial for doing those combination welt/patch pockets just below
pinterestmail

Sam’s shirt

This is the shirt I made for our youngest for a Christmas present.  The funny thing about making this shirt was that I cut it out and made it up with absolutely no attempt at secrecy whatsoever, and it was still a surprise to him when he opened up his present!  Luckily a happy surprise…   Yah, Sam is not particularly observant of or interested in my sewing projects, but will sometimes grudgingly give approval or advice when pressed.
This shirt is just the thing for his style.  Sort of conservative, but with the youthful twist.  He currently likes to look a tiny bit cool, but not really.  Sorta hip while still wanting some invisibility.  Just… well, a teenager.
The fabric is cotton check, a bit scrunchy and randomly creased like Tim’s, but is not stretchy and was correspondingly a lot easier to work with.  In fact I love this fabric.
I used the old faithful Burda 7767, with the following modifications; the addition of two bias cut breast pockets with shaped bias cut flaps, shorter sleeves, added sleeve tabs and shoulder tabs, a longer curved hemline, and the use of silver snaps in lieu of buttons throughout.  I also later added an iron motif, like I did for Tim’s shirt, but this isn’t in the photo I took on Christmas Day here, because … oh, kind of long story.  Basically when we were in Spotlight choosing Tim’s motif (Tim was still away working) I asked Sam which one he liked the best.  He promptly and without hesitation chose a square motif with a sailing ship, which was quite cute but I also knew would not look cool on the shirt I was making.  I felt the rearing lion one would look really good.   So I secretly bought this one as well, and slipped them both in the pocket of the shirt when I wrapped it for Sam to decide.  And then he chose the rearing lion too… so I put the rearing lion on and we still have the sailing ship for some other shirt down the track…  
This motif is from the same horoscope collection as Tim’s raging bull; similarly Sam is no more a Leo than Tim is a Taurus… but look at us, defying the system…
I’m a Libra, but I’ve always felt a bit gypped at the mundanity of being represented by an inanimate object; a pair of scales, for heavens’ sake.  The other signs get all this cool stuff like bulls, scorpions, entwining fish and other interesting and/or virile animals, or cool centaurs, beautiful girls, water bearing maidens… the stuff of myth and legend; romantic fables of old.  Scales.  I ask you…  What’s more, I’ve just looked up Libra and,  well thank you Wikipedia, found it described as “fairly faint, with no first magnitude stars”.  Just couldn’t sound more lame…  as if we weren’t struggling with the whole stigma of a kitchen-device-as-our-mascot already…
Excuse my rambling, hehe.  I’m going to go and chill out with some fabric now.

pinterestmail

Pacific Blue shirt

Today is my youngest’s birthday!  And as his shirt collection is sparse and he has about as much enthusiasm for clothes shopping as many of us reserve for root canal treatment I decided to surprise him with a new addition to his wardrobe.  He does like clothes, just hates the whole choosing and purchasing process; a common condition amongst teenage boys…  I was a bit worried about making something that he would be sure to like; so checked out a few surf shops first and immediately noticed that Aussie teenage surf clothing is made out of the most unlikely and bizarre fabrics!! the kinds of fabrics most of us home fashion designers would leave behind in amazement and disgust!  So when I went fabric hunting I looked for something “unexpected”.  I think I found it in this very bright turquoise stripe, no?  Definitely not a print that traditionally whispers “teenage boy”, but in keeping with my research…  still I worried that it would be too bright and even trialled staining an off-cut with coffee.  I then asked his opinion (sneakily pretending I was making a blouse for myself) but he definitely preferred the bright version!  Luckily he loves his shirt and has been wearing it all day.
I made it using Burda 7767 again, tailored to fit his size based on other shirts in his wardrobe…  The modifications I made were: substituting press studs for buttons throughout, adding two shaped breast pockets with pocket flaps, shoulder tabs and sleeve tabs on the inside of the sleeves so he can roll his sleeves up.  I also shaped the hemline as he likes his shirt to be hanging out…

pinterestmail
Switch to mobile version
↓