Tag Archives: Shoes

black derbys, and some tights

DSC_0048

Hello! We’re Carolyn’s feet; don’t know if we’ve been introduced yet, but hi there!!  We’re here today to model some more shoes that she’s made… *sigh* yep, we’ve managed to avoid too much of her self-made nonsense for years and years now… we’ve just kept to ourselves, all quiet and unobtrusive down here, hum de hum hum, nothing to see here! and thought we might just have got away with it but NOPE!!!  it seems we could not go by unnoticed forever *deeper sigh*

Oh well.  Today we are wearing a new pair of ridiculous shoes, made out of tape again… I know, right?!  you’d have thought that one pair was enough, but NOPE!!  Carolyn got into the painting supplies in the shed and eventually unearthed a roll of black all-purpose builder’s cloth tape, and whipped these up.  OK, so we have to admit, they are a bit of an improvement on the yellow pair, quite a bit sturdier and actually engineered to a slightly higher degree on the inside.  The lining is made of an old, well-washed black Tshirt… so it is nice and cuddly soft on us, mmmmmm… Then Carolyn made proper heel counters and toe puffs on her lasts using stretch cotton denim and PVA glue, so these shoes are a lot more like real shoes.  We have to hand it to her, she does seem to be actually improving infinitesimally with each new homemade pair of shoes she’s forced upon us.

DSC_0062

She was shamed into showing these to an actual real shoemaker, who happened to be around at the same time Carolyn was out with her mother one day, and her Mum thought nothing of announcing to him what Carolyn was up to, and made her hand them over for inspection… laugh!  We thought Carolyn would die of embarrassment right then and there! but rather surprisingly the shoemaker actually praised them and reckoned she was doing great.  We figured he was probably was just being nice to her, polite, you know.  He even urged her to get going on her leather supplies because he reckoned she’d get much better results.  It was totally the wrong thing to say, of course; because she got home all fired up and immediately got out her leather supplies and started cutting into them.  Dammit!!! we could have kicked him!!  Now we’re just waiting with bated breath to see what she’s got in store for us next…  honestly, if we had eyes they’d be rolling so hard right now.  But we don’t, so you just have to imagine we’re doing it… on the inside.

Oh, and what else is new? the weather’s been getting fresher, so she got in and made a few new pairs of boring black tights.  Four.  ALL black!  *yawn*  Seriously, but that girl has no imagination.  These are going to last all winter.  Well, at least we’ll be warm.

DSC_0014

Ok, well that’s all the news for now… Feet; signing off!

*my tutorial for making your own custom-fit tights pattern is here*

DSC_0042

pinterestmail

don’t let the grass grow under your feet

grass sandals 2

I’ve made some rather funny sandals.  Grassy, you know.  What, isn’t that normal?  Well, you know, you see some materials, you get an idea and you’ve just got to run with it.   🙂

Cassie brought some small pieces of fake grass home; samples from her work that were getting thrown out, and I was instantly like, o yeah, summer-y sandals!  I was allowed to have one piece and she plans to make some thongs for herself from the other one.

IMG_1493

Design; my own.

grass sandals 1

Materials; fake grass, free sample; white vinyl from Clark Rubber, contact adhesive and black rubber for the soles from Bunnings.

The grass is sewn into a really stiff thick plastic backing that was pretty difficult to cut neatly, or at all actually.  I used a stanley knife for that bit, and for cutting slits along the edges for the upper tabs to go through, and sanded off the sharp bits with the heaviest duty sandpaper I could find.  I played with pieces of cotton on my foot to get the pattern pieces how I wanted, and then cut them from white vinyl  with 3-4 tabs along each long side, to insert through the grass to fold down underneath.   The vinyl is fabric-backed already, but I glued on some thick white cotton as well, for some extra strength and resistance to stretching.  Hopefully, anyway!  I also topstitched all around the edges of the vinyl, which I think looks nice and neat.

The vinyl tabs underneath and the black rubber soles are glued underneath to the grass backing with contact adhesive, so it’s all held together firm and strong.

cat contemplates shoes…

grass shoes

Are they going to get worn very frequently?  Hmm, time will tell! They are kinda weird but I reckon fun and funky, and the fake grass means they’re very soft and comfortable to wear.  Like slipping on a pair of soft comfy slippers! And I like that they’re o so summery.  You know, green green grass, plus clean, crisp bright bright white.    *blissful sigh*  I love summer.  It’s great since today the weather has forgotten it’s autumn and has turned up the heat with a cloudless blue sky.   Picnic weather.  Actually, they do feel just right for a picnic.  Also, looking at the bright green plastic-ness reminds me of Christmas trees.  Yes!  The perfect sandal for Christmas do’s!

grass sandals

pinterestmail

sheeplefeet

shearling slippers

Baa-aa-aa!

So, I was thinking of calling these Uggspadrilles.  You know… uggs? espadrilles?  Haha. YeeeeeeeeaNo.

Anyway.  I’m fulfilling a need for some slop-around-the-house winter footwear.  All winter, I usually LIVE in my sheepskin ugg boots at home.  I wanted, nay, needed something like that for my year of handmade!  I had some leftover shearling from my shearling coat, that I made for Japan, and for the soles I used an insulative foam kind of stuff.  It’s black foam, that has one side covered in a thick silver foil-y type of coating that’s both quite tough and waterproof, so I used it silver side down.  This was cut from some very small scraps given to me by my friend Megan recently. They were actually not just small scraps but awkwardly shaped ones too, and I’m pretty sure she will be rather surprised that I managed to get two soles out of it!

shearling slippers2

The slippers are a pretty basic design.  An espadrille really must be the simplest style of shoe design, after the humble thong.  They are beautifully snuggly warm, thanks to the shearling, and the sole underneath will provide some degree of waterproofing, if I need to leave the house briefly.  Obviously they will be mostly inside the house footwear, but they’ll be ok to go outside and onto the wet paving sometimes, to hang out the washing, take out the rubbish, check the letter box, you know.  Stuff.

They’ll do  🙂shearling slippers 1

Also, I wanted to give a quick report on my latest Alabama Chanin project… the last time I wrote, I promised that I would have finished it by the end of March, which is today!  Anyway I am happy to say that I met my deadline and I have finished! the only thing is that I’m not ready to write a blog post about it yet.  I took a few pictures of my new ensemble in our boring old garage… *yawn* and then just decided it really deserved something better.  So, in the meantime, while I get my act together in the photography department, here is a little sneaky-peaky glimpse of a some details…  I can promise, it is a multi-shaded, multi-textured, multi-detailed ensemble and I am super proud and super happy with it all!

Thank you so much to my lovely friend Lisa of Lisa’s Carolina, for the gift of the lovely blue Alabama Chanin cotton  🙂

magdalena dusk

pinterestmail

paprika suede desert boots

paprika boots

I’ve made some boots!  or kind of like, shoe-boots, really.  Desert boots.

Ok, I have to be honest; I’m so proud of these I think I might just explode with happiness!!!  Finally, a pair of winter shoes in which I have complete satisfaction and pride and joy.  I’m so so so so SO immensely pleased with how these turned out!

Woooooooooot!

Ok, calming down a little.  The lowdown.

paprika bootsMaterials; my friend Megan had given me a few small bits and bobs of sturdy fabrics, including some thick and stiff, paprika coloured suedette upholstery fabric.  I immediately envisioned boots of course, hehehe; my mind nowadays almost totally taken up with thoughts of shoes and how I can bend whatever materials I catch sight of into making them.  I used the paprika suedette for the outer, and the boots are lined completely with faux chocolate suedette, a far more flowy and lightweight fabric, the leftovers from this little cropped top.  The outer and lining lightly glued together; plus I covered a pair of insoles with the chocolate suedette too.  This fabric originally from the Fabric Store in Melbourne.  Laces and insoles from Coles, all glues and the black rubber from which I cut the soles and heels from Bunnings.  I cut an interior layer and one layer of the stacked heels from some thin cork placemats.  Do you like the one layer of brown in the heels, from the cork? I did this on a whim, and while my husband and family thought it looked a bit weird, like a mistake; I absolutely LOVE this little feature.  Kinda gives my own little touch  :)Topstitching; I used upholstery thread, in a shade of burnt caramel.  I like the contrast and that it doesn’t match the paprika.

paprika boots5Eyelets; rather than add metal eyelets, I left the holes raw. Most of the desert boots I’ve seen are like this and I prefer that look.

Pattern, I drafted my own, using my new (old) vintage lasts.  It looks like this:

desert boots pattern

For my own future benefit, since this procedure actually worked very well with these particular materials: a rough run-through of the construction…

Glue uppers and lining pieces together leaving the front of the vamp free so as to create the toe puff later, and back part separate so as to sew the back seam together later and then create the heel counters… topstitch edges, punch eyelets, sew pieces together.

boots1

Sew quarters to vamps with some sturdy reinforcing at the point where the eyelet closure joins on.  By the way; this style of shoe in which the eyelet closure sits OVER the vamp is known as the Derby style, as opposed to the Oxford style in which the eyelet closure sits underneath the vamp.  My previous lace-up shoes have all been in the Oxford style, except for the yellow ones which were also Derbys.  Learn something new every day, no?  🙂

boots2

Sew the back seam of lining and upper separately, sew the lining to a fabric underfoot piece, glue the upper and lining together behind the heel and topstitch the upper edge, back of the heel.

boots3

Create the toe puffs and heel counters.  I used stretch cotton denim and several layers of PVA glue.  My heel counters (not seen) stretch around to “just” join onto the toe puffs here.

boots4

Glue uppers to the lining, stretch and shape the fabric over the toe puffs and heel counters as much as possible.  I spent an evening in front of the TV just stretching by hand.  Then stitch the uppers to an underfoot layer of self-fabric (if sturdy) or leather.  When stitching leathers and leather-like fabrics in any project, be it shoes or bags or anything; a double up-and-down stitch with two threads is employed.  So, stitch a running stitch one way all around, then return and stitch back over the same stitching, in the same holes, completely the double row of stitching.  This can also be done with the stitching going in one direction and employing two needles, doing each stitch twice, one at a time.

first row of stitching, sorry for the blurry picture, I swear it didn’t look blurry when I took it!

boots5

aaand, the second row of stitching, complete.

boots5a

Then I trimmed away the excess, cut a cork inner sole and glued it to the under-foot layers with contact adhesive, then made a bias binding strip of black quilting cotton and glued this all round the edge (PVA glue).  You can leave the stitching and edge visible and raw and unbound, which is a more authentic desert boot look; but I wished for a neater finish plus visually to have a stronger black line here to tie the touches of black in the shoelaces and (future) soles and heels together more visibly.

boots6 boots7

Up until now, most my glueing has been using PVA glue, but for the stacked heels and to glue the soles to the underneath of the shoe I used contact adhesive.

boots8

DSC_2637

Last step was to cut foam inner soles to fit, cover with the lining fabric and insert into the shoes…

paprika boots4The height of the heel was determined by the fact that I will wish to wear them with my favourite flared jeans…  my lasts are not reeeeally designed for a high heel so I went as high as I dared while not destroying the line of the shoe.  I’m very happy with this height as it looks with my jeans!  🙂

paprika boots with jeans

They are a little loose-ish on my bare and stockinged/tight-ed feet but fit nice and snugly with my hand-knitted socks.  I will want to wear it with both tights and with socks, so this is perfect for me  🙂

Yes, I knit all my own socks too.  Well, been making my own clothes for years so I’ve built up a supply of literally everything.

paprika boots3

I’ve kept a few old shoeboxes from old rtw pairs for my self-made shoes, so they stay nice and unsquished by other pairs of shoes in the bottom of my wardrobe.  Here they are, all snuggled up and ready and waiting for winter.  I can hardly wait to wear them!

paprika boots in box

pinterestmail

better black shoes

black oxfords So, black Oxford shoes, mark 2.  This version was made with the help of my beautiful new lasts!  Or I guess I should say, old lasts?  ha.

lastsDesign, my own, based upon a classic Oxford shoe style.  My tutorial on how I made my shoe pattern is here.

Materials:  black pleather from Spotlight, leftover from my moto jacket.  I would describe this as butter-y soft, but of course since it’s not real leather that just sounds a little pretentious, non?   Lining in faux chocolate suede, leftover from my chocolate suede top. Rubber for soles and heels, contact adhesive, PVA glue from Bunnings, , insole and shoelaces from Coles.  Toe puffs and heel counters created from stiff, non-fusible interfacing and stiff cotton denim, and lots of PVA glue!

black oxfords 3

Method:  I’ve been watching lots of online shoe-making videos.  I’ve particularly enjoyed Andrew Wrigleys’ youtube series on How to make a Shoe by Hand, absolutely brilliant.  I enjoyed this more than any blockbuster movie I’ve seen in a long while!  Even though I don’t think I would ever go to that level of internal engineering when it comes to my own shoe-making effort, it was just fantastic to see a a traditional process broken down, step by step.  Honestly, mind blowing.  If you’re at all interested in making shoes then it’s a must-see.  Many times I was just speechlessly shaking my head in awe and admiration, reflexively muttering “oh my god” and will never ever EVER complain about the high cost of a shoe, EVER AGAIN!!

I also found Marcell Mrsan’s video Basic Shoemaking Method – the Cemented Construction to be particularly useful for my own project, as my own efforts run more to the cemented/glued approach as opposed to the traditional method of completely sewing a pair of shoes.  I was going to say the lazy way, but naturally making one’s own shoes could never be described as a “lazy” thing to do!

DSC_2649Detailing:  I sewed the outer and lining layers right sides together, and turned them right sides out.  Then, using black embroidery floss, I topstitched by hand around all edges in a long running stitch, in a way that a very narrow ridge of the faux suedette shows all the way around the edge, as a kind of faux piping.  I absolutely love how this looks, peeping  out  🙂

My shoe puffs and counters; in both videos they are using leather and some form of starch; I researched this a little bit more and learnt that PVA glue is also often used as a fabric stiffener too; I had plenty of this on hand so went this route.  I made mine using stiff, thin, non-fusible interfacing, and some stiff cotton stretch denim, leftover from my Ginger jeans.  And lots of PVA glue!  The first layer of interfacing was glued over the lining, then coated itself with PVA glue, then I stretched a denim layer smoothly over this.  I allowed this all to dry, then snipped and glued down the underneath, allowed this to dry a little and then trimmed and shaved the folds underneath down nice and as smooth and flat as I could.  Similar to what they call “skiving” in leatherwork, but I don’t know if I can rightfully use that word for fabric?  More like I was just trimming away bulk and bumps.  Last step was to coat the topside  of the denim with a smooth layer of PVA glue, and allowed this to dry overnight, with the outer flipped back out of the way.  This has done the trick beautifully, and my toe puffs feel just perfect, hard and stiff and very unlikely to cave in.  I made the counters in the same way.  It was very helpful that my denim has just a little stretch, which enabled me to pull and stretch it nice and smoothly around my lasts.

Note; these are the toe puffs for my NEXT pair of shoes… but they look pretty much the same as the ones in these shoes  🙂

toe puffs

I didn’t glue the outer and lining together, so the middle bit, what they call the “waistline” is quite soft and not very stiff.  This feels very comfortable and I think it does give the shoes that “feminine” look.  I like it as a nice change although maybe the shoe overall could have used that little extra bit of stiffness that the glue gives.

As usual, I covered some insoles with the chocolate suede lining fabric.  This is so soft and tough, and just perfect for lining!  I’m using it for my next pair too  🙂

DSC_2623

Thoughts ;  I’m actually fairly pleased, I think they turned out quite elegant, especially when compared to my previous Oxfords!  These feel more stepping-out-worthy, and even like I wouldn’t be horrified to wear them in public, dare I say it.   Ideally I would like the heels a little higher, but this height is fine really, and will be very practical.  To get a higher heel I’m starting to realise I would need a different set of lasts … o man, the need for and accumulation of more new equipment continues… *sigh*

I’m extremely happy with my hand-stitched detailing, I just love the handmade look of this.  I’m preeeeeetty happy with the finishing although, obviously, it’s still not to the level where I would like it to be.  But I’m starting to realise this could be a lifelong lament.  😉

Note, I still have not cut into any of my actual leather!!  What a wuss, eh?  It feels too scary.  I’m still not ready.  I feel like I’m working towards that… like training for Mt Everest or something, ha.

Anyway.  Ever onwards and upwards!

black oxfords1

pinterestmail

yellow shoes

yellow shoes1
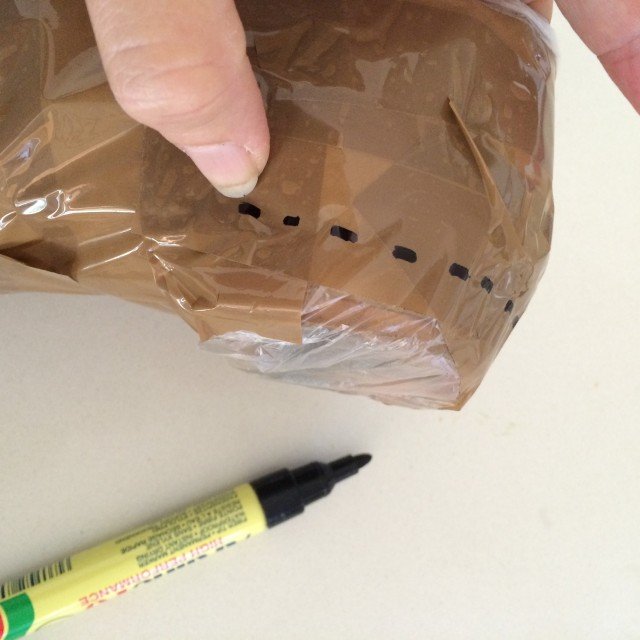
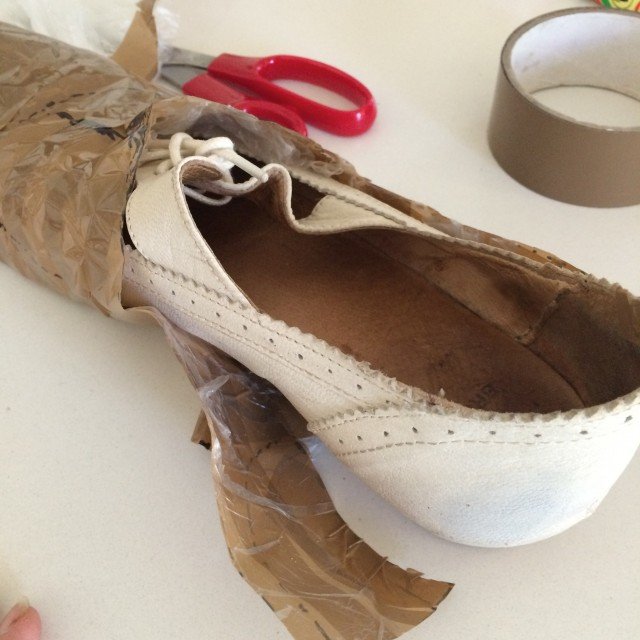
Some crazy yellow-tape shoes!

I was inspired by Melanie, and I always find that lady inspiring!… she commented how she thought the taped mummy shoes in my shoe pattern making post could be called finished, and I just kinda though “aha!” And  “why not?”  Thanks for the fab idea, Melanie!

I have an actual proper pair of shoe lasts now, but I’m so fired up with enthusiasm I just couldn’t wait and made these yellow shoes before they arrived.  MAKE SHOES!!  I’m SO into this right now  🙂    I sort-of did use sort-of lasts, if you can call a pair of shoes, lasts.  I used some favourite shoes for the toe region, the same pair I used to for my tutorial on how to make your own shoe pattern here, and for the rest of the shoe used my own foot in a thickish sock, for some “ease”.  I’m not sure if “ease is the right word though, if applied to shoes?  is shoemaking like dressmaking…?  Anyway.

Materials: Bear cloth tape, originally from Bunnings, old yellow Tshirt for lining.  Rubber matting for soles and heels, contact adhesive from Bunnings.  Eyelets from Spotlight, insole and shoelaces from Coles.

IMG_1098

I started out by making rough “socks” using an old Tshirt from my refashioning bag.  I put them on over the shoe and got taping!!  whimsically going on to cut a tongue, to firmly tape on some Derby style flaps with an eyelet closure, add a sole, and make them into actual shoes.   The cloth masking tape was in our garage, no doubt originally from Bunnings.  It’s an all-purpose tape, sometimes as a masking tape for painting purposes, although it can also be used in plumbing and insulative repairs, and I know from bitter experience that if not removed fairly promptly after a room-painting stint, that the adhesive on this stuff gets SUPER strong over time and is capable of tearing off parts of the thing you put it on, like varnish from your skirtings and architraves, and even sometimes little strips of actual wood from your skirtings and artchitraves too.  So I figured, it could be strong enough for an actual pair of shoes too?

IMG_1102

Time will tell, time will tell.  They might fall apart straight away, but if so, no biggie; they only cost me the glue for the soles.  Which would be re-used in the event anyway.  By the way, after perusing online video tutorials, I’ve switched to using contact adhesive for glueing together my stacked heels, and for glueing the shoe to the sole.  It’s super strong, permanent, waterproof, and seems like it’s the adhesive of choice for shoe-makers.

I put an insole inside, for comfort.  I covered this with some of the yellow Tshirt fabric, so it all looks nice and cohesive inside.

yellow shoesThey’re a bit dorky and in retrospect could have used a toe puff, but you know what? they actually feel great on, and I think they could be perfectly fine for walking, even in the rain.  They are waterproof, and feel very comfortable too!, the tape makes them firm bodied, yet they’re still soft, with that cotton jersey lining.  I’m just a bit nervous of the bright colour… hmmm  I think we might actually have a roll of black cloth tape in the shed somewhere, and maybe an old black Tshirt too… must go and rummage sometime.  I fancy a black pair now!!

NOW.

I’ve got to be honest, I held off on posting this and almost didn’t.  I recently received some well-intentioned words about my shoe-making which was actually a little disheartening.  So, I want to just reiterate; I am just a beginner here.  I’m trying my hand at a new thing and learning as I go along.  Obviously I am going to make some horrible shoes, make mistakes, learning is a process, and sometimes a long one; particularly when it comes to making shoes.  Shoes are difficult, and don’t let anyone tell you otherwise!

I do NOT have real-life shoe-making classes nearby, where I can just march in and sign up, and get supplied with everything I need.  There are scant supplies around these parts and I’ve had to be resourceful and hunt things down, have to make do with what I can find; learn as best as I can from online videos and tutorials, and by doing.

I know my shoes look homemade, and I think I always look at the things I make with healthy attitude of self-improvement with regard to how I approach things next time…  This is a new journey, and one I want to document here.  If I’d just lain silent for a year and then suddenly come out with a fabulous pair of expertly made shoes, well where’s the journey in that?

Anyway, *deep breathe* enough of that.  These are just silly shoes of course, albeit potentially useful too! but I’ve actually nearly finished my first, well REAL shoes, that I’m actually quite proud of!!! Just a few little finishing touches and they will appear here.. soon.  Verysoon.  Excited!

pinterestmail

black Oxford shoes, with pinking

DSC_2641

I’ve made another pair of shoes.  They’re a bit shonky, dodgy and clutsy, and clearly home-made, particularly those rough n’ ready heels, but y’know what?  I LOVE THEM!!!

Pattern; classic Oxford shoe style, drafted by myself; my tutorial for drafting your own shoe pattern is here.

Fabric; black faux leather from Spotlight, lined completely with very dark navy cotton denim from Spotlight, the two layers are lightly glued together with PVA fabric glue.  Rubber soles and heels cut from black rubber matting from Bunnings, two layers of cork inner sole linings from an old set of placemats, black eyelets from Spotlight, black shoelaces and foam inner soles from Coles.

Details:  I whimsically pinked various pieces of the shoe, not sure if this looks cool or just emphasises the homemade quality, not in a good way, mind you, but meh, it’s done.  Actually there’s a little bit of a pinked theme throughout the shoe and the detailing…

DSC_2695

Pinked edges to the vamps and upper edges, and below, the little bit of pleather that covers the centre back seam has a pinked edge too.

DSC_2692

Inside; pinking to the edges of that half-circle of denim at the back of the shoe… this contains the counters, which are bits of stiffening to keep the back of the shoe stiff and standing up straight.  DSC_2691

Confession time, I cut my counters from milk bottles… yep, household rubbish; whoops! am I going to be booted out of the cobbling club now?!   😀
Well, our milk bottles here are made of a strong, sturdy plastic that I thought is totally perfect for this purpose… it is stiff, strong, pliable, can be cut very easily, coaxed into a new shape fairly easily and holds the new shape well too.  And of course; free! since it’s rubbish.  What’s not to love?

IMG_0920

I covered the inner soles completely with the same denim so they match and blend in with the interior nicely.  The inner soles are removable, ie. not glued down inside of the shoe.  Inside the shoe you can see the long nails that I used to secure the shoe to the sole and heel… Not seen, but between shoe and sole there are also three shorter tacks holding the sole to the heel along the straight edge of the heel.  I did this because I knew this heel/sole joint would be the weakest point in the shoe most prone to coming apart under pressure.DSC_2687Sizing; they are moulded to my own feet, so obviously the sizing is good on me.  They are sized to fit my just-slightly-larger right foot.   My feet are a touch wide compared to the average so the shoes look a little wider than most you see in the shop;  actually I was so worried about making them too tight I think I overcompensated and made them just a touch loose… ! This is ok though, since I’ll need to fit warm winter socks in there at some point and at least they are very comfy and totally not tight!

IMG_0916

How do they go with socks?  Phew, they still fit.  Yes, I knitted these socks too…

DSC_2650

Technique and finish-wise; far far far from perfect but I’m still pretty happy.  Actually, all was going swimmingly in the beginning and I was very happy with them, then ran into difficulties and self-doubt, decided they were crap, almost threw them in the bin a few times; realised that, contrary to what it says in my book on shoe-making, shoe lasts are actually INDISPENSIBLE to shoe-making… then things started to look up and I got a bit optimistic they might even work out ok.  Limped in to the finish line in the end, in spite of a little glue splodging mishap on my nice black binding which downgraded my happiness factor considerably.  *sad violin*  and resulted in a decision to use my “failed” stacked heels rather than my good ones.  Those, I’m saving for the next pair.

heels a bit nasty… but trying not to beat myself up over it

DSC_2681Yes, there is a next pair in the works, sneaky-peeked here on IG;  I’ve constructed the uppers already and have found and ordered a pair of shoe lasts.  We’re all just in a state of suspended animation, patiently waiting, waiting, waiting; just for those lasts to arrive.

HURRY UP, LASTS!!!

Final thoughts: pretty bad really, but they’re quite tough and totally wearable, even though not pretty.  Let’s just say, I’m embracing the homemade look, ok?!  😀
I’m anticipating that these ones will be hardwearing workhorses during winter; everyday things that I can just chuck on for day-to-day everything.  I think they could even look quite cute with tights and my little winter mini-skirts, a go-to winter uniform for me  🙂  At least I’m starting to get some confidence that I may just actually have a small range of wearable winter shoes for my Year of Handmade.  Woot!DSC_2632

pinterestmail

how to make your own shoe pattern

shoepattern

I thought I’d share my method for making my own shoe pattern, in case it helps anyone else interested in self-cobbling? is that even a word??   This is for if you don’t have access to a last or haven’t bought any special equipment yet but are just experimenting, trying shoe-making on for size, dipping your toes into it so to speak… 🙂  It’s the same principle as those custom-fit duct-taped dummies that everyone was making about four years ago (remember those?)  except for your feet!

Anyway…

Materials; a thin plastic bag, masking tape, permanent marker, scissors, and a shoe with a fit you really like.  And paper for drawing the pattern on.

shoepatternsp

Put the shoe in the bag, your foot in the shoe, or in the other order!  and commence cutting lengths of masking tape and wrapping them tightly around your plastic-bagged, shod foot all the way around to underneath and all over, covering the toe too.  You don’t have to have your foot in the shoe of course, but it helps the shoe to keep its shape without collapsing in on itself… you’re trying to tape it up TIGHT! and also I actually found it a tonne easier to do the taping with the shoe on; meant I didn’t have to hold it to keep it steady, for one thing…

sp2 sp3

Overlap the tape by at least half its width with each “pass”, and cut the tape short and start a new bit rather than having “folds” or uneven bumpy bits.  Or at least keep any folds in the tape at a minimum.  The important thing is to keep everything as smooth and as flat as possible, and to have total, solid and smooth coverage.  A good amount of overlap is to ensure there are no weak bits that could split apart when it’s taken off.

Once you’ve got a firm, smooth, fully taped-up shoe-foot, carefully wriggle off the shoe (not easy) and inspect it for any weak or un-taped bits that you might have missed, like below right.  Fix these up now.

sp4sp5

With a felt-tip permanent marker, feel around the lower edge of the shoe, determining where the ridge of the sole meets the upper, and mark it in as accurately as possible using small dashes or dots.  Also draw in the upper line of the shoe, the centre back seam, and the desired seam lines of your shoes.   I spent a pleasant few hours researching different shoe styles and there are many many many varieties of lace-ups alone!  so hard to choose just one.  I went for an easy style and imitated the seam lines on a pair of Cassie’s Converse which I now know (thank YOU Wikipedia) is actually the classic Oxford shoe design.

p6 sp7 IMG_0764

Now it’s time to carefully snip the taped “mummy” shoe away from your real shoe.  Take great care not to damage your shoe! Snip along the lower line where the upper joins the sole, and separate the two.  Once you’ve cut the central back seam of the shoe it should be easier to ease the shoe out of its “mummy” a little, to lessen the danger of scratching it with the scissors.

sp8sp9

Cut along all the marked seam lines.

sp10

The toe of the shoe is usually a 3D rounded curve, snip into the curve so the piece can be laid flat.  When you cut this piece in fabric to make your shoe, the excess will need to be eased into the sole lining.

sp11 sp12

Lay the tape pattern pieces down and trace around them onto paper and bob’s your uncle!!  The tongue is just a simple U-shape, cut to the same length as the lace up section.  By the way those two long curved pieces that go on either side of your foot are called the vamp.  This pattern has no seam allowances of course, they can be added at this stage or not, a personal choice, just be sure to mark on the pattern pieces whether it is there or not.

shoepattern


I used my right shoe so marked all my pieces with a big R to show which side up they go together as a set.  Obviously, the same pieces will be used for my left shoe as well, just that they will all be laid upside down.

And that’s it! pretty simple really.   I have to add, this pattern should be thought of as a starting point, and it’s well worth making a mock up pair of shoes in not-very precious fabric to test it out before you launch into cutting into a precious piece of leather or something… you may well find that the shape of it is not exactly what you want for your shoes and shave off a fraction here, add on a slight wedge there.   It’s always better to be safe than sorry!

Anyway,  I certainly  hope this method proves useful to someone else too.  Happy self-cobbling!

pinterestmail
Switch to mobile version
↓