 Hello!
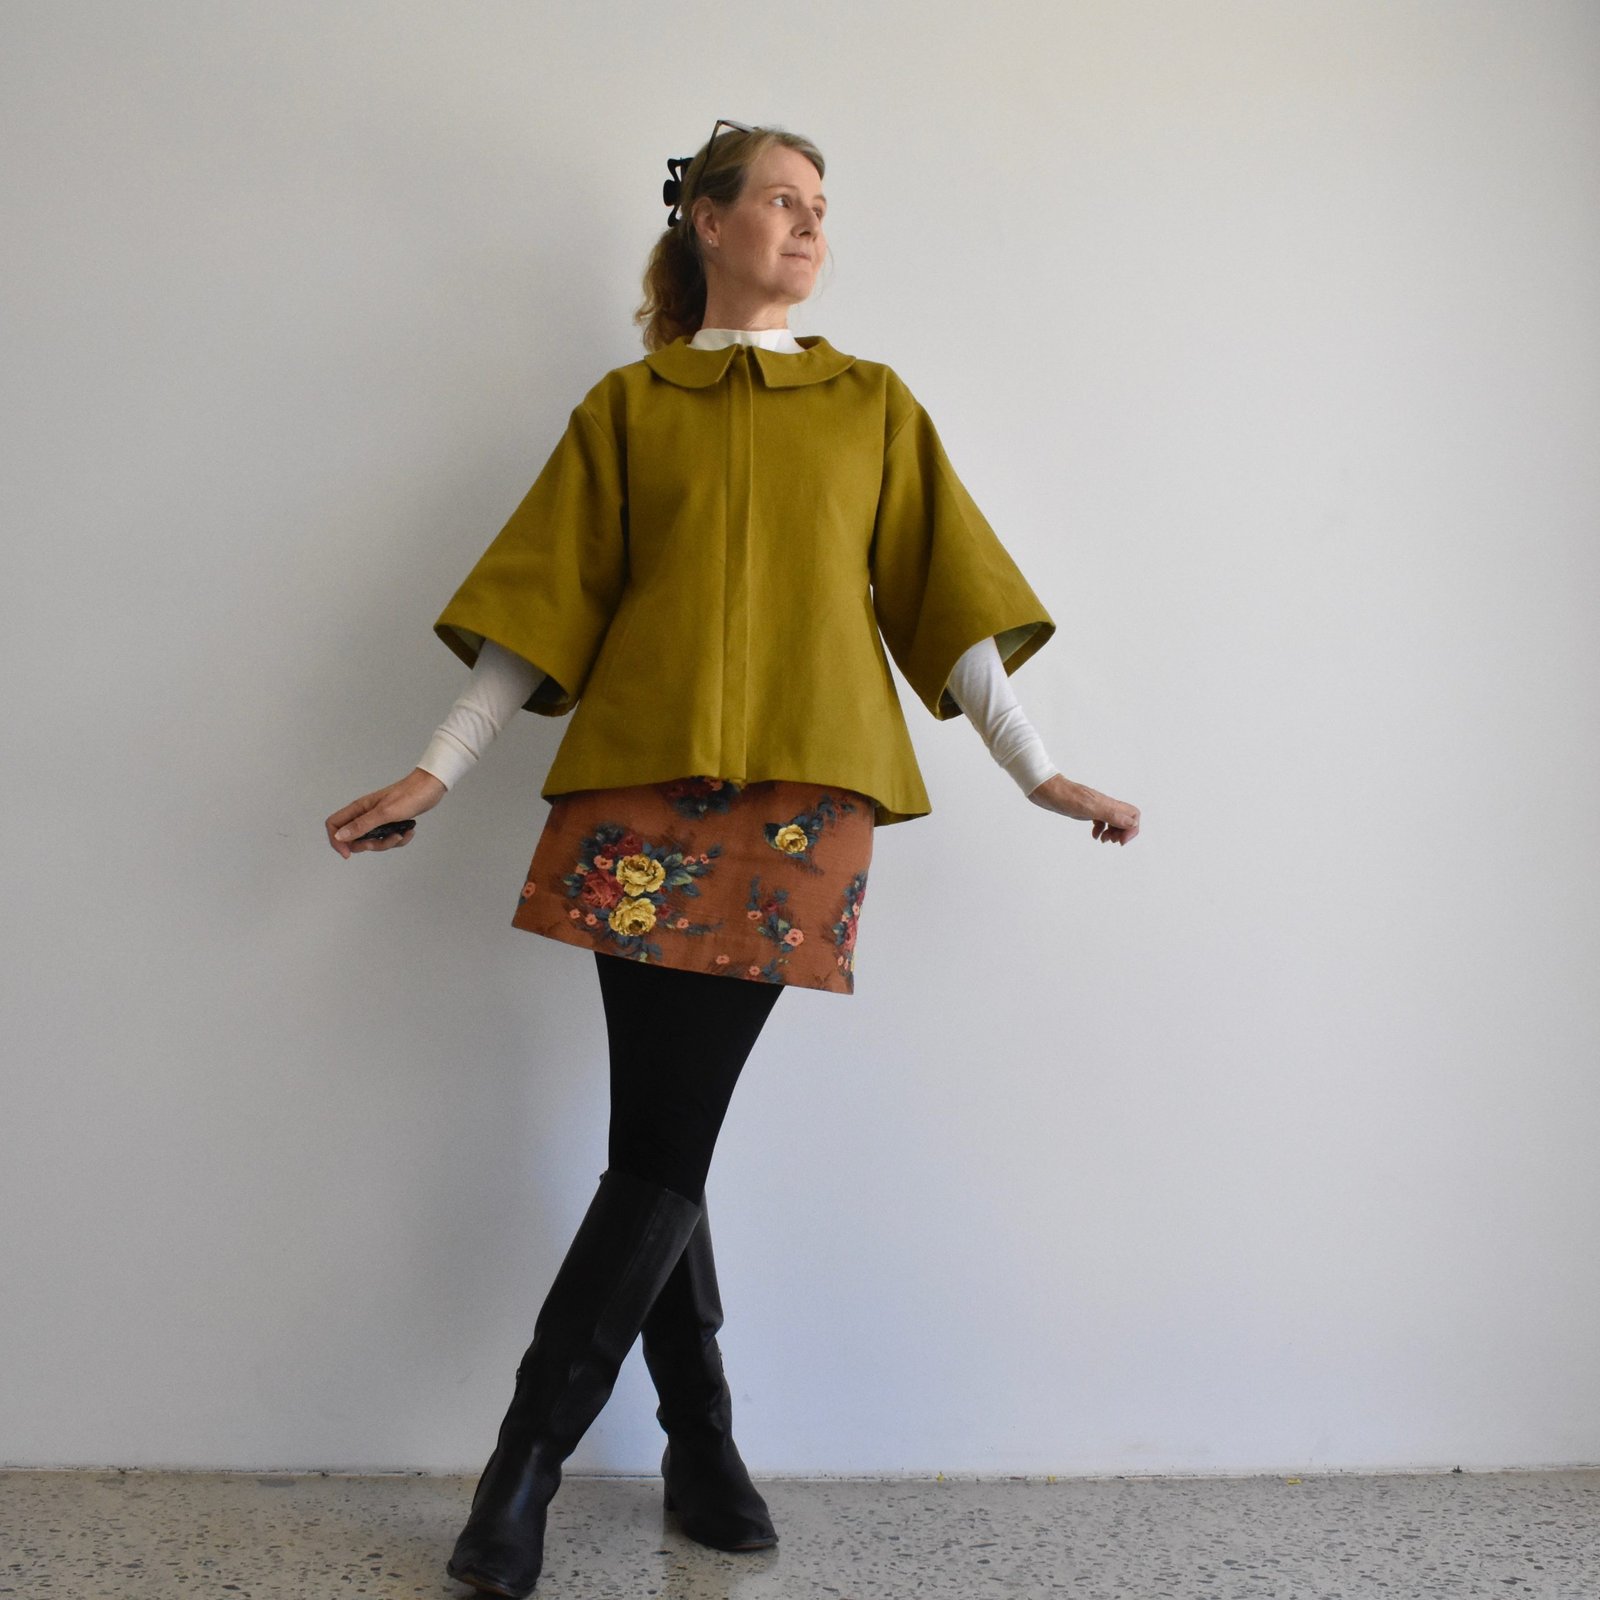
I’ve made a new thing… an “almost” zero waste jacket. I’m pretty proud of this fact! Ok, to be totally honest; I didn’t set out to make an almost zero waste jacket; I actually just set out to make a mere jacket. This whole exercise turned into a case of sheer dog-at-a-bone stubbornness and a masochistic refusal to be beaten by my own plans…

Storytime; so, I had this lovely stuff and I wanted to make a jacket … It’s kinda hard to tell but there’s a little less than 1.5m of 106cm width fabric, folded lengthwise in the pic here.

I took out my first chosen paper pattern and laid it down onto the fabric; absolutely no way was it going to fit. I got out another paper pattern from my stash, same story. Damn! I then searched through my entire collection of Burda magazines for a smallish, or at least cropped jacket; selected and traced out a pattern. Laid it out on the fabric, hmmm, that didn’t fit either. Searched for and selected yet another, even tinier, cropped jacket, and traced this out too. Nope. I felt like my fabric was gaslighting me! because it certainly “looked” like I could get a jacket out of it, but absolutely nothing was even close to fitting!

Ordinarily I might have given up and just gone for a skirt or something, in this case I was absolutely determined to make that jacket … why the stubborn insistence on a jacket, you might ask? well, only that I had previously selected the fabric for my #use12 capsule wardrobe for this year, and this was earmarked to be a jacket. I can’t have a capsule wardrobe without a jacket! and of course I’ve already used all the other fabrics for other things, so this HAD TO WORK.
And it did, obviously, and I may be feeling just a wee bit smug about it! I did a quick mud map of my design… in case anyone is interested. F = fold, S = selvedge

You can see the back and two fronts to take up the entire width of the fabric, even so the width wasn’t enough to be comfortable over my hips, especially with the pockets I sorely wanted, so that is what the triangular “side gussets” are for. These are stitched into the side seams. I stitched all my seams at 6mm – also for minimum waste reasons! then overlocked all raw edges and faux-flatfelled the seams down.

The jacket length was determined by the length of a nice, heavy, open ended zip that I already had in my stash; its colour blended in nicely with my fabric which is partly why I chose it over buttons. Also for the minimal streamlined look! I don’t have any perfectly matching buttons, and I’m still on the buy-almost-nothing stint that I’ve been on most of the year.

The “front placket” sits underneath the zip inside the jacket, the “back neckline facing” was stitched together down the straight edge, and attached to the back lining. I didn’t even have enough fabric to cut the under collar, so this is cut from brown cotton corduroy, leftover from these jeans.

No, it’s not ideal to have that different colour there, but I don’t think it’s too visible. You can also see the corner of a patch pockets stitched to the lining there… there’s one on each side, just for extra, just in case. You can never have too many pockets!

“Pocket welts” is self-explanatory, and “pocket facings” are stitched to the pocket bags at the opening so that this is the fabric you see when the pocket peeps open. The inner pockets themselves are cut from the lining fabric.

The fabric.. oh btw, I bought it in Japan, in Stripe & Check in Tokyo during our last trip there… and posted about here. It’s a beautiful, quick thick brushed cotton, almost like flannelette but more solid and “coat-like” in its weight and feel. The colour!! Isn’t it gorgeous?! I’ve already mentally dubbed it my pickle jacket, for some reason… 🙂

The lining is from a pale green polyacetate that was already in my stash. I cut it a tiny bit bigger than the pattern all the way around, and then widened the seams towards the edges so that they would fit at the sleeve hems and bottom hem, though there is a small tuck in the lining at each side seam of the hem. The lining is machine stitched to the neckline and zip tape, and hand stitched to the sleeve and bottom hems. The hems themselves were also invisibly hand-stitched to the jacket. The only thing I had to buy for this was some matching thread!
obligatory boastful pic of scraps…

I’ve got something to say about the collar and zip opening… so, when I had my Mundaring raincoat tested by all my lovely testers; one of them commented that the front opening was “off-centre”. What that meant: was that while the zip is actually bang on centre front, it has a weather placket over the zip, and the opening edge of the placket is obviously not centre front, but a little off to the side. It was planned that way, but her comments certainly gave me some pause, as though maybe it was perceived as “wrong”?? Well, it’s not, of course because coats have their openings situated in many different ways… however, I’m mentioning it because with this coat I decided to make it so that the edge of the jacket opening was situated at the centre front. It’s neither right or wrong either way, of course; and while the opening edge of this jacket is satisfactorily right boom in the middle, the zip is, by necessity, off centre underneath. The collar comes up to the opening edge of the “uppermost” front, while falling short of the “underneath” front, if that makes sense. It’s no big deal, of course, just thought I’d mention it.

This is the 11th thing in my #use12 from my stash, wardrobe capsule. Only one thing to go! although, to be honest I’ve since added another piece to the collection actually, which I am making next before the real “final thing”, hehe. So the project is now a use 13 really… All will become clear soon! I’ve even started photographing my final mix-and-match of my capsule wardrobe for a final post on the project. I’m so excited for it!

Oh, sincere apologies to Sanni, but I did some more baking this week from the cooking tree… I made these oreo macarons, using this recipe. SO YUMMY!! I don’t know how I’m going to stay away from them until the family gets some!


 I’ve made a new coat, and I really love it! I’ve been seeing some oversized, over-long coats here and there, not in the flesh I mean since where I live we really do lag behind just a leetle bit fashion-wise, particularly when it comes to something as Perth-inappropriate as a coat. No, I mean I’ve seen them mostly in Vogue magazine or Pinterest, and had a fancy for one myself… when I saw this pattern by FibreMood I decided it was time to go for it and make one!
 Hehe, I’ve had this gorgeous stuff in my stash since late 2010/early 2011, when I bought it in Tokyo… this was the first time I’d met Yoshimi and Novita in Japan, and they took Cassie and me out fabric shopping. It was such fun! and this lovely piece of fabric was one of my spoils of that trip. I


