floral trench coat

I’ve made a new trench coat; a riotously floral-tastic, blowsy English rose of a trench coat.  As soon as I spotted this print I was smitten!  delightfully old-fashioned, vaguely reminiscent of Granny’s china cabinet and a wholly unabashed celebration of spring-time.  Because that’s what it finally is now… SPRING!!!

This very thing, by which I mean an over-the-top floral trench coat, is a thing I’ve had percolating in my mental wish-list for aaaages, ever since I first laid eyes on the floral trenches by Burberry from a few years back.  I originally bought this paler pink magnolias floral fabric to make the trench coat but got distracted and made that dress instead, obviously!  Anyway, a little after I finished that dress, I still really really wanted my imagined floral trench coat, so I bought some more floral sateen.  And I’ve finally made it!

Pattern; McCalls 5525 view E, the view with all the bells and whistles.  The only things I left off were the flap thingies over the pockets, because I didn’t have enough buttons for them!

Fabric; a floral cotton sateen, from Spotlight.  The trench is fully lined with pure white cotton poplin, also from Spotlight, and the buttons… the buttons! – are totally gorgeous vintage ones that I’ve had for about ten years.  I was actually the lucky person to get them in a Secret Santa pressie swap at a very early Burda sewing community meet-up, way back in 2010? I think?

I had only 11; they are a deep bottle green, possibly made from Bakelite or something very similar.  I’ve been looking out for yeeeeeers for the the perfect project for them and I thought this trench coat was it…  they are in fact a perfect colour match for the deep teal-y/ocean-green of the foliage in the print.  However! now they’re all stitched on, I’m not completely sure the fabric was the right choice for them after all? ahhhh, the agony of high, followed by unattained, hopes and expectations!  The thing is; the busy busy busy colourful print, while it is really gorgeous and I LOVE it! it really just swallows up the impact of those buttons and at any distance you can hardly see them on there at all.  They just disappear.  As in, buttons, what buttons? I can’t seen any glorious buttons!!  The fact that they are beautifully profiled, and slightly marbled, and vintage, well, you’d never know.  So, I’m just thinking, maybe? I should substitute them for some plain buttons, and save my exquisite vintage buttons for another project – another, different trench coat, something in a solid colour where the buttons can really be allowed to shine? Hmmm….

the one under the collar is not one of the original set, it’s a modern, plastic, flatter one…

Making a coat is always an activity that brings me huge amounts of joy and satisfaction, and this one did too, keeping me blissfully pottering away the whole time I was working on it. Constructing all the little bits and bobs that go into a trench coat, like the tabs, the collar, putting in the sleeves and bagging out a lining is enormously fulfilling to me, just about as enjoyable as any project I can think of.  I’m totally in zen mode, throughout.  As it happens, I’m perfectly happy with all the construction details of this one; all my seams and sleeve insertion and symmetry of the tabs and collar, the walking vent, topstitching, and the neatness of my buttonholes and all that jazz all worked out exactly as I hoped, and I’m very pleased with all this.

for some reason, this arrowhead tab on the collar stand is always an especially pleasing detail to me!

So that’s all super good and satisfactory.  However?!  I have to admit to a little frisson of disappointment at the halfway point of making this coat, at about the point when the body was together, and I slung it over Bessie and took a step back to have a first look… and, oh dear.  See, I had barely enough fabric to cut out my trench, and in fact several pieces are pieced together!  Which ones?  oooh, I’ll never tell!!!  See if you can see the seams!  But that’s not the problem here, after all, piecing is something I’ve done in a lot of garments because of lack of fabric and I’m perfectly ok with doing that when I have to….   The thing is, I really had to be clever about laying out the pattern pieces to have any hope at all of getting the coat cut out, and I did some very premature self back-patting when I managed to lay out the pieces.  Because the way the print has turned out on the finished coat is just not good.  Specifically; the front is quite a lot “busier” than the back, and I wish I could have been switched-on enough to see that while I was juggling those pattern pieces but sadly, I did not.  The front and the back are to my eye almost like two completely different coats, which is very sad-making (please excuse my little Evelyn Waugh-ism there…)

It’s definitely not as obvious when the coat is worn open, like this; which to be honest is how I was planning to wear  it most of the time anyway.

I can’t do anything about the unbalanced “busy-ness” of the print; but as far as the button issue goes, well I’m gonna wear it for a while and sleep on it, but button-switching may just happen sometime down the track.

I’ll just see how it goes for a while.  The coat is quite lovely to wear, and perfectly comfy, well-fitting, and I did pour myself into making it well.  Oh well.  I’ll give it a crack!  Quite often, early dissatisfactions I have with a project evaporate a little bit down the track when I look at it one day and kinda go, what was I worried about?   I adore the overall vibe of my trench coat, how it looks when worn both belted closed and open are both very pleasing to me, and as usual, wearing a coat always makes me feel amaaaaaazing, no matter what!  Sometimes, well, very occasionally really, I have a tiny little wish we lived in a climate which was more conducive to coats?  But not very often really.  Like, hardly ever, to be honest  😉  #devotedtotheaussiesummer

I am mostly planning to wear it casually and glamorously open, like I’m wearing it here with my white Inari tee dress, I’m actually rather thrilled at how super swish this combo looks, and feels!  I’m even thinking this could be my Christmas soiree outfit over the upcoming festive season?  Maybe!!


Details:

Coat; McCalls 5525, cotton sateen, lined with cotton poplin
Dress; Named patterns Inari tee dress, white stubby cotton, details here
Heels; Zomp, from Zomp boutique

also looks pretty good when accessorised with a dog… mmm?  sorry, I couldn’t resist roping her in for just one picture!

pinterestmail

jump to it!

Ohmygawd, wot is this then??  I’m wearing a jumpsuit!

I know!  So… fashionable!!

Disclaimer; so, any and all claims to being abreast with current trends and wearing something that’s oh-so-hot-right-now! that’s only just barely appearing in RTW shops here is absolutely nothing at all to do with me and everything to do with Heather of Closet Case Patterns for kindly sending me this pattern and thus propelling my wardrobe ever closer to what the cool girls are all wearing…  thank you, Heather!!

Up until now I had precisely zero jumpsuits in my repertoire and to be honest I had early, prior-to-making-it worries that I would be wanting to transform this one into a midi-dress fairly soon … my fear of  jumpsuits is mostly because of the toilet issue.  I remember Cassie telling me a story about herself and a friend: said friend was wearing a jumpsuit and no bra one time, and Cassie was waiting for her in the ladies’.  Friend sings out from her stall;  “Cassie? I’m basically sitting here naked right now… ” This struck both of them as particularly hilarious and they laughed until they cried… well I’ve gotta say I think of that every time I even contemplate a jumpsuit.  Once I’d made this one though and tried it on, I did immediately love the rather glamorous breeziness of those super wide wide legs, immediately! and I also really like how the extravagance of width at the bottom edge is nicely balanced out at top by the tapered in lines of the camisole-style top half.   The curved V-neckline is cut quite low both front and back, it’s flattering in a quietly sexy sort of a way; and while it’s a leeetle bit skimpy it’s not too skimpy that you can’t wear a bra, which is comforting.  In fact the straps are designed thoughtfully wide enough to be bra-strap friendly.  Wearing it feels quite delightfully breezy and relaxed and comfy and easy, like you really are wearing nothing, even though you’re actually swathed in looooads of swishy fabric, and I found myself not minding the bifurcated-ness after all.  In fact, colour me pleasantly surprised!  Could I even be *gasp* converted to jumpsuits?!

Pattern: so, of course this is the Amy jumpsuit, designed by Heather Lou of Closet Case patterns…  and I used a slightly crinkly deep blue rayon from my stash, I think this was originally from the Morrison sale; and I cut the shoulder straps from white cotton because…. well just because.  The white was a remnant from deep deep Stash.

I lined the bodice with the last remains of this goooooorgeous yellow and white check rayon… love this divine fabric, originally from the Tessuti’s in Melbourne, and I used it to make this top for Cassie, and this little dress for Ms Spring.


It’s now been used up totally, each and every skerick, likewise the blue rayon, and likewise the piece of white cotton now too.   I’m using up so much of my stash!  I’m a bit behind on my blogging, but trust me; I’ve been making tonnes recently and have used up LOTS of my stash while at the same time adding almost nothing to it…  THIS.  IS.  AWESOME!!!

Details:

Jumpsuit; the Amy jumpsuit, pattern by Closet Case patterns, in a royal blue rayon? I think? with white cotton straps
Sandals; made by me! at the shoe camaraderie workshop; details here

jumping in my jumpsuit!  I’m sure Clara’s wishing she had one too…

pinterestmail

Ms Spring

The latest addition to my little set of seasonal dolls is finished! Please say g’day to Ms Spring!

Ms Spring is, obviously, a spring-y kind of a girly; she is actually made from the exact same ivory calico as her sister Ms Winter but has light coffee-coloured skin thanks to a long hot soaking in a cup of strong coffee.  Not Ms Spring herself, of course, but her fabric prior to her making!  She has green/blue eyes, and tawny golden blonde hair.  I’m super pleased with her hair!  It started out life pale grey in colour; Morris & Sons Empire 4ply, 100% Australian merino “French Grey”, and I dyed it in a yellow/orange dye solution, the same dye-bath that I used for this jacket.  I wanted the colour to be a bit blotchy and two-tone, because natural hair IS is a bit variegated in colour so that’s a more realistic look…. so dunked the completely dry wool straight into the bath and just minimally swirled it about, just a little bit.  I’m so so happy with the pretty range of warm golden yellows I got!  I also really adore her side-swept fringe ‘do…

Up top, she is wearing her cocktail dress; a blush pink sequinned number which is in my humble opinion, the most divine shade of pink ever invented!!  How much would I like a dress for myself in this colour?? SOOOOOOOOO much!  I know, I know, I should just make one.  Sadly though my actual life involves zero need for a pretty pink sequinned dress, so I’m just going to settle for making one for this young lady instead  😉

Her matching necklace is all pink; pink jewellery wire, with a pink-y apricot pearl bead.

on Wednesdays we wear pink….

Her summer dress is a checked yellow rayon, beautifully drape-y…  this fabric is a little fray-y, so I went to the effort of a narrow rolled hem.  So fancy!

Really though – really – my personal piece de resistance for this dolly has been her winter outfit… this turned out rather chic, if I say so myself!!   I’d made the denim blue leggings, and knitted her little blue beanie… and then just couldn’t settle on a good colour/look for her turtleneck sweater dress.  I actually made three other rejected candidates, prior to this one!  None of them were just right, too dull, or too bright – it’s really important to me that all the pieces in my dolly’s wardrobes tone together really beautifully and have a lovely and harmonious overall colour scheme.  I love this dolly’s colour scheme; it’s soft and sorta cheerfully pretty in a muted way, a bit stronger than pastel but definitely not bright.  I just couldn’t settle upon a fabric/colour that fitted my vision.  Then I made this ivory sweater dress, which is nice, but still not quiiiiite right, and finally I hit upon the idea of adding embroidery to the yoke, to make it look a bit like a fair isle sweater.  Well, that’s what I think, anyway!  And it all clicked into place!  It has blue -the same blue as her beanie -, the orange is the same wool as her hair, except I soaked it in the dye bath for a lot longer to just get a stronger colour – and grassy yellow/green.  Now, it’s perfect, I think!

And of course she has a duffle bag! to carry all her stuff!  It is made of wide-wale corduroy, that I dyed also to get this shade of caramel brown, and it has a pocket both front and back too.  Goodness knows what she is going to put in those pockets, but as we all know, a girl can never have too many pockets, no?!

Oh! of course she has underwear too… a pair of lacey boy-leg briefs, with an embroidered yellow rose on the front, so you can tell the front from the back.

you can see her light, coffee-coloured skin shade better in this picture, I think  🙂

Here she is, with everything!

But wait, not quite everything!  There’s more!  Lastly, just one more thing… when I sent Ms Winter off, I made at the very last minute a drawstring carry bag, with an inset tulle window, so she can see out… this can store her and all her clothes and possessions in one place, for when she’s not being played with, or out on display or whatever.  So, of course I had to make one for Ms Spring too, in a shade of spring-y turquoise that fits nicely in with her particular colour scheme.

She is currently listed for sale over in our shop  🙂

pinterestmail

blue and green should never be seen

I almost called this new lingerie set “frozen”; which to be honest is more like an accurate description of me, actually, while disrobing for the purposes of trying it on, haha.  #comeonsummer  But finally, today the last day of winter YAY!!!  Around this time is typically a low time of the year for me, when I’m really flagging and running low on zip and zoom, just banking on the promise of warmer weather appearing, any minute now.  I know I know; our winters are so mild, what have I got to complain about? Nothing really.  And yet…? I do.  Sad to say, I do.  But I shall stop now.  Becaaaaause… *pauses for dramatic effect*   I have some new pretties!!!!

It’s a bit embarrassing actually, since this lingerie set has been all cut out, elastics and all the other bits and bobs present and accounted for, and the whole lot merely awaiting the sewing together bit for…. *mumble mumble* months now.  Actually I believe I mentioned it the last time I presented a set of underwear, here on ye olde blog.  I did a bit of a cleanup of my sewing space (Tim Gunn voice, there) and the pieces of this set got “tidied” away into my laundry cupboard, out of sight and out of mind.  SAAAAD!!   Anyway, it’s made now.

I’m very happy with this new set… I really love to have matching sets, and it’s even more pleasing if I can make the two sets of undies quite different from each other, and at the same time match each other, and the bra.  Tick!!

Patterns:

Bra, or more accurately “bralette” I suppose, since it’s a fripperous little thing with no underwires or anything serious like that; it’s basically my own design, the same design I used to make this neon yellow one here.  I draped the lace onto Bessie and cut and pinned and tried on here and there… and ta da!

The two sets of matching undies are made using:

1. the Watson briefs, which I’ve used a million times before.  Not even exaggerating there.  Oh, ok, maybe a little then  😉  And

2. the Tanga lace panties pattern a free pattern available on Burda style here.  I’ve made this pattern up three times before; here, here and here.  They look absolutely adorable while you’re wearing them, but the design is just not my favourite… the sides are completely unsupported and so have a tendency to slowly slide down your hips; meaning I’ve never felt 100%  secure in them.  But they really are soooo cuuuute! so here we go again… this time I downsized from a medium to a small,  because it occurred to me, that maybe the medium is simply too big.  I cut out a medium first – this lace is not cheap!! – but pinned the small on me, to see; and yep, small fits just fine.  Got high hopes for these ones!!!

Oh, and I also did my usual, and very essential, crotch fix as described here.

Materials;  Blue lace from Homecraft Textiles, green silk jersey was a hand-me-down scrap from Mum.  Bralette is lined with a light peach-coloured swimwear lining fabric from the Fabric Store ( I have quite a lot of this)  Elastics and all other findings from Homecraft Textiles.  The blue fold-over elastic on the green watson undies was leftover from a previous project, this set.  The lace knickers have a green panty liner, because it shows through the lace obviously! whereas the green undies have a white liner, because not enough fabric!

pinterestmail

the Perth dress pattern, new size range

This much-requested new pattern has felt like a long time coming…  I had a lot of requests from ladies wanting our Perth dress/blouse pattern to be made for a larger size range… so ta da!  this new version is for sizes 46-54.    It’s now available here  in our etsy shop; CarolynandCassie, as a pdf and also a paper version in limited numbers.

I apologise for the delay; we’ve had to contend with a computer issue that has been pretty devastating, some extremely costly software that we desperately needed in order to function has been practically obliterated, it’s been so difficult… All I can say is thank God for Craig who eventually managed to work it out.

Anyway.  No one wants to hear about computer blurb, yeah?  On to the pattern!

ye all-important size info….

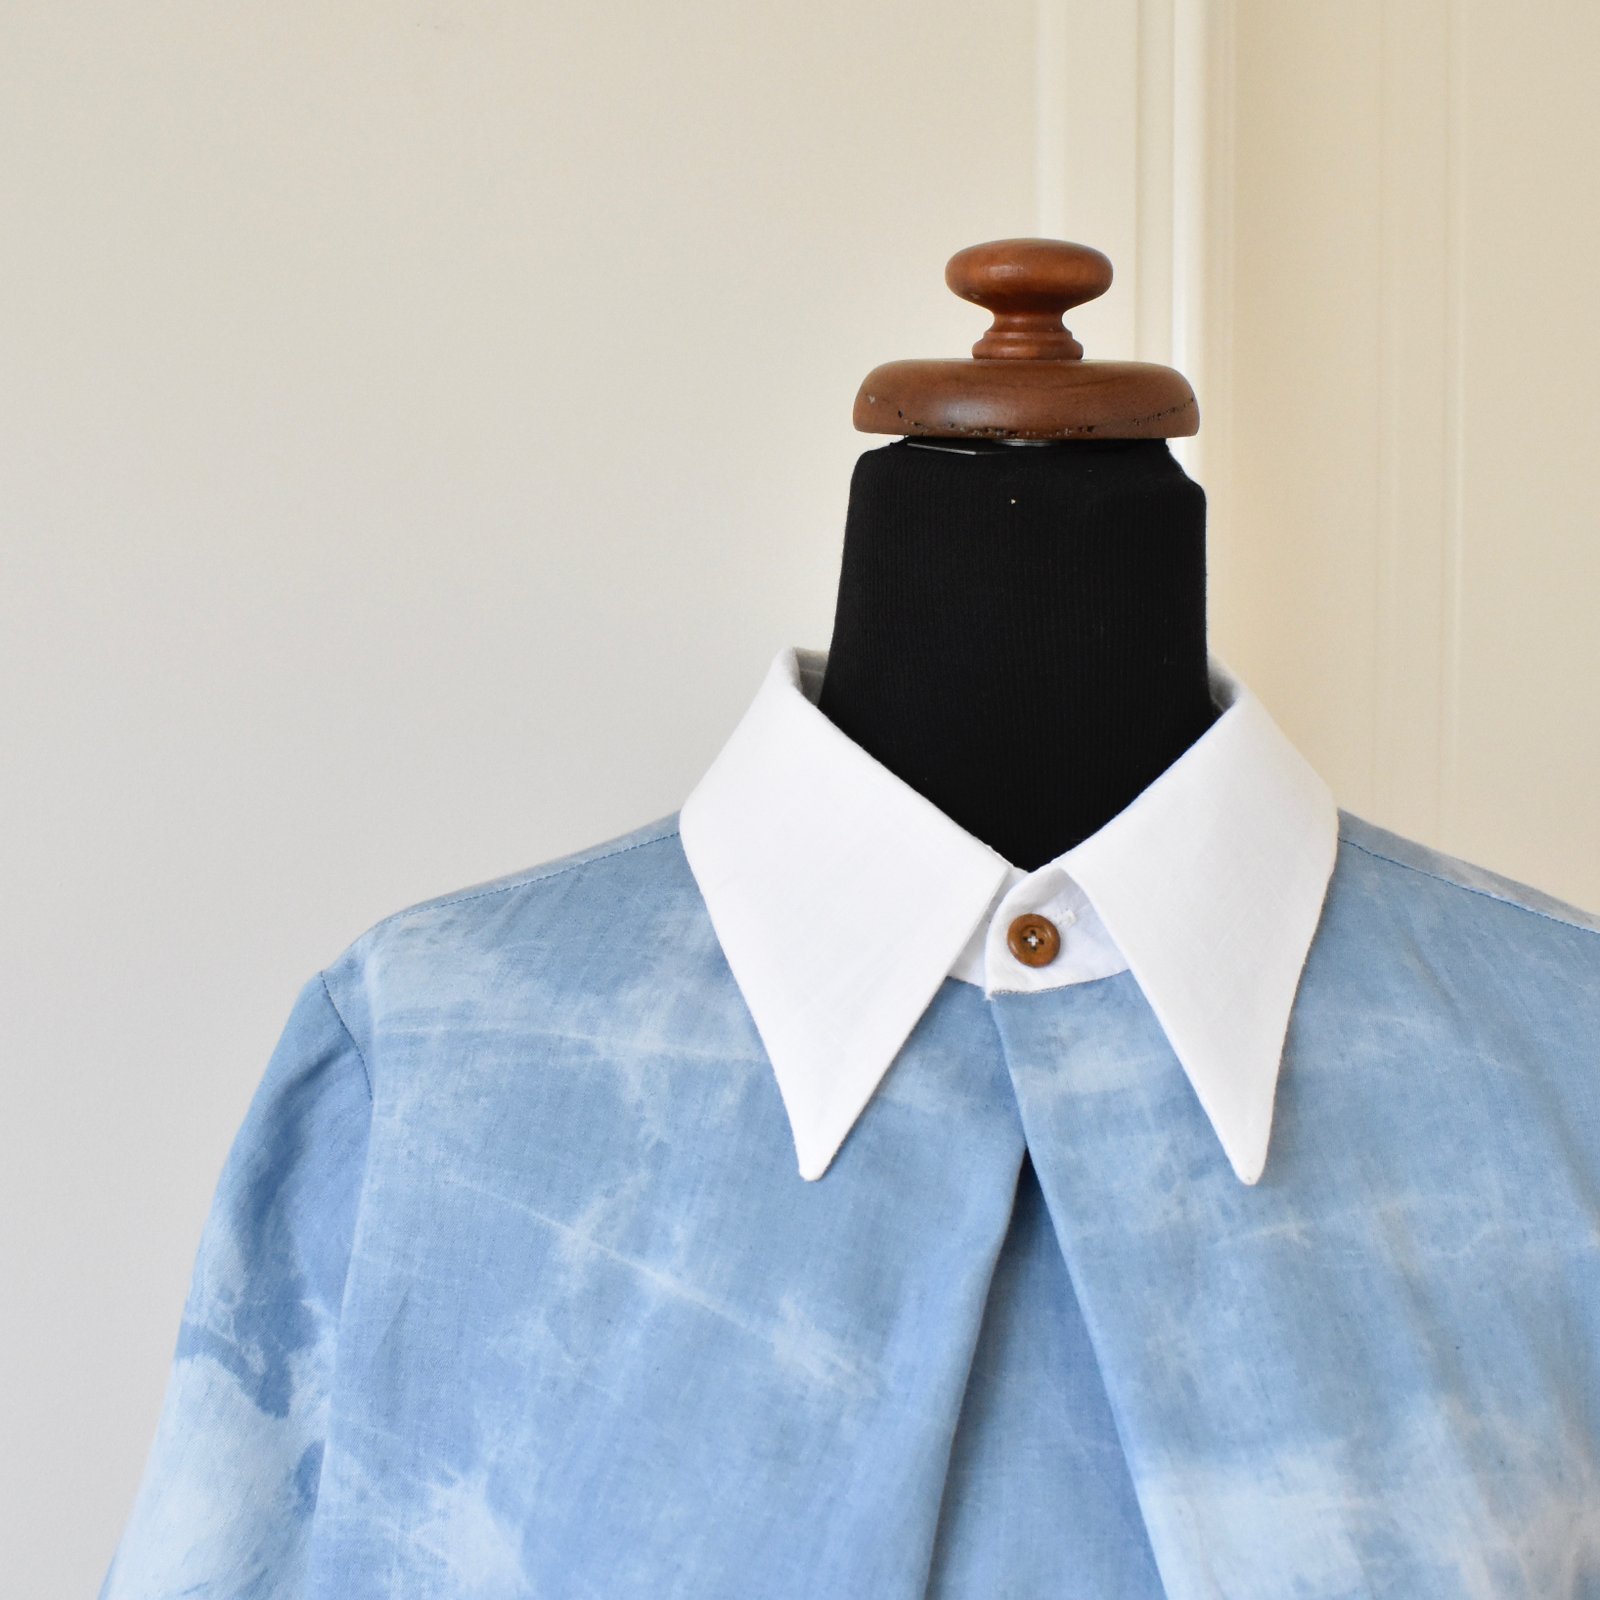
Sam’s girlfriend L is in our new size range so I asked her if she would kindly model for us.  I’m so happy she agreed because she is super cute! plus now I had a good reason to make something for her, hehe…  The dress I made for her is in a rather beautiful cloudy-sky print, cotton drill from Spotlight, with a white contrasting collar.  I absolutely adore this on her!

My favourite part though is the crisp white collar; just love this look! the button is a little wooden one from my stash

Thanks so much L; for being such a totally gorgeous model!!

I also made two blouse versions for my sister in law, Sandi.  This first version was initially a bit big on her, which totally did my head in – what did I do?!!! – but eventually I worked out it was all due to a very stupid mistake which I am too darn annoyed and exhausted to even talk about how this happened, suffice to say that one should ALWAYS check the test square BEFORE leaving the copy shop.   I know I personally will never ever neglect this ever again!!  #superannoying

I took it apart and re-made it to fit properly, just because I’m a glutton for punishment well really, I cannot bear to waste perfectly good fabric!  And also, Sandi really likes it  🙂 #allswellthatendswell  which is why I went to the effort of re-fitting properly.  I cannot say how much I LOVE an appreciative recipient! makes it all worthwhile in the end, yeah?   The fabric is a really very nice charcoal and white striped linen, that I ?think? I bought in either Tessuti’s or the Fabric Store in Melbourne, during one of our visits there.  The only giveaway that it was initially made to a larger scale is the the overly long collar points, which I just left as they were.

The blue and white striped version, which was correct all the way from go to whoa, yay!! is a rather lovely shirting cotton from Homecraft Textiles.

Yes! Homecraft Textiles actually stocks a really nice little range of crisp shirting cottons… who knew?! certainly not me, since they were hidden way back at the very back of the store behind the vast wasteland of lurid polyester satins and “chiffons” and fleeces that takes up like 90% of that store.  One day I was hanging around in there and discovered it.  EUREKA!!!

Oh! Something else I made for Sandi recently, which is completely unrelated to our Perth dress pattern so if this seems a little random and out-of-the-blue, sorry! but this seems like a good a time as any to lob it into Le Blog… I promised to make a custom-fit top pattern for Sandi, for her birthday, she put in a request after I had done the same for Mum, a few birthdays back.  So I made this one…  The shorter, open front T-shirt over a longer one underneath in a contrasting colour is a design modelled to a favourite top she has already.  We chose and bought the fabric together from Fabulous Fabrics.   I’m kicking myself I forgot to take a picture of her wearing it, because she looks so lovely in these moody pinks and blues.  AND she professes herself to really LOVE this one too. This just makes me so happy!  See what I mean about a grateful recipient?

pinterestmail

Ms Winter

O hello, dahlings!

This is Ms Winter.   So very pleased to meet you!

Her first name?  well, what is in a name?  Is a name, “just a name”, or does it mean something?  We all know someone who makes us think, “well she certainly doesn’t look like a “Carolyn”, I’ve always thought she looks just like a ____  “(fill in the blank)  When I was making this young lady, I did not intend to give her a name myself, in fact I purposely tried to avoid thinking of one.  Howeeeeeever, the same as when I made my Sally doll, I couldn’t help it but a name did pop into my head in those quiet zen moments as I was working on her.  So, in that respect, she actually does have a name; a quiet maker-born name… but first things first, let me start at the beginning.

I really enjoyed making my first doll Sally, which is why I decided to make this other… she is quite similar but actually quite different too in many little but significant ways.  I used the patterns in “the Making of a Rag Doll” by Jess Brown for Sally; whereas I drew up my own new patterns for this girl and for all her clothes.  The new girl is taller, has a smaller head and is quite the lanky skinny-minnie compared to the pear-shaped Sally.

She has pale skin, blue eyes and a thick long mane of charcoal-black merino hair… technically “beluga” hair, actually the wool leftover from these hand-knitted gloves, as well as from the heels and toes for nearly all my hand-knitted socks.  Just like Sally, her hair fully covers her scalp and can be styled a little.

I started out thinking of her as a Winter girl, thus her colouring; and was just going to make the above winter outfit for her… black merino tights,  a black and white striped sweater dress (leftover from this little top) and a knitted beanie (leftovers from these arm warmers)  The pattern for the beanie is adapted from that free one from the tiny sparks website, designed for preemie babies.  I’ve previously used it when I made a bunch of little preemie outfits.  And I added a pompom.

But of course, the minute I’d finished her winter outfit I couldn’t resist making a summer outfit for her too;  an elegant and ladylike wrap dress – le dernier-cris!! – in a swishy, prettily floral rayon.

Having two outfits made me realise, of course she was going to be getting undressed every now and then…. which can only mean one thing; underwear.  Even dolls deserve pretty underthings! so I made a little pair of lace boy-leg knickers for her too.  I embroidered a tiny rosebud with flanking leaves on the front,  just because.

And then I thought… all these very casual clothes: what if this glamorous young lady wants to sashay out after dark?  Every girl needs a chic little sparkly number for a special occasion, yes?  So I whipped up a hot-pink, sequinned, raglan sleeved sheath; in a mini-length in order to show off her enviably long slim legs; and for a finishing touch, added a matching jewelled necklace to nestle at that alabaster throat.  Oo lala!

But, all these clothes? How is a girl to get from A to B with all this lot?  Not to worry! she has a lovely cherry red duffle bag with a black strap to sling over her shoulder, as she dashes through traffic twixt office and taxi, taxi and theatre.  Just like all the cool girls.

Just a note to be real here; the duffle is actually empty in the below picture… she has a tendency to topple over when it’s packed full with her wardrobe!

Oh, her name?  Well, that’s for me to know and for you to find out!  Anyone who likes to “pin” will be able to find her name easily enough… !  There now, that’s a clue!

This is the first girl in a small seasonal set that I am planning to make, and sell in our shop.

Later edit; I made little raspberry coloured drawstring carry bag, with an inset tulle window so that she can see out… this can store her and all her stuff for when she’s not out and about  🙂

pinterestmail

ivory leather “camaraderie” sandals

This past weekend I had great fun doing a shoe-making workshop with the lovely Lisa, of The Shoe Camaraderie!  This is a bucket list item I’ve obviously been wanting to do for aaaaaaaaages, so when I saw on instagram that Lisa was planning to come here and run some day-long workshops to make a pair of sandals, I jumped immediately!  And here they are!  I chose to make a simple slide, the strap around the back of my ankle was my own idea, partially because I just wanted it, and partially also I wanted to add my own little spin to the design, and Lisa graciously accommodated my request.

These are obviously the most professional looking and beautifully finished shoes I have ever made; benefitting from the help and supervision of a professional.  Not to mention learning what are the right tools and supplies I need, and how to use them safely.  I’m super keen now to get my hot little hands on the proper tools and glue I need to get, so I can make more of my own shoes in the future.  I’m hooked!

Lisa was a wonderful teacher; generous with her time and expertise and super helpful to everyone in our small class.  There were six of us; and we all managed to complete our different shoes.  Lisa devoted time to everyone individually, as well as frequently teaching relevant information to the whole class; and stepped in to help anyone with bits they found too tricky or difficult, in order to ensure we all went home with a perfect pair of shoes.  Funnily enough, everyone’s shoes were quite unique! Not one of us had an identical pair to anyone else.  Which is exactly what you want, yeah?

I chose ivory leather… I was dithering whether to go for this or caramel, because you know, white shows the dirt.  But in the end decided to just go for the one I wanted.  After all, you can always buff and re-polish!

Below, applying glue to the soles and heels.  I need to get me some of this glue!!!  It’s a special shoe glue by Foss.  At right, my straps are lined with thin pig hide.

These dash-holes were made with a special punch.  I couldn’t get over how cute they are!   I forgot to take picture, but I also learnt how to skive… a very useful skill if I’m going to do any more leatherwork! 

I’m so pleased with how the black buckles look with my white leather!  It picks up the black layer on the bottom of the heel so nicely.  The little curved “V” on the end of the strap in the lower picture was made with another purpose-shaped punch.

Forgot to take pictures… again!  But we spent some time fitting the tops specially to our feet, and then getting the second slide to look exactly the same!

Temporarily glued the skived straps in, then punched some holes and stitched them on.  It’s funny, but this simple stitch on the sandal is so charming to my eyes! and adds the perfect amount of “handmade” look to them.

This stuff below is AMAAAAZING!  It’s “rand”.  You’d think there was hours and hours of hand-stitching the uppers to the sole, but this stuff is simply glued in and it all looks absolutely perfect.  Cheating?  Maybe just a little bit, but doesn’t it looks lovely when it’s in!

Lisa showed us how to apply the rand with little bit of a downward slope around the heel and toe curves, top and bottom, which keeps the shoe and sole nicely tight once they’re glued together.

And finished!!!

The thread you use for all stitching is heavily waxed, and all the knots on the inside are melted using a lighter, then stamped down flat, so a) they’ll never come undone and b) so they won’t poke into and irritate your foot while you’re wearing the shoes.  Clever!

Lisa very kindly and generously did the final bit of sanding of everyone’s heels, which allowed us all time to relax and chat with wine, cheese and chocolate.  I know, right?!!!

You’re not supposed to wear newly finished shoes for at least 24 hours after completing, to let the glue dry.  You’ll be pleased to know that 24 hours had just passed when I gingerly donned the sandals for these pictures, and then immediately afterwards very carefully took them off again and put them back in their special bag.  And I might even have (ahem) especially shaved ye olde legs and applied nail varnish for the occasion.  Well… it’s winter!

I know I’m going to enjoy wearing my new sandals so much!  And I’m looking forward to when Lisa next comes over for another round of workshops…. I’m totally planning to sign up again!

pinterestmail

10×10 challenge, winter

This is my fourth, and possibly final time taking part in the 10×10 challenge; I always said I would complete a full four seasons and … now I have!  While I’ve enjoyed doing this challenge in previous seasons, I didn’t really this time.  Why not? well I’ll delve into that later.

The scenario; you pick 10 items of clothing, including shoes, and wear only those items for the following ten days.  You can freely add accessories like hats, scarves, gloves, bags, jewellery and tights, as needed.  Because this was a winter round for me, I added tights every day, and scarves a few days too.  Well, it was cold!

My selection; four tops, two skirts, one dress, one raincoat, a pair of hiking boots and my knee-high black leather boots.  I made all items except for the two pairs of boots.

From L to R, each item is linked to its original construction post.  The number in brackets after each item is the number of times I wore it during the 10 day period.

  1. raspberry tee, the Nettie pattern by Closet Case patterns…  (3)
  2. navy blue merino tee, the Nettie by Closet Case patterns… (3)
  3. ivory twist top, from Pattern Magic… (2)
  4. forest green twist top, from Pattern Magic… (2)
  5. mustard corduroy skirt, self-drafted… (4)
  6. red mini skirt, the Jade skirt by Paprika patterns… (4)
  7. blue corduroy dress, V1316… (2)
  8. mustard raincoat, my own pattern… (10)
  9. black leather boots… (9)
  10. hiking boots… (10)

all tights also made by me…

The outfits:

Thoughts?

Just as predicted, I found winter to be the most difficult season in which to do this challenge! To be fair; it’s been so dingy and  very very wild, wet and stormy which is something that will always make me feel a bit miserable anyway.  But as far as the challenge goes… well fashion is obviously one of my major passions and winter is that time when I really get into playing with layering and the mixing and matching of as much of my wardrobe as possible.  I guess it’s the one of those tiny pleasures that takes my mind off the winter blahs.  Sounds a bit pathetic, I know; but this round I just felt a little resentful, like I was needlessly depriving myself of something fun in my life.

I chose all my items fairly quickly and without putting much thought into it, all very easy wearing and I loved wearing them all.  Even though a coupla pieces are new, namely my raincoat and my little ginger/mustard skirt; they’re all tried and true favourite winter silhouettes so I knew I’d be happy with every piece.  I did really love my jewel/spicy colour scheme.  Something sorta noteworthy to me is that my black leather boots are the only item that I’ve picked to be in two different capsule wardrobes… I also had them in my first, spring, 10×10.  Hmmm, obviously they’re very very “me”!

I wore my raincoat every day – so happy and pleased with that thing!! –  and even though the pictures don’t reflect it, I wore my hiking boots every day too!  Where I walk Clara every day is a natural swamp during winter, and hiking boots are the best footwear option.  Off topic, but I kinda giggle to myself whenever I remember how making shoes to cope with my daily walk during winter was the biggest source of angst to me during my Year of Handmade.  I think that’s why I’m proudest of my knockabout walking shoes than I am of pretty much any other pair!   Boy, I put those things through their paces.  Shoes that can withstand my daily winter walk can fair dinkum withstand ANYTHING.

Anyway, back to the subject at hand.  So, I’ve completed four seasons of 10×10 now.  Will I do this again?  Probably not, but never say never!  There are very few sewing peeps who get into this game, just one or two, or possibly three including me.  So funny!  I’m not sure why not.  It is very nice and reassuring to know that the things I am making suit me and my lifestyle very well, and that they are capable of mixing and matching up acceptably too.  The 10×10 experiment is a very good way to thoroughly test that they do, so it’s got that going for it.  But…. I am reeeeeally looking forward to wearing something else tomorrow!!  So much choice!!!  Aaaaaaaagh!

pinterestmail
Switch to mobile version
↓