Finally posting some other new things I’ve made this year…
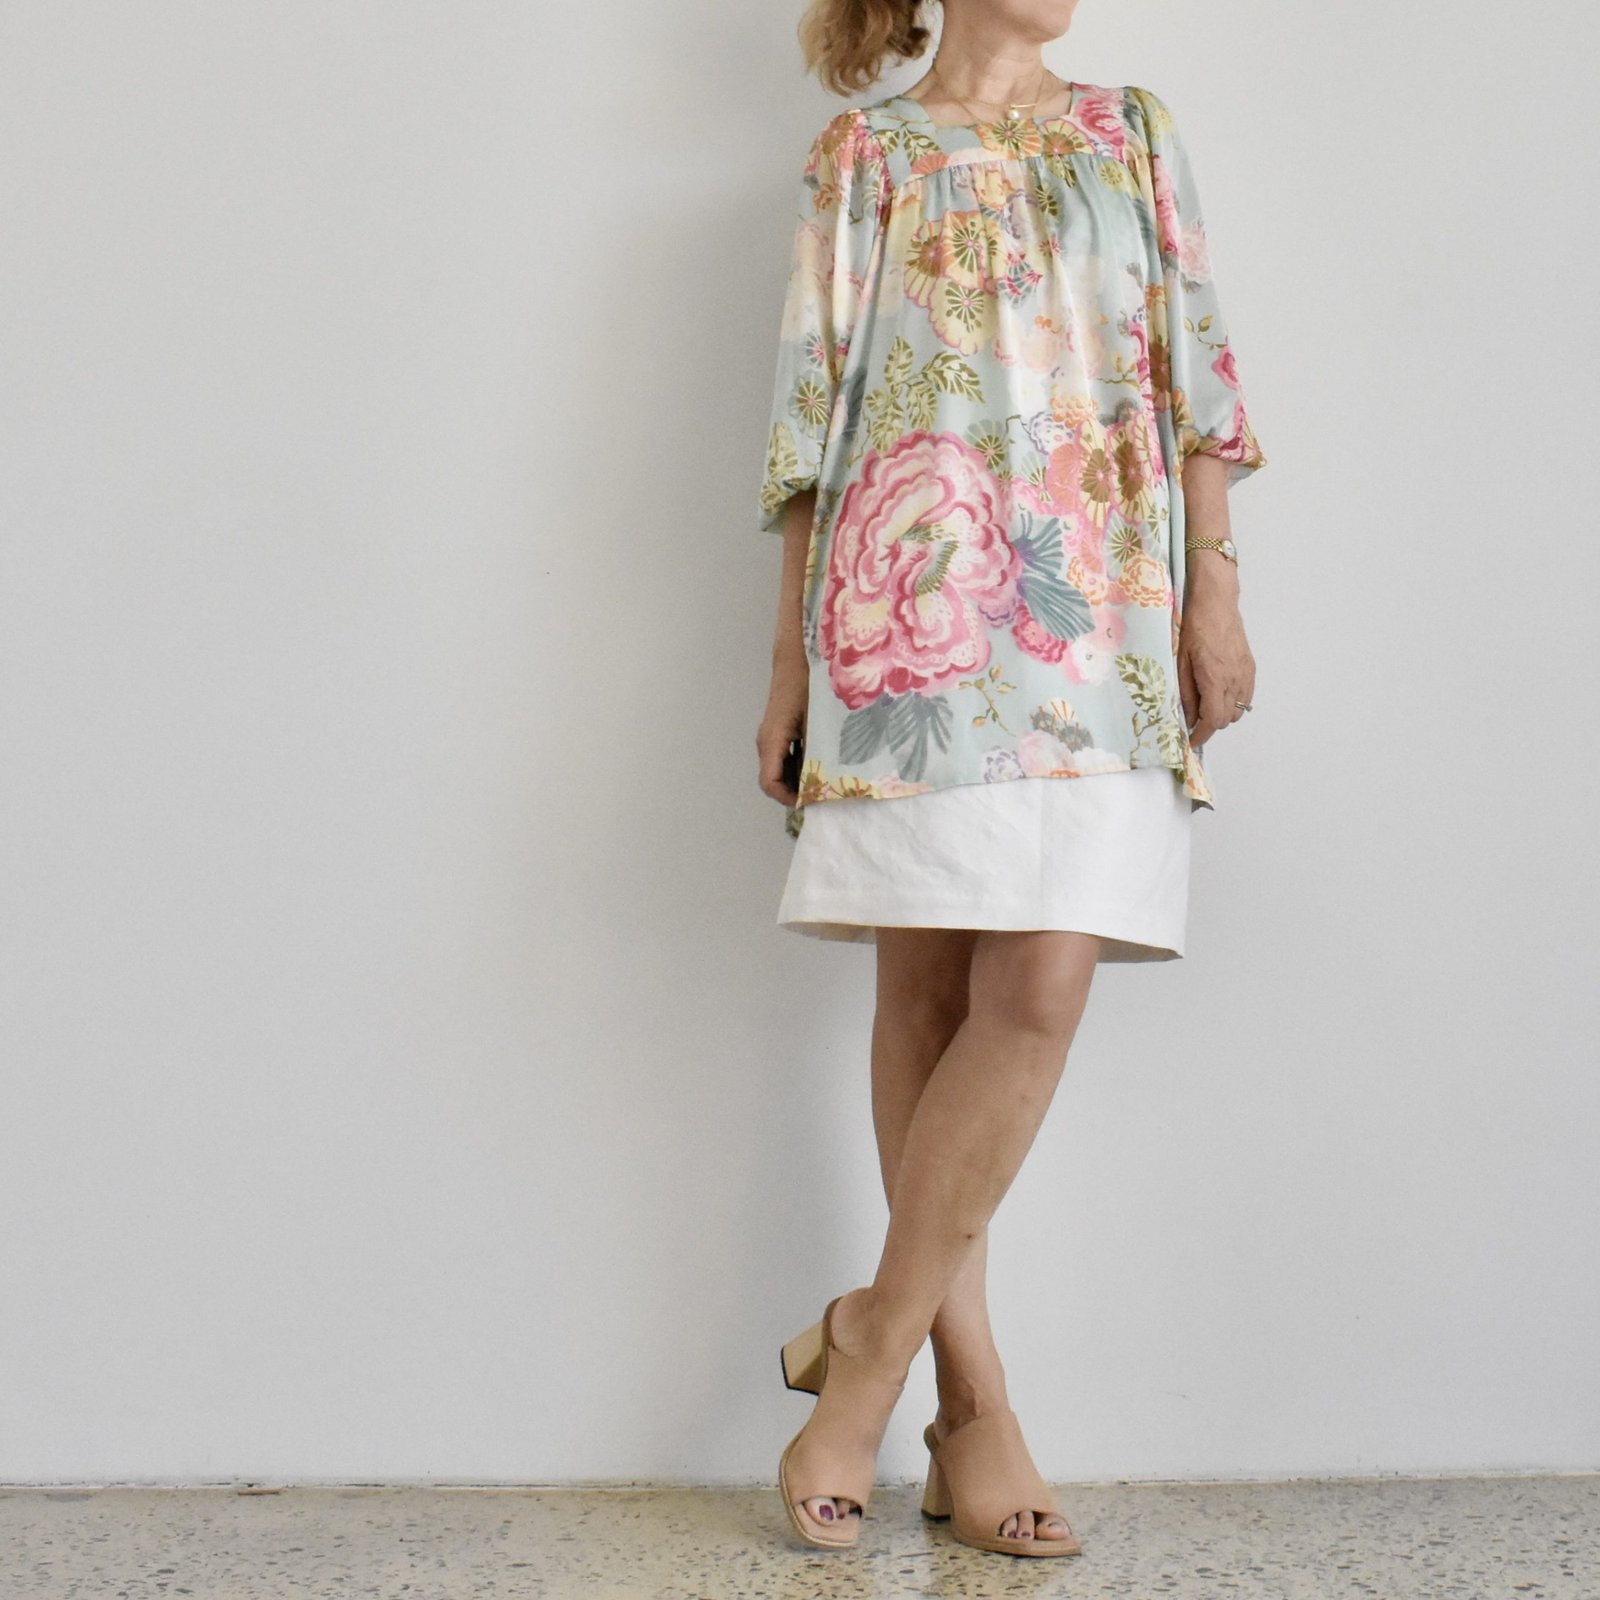
Item 1; a love floaty top for summer. Actually to be specific, I think this is the dress version of the pattern! however it’s kinda short on me thus I am wearing it with a skirt here. And I will probably choose to wear it with shorts or a skirt over summer.
The pattern is the new pattern by Original Digby patterns, the Julie blouse and dress… it’s so pretty isn’t it? I absolutely love it! I kinda want to rush out and buy prettier fabric in like a softer colour, or even something printed, like a floral or something; but you know. Stash busting is still going on over here. Anyway.
So, this is the longest version of the pattern. I added inseam side pockets, just because I like to have them in everything nowadays and am not readily prepared to go without. My fabric is a very lightweight cotton, I think originally from a Morrison seconds sale. It’s quite good for the design, but maybe not strictly “flowy” enough for those lovely softly gathered panels. I think in a very lightweight chiffon or crepe the gathers would fall and flutter beautifully. However I am still very happy!
I hand-stitched the button loop as instructed, and think this looks really nice; however to be honest I’m able to just slip the dress straight over my head, with no need to unbutton. It’s ok thought, because I can appreciate the long slit and button makes the back yoke look more interesting. The instructions for constructing this bit was really good and I enjoyed the lovely clean finish both inside and out that you get at the end of it.
The sleeve pieces are absolutely massive and the result is lovely in my opinion! a very pretty, half pirate-y, half mediaeval sort of effect!
Just secretly, although I am putting this out on the internet, hehe, for the whole world to read should they so choose! but still; just secretly…. I have started doing some embroidery on the yoke. I saw this embroidery design on Etsy and got inspired enough to purchase, ahem. I’ve made a small start. Hmmm. This might take me a while.
Item 2; hehe, I just realised the skirt I’m wearing is as yet unblogged too! It’s just one of the test runs for our new skirt pattern, due to be released very soon, we hope! The Batman cotton drill is from Spotlight, and was leftover for a cushion I made for Theo when he was a tiny bub.
The skirt is fully lined and is a joy to wear. More on our new pattern in a very short space of time, I hope! I think it’s a terrific basic and one I’ve made and wear a lot.
I’m wearing it with a very old T-shirt made absolute yonks ago…
Finally, I made a second version of the Original Digby Julie blouse… hoo yes I managed to find some prettier and silkier and flowy-er fabric…. IN LE STASH what’s more! Whatup?! I knew I could dig up some more appropriate fabric if I really tried. One was just not trying hard enough, that’s all.
This is a silky stuff inherited from Mum’s stash. It’s absolutely gorgeous and feels beautiful against the skin but I have a sneaking suspicion it’s not precisely “pure” silk. Most likely spun from the sloughed off cocoons of the Plasticus Bottleus variety of silkworm, ahem. Anyway, how pretty is it? that’s all that counts really. I’m wearing it with yet another new skirt, white linen, fully lined; also our new pattern, hehe. To be revealed soon!
It’s hard to believe, but I STILL have as yet unblogged things to share here! Until then, mwaaah!
Hello! I made all four of these summery new things featured here during the depths of winter actually, and took a whole lot of photos whilst also wearing thick tights and boots… but obviously the vibe was strange! so here I am, the weather a little more appropriate. I was maybe a little too optimistic for warm weather at the time. Silly me.
These fabrics are both linens from Maai Design; in Sunset Ocean check and the co-ordinating blue is Cornflower mini check. With careful cutting I managed to get four items from my lengths of fabric and use up every single scrap! two tops, a hat and a skirt. I absolutely love it when I can have no leftovers.
Item 1; a Yallingup top in the Sunset Ocean check. This pattern is one of our own Carolyn & Cassie Pattern Co designs… I’m a big believer in this top, it’s truly a lovely design to wear in summer. So comfy and breezy.
Item 2; a matching skirt. This is a Burdastyle pattern, 03/2016; 101 (A-line skirt pattern). I thought this pattern would be perfect for the fabric but truthfully it really requires a slightly thicker and beefier fabric to hold up this welt pockets. It’s fine though, really; I’m very happy with this skirt and am excited to wear it! I really love how the checks look cut on the bias for the lower panels. I was lucky to find a perfect, pale blue invisible zip already in the stash.
Item 3; a blouse in the Cornflower mini-check. This is another of our own Carolyn & Cassie Pattern Co designs, with shortened sleeves due to not quite enough fabric, and a big patch pocket just for fun. Throughout I topstitched with a pink thread, also just for fun, although it barely shows up! Button also from stash.
Item 4; a hat. This is the Elbe Textiles Sorrento bucket hat, that I’ve made many many times before. I made it reversible, with the ocean sunset one side and the cornflower mini check on the other side. Now I just need bathers to match! This photo makes me smile, this is one of about 100 identical trips to and from the ocean with Theo to fill up that little watering can. He absolutely LOVES the beach and we spent hours there happily playing in the sand and wading in the shallows, Theo chortling like mad. Such a joyful day, I hope this photo helps me to remember this time.
I’m also wearing these bathers, made using my favourite vintage McCalls pattern, and my beach cover up, made using the Closet Core patterns Charlie caftan pattern.
I’ve still got more unblogged things to share soon! until then. 🙂
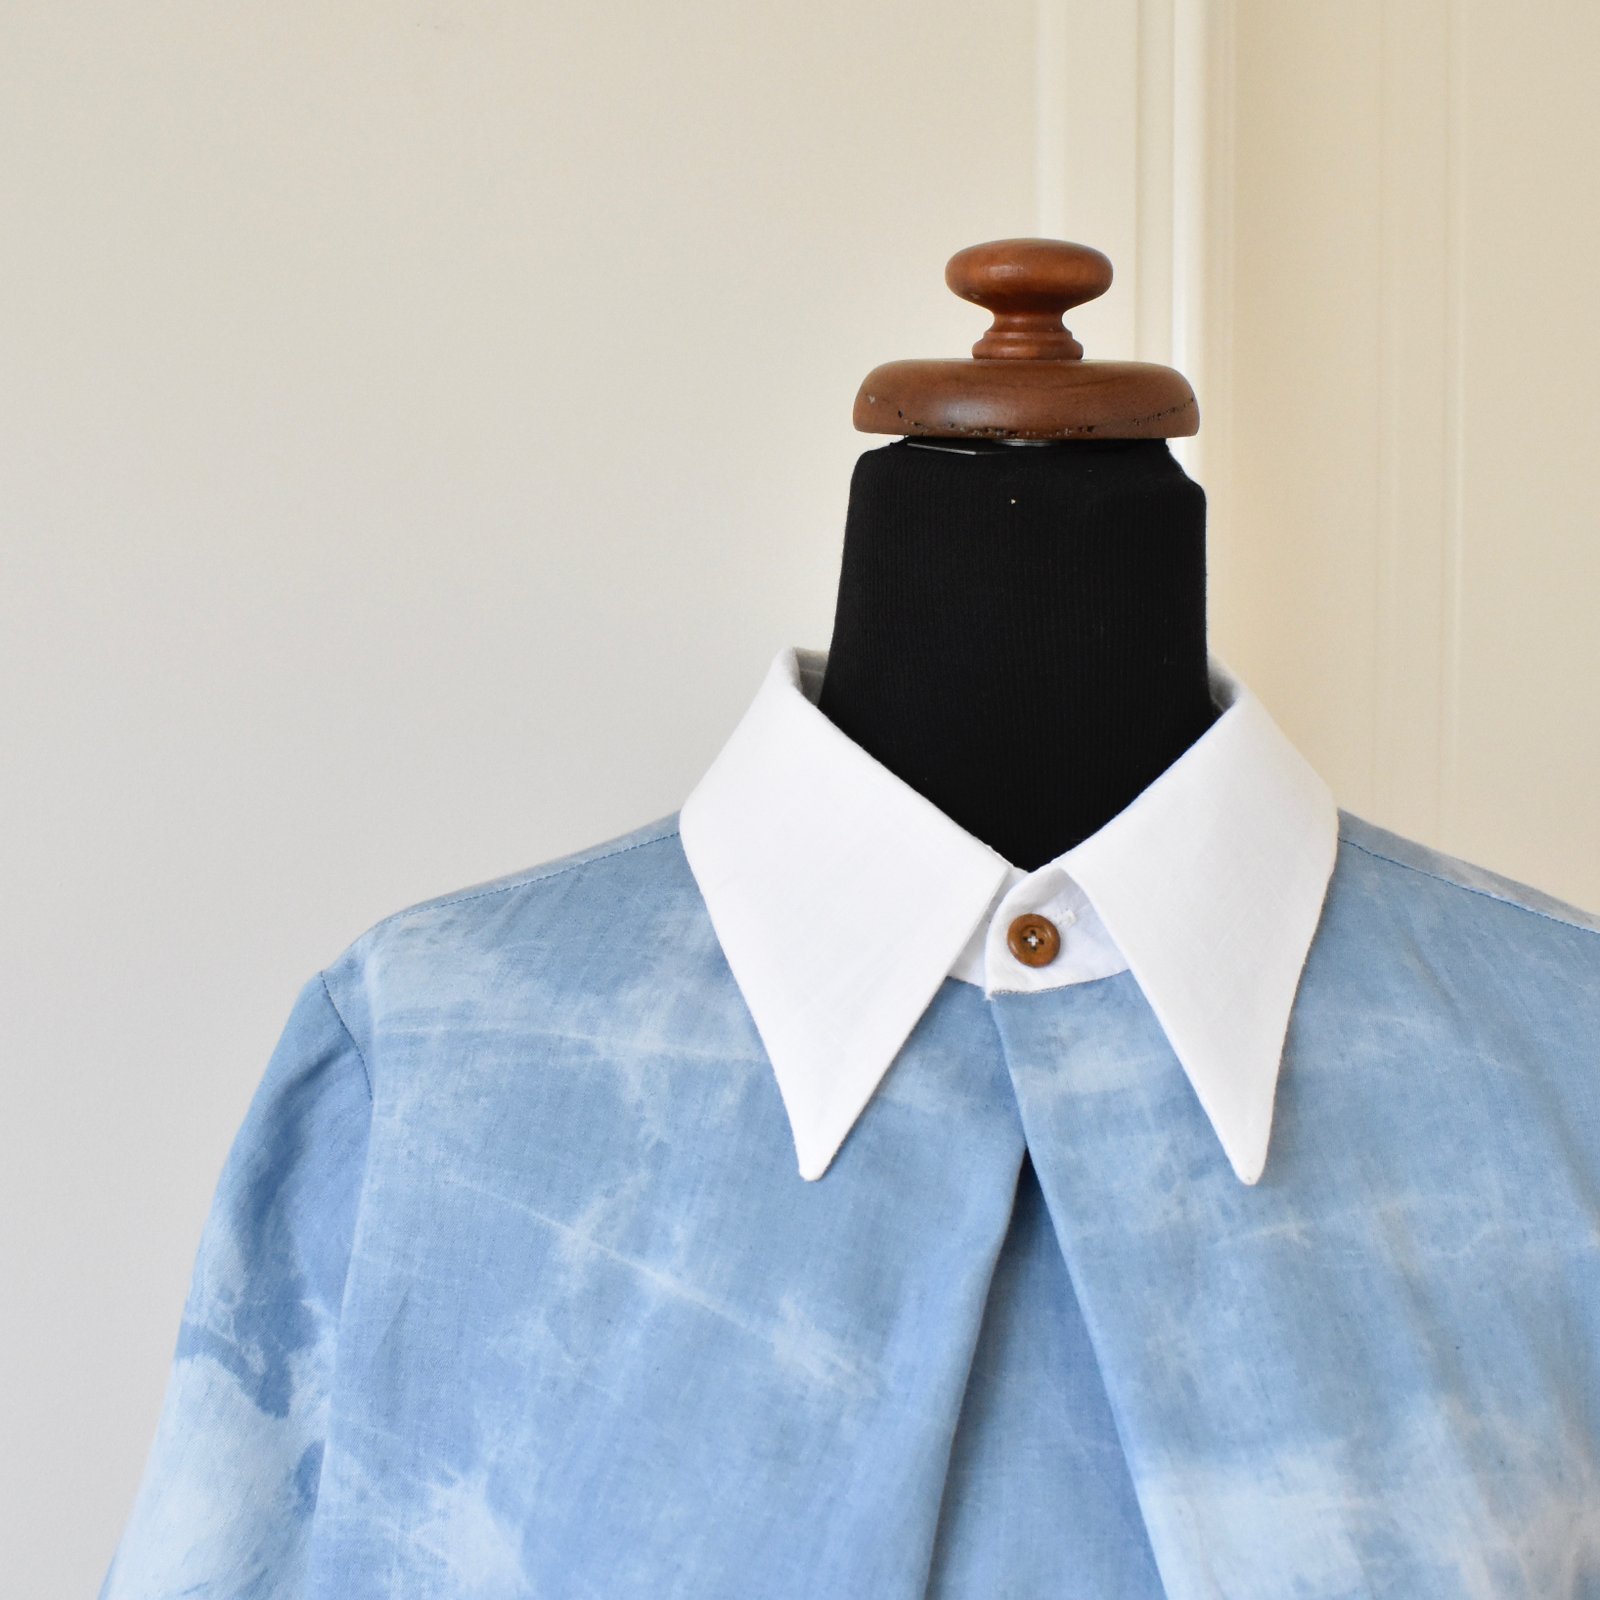
Hello! I have been so remiss in not posting this top, made months ago now… I wanted a new white shirt and if you’re feeling like a quick and easy shirt project then what better pattern to get out other than my own Perth pattern?! #shamelessplug
The back pleat goes “out”; I really prefer pleats to go “in, the fact that this one does not was not intentional but a boo boo. It’s, ok, I can live with it! I used some white linen/cotton from my stash; leftover from my Charlie caftan that I made *checks blog stats* goodness me, about six years ago now! And obviously made a few minor mods.
The length is about halfway between the top and the skirt cutting lines, and I lengthened the sleeves as much as I could to about three quarter length. I really love this sleeve length on a shirt! and for visual interest I added buttoned cuffs. I also added a little pointy-bottomed breast pocket, for almost the sole purpose of sporting a “circa 2023” label.
I also made the little black flecked white skirt.
Item 2; this (to my mind) absolutely beautiful jumper is also something I finished months ago, and have only just got around to wearing and photographing it for my blog here.
The pattern is Ghost Horses by Boyland knit works… I bought it through her blog site here but you can also get it through Ravelry…
The yarns are:
dark blue: Rowan felted tweed, col 170 Seafarer
variegated pink: Manos del Uruguay silk blend, col SB3317 Kilim
plain pink: Manos del Uruguay silk blend, col SB3236 Clafoutis
Le inside/backside
I bought the yarn from Morris and Sons in Melbourne, during our Harry Potter excursion over there, last March. Actually, March 2022, hehe; so embarrassed to admit that. I actually started knitting it straight away and got it to final ribbing stage within a few months. Then took like forever to decide on the finishing bands. I didn’t really like the slightly tight look of the finishing bands on the pattern envelope sample and tried multiple variations ie various k/P ribbing combos, stocking stitch, double yarn etc before finally settling on … well, these ones. Mine is same needle size as body, single yarn, 2K 2P rib, very loosely finished.
And at least it finally is finished!
yea haw! btw, I made my shirt, skirt and tights too…
Item 3:
I made a new underwear set… all from scraps and leftovers! this kind of project is super fun for me, mostly because it is so crazy and silly.
The pattern is my favourite, the Cloth Habit Watson, and the fabric is all from projects in my previous post; the T-shirt for Arthur, itself an old T-shirt of Tim’s; and the red and navy stripe from the skirt I made for Cassie. I had only small pieces, so it was fun to cut and join bits together to get enough for my set! I know I know, silly and crazy. But fun!
I’m belatedly a little annoyed that the white-fronted knickers are asymmetrically pieced so it looks a little lopsided, but at the time I was just happy to have enough to even cut a front! so I guess I can’t complain…
The strap elastic was also salvaged from an old, also me-made bra, the straps though were still in really good nick … the knicker elastic I had in the stash already too. In the last couple of years since we moved and I vowed to use entirely from the stash, I’m constantly amazed at HOW MUCH is in there…!
Hello! I’ve made a couple more items for my #use12 mini capsule wardrobe that I proposed for myself at the beginning of the year, in fact the last two items! So I’m essentially finished! Apart from a big mix-y/match-y dress up session that I’m planning… quite excited about that, actually! I’ve purposely held off up until now!
So the second to last item is a mustard-yellow Perth blouse… this pattern was our first offering from our own little Carolyn & Cassie Pattern Co. My new blouse is actually kind of a blow-in, sort-of/not-really but yeah, sort of. Let me explain. See, I had a small piece of mustard yellow jersey in the original #use12 lineup, with which I thought I’d be able to make a simple little top. However I just didn’t have enough of that fabric, no matter which way I looked at it. So, if you remember I made a set of yellow underwear with the scrap instead. Yes, it was a scrap, originally leftover from my yellow Jade skirt, which I’ve worn a tonne, btw. Anyway, I used the scrap, yay! but I didn’t have my little top. Fast forward to when I made myself a dress for my niece’s yellow themed 21st, and I actually had enough scraps leftover from that, that I thought I might be able to do a little top after all. And I did! I managed to cut out a Perth top, with shortened sleeves. And I now have zero left of that yellow fabric too. So; I kinda used up both the scraps, and got my yellow top for the capsule in the end too. Clear as mud? I thought so. Never mind, Just me rambling.
Not much else to say really! I double topstitched all the seams throughout, which gives a sort of casual utilitarian look; and used a small, natural wooden button for closure. I already had the yellow thread in my stash too, from when I made the dress!
The last item for my #use12 is my new pair of clogs!
I’m so so happy with these! although I have to confess that these were quite a departure from my original intentions too… see I’d originally proposed to use a piece of the precious fish leather that I’d bought in Iceland to make a pair of oxfords. I still want to do that. However, just at this stage I don’t think I’m quite ready enough for that project…. I had this bottle green leather in my stash though, that I’d bought in the Fabric Store in Melbourne during one of our girly trips over there. I ordered a refill clog kit from leather needle thread, without leather, and bammo! bob’s your uncle.
Actually, I said I’m happy with these, and I am! but truth be told I think my leather was just a shade on the flimsy side? and the ankle strappy bit flops in when I’m not wearing them, whereas the ones I’ve made using leather supplied with the kit – obviously superior! – does not. So I’m thinking of going in retrospectively and applying a lining to the straps to stiffen them up. I think this will be quite easy actually, and I have some very thin pig leather that is supposed to be used to line shoes that I can use for the purpose. I bought this from Skindhuset in Copenhagen during one of our trips there.
I might not though, because I’m not sure if my worries are just me being nit-picky… which is quite probable. We’ll see ….
So, I popped on my original Perth dress today and I realised this post is way overdue and I’ve been owing it for some time… I’m sorry for being so slack!
I have to admit that a reasonable number of the requests/comments I have received vis-a-vis our Perth dress pattern is that people like my “bouffy” brown prototype, above; and wish to know exactly how this one was made as opposed to the more streamlined final pattern version … I’ve generally taken to just describing it on a request-by-request basis since it’s really quite a simple modification ; but obviously a visual is preferable.
basically; you take the lowest point of the side seam of both front and back, and pivot it out from the armhole point, adding 8.5cm (3 1/4″) to width at the lowest point. Keep the pocket markings in the same place.
not to scale
2. the other thing about the prototype is that the collar is a little smaller, which I think visually is a good balance against the much more flared-out “skirt” part of the design. In the final version of the pattern, I thought a more dramatically pointed collar was a better look with the more streamlined silhouette. Collar stand stays the same.
again, zero scale considerations, sorry. About 1.2cm (1/2″) is taken off the collar point itself and the difference tapered off to meet up with the seams on each side…
3. finally, I decided to tame some of the bouffe in back by extending the box pleat down from the yoke and top-stitching it down at about my waist level.
All of these modifications are, of course, optional and open to even further alteration if desired. I love it when I see people adapting the design and making it their own! For example, just recently I saw @thesewingsociety had adapted the collar to be a club collar, which is super cute, oui?!
It’s funny; because I personally didn’t like the brown version so much at first, thinking it just WAY too voluminous, to a fault; its only saving grace to me was the top half/neckline which of course I preserved exactly in my pattern. However over time my brown version has very much wormed its way into my heart after all. Yes, it is voluminous, but lots of volume in a summer dress has a certain charm of its own which I really really appreciate in very hot weather. I like being able to “flap” my dress about to create a bit of a cooling airflow as I’m walking. And of course the covered-up-edness of the top half is great for our full-on sun, meaning less of a need to slather on the suncream and less chance of getting sunburnt too. In short, I’m really appreciating all my Perth dresses all over again!
I apologise for the delay; we’ve had to contend with a computer issue that has been pretty devastating, some extremely costly software that we desperately needed in order to function has been practically obliterated, it’s been so difficult… All I can say is thank God for Craig who eventually managed to work it out.
Anyway. No one wants to hear about computer blurb, yeah? On to the pattern!
ye all-important size info….
Sam’s girlfriend L is in our new size range so I asked her if she would kindly model for us. I’m so happy she agreed because she is super cute! plus now I had a good reason to make something for her, hehe… The dress I made for her is in a rather beautiful cloudy-sky print, cotton drill from Spotlight, with a white contrasting collar. I absolutely adore this on her!
My favourite part though is the crisp white collar; just love this look! the button is a little wooden one from my stash
Thanks so much L; for being such a totally gorgeous model!!
I also made two blouse versions for my sister in law, Sandi. This first version was initially a bit big on her, which totally did my head in – what did I do?!!! – but eventually I worked out it was all due to a very stupid mistake which I am too darn annoyed and exhausted to even talk about how this happened, suffice to say that one should ALWAYS check the test square BEFORE leaving the copy shop. I know I personally will never ever neglect this ever again!! #superannoying
I took it apart and re-made it to fit properly, just because I’m a glutton for punishment well really, I cannot bear to waste perfectly good fabric! And also, Sandi really likes it 🙂 #allswellthatendswell which is why I went to the effort of re-fitting properly. I cannot say how much I LOVE an appreciative recipient! makes it all worthwhile in the end, yeah? The fabric is a really very nice charcoal and white striped linen, that I ?think? I bought in either Tessuti’s or the Fabric Store in Melbourne, during one of our visits there. The only giveaway that it was initially made to a larger scale is the the overly long collar points, which I just left as they were.
The blue and white striped version, which was correct all the way from go to whoa, yay!! is a rather lovely shirting cotton from Homecraft Textiles.
Yes! Homecraft Textiles actually stocks a really nice little range of crisp shirting cottons… who knew?! certainly not me, since they were hidden way back at the very back of the store behind the vast wasteland of lurid polyester satins and “chiffons” and fleeces that takes up like 90% of that store. One day I was hanging around in there and discovered it. EUREKA!!!
Oh! Something else I made for Sandi recently, which is completely unrelated to our Perth dress pattern so if this seems a little random and out-of-the-blue, sorry! but this seems like a good a time as any to lob it into Le Blog… I promised to make a custom-fit top pattern for Sandi, for her birthday, she put in a request after I had done the same for Mum, a few birthdays back. So I made this one… The shorter, open front T-shirt over a longer one underneath in a contrasting colour is a design modelled to a favourite top she has already. We chose and bought the fabric together from Fabulous Fabrics. I’m kicking myself I forgot to take a picture of her wearing it, because she looks so lovely in these moody pinks and blues. AND she professes herself to really LOVE this one too. This just makes me so happy! See what I mean about a grateful recipient?
One of the most exciting things for me lately is seeing pictures popping up of everyone’s Perth dresses, it’s been absolutely wonderful seeing it work and how everyone makes it look even more amazing than I could have dreamed! … I personally think it looks fab on everyone but then maybe I’m a wee bit biased? 😉 By the way; by far the most oft-repeated feedback I have received has been requests for a greater size range… I promise this is being worked on right now, as we speak! type? read? well, right now, anyway. And will be on offer pretty soon.
But in the meantime… behold, my lovely testers! all totally rocking their Perth creations… and I should just mention that the sleeves have been shortened by 5cm in the final version of the pattern.
Now for a little story… I have to confess that I made Mum’s dress here! Mum did print out the pattern and made a dress, but it was a little small and oddly shaped, which was very confusing. It took me quite a while to work out WHAT the heck was going on … she’d sent me photos of her pattern which had some weird anomalies. It was during the lead up to our release, and it was all quite stressful actually, totally doing our heads in. Finally she had the opportunity to bring her pattern itself up to my place, I made a few measurements and worked out that their printer must have been set to “fit to scale” for parts of it, meaning the pattern was partially printed out of whack. It was miraculous that she’d managed to make the dress at all, really.
A timely reminder… when printing the pattern at home, check that the printer is set to ACTUAL SIZE!!!!
I didn’t want to make poor Mum make another dress, and I can practically make them in my sleep now, so I resolved to make one for her myself, a little surprise, to make up for all the stress the mis-printed pattern put her through. I whizzed up to Fabulous Fabrics, bought some of this lovely charcoal grey linen and a purple-y/grey pearly button that I think looks absolutely beautiful with it! and quickly whipped one up. I think it looks absolutely beautiful on her, she loves it! and it fits perfectly too, yay! so all is well that ends well.
At Mum’s request, I made the sleeves longer, and she decided she likes them rolled up to make a faux cuff.
I’m showing it twice… but really, that button?!! I LOVE it!!
I’m beyond thrilled to announce the publication of our very first pattern! The Perth dress/blouse is an unlined, loose-fitting little summer frock with a bit of a buttoned-up menswear vibe to it. It’s kinda like a shirtdress, but kinda not. A faux shirtdress. The shirtdress to make when you’re not making a shirtdress. Hehe, I joked in my own head while making it that it’s the shirtdress to make if you loathe buttonholes, since there are barely any at all in this one! Also, I say “our”pattern, not because I’m using the royal “we”; but because I’ve gone into partnership with my daughter! #whatdotheysayaboutfamilyandbusiness but it’s OK, Cassie and I get along very well. Plus she has mad magic Illustrator skills, which perfectly complements my complete lack thereof. So we are the Carolyn & Cassie Pattern Co – this warms the cockles of my heart SO much I can’t even tell you! I never dreamed we’d have some kind of venture together like this but now we do I think I can tick it off some sort of subconscious bucket list that I never knew I had.
So we have a brand new Etsy shop, CarolynandCassie; situated here… Right now there’s only one thing in it, well TWO, since the pdf pattern and paper patterns are listed separately, but we harbour big dreams of having lots and LOTS of designs there in the future. Or maybe that’s just the happy glow that comes with having it finally finished… I’ve been basically living and breathing this thing for such a while, well …. it’s out there now!
So this is what I’ve been working on for the past few months, not just pattern making but lots and lots of sewing too. Apart from well over a dozen muslins, I’ve made four Perths in my quest for the perfect Perth. I shall now proceed to bombard you with Perths, ahem…
1. My chocolate/tobacco version above; this is not strictly a Perth but a “sort of” Perth dress, really. This is my prototype Perth, a Perth in spirit since the final pattern is actually quite different everywhere in small ways … you can see in my little movie below that it’s super bouffy, for one thing, and I tamed the boufff in that back with a big ol’ stern box pleat. Down, boufff, down!
I made this one back in April of last year! and because I’d already had the idea of making it into a pattern somehow it never got blogged here, even though I wore it a few times.
2. My white one… a true Perth and currently my favourite mostly because of the perfect fabric. It’s a white shirting cotton from Fabulous Fabrics, almost like a sateen, but a super fine one, crisp, lightweight and with the perfect amount of drape. LOVE IT SO MUCH and actually I’m slightly regretting that I didn’t buy the whole roll #addicted In fact, this might be a good time to state what I think is the ideal fabric for this design… lightweight, thin fabrics that have some drape, yet still have just enough body for the tailored collar to work. Basically, if you can imagine a mens’ business shirt made in it, then it’s probably just about perfect. Sad sad times… I went back to the fabric store yesterday on another quest (long story and a pretty “big” one too in lifetime terms, I’ll relate it another time…) and had a quick but hopeful look out for this perfect white fabric.. they’d sold it all!! *sob* #gottagrabitwhileitsthere
This one has slightly longer sleeves, that I eventually decided to shorten for the final version of the pattern. I shortened them back to the length of my original brown design because I thought the shorter sleeves looked a little more feminine and “perkier”; a nice offset to the overt masculinity of the buttoned-up, very formal looking collar.
3. Further playing upon the menswear influence, I ran up a third version with a smart white collar, a lot like the shirts that I’ve made for my menfolk over the years.. these ones here are prime examples. I used a lovely lemon-y yellow, lightweight pinstriped linen that I bought in Fratelli Bassetti Tessuti in Rome when we visited six years ago. It was my Roman souvenir, and I’m fiiiiinally making something with it. Well, it’s nothing if not well marinated! I used a single black button at the throat as a small but definitive focal point on the dress.
Going back to my point about the perfect fabric, this linen has a little bit of body, maybe if I’m being super picky then I would say it has slightly too much body for the design to drape perfectly? But it’s still pretty nice to wear, and cool!
4. And finally; along the way I realised the design would make quite a nice blouse too, so we went about making this happen. I like this length for a blouse slightly cropped and a little boxy. For the blouse, I used a dark indigo chambray, leftovers from this dress actually! and a wooden button.
The chambray is a touch on the spongy side with some body to it so Im a teeny bit meh about it for this design really, but well… I’m completely ok with it for testing out, and I think it turned out a pretty cute wearable muslin.
Some of the technical deets…
So, want to hear the story behind the pattern?…. it’s ok if you don’t just stop reading now. If you want to know to whole boring saga, carry on! SO: nearly a year ago I made my brown dress, my prototype as it turned out. I’d bought this lovely, slightly blotchy chocolate/tobacco linen from Tessuti’s in Melbourne during my trip there with Mum, Cassie and Tiffany, and drafted my own pattern, using my own block that I made years ago from my own measurements using the diagrams from Pattern Magic (originally blogged about here), though I tacked on the collar and collar stand from my favourite Burda mens’ shirt pattern… but before you cry “plagiarist!” I did NOT use that Burda collar and stand for my own Perth pattern! I drafted the Perth ones myself from scratch, as I did all parts of the pattern. I promise you, I’m very ethical and would never try to claim something as mine that is not…but more about the drafting process-ario later, I’m getting ahead of myself.
So, I made my brown dress. I put quite a bit of thought into the closure, and worked out a solution to get the look I wanted. I liked it, but overall thought the silhouette was a little “booffy” and was definitely planning to streamline it a bit down the track. In the meantime though I’d posted a progress picture on instagram, and there was a small number of polite comments suggesting an interest should I make a pattern for it. The seed was planted…
I thought more and more about it.. I wasn’t daunted by drafting a pattern to fit “me”, but I was wondering how I could grade it. At first I thought I’d get a qualified person to grade it for me. I approached several people I know who have completed fashion design school at tech, none of whom had time. But my friend J, fashion school graduate, and all-round awesomely inspiring lady, was extremely encouraging and assured me I could “easily do it” and it was “super easy”. I secretly had doubts about this… but she piled my arms high with her pattern drafting books and sent me off. I definitely felt challenged, and like I couldn’t possibly not do it now! I was honour bound! J would think I was an idiot! Well… I am obviously, but no need for the world to know that, hehehe…. I spent the next few months studying the books J had given me, taking notes… the best by far was Winifred Aldrich’s Metric Pattern Cutting for Women’s Wear, I pretty much got everything from that. There was also a vintage Burda book, I can’t remember its title at the moment but that one gave some very helpful grading tips too.
So I eventually graded my pattern! I’d drawn it out by hand on large sheets of paper from a flip chart pad, with no seam allowances, graded it all by hand, and proceeded to trace and test each individual size myself before getting it scanned as a full sized pdf. Yes, this is definitely NOT the most efficient way to go about it… I had early, highly romantic ideas about a hand-drawn pattern… aaah, so naive! I quickly abandoned that fantasy!! though hand-grading was an essential step in the process in the end, and I happily had complete confidence that my pattern “worked” in all the sizes… Then I started thinking about learning Illustrator. I made a few low-grade investigations… and then Cassie got wind of what I was doing and reminded me that she basically spent her whole degree using Illustrator. I was like, wow, would you teach me? and she replied, oh Mum, I could make that pattern into a pdf for you in half a day… I was, like OH My GOD! My saviour!!! At first, I was just going to pay her for her time… but as time went on, and we were working side by side on our computers, her on the pattern (it took a lot longer than half a day, btw!) me on the illustrations and instructions (also way longer than half a day!) and the idea of a partnership came up and it felt totally natural. She was keen. And I’m so very happy about it! This means that if either of us come up with an idea then we have this outlet for it, and we have complementary skills.
Of course, it’s our first pattern, and the learning curve has been steep. I reckon I did some things three or four times over, simply because the right way wasn’t immediately obvious. Almost like, you have to kiss a lot of frogs before you get a prince. Or maybe you can’t see the trees for the forest? Making a pattern turned out to be something like that!
The next step was the all-important “real” testing phase, and it’s SUPER important! I’m completely indebted to my delightful and awesomely helpful testers… who went through my amateurish instructions with a fine-tooth comb, thank goodness since I could barely see anything anymore for having re-written them a hundred times over. Those that sent me pictures have made the most beautiful dresses which has been SUPER exciting. I will do a separate post highlighting my lovely testers, soon, once everyone has got “final” pictures in to me.
Making the pattern a tangible thing: well at first I was just like, A4 is enough, yeah? Then one of my lovely testers SaSa of paisley pirouette mentioned a firm preference for A0, and I had a lightbulb moment that I should offer that too. Sounds so obvious in retrospect but truthfully I was kinda overwhelmed with it all at this point, so I really appreciated the reminder! SaSa also kindly recommended to me a massive comment thread about people’s pattern preferences, over on sewbusylizzy, which I sat down and read in a night. I got from this that sewing peeps were pretty evenly divided three-ways in their allegiance to and/or total avoidance of A4, A0 and/or paper patterns. Meaning in fact, a pattern designer pretty much has to offer everything if she/he wants to a. please everyone, and b. be taken even half-way seriously! So Cassie got to work on the A0 file and I went about making paper patterns happen. I got my patterns printed at Officeworks, folded ’em all myself, and printed out and compiled my own instruction booklets, put together the pattern envelopes myself. Goodness, that took an entire day all by itself, phew! And then I set up our etsy shop… aaaand sat on the edge of my seat waiting for my first sale! The excitement when the first one popped in, wheeee! What a rush!
So that’s it! Want to try out my pattern?! We are the Carolyn & Cassie Pattern Co. our shop is CarolynandCassie on Etsy, and we have the Perth dress/blouse pdf pattern and the Perth dress/blouse paper pattern on offer. I’ve also put a link to the shop up in my sidebar. And I would love to see your Perths! If you make one, then please either let me know in the comments, or tag us @handmadebycarolyn and @shyshycassie on instagram, and use the hashtag #perthdress
Perth, and Perth! hehe
Am I thinking about my next pattern…? well, of course!!

 Hello!


 The sleeve pieces are absolutely massive and the result is lovely in my opinion! a very pretty, half pirate-y, half mediaeval sort of effect!


 The pattern is Ghost Horses by Boyland knit works… I bought it through
  I bought the yarn from Morris and Sons in Melbourne, during our Harry Potter excursion over there, last March. Actually, March 2022, hehe; so embarrassed to admit that. I actually started knitting it straight away and got it to final ribbing stage within a few months. Then took like forever to decide on the finishing bands. I didn’t really like the slightly tight look of the finishing bands on the pattern envelope sample and tried multiple variations ie various k/P ribbing combos, stocking stitch, double yarn etc before finally settling on … well, these ones. Mine is same needle size as body, single yarn, 2K 2P rib, very loosely finished.

 I made a new underwear set… all from scraps and leftovers! this kind of project is super fun for me, mostly because it is so crazy and silly.


 Actually, I said I’m happy with these, and I am! but truth be told I think my leather was just a shade on the flimsy side? and the ankle strappy bit flops in when I’m not wearing them, whereas the ones I’ve made using leather supplied with the kit – obviously superior! – does not. So I’m thinking of going in retrospectively and applying a lining to the straps to stiffen them up. I think this will be quite easy actually, and I have some very thin pig leather that is supposed to be used to line shoes that I can use for the purpose. I bought this from Skindhuset in Copenhagen during one of our trips there.


 This much-requested new pattern has felt like a long time coming… I had a lot of requests from ladies wanting our Perth dress/blouse pattern to be made for a larger size range… so ta da! this new version is for sizes 46-54.


 So we have a brand new


