Tag Archives: Tutorial

Knotted rope necklace; a tutorial

Even though we are technically well into autumn, with a forecast of 32C today it’s still feeling a lot like summer.  Not counting last week’s storm, that is.  The past week has been absolutely glorious.  So everyone is still dressing in summer type gear.  When you live here, that often means beachy inspired stuff. Beachside fashion is huge in Australia.  Particularly with teenagers.  I have no wish to go around looking like a teenager, but some beach and surf gear can be quite sophisticated and still fun.  The March issue of Vogue was all surf inspired, and I caught sight of this necklace.  You may be able to read the price of this thing printed there in the middle.  Yes, $110.  Hooley dooley!

This piece is interesting, colourful and ripe for a DIY.  Right up my alley.  Actually, confession, I bought the bits and pieces for this DIY about three weeks ago, and am just only getting around to it now, my experience at making my Chanel style chain belt put me off jewellery making for a while… but I needn’t have stressed as this was a breeze.
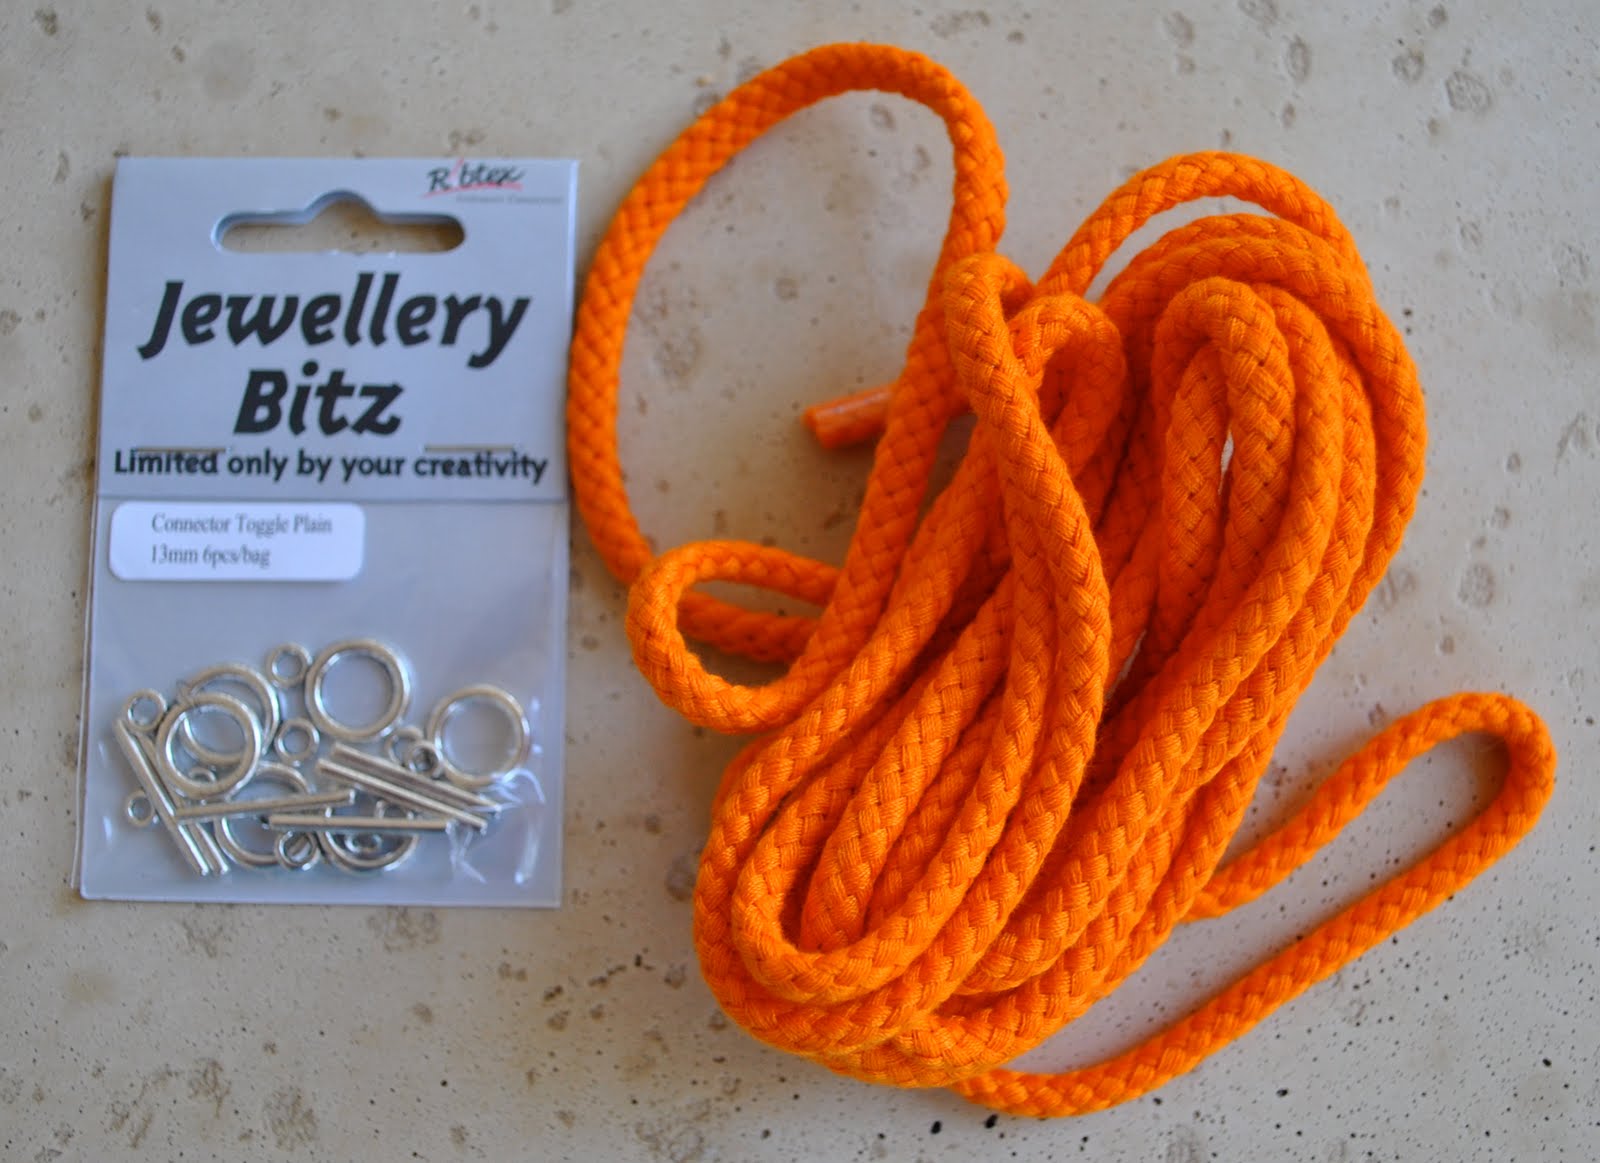
I bought 3m of brightly coloured cotton rope and some end bits.  This cost me about $10.  Not pictured here, but you also need a needle, scissors and matching thread.  I used embroidery thread, but that’s because I inherited a lifetime supply of this from my great-aunt and my grandmother, any thread would do.

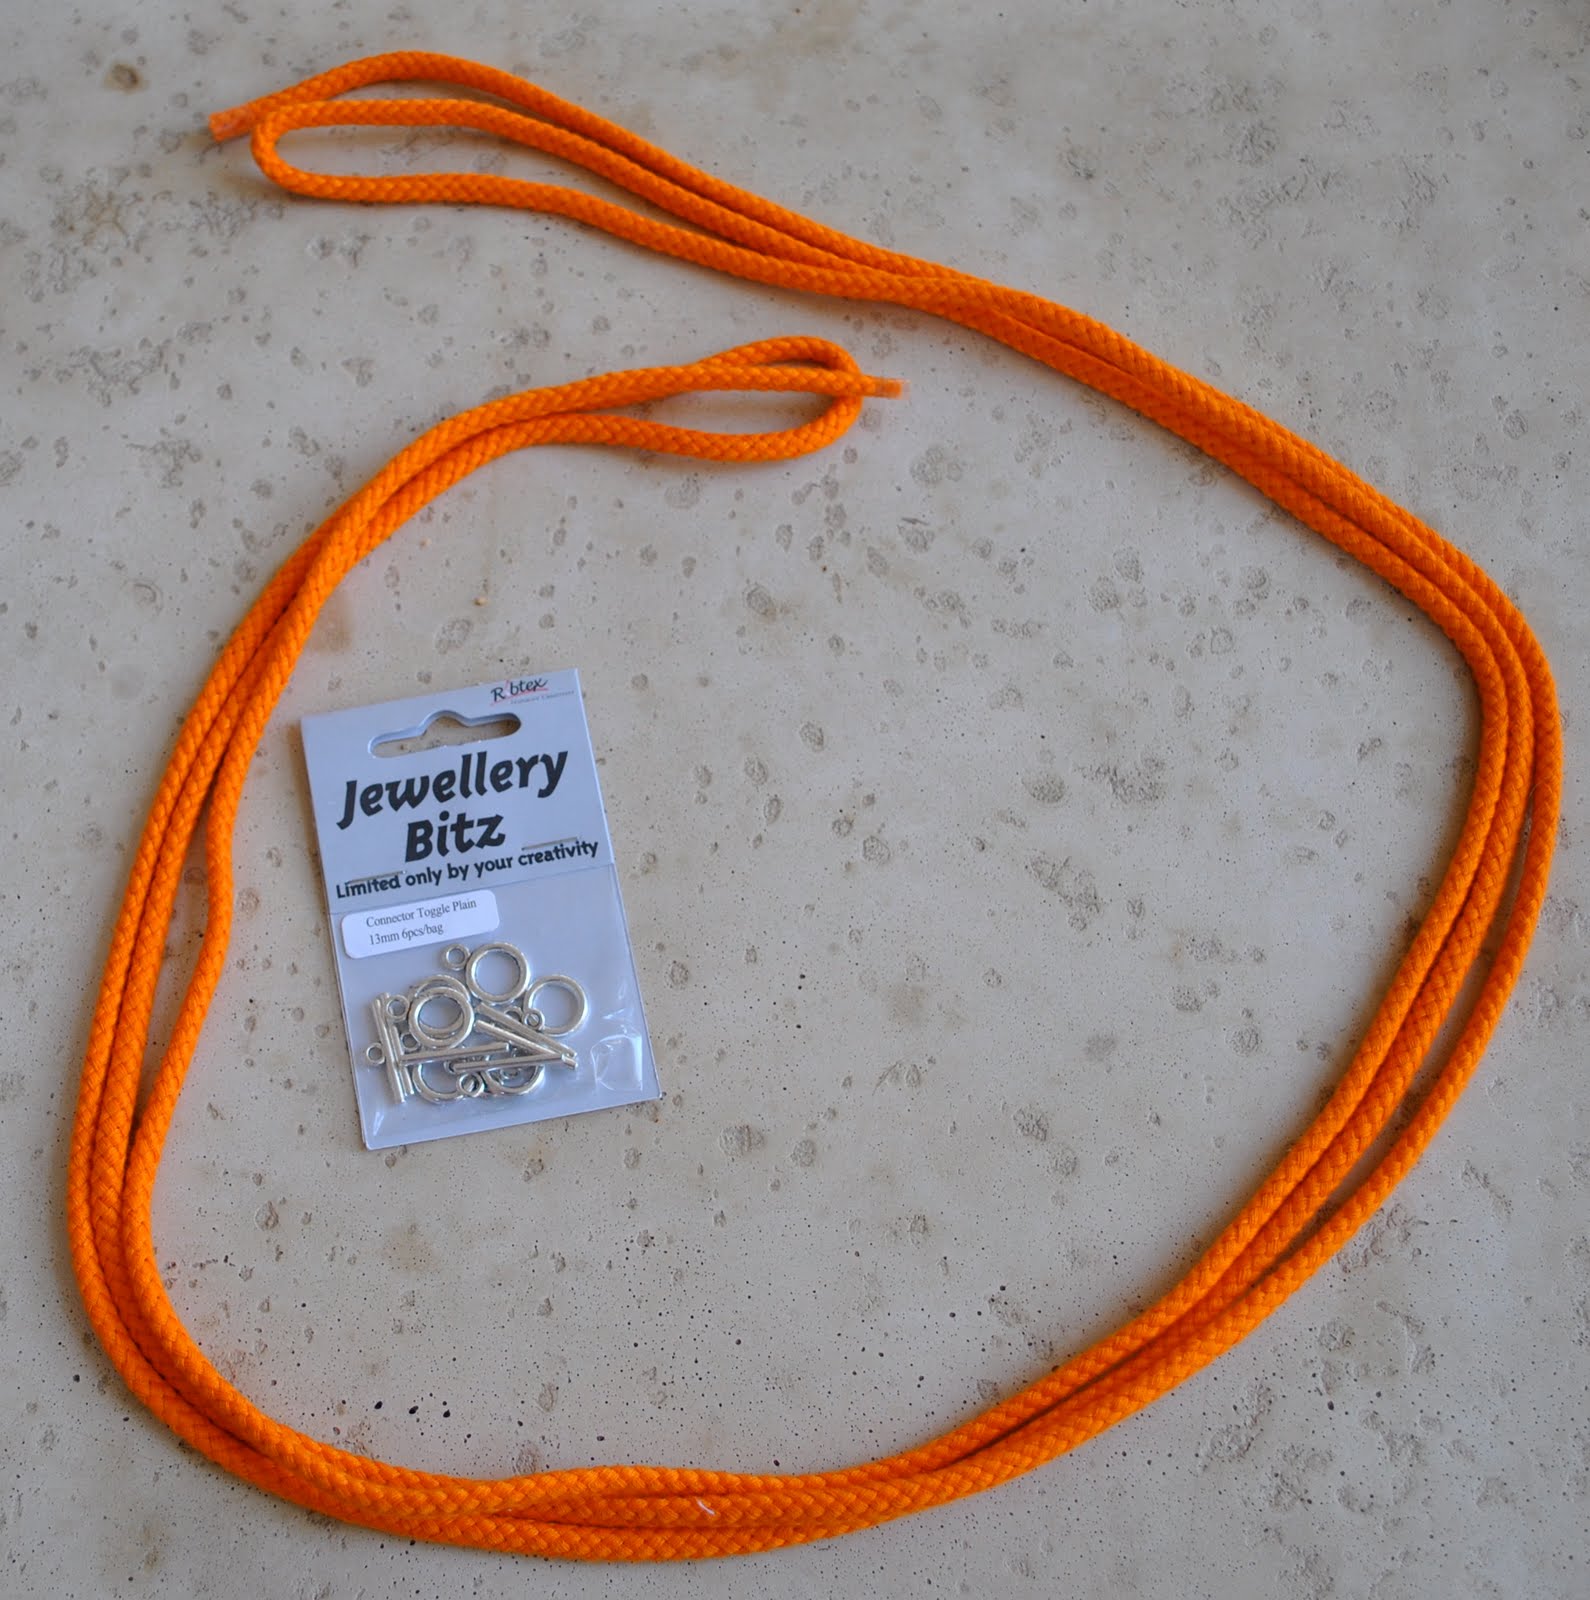
Fold the rope into three equal lengths.

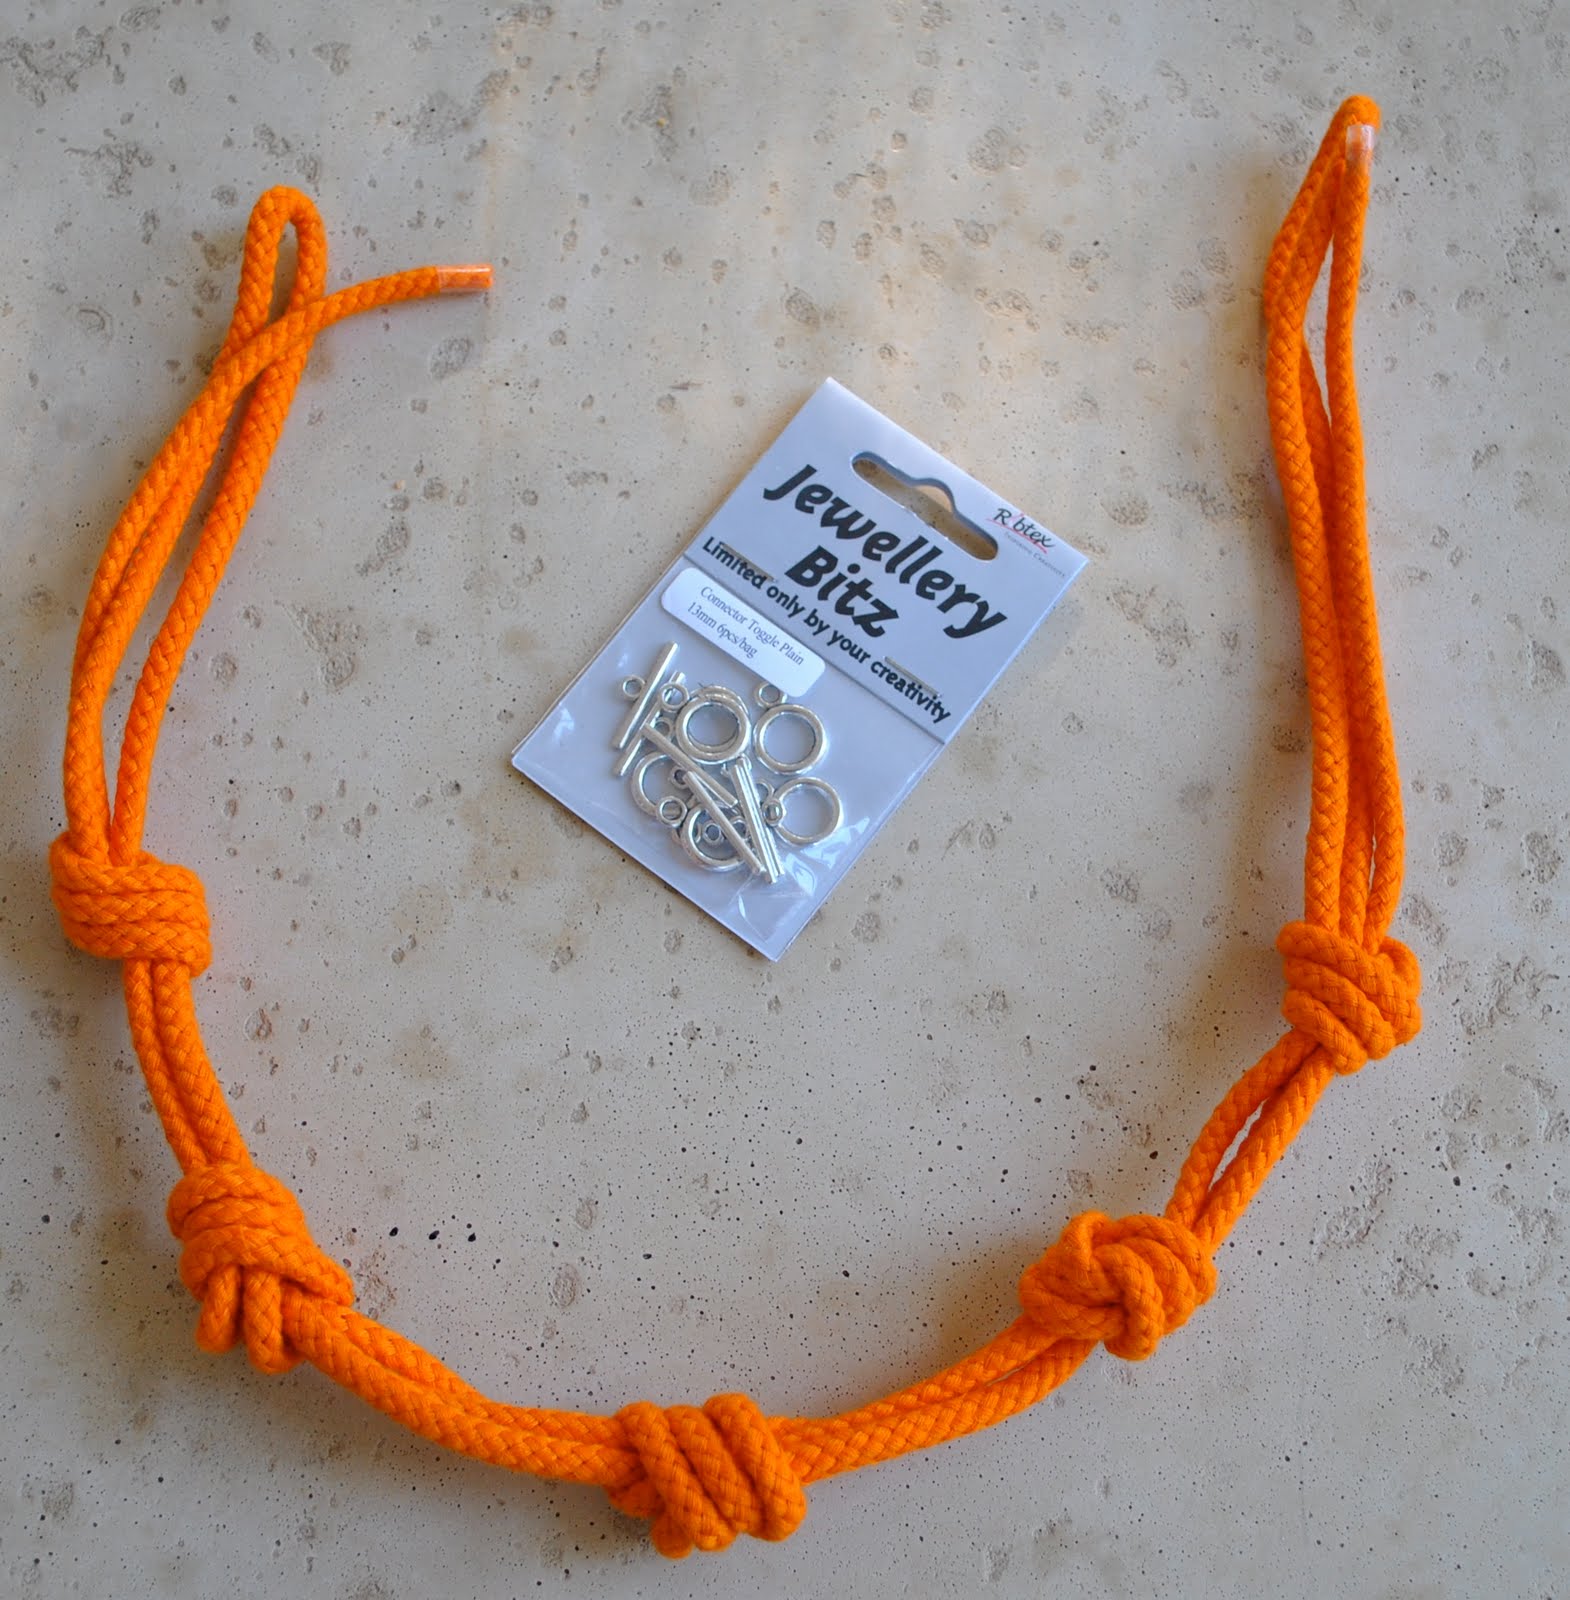
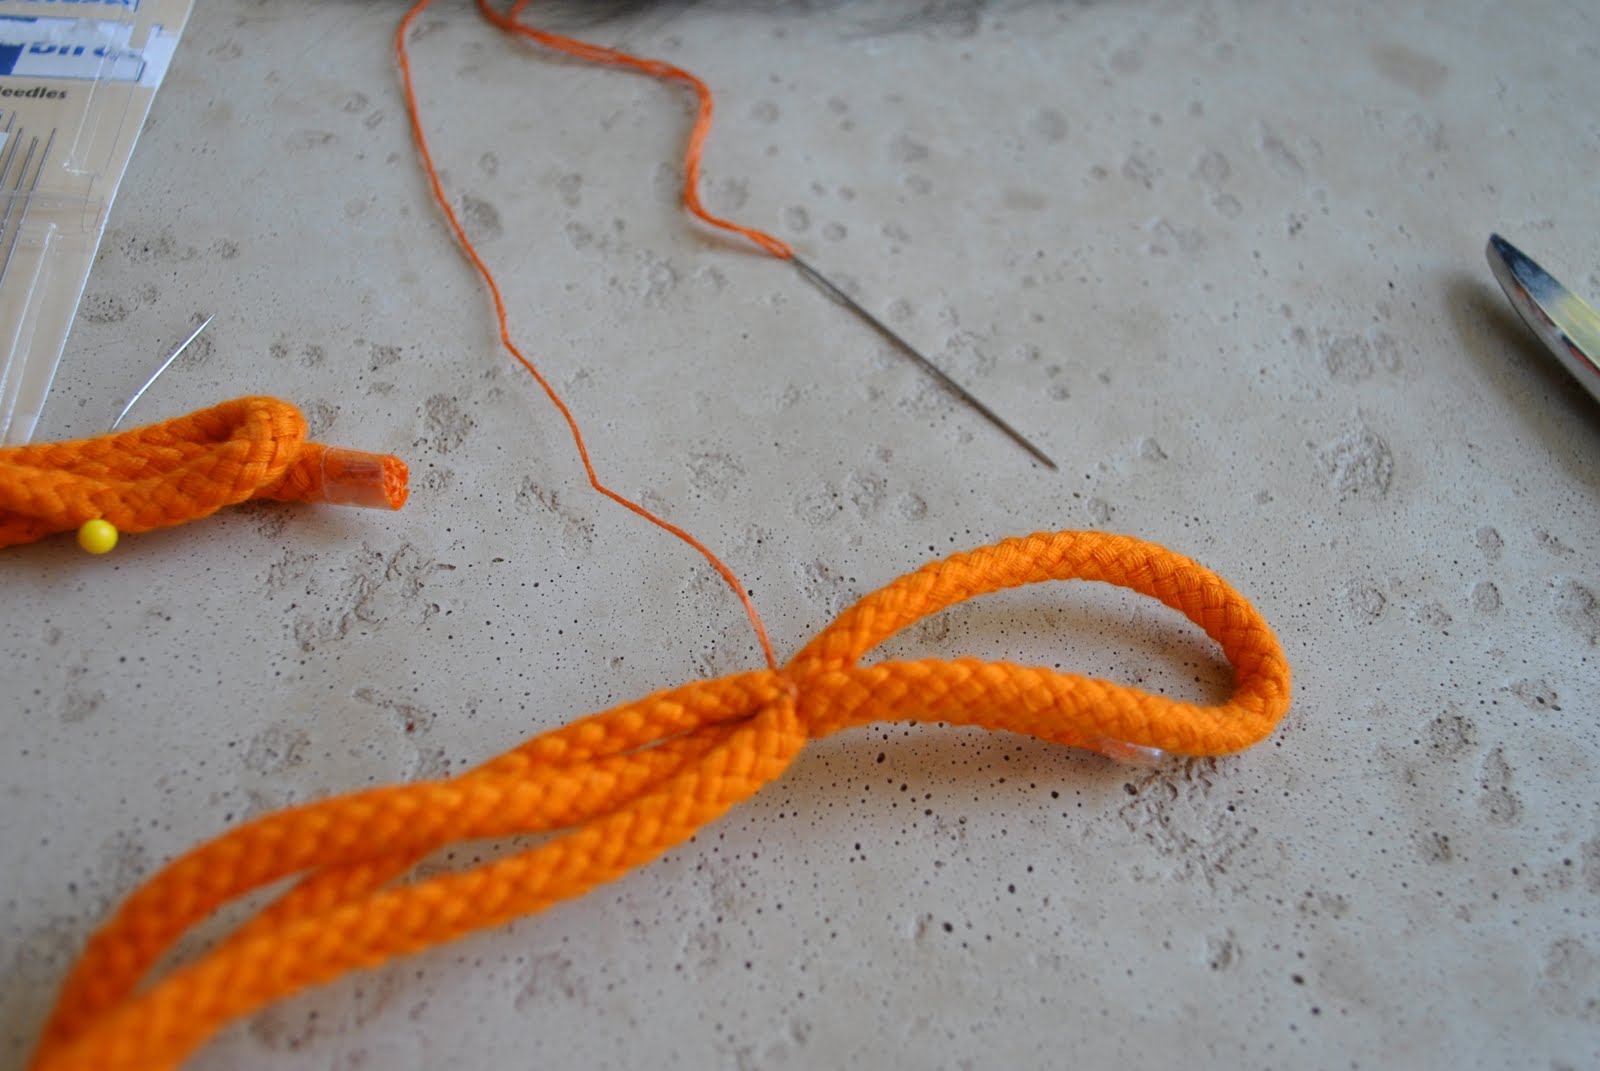
Simply knot the rope in five evenly spaced knots.  I spent a bit of time getting them exactly even but I’m a bit obsessive that way, and it would probably look just as good a bit more randomly spaced…

Measure around your neck where you want the necklace to hang and mark each of the ends with a pin.

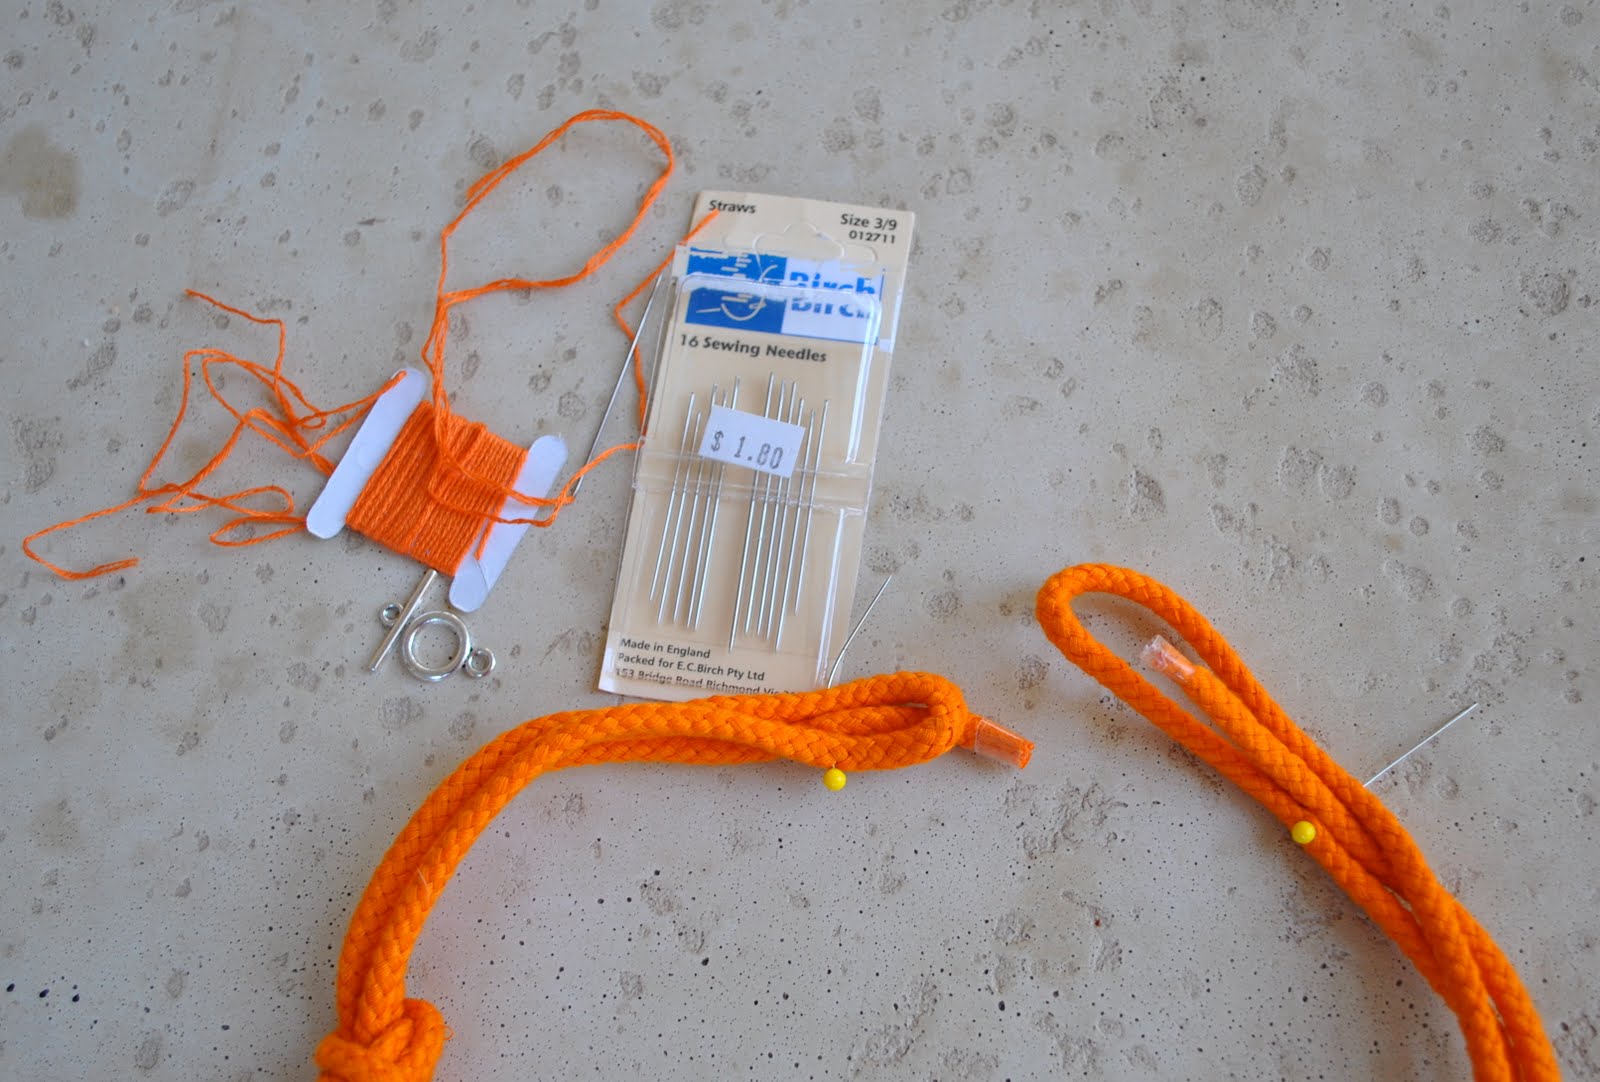
Using your matching thread sew a few firm stitches through all layers to secure them together.

Cut the ends off, and sew on an end piece, using loose stitches so it stands away a bit from your rope end.

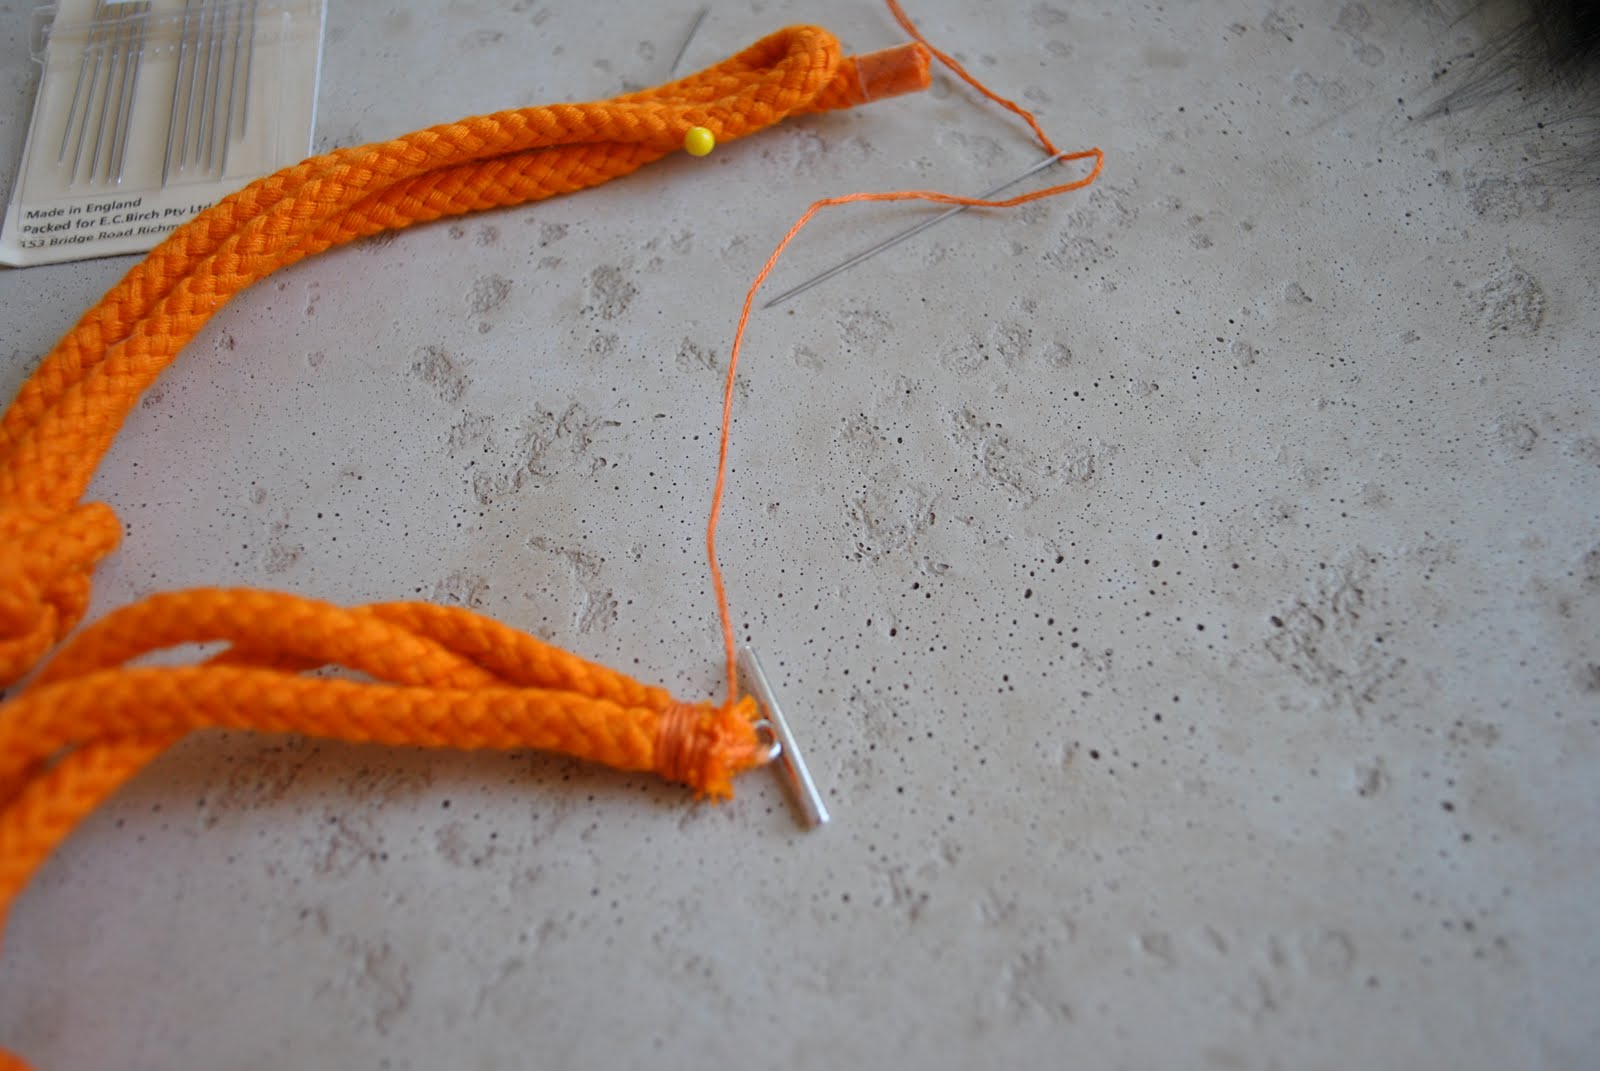
Finish off by winding the thread tightly around the rope ends to bind down any loose ends poking out, and secure the ends.

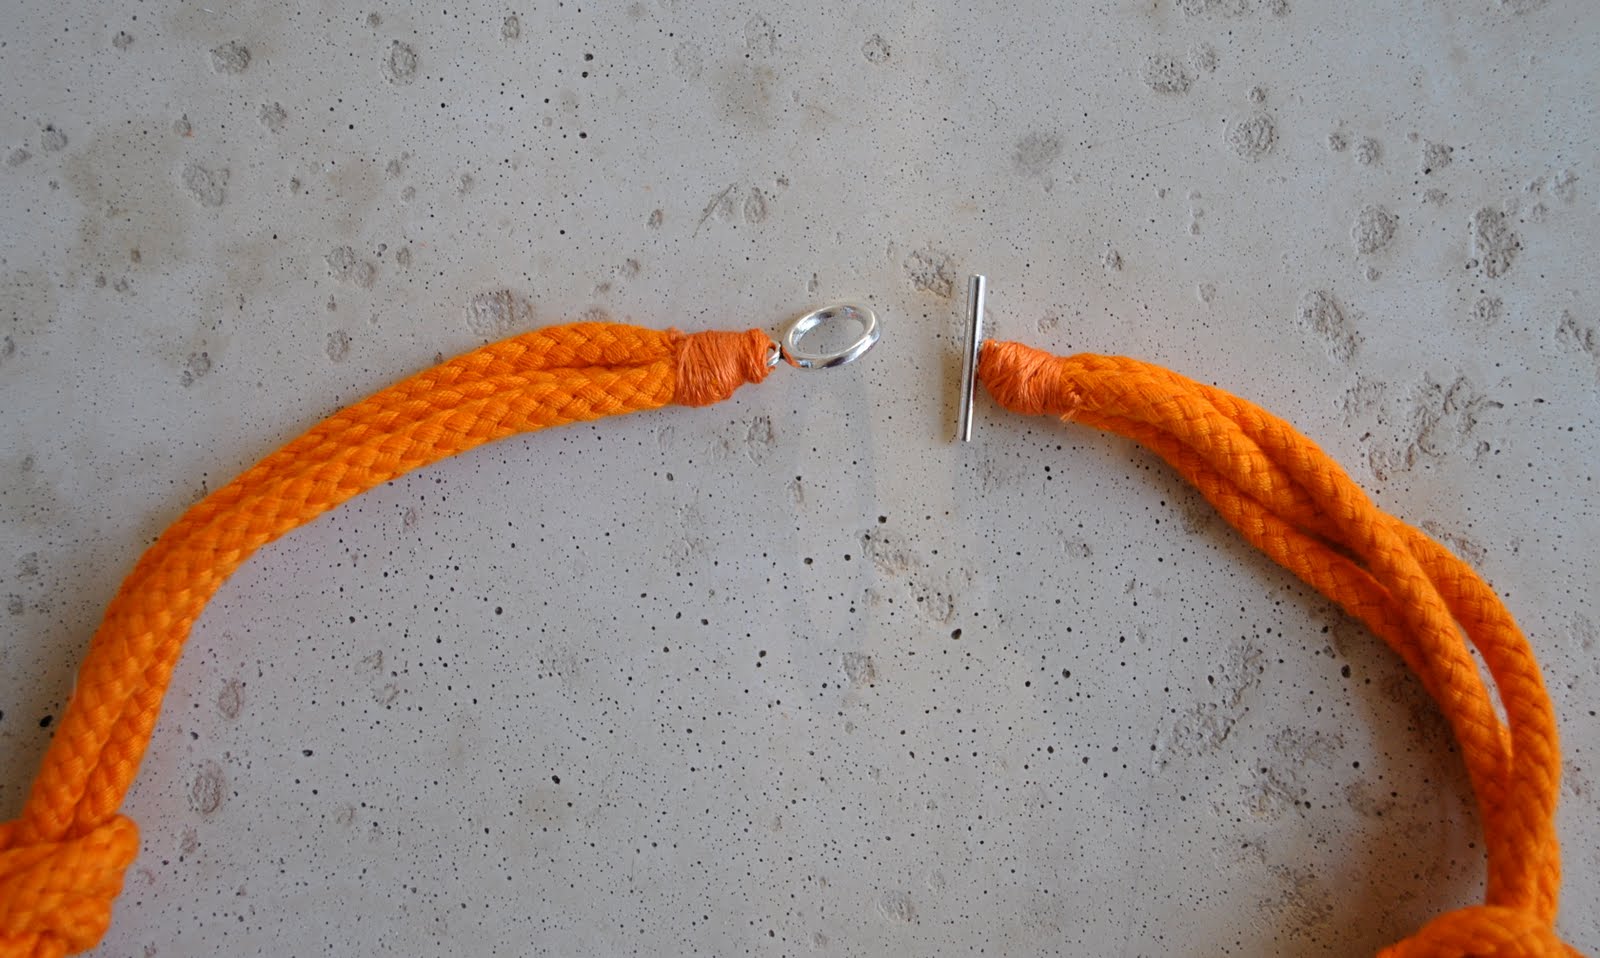
Voila and ready to wear!  Even though I attached jewellery ends to the necklace I find I can still slip it over my head pretty easily without having to undo the catch.
I like the funky, casual, different look of this necklace; its not your average kind of accessory (and so the perfect accessory for me) and cost a lot less than the original.  Win!

pinterestmail

Wardrobe Refashion, project 6

This refashion was actually excessively easy and barely worth a tutorial of “during” pictures, but here it is…
I started out with these drawstring waist, three quarter pants.  They are shapeless and unattractive and only suitable for pyjamas… but the fabric is lovely fine linen in a gorgeous shade of pistachio that I fall in love with straight away… but am I ever going to wear these pants as is?  No way.  Drawstring and elasticised waists are just a no-go in my wardrobe.  I feel they bunch unattractively around my waist/hips, adding bulk to a problem area, and as a recent commenter kindly reminded me, I am not model thin.  Yeeeah…..  If I will take the risk of putting myself out there then people will feel free to inform me of my figure flaws, but hey I can take it.
So here are the before pants:
No way am I modelling these for the blog, they do look ridiculous and I have some pride.

I removed the drawstring and the elastic from the waist casing and cut the leg pieces off just below crotch level:

Now I took each of the legs; in these pants the back leg pieces are wider than the front pieces, so when ironed flat you get a pressing line with the leg seamline just inside of this running down the length of the legs … I marked with pins on the leg backs the line of this seamline that is on the leg fronts, and cut the fabric of the leg backs approximately 1cm in from this pinned line and overlocked the raw edges… Then on the leg fronts (which looks superficially the same as it did before) I stitch in the ditch down the original seamline… this is being pointed to by my unpicker in this photo… and thus a hem is created on each side of the two long leg pieces utilising the original pressing line.  (phew! that probably made no sense whatsoever! the picture can do the talking…)

I fitted these two pieces over my shoulders and pinned them inside the original waistband and stitched them on the top stitching line as well as the bottom stitching line of the waistband casing.  The short crotch seams front and back are re-sewn to be straight seams.  The original back of the pants with its pockets still intact I placed at the front.. and cut new holes for the drawstring at the new front…

There was a little slit at the bottom of the legs (now the bodice), I kept this and sewed it down with a button for an extra detail and to bring it in under the arm and help avoid bra flashing…

Hemmed the bottom, et voila….

I think it looks a little like a scrubs top, but then I do like this look.  The team that brought us Scrubs the TV show introduced to non-hospital workers a whole new wardrobe concept in the sexy loose-fitting comfort of scrubs, (and who didn’t just love “Scrubs”?)  This will be a good light floaty top which will be lovely and cool for hot days.  And comfortable!  Man, I might just still use it for pyjamas as well as day-wear…

Details:
Top; pistachio linen, refashioned from old pants
Skirt; Diesel
Shoes; Timberland

pinterestmail

Making boring black satin “snake-worthy”

So I’m working on this python print satin outfit, inspired by this gorgeousness of Prada.  (At right, Prada, Spring/Summer 09)  I’ve finished the top.  And I really want some kind of black detailing on the skirt to offset the python print.  I had a small amount of black satin, leftover scraps.  But plain black satin looks so boring; flat, shiny and plain.  I wanted some pizzazz, here.  What to do?
I spent a lot of time contemplating this and trying different things.  I even drove up to Fabulous fabrics and found some really gorgeous black snakeskin-detailed rubber coated jersey that I thought might be fabulous.  Bought 70cm.  It is fabulous.  Love it.  But against the python print skirt, it … just wasn’t working its magic.  It subtle little scales were lost against the python print, which is a pretty bold and striking print.  So I turned back to the black satin and tried to dream up some way of making it more exciting.  I know crushing satin permanently is a chemical process beyond the scope of my amateur skills; it had to be a sewing thing.  So I tried this:
Here’s a bit of black satin.  Not very “snake-y”, now, is it?

Folding the fabric with right sides together, I sewed 3cm-4cm lengths of pintucking, randomly placed to form rough asymmetric triangles and quadrangles.  This part is very random and “artistic”.  I’m aiming for a sort of fluid, languid flow of chaotic lines.

This is what it looks like from the wrong side.

And this is the right side, before ironing.  (Sorry, flash went off and I didn’t realise)  Looks kind of like a quilted eiderdown sewn by five year olds.  Fabulous.

Then I ironed on the right side, being careful not to pull the fabric out too much.  I kind of “placed” the iron onto the wrinkles to set them down as naturally and as scrunchy as possible.
Ironed, right side up.

And here I’ve pressed down the edges in a random wavy line (this is easy with satin) and sewn the finished satin strip along the side of my skirt.

Snaky enough?
I think so!
Stay tuned for the final outfit, shouldn’t be too far off now.
(And I still have that fantastic bit of black snakeskin jersey to make a matching cardigan, woot!)

pinterestmail

An edging finish using the fabric selvedge; a tute

So I set to work on making an outfit from my python print satin.  I want to make a skirt and a top this time, rather than a dress, so I can wear the top with other pants and jeans during autumn and winter.  For the top I’m using a wrap top pattern Burda 8497 and gave some thought to how to finish the edges.  I wanted a clean smooth edge with no visible stitching on view.  This pretty much ruled out any machine finishing, and while I’m more than happy to hand finish a hem I thought I’d try something else this time…
The Feb/March 2010 Threads magazine gave instructions for an edge treatment attributed to Madeleine Vionnet.  This method utilises the selvedge of the fabric, and the accompanying photograph showed a clean smooth edge with a rather attractive almost “piping” effect along the edge that I thought would be perfect, so here we go…
For this finish, cut the selvedges off the fabric, keeping about 1cm extra fabric, giving about a 2cm width strip overall.
Fold the fabric and press, so the “selvedge” side of the pressed strip is wider and overhanging the “cut” edge of fabric.  Lay this strip on top of the right side of your edge to be finished, with the “selvedge” edge up and keeping the selvedge edge longer than and overhanging the unfinished edge.
Stitch along the strip, keeping your stitching about 2mm in from the folded edge of the strip
Turn the selvedge strip to the inside and press.
According to the instructions in the Threads magazine no further stitching is needed.
My final verdict?  There seems no way of preventing the whole strip from just falling down and into view, so I would have to say it actually didn’t reeeally work all that well and I don’t understand how this method could be considered so fantastic.  I ended up hand stitching the hem down invisibly in the end anyway.  Alternatively you could “stitch in the ditch” along the edge and this could help prevent fallout.
I guess you could say it was a nice smooth flat hem, and the selvedge edge is clean and self-finished, so looks good on the inside.  I would use this again, but it might work better on, say, a neckline where there is no danger of gravity causing the strip to fall down and out, but if you are using this for a bottom hem then be prepared for further hand stitching for an effective hem…
pinterestmail

Light summer cardigan: a tute

When the summers are long and hot like they are here, and your daily activities include getting out and about in the sun a lot you need lots of light cool clothing that still provides protection from the sun.  I could go out in camisoles and singlets every day, but like all Aussies I worry about skin cancer a lot, and although I slather on the sunscreen each morning it’s good to have some sort of light garment to pop on which covers your shoulders. 
I made one of these cardigans last summer and found it invaluable, so decided to make another. 
(I actually made this particular specimen a few weeks ago and amazingly remembered to take pictures of the construction process, but promptly forgot about them until this morning… yeah, haha)
First, draft for yourself a basic cardigan shape, either from scratch or using a favourite cardigan whose shape you love.  I have a wonderful Marilyn Seyb cardigan I bought in New Zealand which I think is very flattering to me and its style suits much of my wardrobe.  It’s now seen better days sadly but I just can’t bring myself to ever part with it because I love it so…  Make any adjustments to your pattern to fit your personal preferences, such as adding length etc. at this paper/muslin stage.
The ideal fabric for this project is a light stretchy net which doesn’t ravel or fray, as the raw edges will be on show.  I used two layers, the inner one white net, the outer a shimmery mauve/silver embroidered net.  Its not necessary that they have the same stretch ratio as each other, but they do have to have at least as much stretch as your original cardigan you drafted your pattern from…  Cut out your pieces, remembering to include seam allowances to the shoulders, side seams and all sleeve seams.

Now, carefully remove a 2cm strip from the front neck, back neck, end of sleeve and bottom hem edges of your top layer.  I find it easiest to use a rolling cutter for this.
Lay your outer layer front and back together matching shoulder seams, then your inner layer on the outside of this, matching the edges at the sleeve side of the fabric.  There should be the 2cm extra length of your inner layer extending into the neckline edge of your cardigan (see photo)  Overlock the shoulder seams.

Layer the inner and outer sleeve pieces together, matching armhole edges, and with outer layers together, pin to the armhole edge of your cardigan body, matching all edges.   Overlock armhole seams.  In the photo below, one armhole seam has been finished at right, the other at left has been pinned ready for overlocking. 

Now with right sides of the outer layers together, pin and overlock the sleeve seams and side seams in one seam.  Turn your cardi right side out.

Now choose some sort of band and closure material.  For my first effort (in this photo below) I used some grosgrain ribbon and a single cute brass and enamel button and sewed a button hole in the grosgrain ribbon for it.  For my new cardigan I used a scrap of leftover crotchet border lace.  Pin this around the neckhole edge of your cardigan and stitch into place.  I didn’t have enough to go all the way around my cardigan, but it doesn’t really matter if the lower edges are loose…  I then sewed on some charcoal grey velvet ribbon for a closure.

Weave in all the loose overlocking threads into the seams, et voila!  Your cardigan is finished, and wasn’t that the easiest thing ever!  (My apologies to advanced seamstress’ who find these instructions laughably easy…)
 I’ve found these light cardigans perfect for hot days as they are so light and airy you barely notice they’re there but they still provide protection from the sun and are nice if you don’t want to expose too much skin to the whole world.

Details:
Cardigan; white and mauve net, own design
Skirt; Old Khaki, from Capetown, South Africa
Camisole; Country Road
Necklace; souvenir from Egypt
Sandals; Vicenza, from Soletta shoes

pinterestmail

Chanel style belt

From Chanel, Spring/Summer 2010 RTW

How cool are these gold chain belts by Chanel this season?  Often a designer piece inspires me to have a go at reproducing the “look” myself.  It’s not that I’m setting out to reproduce a designer item exactly, but ….  well if I could afford Chanel this would be a completely different story but the real deal is sadly not within my reach.  Realistically.  So my only option is to scrabble together something myself.
Here is what I started with, 1.5m each of thick, medium and thin chain, a packet of jump rings and a packet of gold charms.  I didn’t really know in my head how ornate I wanted my end result to be, so I overbought a bit…  I also took the large lobster catch off one of my own necklaces (it didn’t need it as the necklace could be just slipped over my head)

Started out by just draping the large chain loosely around my waist, to sit at just mid hip/waist height, and attached the lobster catch (modelled on Bessie, here, but I did the fittings on myself)

Then I started looping and attaching the medium chain across the front, joining with jump rings.  After a few of these they started to drive me mad.  Jump rings just cannot cope well with the thickness of the links in chains, besides being really difficult to get on they also become very distorted.  I got some of this 32 gauge jewellery wire I already had, and started “sewing” the chains in place instead with lots and lots of “stitches” (at least 10 per joint, for strength).  This worked heaps better.

I draped and stitched all the medium chain and left just the end hanging loose.

Then I started with the skinniest chain, and …hmmm.  Breakage after breakage later and me getting increasingly frustrated … at this point I considered abandoning the whole project.  Jewellery making is not my forte…at this point if there had been a Chanel shop around the corner I might have just stormed in and maxed out the credit card out of sheer bloodyminded-ness….  However venting one’s rage using the family finances is rarely productive, and anyhow there is not a Chanel shop around the corner…. sensibly, instead I decided that was that and the belt was finished.  I’ll find something else to do with the remains of the skinny chain.
I selected one charm to attach to the end of the chain.  I used a “thongs” (or flipflops) charm, just for an Australian touch.

And voila…  After sleeping on it, I’m actually quite happy with the end result.  I can see it over a pair of tight pants, in fact I’m fantasising right now about customising a pair of bootlegs Chanel style as well….

Final verdict?
Well, if you can afford to buy a real Chanel belt, then what are you waiting for.  The real Chanel belt is probably a beautiful piece of real jewellery, and will be far far superior, for sure.  
You need patience and perseverance to work with these fiddly jewellery components, give me sewing anytime…   However, all said and done, I’m happy.  My version will look nice for a season or two, as long as I take care of it and don’t tie it into knots in the meantime.

pinterestmail

Heather purple dress, part 3

So, now for the final installment of the making of this dress.
At this point it’s just a bit of finishing off to go; sewing the lining to the zip tape, and doing the hem.  It doesn’t sound like much, but hems are not to be rushed into, especially on a plain-ish dress like this one in which a wonky hem would stand out like a sore thumb.  The very simplicity of the dress’s style means that the hem has to be perfect, as there are no design details to draw the eye away from imperfections, not even a print on the fabric.
So I sew the lining on to the zip tape by hand.  A comment kindly directed me to a site where I could learn how to do this feature by machine… (haven’t checked it out yet) but I had already finished it by this stage!  

And the hem…  When I want it to be perfect there is no other way than this…  Remember when your mother got you to stand on a chair and slowly rotate while she measured and pinned your hems…?  I still do this for my daughter’s dresses but a person can’t help but shift weight a tiny bit from foot to foot, and move their hips, even the smallest amount and it really throws off your hem measurements, the beauty of Bessie is that she’s rock steady.

After I’ve trimmed the hem allowance to 5cm (I pull the dress onto the ironing board to do this), overlock the edge, pin up and press, I trim the lining to be the same length as the pinned-up hem of the dress proper.  Then I fold the lining up on the inside 1cm, press, fold up another 1cm, press, then sew it by machine.  This results in a lining hemmed exactly 2cm  shorter than my dress length, which is perfect…

I make some bias binding out of voile…

And attach this by machine to the edge to cover the overlocking stitches, press the bias edges under, then finally slip stitch the hem invisibly into place…

Voila!

I feel like a bit of a fraud modelling it as I’m not wearing it today and I don’t intend to wear it until autumn.  I am wearing the scarf (which I also made over the weekend) and shoes today, but with a different dress!
Truth be told, I finished this dress two days ago; I did say I’d been sewing like a demon, I’ve also finished my next two re-fashion projects which are lined up for those Wardrobe Refashion posts, man I’ve got to slow down…  Good news (?!) is that our office computer is up and running so I can get onto a mountain of office work as of this week…  yay (in a small, depressed voice)…

Details:
Dress; Burda 8511, modified, purple hessian silk
Scarf; turquoise silk chiffon, self-made
Shoes; lasoffitadi Gjilde, from Zomp

pinterestmail

Heather purple dress, part 2

I last left off this exciting saga (ha ha) with the front and back sewn to their facing/linings at the armhole edges and neckline, and the seam allowances clipped and graded.

I then turned the front and back pieces right side out, eased the seams open and pressed, then understitched the facings on the curved part of the seams.  I hope everyone understitches their facings, I think it makes a huge difference to keeping those facings on the inside where they should be, and not rolling out to the outside.  It’s difficult to see in the photo, (I’ve made it a big photo to help) but my unpicker and the pencil are pointing to the understitching seams.  You can’t really sew all the way up to the edge of the seams, because you are trying to sew up a tube and that’s impossible, at least on my machine, but just understitching around the curves results in a much cleaner, nicer edge that sits flat.

Now for the shoulder seams.  I sew the front and backs together, at this point I either congratulate myself on careful measuring getting those gaps exactly the same width, or I’m kicking myself I didn’t measure precisely and check properly (see part 1); nowadays I am super accurate with this part as I’ve come to grief here before…. don’t want to talk about it, but it means redoing those arm and/or neck seams again….

Then I carefully clip the corners a bit (not too closely if the fabric is a real fray-er, like this silk is) in the photo above the left side is clipped but not the right, press open with my fingers (not an iron), turn the facing shoulder seams in and pin closed, then handstitch the facing shoulder seams closed…  in the photo below I’ve stitched the right seam and just pinned the left side.  In the photo you can also see one of my sewing assistants who often helps out by plonking herself down right in the thick of things at some crucial step..

Now for the zip…  I overlock the edges of the left side seam (if you’re a left-hander you might prefer to have your zip on the right side seam, probably one of the reasons you’re a dressmaker is so you can have this feature where you want it rather than where commercial clothing manufacturers have decided for you)  Then I physically try on the dress and pin it closed down the side seams to check just where I want them and mark front and back with pins…

Then insert the zip along these markings.  I perhaps should have taken more photos during the zip insertion process, but I always get in a bit of a zip-insertion zone at this stage and didn’t think to pick up the camera.  Anyhoo, I put the zip in, sewing from top to bottom both sides… then after this sew the seam below the zip, again from top to bottom.  Do others do it this way also?  I find if I do one side of the zip top to bottom, the the other side bottom to top, and/or the dress seam bottom to top, it’s very difficult to avoid little lumps or bumps in the seam. I think it’s because the upper and under fabric pieces shift due to tiny variations in the rate of the feed dogs on the under side compared to the rate you control the fabric feeding into the machine…  Any thoughts anyone?  It’s taken me a few imperfect zips that require unpicking and re-doing to settle on this rigid “top to bottom” rule that I never break now…  Here is the zip inserted, and the pins you can see are the lining pinned to the zip tape on the inside (photo of this further below)

Then I sew the right side seam following my markings, both the dress and the facing/lining top to bottom, and overlock/finish this seam…  (I know this looks a little tight on Bessie but the truth is that she’s a tad bigger than me and although I’m struggling to close the zip on her I have plenty of breathing space when the dress is on me… another trial and error thing I’ve learnt to adapt to)

Here is the photo of the inside of the dress so far, with the lining pinned to the zip tape ready for handsewing…. Does anyone know how to do this by machine successfully… that’s a holy grail for me, as it always ends up looking like a lumpy mess when I’ve tried and needs re-doing.  Until I can learn how to do this I’m handstitching for a perfect finish..

Finishing stages of the dress in a few days…

pinterestmail
Switch to mobile version
↓