Category Archives: Shoes

some new things…

hello!  I’ve made some new things recently… firstly, some new winter pyjamas. 🙂

I used my usual Closet Core patterns Carolyn pattern for the bottoms, and for the top I used a pattern adapted from a Burda pattern, just a basic loose top with cut-on sleeves.  I went to Spotlight and bought 1.5m coral pink, 0.5m navy blue and 1.0m white cotton flannelette…  and right now I have to make a stern warning to future me; THIS IS NOT ENOUGH FABRIC TO MAKE A PAIR OF WINTER PYJAMAS.  Well, to be more specific, it CAN BE enough fabric, but only if one is prepared do lots of careful measuring, careful cutting and careful piecing to use as much of the fabric as is humanly possible.  And there will be practically zero fabric by the end of it.

I mean, this is a good thing, right?  Reducing waste?  To answer myself, yes it is, and I enjoyed the technicalities of the process and pretty proud I managed to use practically all of it, however this normally very simple project turned into a bit of an epic journey.  I think it’s ok to admit that it’s not necessary to virtuously use “all your fabric” when you make something.

I realised I had not bought enough fabric once I laid down my pattern pieces, and so had no choice but to cut and piece every single offcut in order to make the pyjama legs as long as I needed, as well as the pyjama top sleeves and body as long as I needed.  It was kind of fun to have the different colours appear as stripes like this too.

All the seams are overlocked on the inside, and all the seams are faux fell-stitched down using white thread on the outside.  I like that all those little bitsy-bits are highlighted like this!

This is the tiny pile of my total leftovers.  Honestly, in the end, “using all the fabric” became such a quest that I slapped on a few superfluous pockets, which is kinda silly really.  It was a fun experiment, but of course it’s a truth that superfluous pockets are not morally superior to throwing away small scraps.  Just saying.

I also made some new clogs!

I used a kit that I bought from Leather Needle Thread, hmm, perhaps a few years ago.  It’s taken me a while to get around to it, yes.  🙂

The colour is black, which of course will be extremely handy .  As much as I love colourful things in my wardrobe, black shoes really are the most useful ones.  As previously, I applied several layers of clear varnish to the clog bases with light sanding in between each coat before making the clogs.  I know the supplier of the clog kits doesn’t recommend this, but I personally have found it an excellent idea with regards to keeping the clogs clean.  Even if you scrupulously wash your feet each time prior to putting on your shoes, you still can’t help but get them a bit dirty, and varnishing the bases really makes the cleaning process a lot more effective.

pinterestmail

#use12 capsule wardrobe

Ta da!  IT IS DONE…

I can finally present, in entirety, my #make12, or #use12, capsule wardrobe… yes, that funny little project I’ve been chipping away at all year… hurray!  Phoar!  I cannot be more thrilled with this funny little collection, right here!  And how it all worked out in the end, with just a few minor nudges and fudges here and there.

The pieces

from left to right; all pieces linked to their own blog post:

raspberry suiting mini skirt

pale blue damask summer skirt

blue corduroy flared skirt

yellow blouse

moss green swing tee top

chocolate brown, wide leg trousers

salmon pink tee

forest green LS merino tee

avocado green jacket

white, appliquéd blouse

mint green leafy dress

teal green clogs/ shoes

and I also got out a bonus set of underwear  Thanks to my sewing buddy Jane for modelling these! She’s such a good sport  🙂


the aforementioned nudges and fudges:  I used all of my fabrics bar one; my precious green fish leather from Iceland… however I used some of another green leather from my stash for the shoes.  At the same time, I used the yellow for underwear, so used the last leftovers from another project for the yellow top, so that was kind of a bonus too.

does the capsule work?  So, I had great fun dressing up and mixing and matching all the pieces as much as I could.  There could be some combos I missed? but this is as far as I got before exhaustion set in… but I’m so excited to get them mingling all together like this!  My beautiful new teal clogs do go with absolutely everything, which is cause for great celebration!! however since some of the outfits are quite wintery, I put on my black tights and black boots for some of the looks, because that is how I’ll wear them in reality.

Phew, that’s a lot, eh.  More outfits that even I thought possible!  Now I’m completely exhausted!  and also have a vaguely over-indulged feeling, like maybe I shouldn’t add any more clothes to my collection for a while…?! but of course I still have fabric in my stash, and I still have plans too!  It might be a good idea to  focus on more things for others though, for a while  😉

Thoughts?  I think the thing I like the most about all these pieces is that many of the fabrics were precious in some way; souvenir buys, or gifts from family and friends; that I was too frightened to cut into, for some reason or another.  I really wanted to force myself to finally enjoy these lovely pieces, and to wear and appreciate them.   At the same quite a few of the fabrics were smallish, leftover, orphan scraps in my stash, that were too big to throw away, and were just sitting there taking up space.  I feel really good about finally clearing some of these out and usefully; if that makes sense!  I did try to choose a set of colours and textures that I thought looked nice together, and it’s really exciting seeing that most of them really do play together as nicely as I was hoping.

I already know I’ll wear a lot of these outfits, maybe not all of the combinations that I put together here “speak” to me, but just playing with everything like this gave me lots of ideas.  Of course, several of the earlier made pieces have already gone into heavy rotation, and been worn all year long, while some things are nigh on brand new and not been worn at all!

I think this is the second capsule wardrobe I’ve ever made, and doing it was just as much fun as the first time.  I wouldn’t even mind having a go at another one next year?? maybe??  Do I even dare?!  It would have to be very very different from this one… but the cogs are already turning  😉

For the time being though, I am satisfied.

pinterestmail

a yellow Perth top and some teal clogs (shoes)

Hello!  I’ve made a couple more items for my #use12 mini capsule wardrobe that I proposed for myself at the beginning of the year, in fact the last two items! So I’m essentially finished!  Apart from a big mix-y/match-y dress up session that I’m planning… quite excited about that, actually! I’ve purposely held off up until now!

So the second to last item is a mustard-yellow Perth blouse… this pattern was our first offering from our own little Carolyn & Cassie Pattern Co.  My new blouse is actually kind of a blow-in, sort-of/not-really but yeah, sort of.  Let me explain.  See, I had a small piece of mustard yellow jersey in the original #use12 lineup, with which I thought I’d be able to make a simple little top.  However I just didn’t have enough of that fabric, no matter which way I looked at it.  So, if you remember I made a set of yellow underwear with the scrap instead.  Yes, it was a scrap, originally leftover from my yellow Jade skirt, which I’ve worn a tonne, btw.  Anyway, I used the scrap, yay! but I didn’t have my little top.  Fast forward to when I made myself a dress for my niece’s yellow themed 21st, and I actually had enough scraps leftover from that, that I thought I might be able to do a little top after all.  And I did!  I managed to cut out a Perth top, with shortened sleeves.  And I now have zero left of that yellow fabric too.  So; I kinda used up both the scraps, and got my yellow top for the capsule in the end too.  Clear as mud?  I thought so.  Never mind,  Just me rambling.

Not much else to say really!  I double topstitched all the seams throughout, which gives a sort of casual utilitarian look; and used a small, natural wooden button for closure.  I already had the yellow thread in my stash too, from when I made the dress!

The last item for my #use12 is my new pair of clogs!

I’m so so happy with these! although I have to confess that these were quite a departure from my original intentions too… see I’d originally proposed to use a piece of the precious fish leather that I’d bought in Iceland to make a pair of oxfords.  I still want to do that.  However, just at this stage I don’t think I’m quite ready enough for that project….  I had this bottle green leather in my stash though, that I’d bought in the Fabric Store in Melbourne during one of our girly trips over there.  I ordered a refill clog kit from leather needle thread, without leather, and bammo! bob’s your uncle.

Actually, I said I’m happy with these, and I am! but truth be told I think my leather was just a shade on the flimsy side? and the ankle strappy bit flops in when I’m not wearing them, whereas the ones I’ve made using leather supplied with the kit – obviously superior! – does not.  So I’m thinking of going in retrospectively and applying a lining to the straps to stiffen them up.  I think this will be quite easy actually, and I have some very thin pig leather that is supposed to be used to line shoes that I can use for the purpose.  I bought this from Skindhuset in Copenhagen during one of our trips there.

I might not though, because I’m not sure if my worries are just me being nit-picky… which is quite probable.  We’ll see ….

Anyway… next up! the capsule wardrobe in total!

pinterestmail

yellow clogs

I made some new shoes!

So, we have my niece’s yellow themed birthday party coming up, and I’d made my dress so was all set to go, and well hmmm; I just kept dreaming of matching yellow shoes.  Of course I could not resist such dreaming for long.  Eventually bowed down to the inevitable and set to making a pair of yellow shoes to match.

You might think this is a ridiculous amount of effort to go for an outfit for a birthday party.  Yes.  Yes, it is.  Actually the truth is that I just fancied some yellow shoes anyway of course, the party was just the excuse!  I ordered one of the new high heeled clog kits from leather needle thread, and got onto it!

well hello, my little photo bomber…

This was just as much fun as the first time I made a pair of clogs from this company, and honestly, I don’t think these will be my last pair!  I did make a few boo boos making this pair, just like I did before.  The main thing with these was that I broke my awl making holes for the nail/stud thingies  *sob* and had to prise off a bit of the glued-on leather and then tease out and pull the broken end of the awl from out of my almost finished shoe with a pair of pliers … yes, you can imagine my barely controlled panic at this point!  I ended up using our drill with the skinniest drill bit on the end to make holes instead.  Actually this was a far superior method to the awl in the end and I wished I’d thought of using it right from the start.  We live and learn!  And now I guess I need to buy a new awl too!

Anyway, these are awesome and I’m so excited to try wearing them with my entire summer wardrobe… I’ve found in the past that “unusual” solid coloured shoes actually go with far more colours in your wardrobe than you might think…. and by unusual I mean unusual for my own particular personal colour tastes.  For example, my lilac sandals have gone with so much of my wardrobe, in spite of the fact that I have basically no lilac in my wardrobe at all.  Strange, isn’t it?  I have confidence the same phenomenon will result from having these gorgeous golden beauties in my arsenal too.

pinterestmail

blue and pink clogs (shoes)

I’ve made some new shoes! and of course I’m over the moon with how lovely (I think) they look… !  A few months ago, during one of our infrequent and thankfully very short lockdowns – and I’ll just say it again; I am SO GRATEFUL to live in Perth! – anyway, I decided to treat myself and bought a clog making kit from leather needle thread; this is the one that I bought here:

And this is the result!  I was very happy with the quality of all the materials in this kit; the wooden soles are really nice, with a solid and very sturdy looking rubber undersold… the leather is a beautiful quality and of course those beautiful colours!

All the other bits and pieces are really beautiful quality… the little brass tacks are so pretty!  I bought a tool kit too which was terrific and worked really well.  I did think the brass buckles were just a tiny bit tarnished but not too bad and definitely not enough to detract from any other part of the clogs.

The only not-so-good thing was that the tiny little tins of glue supplied with the kit had both dried out, but fortunately I had my own glue that I’d purchased through Lisa of the Shoe Camaraderie from previous shoe-making adventures … I can appreciate that Esther of leather needle thread had gone to the effort though, even though the tins hadn’t worked.

Honestly I can understand it would be a pretty difficult thing to divvy up between kits and expect it NOT to dry up, I can even imagine how you could achieve it actually.

The other thing I did was to separately purchase some clear, water-based varnish, with which I varnished the soles before making my clogs… I’ve made several pairs of clogs already, for which I had carved the soles myself! and I believe they have lasted longer, stayed cleaner and been easier to wear too, thanks to varnishing the wooden soles.

Anyway I made another little “making-of” video, currently up on my YouTube channel… please enjoy!

https://youtu.be/xy2E9qpEkQ8

In other news, I’m now on TikTok too, since apparently it is The Thing to do now… I’m pretty new over there and am still learning, and it takes me forever to make a tiny little video, even on top of making the thing! but hopefully I’ll get better at this too.  My Tik Tok video for this is here.

pinterestmail

I made some cool blue sandals (shoes)

Woo-eee!  I really really wanted to add another pair of handmade shoes to my collection this year and after a whole bunch of postponing and procrastinating and a little bit of prevaricating too… ta da!  I basically had to force myself to get started – I hadn’t made a pair of shoes in over a year and it suddenly seemed quite daunting, and hard! but of course in the end I really enjoyed myself making these.  And I LOVE them!

I bought this quite thick blue suede from The Fabric Store in Auckland, during one of the massive stopovers that Air New Zealand gives you when you’re flying onto North America.  Which I have done twice over the last three years.  I think this might have been the Alaska trip.  I’d originally thought I’d try to make closed toe, oxford style shoes or derbys but realised the suede was really too thick for that.  You need for the leather/suede or whatever to be quite flexible and easily mouldable around your lasts without wrinkles or puckers, which is pretty much impossible in a thickish material.  So I eventually went with this, quite simple style instead.

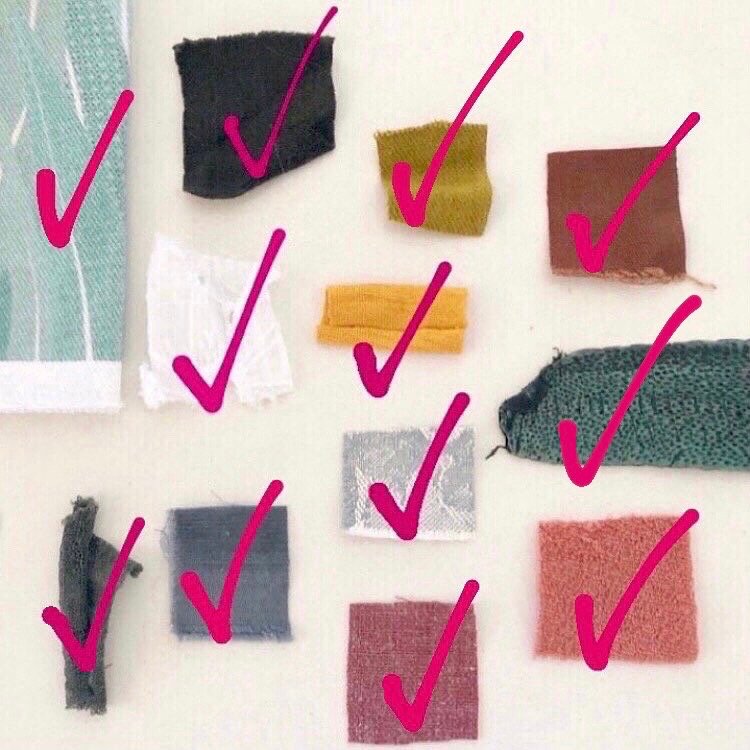
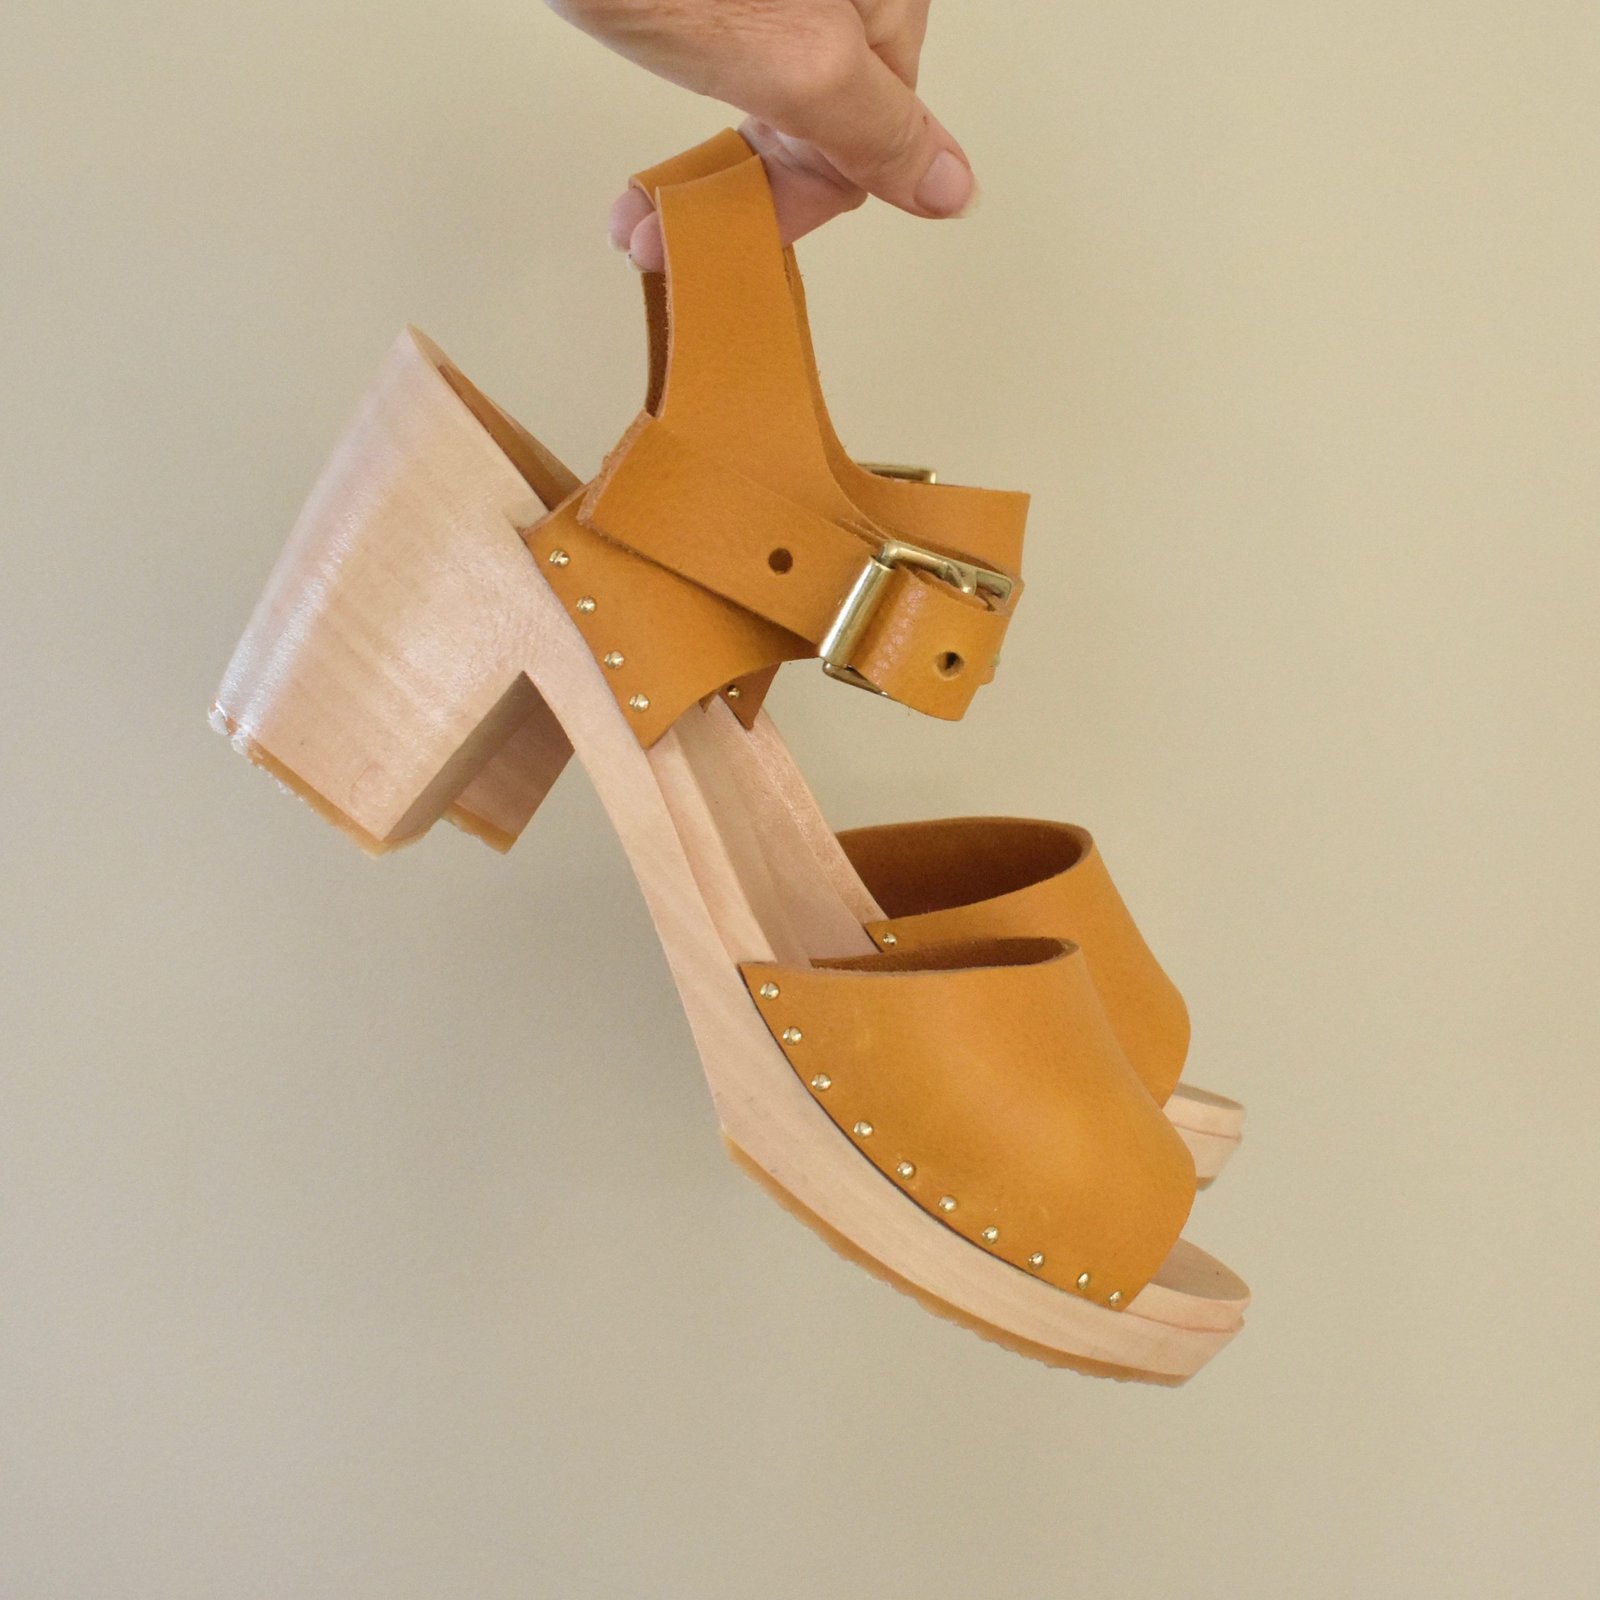
Cute, huh?!  I’m pretty thrilled with them!  Most of the other components are from one of the kits I bought from Lisa of the Shoe Camaraderie, and I followed all her instructions too.  Although like I mentioned, I used my own leather and the design of the uppers is my own too.

I really wanted a matching blue thread for those visible stitches on my shoes, but didn’t have any, not even embroidery thread in the right colour!  which is why I settled upon the beige waxed thread that Lisa supplied with my kit.  Obviously this is the perfect stuff to use for the job anyway, and I think I’m fine with it being a contrasting colour, since it is the same colour as the bottom part of the sandal too.

Having a kit makes it all so much easier, plus I’ve done two workshops with Lisa now… so you’d think I would just barrel through, no problem; whip up a pair of sandals in no time.

Nope!  I stuffed up on multiple occasions!

Firstly, I went to the effort of masking up my lasts and drawing out a fabulous and as it turned out, ridiculously complicated style for my sandals.  And made a pattern and all.  Let’s just say, it did NOT WORK.  I did try pretty hard to make it work and then moved on to trying to force the pieces into a different design, which obviously was not going to work either.

Settled upon this, much simplified design, cut out a whole new set of pieces.  Confidently whipped up a coupla buckle and strap sets and practically finished the sandals.  Smooth sailing!

Noticed the buckle and strap were going the wrong way, ie buckling forwards rather than backwards.  *cue silent scream*

I almost just let it go, but then realised I had plenty of leather actually, enough for new straps, and if I was going to do this thing, may as well do it properly.  Cut new strips, made new buckle and straps sets.  Completed the rigmarole a second time.  Obviously not quite so smooth sailing this time.  It never is.

Next, I’d applied glue to the soles with great thoroughness and excellent coverage… or so I thought.  After leaving them overnight, I noticed in the morning a few millimetres of lifting on the side of one of the sandals.  This is very very bad.  You do NOT want gaps.  I managed to pry open a slightly bigger gap, enough to dribble more glue down, spread it around with an opened-out paper clip, and propped it open with another paper clip to go tacky.  I gave it masses of time, and fortunately this very very NOT-recommended trick seemed to work.  A miracle!!!

On to the finishing touches… went around to Tim’s place to retrieve the sander, which he has for some time, I might add.  Plugged the sander in, very happy I was basically on the home stretch now, and turned it on.  Nothing.  Dead as a doornail.  Hunted out a different extension cord, tried different sockets.  Brushed sawdust and cobwebs from out of likely looking spots.  Nope.  Finally rigged up the the orbital sander instead and got the job done, which did take longer but of course not nearly so long as if I had to sand by hand, so all’s good.  Apart from the fact that maybe we now need a new belt sander, of course!

So, this is the tenth thing in my make twelve, the “making plan” I set up for myself at the beginning of the year.  This particular project was arguably the most intimidating out of the entire twelve, maybe the most challenging too.  I do love making shoes but it’s definitely next level stuff, catapulting me right out of my comfort zone … so I feel like the final two are going to be easy peasy, lemon squeezy!  We shall see!

pinterestmail

rusty lace Cissy dress (Homer and Howells)

I’ve made this rather awesome new dress, if I say so myself!!   Paprika!!  Rust!!  Kinda… burnt orange/dark red/burgundy/wine!!!  It has a strongly autumnal-flavour in colour and feel, but actually it’s beautifully cool and breezy enough for summer too.  I wore it today and it was super comfortable in spite of the 38C heat.  Phew!

The pattern is the Cissy dress pattern by new company Homer and Howells; I discovered and started following them on instagram a few months ago and was thrilled when they asked if I would like to try out this particular design… because I knew it would make a lovely summer frock  🙂

I had this glorious richly-coloured lace that’s been languishing in my stash for hmmm goodness knows how long … I can barely remember its purchase!  I’m pretty sure I bought it at Tessuti’s in Melbourne on one of my holidays over there with Mum and Cassie.  Like about 95% sure.  #youknowthingsarebadwhen…  It’s one of those fabrics I’ve taken out and petted every now and then, even laid out pattern pieces on it before having second thoughts, but finally I felt this particular project was just the right thing.

The pattern is an exceptionally easy thing to make.  It does have pockets, beautiful great big pockets too, absolutely perfect; but in the spur of the moment I just couldn’t think of a way of inserting them nicely or invisibly enough into my underlined lace dress, so left them out this time.  Who even am III????!! but really.  I’m a little ashamed I didn’t think a bit harder, because right now I can think of two separate ways I could have made it work, hmmm.  But I’m feeling too stressed out to unpick all that overlocking to put some in right now.  Maybe later.  After the wedding…  🙂

Of course I needed to underline, because it’s lace, and therefore completely see-through.  I had a length of white cotton in my stash too, inherited from Mum’s stash; that was just the right sized piece, and I thought the white underneath would be really cool.

But you know what? it wasn’t … when the dress was finished, I decided the white cotton was actually really awful; just too harsh of a contrast.  So I dunked the completed dress into a dyepot of mixed orange/red/brown/hot pink dyes.  And now I think it’s lovely!  the underlining is almost the same colour now, just a shade lighter than the lace, and I think absolutely perfect.  I’m really going to enjoy wearing this chic thing!!

Notes; I shortened the sleeves by about 9cm, and the dress by about 17cm from the top edge.  At full length, the dress was just a little too “granny-ish”, and yes I know I AM now an actual granny! but there’s granny-chic which is cool; and then there’s just “granny” but not in a chic way.  The lace that I chose, combined with the long skirt tipped the original look into the latter but I do really love it at this slightly shorter length!  I actually do have fabric in mind for this pattern at the designed-for longer length, but that will probably not happen until after Cassie and D’s wedding… ha!  I have so much to do!!!  #notevenlaughing  #cryingjustabit #ineedaholiday

I managed to incorporate the natural scalloped lace edge into the hemline, which I think is super pretty! but sadly didn’t have enough lace do the same for the sleeves.  They’re just hemmed.

Details:

Dress; Homer & Howells Cissy dress pattern, lace with dyed cotton underlining
Shoes; caramel/ivory clogs are made by me, and my own design, all details here. White shoes are also made by me, at a shoe camaraderie workshop, all details here

pinterestmail

lilac sandals

I’ve made some new shoes!!  the easy way… by doing a workshop!  😉

Lisa of the Shoe Camaraderie came back to Perth to host more shoemaking days, which of course is rather wonderful news for an avid shoe-lover/maker like me!!  I went to her inaugural Perth workshop back in August of last year, and had an absolute blast making these ivory lovelies…  so of course I had to sign up again…  I managed to talk Mum and Cassie into joining me this time, we went along together and all had a fabulous time… BTW though, just want to pop it in right here; the workshop was across the road from the Wild Bakery and that place is DANGEROUS!!  I walked out with a nutty brownie that I’m sure must have had about 10,000 calories.  I nibbled at it over a couple of days though and it was indeed worth every naughty, delectable bite  😉

Anyway!  This style of my new shoes is called the Cosette, and the leather is the absolutely prettiest, most divine shade of lilac/pale blue you can imagine.   Quite heavenly.  When Lisa told me she had sourced it from the Fabric Store, I was just like OH OF COURSE.  Such a beautiful store…. honestly, if a branch ever opened up here I would be totally broke, and staggering home with an obscene quantity of fabric ever week.

Mum made a pair of caramel Astrids, and Cassie made a pair of caramel Freyas.  They both look amazing!!

these are Mum’s shoes; from her instagram

I’m just going to say it; I really really appreciate, not just that Lisa comes over here with such a cool and very fun workshop idea and a chic and elegant product, but also that she offers such a huge range of styles from which to choose.  It’s pretty impressive, actually…  she’s so good at keeping everyone going, explaining the steps the whole class needs to do, as well as helping individuals when you need it too… and at making absolutely sure everyone in the class ends up with a finished pair of sandals by wine and cheese time.  Yes, there is wine and cheese at the finish of the class.  What more could one want?!!

Obligatory progress shots…

…cutting a bazillion teeny skinny strips….

… a pair of little lilac centipedes….

I love that my name is hidden in my sandals! even though no one will ever see it, I know it’s there  😉

just admiring them on the last… nearly finished!

And done!

So, you’re supposed to let them dry for 24 hours before wearing them, but I slipped them on ultra carefully for a quick photo for instagram…. ooo I know; how very naughty! but I seriously COULD NOT resist!  That heavenly colour!  And then immediately slipped them right off again, stowed them reverently in their little cloth bag and dutifully allowed them to languish for a week.

Will I do another workshop if Lisa ever comes back to Perth?  I expect so!!

This how I wore them today in their very first ootd, the first of many I’m sure… and even Sophie thinks they”re pretty cool! look at her checking them out with envious admiration!

Details:

Dress; our Carolyn&Cassie Perth dress, in brown linen, details here
Shoes, made by ME also!


can I please have some lilac shoes toooooo?

pinterestmail
Switch to mobile version
↓