Tag Archives: Blouse

colour-blocked Mimi and golden chain-mail

hello!  I’ve made a new/old blouse for myself… I’ve always enjoyed the challenge of using old textiles PLUS I’ve also always loved patchwork and mixed-prints in clothing so obviously this new blouse is certain to become a favourite!  why?  because the fabric is salvaged from three well-loved old shirts of my husband’s… I really liked each of these shirts when he was wearing them, so when he decided they were too worn to be worn any more (hehe) I packed them away to be refashioned one day.

I know it seems weird and silly to use three whole mens’ shirts to make just one woman’s shirt…  like an exceptionally inefficient use of resources really! however there really were so many bits of each shirt that could not be used because of holes, stains, or threadbare patches that I had no choice.  I was on a rescue mission!

The pattern is one of the newly release patterns from Fibremood, the Mimi blouse. Such a quick and simple thing to make!  Especially coming hot on the heels of two jackets, ahem.  It was nice to be an able to whip up something without having to think too much!

The pattern actually has the button and buttonhole bands cut on, so my use of the third contrasting fabric is an alteration really.  I did have to do a bit of calculation to get this to work out well.  I was seriously worried I wouldn’t have enough of the yellow fabric but thank goodness I did in the end.  Another issue was cutting the lower front panels… I had to join some pieces together to get a piece big enough you might be able to see the joining seams on both of those sections of my new shirt.  The sleeves also have joining seams that I did my best to make reasonably unobtrusive.

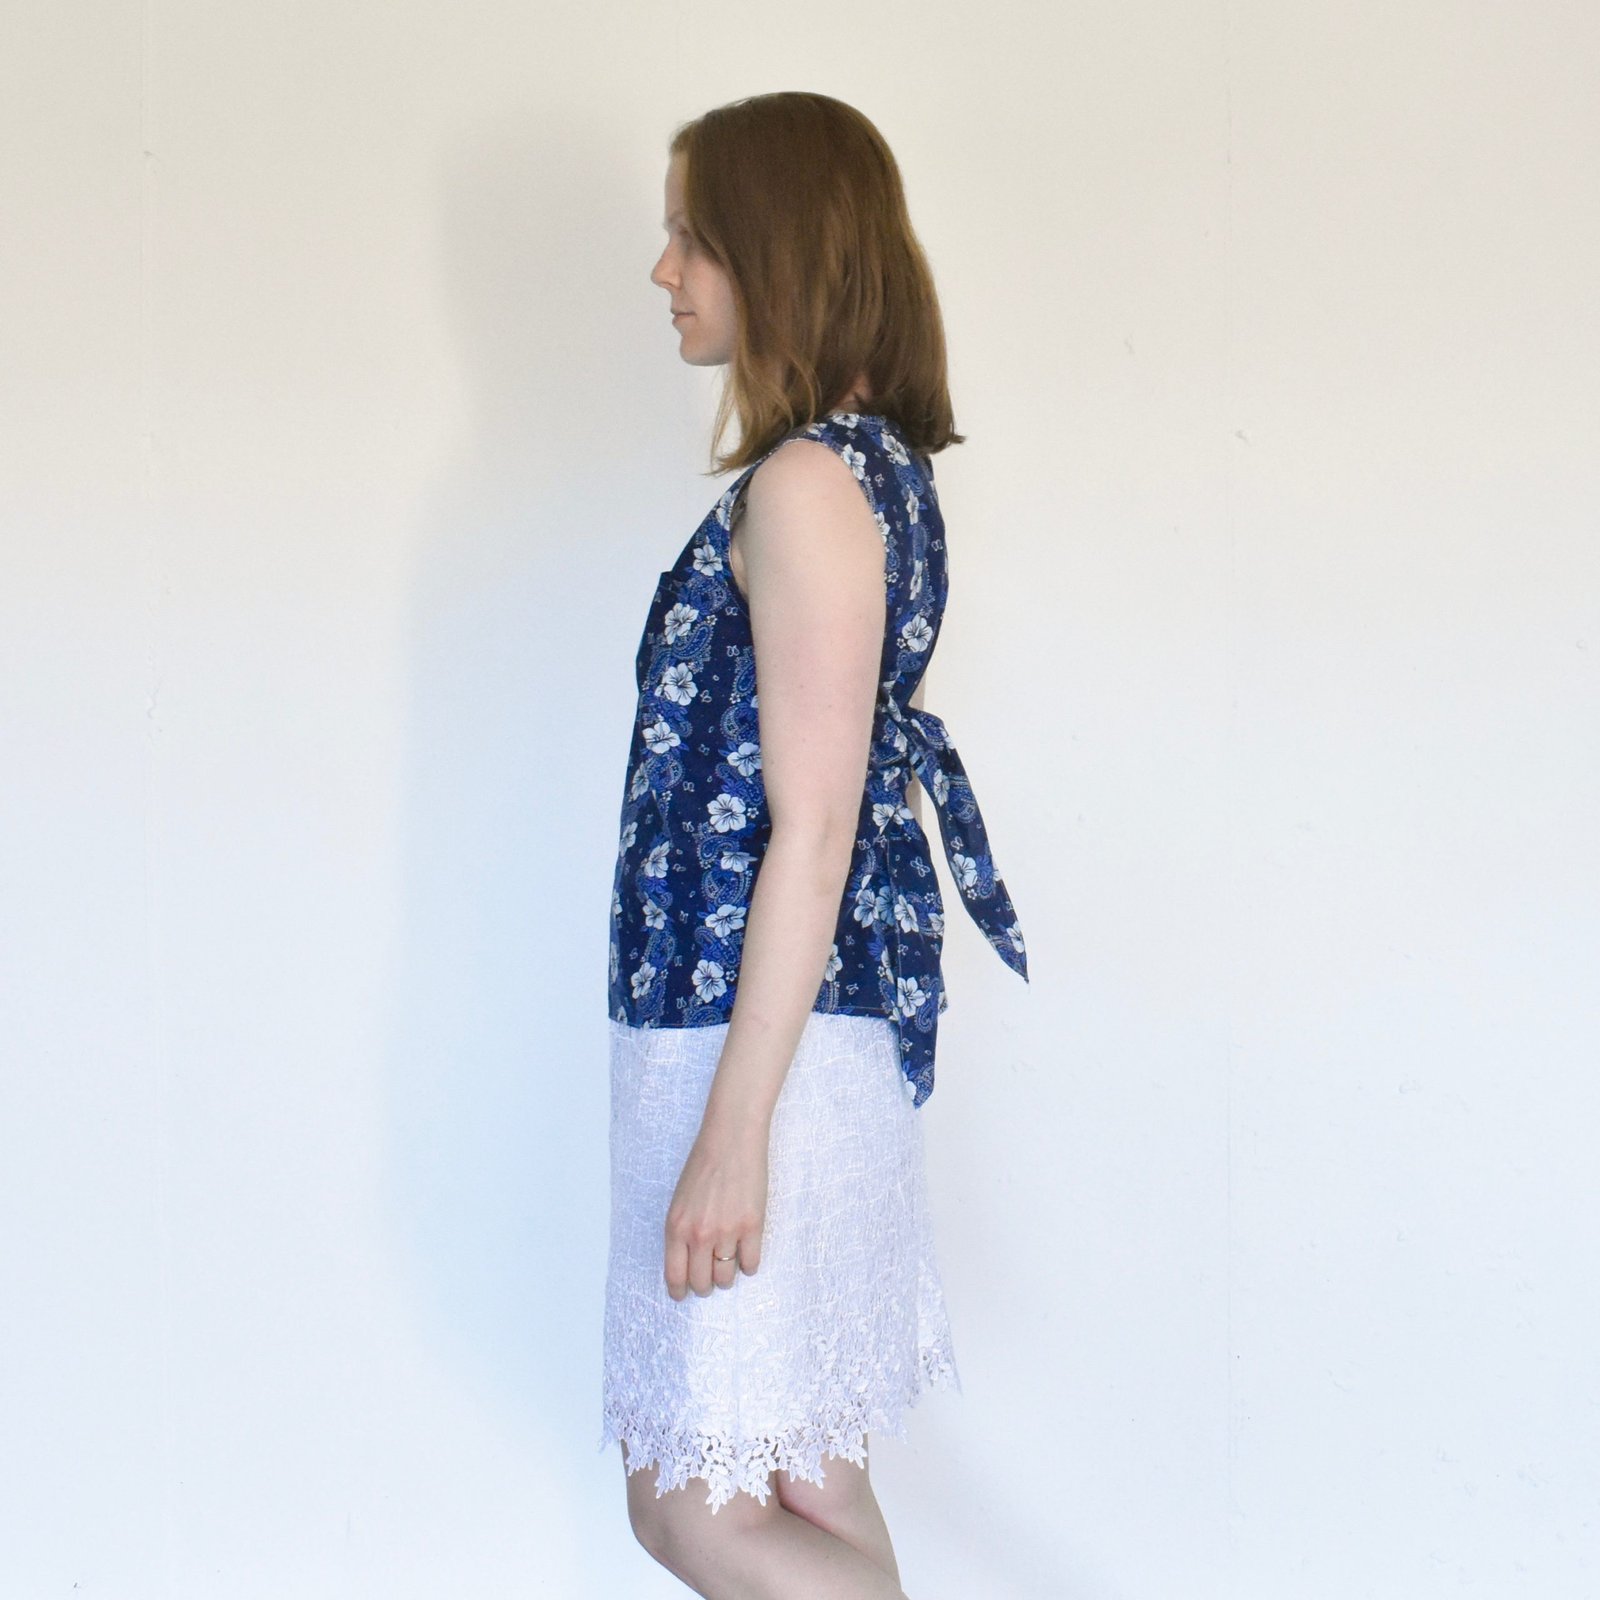
I’m wearing my new shirt in the above pictures with a pieced denim skirt I made last year using old jeans and our own Meelup skirt pattern, plus a number of superfluous pockets, making this outfit a wholly recycled-fabric ensemble.  I really love this skirt too! it used to be quite a bit paler in colour and I overdyed it blue while I was dying something else one day.  Oh, I remember it was this skirt...

Something else I’ve made recently was a “golden chain mail” tunic for my middle grandson T for his book week costume.  Doesn’t he look amazing?!  He wanted to be Tom of the Beast Quest series.  I was only commissioned to make the tunic, and my clever daughter Cassie made the rest of his costume including that amazing helmet.  Theo made his own shield!

I used the measurements from an oversized T-shirt he already had, and bought the golden sparkly remnant from Spotlight.  It was very cheap but is actually quite nice stuff … I have a little bit left over and am wondering what I can use this for?!

pinterestmail

an ivory blouse and a pink neck warmer

Hello!  I’ve finished a few new things over the past few days…

First up, a new ivory blouse for myself.  This is the new Fibremood Georgie blouse, and it’s quite an interesting design and construction technique that I haven’t really come across before, namely a series of very deep pleats in the neckline and sleeves.  These are bound down with a narrow bias strip.  The raglan sleeves also have deep pleats going into those cuffs.

If I was going to be picky I think I would have chosen to cut the cuffed sleeves a little longer, and it’s also quite a short blouse overall.  However I do really like the finished blouse.

I found a short length of ivory muslin in my stash, which was lucky! because it was perfect for the floaty style of this blouse; and for the buttons I went with some fun bee buttons, also from the stash.  Aren’t they cute?!

I’m wearing them here with my Closet Core patterns Sasha trousers and my clogs made using a kit from Leather Needle Thread.  I really should make some new trousers; I don’t really have that many, and those that I do have are mostly quite old by now.

I also finished up my April knitting project, again in the knick of time!  I literally cast this off about half an hour ago and took these extremely quick and slightly dodgy pictures, but at least I got it done within the month!   I’ll take some better pictures when the weather is suitably colder and post them in here later.

It’s a very simple neck warmer, made using a very bobbly pink/apricot yarn from the very large stash I inherited from Mum when she did her cleanup.  I had plans for something a bit more interesting; however when I was in Japan I didn’t have the time to knit on the trains that I thought I would.  I came home having achieved basically no knitting at all, and had to whip up something in the small amount of time I’ve had since we returned.  I’m going to try to be more organised in May and produce something a bit more exciting.

Speaking of; tomorrow me-made May begins again!  I will be joining in once again, but only on instagram this year and maybe on my TikTok account, if I feel like it.  Haha, gone are the days we used to document it all on our blogs, or over on Flickr!  Feels like forever ago now.  I will likely do a roundup here at the end of the month.

pinterestmail

Original Digby Julie tunic dress/ tops

Hello!

Finally posting some other new things I’ve made this year…

Item 1; a love floaty top for summer.  Actually to be specific, I think this is the dress version of the pattern! however it’s kinda short on me thus I am wearing it with a skirt here.  And I will probably choose to wear it with shorts or a skirt over summer.

The pattern is the new pattern by Original Digby patterns, the Julie blouse and dress… it’s so pretty isn’t it? I absolutely love it!  I kinda want to rush out and buy prettier fabric in like a softer colour, or even something printed, like a floral or something; but you know.  Stash busting is still going on over here.  Anyway.

So, this is  the longest version of the pattern. I added inseam side pockets, just because I like to have them in everything nowadays and am not readily prepared to go without.  My fabric is a very lightweight cotton, I think originally from a Morrison seconds sale.  It’s quite good for the design, but maybe not strictly “flowy” enough for those lovely softly gathered panels.  I think in a very lightweight chiffon or crepe the gathers would fall and flutter beautifully.  However I am still very happy!

I hand-stitched the button loop as instructed, and think this looks really nice; however to be honest I’m able to just slip the dress straight over my head, with no need to unbutton.  It’s ok thought, because I can appreciate the long slit and button makes the back yoke look more interesting.  The instructions for constructing this bit was really good and I enjoyed the lovely clean finish both inside and out that you get at the end of it.

The sleeve pieces are absolutely massive and the result is lovely in my opinion! a very pretty, half pirate-y, half mediaeval sort of effect!

Just secretly, although I am putting this out on the internet, hehe, for the whole world to read should they so choose! but still; just secretly…. I have started doing some embroidery on the yoke.  I saw this embroidery design on Etsy and got inspired enough to purchase, ahem.  I’ve made a small start.  Hmmm.  This might take me a while.

Item 2; hehe, I just realised the skirt I’m wearing is as yet unblogged too!  It’s just one of the test runs for our new skirt pattern, due to be released very soon, we hope!  The Batman cotton drill is from Spotlight, and was leftover for a cushion I made for Theo when he was a tiny bub.

The skirt is fully lined and is a joy to wear.  More on our new pattern in a very short space of time, I hope!  I think it’s a terrific basic and one I’ve made and wear a lot.

I’m wearing it with a very old T-shirt made absolute yonks ago…


Finally, I made a second version of the Original Digby Julie blouse… hoo yes I managed to find some prettier and silkier and flowy-er fabric…. IN LE STASH what’s more!  Whatup?!  I knew I could dig up some more appropriate fabric if I really tried.  One was just not trying hard enough, that’s all.

This is a silky stuff inherited from Mum’s stash.  It’s absolutely gorgeous and feels beautiful against the skin but I have a sneaking suspicion it’s not precisely “pure” silk.  Most likely spun from the sloughed off cocoons of the Plasticus Bottleus variety of silkworm, ahem.  Anyway, how pretty is it? that’s all that counts really.  I’m wearing it with yet another new skirt, white linen, fully lined; also our new pattern, hehe.  To be revealed soon!

It’s hard to believe, but I STILL have as yet unblogged things to share here!  Until then,  mwaaah!

pinterestmail

a yellow Perth top and some teal clogs (shoes)

Hello!  I’ve made a couple more items for my #use12 mini capsule wardrobe that I proposed for myself at the beginning of the year, in fact the last two items! So I’m essentially finished!  Apart from a big mix-y/match-y dress up session that I’m planning… quite excited about that, actually! I’ve purposely held off up until now!

So the second to last item is a mustard-yellow Perth blouse… this pattern was our first offering from our own little Carolyn & Cassie Pattern Co.  My new blouse is actually kind of a blow-in, sort-of/not-really but yeah, sort of.  Let me explain.  See, I had a small piece of mustard yellow jersey in the original #use12 lineup, with which I thought I’d be able to make a simple little top.  However I just didn’t have enough of that fabric, no matter which way I looked at it.  So, if you remember I made a set of yellow underwear with the scrap instead.  Yes, it was a scrap, originally leftover from my yellow Jade skirt, which I’ve worn a tonne, btw.  Anyway, I used the scrap, yay! but I didn’t have my little top.  Fast forward to when I made myself a dress for my niece’s yellow themed 21st, and I actually had enough scraps leftover from that, that I thought I might be able to do a little top after all.  And I did!  I managed to cut out a Perth top, with shortened sleeves.  And I now have zero left of that yellow fabric too.  So; I kinda used up both the scraps, and got my yellow top for the capsule in the end too.  Clear as mud?  I thought so.  Never mind,  Just me rambling.

Not much else to say really!  I double topstitched all the seams throughout, which gives a sort of casual utilitarian look; and used a small, natural wooden button for closure.  I already had the yellow thread in my stash too, from when I made the dress!

The last item for my #use12 is my new pair of clogs!

I’m so so happy with these! although I have to confess that these were quite a departure from my original intentions too… see I’d originally proposed to use a piece of the precious fish leather that I’d bought in Iceland to make a pair of oxfords.  I still want to do that.  However, just at this stage I don’t think I’m quite ready enough for that project….  I had this bottle green leather in my stash though, that I’d bought in the Fabric Store in Melbourne during one of our girly trips over there.  I ordered a refill clog kit from leather needle thread, without leather, and bammo! bob’s your uncle.

Actually, I said I’m happy with these, and I am! but truth be told I think my leather was just a shade on the flimsy side? and the ankle strappy bit flops in when I’m not wearing them, whereas the ones I’ve made using leather supplied with the kit – obviously superior! – does not.  So I’m thinking of going in retrospectively and applying a lining to the straps to stiffen them up.  I think this will be quite easy actually, and I have some very thin pig leather that is supposed to be used to line shoes that I can use for the purpose.  I bought this from Skindhuset in Copenhagen during one of our trips there.

I might not though, because I’m not sure if my worries are just me being nit-picky… which is quite probable.  We’ll see ….

Anyway… next up! the capsule wardrobe in total!

pinterestmail

the Yallingup dress/blouse

I can finally reveal the main thing I’ve been working on for the past few months… our new pattern!

Please allow me to introduce the Yallingup dress/blouse!
This is a loose summery piece that can be made as either a regular item or alternatively as a nursing friendly version for nursing mothers… both versions appear superficially the same at a glance but of course are constructed quite differently on the inside!

The design features a scoop neckline, single breast pocket, and an overlaying wrap top that can be worn either loose or tied at the back… for the nursing version the wrap can also function as a modesty cloth for when you are feeding your baby… the dress version also has deep inseam side pockets, of course!

Cassie conceived the design after the delivery of her baby and then I converted the idea into a regular one for “not nursing” people too😁

So technically, the pattern has four views:

A, the regular blouse; B, the nursing friendly blouse; C, the regular dress and D, the nursing friendly dress…  and because the construction method for the regular version and the nursing friendly version are quite different I ended up deciding to write two different instruction booklets, for the two different methods.  I know, that sounds complicated but honestly it was nowhere near as complicated as when I had them combined in one single instruction booklet!  Separating the two methods completely has simplified things considerably so I hope you’ll forgive the extra file that comes with it.

I’ve been making tonnes of these lately, for basically everyone in our family, including the new Mums … it’s super comfy and easy to wear and we hope you like it too!

The Yallingup pattern is available right now in our Etsy shop, here, or you can click the Yallingup illustration in my right hand side-bar over there ->

Pictured here are just a small sample of the Yallingup’s I have made:

btw; I opted to not go the call-out for tester route this time.. this is because there has been a bit of negativity around the “doing testing work for free” in the sewing community lately and I even ran into this a little bit during the testing for my last pattern, the Mundaring raincoat.

It’s funny because I personally love testing patterns and I’ve been doing it for many years for other pattern companies, happily, and with no expectation or even thought of getting paid.  Nowadays a lot of sewing peeps feel like they should be paid.  This is not necessarily a criticism by the way, just an observation into how attitudes are a-changing.

This time we did all the testing in-house and through personal contacts.  I mean, I’ve always personally tested each and every size in all our patterns anyway, so I know they work as they should; and this time we did the same thing.  I think maybe part of the pattern-testing negativity I mentioned earlier is because pattern testers feeling like they’re doing work for free and then being treated like free publicity for the pattern company; and so I decided I did not want to be associated with that perception of exploitation.

pinterestmail

embroidered white top

hello!

so, short side note; but I didn’t post any yearly resolutions/intentions here previously.  I did on instagram though.  Whoops!  Anyway, I did actually make a little resolution, and here’s the lowdown…

at the beginning of the year I was thinking about how I really enjoyed doing my “make 12” last year so I decided to do it again but this time with a little more flexibility ; I chose the above 12 textiles from my stash with the idea I’d make a sort of unplanned mini capsule wardrobe of 12 things.  Early on I optimistically thought I’d be able to do one thing per month but of course moving house, well, moving two houses as it turned out! and our new pattern were all pretty major and stressful events that ended up taking every ounce I had… and before I even knew it it’s March already!

spot the paw… ^

Anywhoo!  For patterns/designs I’m just gonna decide as I go …!  My 12 fabrics are a hopefully interesting and eclectic mix, including wool, corduroy, damask, drill, jersey, heavily embroidered something, and even some precious fish leather that I bought during our trip to Iceland years ago…

And I made my first thing!

also… paw

This particular fabric is a piece given to me by Mum years ago when she cleaned out her stash, a heavily embroidered and appliquéd cotton that is absolutely beautiful and absolutely my cup of tea!  As it turned out, it was not one piece of fabric, but several already cut out into shirt pieces.  Mum had obviously planned to make a shirt and already cut out a back and two fronts, but I decided to switch them around, and have the one back piece at the front; and the two front pieces at the back!

…she’s been quite needy today; came and plonked herself up against me so hard and close, it was so very sweet!  This furry love was just so comforting and I needed it today too   🙂

Apart from that it’s all fairly standard, I left the selvedges at the bottom of each piece because I thought it looked so weird in a way that I really like… and I attached selvedges pieces to the ends of the sleeves too to get the same effect here.  I stitched the button plackets on the (old) fronts simply down onto each other, and cut a new neckline into the (old) back so I could wear it comfortably as a front.  The neckline is finished with a bias binding, that I cut from an old cream coloured business skirt of Craig’s.

love a good bias binding  🙂

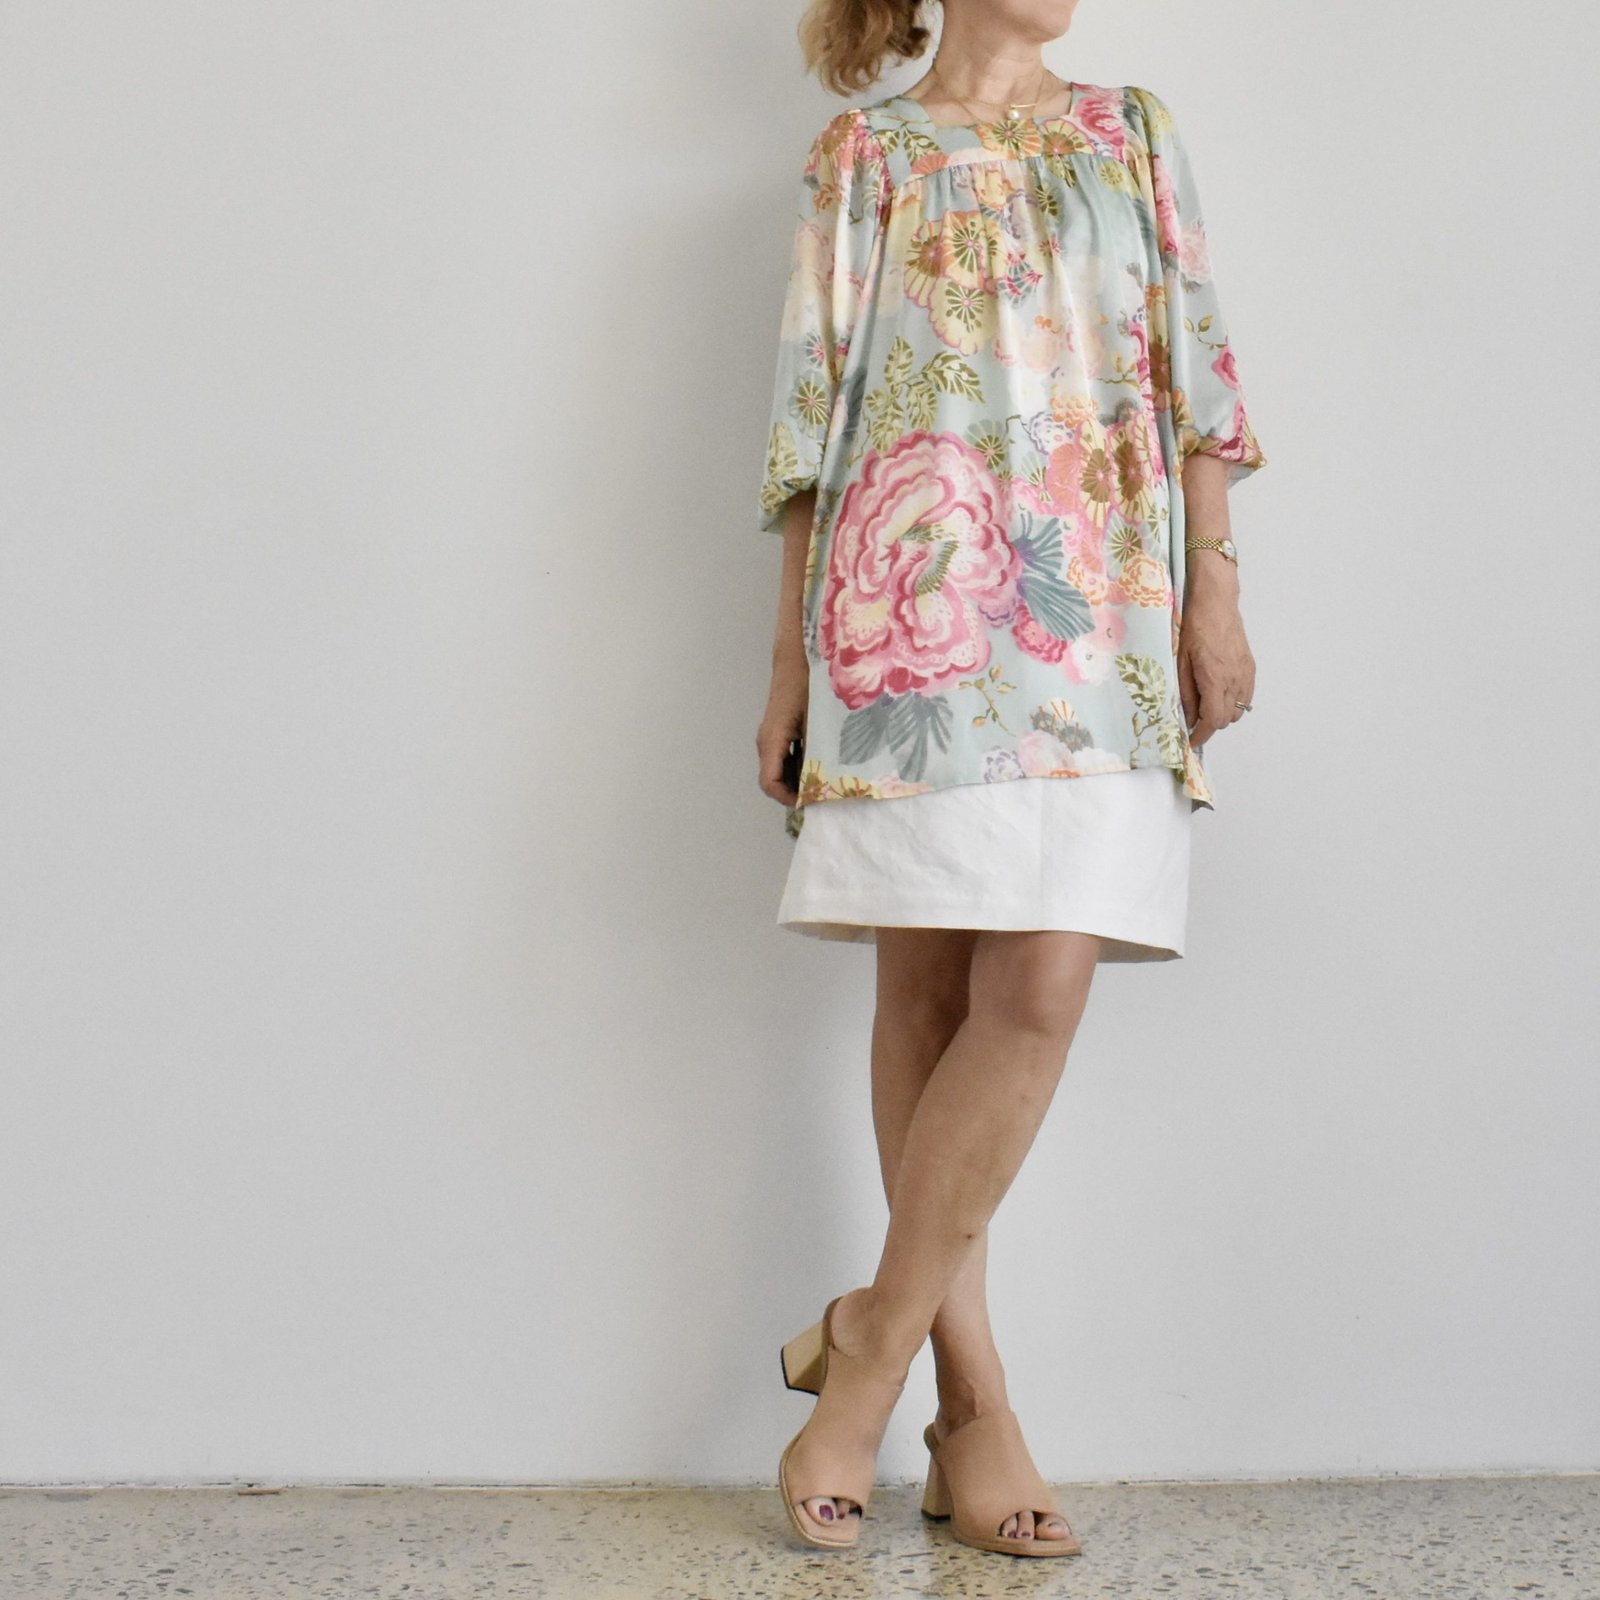
You know how sometimes you make something and you just put it on straight away and don’t want to take it off?  Well, that is how I feel about this new top!  I absolutely love it!

Details:

Top; own design, from embroidered appliquéd cotton
Skirt; from my block, cotton double gauze, details here
Shoes; made by me also, details here

pinterestmail

I sewed selflessly

So, I sewed some stuff!

Item A; a dress for Mum to wear to Cassie’s wedding…

I started out with Burda style 09/2019; 109 because I thought the sleeve cuff really lovely; however I ran up a muslin – actually 2 –  and we decided the cut-on sleeve just wasn’t that nice and that a set-in sleeve would be much better.  So I ended up re-tracing and -fitting the Esme pattern from Lotta Jansdotter’s Everyday Style book again since Mum had really like the one I made for her previously.  I just adapted the sleeve to have the Burda cuff on the sleeve end.

The fabric is a really beautiful, green polka-dotted ivory crepe from Fabulous Fabrics; Mum and I went in together and chose it one morning.  Fun!  I didn’t use the neckline facing pieces, opting in stead to fully line the dress with an ivory lining that I already had in my stash, the lining negated any need for a facing…  Mum kindly hemmed the dress herself since I was seriously running out of time by the end of it!  The dress shell has french seams throughout, though I used the overlocker for the lining.

At the same time that we bought the fabric, Mum bought a length of emerald green chiffon and finished it with a hand-rolled hem to make herself a lovely matching scarf.

I thought she looked absolutely lovely!

Item B; a shirt for part of Cassie’s birthday pressie…

For her birthday, we went out together and bought a few lengths of fabric which I was to make into some simple work outfits for her.  Of course now she’s working from home but that’s ok; at least she’s still working!

This is pattern 02/2015; 113, adapted to be much slimmer in the body due to the fact that I didn’t buy enough fabric, ahem… that’s fine since the style is so super wide I think Cassie would have requested it be slimmed down anyway!  This thing is BOXY!!  I also had to leave off the sleeve cuffs, but Cassie absolutely loves it just as it is  :)..

The gorgeous polka-dot fabric is a linen from Fabulous Fabrics.  The buttons are leftovers from Kelly’s wedding dress!

I did manage to snap one photo of her wearing the top! kinda a miracle given how crazy busy we were before the wedding, and then I’ve barely been able to see her after the wedding during these virus social-isolation times… this is her on the eve of her wedding, when she was preparing to practice her father/daughter dance with Craig… yes, she’s wearing her wedding shoes of course  🙂

I actually made a little video on the making of this blouse, which was fun.  I’m hoping to make more of these for my YouTube channel  🙂

Item C; some shorts for Cassie’s birthday.  For these I started with the Closet Case patterns Pietra shorts and did the same elastic-waist elimination that I did for my own shorts… shown here.

The fabric is a cotton twill from Spotlight, in Cassie’s favourite duck-egg/mint green colour.

Item D; another little top for Cassie… this is the Closet Case patterns Cielo top, lengthened slightly. This is a lovely little pattern and I will definitely be using this one again!  No other adjustments.

The pretty rose-print is a linen from Fabulous Fabrics.  I should say, that while these pieces are all a gift from me to Cassie, she did choose the fabrics herself.  We had a lovely fun morning checking out fabrics and chatting about work-wardrobe possibilities!

Items E & F; I made two different masks for myself.  I haven’t used them very much but am really trying to get more used to the idea!  When we’ve visited Japan I’ve seen lots of people wearing masks all the time of course, and while I think they’re a great idea, especially in our current virus-centric lives, we’re just completely unaccustomed to wearing them here in Australia and it’s really hard to get used to it.  I find them very claustrophobic and a little difficult to breath in them!

The first one, above; I used this pattern/tutorial on the Makers Habitat YouTube channel, it has a lining with an opening so you can insert a filter inside.  It’s a nice straightforward pattern, very quick and easy to make.  I added a skinny channel to the top, and cut a short length of wrapped florist’s wire to insert in there for a nose support; this can be removed for washing.

This second one I used the Trend patterns free mask pattern, here.  This is also a nice pattern, very “designed” and I really like it, but I did find I had to fold a quite wide dart in the under-chin piece to get a good fit.  Also it is a more complex and involved thing to make than the previous pattern,  For both masks I used a leftover piece of cotton from my stash, the most tightly woven and with the densest thread count I could find!   They are both lined with cotton voile.  The ties are just thin strips of cotton jersey, cut with my rotary cutter, left unhemmed, threaded through the side channels and simply knotted.

pinterestmail

deep teal, suedette dove blouse

Hey!

I’ve made a new blouse.  It’s the Dove blouse by Megan Nielsen patterns, in an lightweight but warm, faux suede from Spotlight.  So, the recommended fabrics for this pattern are shirt-weight stuff like voile and crepe de chine and chambray and linen… not a wintery fabric like this.  However, when have I ever taken any notice of fabric recommendations? Pretty much NEVER, haha.

And I love it.  Very very happy.  Look at those sleeves.  Oooo yeah.

this is a blouse that demands at least one dramatic arm pose

Now, remember how I mentioned pretty recently that I was looking out for this pattern??  Well, Evie, of Indie Stitches very kindly emailed me to let me know that she had one in stock… and offered to send it to me… thank you so much, Evie!  Indie Stitches is an online pattern store with a very nice range of both paper and digital patterns, obviously as the name suggests specialising in small and independent pattern makers like Closet Case Files, Grainline, Sewaholic, Jennifer Lauren Vintage, Papercut, By Hand London, Tilly and the Buttons, Waffle patterns, Megan Nielsen and would you believe this is just a selection?! There are many many more!  If you love supporting small independent pattern companies then I highly recommend heading over to the Indie Stitches pattern store and having a browse, at least.

Please note; I did receive this pattern gratis, however there are no affiliate links in this post.  I will always notify my readers if there is an affiliate link in my posts.  Also on a tangential yet related note, I read somewhere that people think bloggers are raking in the money through affiliate links, well! that may be true for some types of bloggers, like maybe fashion bloggers?  but sewing bloggers…  NO.

For the sleeves you do a triple-stitched skinny hem… it’s a hem finish I have used a few times before that gives a neat little baby hem but with no rippling or “lettuce-leaf” curling that you usually get with a single-stitched or machine-rolled hem… I think I read about it first years ago in an issue of Threads.  I wasn’t sure how it would work out with the slightly thickish suedette, but it did beautifully! and I had a request from my daughter and also from sewnewbee in IG as to how exactly is it done so I did a little sample and took a few pictures for a short tute…

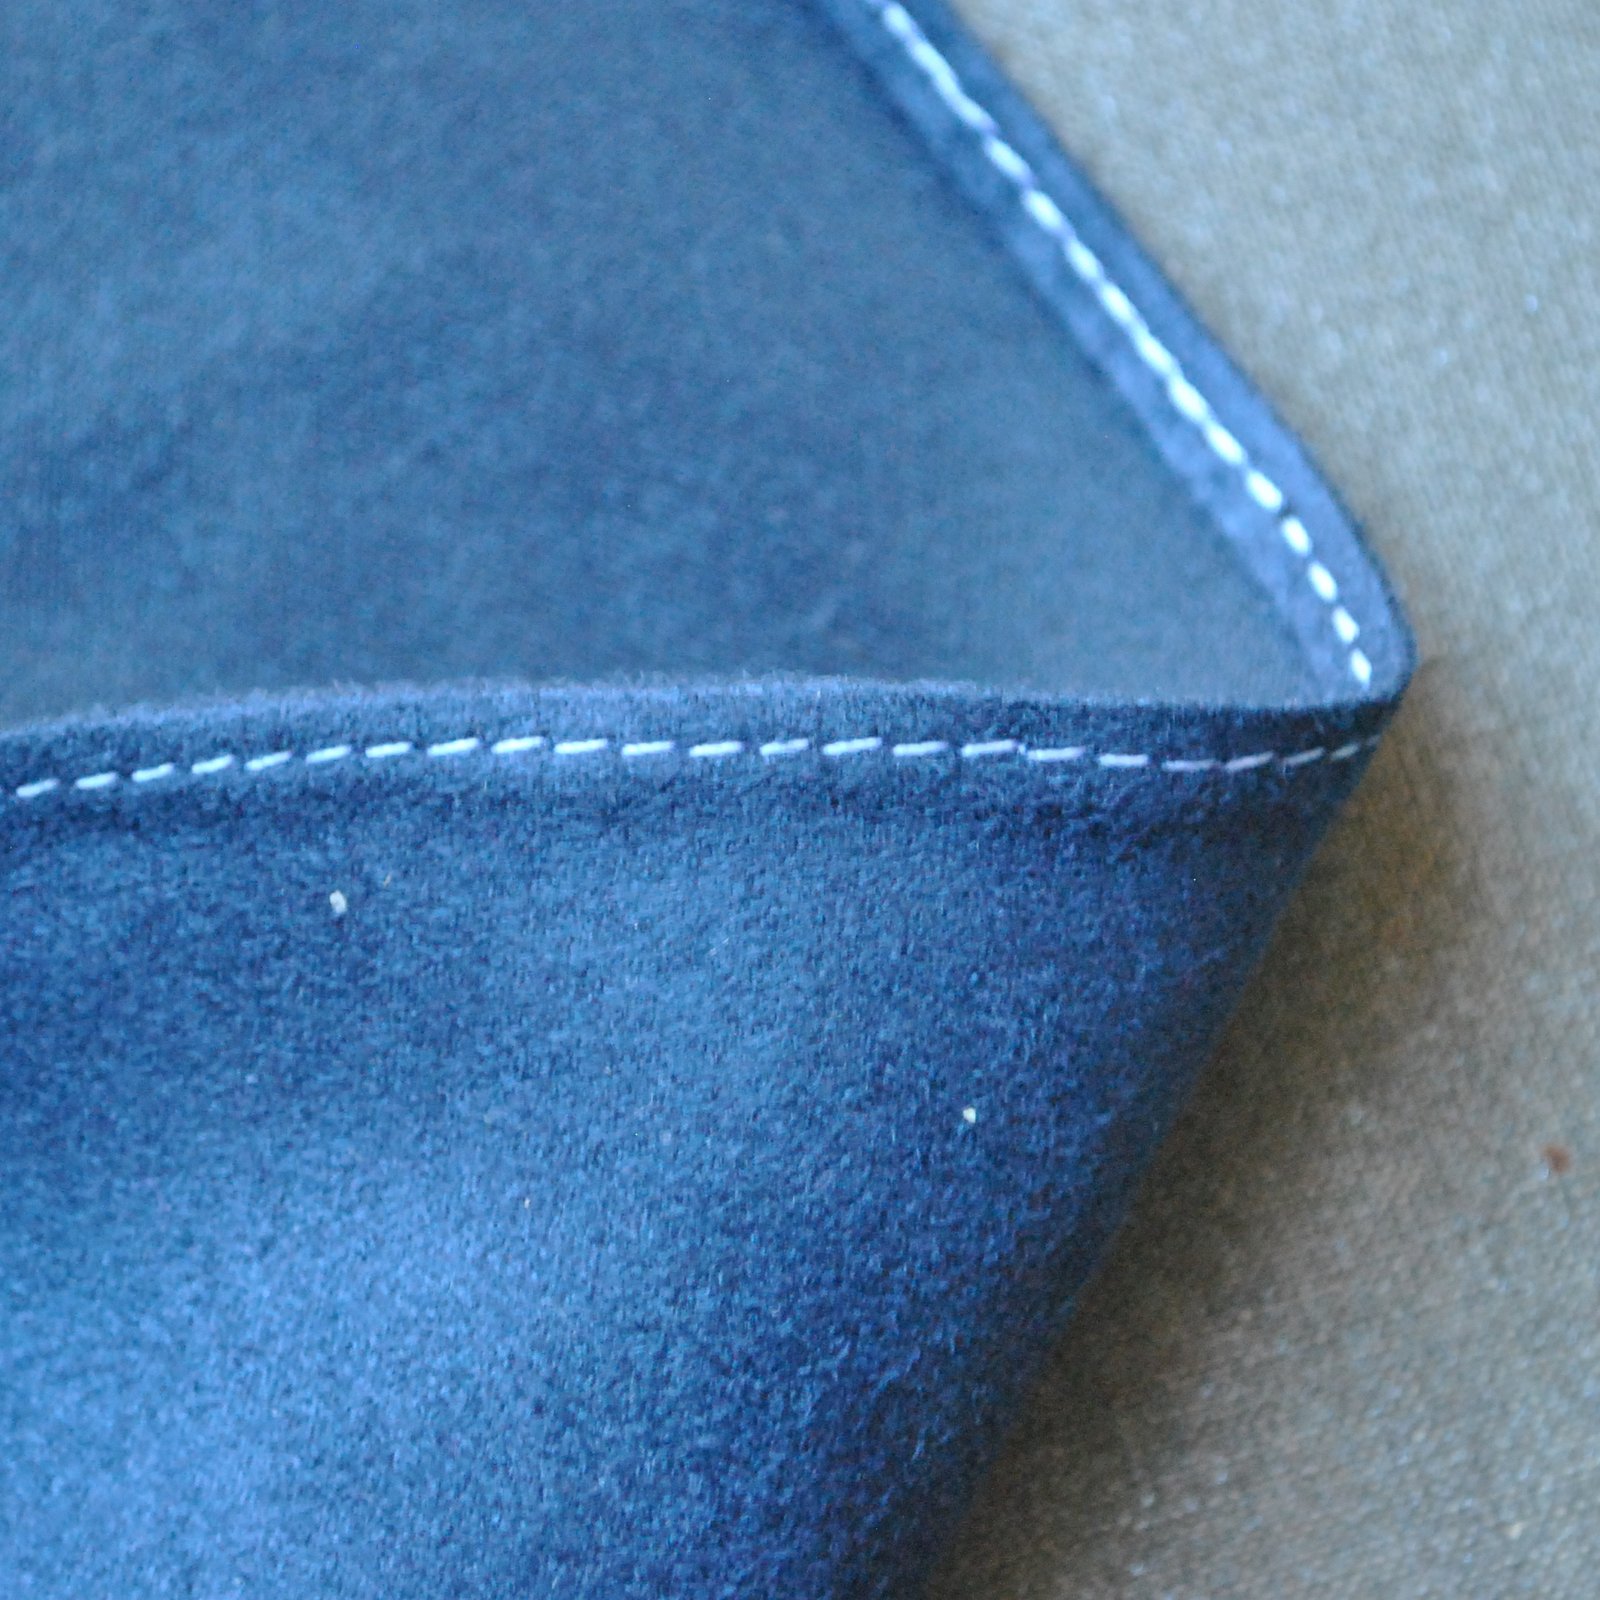
I used a contrasting white thread here because I found you could barely make out a single thing in my pictures with the matching thread!  anyway:

First; stay-stitch at a distance of 6mm (1/4″) inside the raw edge, being super careful NOT to stretch out the edge while doing so.  This is the 1st row of stitching.

Turn the raw edge to the underside just outside the previous stitching, so the stitching sits just inside the pressed edge, and press.

Stitch again (the 2nd stitching) at a distance of 2-3mm  (1/8″) inside the pressed edge, and give it another quick press…

Trim away the raw edge as close to the 2nd stitching as you can.

Turn under this now extremely skinny, double stitched edge and stitch again (3rd stitching) right over the visible (2nd) row of stitching.  The first two lines of stitching help keep the hem from stretching out as you sew, so your edge will be nice and flat and with minimal “lettuce-leaf” curl along the edge.

Inside: looks almost like one row of stitching, but it is actually two; one over the top of the other

Right side has only one row of stitching… plus a very skinny, nicely non-curly edge achieved in a difficult to hem fabric  🙂

excuse me ma’am, your remote is showing

Details:

Blouse; Megan Nielsen Dove blouse MN2105, version 2, in petrol blue suedette
Skirt; Vogue 1247, yellow corduroy dyed brown, details here and my review of this pattern here
Tights; self-drafted, black polyester stretch, details here and my tutorial for making your own custom-fit tights pattern is here
Boots; made by me, and my own design, details here

location: South Perth foreshore, Western Australia

pinterestmail
Switch to mobile version
↓