Tag Archives: Handcrafts

Pink Alabama Chanin T-shirt

I’m very happy and pleased that my Mum agreed to let me photograph her wearing her very recently completed hand-dyed-embroidered-and-stitched creation, and to show the pictures here on my blog …
thank you so much Mum!
This is Mum’s third Alabama Chanin project, and the first completed one… she has very nearly finished a more wintery skirt and top but has put those aside for a little bit in order to make something with the flavour of summer.  She wanted to have something to wear now!

Mum hand-dyed white cotton jersey in three different shades of pink for her top; pale apricot pink for the under layer, a deeper apricot-rose pink for the upper layer, and a true pink- pink for the neckline binding.  The floral design is her own, and she made a stencil using dressmaking paper from Jackson’s but does NOT recommend this; it buckled and was apparently a nightmare.  The design was rollered on to the upper layer in slightly watered down, regular household paint applied with a small roller.  Mum used double thickness Gutermann’s upholstery thread to hand-stitch the floral motifs, all seams and the flat felling of all seams; and pink stranded embroidery cotton for the cretonne stitch to secure the neckline binding.  We had some debate on whether the armscye seams should be stitched down to the sleeves or the body?? a quick recce of the Tshirts in the general vicinity seemed to indicate that there is no convention here but men’s buttoned shirts are to the body so this seemed like a good example to follow.

The pattern is the Tshirt pattern from the book Alabama Studio Sewing + Design, by Natalie Chanin, with the neckline from the tank/dress pattern, and short sleeves.  Before launching into all that time-consuming embroidery Mum wisely tested the pattern and found it necessary to make small adjustments for fit… both of us loathe muslins and generally avoid them like the plague and yeah, it does seem ludicrous for a basic Tshirt in a forgiving stretch knit, but an Alabama Chanin project is kinda exceptional.   It doesn’t take long to run up a test Tshirt on the machine using a long basting stitch, and is well worth the effort.  And could save lives!!  Well; at the very least, a tantrum  πŸ˜€
Thank you so much Mum!

pinterestmail

Alabama Chanin; a tank top

Fortunately I have managed to finish the matching embroidered tank top to go with my skirt.  Hurrah! for plane trips and the resulting enforced hand-sewing time!  I’m so happy with the full ensemble; I like how it looks like a full dress, and that if I choose I can break it up into the separate components.  The pattern is the fitted top from the  Alabama Studio Sewing + Style book (Natalie Chanin), and is made from the same fabrics as the skirt; a thickish, cafe au lait cotton jersey substratum (KnitWit) with a dark olive, lightweight jersey overlay (Potters Textiles), the latter stencilled with the Anna’s Garden stencil from the same book as outlined here, and top-stitched with Gutermanns topstitching thread.  

I took a slight swayback wedge out of the tank pattern…. looking at the picture below I could possibly have gone further with that, oh well, next time.  Otherwise it has the same width shoulder straps and the same low rise of the back neckline as the original pattern.  The stitching throughout is in exactly the same style as the skirt; with all seams stitched and flat-felled by hand, and the neckline and armhole binding sewn on using herringbone stitch.

My Mum wanted to know if the jersey fabric loses its stretch though being embroidered; it does lose a little, but not all of its stretch.  The fabric also shrinks ever so slightly through the process of quilting the two layers together. Not drastically, but if your muslin is skintight then I reckon this is definitely something to bear in mind.

OH BTW! a little tip I forgot to mention before… when the pattern pieces have been cut out and stencilled, stay-stitched and are awaiting embellishment; the very first thing I did was to tack a scrap of paper to each piece as above, marking the centre front or centre back of each piece, as applicable.  The pattern pieces for both tank and skirt, are actually all so similar to each other that I think this is an essential precaution!
Well, was it was worth all the hours of hand-work?  But of course.  I’m not going say otherwise now, am I?  πŸ˜‰

Actually, seriously, I totally love my AC pieces and it was no biggie to make the tank top; each pattern piece is quite small and manageable and the embroidery can be knocked off in a couple movies or a short plane trip quite easily.  A little tank top is not really the sewing marathon that the midi skirt is.  I’m even feeling optimistic about taking on another Alabama Chanin project…! (gasp!) um, well… in a while.  Maybe, hehe.  Well, I should really, I bought a whole lot of beads while Mum, Cassie and I were in Melbourne, in a zealous fit of enthusiasm, so hmmm.  (blush)

Details:
Top; the fitted top from the Alabama Studio Sewing + Style book,  hand-embroidered and -stitched cotton jersey knit in two solid colours
Skirt; the midi skirt, same as above, all sewing details here
Sandals; Zomp, from Zomp shoes

pinterestmail

Alabama Chanin skirt and tank

Hello!
So! after hours (and hours… and hours…) of aeroplane and in-front-of-the-TV stitching, I have finished my first AC project(s).
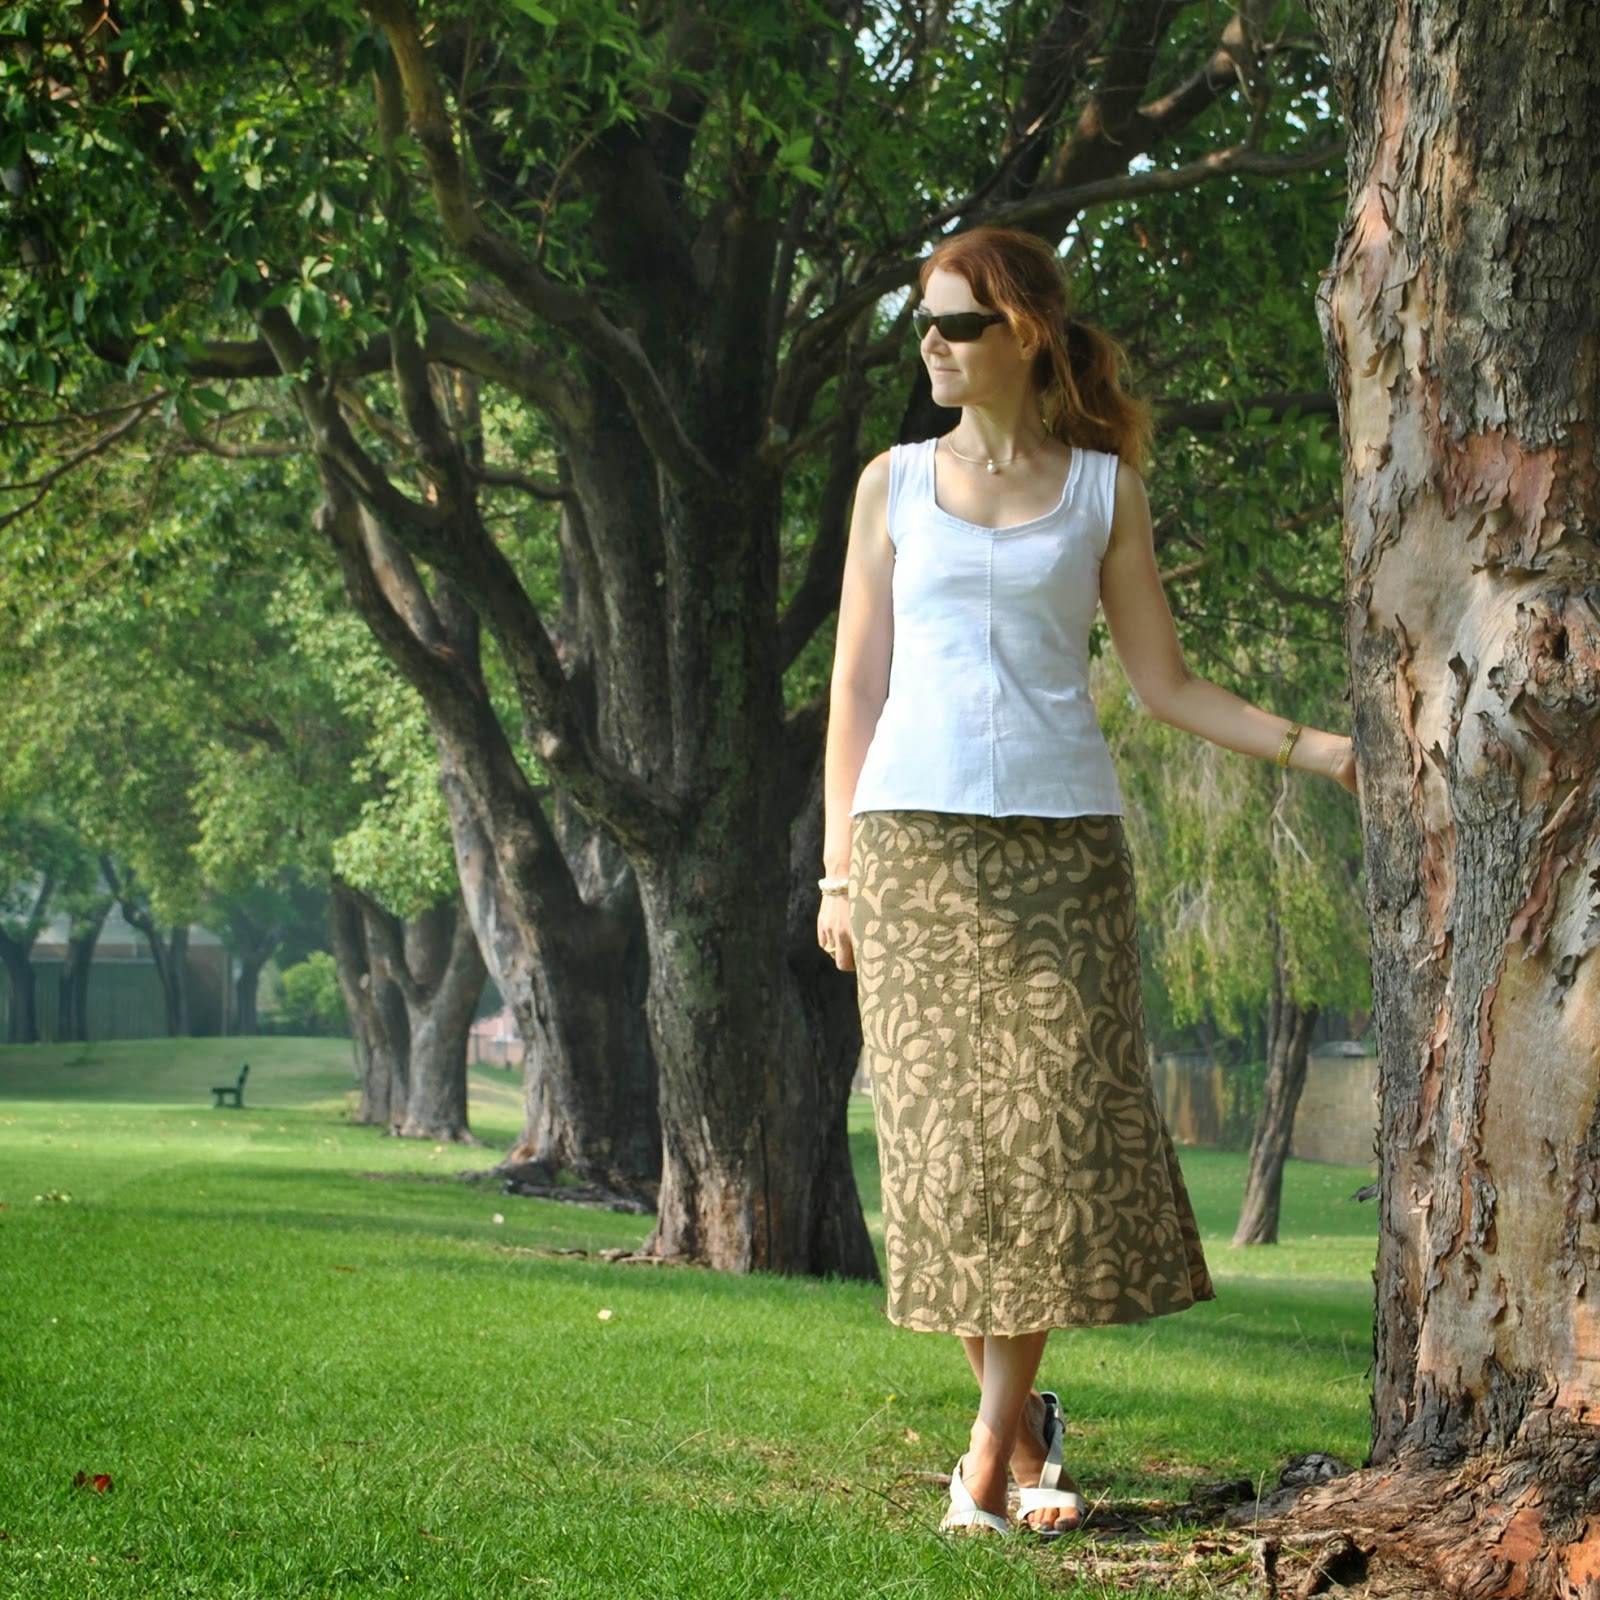
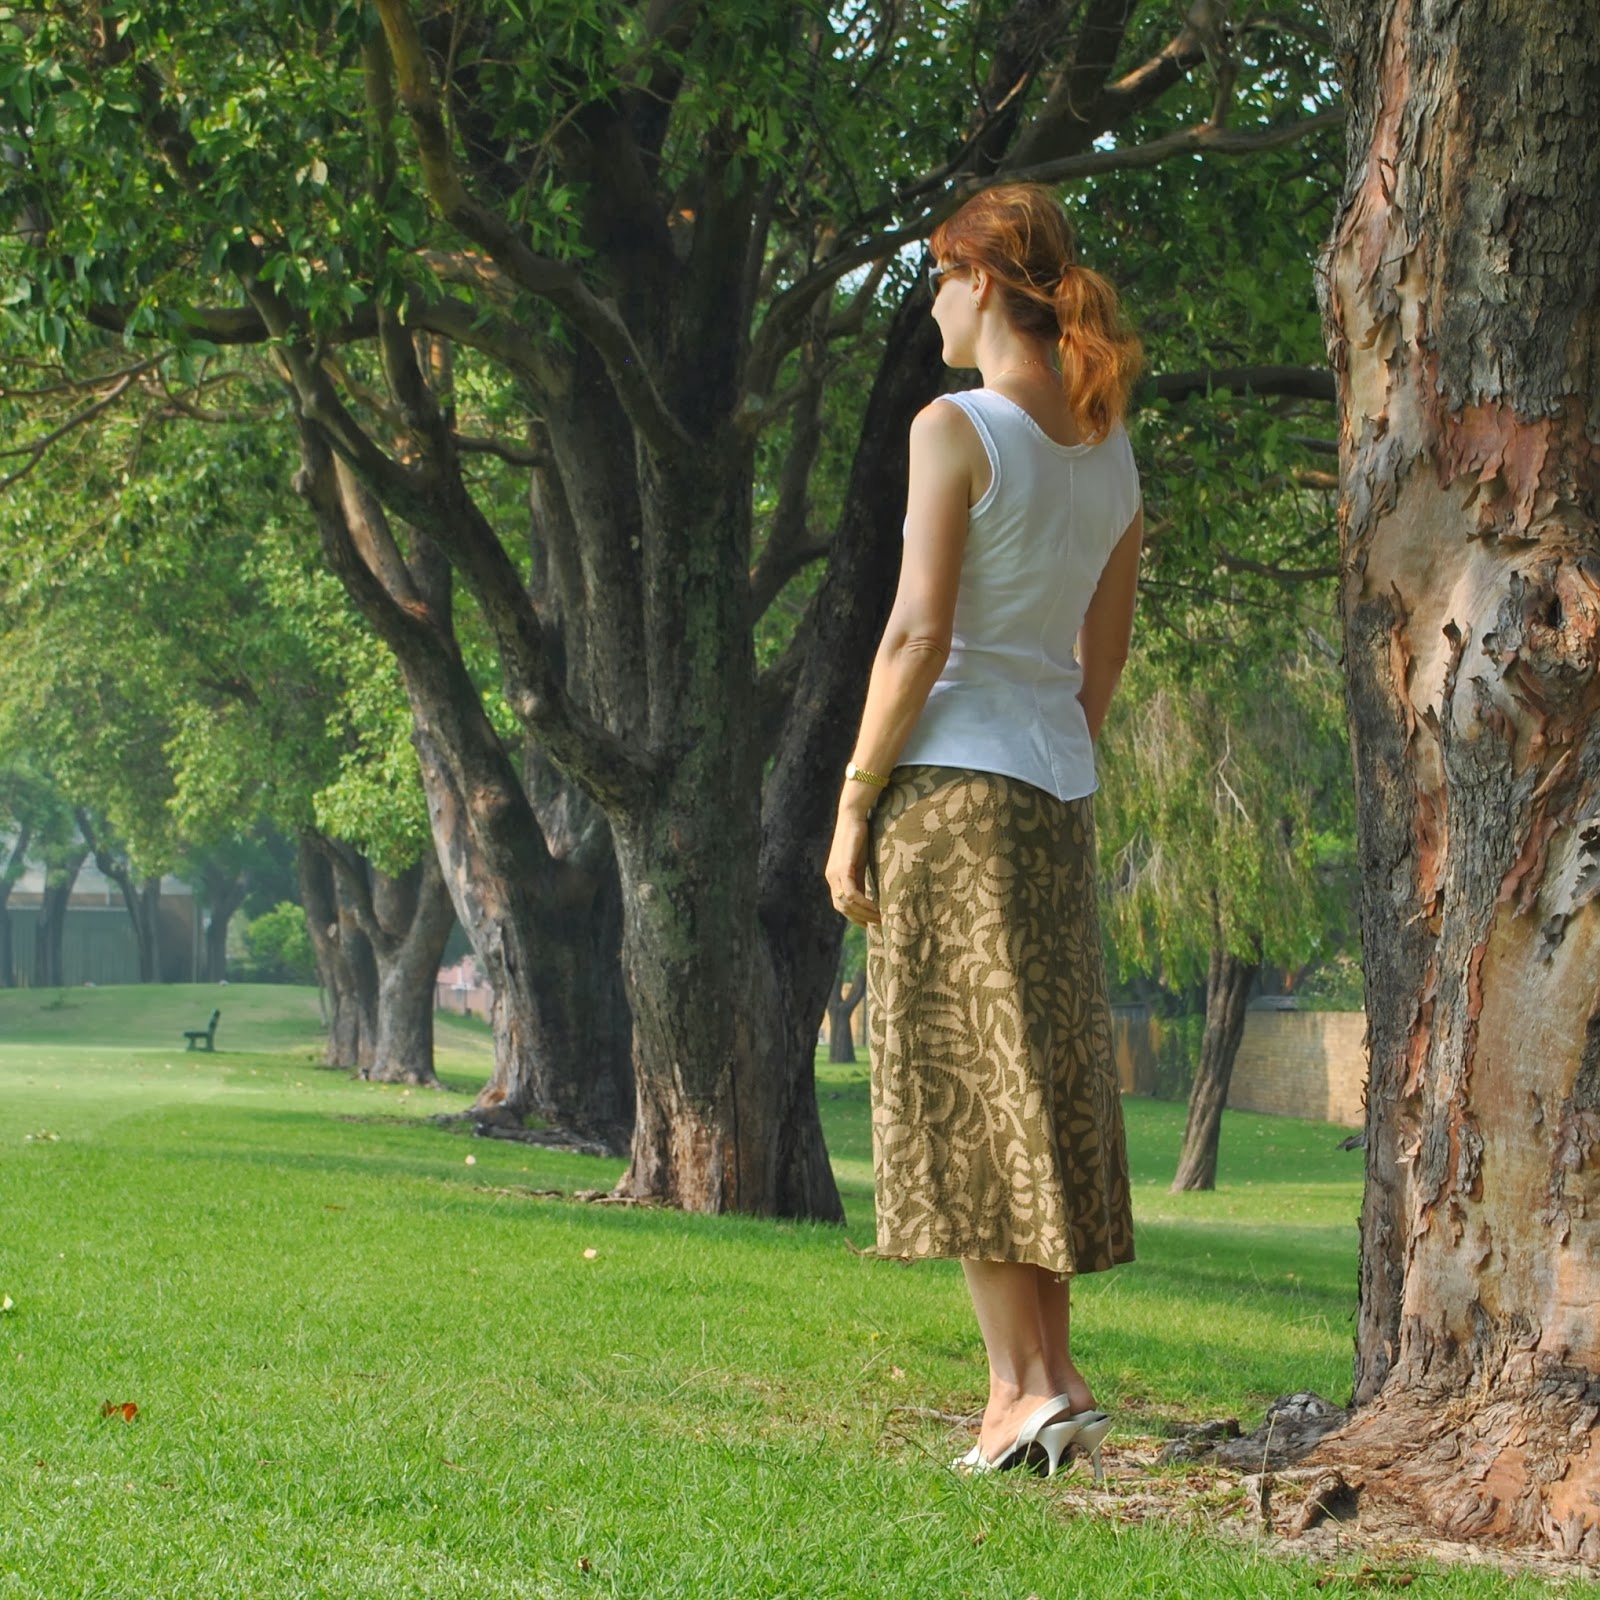
This is the mid-length skirt and the fitted tank top, both from the book, Alabama Studio Sewing + Design, by Natalie Chanin.  The two are actually just one pattern, a full length dress pattern, which you cut off at the relevant places to make either a skirt or a top.  Or a tunic or a dress.
Great idea, by the way.    I love the economy of one all-inclusive pattern.  Means you only have one thing to store, but about a zillion “making” opportunities in there.  OK, to be accurate there are eight garment possibilities from the one pattern, but surely at least a zillion wearing and layering combinations to be had.

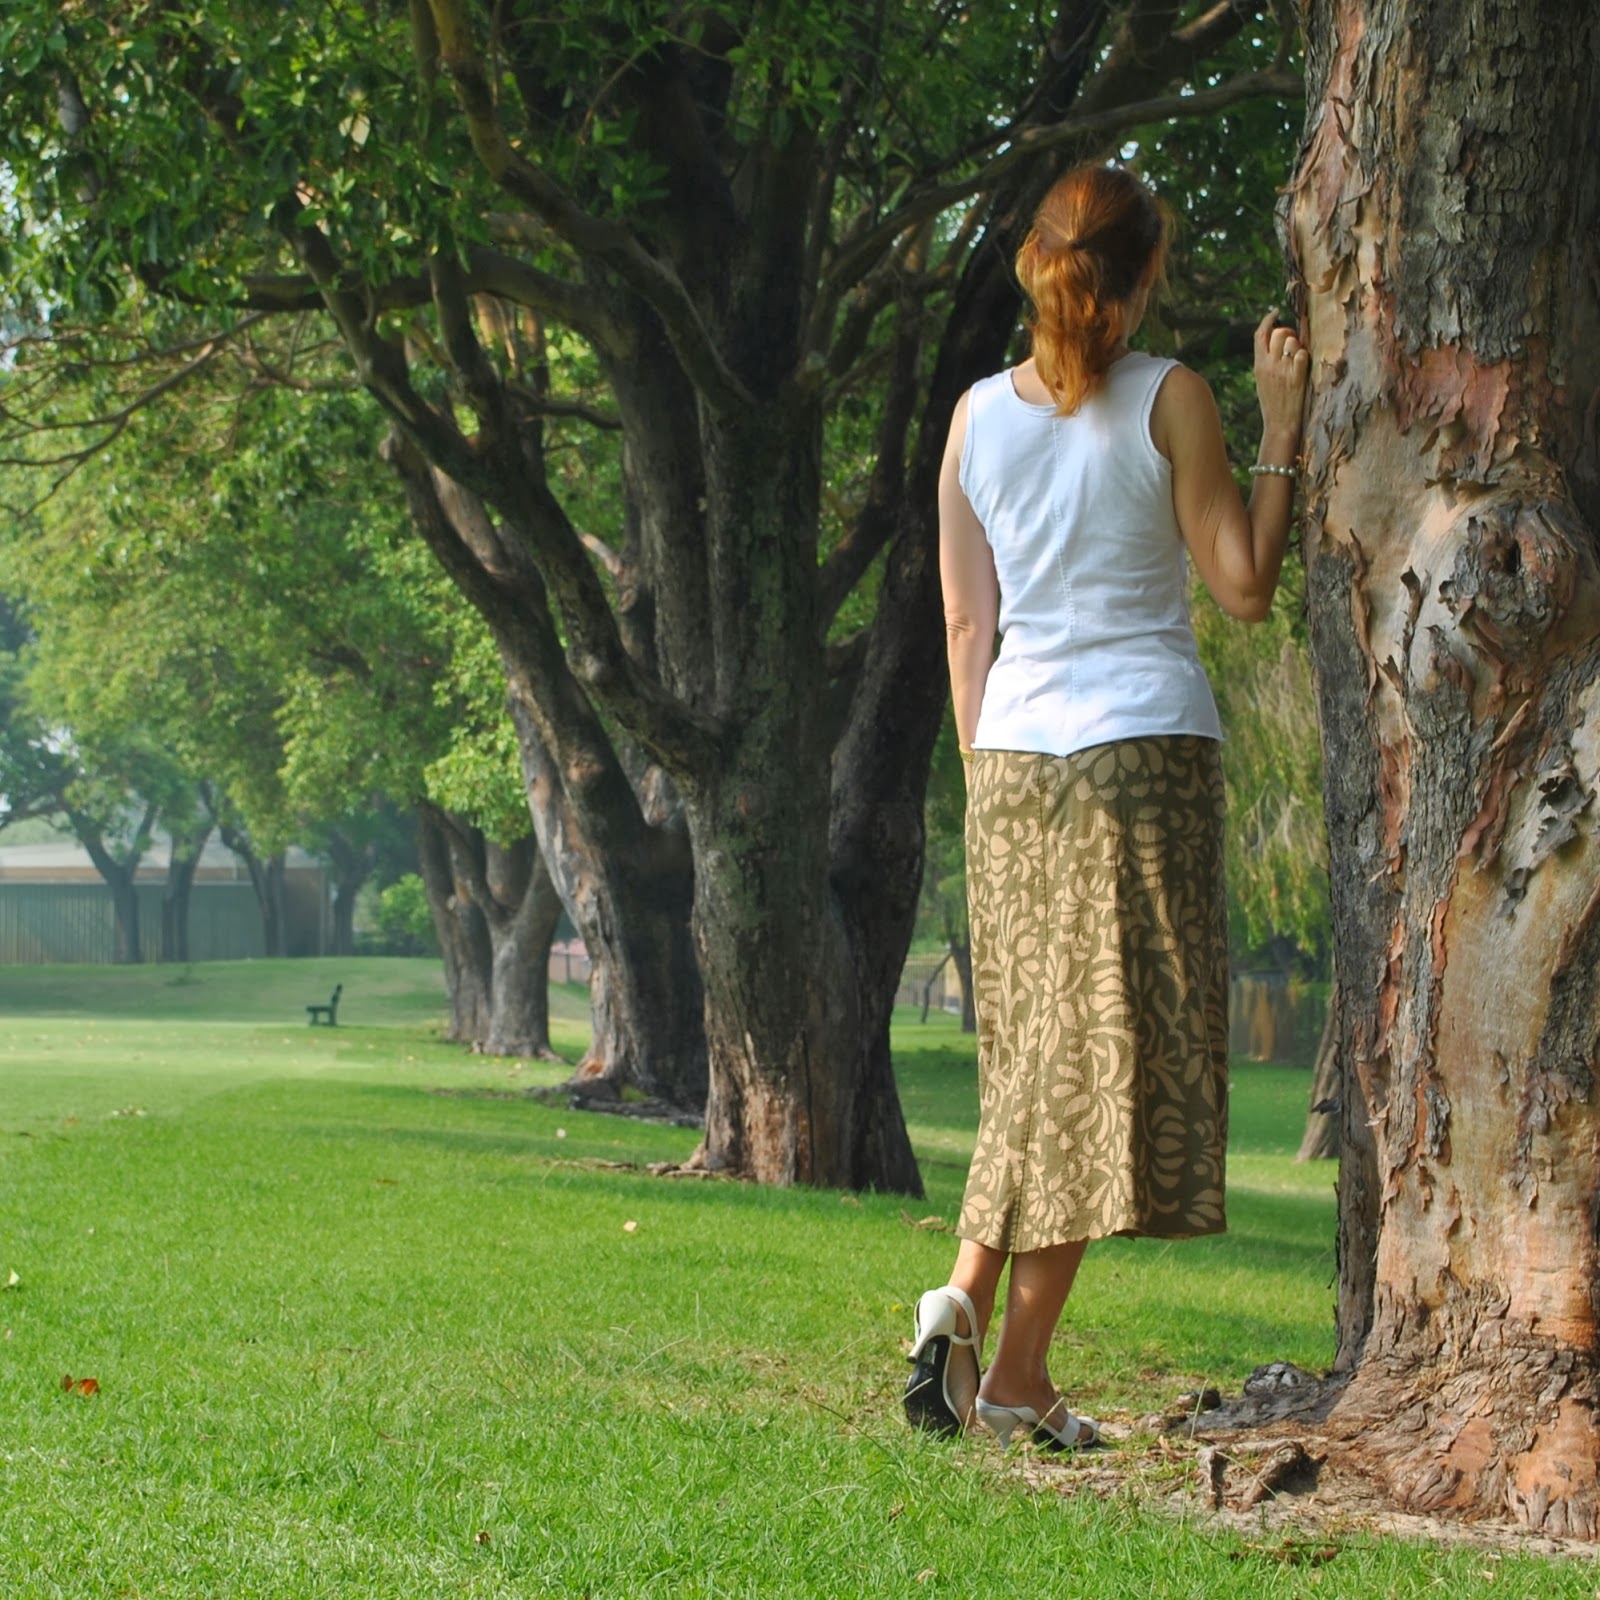
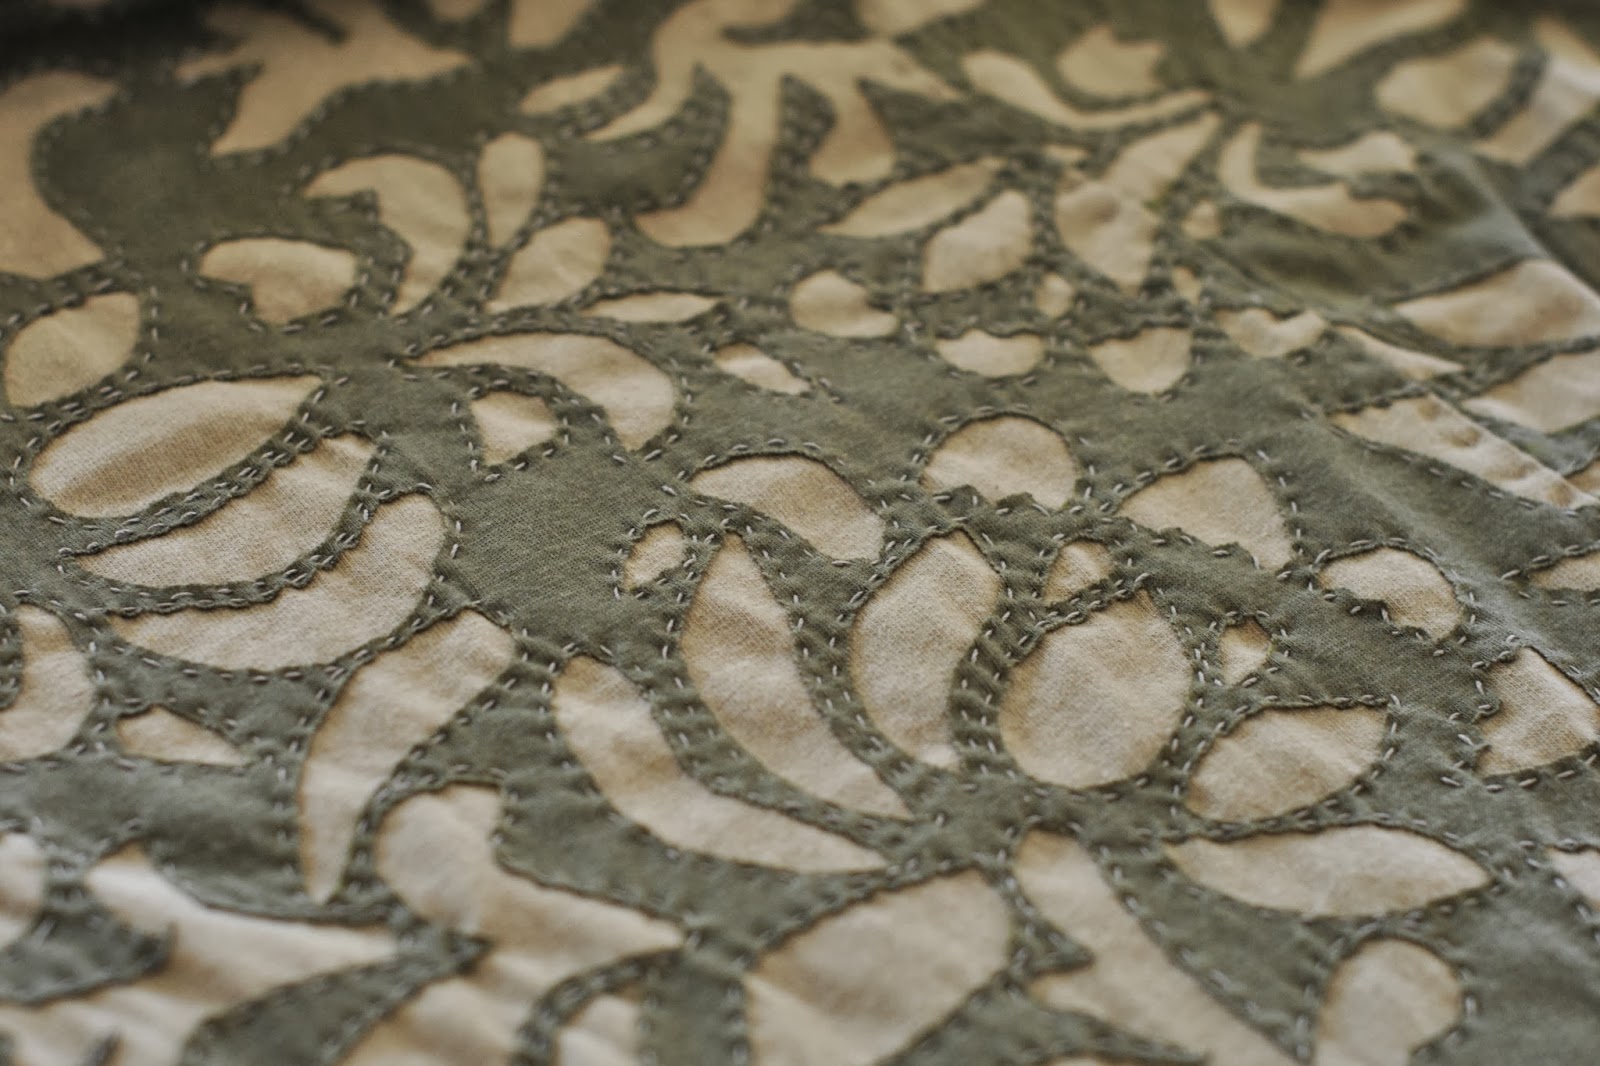
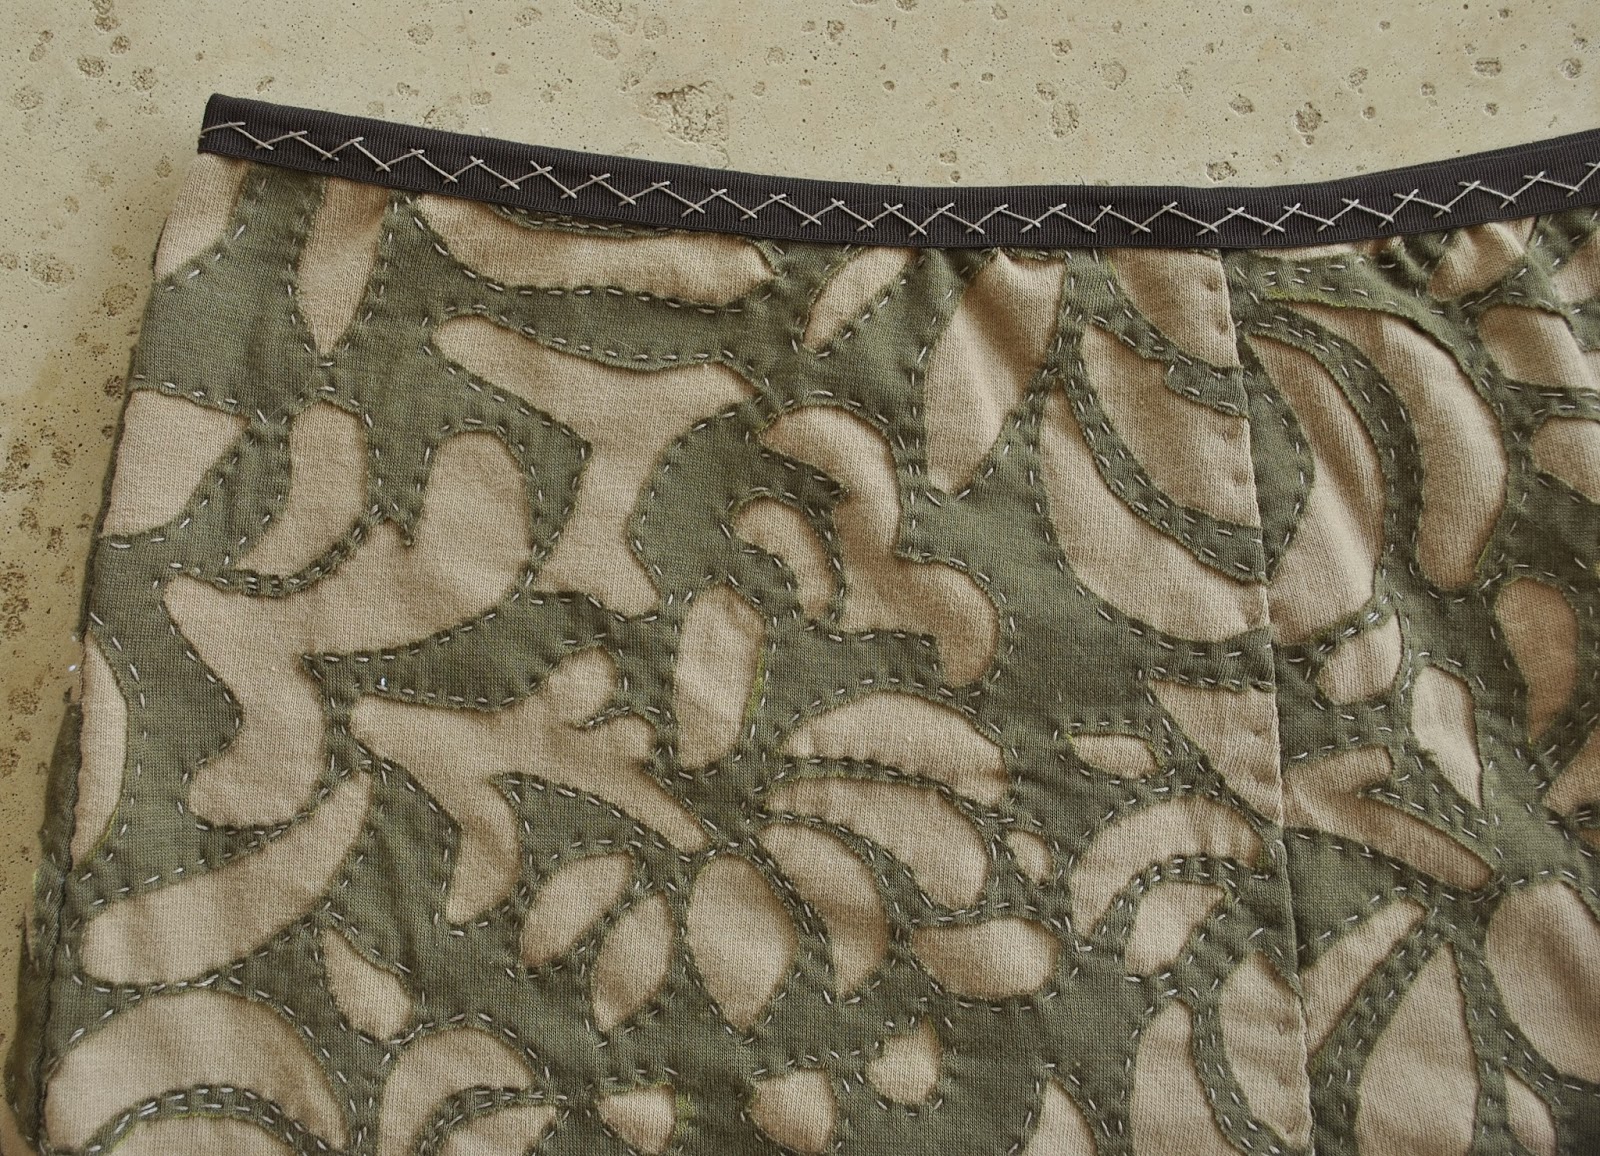
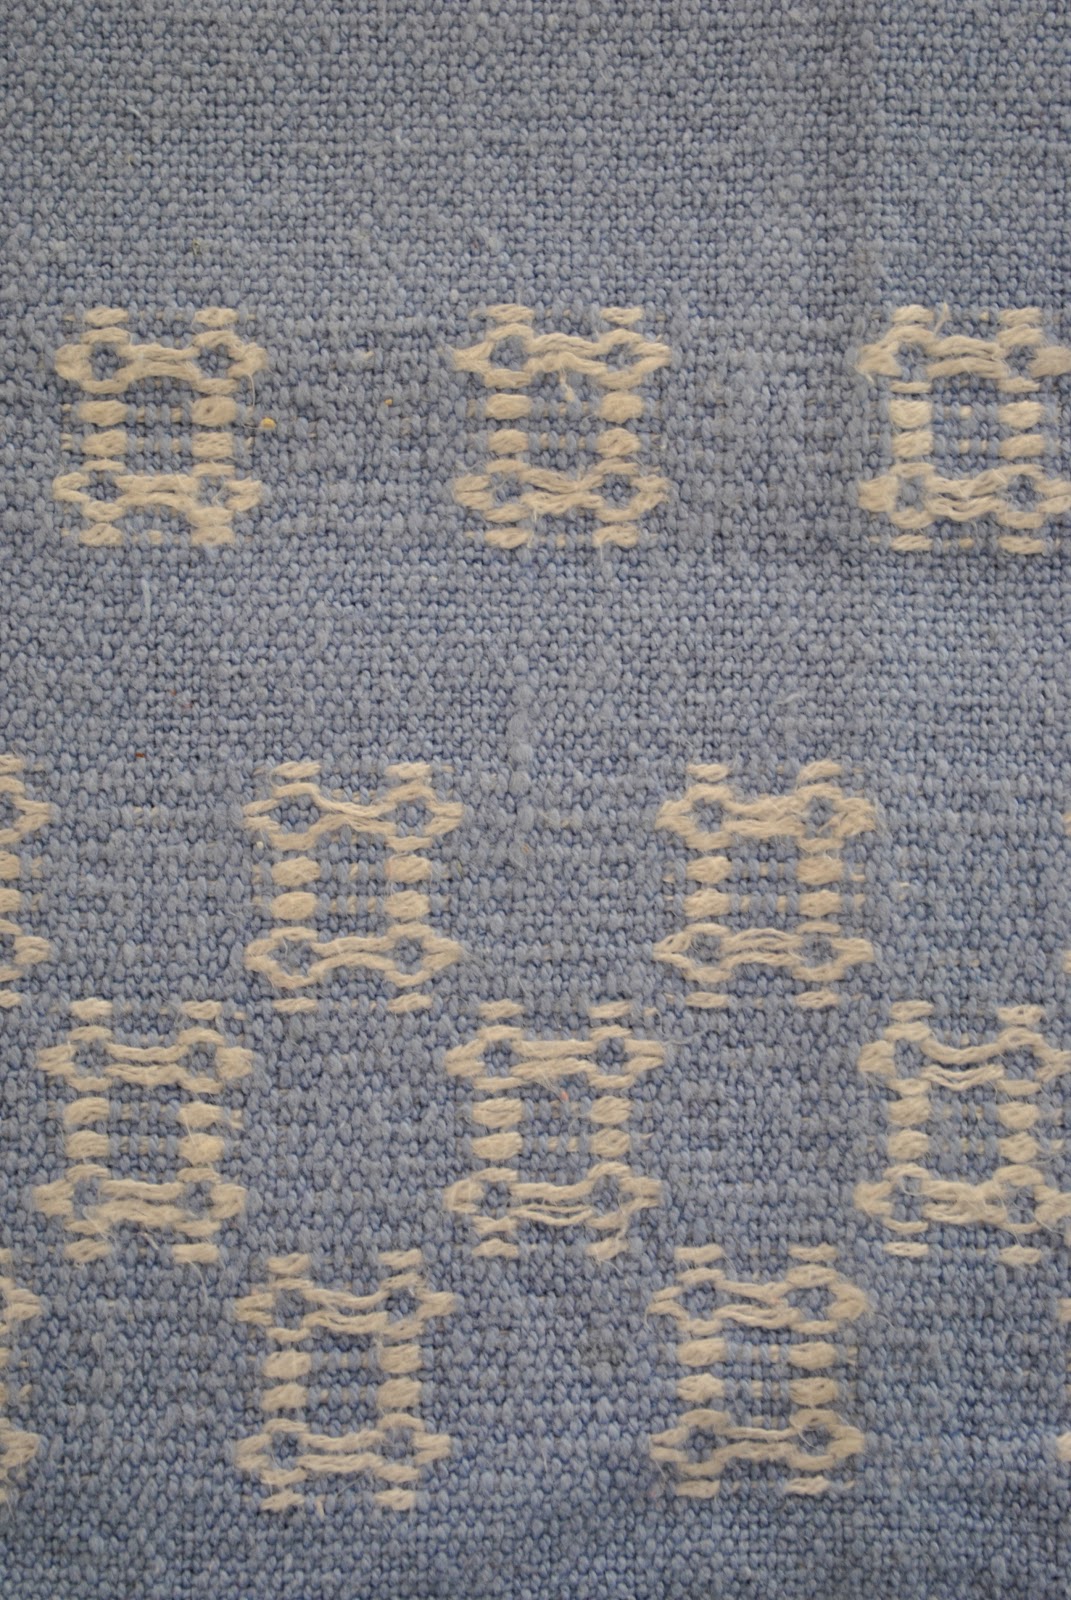
My skirt!  I’m so pleased with it!  It is totally hand-quilted and stitched in the reverse appliquΓ© technique described in the book;  using a top layer of lightweight deep olive bamboo/cotton knit, bought originally from Potters Textiles years ago, and the base layer is a thicker and more stable dirt-brown cotton jersey from KnitWit, also bought years ago.  These are my colours, yo  πŸ™‚  I also used some of that same brown cotton to make part of Tim’s hoodie, here.

The stencil pattern is Anna’s Garden from the AC book, enlarged 306%.  I applied the stencil to the olive fabric using a small foam roller and regular household paint, as described here.  The thread used throughout is a brown/grey Gutermann’s upholstery thread, although Spotlight ran out of my colour (grrr!) so a small portion was done in the same colour of Gutermann’s topstitching thread.  Top-stitching thread is kinda OK stuff but I really prefer the upholstery thread; much smoother and less prone to the strands separating from each other.
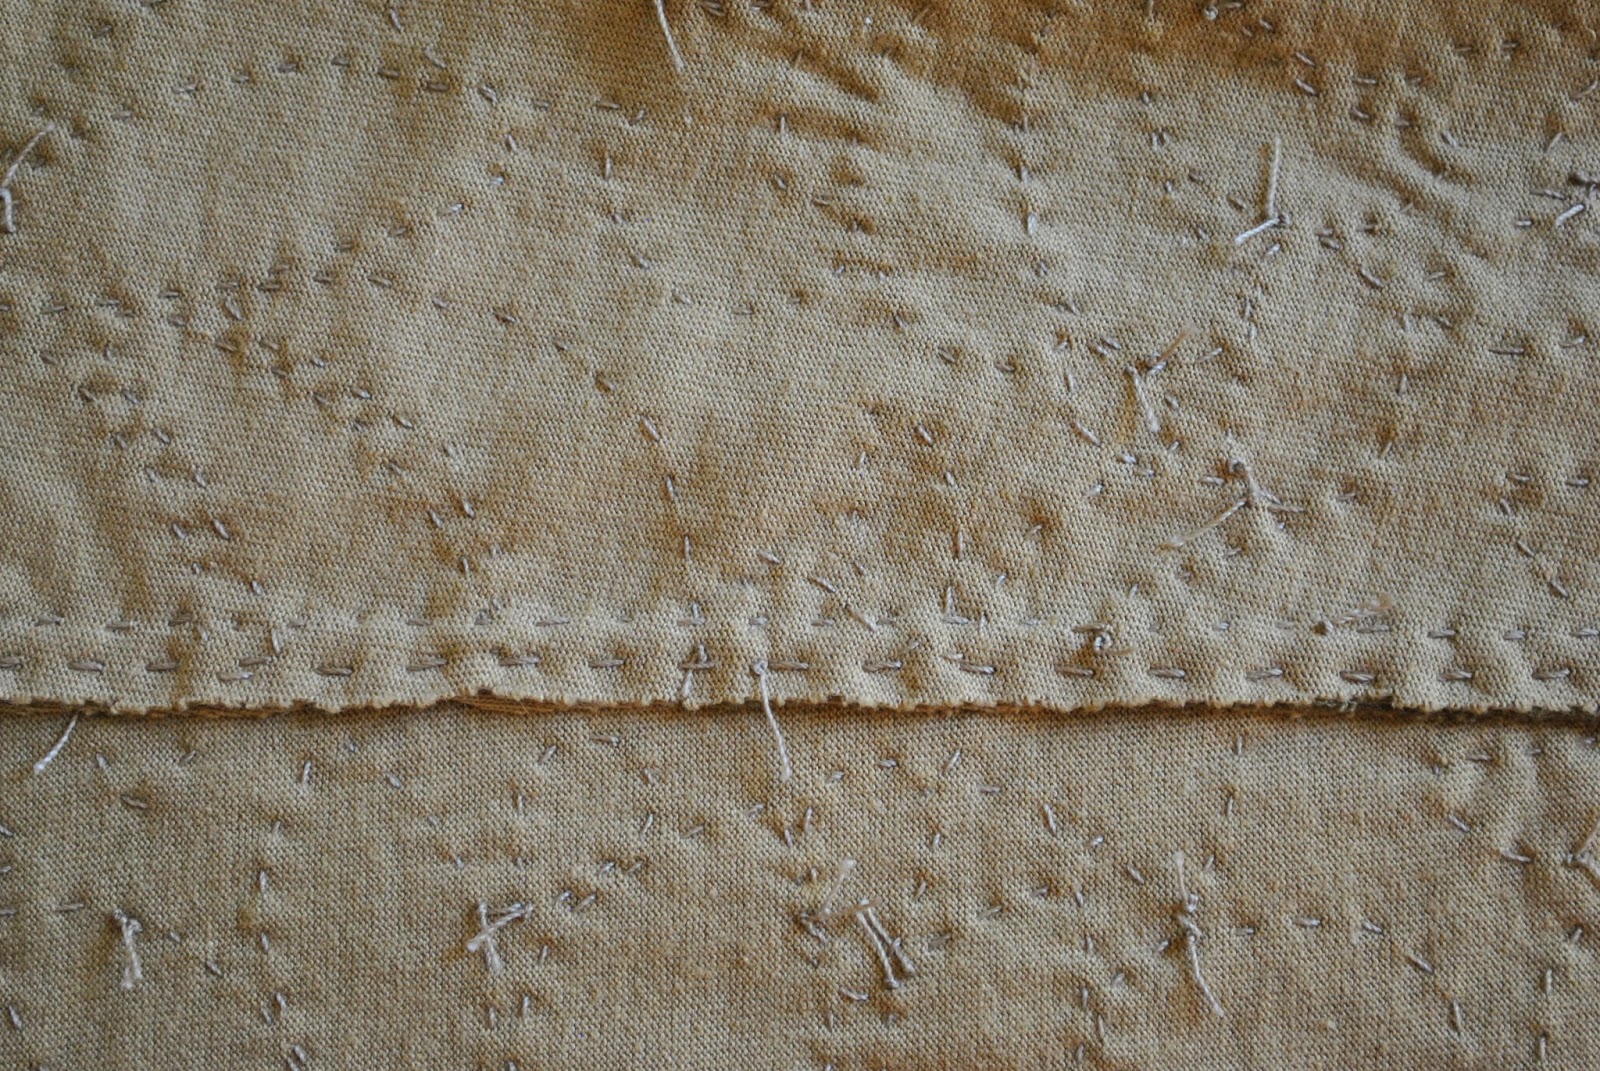
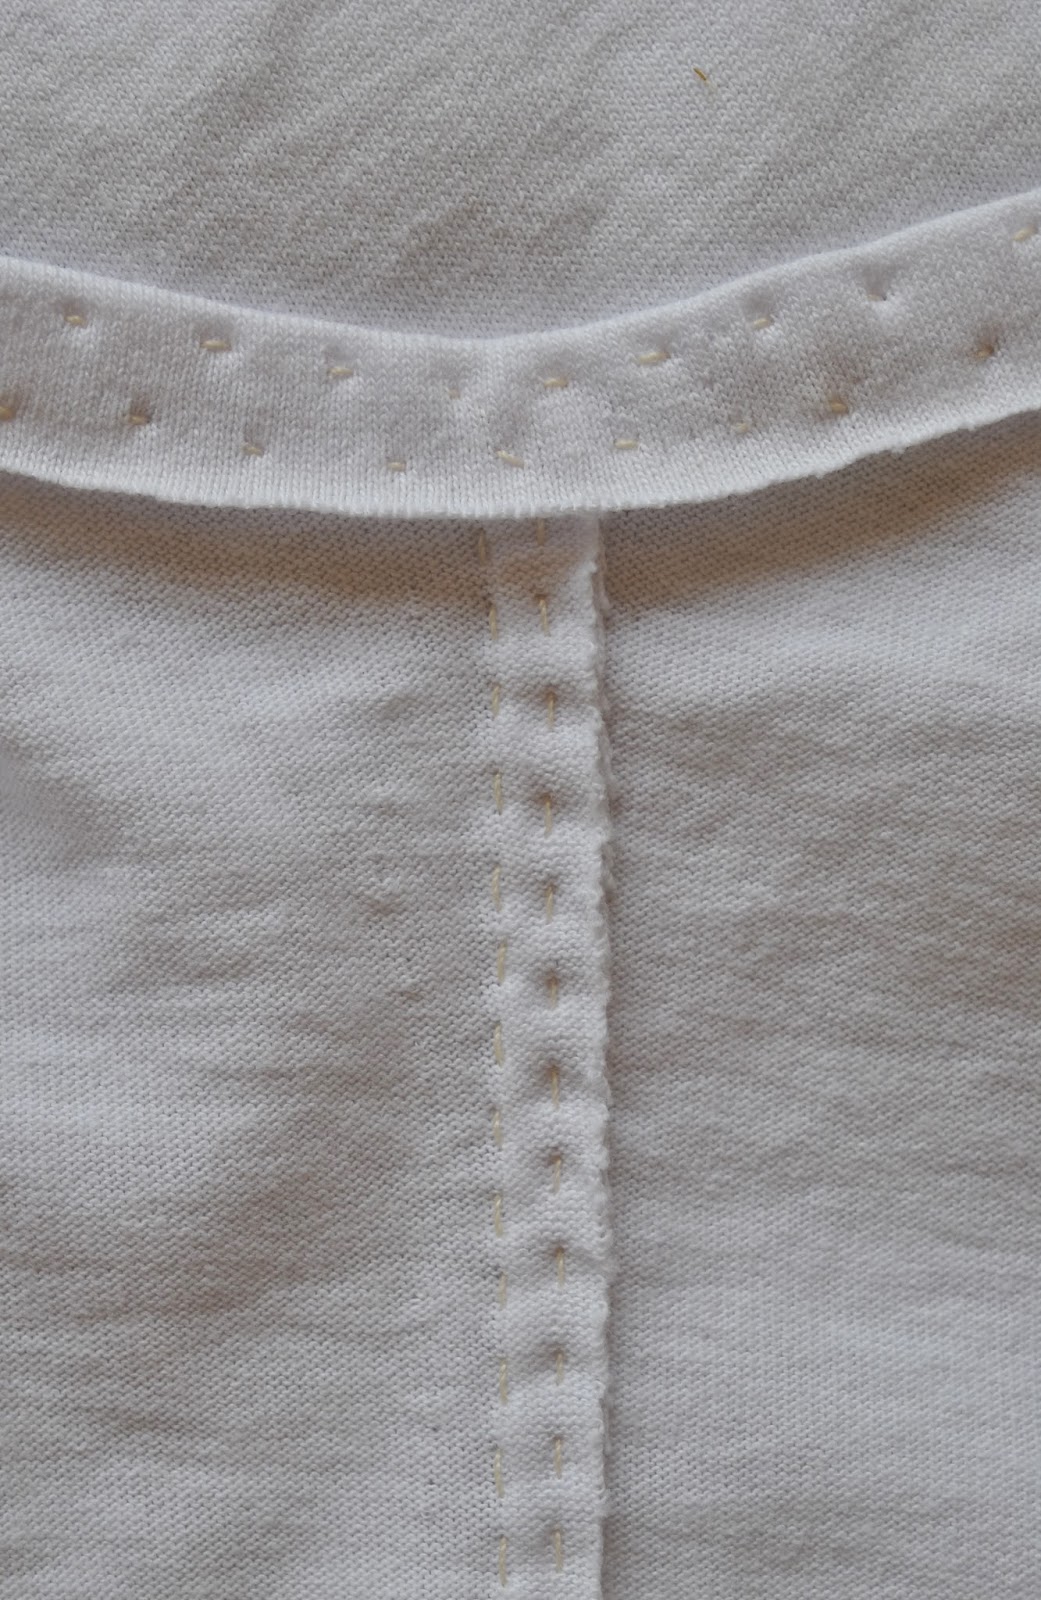
All the seams are hand stitched too, and felled by hand.  I had initially toyed with machine stitching the seams; but of course after all that hand embroidery I knew I had to finish off properly….   This took a blink of an eye compared to the embroidery side of things, so I am so pleased I opted to “do it right”, so to speak.  I like the way the felling shows upon the right side as a row of dimples; barely hinted-at stitches along the seams.

I finished the waistband with chocolate brown fold over elastic, bought from Tessuti’s in Melbourne. This stuff is extraordinarily expensive here and pretty hard to find in Perth.  Believe it or not; this colour is the closest match that I’ve found… anywhere

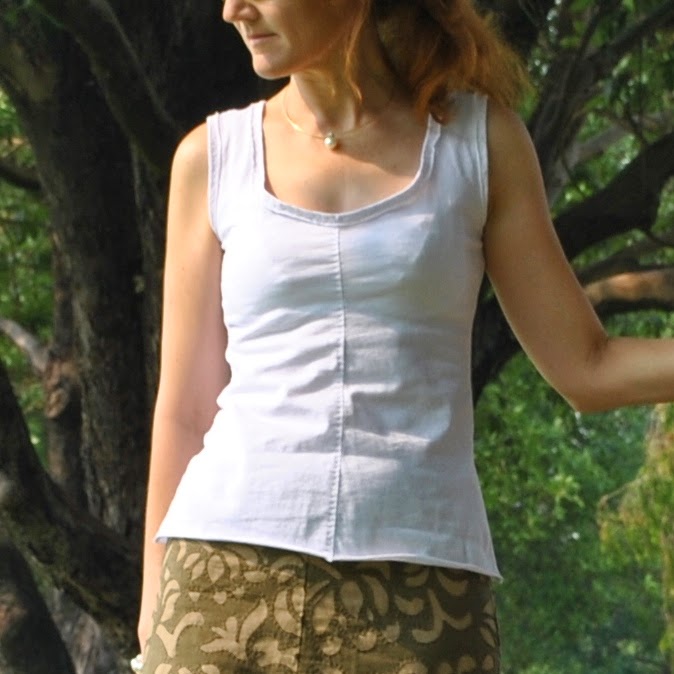
My top: I actually do have a matching deep-olive-and-dirt-brown fitted tank top printed, planned and ready to go, but as soon as I finished the skirt I had a Vision; only the plainest of plain white tanks would be the absolutely perfect-est accompaniment to this busy busy skirt.  I had the immediate compulsion to make such a thing.

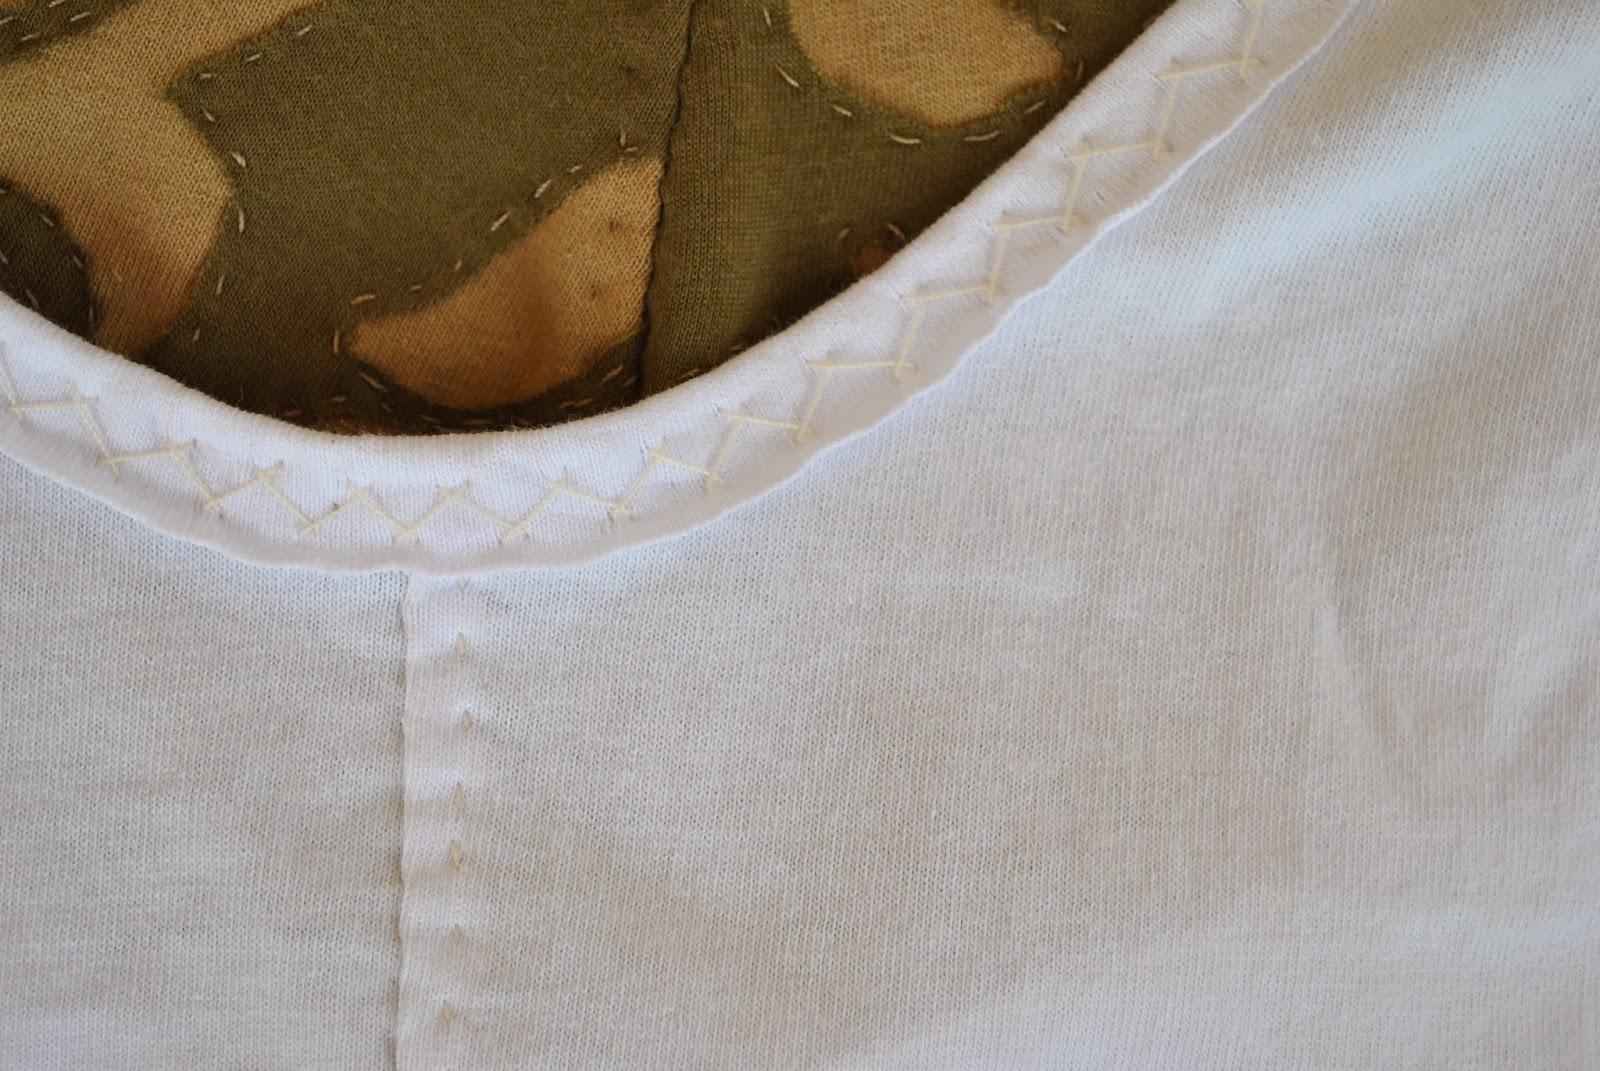
I bought the white cotton jersey from KnitWit, and made up a very simple fitted tank; no frills but still constructed in the Alabama Chanin way, so stylistically it matches the skirt really well.    The seams are stitched and felled by hand, and the binding applied with herringbone stitch.  Although there a visible knots aplenty on the inside of the skirt… unavoidable!  I went out of my way to hide them on the inside of the tank top, concealing all the knots inside the layers of the felling and binding.
Neckline and armhole binding and seams: below left, right side view; at right, inner view with felled seams

Fitting-wise;  I raised the back neckline of the tank and made the shoulder straps a little wider also.  In my early experiments, I sliced a biggish sway-back wedge from the pattern which affected both the tank and the skirt pieces. 
Time-wise; the tank top took, like, one day at the most? while the skirt has taken weeks!  Although I would like to add more Alabama Chanin pieces to my wardrobe, there is no danger that I am going to get addicted to this technique.  It is basically identical to hand-quilting and I have made enough quilts to know I can only take so much of that.  My left pointer finger needs time to rest and recuperate.  The tip of that finger has skin like a rhino now.  Seriously.
Obviously I am thrilled to bits with my first Alabama Chanin project, and the second!  however there will be one little hurdle; I’m going to have to force myself to wear the skirt and not treat it like a museum piece.  I’m having visions of unwittingly sitting down on a patch of oil, or brushing against a spiky bush or someone carrying a glass of red wine tripping and falling in slow motion  in my direction…. aaagh!  The stuff of nightmares!  πŸ˜‰

Details:
Skirt; the mid-length skirt from Alabama Studio Sewing + Design, hand-embroidered and stitched cotton jersey in two solid colours
Top; the fitted tank from Alabama Studio Sewing + Design, hand-stitched, white cotton jersey
Sandals: Franco Burrone, from Marie Claire

pinterestmail

the Wolery

After my brothers and I had all moved out of home and started our own families; I started a rather non-rigid, and not annual, tradition of making a Christmas ornament for each of us… just something silly and small, not anything of great worth or anything but something that could be a commonality to us in our separate homes.  This year I was happy to find the time for it again  πŸ™‚
so please say tu-whit, tu-whoo!  (trans.  Hello) to…
the Black parliament above
the Green parliament 

the White parliament

and the Brown parliament.

I used this pattern developed by Moonstitches, and I used old corduroy jeans, some scraps of cotton and embroidery thread; and the little buttons I had to buy new, from Spotlight.  Each owl has a circular cardboard base, covered with cotton and stitched in place.  I slipped a glass bead inside just before stitching the base on, to make the owls bottom-heavy and to help them stay upright and not blow over.
I just love how the tiniest variations in height and width, and the placement of the beak and the eyes, results in very distinct and individual personalities in each owl!

Merry Christmas all!

pinterestmail

Handwoven “rag-rug” placemats

Another set of hand-woven and -stitched items from my teenage years…
and I cannot believe I have so far overlooked these very frequently used items in my documentation process!  :O
To the best of my memory, this is probably my very first handwoven project on the big floor loom…  I expect Mum suggested these as a good beginner’s project before moving onto a more complex project; like the serviettes* I featured in the previous post, with an in-woven pattern.

A set of six placemats in the rag-rug style.  Each measures 40cm x 24cm. 
They are woven in a plain weave, with a blue cotton warp.  The weft was made of three different blue cotton fabrics; two plain cottons and one fine-wale corduroy.  These fabrics were cut into thin strips, the ends spliced and lightly hand-tacked together to make a continuous strip.

The tops and bottoms were finished off by hand-stitching a loop around each and every warp thread and into the weaving, the warp trimmed and then the ends folded under twice and stitched into hems.

These have been in solid rotation for twenty-five odd years although we haven’t really used them as much in the past coupla years.  This is not because they are fragile, oh no! the rag-rug is a super long-lifed type of fabric; super tough and hard-wearing and able to withstand a pretty heavy-duty lifestyle!  More just our laziness, not going and getting them out of the linen cupboard as often as we used to, I guess πŸ™‚

*btw, I decided to eliminate rants from my blog a while back, but just quickly: anyone who wishes to anonymously “correct” my Australian English and lecture me on the “proper” words to use when describing my handmade items, how about this:  instead of trolling, maybe you could appreciate that other countries and cultures might sometimes use different words from your own.  As well as broadening your mind, you might just learn something new every once in a while  πŸ™‚
Phew! Rant is over and good nature has now been restored!

pinterestmail

Hand-woven

Every now and again I come across another handmade item in my house that I have not yet documented on my blog here…
This is a set of serviettes, handwoven by me!  Yes, I have dabbled in weaving, in a very very minor way, hehe.
I made these when I was about nineteen, before I was married and when I was still living at home with my family.  My mother had, and still has today actually, a big floor loom on which she made many beautiful things.  I made a few things on it too.  
These serviettes are woven in a plain weave in blue cotton, with decorative rows in white cotton.  These were based on a traditional Scandinavian design, and required some rather complicated setting up, threading and manipulation of the heddles.
I think the reverse is almost as nice as the right side…  I remember dithering for a while on which side I should designate the “right” side  πŸ™‚

I remember I made calculations for a set of six, but I must have allowed plenty of room for error since I ended up with a long enough warp to squeeze in one extra, giving me a set of seven.  Each of the seven serviettes was woven to size and then a spacer was inserted before starting the next one.  Once I had taken the woven cloth off the loom, I hand-finished the top and bottom of each serviette by stitching loops around each and every thread of the warp and into the weft, one by one…
Can I just pause for a mo’ and say here…  I have to admit that even I am kinda super impressed at how dedicated and meticulous my teenage self was.  I don’t know if I am even capable of the patience required for this sort of immaculate finishing nowadays….  :S
Finally I cut them apart, then turned under the top and bottom twice and hand-hemmed.  The selvedges at the side I left just as is with no further finishing, since I had gone to so much care to have them looking perfect, ahem.
Each measures 32x30cm.

These were used on a semi-regular basis early in our marriage and even when the kiddies were little but now I keep them for special occasions only  πŸ™‚

pinterestmail

Random stooff…

1:  I saw this idea for seedlings on Better Homes and Gardens and thought  awwww, how cyooote!  So had a go myself….  these hold sweet peas (yup, planted on St Patricks Day, thus earning myself a gold star for being “traditional”) and parsley.  After this weekend, the bottoms will get lopped off to give the roots somewhere to escape, and they are going in the garden.  But in the meantime I think they have made quite a nice Easter-y table display, yes?
The two whole eggs were my failed attempt at natural egg dyeing.  The mustard-yellow is a result of being boiled up with turmeric, and that rather grotesque, emo, splotchy, Addams-family-grey one on the right is dyed with blueberries.  I lost heart after this one and didn’t bother trying out the spinach or the beetroot or the red cabbage; this what you can expect when the only eggs available are brown eggs.  I searched high and low for white eggs, even going to the drastic measure of peeking inside the boxes of caged-hen eggs  (eeek, caged??  quelle horreur!)  but no dice.  It seems there are simply no white eggs commercially available any more in the whole of Perth.
So…  the half shells were painted with acrylic paints.
Random stooff 2:
My husband likes to cook, and I graciously let him, whenever he wants to  πŸ˜‰  He is a very good cook too.  Way better than I.  Way more enthusiasm.  Enthusiasm is good.
Fired up with the urge to create after a Heston Blumenthal programme on the telly, he decided to have a go at the famous lemon tart.  Not just an ordinary ol’ lemon tart, but one cooked the scientific way.  The one that goes purely by temps and times.
So, here is Heston’s version….

And please admire my husband’s version, cooked to exactly the same recipe….

and btw, I am happy to report that it is absolutely delicious!!
So; has anyone else ever tried this or any other of those scientific recipes of Heston Blumenthal?  how did you go?

Random stooff 3:
The perfect nail varnish for Easter?  BYS White with One

And finally, Rs 4; I’ve signed up for Zoe‘s me-Made May…

I, Carolyn, sign up as a participant of Me-Made-May ’12. I endeavour to wear all me made clothing each day for the duration of May 2012′


 although taking part in the challenge this time will hold an added degree of difficulty for me, the specifics of which I will not divulge right now but will become blatantly apparent as time unfolds.  I may not blog each day, like I have done previously for these months, and I may not be able to wear a unique outfit each day although I shall try.  However I can promise some spectacular scenery  πŸ˜‰  We shall see how we go….
Later dudes!

pinterestmail

It isn’t easy being green…

… at Christmas time.  Oh tosh.  Of course it can be VERY easy!!
Something I feel guilty about every year is the massive pile of wrapping paper that gets tossed out on Christmas Day.  We go through our wrapping paper on the day, salvaging bigger unripped pieces to recycle as much as we can, but the “keep” pile gets smaller each year and after you’ve cut off the mangled bits the pieces get smaller too.  And the next year there’re always one or two bigger pressies that need LARGE amounts of wrapping paper and one always ends up buying a few more rolls just to keep yourself topped up in wrapping paper and just because you don’t want to run out…
and I feel guilty about buying new paper all over again.

well not this year!
I decided to go really green, and use newspaper this year.  Remember my eco-friendly gift bags?  Yes, I am still making up those to use in all my other gift-giving too.  Actually I really do like the muted and monochromatic look of newsprint; the rustic look of it appeals to me more than bright glossy sparkly paper.
The little tags were made using a piece of lightweight cardboard found rolled inside a poster, and the little gingerbread man stamp I’ve had for years, from back when I was really into card-making and made all my own cards.  Actually, I still do make most of my own cards… which doesn’t take up very much time since my designs lean towards the very simple in style, which is my style..  A time-consideration thing there as well as my personal taste.
Just to make it all a bit more personalised; I select parts of the newspaper that suit that person.  So, Tim is into cars in a big way, and Cassie is fashion-conscious.  Sam loves the comics and the puzzles, and then for my man who loves to dream of travel… the luscious scenery in the travel section.

So, no guilt come clean-up time.  And let’s face it, it is the gift inside that really counts, right?!

pinterestmail
Switch to mobile version
↓