
Heya’all. I’ve made this new dress. Actually, I made it ages ago.  And took most of these photos ages ago too. Bad lazy blogger!
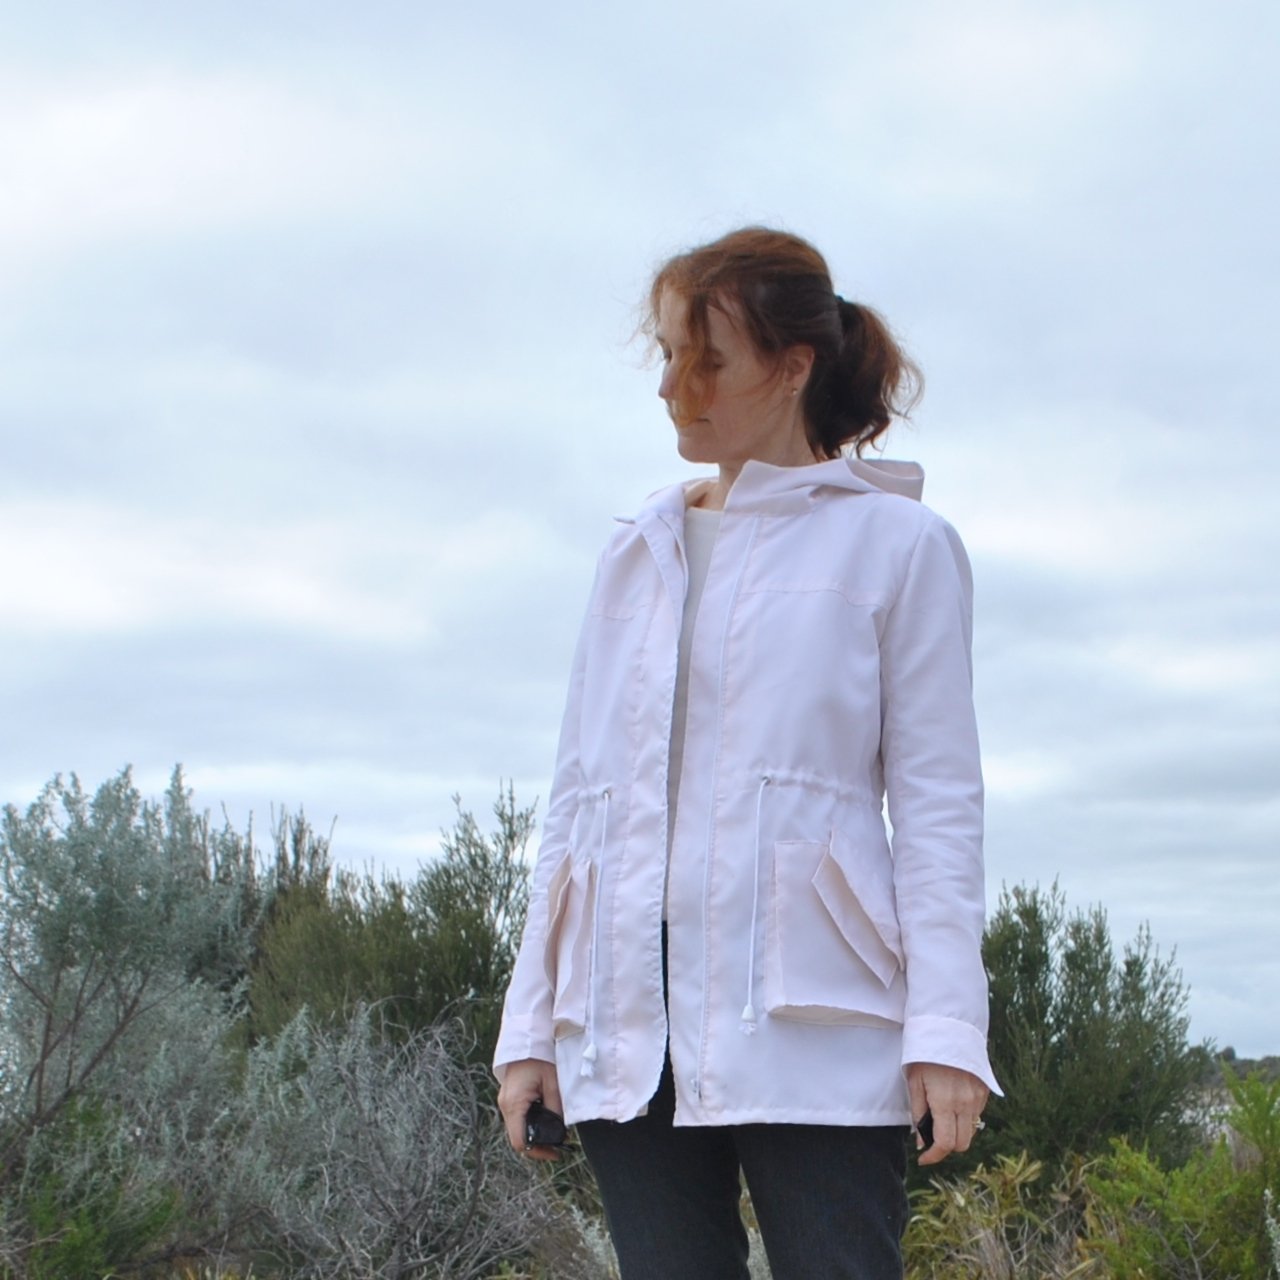
I wore it recently as my “travelling dress” when we holidayed in Broome, and it was the most AWESOME travelling dress… why? well it’s a loose-fitting, baggy, dress made in a comfy fluffy fleece, so just about the most amazingly comfortable thing EVER! pretty much like wearing a blankie. At the same time, there’s something about the curved, slightly cocoon-y lines of the dress that I think makes it quite smart, chic and pulled-together. This is actually my wearable trial of the pattern and I absolutely love it. I might almost love it more than my “real” version. Almost. I actually love that one a bunch too. To appear here very soon.

Pattern: So, yeah; the Inari tee dress by Named patterns. SUCH a popular pattern, and as I now appreciate, for an excellent reason. It’s terrific. Simple, yes; and basic, and bordering on a boiled-down-to-the-bare-bones kind of a pattern with just a few very subtle features like that slight cocoon shape, the side seams drifting gently frontwards, the split hem and an up-down front and back hem. And I love it. I’m normally attracted to a more complex design for a dress, but this one just hits all the right buttons for me right now.
Fabric; a red and white stripe mid-weight fluffy fleece from Spotlight. This is the same fabric I used for Tim’s Christmas hoodie and for Kelly’s hoodie too. Yep, I bought quite a lot! there was a sale… um, yeah *awkward self-justifying of excessive fabric acquisition* Well, at least I’ve used it all now. This has been kicking around in the stash since pre-Christmas, since I’d decided it didn’t really suit anyone else in the family. I think it suits me though!

My stripes are matched up as perfectly as my obsessive little soul could manage. I’m smugly and complacently satisfied with how well they turned out… the only way I know how to achieve this level of stripe matching is to pin each and every junction and go nice and slow. Tedious but failsafe, and all my stripes here match any which way and everywhere. *primly pats self on back*

sewuthinkucan asked me on instagram whether I found the high slim sleeves on the design to cause the dress to ride up when you lift your arms up as above: not that I pull this pose all that often and probably will be careful now I’ve seen these pictures! but it does a little. Not enough to stop me from wearing it! I think the effect is not too bad because of my fabric being a little stretchy. However, in my next, “real” version of the pattern, I altered the sleeve so as to successfully fix the problem… and will post details on that in my next Inari post.

Alterations; the most obvious one is inseam side pockets! Well, of course. It’s baggy enough and the side hems curve forward slightly to the front, an even more comfortable position for your hands than the true sideline of your body; making inseam pockets an almost foregone conclusion.

My neckline has neither facings nor bindings; partly because my fabric has too much fluff and loft for bulky extras with incorporated double seam allowances etc, and also because this is basically my wearable muslin for the pattern and I just didn’t want to fuss around with it. I overlocked the raw edge and simply turned it in once, topstitching in a single line of stitching from the right side. My fabric is all of thick enough, stretchy enough and stable enough for this to be totally fine. I did do the sleeve cuffs though.
Details:
Dress; Inari tee dress by Named Clothing, red striped fleece
Shoes; designed and made by me, details here
taken after a plane trip, a week rolled up in a suitcase, another plane trip, and precisely zero ironing. LOVE.


 Uppers: this particular vinyl has that very rubbery texture which sticks to the presser foot, leading to horribly uneven stitches. I usually use a strip of tissue paper to facilitate the vinyl going evenly through the machine; but these strips are really really skinny, wonky stitching would stand out a mile and I wanted to get the topstitching perfectly even in appearance, and you can’t see through tissue paper so it just wasn’t going to cut it this time. I found though, that by turning the vinyl upside down it all worked out quite smooth and fairly easy to sew.
 A bit of faffing about with strips and I finally settled upon a nice simple, multi-strapped design, cut a denim “inner sole” piece and zigzagged all the strips to this underneath the echo-panel layer, to anchor them securely into position inside the sandal. This denim inner sole is sandwiched between, and securely glued to the echo-panel above and the cork sole below. So it’s not visible in the final sandal, also, none of those strips is in danger of pulling out!
 I toyed with the idea of leaving the echo-panel showing on the edge, but its woolliness actually picks up every stray hair and twig, and the white shows like every smudge, and I decided a smooth, dark edge would be less of a headache. More sensible, hides the dirt, you know. I cut and glued on a nice evenly cut strip of dark denim to the outside edge, pinning in a few strategic places where the denim didn’t instantly stick to the inner curves of the sole. Those pins can just be seen in the picture below; I sort of thought they would be a temporary measure until the glue dried, however they got pretty firmly glued in themselves and proved impossible to get out! so I’ve left them in there. After this picture was taken I went back and touched them all up with a dob of black paint so now they’re invisible. And, then they were further sealed in with several coats of varnish over the denim, so they’re pretty secure. I don’t think I have to worry that they’ll ever come out 🙂


 O hey-a! After finishing my own Kelly anorak and having it admired to the nth degree by family members, I made a few more! a pale grey one for Cassie, and I also made a deep cobalt blue one for Tim’s girlfriend Kelly. Well, it seemed only right that she should have a “Kelly” too!
 I quickly snapped that top picture of an unsuspecting Cassie waiting to meet up with me in town before she noticed me heading towards her… I know it’s a bit blurry and not very posed to show off the anorak to modelly perfection, but I just really like it nonetheless… to me it attests that she’s been wearing it a tonne, in fact every single occasion that I’ve seen her in the past three weeks since I finished it and gave it to her she has been wearing it. There’s no greater compliment to a seamster than that! as well as a testament to the pattern being an absolute style winner. Kelly’s worn hers each time I’ve seen her since I gave it to her too, but I’ve not taken any pictures of her in it.. will update if she sends me one 🙂
 Both the anoraks are in a nice weight cotton drill from Spotlight, in fact, all the other bits and pieces are from Spotlight too. In both anoraks, I added a few inches to the length of the body and modified the pockets to have separate pocket flaps so as to close the pockets; otherwise these are both made up exactly to the pattern.
 This picture below of Kelly’s anorak has been my most “liked” picture on instagram ever! far more than anything I have ever made for myself! Interesting, no? Well, I think it is, anyway 😉 I don’t know what that “says”, if anything at all, but maybe something. Social media is such a funny phenomenon. Something else also interesting to me is how a person, any person, can have a certain number of followers and the number of “likes” never ever reaches anywhere close to that number. Honestly, I have no idea about how or why this is so, but it’s just a curious thing.
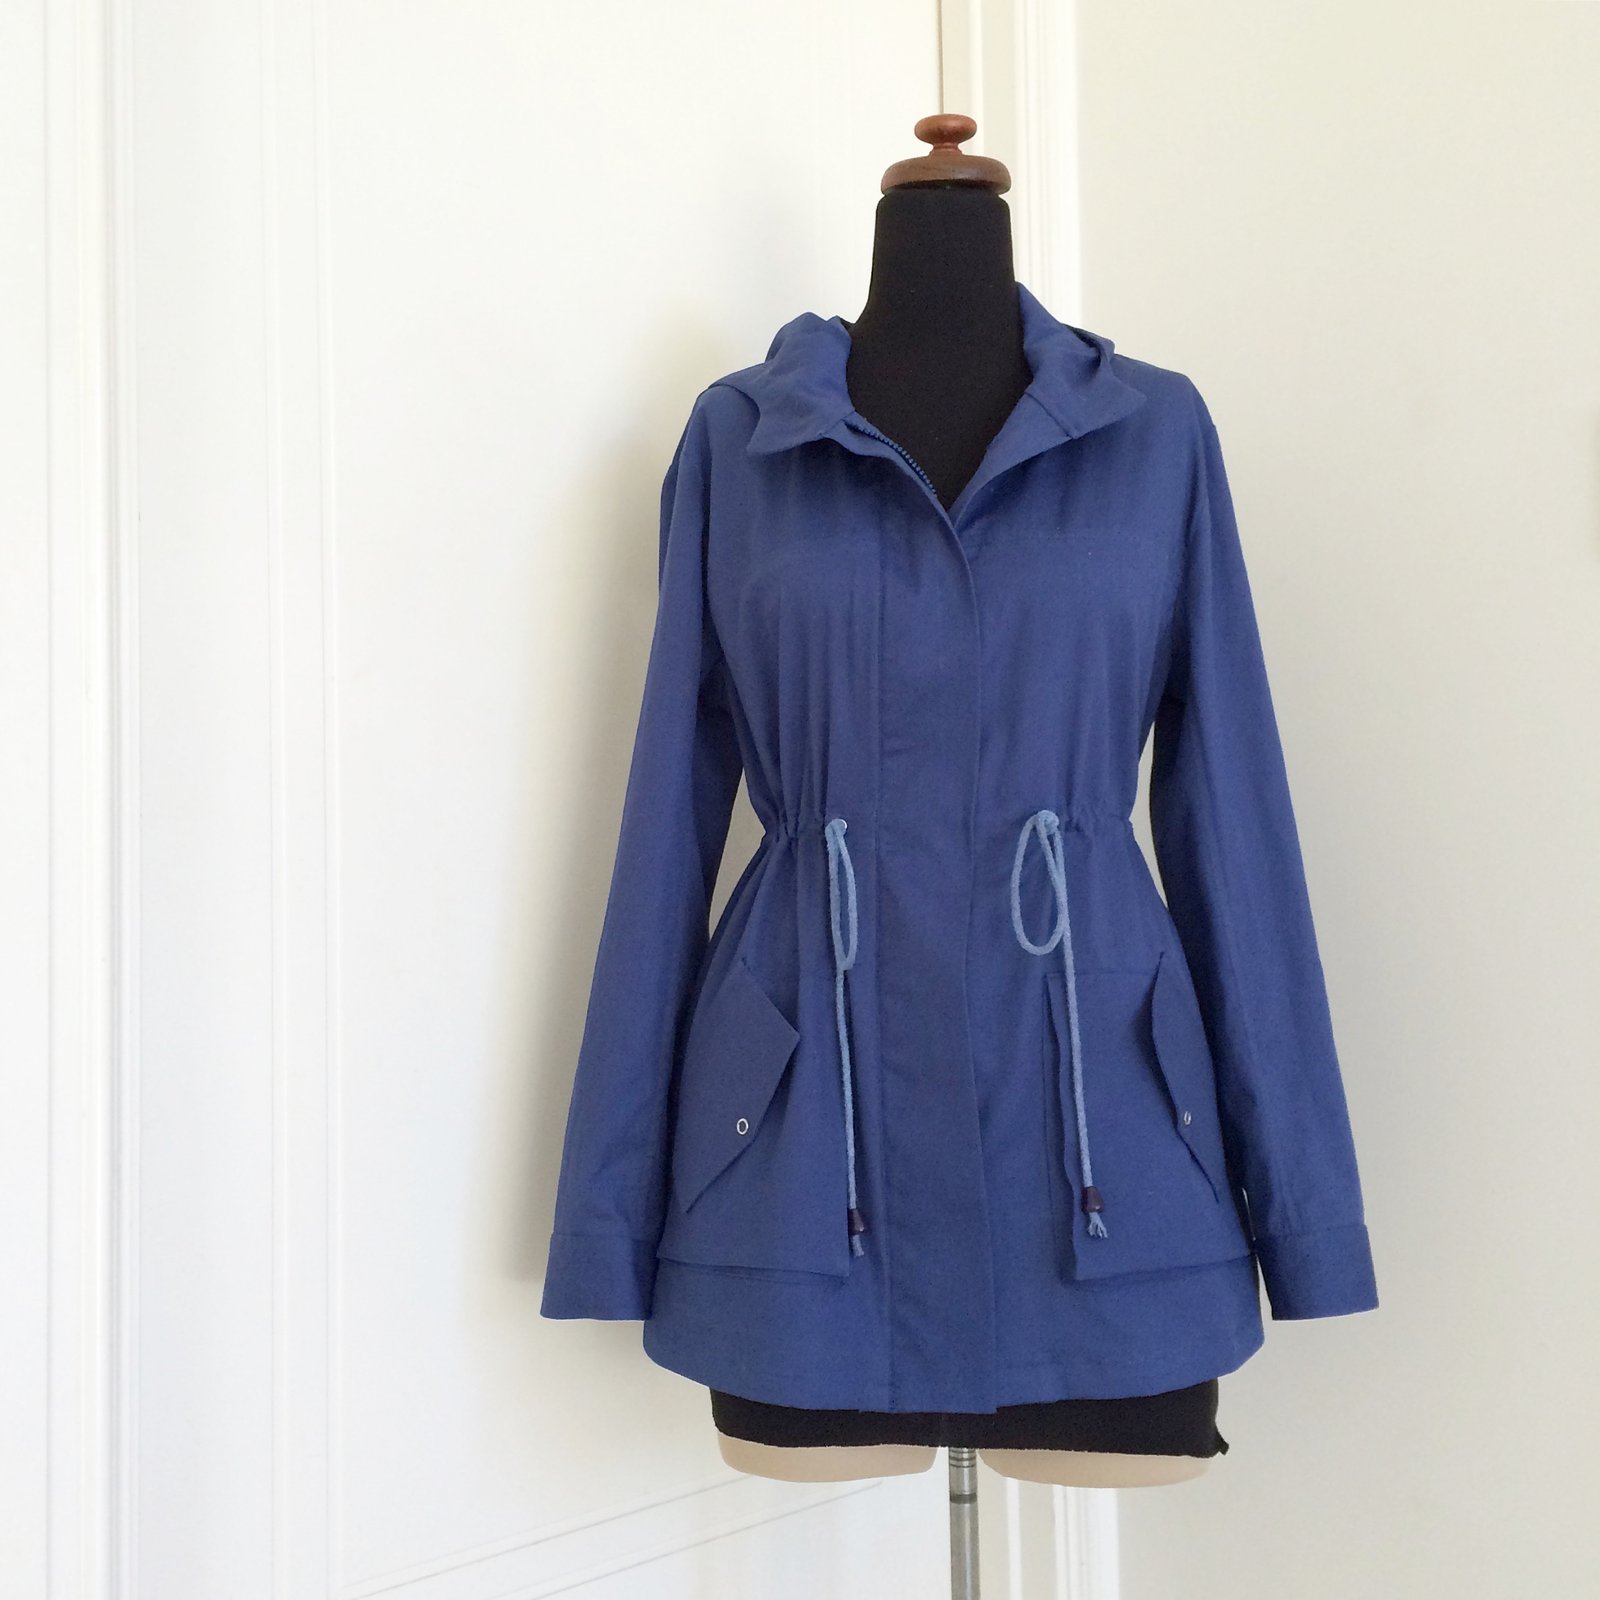 I’d got enough of the same white cord for Kelly’s anorak , but since I’d found a nice, perfectly colour-matched blue zip for hers’, and used blue thread for all topstitching and there was no other white anywhere in the jacket; the white cord looked all wrong. And naturally there’s no such thing as blue cord in the whole of Perth! so I just had to dye it. And, when your regular dye-pot is HUGE and there’s just one little length of cord what’s a mad maker to do? but of course, improvise.


 Details:


