Tag Archives: Closet Case Files

paprika cardigan

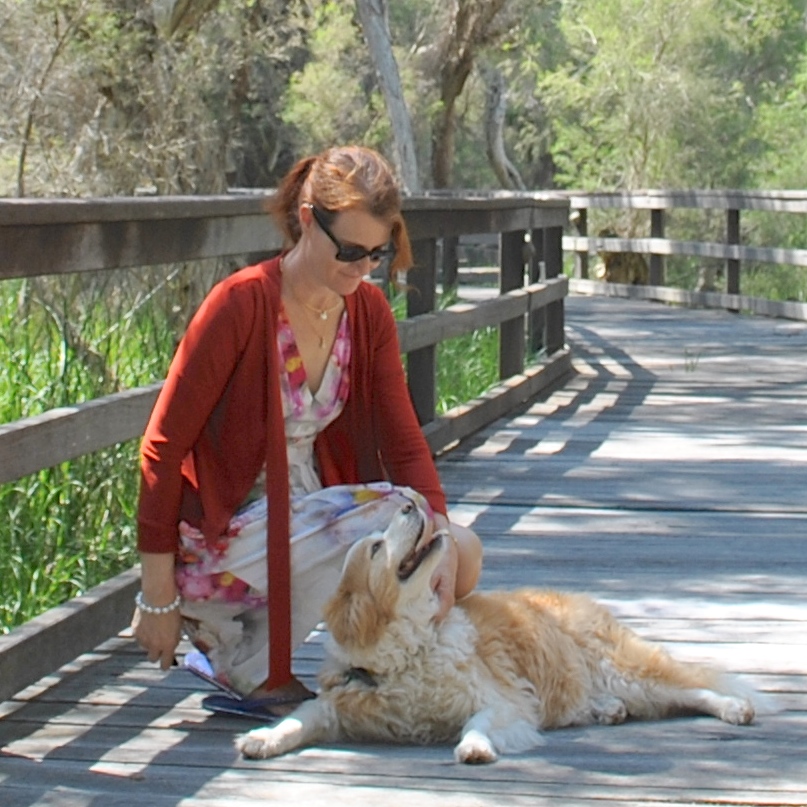
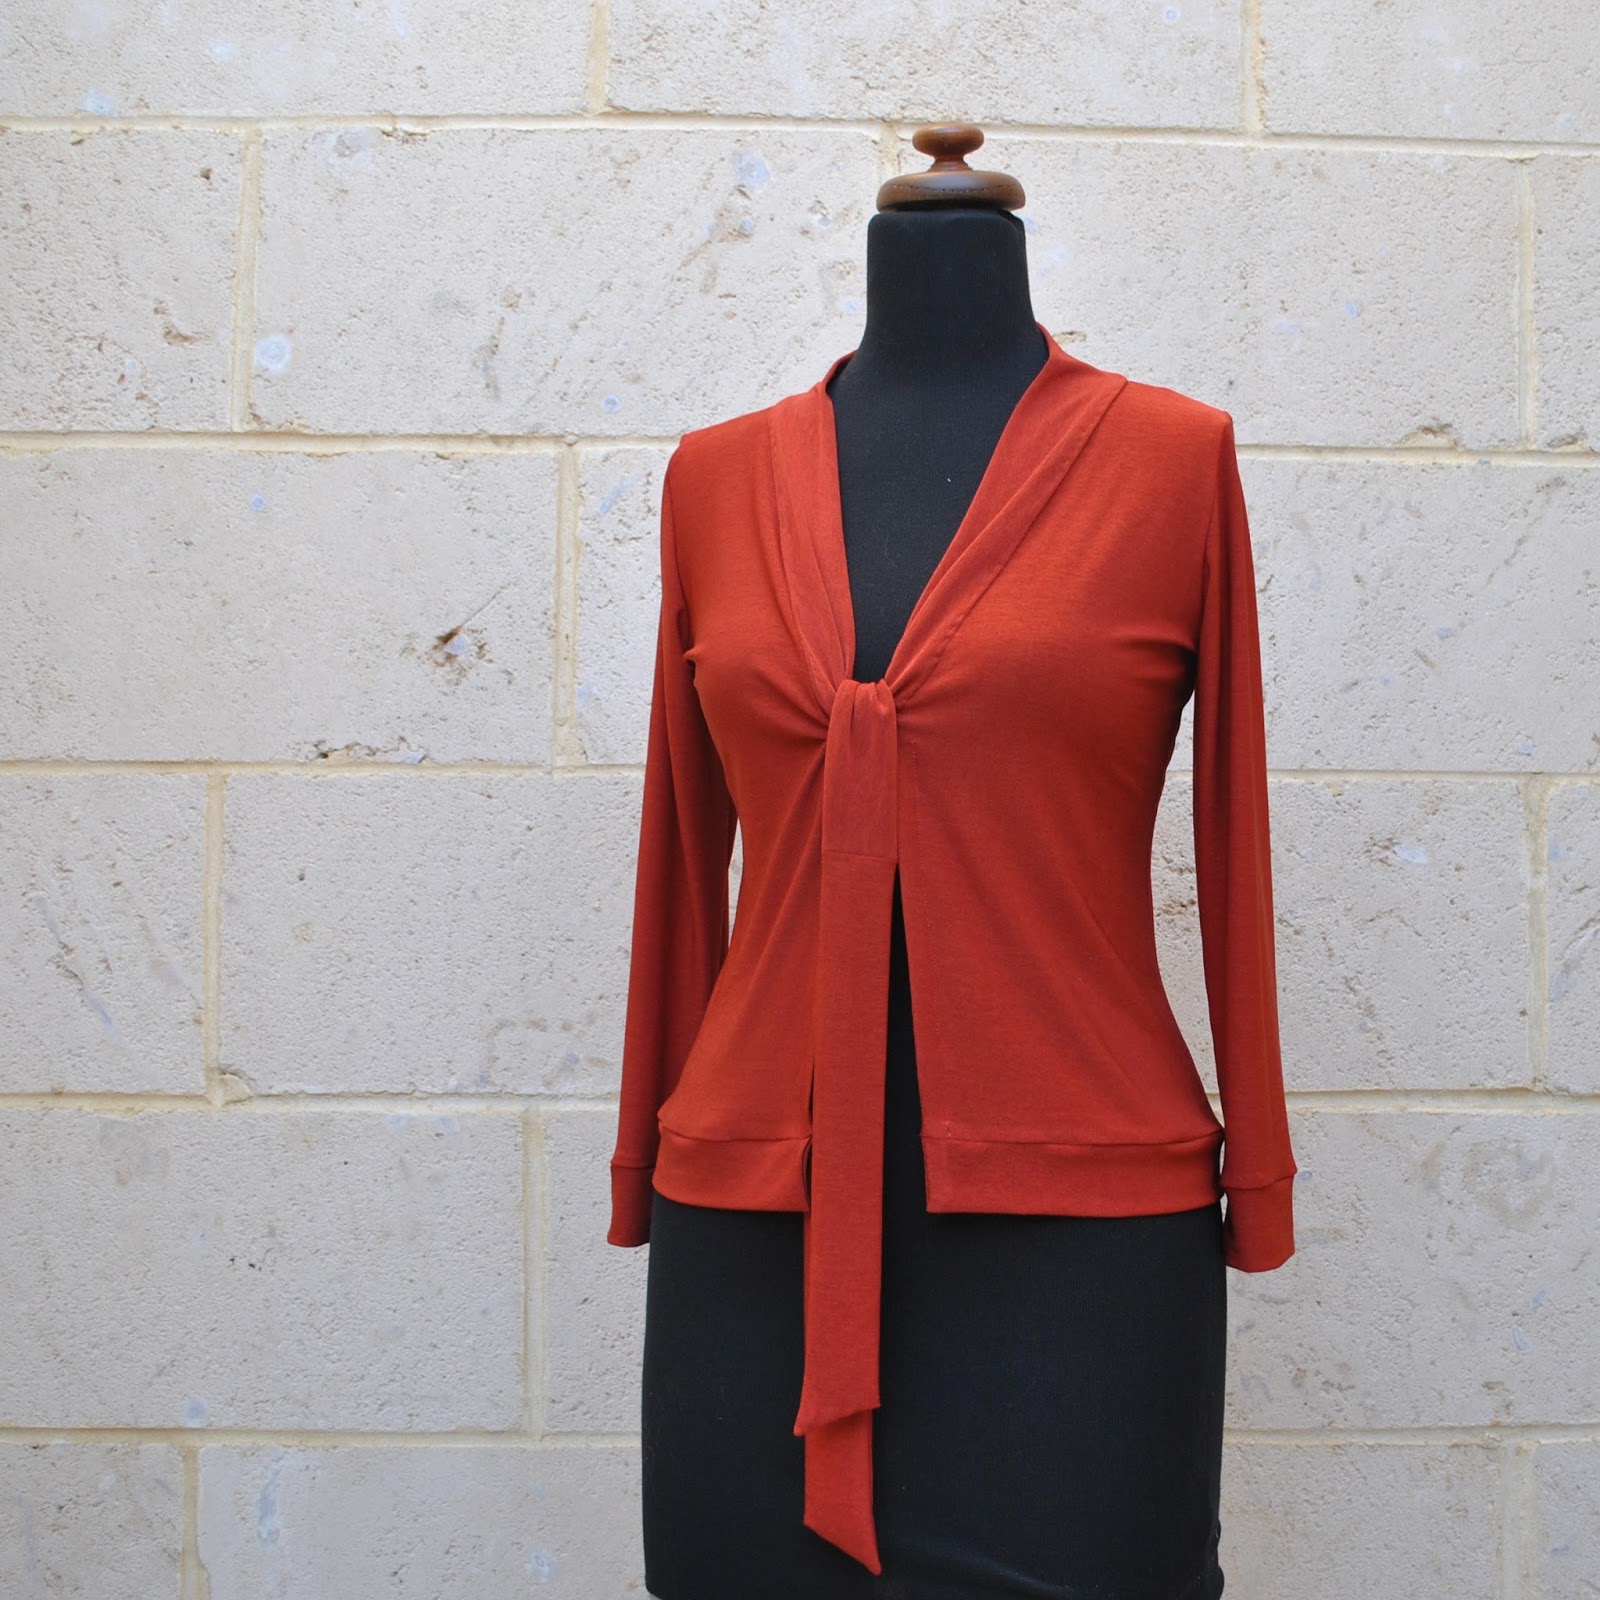
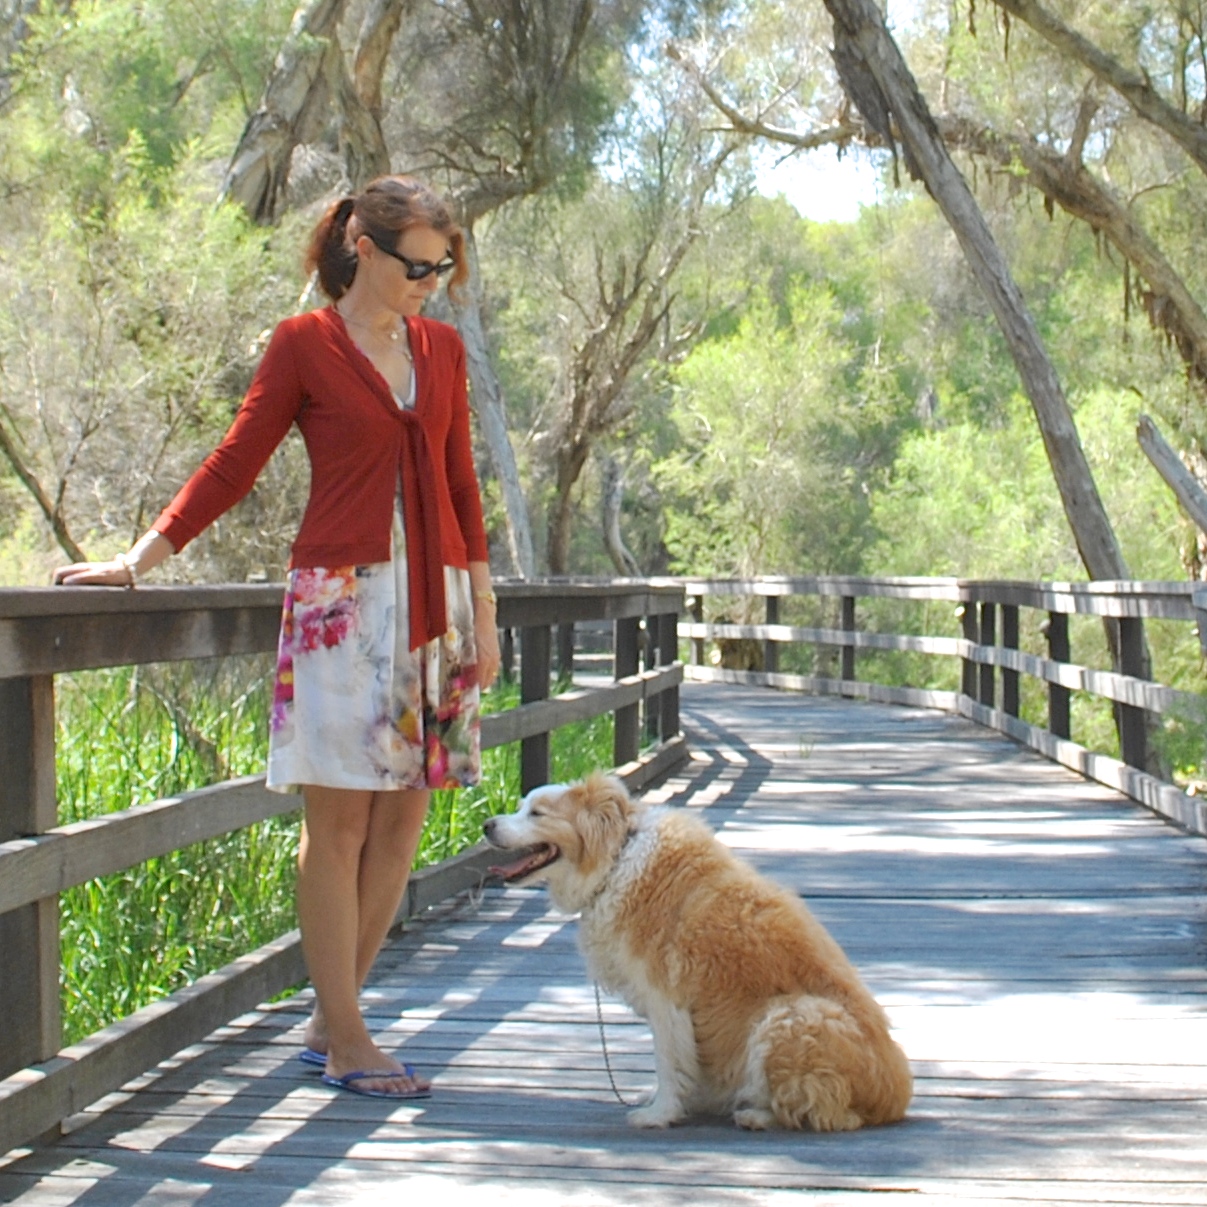
I took some time out from making something far more time-consuming and complicated, ahem Alabama Chanin, cough cough…. ooo did I once say I would never get addicted to Alabama Chanin??? yaas, going back on my word, guilty as charged!!  Anyway, I took a day to put together this simple little cardigan from some scraps.  It’s a light and nothingy-to-it sort of a thing with no closure except for a necktie at the bust level.  A little something to throw over a summery ensemble on cooler summer evenings, or to cope with air conditioning.  
It’s mostly made from scraps; a piece of paprika stretch knit from Fabulous Fabrics, leftover from my paprika Nettie bodysuit and I bought a little extra to get out the pieces for this cardigan.  Once again I used the fabric wrong side out, because I prefer the duller, deeper, richer colour of it.  
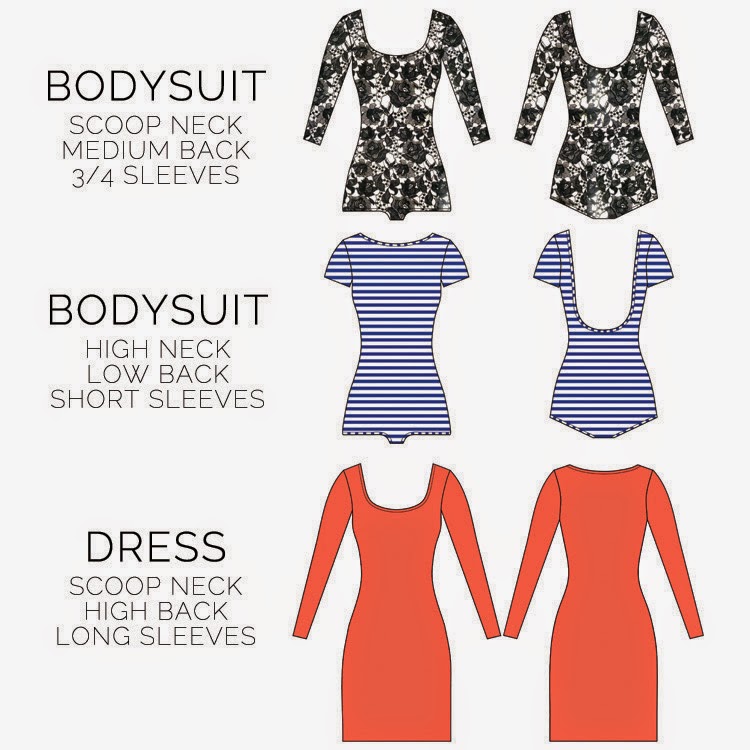
Speaking of Nettie, I actually made this using the Nettie pattern too! just with a touch of ad-libbing.   Such a good basic pattern and a fantabulous springboard to a lot of other variations.  I can honestly see myself making like a tonne of these over my lifetime, with slightly different additions, subtractions and/or bits and bobs going on.

Changes to the pattern:
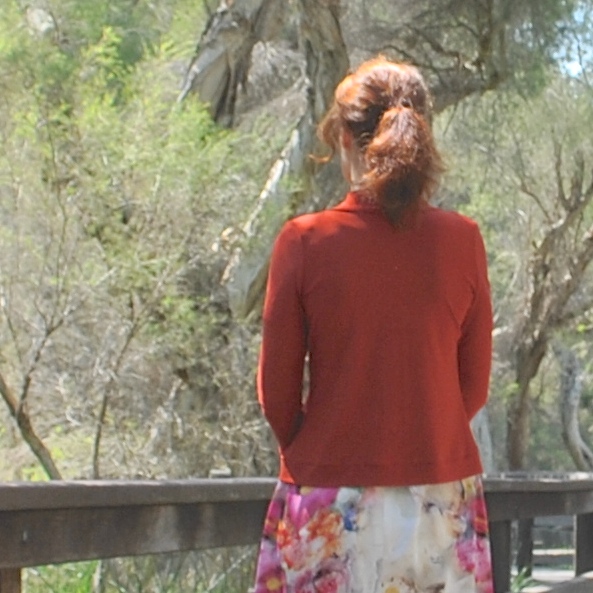
I cut size 18 which is a coupla sizes bigger than my usual, so as to get a looser “cardigan” fit rather than the skin-tight bodysuit fit; cut it to hip level with a wider shoulder, a low V-neck, and split the front up the middle.  I added a wide band all along the bottom edges and wide cuffs to the edges of the sleeves, a long wide necktie, which is basically a very long skinny rectangle sewn along the top edge and with the “tie” edges sewn right side together, with pointy points on the ends of the ties, then turned right side out.  The remaining gap of the necktie is slip-stitched closed to the cardigan on the inside. 

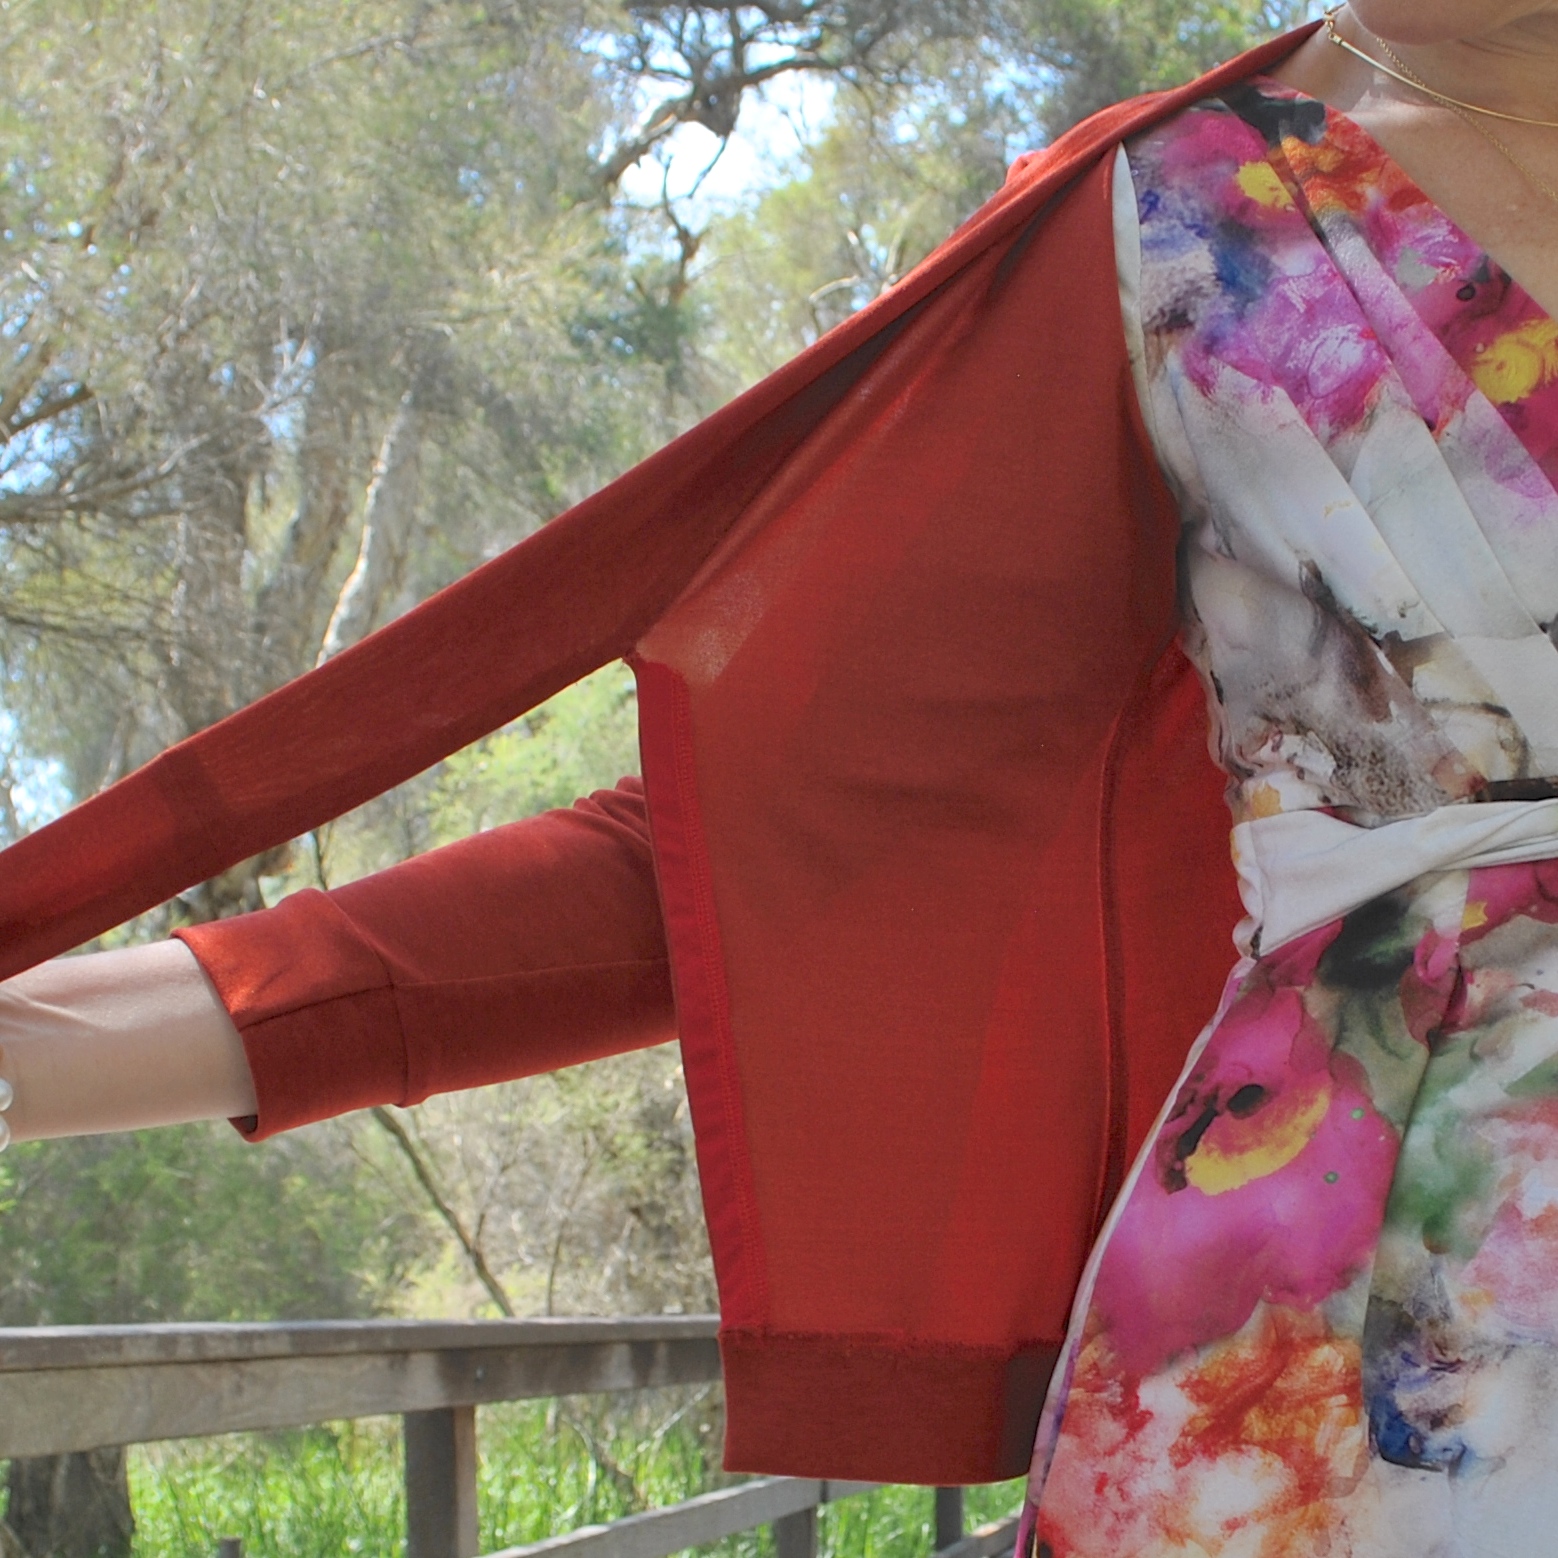
 The front edges I finished with strips of red crepe, itself leftover from my infinity dress here.  This was sewn on to the front edges, turned inside and topstitched down along the outside.  It’s a nice stable edge and the crepe takes away any tendency to stretch out, but I’m not wowed by my efforts here and in the making of this thing I conceived a much better way of doing the cardigan fronts.  I’ll probably make another one of these pretty soon, incorporating my imagined improved way of finishing the edge, but I’ll need a lot more fabric than the scraps I used for this one.
Hmmm, that’s all I need; an excuse to go fabric shopping! 

Project happiness factor; front edge satisfactory but I’m a bit meh about it and I’ve thought of a better way of doing it… otherwise it’s not too bad and I’m happy.  9/10

Details:
Cardigan; my own design modifications to the Nettie bodysuit, by Closet Case patterns, paprika stretch
Dress; Vogue 1194, floral stretch, details and my review of this pattern here
Thongs; Rusty
Sunnies; RayBan

pinterestmail

Carolyn shirt and shortie shorts, take one

Hello!  So what’s new? hmmm not much.  
Well OK, of course I am wearing something that has not yet appeared here on the ol’ bloggeroonie.
My shirt and my shorts are another pair of Carolyn pyjamas by Closet Case patterns, made a few months ago.  These are the first ones that I made actually, months ago! using an earlier version of the pattern, before Heather changed the shape of the collar for her final pattern release.
So technically they are not really new, nor are they “pyjamas” for me either since I have every intention of wearing each of the pieces as daywear, actually out and about and in public.  Why? well, I used such really nice fabric, a particularly lovely slubby soft cotton from Fabulous Fabrics and I feel like it’s just too good for bed!  Also, maybe I’m biased, since well, you know, they have my name on them and all! but I do really like both the pieces in this pattern such a lot.  The shirt has such a crisply classic, yet easily swingy shape to it, with a very nice curve to the lower hemline.  I left off all piping, and I like to wear the shirt with their long cuffs casually and cooly rolled up.

I made the set really as nicely as I could, flat-felling all the seams in the shirt.   Well I’ve been flat felling all the seams in the shirts I make for my boys for ages so felt like maybe I too deserved a little of that same attention to detail  🙂 

My own tip for flat-felling a shirts curved armscye seams is here, and another for just regular flat-felled seams is here

I think the shortie shorts are very cute too, and I actually have worn these out and about! in public! *gasp* several times during our holiday, with the elastic waistband hidden away underneath a longer overhanging top, so it doesn’t show.  I am slightly allergic to visibly elasticated waistbands in daywear.  But yes, of course they are super comfy, that cannot be denied.  I think the shorts with a turned-up cuff, peeping out underneath a long top, make a really fun and playful look for summer.

Just exactly the same as I did for my previously blogged black Carolyn shorties, I like for shortie shorts to have the turned-up cuff look, so I constructed the cuff slightly differently to the pattern to have this feature.  I left off the piping, and sewed the cuffs on with a narrow seams allowance and then turned up and pressed a 1cm fold-up.  Then turned under the cuff and pressed under the other SA so the SA fold sits directly underneath that stitching line.  Then underneath the first fold, I sewed all the layers underneath together by stitching-in-the-ditch of the shorts/cuff seam; so that folded-up cuff is sewn securely and permanently in place and you can see no visible stitching on the outside, since it is all hidden inside the cuff.

Details:
Shirt and shorts; Closet Case patterns Carolyn pyjamas, in white cotton

pinterestmail

Carolyn pyjamas

I was supremely flattered when Heather of Closet Case patterns contacted me to ask if it was ok to
name her latest pattern after me… wow, seriously?!
!!!!!  
*deeply flattered moment*
So the Carolyn pattern is for pyjamas, hehe. 
Yep, I inspired pyjamas!  Honestly
I’m not sure why I find that borderline hilarious, but there it is!
I have to say though; it’s amazing that Heather totally has her
finger on the pulse of what everyone is currently needing to wear and sew.  
Loungewear.
Very astute.  I mean, I love Vogue patterns for their smart
little fitted designer dresses, and have often thought that the working woman can do no wrong
by sewing up nothing but little Vogue dresses for her office/working wardrobe…
so smart and stylish and absolutely perfect for a businesswoman’s life.  but here’s the thing, the number of people
working from home has increased significantly over the last few years and
comfortable loungewear is definitely a thing that work-from-home peeps are
stocking up on for their working life, not just for their after hours life.  A few years ago, who’d have thought it? But
now totally this is a real trend.  I
mean, I work from home myself. And although I need and want to dress up smartly for many things in my life, my real wardrobe workhorses lean towards the easy-to-wear and casual.
Enter stage right; stylish and smart loungewear.
The things one would actually wear to bed are generally loose-fitting to enable
minimum chance of ripping or restraint while one is unconsciously flailing about, but Heather’s new
Carolyn (pinch me!) pyjamas have a slightly sleek and tailored air to them; a body
skimming rather than blouse-y line, that in the right fabrics one could happily
wear outside the house if one so wished. 
Without looking like one is wearing pyjamas!
With that in mind, I chose to make my test pair in luxe-ish, not-bedwear but daywear like fabrics; namely silk hessian for the body of the top, poly organza for the sleeves and
a silk/cotton for the collar and cuffs. 
The little shorts are in a soft, lightweight polycotton.  These were all from the remnant table at
Fabulous Fabrics.
I chose to make view C with long sleeves on the top and leaving off any piping.  I love piping as much as the next person… however I felt piping in this shirt/shorts style IS going totally “pyjama” and I’m serious about wanting to wear my outfit out and about.  In the streets even!
The shirt is a classic, sleek, unfitted style, with notched collar and a gently curved hemline.  I felled the seams in the body of the top and French seamed those sheer sleeve seams.  The armscye seams were overlocked before stitching down to the shirt body to finish; faux felling, if you like!
The shorts are super quick and easy things to whip up, with satisfying huge
pockets.  The pockets are the same fold-back design
that Heather used in her Ginger jeans, which was the
very first time I had come across pockets like this in my 40+ yrs of sewing .  Yes, really! 
I’m starting to think of them as her signature pockets.
I made my shorts with the cuff as per the pattern, but sans piping and with the cuff invisibly stitched in place from inside the fold, so it appears to be a folded-up cuff.  I like this cuffed look on the bottom of shorty shorts like these  🙂

So… do I love the Carolyn pattern, well heck yes!  The shirt especially is an easy classic shape and tres chic, in my opinion.  I will definitely be making both pieces again, maybe even as actual pyjamas!
As for my fabric choices for my test sample here… well, I was using all remnants and my favourite part is the sheer and floaty, leaf organza sleeves, and I also love the strength of the black accent collar and cuff details.  However while the roughly textured, stone silk hessian seemed like a good idea at the time, now I’m not so sure if it’s letting down the rest of the ensemble.  Hmmmmm.  I’m gonna wear it for a while and sleep on it – by that I mean figuratively not literally, of course!   but don’t be surprised if a dye job or small subsitutory type of refashion happens on this bit in the near future!

Details:
Set; the Carolyn (eek!) pyjamas by Closet Case patterns, shirt in silk hessian, poly organza, silk cotton; shorts in polycotton

pinterestmail

Ginger jeans

Hello!  I’ve made some new jeans  🙂
These are the Ginger jeans designed by Heather of Closet Case Patterns, and named after Sonya of Ginger makes, and I was so happy that Heather asked me to test the pattern.  Thanks so much for asking me, Heather!  I LOVE trying out new patterns!  
The pattern has two views, I have made view A, a mid-rise bootleg design.  View B is a high-rise skinny leg.
I used a stretchy cotton denim from KnitWit in a very deep blue-black wash, and the topstitching is in ivory/cream-coloured Gutermann’s upholstery thread.  The jeans zip, the copper coloured snaps for closure, and the copper coloured rivets are all from KnitWit too.

The pattern is a classic five pocket jeans pattern; and I know Heather has worked very hard to perfect a really good starting-point fit.  Although obviously; everyone, everywhere has completely different bodies, meaning fit is a very personal and individual thing that cannot be easily standardised; so it’s terrific that Heather has included in the pattern instructions some very helpful suggestions for trouble-shooting the fitting process.  I learnt several new things!  I did make some adjustments to custom-fit mine to myself, taking in the crotch, the side seams at the waist, a pinch-in adjustment of the CB seam for a slight swayback.
Just as a comparison, these are pretty much the same adjustments that I generally make for my old tried-and-true jeans pattern, Burda 7863.   
Also, at the cutting out stage I added 7.5cm (3″) to the leg length, just in case.  Lengthening the legs is another always adjustment for me; partly a shrinkage insurance policy, and partly in case I fancy wearing a high heel with my jeans and partly because when I’m crouching down or sitting with my knees crossed I prefer for my ankles to stay covered and warm and out of the wind.    I’m of the school of thought that you can always cut off but you can not add on afterwards!  And I was glad I did add that little bit of length since I think the legs would have been just a smudge short otherwise.  

During my early fitting trials I realised the rise of view A is quite low, so I decided to sew the upper and lower seams of the waistband with skinny 2/8″ seam allowance, instead of the standard 5/8″.  Meaning my waistband ended up 6/8″ or 2cm wider and thus my jeans have a that-much higher rise than intended.  This higher rise feels a tonne more comfortable for me.

I also like my waistbands to be firm and stable and secure, holding everything in ie. not stretchy!  so instead of on grain I cut the waistband on the cross, where the fabric had zero stretch.  My waistband is interfaced, and the waistband lining and pocket bags are cut from a charcoal/white pinstriped fine-grade linen, the leftovers from Tim’s business shirt that I made for him last year

Speaking of learning things… I’ve put in loads of fly fronts in my time, so sometimes I’m tempted to ignore pattern instructions and just potter along blithely in my own merry way.  But when I’m testing a pattern I follow the instructions given.  Because you’re testing and later reviewing the pattern and its instructions, duh.  And hey, you might learn new stuff.  I sure did… the Ginger jeans fly front method is, dare I say it? …foolproof.  Detailed to a fault, meticulously outlined, and it works like an absolute charm!!  I think my new jeans have the best damn fly front I’ve ever done, ever.  And it went together so easily.
I’m so impressed with those fly front instructions I’ve printed that bit out and stuck them to the wall behind my sewing machine.  Have I ever done that with a technique before…? Precisely never.  
These instructions are that good.
Thank you so much for another excellent pattern, Heather!

Details:
Jeans; Ginger jeans by Closet Case patterns, navy/black stretch cotton denim
Top; Burda magazine 04/2014, 111, creamy bobbly stretch stuff, details here
Sandals; c/o Misano

pinterestmail

a bobbly little top, and some others too

I’ve made a few new tops…
Top un; a cosy little pom-pommy top, using pattern 111 from Burdastyle magazine 04-2014 in a bobbly stretch fabric the colour of whipped cream from Fabulous Fabrics.  The design has quite an interesting and unusual shape already and I further toyed with the proportions, shortening by about 15cm at the lower hem and lengthening the sleeves by 3cm.  This was only like, the easiest thing in the world to run up and I think it’s rather cute too!  The oversized floppy neckline manages to be all of comfortable and even a little dramatically designer-y too.
The design, while a very easy project, still fits happily into the interesting category for those of us who like that sort of thing… The body is a one piece tube with one piecemeal seam down the right side.  The sleeves are have different shaped sleeve caps from each other and their positioning and individual insertion methods creates a slightly skewiff shape to the top when worn.  Cool!  Completed, it reminds me a little of my Pattern Magic twisted top, which is illogical since this one is both boxy and has the oversized cowl and is cut on-grain, and… well, technically speaking is different in just about every respect, really.   OK, forget I ever compared the two.  

And to pre-empt an inevitable concern; yes, the sleeves do feel different to each other but it is not uncomfortable.

Tops deux and trois are the Nettie pattern, by Closet Case Files, my now go-to tshirt pattern. I upsized to an 18 from my usual 12, because a slightly more relaxed fit is desirable in a summertime thing.  The fabric is a fine, off-white jersey knit from Fabulous Fabrics.  
One has short sleeves and a fun little pocket.  The pocket looks like a cute design decision but is actually covering a hole that I had accidentally snipped right in the middle of the fabric oooops!!  Thoughtless, overconfident me, snipping away wildly and with carefree abandon! It was in a REALLY awkward, unavoidable spot, so I sewed the hole shut and reinforced it underneath with a bit of scrap, but it still looked way too obvious and ugly.  Rats.   So when cutting out I cunningly managed to finagle it in breast pocket position, plonked the pocket on top, and then had to cut short sleeves for the tee.  Hmmf, but well, at least I managed to get the two tees out of my fabric piece, in spite of the snip.  No one will ever know!
The other is completely unremarkable, apart from that all the seams and hems sit on the outside and are simply overlocked with navy blue thread.   Why did I do this?  *shrug* dunno, something different from my gazillion other white tees.

 Oh, this old thing, tshirt quatre.  I’m taking the opportunity to finally blog this one I made about two years ago.  It’s annoying that I never blogged it, because when I’m wearing it in a daily outfit and linking to my blog posts it’s not there.  So here ’tis!  It’s beige and boring, and therefore incredibly useful.  Made using my own custom fit Tshirt pattern, which apparently I seem to have chucked out at some point.  Double rats.  Yes, I’ve been doing a lot of careless silly things lately.
So, while stuffing the new creations into my Tshirt drawer last weekend I spontaneously embarked, as you do, upon an epic wardrobe spring clean-out.  As in, I emptied every single one of my drawers and took everything out of my wardrobe.  And went through methodically trying on, sorting, assessing and sifting out only the things I really truly wanted to keep.  Discovering forgotten treasures!  New, cool, outfit combinations!  Tossing hideous things into big rubbish bags!  Purging!!!   It took a few hours but man, it was great.  Felt SO GOOD.
This house, is clean…
OK.  My first, same old conclusion; I have a LOT of clothes.  And I love most of them too. I have very few unloved things and those have been weeded out now.  A few undecided things are going to be worn on a trial basis and assessed over the next few weeks.
Second conclusion, and slightly surprising, to me at least; I do not need to make nor buy basic Tshirts for, like the rest of my life, probably.  Why is this surprising? because after my first and second me-made months four years ago, my biggest conclusion was that I severely lacked basic tops and tees.  Well, obedient little me has diligently been making basic tees ever since and has rectified that lack very adequately now.  Thank you, me!  This is good, because while I don’t mind making Tshirts, lets be real, they are bread-and-butter.  Without the butter.  Not the most inspiring things.  Obviously instantly gratifying projects can be fun and fulfilling in their own way.  But my last couple of more in-depth projects have been a hugely more satisfying to me, on every level.  So I’m pleased that a full complement of basics means that I can relax about Dutiful Wardrobe-Building, and just happily spend my time and energy on the kind of more complex, involved, longer term projects that are truly enjoyable.
So, yay!!
Now on to something more interesting…  🙂

pinterestmail

Nettie; by seven

The very clever Heather of Closet Case Files has released another pattern, this one is a must-have basic, the bodysuit, available here.  Named Nettie, after the totally gorgeous Nettie of Sown Brooklyn.
Of course, I say “must-have” and I didn’t actually have any.  But I’m rectifying that now since everyone knows that bodysuits are super useful and way superior to a tucked in tee when it comes to winter warmth.  So good to have that thermal layer underneath everything else.  I used to have a few bodysuits years ago which did hard duty all winter long but I don’t know if they’ve gone out of fashion favour? or what; because they are pretty darn hard to come by nowadays.  Even patterns for bodysuits are pretty few and far in-between.
Thank you so much Heather, for asking me to test the pattern, and for filling this gap in the sewing pattern world!  🙂

Hmmm, seven Netties… seems excessive for one person? well they’re not all for me.  Occasionally I make things for other people.  Occasionally  😉
The instructions stipulate to size up if you are tall or if you think your fabric is a little firm; and yes indeedy; this.  My first version was in a mystery black knit with just a medium stretch, bought in the Morrison remnant sale, and it turned out a little er, bottie-baring for me!   Fortunately I have a petite daughter who can absorb into her wardrobe everything that is too small for me.  🙂  And then I went up a size for me. 

The red, orange, green, pale taupe and white coloured Netties are all in a super stretchy viscose/rayon knit from Fabulous Fabrics; and for this stretchier fabric I didn’t need to lengthen although I did cut the sleeves at the size up.  The fit is snug and fabulously comfy.   

The white long sleeved tee is for my niece; her measurements matched the smallest size on the size chart and so I just ran it up quickly to test the fit.  It was on the tight side for her too; so when starting out I do recommend erring on the side of too big, just to start with.  You can always shave a bit off!
For the crotch closure I used strips of black snap tape; leftover from my Issey Miyake tucked dress.  Obviously it would be every bit as quick to hammer in a coupla snaps though.  Really, the Nettie is a wonderfully quick and easy project, the kind of thing you can run up to wear an hour later.  The hardest part of making the body suits is finding scraps of woven for the crotch bit to match your fabric!  I had nothing matching my green so used self fabric stiffened and stabilised with fusible interfacing.

I did something a bit different with the sleeves on my green one; I made them super long and put in a little thumb hole, finished with a band just like the neckline.  Built-in hand warmers!

The pattern comes with multiple variations; a high, mid and low back neckline, and a high and low scoop front neckline, and with long, elbow-length and short sleeves, and a body-con dress.  And obviously you can slice it off at hip level too and just have a tee.  So much choice!  If I’d had the dress option earlier I totally would have made one of these too…   
I made some with elbow length sleeves and some with long sleeves, and some high neck and some scoop.   I made them all with a high back neckline just because winter is around the next corner here, but I think a high front neck/low scooped-back neck Nettie would be an absolutely stunning summer evening option; worn with a huge oversized flouncy skirt, hair up in a bun.  Imagine!
Also, I reckon if you made it with a closed crotch and a scoop neckline wide enough to allow you to step into it then the Nettie would work beautifully as a dance or workout leotard too.  The sides are quite low-cut  allowing for full bottom coverage and minimal chance of a wedgie wardrobe malfunction.

OK, I’m now baulking at posting a picture of myself in the pale taupe one sans outer layers; with my skin tone the overall effect is just a bit too er, nude?!  but I have worn here it in a daily outfit already  🙂
Thank you for a fantastic pattern Heather!
pinterestmail

White Bombshell

G’day beach babes!  OK so I admit it is winter here in Australia now.  I can explain…
The very clever Heather of Closet Case Files has dropped a literal Bombshell on the sewing world with  this, her inaugural swimsuit pattern, and I was honoured that she asked me to be a pattern tester, woot!!  So thrilling!  This is the first time evah I have been asked to test a pattern, so that was pretty exciting for me!  Thanks Heather!
The pattern for the Bombshell swimsuit is available here.  So how ultra glamorous is this style, huh?  Honestly, I think that this is like the most flattering swimsuit I have ever owned… including RTW.  I even bravely turned my back to the camera, to show the rear view… yikes!  Normally I would be waaay too terrified to model the rear view of a swimsuit, on the internet.  But you know what? the back of this swimsuit is actually very flattering to the be-hind, and even looks… dare I say it! quite lovely?  Believe me, I would not be turning my back to the camera in just any old swimsuit!  The sides and back come down far enough to modestly covers one’s entire bottom, which is very nice.
In fact, not just the bottom but the whole style is very demure and sweetly retro.  The full-body ruching and straight boy-leg cut is reminiscent of the 50’s.  Heather has designed three styles; style A has a gathered bust with a wide-set strap, style B is a halter neck, which can also be constructed as a pair of high-waisted bikini bottoms (style C)  See Heather’s gorgeous versions of styles A and B here.
This is style B, and I used a white polyester knit from Fabulous Fabrics.  White swimwear can be scarily see-through when wet, but in this design both front and back has two layers of fabric, and with the outer layer heavily ruched, meaning you have pretty much two and a half layers of fabric covering your body.  So I think it’ll be pretty modest in the water  🙂
Do you like this swimsuit? if so then I have very good news!
Heather is generously giving away a copy of the pattern to one lucky reader of my blog…  so for a chance to win then please leave a comment on this post before Monday 10th June.  If you have never made a swimsuit before and are nervous about the techniques involved then never fear; Heather has that base covered.  She will be running a Bombshell sewalong on Closet Case Files, commencing on Monday 17th June.

Later edit: Thank you all for those lovely compliments!  the pattern recipient has been notified.

Details:
Bathers; Closet Case Files Bombshell, white polyester knit
Hat; Country Road
Sandals; Misano
pinterestmail
Switch to mobile version
↓