Tag Archives: Pattern Review

a creamy little double-fronted top

My new top will come as a very un-surprise to anyone who has been following me in the Sewvember instagram challenge, haha!…
This pattern is Burdastyle 04/2014-115, with modified sleeves  and my fabric is a silk hessian from Spotlight.  It has a very loose weave, a rather pleasing slightly rough and rustic texture.  The rich, almost buttery cream colour apparently suits me.
Now, I have received a handful of patterns of my choice from Burda… however this is NOT one of them.   I had bought this magazine myself already!  and I’ve already made the asymmetrical turtleneck top from the same collection in the mag.  Ok, honesty here; I actually totally love just about this entire collection.  It’s embarrassing to admit how easily I am swayed by colour choices.  Those peacefully harmonious shades of soothing cool non-colours; *sigh* heavenly!
So style-wise, this is a plain design.  And my choice of fabric; quite plain.  But that’s ok, a bit of plain is a good thing to have in the wardrobe to set off the more eye-catching elements within.  But as I was doing the sleeves, which are likewise as plain a style as could be, I worried that they were going to tip my blouse over into the territory of Irretrievably Bland.  So I added a little feature; a faced split that has a little button closure on the corners.  I’m very pleased with how this looks; quite primitive, like a vague sort of a nod towards a tailored shirtsleeve button placket.

Construction-wise, this is a nice, quick and simple little pattern and utterly foolproof… . oh, I put the wrong front lapping over.   Haha.  We’ll just pretend that I did that on purpose, ok?  Ahem.

Insider biz; the side and shoulder seams are flat-felled, the sleeve seams overlocked.  The neckline is faced with a bias-cut strip of pale yellow/cream cotton voile.

Finally, my usual criteria; if I saw this in a shop would I be tempted to buy?  Heck, yeah!  Plain is my middle name.  Along with all the other middle names I adopt when the mood strikes.  This is going to be worn a tonne  🙂


Details:
Top; Burdastyle 04/2014-115 with modified sleeves, cream silk hessian
Skirt; adaption of Vogue 1247, coffee lace with silk charmeuse lining, details here
Thongs; Mountain Designs
Sienna wears her own custom-fit coat

Later edit: 4 yrs later, and I gave this little top a rejuvenating dye-bath!  it’s now a pretty shade of cherry-blossom pink…
Other outfit details:
and then again, to an exciting new shade of hot pink!  I love it like this!
pinterestmail

a ladylike skirt

I have lots of “little” skirts, but it’s nice to have some longer, looser, wider skirts too.  To be more refined, relaxed, ladylike and elegant, and less, er, whatever I was before.  This pattern is Burdastyle 02/2014, 106, and delivers the required dose of elegance quite nicely, I think.
Even in an annoyingly brisk breeze that turned up, just at the right time to buffet it about in my pictures here!  The wind tried, but never once did I come anywhere near doing a Marilyn in any of my shots.  Thank goodness for that!  Ladylike personified.  Or, should I say, skirtified?  Yeah, I think maybe I should  😉
So, yes, it is looking a bit windblasted here, but that’s “real” or whatever.   My fabric is a mid-heavyweight, richly creamy-coloured satin remnant from Fabulous Fabrics; I suspect from the bridal section.  Probably if I’d made it up in the suggested brocade it would hang properly smart with the big box pleats standing out nice and stiffly-straight and looking just like the one on the magazine cover, at right, but I think that the luxurious feel of the satin rippling and swishing against my legs is a happy bonus.

The skirt is pretty simple; wide, deeply pleated skirt sections attached to a fitted, curved yoke.  The pattern is super straightforward, all going together very easily and quickly.  I would describe this as fast gratification; a nicely stress-free project.
There are two views to the pattern; the other, illustrated in the line drawing, is a more complex version with a bigger rectangular piece of fabric pleated over the yoke as an over layer.  This feature you can just make out on the magazine cover, above, at right.  I made the simplified version with plain yoke because hello, remnant.

I lined the yoke in ivory polycetate lining fabric, also from Fabulous Fabrics, and used an off-white invisible zip in the CB seam.  I wanted the skirt to be as long as long as I possibly could make it, and managed to cut the skirt pieces to be about 10cm longer than the pattern.  Then hemmed as stingily and as meanly as humanly possibly, by stitching to the lower edge a bias cut strip of pale ivory/yellow cotton voile in a very narrow 2/8″ seam.   This enabled me to only turn up a mere 2/8″ of my satin but still to have a nice deep hem.  The hem is slip-stitched by hand.

the least windy of the pictures…
Details:
Skirt; Burdastyle 02/2014-106, ivory/cream satin
Cardigan;  Audrey in Unst knitted by me, in 4ply poll dorset bought in Paris while shopping with Donna, details here
um, I’m not sure if or how I’m supposed to do this, but just in case…
Disclaimer; this pattern was given to me by Burdastyle; however I chose it myself from the large range of patterns on offer because I liked it.  All opinions are most definitely my own.  There are no affiliate links on my blog and never will be…  I’m in it because I love sewing  🙂 
pinterestmail

Ginger jeans

Hello!  I’ve made some new jeans  🙂
These are the Ginger jeans designed by Heather of Closet Case Patterns, and named after Sonya of Ginger makes, and I was so happy that Heather asked me to test the pattern.  Thanks so much for asking me, Heather!  I LOVE trying out new patterns!  
The pattern has two views, I have made view A, a mid-rise bootleg design.  View B is a high-rise skinny leg.
I used a stretchy cotton denim from KnitWit in a very deep blue-black wash, and the topstitching is in ivory/cream-coloured Gutermann’s upholstery thread.  The jeans zip, the copper coloured snaps for closure, and the copper coloured rivets are all from KnitWit too.

The pattern is a classic five pocket jeans pattern; and I know Heather has worked very hard to perfect a really good starting-point fit.  Although obviously; everyone, everywhere has completely different bodies, meaning fit is a very personal and individual thing that cannot be easily standardised; so it’s terrific that Heather has included in the pattern instructions some very helpful suggestions for trouble-shooting the fitting process.  I learnt several new things!  I did make some adjustments to custom-fit mine to myself, taking in the crotch, the side seams at the waist, a pinch-in adjustment of the CB seam for a slight swayback.
Just as a comparison, these are pretty much the same adjustments that I generally make for my old tried-and-true jeans pattern, Burda 7863.   
Also, at the cutting out stage I added 7.5cm (3″) to the leg length, just in case.  Lengthening the legs is another always adjustment for me; partly a shrinkage insurance policy, and partly in case I fancy wearing a high heel with my jeans and partly because when I’m crouching down or sitting with my knees crossed I prefer for my ankles to stay covered and warm and out of the wind.    I’m of the school of thought that you can always cut off but you can not add on afterwards!  And I was glad I did add that little bit of length since I think the legs would have been just a smudge short otherwise.  

During my early fitting trials I realised the rise of view A is quite low, so I decided to sew the upper and lower seams of the waistband with skinny 2/8″ seam allowance, instead of the standard 5/8″.  Meaning my waistband ended up 6/8″ or 2cm wider and thus my jeans have a that-much higher rise than intended.  This higher rise feels a tonne more comfortable for me.

I also like my waistbands to be firm and stable and secure, holding everything in ie. not stretchy!  so instead of on grain I cut the waistband on the cross, where the fabric had zero stretch.  My waistband is interfaced, and the waistband lining and pocket bags are cut from a charcoal/white pinstriped fine-grade linen, the leftovers from Tim’s business shirt that I made for him last year

Speaking of learning things… I’ve put in loads of fly fronts in my time, so sometimes I’m tempted to ignore pattern instructions and just potter along blithely in my own merry way.  But when I’m testing a pattern I follow the instructions given.  Because you’re testing and later reviewing the pattern and its instructions, duh.  And hey, you might learn new stuff.  I sure did… the Ginger jeans fly front method is, dare I say it? …foolproof.  Detailed to a fault, meticulously outlined, and it works like an absolute charm!!  I think my new jeans have the best damn fly front I’ve ever done, ever.  And it went together so easily.
I’m so impressed with those fly front instructions I’ve printed that bit out and stuck them to the wall behind my sewing machine.  Have I ever done that with a technique before…? Precisely never.  
These instructions are that good.
Thank you so much for another excellent pattern, Heather!

Details:
Jeans; Ginger jeans by Closet Case patterns, navy/black stretch cotton denim
Top; Burda magazine 04/2014, 111, creamy bobbly stretch stuff, details here
Sandals; c/o Misano

pinterestmail

“Swedish” dress

I’ve made my Swedish souvenir    🙂
I bought this linen-mix with a Swedish designed print in Stockholm during our Scandinavian holiday.  I fell in love with the bold and yet delicate print in orange, soft greeny-browns and black on a creamy background.  Bold and delicate?! sounds like an oxymoron but I think this design does magically manage to fit into both categories somehow!  The pattern is Vogue 2900 and I “framed” each piece in the design with a skinny strip of black cotton to highlight the piecing in this quietly interesting dress design.  
I chose to do this because I felt the broad sweeps of a bold – yet delicate! – print like this could lose much of its impact upon being cut up into small pieces… I think the black framing successfully highlights the piecing of the pattern as a feature of the dress, while still being subtle enough to allow the print to hold its own and shine equally as a feature of the dress as well.
In its own way, the black framing is a bold and delicate thing, too!

I’ve long admired all the many beautiful versions of this pattern made by Yoshimi.  Beth recently wrote about the concept of a “pattern whisperer”; and in fact, during Yoshimi’s stay with me she recommended this pattern to me, saying that she thought it would suit me.  I have very high regard for Yoshimi’s taste and style and so paid careful attention to her “pattern whisper”.  And I am glad I did because I love it!  Thanks Yoshimi!

I took my time with this dress, cutting and precision-stitching the bias cut strips of black cotton and lining up all the black corners and edges just exactly right.  All the seams are highlighted in this way, except for the bodice centre front seam; I couldn’t see it working in neatly with the edging on the centre front split at the top, and the centre back seam, which again, having the black edging would not have worked successfully with the white invisible zip closure.  All the edges; the armhole edges, neckline edge, pocket edges and the lower edge of the dress, are similarly edged with the same black cotton.

It’s funny; I’ve had a large piece of this black cotton on a big cardboard roll for so many years, and it’s come in so very handy for so many little touches to about a zillion projects, to the point where I felt that it was like a never ending supply.  With this project I suddenly realised I’m down to the last half a metre!  Panic!  I’m going to have to buy more!!

I used my own tip to perfectly align those black strips on either side of the invisible zip.

Details:
Dress; Vogue 2900, Swedish print with black cotton edging outlining each piece
Sandals; Zomp, from Zomp shoes

pinterestmail

a split-backed top

Once upon a time there was a shirt, a man’s shirt.  This shirt was superficially unremarkable, but was made out of a wonderful microfibre that had extraordinarily silk-like properties.  Soft, ripply, with a quietly glossy sheen, it felt wonderfully cool and smooth against the skin just like silk; but unlike silk it was as tough as guts.    It barely ever needed ironing, thus earning the everlasting approval of the laundry maid of the house. 
 After a few years of regular wear it was designated “old”, signalling the end of any special care in its laundering, from then on it just got tossed in the machine with jeans, whatever, no special cycle.  It soldiered on, looking just exactly as lusciously silky as it always had.  
The Indestructible Shirt.  Winning further admiration from the laundry maid, who alone in the household truly appreciated such a magical fabric … all the benefits of silk but without the maintenance… ! o-kaaaay!
After twenty years of use, its owner carelessly tossed it in the Salvoes bag, whereupon the laundry maid astutely retrieved it and planned a feminine new life for it, hehehehehe.

The End.
Well maybe more like a brand new beginning!

Technical bizzo…
The pattern is Vogue 8879, view B.  Funny thing; Spotlight had a $5 pattern sale last week, I bought um, 6 patterns *blush* call Patternaholics Anonymous; I need help!! anyway, I bought some of the more glamorous interesting and unusual designer Vogues that caught my eye, and then this funny unassuming little one too.  Guess which one was the one I was most excited to try out first.  Ha!
I love the split back; it’s quite elegant in my opinion, and just quietly sexy without being the least bit tarty.
The old shirt was completely cut it apart to make the new one,  and I modified the existing button band and sewn-on buttons to accommodate the split back.  The old front is now the back of the new shirt, and the old back is the new front.  The sleeves! it often astounds me how difficult it can be to cut a new thing from an old thing even if you think the old thing has masses of fabric; the sleeve pattern pieces barely fitted on the old sleeves, taking up the full length of the sleeve from the cuff to the armscye!  Amaaazing!
One new buttonhole was required at the very top, and the left breast pocket was picked off and repositioned it at a funky angle on the lower front of the top.  All the seams are flat felled to honour the original beautifully flat felled seams in the original shirt: although obviously none of the original seams remain after it was hacked apart I still felt compelled to try and reproduce those immaculate finishes in its new incarnation too.

Rather than the quirky but fabric-hungry twisted sleeve bands of the pattern, I made hidden, shaped facings for the lower edge of the sleeves instead and I finished the neck edge with a narrow bias cut strip; these were cut from a scrap of deep blue real silk, the leftovers from this top, and stitched, under-stitched then top-stitched.

One thing: the pattern stipulates two way stretch fabrics only; but I found that this view B is so loose and easy fitting that my decidedly non-stretchy microfibre version is absolutely fine to slip on over my head.  Don’t need to un-do even a single button.
So it’s got that going for it too!

Details:
Top; Vogue 8879 view B, blue microfibre, a refashioned mens’ shirt
Skirt; my own design based on Vogue 7303, white stretch lace, details here
Thongs; Havaianas

pinterestmail

“watercolour” floral lingerie set

Another lingerie set, and a new-to-me bra pattern.  This is pattern 2610 for a balconette style bra by makeBra, a Finnish lingerie pattern company.  The two pairs of matching knickers are my usual McCalls 2772.

The watercolour fabric is from Fabulous Fabrics.  When I made my floral birthday dress last year, I originally wanted to make a lingerie set from the fabric and was talked out of it.  Obviously I do not regret making that dress instead; it’s one of my favourites! but that floral lingerie set was still in my head, crying out to be made.  I really really wanted realise it, too.  So recently I snuck out and sneakily bought 50cm of a different splashy floral stretch knit and quietly made it without showing the fabric to anyone who might talk me around hehehe…  Note to self; 50cm is the perfect length to cut out a bra and two pairs of matching knickers.

The makeBra pattern; well, I LOVE it!!  I’ve been hankering after a balconette style bra, one designed specifically for a foam lining.  I really do prefer a foam lining. All my current bras are made using KwikSew 3300 which is an absolutely terrific little pattern, but it’s not specially designed for a foam lining.  I usually forced a foam cup lining on it, found a way to make it happen, but it was always flying against the spirit of the pattern, if you know what I mean.
I bought a paper pattern in one size, which is a money saver.  You can get it in a multisized pattern if you’re not sure of your exact size and that costs more.  I’m familiar enough with my needed size that I decided to go with the single size  and I’m happy to report that it does fit me beautifully and the sizing is spot on.
At the same time I bought two basic lingerie kits; black and ivory.  THESE ARE FABULOUS!!!!!
It was a real pleasure, and so much easier, to sew a bra using such high quality materials and findings.  Up until now I’d been making my own shoulder straps and underwire casings as per the KwikSew pattern instructions, and using rings, sliders and underwear elastic from Spotlight, which is meh, kinda-ok standard.  Hey, absolutely nothing “wrong” with that of course, but now my eyes have been opened to how using proper underwire casings and really nice lingerie elastic is SO MUCH BETTER.  I’m talking rtw quality here.

The makeBra website also has this absolutely brilliant video where you can watch someone making a bra.  I was soooo impressed at how quickly and easily that girl whizzed up a beautiful bra in the video, I cannot tell you.  Gobsmacked.  It was a revelation!   On viewing that video I realised how difficult I’d been making it for myself, by using less than good quality materials available and “making do”.  She didn’t even pin her underwire casings anywhere to sew them on, compared to my homemade, bias-cut, double folded voile underwire casings requiring 7000 pins to hold it evenly in place…. man!   Well, now; I know.  I didn’t use pins either this time and I think the finish turned out pretty nice!

And her machine…  *drool*  My poor little old Janome is nowhere near that smooth.  But I’m banishing any and all machine envy thoughts.  I love my dear faithful little Janome.
I do have one tiny hmph with the makeBra pattern; you have to go to the website to get the full instructions, including elastic lengths etc.  I mean, no real biggie, I’ve noted the relevant elastic lengths in with my pattern now, but would it have been really so hard to include that info in with the pattern?  What if your internet was down when you wanted to use your new pattern?  I would say that is my one pet peeve with modern-day online pattern services: I think when you buy a pattern, you should get with it everything you need by way of instructions, and you should not have to search through some website to find necessary information.
But small grumps aside; essentially a fantastic pattern, went together like an absolute dream.  There will be lots more of these in my life  🙂

pinterestmail

Cocoa silk georgette dress

Ok, so I’m on the fence… I’m not sure if my new dress is just an ultra feminine style that I’m not quite used to it yet, or um, sorta hideous.  I hope it’s not hideous, that would be pretty tragic considering I’ve poured a massive amount of meticulous fiddling into this thing.  And silk georgette too, grrr.  Like, only the most difficult freakin’ fabric ever!  
A recent Vogue magazine editorial informed all of us bright-eyed, eager and devoted little fashion mavenettes, aka their readers; that a longer, elegant tea- or midi-length was the Next Big Thing in dresses and skirts.  An edict accompanied by loads of pictures of lovely young things striding the streets trailing beautiful long fluttery floaty tea dresses in their respective wakes.  Well, I was inspired!  aw hells yeah, I definitely need to get me one of those badass elegant tea dresses so I can look all freakin’ feminine and ladylike, yo!
Et voila.  But hmmm.  Technically speaking, this dress is rather lovely, if I say so myself; I put a lot of effort into finishing as well as I could; doubled-layered the bodice with all seams enclosed within the layers, French seams throughout and a hand-rolled and -stitched baby hem around that long looooong lower edge.

The dress looks charming on the model on the envelope but not as tea-length as I was envisioning, so I lengthened all the skirt pieces by 15cm.  Maybe that was a mistake, although I still think the length looks quite lovely on Bessie.  Maybe a little Pride and Prejudice, or 70’s Faye Dunaway or something.  I should get one of those wide brimmed felt hats maybe…
The front skirt panel is supposed to be cut wider and heavily gathered into the front of the bodice, and if you think it looks a bit fluffy in this version you should have seen it with those gathers!!  I painstakingly unpicked that middle panel and re-cut it narrower at the top to fit the bodice portion assigned to it, eliminating all the gathering.  The skirt is a LOT more sleek now, believe it or not!

The sleeves at their intended length were a bit puffy and perky and juvenile for my tastes,  so I carefully picked those off too and re-drafted and re-cut new ones.  My re-drafted sleeves are 16cm longer than the pattern and have had the sleeve cap flattened a little AND reduced in length to eliminate nearly all gathering to fit it to the arm scye.  I do like my modified sleeves a lot, actually one of the few things about the dress with which I’m unequivocally happy.  I LOVE the interesting cross-over sleeve cuffs.  In fact these, along with the petticoat pattern are what seduced me to buy the pattern in the first place.
 So maybe it’s the empire waistline?  I think maybe empire waistlines are not for me…  But you know, a lot of work went into it so I’ll wear it.  It actually looks quite nice if I throw a coat over it, haha; like how I’m wearing it today!  The hemline is quite pretty, I think, and looks quite satisfyingly fluttery around your legs as you walk.  And it looks rather gorgeous while twirling too, although sadly my days generally involve very little girly twirling.  

Obviously I reserve all rights to suddenly decide I love it sometime down the track.  I do that sometimes because I’m, like, capricious and flighty.  When it suits me.  And if feminine floaty, twirlicious tea dresses do become the dernier cri then I’m well prepared!

Oh, one more thing; I have another copy of this pattern to give away to a reader.  When I ordered the pattern from Club BMV, for some weird reason I ordered two patterns exactly the same.  When they arrived I thought Club BMV had made a mistake, but then I checked my own record and oh deary me, it was all me.  I had clicked “2” in what I hope was late night fuzziness and not early dementia.
Anyway if you would like a pristine brand new copy of Vogue 1160, sizes 6-8-10-12 and still in factory folds, then please leave a comment on this post stating so, and next Tuesday 29th July I will randomly select a winner.  

LATER EDIT: thank you all very much for the kind comments and the great styling suggestions and I will be sure to try wearing the dress with different shoes in the future  🙂  I drew a winner the old fashioned way…

Details:
Dress; Vogue 1160, pale cocoa brown silk georgette 
Petticoat (under) ; Vogue 1160, dark chocolate brown silk charmeuse, seen here
Tights; Kolotex
Boots; Sempre di, from Zomp shoes

pinterestmail

my Milanese Panther dress

Not the real Milanese panther of course which I understand is a very rare animal…
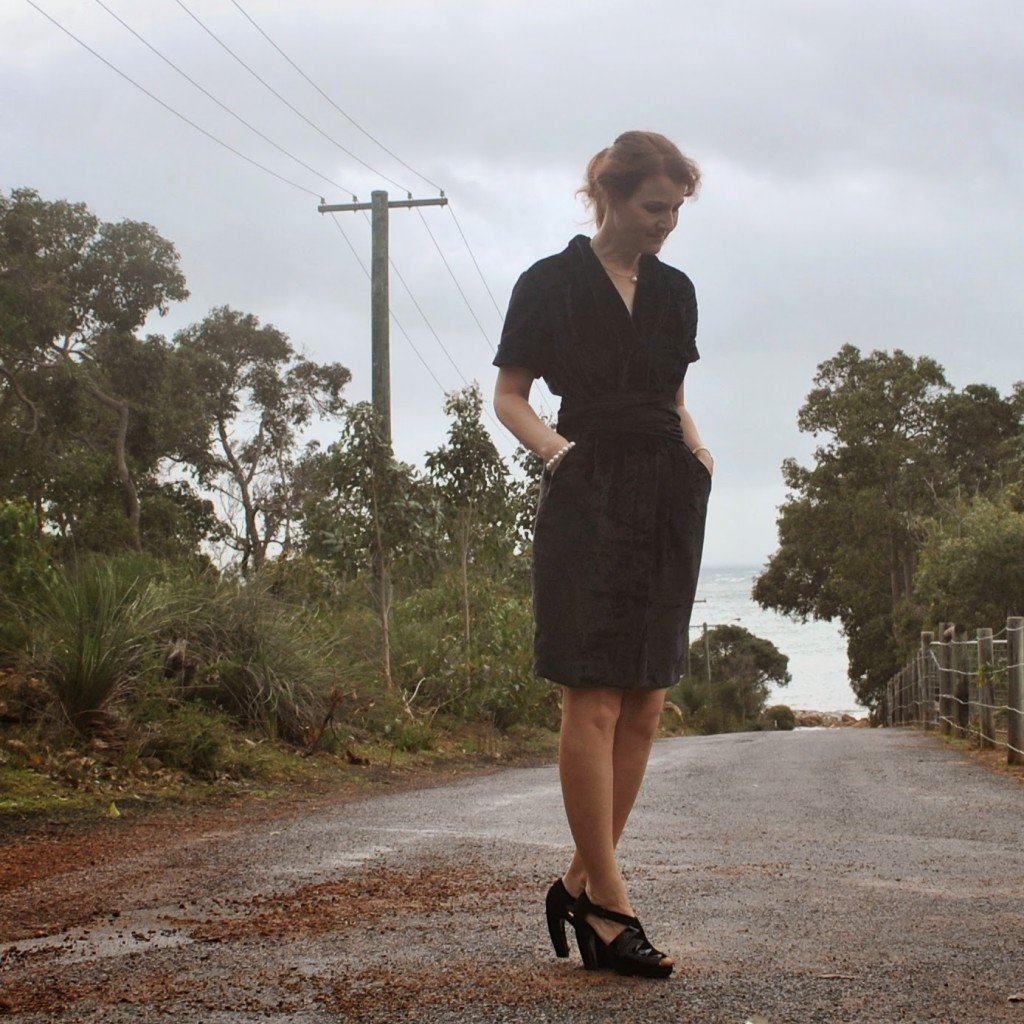
I bought this fabric in Milan during our trip there two years ago.  I realised after making up my caramel suede from Denmark that, well *blush* all of the fabric I bought on our Paris/Italy trip was still sitting in my stash virtually untouched.  It’s a bad habit of mine, buying precious fabrics and then finding myself completely unable to cut into them.  Fear of destroying them, you know.  Fortunately this beautiful fabric has been successfully not-destroyed ….I don’t know whether to call it velvet or fur, it’s not really like one or the other but a kind of hybrid of both.  Thicker and more directionally “brushed” than velvet, and lighter than most furs.  The pile is deep midnight black over a brilliant, almost neon, rusty-orange backing that reveals itself in the folds of the dress and in motion as sort of inner fiery glow, like the embers of a dying fire.

please excuse that a vampire appears to be wearing the dress here but instead note the interesting inner glow and the luxurious velvet-y furry pile of the fabric, as mentioned above..

The pattern is Vogue 1220; and the design is, in short, lovely.  In not-short; it achieves the trifecta of interesting and feminine and figure flattering; the neckline is pleated into a softly draped shawl collar with a slightly retro feel in its volume, the wide belt cinches the softly blowsy cocoon shape into a tiny waist, and a pegged hemline accentuates the hourglass effect further.  I wasn’t keen on that tie belt at first, especially the way it’s been tied like a big juvenile birthday-bow in the middle of the model’s tummy on the pattern envelope; but the dress does look nicer with the extra waist definition that a wide belt gives and I like it wrapped around twice and with the ties hanging down at the back like this.  

The tie belt is supposed to be unlined and simply finished with a narrow hem, meaning the wrong side of the fabric is exposed.  And the bright rusty-orange reverse of my fabric would have shown in a very distracting and very not-good way!  So I underlined the belt using a very thin, slippery black poly-crepe from Fabulous Fabrics.  

Also I like my winter-y skirts to be lined, so I improvised a lining for the skirt portion of the dress, using the same poly-crepe.  It is cut the same as the skirt parts of the pattern pieces, the pleats and darts simply folded in position and the top edge sewed right sides together to the back skirt/ back seam.  The skirt lining fronts have the raw edges turned under and are hand stitched invisibly to the dress front, and the raw edges of the lining at the side edges and lower edge are encased within the folded back front facings and the hem facing pieces.  I hemmed the skirt facings by hand, to the skirt lining.
The pocket linings are cut from the same poly-crepe; and due to my improvised lining the pockets are nicely hidden away between the layers of the skirt and lining, as seen above.  Or not seen, I guess…

The sleeve cuffs are supposed to be folded out so the wrong side of the fabric shows on the outside too; instead I sewed them in a deep inside hem, which I turned back outside on itself and hand-stitched invisibly in position to the sleeve about 0.5cm inside the edge of the cuff.

How is it to wear? Well… first outing, I wore it out to dinner and found that when seated a little more inner/upper thigh is revealed than I am comfortable with!  And also that attractive pegged hemline does make the skirt rather tight around the thighs, which, if you want, can be easily and quickly remedied by some discreet bottom-button undoing.  Leading however, to even more revealing.  Thank goodness for tablecloths and the ginormous linenware that restaurants drape across your lap!  
Anyhoo, I rapidly formed the opinion that a separate petticoat or slip is pretty much an essential accessory for this design.
So: upon getting home I dug out of my wardrobe an old black satin and lace petticoat that I made about seven? eight? even more? years ago using NewLook 6035; I’ve re-hemmed it to the requisite length and will wear this underneath.  

I’m actually super happy about this, to be honest it’s actually an absolutely brilliant turn of events … why? because I pretty much haven’t worn this black petticoat for years.  Years!  But I’ve hung onto it, thinking surely! it’ll come in handy again, someday!  And now it has!  Finally!  Woooooot!

Just to give some perspective to the issue: seated, with petticoat… see wot I mean? Essential!!

Details:
Dress; Vogue 1220, black/orange brushed velvet
Petticoat; NewLook 6035, black satin and lace, first seen here
Shoes; Zomp, from Zomp shoes


no real reason for this picture other than that the sun broke through the clouds and I just liked it  🙂
pinterestmail
Switch to mobile version
↓