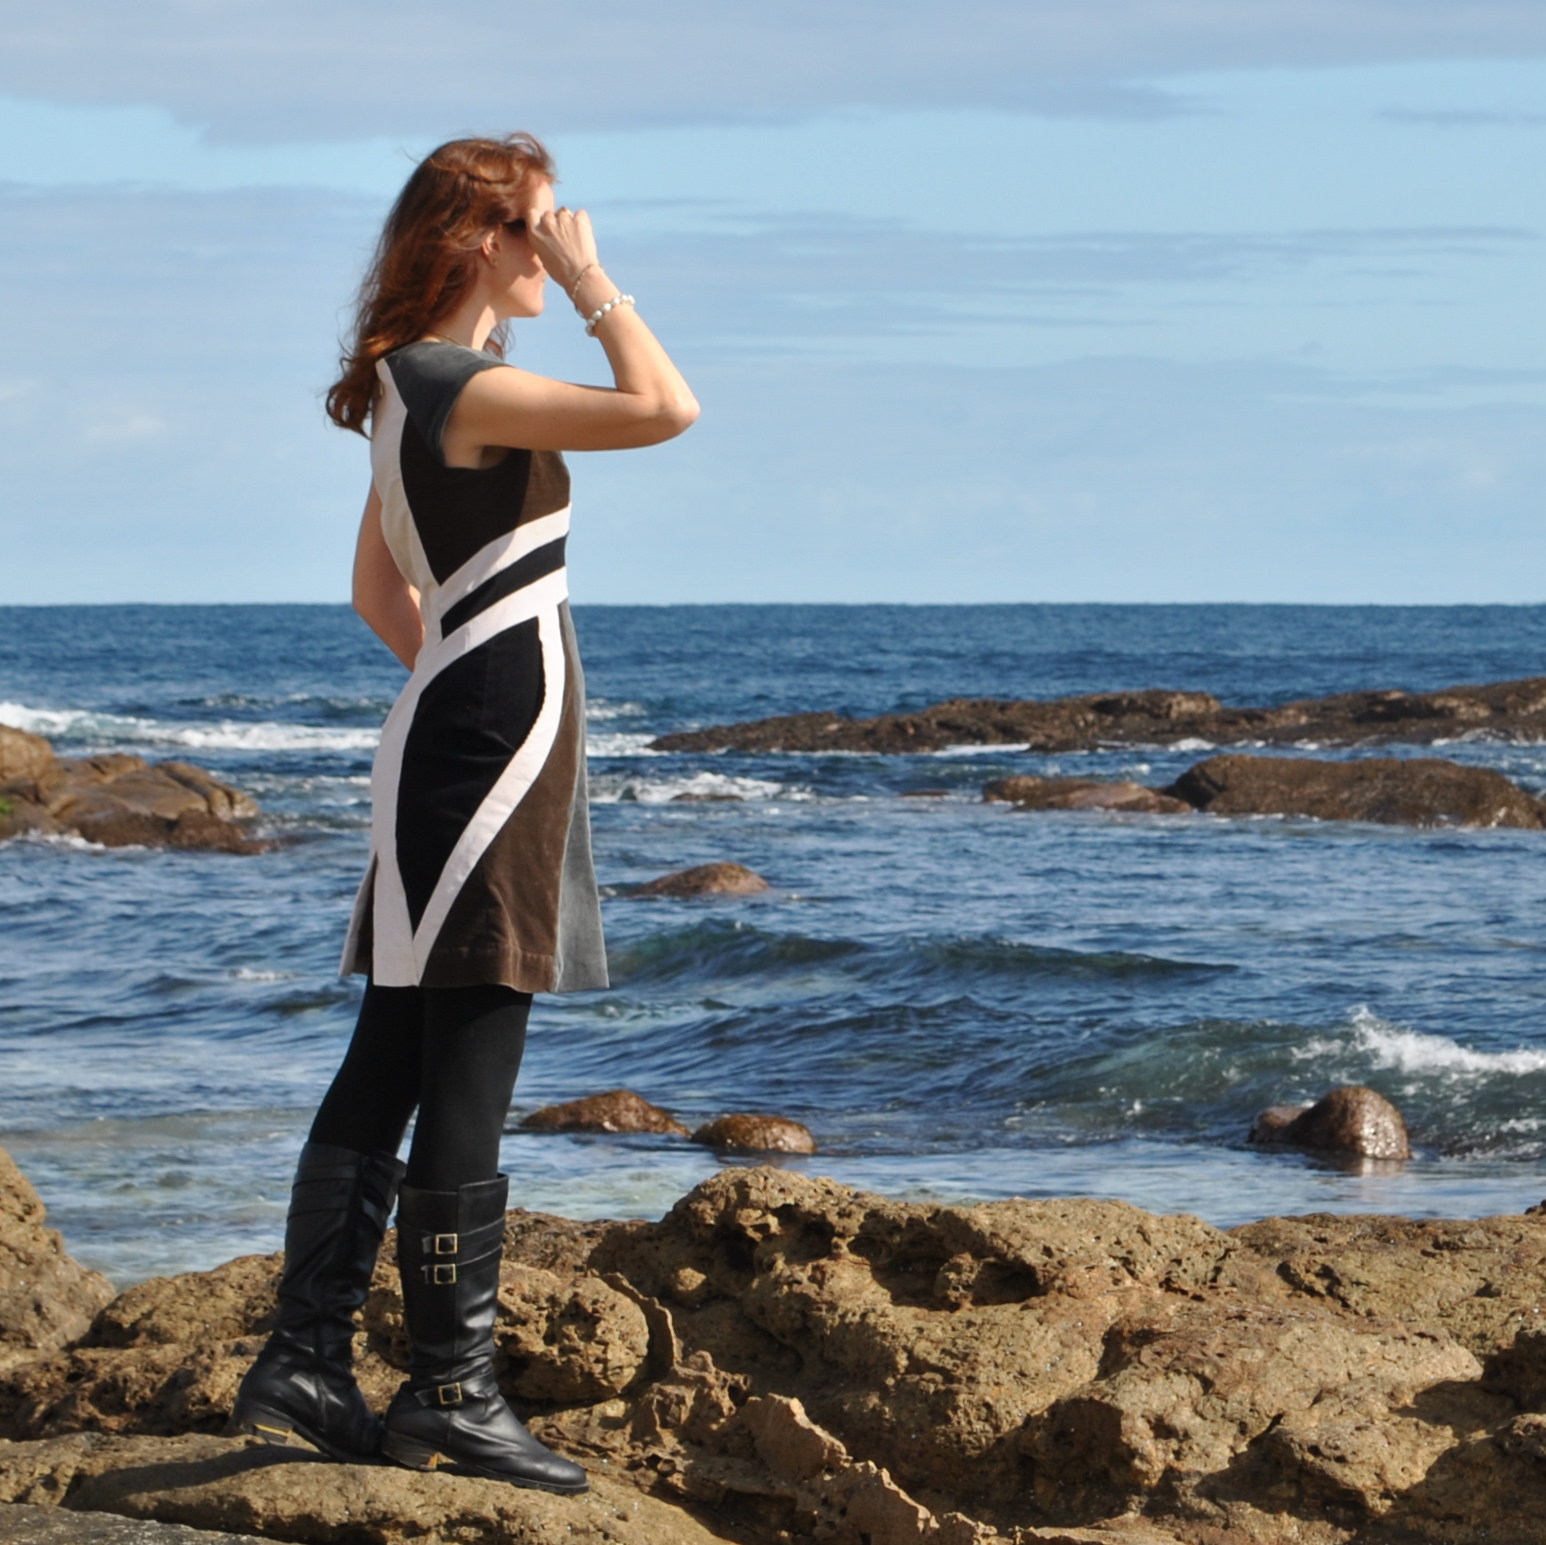
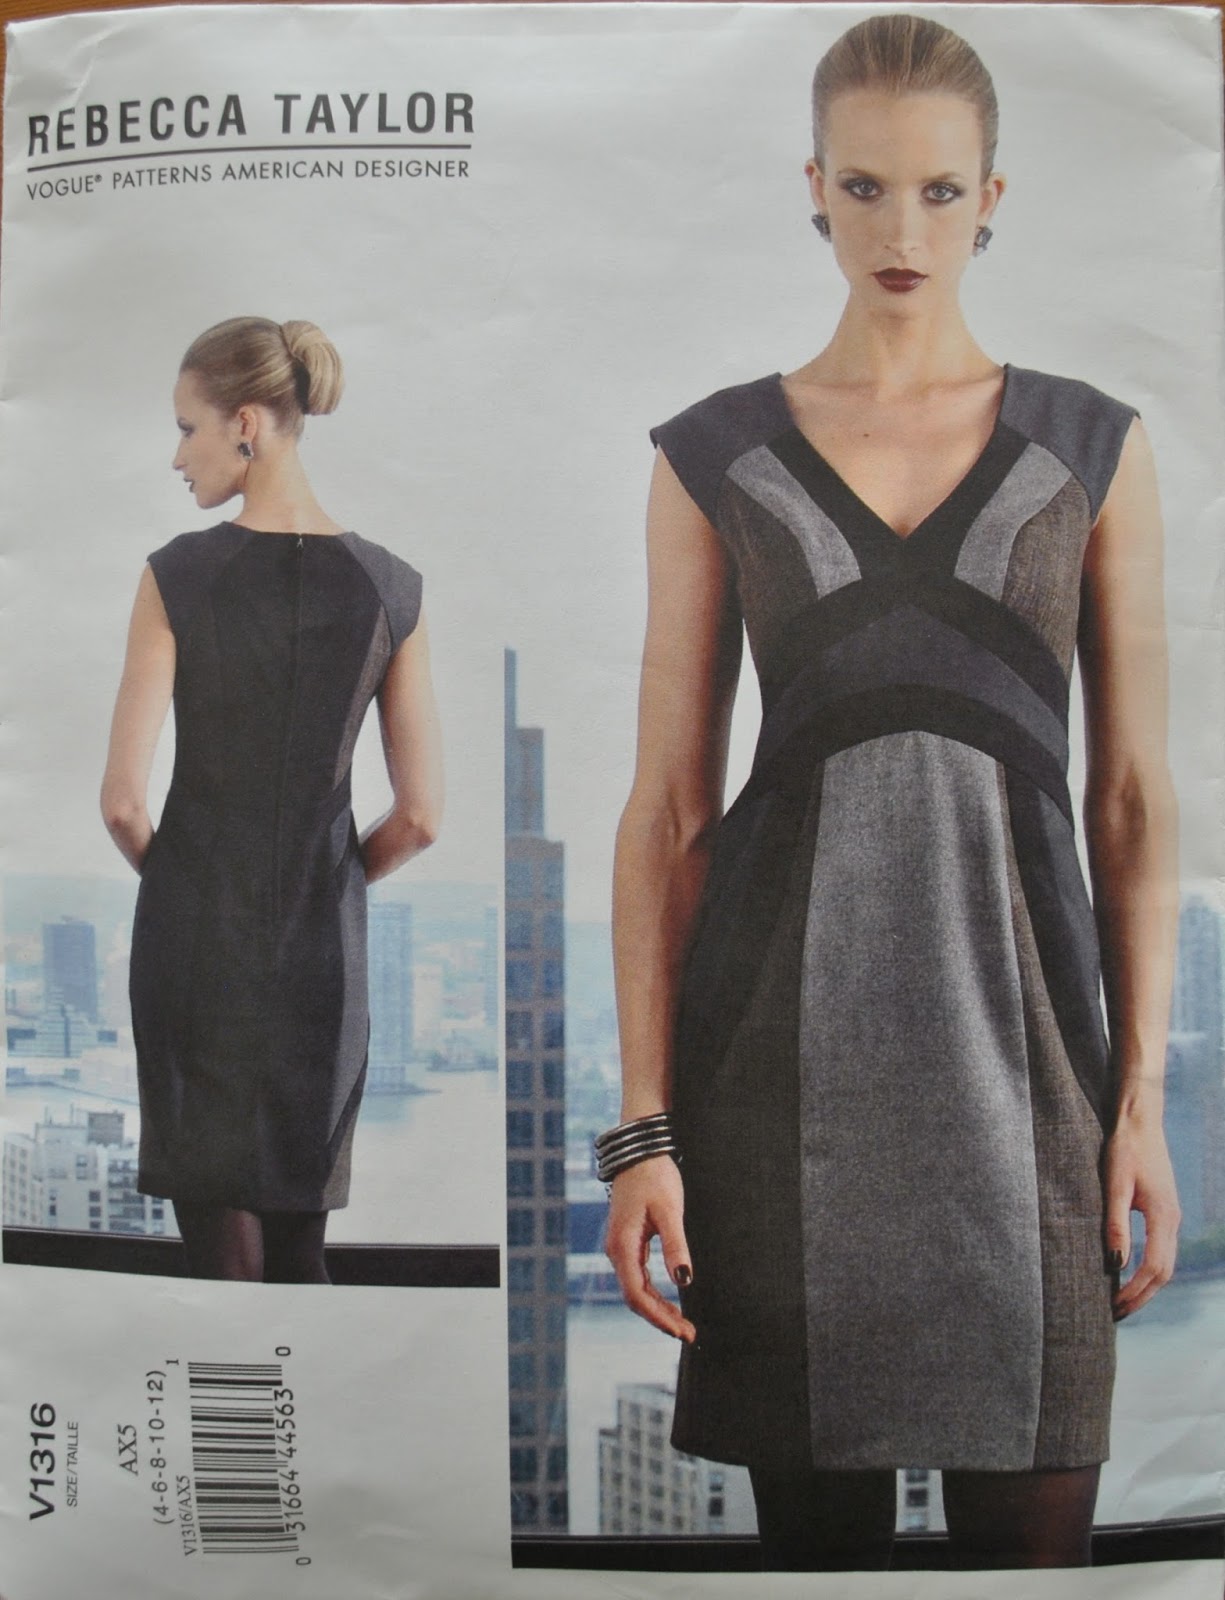
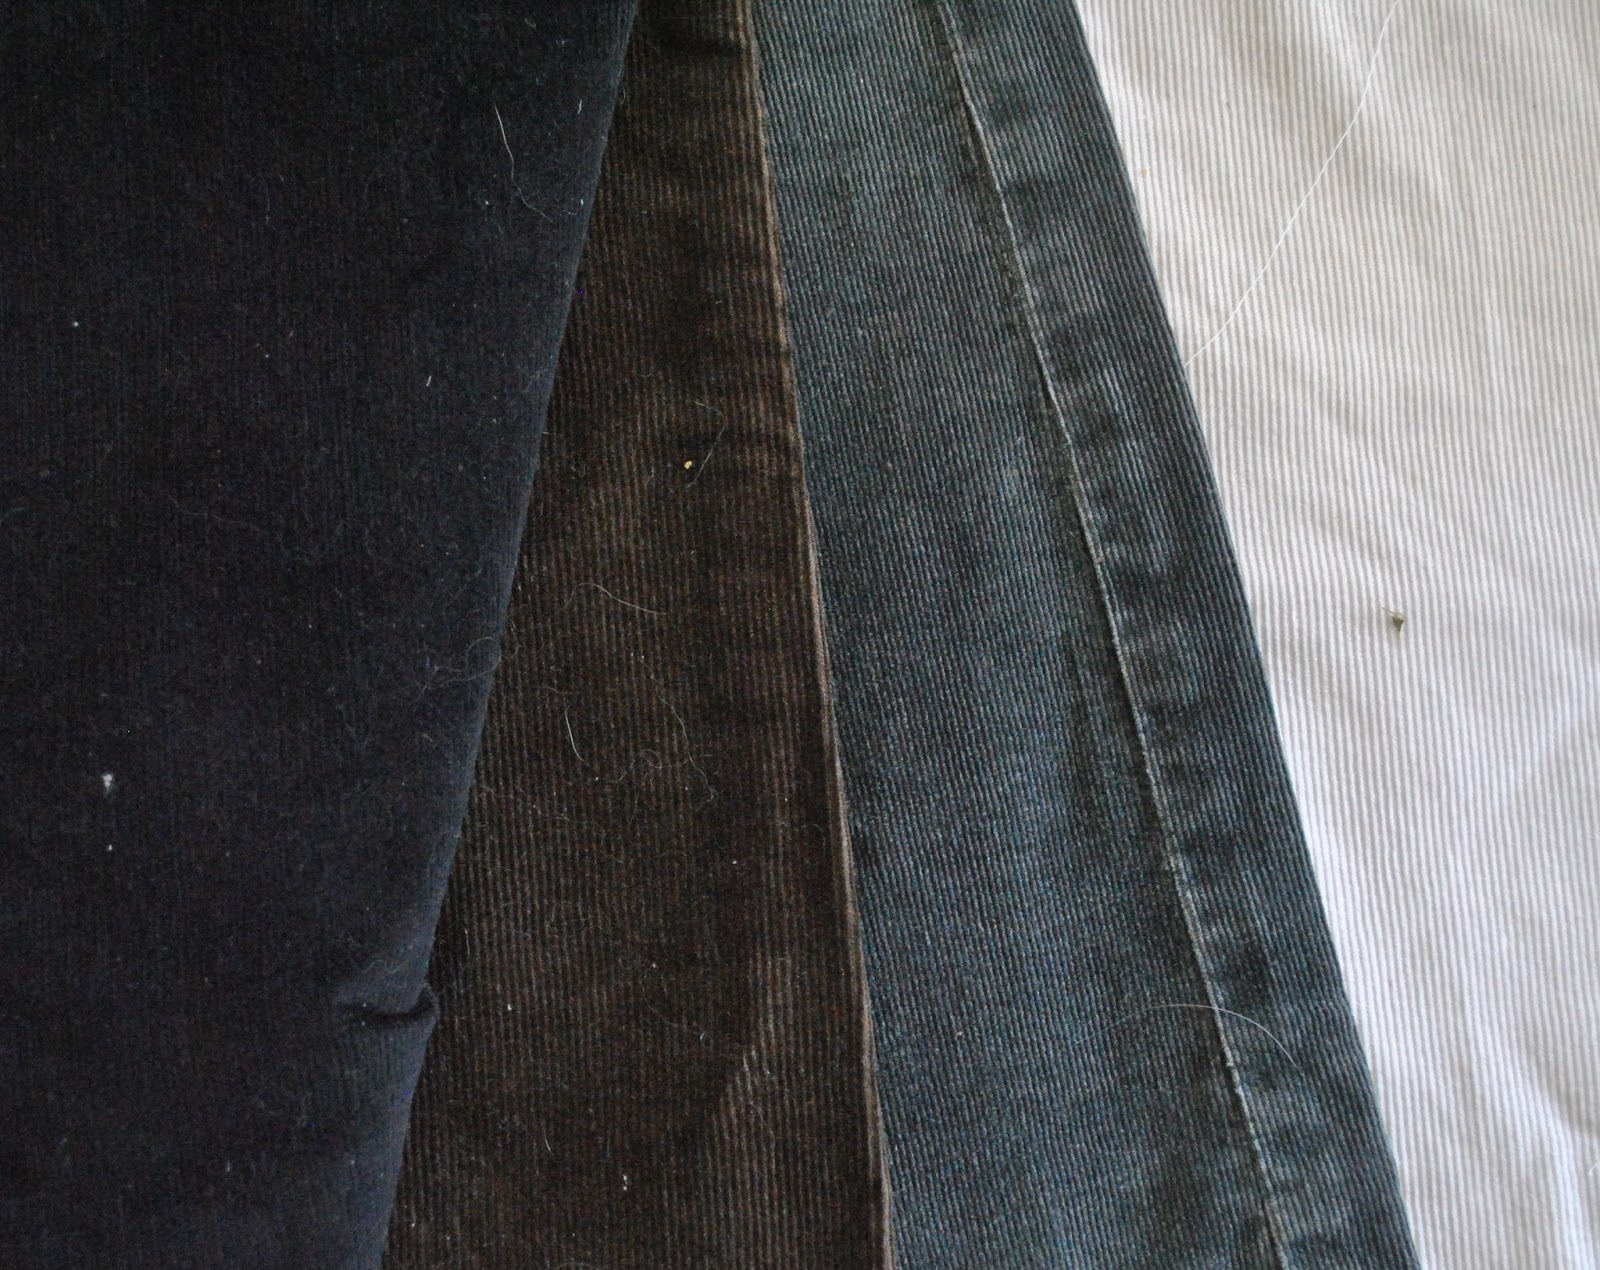
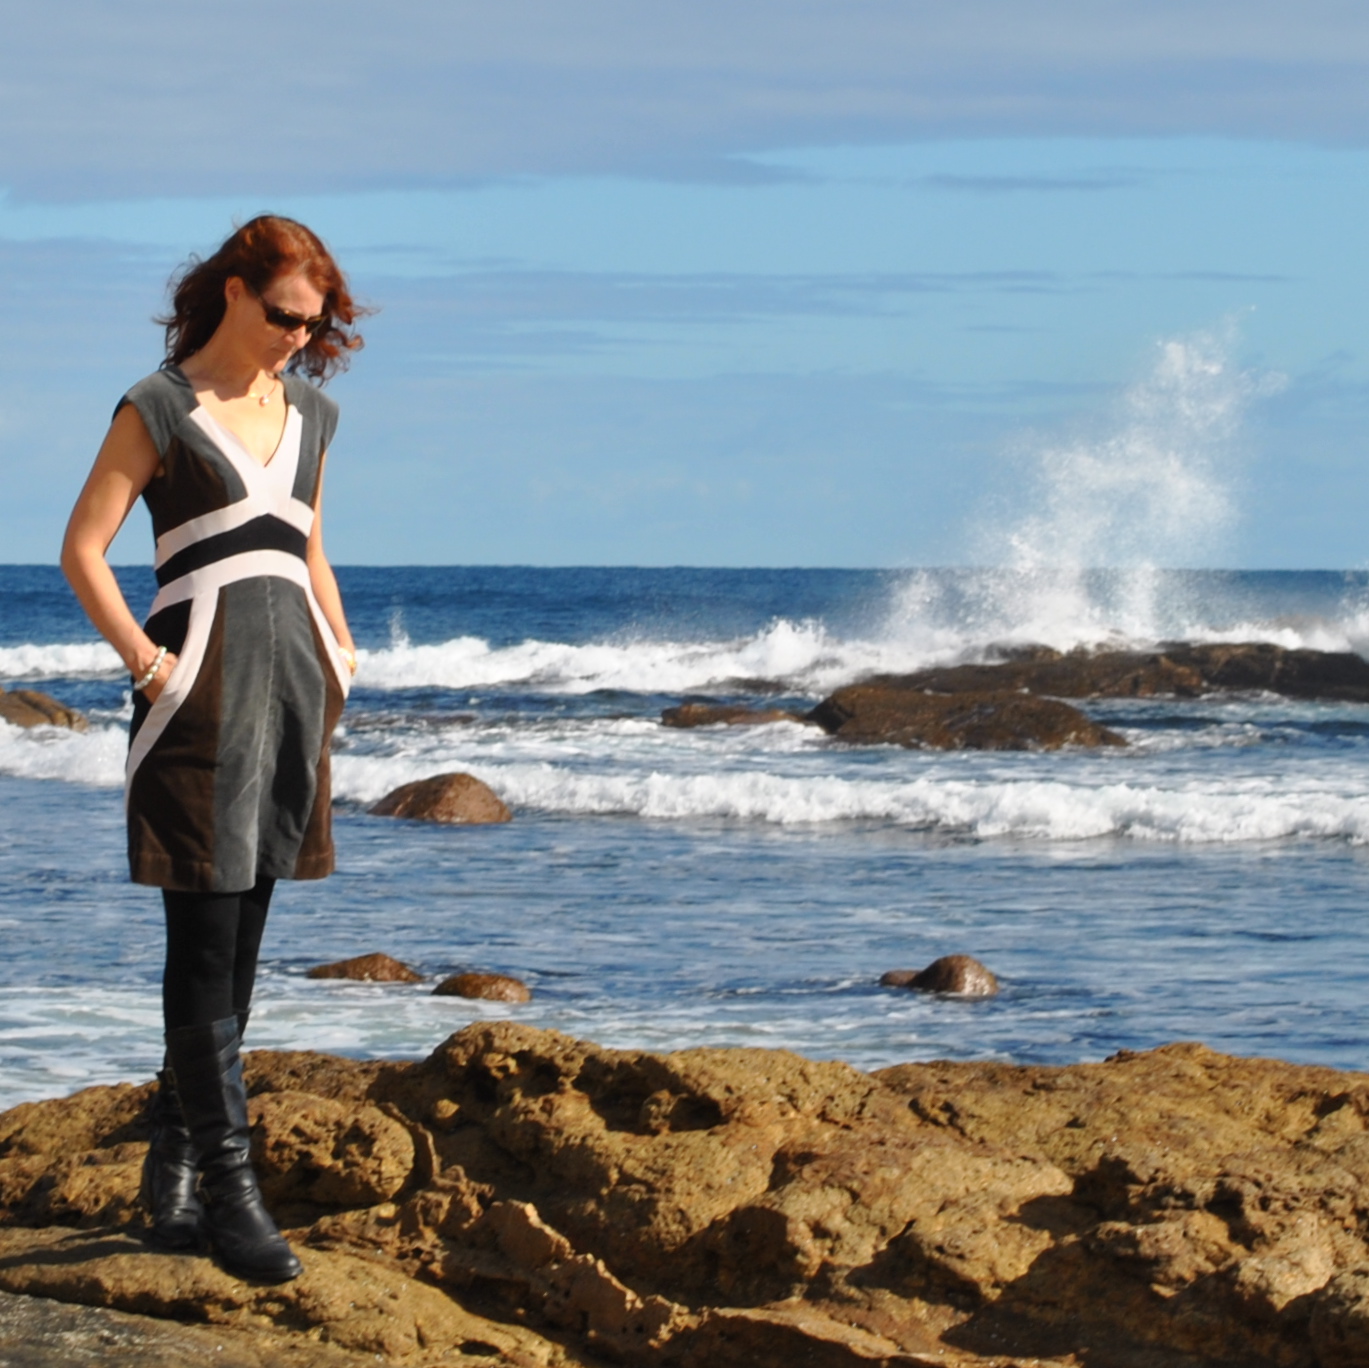
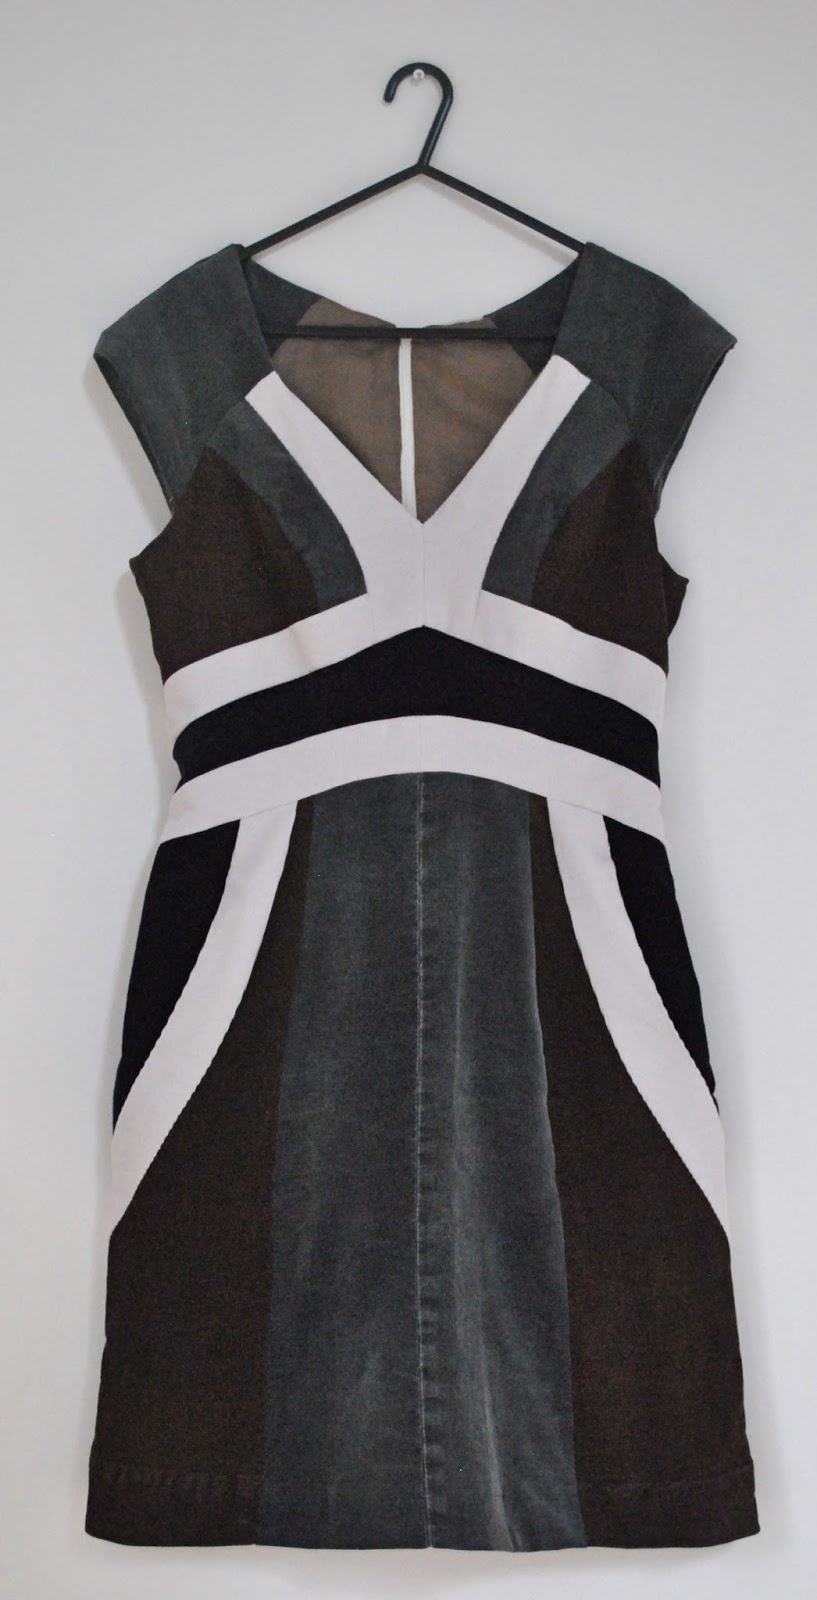
I’ve made a new dress! a dress comprised of panels and bands. This is Vogue 1316 and I made it using three pairs of old corduroy jeans, ivory, chocolate and a faded black; plus a piece of new black corduroy, itself a leftover from my black corduroy flares-now-bootlegs. Ha! hanging on to those old jeans and leftover scraps payed off… eventually. It can be seen by the mangled leg of the jeans on the left that these have been partially harvested previously, when I made the Black parliament…

I managed to get the pieces for the dress, following the grain AND the nap (no small feat) from these jeans, with only a few piecings necessary. The original hem has been retained and incorporated into the lower hem of the skirt in each of the ivory and chocolate brown lower skirt panels. The widest panels I cut from the leftover piece of black corduroy, because that piece was the widest… the bonus is that this is the hip area and the darkest fabric situated here gives a slimming effect.
The lower band of the dress is a very wiiide piece, and since jeans legs are not wide, this required joining three pieces together. But hey, I don’t think the joins scream “hey lookee here, seam!” very much, so I think I get away with it.
Also the lower front is cut over the side seam from a jeans leg, with the old side seam in the new centre front.
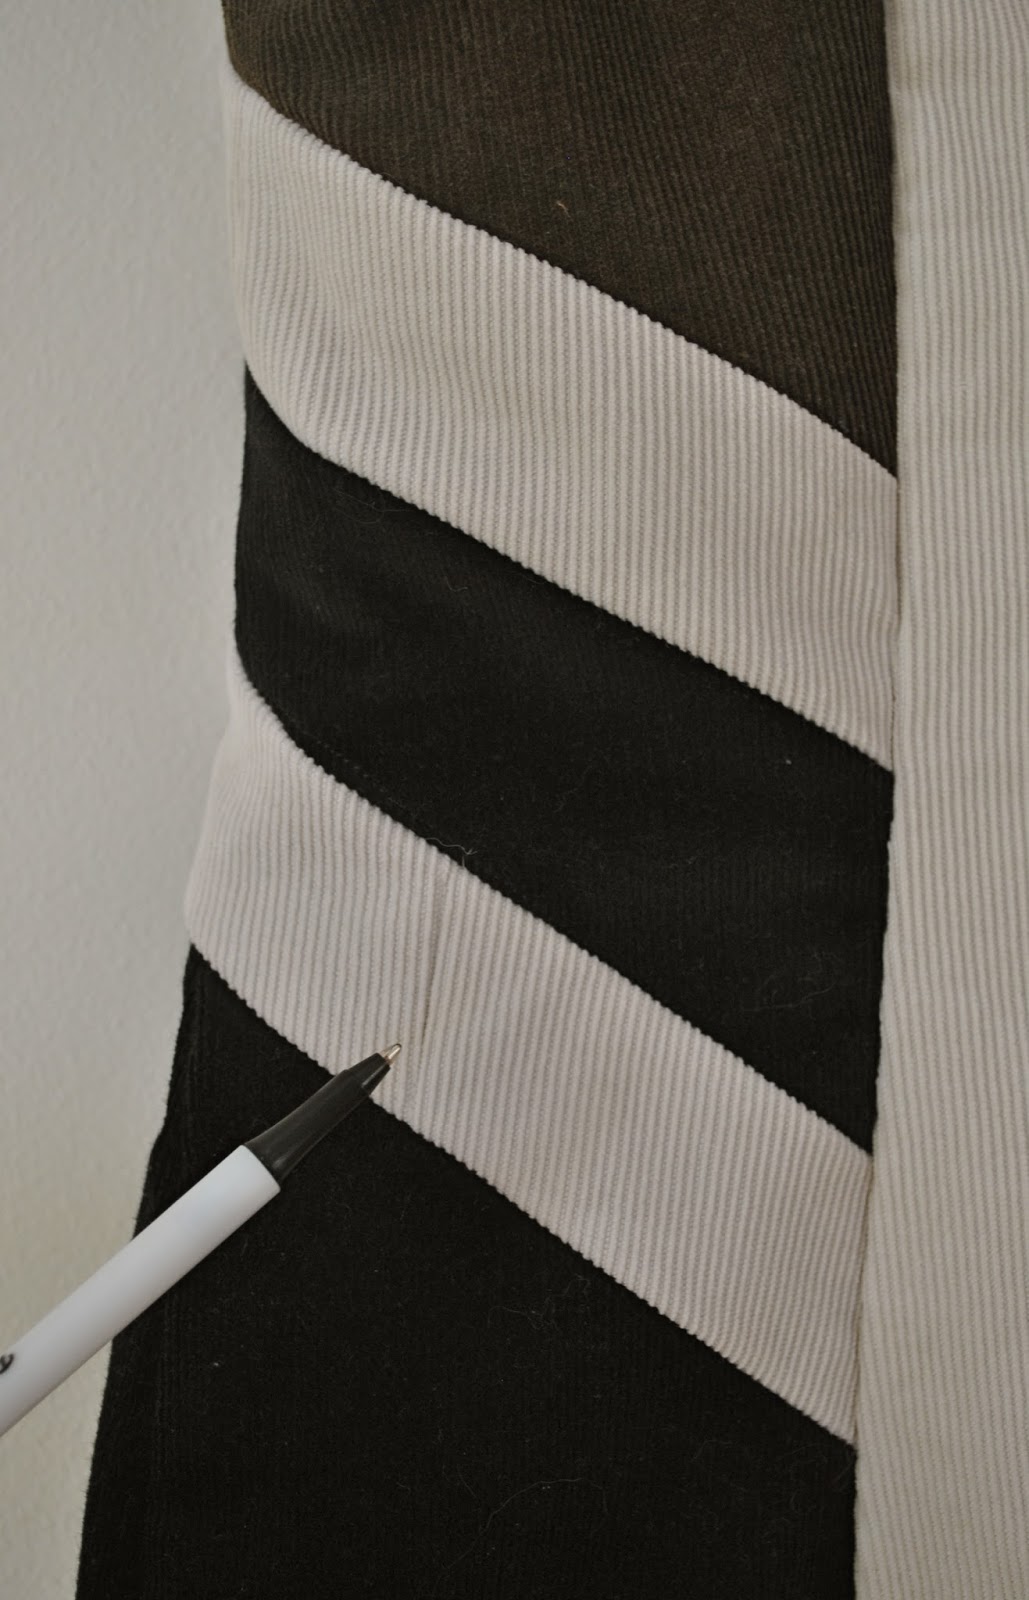
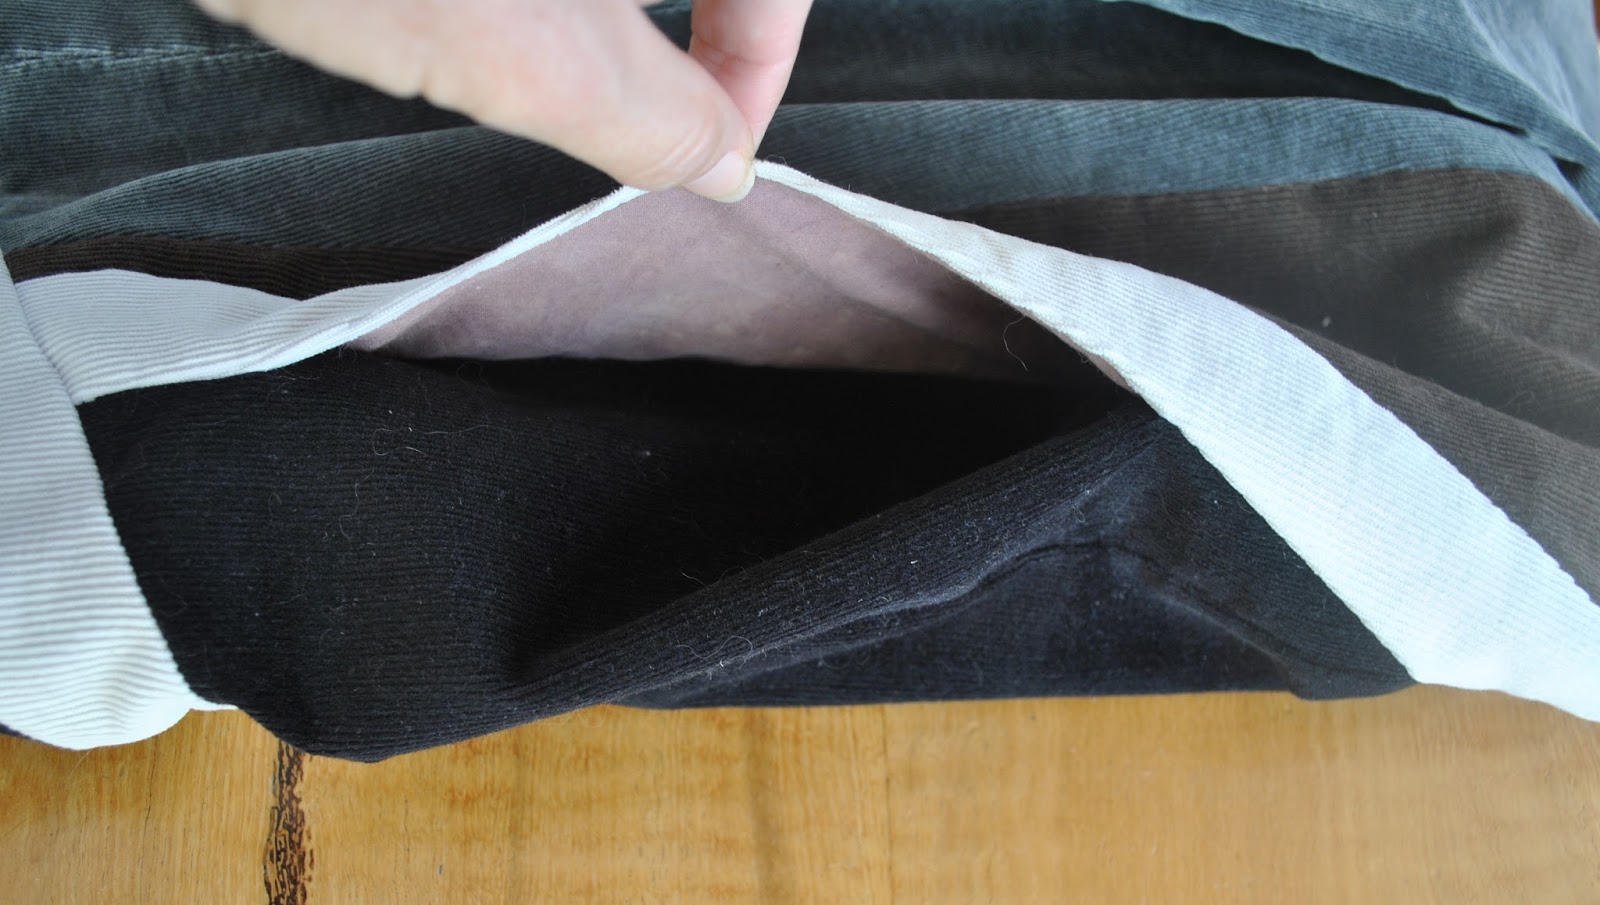
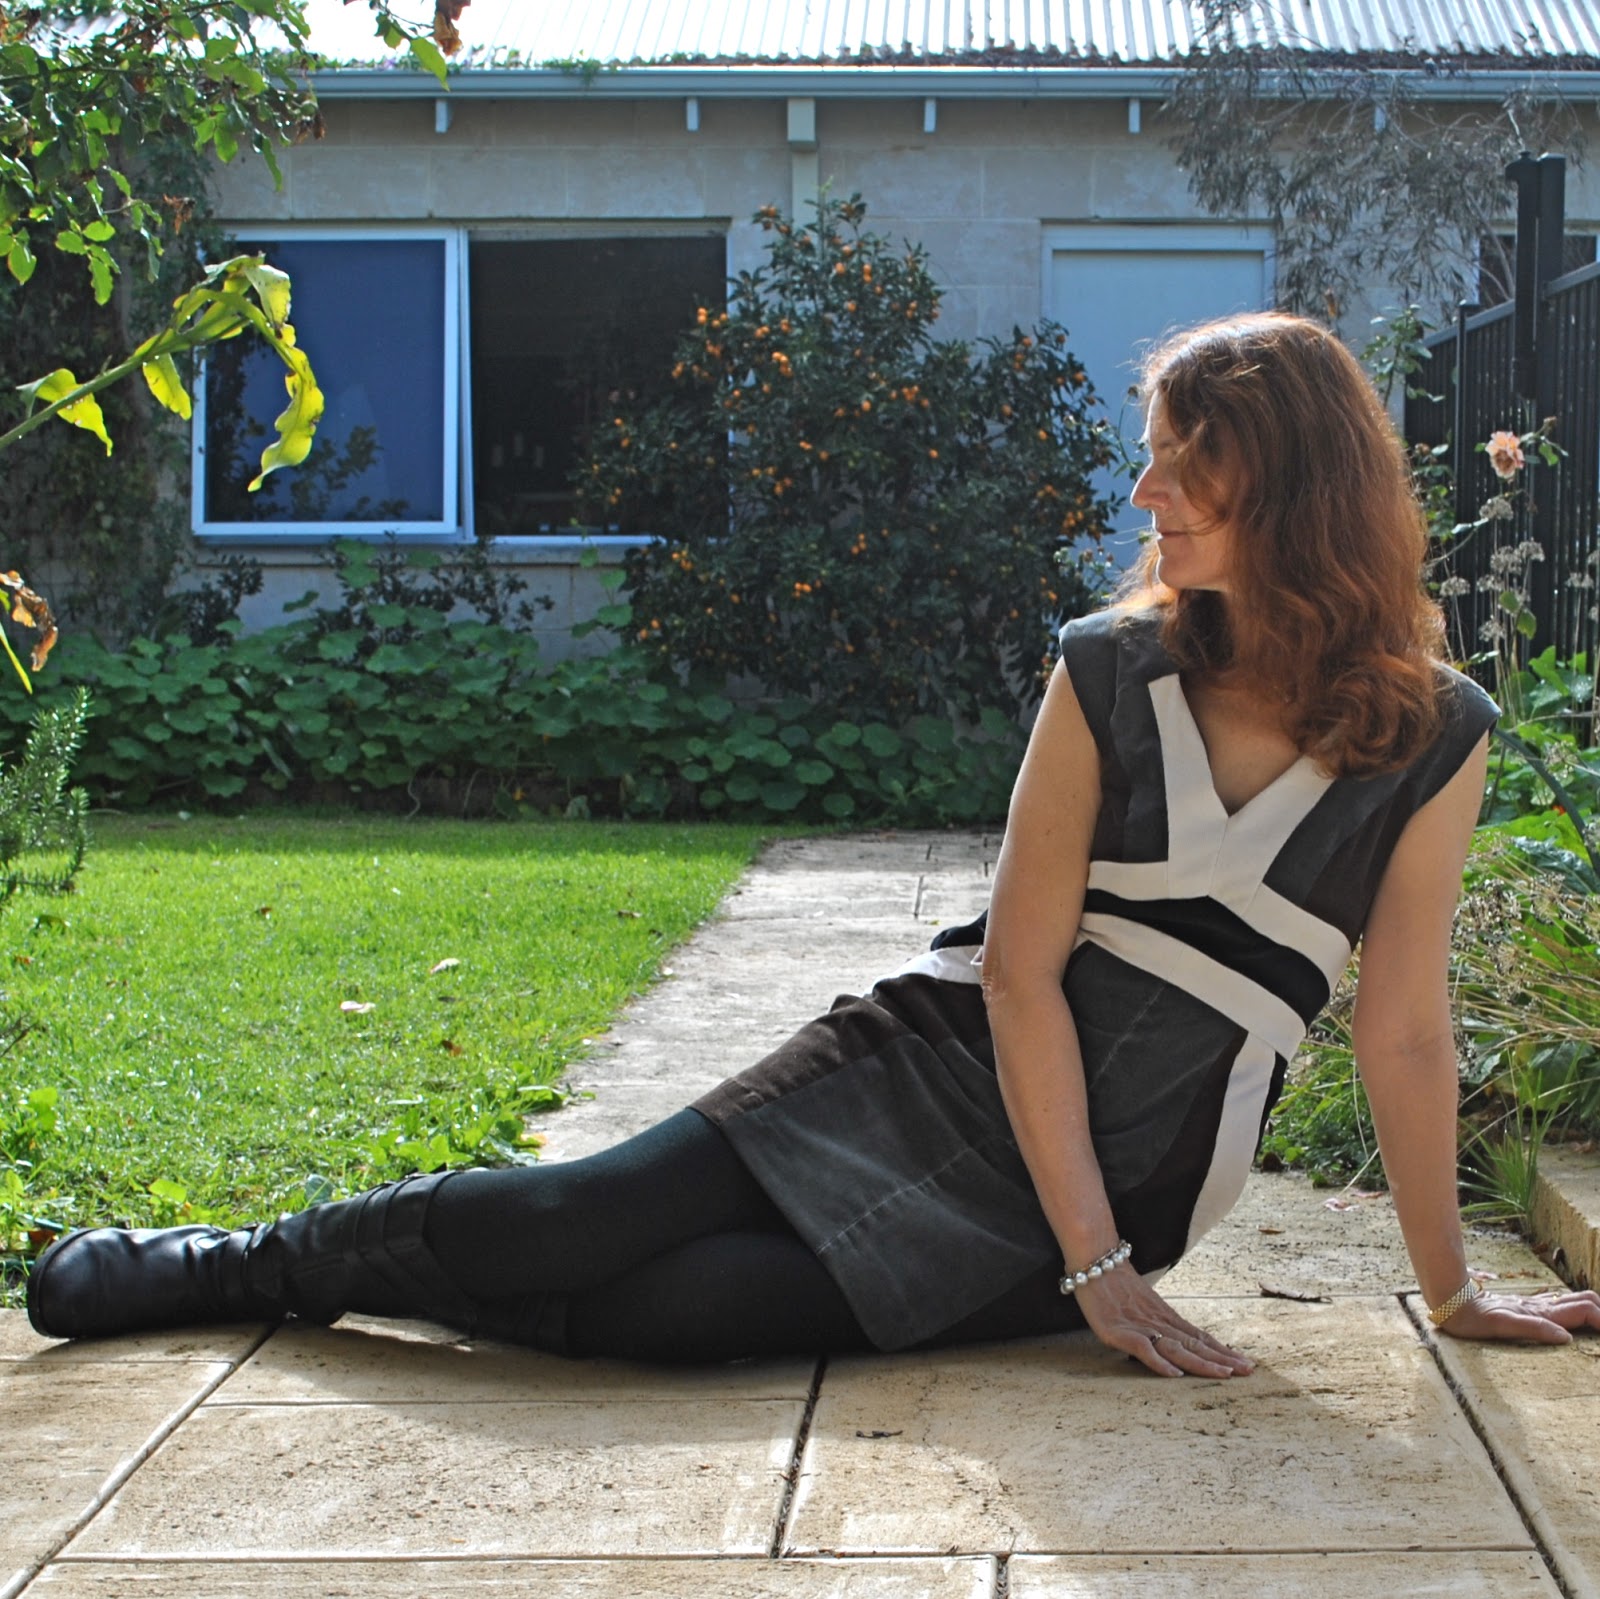
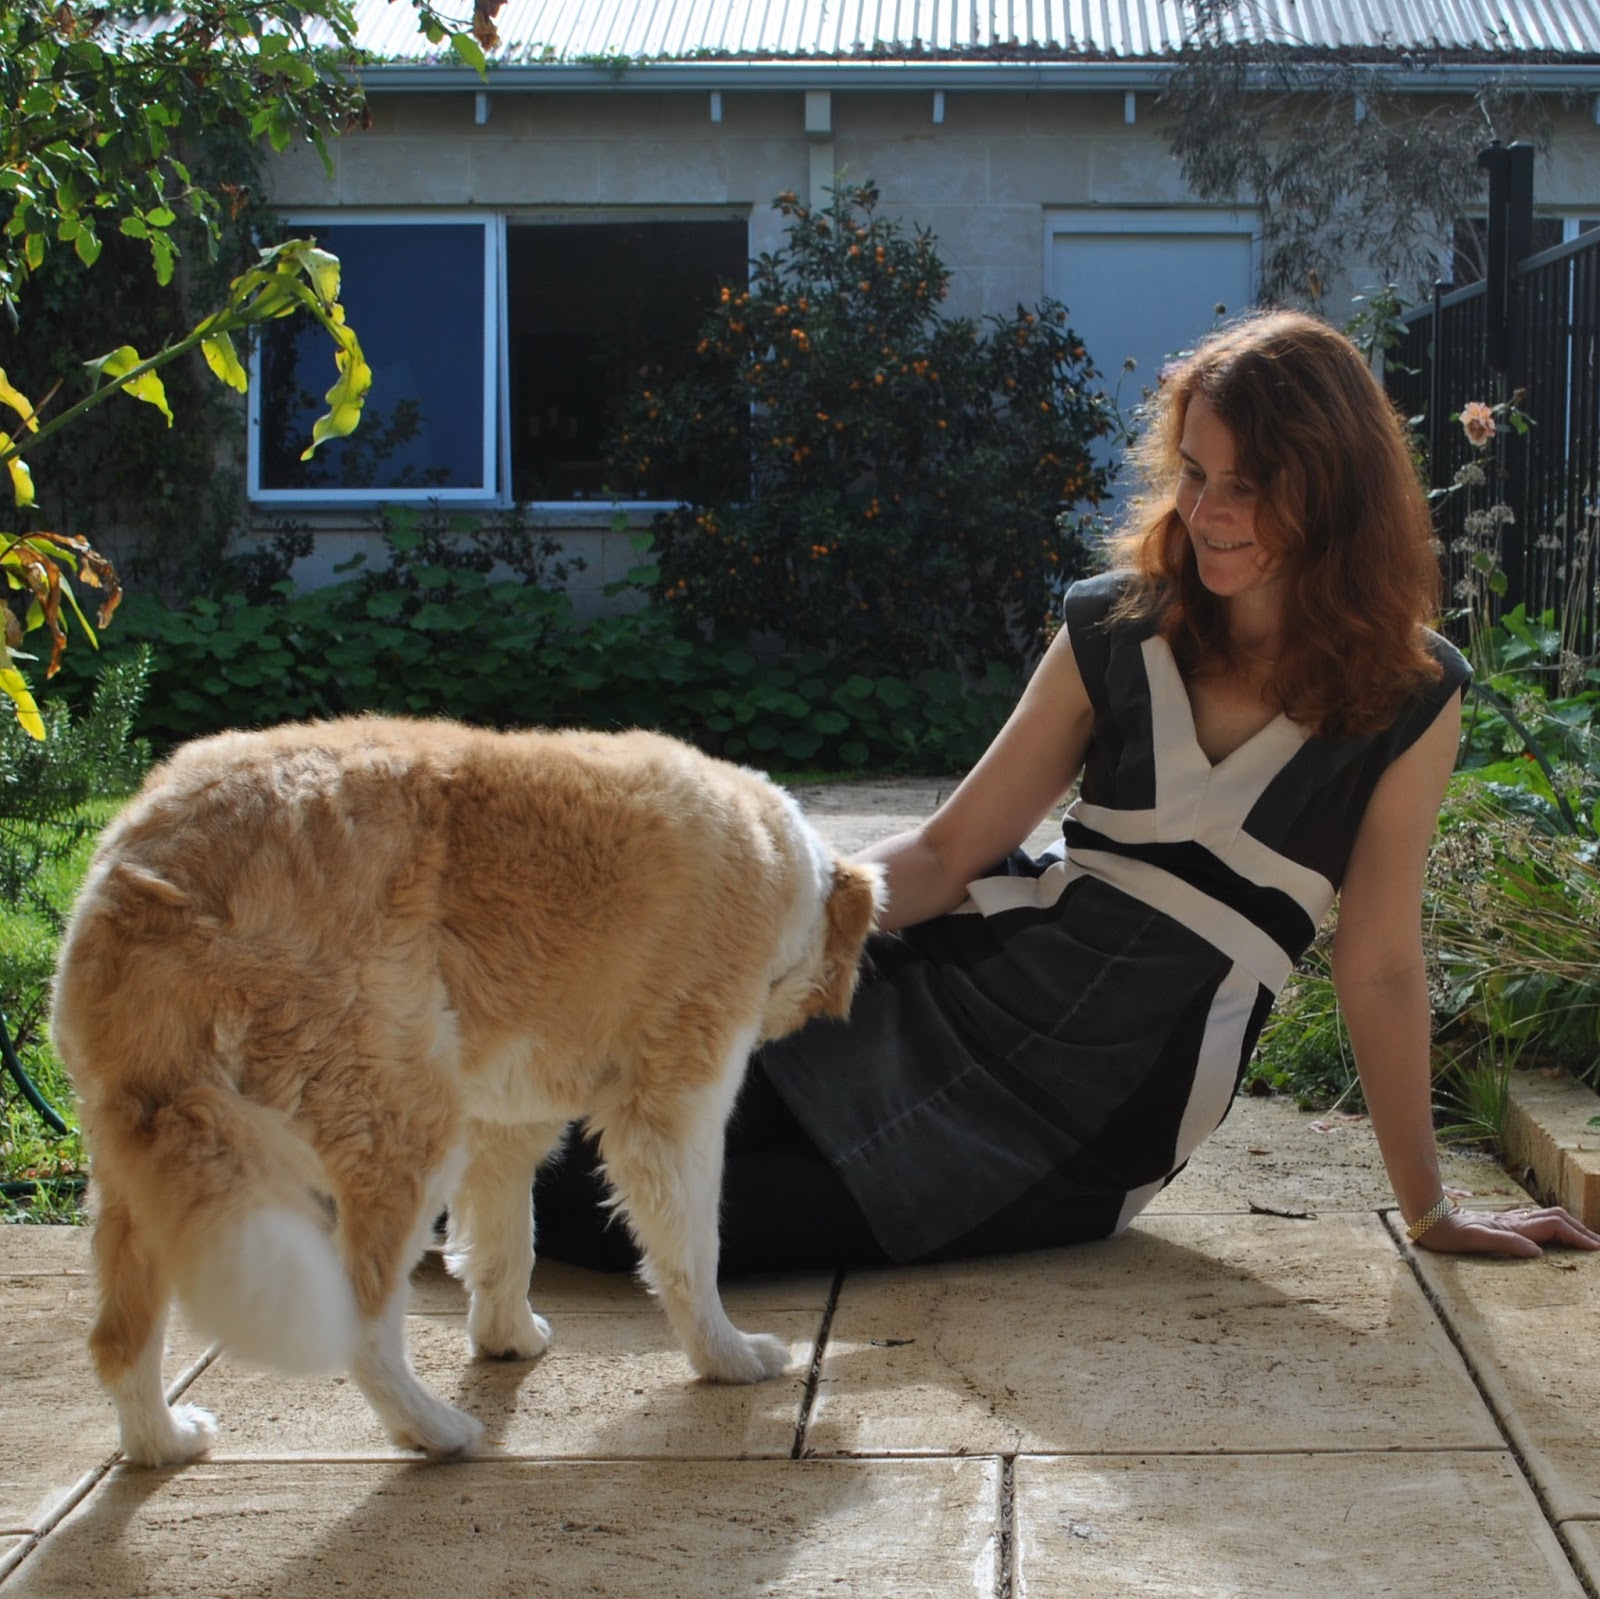
So, it can be seen above that my dress has luvverly deep pockets. The pattern does not provide for pockets. When I first saw the picture on the pattern envelope I thought that it did. That side band curving down from the waist and around to the back was situated in perfect hip pocket position, so it was a reasonable assumption to make. Perusal of the fine print revealed that I was sadly mistaken. Early elation (and it has pockets!) turned to disappointment (oh it doesn’t have pockets), turned to a dawning realisation (hey, it could so easily have pockets) turned to a firm resolve put those missing pockets back into the design where they were so inexplicably lacking (dammit, that dress really should have pockets!)
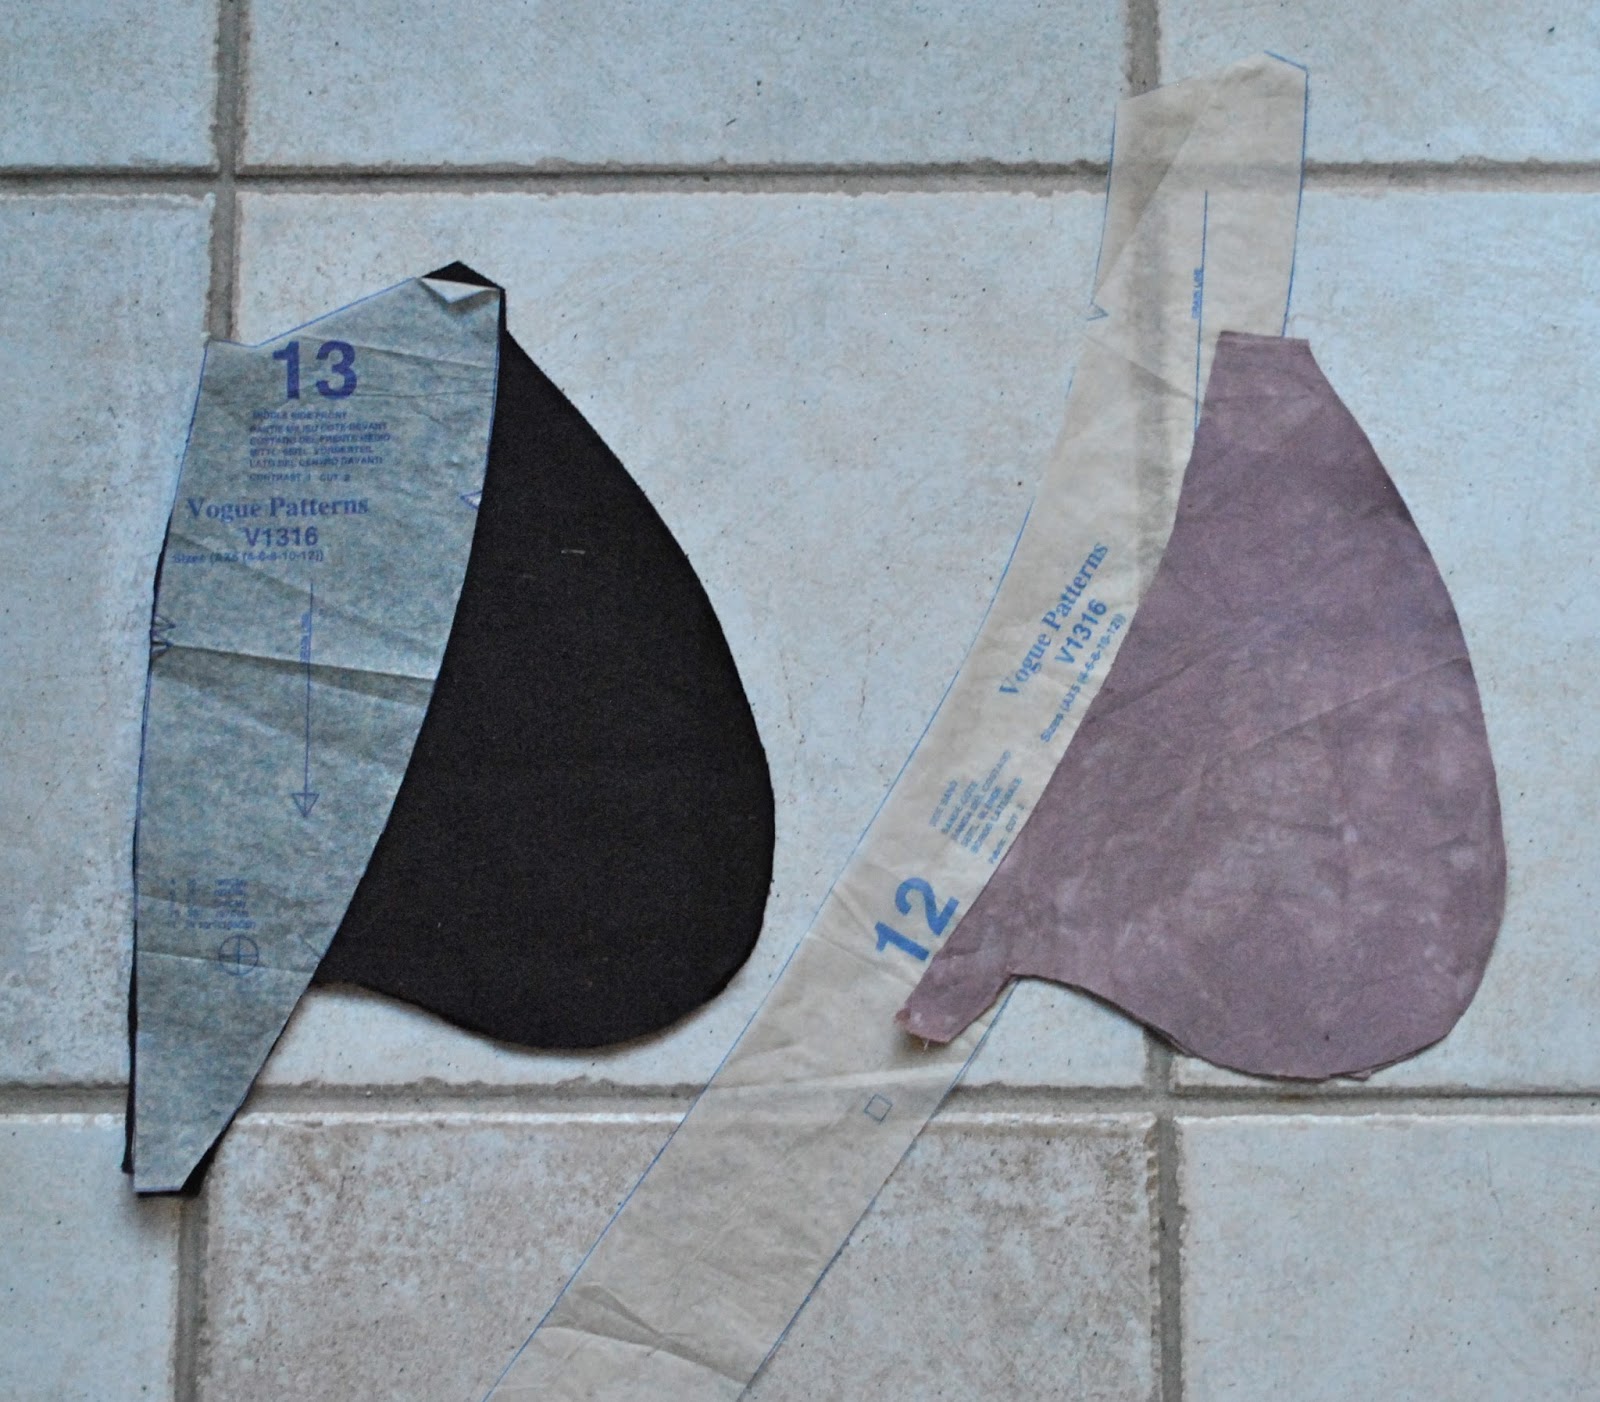
Adding them was not very difficult. I cut the skirt pieces to be bigger, grading from my usual waist size out to between one and two sizes bigger than my usual choice at the hips to accommodate having hands in the pockets. Then drew a rough, my-hand shaped piece onto paper, added this to the inner edge of pattern piece 13, the middle side front, and cut this composite new piece from the fashion fabric for the pocket. I cut the hand-piece from woven cotton for the pocket lining. I interfaced the corresponding section of the full-sized fashion fabric side band piece with iron-on interfacing, as this was to be the pocket opening and so needed stabilising, and joined all the pieces in the normal pocket way, the pocket lining to side band with a narrow seam allowance so the fashion fabric continues over and into the pocket within the fold. Additionally the pocket opening is under-stitched, to prevent the lining from rolling out.

I am unreservedly thrilled with how the pockets turned out, they really are in the perfect position, and I cannot understand why they were not there in the first place. Vogue would do well to include pockets, or at least the possibility of pockets, in all their casual designs imo , since they are clearly high on the list of Most Desirable Features in a Design, wouldn’t you agree? It’s certainly something I always look for in a casual pattern, or at the very least, the potential for finagling pockets if at all possible. I reckon this dress is only, like, a hundred times better for having pockets? Rough guesstimate, there.
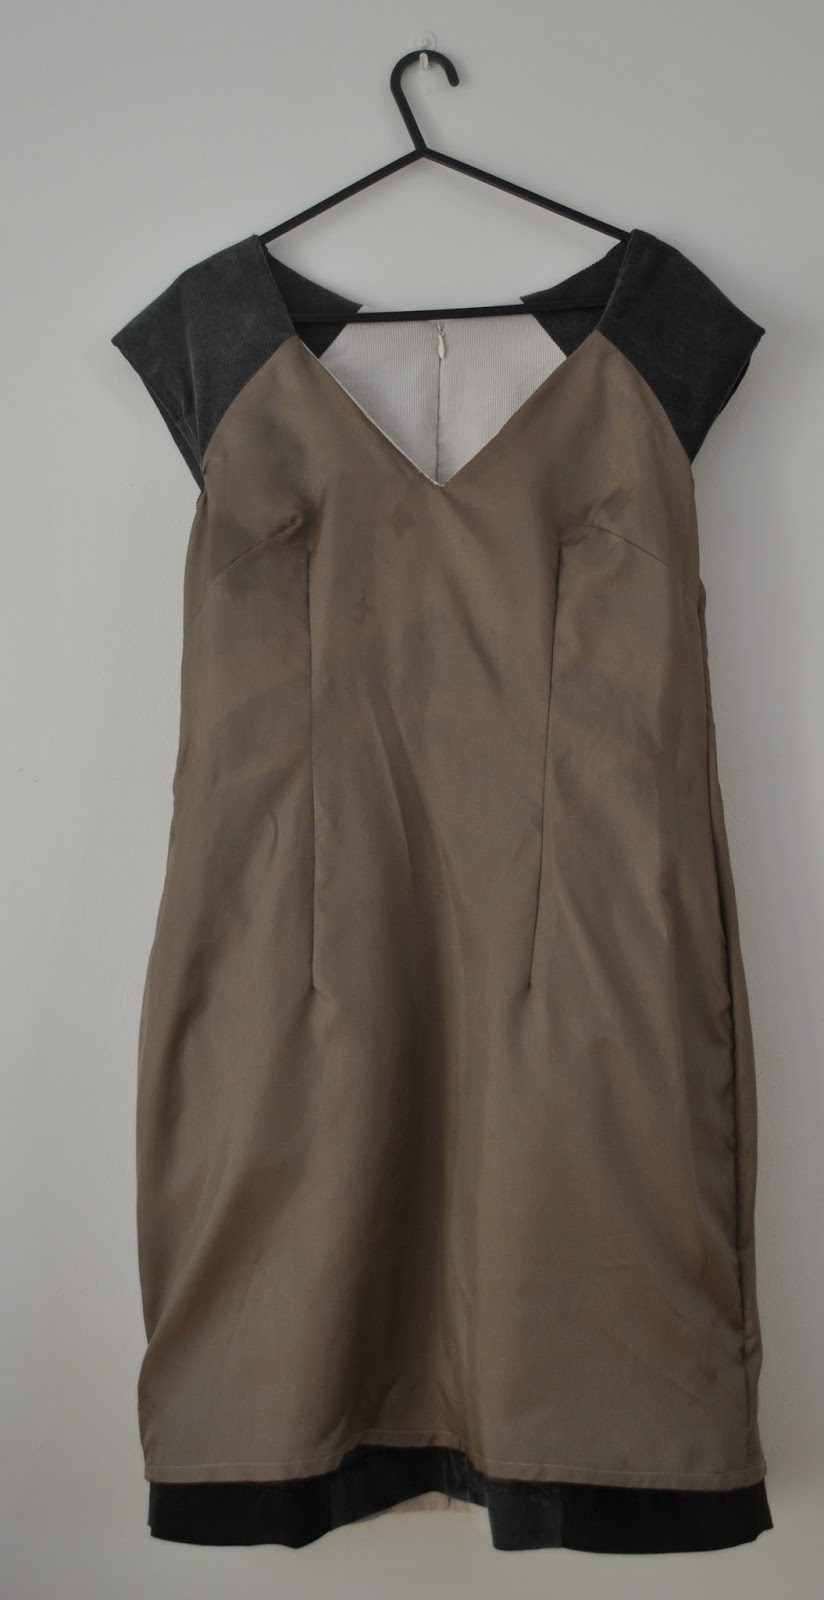
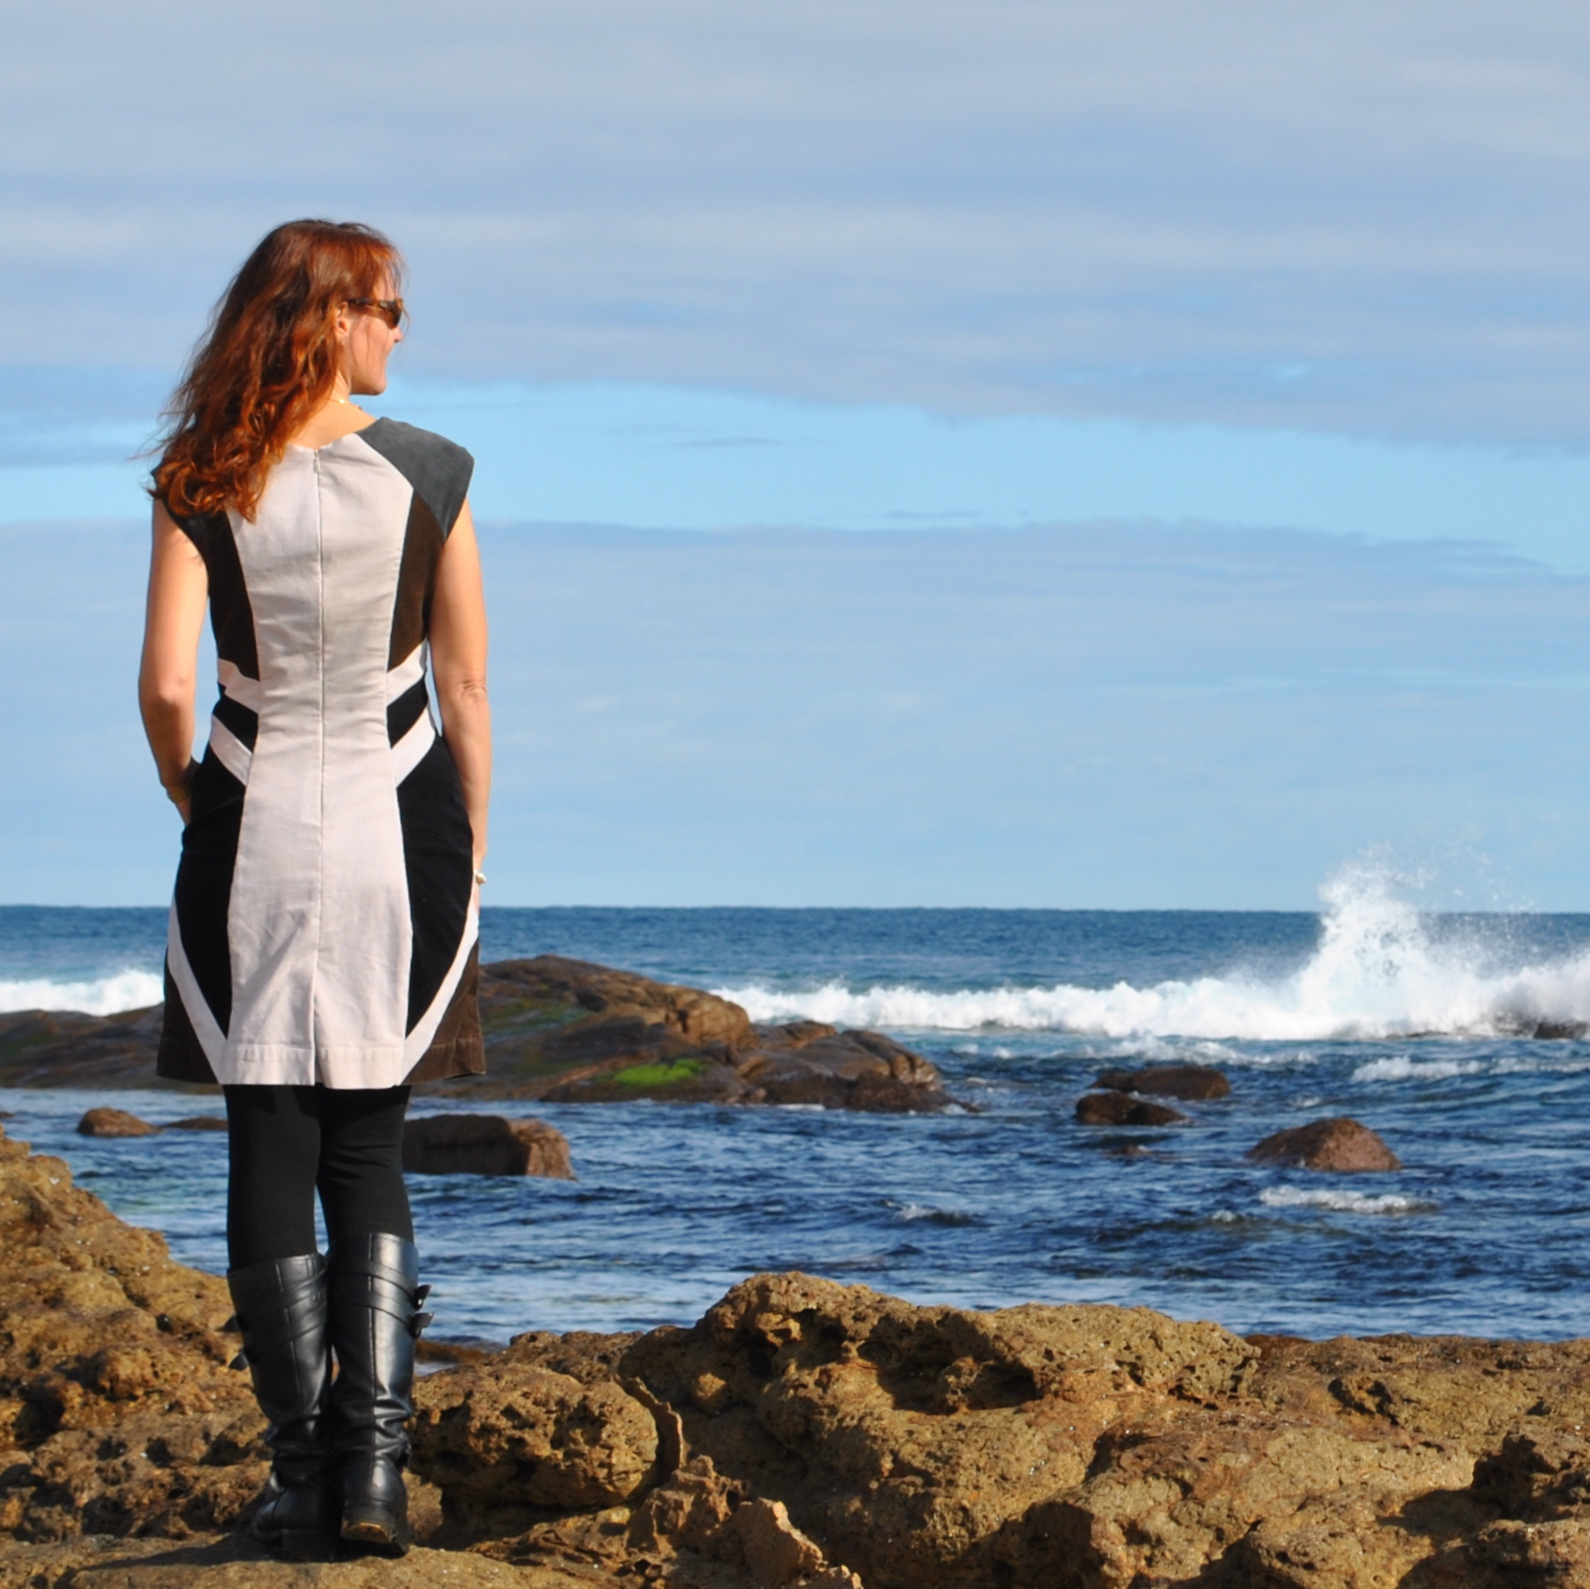
The dress is fully lined; and even in a casual, toss-it-on-for-whatever, day dress like this I prefer the clean and streamlined minimalism of an invisible zip, so used one.
The fit… there were minor issues. For a “fitted” pattern I reckon it runs quite big and boxy throughout. But this was easily fixed, mostly through that handy back/side section seam, pictured below.
I am super happy with the dress, it was an enjoyable puzzle to put together and is very comfy and easy to wear. I love washed and worn corduroy, such a beautifully soft and warm texture in a winter dress. And it always makes me feel good to re-use old textiles constructively like this. 🙂
More
inane drivel thoughts about this pattern can be found in my pattern review below if anyone is interested.
Details:
Dress; Vogue 1316, fashioned from 3 old pairs of cotton corduroy jeans plus another piece of cotton corduroy in another colour.
Tights; self-drafted, black merino, details here and my tutorial for drafting your own custom-fit tights pattern here
Boots; Andrea and Joen, bought from the now re-branded Uggies in Dunsborough
and merely because I find these pretty amusing… the Vogue pose
Pattern
Description:
Fitted
lined dress has several shaping bands and multiple panels, a central back zip
and walking vent
Pattern
Sizing:
Size
4-12. I cut my usual size 10 in the bodice tapering out to between a 12-14 at
the hips. This hip is larger than
my usual size, but I wanted to incorporate pockets into the design, which
requires a bit more room in the skirt.
In my opinion the pattern runs a little big, since I had to take in the
bodice quite a bit, and might go down to a size 8 in the bodice next
time.
Did
it look like the photo/drawing on the pattern envelope once you had finished
sewing it?
Yes.
Were
the instructions easy to follow?
Yes
What
did you particularly like or dislike about the pattern?
I was
attracted to the complex banding and panels design, lending themselves to
pattern through the use of tonal solid colours.
I was
disappointed that it did not have pockets, considering that the side
band is perfectly positioned to have a pocket tucked under it. But I knew the
design would be very easy to adapt so that I could have my beloved
pockets. And it was, and so I have them 🙂
The
lining is not done in the best way, in my opinion. I don’t really love lining being sewed straight to the shell
of the dress like this. It is
under-stitched to help keep it all inside; but if I was going to make this
again I would instead make self-fabric facings for the neckline and underarm
and attach these to accordingly modified lining pieces.
For the lining, the pattern stipulates 1.8m. In my size, I found 1m is sufficient.
Fabric
Used:
Cotton corduroy in four different colours
Pattern
alterations or any design changes you made:
Pockets! I was
determined to incorporate pockets into the dress, so modified pattern piece 13
to be a pocket piece, and also drafted another piece to be a partial facing for
piece 12 with an integrated pocket lining. To accommodate hands-in-pockets wearing
ease, I drafted the skirt pieces to taper from my usual size 10 at the waist, out
to between 12-14 at the hips.
I
raised the height of the centre front by about 1cm, and am glad I did. Next time I might raise it even higher!
Step
19-23: I prefer an invisible zip in my dresses, and I always install an
invisible zip before stitching the remainder of the seam below. I reckon this gives you a much better
and smoother finish.
Sizing; I find the bust of Vogue fitted patterns to be drafted too big for
me generally, so I pre-emptively shaved about 1cm width off the bust curve of both pattern pieces 3. Even so, at Step 24: sewing the back to side section seam; I found the fit still quite boxy and not
close-fitting enough for my tastes around the waist, so took out several inches in
width from the underbust and waist, graduating out again to the bust and hips.
Ultimately these alterations left me with a distinctly more A-line skirt than the pattern intended, and I am happy with that.
Would
you sew it again? Would you recommend it to others?
Oh my
gosh, I always say yes I will sew it again, and then I’m immediately distracted
by new patterns like a toddler with a shiny new toy! But I certainly would not rule out sewing this one again. This one is just going to be casual, everyday, winter’s dress. I’ve been thinking about the idea of using several bright clear colours demarcated by black bands, like a licorice
allsort. Wouldn’t that look cool?
And
yes 🙂
Conclusion:
I
really love how it turned out! The interesting and unusual seaming pits the chosen colours against each other to dramatic effect. I can picture a multitude of
possibilities for colour-blocking here.
I am especially pleased with how my pocket alteration turned out, to be honest I
probably would not enjoy wearing a dress without pockets so much as one with,
so to be able to incorporate them so easily into the design was a very happy
bonus.
Without
any fitting modifications I would not describe this as a fitted dress. I had to take
my usual size in quite a bit.
However it is quite easy to do a lot of final fitting through the back
to side section seams.
….photo-bomb!…


 I made a green dress… this is a dress that I’ve been meaning to make for ages! and have been quietly gathering suitable green fabrics as I see or unearth them. It’s actually been a very long term work in progress! since I identified what I thought could be the first suitable fabric about four years ago. I know, right?!


 I’ve made a new dress using a bunch of my kids’ old jeans that I have
 Materials; obviously, all blue denim jeans. I used three pairs of children’s jeans, one pair of child’s long shorts and one pair of adult jeans. The adult jeans turned out to be necessary when I realised that the full-length panels at the back would look pretty terrible if pieced at the waist; it’s a very much piecemeal kind of a design anyway, and to have that nice long smooth length of fabric at the back is just a nice visual anchor in amongst all that busy patchworking, in my opinion. I decided it would be best to retain it; fortunately I had one pair of Craig’s old jeans in my refashioning bag and could cut the long back pieces from those.
 My vision for this dress has always been to have lots of the existing jeans’ details retained in it, like the pockets with their decorative top-stitching, the coin pockets and belt loops and so forth; HOWEVER when it came down to it I retained very little of all that! The design was just so… busy; I ended up removing a lot of the little details I was going to put in. There’s still plenty of the jeans bits and pieces left in, I reckon just the right amount to keep that definite “jeans flavour” to it. There are a few original topstitched seams here and there, and the portion of a pocket left on the bodice. I also added tonnes of new topstitching in terracotta upholstery thread, in fact every seam is topstitched down in some cases doubly so.
 Something I’ve managed to forget to blog about each time I’ve written about this dress… like all Vogue patterns, for a fitted design it’s a little blouse-y in the boob-al region for my figure; however the princess seamed bodice makes this a very easy fix. I simply pin and stitch to shave a bit off the inner curve of the central bodice piece (above), and this solves the problem for me. A very very easy small bust adjustment, and one I usually end up using for pretty much every fitted Vogue bodice with princess-seaming. I don’t have the same issues with Burda, but always with Vogue. I guess their “blocks” are a little different.

 One pair of jeans, the very pale blue pair, was practically threadbare in places, but I still really wanted to have that pale blue as part of the lovely indigo-y mix… these pieces I reinforced with lightweight iron-on interfacing to the back to stabilise and strengthen these areas (below). Don’t want my new dress ripping in its first wear now, do I?!


 Well, for now I’m just going to enjoy mixing and matching this new one into the current wardrobe repertoire. The warm toasty colours are going to go with lots of things I currently have, I think.