Tag Archives: Wardrobe Refashion

A double-sleeved shirt


Remember I said I had made 6 shirts over the past month and a half?  well here ’tis t’ sixth!
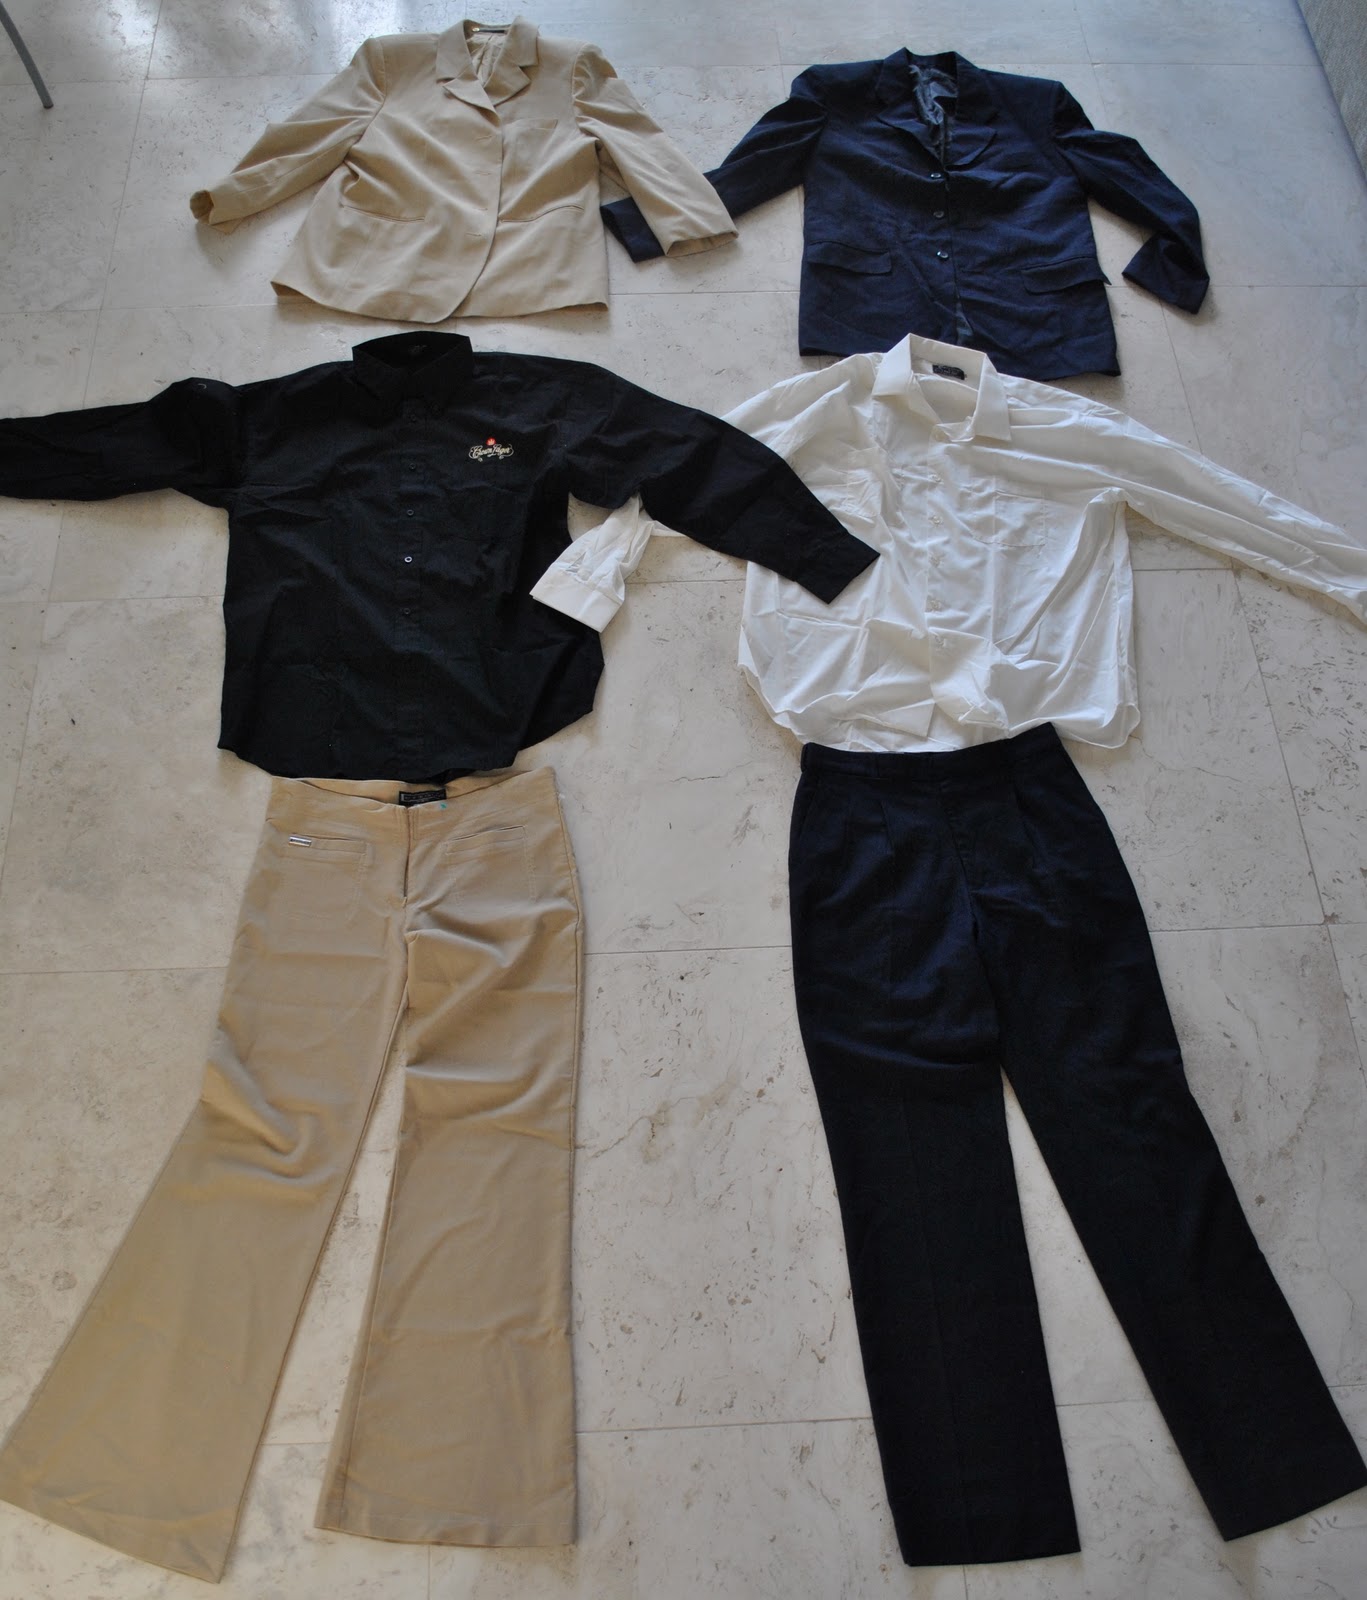
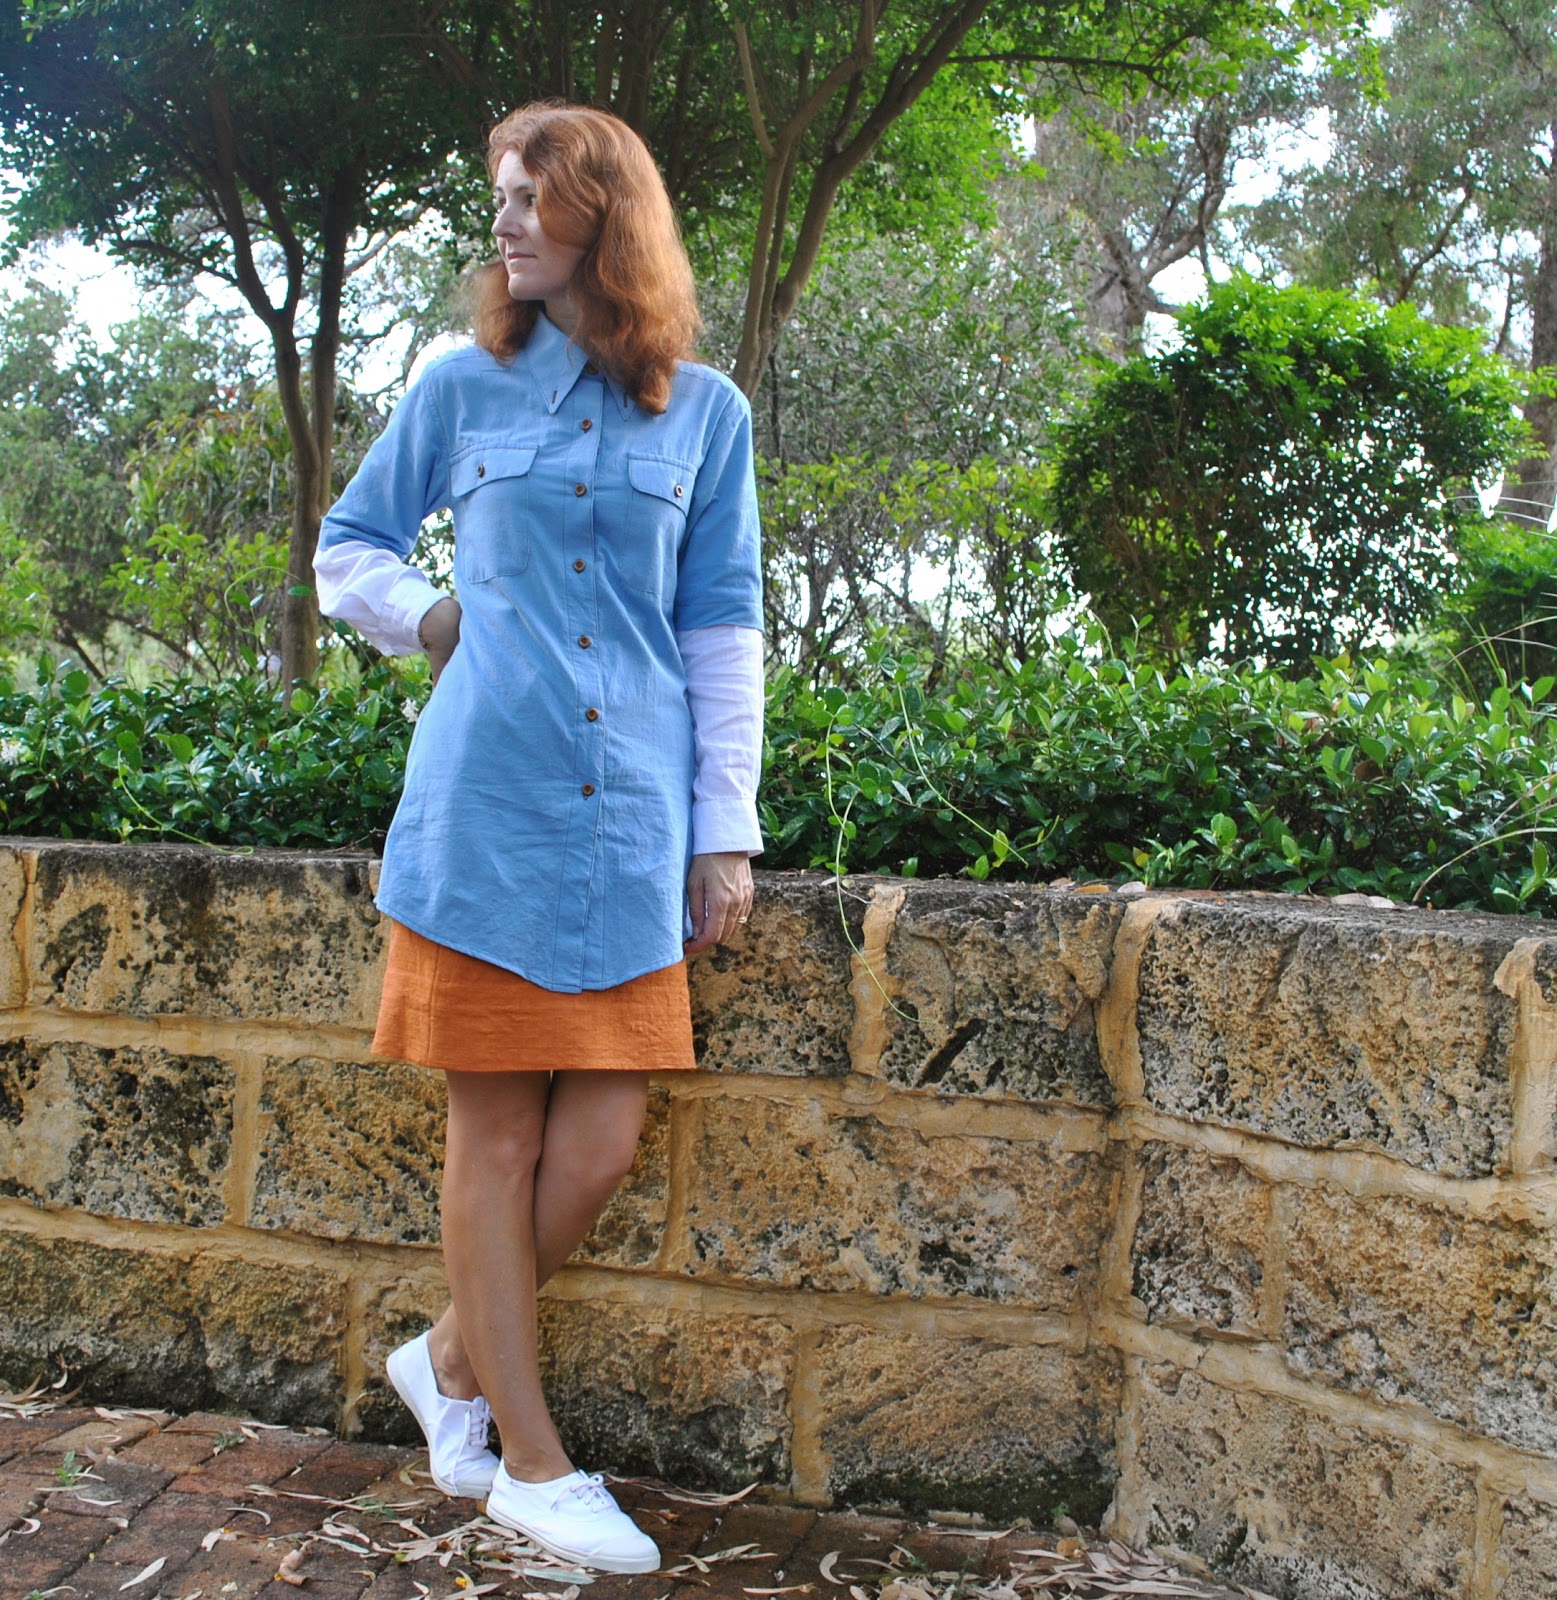
This blue shirt was was intended for one of my boys and was pretty much finished, but I was getting more and more disillusioned with it and realising that they would probably not find it in the least bit cool.  The colour and the fabric are too flat, the style is too old, and the whole deal is not hip at all… :((   so I set it aside and made other plans for their pressies…
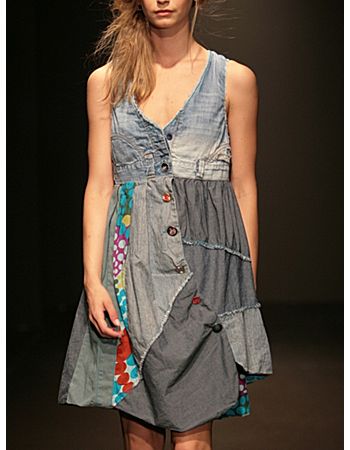
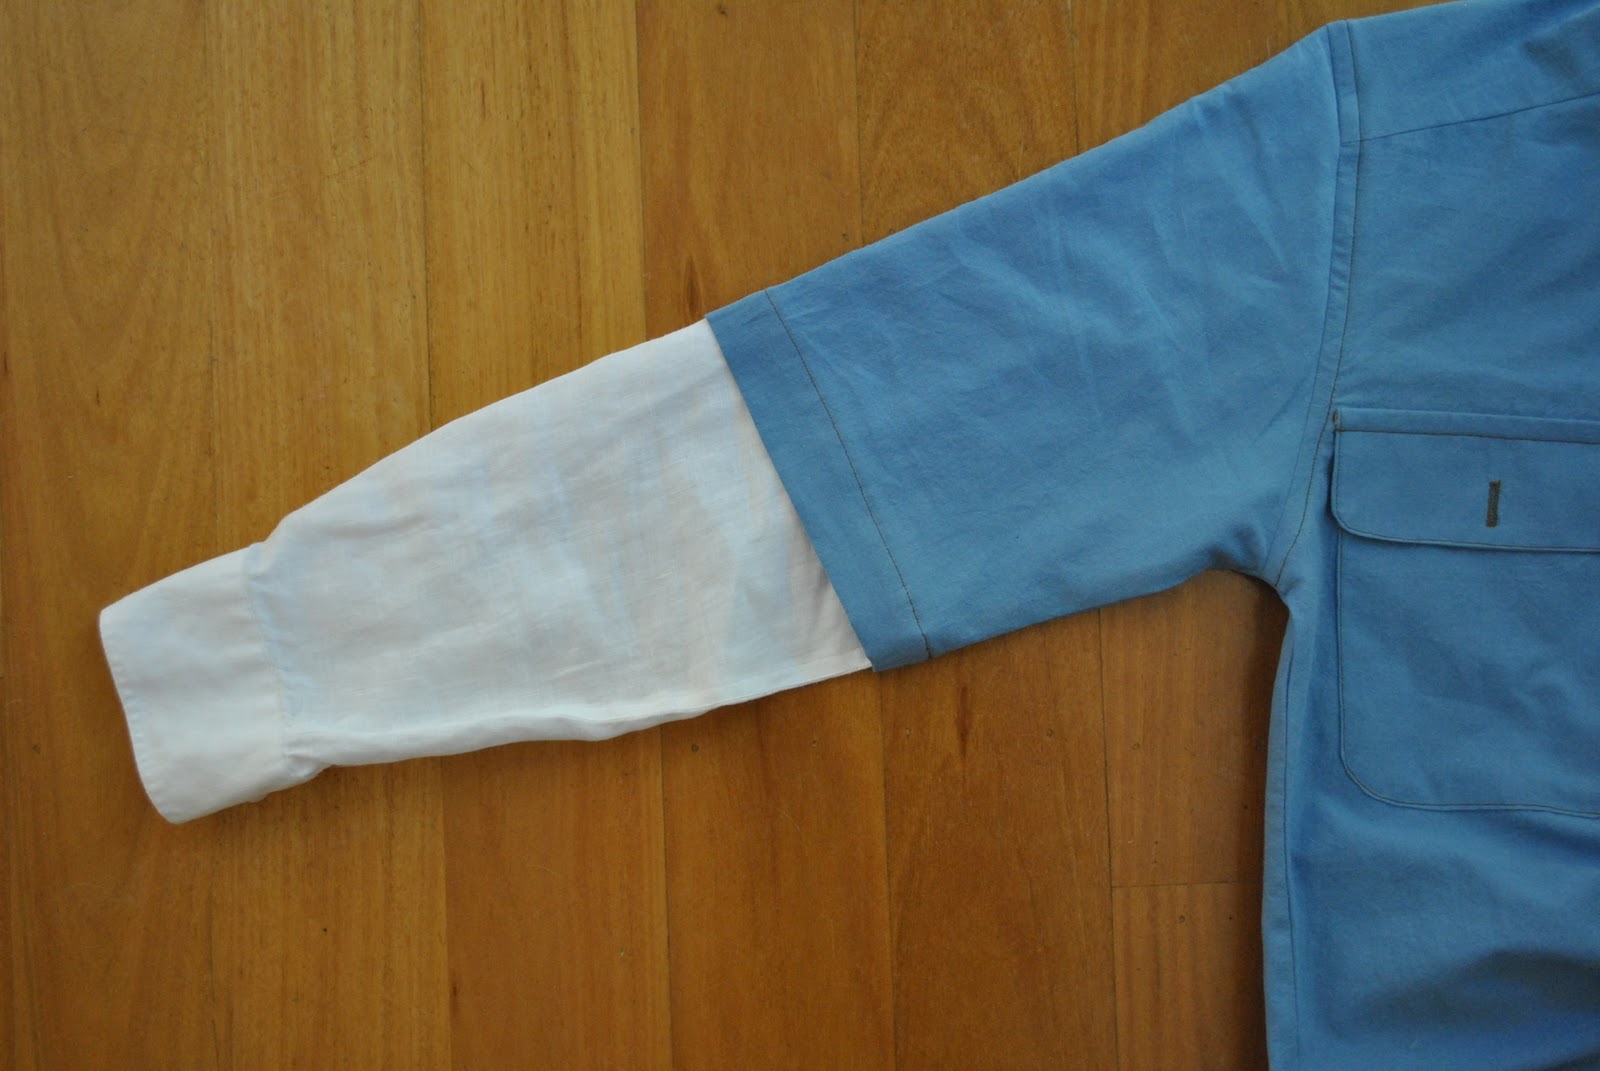
Then I recalled an editorial picture I had seen and loved, of a Celine shirt from pre-fall 2011; which appeared in that picture to have double sleeves.  A long sleeve of a different colour peeping out from underneath a prim high-collared short sleeve shirt…  I had loved this look and mentally filed it away for future use.  Now whammo realised that I had the perfect candidate all ready and waiting!!
So, I went online to find a picture from the original release of the collection (below) and saw straightaway that the sleeve that inspired me is not in fact a double sleeve, but appears to be a single and pieced sleeve with a seam at the midpoint… but by this time I was in love with my falsely inspired idea of the double sleeve and so this was what I set out to do…
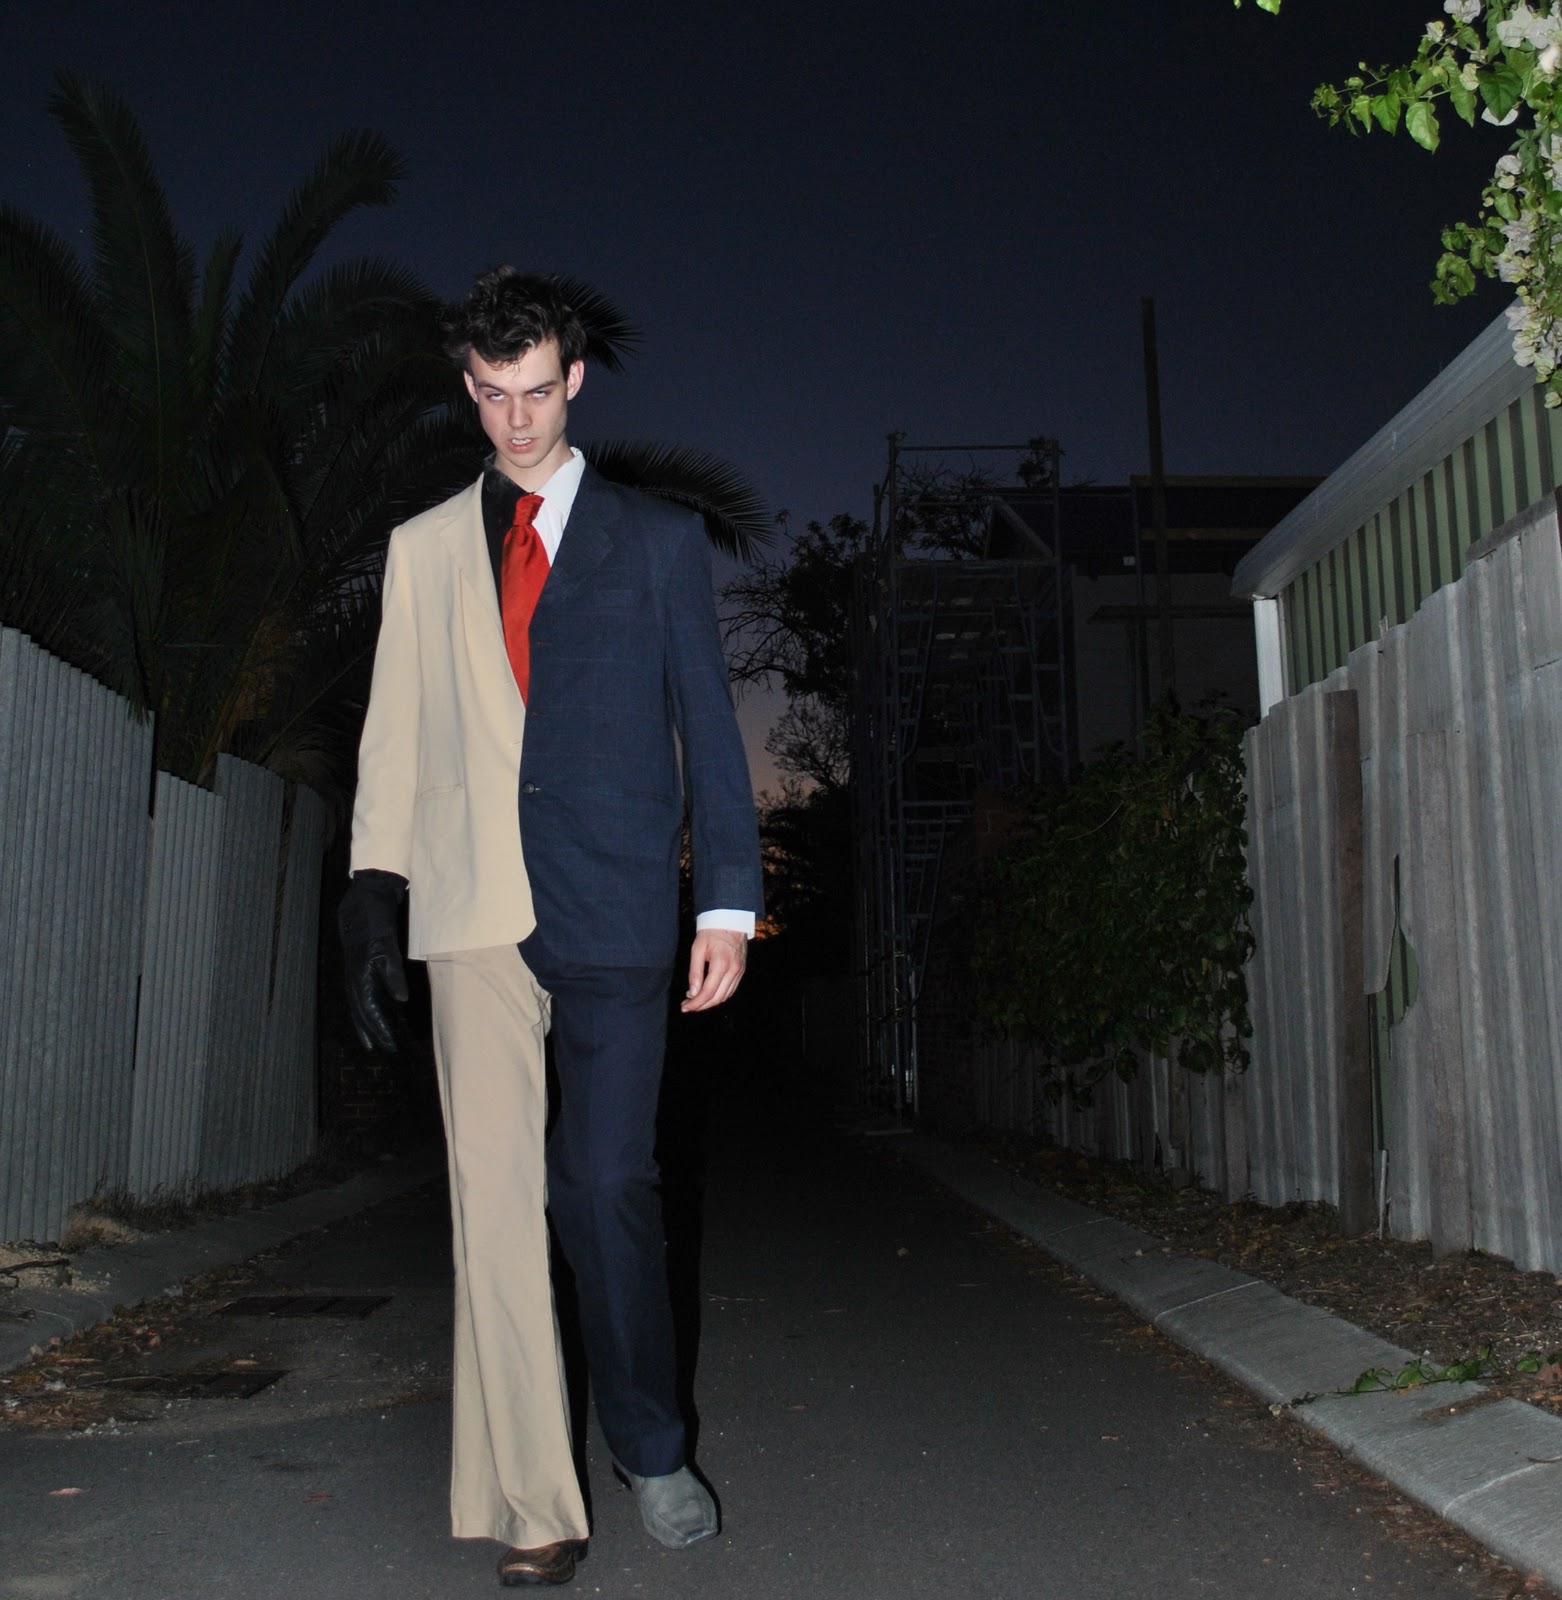
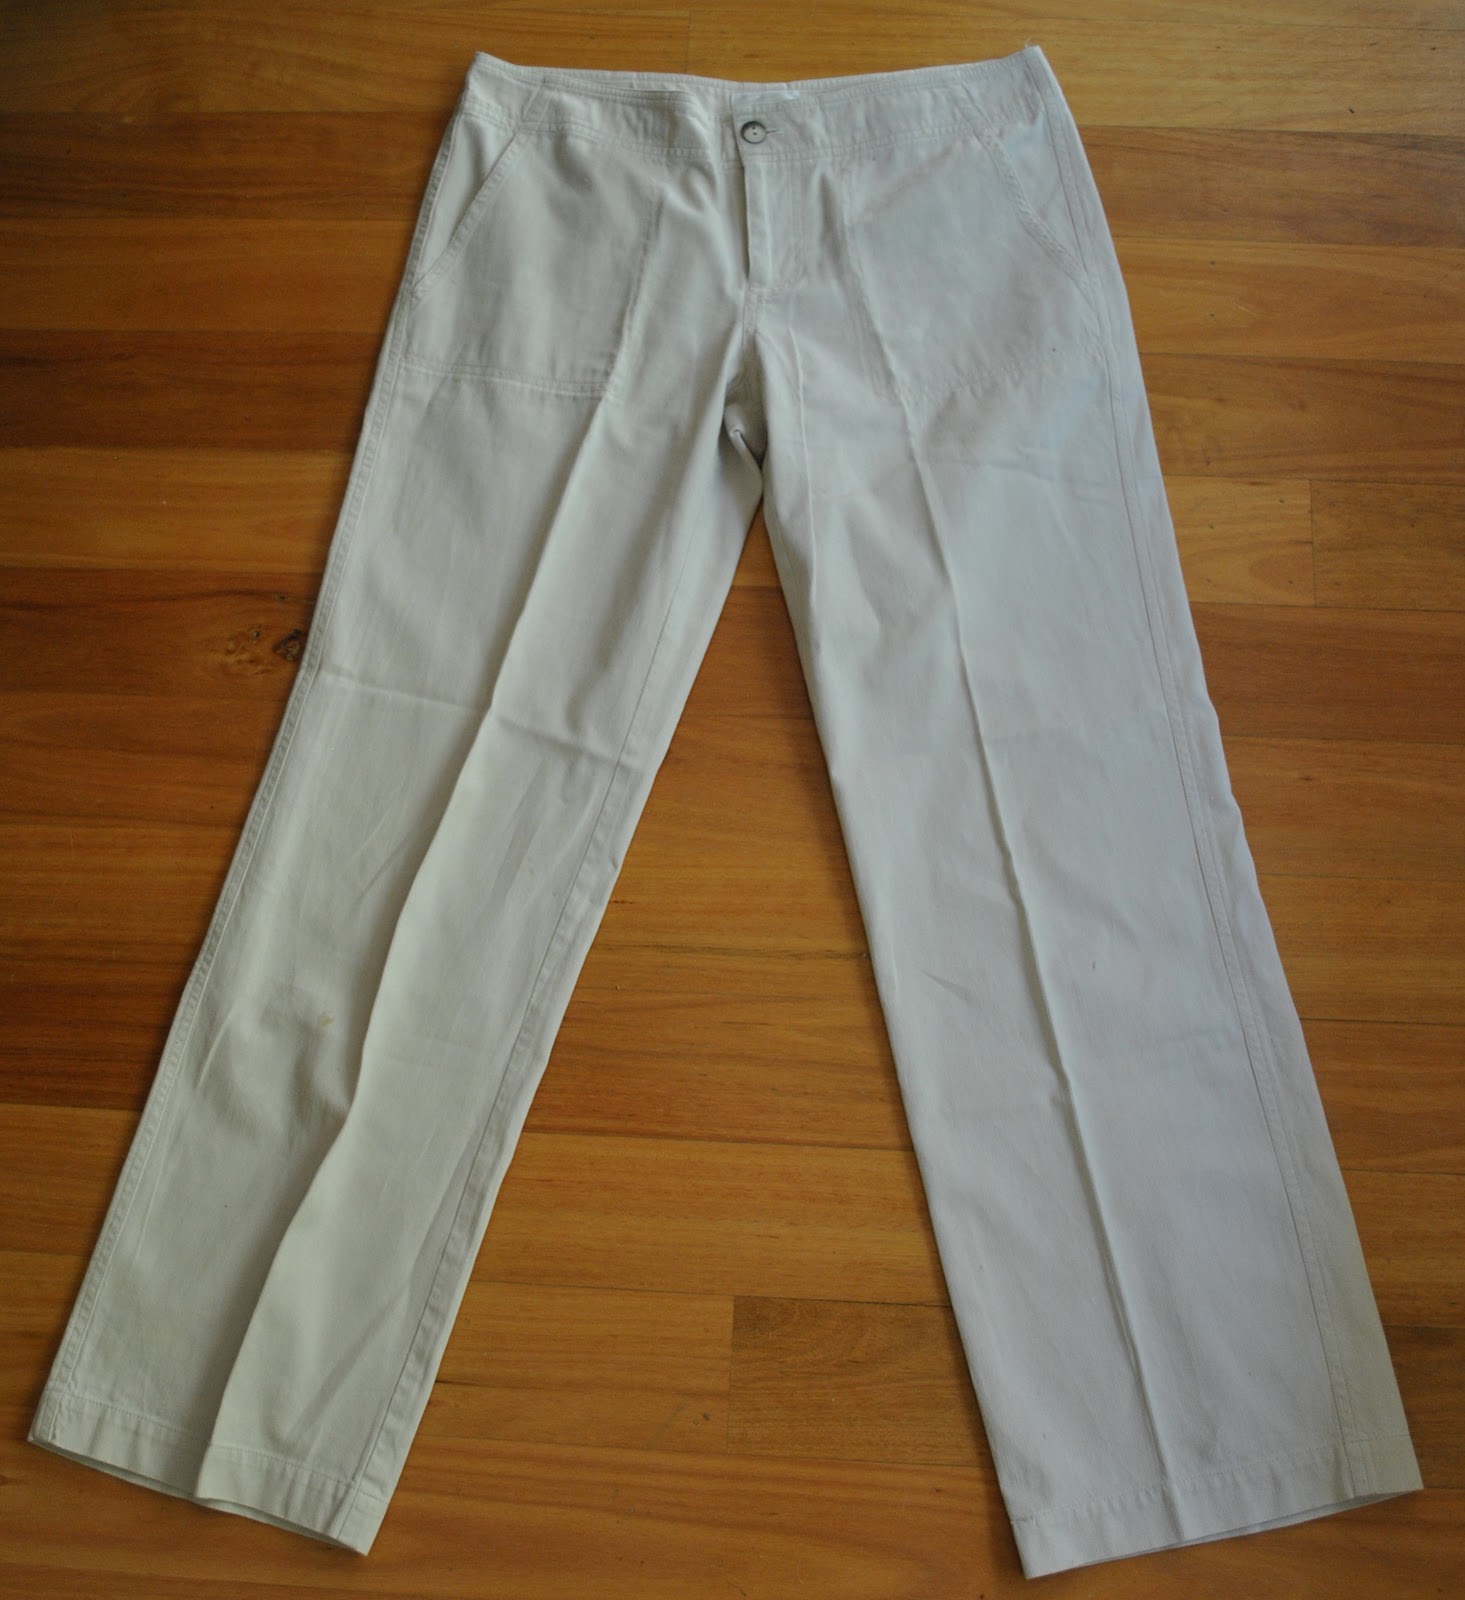
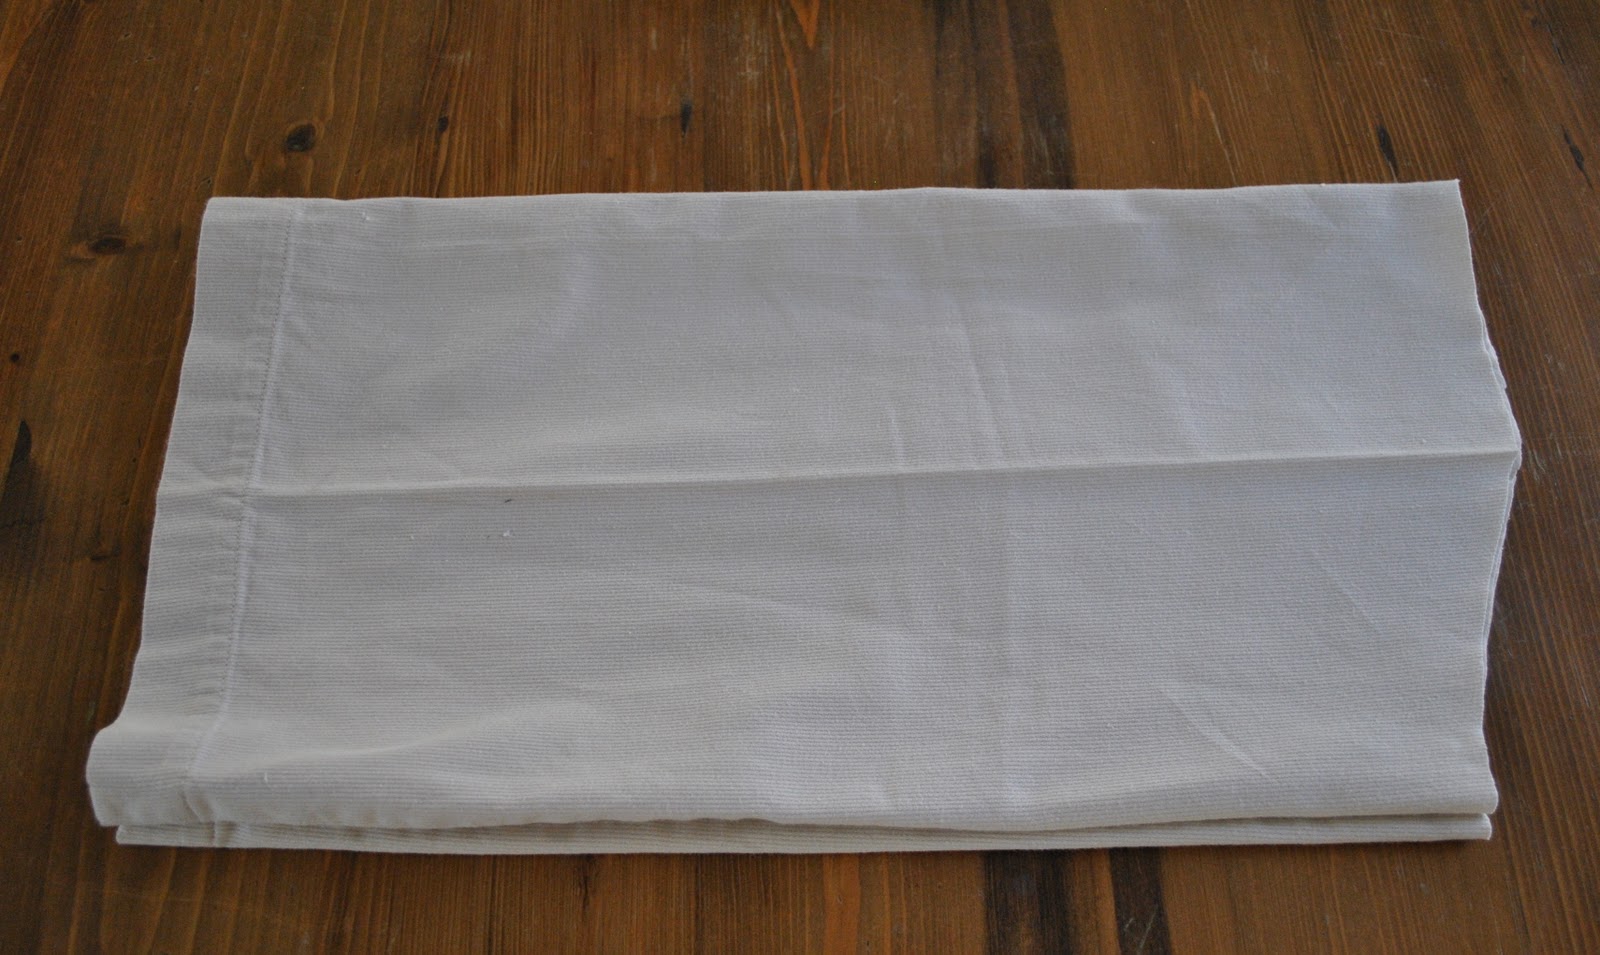
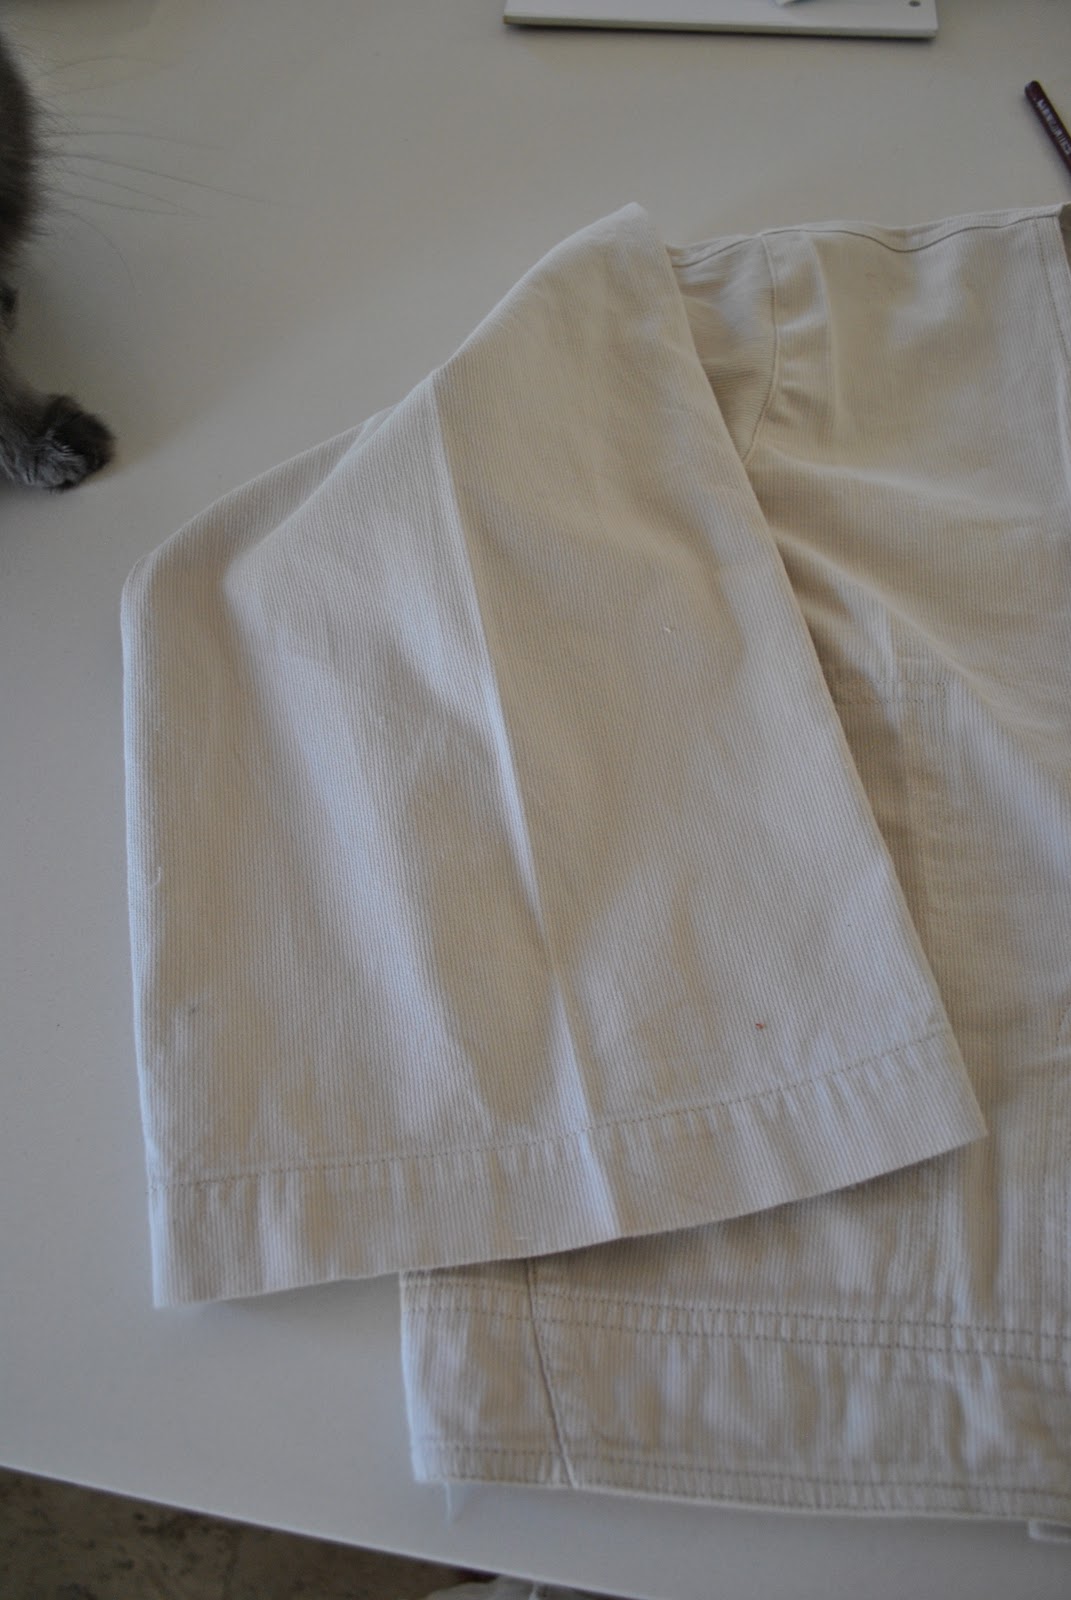
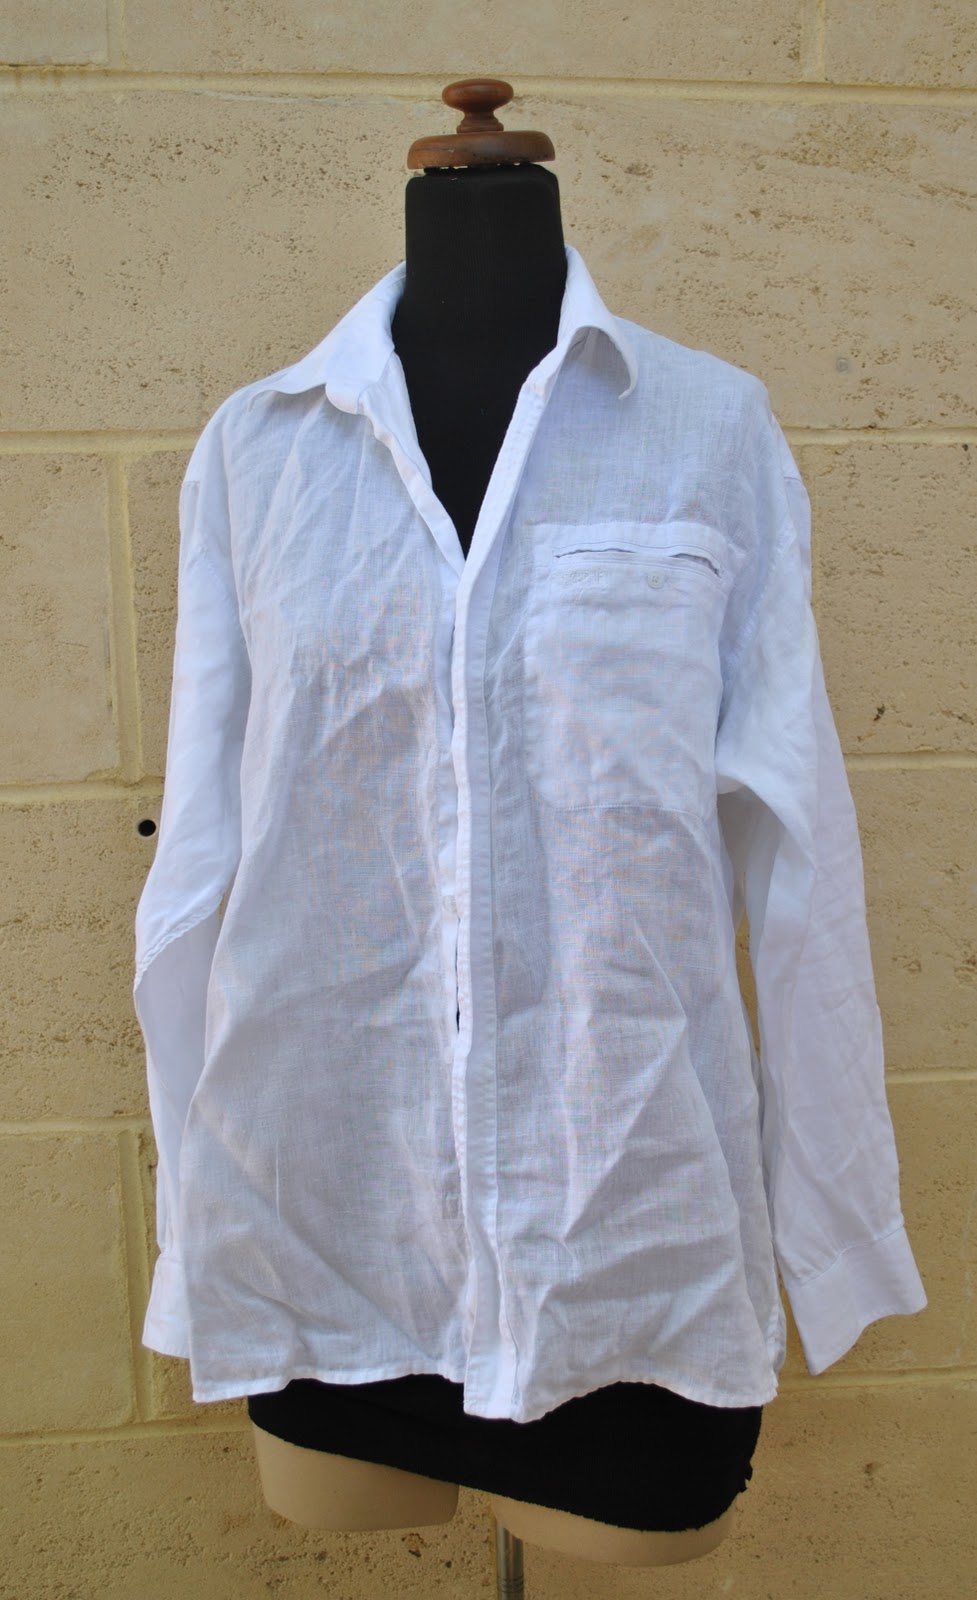
I have had this long sleeve, white linen men’s shirt (below) sitting in my refashion pile for… ahem, mumble years.  Er, hazarding a guess at five? … cough cough.  It doesn’t fit anyone in my mob, but is still pretty well-made and the linen is a lovely fine quality.  I took the scissors to it and liberated its sleeves (the rest of the shirt will be put to good use, don’t worry…)

                                                  source

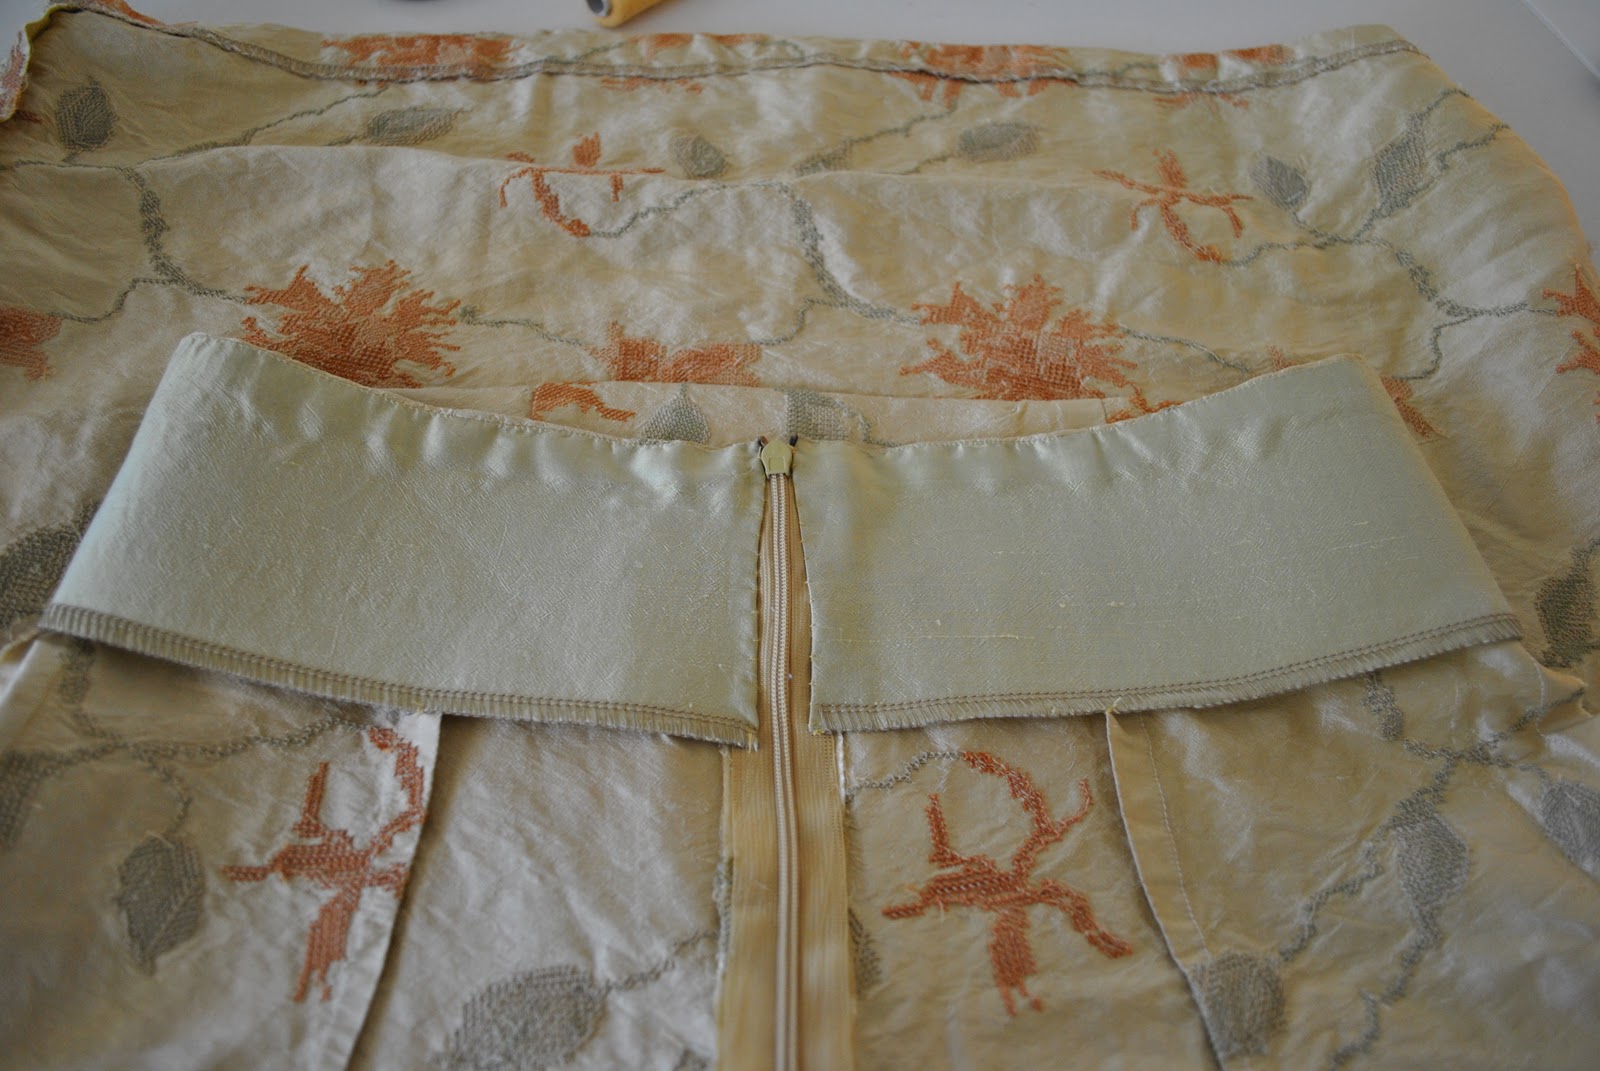
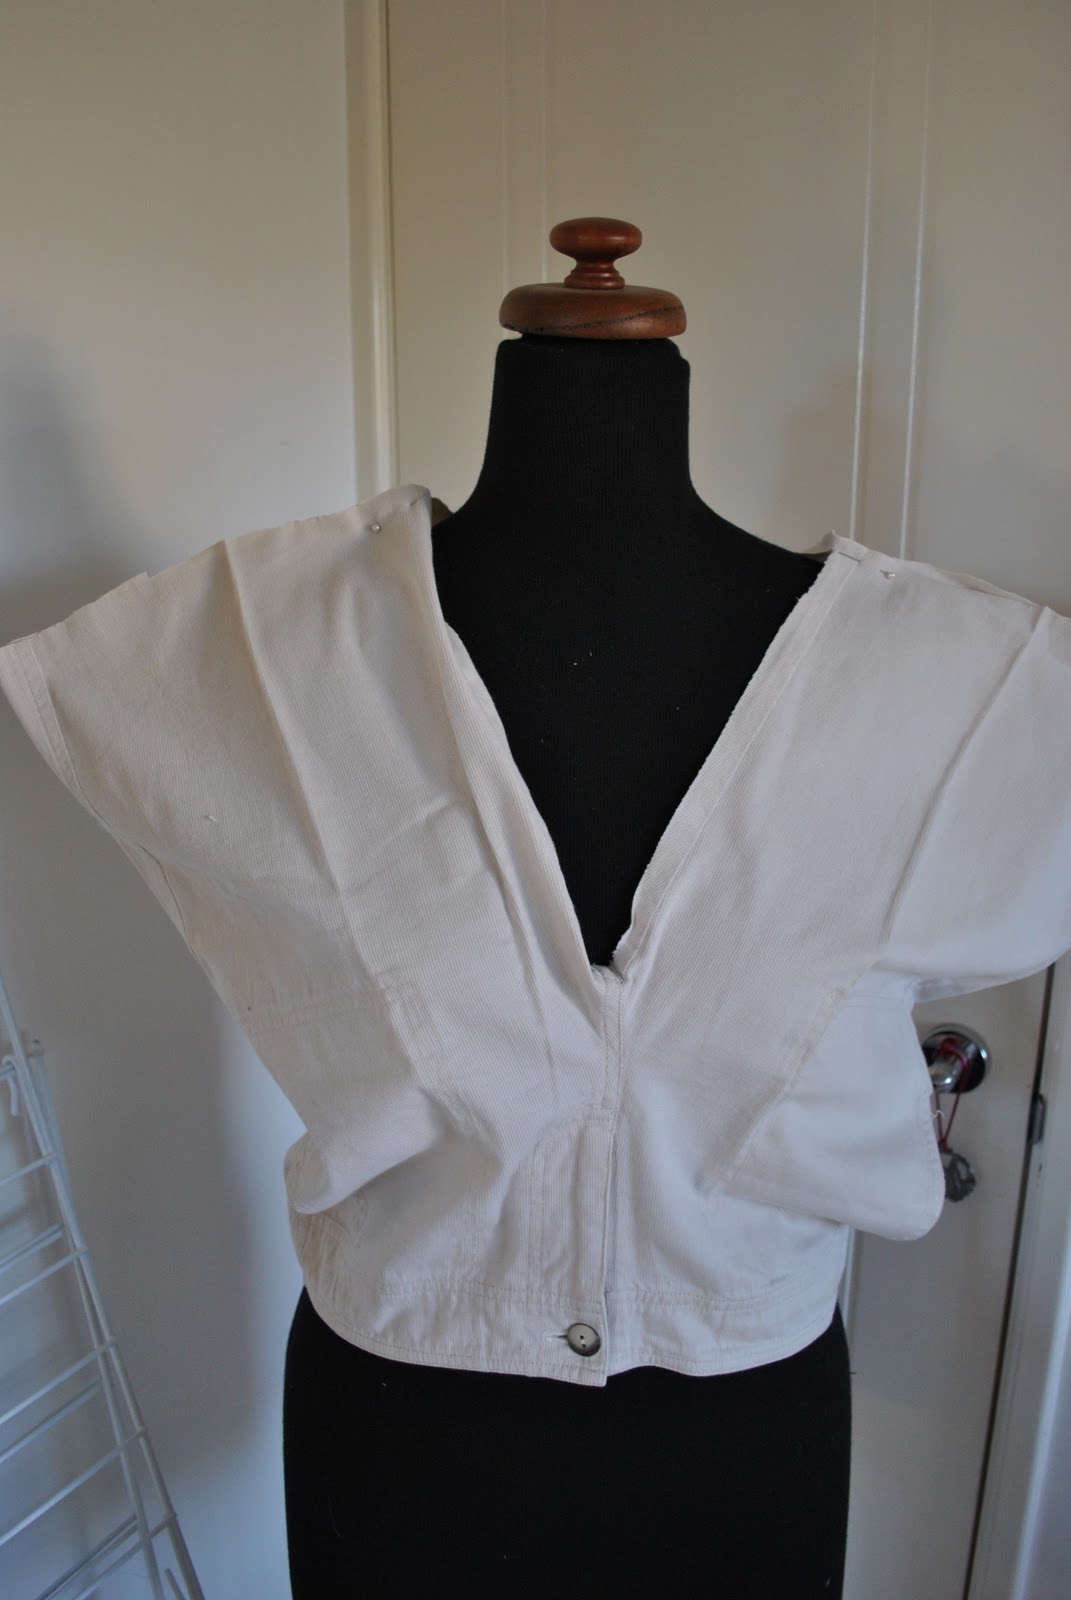
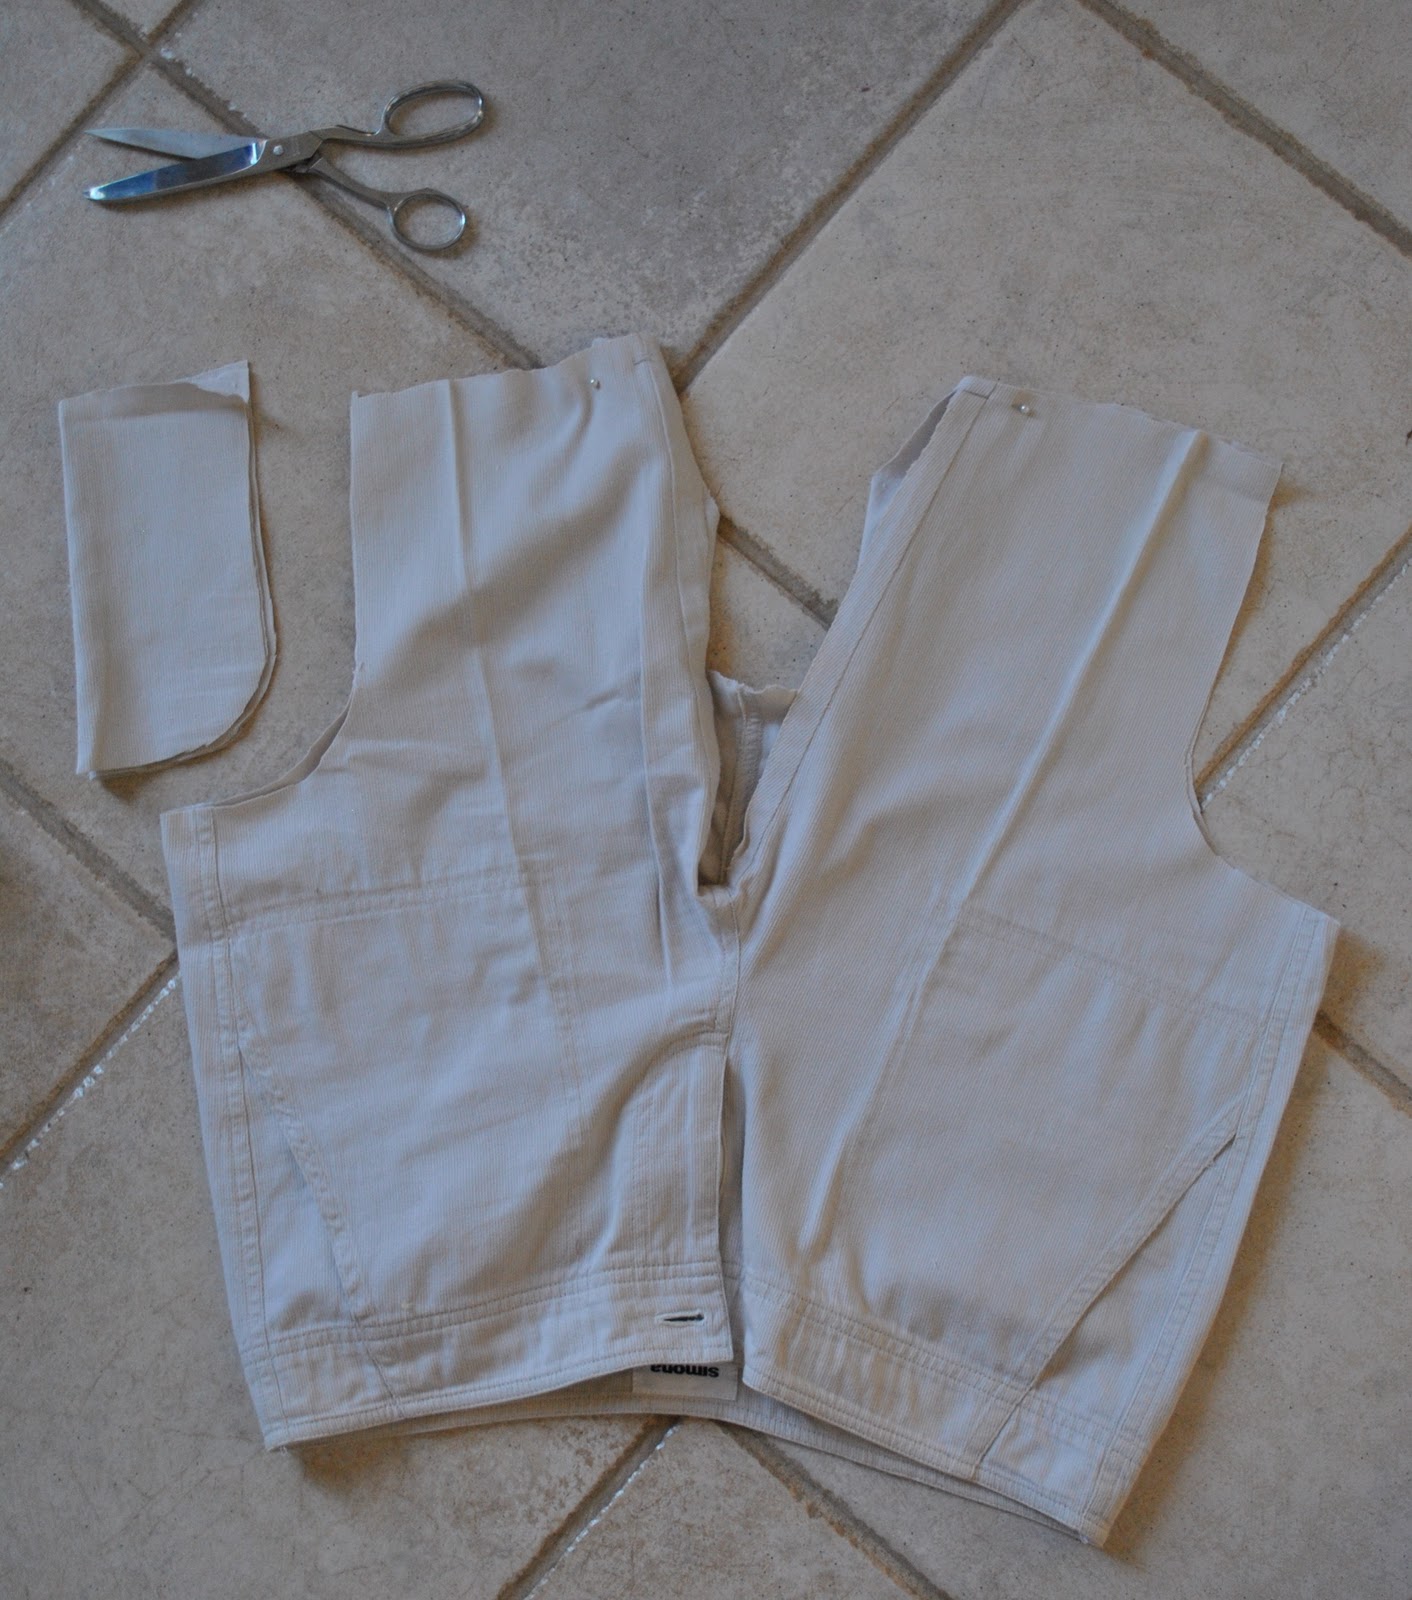
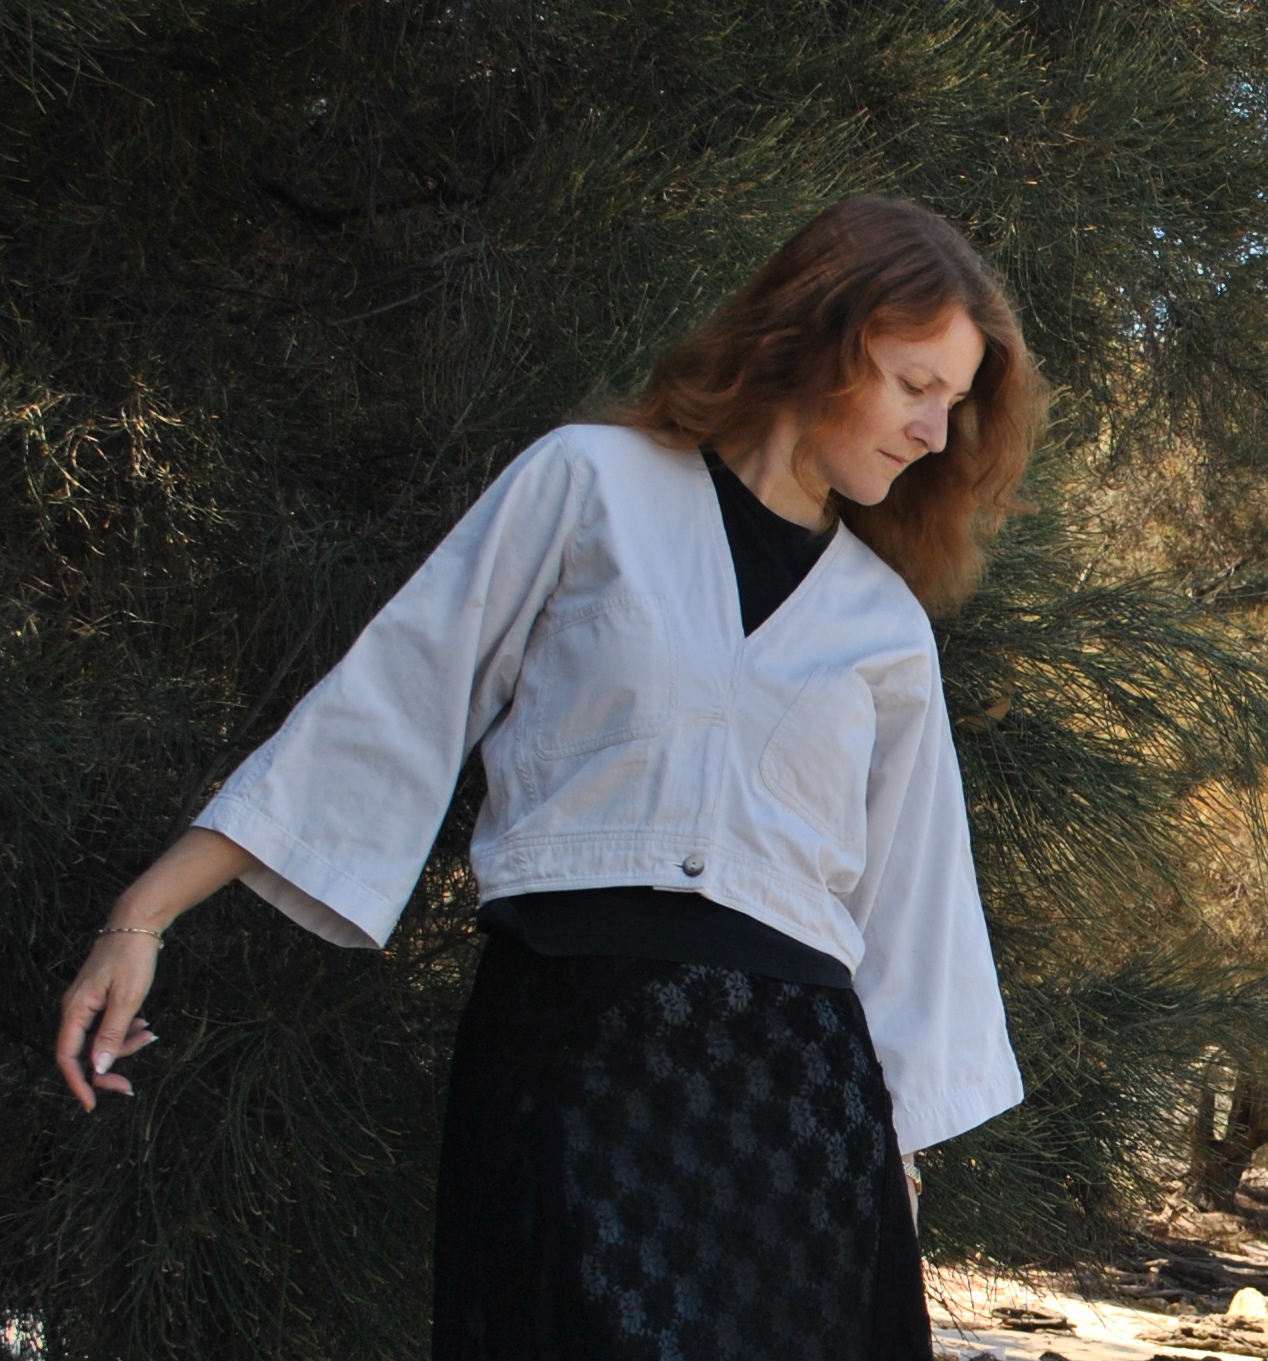
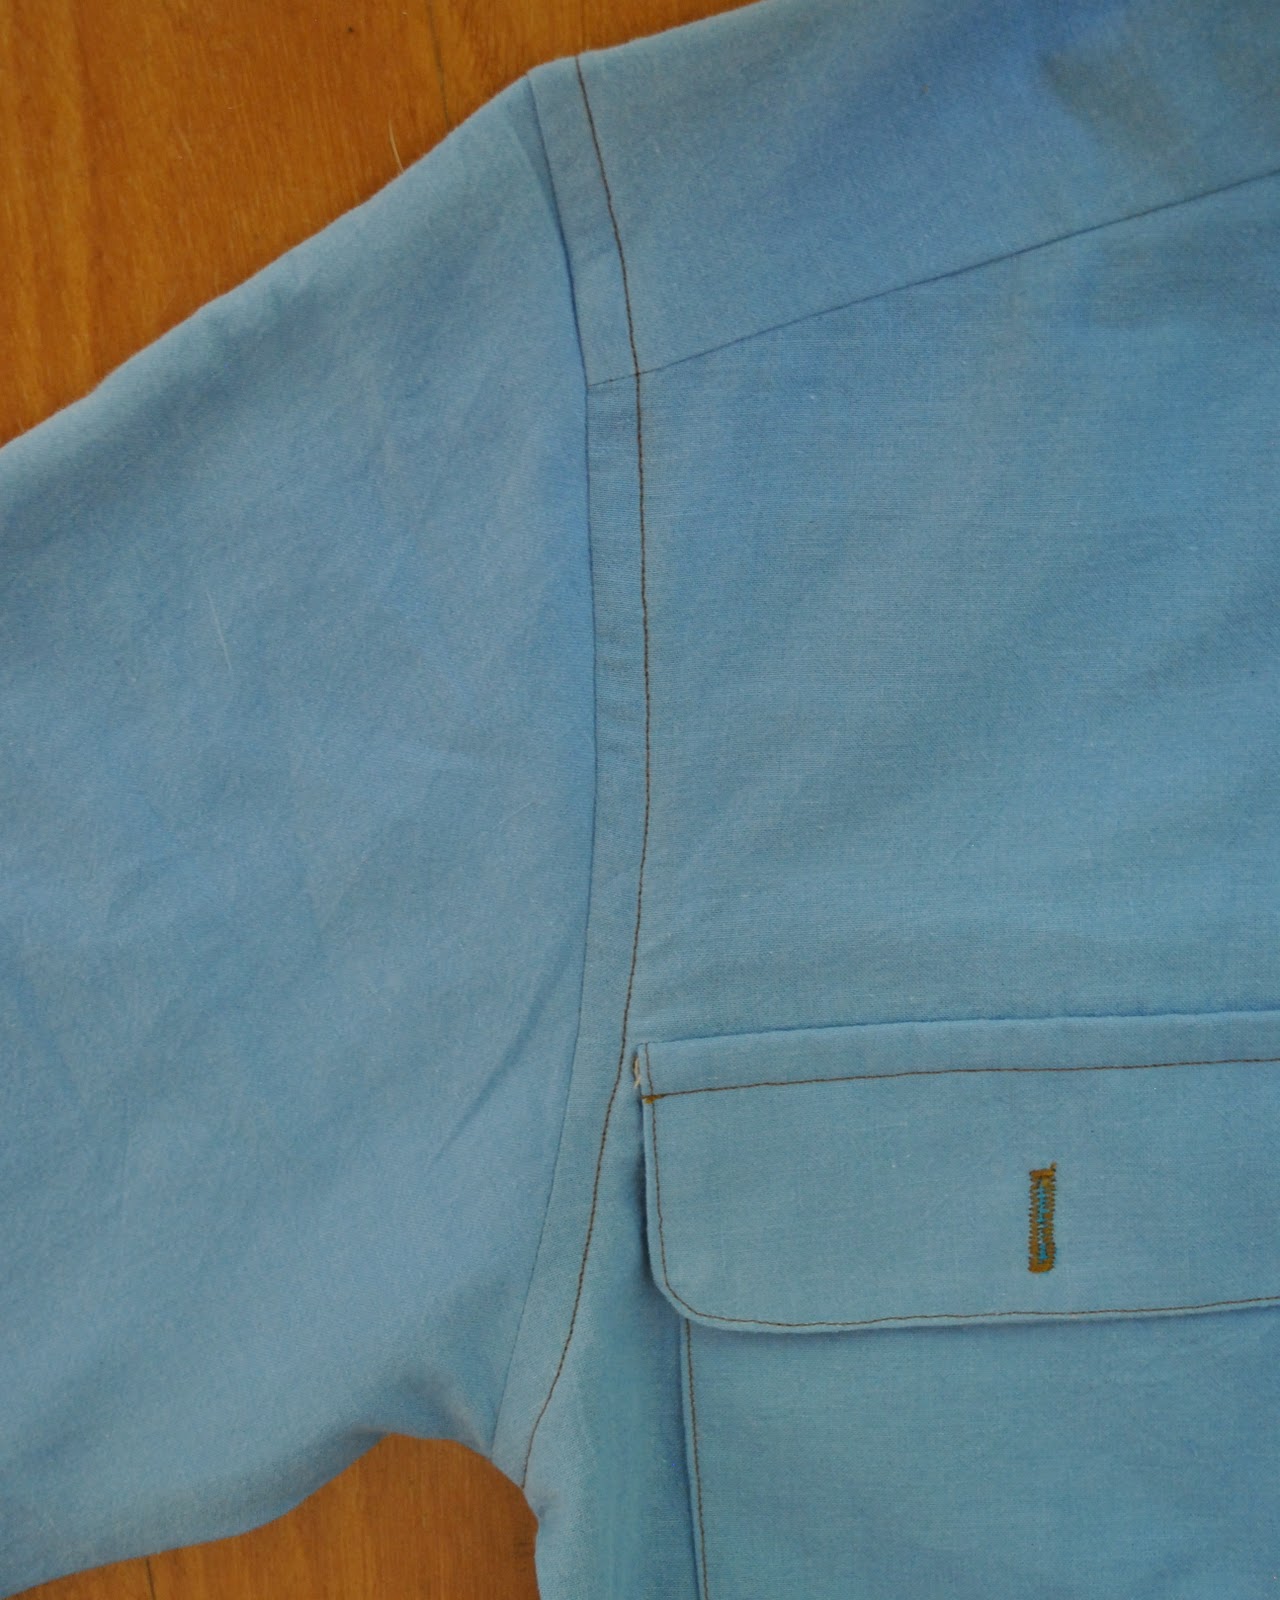
Taking the blue shirt; well I had to cut off my perfect flat felled sleeves and flat felled side seams (a wrench!) and resize the shirt to me, since all my boys are a lot bigger than me.  I’m afraid I just didn’t have the heart to go through re-flat-felling these seams again either, since I was getting severely “shirted-out” by the time I had got to this one; number six.  I was kind of like, oh yeah, whatever, run ’em through the overlocker  (brrrrrrrrr! and 10 seconds later) yup, that’ll do.
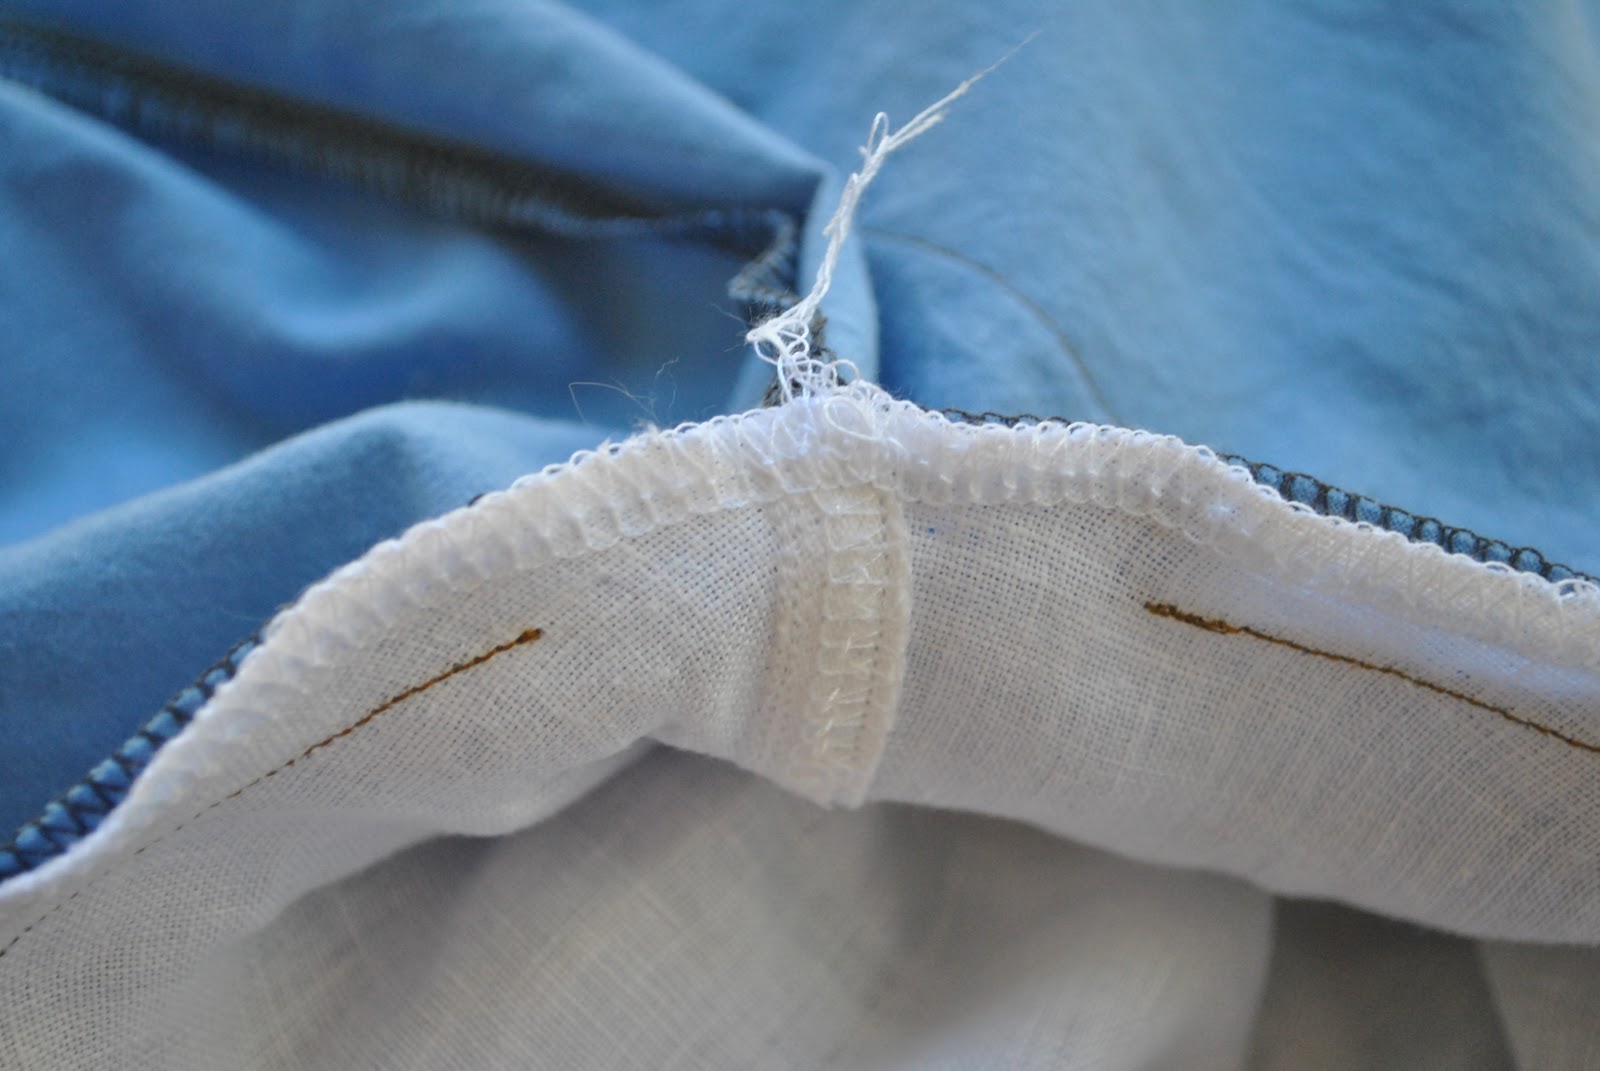
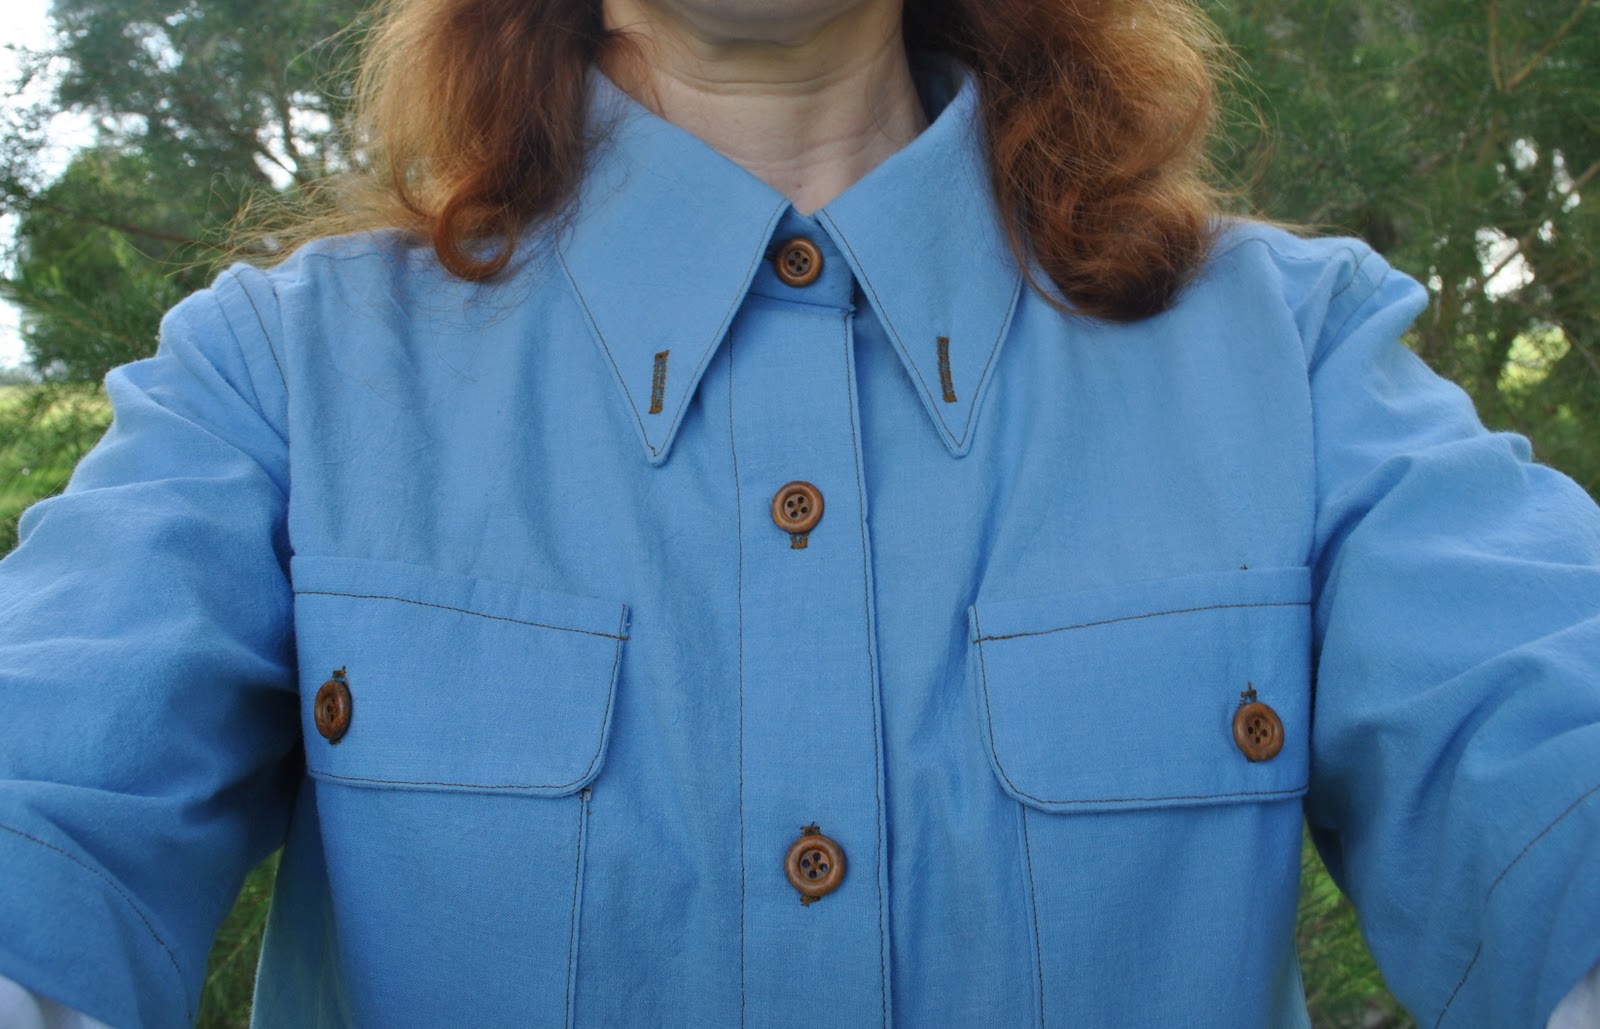
I didn’t unpick the pockets either, and just left them completely in situ.  This is why they appear quite big on my little chest and are disappearing into my armpits.  Hey, I can live with that.  The white linen sleeves were also quite massive on me so needed resizing as well… this turned out to be more challenging that it sounds, since the sleeve seam was a French seam and double top-stitched down in place.  Tricky!  I got there in the end, but the insides are not gorgeous… basically I ended up just overlocking the raw edges of my new seam and double top-stitching this down from the outside to match up with the remainder of the original seam as it goes down in the cuff.  The cuff and the placket both are perfectly double top-stitched, and I wanted to keep all that intact and mimic this finish as much as I could.  I think the seam matched up pretty good, yes?  Can you see where the old topstitching ends and the new begins?

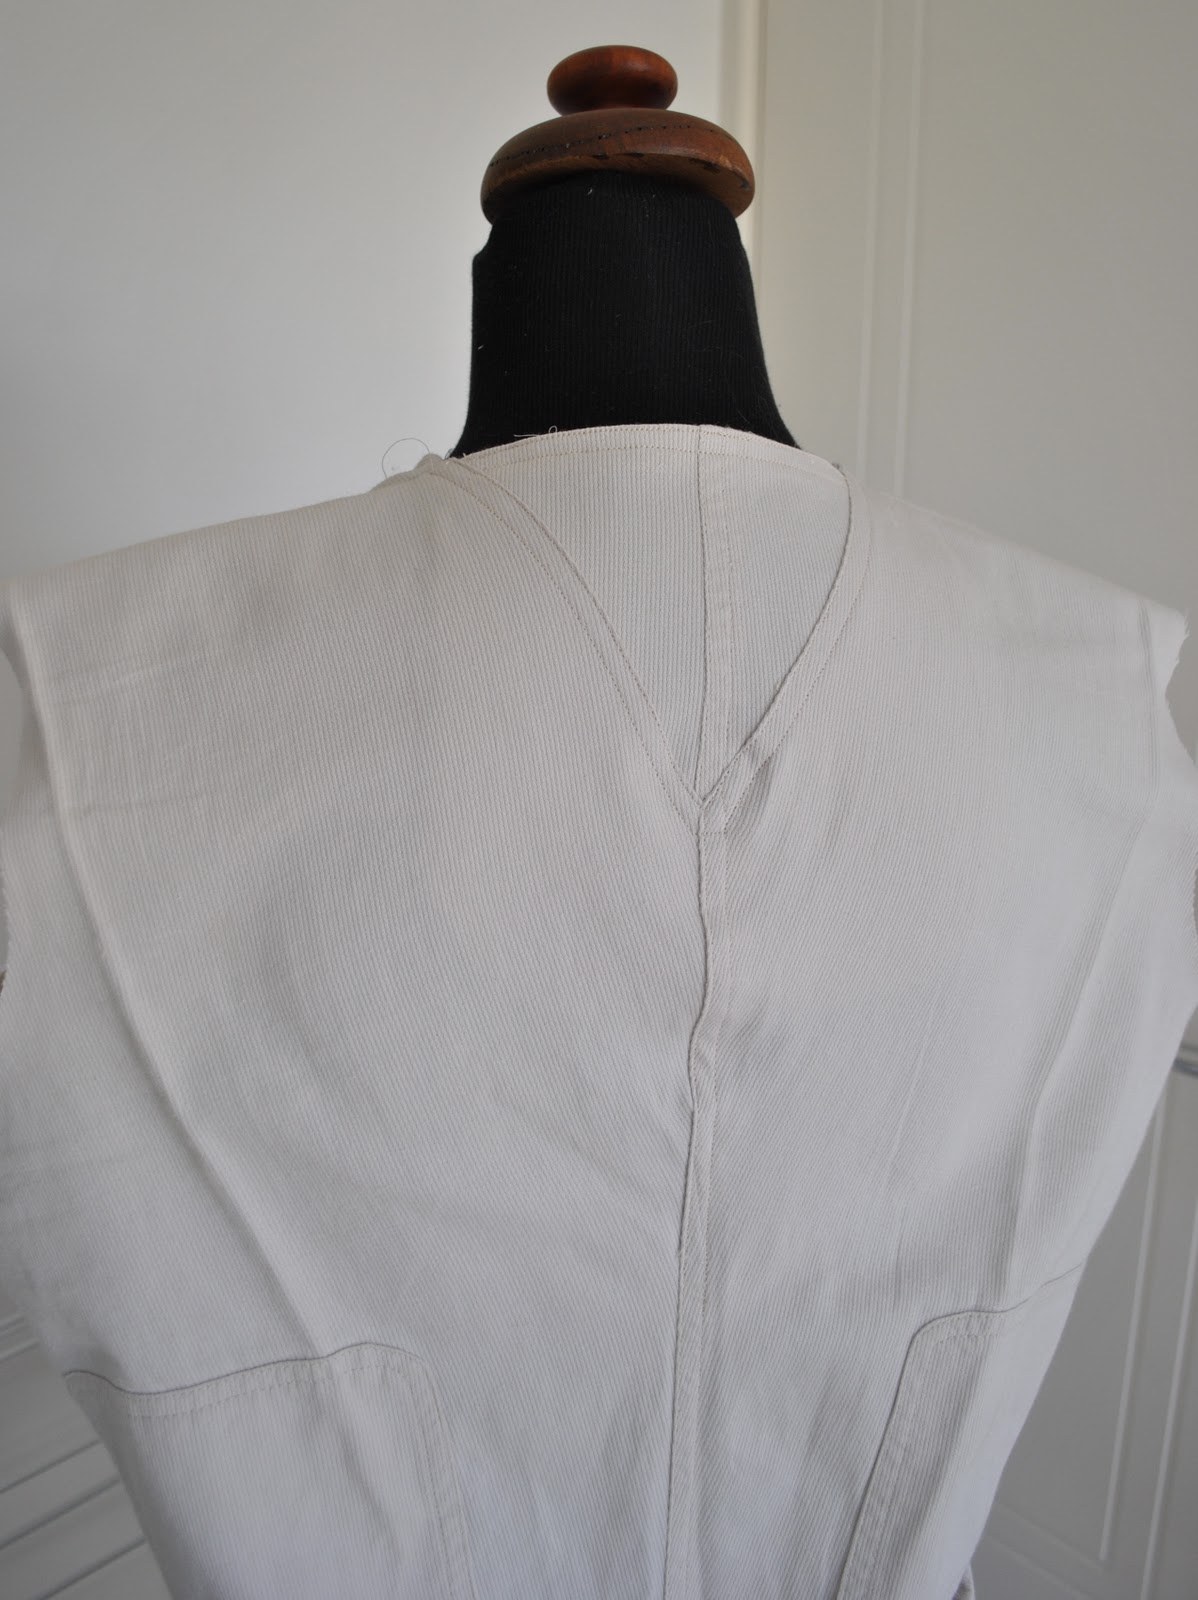
I wanted the sleeves to be fully separate from each other as the white sleeve emerged from out of the blue sleeve, which was a bit of a puzzle to mesh together…  I ended up deciding to sew the blue sleevecap in flat, sew up and finish the sleeve and side seams of the shirt; and then after this set in the white linen sleeve.  This meant the white sleeves could only be machine stitched in so far.

I completed the set-in by hand.

Last step; to topstitch the allowances of both sleeves together down to the shirt body…

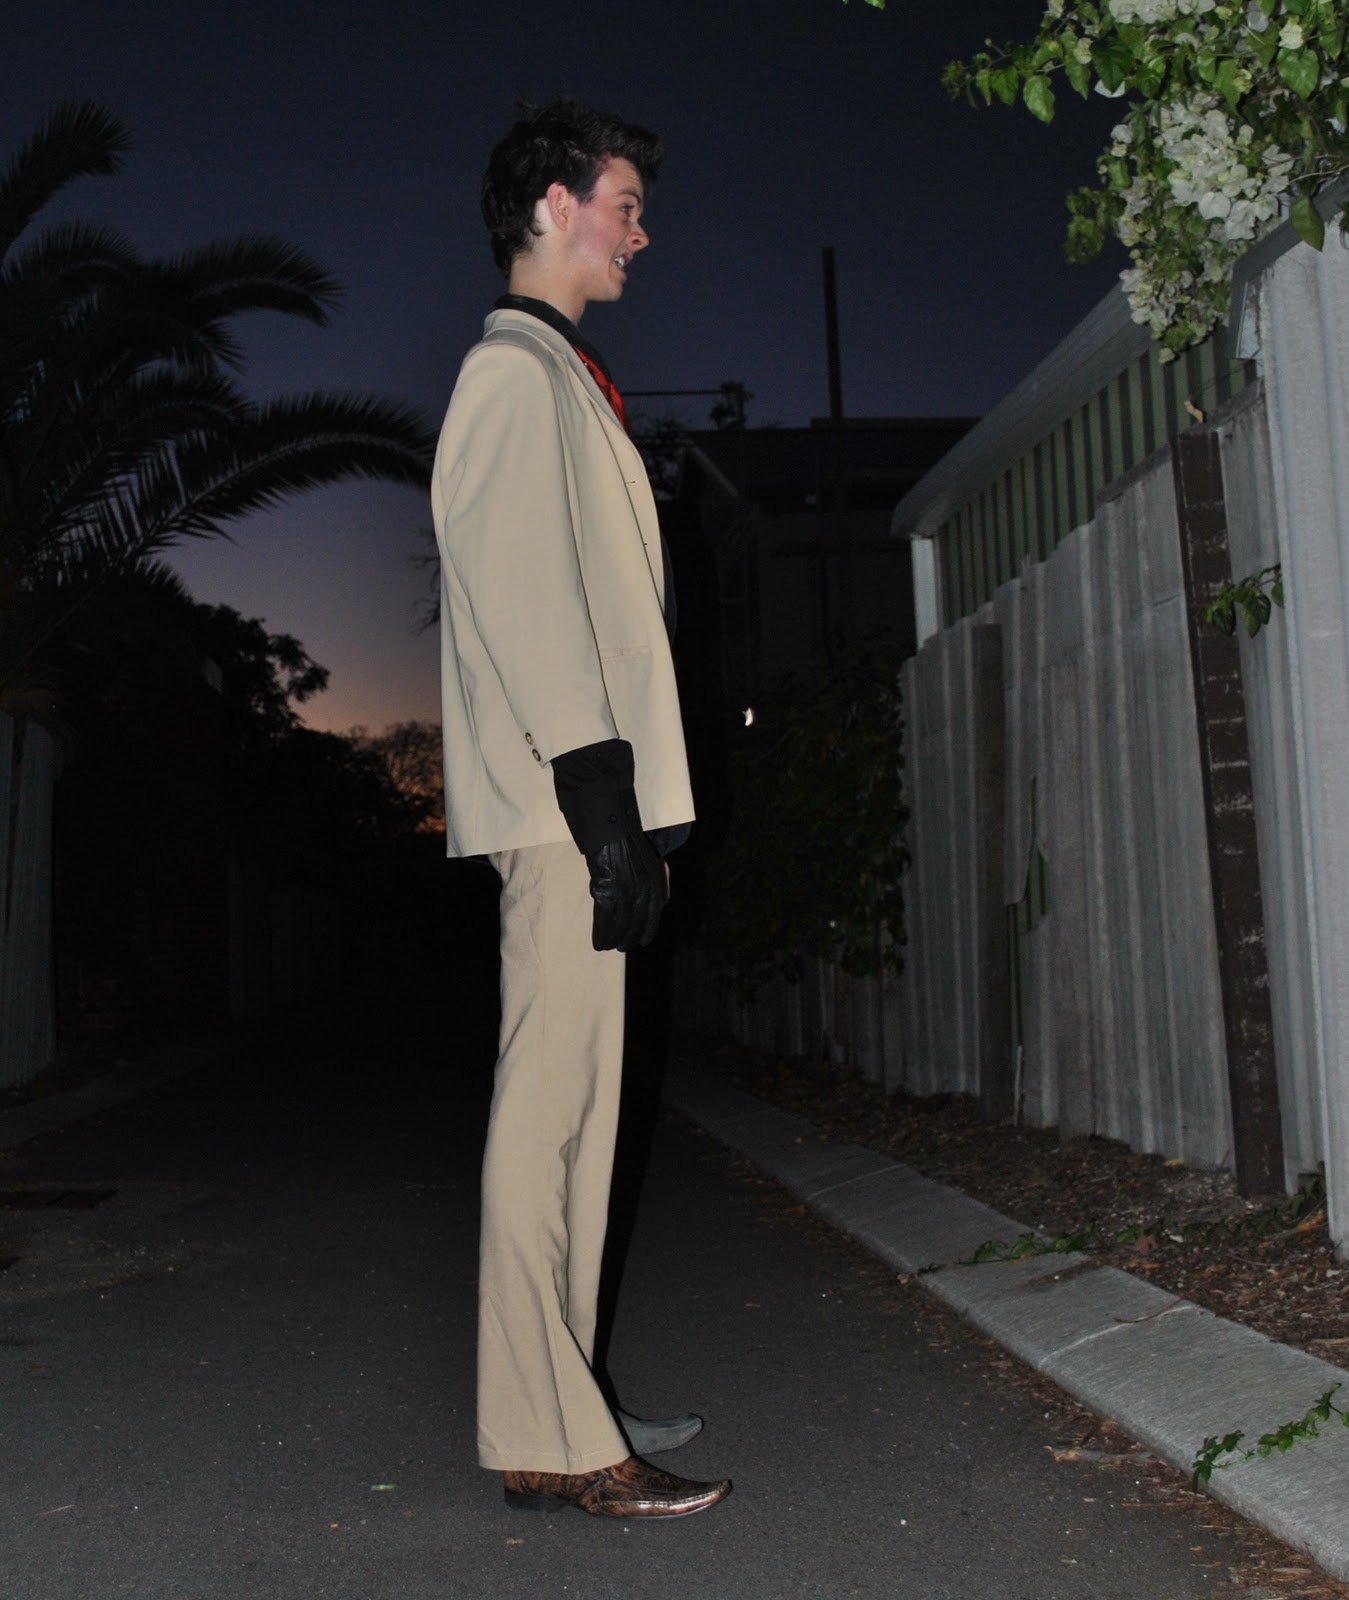
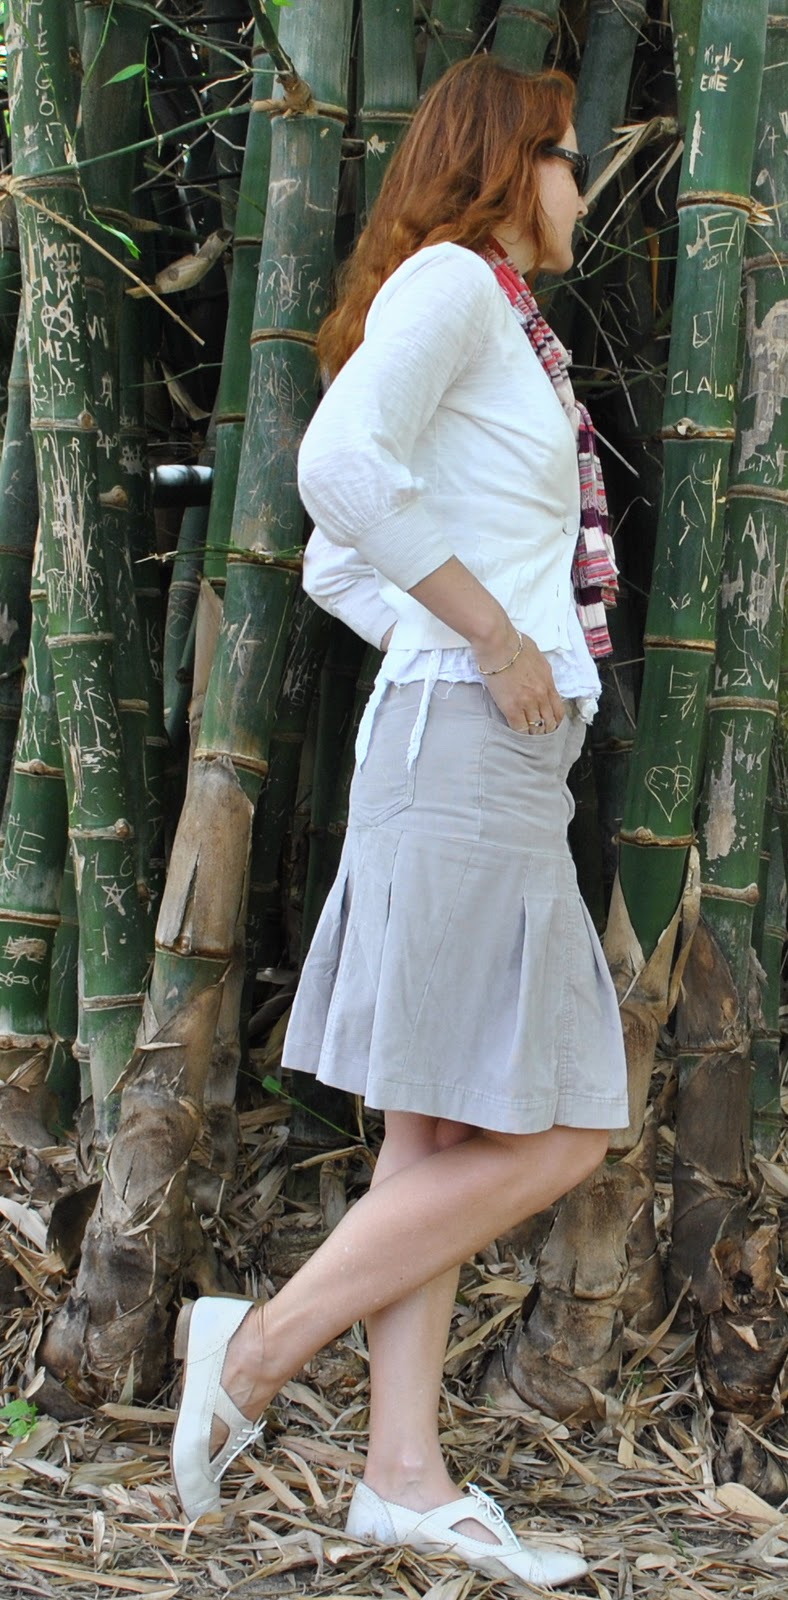
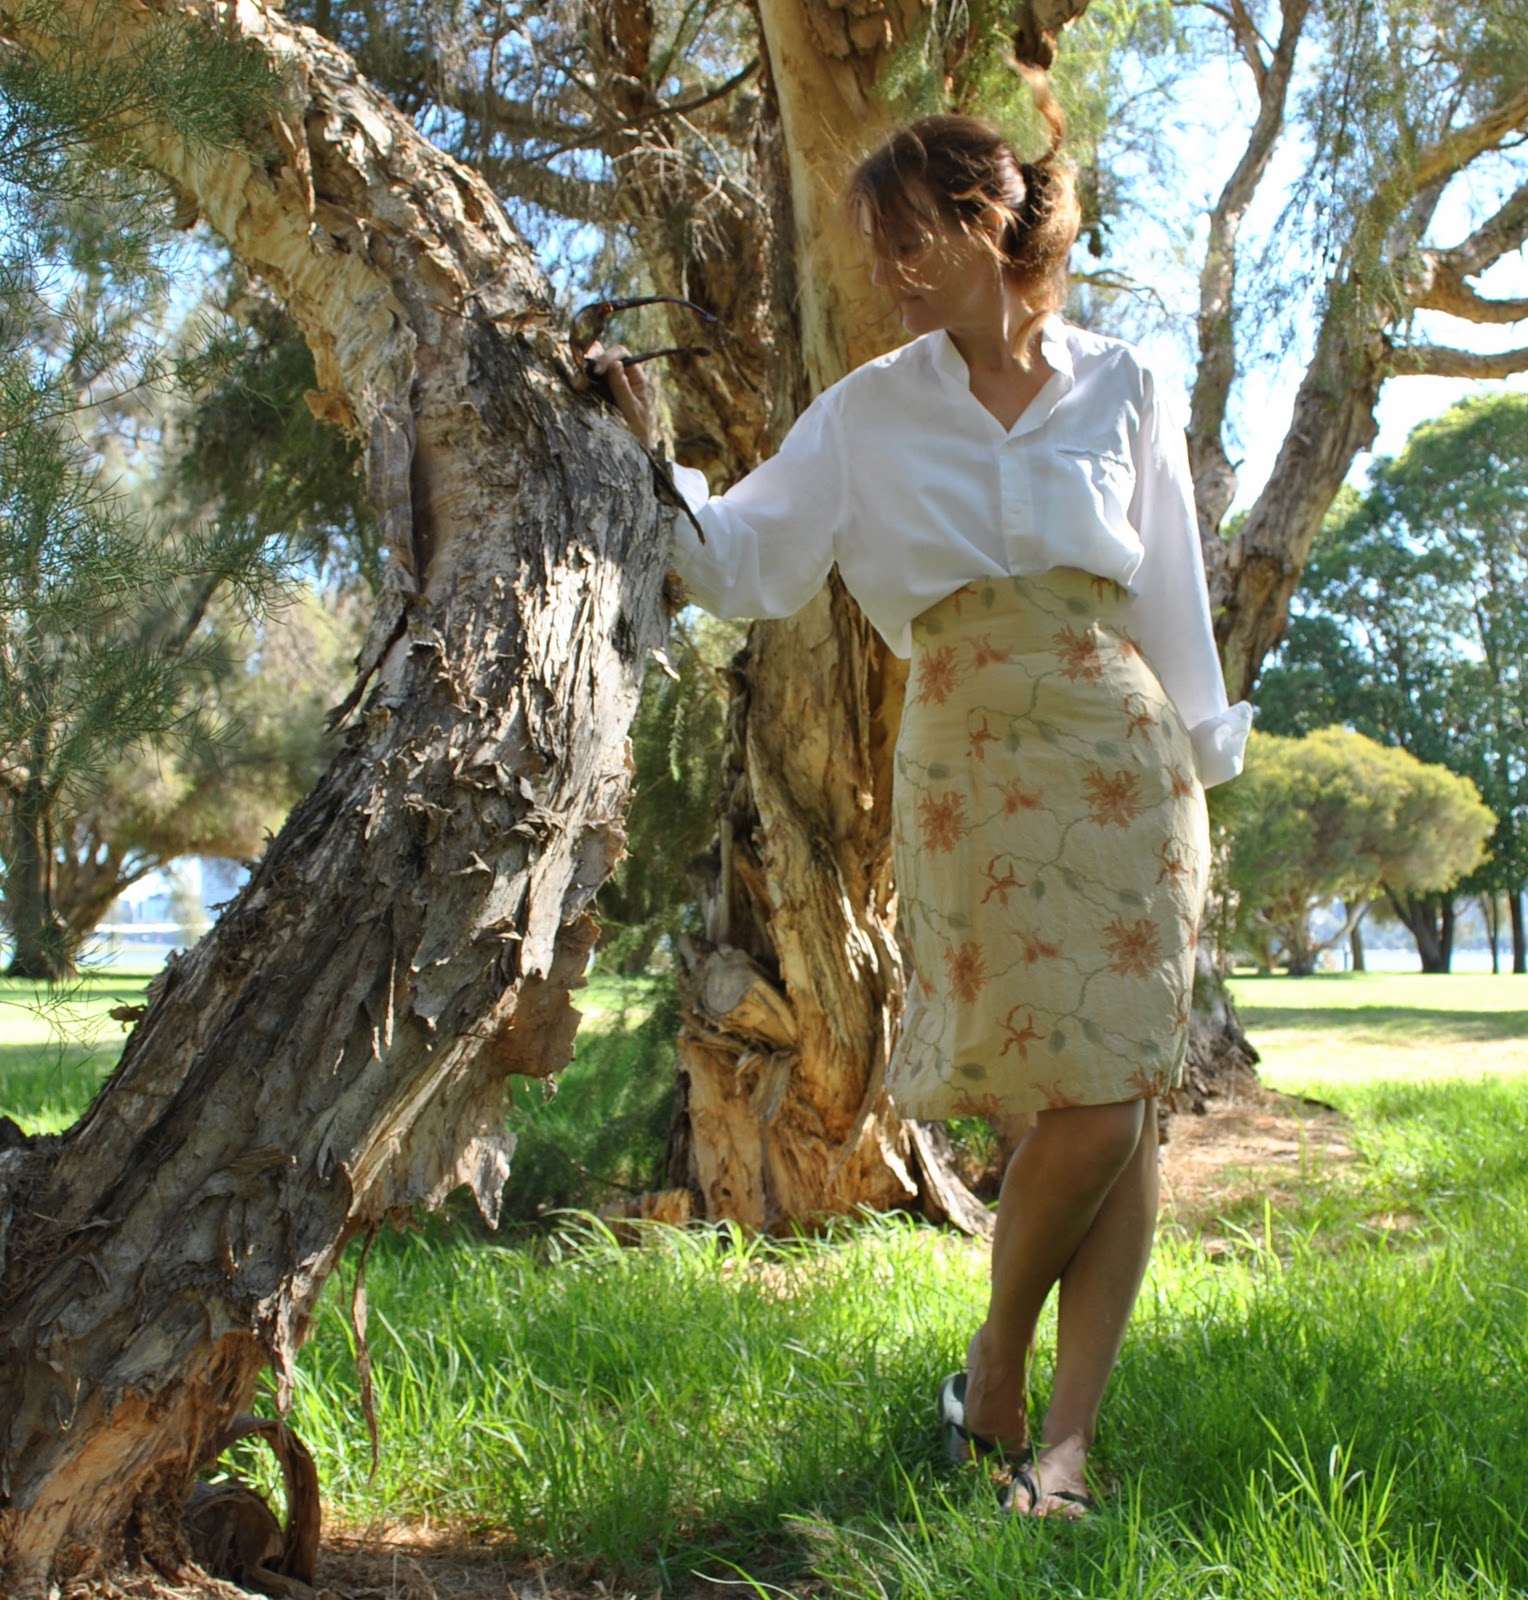
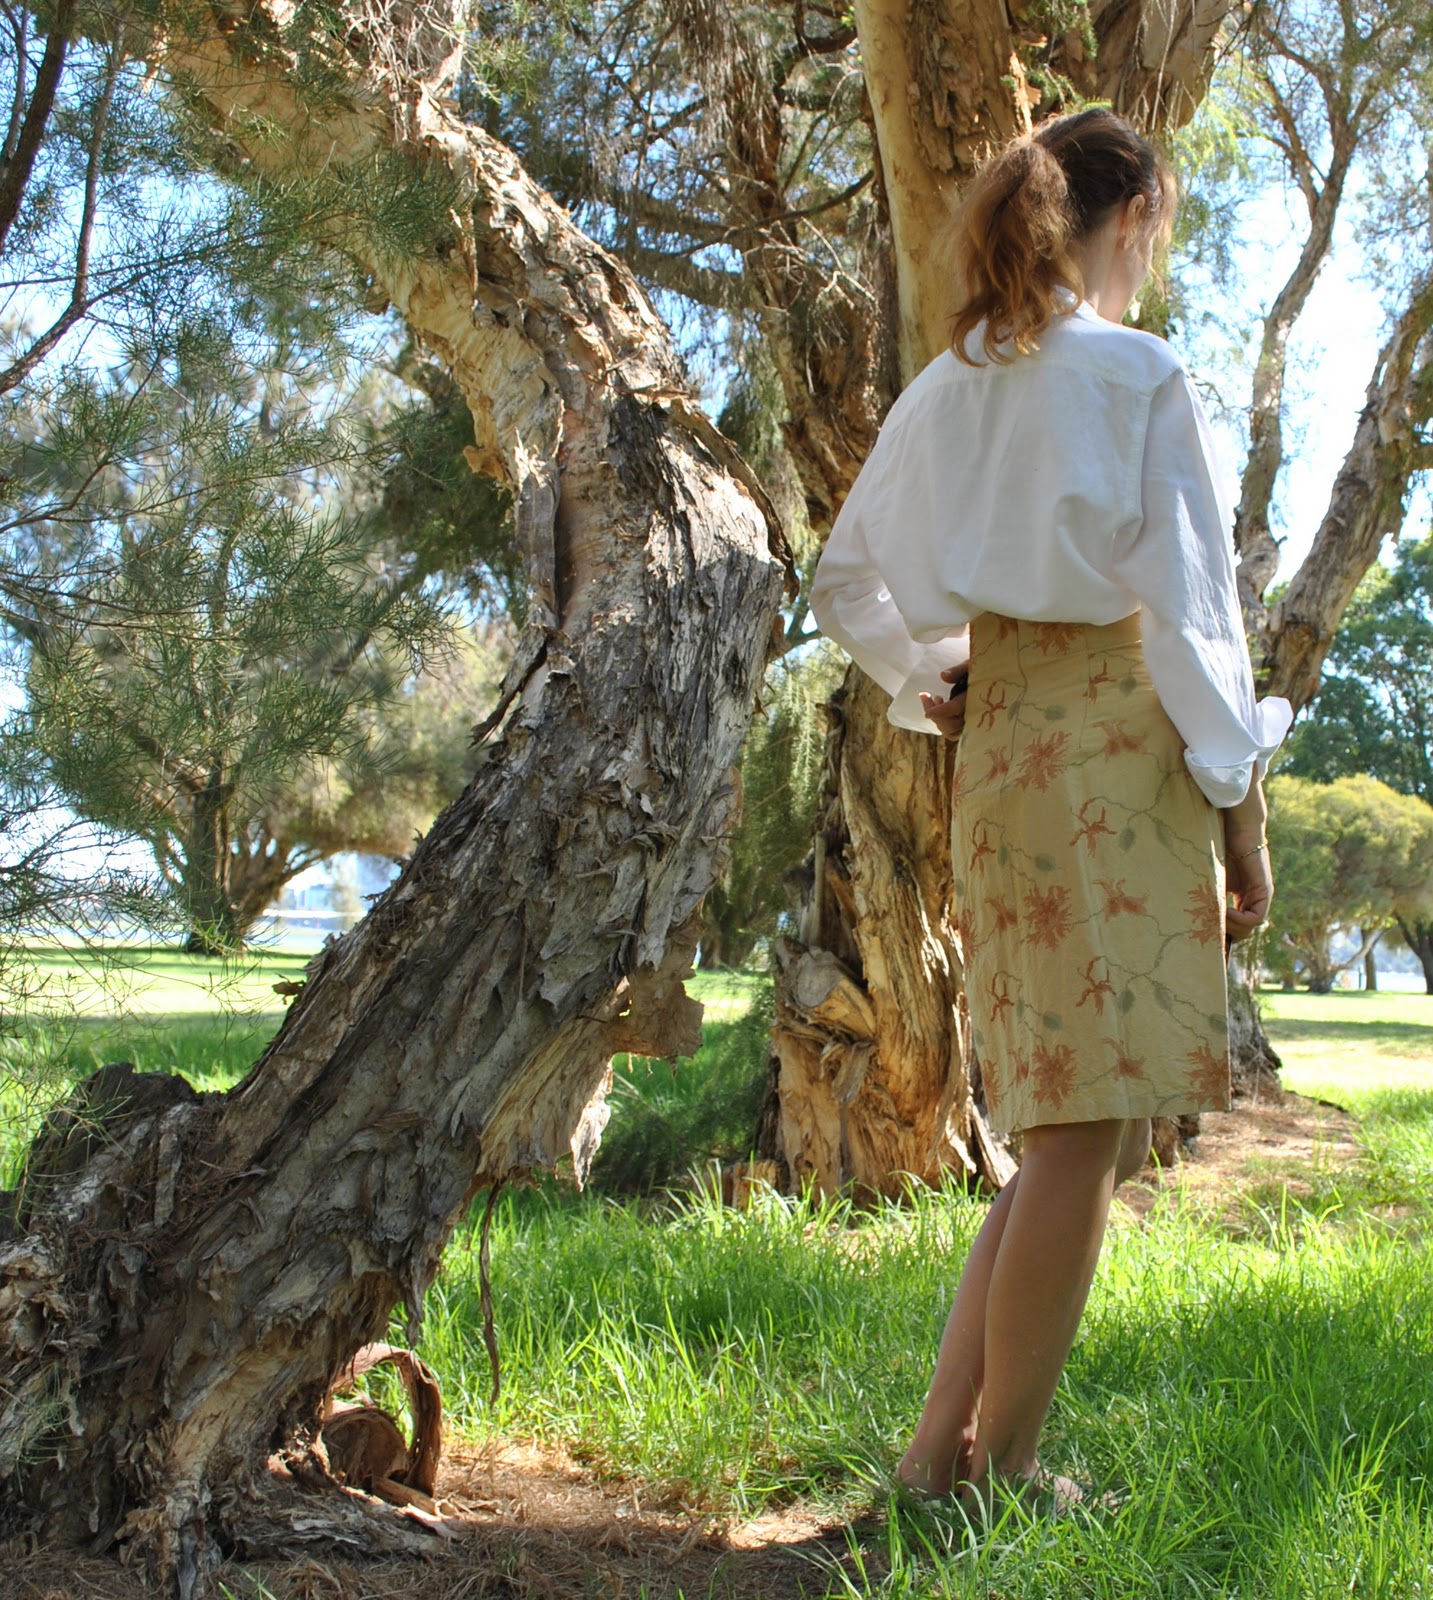
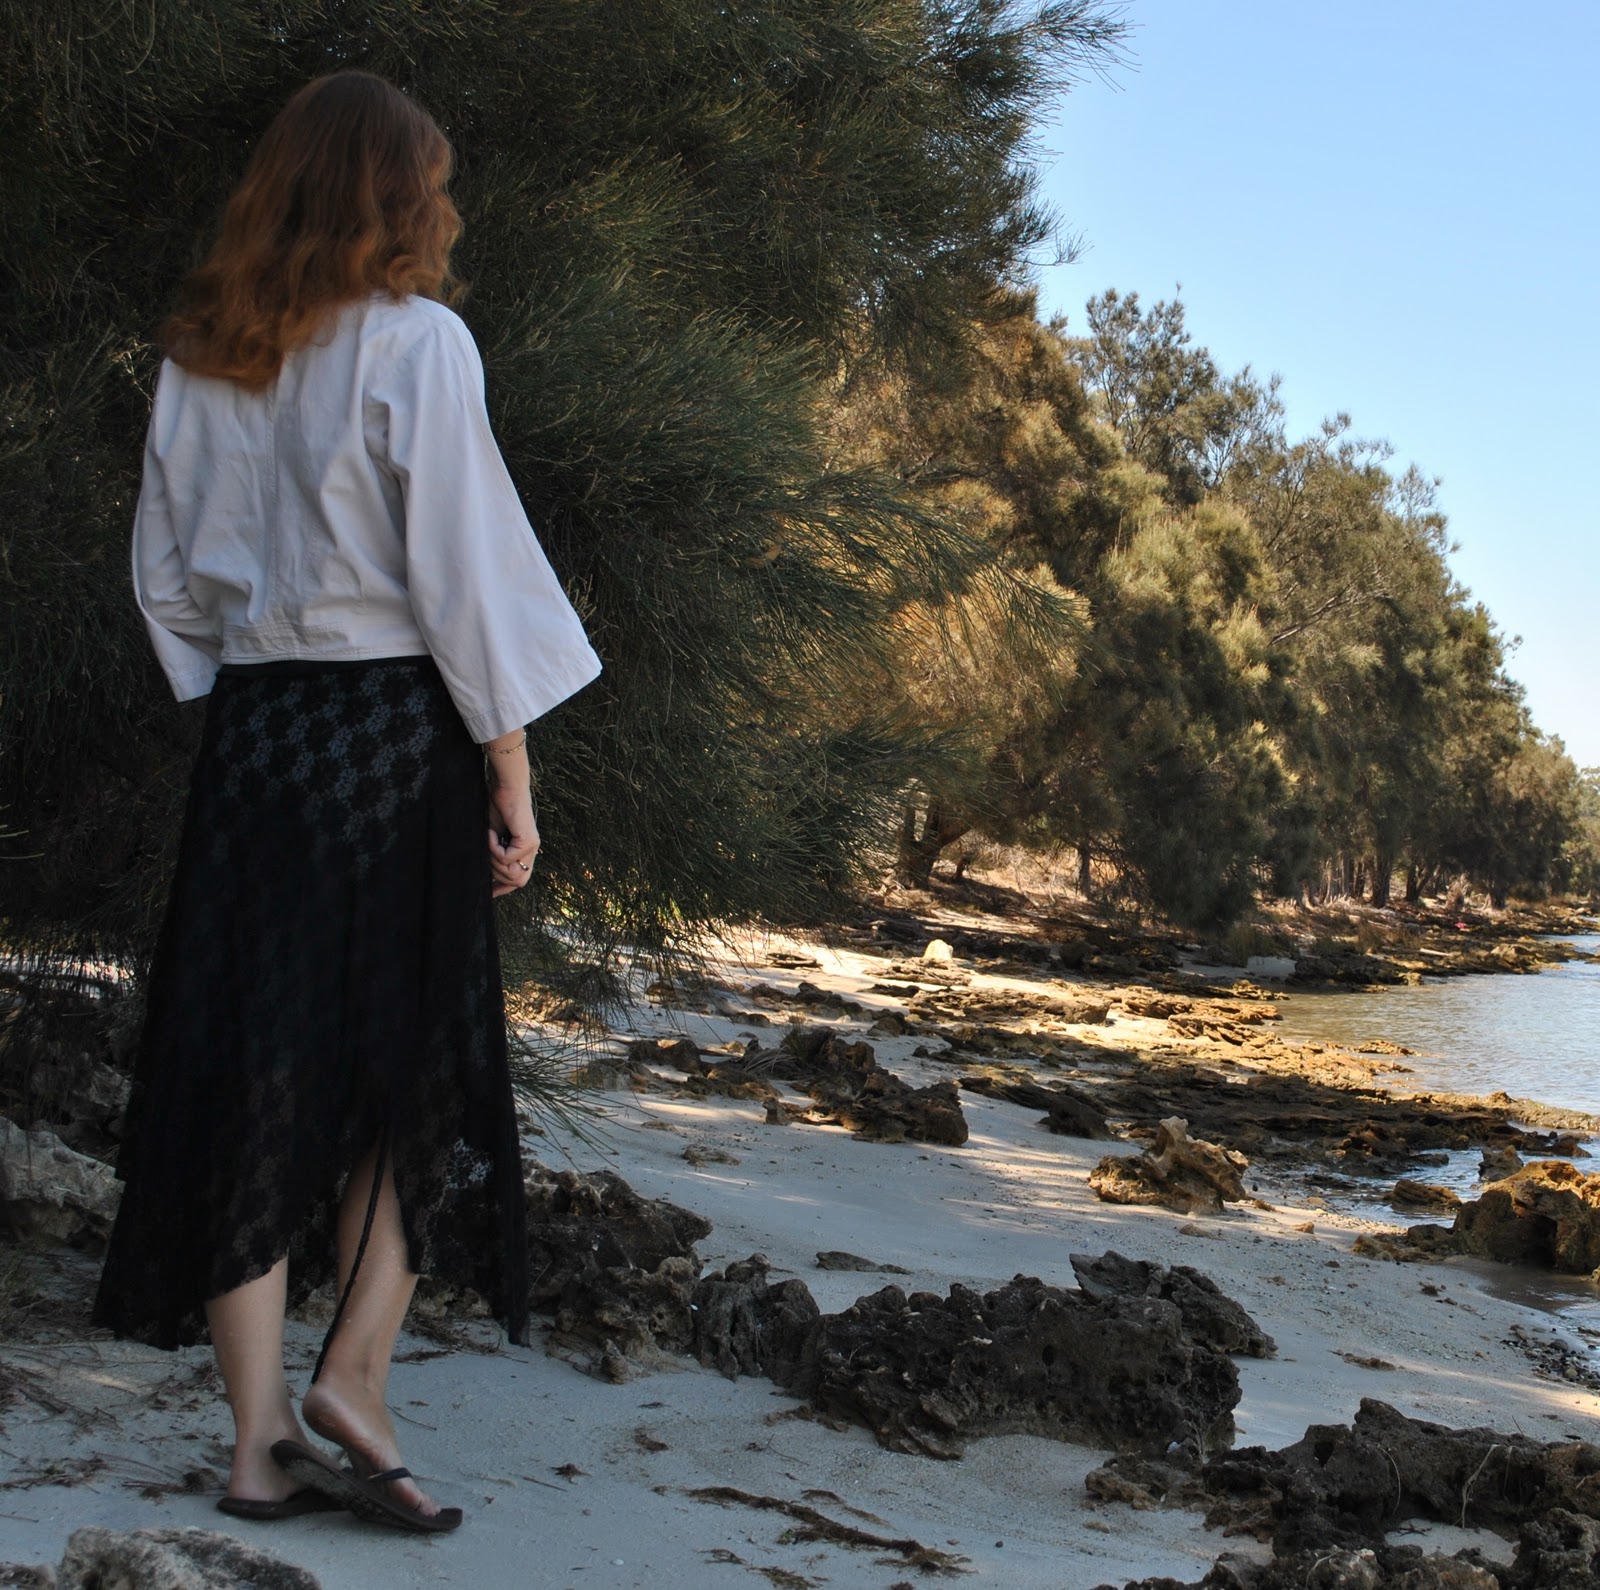
Just to show the garment full-length… (might not wear it this way much)

Luckily I hadn’t yet done the buttonholes on the shirt and so could put them on the “female” side of the shirt.  I love these gorgeous wooden buttons from Fabulous Fabrics, the same ones that Sam chose for his shirt here.
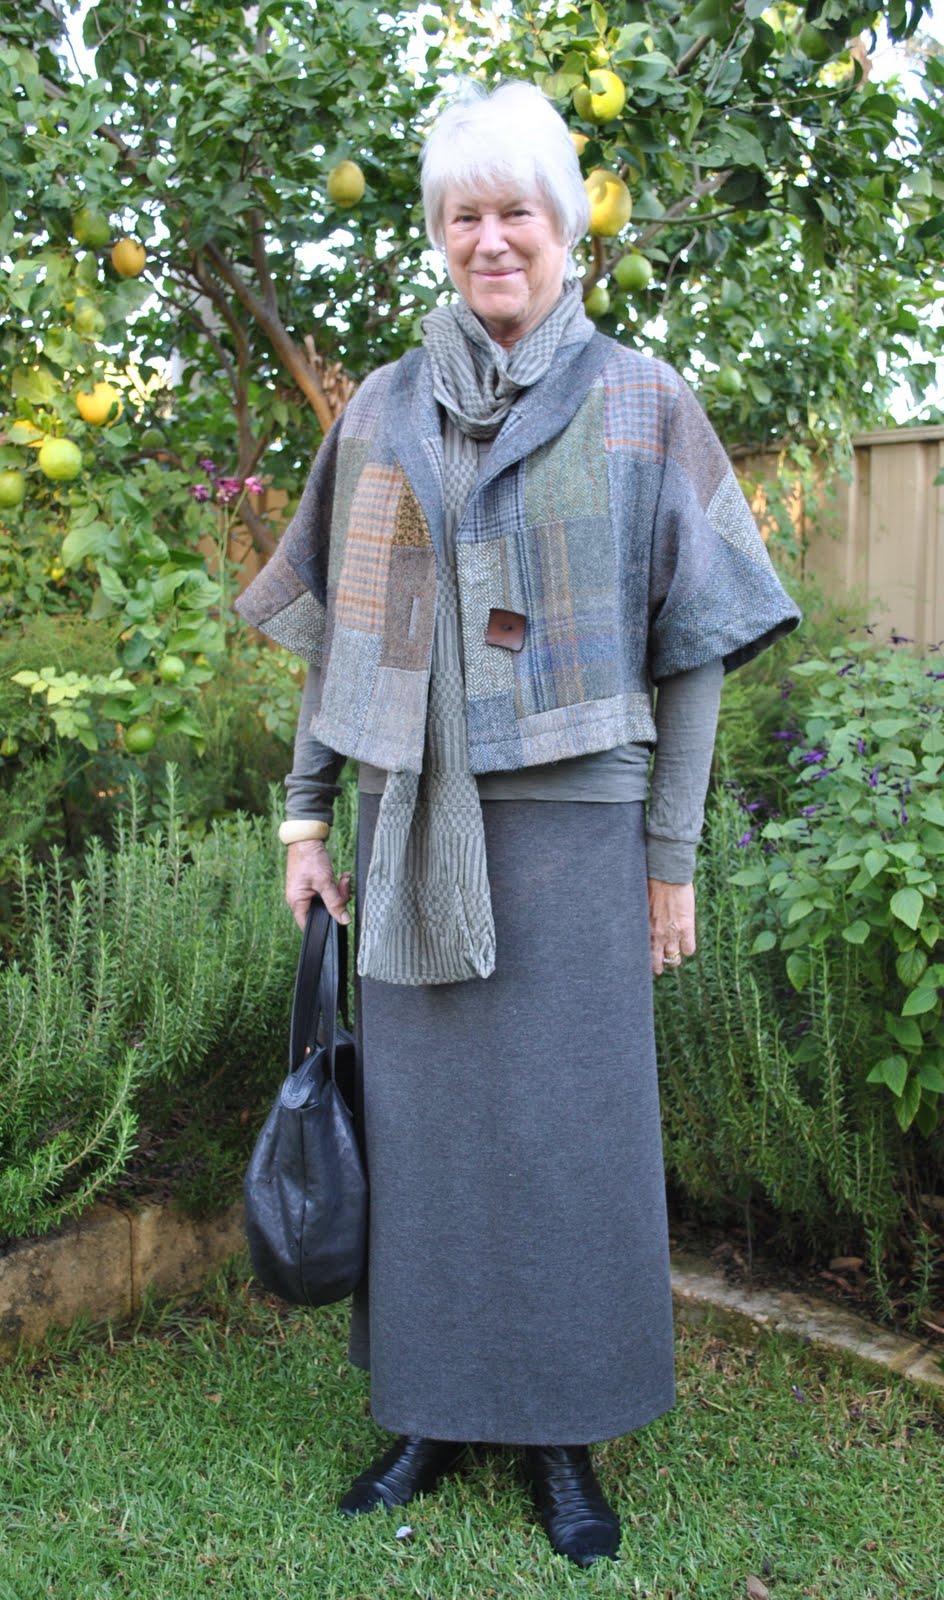
Details:
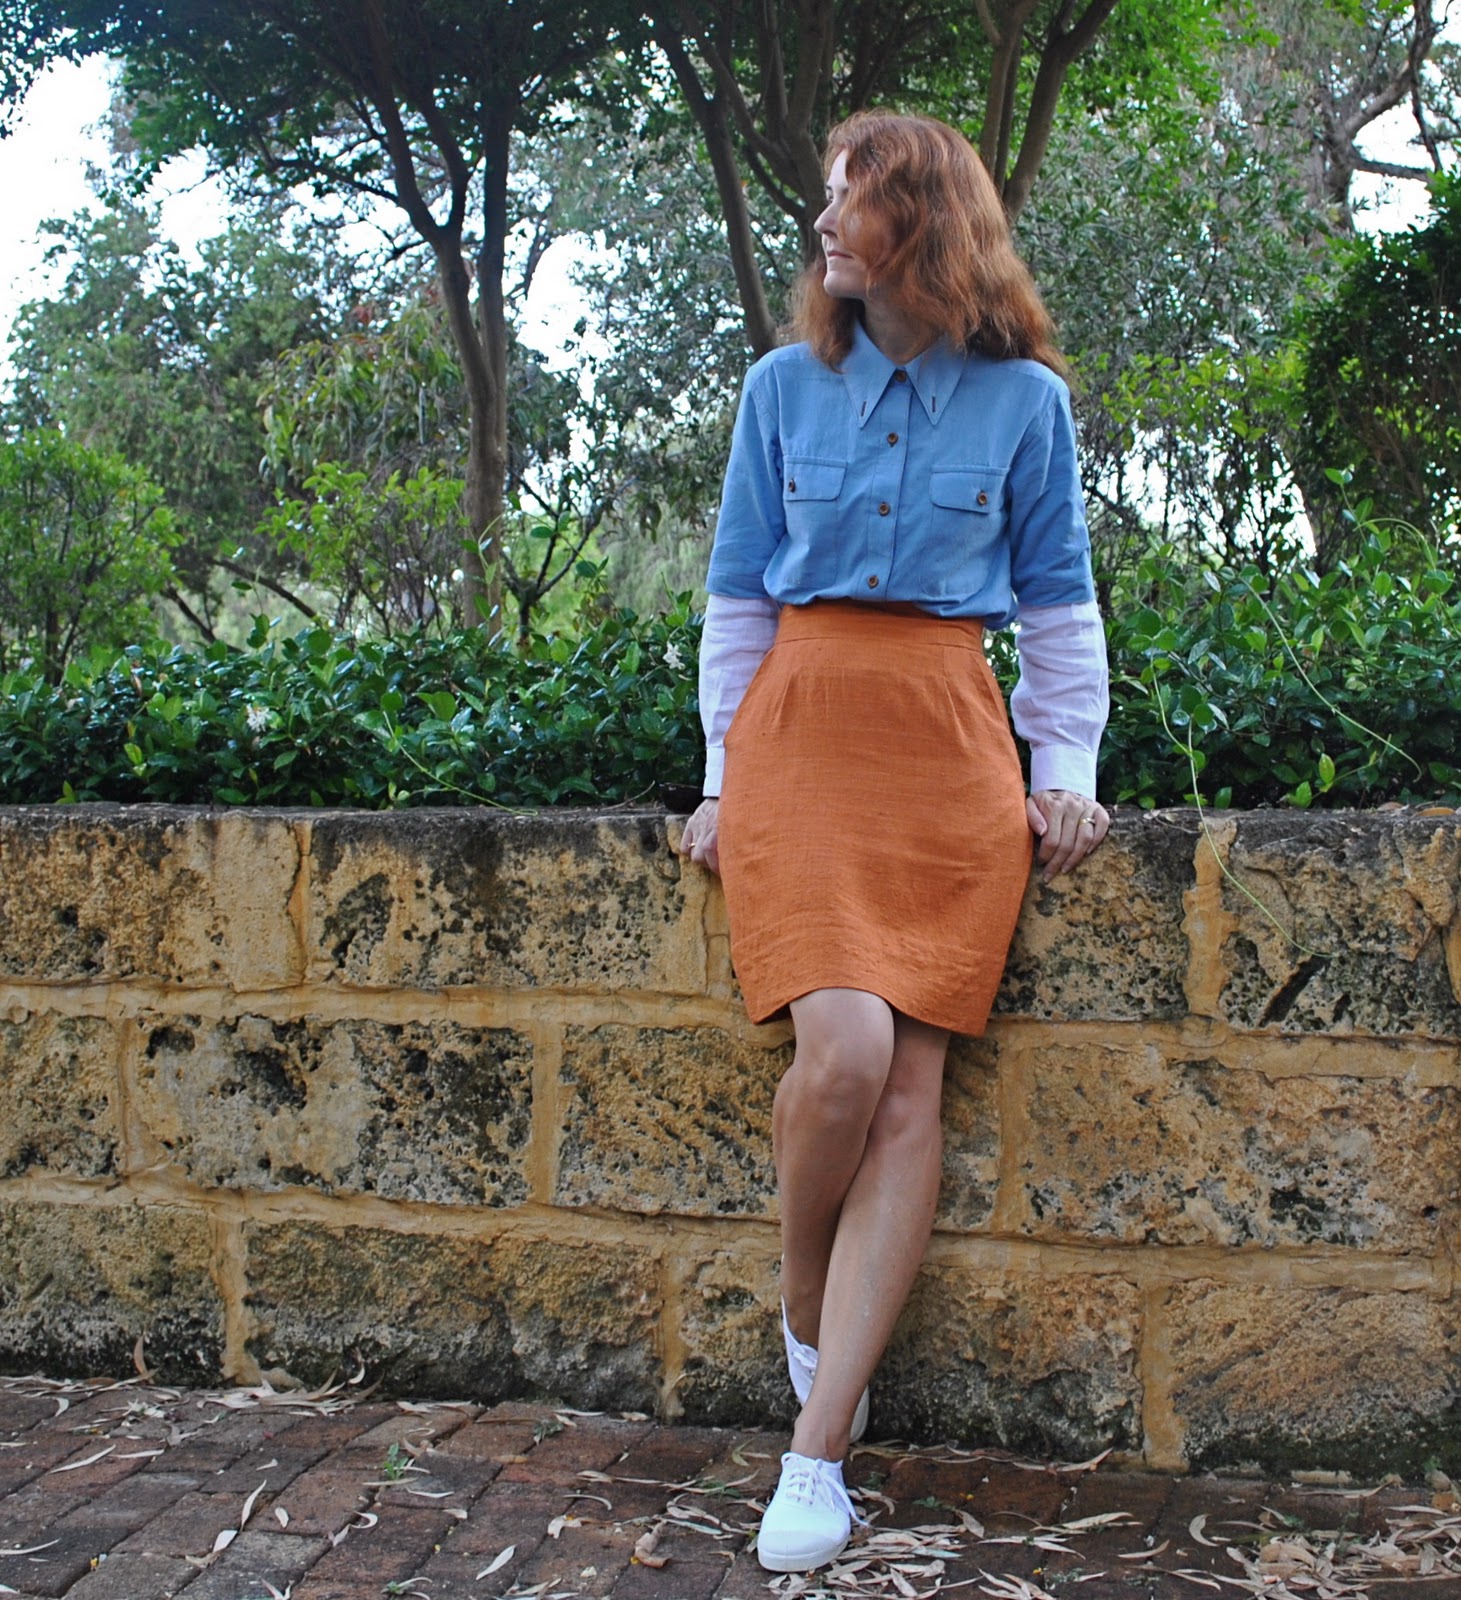
Shirt; Burda 7767 modified, of shot cotton in Sky and with long white sleeves from an old shirt
Skirt; Vogue 8363 modified, of burnt orange raw silk, details here, my review of this pattern here, and see this skirt styled in 6 different ways here
Shoes; Bensimon, from seed

pinterestmail

Dreaming, of chocolate

Y’know how you see some patterns, and you’re like, oh so easy!! but you go ahead and buy or trace-out or copy-as-exactly-as-possible anyway?  
That’s how I felt with this Tshirt pattern; top 106 from Burdastyle magazine 06/2011.  I just liked the shape of it, exactly as it appeared in the magazine; the subtle kimono sleeve, the boxy looseness of it.  So I hauled out the ol’ tracing stuff and spread out the sheets and traced out this very very basic Tshirt/dress (you can make it a bit longer, and surprise! it is a dress! in true Burda magazine style, they elongate top patterns and give it a different number, making out it is a whole new pattern) even though all the while wondering that there was really nothing to it and maybe I was wasting my time and my tracing plastic.  And my final thought; there really is nothing to it!  Too easy!
However; made up, I am still enamoured of the cute shape and the very easy-to-wear and flattering kimono-sleeve.  I will make this top up again, and properly next time.  Because I admit it, this particular example is far from… well, gorgeous.  To be honest, I think it is soon to become my bed-time attire, … woooh, such a glamour puss, no?!  
But, here is my reasoning … remember this sundress? (below right)  It has been a hot weather staple for quite a few years and I have finally bid it adieu.  The zip pull was finally paintless, the straps had come adrift and been reattached with zig-zagging (discreet, but still unacceptably visible upon close inspection) a couple of times each, and the fabric is … old.  I eventually realised it was not doing me any favours at all…  But I still loooovee this colour, and there was plenty of fabric in the dress.  
The thing with using old fabric for making new clothes is that; well obviously you are using old, and worn, and many times washed fabric, and usually that all shows and not to advantage either!  Old fabric gets thin, stretched and mis-shapen in some parts of a garment and not others, and so has limited application for smart new items.  But I still like to use old textiles as much as possible, saving the planet and so on and so on.  Assuages the guilt of my eco-conscience, if you like.
The neckline of this Tshirt here is slightly higher and not-as-sharply-V as the pattern, and instead of facings for which surprisingly there was not enough fabric, I made bias strips to finish the neckline and sleeve edges.  Since the original dress was cut on the bias, so the Tshirt is too.  And it is a little shorter than the pattern stipulates, again due to fabric shortage.  And even though this is just going to be a jammie top, the shoulder seams are flat-felled and the side seams are French seams.  Well, one may as well practise where one can, right?
Y’like?

Details:
Top; Burdastyle magazine 06/2011, 106 modified slightly, chocolate brown bobbled and embroidered cotton, a refashion of a sundress also originally made by me
Trousers; (hmmm, these are getting pretty old too…) self-drafted, based on a pair of old jeans, of white linen, details here

pinterestmail

Harvey Two-Face

So, we don’t do Halloween here in Australia.  
But in the last few years; each year it seems my children are attending parties that have a Halloween theme.  Different from how it is in other countries; just invited kids together on the one premises, and no door-knocking and begging the neighbours for food, thank goodness.   This kind of Halloween is acceptable to me.
But still requiring a costume.
So true to form Tim informs me on Friday (the day before the party) that he wants to go as Harvey Two-Face, the character from Batman who has one half of his body all acid-burnt and crazy and evil, whilst the other half is a neat, respectable looking business man.  Can I make a half-and-half suit and shirt set fitting the brief in, like, 24 hours??  
Hehehe; funny.  Oh.  You’re serious?  Oh, well, no! sorry.  Superpowers, I have not….  But I could possibly divide up two old suits and shirts and splice them together….?  So it was off to the op-shop.  Naturally, Friday was a public holiday in Perth… oh, did you know, we’ve had a VIP in town??  Yeees, so almost everything was shut, but a bit of phoning around informed us that the op-shops in the CBD were open that day.  So in we went.  Entering Good Sammy’s I immediately scanned the clientele; hoping against hope to catch sight of Her Majesty… maybe checking out the hat and bag sections? … but  (sigh) she must have already been in and cleaned up before us because there wasn’t much of a selection.  
Disappointed!
But we did manage to score some rather paltry bits and pieces.

Bit of butchering and slashing and fudging together later…

It was all a bit mashed together; of course nothing slotted together easily and needless to say there are no HongKong finishes!, and I couldn’t help thinking if only I had had a bit more time and if Spotlight had been open I felt could have had some fun and done something really wild and funky with the “evil” side, but we did the best we could with limited time and resources.  And I was pretty chuffed that he got the Best Costume award!!
Later edit; yup, he did put horrible blotchy red and pink make-up on the evil half of his face later on…  so dya reckon he is sufficiently supervillain-ous?

pinterestmail

Turning old jeans into a skirt…

…  I decided it was high time for another refashion since I still have a small mountain of perfectly good fabric in the form of old clothing sitting in my stash.  eep!  Do you remember these jeans?   They had got a bit saggy and baggy about the crotch and seat area, thanks to me using almost-stretchless fabric.  Thus I learnt jeans really are so much better with a bit of stretch in them… anyhoo so I could barely stand to see myself in them as jeans anymore but the corduroy was still in pretty good knick overall, and I still absolutely looooove the colour.  It’s the perfect “white” for me, a sort of warm shade of grey-white that I love.  Oyster white, to get all referentially descriptive, if you like that sort of thing.  Yeah, I do too  ðŸ™‚
So.  I’ve seen dozens of jeans-to-skirt refashions on the net but none of them have ever ever appealed to me.  Why?  People can’t get past dealing with that big curved crotch seam, and will just leave it there, sew it down boom onto the front of their new skirt as is, and I just can’t bear that look.  When I do a refashion I want it to actually look like a skirt, thanks, and not for people to look at it and go, “oh, she obviously converted her old jeans into a skirt, yeah.  Hmmm.  Okaaaaay…  No attempt to do anything at all about that crotch seam….  And what about the rest of the fabric from the legs?  Why not make use of that somehow?”
So I gave it some thought and came up with this refashion (details below), that actually used up nearly all of the fabric from my old jeans.  The whole top bit, with the waistband, fly, side pockets, coin pocket and rear patch pockets is still there completely intact too.  I think it ended up looking quite fun and flippy, and almost sporty too, don’t you?

Details:
Skirt; my own design, a refashion of an old pair of off-white corduroy jeans (originally made by me too, using Burda 7863 here)
Blouse; Butterick 4985, ivory eyelet cheesecloth with lace trim
Cardigan; Country Road
Scarf; Missoni
Shoes; Bronx, from Zomp shoes

It was a pretty simple refashion…. firstly I cut off the top bit, and unpicked the curved part of that offending crotch seam.  

Pinned and resewed centre front and centre back respectively into a straight front and back seam… aaah; already, things are looking a lot more skirt-like here, right?   I also re-double-topstitched that centre back seam down again to match how it was originally…

Now for the legs bit…
Measuring and allowing for an equal depth hem cut each two leg pieces in almost-half horizontally.  

I wanted to keep the original hem down at the bottom of the legs intact, and so just unpicked a small area of hem near the outside leg seam… so I could unpick that long outside leg seam.  I chose the outside leg seam for unpicking like this since I had originally double-topstitched the inside leg seam down, and so the outer leg seam was a far easier option here…!!  And those double topstitched seams makes a nice random feature on the final skirt too.This gave me four largish pieces of leg, in pairs of two mirror images.  I used the lower leg pieces (with the hem mostly intact) for the skirt front and the upper leg pieces (which as yet have no hem) for the skirt back, and checking to make sure the nap of the corduroy is all the same way as each other and the top of the skirt, sewed up the side seams, and centre front and back seams.

The  next step was to arrange the excess fabric in the lower skirt piece into folds so that it fitted the upper skirt piece.  This was just a matter of measuring and arranging the folds to be as near as perfect mirror images of each other, front and back, and checking every now and again to see that it was fitting into the top section.  

Once the folds were all evenly in place I basted them all and then sewed the skirt top and skirt bottom together.  I top-stitched each fold down in place by about 5cm vertically, some single- and some of them double-topstitching.  Then hemmed the skirt back, to match the hem of the skirt front (which is already in place, and only required the centre front bit of the hem to be sewn into place…)

Voila!  A new skirt, and with very little waste!  The only waste fabric was from the crotch area, plus I ended up shaving a few inches off the top of the lower skirt section also to get a length that pleased me.  Note, I took length off the top of the skirt, not the bottom, since I was keeping that existing lower hem in place.  When re-fashioning a garment it is well worth incorporating those existing hems into your new garment somehow, since years of washing and wearing creates a permanent and very visible line of wear into the fabric, and a fold that will never ever iron out … thus removing length from that top area (that will just be disappearing into the joining seam anyway) is definitely the way to go here.

Better, yes?
pinterestmail

Red Emperor, or Catch of the Day

The theme for this year’s Amanda Young Foundation Ball was “Nautical, but Nice”  
(If you have time, click on the link and view the information video on meningococcal disease.  Having this knowledge could save a life…)
As usual I had about a zillion ideas for a dress.  Was so so sorely tempted to make a completely brand new gown.  In fact originally I had every intention of making a whole new ballgown for this event.  This was a very enticing thought, there’s nothing I like more than delving into the glamour of the eveningwear section of the fabric store…  but I confess not an very eco friendly option really (sigh)  After much enjoyable fantasising about such nautical fabulousness as mermaid-like dresses or dresses looking like a breaking ocean wave (I had visions of a turquoise sheath, with a frothy white lower skirt section to represent the surf), eventually I directed my thoughts to my collection of evening gowns already sitting in my wardrobe, and working with something I already had.  Last year’s gown had possibilities; this is what it looked like last year…
I decided to re-work this gown and be a Red Emperor, as in, the fish…hehe.  In the end, of course, the gown was almost completely re-constructed and is pretty much a new dress.  
I removed the red velvet bodice and silk midriff section, and made a new red silk skirt to go over the old lining/petticoat with its attached grand silk flounce around the bottom.  Then re-attached the midriff and bodice.  I thought this would be OK, but unfortunately the red velvet just looked wrong on top of the dress, otherwise composed entirely of red silk. So I unpicked that off of the midriff section and away from the zip, un-picked and kept the red velvet ribbon shoulder straps to re-use, and made a new bodice, out of the pieces of red silk left over from cutting out the new skirt.  
All the un-picking and re-sewing together of seams took ages, about five days.  All the skirt sections are hand-hemmed, and I estimated there is between five and six metres of hem altogether in this dress.  (Later edit; I just measured, 8.5m!)  Luckily, I already done the lower skirt and petticoat last year….!
The new parts are: the wrap-over upper skirt and the bodice.  The old, re-used parts of the dress are: the lining/petticoat with the lower silk flounce, the midriff section, the velvet ribbon shoulder straps, and the invisible zip.  Yes, I re-used the ZIP!  I think I’m most proud of that part of the whole she-bang, silly as it sounds. 
If you look really closely enough, under a strong light, you can see that the lower flounce and the midriff section are a different shade of red than the upper skirt and the bodice…  from floor up the fabrics sections are old, new, old, new but meh.  I think they are close enough to be good enough.  Also the different shades are divided up over the dress, so it still looks OK.
So when I had finally finished, I had a kinda new red dress that I am completely thrilled with, even more than last year’s version I think!
But even though it was “red” and sort of “royal”, fitting in with my plan to be a Red Emperor, it didn’t scream “nautical” by any stretch of the imagination.  So I gathered a few fishy accessories; the fishing net to be my stole, and I also bought a few lures and a bit of fishing cord from the fishing store to make some jewellery.
So sufficiently nautical, yes?
And when I came out to show the children my costume and asked them what they thought I was, Sam immediately said, “the catch of the day?”  
And I wondered if that was a better title than my Red Emperor idea…

Details:
Dress; based on Butterick 4657, petticoat and lower skirt of my own design.  Originally looked like this, and my other dress using this same pattern here
Gloves; Vogue 7949, red jersey knit, my review of this pattern here
Stole; fishing net
Jewellery; made by me from fishing lures…
Shoes; Raymond Castle.  These are my oldest shoes, I’ve had them since I was about 19…! 😀

a side view…

a back view…
pinterestmail

Introducing Mum…

I will say straight out this amazingly beautiful ensemble is not made by me but by my Mum here.  I had to put a picture of it here, because I couldn’t resist; Mum will never ever get herself a blog and this outfit is too creative, clever, immaculately made and finished, and lovely in itself not to share.
My parents have been staying with us recently, and when Mum came downstairs one morning in this ensemble on her way to attend Grandparent’s Day with my Dad and Sam, I literally stopped in my tracks.  Then raced to get my camera, simultaneously begging Mum to let me post her outfit on the blog.  She graciously agreed.
(Of course I would not be human if a little bit of me thought it might not be a good idea, posting Mum’s creations here on the blog.  After all, they will just serve to highlight how my skills are but 1% of Mum’s.  But let’s not be petty now…)
The jacket:  Mum bought these tweed fabrics, sold as small patches or “salesman’s samples” from a shop called Peppertree in NSW which she visited as part of the Australian Sewing Guild convention last year.  She pieced the different sized pieces together in an attractive random patchwork pattern… and anyone who has attempted patchworking will know that randomly shaped rectangular and square patches are not easily put together.  There are also one or two patches harvested from my Dad’s old tweed sports coat that has finally bitten the dust after many years of good service (a Re-fashion!).  The pattern for the jacket is a Vogue pattern by Donna Karan, (pattern number to be provided when Mum looks it up and tells me)  Please note the perfectly constructed welt buttonhole, made from tweed too.  And I have to especially point out, see the piece of mustard/dark green houndstooth-y looking fabric, on the right, or buttonhole opening side of the front, just under and by the lapel?  Mum knitted that bit in fair isle, to tone in with the other tweeds.  On a seamstress’ note, she wanted it mentioned that the knitted section required extra underlining and stabilising, as of course knitted fabric is not as sturdy as woven tweed.  
The jacket is fully lined in dark grey acetate lining.
Mum made the skirt too, from charcoal jersey knit.  I think she might have made the pattern for that herself.
Thank you Mum, for this bar-setting self-sewn moment!
Later edit: Jacket: Vogue 8605, shortened; Skirt: Vogue 2911

pinterestmail

The dress that wanted to be a skirt

This skirt was originally a dress.  I posted about my dissatisfaction with it here, and Terri brilliantly commented that she thought this dress wanted to be a skirt.  Well, that revelation was like a bucket of cold water over my head.  Oh, I mean that in a good way, actually in this weather, a bucket of cold water over the head could be a very welcome thing.  I mean it was like I woke up and looked at the dress with new eyes and saw that yes, it did indeed want to be a skirt.  Thank you , Terri!
Was able to fashion some facing out of the old bodice, luckily.  I cut off the top of the invisible zip and held the top ends of the same over a candle flame to melt the top couple of plastic spiky zip bits into a biggish round blob, so the zip pull won’t come flying off the top when I pull the zip up.  Yikes, has anyone else ever ever done this??  I have, once, years ago by accident, and learnt my lesson, never ever take that risk again.  Re-attaching the zip pull back onto an invisible zip is NOT FUN!   
Aaaand bob’s your uncle.  New (very) high-waisted skirt.  I think I like this style, especially worn with my husband’s white linen shirt tucked in, and all oversized at the top, setting off the slimline-ness of the skirt.  It is Craig’s shirt, but I am allowed to wear it this month, since I made it.  But poor Craig.  Perhaps I should make myself my own oversized crisp white linen shirt, so I don’t need to go hijacking his all the time…

Details:
Shirt; Burda 7767 with minor modifications, white linen, details here
Skirt; Burda 8071, the skirt part only, faced at the top; embroidered silk

pinterestmail

A boxy little jacket; a refashion

I’m so pleased with this latest refashion that I finished just yesterday, that I just had wear it even though it’s really too hot for this time of year…
I took an old pair of too big, light cotton twill pants that my mother didn’t want anymore, and made for myself this loose unstructured jacket that I am now totally in love with…
I realise it may not be everyone’s cup of tea and I’m not sure Craig is very keen on it, but meh…  I really like it!
I first got the idea after seeing some of the Desigual designs, using old jeans upside down as the bodice of dresses, see below from Desigual.  I know, I know, mine doesn’t look much like this, but I’m just trying to illustrate where my original inspiration for this idea came from…

This is the pair of pants as they were originally…
I cut along the inside leg seams, not the whole way down the legs but just in the crotch area, and put it upside down to be used as the bodice of my new jacket; with the cut-open old leg/crotch seam as the new neckline.  The excess leg tubes were cut off to be used later as sleeves.   I sewed the jeans legs together for my shoulder seam…
Cut away some of the side seam for an armhole edge.  This was my first armhole cut, which is why the armhole looks a bit too small; it took some trial and measuring to get that armhole length perfectly fitted to the sleeve circumference (“sleeves” being the old lower legs above I just cut off)…  In trialling something experimental like this I’m a big believer in cutting away not-enough and then having to take away a little more, rather than cutting too much to start with and then regretting it…  (Horrible sentence, but I’m sure you seamstresses know what I’m talking about there)
I used one of these armhole cutouts to cut a triangle to fit in the V of the back, and sewed it in, mimicking the double topstitching featured elsewhere on the jeans…  Oh, I did have to unpick the curve of that back centre seam some and re-sew it to be straighter before this step…. again mimicking the double topstitching for continuity.  The top of this back neck edge was finished on the inside with a short strip of bias binding for stability.  As for the back; the curved part of the front crotch seam was unpicked a little bit and resewn to be a straighter seam, and then the V of the front neckline was folded in and finished also with double topstitching.
Set in the sleeves.  The sleeve hems are just the old jeans hems and were left intact for ease of finishing.
I topstitched closed the edges of those slanted front pockets, and removed the back pockets (now upside down) from the back of the jeans and repositioned them right way up onto the front of the new jacket.  See, the waistband of the jeans is still the waistband of the new jacket, and that fly can still be unbuttoned and unzipped for ease of taking on and off; just that it’s upside down now…
Et voila!
Details:
Jacket; my own design, refashioned from an old pair of light cotton twill pants
Skirt; my own design, based on the shape of Vogue 7303, black lace and black lace strips
Tshirt; Tbox
Thongs; Mountain Designs
pinterestmail
Switch to mobile version
↓