Category Archives: Uncategorized

Data Irretrievable

I hate technology.  No, an exaggeration, I just don’t trust technology.  Just when you come to depend upon it, wham! it lets you down.  And when it happens, it’s always big-time.
Over the weekend my computer crashed.  As my husband says; there are two types of hard drives, one that has crashed, and the other that is going to crash.  When you least expect it.  I’m a wee bit sad.  I’ve probably lost a lot of stuff.
Actually, you know what?  I confess, I’m a mite relieved too.  It’s too easy to build up such a lot of “stuff” on your computer, info you can’t possibly delete voluntarily, but is actually pretty useless when you get down to it…  Old letters I’d kept copies of “just in case”, funny emails, links to handy websites I’d discovered along the way, massive email address book of which I was only using about 5%…  I had a lot of downloads sitting there, probably that I was never ever ever going to get around to doing anything at all about.  Free downloadable patterns, both sewing and knitting.  Inspirational ideas, photos from style.com of garments that had me all fired up at one point or another that I was going to try to re-create in some way…  well now it’s clean slate time.  Through no fault of my own (that I am aware of) I’ve lost a whole lot of … well, I won’t use as strong a word as junk, but certainly a whole heap of things that may have a certain burden-like nature to them.  
I’m looking on the bright side.

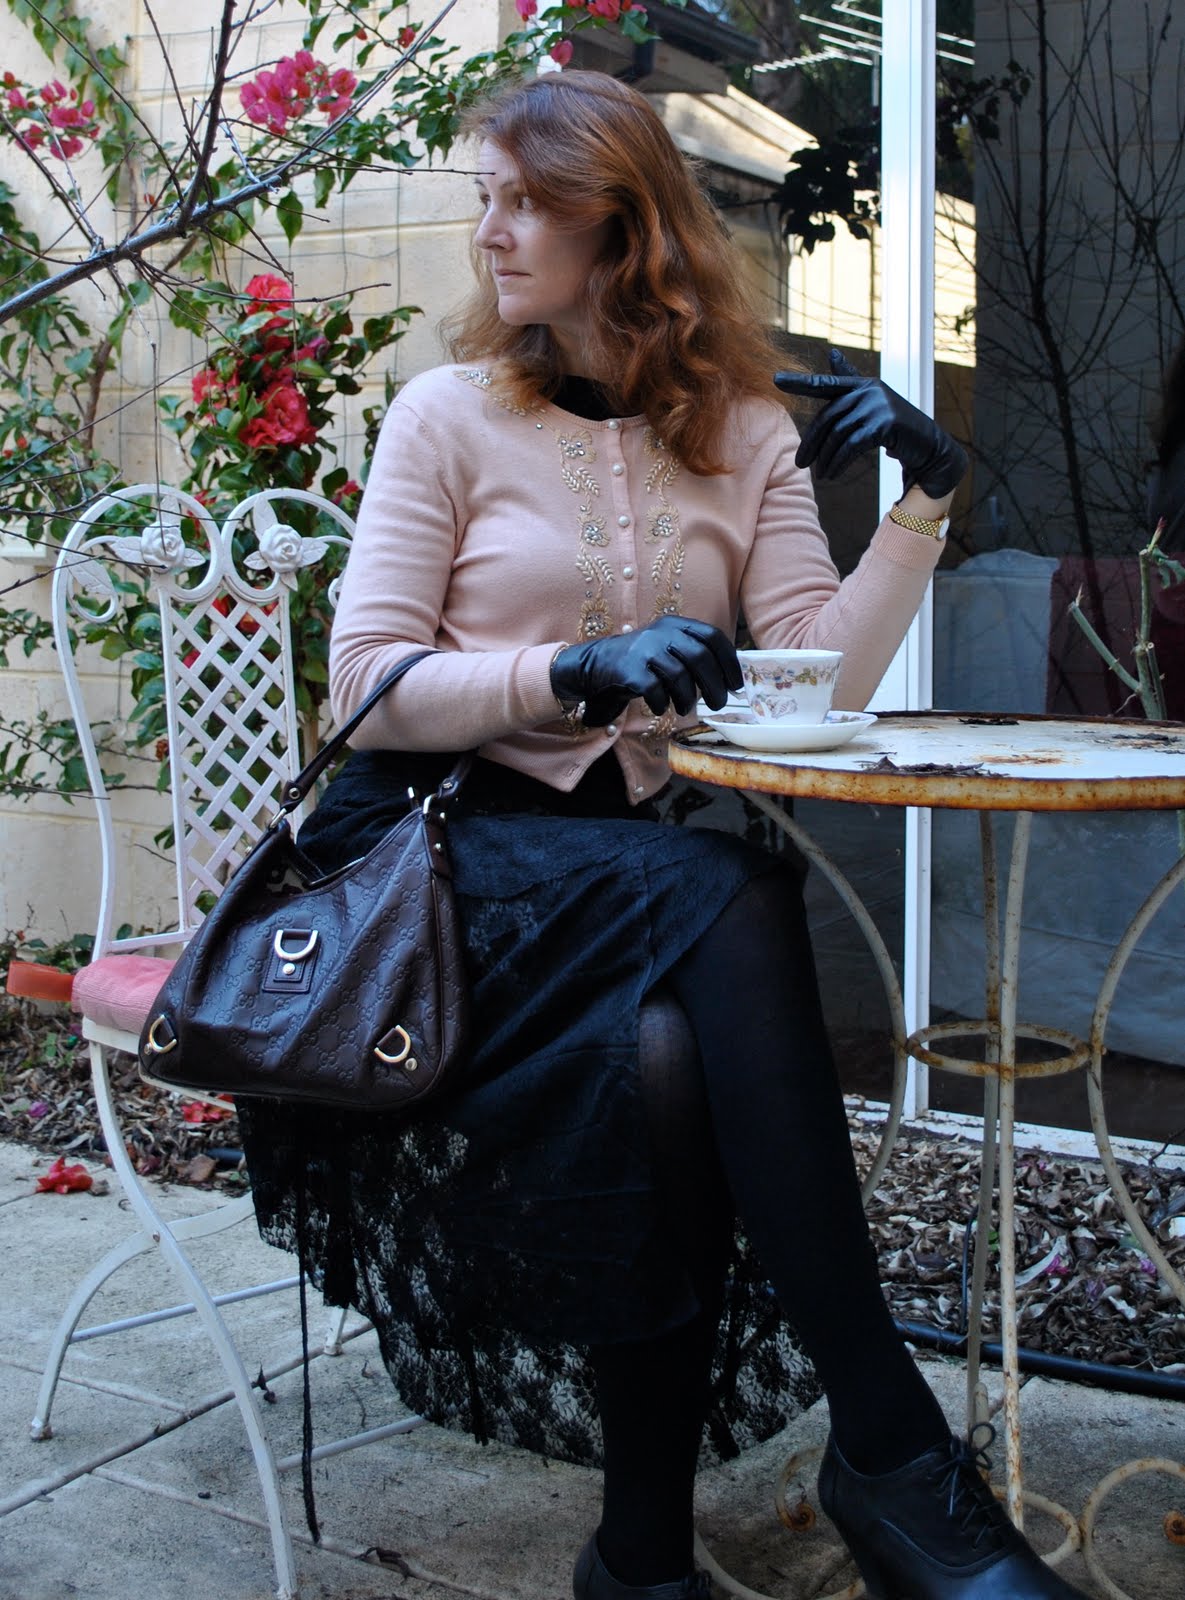
This morning: on my way to morning tea with the gals…

Details:
Skirt; my own design, based on Vogue 7303, black lace
Top; Sexy Lady, second hand
Cardigan; Wheels and DollBaby, second hand and repaired to look like new
Tights; Kolotex
Booties; Django and Juliette
Bag; Gucci
Gloves; not sure now, from David Jones

pinterestmail

The wind and the tides as our companions…

Walking along a wintery morning beach.
The wind whips at our hair, tying curly tangles in sudden lusty gusts, prompting me to seek the warm sanctuary of my cosy handknit hoodie about my ears and saving the hair from a cruel tussle with the hairbrush when I get home…

This is Sienna’s favourite place to be in the whole world.  When we are here she regains the unalloyed joie de vivre of a puppy; uncomplicated, pure and complete in her appreciation of soft sand and rippling water.  The tide is her playmate, her partner in the crime of meaningless high-spirited fun.  The peekaboo waves are an irresistible tease, their behind-her-back whispering a gentle and cheeky provocateur demanding her stern attention…

And sadly for her it’s out with the hose and the hairbrush at home…!

Details:
(ancient) Jeans; Country Road (should probably re-fashion these as they are embarrassingly shabby now, but find myself strangely clinging very hard to the store-bought clothes I still have since my Wardrobe Re-fashion pledge…)
Tshirt and charcoal cardigan; Country Road
Wristwarmers; Sportsgirl
Hoodie; knitted by me to my own design, Jo Sharp Silk Road yarn in colour Ambrosia
pinterestmail

Cool Bunnykins

This is a very late post today!  Been a busy day…

This is a beanie/scarf thingy I knitted for my daughter Cassie several years ago.  Knitted from a variety of different yarns, to my own design…
I used four balls of yarn, three solid colours (1=pink, 2=blue, 3= lavender) plus one ball of chunky, bobbly one ply yarn.
Tension; 12 stitches to 10cm
To start: make the pom-pom first, also wind off enough yarn of each of the colours for the tassels on the ends of the scarves at the start of the project.  This will ensure you have enough yarn for these bits.
Tassels are approximately 30cm in length, I use a small paperback book to wind the yarn around, and you will need approximately 20cm worth for a good thickness.  I used lots of colour 3, lavender in my tassels, which is why there turned out to be not much lavender in the beanie itself! *blush*  Colours and numbers of rows in each colour are up to the individual according to taste, the following is the combination I used here.
Beanie: the beanie was knitted in the round, from the crown down to the rim.
Cast on 7 stitches.
Row 1; K2 in each stitch (14 stitches)
K 1 row
K1, inc 1 in next stitch, repeat until end (21 st)
K1 row
K 1, inc 1 in next stitch, repeat until end (31 st)
K 1 row
K2, inc 1 in next stitch, repeat until end (41 st)
K 1 row
K3, inc 1 in next stitch, repeat until end (51 st)
K 1 row
K4, inc 1 in next stitch, repeat until end(61 st)
K 5 row
(change to bobbly yarn) K 3 rows
(change to colour 2) K 7 rows
(change to bobbly yarn) K 6 rows
(change to colour 1) K 4 rows
(change to bobbly yarn) cast of very loosely in bobbly yarn, until there are 24 stitches left, divide into two sets of 12 stitches and continue knitting on each set of 12 stitches separately.
Continue in stocking stitch, alternating yarns as follows:
(colour 2) 10 rows stocking stitch
(bobbly yarn) 4 rows stocking stitch
(colour 2) 10 rows garter stitch
(bobbly yarn) 4 rows garter stitch
(colour 1) 24 rows garter stitch
(bobbly yarn) 4 rows garter stitch
(colour 2) 18 rows garter stitch
(bobbly yarn) 4 rows garter stitch
(colour 3) 30 rows garter stitch
(bobbly yarn) 8 rows garter stitch
(colour 2) 6 rows garter stitch
Cast off.
Loop tassels through the cast off stitches, and sew pom pom onto crown.
Done!
Of course, colours and the numbers of rows in each colour are up to the individual according to taste, this pattern is the combination I used for this particular beanie.   Really though, colours can be used however you choose, basically just keep changing colours at whim and knitting away happily until you get the length you want, or all the yarns are used up completely; ta-dah! zero waste!
pinterestmail

Rocking the double denim look

So here is my new dress, Vogue 1152, with more me-appropriate sleeves (for the “before sleeves”, see the post below).  I’m very happy with this now, will be perfect for a casual day-dress suited to the simple warm days not now very far off on the horizon…? (said hopefully)  Today being still just a little cool I’ve opted to try out at styling the latest double denim trend, and wear the new dress with my old jeans underneath… tres cool, no?
So the key to making the new double denim trend work is to definitely not have the same denim head to toe, take a look at the pictures just below…  no no, no and er, no.  Too avoid this very dated “denim suit” effect the modern interpretation is to mix it up in terms of colours/shades and texture.  So on the bottom half I am wearing my trusty ol’ denim jeans which have the two tone stone-washed look we knew and loved er… only a few years ago, and on the top half the lightweight chambray dress in a much paler shade of indigo.  And I’m thinking this isn’t tooooo bad!  But if the double denim thing still offends you;  relax, I will definitely be wearing this sans jeans before too long…!
Below is my review of this pattern.

Details:
Dress; Vogue 1152 with minor variations, cotton chambray
Jeans; Little Big, from Labels


Pattern Description

Loose-fitting dress has front and back princess seams, front and back gathers, front insets with contrast piping, back elastic casings, self-faced yoke, left side invisible zipper, short sleeves with pleated cap and gathered lower edge into self band and curved hem.  Length is 2″ above knee at centre front.
Pattern sizing
8-14.  I cut size 10
Did it look like the drawing/illustration on the pattern envelope once you had finished sewing it?
Essentially.  I altered the sleeves and fiddled about with the fit somewhat.  Also I have a suspicion the dress in the photo on the pattern envelope has a big bulldog clip at the back to make it nip in at the model’s waist like that… either that or the dress has been fitted to her shape like I did with mine.
Were the instructions easy to follow?
yes
What did you particularly like/dislike about this pattern?
I liked the look of it from the envelope photograph; the V-neck, the prettiness and the shirt-dress vibe it has without being a shirt-dress
After finishing I decided the puffy sleeves didn’t suit me, and ended up changing them.
The dress ended up being (for my taste, too) loose-fitting; just as described, and close to how it is illustrated in the line drawing on the back of the envelope but not in line with how the dress appears in the photo.  And the back elastic casings are situated too high I think.  I had to alter it to look less “maternity”
Fabric used:
Cotton chambray
Pattern alterations or any design changes you made:
Shaped the bodice sections to bring it in more at the waistline and also to take away some excess fabric in the bust-point.
Added another single casing with elastic on the back, additional to and underneath the double one stipulated in the pattern; also to help define the waistline better.
Eliminated about 1″ in sleeve width, and the lower gathering and sleeve bands completely.  I simply narrow hemmed the ungathered lower sleeve edge instead.
Would you sew it again?  Would you recommend it to others?
Yes I will sew this again.  I am planning to make this out of a light chiffon-y stuff for a fancy springtime lunch dress, but am going to implement even more design alterations than I did with this one.  I would recommend this pattern; as long as you are aware the dress is looser fitting than it appears in the photo.
Conclusion:
It might sound like a tale of woe, but I am very happy with this dress now.  I definitely prefer my version of the sleeves, although if the dress were out of a lighter weight fabric the sleeves may flop down like in the envelope photo and look better than they did in my cotton chambray version.

pinterestmail

On piping, and puffy sleeves…

I bought a second Vogue pattern during the recent half price sale, Vogue 1152 at right… and have been making it up using some cheap chambray cotton.  And was all happily whizzing along and halfway through when I realised I needed some piping to proceed.  And didn’t have any.  Fear not, I do not let piddly obstacles such as not having the correct materials at hand stop me from contriving some sort of substitute out of whatever is floating around in the laundry cupboard where my stash lives.  And is actually being chipped away at at a nice steady pace, thankyou for asking.  But I digress… back to the piping…  
I fashioned my own piping out of leftover scraps of the chambray and thought to take a few photos to illustrate, as I think this is a cool way to use up small scraps that are otherwise useless and save, oh OK, only a few cents, but every little bit counts, right?  As well as saving planetary resources, etc.
At first I had the bright idea of making a twisted strip of piping.  I thought of doing this as the proper piping rope you buy is twisted…  So I just cut some strips of the length required, plus about a third (roughly), this extra is to allow for length lost by twisting.

Twisted and ironed flat.  Immediately noticed was no good.  Now I think the ironing is where the problem lay.  The twisted strip appeared a nice even piece of cord and looked just right but when ironed, it flattened along the twists and developed lumps and bumps most undesirable in a piping cord… so this method had to be abandoned.

On to plan B.  Folded the strip carefully in equal thirds longwise and ironed just enough on low heat to make the creases a mere memory on the fabric…
The set the machine stitching to as loose as possible and sewed down the centre of the strip.  This created a nice fat cord-like strip that had a nature pretty close to piping…

So went ahead and encased the wannabe piping in my contrast bias binding… 

and Bob’s your uncle.  Not tooooo bad?  (They don’t look terribly even in this photo, but that is because the bottom two strips have been ironed flat while the top one was left unironed to avoid messing up those gathers above it … when I realised this I went back and hand-puffed some life back up into those two bottom contrast strips and now they match OK, for a day dress…)

So onwards and upwards.  I actually had finished this dress pretty much to the pattern, and look at these sleeves…

Anyone who knows me will know for sure that these sleeves are so not-me.  (Ha!  That was a fun sentence, no?)  So my next project is to fix up those sleeves.  And will show the finished result tomorrow…
It’s not that I don’t like puffy sleeves.  I think in the right fabric, say a very light floaty chiffon, the sleeves would flop down attractively like the dress on the pattern envelope and look fine. But in this chambray, which has a lot of body to it, the puffs are just not right.

pinterestmail

Communing with the lorikeets

Today I asked Tim if I could borrow the scarf I made for him years ago to photograph for the blog here; he is far too busy for me to needle him to model it…  and found this lovely bench underneath the flame trees which are considerately blooming quite magnificently right now… the sight of the brilliant scarlet blossoms against drinkable blue skies was breathtaking in its sheer intensity; and above me was a flock of these little fellows feeding and squawking to each other.  The hues of the rainbow lorikeet provided an extra blast of saturated primary colour.  Flitting about from branch to bloom in vivid splendour, they were chatty and busy little bodies cheerfully banishing solitude…

Details:
Scarf; made for Tim from anny blatt pure wool bought when we were all in Paris
Tops; both Metalicus (the cardigan new to me but second hand!)
Jeans; Little Big, from Labels
Boots; Mina Martini, from Marie Claire shoes
Bag; Gucci

pinterestmail

A visit to the Art Gallery…

Paid a visit to the Art Gallery of WA today, to view an exhibition and also to celebrate a birthday of a dear friend in our group…
I won’t mention the name of the artist because to be blunt I thought the works were quite hideous and grotesque although on a small (very small) positive note they did make food for thought.  All I could think touring through the exhibits is how on earth the artist was getting funding to put out the work, because the works were very costly and labour intensive.  They were sculptures, mostly very realistic “monsters” made out of silicone and adorned with real human hair and glass eyes to look like horrible deformed creatures out of a very unethical geneticist’s chamber of horrors of cloning/genetic experimentation gone wrong…  just shudder-ous (not a real word, just describing my reaction)  Our tour guide was excellent, raising discussion questions about the future of genetic research and experimentation into issues such as cloning and surrogacy and how far we human beings are prepared to go in these areas, and how much more accepting are our children of scientific “fiddling about” with the natural order of things than the current generation.  These are issues that I, with my scientific background, am already fairly familiar with and have already had some debate …
Viewing this exhibition has made me wonder about the point of art, all over again.  Beauty or politics?  Political art is so far removed from artistic art that I wonder if we should find some other category for it to reside in…  I personally thought this artist’s talents would be put to better use for humanity manufacturing limbs and prostheses for landmine victims (say) or amputees and that is the pragmatist’s view…  but then the scientific debate is important, and how important is the art in the role of stimulating that debate?   There was no beauty and we are accustomed to expecting some beauty in our art.  I do like some beauty, sorry.

A definite feeling of spring in the air, today is practically hot!  Am feeling a bit too wintery in this outfit even…  I’m starting to think about the upcoming Self Stitched September.  Should I try to go all self stitched, or (as is my usual habit) incorporate a few store bought basics?  Maybe I’ll start out going all self-stitched and see how I go.  And as for taking my photo everyday… this will be a time challenge.  But I’m still excited about it.

Details:
Dress; Burda 8511 with some modifications, purple silk hessian
Cardigan; Country Road
Belt; had since a teenager
Tights; Kolotex
Booties; Django and Juliette, from Zomp
Bag; Gucci

pinterestmail

Desiccated art

The art of dried flower arrangements.  Did a few once (a few years ago now).  This is one made for my parents, and they are obviously much gentler in their housekeeping than me since this is the only one left out of several.  It has yellow, apricot and ivory flowers (these have faded a bit) against a soft background of blue/grey and sage green foliage.  I had also made a lovely one out of blue and red flowers and a background of soft grey green leaves on eucalyptus boughs and had it hanging in our lounge room.  One day I took it down for cleaning, accidentally dropped it and it was sadly no more; disintegrated into a million pieces.
There is an art to drying flowers in order that they retain a. their shape, and b. their colour, or their colour in at least some degree of intensity.  Some colour is essential in order for the arrangement to avoid looking like so much kindling…  The pieces done well can have a desiccated melancholy about them that can be charming.  The lifeless tissues of once blossoming things have a sadness clinging about them; the opposite reaction that a living flower arrangement incites, the optimism and freshness and glorious fruitfulness inherent in the beauty of a living thing…
Mum and Dad have managed to preserve it so well and I’m so glad it still suits the rustic charm of their cottage.

pinterestmail
Switch to mobile version
↓