Category Archives: Uncategorized

the year of handmade, 7

yoh7

I’m seven months into my Year of 100% Handmade; just five short months to go!! above is a selection of my favourite outfits in the last month, the whole kit and caboodle can be seen in my Year of Handmade flickr album here

Yeah, so I’m still really enjoying the challenge, and of course I absolutely love wearing all my own clothes and shoes.  Although, I am looking forward to warmer weather so I can start wearing some of my newer, spring-y shoes!  I picked a really bad year to be doing this thing though…  we’re officially having the coldest and wettest winter in like thirty years or something. Obviously I’m excited about wearing my own shoes… but when it’s bucketing down with rain?!  which it’s been doing a LOT?!  eeeeek!  It’s a little heart-wrenching, to be honest!  I’m sometimes tempted to whip off my precious handmade babies shoes and just slosh through the puddles and mud in my stockinged feet, shoes clutched protectively to my chest.  I don’t, though.  I stay normally shod, like a regular person, albeit sobbing on the inside and hoping like mad that my dinkie little handmade shoes-ies are going to come out of it ok.

Fortunately, they do.  Surprisingly, everything is holding together just fine.  My trusty winter boots are not just warm but completely waterproof, so yay for that!  So chuffed about those things.  Some of my casual walking shoes… not quite so waterproof, ahem, but shoes do dry out.  I’m still wearing them all!  My paisley oxfords are my go-to, casual “walking shoes”.  They’ve done miles and miles and miles, they’ve been rain-drenched and subsequently dried… they then started to wear quite thin under the balls of my feet.  I just glued new soles onto the bottom.  If I can say one good thing about being forced to wear my shoes in the worst of worst weather; then it is that it’s proved to me that my shoes can take it, and are tougher and not quite so flimsy-whimsy as I feared.  Confidence-boosting stuff  🙂

New soles.  ‘Nother month of milessoles

pinterestmail

pretty duds, plain duds

img_6740

Sooo….. I’ve been making underwear, and recently have produced two new sets; one is sorta Oo-la-la while the other is more of the Serviceable variety.

Madame Serviceable? you’re up first!

neutral-set

“Pretty” is all very well but we all need some plains in our lives too, right?   I still think this set is kinda classy  🙂  Of course I’ve been wearing it a lot! because it’s absolutely awesome under all my winter white sweaters and Tshirts, which I wear such heckkuva lot it’s not even funny.  Rest assured though, I took these photos when it was all fresh and brand new, hot off the machine and not yet been worn.
bra1

Patterns; MakeBra 2610, which is apparently now renamed DL03; so I’m going to start using that tag instead…  and all four pairs of knickers in this post are the Watson briefs.
Materials; light caramel stretchy stuff from Fabulous Fabrics, all other materials are from my MakeBra basic kits.  The foldover elastic on the waist of the knickers is a different type from that I used for the legs, because in between the two basic kits I’ve bought through them, they seem to have changed their supplier or something.  I didn’t have enough of either elastic to do everything on both pairs of briefs, but I had enough for this arrangement.  They’re close enough to identical that I can live with it  😉  The waist elastic is a teeny little bit “shinier” than the leg elastic.  The little ribbon bows are rescued from off of an old lingerie set, also me-made.  Yep, when I toss out an old lingerie set, I usually salvage the little decorative bows off it, because A) it’s not like they get dirty or worn out or ruined or anything through wear, and B) they’re kinda fiddly to make so it’s worth the few seconds it takes to pick them off to keep for a new set.  Waste not want not!

elastic

Madame Oo-la-la…

I bought this neon yellow bra kit from Measure Twice Cut Once… and was rather thrilled that I managed to get not just the bra but two pair of knickers from it too;yay!!!  Stingey economical cutter; yet another of my middle names…

hehe; I finished the set late at night and then just slung it all over Bessie in a hurry.  The next morning it gave me such a laugh to see her “wearing” these pretty frilly nothings all deshabille and “twas a wild-night, eh?” like this!!  😀

img_6747

The bra design is my own; I just wanted something flimsy and a bit of whimsical frippery.  In summer I don’t always want or need to wear the foam-lined “Tshirt” bras that I favour in winter, and can just happily live in the more lacey, pretty and fun designs.  Just one more reason to love summer!!!  Anyway, I just draped the lace directly on Bessie and ad-libbed it, and I couldn’t be happier with the result!  I think it turned out really pretty and almost more like a sweet little camisole than a bra.  Don’t worry, it’s definitely going to be worn as a bra, though! even though it’s lined with beige power net it’s still quite see-through.

It’s not a super supportive thing, but realistically I have no need for a super supportive bra anyway.  I still think it’s pretty stable though;  I stitched the clear elastic that came with the kit along each side of the cups; so they won’t stretch out, and stitched a little strip of bias-cut white linen in with the side seams.  I trimmed the linen strip right down before encasing it within the side seam, so it doesn’t show…. and this stabilised the side seams and makes them nice and strong, and they won’t stretch out either.

Inner workings: 1) hand flat-felled seams within the cups and clear elastic stabilising; and 2) linen bias-strip to stabilise the side seams(above)  is then sewn to be enclosed inside the layers (below)

img_6642img_6645

img_6734

There was enough of some neon yellow bra elastic to do one pair of knickers around the waist, the other has a strip of the leftover neon yellow lace at the top.  After that, I had to resort to things from my stash; obviously I didn’t have any matching lingerie elastic for the legs and had to resort to white.   I don’t hate the white, but don’t love it either… I kinda wish I had made some attempt to get hold of matching lingerie elastic but I’m an impatient person and really wanted to just get them made and done!

pinterestmail

a tart for tartan

tartan

Och aye! I’ve made this big, swirly tartan dress, and I absolutely LOVE it! I know itv1147‘s kinda crazy and huge-skirted and possibly a bit over the top, but you know what? it’s also extremely comfortable and cosy, and so swirly and swishy.  The instant I finished it and put it on I immediately felt simultaneously relaxed, like I had put on a warm comfy dressing gown or something; but also a bit chic as well.  The big feminine skirt with a nipped-in waist does that, but I really like how the volume below is balanced out by the mannish style shirt top with cargo pockets and flaps, and a notched collar.
tartan-bodice

Hehe, actually while I was making it I did worry a little bit that it was going to look exactly like a dressing gown! but once I put it on I was instead happily reminded of 80’s Ralph Lauren, and even Spandau Ballet.  Remember To Cut a Long Story Short? big big fan here.  HUGE fan.  I still know all the words off by heart; and that film clip transports me right back into breathless, happy teenagehood all over again, and wearing this dress totally reminds me of that clip and that joyful time in my life; the over-the-top, big, blowsy, romantic 80’s era.  So I”m very happy.  And, can I say? there’s something about a big wide dramatic skirt that really brings out the poses in a person.  Not to mention twirling… put a big skirt on a girl and just watch; you just can’t help it but break out into a coupla twirls.

dsc_0087#awkward!!  Yes, well; obviously most of us don’t actually twirl very often.  Twirling is something of a fashion blogger contrivance…  although if I do want to get in a bit of highland flinging I am all set.  😉

More realistically, it still looks pretty awesome when you’re striding briskly along the street too, and this? I do a LOT.

tartan-striding

When making this I had an image in my head of an actual dress like this from an 80’s or maybe 90’s editorial, I swear it was a Ralph Lauren… so of course I wasted many hours searching and searching and searching to link to it, and do  you think I can find a picture anywhere of that maybe-Ralph Lauren dress???  NO.  The closest thing I could find is this maxi-dress, which isn’t it.

tartan-side

Anyway:  Fabric; soft, cotton flannelette, tartan shirting from Spotlight.  The same stuff I used to line my Tosti jacket, in a different colourway.   One side is slightly fluffy, the other side is smooth and flat.  I put the fluffy side inside.  This is the opposite of how I used it for my Tosti jacket, which has the fluffy side out!  Or… since it’s the lining, is the fluffy side therefore in? hmmm, that’s a puzzle!  Navy blue buttons from Fabulous Fabrics.

Pattern: Mum had given me some of her old patterns, including this great Vogue 1147 shirtdress with multiple variations, from 1993.  I thought it perfect for that vision of the big skirted, maybe-Ralph Lauren, maybe-not dress in my head.  It’s not in my size, but the three nested sizes made it fairly easy to downsize a bit.  I made view B, at far left.

The skirt pieces, bodice pockets and flaps are all cut on the bias; bodice and sleeves on the grain.  As much as possible, I matched the tartan.   #madpatternmatcher  This was easy in the bodice and sleeves,  and the pockets which please note, are exact mirror images… however! That skirt.…!  I love how the centre seams in the skirt have a nice, fairly even row of white diamonds and am fairly happy with how the lines join up at the side seams… this took some careful pinning and only a wee bit of fudging…  😉  Those side edges did not have the same profiles and combine that with an asymmetric tartan…! *hair-pulling stuff*   Anyway, the matching turned out pretty good, spot on where it counts, and so is reasonably satisfying  🙂

dsc_0072

I cut the sleeves long, then stitched an ultra-wide wide hem.  This is then turned up once in a wide cuff, and secured with invisible hand stitching 1cm inside the fold.  I did it this way because the underside of the fabric is different from the right side, quite fluffy! and I wanted the smooth side to be on the outside of the turned-up cuffs.

Because the skirt is on the bias, I let it hang up for a week to let the bias drop a bit, and it did! by quite a lot in some places.  The hem is hand stitched.

tartan-belt

I also made a sort of belt… this helps to pull the waist in.   I only made this actually because of my year of totally handmade, meaning I can’t grab one of my nice leather ready-to-wear belts, and I really think the design NEEDS a belt.  But now I’ve made it I LOVE how it blends invisibly into the dress so perfectly!  It’s basically just an interfaced waistband, with an inside button and two buttonholes.  One buttonhole is for the start of the evening, before dinner.  The outer one is for when you decide you do want to have dessert after all.  Comfort dressing, at its finest!

Details:

Dress; Vogue 1147 from 1993, tartan flannelette shirting
Tights; my own pattern black stretch, details here and my tutorial for making your own custom fit tights pattern is here
Shoes; made by me, details here

pinterestmail

blue roses *

v1247
* … Tennessee Williams…

Hello! I’ve made a new skirt. Hehe, hot on the heels of writing that I was a wee smidgeon tired of making Vogue 1247 skirts; what should I do? but immediately vogue1247make another one!!  Doh!!  Clearly there’s something terribly wrong with me… #madvogue1247addict

But wait, there is a perfectly good reason…. I’m doing One Week One Pattern again, and of course chose to use this pattern, well I’ve got so many of them!! lotsa skirts and I was kinda hoping that we would get at least ONE day warmish enough for me to wear the one top I have from it… but it’s been so freaking cold; officially the coldest and wettest winter and early spring we’ve have in like thirty years or something like that!  I’m getting to the end of the week, no motivation whatsoever to wear that thin little summery top, and only have 6 pocketed V1247 skirts.  Which are what I consider to be the only true V1247’s, all my ones without the pockets are kinda pretenders to that crown, and even though I love them all too I ruthlessly omitted them all from the line-up.  So what can a girl do? but get cracking and make for herself another true V1247, obviously, so I have a nice 7 to round the week off.  Yeah, I know; a normal person would have worn one of her existing ones, twice; but see I already had the fabric earmarked for the pattern anyway; and just decided go for it; whip it up, make it happen.

side

Fabric; pale teal denim, just very slightly stretchy, with a reverse print of smudgy roses.  This was a remnant given to me by my friend LW, who was cleaning out her stash.  Something funny/miraculous; the remnant was kinda oddly and awkwardly shaped, yet it was absolutely perfect for the pattern pieces! like it was cut just perfectly to fit them all on with the smallest of scraps leftover.  I freakingLOVE when this happens! it’s like the planets aligned for a pattern/fabric match made in heaven  🙂  Even if I was feeling a bit meh about V1247 to start with, when I laid out the pattern pieces and saw how perfect it was it totally galvanised me into excited pattern-love all over again.  I managed to cut my skirt about 10cm longer than the pattern, and I cut the pocket linings and waistband facing from a small piece of nani Iro quilting cotton, from the little bundle of pieces that Mum gave to me for my birthday, for my rag-doll Sally.  I used it for her tote bag.

waistband-facing

obligatory “waitress” pocket pic

pocketsaaaaaand, my week of exclusively wearing Vogue 1247 skirts, in a nutshell…!

owop16v1247

Back very soon, with something that is NOT Vogue 1247… I promise!!

Details:

Skirt; Vogue 1247, lengthened by about 10cm, teal denim
Top; Nettie, by closet case patterns with my own collar variation, ivory knit; details here
Cardigan; knitted by me, Audrey in Unst, wool bought in Paris as a souvenir, details here
Tights, my own pattern, black stretch, details here and my tutorial for making your own custom fit tights pattern is here
Socks (not seen); hand knit by me, details here
Boots; made by me, details here

back

pinterestmail

bananananananana BATMAN!!

batman

Oh hey-a!  I’ve been making some more stuff for Le Daughter…  recently I went around to her place on an important mission: Wardrobe Assessment and Consultation following the Winter Blahs.  She was feeling meh about all her clothes, so we went through EVERYTHING and worked out new combinations, identified tired stuff, rediscovered forgotten stuff, and dreamed up new stuff to fill some holes.  It was actually great fun! we did the same thing with my wardrobe too; so useful.  I reckon we could stand to do this every six months or so.  Keeps things fresh, and you know how you tend to wear the same things over and over and over again and sometimes don’t seen yourself how tired and ratty things are getting?  Just grab yourself a trusted friend/daughter/mum that doesn’t mind giving you the hard truth and have at it.  It’s SO worth it!


mannish style   vogue1247

Anyway, so we made a little list. Cassie wanted some more options to wear to work; she works in an office but in a very creative field, so along with the more professional stuff she sometimes likes to wear pieces that are fun, humorous and “arty” yet still city and office appropriate.  She had a small piece of Batman print fabric leftover from when she made some pj shorts for her brothers, and I still had some yellow corduroy leftover from my own yellow corduroy skirt… the yellow is a perfect match for the small blotches of yellow in the Batman print, and I just managed to squeeze the pieces out with only one bit of piecing inside the pockets (see composite picture below).  The Batman fabric… now it IS fun, but let’s face it; professionally iffy…  To twee, to not to twee, that is the question.  Then I thought of the black leather sleeves and we both went Oh yeah!!  I think they “adult” the print up a bit, make it kinda cool and ok.  Also; I like how from a distance the Batman print could just pass as a nice, blue/black/white nondescript print, and it’s only when you get up close you notice that it’s actually a cartoon.  The black pleather is leftover from my shoemaking adventures.  All fabrics are originally from Spotlight.

black pleather sleevesunderlining
Patterns: the skirt is Vogue 1247.  I do really love this pattern but to be honest, I’m getting a wee bit tired of making it?!  I’ve just made SO MANY, and even though I love all of them to bits I think I just need a little break…!!  Anyway, this was requested, and those pockets were the drawcard. I used some deeper gold cotton to bind all the seams; this is a leftover from Cassie’s Lucy Hartfilia costume… so in actual fact, her entire ensemble is a glorious mishmash of completely unrelated leftovers.  Amazing how things can come together, no?!

yellow skirt

Top is the epaulette cut & sewn top from “she has a mannish style”, by Yuko Takada.  I’ve only just made this pattern up for myself, here; and coincidentally also with black pleather sleeves!

I took this picture to send to her when I’d finished the outfit.  She was so pleased!
batman3

pinterestmail

Marimekko dress

marimekkowhat’s with the ballet pose? I have no idea.  Anyway… I have a Marimekko dress.  *pinches self*  *sits in reverent silence for a minute*

marimekko fabric

See, to have a Marimekko dress is something I’ve kinda lusted after for a long long time…  I grew up in a Scandinavian style house decorated in modern Scandinavian decor by my everything-Scandinavian-loving parents.  White walls, those white Danish “UFO” light fittings; lots of pared-back wood and leather, with simple lines, naif flowers sprouting upon our white bathroom tiles and so I’ve been trained to have an affinity for it from a very early age …  When we went to Scandinavia I was quite disappointed to not find any Marimekko fabric during our time there, although to be honest it was a gamble since we didn’t actually manage to get to Finland, the home of Marimekko.   All through Sweden, Denmark, Norway and Iceland I harboured vain hopes and searched and searched, obviously coming up empty handed, sob.  And I’ve never ever seen any for sale here in Perth; so it’s proven to be pretty elusive stuff!   But no more!  you CAN get Marimekko fabric in Australia!  🙂

marimekkoside

Fabric; Marimekko Pieni Unikko 2 in blue/yellow,  and is actually from an Australian fabric store, Yulki’s Home Decor in Hobart, Tasmania, believe it or not!  I’m a wee bit sad the brick-and-mortar store is not next door to me! but only a wee bit because the store does (obviously) have online sales.  Thank goodness for that!    It’s a little price-y but well worth it because it really is absolutely beautiful quality, thick and strong, happily not too thick for clothing, and the colours and prints are of course instantly recognisable, modern day classics, so vibrant and optimistic and happy.  There’s a pretty good reason why they are perennially popular and still in production after fifty years… everyone loves a happy vibrant print, and I’m pretty sure I will not be able to resist buying more either *blush*.   The currently available range can be viewed here.  I’m rather excited to see it comes in oilcloth too… mmmmm, raincoat? *plotting plotting*

marimekko selvedgeI’ve kept the selvedge from off the fabric, and have sewn these inside one of the pockets! just because I love information like this… namely: this design is by prominent Finnish designer Maija Isola, and was created in 1964!  out by a year but definitely still of my era, haha.  “Pieni unikko” translates literally to “little poppy”  I’m not sure what KI 2009 means yet, but I’m investigating….  Also, how cool is it that the laundering info is printed on the selvedge?! so classy and very considerate really, it’s been along long time since I’ve seen such consideration in a fabric.  That information’s the kind of thing I usually forget the very minute I swan out of the shop with my new fabric tucked under my wing.

marimekko label

I also sewed this: “The Label”  inside my dress… half of me wanted to sew it on the outside, haha! but of course Marimekko is instantly recognisable so there’s probably no need.

hehe, I’ve just asked my husband, and he had no idea! so maybe I should amend that, ahem… instantly recognisable to design and fabric afficianadoes, then!

burda 04:2014dress 108,04:2014

Pattern; I used dress 108, the cover dress from the Burda 04/2014 issue, also known as the Wings Dress.  It’s an interesting design; looks simple but has quite a lot of seaming which I chose to highlight with inset strips of acid-yellow cotton voile, bought from Calico House.  My method for framing pieces with contrasting inset strips like this is here…  and my method for edging those pocket openings as part of the side seam inset strip is here…  I also edged the neckline, armholes and the lower hem and edges of the overskirt in yellow cotton as well.  The dress closes with a long navy blue invisible zip in the centre back.  I agonised a bit over the colour to use here, the contrasts in the colours of the print are all pretty extreme! yellow? blue? black? white?  aaagh, so hard.  The navy blue turned out not too bad, I reckon.


pocket

The bodice has princess seams and tiny additional bust darts in the centre front piece that I believe are called a Dior dart.  This is the very first time I’ve come across one of these! it just adds a little more nuance to the “shape” in the bodice.    Although there is all that shaping by seaming, the design is actually little boxy, believe it or not.  I shaped mine a bit more throughout those seaming lines, bringing it in at the waist more and giving a bit more width at my hips.  The princess seams in the bodice visually connect to the gore lines in the skirt, which itself has an interesting overskirt feature with the pockets in it.  I think it looks quite interesting and pretty and lends the whole dress a slightly sporty “wraparound” feel to it, a bit like a sports or tennis dress.

marimekko bodice

I finished the raw pocket edges inside the front overlays all with HongKong seaming, because they have a tendency to flap open and show!  So, I had to make sure the insides here look as lovely as possible.  Binding the seams visually ties the inside with the inset strips on the outside;  all those yellow edges everywhere just keeps it all nicely harmonious.  Well, I reckon it does…

marimekko skirtThe loose front pieces also allows you to have these big loose comfortable pockets that you can shove your hands in, while still maintaing quite a slimline dress overall.  As a result, the pattern uses very little fabric.  I managed to squeeze my pattern pieces out of 1.5m, which is not too bad, not too bad at all, I think *preens oneself on an exceptionally economic layout*  I had the merest of scraps left after cutting out my pieces, scraps, I tell you!  The pattern has you line the dress, and after a bit of um-ing and aah-ing, I decided to not.  Reason? summers here are very hot and I think the breeziness of this lovely cotton fabric is going to be perfect just as it is.

So that’s it! I love it paired up like here with my new white shoes.  A little bit sporty, a little bit flower child, a LOT summer;  my little bit of Marimekko loveliness is just awaiting to dazzle with ultra mod 60’s chic.  Right on.  🙂

Details:

Dress; Burdastyle 108;04/2014 in Marimekko cotton with cotton voile contrast
Shoes; my own design and made by me, details here

Pictured below on Cable Beach, Broome…   along with my hat and my new sandals

pinterestmail

laced up at the heel (shoes)

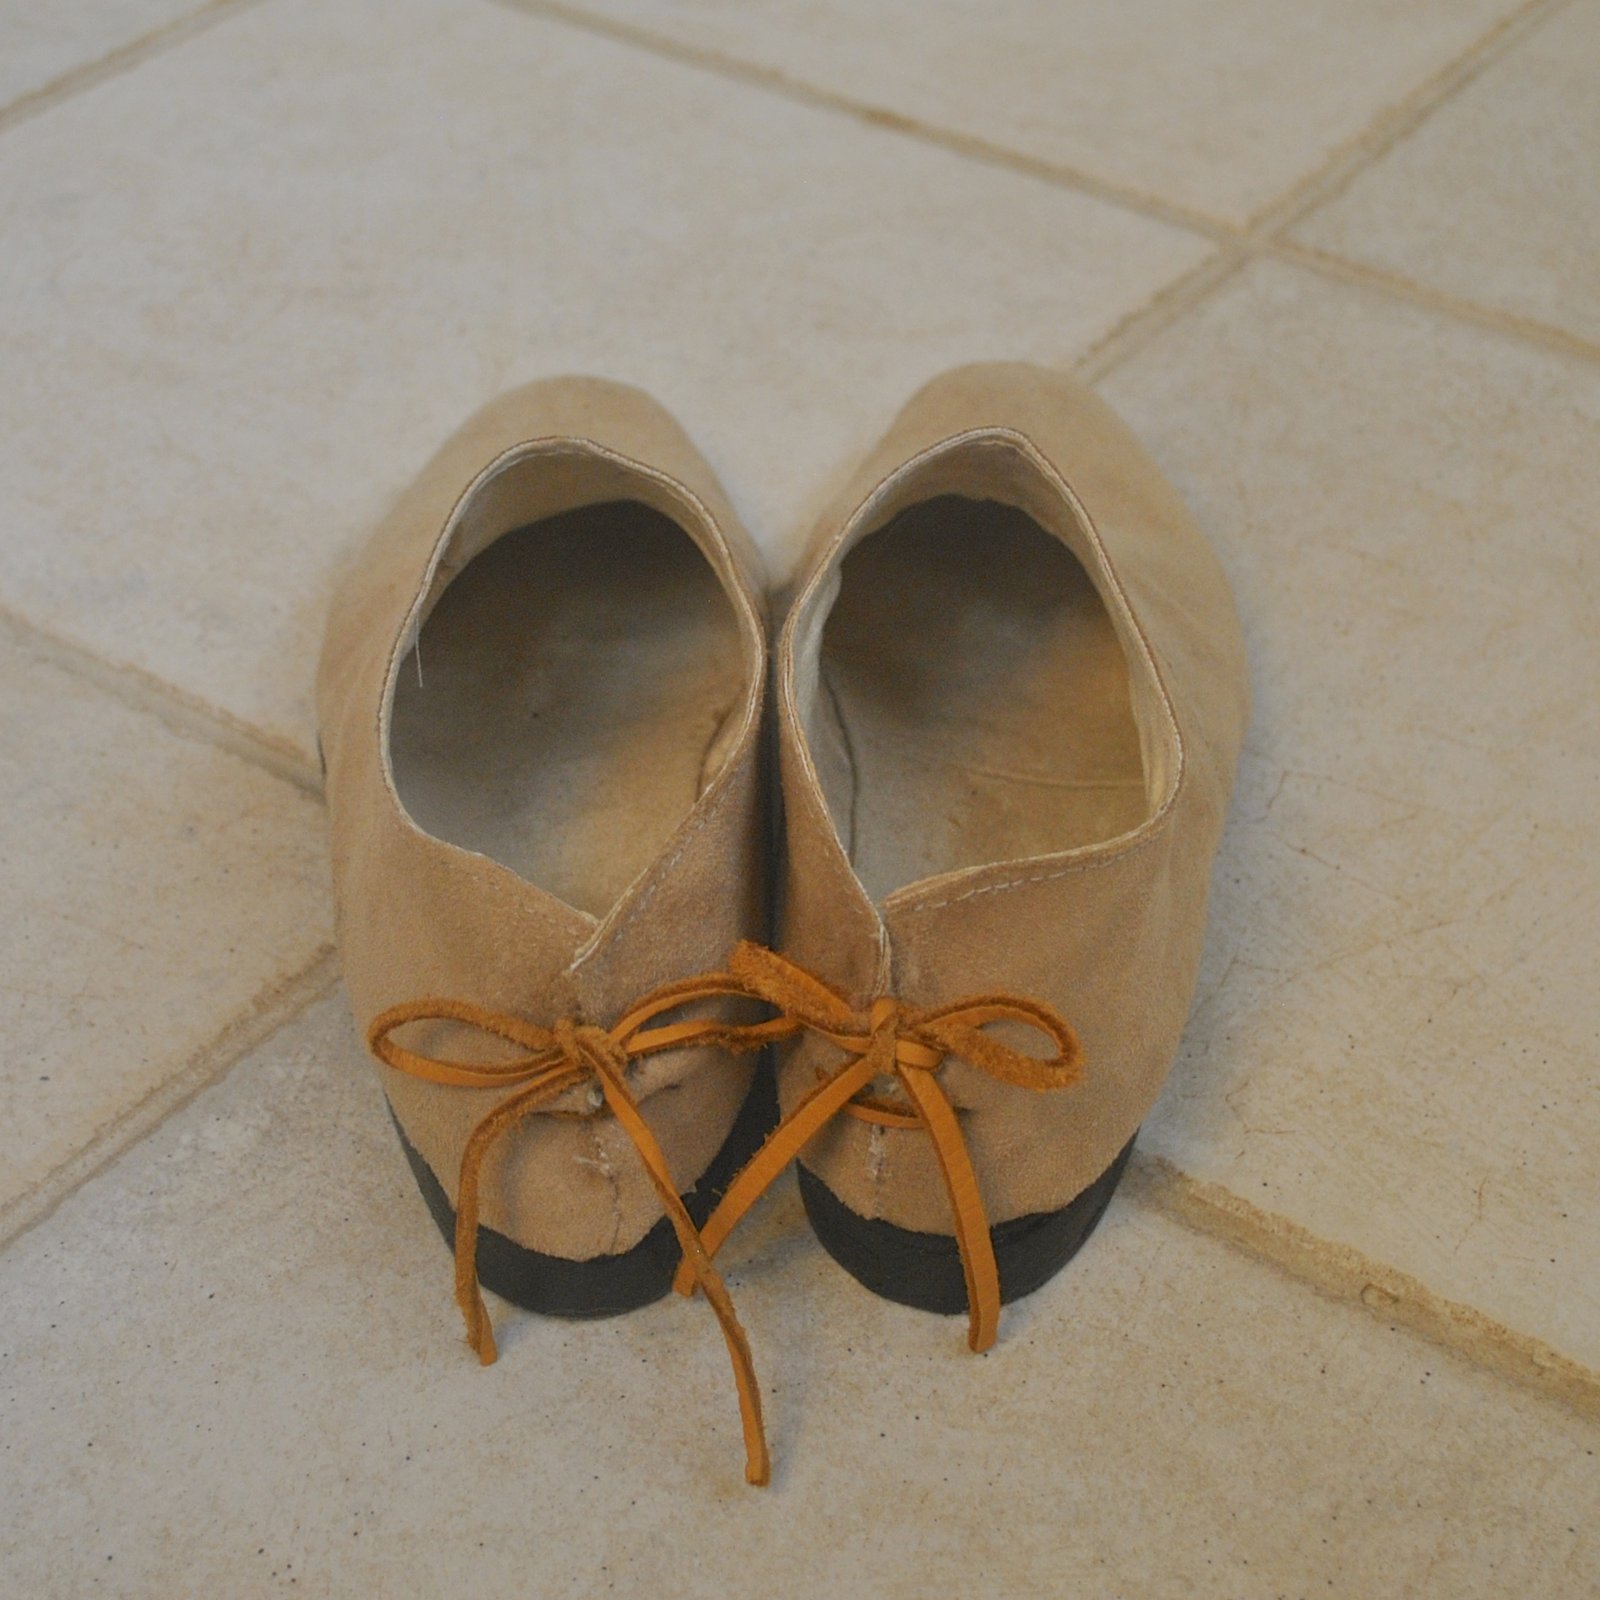
lace up heel 2I made some new shoes! and they lace up at the back of the heel.

laceup heels4

Yah, sorta weird…  It’s not often you see shoes laced up at the back of the foot, well never, actually!  Seems a fiddly awkward place for the laces, however I can slip them on and off without untying the little bow, which is pretty useful.

I’m so happy with my shoe-making lately, I feel like I’ve actually “got it” down pat at last.   The making is easier for me, they’re staying together well, and feel sturdy and comfy on my feet and like they can withstand the knocks.   My winter boots were the ones that kinda sealed the deal for me.  LOVE THOSE THINGS SO MUCH!!!

And I’m very happy with these ones too.  I reckon they’re going to be great come spring.  The colour, the shape, the style; all very classic and basic but I think they’re kinda fun too.  I like how they’re all plain and modern from the front view, and at the back view has that funny little mediaeval leather lace-up.

lace up heel 4

The pattern and design is my own.  The fabric is some beige suedette-faced upholstery fabric, given to me by my good friend A who was having some bench seating recovered.  She kindly gave me some of the offcuts, and it’s actually brilliant stuff for shoes!  Tough, yet pliable and with that nice fuzzy suede surface but without the high maintenance of real suede.  I’ve cut off a bit of a length, because I reckon that it might come up good if spray painted too… which opens a whole new and colourful world to me, shoe-wise. Excited!  and no, I still haven’t got up the courage to cut into my Icelandic fish leather yet.  I don’t know why I’m still scared of doing that, but I am!  Maybe I’ll manage it before my Year of Handmade is up!

The shoe laces were cut off from some of these caramel leather laces, the leather strips I bought in Japan.  As shoe laces those strips were quite long… far too long really, which is terrific.  Means I can get another pair of short laces out of each set!

lace up heelI lined the shoes with some very thin, pale gold suedette from Spotlight, the same type of stuff I’ve lined all my other shoes with, and the exact same stuff as my paisley oxfords.  I glued the layers together with PVA, and have also hand-stitched the layers together around the opening edges in beige upholstery thread, for a more finished look.
Inside is a foam inner sole, covered with the lining fabric for a neat, co ordinating look.  I made the toe puffs and heels counters with stretch cotton denim as for all my previous shoes, as described in this post here.

btw, I’ve received several emails asking me for tips on how to make shoes… thank you to all those who are showing an interest in my adventure!   I still consider myself a beginner, or maybe an advanced beginner, but I am always happy to help others by sharing what I’ve learnt along the way. Please, if you do want my tips and advice then read through my posts on shoe-making, it’s already all laid out there!  I don’t see a lot of point in writing it all out twice; although I am considering a step-by-step on making a pair of shoes.  Possibly in video format.  I’ll see how I go  🙂

lace up heel 1

The back seam, where the laces are, is not super neat… it was actually quite hard to sew this part and to gauge how this was going to lie on the finished shoe… not to mention forming the shoe and installing the heel counters.  I ended up having to take it off and sew the back heel seam temporarily to make the shoe, and then carefully unpicked it and re-finished the top edge of the seam and re-sewing the edges again by hand.  The hand stitching and that general sort of lumpy-bumpiness going on at the back of the shoes definitely adds that “handmade” look to them. LOL! but I can live with that.  After all they ARE handmade!  🙂

lace up heel 3

pinterestmail

paisley oxfords (shoes)

paisley shoeshello!  I’ve made some new shoes!

I have to admit, I actually had no drama with these ones I was just kinda, yeah, you know, need some new shoes for walking the dog, whatever.  I’ll just use this paisley stuff, it’s a bit thick and beefy, quite stiff so should work quite well, plus it’s kinda cool-looking too.  Making them all went so smoothly and I didn’t even once feel depressed that they weren’t going to work out at any point at all.  A first!  So I’m now rather thrilled with them 😉

paisley shoes 2This is actually a shoe version of a muslin, whatever you would call that… I’m working up to making some shoes using some of the Icelandic fish leather that I bought when we visited there a few years ago and I’m trialling a new pattern.  The pattern looks almost identical to the pattern I’ve been using previously, to make my previous pairs of oxford shoes, but since I made that pattern prior to getting my lasts I decided it would be prudent to make a new pattern tailored specifically to the lasts.

IMG_3522

So I did it all properly; got out the masking tape, and re-did the whole pattern making process as described here.    Got my new pattern and this is the trial run before slicing into my precious leather.

quickie pictorial of the process…

paisley shoes progress


paisley shoes lining paisley shoes details Details above: the top pieces are edged with close-spaced zig-zag stitch in black, and the shoes are fully lined with pale yellow faux suedette from Spotlight.  The paisley fabric is from Spotlight too.  Foam shoe liners from Coles for added comfort are covered with the pale yellow suedette which gives a co-ordinating, neat and tidy look inside.  Heel counters and toe puffs from stretch cotton denim exactly as described in this how-to post here.  Stacked heels and soles are made from sheet rubber from Bunnings; glued together using contact gel adhesive, then thoroughly sanded smooth and finished with satin finish varnish. Heels nailed to the soles from the inside exactly the same as pictured for theses shoes here.  I hand stitched a small square of black vinyl on the back edge to strengthen that area and hide the seam top.

paisley shoes solesCraig and Cassie both separately and spontaneously, and without my asking, mentioned that they thought this is my best finish yet.   The shoes are quite sturdy and I don’t think I’d even be embarrassed should they be subject to a close inspection.  Hehe, I cannot say the same thing for some of my previous efforts!

Plus I think they’re actually rather cute too  🙂

paisley shoes 1

pinterestmail
Switch to mobile version
↓



























