Category Archives: Uncategorized

Big baggy pockets…

… with bonus skirt.
It is an unusual skirt, admittedly.  That’s OK.  One description could focus on the fact that it is softly creamy in shade, ever-so-slightly crinkly in texture, interestingly layered in construction, and easily breezily comfortably summery as a whole.  Another could point out that it is made of flippin’ curtaining off-cuts for crying out loud, and features ginormous flappy saddlebag things.  Well let’s not over-romanticise, hmmm?  But I like it, nonetheless.  And I don’t mind curtaining fabric; in fact, one of my most useful and reliable favourites is another curtaining skirt..
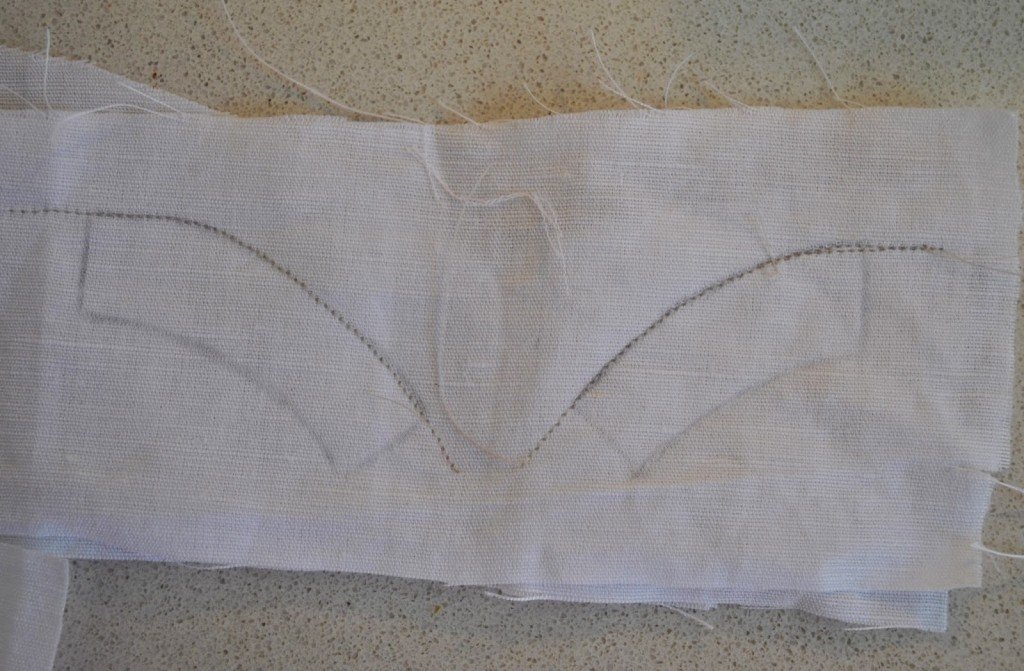
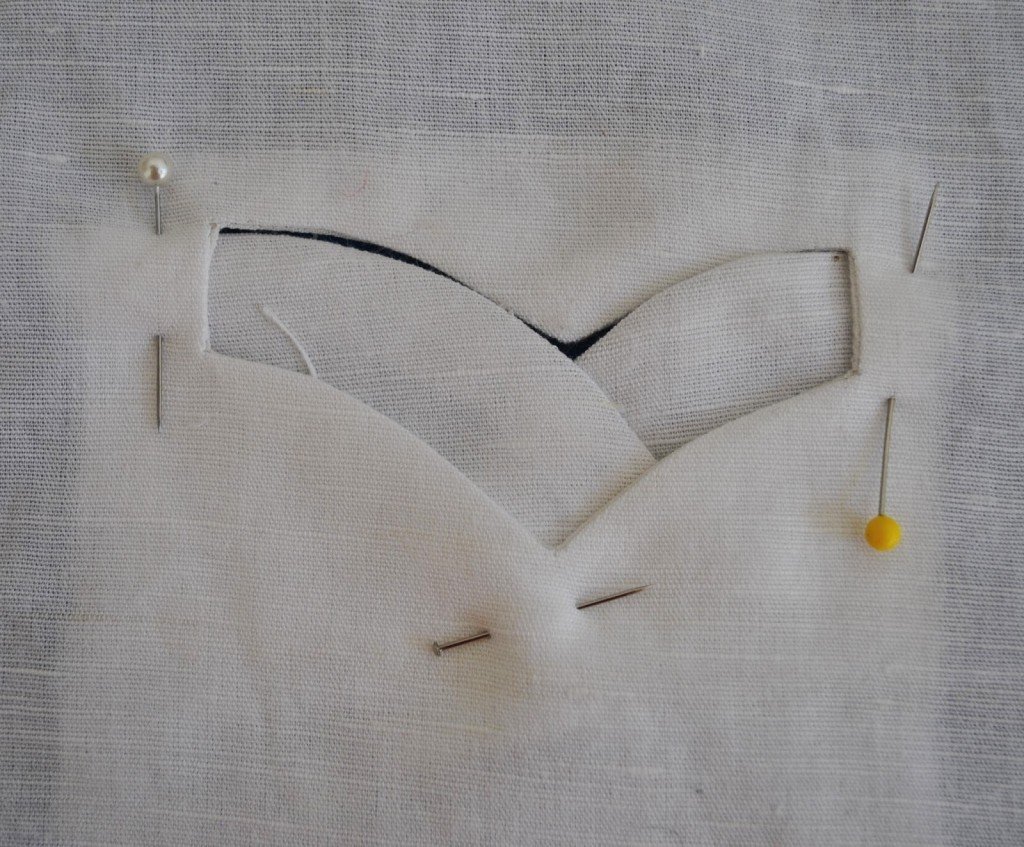
I started out with Vogue 8363, a plain, waist-banded pencil skirt with simple variations; and altered it to make it a bit more A-line, cutting the side edges like so; both front and back.  And then added my little added designer-y flight of fancy in the form of those big wrap-around bags.

They are basically sacks; like envelopes or pillowslips, that are sewn within long long extensions of the narrow waistband.  These cross over at the centre back, wrap around my hips and tie loosely at the front.  The skirt closure is the regular kind, by invisible zip in the centre back seam.  
I was inspired by this skirt.  Does anyone else have a go at actually doing something with their pins?  I have pinned LOTS of things, but have only followed through on nutting out making a few.  I have big BIG plans for making tonnes of things from my random unbridled pinnings; but the same ol’ story; so much inspiration, so little time.  And there’s only so many clothes that one can in all good conscience add to one’s wardrobe.  Striking a balance is key, my friends, striking a balance.  However I do feel pretty good about this particular skirt since it’s pretty much a freebie; made from the off-cuts of Cassie’s curtains.  I’d found the absolutely perfect thick calico curtains on super special in Spotlight.  Correction; the fabric was perfect but the top had been made as pencil pleat curtains, which I loathe and detest with a fiery passion.  So I bought them too long and cut off the tops, keeping the hemline intact, and re-sewed the top edge with my preferred triple pleat curtain tape, so they match nearly all the other curtains I’ve made for our house.  And was rewarded with a few pieces of leftover fabric… which I have now put to good use  ðŸ˜‰  Double, no… triple win!

Details:
Skirt; a modification of Vogue 8363, thick calico curtaining fabric, my review of this pattern here
Top; the loose drape top slightly modified, from drape drape by Hisako Sato, white crinkly cotton jersey, all details here
Sandals; Franco Burrone, from Marie Claire boutique

pinterestmail

Issey Miyake tucked dress

I’ve made a new dress.  Part of that swap-eroonie…. which does seem like a vague dream from the distant past now; but actually upon which progress has happily been made.    *gasp*  *self back-pat*.
My new dress is from an old Vogue Issey Miyake pattern, Vogue 2438, hailing from maybe the late 90’s? I think? I don’t know for sure.  If someone does then please feel free to enlighten me!  (Later edit; 2001)  I bought it through ebay.  The dress is basically a giant, almost shapeless sack of a dress that achieves shaping with a few darts and two big strategically placed folds held in place with snap tape.  You are supposed to arrange the snaps to make the folds more or less pronounced, as desired.  Pretty cool concept, huh?   This is in the same vein to another Issey Miyake dress I have, of black jersey, and is perfectly representational of my desire to make things that look kinda ordinary on first sight but on closer inspection turn out to be just a touch weird and slightly “off”.  Those of us into clothes often see the link between our fashion choices to our personalities; and I think that description pretty much sums up me in a nutshell too  😉

 it’s asymmetrical so the side views are a bit different
there are also darts down each side from the underarm to the hip

This dress is supposed to be made in stretchy fabric too, but scandalously, it is not.  It is a thickish woven cotton, deep chocolate brown with a cream pin-stripe, bought from the Fabric Store in Melbourne about three years ago.  I was so in love with my vision of this particular dress, in this particular fabric that I was just like; oh, recommended fabrics, pfft.   I know I know, such a rebel, tut tut.  The recommended fabric is generally like a primary tenet of dress-making; that thou shalt ignore at thy peril and risk of permanent exclusion from the hallowed halls of sewing Utopia.
O woopsie.  *blush*
Well ok, I didn’t just gratuitously leap in and go for it helter skelter; I did measure to check feasibility.  I sized up, and also altered the snap tape placement to accommodate my shape; in a little bit in at the waist and out a little bit at the hips.  And it all worked out.  In fact it is pretty much exackertackerly just how I wanted it to be, so I’m happy!
the back tuck is on quite a slanted curve

Details:
Dress; Vogue 2438, chocolate/cream stripe cotton
Shoes; Perrini, had for so long I’ve forgotten where I bought them now.

pinterestmail

Alabama Chanin; a tank top

Fortunately I have managed to finish the matching embroidered tank top to go with my skirt.  Hurrah! for plane trips and the resulting enforced hand-sewing time!  I’m so happy with the full ensemble; I like how it looks like a full dress, and that if I choose I can break it up into the separate components.  The pattern is the fitted top from the  Alabama Studio Sewing + Style book (Natalie Chanin), and is made from the same fabrics as the skirt; a thickish, cafe au lait cotton jersey substratum (KnitWit) with a dark olive, lightweight jersey overlay (Potters Textiles), the latter stencilled with the Anna’s Garden stencil from the same book as outlined here, and top-stitched with Gutermanns topstitching thread.  

I took a slight swayback wedge out of the tank pattern…. looking at the picture below I could possibly have gone further with that, oh well, next time.  Otherwise it has the same width shoulder straps and the same low rise of the back neckline as the original pattern.  The stitching throughout is in exactly the same style as the skirt; with all seams stitched and flat-felled by hand, and the neckline and armhole binding sewn on using herringbone stitch.

My Mum wanted to know if the jersey fabric loses its stretch though being embroidered; it does lose a little, but not all of its stretch.  The fabric also shrinks ever so slightly through the process of quilting the two layers together. Not drastically, but if your muslin is skintight then I reckon this is definitely something to bear in mind.

OH BTW! a little tip I forgot to mention before… when the pattern pieces have been cut out and stencilled, stay-stitched and are awaiting embellishment; the very first thing I did was to tack a scrap of paper to each piece as above, marking the centre front or centre back of each piece, as applicable.  The pattern pieces for both tank and skirt, are actually all so similar to each other that I think this is an essential precaution!
Well, was it was worth all the hours of hand-work?  But of course.  I’m not going say otherwise now, am I?  ðŸ˜‰

Actually, seriously, I totally love my AC pieces and it was no biggie to make the tank top; each pattern piece is quite small and manageable and the embroidery can be knocked off in a couple movies or a short plane trip quite easily.  A little tank top is not really the sewing marathon that the midi skirt is.  I’m even feeling optimistic about taking on another Alabama Chanin project…! (gasp!) um, well… in a while.  Maybe, hehe.  Well, I should really, I bought a whole lot of beads while Mum, Cassie and I were in Melbourne, in a zealous fit of enthusiasm, so hmmm.  (blush)

Details:
Top; the fitted top from the Alabama Studio Sewing + Style book,  hand-embroidered and -stitched cotton jersey knit in two solid colours
Skirt; the midi skirt, same as above, all sewing details here
Sandals; Zomp, from Zomp shoes

pinterestmail

Japan, skiing; a travel wardrobe

Hello! we have just returned from our totally marvellous family holiday to
Japan!  and I’ve had the last few days to thaw out and wash
everything: the washing machine has been going strong 3-4 times a day and now the small mountain on the laundry floor has just about disappeared.
 Yay!  Now… something I like to do is to look back at my
travelling wardrobe and do a little retrospective  “did it or didn’t
it all work out OK?” analysis, so here goes…
Time away:

15
days

Where to:

Japan

Season:

the middle of winter.  The expected
temperature range was from rather cold to Really Cold.
 Snow.  Blizzards, for real!
Expected activities:
Our holiday was divided neatly into two distinct parts requiring two very
different sets of clothing, a City part and a Skiing part.  First, a week
of city-based walkabout and shopping, some rural sightseeing and including one
day of bicycling; for all of which I wanted to look reasonably smart and put
together amongst the fashion savvy people of Japan.  Followed by a week
of skiing and generally hanging out in a snow-laden village;
requiring heavy-duty ski/snow gear.
Colour scheme: a safe and
easily mix n’ matchable collection  of wintery neutrals; greys,
black, chocolate and creamy ivories, with just a few warm and cheerful
colours thrown in there just to lift it all a bit
What I packed: (each
highlighted garment is made by me and linked to its original construction post,
unhighlighted clothes are RTW)

(left to right; top to bottom)
The “smart” city stuff:
lightweight charcoal cardigan, khaki cashmere cardigan
(middle) Noro striped knitted jumper and (below that)
2 “thin” ivory thermal tops
(at left, below coat)  4 LS woollen Tshirts; ivory, burnt orange, dk
red, ivory turtleneck
3
prs hand knit socks; red, dk blue, blue
chocolate leather gloves
(below)
black leather boots (for the city), red thongs
(to wear to and from the hot tub), sandshoes (for the country and cycling)
chocolate leather handbag
blue
bathers
(for the hot tub)
The ski stuff:
red fleece neck-warmer, hot pink head-band, ski goggles, charcoal ski
jacket
4 “thicker” thermal tops, 2 thermal leggings
skiing mittens, 2 prs liner gloves, 3 prs ski socks
snow boots
not pictured; winter jammies, selection of underthings, toiletries bag
Thoughts:
Above is how it looked all packed away; the trip involved several very tight connections ‘twixt trains, buses and planes so I was pleased that it all was quite easily and quickly transportable up and down escalators and staircases and in and around multiple train stations.  On the right is my check-in bag, and I always carried with me my handbag which tucks up under my arm quite securely and unobtrusively, and the other small black bag contained my little travel camera and a sewing/knitting project so I always had something to occupy my hands in any long travelling or waiting situation… and there were plenty of those!
Speaking of my sewing project, it’s very nearly finished…!
Thankfully
the clothing selection worked out extremely well!  I think I packed quite
light but I still felt like I had a little
variety, I liked my outfits  and was warm and comfortable always.   All my daily outfits can be seen on my ootd
blog
(15/1/14-30/1/14).
I
hired ski pants on site so was spared the bulk of those in my bag.  So that was a
bit of a “cheat” since I wore those ski pants continuously during the
second week!  I also never had to pack my grey coat, since I wore it
travelling.  Two pairs of jeans was an indulgence, but it was nice to have
a choice.
Having lots of thin Tshirts and tops was absolutely
brilliant!!
for layering; I always wore two or three layers so I could peel
one off if I got too warm, which happened, um… maybe only once or twice?!  Also an
outer or middle layer could be worn as an inner layer on another day,
minimising the dirty laundry pile.  5 people and laundry facilities only
available in the second week; makes keeping washing to a minimum a Very Good
Thing.
Shoes
are always the bulkiest things; those snow boots!  I stored my 2mm
bamboo knitting needles in them while travelling, to keep them safe from
snapping.  That is, to keep the bamboo needles safe, of course…  I didn’t even wear those thongs once, oh well, they didn’t take up
very much room.
So
there was a little space for souvenirs, including some fabric!
 I bought four pieces of fabric, and a Christian Dior plaid cashmere scarf
from a little secondhand shop in Kyoto.  That’s the first RTW I’ve bought
in years and years! AAAAUGH! but it is secondhand so I’m still within my
wardrobe refashion pledge.
pinterestmail

“swoosh” welt pocket

To those who showed an interest in the swoosh welt pocket on my Tao blouse; thank you 🙂 and it was my take on this welt pocket for which Patty wrote a very in-depth tutorial.  The fabric I used for my blouse is quite light-weight; allowing me to devise a simplified method  as follows  …
Sketch the shape of the welt.  Then accurately trace the two halves onto a small piece of the fashion fabric with plenty of room around each,  and including the overlap on both sub-sections.  You could also just trace the shape in entirety, making it as a one-piece welt.  With hindsight that would be a bit easier; but anyway it does look kinda cool as a two-piece welt…
Lay another scrap of fabric under the traced sections and stitch along the top curve, extending the stitching well past the pencilled lines to allow for seam allowances.

Trim, grade and clip seam allowances outside the stitching, turn out, finger press the curves out, and press flat.

Using the original sketch to check for placement, pin the left-hand welt into position over the right-hand welt.  Open out the left-hand half and stitch it into place onto the other half; exactly over the previous stitching.

Determine where the welt pocket is to be sewn on the garment; mark its position.  Cut a strip of iron-on interfacing big enough to cover the area of the welt, and apply this to the wrong side of the garment to stabilise.

Cut a rectangular piece of fabric for the pocket lining and trace onto it the welt shape, using the sketch from the first step.  Position over the stabilised section of fabric where previously marked, and stitch garment and pocket lining together, following the perimeter of the traced welt.

Snip along inside the centre of the stitching, and out into the corners and turning points, grade and clip curves.  Turn the pocket lining through to the inside of the garment, finger press out along the stitched curves, and press flat.

Pin the welt in position behind the pocket opening, and top-stitch along the short sides and along the lower curved edge.

Inside, trim the lower edge of the welt.  Being careful to keep the garment free, pin the pocket backing piece to the pocket lining.  Stitch around the edge, finish the edge either with overlocking, zig-zag stitching or pinking.

Last step, from the right side of the garment, top-stitch through all layers along the upper curved edge of the welt.

C’est fini  ðŸ™‚
pinterestmail

Hayward, in Noro Ayatori

Hello!  In further knitting news I have also just finished a comfy new jumper recently.   The pattern is the Hayward, by Julie Hoover, and the yarn is Noro Ayatori; a wool/silk mix, in colour 19; a beautiful variegated collection of raspberry pink, grass green, warm pinky/ivory, mint green and hot chilli pink.  The yarn was a birthday gift to me from the lovely Yoshimi; thank you so much Yoshimi!  

When I was trying to decide what pattern would be worthy of this eye-catching yarn, I remembered an elegant Hayward Yoshimi had knitted for herself and I have to admit I seriously wanted to copy  ðŸ™‚  I enjoyed wearing my new jumper for the first time on our recent day out in Tokyo together.
And actually Yoshimi also wore her own Hayward that day too!


I think this is a very chic style; I like the loose and wide boxiness, the wide unstructured boatneck and the curling up lower edge and neckline.  It’s soooo supremely comfortable!
I knitted mine pretty much to the pattern, the only change I made was to the neckline: I kept all the top stitches live without casting off, and once I had sewn the front back and sleeve pieces together; knitted in the round around the neckline using all live stitches, for 4 rows before casting off loosely.  I did this mostly because I’m lazy and loathe picking up stitches, but really it makes more sense to do it this way since, well c’mon it is so much easier and as well makes for a much smoother seamless look at the neckline.  My jumper is size 48″ (34-36″ bust) and I found it necessary to have eight balls of the Ayatori to complete the jumper with stripe matching at the sides and to have the sleeves identical to each other.
I had already started knitting this last year so unfortunately I cannot include it in my SWAP wardrobe; but it’s going to go very well with all my planned olives and ivories  ðŸ™‚

Details:
Jumper; the Hayward in Noro Ayatori yarn,col 19, the pattern is available here
Beige high-necked Tshirt (under); Metalicus
Jeans; Burda 7863,white cotton denim, details here and my review of this pattern here
Ski gloves; had for years, can’t remember where they’re from
Snow boots; I bought these from Big KMart in the US, 13 yrs ago!  while we were living there  ðŸ˜€  We come across snow so rarely I expect these will last me forever!
pinterestmail

Sheen green hand-warmers

Obviously I’m not in Australia here….  ðŸ˜€  we’ve been visiting Japan, and have thoroughly enjoyed seeing my friend Yoshimi again.  Thank you Yoshimi, it was so lovely to spend time with you and to meet your gorgeous family too.  It was lots of fun!
Sorry for my silly photos here. Snow is still such a huge novelty to me, you see.  I can’t stop marvelling at it.  It seems like such amazing and magical stuff! and maybe it puts me in a kinda loopy mood  ðŸ˜‰  I never even saw snow until I was in my late 20’s, and first put on a pair of skis at the age of 36.  Meaning, I’ll never be anything more than a really slow and cautious skiier, but I still love it!  My quads are killing me, but!!
Now for the point of this post: hand-warmers.  Bright ones!  Highlighter hand-warmers!  These are brand new, fresh off the 2mm bamboo dpn’s.   I lost my ultramarine blue arm-warmers last year, I’ve searched and searched and searched, in vain (massive sad-face).  No time for moping but; I needed some more, pronto!  These were cast off in the nick of time to be pressed into immediate service….  ðŸ™‚  
They are basic tubes knitted in the round with a gap for my thumbs, using Morris and Sons 4ply merino wool.  The colourway, Sheen (col419)  is kind of a whoa! in-your-face colour, like a hi-vis construction worker vest.  In my present surroundings though, I’m considering that to be a plus.  If I get stuck and incapacitated in a snowdrift I can just stick my arm up, and the arm-warmers will be like a beacon for the rescue crew.  In-built safety feature!

Ahem; and now, a silly little haiku…

Neon hand-warmers
on tatami mat.  Empty,
Momentarily.

Hmmm, okaaaay then….  Poetry has never been my forte 😉

Details:
Hand-warmers; knitted by me
Beanie; knitted by me, details here
Thermal top; Kathmandu, neckwarmer; Kaos (both old items I’ve had for years)
Ski pants and boots; hired

pinterestmail

ootd blog

It might be a good time to introduce a new thing I’ve been doing lately… well, a new blog actually!  It’s a daily outfit blog, with basically a no-frills photo of the ootd *, and when applicable, the ootn *, with a very brief summary of the day’s weather for an indication of how weather appropriately I am dressing.   I created it at the beginning of the year and have been updating it daily, and had considered keeping it private; but then I just thought, oh, what the hey.  I actually like looking at daily outfit blogs myself but then I am a bit of a nosey parker about other ladies’ outfit choices  ðŸ˜‰
Last year I drew all my daily outfits in my Fashionary, which was both fun to do and also I think turned out to be quite helpful for the end-of-year analysis of my style preferences and how well my sewing is serving that, and as well I just really enjoy looking back through my little book at the year of outfits.  I was inspired by The Makeshift Project, and actually I still enjoy going back and looking through Natalie’s blog every now and again.
My new blog won’t be like a real fashionista’s personal style blog since almost everything I have is home-made and my style is quite, um, maybe unaccessorised? would be a good way to describe it?  I’m going to continue to wear as much  of my own handmade clothing as I can, although there might be some specific situations this year in which I am unable to be completely strict about that rule.  Like right now for example!!   
I will use it for analysing my style and wearing habits again.
It’s currently called Handmade by Carolyn too, since, well I dunno, I guess I’m a creature of habit and pretty unimaginative, but maybe I’ll change that if something more interesting occurs to me  ðŸ™‚

*  #ootd; outfit of the day: #ootn; outfit of the night

pinterestmail
Switch to mobile version
↓