Category Archives: Sewing

Indian patchwork jacket

So, I made a jacket! the beauty of which is all due to the magnificent fabric.  Which has been recycled, and recycled again.  To explain…


… so many years ago, like fairly early on in our marriage I think; we bought a patchwork wall hanging at one of those stores that sells all sorts of random imported things, I’m pretty sure it was in Margaret River actually.  Definitely somewhere down south anyway.  We had it hanging on the wall for years.  I’ve always loved the beauty in each of its amazing little patches, each one I imagined was once part of a much loved and cherished sari once upon a time.  Lots of the patches were very fragile and there were missing and broken beads and sequins, and worn frayed patches everywhere.  The patchwork pieces were united by a sort of “hank” of red thread that wound its way through the patches,  dividing and bordering them all.  The red hank was bound to the piece by a fairly roughly stitched length of black cord.  The wall hanging was backed with plain red cotton, and the same stuff bordered the piece as a whole, roughly and loosely stitched on in HUGE stitches.

Side note that adds nothing to the sewing story but says something about Australia; several times during its time on the wall I took it down for dusting, only to discover large spiders, and nests of spiders hiding behind it.  Such is life here!  I would brush it down outside into the garden – never kill a spider! spot clean any little eggs off, and hang it up again.

At some point I got a little tired of it, and took it down, folded it carefully and stuck it in the linen cupboard.  I thought I’d hang it up again someday, but never did.  Every time I sorted through the linen cupboard I’d think, hmmm maybe I’ll turn it into a little jacket one day, then would I re-fold it and stick it back in.

Anyway, obviously and anti-climactically; that day finally came!  I got a copy of the FibreMood Molly jacket pattern, a boxy little thing with patch pockets.  The instructions assume you’re making a double layered jacket with the potential to be reversible, with the edges bound with bias binding for a perfectly reversible finish.

It was actually touch and go as to whether the pattern was going to fit onto the patchwork piece! I printed out the pattern, and taped extra pages to the back centreline, and also traced out another front, sleeve and pocket piece each, so I could lay the pieces down onto the patchwork piece to be absolutely sure.  After I’d removed the red border from the outer edge, I just managed to squeeze the pattern pieces out, with literally nothing to spare between the pieces for the most part!  Honestly I couldn’t believe it… it was like it was meant to be!   I know I probably say that a lot, because a lot of the time I will not cut out a thing until I’ve found a piece of fabric for it where there are basically NO leftovers, but this was the tightest pattern layout I’ve had in a long time… almost like the patchwork piece was made specifically for this pattern!

Cutting out was quite a challenge too… lots of the sari pieces were SO fragile that they had been literally glued to a piece of cloth underneath, for stability I suppose.  Which made it unforgivingly stiff and inflexible in spots.  Also, I had to temporarily remove beads etc. from some of the more heavily beaded bits just so I could cut, and later seam, the jacket together.  I also removed all the beads from the seam allowances and saved them, to stitch on later and fill some of the barer gaps where beads had been lost over the years.

For the bias bound edging, I started by piecing as much of the red backing as I could for the edging, and managed to bind the top of the pockets with this.  Once I’d joined the jacket though and got to the stage of edging the sleeves and long edge of the jacket, I realised it was going to be absolutely impossible to get together enough red leftovers from the scraps to do these too… so I found a length of dark red poplin from my stash and used this instead.  I considered unpicking the red from the top of the pockets and using the dark red poplin to edge these too, but decided I liked it just the way it was!  Perfectly imperfect!

For closure… obviously buttonholes were a complete impossibility, so I settled upon snaps.  I kinda feel like these do look a little jarring and incongruous, but hey, they’re fine for the moment.  If I’m feeling enthusiastic one of these days I might just remove them and add some bias fabric loops and small unobtrusive buttons inside the bias bound edge, which would probably look nicer.

Once I’d finished the jacket, I hand stitched on all the beads and sequins that I’d managed to save.

I’m so glad I managed to make something with this piece after all, and something that I think shows off the unique beauty of these precious scraps once again!


Details:

Jacket, Fibre Mood Molly jacket
Dress; Named patterns Inari tee dress, white cotton, details here

pinterestmail

black stewart tartan coat

Oh my gosh, I love this new coat so much!   I’ve been in the process of making this for quite a long time now.  It’s been a sort of long term, high quality sort of a project, squeezing little bursts of sewing in between making raincoat toiles… so many raincoat toiles… and finessing the grading of a raglan sleeve.  For a raincoat, natch.  Making this coat has been “fun” simply because just simply following a pattern already written for me feels like a holiday by comparison.


I got this fabric from Minerva, and it’s GORGEOUS.  So gorgeous in fact, that when it arrived I just kinda froze, creatively speaking.  You know when you’re so terrified of ruining the fabric you can hardly bare to even take the scissors to it?  I couldn’t settle upon a project for a while.  Finally, I decided a coat was really the only worthy choice. I frolicked amongst the coat options in Le Pattern Stash, and finally settled upon this one I’d used before, Vogue 1537.  My first version of this was for Tim and Kelly’s wedding! and I really really love that one too!

I even did the double welt buttonholes again too; they were just a tad more challenging in this thicker, felt-like fabric, but the challenge was actually quite enjoyable.

During the cutting out, I was initially going to go with the super strict, thou-absolutely-MUST pattern match or else thou shalt be cast out from the sewing community, never to darken that doorstep again, thing; which I personally have definitely been a part of, no judgement for that.  However, at some point I just decided I didn’t want to do that this time.  I wanted something more creative.  So I re-assessed and cut the side panels on the bias, and the pocket flaps and under-sleeves, and recut the pockets.

Fortunately I had enough leftover that I could do this! and I was able to cut some of the smaller pieces from some of the old, bigger pieces to make this happen.  In the final coat, nothing “matches” in the traditional sense, although everything IS symmetrical, at least!

I bought deep petrol blue lining from Fabulous Fabrics; which is not a colour that appears anywhere in the tartan but interestingly looks absolutely perfect with it, imo.

I also bought dark blue buttons from Fabulous Fabrics.  They were a nice blue, and had a lovely surface design on them too, but I eventually decided they were completely the wrong blue.  So I painted them with black enamel paint, which I’ve previously used to blacken shoe soles, etc.  Now I think they look amazing!

These photos – in fact, this coat! – are kinda funny/bittersweet for me to think back on now, because this coat is the last thing, and these are the last blog photos I took in our old house… the one we’ve lived in for the past 17 years.  A bit sad, but I love our new house so much and am really excited to make it our home!  I’ve been re-homing LOTS of stuff so we can fit into it… our old house was a five bedroom, three bathroom family house, and out new one is a three bedroom, two bathroom.  Quite a difference! and I’ve made the downsizing process much harder for myself, by filling up each of the children’s wardrobes with stuff as they’ve left home and vacated their rooms.  I kinda had the attitude, well I have the storage space, so I may as well use it!  Bad policy… because now I’ve had to be extremely ruthless in streamlining all our things.

Also weird because I lavished such a lot of care and attention on this coat and it was such a HUGE project for me time wise, I’ve run out of things to say about it… hmmm, strange!  So I guess I should just stop rambling.  In short though, I really really love it!  I honestly think it could be the best coat I’ve ever made!

Details:

Coat; Vogue 1537, using this black stewart tartan wool coating
Dress; Vogue 1351, white crepe, details here
Sandals; akiel, from an op shop ages ago

pinterestmail

Mundaring raincoat

Hurrah!  Cassie and I have finally finished making our newest pattern!  please give a warm welcome to the Mundaring raincoat pattern, currently for sale in our shop, the linky dink to which is over to the right in my sidebar there… or you can just click on the this pattern picture just to the right here.

So, the Mundaring is a pattern for a loose-fitting, below hip length raincoat with raglan sleeves, large front zippered pockets with inbuilt weather flaps, a back weather flap covering a hidden vent panel, roomy hood that can be tightened with a hood cord.  Closure is by an open ended zip, hidden underneath a front band.  The pattern includes separate pattern pieces for an optional lining with additional inner breast pocket, and an appendix with tips for weatherproofing the seams of your raincoat.

I know it’s taken me a long time to finally finish getting this together, I first made this design for myself back in 2012 when I made my blue raincoat

this is actually a great little raincoat and I love it and still wear it!  Then I made a pink and blue colour blocked version for Cassie, improving on the design a little more.

Then I fine-tuned the design to be just about exactly what I wanted, albeit in unlined form, when I made my mustard one

this is when I got actually got serious about turning it into a proper pattern and studying the grading criteria.  btw the mustard one has been a really great raincoat too, and I still wear this one when the colour of it is what an outfit requires  😉

In testing the design I’ve made multiple Mundarings since that time, several in each of the five sizes each… plus another “proper” one for Cassie in this chic, pale grey pleather.  And finally, the cheerful yellow one for myself, and then a lovely blue one for my sister-in-law S.

Doesn’t she look gorgeous?  I’m so grateful she agreed to be my model again!

Both my latest are made using a fabric called Oxford Waterproof that I bought from Remnant Warehouse.  btw, NO, I am not getting free fabric or recognition or anything for promoting it, and these are not affiliate links even, I bought this fabric and am recommending it because I am genuinely a fan and think it is the perfect fabric for my design!

My raincoat is this colour, the Gold colour-way, and S’s is the Royal colour-way.   I fully lined both these raincoats using matching polyactate lining fabric from Fabulous Fabrics, and both of them have white zips and white cords and cord stops, which I think looks really nice  🙂

I sealed the seams on both raincoats using this stuff…

I selected it because it is an adhesive sealant with high flexibility, and bonus that while comes out of the canister kind of cloudy it then dries to be quite translucent.  In my  opinion it’s absolutely perfect for this purpose!  I’ll update this post with the exact product as soon as I can, and am truthfully kicking myself right now I did not take a picture of the canister before (doh!)

The pattern is for sale in pdf form here… we are working on getting a paper pattern up and running, and will update the shop with a paper pattern once we’ve got all our ducks in a row vis a vis that.  But in the meantime… here is is!!  I’m so happy to finally have it out in the world!

Here are some of the specs!

Pockets?  Why, of course!

Details:

All raincoats; Carolyn & Cassie Mundaring raincoat pattern, in Oxford Waterproof from remnant warehouse
White tank top; my hand stitched Alabama Chanin tank top.. it was the first one I laid hands on in the drawer!
Jeans: Closet Core patterns Morgan boyfriend jeans, blogged here
White shoes; handmade by me, blogged here

pinterestmail

Theo

… so first post for the year! the most exciting news of all for us is the arrival of our darling little grandson Theo; Cassie and Daniel’s baby boy.  He’s very little right now so he is extremely busy eating and sleeping… in fact, more sleeping than usual since he was a tad on the early side.  I’m so proud of Cassie how she has coped in difficult circumstances… Mum and baby were sent home from hospital only a couple of hours after birth, and coming from a generation that was typically spoilt with about five days in hospital for your first baby, this is pretty shocking to me.  She’s doing amazingly well!!

Anyway, I made little onesie for Theo, just before he was born; in fact I gave it to her at his baby shower which was held just barely a scant week before he arrived actually.  Man, things went so fast… anyway, here it is!

O course there is a little story behind this… a few years ago, Cassie made a few workout tank tops for Tim and Sam for Christmas pressies.  She drew the screen prints and printed them herself, and then sewed up the tank tops too.  She gave one each to Tim and Sam, and I’m not sure what was the story with this particular one but it has sat unworn in the fabric stash every since.  She can’t remember now either!  Maybe it was always an extra?  Anyway, I always thought it was such a thoughtful idea of hers, and it’s a pretty cute and clever print too.  Couldn’t possibly just let it continue sitting there!  So, I dug it out, and in the tradition of babies in this family; I made a little onesie for Theo out of it.  The pattern is my own, I just had to make this one a bit bigger, because the writing on the back would not fit on the smaller size I’d made previously for newborns.

Pretty cute, huh?!

I’ve also made a much-needed, new maternity dress for Cassie, the same design as the white one I’d made previously.   I had a few … issues… with this one, suffice to say stripes are always a nightmare and even when you think you’ve accounted for all stripe contingencies that may arise, a new one IS probably going to crop up and surprise you.  Ok, guess I may as well go into it… somehow, despite careful measuring and checking, I STILL somehow managed to hem the dress with an extra stripe along one side seam than the other.  Honestly thought I’d cut them the same, but well, turns out I had not.  I had to cut off the old hem and make a new one.

The other disaster was that I somehow managed to stitch the separate tank front INTO THE WAIST SEAM! thus rendering it useless for its intended purpose as a maternity dress.  DOH!  This required unpicking the seam plus the overlocking, because OF COURSE I overlocked it before I’d noticed!  in what is actually quite a delicate fabric, and well, fixing up the whole shemozzle.  So, for a simple little make it ended up taking most of my day, which I can ill afford right now, to be honest, but at least it got done.

And she looks lovely in it, so it was all worth it actually.

I’ve finally finished another very long-term thing recently too… for me! and am hoping to get it posted in between packing boxes and organising some minor work done for our new house as well as this, our old, one.  Oh, and of course our new pattern, which is far more challenging to finish now that I’m on my own with it, since my helper has her precious new baby to attend to.  Aaahgh, my head is going to explode…

Onwards and upwards!

pinterestmail

baby swing and coconut ice

Tim and I made this adorable little swing for Arthur!

peekaboo!!

Kelly found the design and Tim suggested it be a joint project between us, with me making the swing and Tim taking care of the woodwork etc… Kelly and Arthur and I went to Spotlight together and bought the stuff… apart from the fact that it was like 41C that day it was fun!

Arthur’s first trip to Spotlight!

We bought this cute orange-based kangaroo? wallaby? print which Kelly thought would go really nicely with their deep blue/grey walls and jarrah floors, bamboo wadding, which I used doubled up for extra padding, and white webbing and a white clip-in catch to make a safety belt too… also Tim got pine dowelling and nylon rope from Bunnings.  We based our swing on this one on a blog the Thud… I think that Kelly had found it through Pinterest? I think?  anyway I recommend checking it out because she is hilarious!!

I did have to make adjustments to practically every dimension though for several reasons:

a. the dowel Tim had was 2.54mm (1″) instead of the 19mm dowel used in the tutorial so extra height was needed at every top edge.

b. we wanted the back rest to be above the arm rests because it makes good sense to have the back highest, I think and also makes a nice visual to the layers.

c. I wanted all the kangaroos/wallabies to face UP, so I split the bottom/side piece into two, and cut and joined so the animals stood up each side.  Furthermore, I arranged it so the seam in the back/side piece was on the opposite side for each piece, the inside and outside of the swing, if that makes sense.

d. I added a little seat belt for safety.  The part that goes around his waist is stitched in each side of the back piece of the swing, and the front is stitched in with the seam between the front and the bottom/side piece,

e. I also made a little flat, square, seat cushion, partially for comfort and also so the kangaroos face up when you look inside the swing too.  In addition, I made an extra, super-fat cushion to sit in the back of the swing, which looks cute, and also narrows the opening a little so he’s less inclined to pull his knees up and try to stand up in it.  Although, Tim and Kelly tell me that when he’s in it he just loves chilling out in his swing, mostly just sitting quietly resting against the cushion in it, and happily swinging.

Here is my (amended) pattern…

and Arthur, chilllaxing in his swing … CUTE!!

Oh, and of course everything is going to be an anticlimax after that cutie patootie! but anyway… so, every Christmas I usually make some sweet treat as a gift for extended family and friends.  This year I made coconut ice, but partly due to small supplies of red food colouring I decided upon a slightly different colour scheme from the usual.

I think it all turned out super pretty!  Also, delicious, obviously!  btw, this quantity pictured looks a bit mean but is really just for “pretty” photographic purposes, because everyone got at least four times this amount in little reusable lunchboxes.  I used this recipe from Taste.com…

pinterestmail

madder and madder…

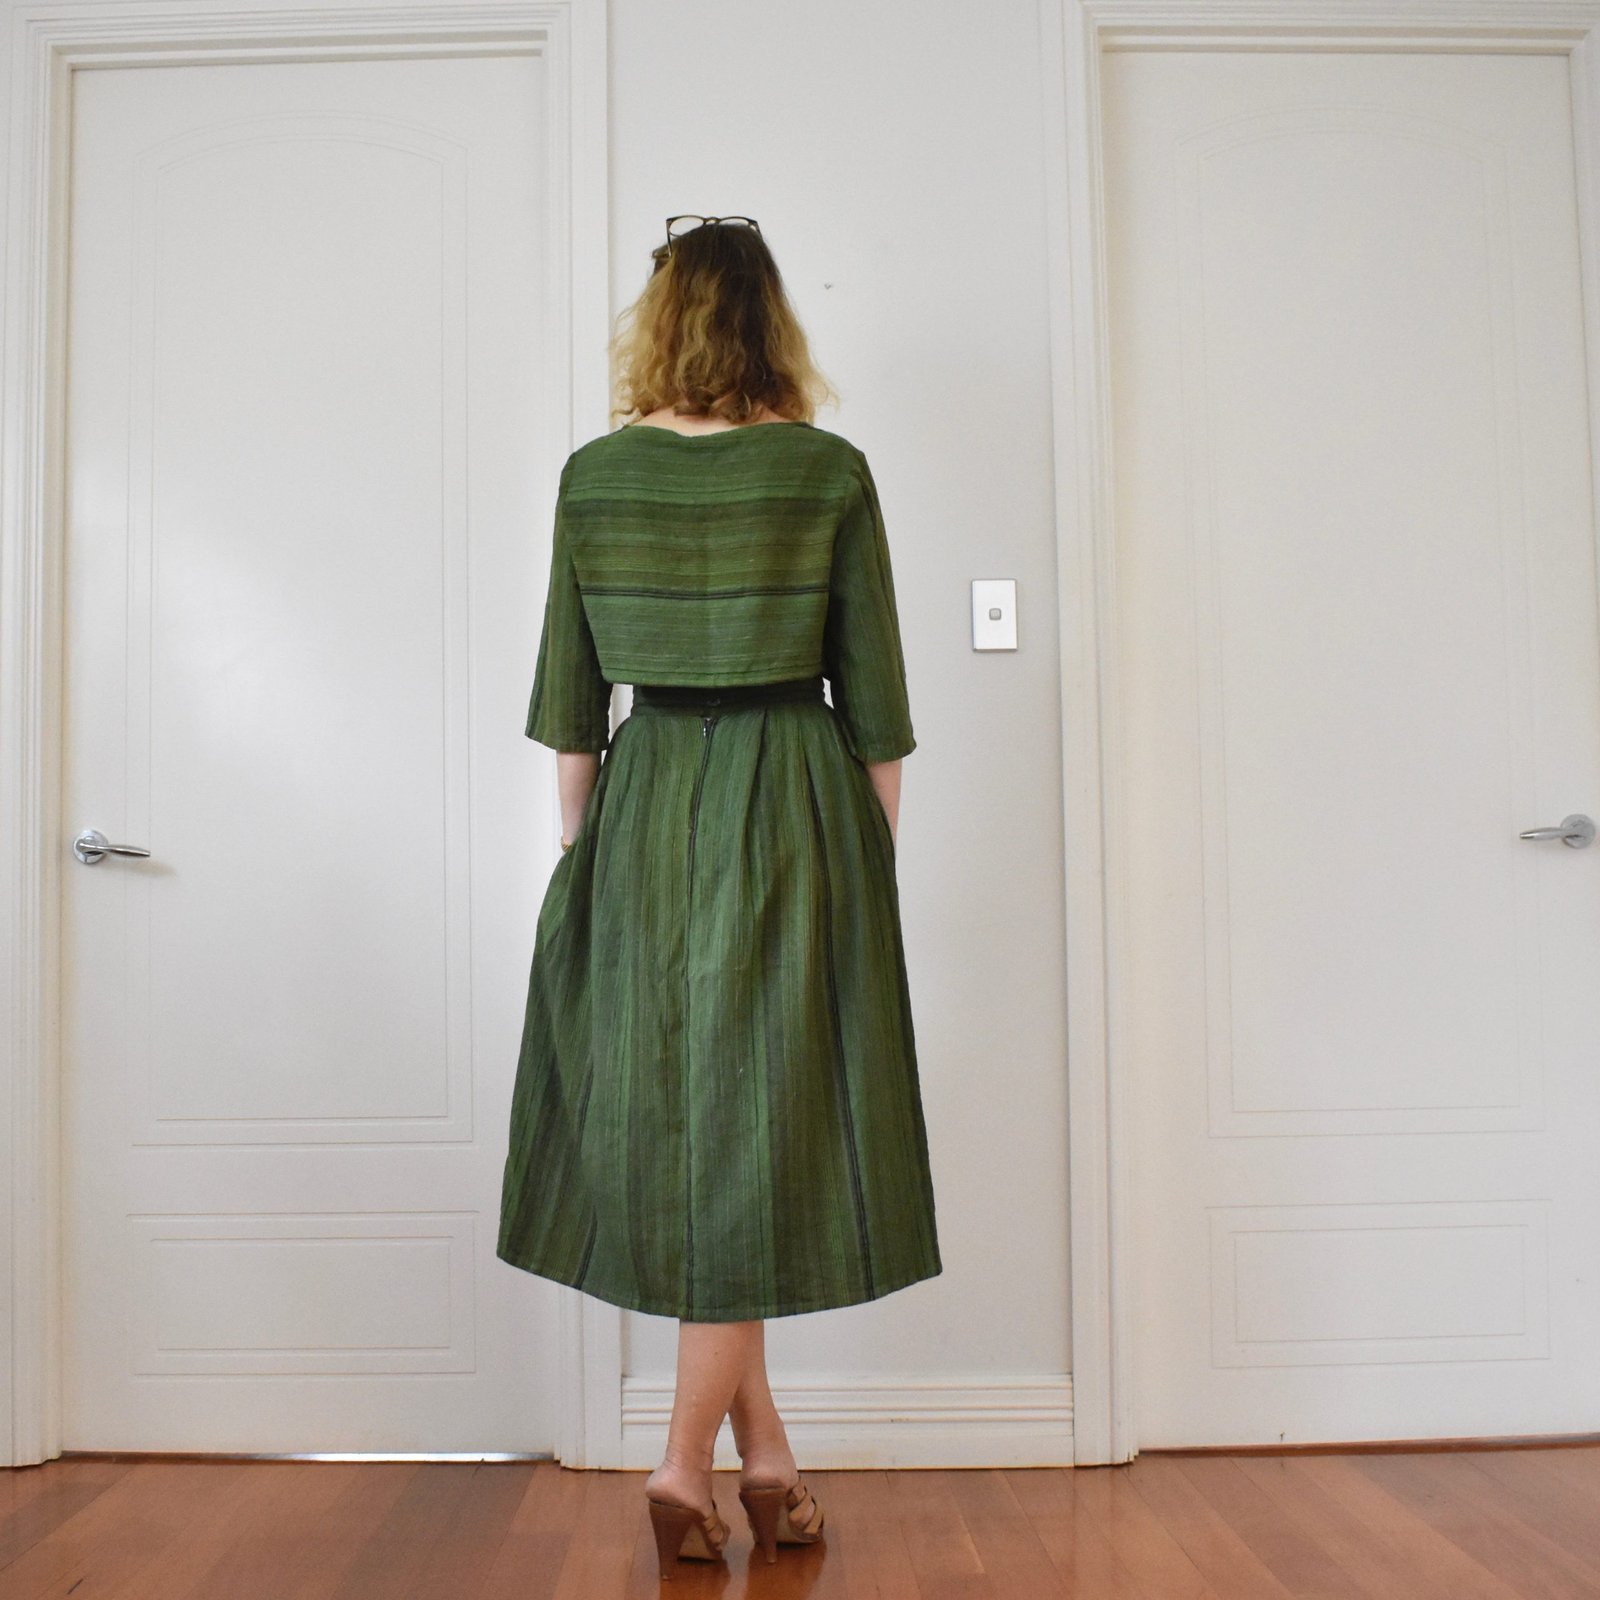
I made a dress, using this very precious piece of fabric that I have been too frightened to cut in to for years now … ok so I’ve just checked back and it first came into my life back in August 2015,  FIVE YEARS AGO!!  well it’s about well overdue that I made it up, hey…

So what is this, hmmm?  well I did a fantastic one day, natural dyeing workshop with Niji iro Kitta during which I dyed a length of pure white linen with natural madder root.  They had two options; you could either choose to dye with madder, or indigo.  I (obviously) chose madder, the natural dyestuff from the root of rubia tinctoria and since I later got a chance to also dye with natural indigo too, I’m so glad I chose madder this time!  I went along with Nicki (this is moonlight), Sue (fadanista) and Megan (meggipeg), and first posted about it here

It was heaps of fun!  I remember our fabric had been soaked in soya water and dried first, which apparently helps the dye “take” thoroughly.  Before dyeing, we had to embroider our initials or something marking the fabric as “yours” in some way.  I did mine in red thread; and when it came time to cut out my dress, I carefully made sure to cut around and save the corner with my initials.  And rather than use one of my usual labels I stitched the little square of linen featuring my embroidery inside as a sort of reminder of the day.

I used Vogue 2900 to make my dress… I’ve used this pattern twice before and I really love it!  I think it’s all of comfortable, elegant, classy and beautiful too… I mostly made it just about exactly as per the instructions, topstitching all the seams with matching thread.  I think my only difference was leaving off the pocket facings because I had enough fabric to simply cut the pocket piece and lining also from the self-fabric linen.  I also had enough fabric for a mask!

Hmmm, I wonder if we’ll ever need to wear these here?  I could be making all these masks for nothing!  I guess we’ll have to wait and see.  I sure have nothing against wearing one.  Also, I know I sound like a broken record, but again we are so lucky to have no community transmission of the virus here.  So lucky!   for now!

I finished all the raw edges inside with red overlocking thread, and used a red invisible zip in the CB seam. The natural madder root produces a colour that I would describe as more of a coppery pinky-orange rather that a red actually… and I really like the red inner workings inside against this colour, I think it’s a really pretty contrasting feature.  Of course a pretty contrasting feature that no one is every going to see, haha.  I mean, that’s ok, because who do we do this for but ourselves anyway, hmm?  Exactly.

This is the eleventh thing in my list of 12 things I was going to make this year, from the 12 fabrics I nominated as well… hurrah!

 I have just one thing left on the list, and I think I’m going to be able to manage it.  And I love this dress!  I adore the colour, and the style is right up my alley, so I’m so happy Yoshimi recommended the pattern to me all those years ago.  🙂


Details:

Dress; Vogue 2900, madder dyed linen
Mask; using this tutorial
Sandals; super old, from an oppy… I love these and really really need to replace them!

I propped up my phone in a tree and snapped a quick picture on our walk, even though it’s a bit blurry… oh well!

pinterestmail

separated Cissy… and it’s green

Seems like a bit of a non-sequitur, but kinda sums up the whole process actually.  Let me explain…

So I set out to make another Homer and Howells Cissy dress for myself because I was so pleased with the rust lace one that I’d made first off the block.  This is back in April by the way, back when we were in a lockdown of sorts here in Perth, when we were all terrified of the virus and didn’t know as yet that there was no community transmission here.  Yes, I do indeed know how very lucky we are! and it’s fantastic that everyone here is working hard to keep things that way too… but I digress!

I needed a sewing project!

I had some khaki-olive-blue-grey, slightly crinkly cotton in my stash  that Mum had chucked my way, when she cleaned out her own stash, and it was just enough to cut out the Cissy pieces.  Awesome!  It was meant to be!  However when I put it together I was just like…. blah.  I think when you’re feeling anxious and depressed then your soul cries out for cheer and vibrancy, or even just strength, even in colour form; and drab colours just kinda drag you down … however at the time I determined a waist was what was needed.  So I proceeded to cut a straight waistband from the scant remains of fabric, miraculously I had a strip just long enough! I took off the bodice and skinny-hemmed it, making a cute little loose crop top.  I the sliced up the centre back of the skirt and inserted an invisible zip, re-folded the skirt pleats into my new waistband, and stitched on a button.  Ok! I thought.  This is going to be great!

ORIGINAL COLOUR… yeah it’s not awful, I guess


It lay in my wardrobe during winter and I was anticipating a lot of wear once the warm weather hit… and when I did my rainbow week mini-challenge I thought it would be my “green” ensemble…  I frocked up and took a few photos, a sample of which is below, and man, at that moment the not-greenness of the whole thing just killed me, so it did not feature in that week after all.  I still thought the ensemble had promise and I was on a mission to save it now!  I wanted GREEN!   I had to wait until Spotlight had restocked its dye supplies but finally they came in.   And into the spa dye-pot it went!

looked terrible in this light!…

I used a whole pack of Rit Kelly green, and I very happy with it now, I think the strong colour is just what it, or maybe I – needed!  The crop top is very cropped, and I have to be careful about lifting my arms up too high, and I’m planning next to make some pretty little lace camisoles to wear underneath.
Watch this space!

Details:

Top and skirt; from the Homer & Howells Cissy pattern, old cotton, overdyed by me
Caramel sandals; super old, originally from an op shop.  I need to replace these, desperately!

Green turtleneck: modified Closet Core pattern Nettie in green merino
Black tights; my own design, black stretch poly
Black booties, from Zomp boutique

pinterestmail

limoncello

I originally bought this fabric simply because it reminded me of limoncello; specifically limoncello partaken after a long day hiking thr0ugh the delightfully bucolic Italian countryside… yes of course it is indeed that most wonderful variety of fabric; souvenir fabric!  I bought it in Rome, in the famous Fratelli Basetti Tessuti back in 2012, after our hiking holiday… it is a most gorgeously crisp linen in a sharp, warm, citrusy yellow with the skinniest white pinstripes.  I have used a small piece of it previously to make one of my Perth dresses, and so I have learnt that this gorgeous colour unfortunately runs like the the wind!  My Perth dress started out yellow and ended up basically beige eventually.  Sad, but true.  It’s ok though because I’m perfectly fine with giving it a refreshing new dye-bath when the time comes.

The pattern is the FibreMood Feliz.  I have to admit I was a little suspicious of how very long the skirt is! and was initially dead set on shortening it just about immediately, but actually? I kind of like it like this.  The Feliz has some nice features, specifically I like the curved back yoke and the flat, narrow collar; and I love how the workman-like vibe of those rolled up sleeves clashes stylistically with an almost impractically long skirt.  Not that the skirt is really “impractical” in a real life sense but you know what I mean.  I’m going to give it a good fair go before thinking about shortening it anyway.

Changes; just a few very minor tiny things.. Because the sleeves are worn rolled up most of the time, I decided to do a flat-felled seam finish on the sleeve seams,  The seam allowances are only 1cm so this was a tiny bit tricky! but definitely worth it.

So, here’s a slightly funny thing…. see how the back bodice of my dress pictured below curves down to the side seams? well the pattern piece, below right, is most definitely shaped just to do just this, however, the line drawings of the dress do not show this downward curve.  Mmmm…

I made the back yoke double layered and utilised the burrito method to get a perfectly neat finish on the inside.  This meant I could also add one of my labels without visible stitching showing on the outside, which is nice  🙂

The slimline, stamped brass buttons are so lovely, I got these from Fabulous Fabrics.  I’ve actually used these twice before, for this olive shirt, and this blue shirtdress, now a shirt too.  I know I shouldn’t ever be using the same buttons, you should find different ones.  But you know when you’re perusing the button selection and you see they still have that super cute button you’ve used before… and you know you’re being predictable and unadventurous but basically one knows a good thing when one sees it and in the end why fight it.

Details:

Dress, Fibre Mood Feliz, in lemon-yellow pinstriped linen from Italy
Tights, made by me here
Booties;  nylon from Zomp shoes

pinterestmail
Switch to mobile version
↓