Category Archives: Sewing

an exciting need for maternity gear!

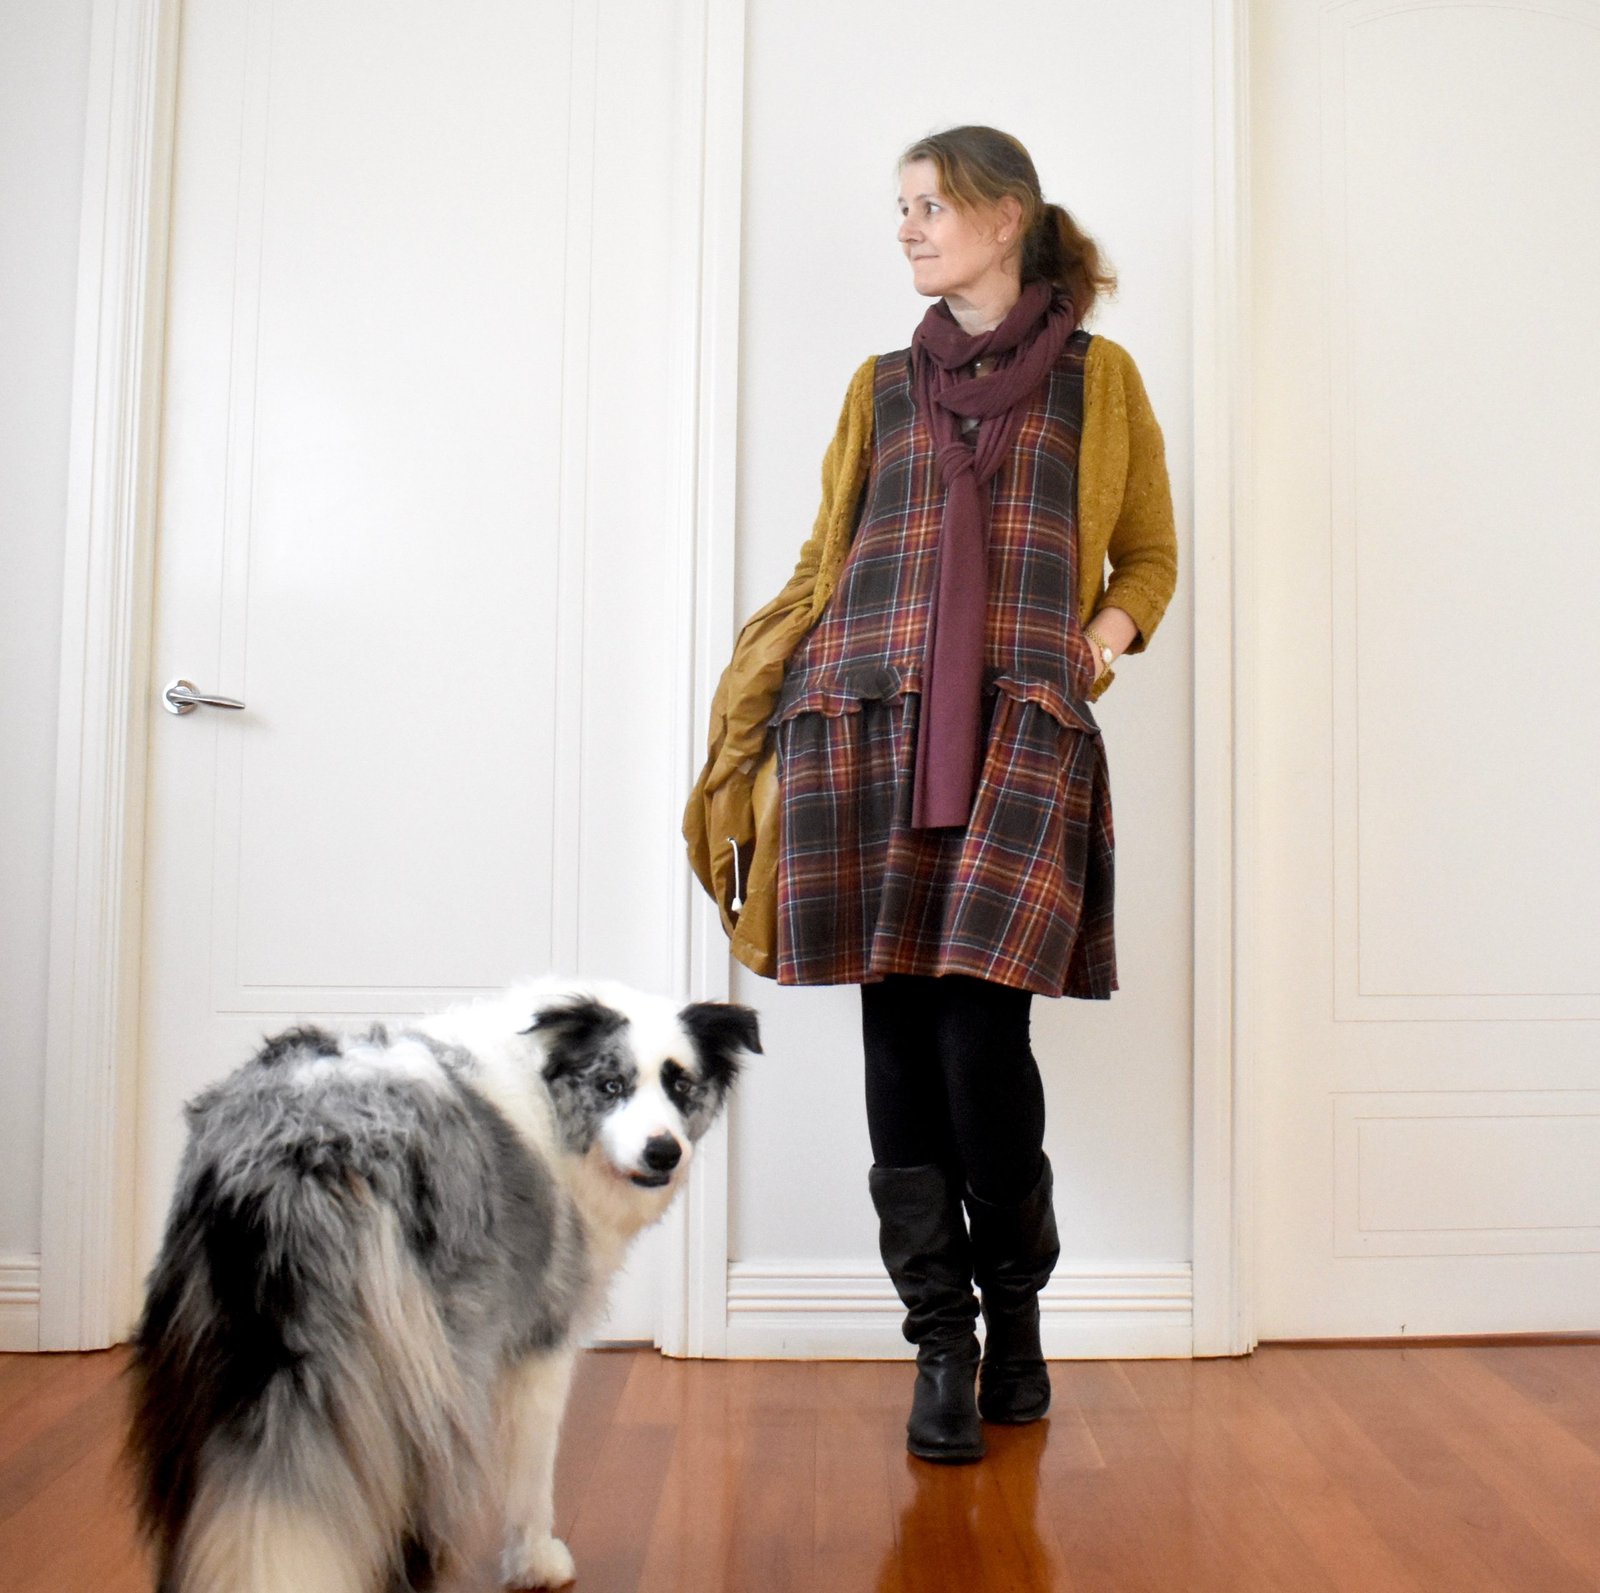
so, I have some very exciting news!  I’m going to be a granny again!  Well of course I’m already a granny to darling little Arthur, but I am going to be granny to TWO.  That’s cause for celebration, I think!  Especially if by celebration, I mean celebratory sewing … which is specifically the kind of celebration this blog recognises, hehe.

Cassie is quite early on in her pregnancy but is already uncomfortable and in need of maternity clothes. Kelly passed on to her one or two of the things I made for her last year, but they are different sizes and so Cassie needed some things of her own, too.

Exhibit A!

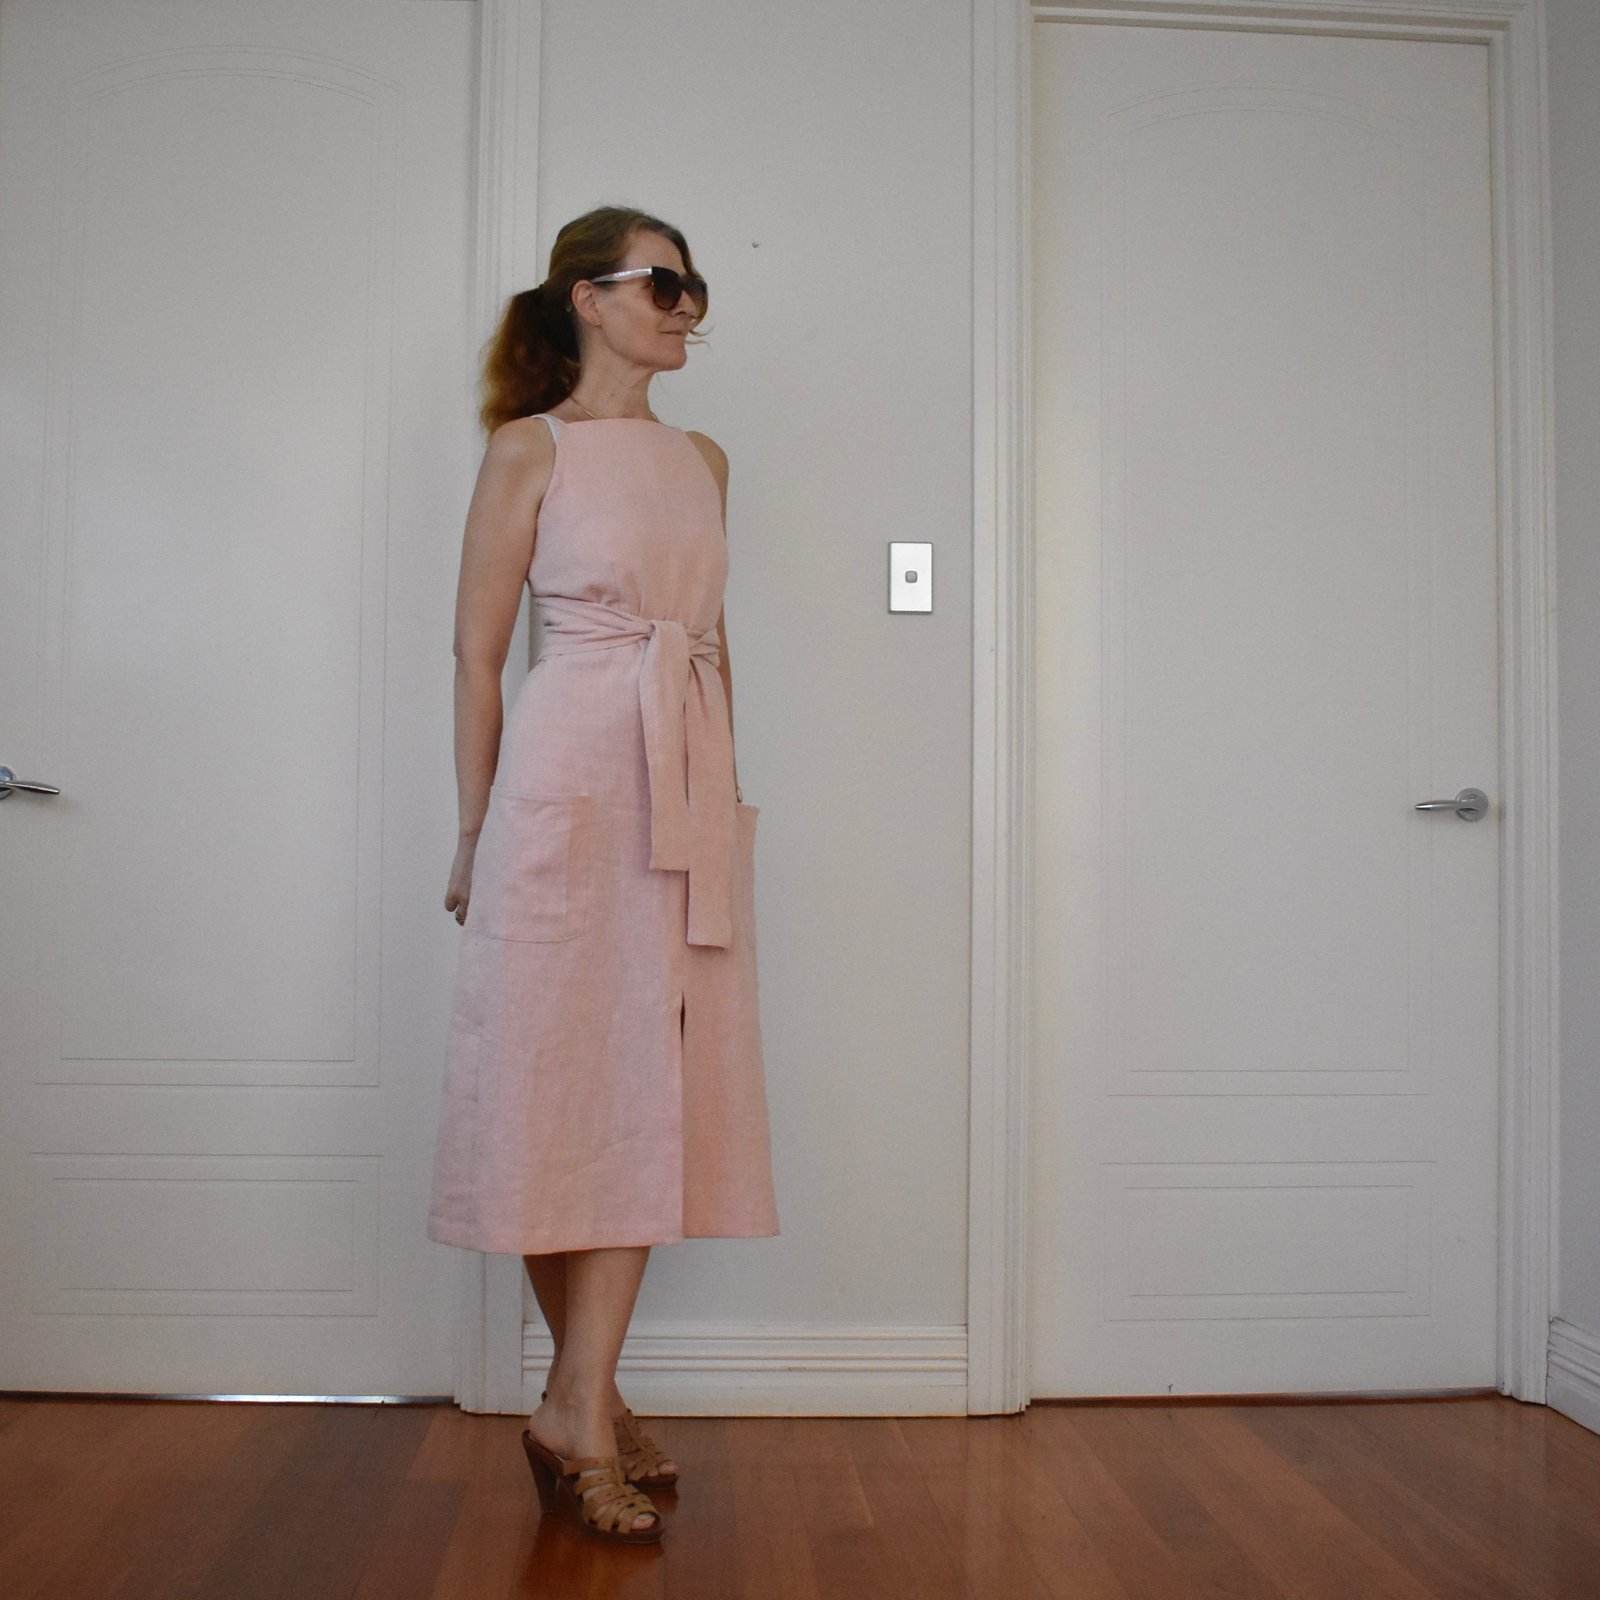
I printed out another Closet Core patterns Ebony pattern to cut out Cassie’s size… now I know it’s not technically maternity, but in my opinion this makes a really good maternity option!  And there are so few! Honestly, you  go and check out the maternity range around at the moment and it’s quite shocking how few there are on offer.  Quite disgraceful, to be honest!  There used to be lots of options back when I was sewing for my own pregnancies, but those options seem to have sadly dwindled…  today’s pregnant ladies who sew for themselves have to be resourceful because there is practically nothing at all being designed specifically for the expectant figure.  And even less that’s very interesting.

Anyway.

The first thing I made is the above cotton jersey floral dress for Cassie… she absolutely loves it, which is great because I was initially not a fan of the fabric she chose!  However, once I’d made it and she put it on I could see she looks lovely in these fresh, bright, pretty springy colours.  She wanted something that could work for just about everything, casual and comfortable for both at home and out, she can wear it to work, and even to a formal event if she wants with the appropriate shoes.  Specifically, she has a friend’s wedding coming up, to which she is planning to wear this; and with her high heeled black booties I think it’s going to be lovely.  Plus, it’s stretchy fabric, so it’s very comfortable too, she can curl up on the couch in it just fine.  Pretty? and comfortable too?!!  win win!

I used the aforementioned Ebony pattern, of course, with the set-in sleeve.  The swing of the skirt is a little less than the pattern, because the fabric I had wasn’t as wide as needed.

Exhibits B! and C!

This top is another Ebony, naturally, in the tunic length and with the raglan sleeves.  This spotty cotton jersey is absolutely lovely! such a pretty print.  Oh, both of these fabrics, the spots, and the green, plus the previous blue/pink floral, were all from Spotlight.

please excuse the lumpy look, there’s a cushion doing baby stand-in duties in there and it’s not doing a very good job…

The skirt is Burda 7023, one I made several times previously for Kelly, so we know it’s a fantastic little pattern.  Thanks again to my lovely reader Graca, who very kindly sent this to me!  xx

I did the same thing I did before for Kelly’s skirts, with a self-drawstring in the front band coming out through little eyelets on the inside, so she can tie the front up tighter during these earlier days before she’s very big.

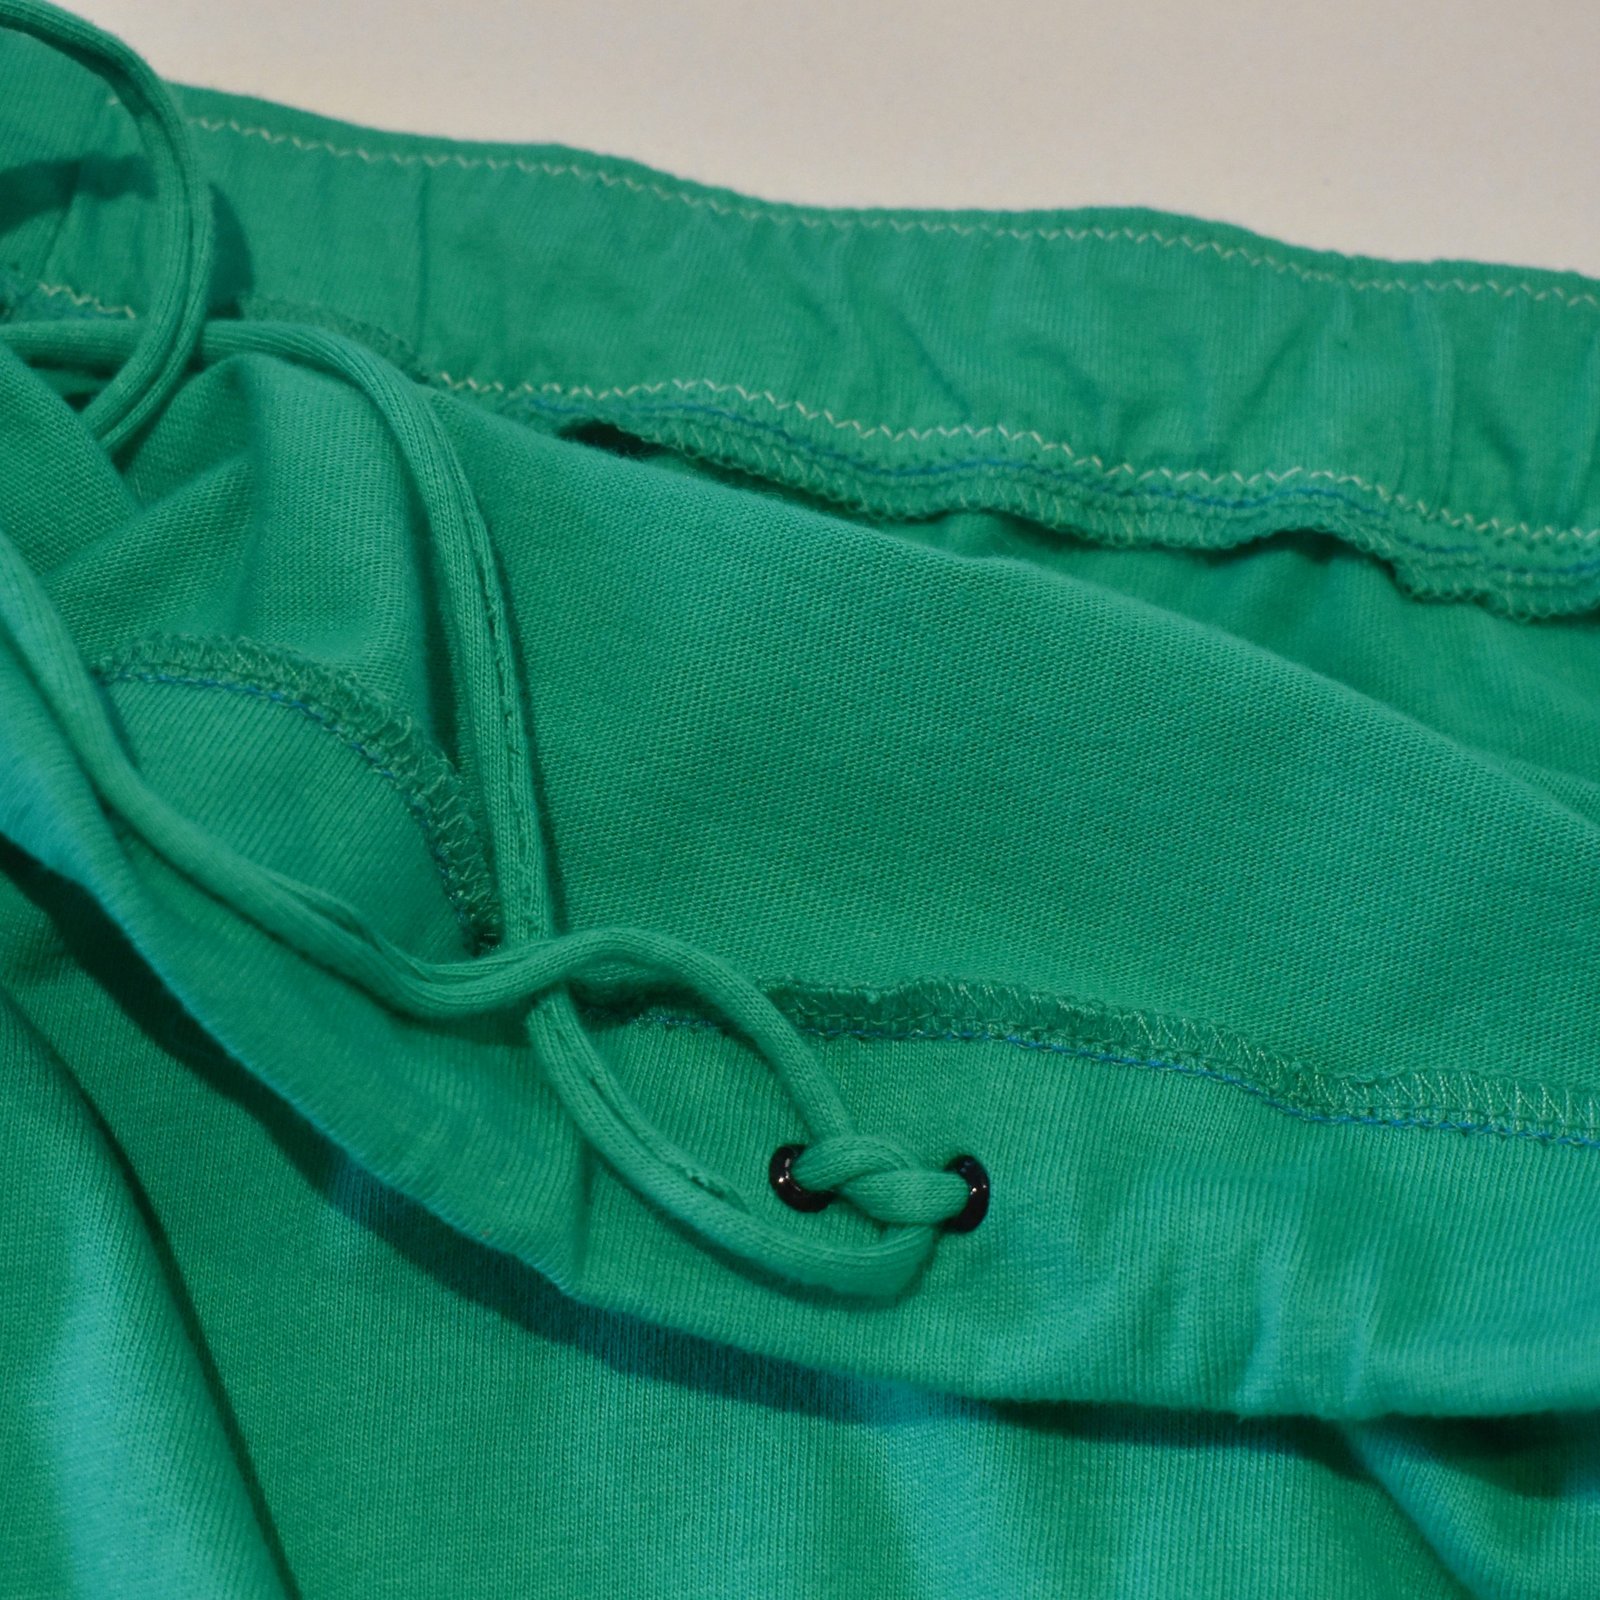
Exhibit D! and sorta E? though I’ve shown this little top here before so it shouldn’t really count actually.  Cassie made the skirt herself, using the Megan Nielsen Axel skirt pattern, and a pretty embroidered and pleated organza that she bought from Megan Nielsen store too actually.  It has a stretch jersey waistband, and is lined with lightweight cotton jersey too.  The little top is one I made for Kelly, and is a streamlined Closet Core patterns Ebony, first blogged here.  I made it using the same oatmeal-coloured, lightweight cotton jersey Cassie used for the waistband and lining of her skirt…  I originally bought this gorgeous stuff at Homecraft Textiles.


I just wanted to add pictures here of two other me-made clothes that Cassie is finding very useful in her pregnancy, a sort of pregnancy-appropriate, pattern round-up, if you like.  Both these dresses are getting worn a LOT.

Exhibit F: this Megan Nielsen patterns Sudley dress that I made for her in 2017, in a gorgeous spotty rayon from Spotlight, originally blogged here.

and also Exhibit G: this Burda dress also from a few years ago, made using a really beautiful, Amalfi coast printed crepe from Fabulous Fabrics, and Burda 02/2015/107, and originally blogged here.  This was my Christmas present to her from 2015, so I’m thrilled she’s got so many years of great wear out of it!

pinterestmail

I made a turquoise skirt

Enough said!

Well actually, I guess I can say a little more… so I bought this turquoise denim in New York City during my holiday in the United States with Yoshimi last year…. and who could have guessed how much the world would change during this short short time??  Crazy… I’m still reeling to be honest! Anyway, I did have such a wonderful time and am very happy to have made up my first thing from some of the fabric that I bought.  Don’t worry, there’s lots more!  I got this in a little shop whose name now escapes me, sadly; though I’m forgiving myself for forgetting since it was kind of an overwhelming day.  Honestly I’ve never seen as much fabric in my entire life as I did on that day of fabric-shopping in NYC!

have a squizz at those pockets!!!

The fabric was cut wildly off-grain, which meant I had a bit less than I thought, but fortunately I had enough to make this skirt using mostly Burda 2/2015; 109.  This is a pattern I’ve attempted once before; I made it up using yellow linen which was quickly deemed a giant fail and converted into a top, and I must say it’s been a great little top!  Anyway, I still had faith the pattern had great skirt bones.  And I’m glad I gave it another chance since this little skirt is fantastic and I love it!

I did make a few mods though… namely, the wrap nature of the skirt is gone, because I felt the denim would be too stiff to make a nice wrap and tie belt; also I didn’t have enough of the denim for something like that anyway.  Instead I made the skirt to have a fixed waistband and a centre back zip closure; a pretty straightforward mod.  I also stitched down some of the pleats to make it a little more fitted.  I wondered if I’d have a matching zip in my stash, and you know what? I did!  Miraculous!!  It was from a large bag of colourful zips that Mum had tossed my way, once upon a time.  I’ve used up quite a lot of them over the years!  This one is really very “vintage”, so much so that I zip it up and down quite carefully.

I used white thread for all the topstitching; I really love how subtle this looks.  And I cut the contrasting inside waistband and bias to finish the hemline from an old shirt of Craig’s.  I’ve harvested from this very same shirt previously, to bind the quilt that his Mum made for Arthur, here.

That shirt still has quite a bit of fabric leftover still to use for other things, which is fabulous; because it’s beautiful quality stuff!

This is thing 6, from the collection of 12 I tasked for myself at the beginning of the year.  Yay, I’m halfway through!!


Details:

Skirt; Burda 02/2015; 109, turquoise denim
Top; Burda 04/2014; 111, in a slightly stretchy bobbly stuff, details here
Tights, made by me to my own design
Boots; Roberto del Carlo, from Zomp boutique

(below)
Jumper; hand knit by me, my own design
Raincoat; made by me, new and not yet blogged!  eeep!  I’m so behind!

… nothing to do with sewing, but lately I feel like I have so few good hair days I reckon it’s worth documenting when I do have one, even if it’s courtesy of the salon and not my own doing at all!  I’ve been trying to grow my hair out all natural, a whole year later and I think I almost like my hair again.  Finally, a light at the end of the tunnel!

pinterestmail

adding the almighty pocket

So, recently I’ve been on a bit of a pocket binge.  You see, one has a phone which has rapidly become the ruler of one’s Life, and one has decided that this little autocrat needs to be on one’s person at all times.  So if something doesn’t have a pocket?  BAM! it’s getting one, like it or not!  Take that you pocketless fiends you!  Picture, if you will; pockets raining down upon Le Wardrobe, with lightning bolts and attendant thunderous cracks and booms as they attach themselves fiercely and fearlessly to the offending garments cowering on their hangers… ahem, my apologies.  Maybe I’ve been isolating too long.

Anyway, meet the victims:

please note; The Eye…

Firstly, my plaid Delice dress

I’d already promised to myself that I would add pockets once I got around to it… it’s a loose-fitting little thing, and while the attempted side-seam pockets did not work I knew welt pockets would be fine.  I just needed to get onto it!  and finally, voila. I still had the pocket bags, and I cut welts on grain from the very tiny amount of fabric I had leftover.  Both welts and the opening area of the pocket were interfaced with iron-on interfacing for stability – this fabric is basically a brushed cotton flannelette and so it has pretty poor stability actually,  A pocket bag on a welt sans interfacing stood a good chance of becoming a gaping, saggy mess, so I used nice firm stiff stuff, and the pockets turned out a charm.  No I didn’t take any progress pictures.  Bad me.

Secondly, my rusty coloured Sabrina skirt


this has always been a little on the baggy side for a pencil skirt, I think I might have selected the incorrect size in the first place because I’m slightly terrified of making a thing too small or too tight; a problem which is practically unfixable, and the fabric was kinda precious to me.  I mean, if you make something slightly too big, that is a problem that is eminently fixable down the track.  Except that “down the track” never seems to come… anyway, flash forward to a few days ago when I realised that same slight bagginess could easily accommodate some inseam pockets.  So I went for it!  I did remember to take some pictures of this one for posterity…

Firstly cut out the pockets lining at the size of pocket you want.  Stitch to the skirt front seam allowance at the place where you want your pocket to be in a skinny seam allowance, and press towards the skirt front.

Cut the pocket itself from the self-fabric, with an opening extension that covers the width of your side seam allowance once it’s laid over the pocket lining.  My side seam allowances for this skirt are actually quite huge, showing that I really truly overestimated how much wriggle room I needed; but since that mistake resulted in such a good prognosis for future pocket insertion, I forgive past-me.  Trim to fit, and finish the raw edge.  Stitch to the back seam allowance, right sides together in a skinny seam allowance, and leave it laying towards the front.  Check the pocket piece and pocket lining piece are aligned perfectly.

Now open the two pocket pieces apart and gently rip open the skirt side seam.  Leave at least 1cm closed at both top and bottom edge of the pocket pieces, and then reinforce the side-seam stitching at these points both top and bottom with some quick forward/backward stitching so the seam doesn’t open any further.

Now; open out the back skirt side seam allowance and as far as possible, stitch the skirt back and the pocket piece together, using the previous pressed seamline on the skirt back as a stitching guide.  Be sure to keep the skirt front free from this stitching!!

Lay the pocket pieces over each other again, and stitch them together around the curved edge, commencing and finished the seam at the skirt side seam, taking care to not go over it and into the skirt itself.  Finish the raw edges as far as possible on the overlocker.

Now open out the side seam allowances away from the skirt front and back, and at the top and bottom edges of the pocket, perpendicular to the side seam: stitch the pocket to the front skirt seam allowance up to the side seam line, and the pocket piece ONLY to the back skirt seam allowance up to the same seam line.  These short seams are indicated in white on the previous picture.

Ta da!

And, while I still had the machine threaded with chocolate brown thread… victim number three.  This is a great little corduroy skirt, very simple and plain and useful.  Except that it had no pockets!  Problem solved!  For this one, simple patch pockets were the go; but slanted at what I find to a optimal angle for my hands.  I used some of the leftover corduroy from which I made my wide-leg Sashas, and even though it doesn’t look like it I spent ages and aaaaaages aligning them to be perfectly symmetrical.  Yes they probably look a bit weird but I have pockets so I care not.

That’s it for now, until next time!

pinterestmail

a pretty outfit (cielo and sixtine)

So I made an oh-so pretty, fluttery, flower-strewn outfit of the most perfectly spring-worthy persuasion! but wait…  am I not currently still on the downwards slope to the dark dank pit of winter?  well yes, so we are just barely into July, and I am OVER winter already.  *sigh*

Really I expect I’ll be making winter-y things soon but I just don’t feel like it right now, and I just want to think about fun summery things still.  Terrible, isn’t it?  Anyway, I bought this lovely rose-y rayon-linen in Spotlight, back when Perth was sort of half in isolation.  I’d been feeling very down, gone shopping for some essentials and just spontaneously decided buy something pretty and non-essential at the same time, to cheer myself up.  As it turned out, we had hardly any cases of the covid-19 virus in Perth, which is of course wonderful; but we were all as terribly worried at the time as if there were and buying something lovely lifted my spirits quite a lot at the time.

I cut out the ruffle-tastic new Sixtine skirt by Coralie Bijasson patterns and then had just enough left for a plain little top, which is the best counterpoint for all that ruffle anyway.  I’d recently had success making the Closet Case patterns Cielo top for Cassie so traced out the  next size up for me.  And I really love how they go together!  The Sixtine pattern is a simple, completely symmetric, true wrap skirt, with the most amazing ruffle and a half action going on.  Actually when I say ruffle and a half, that is quite literally what it is; there’s a ruffle, and then another half of that same ruffle on top.  Ruffle and a half! And my fabric worked out so nice! it is quite fluid and soft, which was just right for the ruffles; they have just exactly the right amount of body and zero limpness.The Cielo top is a great little basic, I can already tell I’m going to make stacks more.  Simple, but perfectly so.

I don’t really have much else to add, both these patterns are unambiguously straightforward designs with no tricks to speak of.  With the Sixtine skirt, I think you were supposed to place the buttonholes and buttons so the buttons popped out on the outside of the waistband when buttoned up, but I used very plain sheer flat ones from my stash, both ancient and inherited and not very pretty, so I positioned them so they button up on the inside of the skirt.

Oh, I also finished the lower hemline of both ruffles using the triple-stitched narrow hemline, explained in this post here.

I have one more sort of interesting thing I can say about sewing this; normally when you’re cutting things out from a print you carefully make sure all your pattern pieces are aligned with the “up” side in the same direction, yes?  Well I would definitely do that for fabric with a nap, but for a fabric with a print I’ve often preferred the look when I do not adhere strictly to this rule, but lay pieces so as to alternate up and down placement.  That way you avoid that “double-ing up” up of an identical motif that can look absolutely terrible and obvious when it occurs in a pieced garment.  Obviously this really only works if the print doesn’t have an obvious “right way up” design, but while it’s only a little thing it can make a noticeable difference.  As soon as I looked at my pictures here I could see a couple of instances where an upside-down motif is not too far away from a right-way-up motif, and if they’d been both oriented the same it would have looked strange.  So I’m glad!  I hope I explained that OK!

Anyway, I love this new ensemble and honestly can’t wait til the weather is hot again so I can actually wear it.  In the meantime perhaps I should start finally turning some attention towards more wintery projects  (sigh)


Details:

Top; the Cielo top by Closet Case patterns
Skirt; the Sixtine skirt by Coralie Bijasson patterns
Shoes; both super old now but still much loved

Later edit; so I added some pockets to this skirt! They’re patch pockets, with a slightly gathered top, drawn in by a little olive ribbon, which I happened to have in my stash.  They’re simple but of course useful.  Who doesn’t like a little bit pf practicality along with their floomph?!

Here’s a brief overview…

the pockets are cut to fit my mobile phone in, and are about 3cm wider at the top…

I snipped a little hole in the outer layer of the upper hem/casing..

the gathering ribbon emerges from this hole

align the raw ends of the ribbon inside with the raw edges of the upper pocket hem/casing

ensure the ribbon ends are stitched down firmly along with the pocket… gently pull up the excess pocket width at the top and tie off the ribbon…

camouflaged but not totally, and I think it looks kind of pretty when you do notice it   🙂

pinterestmail

crimson rosellas

{Sooo, what’s going on?  It’s actually been well over a month since I made this dress, took these pictures and half wrote this whole post too so maybe I should say something about my absence.  Later.

Meanwhile, over to 6-weeks-ago me …}

This fabric is so cute!  I absolutely love it! well I love the pattern too of course, but I’m going to start with the fabric… I bought it at Spotlight last year, it’s a Jocelyn Proust design.  Actually, Spotlight is on a roll with great Jocelyn Proust designs at the moment… there are lots of absolutely gorgeous ones and it’s nearly impossible to choose just one.  Fortunately when I got this one it was the first one I’d seen, as well as the only one in the store at the time, so I was just like WOW! I love this!  *grab*  *buy*  A coupla weeks later and there were now lots of really beautiful Jocelyn Proust designs in the store from which to choose… but I think I still would have chosen this one!

It’s cotton drill; such practical stuff, and nice to both sew and wear, and I absolutely couldn’t resist the colours … I love navy blue and raspberry pink together.  Also; crimson rosellas.  Any Aussie-specific print is going to catch my eye in the shops and I think this one is really cute.

The pattern is the cover dress of the Burda 07/2018 magazine, dress 118; I’d earmarked it as a must-make from the first flick-through of the magazine… then as soon as the crimson rosella fabric came into my life I was like bingo.  The design of the dress is quite interesting, with a sort of faux bib-front look to it, a raised faced section both front and back of the dress with set-in side panels that help form the pockets.  It’s hard to explain actually, but you can get an idea of how the front sits out over the side panels in the side view shot above.  The “sitting-out” bits have long, oddly shaped facings, that I managed to miraculously cut out from a fairly small piece of navy blue cotton drill, the final leftovers from these Issey Miyake pants from a few years ago.  I only had to piece together one little bit on both facings.  The pattern stipulates a lining, which I decided to leave off because I want to wear mine in the heat of summer… so I needed a way to finish off the armhole edges.  I drafted some facings by just splicing the side pieces together, tracing the raw edge, and cutting the subsequent facings to be the same width as the other facings, for a matching look inside.  All edges inside are finished on the overlocker, with matching bone-coloured thread, mostly because I couldn’t be bothered changing the overlocking thread to navy from the bone I used for the fabric itself! but in the end I really like the look of contrasting colour here.

The dress is drafted as a petite design, so I checked the burda size charts to see what changes I might need to make.  I decided to add in 2cm length to the bodice area of the dress on all pieces, did a quick pattern mockup and this was just the right amount, I think.  The pockets would have just been sitting that little bit too high on me, otherwise.  I love the pocket design on this dress too, but if I made it again I would make them just little bit deeper, maybe 2cm or so.  They are ok the way they are, but you know.  When it comes to pockets, size does matter!

The pocket linings are also cut from the same navy blue cotton drill.

I love the design; it is just slightly on the boxy side which I like for a summer dress.  You’re supposed to put in a whacking long invisible zip in the centre back seam, which I did, very obediently.  And then discovered, as you do; that I can actually slip the dress on over my head without having to undo the zip.  Of course!

Oh, and I ended up re-hemming the dress to be about an inch shorter.  That doesn’t sound very much, but I think it looks a lot better, even that small amount made a difference! From just verging on slightly frumpy to Jackie O chic in just an inch!

This is the fifth thing made  from my #makenine  that is really twelve, list of 12 designs and fabrics that I promised myself at the end of last year.  Hmmm, what should I make next?!

Details:

Dress; Burda 07/2018;118, cotton drill
White oxford shoes, made by me, details here
Black tights; made by me, details here
Black boots; made by me, details here

So… what’s been happening, indeed… well LOTS in the world obviously.  From the perspective of our family here, we lost an important, elderly family member at the beginning of June, and it’s been a very emotional and rather difficult time for us, separately and on top of everything else.  By “everything else” I mean the continuing and not inconsiderable anxieties of Covid-19, and the very important “black lives matter” movement – for which I am obviously pro – and just some other family stuff, so mmm.  It’s been a lot.  I don’t want to go on and on about it because this is my just-for-fun sewing blog and not a “let’s offload all one’s emotional baggage upon an innocent world” blog, and I prefer to dwell on the positive.

With regard to the BLM movement, so I’ve been buying fabric! supporting indigenous makers.  I’m just going to copy and paste here what I already wrote in instagram…

I’ve been thinking about the best way to show my support for blacklivesmatter and as a fervent sewing peep I think using more indigenous textiles is a good start… I was so excited to receive my first purchase the other day… this beautiful piece of fabric, “Tjilkamala Rockhole” designed by Alice Nampitjinpa… this talented lady recently won a collaboration with Gorman clothing with another piece of beautiful artwork so I’m extra excited my first purchase should be from such an amazing artist! …
.
This piece was produced by @ikuntjiartists and purchased through @flyingfoxfabrics and I’m so grateful these cooperations exist to make indigenous work accessible and available to us…
.
I am humbled and inspired by my country’s rich and ancient indigenous culture that has survived here for millenia … I wish to learn how to better honour and protect the Aboriginal people, as well as acting to create a kinder and more respectful future for everyone here in this beautiful country I am so grateful to call home … I’m looking forward to researching and buying more indigenous art fabric, and, if I’m allowed a rather shallow final note, cannot wait to sew something lovely to wear from it, too! #sewing

AND

I’m so thrilled this beautiful length of art fabric has arrived! This print is “Mandem” designed by Eva Nganjmirra and printed on linen by @injalakarts a wholly Aboriginal owned and governed community art centre in the Northern Territory… and from whom I purchased this piece. .
I can’t wait to trawl through my patterns and make something hopefully worthy enough to do justice to this beautiful work.
.
#sewing

ALSO…  in the meantime, I also participated in me-made May last month, as usual.  I pledged to wear 100% me-made, including my shoes and underwear, because why not? I have plenty of me-made things to wear!  I was happy to achieve this, and to also mix and match my existing wardrobe so as to not repeat anything during the month either, apart from obviously black tights and a few of my shoes.  There was only one tiny fail at the end there, where I neglected to wear me-made shoes for the final two days of the month, because we’d gone down south and I just decided oh to heck with it.

Here are my outfits for the month.  Absolutely everything made by me, except for the boots on the last two days of the month  🙂

pinterestmail

knots and crosses

I made this crazy outfit!  I know; it doesn’t “look” too crazy.. but it is, because it was a super-fiddly process and took aaaaaages.  Not content with just using what was actually very nice fabric as is; I, of course, made life more difficult for myself by instead cutting it up to make new fabric.  Crazy..  Yep.

But I’m getting ahead of myself…. this is actually my entrant into the Tessuti Sewing competition… the idea is that you get some of the nominated competition fabric and make something with it… pretty simple huh? but the kicker is that nothing else other than the competition fabric can be visible and you cannot dye it either.  Tessuti nominated a family of six fabrics, which was pretty awesome! three colour ways of two related eyelet fabrics; one is Knots, the other is, naturellement, Crosses.  I bought the Natural colour way of both fabrics and got to work!

My thought was to cut the fabrics up “creatively” to make a multi-layered, multi-textured sort of a thing, like a layered lace kind of a look…

For the top; I cut the fabric into 3 types of fabric strips; the knots fabric on the bias, snipping out the backing fabric to make the pretty embroidery design into an edging.   The crosses fabric I cut strips on both the bias and the straight; in each case snipping out the backing fabric carefully to leave the embroidery forming a pretty border.  I arranged these strips over a pale pink lining bodice and stitched them in place with double rows of stitching…

the sleeves are in the knots fabric, and I cut the edging “lace” like so; just the very edge of the crosses fabric cut on the straight made the outer, lace-like edging.  The neckline edge is made from two different cuts of the same Knots fabric, one on both the bias and one on the straight.  The eyelet with the “ribbon” thread through is one diagonal arm of the knots fabric, and the lace edging was the same fabric cut on the straight; the two were stitched together to make the neckline edging.  The blue “ribbon” threaded through the neckline edge; well you might be thinking, ah, but that’s not the competition fabric?  Fail!  But it IS the competition fabric!  The selvedge had these pretty blue striped borders printed along the edge… I carefully stitched very very close to the blue with tiny, 1mm stitches to stabilise and help prevent it from fraying, and cut off the excess to make a ribbon to thread through my created eyelet.

The skirt is relatively simple, sort of… I dug out a favourite old skirt pattern Vogue 7880, which has multiple, asymmetric layers.  It’s such a lovely pattern, I haven’t made it for ages but I think about it every now and then.  Now, as before; I lengthened the skirt stay pieces to make a full lining for the skirt, otherwise just made it up as normal.  The lining is the same pale pink lining fabric I used for the top.  I used a “natural”-coloured invisible zip in the left side seam.


It’s looking very pressed and neat in these pictures, but what I’m really looking forward to is washing it and letting it crease and rumple naturally, which I think will look really charming.  And better, I think…   I really should have done this before taking my pictures here but I literally forgot about the competition until the last minute and had to take my pictures here on the very last day.  Which is today.  Gah!  I hate being incompetent!!

So.  I actually do really like this outfit…

however!!  I purposely did not look at the tessuti pinterest board with everyone else’s entries in the lead-up to the competition, because I did not want to be influenced by anyone else’s design decisions.  I just wanted to come up with my own ideas purely unaided and unabetted – is that even a word? Never mind… stream of consciousness blogging!!  Well, as I was saying, I finished my outfit, quite oblivious; took a bunch of pictures and sent in my entry, THEN I went over and had a look at the pinterest board of entries.  And immediately saw that I had not the proverbial snowflake’s chance in hell.  There were SO MANY beautiful and fantastic entries!  It was wonderful to see so much creativity! even though mine is kinda ordinary, but I can live with that.  I think the top’s kinda pretty and as a whole it’s ok!

Details:

Top; kinda based upon New Look 6483, except completely different and with nothing of the original remaining.
Skirt; Vogue 7880
Tights, made by me, details here
Shoes; made by me, details here


pinterestmail

pink Axis

I absolutely love this, my new dress!! for several reasons, upon which I shall now proceed to wax lyrical…

The pattern is the Axis dress by Papercut patterns… I’ve loved this pattern company for several years… for one thing their packaging is absolutely the most beautiful of all.  I know that seems like a shallow sort of a reason to buy a pattern but hey, it’s ok to be shallow when you want to be.  I think we’ve all deserved that right!  The patterns are printed on nice crisp brown paper, and the instructions are printed on the same paper as the pattern pieces.  You cut them off and accordion-fold and glue them together to make up your little instruction book.  This is a pretty fun crafty little thing to do before you make up your pattern!

Secondly, Papercut patterns are a New Zealand company, and I have a soft spot for the land of the long white cloud.  Also I love to support fellow antipodeans.

Additionally, Papercut Patterns have always had this indefinable aura of the cool-girl about them, and who doesn’t want to be a cool girl, hmmm?   to be honest I’ve sometimes thought some of the designs are a little … basic, but at the same time that wonderful packaging makes it worth paying for those of the designs that are more individual, if that makes sense.  By the way, absolutely nothing wrong with basic patterns! and from what I’ve observed in the sewing world it’s often the most ordinary of patterns that seem to be the biggest and most popular sellers.  So there you go.

In any case, I love the Axis pattern, I happen to think it’s pretty unique, and it appealed to me immediately.  I also have their Sapporo pattern, and hope I can get around to it finally this year!

My fabric is a really gorgeous, slubby cotton from Fabulous Fabrics, a Christmas gift from Cassie last year.  Actually we’d been shopping there together and I almost bought it for myself before Cassie stopped me, and reminded me that she needed to have a Christmas gift for me!  She knows me so well!

This fabric is the same stuff from which I’ve made:  this set, this dress, this dress, and this dress too; each of them just in a different colour way.  You can see how much I love this fabric! I have bought some of practically every colour way it’s ever come out in, and all of these things have got worn a LOT in their time.

I made my dress to have the A-line skirt version, but I also added in the front walking slit too, which is really supposed to just be put into the straight version of the skirt, so you can walk normally of course.  I take very big strides while I walk, so I did the walking slit AND the A-line cut.  Rebellious!!  I cut my top as a size 3 and the skirt graded out from the size 3 waist to a size 4 at hip level.  This is why I make my own clothes!!

The Pocket is something I will often try to bung in to a pocketless new thing somehow, if possible…  in this case I decided the best sort of pocket for this sleek, body skimming style could be a patch pocket.  Craig thought they might turn out to be a mistake, spoil the line, but I stuck some on anyway, figuring I could take them off if they looked awful.  But I really like them!  both how they look and obviously they’ll be practical even if you can only fit slimline things like a phone, credit card and maybe a key in there…  I kinda pictured them standing out from the body at the top edge rather than laying flat on the body, and fine-tuned the exact amount of “stand-out-iness” and placement in pinning trials.  They are simply top-stitched in place; my slubby cotton is quite “sponge-y” and so the stitches sink into it quite beautifully.

I had not quite enough fabric to cut out the dress completely… those back bodice pieces are HUGE and you need to cut out FOUR of them! but I had nearly enough that I managed to make it all work.  There is just the tiniest amount of pink voile pieced in at the top of the front facing shoulder strap.

With the front slit, you’re just supposed to turn under the seam allowance in a single layer and top-stitch it down but I finished mine with a little facing.  I think this adds a small but nice amount of weight to the hem, and balances it out against the heavily faced bodice area.  The facing is stitched on, trimmed, graded, turned under and under stitched, and hand slip-stitched in place at the same time I did the hem.

Look at that perfect zip!!

hmmm, so why has Carolyn just posted two sets of near identical pictures of the zip?? so maybe you can just barely detect that the zip in the second set does look a little bit pink? compared to the first?  Yes, there is a little disaster story there…  I originally put in that cream coloured zip above, patting myself on the back that I had a mostly suitable zip in my stash already and didn’t need to pop out and buy a new one.  I even took all my pictures here with that zip in.  Then I was re-pressing this brand new dress and putting it away, and what should happen but to my horror the zip just casually split open underneath the pull.  Aaaagh!!   I simply could NOT believe it!  My brand new, perfect dress!!  I tried and tried to tease the teeth back together, resurrect the zip, but it was truly stuffed and there was nothing for it; I just had to unpick the wrecked zip, and head into Spotlight to buy a new one… since I sadly did not have a second suitable zip in my stash.  I made my trip worthwhile though, by picking up a little range of new threads and some more zips that I knew I’d need in the future.  I tried to nobly restrain myself from buying more fabric too, but failed in such endeavours.  Well, I needed to cheer myself up!  You just do sometimes, you know?!  Especially when one suddenly needs to replace a BRAND NEW ZIP in a BRAND NEW DRESS 🙂

I think the problem was too much bulk in the back waistband/skirt junction, since I had stupidly tread quite light while trimming the seam allowances in there…   The waistband is a single piece foldover one, interfaced fully, so you end up with triple thickness of interfaced waistband, interfaced seam allowance and interfaced self-facing, add in a skirt seam allowance too, and that’s a fair amount of bulk at that junction.  The zip “looked” perfectly fine, but the bulk of fabric hard up against the zip pull did make it difficult to pull up and down past that point and I’m not quite sure how it happened but it all proved too much for the mechanism. When I inserted the second new zip I aggressively trimmed away a lot of that bulk inside before stitching in the invisible zip, and this helped a lot, I think.

Anyway; zip drama notwithstanding; I still really really love this new dress! we’re still getting warm enough days every now and again that I can wear it now! and even in slightly cooler weather it’ll be still be nice with a little white tee worn underneath too.

This is my fourth thing from my #makenine but actually twelve, that I challenged myself to make for this year.

Details:

Dress; Papercut Patterns Axis dress with pockets; textured pink cotton
Sandals; ariel, from an op shop years and years ago

pinterestmail

blue Blair jacket

Hello!  I made a new thing.  It’s sort of a jacket, sort of a coat.  What’s the difference between those two things anyway, I wonder?  I always thought a jacket was short, like maybe no longer than hip length max, and a coat is longer, like anything past the hip.  This pattern is marketed as a jacket, but also as potentially a shirt-dress, and the two variations are called duster and blazer respectively; so I guess you can take your pick!  A multi-faceted design, to be sure!Whichever, it’s unlined so a very simple and quick thing to make as far as jackets go, and the boxy unfitted shape makes for an undemanding fitting process too.  Oh, maybe I should mention the name of the pattern; this is the new Blair jacket pattern by Homer and Howell, and I made the duster length.

I really enjoyed making this! you normally think of jackets/coats/dusters as being quite involved but this was really easy.  Even considering that I chose to bind all the raw edges inside with HongKong binding, which is a process that when you’re about to embark on it you think; oh this is going to take FOREVER… But since I figured the seam allowances were going to show every single time the coat blew open I wanted everything to look neat and tidy inside.  And whenever I do get going with HongKong seaming I invariably love it, end up thinking, oh this is FAB!! and why don’t I do this for ALL the things I make, hmmm??

My fabric is a wool-blend suiting that I’ve had in my stash for years and years; so long I cannot even remember who gave it to me.  Because, yes; it was donated to me from someone else’s stash once upon a time.  I think maybe my grandmother’s?  It’s beautiful quality, but I’d always shied away from using it because I thought the colour was absolutely terrible for me.

However right now I’m trying to be more resourceful and use le stash, stay in my house and avoid shopping as much as possible.  You know, isolation and all that … so decided what the heck.  That’s why dyes were invented, right?  I knew the fabric wasn’t 100%wool, but it was worth a try.  Sploonch! it went, straight into a navy blue dye-bath.

This actually worked out pretty well… it’s now a lovely shade of …  bruise?? ok maybe I’d describe it as smokey blue, or even light teal.. anyway it’s a richly smudge-y sort of a colour that I really like and a big improvement on the original light sky-blue.  For the HongKong seaming I used an olive green poplin from my stash too.

Buttons! well obviously I had nothing that matched in size or colour AT ALL and normally I’d pop off to the shops to search for something.  But see I’d made up my mind to work from my stash, and giving in on the buttons would be such a fail… so fresh on the heels of making my tea-cup for the bridal shower hat, I thought I’d try to make some from modelling clay.  I think they worked out really well!

I don’t think I’ll be tossing the coat in the washing machine any time soon, just in case, although I’m sure they would probably survive fine.  Maybe just a gentle hand-wash.  But look at them!  I LOVE them!  I especially love how slightly wonky they are.  Of course any and all wonkiness was completely intentional  😉

I’m just going to briefly mention the changes I made to the pattern:

I switched the orientation of the box pleat in the back to be an “innie” rather than an “outie”

I added a hanging loop inside the collar/yoke seam

I put in BIG inseam pockets into the side seams.  Yes, there are now pockets in the Blair pattern, but I was a tester for this pattern and they weren’t in the original design.  I NEED pockets in a coat! so I actually went in with the seam ripper and added some in after I’d finished the coat completely.

Here’s a little video on the making of this coat, now up on my YouTube channel… I’d like to say that the quality of my videos is improving, but I still haven’t worked out how to even add music.  I feel like such a youtube failure!  but it’s such a lot to even get this out.  I’m trying to improve!

Anyway, blogging/vlogging fails aside; the final verdict is that I’m going to love wearing this… coats are not an awfully common sight here in Perth, we’re so ridiculously casual here, to a fault! But I really love coats, both the making and the wearing of them; and I really love looking at pictures of Northern hemisphere bloggers wearing coats regularly that I’m going to just do it anyway.  This is one of those things that is kinda un-Perth, even though I’m deeply Perth in just about every way.  This is weird, but it’s just the way it is  🙂


Details:

Coat; the blair jacket pattern byHomer and Howells, in a wool mix suiting
Dress; the Cissy dress pattern by Homer and Howells in a rust coloured lace, underlined with pink/rust dyed cotton, details here
Tights; my own design, black stretch stuff, details here
Black shoes; my own design and made by me, details here
Floral dress; based upon Simplicity 8658, floral cotton gauze, details here
White shoes; designed and made by me, details here

pinterestmail
Switch to mobile version
↓