Tag Archives: Bag

a cosy new dress and a backpack

hello!  long time no see!  I’ve been very busy lately, being a diligent little jet setter and living out of one suitcase for an entire month …  I do have a travel wardrobe post planned but it will take me little while!

Anyway, I made a new dress before I left and took it away with me. I’ve worn it quite a lot already! and managed to take a few photos out in the wild.  Not that top photo though.  The other ones  🙂

babysitting my littlest grandson G.. I knitted his beanie early last year (posted here)

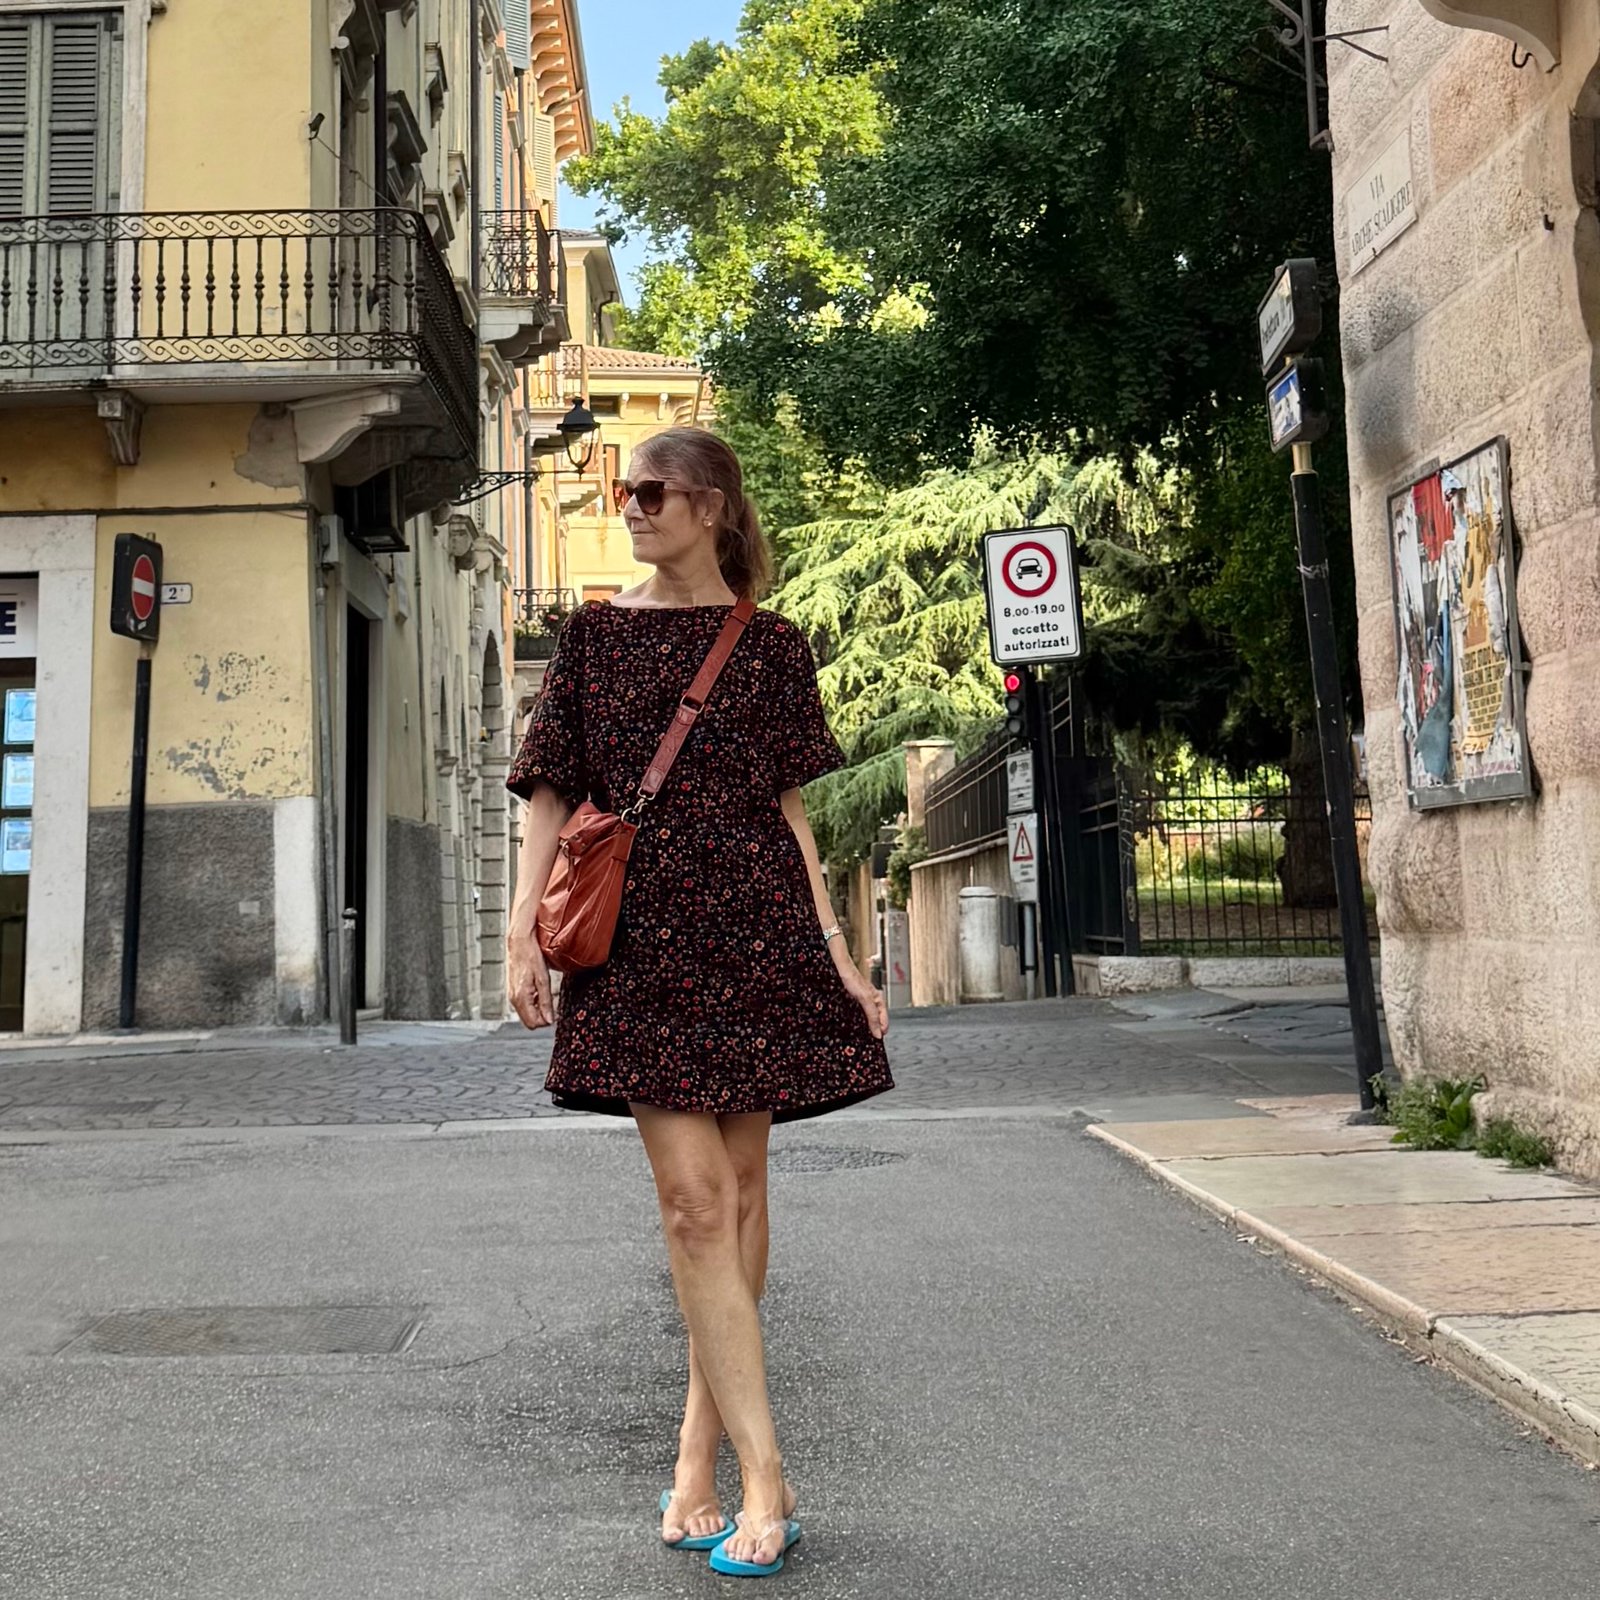
The pattern is the new Mirri pattern by Fibremood, a delightfully quick and easy thing to make; and I used a lightweight cotton corduroy bought from Spotlight just before covid lockdown if I remember correctly.  I loved the pretty bright florals on black background, and luckily had “just” enough for this pattern.

feels pretty good even in 36C heat!

Surprisingly, it reads as kinda “brown” from a distance, probably because of the large-ish amount of orange and black merging together.  Honestly I did not expect that effect!

The Mirri is supposed to be a summer pattern, of course; since the new European summer patterns are all released during our, southern hemisphere, winter… however I can still usually manage to wrangle something together that’s suitable for me, somehow, anyhow.  As it happens, I’ve found this dress has been that rare happy and successful marriage between summer pattern/winter fabric… it’s loose enough to be breezy and therefore cool in hot weather, but then can be worn over tights and a warm merino top to keep you cosy in cold wintery weather too.  Versatile!

It’s such an easy to make design there’s really not much to say.  The neckline is finished with a bias cut strip and the pattern includes a lovely deep hemline facing, which I edged with the same orange linen bias binding.  I think this looks so pretty.  Designwise, it has deep side pockets and sleeve cuffs.  Hmm, that’s it, really…

worn over my indigo dyed, linen Pauline Alice patterns Mestre shirt, blogged here.

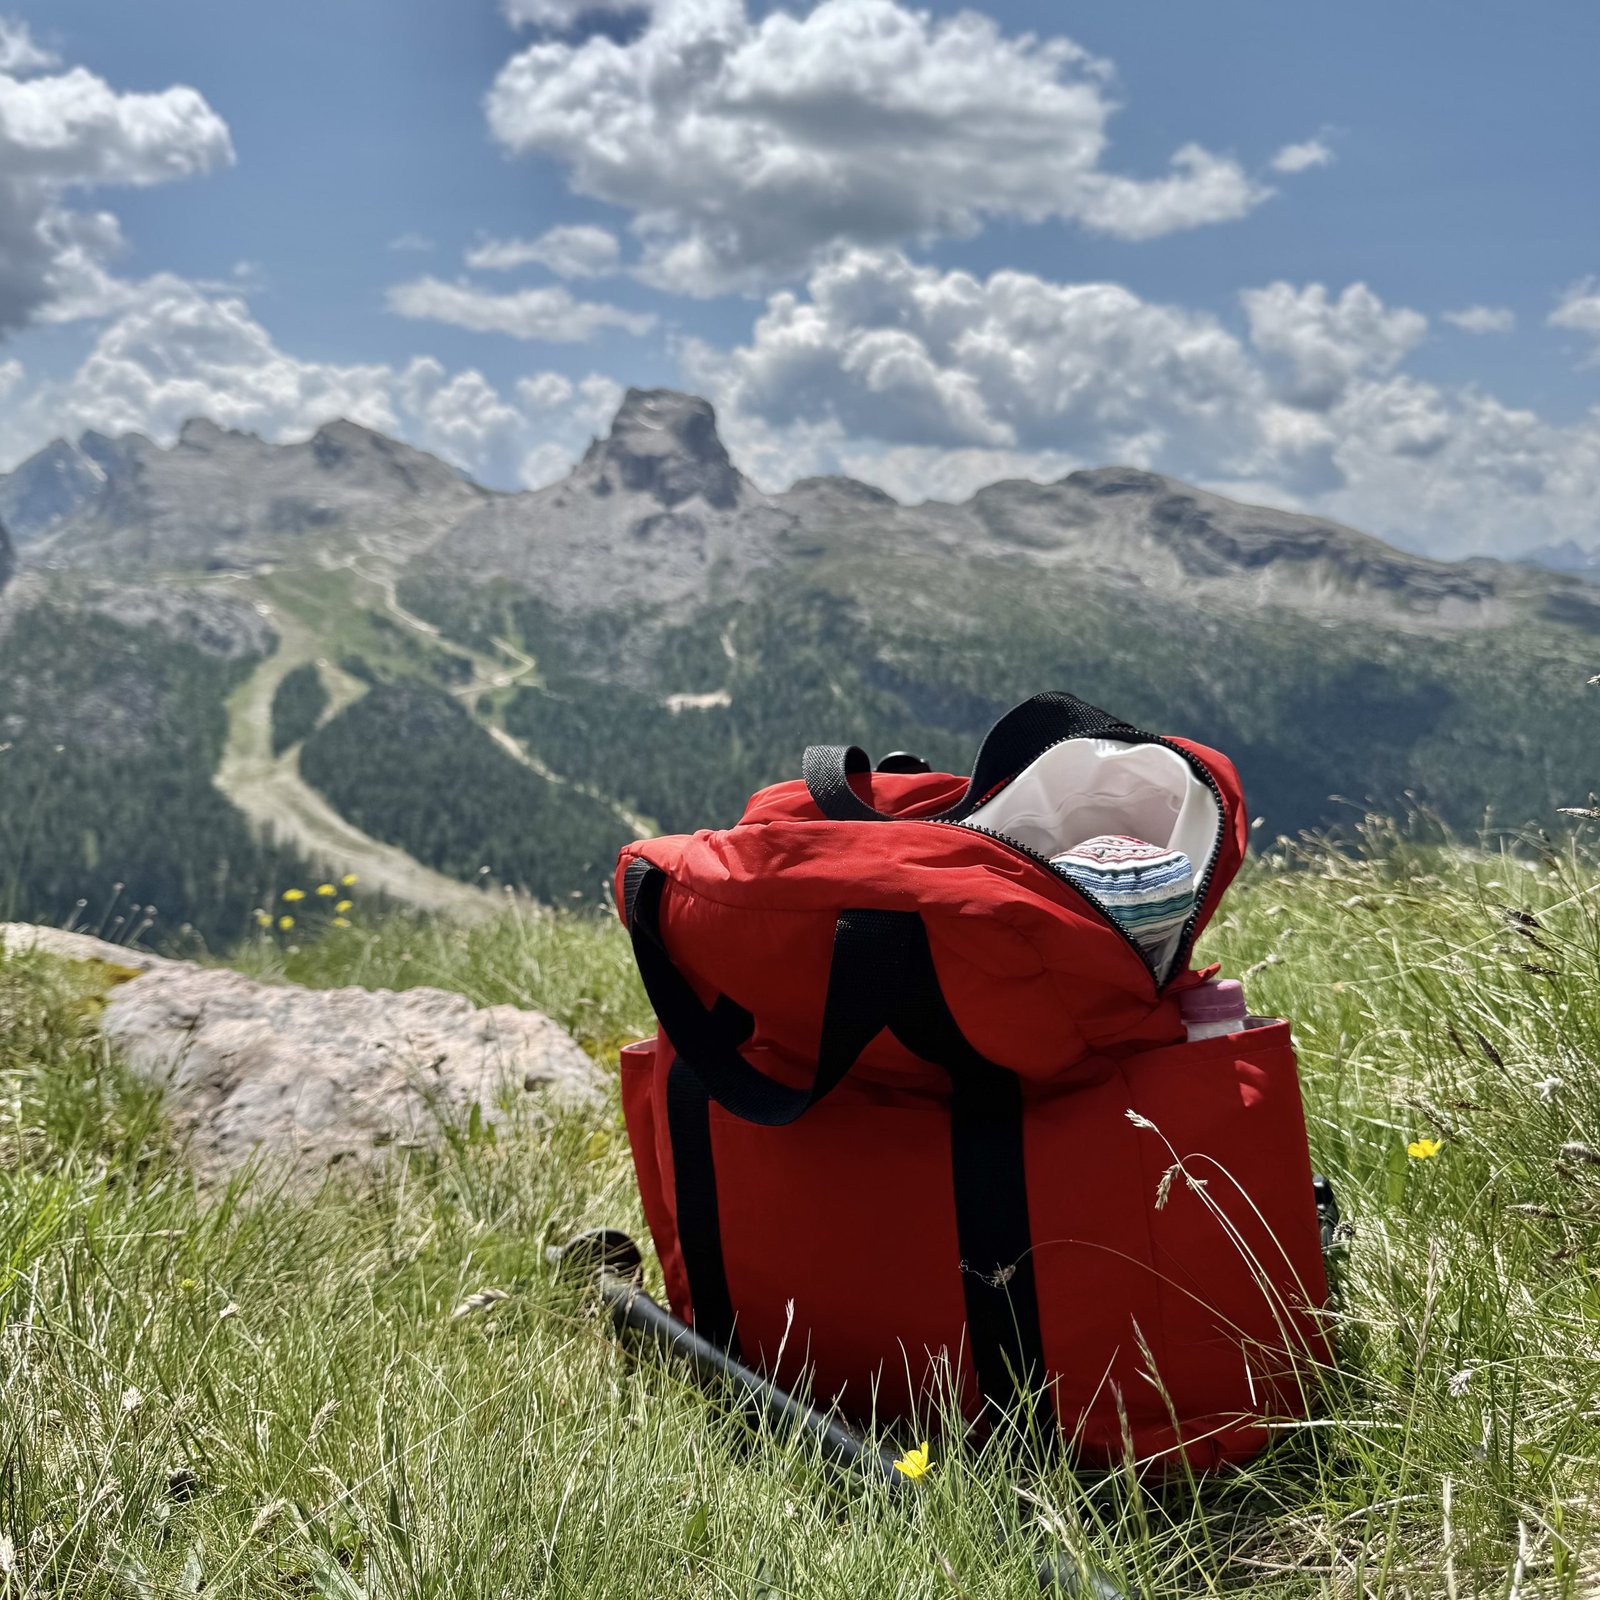
And, I made something else new on the eve of our departure overseas… a backpack.  I’ve never really worn a backpack much during our hiking travels but decided it was high time I got one so poor Craig didn’t have to carry everything in his backpack!  I used this tutorial called “DIY 3-pocket casual backpack” by a Korean channel, Tendersmile Handmade.  This was an absolute terrific tutorial, very easy to follow and I loved the final result.

I made mine from a tomato red water-resistant stuff that I bought many years ago, I think from a Morrison clothing company fabric sale.  I already had some white waterproof plastic fabric, leftover from when I made a whole lot of luggage for some of my family for Christmas one year (here).  I also interlined with some wool wadding between the two layers for a bit of padding. All these materials were from stash, and I bought the strapping, zip and plastic hardware from Spotlight.

I altered the dimensions by a bit; specifically making mine 10cm “higher”, and so made the side pockets a little higher to compensate proportionally.  My zip was also a different length, so all the dimensions of the side, bottom and top pieces are different actually.  It really wasn’t all that difficult to work out though.

I couldn’t get a zip like theirs that zipped from the middle out, mine zips from each outside edge in.  This wasn’t ideal, but didn’t make a lot of difference.  I also stitched the lining down firmly to the seam allowance inside to keep it firmly in place as far as I could possibly reach; the bottom and top edges, and part of the side edges. The tutorial doesn’t tell you to do this but I imagine the lining would just kind of float around inside the bag in an annoying way if you didn’t anchor it to the bag in a few key positions.

The backpack worked out really great! and would have been actually perfect if it had been for one small modification… to have a shoulder strap as well so I could carry it comfortably as a cross body bag if I wanted to.  I desired this variation so greatly that since I returned home I did indeed pop off to Spotlight for all the necessary bits and added one.  This can be removed if not in use.  As well, I added a “made in 2025″label, that I’d forgotten when I first made it.  Voila!

So this bag did absolutely great duty and I enjoyed making and wearing and using it.  It passed the waterproof test on one day of continuous rain and all my stuff inside remained perfectly dry.  My water bottle fitted in the side pocket just fine.  Having three internal pockets worked well for how I like to arrange my stuff.  I did think it possibly couldn’t carry a superheavy load, but then I wouldn’t want to do that anyway.


pinterestmail

pretty blouse, handbag, wallet, underthings, baby things and pink books

I’ve been checking out all my as-yet unblogged things, and there are so many!  I guess I’ve been in a real blogging slump this year.  Anyway, apologies for the overloaded, as well as overdue! blog post, and here we go…!

Item 1: a pretty lingerie set.  This is of course the Watson pattern by cloth habit, one I’ll be making for the rest of my life, I’m sure… just such a goodie.  Same modifications I’ve always made. (see here)…

I had all the elastics and bits and pieces already, and a quite short length of bright neon yellow elastic, leftover from this set… it was fun incorporating a length of it in each piece!

Item 2; a pretty blouse.  This is actually my most recently made thing… well, apart from a few samples for our new pattern, to be announced very soon, I hope!

This design is the new Nova pattern by Fibremood. It has a very interesting fluted neckline, that attracted me to it in the first place.  I dunno, but I can’t resist a unique twist to a thing! and simply must try it out.

I used a length of pretty slightly brushed cotton, given to me by Mum when she cleaned out her stash.  It’s lovely, isn’t it?!  I added one pocket, just for fun, and threaded a length of elastic through each sleeve hem, a look that I really like lately.

The back has a centre-back seam with an invisible zip.  Quite unnecessary, since I found you can pull it over your head quite easily.  Something I like to do with the end of an invisible zip is to wrap the end with a little piece of fabric, since a lot of invisible zips seem to have almost imperceptible sharp bits at the end, that will torment you without pity if you don’t do something about it first.

The back has a centre-back seam with an invisible zip.  Quite unnecessary, since I found you can pull it over your head quite easily.  Something I like to do with the end of an invisible zip is to wrap the end with a little piece of fabric, since a lot of invisible zips seem to have almost imperceptible sharp bits at the end, that will torment you without pity if you don’t do something about it first.

Item 3; this cute little bag… I made this earlier this winter, using a kit from JT Tanner bought during lockdown actually!

It was an exceptionally beautiful kit and I really enjoyed putting it together, in spite of breaking all three of the provided needles!  however I finally figured how to stitch through that tough tough leather without putting too much strain on the needles… :D. and am super happy with the quite profesh look of the final product!

I wore it a few times, but it had one small problem which ultimate led me to my next project…

Item 4; a little wallet.  My new bag is awesome, but my current purse doesn’t fit into it at all, and since the bag is such that a loose credit card or cash would easily fall out of the gaps,  I decided that I needed a customised purse! Yes, I’m admittedly weird about not immediately shopping for things at the moment and I also I do like to challenge myself, ergo; I decided to have a go at making one.

There was one failed version before this final one, failed only because I cut the zip too short and it couldn’t flip out open completely; but this one is nearly perfect, I’m happy to report.


I didn’t want to use any of my precious leather just yet! although I might be ready to go there soon; instead I used charcoal felt, that I bought to make a stuffed toy at some point (still unblogged, whoops!). Fortunately I still have a huge number of oddly coloured zips that Mum gave me at some point, and found two matching ones.  The wallet took a bit of very careful measuring and lining up, and I am pretty proud of the final precision.

It has a whole lot of card slots, a zipped coin compartment, one separate car slot that I was initially intending to have a clear plastic window in it, but couldn’t found the right plastic on hand and didn’t want to go out and source any either.  C’est la vie!  Oh, and also a bellowed pocket for bills/notes.  This time I carefully made sure the wallet could flip open fully and lie flat.

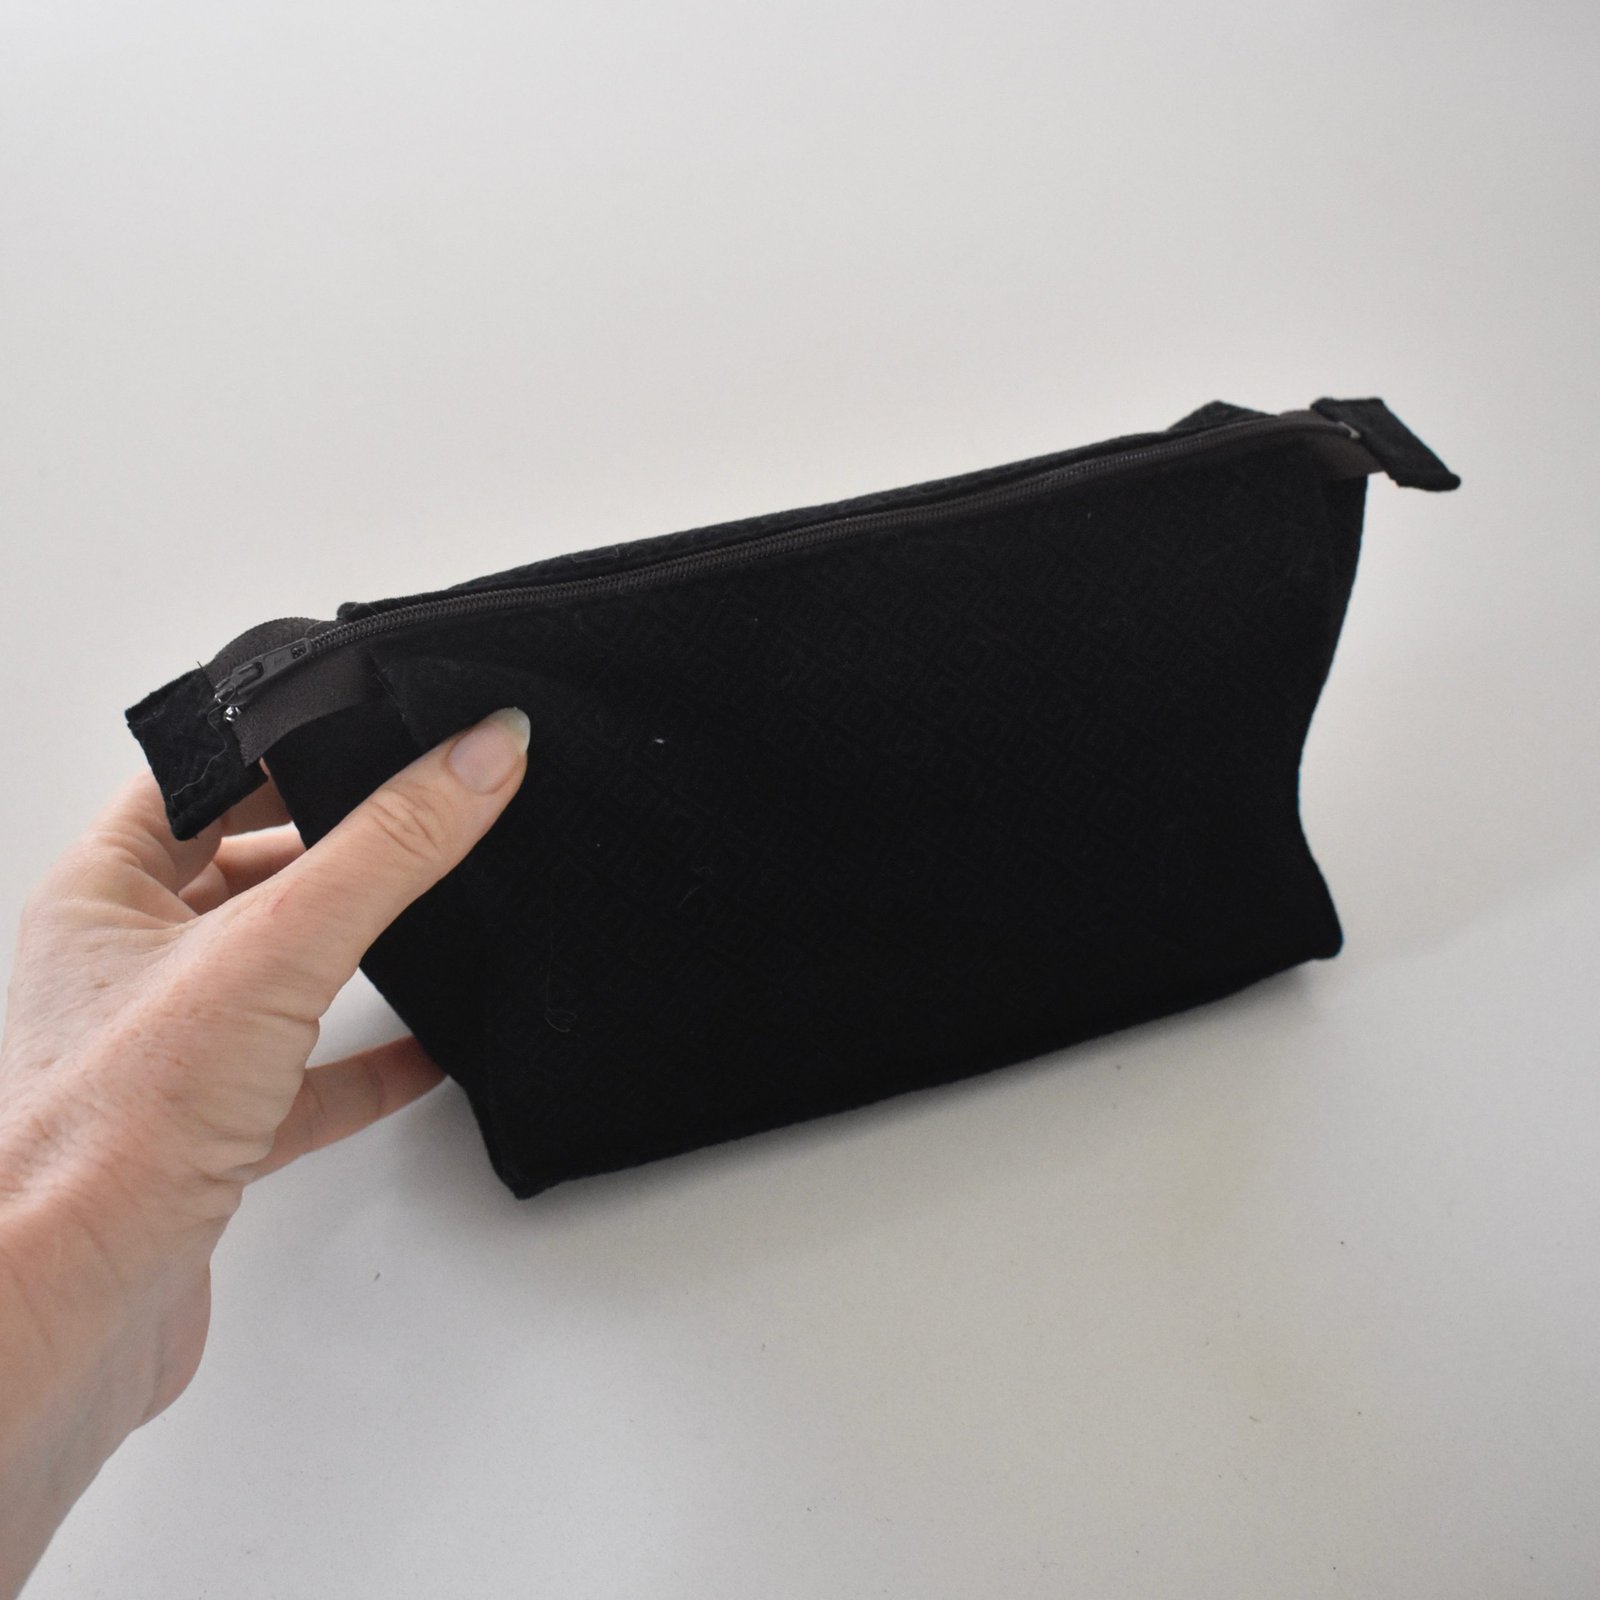
 I agonised on how to put in the zip, finish the raw edges, and eventually bound the edges with matching charcoal linen – the same stuff I used to line the card slots and coin pocket. I hand stitched the linen binding down inside, and then finally glued the outer layer over the top.  I wasn’t sure how the glueing would work out, but it has nicely stiffened up the final product in a very satisfactory way.

And it fits into the bag perfectly!

Item 5; I’m not sure if I’ve posted this before? if not here tis… a baby onesie for our friend’s baby.  Design is my own, and yes, I used the leftovers for my Watson set, above!

Item 6, 7, 8, 9

some new little books.  I always save and cut up the leftover paper from paper patterns and make little books from them.  It’s fun to do this and makes me feel virtuously zero waste.  All materials are waste scraps and leftovers from other projects.  I have one in my handbag all the time and use it all the time, and they make nice gifts too, I think!

I think that’s enough for now?  Anyway, I’ll be back with more soon!

pinterestmail

bikini washing bag

… the zip on my old lingerie washing bag finally gave up the ghost, so I whipped up a new one!  Perforated sports fabric has been in Le Stash for years, I originally bought a long length of this from the Remnant Warehouse for raincoat vents and I think it’s going to last me a lifetime! purple zip inherited from a large batch of random haberdashery from Mum…

After I’d cut it out I decided to tizzy it up a bit with a spot of embroidery… I was going for the bikini emoji so tried embroidering yellow French knot “polka dots” over the pink but they sadly turned absolutely terrible so OFF they came!  It’s ok, I happen to think the pink bikini by itself is super cute and I’m very pleased with it.  I was little worried the satin stitch would skew in the wash, but it’s survived several washes already and come out totally unscathed so I think it’s going to be quite stable!

To do the embroidery, I freehand drew the bikini straight onto my bag with lead pencil.  The sports fabric is a little stretchy, so on the back (inside) of the bag I pinned a bias cut piece of white linen.  This provides a stable “tough” layer to give the embroidery a nice strong backing, so it won’t stretch out.


I outlined the design with simple back stitch, and then just filled in the gap with satin stitch.  The bikini straps are double stitches.


On, I should mention something about the zip too… again because of the sports fabric being a little stretchy and we all know what inserting a zip into stretchy fabric looks like ie. absolutely blooming’ awful most of the time…. anyway I interfaced the zip opening with fusible interfacing AND stay-stitched the zip box as well as the stitching lines before putting in the zip.  I think it did the trick as my zip is nice and smooth and flat with no bubbly bits or humps or bumps.

Et voila!

pinterestmail

bucket hats and tights and a big big bag…

Oh hello!  Those blue blue skies are making me so happy right now, as most of the past month has been more like this:

Oh yay, storm clouds, yes you’re making me happy too… not.

I’ve been making lots of stuff lately and the last two pics feature two of them…. two bucket hats!  This is the new Bruno pattern by FibreMood.  I made the green corduroy one first and it was a tad too tight on me so I’ve given it to Arthur.  It fits him quite well actually! with a little room to grow, and of course he looks super adorable in it too!

The pink one was my second go at the pattern, and this one fits ME, fortunately!  I used cotton canvas, leftover from this lovely pink top I made for Cassie’s work capsule wardrobe last year, and it is lined with some very pretty green polka-dot silk crepe leftover from the dress I made for Mum to wear to Cassie’s wedding a couple of years ago… the green one is lined with the same green polka-dot.  I know, right…  fancy linings are a bit …. fancy?!  At least my hair is enjoying the proximity to such luxury.

Next up… I made a whole batch of new black tights.  Not fancy at all, but these are literally the mainstay of my winter wardrobe and I was absolutely desperate for new ones!

These are made using my own custom fit pattern, and thin black super-stretch poly from Spotlight… and it’s not even new fabric, I bought a large length of this about three or maybe even four? years ago in preparation for making more tights.  Then I just kept putting it off.  My old tights got pretty ratty but … you know; I sure got a good innings out of those things.   And now it’s also feels pretty good to get that 5m or so of black poly out of my stash!

These are so much warmer than most RTW winter tights I’ve ever had and of course they fit me perfectly, never falling down or sagging at the crotch.  They have a distinct front and back so I always stitch a contrasting zig zag at the back, for easy identification when I’m rushing to pull them on on a dark winter morning. Yes it’s a bit rough but effective!

Lastly, I also made a giant beach bag!

This thing truly is GIANT, which is great because beach towels are pretty giant too, usually.  I used another newish FibreMood pattern, the Nouria; and cut up an old towel to make it, which seems a slightly cannibalistic thing to do? but I think towelling will be very practical and hopefully perfect beach-bag material.   The design used up the entire towel, like it was designed on purpose to do so! which is of course awesome.  I’m all for making use of every little bit of fabric, as much as I can! The handles are plain cotton canvas; also from my existing stash.  Yay, for using up more stash!

My only slight regret now is that I didn’t choose a more colourful or exciting towel! but this one was there and available and no longer being used, so yay for recycling!

It’s lined with plain white poplin (yes, stash) and I added a few extra internal pockets to reduce the risk of things getting completely lost within the cavernous expanse of the bag… a biggish pocket for a book with a sectioned off bit for a pen, and a phone pocket.  And it already has a huge pocket on the outside too, for frequently required sundries such as sunblock and a water bottle.

Craig’s phone is standing in for my own, which had more urgent duties to perform such as taking this picture here, hehe…

SOOOO ready for summer now!!  oh and btw, I have even more recently made stuff to share here very soon.  Even if I haven’t updated my blog in a while, I really have been making quite assiduously and diligently!

pinterestmail

regarding lingerie and shopping totes

I made some pretty new underwear… I bought this super cute Snugglepot and Cuddlepie cotton jersey from Spotlight at the very end of last year.  Such a beautiful print, yes?  Slice of my childhood, right there,  I just could not resist!

I am in need of padded underwired bras during winter, because I tend to favour merino T-shirts at this time… thus I made another one.  This brings my bra numbers back up to a respectable number so that I don’t have to hunt around looking for enough things to go into a wash every few days!  Honestly, when the kids leave home, that’s something you don’t take into account!

I used my old favourite, MakeBra DL 03 again.  Although I lately bought the Emerald Erin Black Beauty pattern and am aiming to run up a trial run of it sometime soon, when I get the time for that sort of thing again.  Right now, I only have the time for a tried and true.

The two set of matching knickers are once again the cloth habit Watson briefs.  Sorry to be so predictable!

The neon yellow picot elastic was also surprisingly from Spotlight; i say surprising because it’s pretty unusual for them to stock something so…. not-basic.  Ribbon, also from Spotlight.  The pale green strap elastic was from Homecraft Textiles, of course.  I would have LOVED to find neon yellow strap elastic too, but beggars cannot be choosers around these parts!

While I had the yellow raincoat leftovers from Theo’s raincoat (previous post) I also cut out a Claremont shopping tote for myself, thus using up the very last scraps, which felt awesome.  I’ve been needing a new shopping tote for quite a while, since my older one is pretty shabby now.  I did have to piece the bottom bit due to lack of fabric but that’s ok, I double flat-felled all seams for extra strength so I’m confident it will all hold up well.  I also didn’t have enough fabric for the facing, so just finished the edge with some mustard poplin from my stash, and the yellow zip is an inherited oldie from stash.

in situ in Coles, awaiting the grocery haul

mission accomplished… 

Hurray! I’m really ripping through the stash lately!  Feels so good!

obligatory pocket photos…


In my #use30 challenge update, the lingerie used 0.5m, and the bag also used about 0.5m… bringing my total up to 24m used, and just 6m to go.  I’m so stoked at that number, it feels truly reachable at last!

pinterestmail

FEED ME! … a peg bag

So I’ve just whipped up this crazy little peg bag …  it makes me smile every time I hang up the laundry!

I used an approximately 50cm length of charcoal denim from the stash, too small for a skirt but not so small to toss out of course!  I know, no scrap pieces is too small to throw out really, but you know what I mean.

I drew up a pattern with a boxed bottom, and edged the opening with some red cotton bias leftover from my previous dp studio sporty dress.  The teeth are from the same sturdy cotton I used for the dress’s white “sporty” panels, interfaced.


I inserted the hanger through the open, unstitched bottom of the peg bag, and then pulled the bottom edge through its “mouth” to stitch it closed.  Then stuffed the bottom edge back down through the mouth to the inside.  So it’s all nice and neatly finished with the hanger firmly ensconced in position, only the wire hook poking out through a tiny hole in the top.

It’s pretty cute, I think!  Gives me a giggle every time I catch sight of it!

AAAAAAAGH NOOOOO!!!

#use30 update: 19m down, 11m to go!

pinterestmail

Arthur’s backpack

I also made a back pack for Arthur, for Christmas …

I’ve made this pattern a couple of times before, for my own children, and Tim particularly loved his backpack when he was tiny.  He wore it all the time and would toddle about the house with it on his back, with a few precious toys stashed inside… it was very cute!  and he still has it today.  It was Tim who suggested one for Arthur too.

Fortunately I still have all my Topkids magazines, including the one the pattern was in! I still flick through them sometimes, and while some of the patterns might be considered a tiny bit dated, especially some of the ones for older kids; there are still plenty of cute ones in there.  I’m never throwing them out! Love my Topkids magazines!

I had the dark grey denim in my stash already, and also the red check cotton I used for lining throughout… the latter given to me by Mum when she cleaned out her stash.

I hand drew the letters for his name… transferred them to interfered cotton, cut them out, and stitched them to the pocket piece with narrow, closely spaced zig-zag stitches.  I had the velcro, wadding, D-rings and little swivel clip for closure already, but had to buy all the other pieces for the backpack; the red webbing, stops for the straps, and cording.  Still though, it’s been amazing to me what I do have in my stash already and am capable of finally putting to good use!


If you’d like to see Tim’s own backpack, I blogged about his yonks ago here, back in the early days of my blog.  He still has it today and loves it!  This is so heartwarming to me, and I just hope Arthur loves and enjoys using and wearing his own backpack too.  If I get a nice picture of Arthur wearing his own backpack I will certainly update here, and put it in  🙂

pinterestmail

a little packet of masks

… we are so very very fortunate here in WA so far, there have been no outbreaks of covid-19 but we’re not taking that for granted! everyone including me is continuing to practise social distancing and hygiene because for sure the current virus-free state of our state cannot last forever.  Masks are not mandatory yet, but one person in our lives who is very health-vulnerable is Craig’s Mum, she is being super careful and wears disposable masks everywhere.  However, they probably cost her a bit so I offered to make some for her.  And she accepted, so I got to work!

Voila!

I made seven differently coloured masks, all are simple, two-layered and pleated so as to expand to fit over your nose and chin too, using this pattern and tutorial on the Makers Habitat youtube channel here.  I made seven so she can wear different colours to match different outfits, and included one pretty floral one too.  I also cut seven cotton denim inserts, which I shall explain later.  Because masks and inserts are small fiddly, nothingy things liable to getting lost, I also made a little custom-sized pouch for her to keep them all safe and together in one spot.

All the solid colours are tightly woven poplin (Spotlight), the floral is a linen, leftover from this top I made for Cassie (Fabulous Fabrics), and the linings are made from tightly woven cotton voile (Spotlight).  The denim inserts are all cut from a piece of coated cotton denim, and I finished the edges simply on my overlocker.  I cut the mask straps from a small leftover piece of white cotton jersey.

Some sewing notes; I’ve found it a really good idea to understitch the top and bottom edges of the mask/lining seam after the first sewing step.  The masks look so much nicer if you do so!

And I cut my straps to be 30cm x 1cm using my rotary cutter and ruler, no finishing because it’s not going to unravel, and just allow the cotton jersey to roll up naturally, if it wants.  I just tied them in very loose knots so they don’t pull out, and Craig’s Mum can re-tie them to fit herself properly.

So, why separate inserts?  Well, homemade masks are considered ok here; as long as they are made of at least three layers of fabric, preferably tightly woven and with the inner layer being of something like denim.  Basically all the patterns and tutorial out there are for two layered masks.  I trialled a few different mask patterns in three layers of fabric, with an inner layer of denim, but actually found this to be a really bad idea; the masks; and the seams! were terribly thick and bulky.  Oh, long story short; I popped it in as an insert and I think it’s going to work really well.  You do have to put the inserts in; which I hope is not too fiddly a thing for her! and push the corners up into the corners of the mask, but once they’re in it’s very comfortable to wear, and you can breathe through the layers quite ok.

The little pouch was fun and easy to make! and it fits all the mask components perfectly… I cut it from an old tablecloth that Sam bought at the Salvos to make part of a costume; the fabric is quite thick and stiff and it stands up by itself.  I pin tucked all the side and bottom edge seams, which helps to stiffen it too, and used a brown dress zip from my stash for closure.   I also put a piece of cardboard in the bottom of the pouch to stabilise it.

pinterestmail
Switch to mobile version
↓