Tag Archives: Arthur

“cool bunny” T-shirts

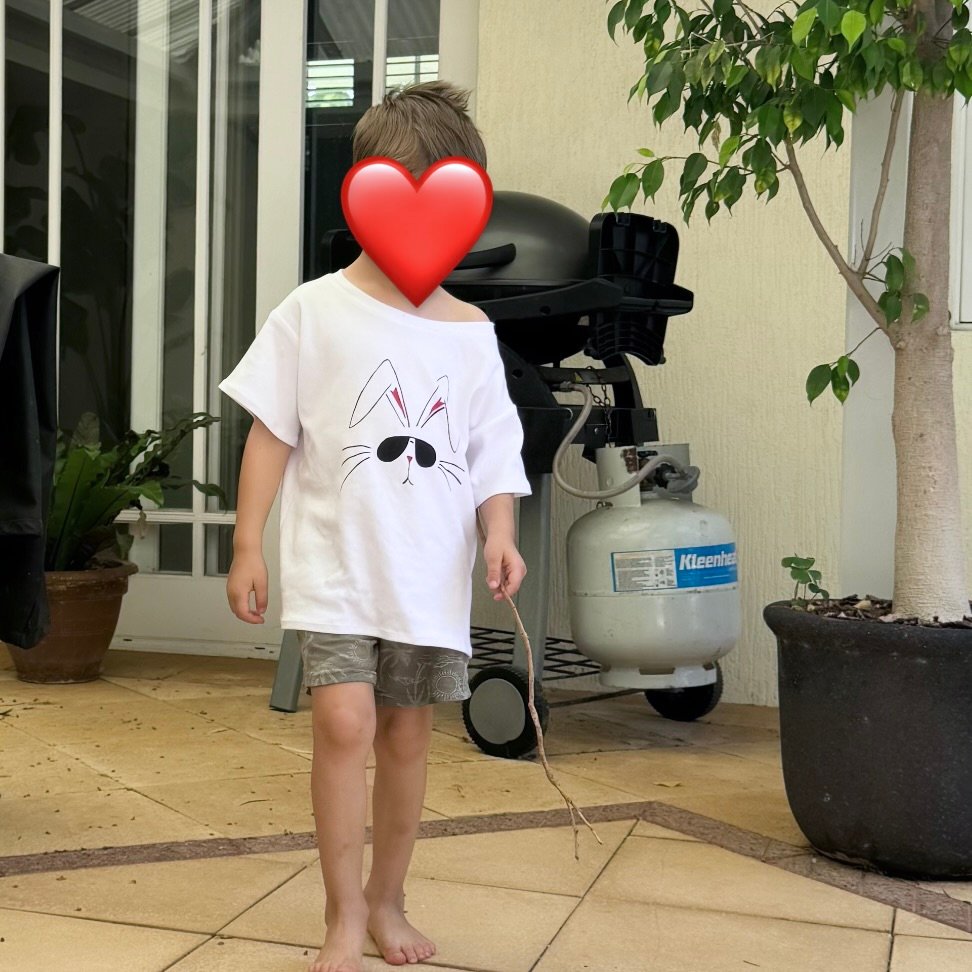
Hello!  For the Easter just gone by I wanted to give something to my three little grandsons… chocolate has been ruled out by the parents and so I had to think of something else.  I decided upon this!  As a teen, my eldest Tim used to have a pink T-shirt with a “cool bunny” printed on it which he absolutely loved.  It was actually a very different print from this one, but with this in mind I googled “cool bunny” and something like this was one of the millions that came up.  I thought it was really cute!

The following is my process… I’d done a screen printing course years ago and so already had all the materials on hand.  Most of my old paints had dried up but fortunately the red and black were ok.  Phew!

I hand-drew the design on tracing paper in lead pencil, then transferred the designs to equally sized pieces of wrapping paper.

Why wrapping paper?  Well, because it’s a little stiff and “waxy” in texture I thought it would last a little longer in the printing process, and hopefully not disintegrate after a few prints.  Yes I could have gone out to buy proper printing paper but I’m still on a “use what I’ve got in the house already” kick.  I’d pre-cut the paper pieces to be the exact same size, in the hopes of being able to overlay the two colours as perfectly as possible.

Using a scalpel, from my shoemaking kit, I cut out the two designs.  I’d also cut out four pieces of white cotton jersey (from stash) big enough for a T-shirt front.  Four pieces? but I only have three grandsons?  well I was accounting for one possibly not working out well since I wasn’t going to easily be able to do all this a second time!  Screenprinting is quite involved!

To help line up the prints, I’d drawn the corners on the white cotton jersey in disappearing ink.  As it turned out, this didn’t work out well at all because the edges of the paper are stuck down to the screen with masking tape which then obviously also masks the corners drawn on the cotton jersey underneath.  So of course you can’t see them.  I mean, duh!  It was actually pretty difficult to line up the screen for the red print afterwards.  I’m going to have to put my thinking cap on for future multi-colour prints.

First print done!

I’d cut the black with little “bridges” to keep the design actually together, so after printing I went over with a paintbrush and carefully filled in the bridges.

Second print!

These are the three that worked pretty well…

and this one did not.  If you can’t see it straight away, just look at the red, inside-the-ears bit, and you can see how skewiff it is compared the the others.  I’ve still got this fabric, and may use it for something else in the future.

Heat set the prints, and then I sewed up the T-shirts.

I used Butterick 5510 for G’s T-shirt above, that I’d used for him previously…

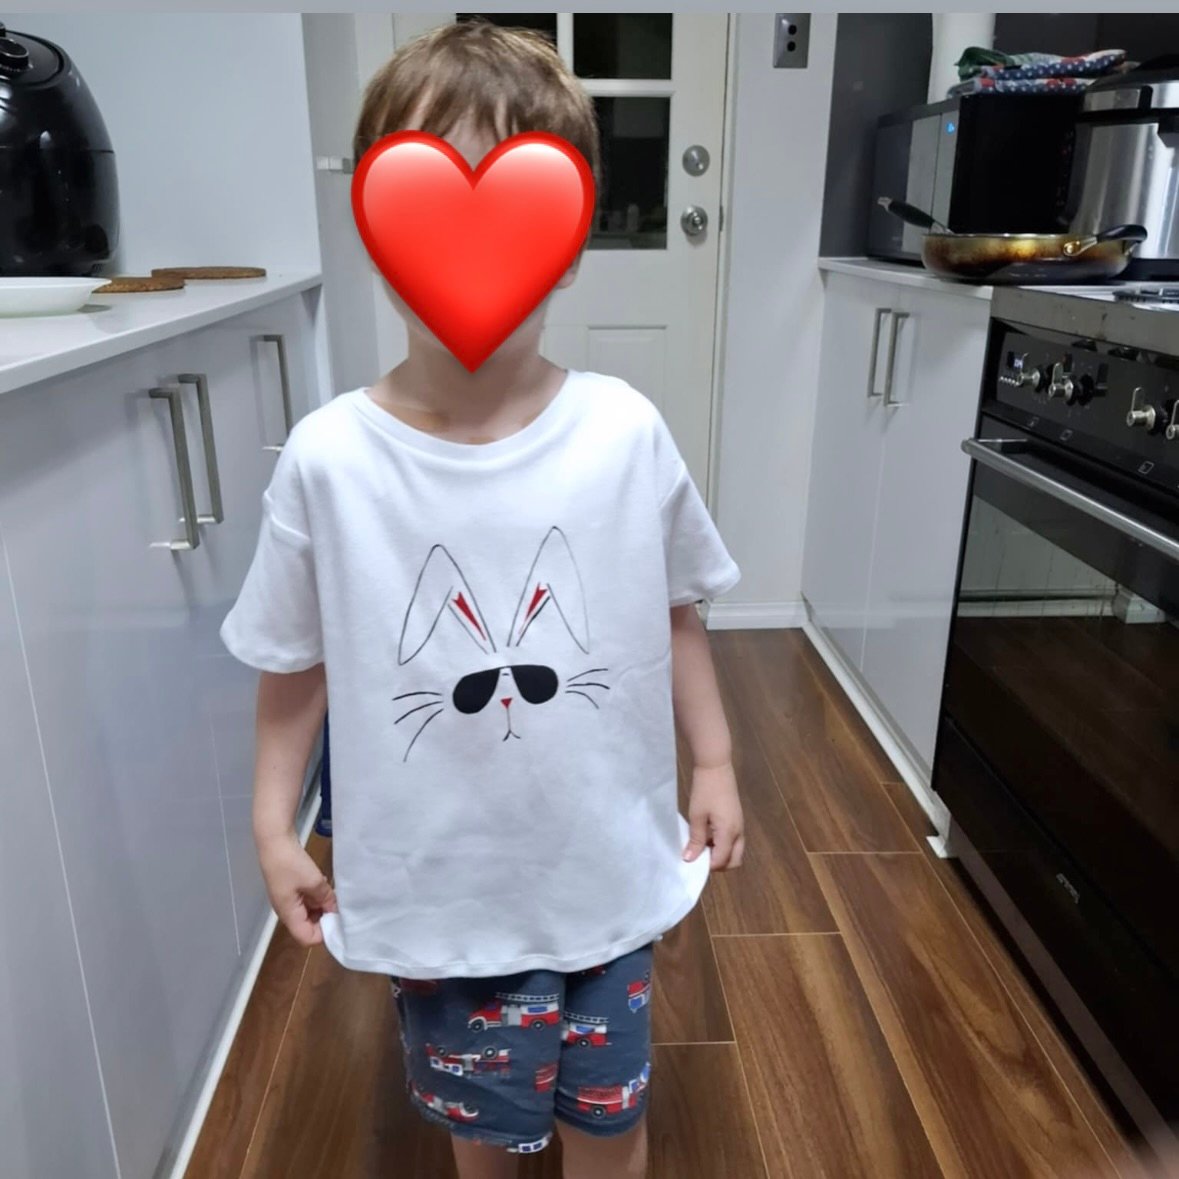
and for A’s and T’s I’d traced around a child’s T-shirt and adapted it to their sizes as well as I could.  I deliberately made them all oversized so they could grow into them, but they did all turn out pretty big.  Fortunately all the boys seem to like them and have worn them, so I’m happy!

pinterestmail

a weird new top

Hello!  I’ve made a new shirt/top; it’s a little weird but it’s an idea I’ve had in my head for a long time and have been quietly working on realising it.  I’ve actually been making this shirt for over a month! it’s still not quite there but this iteration has helped me to firm up the idea even further, so it’s all good!  This will most likely become a new sewing pattern for our Carolyn & Cassie oevre…

I used a white slubby cotton that has been in my stash for ages, awaiting a good project.  I really love this stuff and have made lots of things using it in various colour ways over the years.  It’s originally from Fabulous Fabrics and I’m pretty happy that they still have it available in lots of colours to this day.

I drew up the design myself and it still needs a little work but I’m fairly happy so far.  My idea is to have a shirt with the traditional collar, collar stand and opening button placket to be offset over the shoulder.  I really like how this part of it turned out!  I made the sleeves not quite full length, and there is a short, bias bound slit opening and traditional cuff.  This may or may not change as time goes on, I’m not 100% sold on this.  I added two patch breast pockets to the front because it all looked a little bare without them, but the pocket situation is still a work in progress too.  Reset assured there will be pockets in some form or another though!  Most of my time has been in perfecting the collar and collar stand and I’m very happy with how this bit looks.  Although I forgot to button it all the way up while taking my photos here it’s still very comfortable fully buttoned up.  Hurrah!

I stitched on black buttons for a contrasting look; also from stash and originally from Spotlight probably.  These don’t really match each other but they’re all black and two-holed, and the same size so you wouldn’t really notice the difference without knowing.

I made the hem gently curved and love how this looks.

Watch this space!

I’m wearing today for me-made May here with my beloved Closet Core Morgan jeans and raspberry silk jacket made years ago using V 2894…

You can also see this jacket worn in 6 different ways in this post here… and wow, I’ve just reminded myself how long it’s been since I did something like that!  It was actually fun, maybe I should do one again!

Oh, and my daughter in law Kelly kindly sent me a few pictures of Arthur wearing his new cardigan, that I finished at the end of March.  He looks so cute!  In his words “it’s beautiful, like a rainbow”.  Words to totally warm the cockles of his granny’s heart.  What a sweetie!

pinterestmail

another little scrappy cardigan

Hello!  I’m back wth my March knitting project; this one is of course a cardigan for my oldest grandson Arthur…

It’s the same Sirdar pattern that I used for Theo’s cardigan, one size up.  You might have noticed it’s the same colour pattern too… with seven double rows of each colour offset with each other.  When you start out with a plan like this, using scrap yarns, then it’s always going to be a bit of a gamble that the quantities of wool colours are going to actually be enough to see it through.  Fortunately I was very lucky again that it worked out!

Arthur has quite delicate colouring compared to his cousin; blond hair and blue eyes, pale skin, so I know these lighter, clear colours would be really nice on him.  I’ll come back and post a picture of him wearing it, come winter time. 🙂

In Arthur’s words “it’s beautiful, like a rainbow” sigh!  Higher praise is just not possible!

Now; when I posted Theo’s cardigan, remember I promised to post pictures improving how to join the sleeves to the body to continue in one piece without stretching out the underarm bit?

btw; I know this explanation is not going to make much sense unless you’re actually knitting a thing like this, but it’s mostly to remind myself if I ever need to do this again…

So, up until this point I’ve knitted the body ie. back and two fronts, in one piece and cast off the underarm stitches.  Each sleeve has been knitted flat exactly to the pattern to the underarm.  Then I take a needle and knit the right front and half a sleeve, then take a (long) fresh needle and knit the other half of the sleeve, the back, and half the other sleeve, then take another fresh shorter needle and knit the other half of the sleeve and the left front.  So; the three sections join up on the middle outer edge of each sleeve; and I commence knitting the cardigan from the armholes up, decreasing the raglan seams across the whole piece.  The only seams needing to be stitched at the end are the underarm and sleeve seams.

pinterestmail

some new sewn things….

Hello!  I’ve been busy; making lots of things, but not so busy posting them!

Firstly; Cassie is expecting again, so I’ve whipped up a few new maternity outfits…

Items 1 and 2;

this is the Closet Core Ebony tee combined with the Burda 7023 maternity skirt pattern.  This is such a great maternity combination; I’ve made it as a set for both Cassie and Kelly in the past and it’s worked so well.  This set is made with navy blue merino and a navy blue/red striped cotton jersey; both have been in the stash for at least a year.  I’d bought 2m of the merino from The Fabric Store and made one single tee; I’d been planning a cardi from the remainder but never got around to it… I’d bought the striped jersey to make baby things but again not got around to it yet…   Right now I’m totally over saving things for that imagined planned project but am just of the mindset to use what I’ve got, when the mood for a project strikes … it’s a much healthier mindset in my opinion!  After all, I can always buy more fabric if I don’t have something appropriate, right?

Items 3 and 4;

the same pattern combo as above, in a mossy green/grey stretch stuff.  I have no memory of buying this, and I’m pretty sure it’s another from Mum’s stash.  I didn’t have quite enough to cut the tee full length so it’s about 10cm or so shorter than the pattern.  Still looks pretty nice imo!  I think the sombre colour makes it look a bit more sophisticated and smart.

Item 5;

this is a Burda pattern; 2/2015;107… I’ve made it for her once previously and she absolutely loves that dress.  Thus why she requested that I make this one, using fabric from her stash.  I think she bought it from Tessuti? when we were in Melbourne, and yes I know I know; I’m trying to use my own stash, why on earth am I accepting commissions from other people’s stashes, hmmm??  Madness!  But she’s my daughter so of course I acquiesced.  She’s pretty busy, after all!

The fabric is a very lightweight silk?  I think… so lightweight I deemed it necessary to underline totally with a creamy coloured, very drapey drill, also used for that visible tie.  This was from the stash, yay!  It was all finished and I was pretty happy; however when she tried it on it looked way too heavy.  When I’d made the first one I’d simply lined it, not underlined; and I realised this was the problem… the simple fix was to cut away the underlining from the side seams and resew the underlining side seams separately to make it a lining.  Sounds kinda slapdash but it worked pretty well.  The silk hangs quite nicely now!  This is not really a maternity pattern but Cassie has found it works just fine in early pregnancy.

Item 6; another self-drafted tee for Arthur.  This was cut from one of the last of Tim’s old tees from my T-shirt bag!  Feels good to have those all gone now!

bragging about careful stripe matching ahem, particularly on those very small sleeve bands!

Item 7; a kinda silly hat for Cassie.  I cut this from the scraps from hers and Theo’s matching pj pants; blogged here.  The fabric is of course her own design, from her Spoonflower shop.  The hat is a little funny but you know, the fabric was too nice to throw out.

The pattern is the Elbe Textiles Sorrento bucket hat; this used to be a free pattern but now has a small price on it.  Which is fine, imo.  Designers should be paid for the work they do!  Did I ever tell you the story about the sewist who sent us multiple emails trying to not only get our patterns for themselves for free, but also to donate them as prizes for her followers?  All to “support us and help promote us”?  No?  One for another time, maybe!

pinterestmail

dressing like a tomato

Hello!

So, I’ve alluded to this ongoing project previously; the mission to “use up a rather large length of tomato-red jersey”  I am pleased and just a little lot relieved to report a successful completion of the mission, ahem…

I originally bought this “remnant” from a Morrison seconds sale… it was very cheap… when I had the chance to check it out properly I realised it was at least 6m in length, possibly more if I’m honest.  Phew!  Just a few weeks ago I dedicated myself to remove this from Le Stash.

Item 1; a dress for Cassie… this is the Ebony pattern by Closet Core patterns.  I don’t have any pictures of her wearing it, but it skims her knees and the sleeves are elbow length.  This will be a great little dress for winter for her; worn with tights and boots, over a turtleneck, and with her denim jacket, it looks super cute!

Item 2; a little T-shirt for Theo (previously posted)

yes, he looks cute

Items 3,4 and 5; a little T-shirt for Arthur, plus the sleeves for two more (previously posted)

here he is on Mothers Day.  Cassie is wearing this dress I made last year, and Tim is wearing a hoodie I made for him yeeeeears ago.  I’m thrilled he still loves it so much!  Also, yes, the dress is still mine but I’ve lent it to Cassie for a little while because she wanted some more work-appropriate dresses and I don’t have the time to make new ones for her just yet!


Item 6;

a cardigan for myself… I’m in the midst of planning to make a pattern for this design this year.  I’ve made multiples for myself and it’s such a useful little thing to have!

wearing it during me-made May

Item 7:

a little top for myself.  This is our most recent pattern the Booragoon top, available in our etsy store here  #shamelessplug

Item 8;

a little winter skirt for myself.  This is the Paprika patterns Jade pattern; one I make up usually once a year.  Well, I really like it!  Again, pictured during me-made May…


there’s even a failed Item 9!  I cut out a skirt for Cassie too, but as I was pinning it together for its first seam I noticed a fault, a few holes right across a line of the grain.  By this time I was well and truly over the tomato fabric so it was with some joy that it got tossed into the bin.  No regrets!

So wow, yes that’s still a lot of tomato!!

I may or may not wear all three of my own tomato items together like this; on the one hand I really love this colour.  On the other hand…. well actually there is no other hand really.  I love the colour, so I most like will!  btw, not pictured; but the three items I made for myself each has a “circa 2023” label on it.

Now; to be honest, there is a problem with all of these new makes, well more accurately there is a problem with the fabric… I realised that it was cheap and plentiful for a reason.  The fabric is super stretchy, as in it’s stretching out quite fast and it’s clearly not going to last very long.   Like, probably not longer than this year.  Beware a bargain!  You can see in my miniskirt how the folds do not look super stable and a little stretched out already.  Oh well, just gong to enjoy it while I can  🙂

pinterestmail

green Quilla and some small T-shirts

Hello!  I’ve made some new things… actually I’m always making new things but am seriously behind on blogging them.  Bad me!

First up; a new little top for myself… this is the new Fibremood Quilla pattern, I and I love it!  It’s super cute in my opinion, very easy to make and uses a very small amount of fabric.  Is that a good thing? well pretty wonderful when you have lots of small leftover cuts that you wish to “gainfully” use up, like I am.

something I should mention: several times I have had to go back and lowered the necklines on a few of my fibremood makes, retroactively; because I’ve found them to sit quite high in general.  So this time I proactively lowered the neckline by 5cm on this and I’m glad I did! it doesn’t feel too low at all and is in fact very comfortable.   Something to bear in mind!


I used a raw silk hessian from Le Stash… this is leftover from when I made this green dress.

I stitched with green thread of course, but didn’t have any matching cotton for the bias binding nor green overlocking thread, so used white for both of these so there’s kind of a match-matchy situation going on with the inner seam finishes.  This is quite a pleasurable sight to my eyes.

This top has a reverse pleat going on with the front/back panels and side panels; so I thought I’d share how I do the hem in this circumstance; the pattern just has you hemming as usual, but I’ve always found you get a sharper pleat if you doit like above.  You need to snip the seam allowances at the hemline point so the hem seam allowances can wrap out the other way around the side seam allowances.  Yes, sounds like it makes no sense but it does if you’re doing this sort of hem, trust me.  Because I didn’t have matching overlocking thread, I just did a zigzag stitch to finish the raw edges in the hem allowance.

This gives you a nice, permanent fold at that point and enables the pleats to sit the way you want them too.

oh, see that cute little T-shirt Theo is wearing in the above pic? that’s the one I blogged about in my previous post.  I’m happy to say he loves wearing it as a regular T-shirt and not just for pj’s!

Also, since Arthur’s T-shirts were a tad on the small side I made him a few more… These are made from out of two of Tim’s old T-shirts and also some more of that tomato red cotton jersey that Theo’s top is made from; that I’ve been using up lately.  There will be some more things from this stuff appearing very soon, once I get around to modelling and photographing it.  It’s actually finally all gone now, hurrah! and I have moved onto other fabrics!

Extras: yes, I made those jeans, using old jeans and the Closet Core Jenny pattern, previously blogged here

pinterestmail

pj’s

Oh man!  I have been unable to post here for quite a while and was starting to wonder; could this be the end of Handmade by Carolyn…?  Fortunately my clever husband worked the problem out.  Then I wrote a whole post and posted it, and it just disappeared, poof! into the ether.  So upsetting!  I’m going to try for a second time, so hopefully this time it will not!

Pj’s.  I’ve made a few.

Firstly, for me, I used my namesake pattern, the Closet Core Carolyn PJ’s for my pants and a Burda pattern, 10/2009, 121 for the top.  Sometimes I think I should make the Carolyn top as a pj top too, but I really prefer my pj tops to be buttonless. As well as saving buttonholes for a shirt that I will wear awake, and out of the house.  Well, buttonholes are an effort!

I know I pledged to not buy any new fabric until I’d used up my stash, and I had to buy some flannelette for these, which is a little bad but not really because I really needed new winter jammies.  I managed to use up every last scrap by slapping some patch pockets on the front of the top; which makes me feel very thrifty and virtuous, so it’s all good in the end.  The white flannelette was already in my stash, leftover from a previous jammie-making venture.  Both from Spotlight.

Next up; I made pj pants for Cassie, and mini matching ones for Theo.  So cute that they can match each other!  Cassie’s are the Closet Core Carolyn pattern, and I left the front open at her request, just in case she decides to go though another pregnancy in the next few years.

I added a press stud at the waistline and a drawstring so they can still be closed easily.  The drawstring is attached to a bit of elastic threaded through the back of the waistband.  I cut out and stitched in her Spoonflower label… oh I forgot to mention!  The print on the fabric is her own design in her Spoonflower shop, printed on fleece from their range.  We were using this small length as a cot blanket for when the kiddies slept over, but it’s outgrown that function and needed up cycling.  So now it’s pj’s!

Theo’s matching pants are Burda 9436 modified slightly to be pj bottoms by eliminating pockets and adding elasticated cuffs, and his little red raglan T-shirt is self drafted.  It’s cut from a massive “remnant” that I bought from a Morrison seconds sale, once upon a time.  When I say, remnant, I mean about 6m although I’ve been too depressed to ever actually measure this.  I don’t know what I was thinking, buying it; honestly.  I must have been mad.  It’s my current intention to use up this remnant as soon as possible… I’m making good headway too, results to appear here soon.  I hope!

Next up, for Arthur.  For the pants, I used the same Burda 9436 as for Theo, lengthened because he is much taller; and grey sweat shirting fabric from the stash.  The two little T-shirts (same self drafted pattern again) are made using his Dad, Tim’s old T-shirts.  Yes, I still have some of these left! and actually it’s getting quite hard to cut Arthur sized T-shirts from adult-sized T-shirts, believe it or not; so I’m planning to power through all the T-shirts pretty quickly now.

Lastly, and completely random I know; I made some lemon macarons because I had lemons, and because I kinda wanted to prove to myself I was still capable.  Very very pleased with how they turned out!

pinterestmail

Arthur’s backpack

I also made a back pack for Arthur, for Christmas …

I’ve made this pattern a couple of times before, for my own children, and Tim particularly loved his backpack when he was tiny.  He wore it all the time and would toddle about the house with it on his back, with a few precious toys stashed inside… it was very cute!  and he still has it today.  It was Tim who suggested one for Arthur too.

Fortunately I still have all my Topkids magazines, including the one the pattern was in! I still flick through them sometimes, and while some of the patterns might be considered a tiny bit dated, especially some of the ones for older kids; there are still plenty of cute ones in there.  I’m never throwing them out! Love my Topkids magazines!

I had the dark grey denim in my stash already, and also the red check cotton I used for lining throughout… the latter given to me by Mum when she cleaned out her stash.

I hand drew the letters for his name… transferred them to interfered cotton, cut them out, and stitched them to the pocket piece with narrow, closely spaced zig-zag stitches.  I had the velcro, wadding, D-rings and little swivel clip for closure already, but had to buy all the other pieces for the backpack; the red webbing, stops for the straps, and cording.  Still though, it’s been amazing to me what I do have in my stash already and am capable of finally putting to good use!


If you’d like to see Tim’s own backpack, I blogged about his yonks ago here, back in the early days of my blog.  He still has it today and loves it!  This is so heartwarming to me, and I just hope Arthur loves and enjoys using and wearing his own backpack too.  If I get a nice picture of Arthur wearing his own backpack I will certainly update here, and put it in  🙂

pinterestmail
Switch to mobile version
↓