Tag Archives: Daily Outfit

och aye

My final creation for the year! and a couple of other things too, since of course I found/have recently finished more unblogged items which I am including although technically I didn’t “make” them.  But first things first… I shall start with my new tartan dress.  I did make this!

I think I’ve had a bit of a thing for a voluminous skirt lately, and this one is also on the flooffy side!  I used a pattern I’ve had on my “want-to-make” list for years; Burda 10/2009;119, but altered it somewhat:

A)  mine is longer and at the same time, more voluminous, more of a midi length than the knee-length in the magazine,

B) I added in extra seaming, to showcase both a bias and an on-grain tartan layout, and making it more user-friendly to put together, and

C) I changed the width of the skirt panels so I could pattern match the tartan across the skirt pleats and still get the correct width panel into the waist.

(A) needs no further explanation, so I’ll move straight on to B …. The pattern has you cutting a full-dress length centre panel that is pleated from neckline to waistline… rather than have a whole lot of, possibly unnecessarily bulky pleats in my bodice, AND having to pattern match the darn things… I cut the centre panel of the bodice separate from the skirt, and as a finished width, with no pleats.

I also cut the back bodice in three pieces similarly to the front; with a centre back centre bodice on the fold, and two bodice side pieces; and put an invisible zip in the left side seam of the dress.  Not only does a side seam zip make it easier to put on and take off the dress, but obviously … no pattern matching of plaids along either side of an invisible zip!! Since I was cutting the back bodice in this way, I took the opportunity to rotate out the waist-shaping darts, incorporating the shaping into the seams.

I’m doing the Burda styling thing here…

The back skirt pieces were cut similarly to the front skirt pieces; so as to have two side pieces and a generously pleated centre panel.  Maximum skirt volume!!!  Oh, I also cut all pieces so the bodice seamlines would match up vertically with the skirt seamlines… it just looks a lot neater.  OH! and also my skirt side pieces are just a touch more flared all round, not by much, just a few inches at hem level each side, but multiplied over the four gores and it adds up nicely!

As for point C; I carefully folded and basted the plaids together so as to pattern match the tartan perfectly across them, and then cut the centre front and back skirt panels at the finished width as indicated in the pattern.  Because of the width of my plaids, the skirt centre panels ended up a lot wider than those in the pattern, which is fine with me #maximumflooff

Originally I kept the pleats stitched together vertically for a little bit at the top of the skirt, but in the end decided it looked nicer for them to flare out immediately out of the waistline.

The skirt side pieces, as with the bodice side pieces, are cut on the bias.

can I just point out… ^^ those little Sophie-ears!! ^^

The last modification, which almost goes with saying because I’m a well-documented pocket freak, was… well I guess it just got said!  I used my most used pattern piece for this, which is one I drew up to fit my own inelegantly large hands.  I cut it from an old Vogue magazine cover, which is a nice thick glossy card; and it lives permanently stashed in a handy place adjacent to my sewing machine.

My fabric!  is a really nice, poly-viscose suiting from Minerva.  I realise poly-viscose might not sound very nice, but it really has an extraordinarily realistic wool-like feeling to it and is lovely and soft against the skin!

One of the things I really like about this dress is that while it definitely has a winter-y vibe to it, it’s sleeveless and not body-hugging either, so I think it’s going to be ok to wear it in spring and autumn, and even cooler summer days too.  In winter it would definitely need a long sleeved skivvy or tee underneath, and tights, and I’m looking forward to wearing it like that too!

The next thing!  I didn’t make this dress but I did devote an entire day to making it fit for Kelly to wear so I’m totally OK with documenting my creative input here… I remember now it was presented to me basically a few days before I flew out the the US for my holiday with Yoshimi, which is why it slipped my mind to document it here before! 🙂

Tim and Kelly were groomsman and bridesmaid respectively for their friends T and G; who were likewise their groomsman and bridesmaid respectively! and together Kelly and G had ordered the below dress off the internet … and btw, can I take this opportunity to say? never ever ever order a dress off the internet at the last minute!  Kelly had specified “for maternity” and sent in her measurements and it was “supposed” to be made to measure – inverted commas there because of course when it turned up it was instantly apparent that it was not at all suitable for maternity and also, nowhere near made to measure.  For a start, there was an insurmountable gap of five inches between the two sides of the invisible zip, and obviously poor Kelly with her pregnant belly was going to do even more baby-growing in the two weeks before the wedding!

She brought it around for some urgent adjustments…

When I opened it up, I could NOT BELIEVE the innards of this dress… it looks so soft and floaty and comfortable in the modelled picture, doesn’t it? well far from it; the insides were built like a Sherman tank…

The bodice lining AND the underlining were interfaced with firm and inflexible horsehair stiffening that had been securely fused to the fabric. The princess seams were boned, believe it or not, with the boning going directly over the bustline.  SO uncomfortable!  The skirt looks softly gathered into the waistline with a little self-fabric belt, and you might think it had an elastic waistband? well NO, of course the skirt was gathered into a securely stitched and totally inflexible waistline.  The neckline/off-the-shoulder ruffle was very not-Kelly too, she’s just not a ruffle person at all.  So the first thing was to cut it off, as neatly as possible close to the neckline edge, leaving a chic little spaghetti strap.

I actually needed to harvest fabric from somewhere to put some wedges into the side seams of the inner skirts anyway, so was glad to be able to get some so easily from the ruffle!

I opened up the side seams of the two inner layers: the underlining and the lining; and inserted wedges to add in the needed 5″ of extra width, so the zip could close at the back.  I had a bit of pretty-good matching linen, which I used for the bodice; these wedges needed to be strong because these were the layers that had been stiffened with iron-on interfacing, I also ended up using the linen in the skirt underlining for opacity, and the chiffon from the ruffle in the lining, so it looked nice on the inside.  I know it didn’t really need to “look nice” on the inside because this was emergency butchery at best, but you know; old habits die hard!  After all this, the ribbon hanging loops needed unpicking and repositioning too.

just to clarify; this is the INSIDE of the dress!!  I needed to say this because yes indeed I’m aware it all looks a wee bit scrappy… 😉

For the shell; I unpicked and opened up most of the waistline seam and let out the gathers for the required 5-6 inches of needed extra width, then restitched it up.  And re-inserted the belt loops.

Finally, it’s hard to see from the before picture, but the bodice had too much vertical height, and horizontal folds of chiffon ballooned out quite unattractively over the bust and waist seam… so I turned up as much of the extra volume as I could into a sort of horizontal “cuff” just underneath the top neckline edge.  Cassie kindly hand-stitched this down invisibly for me  🙂

It was all a bit rough and ready really, but at least Kelly was comfortable, and carried it off beautifully, plus I think she looked lovely!  And look at my handsome boy!!

The last thing, that I worked on yesterday actually! was binding this baby quilt… When we went down to visit Craig’s parents for Christmas, his Mum took it out and asked me if I could please bind it for her as she was not going to get the time or the opportunity to finish it herself.  Of course I obliged!

She had appliquéd and embroidered all these cute little motifs on squares of calico, and patched the quilt top together, and quilted it with decorative stitching, stitched around the edge where the binding was to go.

She couldn’t find any more of the blue fabric that she had wanted to use for the actual binding, but I assured her I could probably find something that matched.

It took a bit of searching because I didn’t actually have a nicely matching plain blue cotton after all, but I dug out this old shirt of Tim’s? Sam’s?  I’d thought it was one of Craig’s old shirts but he assures me it wasn’t his.  I’m not sure now which of the boys it belonged too, but I thought it was a lovely colour match for the quilt! checks in soft green and yellow, and blue too.  I cut strips on the bias and bound the quilt by machine on the top edge, and by hand underneath.  It was quite interesting to me that the sleeves were plenty for the job!  I’ve always marvelled at how men’s sleeves take up a TONNE of fabric, and here’s more proof!

btw, I could not find a good tutorial online for a nicely mitred corners for a quilt; all the ones that popped up had you encasing the edges in the folded-up bias strip and just machine stitching the lot, catching the underneath edge along with the top edge all in one go.  Maybe I’m a snob, OK I probably am! but that just isn’t nearly neat enough for me and you run the risk of the machine stitching underneath looking all wonky, and maybe even not catching the underneath edge at all, since you can’t see what’s going on under there.  In my opinion.  So I worked out my own way which I think turned out quite neat, and think I’ll write a tutorial  on here sometime, when I get time.  If I get time.  Next year, no doubt!

SO CUTE!  I think Tim and Kelly are going to love it!

pinterestmail

jumbo checks

Oh hey! I made a new dress!  And I have writer’s block!


Obviously the second thing is not the least bit interesting to anyone who just wants to read – or in my case; write! about sewing… however the silliest thing about it is that it is not only hindering my efforts to document the things I’m making; the very purpose of this blog in the first place! but even sillier, it is preventing me from wearing it! Since I have this crazy self-imposed rule that when I wear something I really should have blogged it first.


So I bit the bull by the horns, or whatever I even mean by that accidental mangling of metaphors which I just decided to leave there after tapping it out without thinking… oh man… and decided the only thing to do was to wear it.. TODAY.  Thus forcing myself to sit down and attempt a blog post, and hopefully loosening up that pesky little brain block… and letting it soften and dissolve and become ethereal enough so it floats up and away and out of my head, like a puffy little cloud.  Bye bye writer’s block!!

What am I even writing about??  OH! My dress!  Of course!

yes, it’s a bit windy today… 😉

So, a few months ago, I was contacted by Sarah, of Super Cheap Fabrics, who offered me a length of fabric.. I chose this lovely, light-coffee coloured,  jumbo plaid-ed linen.  It’s absolutely divine, really.  I’d been inspired by a dress I’d seen irl on a lady; a very chic friend of a friend.  It was too long, too wide, the check too large; and I became completely inspired by the overall oversized-ness of the scale of this dress!  Like a child wearing her sister’s hand-me-downs with the thought she was going to grow into it, eventually.  I subsequently found out she’d had her dress custom-made up on a holiday in south-east Asia.

I used Vogue 1312; a Lynn Mizono  pattern that I’d bought years ago… it has a “tablecloth” skirt, very similar to the one Shams posted on her blog, many moons ago.

could not resist the inevitable twirl!!!

I went to some effort to incorporate a few things – well, ONE thing –  I really really wanted for my dress; namely, pockets.  I know, I know, we seamsters are so weird about pockets… the difficulty about pockets with this particular design was the invisible zip in the left side seam.  While of course it’s easy to put an inseam pocket into a regular side seam, it’s actually extraordinarly difficult to finagle a pocket in a side seam that has a zip in it…

in the end I settled upon the aforementioned in-seam pocket in the right side seam, and on the left side, I put in a single welt pocket, about an inch away from the seam with the invisible zip.  Sounds simple, yes?  NO!!!  Because the pocket is only on one side not both, and I’m a pattern-matching lunatic, I wanted both the pocket and the invisible zip insertion to be as seamless and invisible as possible.  I know.  I don’t know why I do these things to myself…. anyway, careful pinning and even more careful and slow sewing, and I think I did it…

Here is the front, all zipped and pocket closed and (hopefully) reeeeasonably, sorta, invisible.

and now, the unzipped, showing-the-pocket shot.

I think I’ve shown this next feature before, but I often find the bottom inside end of an invisible zip has a slightly scratchy area, pretty much invisible to the naked eye but it makes itself felt after you’ve been happily wearing your garment for a few hours.  You can feel it if you rub your finger over it a few times.  So I generally wrap the lower end of the zip in a bit of fabric, like so; and stitch it down to the seam allowances.

So, as soon as I finished the dress, I was so happy I immediately flung it on and took a few pictures, shoeless.  I love how it feels! the oversized ness is exactly what I wanted.  Large, flooffy dresses feel so incredibly feminine to me; which is kind of funny when you consider the well-established “modern” feminine perception tends to be for tight fitting and short.

I rushed out for a location shots too, but when I got back home I felt a little cool – it’s 24C today, but funny thing, 24C feels, dare I say it? cold? compared to over a week of 35C++ !! haha… so I put on a T-shirt underneath; and I think I REALLY love it with the little sleeves underneath.  I love it like this so much I might even just add little sleeves to it permanently?  Hmmm, food for thought!!

Sophie very often comes up for little cuddle while I’m taking pictures in this spot… it’s near “her spot” in the house.   Hehe, this picture of her little head sneaking into the shot above as she crept over to me gave me a laugh.  hello, my darling little snooky snookums!!


Details:

Dress; Vogue 1312
T-shirt; the Closet Case patterns
Nettie in white jersey, details here
Shoes; Zomp, from Zomp boutique

I have just two more things to share here before the end of the year… hurrah!


pinterestmail

scribble-y sundress

I’ve made a new dress, and how gorgeous is this splashy, scribbly, fireworks-y print!  And the way this divine rayon challis ripples breezily against my legs was actually quite quite delicious… it was extremely hot when I took these pictures, like 39C, so soft whisper-y cool, featherlight stuff felt like exactly the right thing to wear.

While we were in San Francisco, Shams took us to Britex.  According to basically everyone who knows; Britex is a “must-visit” for the fabric enthusiast… like, every single, San Francisco shopping recommendation to me included in some form or another ” …and Britex, of course”

And I most heartily concur.  This place is insanely fabulous and I could’ve happily spent all day there..  The walls are stacked floor to ceiling with, well it felt like thousands of bolts of strong solid colours, arranged by colour to make a rainbow mural of fabric itself.  What a sight to behold!  I was crossing the rainbow bridge!  Is this heaven?!!!

I die…

can you even…??  #sigh  And this was only ONE floor, there was another one too!

Shams introduced us to the lovely owner, Sharman Spector; who was so kind and welcoming to us foreigners.  I learned that Britex is a Legacy Business, which means it is one of a “longstanding community-serving business that is recognised as valuable cultural asset to San Francisco by the Office of Small Business. Preserving Legacy Businesses is critical to maintaining what makes San Francisco a unique and special place.”  … and thank you, Professor Google for that succinct explanation…

Obviously, this is a wonderful idea, one that I wish we would adopt over here.  Imagine a world populated by lots of small businesses offering unique and special services?! This, and many other utopian customs are just part of the enormous appeal of San Francisco, and I should add, New York City too.  I think they are very innovative and future-thinking over there, while still keeping firmly in mind what is important to the happiness of human beings.

Anyway… my dress!

Sharman kindly gave me a length of this lovely “scribbled flowers” rayon challis; it’s delightfully whisper thin and feels coolly divine against the skin.  So I envisioned a floaty, nothing-y little wisp of a dress.  The print is quite oversized, so I could’ve got away with a longer dress, I think, but I’m very happy with this length; I think it’s both cute and chic, and the higher neckline balances nicely with the higher hemline.

Pattern; is my own design.  It’s very simple because I really wanted this lovely eye-catching print to shine…   so I’d made a similar dress for my friend L at the beginning of the year, a clone of a favourite dress of hers, and I couldn’t get the design out of my head.  Mine has a few key differences which I wanted to implement; namely it’s quite a lot more A-line… MORE float!! … and has pockets.  I altered the width of the top bits too, and the armscye.  Actually, the armscye turned out to be a bit of a boo-boo…  once it was hemmed it was just a leeetle bit low-cut.

You could definitely see bra-action… and I decided that if the bra was going to be seen, at least it could be a bra designed to be seen, and that went beautifully with the dress, complementing it.  I toyed briefly with the idea of a hot pink thing, – sawww tempting!! – but in the end decided the perfect bra to match this was in fact a plain black, strapless bra.  Strapless, well obviously, and plain black in order to not fight with the amaaaaaazing print, and to offset the black fabric I used for the tie.

For the bra; I used my old faithful McCalls 2772 swimsuit pattern pieces for a strapless bandeau bra; the only mods I made were to make boning channels using the side seam allowances, and inserting a short strip of boning.  This keeps the bra structured and upright and not fold in on itself while I’m wearing it.

I also gathered the centre front onto a 7cm length of black elastic, just because I think it looks nice! and I also shortened the back straps by several inches, to make it nice and tight.  Strapless bras have a tendency to migrate south, if they are not quite tight!  I like my underwear to be in sets, so I also whipped up a matching pair of undies, using the bikini bottom pieces from the same pattern.

Oh, the dress neck-tie, I cut from a black satin remnant, leftovers I think from this black Forsythe dress I made for Cassie, three years ago.

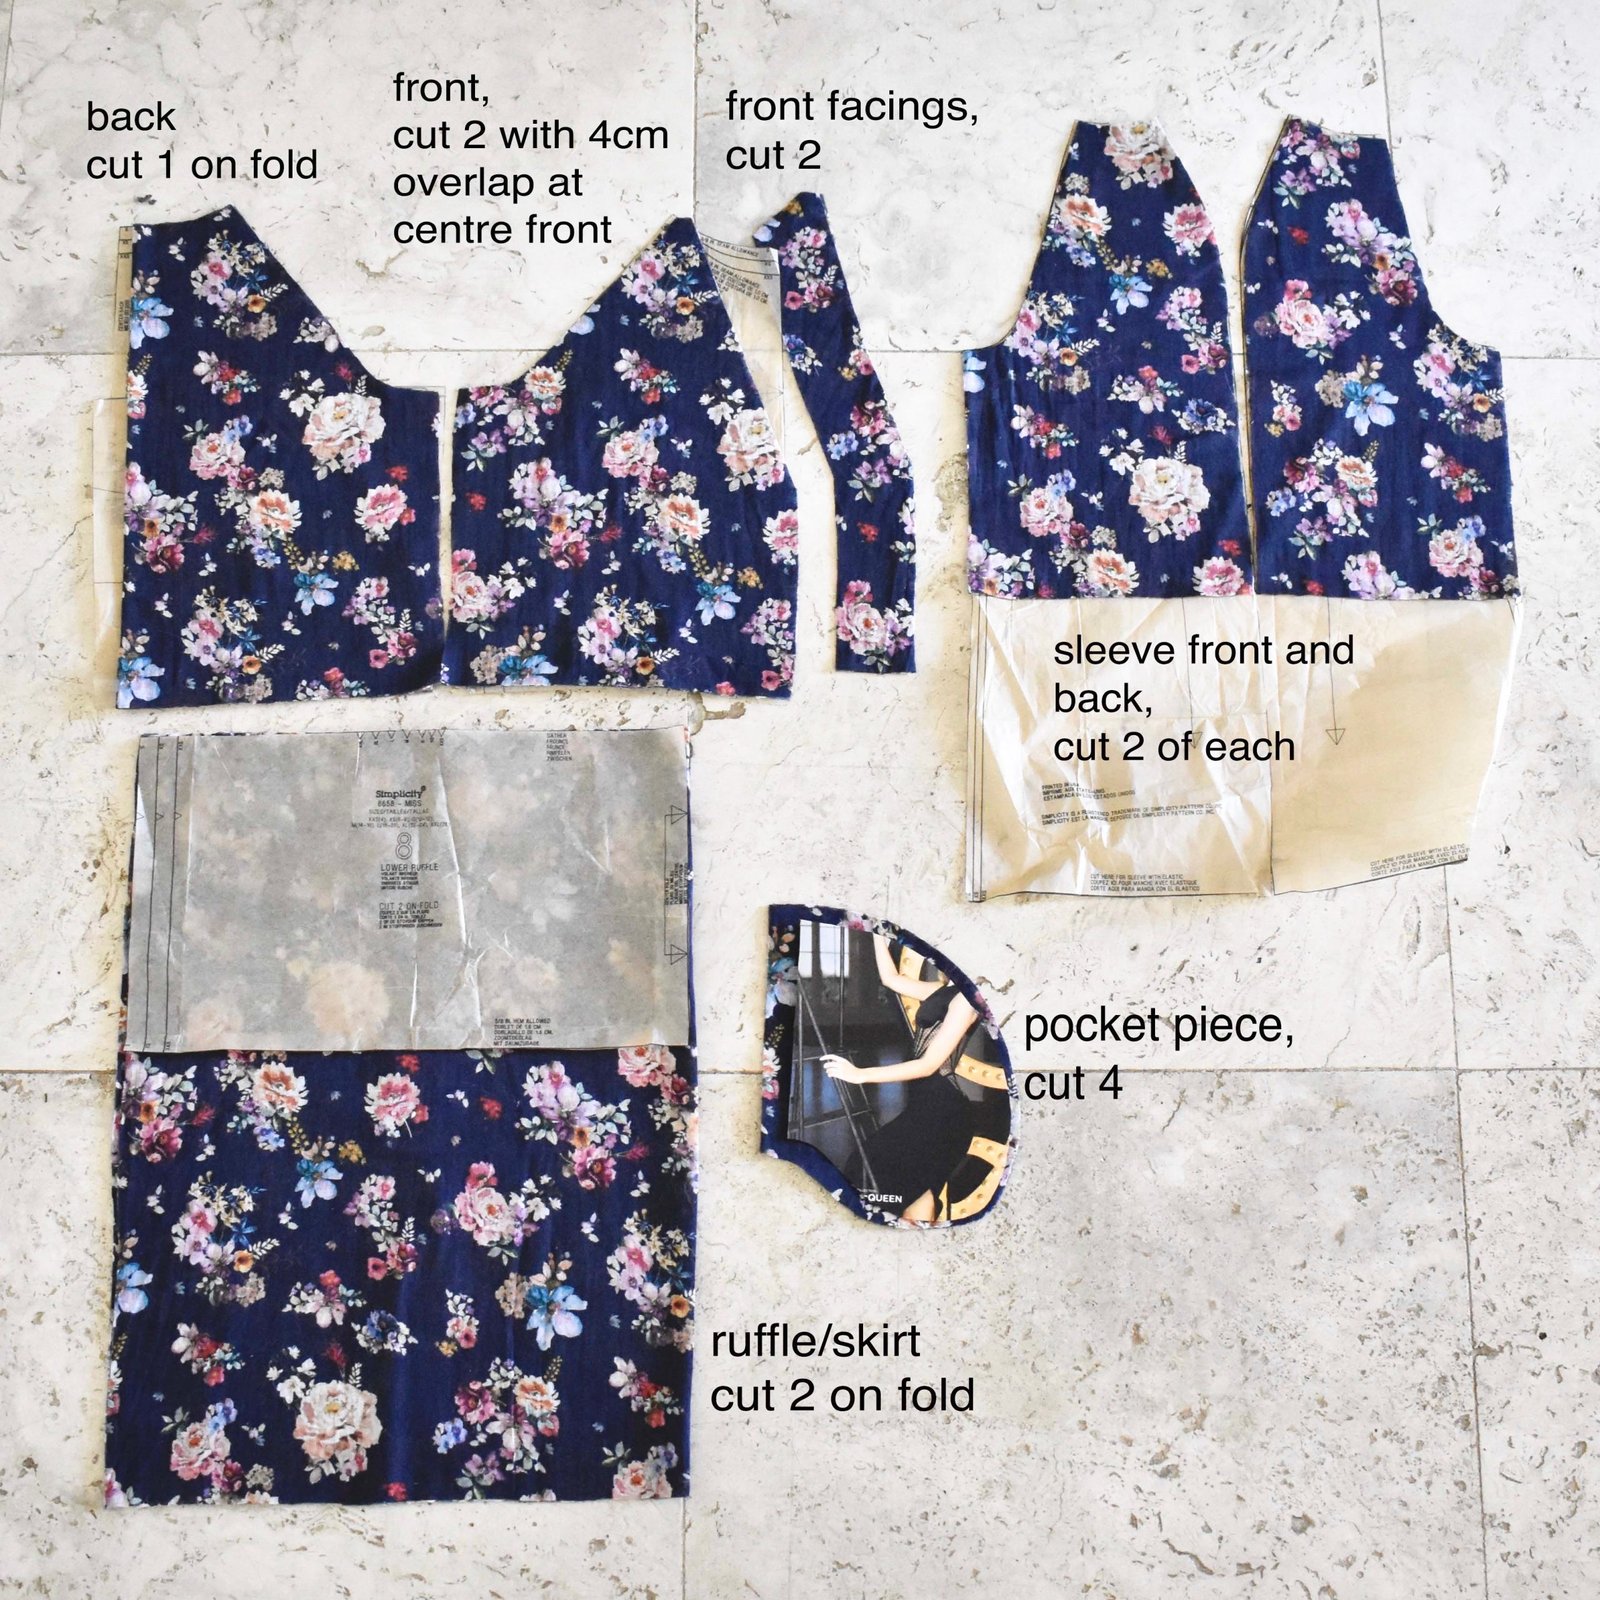
The front and back of the dress are actually different from each other, even if they LOOK identical! so in order to identify the back I used this little Kylie and the Machine label I got in the Perth Frocktails goodie bag.  It’s pretty cute, isn’t it? even if I kinda had a fleeting wish it was one of the “the is the back” labels; well I can swap that out if I ever buy a set.

But for now; it’s finished, and ready to keep me chic-ly cool in this extreme heatwave!

Details:

Dress; my own design, in this beautiful printed rayon challis from Britex 
Bra and knickers; McCalls 2772, black poly
Shoes; Zomp, from Zomp boutique

pinterestmail

a cute little floral frock

Oh hey.  I made a dress. Wot a surprise!  No seriously, how cute is this dress?  Like, I think it’s rather cute, eh.

did I make my shoes too? why yes I did!  thanks for noticing!

 But of course what am I here for? but to provide the exact deets on how you can procure such hacked cuteness for yourself too.  AND; be happy about how you not only made it yourself but that if you do so, you’re also raising funds towards an excellent good cause too… and did I mention there is a competition? with prizes?!  No? well you could be in the running for a sewing machine, or an overlocker machine!  Check out all the deets here!!

So, a few months ago I was contacted by Rachel of the Foldline re taking part in this thing, the third annual sewing blogger “hacker” tour with Simplicity/McCalls.  Hacker?  yes, I can tell you’re immediately interested, since all of us who sew also LOVE to hack; butcher; ham-fistedly riff upon  add our own little “something” to a design, yeah? well, the tour is an initiative where proceeds raised from the sale of a small range of Eminently Hackable (TM) patterns nominated in the tour will go towards the Eve appeal charity… In all seriousness the Eve Appeal is a truly excellent resource to raise awareness of gynaecological cancers, and to provide a port of call for those wishing to seek information about the condition and the community.  The site helps people with where to go and what to do, who to call for medical and non-medical cancer advice and support, should that situation arise in their lives.  Like everyone else, I have very close friends and relatives who have gone through this dreadful experience, so I know sites like these can be a very soothing thing to turn to, when your closest loved ones just don’t know what it’s like or what to do…

I’m like, well GOOD ON Simplicity for being a part of this!   here is the list of Simplicity sewing patterns that are part of the hackathon for the appeal…

S8378 XXS-XXL
S8658 XXS-XXL
S8700 XS-XL
S8701 H5 (6-14) U5(16-24)
S8888 XXSl-XXL
S8929 XXS-XXL
S8930 XXS-XXL
S8991 XXS-XXL 
S8992 XXS-XXL

btw, the patterns I’ve listed above are all directly linked to the Simplicity website, but are NOT affiliate links,  I would always disclose an affiliate link and in any case have so far had a super impressive, grand total of ONE affiliate link in all my decade of blogging – my goodness, how time flies! – but anyway,  rest assured I am not making a single cent out of this!  it’s all going to the Eve appeal!

Anyway, I chose Simplicity 8658… which is a pretty nice, loose, basic raglan sleeved tunic top, with some optional ruffle action going on… and I made a dress.  Of course, one doesn’t have to “hack” the pattern, if you just want to make it up just as it, that’s fine!  However, I couldn’t resist a few tweaks, here and there, just because not only do I love a good hack-attack but also I do love a cute little summer frock and could see how this pattern could so easily become the CUTEST summer frock imaginable! and I think it turned out ok too!  … and I have thusly, and dutifully, documented any and all such tweaks in excruciating detail, right here because well, I am a blogger after all…  Bloggers, must blog.  It’s what we do  (shrug)

I used  this beautiful navy blue floral, cotton and linen single gauze from Minerva    to make my dress.  I’ve always waxed lyrical about how much I love navy blue and pink as a colour combo, so no need to bang on further,  it’s just… CUTE, that’s all.  Navy blue, and pink; am I right?  And the texture of this stuff is just as lovely as it sounds; almost exactly like nani Iro double gauze, except it’s a single gauze, so not quite as “cosy” which is a very good thing in our very hot summers! and still with the same, super soft and exceptionally lovely light-as-a-feather touch to it.  I love this fabric so much!

When I opened the pattern I was pleasantly surprised to find included a large sheet of grid paper, printed with 1″ x 1″ squares all over.  Obviously to make your pattern-hacking plans just that much easier!

After some thought, I decided to make the following hacks:

  • cut the back on the fold, as one piece
  • cut the front as two separate pieces, with an overlapping V-neck opening.  This would have little self-fabric loops and self-covered buttons to “close”.  Inverted commas around that “close”, because actually the V-neckline is wide enough that I can just pop it on over my head, no need to undo any buttons at all  #cleverNON?!
  • use the lower ruffle but lengthen it considerably so it actually transformed the tunic into a full-blown dress  #DOUBLEclever…NON?!!
  • put in pockets.  Because, obviously, pockets.

So above are my cut-out pieces.  Additional pieces to the pattern are the two front facings, which have exactly the same profiles as the front opening edges, at 5.5cm wide not including seam allowances.  I added a 1cm seam allowance to both the front opening edges, and the facing front opening edges too.  I applied lightweight iron-on interfacing to the facing pieces.  And, the pocket; which is basically self-drafted, though I can barely even write that with a straight face.  I laid my hand down and drew around it for heaven’s sakes.  It’s pretty big, because I have big ungainly hands.  This is seriously my most used pattern piece, of all time.  I use it in every single thing that I possibly can!

First step: stitch together the sleeve pieces, as directed.  I opted to overlock all seam allowances to finish, using my overlocker and navy blue thread.

Stitch the back sleeve pieces to the back piece.

Belatedly stay-stitch the back neckline (woops!)

Interface the front facing pieces and finish the raw edge on the overlocker (or HongKong seam, or bind, or turn under and hem, whatever)

Make a skinny rouleau or “spaghetti strip” for the button loops; by cutting a 3cm (1 1/4″) wide strip on the bias, folding right sides together and stitching to give a 6mm (1/4″) tube, turn right sides out  (a more detailed description on how to make rouleau strips here)

Cut into 5cm (2″) lengths for the button loops, and spacing them evenly; stitch them into place along the opening edge of the right front.

Lay facing pieces over the bodice front opening edges, and stitch.

Trim, and clip into the point.  Press open, under stitch.

Cut a 2.5cm (1″) bias strip, and apply to the entire back neckline to finish, including both sleeves as well as the back piece  (this technique described in more detail in this post here).

Pin the front bodice pieces to the front sleeve armscye, abutting the neckline edge of the sleeve hard up against the front/front facing seamline.  Fold the front facing back over the front, right sides together, and enclosing the front sleeve between the two.  Pin, and stitch.  (apologies for the photobombing camera strap)

Trim corners, grade seam allowances, and turn out.

Attach buttons to the left front bodice piece, corresponding with the button loops.  I used self-covering buttons, purchased at this etsy store here; and covered them with the same floral fabric as I used for the dress.

Measure where you prefer your pocket pieces to lie – this is a personal preference determined by your own arm length – and attach the pocket pieces to both  ruffle/skirt pieces, front and back.  Stitch side seams of ruffles, going around pockets  (inseam pocket insertion described more fully in this post)

Apply gathering stitch to top edge of ruffle/skirt, draw it up to fit the measurement of the bodice.  Stitch, over gathering stitches.  Hem sleeves and ruffle, and yay! it’s finished!!

I’m so happy with this dress! and really enjoyed brainstorming how I could transform the basic pattern to get the look I wanted.  Let’s be honest; hacking IS fun, and is always something to consider as part of the creative process for those of us who make our own clothes.  I would absolutely love if my dress here inspired anyone reading this post to perhaps join in with the hack-along… it’s open to everyone throughout the world! and what’s more runs all the way through January so there’s still plenty of time to get involved.  You can share your creation on social media and use the hashtags #hackalongday #hackalongparty #hackalongvintage in order to be in the running to win one of the pretty generous prize pool  … see all the deets here.

Please let me know if you do join in!

Here’s some more inspiration from the other bloggers taking part, using other patterns from the list, please do visit and check out the very creative and interesting hacks from these very creative and interesting ladies!

1. Thursday 26th September
Juliet, from Sew So Natural
https://sewsonatural.com

2. Thursday 3rd October
Abi, from Crafty Pinup
https://www.whatabimakes.co.uk

3. Thursday 10th October
Rachel, from The Fold Line
https://thefoldline.com/blog/

4. Thursday 17th October
Susan, from Susan Young Sewing
https://susanyoungsewing.wordpress.com

5. Thursday 24th October
Brittany, from Brittany Jones
https://www.brittanyjjones.com

6. Thursday 31st October
Bianca, from Sleepless in Bavaria
https://sleeplessinbavaria.com

7. Thursday 7th November
Amy, from Almond Rock
http://almondrock.co.uk

8. Thursday 14th November
Victoria, from Victoria Lucille Anne
https://www.victorialucilleanne.com

9. Thursday 21st November
Sara, from The Sara Project
https://thesaraproject.com

10. Thursday 28th November
ooo, that would be ME! haha

11. Thursday 5th December
Rumana, from The Little Pomegranate
http://www.thelittlepomegranate.co.uk/

12. Thursday 12th December
Emily, from Self Assembly Required
http://selfassemblyrequired.co.uk/

13. Thursday 9th January
Marie, from A Stitching Odyssey
http://www.astitchingodyssey.com

14. Thursday 16th January
Portia, from Makery
https://makery.co.uk

15. Thursday 23rd January
Barbara, Lisa and Louise, from The Pattern Pals
https://www.youtube.com/channel/UChdhdeKB7n39vstdMNGgX3w

16. Thursday 30th January
Jen, from The Gingerthread Girl
https://gingerthreadgirl.co.uk


Details:

Dress; Simplicity 8658 modified, single cotton/linen gauze
Shoes, my own design and made by me, details here


pinterestmail

I made a cool white dress

O haiiiiii!!  As per the title of this post I have indeed made a cool white dress.  Noice, huh?

IN other news, in an attempt to be more time efficient I am now aiming to write this blog post in the swiftest time possible, and with minimal to-ing and fro-ing and correcting and proof-reading.  Since normally I’m about as slow as a wet week.  Let’s see how I go… it is now 16:17…

So this is Burda 08/2017; 119; also known as the “miscellaneous dress” on the Burda style website.  I was idly browsing on the website and spotted it, and instantly fell in love.  I almost almost clicked buy now for the pdf, when I thought to do a last minute check on the Burda magazines I have in my collection.  Bingo.  Of course I already have it.  WIN!!

I had a length of white cotton sateen sent to me by Minerva; it’s very thin and a little crisp, and perfect for a highly detailed little summer dress like this design, I think, with some twists and folds and pleats and things that are perfectly highlighted in a plain colour.  Or,should I say, non colour?  with black and white, I never know whether it’s technically correct to call them colours actually, but my personal feeling is that both ARE colours and should be awarded that title.  Why should the most commonly used shades in apparel not be considered official colours anyway?  Weird.  But I digress.  I’m never going to write a nice swift blog post at this rate!

So, my dress.

I love designs with a twist and/or something unusual/asymmetric/weird about them, which is the reason I chose this design since; it’s chocka with stuff like that; obviously it has that belt/cummerbund thingy at the waist, and there is also an apparently full length asymmetric fold running all the way from the left shoulder right down to the hemline.  it’s not really a full length fold, that’s just an optical illusion since it’s chopped off and restarts in the waistline, but I love how it does look like it runs all the way through.

This Burda pattern is quite a challenge actually, and I scratched my head several times as to what I was supposed to be doing.   My advice is to mark the seam NUMBERS carefully and accurately; yes, those corners on a Burda pattern where there is a 1, 2 etc; those are the seam numbers which are often used in the instructions.  In my view, having them marked in this pattern is imperative to success.  Attaching the front bodice and skirt to the ride side middle piece and the right front middle piece, and the tab piece is pretty darn tricky to get your head around.  I’m not even sure if I got it exactly right in the end, but it “looks” pretty good and that’s all that matters really.

And truthfully I love a challenge though, something you can really get your teeth into  🙂

Clara asks; does my bum look big in this?

I also have a little feeling I should have done some sort of small bust adjustment, but am probably just splitting hairs here; I’m actually very happy with the final result and am positive I’m going to wear it a lot.  You know one of those dresses that it’s almost impossible to take a bad picture of it?  It felt a bit like this when I was reviewing the pictures of this one.

The fabric had just a little bit of stretch, just enough that I risked sewing  up most of the centre back seam, and only put in a short, 15cm zip at the top end near the neckline, enough that I could fit my head through it.  This worked out great, I can pull the dress over my head and it stretches just enough that I can wriggle into it just fine!

The back is really pretty plain; kinda blah with nothing special going on at all.  I think in a perfect world I would have chosen for this design to have something equally visually interesting at the back too, but well, you can’t have everything.

The first day I wore it, I paired it with my handmade slides/sandal things that I made at my first shoe camaraderie workshop… I love how they look together!

So that’s it!  It is now 16:45; not too terrible… oh but I haven’ t counted the time it took to take and upload pictures. Damm!

I am actually in this picture here, posing like a boss somewhere back there.  There just happens to be a subtle, unobtrusive bit of photobombing going on at the same time…

Details:

Dress; Burda 08/2017;119, in slightly stretchy, thin white cotton sateen
Shoes: white slides made by me! details here 

pinterestmail

deep golden Faye dress

I’ve just finished making this dress… it’s rather gorgeous, isn’t it?

Just before going away, I was contacted by the lovely Sophie, who asked me if I’d like to make something from the autumn issue of the Fibre Mood magazine… would I?!!  Fibre Mood is a newish Belgian sewing magazine, with a nice variety of designs suitable for different sewing skills, some quite simple, and some more funky and cool with interesting details.  I chose the Faye dress – I have to admit partially influenced by the totally divine sample! printed it out before going away, but got no further until the day I got home again …

and literally as soon as I got home, like the very same day… I got onto it and finished it.  Again, maybe influenced by the sample; I dug out from my stash this silk crepe in just about exactly the same colour.  Copycat?  Moi?  Well, I may have also been influenced by the fact that it was literally the only piece in my stash large enough for the pattern layout too!  I’d originally bought it from Tessuti’s in Melbourne, during one of my girls’ weekends over there with my Mum and Cassie.

It’s so autumnal!!  I’m incredibly into autumnal tones right now, I think probably influenced by all the beautiful fall foliage images we’re getting from the northern hemisphere right now, but also of course because I am an “autumn” myself.  I do think these tones suit me pretty well  🙂

pockets!!”…  in a hoarse drug-dealer-on-the-street-corner voice…

The design is slightly 80’s, in a really good way in my opinion! reminding me of the comfortably loose-fitting midi shirt-dresses with gorgeous wide and swishy pleated skirts from ralph lauren 80’s collections…  the Faye design IS a true shirt dress too actually; with a long concealed button band, and with both the bodice and skirt pleated into the waistline.  And, of course, and at the risk of sounding fanatical; HUGE pockets in the side seams, above  🙂

The bodice has what look like pocket flaps on the front, but which are actually faux flaps, and are more of a design feature.  The back bodice has a matching horizontal seam, and a rather cute hanging loop as a purely visual feature.  I love small interesting details like this!

well, hello gorgeous!  Sophie likes the dress too…  🙂

I didn’t have matching golden buttons in my stash, and am trying to use my stash rather than always buying new – holiday souvenir shopping notwithstanding!! – so I dug out some black buttons from my stash.  It may sound counterproductive to stitch very visible buttons underneath a button band constructed specifically to conceal them! however I actually like this look of them peeping out a a lot.

The sleeves are stitched with a very wide hem, which is then turned up to for a self-cuff.  I really love the almost “safari” shirt vibes of the bodice.  This photo also shows the nice pleats in the bodice and skirt fronts.

The only part of the design I found a little too scantily explained was the hemline… there were basically no instructions as to how to finish the hemline with that concealed button band as well as the button band itself either.  I know from past experience this is something you do have to address a lot earlier than the very last step! this sort of thing requires stitching the corners right sides together and turning out, and at least a little bit of hand-stitching things down.  The instructions for Faye pretty much leave all of that entirely up to you.  I also decided to hand stitch the concealed button band pieces together at the lower edge too, to make it all look a bit neater and seamlessly finished off.


Also, in my  opinion, the nature of the button/buttonhole band construction makes for a very thick area at the front of the waistline… because the button band and concealed buttonhole band are cut-on with the bodice and skirt, and then seamed together at the waistline… when you create all those multiples folds that are inherent in a button band, not to mention that of the concealed buttonhole band, well let’s just say there’s a heck of a lot of layers in there.  If I was going to make this again, I would probably cut the button/buttonhole bands separately and in one long piece, no waistline seam, and attach them to the centre front edges of bodice and skirt after they’re joined together.  The way it’s done in Faye is not actually terribly terrible, because this is the kind of dress you wear a belt with it, and a belt hides the waistline anyway; however I think this approach would make for a less bulky and cleaner waistline.

The hem, I made as a super skinny rolled hem, finished with tiny fell-stitches.  My crepe is the kind of fabric that when you press your very narrow finished hem, thus flattening it out from 3D to 2D, it morphs out to a much wider hem, seemingly by magic.

Summary; I love my autumnal new dress! and may even dare to wear it as a spring-time dress… I think it will work equally well!

Details:

dress; Fibre Mood “Faye” dress in a golden silk crepe from Tessuti’s in Melbourne
Tights; self-drafted using my own custom fit pattern and black polyester stretch from Spotlight
Belt; super old one from Country Road
Boots;  Officine Creative from Zomp boutique, a birthday gift from Craig

the swish is amaaaazing!  I’m so into the swish right now!

pinterestmail

box of socks; the October edition

I meant to post this yesterday, however I’m … ok I’m NOT going to complain about being busy.  The dreaded B word.  It’s annoying.  Sorry!

However, ta da!  I finished these socks during my holiday away in the US with Yoshimi.  Here is the incriminating evidence of me in the act of conversational knitting while in San Francisco with Shams and Yoshimi…  and I can assure you we’re actually sitting in our air bnb here and I’m NOT actually humiliating us all while out in public..

I took my bamboo needles away with me, because I knew airlines are ok with skinny little bamboo needles.  However I did not knit one single stitch while on the plane!!  Nope, upon getting on the plane I proceeded to watch movies, eat dinner, sip champagne, and sleep.  I did absolutely nothing constructive whatsoever.  Ha!

it’s a tough life but somebody’s gotta do it

I bought the sock yarn while I was in Japan in April… it’s Opal yarn in the Van Vincent Gogh “Vase of Sunflowers” colour way 5432; and the pattern is kinda my own, heavily adapted basic sockette pattern in a Patons pamphlet from the 60’s, no C11.  I completely adore the warm swampy mossy yellowy, browny greens.  So very moi.

#thePerilsofBeingaPetOwningKnittingBlogger

Before I drag out ye olde updated box of socks picture, I just want to put up this picture Tim sent through.. I’m rather thrilled he’s still wearing that outfit for Hallowe’en!!

Also I thought I’d share here my own Hallowe’en post for this year although you could not call this a costume, it’s just an outfit that I would wear on any other day.  Sophie makes the whole thing, imo… that darling little powder puff.

And now… finally.  Le box of socks is looking rather gorgeous, I reckon!!

pinterestmail

“Moroccan tile” skirt and a little white top

Something I really wanted to do before my trip to the United States was to make a new outfit for meeting with other seamsters… with two days to go; I did!  I made a skirt and a little white top ensemble… each piece was actually pretty simple and the whole process from go to whoa took about half a day each.  Bam! I really  love sewing projects that just whizz together super quick like that.

I used Vogue 1486; a Nicola Finetti design.  Nicola Finetti is an Australian designer, and when have I ever seen an Australian designer collaborate with Vogue??  I’m pretty sure, never.  I decided this was a collab I absolute needed to support by buying the pattern…

For the skirt; I’d ordered 3m of cotton from Minerva.  I thought the print looked quite divine on the website, when it turned up it was actually a bit of a surprise, to be honest!  The print was divine; however it was also far far smaller, I mean, on a smaller scale, than I had imagined.  I’d sort of pictured the squares being each about 10cm, sorta like real Moroccan tiles, actually they’re more like 1cm.  Hey ho though; I still had hopes it would work out ok…  The colours are quite luscious, and very very me!  Mustard, terracotta, burnt orange, turquoise, green, a tiny dash of coral pink… honestly could this possibly get any more my sort of palette!

The fabric is beautiful quality, as good as I could have hoped for; soft, and still crisp enough, densely woven and yet still with a very nice drape.  It was also very generous width, however I still didn’t manage to cut the skirt pattern pieces out from my 3m length!! I know, right?!  You’d hardly believe it to look at it, but it’s a HUGE fabric hog!!  I had to piece a smaller section onto the end in order to cutout the back lower skirt piece.  The join is not perfect, but pretty good; plus it’s positioned so it’s hidden inside a side pleat, so it’s really quite invisible.

For the little crop top I used some slubby white cotton I bought years ago, from Fabulous Fabrics, and a navy blue chunky metal zip from Spotlight.  The top was super easy and fun to make.  You had to shorten the zip; and the instructions showed how to do this with a pair of pliers.. however I just could not pry the metal teeth off of the zip tape.  I struggled and struggled with this, but eventually gave up, and in the end simply cut the zip off at the right point and stitched a good solid bar tack in the gap between teeth to keep the zip pull firmly trapped where it needed to stay.  And I lOVE how the zip looks at the back of the little top!

innards…for some reason this sight is enormously pleasing to me….

You were supposed to put an exposed zip into the skirt too; however I decided this might all be a bit too much; overpowering the delicate print.  I just used a dark green invisible zip here instead.

And just saying; the skirt has fabulous pockets.  Fab -U -Lous…!

So I’d mentioned I whacked this outfit together in a matter of days… of course I haven’t made this pattern previously and didn’t really bother to do a careful fitting on myself either.  I’d picked a size 12; my correct size according to the size chart.  Usually I pick a 10 for Vogue patterns.  And I don’t know why I decided upon a 12 because, of course, turns out I should have picked a 10 for this one too… I knew I usually go a 10 for a reason!  the waistband is a little bit baggy on me, and – is it my imagination? – but I feel the top looks quite big on me too.  Not that this is going to stop me from wearing it, but just; you know.  For next time.

The day we’d planned to meet with sewing girls in San Francisco was a lovely warm day of 28C… so I felt so lucky I could wear my new outfit!!  however we only had the one warm day during out entire visit and that was it!  I was happy that I could wear it for one sewing meet-up, but just a wee bit disappointed it didn’t get another outing.  Like, the days we met other sewing peeps in New York city it was just too cold for it (sob)  so I had to make do with other things I’d packed…

from left: Yoshimi is wearing Vogue 2900, Beth is wearing one of her favourite dresses, a Butterick pattern, and Shams is wearing her Style Arc Stevie jean jacket

Later on we headed over to a cafe where Shams had organised an afternoon tea..

from left: and I apologise I did not catch what everyone was wearing this time … I think Rose is wearing a Cashmerette top and Jilly is wearing a tessuti patterns Lily dress?? 🙁

Wendy, Shams, Yoshimi, me, Rose, Jilly, and Catherine is taking the picture… I knew I should have taken over the camera so she could be in the photo!

And that brown paper bag, clutched in my  pawsies??  Yup, you guessed it… it has a nice little stash of fabric tucked away…;)

Yoshimi took this picture on the train platform, after fabric shopping in the Bay Area with Shams and Beth.  I thought it was such a nice picture!  In fact the whole day was such a fun day!!  I wish I could hang out and gossip and chat and go fabric shopping with all these ladies more often!

pinterestmail
Switch to mobile version
↓