Tag Archives: Own Design

laced up at the heel (shoes)

lace up heel 2I made some new shoes! and they lace up at the back of the heel.

laceup heels4

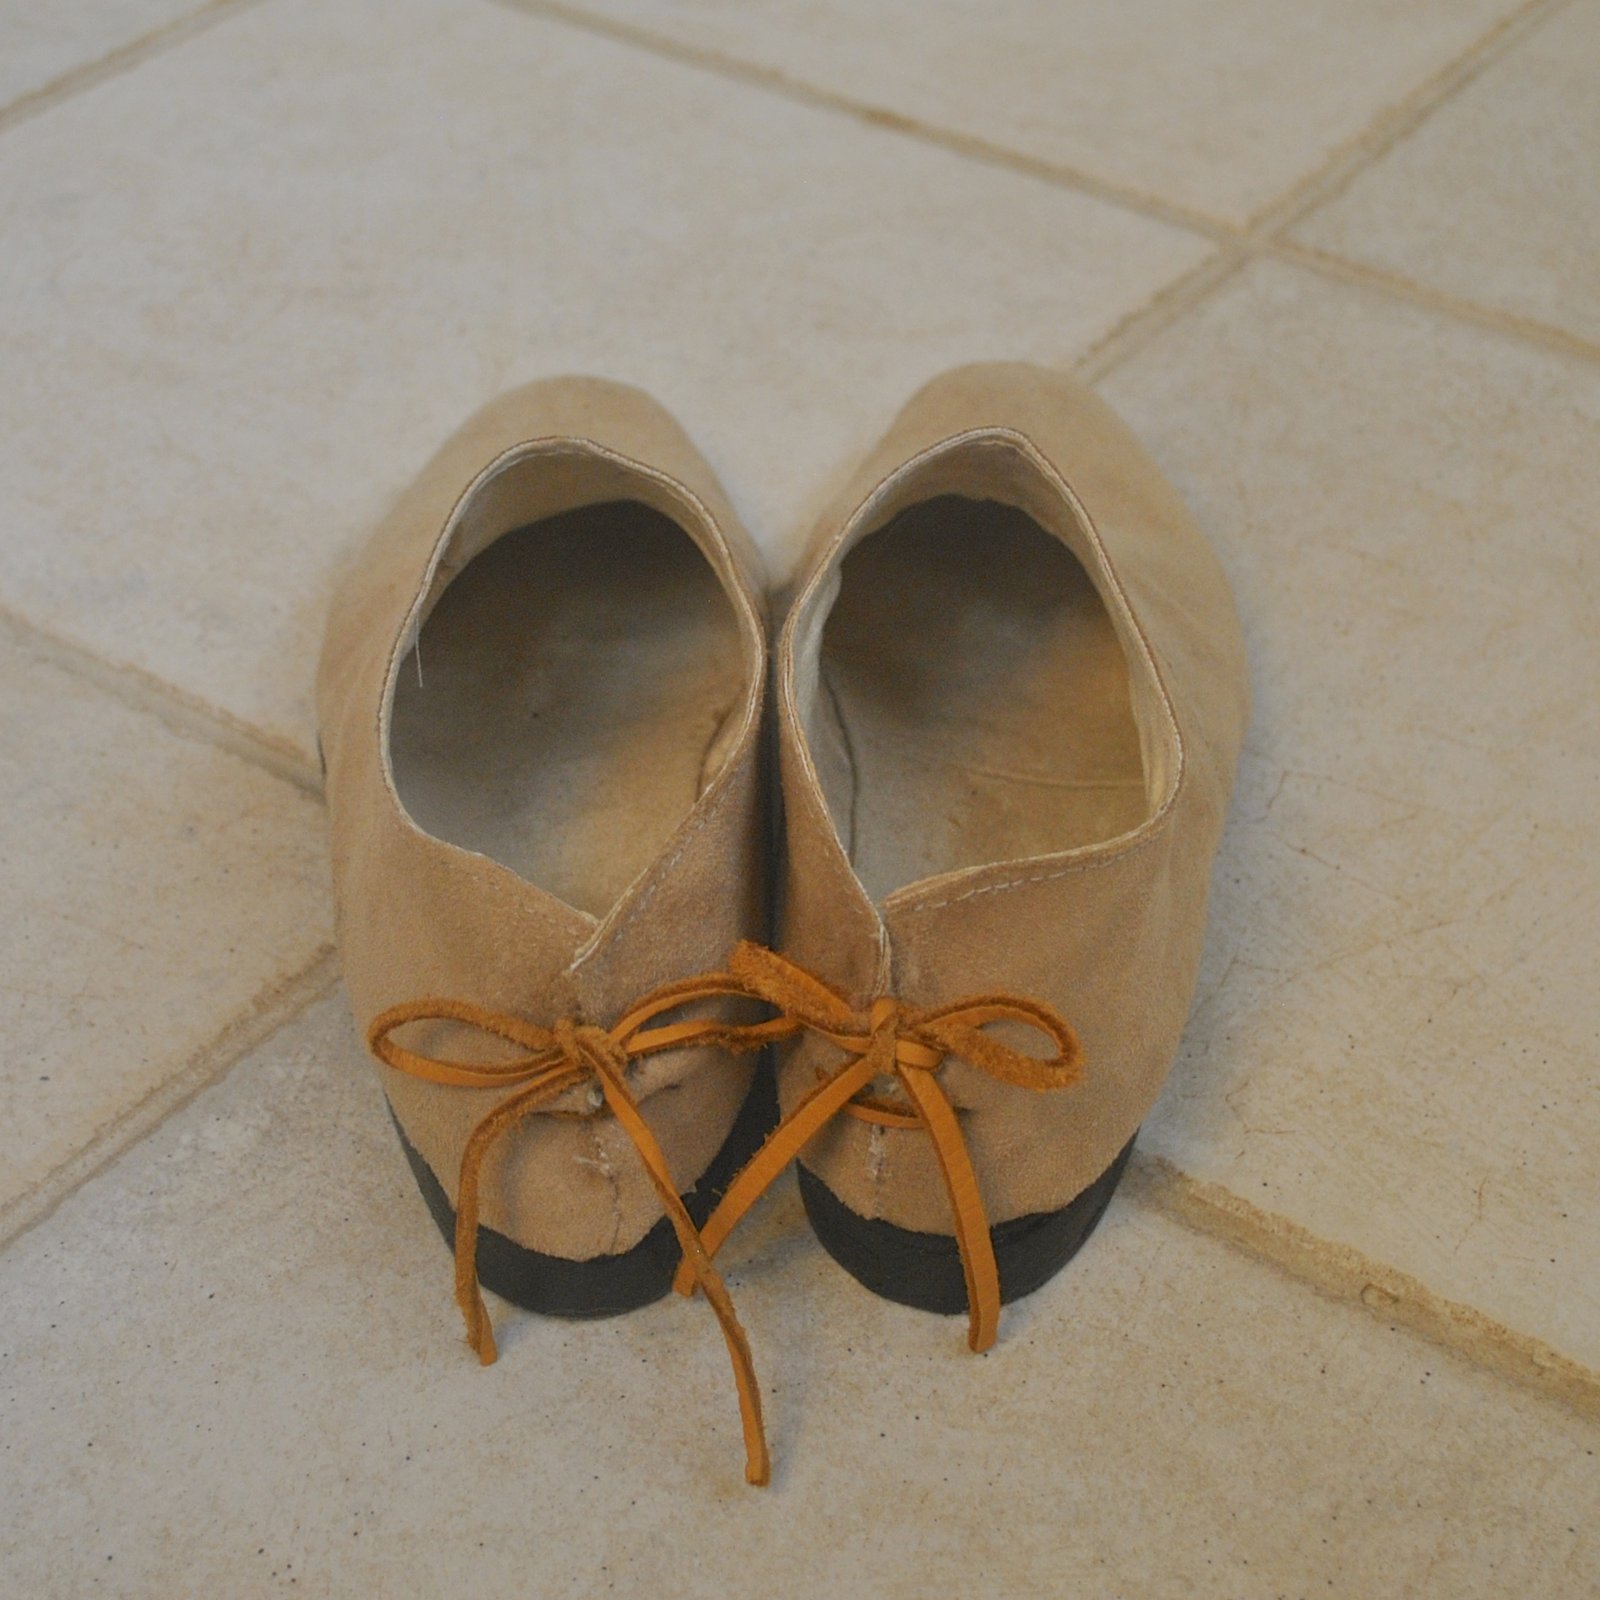
Yah, sorta weird…  It’s not often you see shoes laced up at the back of the foot, well never, actually!  Seems a fiddly awkward place for the laces, however I can slip them on and off without untying the little bow, which is pretty useful.

I’m so happy with my shoe-making lately, I feel like I’ve actually “got it” down pat at last.   The making is easier for me, they’re staying together well, and feel sturdy and comfy on my feet and like they can withstand the knocks.   My winter boots were the ones that kinda sealed the deal for me.  LOVE THOSE THINGS SO MUCH!!!

And I’m very happy with these ones too.  I reckon they’re going to be great come spring.  The colour, the shape, the style; all very classic and basic but I think they’re kinda fun too.  I like how they’re all plain and modern from the front view, and at the back view has that funny little mediaeval leather lace-up.

lace up heel 4

The pattern and design is my own.  The fabric is some beige suedette-faced upholstery fabric, given to me by my good friend A who was having some bench seating recovered.  She kindly gave me some of the offcuts, and it’s actually brilliant stuff for shoes!  Tough, yet pliable and with that nice fuzzy suede surface but without the high maintenance of real suede.  I’ve cut off a bit of a length, because I reckon that it might come up good if spray painted too… which opens a whole new and colourful world to me, shoe-wise. Excited!  and no, I still haven’t got up the courage to cut into my Icelandic fish leather yet.  I don’t know why I’m still scared of doing that, but I am!  Maybe I’ll manage it before my Year of Handmade is up!

The shoe laces were cut off from some of these caramel leather laces, the leather strips I bought in Japan.  As shoe laces those strips were quite long… far too long really, which is terrific.  Means I can get another pair of short laces out of each set!

lace up heelI lined the shoes with some very thin, pale gold suedette from Spotlight, the same type of stuff I’ve lined all my other shoes with, and the exact same stuff as my paisley oxfords.  I glued the layers together with PVA, and have also hand-stitched the layers together around the opening edges in beige upholstery thread, for a more finished look.

Inside is a foam inner sole, covered with the lining fabric for a neat, co ordinating look.  I made the toe puffs and heels counters with stretch cotton denim as for all my previous shoes, as described in this post here.

btw, I’ve received several emails asking me for tips on how to make shoes… thank you to all those who are showing an interest in my adventure!   I still consider myself a beginner, or maybe an advanced beginner, but I am always happy to help others by sharing what I’ve learnt along the way. Please, if you do want my tips and advice then read through my posts on shoe-making, it’s already all laid out there!  I don’t see a lot of point in writing it all out twice; although I am considering a step-by-step on making a pair of shoes.  Possibly in video format.  I’ll see how I go  🙂

lace up heel 1

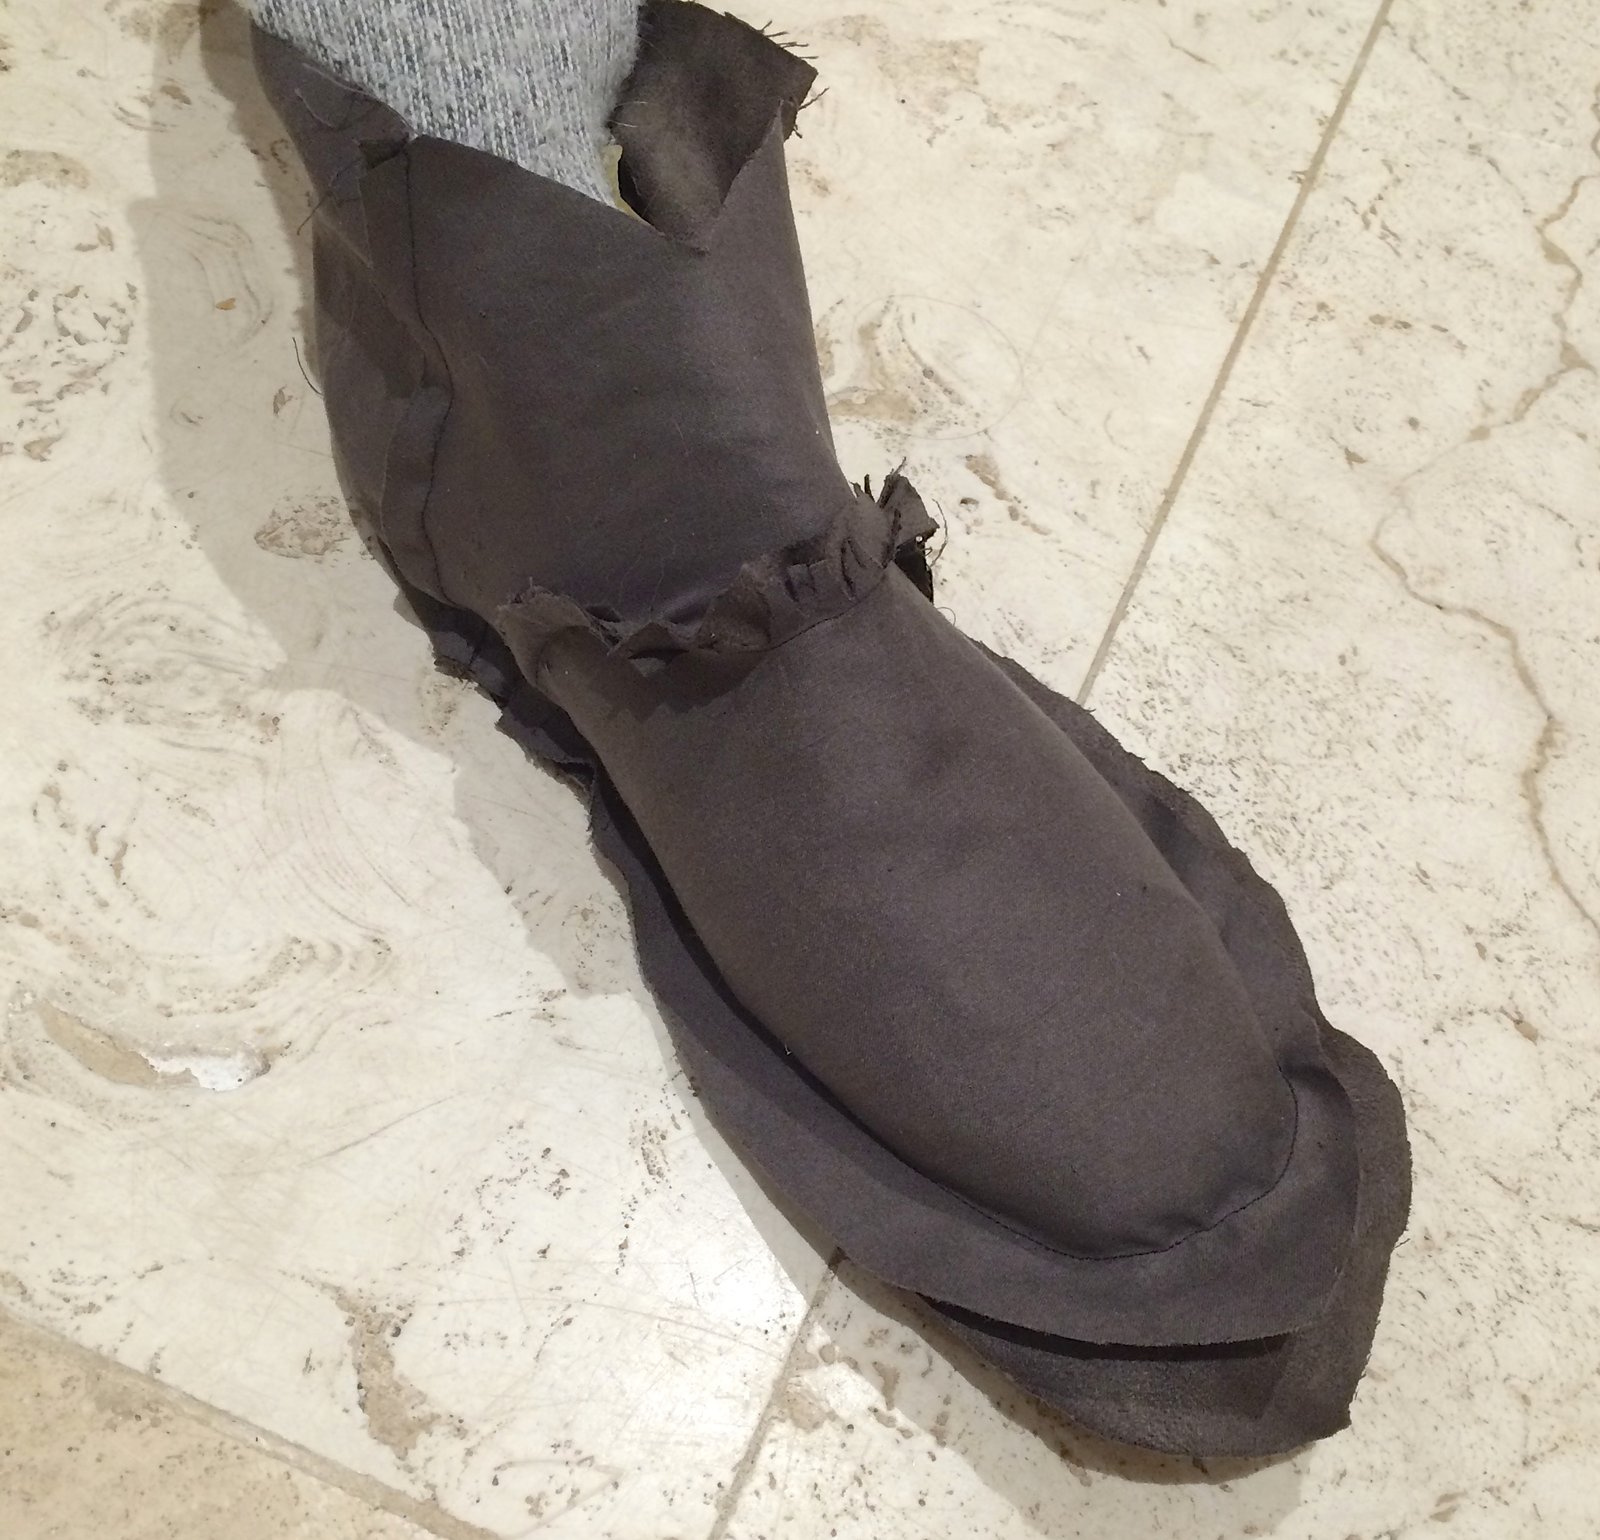
The back seam, where the laces are, is not super neat… it was actually quite hard to sew this part and to gauge how this was going to lie on the finished shoe… not to mention forming the shoe and installing the heel counters.  I ended up having to take it off and sew the back heel seam temporarily to make the shoe, and then carefully unpicked it and re-finished the top edge of the seam and re-sewing the edges again by hand.  The hand stitching and that general sort of lumpy-bumpiness going on at the back of the shoes definitely adds that “handmade” look to them. LOL! but I can live with that.  After all they ARE handmade!  🙂

lace up heel 3

pinterestmail

paisley oxfords (shoes)

paisley shoeshello!  I’ve made some new shoes!

I have to admit, I actually had no drama with these ones I was just kinda, yeah, you know, need some new shoes for walking the dog, whatever.  I’ll just use this paisley stuff, it’s a bit thick and beefy, quite stiff so should work quite well, plus it’s kinda cool-looking too.  Making them all went so smoothly and I didn’t even once feel depressed that they weren’t going to work out at any point at all.  A first!  So I’m now rather thrilled with them 😉

paisley shoes 2This is actually a shoe version of a muslin, whatever you would call that… I’m working up to making some shoes using some of the Icelandic fish leather that I bought when we visited there a few years ago and I’m trialling a new pattern.  The pattern looks almost identical to the pattern I’ve been using previously, to make my previous pairs of oxford shoes, but since I made that pattern prior to getting my lasts I decided it would be prudent to make a new pattern tailored specifically to the lasts.

IMG_3522

So I did it all properly; got out the masking tape, and re-did the whole pattern making process as described here.    Got my new pattern and this is the trial run before slicing into my precious leather.

quickie pictorial of the process…

paisley shoes progress


paisley shoes lining paisley shoes details Details above: the top pieces are edged with close-spaced zig-zag stitch in black, and the shoes are fully lined with pale yellow faux suedette from Spotlight.  The paisley fabric is from Spotlight too.  Foam shoe liners from Coles for added comfort are covered with the pale yellow suedette which gives a co-ordinating, neat and tidy look inside.  Heel counters and toe puffs from stretch cotton denim exactly as described in this how-to post here.  Stacked heels and soles are made from sheet rubber from Bunnings; glued together using contact gel adhesive, then thoroughly sanded smooth and finished with satin finish varnish. Heels nailed to the soles from the inside exactly the same as pictured for theses shoes here.  I hand stitched a small square of black vinyl on the back edge to strengthen that area and hide the seam top.

paisley shoes solesCraig and Cassie both separately and spontaneously, and without my asking, mentioned that they thought this is my best finish yet.   The shoes are quite sturdy and I don’t think I’d even be embarrassed should they be subject to a close inspection.  Hehe, I cannot say the same thing for some of my previous efforts!

Plus I think they’re actually rather cute too  🙂

paisley shoes 1

pinterestmail

the incredible raspberry woman…

superhero

Haha!   I lolled pretty hard at this outfit above, but decided to share anyway.  I look like some kind of burgeoning superhero or something yeah?  All I need is the cape.  “NO CAPES!!” *  (Edna Mode, of course)

Fear not, fellow fashion victims, I will not be wearing my new top and tights together like the above example, well maybe for fancy dress.  Or, if facing the general, unsuspecting and innocent public, then not without a lot more garments layered over here and there to break up the expanse of raspberry pink anyway, woof.

raspberry set

aaaa, oh  dear, calming down now.  See here’s the thing… I wanted to make some more coloured tights.  I really enjoyed my bright paprika tights, when I had them, even did a 6-different ways post on those things once!  I wear black tights a TONNE, like everyone else, but have found it’s absolutely terrific to have a bit o’ variety in the tights department, to have some more colours for layering in my winter wardrobe.  I’m embracing a small pink and plum trend in my wardrobe lately, so bought this piece of poly knit during Fabulous Fabrics recent sale with a view to some Intentional Wardrobe Matching and Planning… oooo so organised!  Not like me at all  😉

yesterday’s outfit, wearing the tights

raspberry tights

I laid down my custom-fit tights pattern and then of course discovered, as you do; that I had enough around the sides that I could probably squeeze a t-shirt out of it as well.  Waste not want not!

For the tee; I used my Closet Case patterns Nettie, which I’ve also made tonnes of times  I’ve fine tuned the fit over and over so much it’s barely the same pattern anymore.  You could call it a vestigial Nettie.

So, the tights are fabulous, and I’m happy, yay! however the top is a so-so thing that I’m a teeny bit meh about.  Stretch poly is excellent stuff for tights, but actually pretty horrendous for a top.  It’s slightly thick and beefy, doesn’t press at all, and is that ultra slippery slinky stuff, that slips and slides over itself, and the whole two metres of it will slither right off the table in an avalanche of fabric if so much as a small corner starts to slide over the edge.    grrr.  I made up the tights, easy peasy.  When it came to the top, oh god, horror story stuff.  I’ve re-done that bottom edge three times… THREE TIMES.  The fabric just wouldn’t take anything.  Attempt number one; ye olde trusty twin needle.  Except, no.  It kept skipping stitches something awful.. so I gave up and moved to attempt number two, a small discreet zig-zag.  It stretched out and looked disgusting, so I unpicked that with much muttering and growling under my breath. Attempt number three was to turn under twice and hand stitch it, which is usually a failsafe for me.  I think this will be ok.  If not, I’m going to move onto plan four, which will be a folded band all around the bottom edge, same as I’ve done to lengthen and finish the sleeves.

Essentially a extra-long, folded cuff.

sleeve cuff

Anyway, it’s done.  I kinda regret not using the excess fabric for underwear now.  I actually think it would have worked a lot better for lingerie, than as a Tshirt.  Well, we live and learn!

Details:

pattern magicpaprika jade skirtwinter boots

1) above

Top; Pattern Magic twist top in charcoal ponte, details here Skirt; Paprika Patterns Jade skirt, in wine silk/cotton knit, details here Tights; own design, my tutorial for making your own custom-fit tights pattern is here
Boots, made by me, details here

2) below

nettievogue1247winter boots

Green top; Closet Case patterns Nettie, in green cotton mix stretch, details and my review of this pattern here
Paprika cardigan; my own modifications on the Closet Case patterns Nettie, details here
Raspberry top; Closet Case patterns Nettie, with sleeve and neckline modifications
Skirt; Vogue 1247, blue corduroy, details here
Tights; black poly, own design, my tutorial for making your own custom-fit tights pattern is here
Boots; made by me, details here

today’s outfit, wearing the Tshirt

raspberry top

pinterestmail

some tops, and a collar pattern

ivory nettie 2 
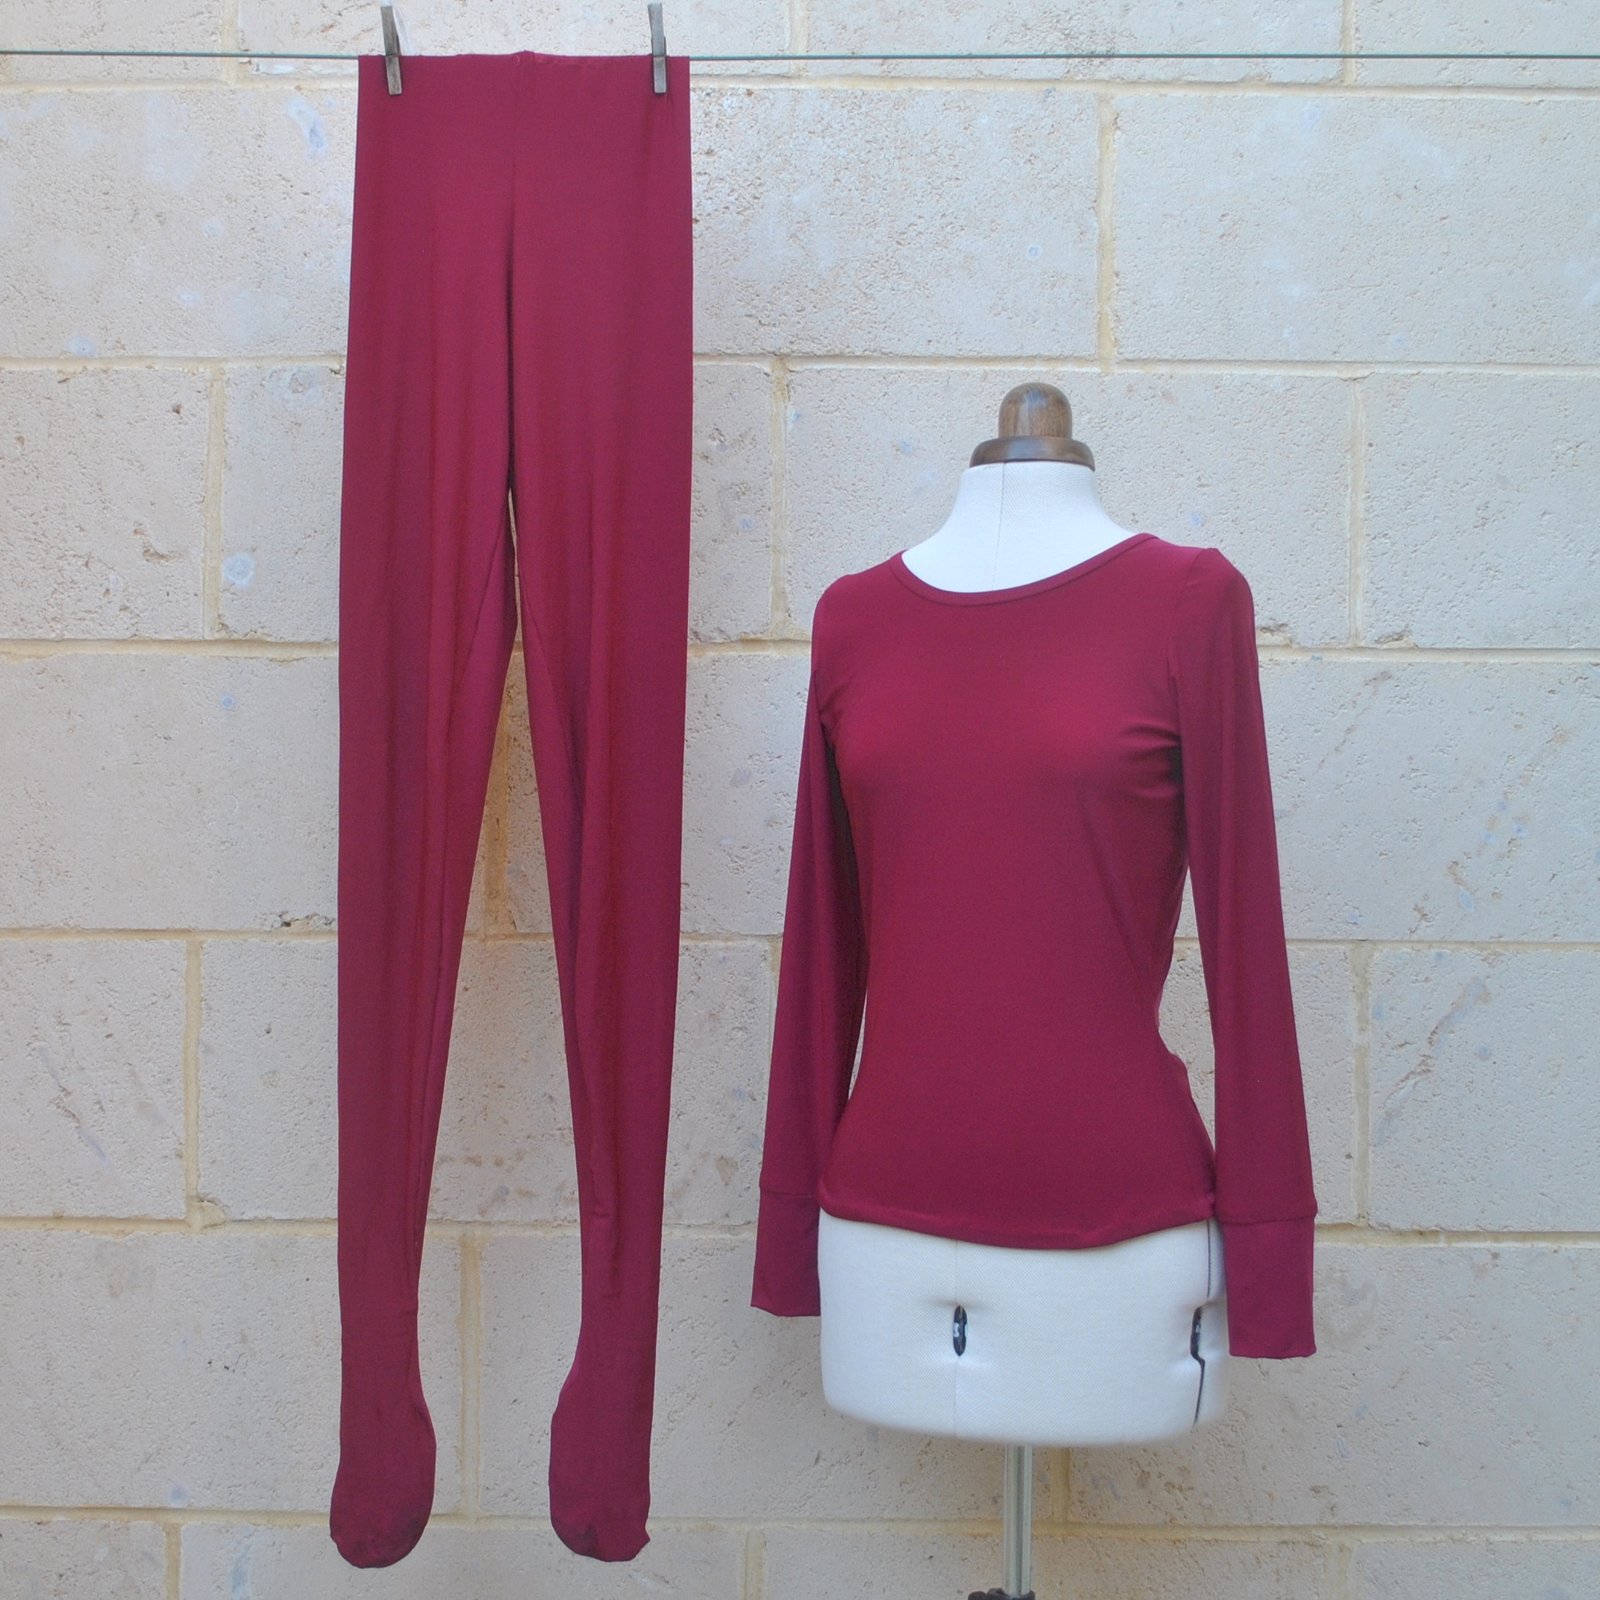
I’ve been busy making a few tops…

nettieSO!  Exhibits A and B; two Nettie tops,both made in a really gorgeous, pale cream knit from Fabulous Fabrics, given to me by Mum.  Now, I know I’ve said a gazillion times before that I have SO MANY white tops I should never ever need to make another one, but you see; a full-sleeve-length ivory Tshirt was one of my most worn wardrobe items last year.   So, I’m pretty confident that these two boring things are probably going to be two of the most worn things in my winter wardrobe this year too! #ivorytopaddict.  I managed to squeeze two tops from out of my piece of fabric, yes! *air fist punch*

I’ve fine tuned my Nettie pattern now for my own figure, but I still have to sorta “start from scratch” with fitting when I’m cutting out a fabric with a different stretch factor than those I’ve used previously with this pattern; and this fabric has quite a low stretch.  So to be cautious I upsized quite a bit, cutting approximately and roughly a size 20, and then pinned the sides in to fit me.  Also; my fabric was just big enough for the two Netties, but only-just-and-not-quite-perfectly-enough!! you know how it is… you MAKE IT WORK.  They both have long sleeves coming right down to my wrists, but I had to cut Nettie B (below) just a little shorter at the hemline, so that I could get the two tops from my one piece of fabric.  It sits at my high hip; Nettie A (above) is longer, plainer, with a high crew neck, finished with a grainline-cut band, applied as for this method here.

DSC_0007DSC_0002Along the back edge only, I topstitched the seam allowance down to the top, just inside the seam line.  In both cases, the raw edges of sleeve and lower edge are finished with the overlocker, than turned under once and invisibly hand-slipstitched in place.

Nettie B, below, is slightly cropped and has a wide, boatneck collar.

ivory nettie 2

I had some interest for this collar/neckline on instagram, so I’ve drawn up a pattern for it… it’s kinda rough-looking and I do plan to improve the presentation but just wanted to get it up here for now.  It does however, work! and so I hope it does prove useful for someone!

neckline:collar

ivory nettie 1 collarThe method is as follows:

This is a collar/neckline designed for a close-fitting Tshirt in stretch knit fabric; the collar is a standup folded collar, and the neckline is wide and shallow. The idea is that you use your tried and true Tshirt pattern just ignoring the given neckline and substituting this neckline/collar for the one in your pattern.  I used the Nettie pattern by Closet Case patterns, although any Tshirt pattern would do.  Align the pattern pieces so the line of the shoulder seams and the centre front/back lines of this pattern are correctly aligned with the shoulder seams and front and back centre folds of your Tshirt pattern, and cut the neckline accordingly.  Seam allowances are 1cm (3/8″), so if the Tshirt pattern you are using has a different seam allowance, align shoulder stitching lines (dotted lines) lines of the shoulder seam, rather than the cutting lines.

Cut the neckband/collar, with the short edges on the grain line.  Sew the collar short edges together, right sides together.  Fold the resulting “ring”of fabric in half lengthwise, wrong sides together, aligning raw edges… pin to the Tshirt neckline right sides together; distributing the length of the collar evenly around the neckline.  Stitch using a 1cm seam allowance, and finish the raw edges with overlocking or zig-zag, as desired.

If you use this pattern, then please do leave me a comment and let me know how it goes.  I’m always thrilled to get feedback  🙂

Now for some more tops, hoodies…!  Smug self back-patting for unselfish sewing commences right here, since neither of these are for me

sams hoodie

Exhibit C; I made a grey hoodie for Sam, to fulfil his birthday request… this is the same self-drafted pattern I’ve used previously for hooodies for each of my boys; and the seventh and eighth time I’ve used the pattern.  The best thing about these hoodies in my opinion is the rather nice combined collar/hood, and I’ve previously written a tutorial on how to make this collar, here.  Sam wanted grey, and the addition of a bit of red was my idea.  I just liked the idea of some little contrast and the red seemed cheerful and fun for winter, and a bit more interesting than if it had just been plain grey.  The rather gorgeous warm, grey terry fleece is from Spotlight, and the red is cut from an old Tshirt from my refashioning bag.

sam hoodie pocketsam hoodie

rayman

aaaaand Exhibit D; a Rayman Hoodie for Sam to wear to ComicCon.  The same pattern, and again to fulfil his specific request!  I bought some warm purple Tshirt ribbing from Spotlight, simply because it was the perfect colour.  The white circle and the red hoodie bit were both cut from two old Tshirts from my refashioning bag.

And that’s it!… well; for now, mwahahahahahahaaaaaaa. *she twirls her cape and dramatically sweeps off to the sewing lair, maniacal laughter radiating in her wake*

Details of all clothing in this post:

1)

nettievogue1247josharp garter jacket

Top; modified Nettie by Closet Case patterns
Skirt; Vogue 1247, yellow corduroy dyed caramel, details here
Tights; self drafted, details here and my tutorial for making your own tights pattern is here
Boots; made by me, details here
Cardigan; hand-knitted by me in Jo Sharp yarn, details here,
Cowl; my own design, mustard yarn, details and pattern here

2)

nettiepaprika jade skirt

Top; modified Nettie by Closet Case patterns
Skirt; Jade by Paprika patterns, details here

3) and 4)

Hoodie; self drafted pattern, my tutorial for making the combined collar/hood is here

pinterestmail

winter boots

winter bootsI MADE THESE!!!

OK, maybe I’m a bit biased here, but to my eyes these are just about the most beautiful things in the world right now!!

So I finally did it! and I’m even extremely happy with them to boot (haha!) and after a month or so of mental anguish and metaphorical hair-pulling even I can find almost no fault with my (eventual) finish.  It’s true there were some struggles along the way yes; but I’m so happy now, and those dark moments have faded away in the happy, warm fuzzy pink glow in which surrounds me right now.  I even dressed today to match it  😉

winter boots1So, the process…

boot pattern

Pattern; self-drafted.  I did buy some long black zips, but eventually decided upon a design which I could just pull on, no zip required, and drafted a pattern to accommodate this…    Before starting, I padded my lasts with a couple of pairs of thick winter socks so as to give my foot a decent amount of wearing ease and allow enough room for my own feet to be well sock-ed too! and taped them down firmly with masking tape, to protect them from the boot-making process, and made my pattern to fit the padded last, obviously.

padded lasts

Materials; the upper is black vinyl, from Clark Rubber,  this comes in two types and I spent a bit extra and bought the UV resistant kind that is highly resistant to whatever the weather may throw at it; sun or rain.  Well, since I plan to be wearing them outside most of the time, and given the amount of work you put into making a pair of boots, the small extra cost is completely justified, in my opinion!

winter boots lining
The boots are fully lined in faux chocolate-brown suedette (above), bought originally in the Fabric Store in Melbourne, and which I have used to line nearly all my shoes so far.  It’s the same stuff I used for my chocolate suedette top, here.

For the soles and heels, I used rubber matting from Bunnings. I cut these to size, and sanded each surface well before glueing them together using contact gel adhesive, also from Bunnings. Inside the boot, I also glued an insole cut from cork matting, and then over that, is laid a foam inner sole (Coles) which I’ve covered with the chocolate brown suedette, to match the interior. Not that you can see it easily, down in the dark innards of the boot, but still

winter boots buckle

Decorative details: I had “finished” the boots, and they were kinda plain, and I decided they really desperately wanted some hardware, and maybe some straps.  I then planned on some “belts” around each boot with buckles… but unfortunately cool buckles are pretty much impossible to find around about here.  Everything I saw was either diamante or leopard print plastic and without exception totally hideous.  In the end, I compromised with these nickel finished swivel clips to close the “belts” and you know what? I love them SO MUCH and am actually super-happy I couldn’t find the buckles I originally wanted after all!  I bought these from Homecraft Textiles.  The three “belts” were all sewn on by hand, after the boots were finished.   And before you ask; yes, this was pretty difficult.  But I reckon it was worth it!  Also, I became acquainted at this stage with how very warm the boots were going to be, even before wearing them, since my hands just about broiled while shoved down in the boots, doing this sewing.

Making the boots…

winter boots half done
I made the lower part of the boots first, like sort of ankle boots, and did all the lasting and constructing the toe puffs and heels counters using stiff cotton denim with some stretch to it, and PVA glue, just exactly the same way as previously described in the making of my paprika desert boots here.

winter boots innards

My vintage wooden lasts are wonderful things, but because they have a metal plate on the bottom it means you can’t nail into them.  So, I pulled in the well-glued up (PVA glue) sides in under the shoe by stitching it all in, in like a cobweb of back and forward stitching, using thick strong Gutermann’s upholstery thread (above).  You have to do this reasonably quickly, before the glue hardens and dries too much, but it’s not actually difficult.  Then I left it all to dry thoroughly, before skiving and trimming much of the bulky folds away underneath.  After this, I glued the sole underneath with contact gel adhesive, and glued and nailed the heel into position, just as for all my previous shoes

Once this was finished, I had two completed ankle boots (above), and it was time to add the “calf-tubes”.  Yes, I expect there is some proper name for those, but that is how I thought of them!  I found it was impossible to machine stitch anything beyond this stage, with my little home sewing machine, and don’t have access to a shoe-maker’s sewing machine, so all the rest of the construction I sewed by hand.  I sewed the lining and outer tubes around the top of the “ankle boots” in a way as to enclose the seam within the two layers, then  hand stitched the tubes up the centre back seam using a leather needle and tough Gutermann’s upholstery thread.  I used back-stitch for the calf-tube to the ankle boot seam, and ladder stitch for up the centre back seam for this.

winter boots sewing

half sewn up…

winter boots sewing 1

Oh, I did manage to sew the upper “hem” by machine! although this was not particularly easy, what with the thick fabric and the boot and all.  I cut the lining to sit neatly underneath the hem, glued the layers together as best as I could, then glued the upper vinyl hem down, and stitched it.  It’s doesn’t look like it would be hard to sew the top hem by machine but just trust me, a boot is a far from manoeuvrable thing to sew.  The final sewing step was to add those three decorative “belts” per boot, as described above.

winter boots heel sandedwinter boots heel1

Then for the finishing off!  I’d cut my heels carefully, but they were still a bit uneven.  In previous pairs of shoes I’ve sometimes left the unevenness, because I kinda liked the randomness, but in this case I wanted a more smart finish… I sanded the heels till they were all beautifully smooth, and then “blacked” the heels and the sole edges (above).  This also camouflaged some stray small blobs of glue that were here and there, that I hadn’t managed to get off with turps.  The very final step was to varnish the heels and soles,  so they’re all nice and shiny and clean and, dare I say it? almost rtw looking?!

winter boots 4

And done!!

winter boots 2sorry for the picture overload, but honestly; I’m so proud of those boots I could burst!

winter boots 3

Details:

Boots; MADE BY ME!!!!!!!!
Jumper; Jo Sharp design and mohair, knitted by me, all details here
Skirt, Paprika patterns Jade skirt, in burgundy silk/cotton knit, details here
Tights; self-drafted, black poly stretch, details here, and my tutorial for making your own custom-fit tights pattern is here

Sienna is thrilled with my boots too; you can tell, yes?  😉

winter boots ootd

pinterestmail

a passing housewife

passing housewife

What am I?  I am a passing housewife!!!

Hehehe just to explain, Izumi Curtis is a character from my favourite Japanese anime Fullmetal Alchemist.  She always introduces herself as just a passing housewife, and so is the character I can relate to the most.  And so, when it comes to choosing an anime character for myself… Izumi Curtis, I choose you!!!! …that’s a pikachu reference there, in case it did not translate…

Izumi Curtis, character and artwork by Hiromu Arakawa

Artwork_of_Izumi_Curtis

So, firstly… WHY??  well, in Northbridge there is a retro video-gaming bar called Respawn that my kids like to go to… and I should just slip in here that this VERY MUCH a young adult’s kind of a place to hang out on Friday and/or Saturday night.  Anyway, last night was Mum’s Night, like a nod to Mother’s Day last weekend, and the deal was that if you brought your Mum you all got free entry.  So naturally, Sam and Cassie hatched a plot that I would be going along with them.  Of course I said yes! how often do I get invited out on the town with my adult kids? pretty rarely, that’s what!  I won’t say never, since my kids are pretty fun and relaxed and not usually embarrassed by my company, but going out to a nightclub in Northbridge is not generally a family thing to do, mmmm?  Fellow Perthies will attest to that  😉

Another thing about Respawn is that people often cosplay it up… and so I set about planning and making my costume…  I made a sleeveless white shirt-dress/coat-dress, I wore my recently completed Morgan boyfriend jeans, and I made a pair of Japanese toilet slippers like the ones Izumi always wears.

vogue 8997 ccf carolynmorgan jeans

Coat-dress/shirt-dress:

I used two patterns; Vogue 8997, a dress pattern, and for the notched collar I adapted the neckline and spliced on the collar from Closet Case patterns Carolyn pyjamas.

Alterations:  for the collar, I added width to the centre back lines of both collar pieces, to fit the width neckline I was after.  I also squared off the collar points somewhat, so as to match the more square collar points of Izumi’s coat dress.  For the dress; I cut the bodice fronts to have a centre front opening and adapted the neckline to have the notched collar bit, and added enough extra width in the centre front to accommodate the button and buttonhole band.  Likewise the front skirt piece has the buttoned opening.  Likewise I cut the back skirt to have a centre back seam, and added a bit extra to the lower part of the opening to hem it.

shirtdress

The bodice front and back are in double fabric, and self-lined, so as to enclose the princess seams within the layers.  Even though this is just a costume, I reckon there’s no need to cut corners and do a shoddy job of sewing it!  I had a small moment of shock when my own Mum suggested just cutting the collar in a  single layer of fabric and leave it with a raw edge … oh the horror!!  I dunno, call me obsessive, but nowadays I could probably not sew a garment all rough-shod like that in all good conscience.  Making all my clothes for the past few years and I am now a fair dinkum full-on, signed up member of the well-made clothing snob club, right here.

bodice closeup

Izumi’s coat-dress/shirt-dress is very well fitted, practically skin tight across her bosom which suggests a stretchy fabric.  However the collar is also quite structured and stiff-looking, more like a regular woven-fabric shirt collar.  So, to get that tight, fitted look; I used two different fabrics in my bodice, a stretch and a non-stretch.  Actually, I used three different fabrics all together… but more on that later…. to get the fitted tightness of the bodice AND the structured collar, I cut the bodice front and back from stiff woven ripstop cotton, and I cut the bodice side fronts and backs from stretchy bengaline.  This way, there is stretch at my sides, but the shirt fronts maintain that nice crisp look of a tailored notched collar shirt.  When fitting the shirt-dress/coat-dress to myself, I left the side seams until the last thing, and the final step was to pull in those bodice side seams nice and tight.

And yes, the skirt is a different, woven cotton… one that is not so stiff and has a bit more flow to it, more suitable to a skirt than the rip-stop.  All are long term residents from my stash, probably from Fabulous Fabrics originally.  The white buttons were harvested from a recently chucked-out doona cover.

slippers

Slippers:  Izumi always wears these Japanese toilet slippers…. this is to reiterate her status as a humble housewife and that she spends her days cleaning and doing housework.  I made these very quickly and simply, the padding is cut from my good old yoga mat, covered with black cotton cut from an old Tshirt.  For the uppers and the underneath bit, I used some very stiff thick black cotton from Remida, from when Meggipeg kindly invited me to go with her the other day.  I did the WC letters on the top by couching with some thick, white wool, leftover from Cassie’s beanie that I knitted her for Christmas.

couching

Another pretty important component of Izumi’s look is the Flamel tattoo.  Cassie drew this on with a ballpoint pen; it was a little bit hidden on me, but ’twas there…

flamel

And, you may be wondering… did I wear this outfit, and these slippers in the streets of Northbridge and in the club? well yes I did!  You can rest assured that the other Mums were of course wearing all black, and heels or ankle booties and the like… but not I!  I am just! a passing! HOUSEWIFE!!!!!!

izumi curtis back

pictured in the club…

IMG_2453

pinterestmail

teal suede heels

teal suede

Heels!

I’ve made some high heeled wedges, specifically designed in colour, shape and height of heel to go with my newest Alabama Chanin outfit.  Hurrah! I know, right? we can all breathe a sigh of relief now.  I’m sure everyone else, just like me, has been lying awake at night, tossing and turning, losing sleep over the thought that I didn’t have any shoes that went with that Alabama Chanin ensemble.  Nail biting stoof.

No?  Just me then? wink wink

teal suede side

I didn’t have any fabric or leather in a colour that went well with my outfit; until…!  While browsing through Spotlight one day, I spotted a pack of so-called premium leather remnants, the “leather” side is black but the “suede” side was a rather beautiful shade of deep oceanic teal.  I thought it went very nicely with the blue/green shades of my newest onn-sohhm-ble (said in an ott Frawnch accent).  So I bought a bag.

Well.

leather remnants

What was I thinking?  All I can say is this; under no circumstances ever buy those “premium” leather remnants in a bag.  Unless you really wish to pay $12 for a raggedy scramble of what is essentially awkwardly shaped, screwed-up scraps, typically around 4x15cm in size, barely big enough to make babies’ shoes, even.  And if you’re making shoes for an adult human? nope!  Premium?!  LOL!  I would LOVE to see the not-so premium stuff!!  It must be heeeeeeeeinous!!!  Because; not to harp on, but this stuff is crap.   However.  I steeled myself to it, determined to make a silk purse from a sow’s ear.  Or, a polyester satin purse, at least.  I was determined to NOT waste this leather and make the best of it that I absolutely could… but I do have to admit that these shoes are not my finest hour.   This was the absolute best I could do!

Some of my most successful shoes have been my denim shoes; that are a hand carved balsa wood base covered with fabric.  I decided to repeat that procedure for a pair of high wedges.. and so I hand carved a pair of soles.  These turned out fine, all well and good.

balsa bases at right; at left is another future pair of pine clogs

shoe bases

Covering the bases, I used the absolute biggest pieces of scrap leather I could glean from my bag of paltry clippings… the colour wasn’t perfectly even throughout, some pieces were a deep deep oceanic blue, while some pieces were more of a faded, smoky grey/blue.  I’m not against colour variatio, not at all!  but they certainly make for more of a challenge.  And when you’re piecing together pieces to cover a shoe base, it just doesn’t look so good to abut different shades around the shoe.  You can see below; the liner of the right shoe is two pieces of very different colours, joining just front of the heel.  I figured that wasn’t a bad spot for a join, because it couldn’t really be seen when I’m wearing it, underneath my foot there.

teal suede shoes

For the uppers; there are eight strips of leather per shoe, sewn at each end to a piece of sturdy cotton denim that is glued underneath the suede liner piece.

The eight strips form “arches”, which had to be tight enough to sit snugly over my instep, whilst at the same time still allowing the frontmost, widest part of my foot to fit through all the arches while I’m putting them on.  This took some fiddling to nut out… also, the straps are essentially woven together across each other and so there are some straps that are key to the design, the middle one across my toes, the two long diagonal ones and one of the highest instep straps.  These four provide the stable backbone for the others to be woven into and are essentially holding everything all in place.  I then added the others more randomly, arranging and weaving them through decoratively, but they do also add strength.

Now, I say “random”; I’m all for random, but I’ve found that true randomness is more visually pleasing when there is some element of order and method in there somewhere.  I like the fact that the strips appear to be a disordered riot of criss-crossing strips; however the shoes are actually exact mirror images of each other with the strips set in exactly the same places to each other.  But when I put them on I do have to “arrange” them all!    Underneath the shoes, I’ve glued pieces of thick, tough black rubber, so the shoes can stand up to the rigours of life on da streetz.

So, yay! new shoes!  They are just the right height to go nicely and unobtrusively underneath my new Alabama Chanin skirts, keeping them up and out of the dirt.  I think the skinny straps look quite nice against the design of my outfit; matching but not too derivative, in a harmonious colour; and a design quietly complementary while not stealing the show away from my embroidery!  Bam!  I’m happy  🙂 well, reasonably so anyway!  And they will do absolutely fine, at least until my Year of Handmade is up and I can return with some joy to the undoubtedly more attractive rtw shoes in my collection!

teal suede top

pinterestmail

olive leather desert boots

olive boots with pink

I’VE MADE SOME REAL LEATHER BOOTIES!!!  (screams hysterically and with a certain stunned disbelief)

olive boots w yellowfabricnippori

And I’m sooooo happy with them, finally 🙂

Leather; I bought both the olive/tobacco brown leather and the coloured leather strips for laces from a leather shop in the Nippori district in Tokyo, pictured on the top, above with my other Nippori treasures.  Do you like the variety of shoelaces? They’re pretty fun, yeah?   I bought three different colours, hot pink, golden yellow and caramel/mustard.  I’ve also got some store-bought, bog-standard black ones for them (below).

olive boots with black

I like all of the colours, simply cannot decide on a favourite.  Oh ok, of course I can! for now, I’m digging that bright pink, sorta unexpected,  like lipstick on a pig  😉

oink oink!

olive boots pink laces

Pattern; In shape and style they look just like my previous paprika suede desert boots, and so they should because I used the same pattern!  The heels on these are lower than my paprika boots; that higher heel looks a little more refined whereas a lower heel is casual which I reckon is better for the slightly grittier tougher look of this leather.

they fit with socks too

olive boots with mustard

Thoughts on construction: I did find the leather both easier and more difficult to work with… easier, because leather really is a far superior material to work with than synthetics; it does mould and form far far better to the shape you want it too, plus it “skives” beautifully, whereas plastic leathers and that paprika upholstery fabric does not.  However, and paradoxically; I also found these shoes to be more difficult to make than my paprika ones, because my leather was actually quite thick and less pliable than ideal.  It was harder to sew; my sewing machine coped fine with it, but it was so stiff as to be difficult for me to manouvere it around the sewing machine while sewing it. and stretching it over and around my lasts took more effort and grunt-power too.  Being a leather shoe newb, I did not fully appreciate that it was not ideal until I was halfway through making the shoes, of course.  Anyway, I think I managed to wrangle it into submission eventually.

olive boots laces

The shoes are fully lined with chocolate synthetic suede, bought from the Fabric store in Melbourne during a past trip, and all topstitching was using chocolate brown Gutermann’s upholstery thread.  I constructed the heel counter and toe puffs using stretch cotton denim and PVA glue, and the soles are black rubber sheeting from Bunnings, which I cut up to make stacked heels and the sole.  Like all my other shoes, these are sanded down before glueing together with contact adhesive, and the heels are nailed to the soles inside, as pictured in a previous pair here.  Also as usual, I made the liners using foam inner shoe soles from Coles, cut to size and covered with chocolate suedette using PVA glue, so they match the interior.

olive boots yellow front

Excuse the picture overload.  I’m just so happy and thrilled with them, I’ve been excitedly threading and re-threading with the different coloured laces and prancing about my house, taking pictures of them.  I LOVE all the laces!  In fact, I’m just in love, full stop!

The only laces I’m meh on at the moment are unsurprisingly the store-bought black ones… which, simply because they are boring, paradoxically will probably become the most useful and worn ones.  Or not.  I think maybe I should stop being boring,  I need to break out and wear the fun stuff more often.

olive boots total

And that’s it!  Ahhhhh, I feel like I can hang up my shoemaking hat, or should that be lasts? for the moment, since I think I’ve covered my basics and probably have enough essential shoes to last me for this winter now.  Although, of course I am not.  In fact I’m already started on my next pair of footwear…. mwahahahahaha.  eeek! I’m addicted!  SO much inspiration to be had, and so little time!

olive boots side

pinterestmail
Switch to mobile version
↓