Tag Archives: Own Design

light as a cloud

floatytop1

stylish dress bookI’ve made a softly floaty blouse  🙂  of course just as summer is on the way out… o no, wait, actually summer is over! However we’re still getting days of 40C.  Not that I’m complaining, mind you.  I love the warmth!  Only thing is that I’m getting tired of all my summer things thus the decision to make a new summer thing, ha.  #seasonallyinappropriatesewingforthewin  It’s light and pretty and easily breezy; and delightfully cool.  I fully expect the weather to turn cold now.

floatytop3

Pattern; based upon dress R from the Stylish Dress Book, by Yoshiko Tsukiori.  I’ve always had luck with the patterns from this book.  But this time … well the pattern is for a short dress, and it’s quite pouffy too, and in this particular fabric it looked just like a nightie! eeeek! this fabric is far too lovely to be a nightie! So I gave it just a little chop and now it’s a top.   Much much better like this… I had also added some rather interesting gathered side pockets to the dress and managed to keep them perfectly intact.  I pinned this picture of a gathered pocket a while ago and have been itching to have a go at incorporating it into a design at some time… And I have! with an added drawstring.  I decided the drawstring was needed with this embroidered fabric, it felt kind of lacking without it.

gathered pocket

Fabric; a rather gorgeous fully embroidered Japanese silk/cotton, bought from the remnants table at Potters Textiles, years’ ago.  Probably about four years ago.   Fully embroidered with a floral motif, the background is very light and fine, quite sheer actually; so a full and voluminous design is just the ticket.  The yoke and bias cut ties on the pockets are ivory crepe from Fabulous Fabrics, cut from the leftovers of my studio faro dress.

floatytopback

Modifications; Shortened to be a blouse.  Also the front and back are supposed to be gathered into the yoke… I tend to steer clear of gathering.  Instead I folded the excess width into box pleats.  There are four at the front, evenly spaced and close to the centre front, and one in the centre of the back.  And I added those two gathered pockets at the sides.  I love the design of these; interesting and practical, and pretty too without being excessively twee, and they’re a little bit different from your average inseam pocket and patch pocket.  I think they add a certain visual “something” to the top that it needed.

I’m thinking of writing a tutorial to show how I made them…  coming soon  🙂

IMG_1263

stylish dress book DSC_2624burda7723-1

Details:

Blouse; based upon dress R from the Stylish Dress Book by Yoshiko Tsukiori, embroidered ivory silk/cotton
Shorts; Burda 7723, green cotton gingham, details here and my review of this pattern here
Thongs, made by me, details here

floatytop4

pinterestmail

black Oxford shoes, with pinking

DSC_2641

I’ve made another pair of shoes.  They’re a bit shonky, dodgy and clutsy, and clearly home-made, particularly those rough n’ ready heels, but y’know what?  I LOVE THEM!!!

Pattern; classic Oxford shoe style, drafted by myself; my tutorial for drafting your own shoe pattern is here.

Fabric; black faux leather from Spotlight, lined completely with very dark navy cotton denim from Spotlight, the two layers are lightly glued together with PVA fabric glue.  Rubber soles and heels cut from black rubber matting from Bunnings, two layers of cork inner sole linings from an old set of placemats, black eyelets from Spotlight, black shoelaces and foam inner soles from Coles.

Details:  I whimsically pinked various pieces of the shoe, not sure if this looks cool or just emphasises the homemade quality, not in a good way, mind you, but meh, it’s done.  Actually there’s a little bit of a pinked theme throughout the shoe and the detailing…

DSC_2695

Pinked edges to the vamps and upper edges, and below, the little bit of pleather that covers the centre back seam has a pinked edge too.

DSC_2692

Inside; pinking to the edges of that half-circle of denim at the back of the shoe… this contains the counters, which are bits of stiffening to keep the back of the shoe stiff and standing up straight.  DSC_2691

Confession time, I cut my counters from milk bottles… yep, household rubbish; whoops! am I going to be booted out of the cobbling club now?!   😀
Well, our milk bottles here are made of a strong, sturdy plastic that I thought is totally perfect for this purpose… it is stiff, strong, pliable, can be cut very easily, coaxed into a new shape fairly easily and holds the new shape well too.  And of course; free! since it’s rubbish.  What’s not to love?

IMG_0920

I covered the inner soles completely with the same denim so they match and blend in with the interior nicely.  The inner soles are removable, ie. not glued down inside of the shoe.  Inside the shoe you can see the long nails that I used to secure the shoe to the sole and heel… Not seen, but between shoe and sole there are also three shorter tacks holding the sole to the heel along the straight edge of the heel.  I did this because I knew this heel/sole joint would be the weakest point in the shoe most prone to coming apart under pressure.DSC_2687
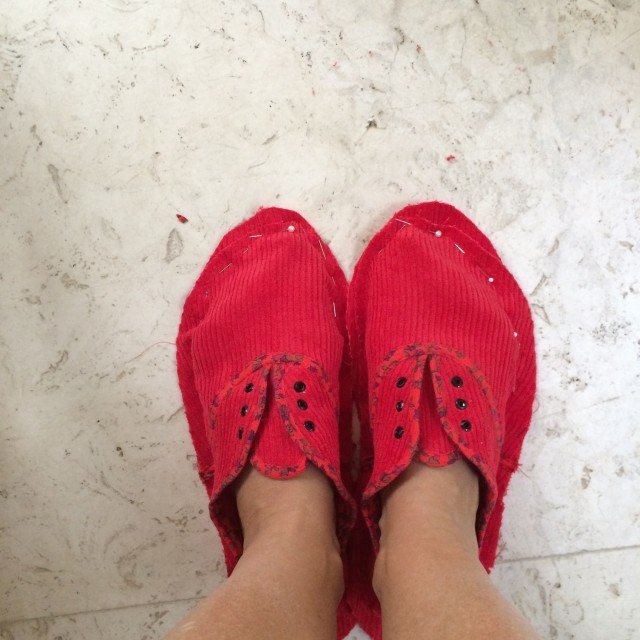
Sizing; they are moulded to my own feet, so obviously the sizing is good on me.  They are sized to fit my just-slightly-larger right foot.   My feet are a touch wide compared to the average so the shoes look a little wider than most you see in the shop;  actually I was so worried about making them too tight I think I overcompensated and made them just a touch loose… ! This is ok though, since I’ll need to fit warm winter socks in there at some point and at least they are very comfy and totally not tight!

IMG_0916

How do they go with socks?  Phew, they still fit.  Yes, I knitted these socks too…

DSC_2650

Technique and finish-wise; far far far from perfect but I’m still pretty happy.  Actually, all was going swimmingly in the beginning and I was very happy with them, then ran into difficulties and self-doubt, decided they were crap, almost threw them in the bin a few times; realised that, contrary to what it says in my book on shoe-making, shoe lasts are actually INDISPENSIBLE to shoe-making… then things started to look up and I got a bit optimistic they might even work out ok.  Limped in to the finish line in the end, in spite of a little glue splodging mishap on my nice black binding which downgraded my happiness factor considerably.  *sad violin*  and resulted in a decision to use my “failed” stacked heels rather than my good ones.  Those, I’m saving for the next pair.

heels a bit nasty… but trying not to beat myself up over it

DSC_2681Yes, there is a next pair in the works, sneaky-peeked here on IG;  I’ve constructed the uppers already and have found and ordered a pair of shoe lasts.  We’re all just in a state of suspended animation, patiently waiting, waiting, waiting; just for those lasts to arrive.

HURRY UP, LASTS!!!

Final thoughts: pretty bad really, but they’re quite tough and totally wearable, even though not pretty.  Let’s just say, I’m embracing the homemade look, ok?!  😀
I’m anticipating that these ones will be hardwearing workhorses during winter; everyday things that I can just chuck on for day-to-day everything.  I think they could even look quite cute with tights and my little winter mini-skirts, a go-to winter uniform for me  🙂  At least I’m starting to get some confidence that I may just actually have a small range of wearable winter shoes for my Year of Handmade.  Woot!DSC_2632

pinterestmail

cherry red sneakers

cherry senakeres1Woa, crack out the sunnies!  So, my second pair of sneakers.  Bit bright, eh?!

Pattern, drafted it myself.  I’ve written a little tutorial on how I made my pattern, coming soon.

Fabric; cherry red cotton corduroy, bias binding; a red small-print floral.  Both these fabrics from my mother’s stash when she did a clean out a while back.  Black bias binding that goes around the bottom edge; made from some quilting cotton from my stash.  Black eyelets from Spotlight, black shoelaces from Coles.  Inners; cut from an old yoga mat, stabiliser cut from thin cork (old placemats), rubber soles (matting from Bunnings).  Glue is all-purpose PVA from Bunnings.

IMG_0766 IMG_0773

Construction; stitched the uppers together first, stitched them to a corduroy “sole” with a wide border (above).  Padding: glued corduroy to bottom of the yoga matting inners cut to fit, trimmed off the edges.  Glued the shoe upper to the padding, wrapping the wide border down and under, snipping around corners, glueing it underneath.  Glued a thin cork sole cut to fit underneath.  Black bias binding, folded and pressed upper edge, left lower edge wide and raw.  Glued folded top edge of binding around the bottom edge and folded under, snipping around corners and glued the excess width underneath the cork. Last thing; cut and trimmed the black rubber sole to fit, glued it underneath. (below)

IMG_0846

As far as the construction of these ones goes, I’m satisfied.  They’re tough, and will hold together just fine, and they work.  Meh, *shrug*   All in all, they’re ok, and not a fail.cherrysneakers2

However, my materials; yoga matting is not an ideal inner sole, really.  It’s been good to play with, for learning purposes; but I think it’s time I shopped around for something more sturdy and hardwearing.  And I’ve discovered it won’t glue properly to anything other than fabric.

Anyway, here’s the thing; I reeeeeeally want to move onto some of my better materials, like my precious small stash of leather, for instance.  My ultimate goal is to make leather shoes for winter.  These last two pairs of shoes have actually been but mere trials.  And tribulations…? debatable!

cherry sneakers

pinterestmail

floral sneakers

floralsneakersHello!  I’ve made some more shoes!  floral sneakers.

Now, I have to admit; they may look kinda superficially cute at a distance, however close up they’re a bit of a fail.  I’m considering them a wearable fail though, since they’re all stuck together firm and good, glued up to the hilt and are not going to fall apart in a hurry!   So all is not lost and I will wear them for casual knockabout events when it doesn’t matter if your footwear gets dirty or ruined.  We all have those events in our lives, right?  I’m sure plenty are going to crop up in my Year of Handmade.

I have learnt a lot making these… primarily the optimum order in which one should put together a pair of sneakers…. but first things first…

Fabric; a small leftover scrap of floral upholstery fabric, maybe barkcloth, from my grandmother’s stash, given to me after she passed away.  It’s pretty cute fabric though, and I have just enough left to cut out the pieces for another pair of sneakers should I desire to revisit this exact same look. Which I probably shall.  Bias binding for the edges and for the strip around the base of the sneakers is unbleached calico.

floralsneakers1

Design; drafted by me, copying a pair of sneakers I have already.  I thought I’d got the design not too far off, but will make some adjustments for the next pair.  I’m not even bothering to put laces in these ones.  They stay on my feet fine without laces so I can still wear them.  I’ll save my bias cut spaghetti strap laces for when I make a good pair  🙂

Details; the bases are cut from an old yoga mat, and my first step was to glue those strips of calico along the side edges…  this was my big BIG mistake.  I would NOT fabric coat the bases so early next time, it made it hellishly difficult when it came time to glue to uppers to the base.  Also, the bases turned out to be a little too big for the uppers and the fact I’d “finished” them meant they could not be trimmed down.

Sewed together the uppers, all fine… sewed them to the lining pieces right sides together, turned them right sides out and glued it to the bases.  Next time I would sew them together, wrong side of upper to right side of lining and turn the edges under before glueing to the base…  I think that could be a better thing.  Then, and only then! add the finishing strip to the outside edge of the sneakers.   The last step is to add the soles.  I used thin cork, cut from an old set of placemats.

Well, we certainly live and learn!  All in all, it was a bit of a mess, but I pushed on and finished them because I wanted to see how the fit and design would turn out.  I’m actually very happy with the fit, and the design is in my opinion 90% there, I will just make a few minor adjustments for the next pair.

At least I have a pair of don’t-care sneakers that are wearable and not too precious to get out and about in.

floralsneakers2

pinterestmail

black thongs, white thongs

blackthongs

I’ve made a couple of pairs of thongs!  They’re pretty basic; I was just kind of mucking about.  Each pair took me just a few hours each.  Anyway, I actually made them back in December, immediately thought oh god how ridiculous and tossed them in my cupboard, where they’ve been knocking about unworn ever since.  I had a second look at them a few days ago and decided they were not irredeemably terrible.  Anyway, I’ve just decided to wear them, imperfections and all…

whitethongs

See, I’m working on a plan… Long-term readers might recall, inspired by Natalie Purschwitz’s the makeshift project; 2013 was my year of going all, 100%handmade.

I wore only my own self-made clothing, including all underwear, tights and socks for the year.  And did it successfully; although in reality it was actually only nearly 100% since I didn’t count shoes.  I hadn’t made any shoes at that stage.  I was pleased that I’d succeeded for the clothes side of things, but always had in the back of my mind that it would be good to have a truly 100% me-made year, including shoes.

Anyway, I’m wondering if I should just start right now since the last five days I’ve been wearing 100% self-made including my own self-made shoes and feel pretty good about it so far.  Maybe I should just go for it now.  Try for a year; right here.  Stop procrastinating.  I have five pairs of me-made shoes now; my three pairs of slides/clogs and now these two pairs of thongs; enough to get started with at the very least!

whiteblack

Writing a little laundry list of shoe needs for myself…  my bare minimum essentials would be :

  • a couple of pairs of thongs…. DONE
  • medium heeled casual summer sandals… DONE
  • smart dressy heels, for both winter and summer… could do
  • winter slippers.. could do
  • medium heeled winter shoes… not impossible
  • low-heeled winter boots… um, pretty difficult
  • walking shoes for inclement and/or cold weather…  woah.  Brain frizzling….

Hmmm.  Need to do more thought….

thongs

Anyway, details…

for the black pair; I traced the bases on an old yoga mat that had seen better days, and used scraps from an old, black cotton corduroy shirt to cover the bases and for the straps.

thongbits

The black straps simply have the long edges folded in and I zig-zagged down the centre to finish them… each strap is 25cm long, although I found it a little easier to manage when I cut them a bit longer when making the white pair.  I made a little “tube” to go between my big toe and the other toes, through which the straps go before piercing the base.  Underneath the base, the straps are stitched to pieces of fabric to secure them firmly, then these are glued to the underneath of the base.  The base is covered in fabric, which is glued in place both top and bottom.

closeupUnderneath the base, I glued a layer of tough rubber floor matting, which is a very tough sturdy base, very hardwearing, which will hopefully keep the thongs going and last me for this summer, even *crosses fingers* next summer too!

For the white pair; I had some thin, worn-down bases from an old pair of thongs that the straps had broken through, and I’d kept the bases just in case #hoardingfinallypaysoff  I glued on a piece of thick, cream cotton corduroy underneath the thongs to strengthen the worn through bits.  The straps are strips of the same corduroy,  sewed together to other scraps of fabric underneath the bottom to secure them, same method as for the black pair above; then I glued a piece of thin cork matting underneath the whole shebang for a new sole.  I chose cork for the white pair even though the rubber makes a better sole, because I thought the black rubber would be visually unattractive with these ones.

rubber sole, cork sole

soles

pinterestmail

a shearling jacket

P1130071

As sneaky-peeked previously; my shearling jacket, and mamccalls5276n, I’m so happy with it!!  It turned out just exactly how I hoped, and was the most wonderfully cuddliest, comfiest thing to have with me in our recent visit to Japan; I loved bundling up in it each day in Tokyo and used it as a snuggly rug while on the plane…  without a doubt the warmest coat I’ve ever made formyself, evah.  Like wrapping myself in a fluffy blanket, and I was perfectly snug enough even in the subzero temperatures of Hokkaido.
P1130050

Obviously, and with my usual attention to weather appropriate sewing ahem, I chose to get started on this super fluffy thing during the most heinously hot heat wave… 42C anyone? phew, try-ons were hideous.  Seriously I question my sanity sometimes.  Well, lots of times actually 😉   Anyway it was all worth it in the end, since I’m quite chuffed with how it turned out.

IMG_9612 - Version 2

What is it about making jackets that is so enormously satisfying and fulfilling? I don’t know exactly why, but I always find jackets, and dresses too, to a slightly lesser extent; to be the projects that give me the biggest of happy warm fuzzy buzzes… 🙂

P1130064wrt this one; well I’ve wanted to make a shearling jacket for oh, about ten years now.  Ever since the first time I clapped eyes upon one belonging to our friend S; a colleague of my husband’s who is always super suave and cool and has a slightly alternative, very hip and happening taste in clothing.  He owns a beautifully thick, oversized shearling jacket that he’s had for years and years and trots it out every winter once or twice.  Every single time I see it I’m struck all over again by how awesome it is and have harboured a secret desire for one of my own…

IMG_9986

I bought the faux shearling from Spotlight and the burnished, dull metal buttons from Fabulous Fabrics.  The pattern is loosely based upon McCalls 5276, a pattern I’ve had for years but only muslined once and not got any further… oops!  I pretty much chose the pattern  just for the collar alone, since I wanted that big oversized 70’s lapel collar on my jacket, but not much else.

My alterations included;
Body and sleeves slimmed down and lengthened somewhat.
Welt pockets added as described here,
Belt and belt loops added.
I also fine-tuned the front edge and collar to have it so I could happily wear it in a variety of ways… a) open, cardigan style b) buttoned up halfway with the lapels flared, c) buttoned up to the neck with the collar laid down in a peter pan style, and finally d) with the collar turned up and buttoned up right to the very top in a funnel-neck style.  Also, having the belt tightened or hanging loose adds to the wearing options too.

P1130068
Because I was using a shearling obviously I left off all facings and all edges are left raw.  When working out how to seam the pieces together, I checked out a pattern for a shearling jacket from one of my Burda magazines… which mentioned overlapping some edges to be joined and top-stitching the overlaps to minimise bulk.  So; I overlapped the shoulder seams in this way, and also the collar-to-neckline seam.  The other seams; namely the sleeve, side and armscye seams are sewn right sides together in the conventional way.

P1130105

Even though I used the McCalls collar, I still cut it a bit bigger on the edges – just in case!!- never forget the golden rule of sewing… you can always cut away but you can’t add it back… EVER!!!  And then trimmed it here and there to allow it to sit how I wanted it to look, to fit how I was imagining my collar.  I’m particularly pleased with how the collar looks when buttoned up to the neck like this..

IMG_9976I made the sleeves extra long, so I could turn them up and have a woolly “cuff” on the sleeve ends, and also made wrist strips.  These are sewn to the sleeve, then wrapped around and buttoned to themselves.  The seam allowance of the cuffs are topstitched down for a neat look when they are turned back, and then I stitched-in-the-ditch of the sleeve seam down to the sleeve so the cuffs stay folded up permanently.

P1130096

P1130073Welt pockets: my tutorial for how to do the welt pockets is here

Buttonholes: I’ve written a separate post detailing how I did the buttonholes here, so as not to clog up this post more than it is already!  aaaaaagh! picture overload!!

P1120887

In summary; I thoroughly enjoyed having and wearing my cosy new jacket in the subzero temperatures of Japan, and now we’re back home…. and it’s 35C… lol! so it’s off to the back of the wardrobe with this fluffy hulk of a thing.  See you again next winter, you snuggly bundle of cosiness!

mccalls5276burda7863DSC_0001-2

Details:

Jacket; my own design based loosely upon McCalls 5276, faux shearling
Top; the twist top from Pattern Magic by Tomoko Nakamichi, in ivory ponte, and in charcoal ponte
Jeans; Burda 7863 modified to be flares, in ivory cotton denim, and made as regular bootcut in black cotton corduroy
Gloves; hand knit by me in 4ply charcoal merino, details here
Socks; hand knit by me in Noro 4ply, details here
Shoes; Francesco Morichetti, from Zomp shoes

P1130083

pinterestmail

Cassie’s bikini

DSC_2635Hello!

so here is Cassie modelling her new bikini, previewed on instagram the other day.  We both popped on our bathers this morning and headed off to the beach for a quick photo op, and of course a swim! aaaah, it was totally divine, like heaven.  The water was crystal cool and clear and it was all just so delightful.  Every time we head off to the beach I think “hmmm, should come down here more often…” but then we get busy and a few weeks go by just like that.  I guess it wouldn’t feel like such a treat when we do get there, so maybe we’ve got just the right balance!

The colour may look a little familiar… remember when I told how Cassie had given me some lovely brick fabric from Fabulous Fabrics for my birthday, with which I was make my bathers this year? well this is the exact same stuff!  Cassie liked it so much she bought some for herself too, to make her own bathers!  We must’ve made a kinda funny sight this morning, in a Sound of Music kind of a way.

But anyway, sewing stuff re the bikini…

Cassie designed and made the top herself, basing the wrap-around band design on that of Madalynne’s free sierra bra pattern; except she drafted her own halter neck bodice pieces and gathered them gently underneath the bust into a double layered, turned out band.  The band ties at the back in a self-tie, likewise the halter tie.  All pieces are self-fabric lined.

DSC_2627 2

I was commissioned to make the bottoms.  I used the ClothHabit Watson briefs as a basic starting point, splicing the front piece and gusset together and cutting them together as one piece. I always do this mod every time I make this pattern.  To get that tied-together-sides style; the side edges were extended by 2cm each side, and the elastic starts and ends at those extensions.  The extensions were then just turned under to make casements, through which I threaded a little self-tie up and down each side.  Meaning the bikini is held together at the side edges by this tie.

DSC_2669That’s it, really!

sierrawatsonIMG_9253 - Version 2

pinterestmail

a townhouse dress

DSC_2712

This new dress is the latest step in my current project to add some architectural whimsy to Cassie’s work wardrobe …. and it was barely off the machine when she wanted to wear it to work straight away, like the next day, meaning today!   I took these pictures before she popped off this morning, looking exactly like this…

I consider that the hugest compliment  🙂

DSC_2700That townhouse print though; it did cause me a wee bit of angst…   how on earth to make it into something that was going to look cute and fun and funky and stylish?  You know with some prints the subject material is absolutely perfect for a person, but the print itself is kinda messy and busy and so has the potential to be disastrous?  It’s one of those prima donna prints, I felt it would look overpowering in a dress with a sleeve, also I knew it would not play nicely with many other colours/prints; likewise any design details like draping or … well anything at all, was OUT.  At first I thought about making a very simple plain sleeveless shift, but still worried that it would look a little naf.

When the idea of a white raglan sleeve occurred to me was an instant kapowww! that this could work out quite cute after all.  The white raglan sleeve lends it that little bit of a fun and sporty vibe and just takes the right amount of edge off the messy print. The sleeve fabric came from an old puffed hem dress *shudder*  which Cassie tossed out.  I’ve kept it because it has a mass of lovely soft ivory jersey fabric in it.

DSC_2724Once the raglan lightbulb had popped up it was all super easy from there… I used my own raglan sleeve Tshirtpattern, that I’d worked out years ago from laying down and drawing around an old Tshirt … in a time when patterns for raglan sleeve Tshirt were non-existent!   Yes, it’s hard to believe now there are tonnes of patterns available everywhere, but for a long time and until quite recently some design features were very difficult to get hold of.  We had to hunt for them, and be creative and innovative and sometimes very devious in order to get what we wanted.  The elusive Raglan Sleeve tee was one such rare beastie.  I think it was often assumed that patterns for basics were something you either had already, or could work it out yourself with no pattern by cutting up an old one.

IMG_8643Collar band, simple folded band done using this method; sleeve and lower edges overlocked, turned up once and stitched on the machine with a twin needle.  All seams stitched and overlocked inside to finish.

Details:

Dress; elongated raglan sleeve tee, body custom fitted to Cassie.  No pattern, townhouse print fabric from Fabulous Fabrics, ivory jersey harvested from an old dress
Shoes; MelissaDSC_2713


pinterestmail
Switch to mobile version
↓