Monthly Archives: March 2014

You are browsing the site archives by month.

leatherette/pleather piping

I have a word of advice for anyone considering putting leatherette piping in a garment.
Don’t.
There, I think that just about covers it  ðŸ˜‰
Haha, I’m kidding… but seriously now, leather/ette detailing is pretty hot right now and adds a smart urban edge to the most ordinary of garments, so I made some to put into my latest project. 
It’s fiddly but I think it’ll be worth the effort.
Some thoughts:  
When sewing around a sharp corner, clip into the corner before pinning the next section in place, and sew each section as a separate little seam.

Same goes for sewing around a curve.  Go slow and check everything is sitting just as it should frequently.  There is no shame in hand-cranking the machine, stitching just one stitch at a time!  Those needle holes are permanent.

Obviously when sewing in tight corners and curves, pick a nice, long-enough section of the piping with no joining seams.  No point in making it more difficult for yourself than it is already.  Only use those bits on long, straight easy edges.

Leatherette does not fold into a sharp edge or point, and even on the bias will not naturally stretch out smoothly around curves either, like a woven fibrous fabric would.  But it does give a nice, softly rounded edge when turned out.  I like the bluntness, am very pleased with the contrast in textures and think they’ll lend a certain je ne sais quoi to the final garment.  Hopefully.  ðŸ™‚

pinterestmail

Patched pockets

Just to provide further proof of my predilection for unusual clothing … please allow me to present my new skirt.
This skirt is the love-child of four old pairs of jeans.   They were a bit battered but in favourite colours, and had fabric in some areas still in pretty good knick.  Charcoal denim (Cassie’s), olive green corduroy, olive green moleskin and chocolate moleskin (Craig’s).  The chocolate moleskins had previously been nibbled away at to produce the Brown parliament.

The skirt pattern is another offspring of Vogue 8363; yes, the very same as my previous big baggy pockets skirtQuite different, yes?!  That’s the beauty of a well-drafted good basic pattern like this one, you aren’t limited to the plain unadorned versions, which obviously have their place in any well-rounded wardrobe too! but my point is that you are only limited by your imagination  ðŸ™‚
I thoroughly enjoyed making this.  For a start it’s re-using old unwanted textiles, always an activity dear to my heart.  I am in the fortunate position that when my family is tossing out cruddy old clothes they tend to lob them my way first.
And I love puzzles, and making this skirt was a fun puzzle.  This was a joyful and totally engrossing project where I happily zoomed along, cutting out on the laundry floor, up and down, rushing to the sewing machine, the iron; slicing and piecing away without any thought to time passing.  Bliss…

I used the pattern variation that allowed for front slanted pockets, and made whole skirt front and whole skirt back pattern pieces from newspaper, re-drawing the side seams on both front and back to be just slightly more flared and A-line than the pencil lines of the pattern although not quite as pronounced as for my big baggy pockets skirt.  

I unpicked and re-used the waistband from the charcoal jeans and made use of its resident buttonhole although I sewed on a new flat button that won’t dig into the small of my back when I’m sitting back in a chair.  I also re-used the waistband of the chocolate jeans to finish the lower hem, putting its button and buttonhole at the front.  It wasn’t long enough to do the full hemline of the skirt, so I made a filler piece and a few extra belt loops and repositioned all the belt loops to distribute them evenly and hide the joining seams.   I also saved the fly front off the olive green moleskins and re-used it for the skirt closure at the centre back, although retrospectively I’m not in love with this.  It’s quite a bulky fly with a heavy duty jeans zip, but I guess the look of it is in keeping with the whole cobbled together, rough-and-ready look of the skirt.

I cut the patches so as to keep lots of pockets from the various jeans.  The skirt actually has eight pockets in total!… in addition to the two regular slanted front hip pockets that I sewed as part of the pattern; there are two patch pockets, three welt pockets and one curved side pocket in it.  I only did this for fun, for the aesthetics of them, but they are all still functional.

It’s just a bit of silliness really, but I like off-beat random patchwork-y stuff like this  ðŸ™‚
Inspiration?  Well, I’ve pinned like a tonne of this sort of thing…  this Isabel Marant dress, this mystery jacket, and also Yoshimi’s jeans from a few years ago.  Also, while I was busy laying down patches and switching around different shapes and sizes, this cottage kept popping into my head.   Now a cottage probably seems like an off-the-wall (ha!) inspiration for a skirt, but let me explain; superficially, the re-cycled nature of the materials is an obvious commonality between the cottage and my skirt, as well as artistically, in the random and irregular grid of their design.  And in purpose, pockets in clothing have a correlation to windows in architecture.   Pockets and windows are a visual feature of a thing, but also a functional component of that thing; specifically as an opening to/in their respective objects but not the entry point to that object.  
So in that vein; can one consider a pocketless garment to be like a window-less building; and are zips and button-bands akin to the doors/gates of a building?  
Discuss in one thousand words or less and submit by the end of class.  
(only joking)
Sometimes I think it would be lots of fun to have a group to discuss and dissect clothing and fashion theory; like a book club, only far more frivolous.
(sigh) A pipe dream…
This skirt is another swap item.

Details:
Top; top “a” from shape shape by Natsuno Hiraiwa, white cotton, details here
Skirt; Vogue 8363 modified, made from 4 old pairs of jeans, my review of this pattern here

pinterestmail

Pink Alabama Chanin T-shirt

I’m very happy and pleased that my Mum agreed to let me photograph her wearing her very recently completed hand-dyed-embroidered-and-stitched creation, and to show the pictures here on my blog …
thank you so much Mum!
This is Mum’s third Alabama Chanin project, and the first completed one… she has very nearly finished a more wintery skirt and top but has put those aside for a little bit in order to make something with the flavour of summer.  She wanted to have something to wear now!

Mum hand-dyed white cotton jersey in three different shades of pink for her top; pale apricot pink for the under layer, a deeper apricot-rose pink for the upper layer, and a true pink- pink for the neckline binding.  The floral design is her own, and she made a stencil using dressmaking paper from Jackson’s but does NOT recommend this; it buckled and was apparently a nightmare.  The design was rollered on to the upper layer in slightly watered down, regular household paint applied with a small roller.  Mum used double thickness Gutermann’s upholstery thread to hand-stitch the floral motifs, all seams and the flat felling of all seams; and pink stranded embroidery cotton for the cretonne stitch to secure the neckline binding.  We had some debate on whether the armscye seams should be stitched down to the sleeves or the body?? a quick recce of the Tshirts in the general vicinity seemed to indicate that there is no convention here but men’s buttoned shirts are to the body so this seemed like a good example to follow.

The pattern is the Tshirt pattern from the book Alabama Studio Sewing + Design, by Natalie Chanin, with the neckline from the tank/dress pattern, and short sleeves.  Before launching into all that time-consuming embroidery Mum wisely tested the pattern and found it necessary to make small adjustments for fit… both of us loathe muslins and generally avoid them like the plague and yeah, it does seem ludicrous for a basic Tshirt in a forgiving stretch knit, but an Alabama Chanin project is kinda exceptional.   It doesn’t take long to run up a test Tshirt on the machine using a long basting stitch, and is well worth the effort.  And could save lives!!  Well; at the very least, a tantrum  ðŸ˜€
Thank you so much Mum!

pinterestmail

Green pleats, please!

Hello!  🙂
So
what’s new here?  Just a colour,
really.  My Issey Miyake pleated top (vogue 1142) used
to be a cheerful daffodil yellow, and now it is a murky-lurky, swampy, toxic-waste shade of
green.  Definitely far more me  😉  Hoorah for dye!
Cassie was doing a wardrobe reno: an apricot cardi
plus some black dye equals a new chocolate cardigan! and asked if I wanted the
used black dye-bath for anything before she chucked it out.  I barely gave it ten seconds of thought, just
grabbed this top.  It’s not that I can’t
bear to waste a teeny bit of dye that might still have some oomph in it.. oh well,
yes, maybe there’s that too.  But I
really liked the top and wanted to get it into circulation more.  Yellow is one of “my colours”, but the
brightness was just not working with many bottoms… and furthermore since
I’ve planned a very subdued autumn/winter wardrobe for myself then the bright yellow
top would just continue to not work.  And
on a psychological note, not that I’m overthinking this or anything!  but I think maybe brights are just too daring
for my personality?  I’m a bit of a mouse and perhaps bright yellow should just
be limited to infrequent miniscule doses in my life.
Ha! I reckon I’ve officially just overthought the
whole thing, which is hilarious considering that I didn’t think at all before
plunging the top into that dye-bath!  Lol!


Anyway, now the main thing is that now it’s going to
go quite well with the ivories, browns and greens of my swap.
Details:
Top; Vogue 1142, yellow silk over-dyed in a weak, already-used bath of iDye in Black, original details and my review of this pattern here
Skirt; my own design modifications to Vogue8363, cream curtaining fabric, details here and my review of this pattern here

below; before…
pinterestmail

enclosing all seams in a double layered top/dress

This is a method for sewing a double layered sleeveless dress or top in such a way that all seam allowances are enclosed within the two layers.  This could be used to create entirely reversible garments as well as simply giving a nice and neat inner appearance.  It is also useful when using sheer fabrics like mesh and very fine translucent knits to make a self-lined garment.

Cut the front and the back pieces with a 4cm hem allowance, and cut a front lining and a back lining, identical except with a 1cm hem allowance each.  This will give a garment with a folded lower edge and the lower hem seam hidden inside 3cm from the fold.  If a different hem allowance is desired then cut accordingly; or if the joining seam is desired to be right on the lower edge of the garment then cut the linings to be the same length as the front and back pieces.

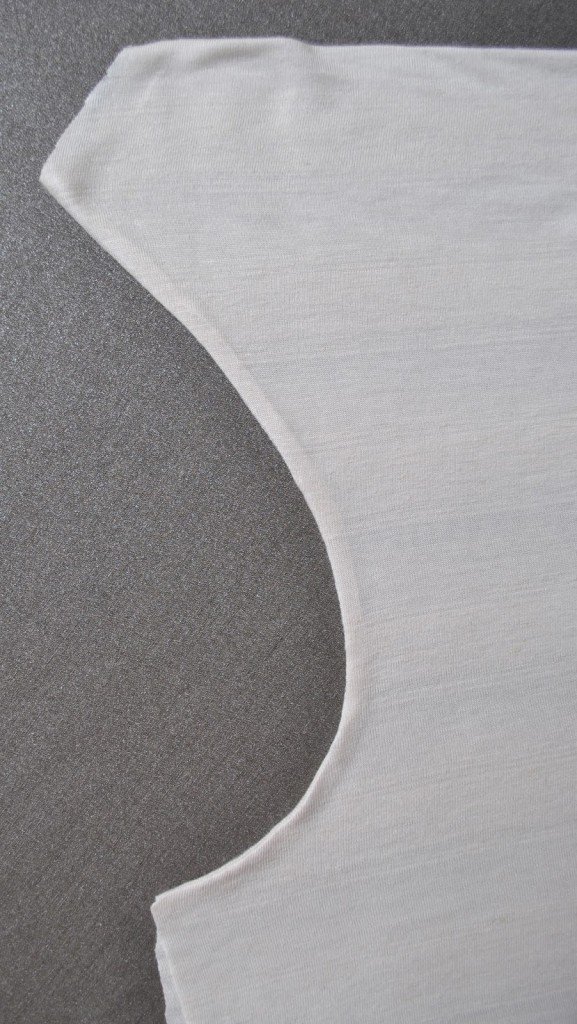
(This particular top pictured has a straight folded edge at the upper neckline; but the method is just the same as if the linings were separate pieces that needed joining all round, since that neckline seam is the very first to be sewn… )

Pin the back to the back lining along the neckline edge right sides together, and stitch.  Trim stitched seam allowances, turn right sides out and press flat.
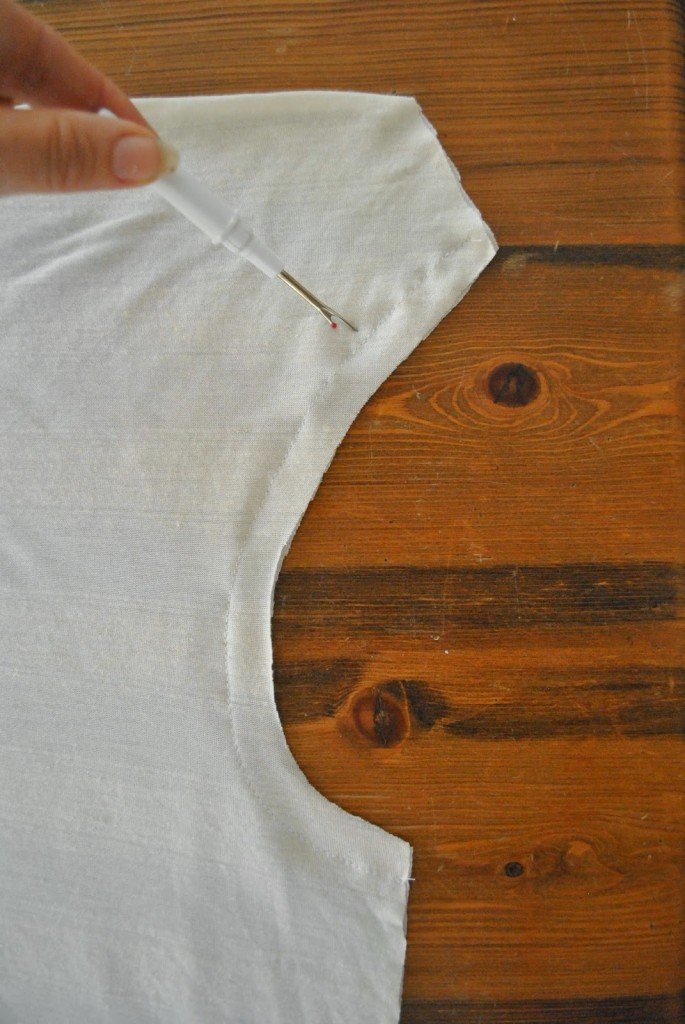
Pin the front to the front facing around the neckline right sides together in the same manner, and stitch.  Now for the front only! also pin the armhole edges of the front to the front lining and stitch.  Leave the shoulder seam open and unstitched.  Trim stitched seam allowances, turn right side out and press.

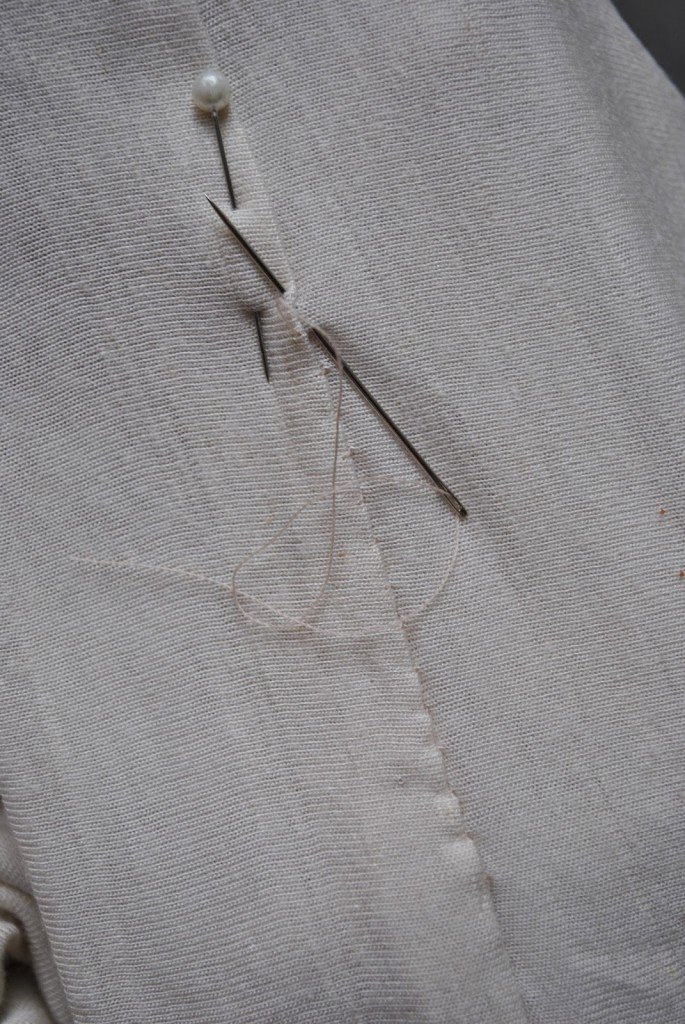
 Open the back/back lining piece at the shoulder and wrap it around the front/front lining at the shoulder edge, all right sides together, back piece to front piece, and back lining piece to front lining piece, aligning the neckline seams.   Pin all four layers together, ensuring the front neckline edge is abutted hard up against the neckline edge of the back/back lining.   At the outer shoulder edge continue pinning the back to the back lining down the armhole edge, keeping the front free.

Stitch the shoulder seam, pivot at the outer shoulder edge, and continue stitching the armhole edge of back to back lining.  Trim seam allowances, and pull the front piece out and through, turning the back/back lining piece right sides out and press flat.

 Now open out the pieces; and pin the front to the back and the front lining to the back lining along the side edges; aligning the underarm seam exactly.  Stitch side seams in one long seam; from lower hem to lower hem.  Press seam allowances open.  

Lay the outer layer over the inner layer wrong sides together aligning the side seams together and press again.

Separate the outer layer from the inner layer again and pin the lower edges of the outer to inner layers, right sides together and aligning the side seams.  Stitch, leaving a gap of around 12-15cm, or big enough to stuff your garment through without stretching out the fabric too much.  Use something long, skinny and padded to press the seam allowance down; I know there are proper thingies for the job but I generally use something like a rolled-up flannel.

Turn the garment back right side out through the gap left in the lower hem.

Inside the garment, press down the seam allowance of the outer layer to close the gap in the hem and pin in place.  Slip-stitch the gap closed invisibly by hand, being careful to keep the outer layer free.

Voila!  There are absolutely no seam allowances showing; anywhere!

pinterestmail

some tops

I’ve made a couple of new tops lately  🙂

I’ve made this design once before  so I knew I’d like this new one too. It is a modified version of the
loose draped top from drape drape, by Hisako Sato.  Modified in that A; I removing a
wedge of the width in the neckline drape both front and back, so I could fit both pattern pieces
onto my small-ish piece of fabric, and B; this time I made it as a double layered top, since my fabric is so thin it’s thisclose to sheer.  This was a rayon/linen remnant bought from the
Morrison’s fabric sale, a grey-ish ivory/bone colour with a very subtle, paler, knitted-in stripe which barely shows up at all in the pictures!
It’s a basic; but I think it will be quite good with all three of the busy, feature-laden skirts I have made for my autumn/winter swap.  The thing I’m most pleased with is that I got all the seams of the top enclosed inside the two layers; and only had to hand-stitch one short bit of the hemline closed after turning it all through, right
side out.
I’d made Cassie’s Christmas dress the same way only a few months ago, but I still had to stop and
think step by step, how to do the double-layering! so I took pictures and am writing a little how-to on my method so I don’t forget for next time.  Appearing here soon  🙂

 lingerie straps; essential in this design

The next top above: I’m very meh about this one.   It’s amazingly boring and unprepossessing  given that making it has been a freakin’ saga and a half.  This is version two; I first made it as a very big and very loose tunic-y style top.  Valuable time and energy and a piece of fabric was dedicated to making a rather hideous top.  So I fixed it.  And re-made it into a marginally less hideous top.  Yay!
this is the least revolting “before” picture … 

I think it’s that the fabric, a knit remnant from Potter’s Textiles was just not suited to an oversized silhouette, being both heavy and weirdly clingy at the same time.  The combination as a whole was instantly frumpifying, like a hospital gown; or looking like you had to borrow your man’s ratty Tshirt from his gym bag in the car because you’ve ruined your dress, or something.  The exact opposite of chic.   

In anticipation that some kind people might express approval of the “before” version, please know that these are the very least offensive pictures, and let me point out that any vestiges of appeal are probably due to the fact that my hand is in a pocket/on my waist, giving it an appearance of shape that it did not have.  Other photos where it’s hanging straight and loose had the hospital gown/grotty man’s gym Tshirt vibe.  
So I cut out of it my much more fitted, regular tried-and-true custom fit Tshirt.  It’s still pretty blah but least I don’t unequivocally hate it now.
I’m thinking it will be ok for warmth or whatever during winter.  Heck, another layer’s another layer.  We’ll see how it goes!


Details:
Ivory top; the loose drape top, from the Japanese pattern book drape drape by Hisako Sato, ivory rayon/linen
Chocolate top; ultimately, my custom fit Tshirt pattern, chocolate jersey knit
Shorts; Burda 7723, charcoal stretch gabardine, details here and my review of this pattern here

pinterestmail
Switch to mobile version
↓