Yearly Archives: 2018

You are browsing the site archives by year.

Ms Autumn

Ciao, le belle signore!!  I am soooooo happy to introduce Ms Autumn! the fourth and final doll in my little set of four seasonal girlies…

I’m rather rapt with this young lady… her colour scheme is fab – u – lous!!! and very much right up my alley.  Well, I suppose since I identify as an autumn girl myself, so yeah!  This rich warm collection of tomato red, gold, rusty orange, teal blue, forest green is totally one I would choose for myself… well haha, obviously I’ve chosen all the girl’s colour schemes myself, but well you know what I mean!  I’ve so much enjoyed choosing all the girl’s colours to co-ordinate nicely and I thoroughly loved choosing this one too

Like her friends, Ms Autumn has a range of clothes to choose from, so she is ready and prepared for ANY situation:

a winter ensemble with leggings, a tunic dress and knitted beanie… I gave her a kangaroo pocket on her tunic! because it’s rather lovely to have a warm kangaroo pocket you can stow your hands in to keep them warm in winter…

… little lace knickers, embroidered with a tiny, rich orange-y red rosebud…

a twirly summer dress… I only had the tiniest portion of this gorgeous rusty orange/gold print, and was so glad I managed to squeeze the little dress from out of it, because I think it’s just absolutely perfect for her!

… a sequinned cocktail dress, naturally in bright sunshine-y gold!  This particular fabric is a little sheer so I lined it with cream coloured jersey knit.  Well, modesty is a virtue, si?

Want to hear something a bit funny… ?  I think my favourite favourite thing about her entiiiiiire ensemble is actually this little necklace?!

Up until now I’ve ade the girls’ necklaces using a simple, single loop of wire.  I had some gold wire for Ms Autumn, but frustratingly it was just a little too flimsy to use by itself.  This stumped me for a little bit… should I use one of the other coloured wires I had? but I really had my heart set on gold.  Finally I thought about making a twisted gold necklace.  It took me a few attempts of painstakingly careful twisting to get the twist nice and even all the way along! but finally I had a necklace I was satisfied with.  The little catch closure was little tricky, but I’m in love with how it worked out in the end!  Though I thought the little necklace was pretty cute by itself, it looked just a touch spare without a pendant, so I decided at the last minute to add a gold-apricot pearl to nestle against her décolletage…

She also a zippered forest green duffle bag, which is roomy enough to store all her things, should she wish to go off for a weekend trip, or something, and need all her stuff.

… and her dust bag, in a deep raspberry shade which also goes quite nicely with all her things, imo

peekaboo!

Ms Autumn is available for purchase here in our shop right now…

My friend Meggipeg asked me recently… isn’t it hard to part with “my” girls?  and yes, it’s little bit scary! but it really does make me truly happy to think they are going to homes where they can be played with; and Ms Autumn may be the last in this set, however I’m still enjoying myself so I haven’t ruled out making more? hmmm, I’ll see how I go, got so much on my plate at the mo…!

Also I guess it’s probably pretty obvious by now; all the girls, Ms’ Winter, Spring, Summer, and Ms Autumn here too, and all their wardrobes are of course made with the same patterns, one that Cassie and I have been working hard at developing as a new pattern to put in our shop!  It’s going to be available very very soon… stay tuned!

pinterestmail

ivory lace; most definitely label-worthy *

OK.   Sooo, it’s early days, since this little sheath o’ my dreams is basically brand new, but I’m so in love with it already I’m just tentatively putting it out there…  I think I’ve just managed to make a forever dress for myself.   I just love love love ivory, as a colour, and lace as a texture, and ivory and lace combined together in one swathe of gloriously snow-dusted curlicues is just always a fabric that’s going to make me sigh with happiness.

Silk World Australia had contacted me to ask me if I would showcase one of their fabrics, and I chose one metre of this guipire lace, one metre being the minimum order; thinking I could make a little skirt.   Silk World have up until recently been wholesalers, and now their beautiful laces and specialty fabrics are available for everyone! which of course is the best news for fabric lovers everywhere.  I was blown away when my lace arrived.. it’s heavily and beautifully detailed, and luxuriously thick with that matte texture that whispers “quality” in hushed genteel notes.    And when I shook out said one metre, well it was so so W I D E! I realised I could get not just a little skirt, but probably a whole dress out of it.  And I did!  Et voila!

One metre dictated a super pared-back, no frills, straight sheath silhouette, which is of course the best thing to show off the intricacies of the lace anyway.  With something this exquisite, you only need a very little of it to make a big impact, in my opinion.  I used an old favourite pattern, Burda 8511, and lined the dress with natural Irish linen, bought years ago at Calico & Ivy, when I had a voucher to burn and nothing in mind to particular spend it on… it’s really gorgeous stuff also and I’ve never really known exactly what to use it for.  I love how the slightly rough ‘n rustic feel and muted stoney colour of the linen is a nice foil to the luxurious decadence of snow-dusted lace sitting on top…  and now I feel like this is exactly the project what it was waiting for all along; a match made in heaven!

Cocktail dress for the season… sorted!

Aaaand, my new labels!! and oh my goodness can we just take a moment to appreciate how absolutely adorable ???

I got these from the Dutch Label Shop, and seriously, I struggled to choose a design, there were just so many cute options, and colours.  I’m super super happy with these; I absolutely LOVE the sweetly funky design! and I’m also pretty impressed with the excellent quality.  The labels are fabric, and the design is stitched, which is very nice; and you know how with a lot of fabric labels, you need to turn under the raw edges as you’re stitching them down, because of fraying? well these ones have all four edges nicely sealed so you don’t need to do that.  They’re all ready to sew on!  Also they are pleasantly substantial and sturdy, with no hint that they will buckle over time or in the wash, and the design is finely detailed and stitched tight and flat; so seems very unlikely it might snag or catch on anything, nor unravel.  I am SO happy with them!  🙂

Also, I have amazing news!  The Dutch Label Shop has very kindly and generously reached out and offered a discount to all my readers … enter handmadebycarolyn15 at the checkout and you will receive a 15% discount on any order.

FLOWERHEAD!!!

random tangent; do you know I’m looking at here? rhetorical question, I know, aren’t they the worst?  actually there was a golden whistler sitting in the tree right by my head, whistling his little head off.  I just had to rush over and grab my camera for a quick shot before he flew off…  If you want to hear his lovely call, you can check it out here…


this next picture looks very loving doesn’t it? a tender mistress and puppy moment? actually Clara was having a “puppy mood” and was just really really keen to rip right into those flowers and zoom off through the garden with them.

LATER EDIT: Mary asked in the comments about the finishing and interior details, and thank you for reminding me, Mary! because I actually meant to post pictures of how I did this in my dress but forgot…

lace side seams; inside

the side seams of the lace shell I stitched along with a bias cut strip of thin, cream cotton, then trimmed the seam allowances of the lace and wrapped the cotton around to bind the edges in a Hong Kong-like seam, except I tucked the raw edge of the cotton under and hand-stitched it in place.  This makes a nicely neat and tidy, cream-coloured roll; which might look like it could be seen on the right side but actually is kinda invisible when the dress is right side out.

lace side seams, outside

The linen lining; I finished the raw edges on my overlocker, and simply left them like that.  The bottom edges of the zip tape I stitched down to the seam allowances like I usually do, in a short row of machine stitching.

The lace around the invisible zip on the outside; here I trimmed the lace while carefully hand stitching the raw edge securely right up to abut against the opening edge, while not obscuring it so I can still pull the zip up and down!  You have to stitch every single little bit of lace down here so there are no loose bits to stick out, which would look very messy and also risk getting lace caught in the zip, so a stitch for like every 3mm or so.

At the top edge of the dress; I stitched the neckline and armscyes of the dress together, right side of linen lining to wrong side of lace shell, and added a linen facing, to hide the lace edges on the inside.  This is under stitched so all edges roll to the inside of the dress.  I handtacked the facing to the lining in a few key places along its edge too.

You can see in the above picture those bust darts shaping the front lining, and also (not seen) on the back lining I stitched long fish-eye darts to shape the small of the back.  I lightly hand-tacked the lace shell to these back darts in a few places so the unshaped lace shell sits shaped to the curve of my back a little  more than it would otherwise.  I mean, without this tacking, the lace just hangs down dead straight, and I like it to curve into the small of my back just a little.  The hand-tacking helps it to do this  🙂

Details:

Dress; Burda 8511, in this guipure lace and natural linen
Shoes; Zomp, from Zomp boutique
Flowers; were from the garden, I love these and they’re looking so beautiful at the moment!  I actually picked them to decorate the kitchen.  I was just aiming for “spring-y”, though now I think my pictures are veering just a little into bridal territory?  though I do quite like the idea of this look for a modern and maybe, mature, bride!   Anyway, Note to self; perhaps avoid carrying big bunches of flowers in my pictures from now on

Christmas party season? I am SO ready! though honestly, not just for Christmas, I am going to wear this dress for ever and EVER…

pinterestmail

Ms Summer

Well, hello there gorgeous!   I’m thrilled to introduce Ms Summer to the world!  the latest in my small set of seasonal girlies…

I hand-dyed natural calico with a small army of different iDyes to get Ms Summer’s lovely cocoa-toned skin tone, however her luxuriant mane of tawny hair came ready-dyed in this wonderful range of browns/charcoal/tan and the occasional touches of chestnut… and can I just say I over-the-top love her hair!! and actually would kill to have a crazy multicoloured mane like this myself…

I have hair envy!!!!

Like her friends, she comes with a whole lot of lovely clothes, to keep her comfortable and suitably attired for all seasons.

For summer, she has this pretty little wrap dress… one can never have too many stripes in one’s wardrobe.. oui? and the blue-and-white sets off her baby blues rather nicely too, I reckon.  Also I rather like the way the stripes lie which way (but loose) all over her dress  🙂

For winter, she has a turtleneck sweater in millennial pink – eeee! sah trendyyyyy! – with an attached denim miniskirt, also a pair of light periwinkle tights, and a hand knitted beanie in shades of slightly variegated lavender/mauve.


I have to say, I’m particularly enamoured of her little denim skirt… probably because when I was a teen I practically lived in little denim skirts myself.  Teenaged me would no doubt have pounced on the pink turtleneck too, to be honest  😉

Of course she has cute little lace knickers too, with an embroidered rosebud on the front…

… and if she wishes to attend a soiree, or even just for strolling on the beach should such a thing take her fancy, she has a sequinned cocktail dress in a shade to perfectly highlight and set off her cornflower blue eyes.

… which she can accessorise with her classic pearl drop necklace…

… AND she has a jaunty emerald green duffle bag.. with pockets!! to carry all her kit  🙂

Ms Summer is currently listed over in our shop… 🙂

Not pictured above, but like all my dollies she also comes with a lavender tote bag that she and all her things can be safely stored in, when she’s not being played with.

pinterestmail

a knitting project bag

It’s sometimes quite difficult to think of gifts for Mum because she will say, without fail; please DON’T GET ME ANYTHING FOR MY BIRTHDAY.  But… I have to think of something!!!  Besides the fact that she’d probably be little bit upset if I actually did give her nothing, haha  😉

Mum is always knitting, and she’s still particularly keen on knitting socks… whenever she comes up to stay she brings her knitting, usually stuffed in some flimsy plastic shopping bag; and works on it pretty solidly, at all hours of the day or night.  And inevitably, she will ask to borrow my scissors and a wool needle… btw, I don’t mind at all hunting these things out for her, but really it would be so much better if she had them with her and at hand already.

Lightbulb moment… Mum was in urgent need of a knitting project bag!!

It’s only recently I even became aware that knitting project bags were a thing, after I discovered a few knitting podcasts on youtube… where knitting project bags are an absolute must have!  I’m a bit embarrassed to admit that my own knitting bag is just a daggy old, small shop tote thing, that shops put your purchases into… it can be seen in this post here.  It’s not very good, and Mum’s isn’t any better.

I perused Le Stash, and my hand fell on some lovely garden-green raw silk, mainly because I knew I had a matching zip in my zip stash already too.  The green silk turned out to be a pair of trousers, that Mum herself had originally give to me to use for fabric sometime.  She’d originally bought them in Italy, while on holiday, and got many years of good use out of them.  It occurred to me I could make a really good little project bag, utilising the trousers’ existing welt pockets and waistband…  bonus that this lovely fabric is boomeranging its way back to Mum in a new, and newly useful form.  Full circle! I selected some brushed tartan cotton for the bags’s lining, and inserted a new zip underneath the waistband facing inside, along with a wrist strap, so she can have the bag hanging from her wrist and still knit from it.  I think the really interesting thing about the bag though is the accessories; I added three little tabs inside, two with swivel clips, to which I attached a pair of scissors, and a pack of wool needles, and the third has a D-ring to which I’ve sewn a tape measure.  I left the original back welt pockets intact on the outside (above), so she can tuck small extra things into those pockets, things she might not want to go rattling around the inside of the bag.

I think she will have everything she needs!

I wrote a little tutorial, in case anyone reading this wishes to have a go at a similar refashion for themselves.  It’s a very useful thing for a knitter, whether for yourself or a gift for someone else, it’s easy and kinda fun to make, and I think it turned out quite cute too! In fact I would really like one for myself!

I used:

a pair of trousers with a waistband,
piece of brushed cotton for lining (around 52cm x 25cm),
stiff interfacing (52cm x 25cm)
30cm zip
2x 13mm swivel clips
1x 20mm D-ring

Extra accessories to finish; a tape measure, pair of scissors, pack of wool needles

To start with, unpick the side seams of your trousers, and cut out the seat.  Cut the waistband off at the side seams too, allowing the same seam allowance as the side seams.  Note; I then trimmed down my piece to about 52cm x 25cm (inc waistband) which made a bag with a finished measurement of approximately 20x20cm, and with a base of 20cmx8cm.

If your trousers have welt, or other pockets, that’s a bonus!  Cut a piece of lining fabric the same size and shape, using the trouser piece as a template.  If the fabric is on the floppy side, apply stiff fusible interfacing to the lining, and if your interfacing is anything like as unreliable as mine, it’s a good idea to stitch/quilt the interfacing and lining together to be sure they stay together as one layer.

Unpick and open out the lower edge of the waistband facing, and stitch up the side seams, including the waistband and waistband facing, in one continuous seam.  Stitch the lower bottom seam.  Likewise, stitch the side seam/s and bottom seam of the lining.

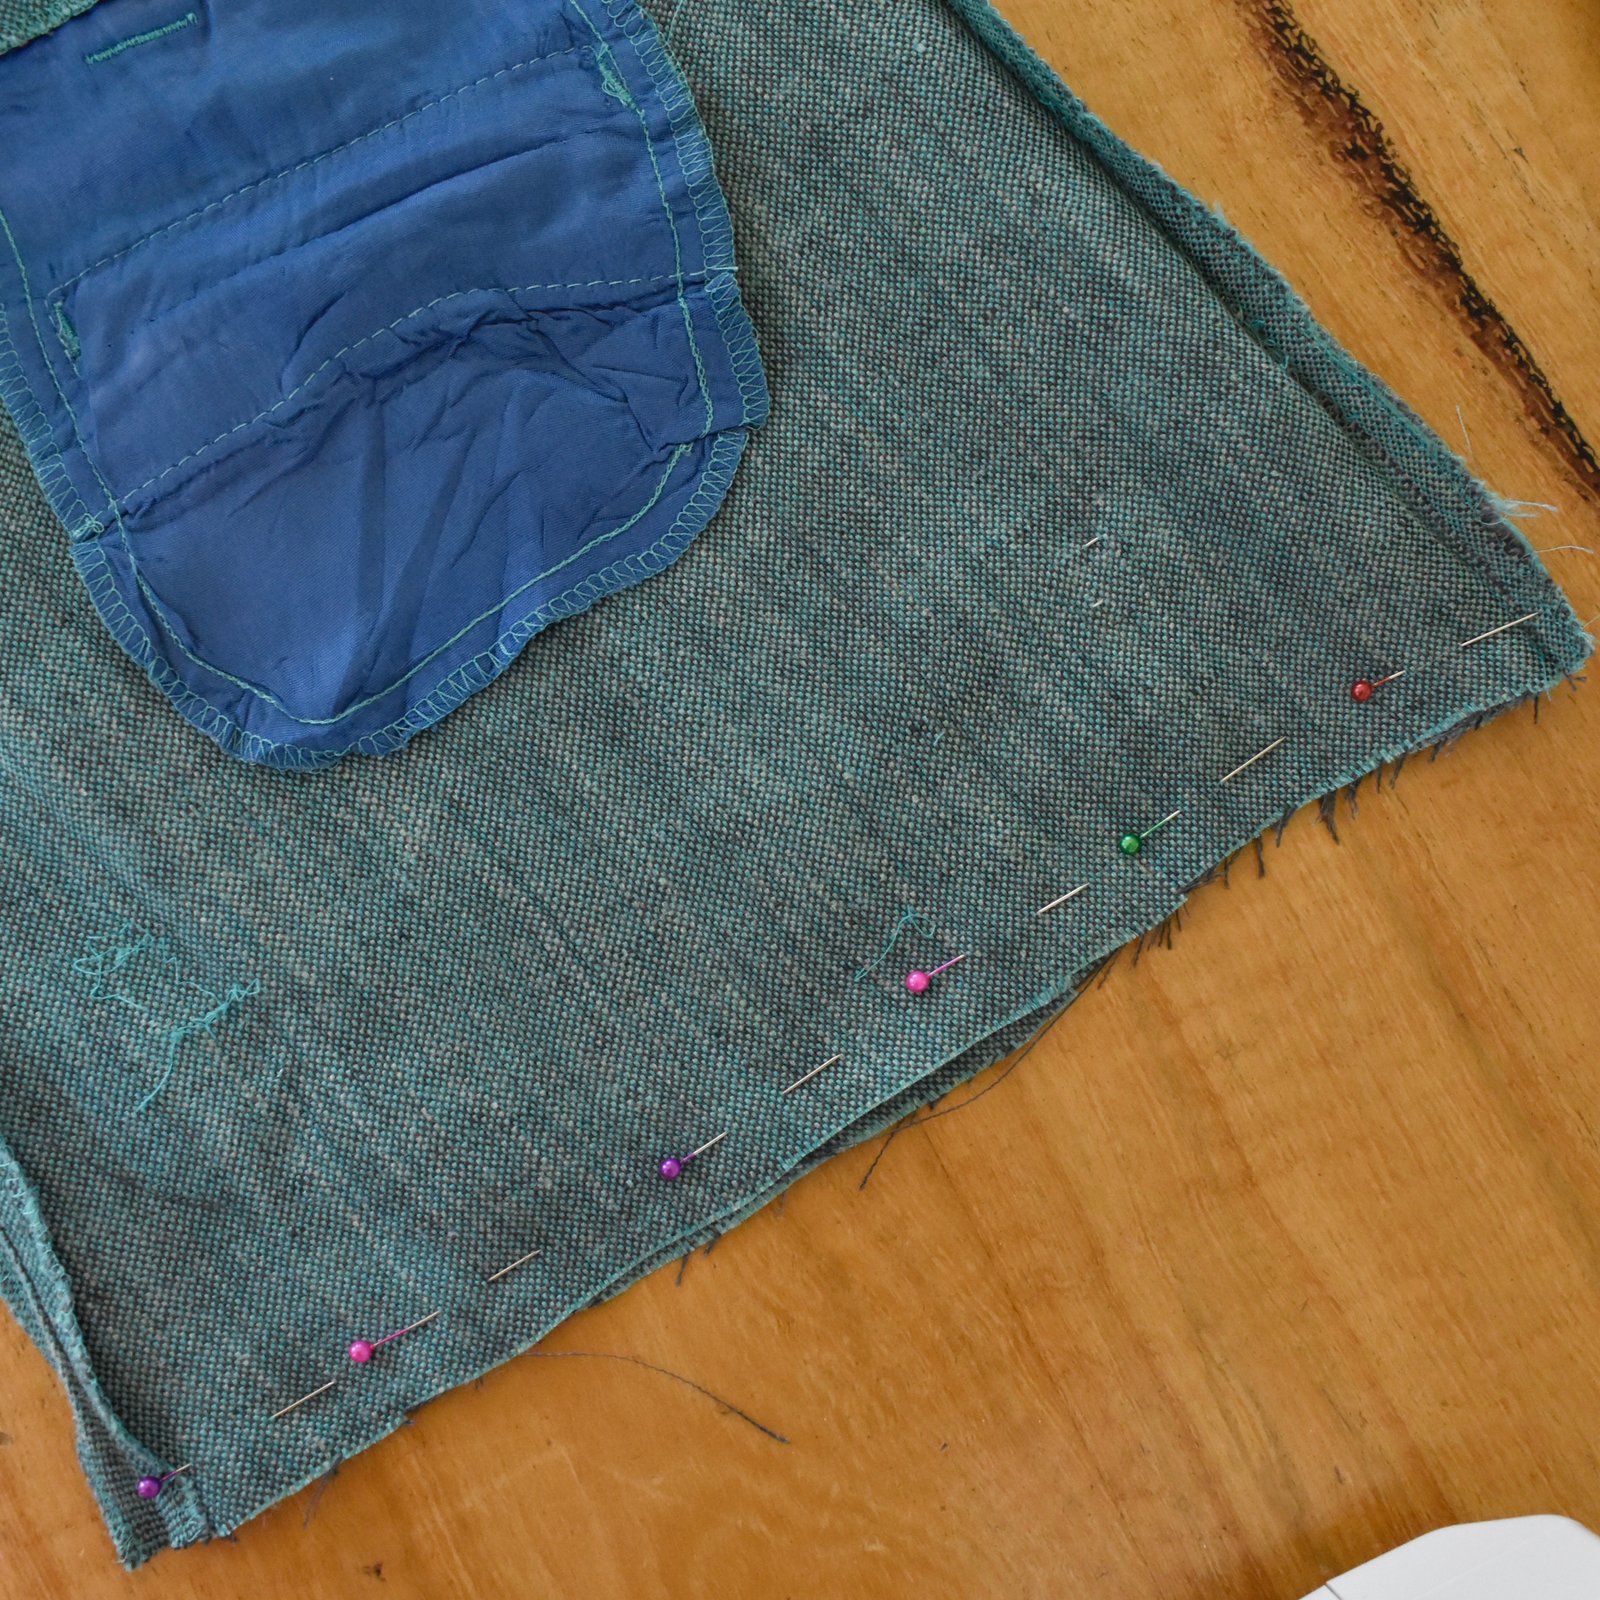
Determine the desired width of the bag bottom… this should be at least equivalent to, or even a bit wider than the bag opening.  I made mine 20cm.  Measure this length along the bottom edge of the bag, centred so that the excess on each side is the same.   Bring the side seam and bottom edge seam to meet, right sides together, and pin.  Determine the side edges of the base of the bag, by marking two straight lines at the end points of the bag base, perpendicular to the bottom seam.  (shown on the bag lining, below) Measure each carefully to ensure they are going to be the same length, if there are differences then adjust and re-mark until they  are equivalent.  Mine are 8cm long from pin to pin.

Stitch.  Construct the lining bag to be exactly the same.  Trim off the corners.  Pin the bag and bag lining together along the bottom side edges, wrong sides together, and stitch together along the previous stitching, ie. the short side edges of the base of the bag.

Turn the bag right sides out, so the lining bag sits inside the outer bag, attached at the base but not yet attached at the top.  You can optionally stitch the bag and bag lining together along the long bottom seam as well, however I found this to be quite fiddly…

Make the wrist strap and tabs for the bag’s accessories to hang off…  my
dimensions are:

strip 1: 8cm x 37cm
strip 2: 4cm x 10cm

Construct each as follows: fold strips in half lengthwise and press, open out and fold both raw edges in to meet the pressed centre line, press.  Fold the strip in half along the first fold line and press, topstitch close to each long edge of the strip.

Cut the narrower strip in half, giving two 5cm strips. Thread each through the closed top of a swivel clip, and baste raw edges together.   Cut 5cm off one end of the first, wider strip for the tape measure tab, thread this piece through a D-ring, baste.  Stitch the tape measure onto the D-clip.  The remainder of the wider strip will be used for the wrist strap.

Bag: open up the remainder of the waistband facing away from the waistband.  Pin the ends of the wrist strap to the waist band facing adjacent to either side of one side seam, baste in position close to the raw edge.  Take the zip, and pin each side of the zip to the waistband facing, aligning the top and bottom ends of the zip with the side seams of the bag, and ensuring the opening end of the zip is adjacent to the wrist strap, and with wrist straps folded back against the waistband facing; topstitch zips in place, stitching over the wrist straps.  Leave a gap of 1.5cm each side at the bottom end of the zip to enable the end to sit on the outside.  Trim the zip, leaving a 2-3cm tail.  Cut a small square of fabric and use it to wrap and enclose the trimmed bottom edge of the zip; fold, pin, and stitch it in place.

Open the zip; take the three previously made tabs with swivel clips and D-ring attached and pin them around the top of the lining bag, raw edges even, right sides together, and with the swivel clips/D-ring hanging down inside the lining bag.  Fold down the waistband facing enclosing the raw edge of the lining bag and top edges of the accessories tabs inside the old waistband.  Pin waistband facing back to its old position on the original waistband of the trousers.  Ensure the upper ends of the zip tape are tucked up inside the waistband, also check you are happy with the position of the tabs with swivel clips/D-ring before stitching the old waistband facing back in place.  This can be a little fiddly around the top and lower edge of the zip, but just take care and stitch as far as possible.

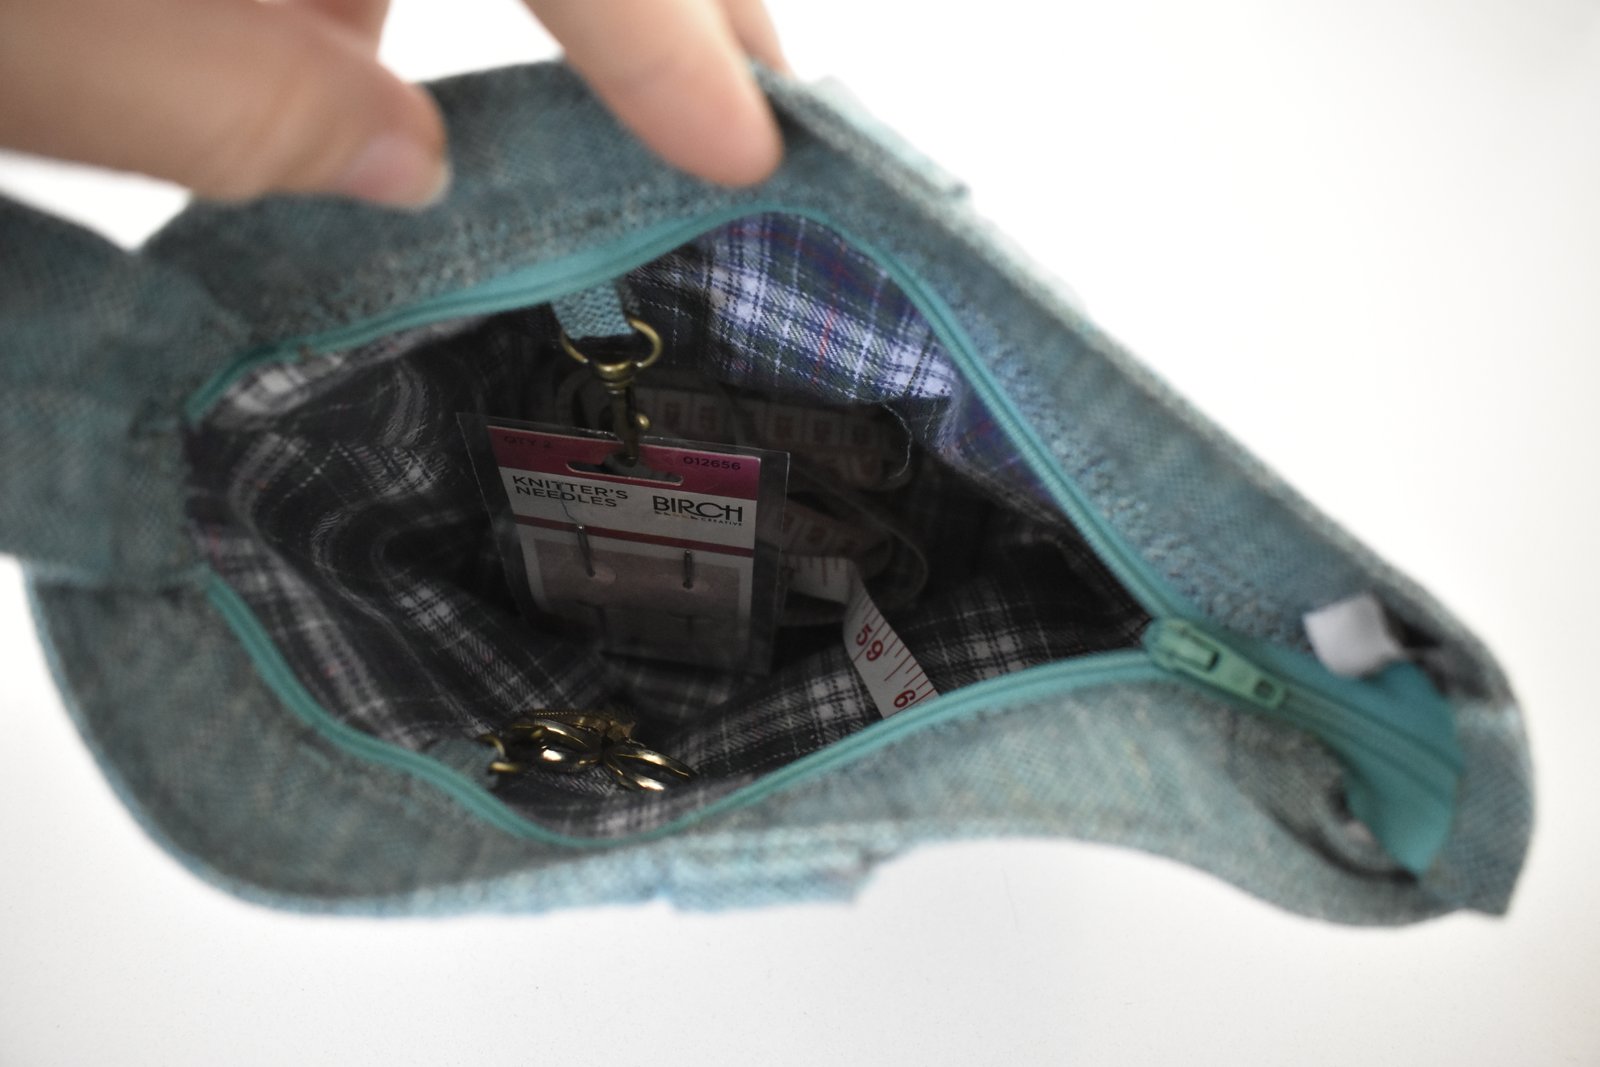
The final step is to clip a small packet of wool needles and pair of scissors to the swivel clips.

Aaaand, done!!!  Now, I really really want to make one for myself too!


pinterestmail

outback wife

My dear sister-in-law S gave to me a length of precious “Outback Wife” barkcloth for my birthday… soooo thrilling to finally get a piece of this gorgeousness for myself!  I’ve bought other designs of this once or twice before as gifts for others but never for myself for some strange reason, I know not why … Because, oh my gosh this stuff is just so lovely, sews up like an absolute DREAM!!  I’m in love!  I’m seriously thinking about sneaking out to Calico and Ivy and buying more!  For meeeee!

I turned to my ol’ reliable, tried and true,Vogue 1247 for the skirt… my copy of this is now a little bit tattered, not surprisingly since this latest is version number 23, ahem.  I just counted, and wow, that’s a shock, even to me!  Yes, I really do need to move onto a new pattern…  A lot of my V1247’s have been straight, sans pockets, because to be honest, although the pockets in this design are really cool I actually don’t really use them all that much.  Very occasionally for my phone and keys and it’s very rare I shove my actual hands in them..  I worry about distorting the lines of the skirt and contributing to premature pocket sag.  And if there’s one thing NO ONE needs in their life, it’s premature pocket sag, am I right?   Quelle horreur!

But for old times’ sake, I put the pockets in this version.

I über-carefully cut my pieces so the print matches up practically everywhere, along both horizontal skirt seams, and as well the centre back seam, and even the waistband seams matches as well as it is able.  This took only a little bit of frowning and sighing, and moving my pattern pieces around more times than the most diligent of sleight-of-hand operatives, but it’s always a worthwhile thing to do, I reckon.  Otherwise, the not-matching pattern would probably bother me forever.

At the same time as I was making my skirt, I happened to notice in my stash two lengths of very thin jersey knit that I’d bought at the Fabric Store in Melbourne during one of my trips over there with Mum and Cassie, one a bottle green and the other in deep teal blue; both an absolute perfect match for the skirt!  It was meant to be!!  I quickly whipped up (k-tchaaaaah!) two long sleeved modified Nettie tees.  These are practically identical to each other, narrow neckline bands and wide sleeve and bottom bands.

It’s so funny to me, looking at these pictures.  See, S actually gave this fabric to me back in early June, yes, it was a very early birthday present!  and I made the skirt and two tees up straight away, like within a week.  And took the pictures of the tees on Bessie, though it was too cold to actually wear them at the time… then a few months later, early September to be exact, I took the wearing-with-black tights-and-boots pictures.  And did precisely nothing with those pictures, either.  As it happens, I’ve been in a bit of a funk over the past few months, feeling a little intimidated, like I’m just not capable or good enough, almost on the point of giving it up entirely.  Generally speaking, it’s been taking me a looooong time to write a blog post lately, like almost as long as to make a little dress for myself.   And so I’ve just been feeling… less inclined, and oh so lazy about it, to be honest; even though I want to write.

Anyway; yesterday, it was a perfectly beautiful day and we went out walking at the beach, and I wore the whole lot of them, the skirt and both the tops too.  Meaning, in my funny weird little world, a blog post must transpire.   Eeeek!  Quick sticks!!  so I gave myself a bit of a pep talk.  Just lay it out there.  With minimal fiddling.  Just spill, organically.   I mean apart from spelling.  I am as it happens, the biggest spelling nazi imaginable.  I roll my eyes on the regular, at the newspaper, at advertisements on instagram; at all the offending “your”s instead of “you’re”s and so on.  I’m sooo judgemental, the absolute worst, in fact!  But, I’m getting off track…  where was I?  Ah yes, writing without pause.  Letting the words flow, flying from my fingertips, of their own volition.  That’s what this is.  Stream of consciousness blogging, for better or worse.  Well, that’s what blogging is supposed to be, right?   It’s supposed to be a personal journey?  Just me, being me?  SO!  I hereby free myself of further worrying, right now.  Begone, thy treacherous feelings of inadequacy!!  Vamoose!  Whooooosh!!! And; this house, is clean *… I hope!

* … name that movie 🙂


Details:

both tees; loosely based on Closet Case patterns Nettie, thin cotton jersey
Skirt; Vogue 1247, in Outback Wife barkcloth
Tights; made by me, details here
Boots; Roberto del Carlo, from Zomp boutique

pinterestmail

floral trench coat

I’ve made a new trench coat; a riotously floral-tastic, blowsy English rose of a trench coat.  As soon as I spotted this print I was smitten!  delightfully old-fashioned, vaguely reminiscent of Granny’s china cabinet and a wholly unabashed celebration of spring-time.  Because that’s what it finally is now… SPRING!!!

This very thing, by which I mean an over-the-top floral trench coat, is a thing I’ve had percolating in my mental wish-list for aaaages, ever since I first laid eyes on the floral trenches by Burberry from a few years back.  I originally bought this paler pink magnolias floral fabric to make the trench coat but got distracted and made that dress instead, obviously!  Anyway, a little after I finished that dress, I still really really wanted my imagined floral trench coat, so I bought some more floral sateen.  And I’ve finally made it!

Pattern; McCalls 5525 view E, the view with all the bells and whistles.  The only things I left off were the flap thingies over the pockets, because I didn’t have enough buttons for them!

Fabric; a floral cotton sateen, from Spotlight.  The trench is fully lined with pure white cotton poplin, also from Spotlight, and the buttons… the buttons! – are totally gorgeous vintage ones that I’ve had for about ten years.  I was actually the lucky person to get them in a Secret Santa pressie swap at a very early Burda sewing community meet-up, way back in 2010? I think?

I had only 11; they are a deep bottle green, possibly made from Bakelite or something very similar.  I’ve been looking out for yeeeeeers for the the perfect project for them and I thought this trench coat was it…  they are in fact a perfect colour match for the deep teal-y/ocean-green of the foliage in the print.  However! now they’re all stitched on, I’m not completely sure the fabric was the right choice for them after all? ahhhh, the agony of high, followed by unattained, hopes and expectations!  The thing is; the busy busy busy colourful print, while it is really gorgeous and I LOVE it! it really just swallows up the impact of those buttons and at any distance you can hardly see them on there at all.  They just disappear.  As in, buttons, what buttons? I can’t seen any glorious buttons!!  The fact that they are beautifully profiled, and slightly marbled, and vintage, well, you’d never know.  So, I’m just thinking, maybe? I should substitute them for some plain buttons, and save my exquisite vintage buttons for another project – another, different trench coat, something in a solid colour where the buttons can really be allowed to shine? Hmmm….

the one under the collar is not one of the original set, it’s a modern, plastic, flatter one…

Making a coat is always an activity that brings me huge amounts of joy and satisfaction, and this one did too, keeping me blissfully pottering away the whole time I was working on it. Constructing all the little bits and bobs that go into a trench coat, like the tabs, the collar, putting in the sleeves and bagging out a lining is enormously fulfilling to me, just about as enjoyable as any project I can think of.  I’m totally in zen mode, throughout.  As it happens, I’m perfectly happy with all the construction details of this one; all my seams and sleeve insertion and symmetry of the tabs and collar, the walking vent, topstitching, and the neatness of my buttonholes and all that jazz all worked out exactly as I hoped, and I’m very pleased with all this.

for some reason, this arrowhead tab on the collar stand is always an especially pleasing detail to me!

So that’s all super good and satisfactory.  However?!  I have to admit to a little frisson of disappointment at the halfway point of making this coat, at about the point when the body was together, and I slung it over Bessie and took a step back to have a first look… and, oh dear.  See, I had barely enough fabric to cut out my trench, and in fact several pieces are pieced together!  Which ones?  oooh, I’ll never tell!!!  See if you can see the seams!  But that’s not the problem here, after all, piecing is something I’ve done in a lot of garments because of lack of fabric and I’m perfectly ok with doing that when I have to….   The thing is, I really had to be clever about laying out the pattern pieces to have any hope at all of getting the coat cut out, and I did some very premature self back-patting when I managed to lay out the pieces.  Because the way the print has turned out on the finished coat is just not good.  Specifically; the front is quite a lot “busier” than the back, and I wish I could have been switched-on enough to see that while I was juggling those pattern pieces but sadly, I did not.  The front and the back are to my eye almost like two completely different coats, which is very sad-making (please excuse my little Evelyn Waugh-ism there…)

It’s definitely not as obvious when the coat is worn open, like this; which to be honest is how I was planning to wear  it most of the time anyway.

I can’t do anything about the unbalanced “busy-ness” of the print; but as far as the button issue goes, well I’m gonna wear it for a while and sleep on it, but button-switching may just happen sometime down the track.

I’ll just see how it goes for a while.  The coat is quite lovely to wear, and perfectly comfy, well-fitting, and I did pour myself into making it well.  Oh well.  I’ll give it a crack!  Quite often, early dissatisfactions I have with a project evaporate a little bit down the track when I look at it one day and kinda go, what was I worried about?   I adore the overall vibe of my trench coat, how it looks when worn both belted closed and open are both very pleasing to me, and as usual, wearing a coat always makes me feel amaaaaaazing, no matter what!  Sometimes, well, very occasionally really, I have a tiny little wish we lived in a climate which was more conducive to coats?  But not very often really.  Like, hardly ever, to be honest  😉  #devotedtotheaussiesummer

I am mostly planning to wear it casually and glamorously open, like I’m wearing it here with my white Inari tee dress, I’m actually rather thrilled at how super swish this combo looks, and feels!  I’m even thinking this could be my Christmas soiree outfit over the upcoming festive season?  Maybe!!


Details:

Coat; McCalls 5525, cotton sateen, lined with cotton poplin
Dress; Named patterns Inari tee dress, white stubby cotton, details here
Heels; Zomp, from Zomp boutique

also looks pretty good when accessorised with a dog… mmm?  sorry, I couldn’t resist roping her in for just one picture!

pinterestmail

jump to it!

Ohmygawd, wot is this then??  I’m wearing a jumpsuit!

I know!  So… fashionable!!

Disclaimer; so, any and all claims to being abreast with current trends and wearing something that’s oh-so-hot-right-now! that’s only just barely appearing in RTW shops here is absolutely nothing at all to do with me and everything to do with Heather of Closet Case Patterns for kindly sending me this pattern and thus propelling my wardrobe ever closer to what the cool girls are all wearing…  thank you, Heather!!

Up until now I had precisely zero jumpsuits in my repertoire and to be honest I had early, prior-to-making-it worries that I would be wanting to transform this one into a midi-dress fairly soon … my fear of  jumpsuits is mostly because of the toilet issue.  I remember Cassie telling me a story about herself and a friend: said friend was wearing a jumpsuit and no bra one time, and Cassie was waiting for her in the ladies’.  Friend sings out from her stall;  “Cassie? I’m basically sitting here naked right now… ” This struck both of them as particularly hilarious and they laughed until they cried… well I’ve gotta say I think of that every time I even contemplate a jumpsuit.  Once I’d made this one though and tried it on, I did immediately love the rather glamorous breeziness of those super wide wide legs, immediately! and I also really like how the extravagance of width at the bottom edge is nicely balanced out at top by the tapered in lines of the camisole-style top half.   The curved V-neckline is cut quite low both front and back, it’s flattering in a quietly sexy sort of a way; and while it’s a leeetle bit skimpy it’s not too skimpy that you can’t wear a bra, which is comforting.  In fact the straps are designed thoughtfully wide enough to be bra-strap friendly.  Wearing it feels quite delightfully breezy and relaxed and comfy and easy, like you really are wearing nothing, even though you’re actually swathed in looooads of swishy fabric, and I found myself not minding the bifurcated-ness after all.  In fact, colour me pleasantly surprised!  Could I even be *gasp* converted to jumpsuits?!

Pattern: so, of course this is the Amy jumpsuit, designed by Heather Lou of Closet Case patterns…  and I used a slightly crinkly deep blue rayon from my stash, I think this was originally from the Morrison sale; and I cut the shoulder straps from white cotton because…. well just because.  The white was a remnant from deep deep Stash.

I lined the bodice with the last remains of this goooooorgeous yellow and white check rayon… love this divine fabric, originally from the Tessuti’s in Melbourne, and I used it to make this top for Cassie, and this little dress for Ms Spring.


It’s now been used up totally, each and every skerick, likewise the blue rayon, and likewise the piece of white cotton now too.   I’m using up so much of my stash!  I’m a bit behind on my blogging, but trust me; I’ve been making tonnes recently and have used up LOTS of my stash while at the same time adding almost nothing to it…  THIS.  IS.  AWESOME!!!

Details:

Jumpsuit; the Amy jumpsuit, pattern by Closet Case patterns, in a royal blue rayon? I think? with white cotton straps
Sandals; made by me! at the shoe camaraderie workshop; details here

jumping in my jumpsuit!  I’m sure Clara’s wishing she had one too…

pinterestmail

Ms Spring

The latest addition to my little set of seasonal dolls is finished! Please say g’day to Ms Spring!

Ms Spring is, obviously, a spring-y kind of a girly; she is actually made from the exact same ivory calico as her sister Ms Winter but has light coffee-coloured skin thanks to a long hot soaking in a cup of strong coffee.  Not Ms Spring herself, of course, but her fabric prior to her making!  She has green/blue eyes, and tawny golden blonde hair.  I’m super pleased with her hair!  It started out life pale grey in colour; Morris & Sons Empire 4ply, 100% Australian merino “French Grey”, and I dyed it in a yellow/orange dye solution, the same dye-bath that I used for this jacket.  I wanted the colour to be a bit blotchy and two-tone, because natural hair IS is a bit variegated in colour so that’s a more realistic look…. so dunked the completely dry wool straight into the bath and just minimally swirled it about, just a little bit.  I’m so so happy with the pretty range of warm golden yellows I got!  I also really adore her side-swept fringe ‘do…

Up top, she is wearing her cocktail dress; a blush pink sequinned number which is in my humble opinion, the most divine shade of pink ever invented!!  How much would I like a dress for myself in this colour?? SOOOOOOOOO much!  I know, I know, I should just make one.  Sadly though my actual life involves zero need for a pretty pink sequinned dress, so I’m just going to settle for making one for this young lady instead  😉

Her matching necklace is all pink; pink jewellery wire, with a pink-y apricot pearl bead.

on Wednesdays we wear pink….

Her summer dress is a checked yellow rayon, beautifully drape-y…  this fabric is a little fray-y, so I went to the effort of a narrow rolled hem.  So fancy!

Really though – really – my personal piece de resistance for this dolly has been her winter outfit… this turned out rather chic, if I say so myself!!   I’d made the denim blue leggings, and knitted her little blue beanie… and then just couldn’t settle on a good colour/look for her turtleneck sweater dress.  I actually made three other rejected candidates, prior to this one!  None of them were just right, too dull, or too bright – it’s really important to me that all the pieces in my dolly’s wardrobes tone together really beautifully and have a lovely and harmonious overall colour scheme.  I love this dolly’s colour scheme; it’s soft and sorta cheerfully pretty in a muted way, a bit stronger than pastel but definitely not bright.  I just couldn’t settle upon a fabric/colour that fitted my vision.  Then I made this ivory sweater dress, which is nice, but still not quiiiiite right, and finally I hit upon the idea of adding embroidery to the yoke, to make it look a bit like a fair isle sweater.  Well, that’s what I think, anyway!  And it all clicked into place!  It has blue -the same blue as her beanie -, the orange is the same wool as her hair, except I soaked it in the dye bath for a lot longer to just get a stronger colour – and grassy yellow/green.  Now, it’s perfect, I think!

And of course she has a duffle bag! to carry all her stuff!  It is made of wide-wale corduroy, that I dyed also to get this shade of caramel brown, and it has a pocket both front and back too.  Goodness knows what she is going to put in those pockets, but as we all know, a girl can never have too many pockets, no?!

Oh! of course she has underwear too… a pair of lacey boy-leg briefs, with an embroidered yellow rose on the front, so you can tell the front from the back.

you can see her light, coffee-coloured skin shade better in this picture, I think  🙂

Here she is, with everything!

But wait, not quite everything!  There’s more!  Lastly, just one more thing… when I sent Ms Winter off, I made at the very last minute a drawstring carry bag, with an inset tulle window, so she can see out… this can store her and all her clothes and possessions in one place, for when she’s not being played with, or out on display or whatever.  So, of course I had to make one for Ms Spring too, in a shade of spring-y turquoise that fits nicely in with her particular colour scheme.

She is currently listed for sale over in our shop  🙂

pinterestmail
Switch to mobile version
↓