Yearly Archives: 2019

You are browsing the site archives by year.

a raincoat for Cassie

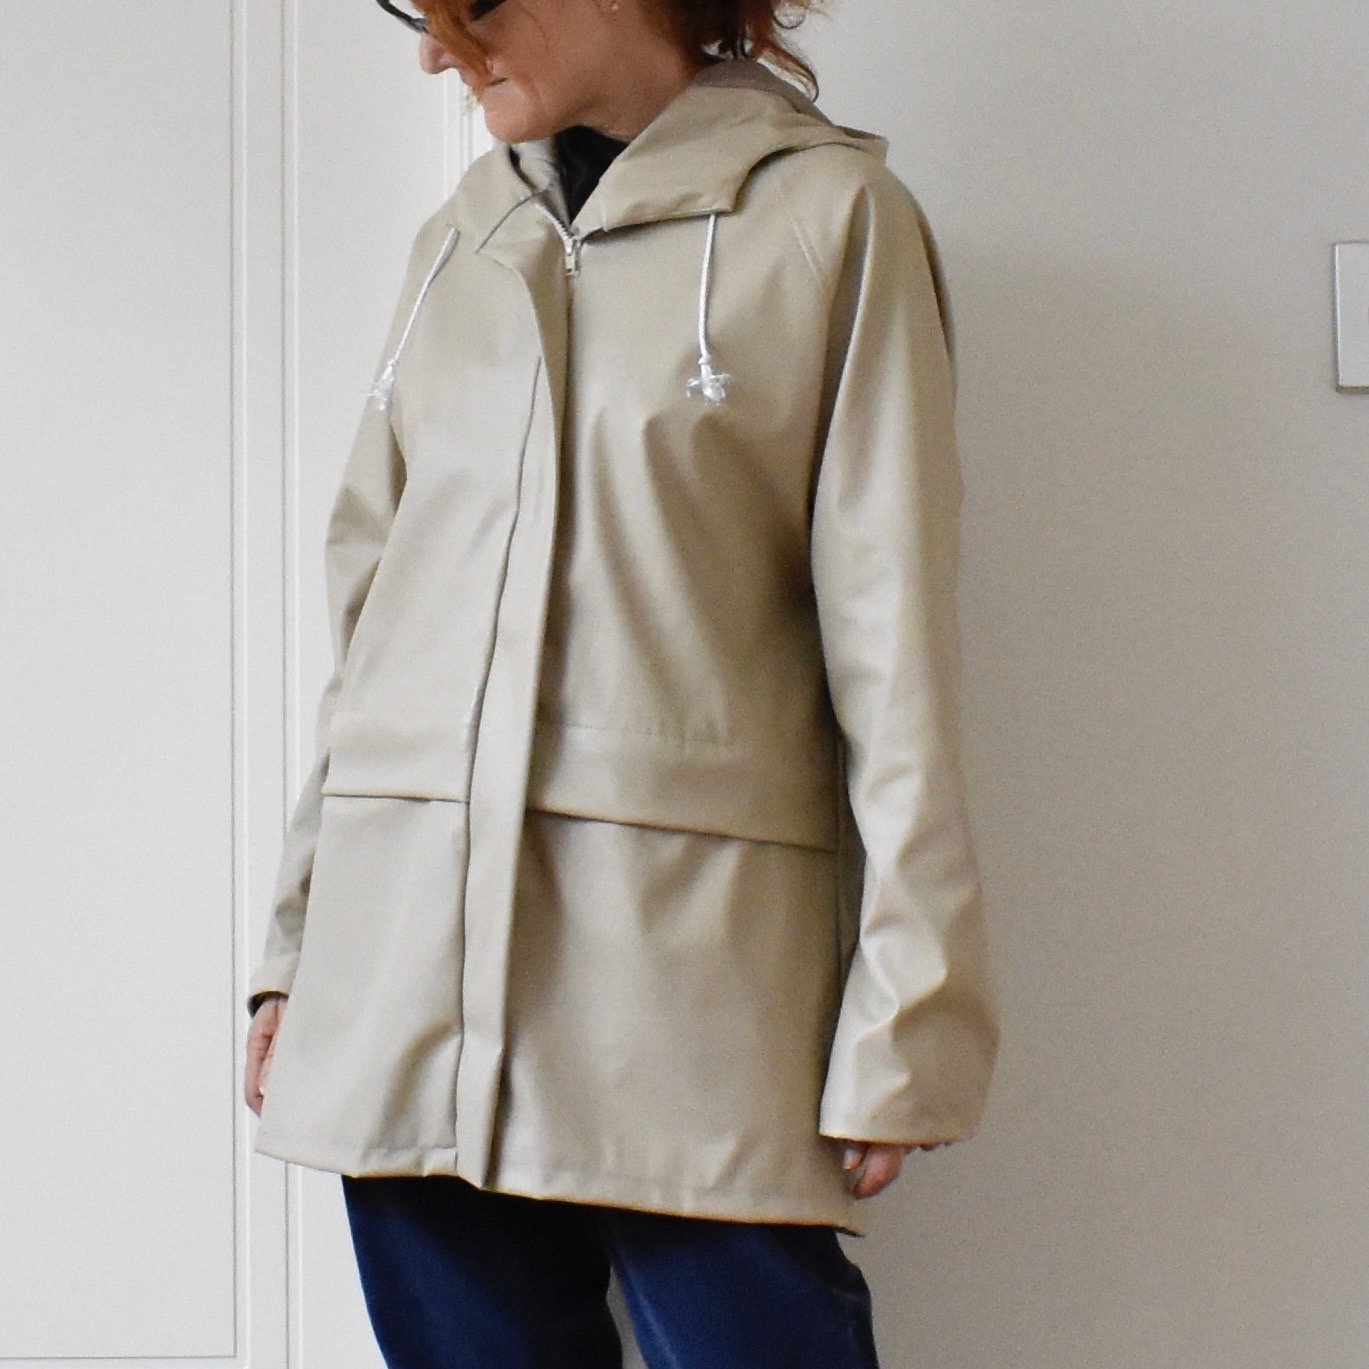
Yes, I may be modelling it here, since maybe I stole it for a few days after finishing it, hehe, but this raincoat was always for Cassie and is now safely residing in her wardrobe, where it should be!  I ended up finally giving it to her a coupla weeks ago.  Luckily I had taken photos of me wearing it because it’s just not so easy anymore to take photos of her, now she’s moved out of home… *sob*  She popped over today for some Mum/daughter time and I asked her how it’s been.  She says it’s waterproof, it’s a good size to wear over regular winter clothes which is just what you want from a raincoat, and she loves it, all three of which are always very gratifying to hear!

Materials; So, I’ve had this beige pleather in my stash for aaaaaaaaages, so long that I barely even remember buying it! although I do remember it was from Spotlight.  I’m in a real stash-busting frame of mind lately, so TIME TO GET THIS STUFF MADE UP AND OOOOOUUTTA THERE!  It’s pretty hideous stuff to sew; slightly stretchy and with that “sticky-ness” of pleather so it doesn’t move nicely under the sewing machine foot at all.  I used strips of tissue paper for each and every top-stitching seam…  see here for my tips on sewing leather or pleather

Lining fabric from the deep stash; have no idea now whether I bought it originally or whether it was one of Mum’s throw-outs.  I used a slightly different beige lining fabric, also deep stash; for the sleeves.  All three zips, hood cord, cord stops and eyelets are all from Spotlight.

I couldn’t find the same seam sealer I’ve used for all my other raincoats; BCF is now stocking the above sticks of wax for the job.  I couldn’t help thinking they were basically candles without the wicks and maybe I could use one of the many candles I have already! but bought one anyway.  It proved not very easy to use, since it was quite “firm”, not really soft enough for the job; and  you have to rub it quite vigorously over the seam to get it insinuated into the stitch holes which seemed to stretch the fabric out a little.  Then, I tried melting it a little in a (real) candle flame, before dripping it over the seams, then eventually moved to softening the wax stick in the flame just a little before commencing to rub it in.  The last wasn’t particularly easy either, because the wax only stayed softened for about five seconds away from the flame before it hardened up again, and needed another “soften” in the flame; but in the end I decided this was the best way to get the wax well-worked thoroughly into the seam holes.

But it works! the raincoat is waterproof and that’s the main thing.  Though if I had a choice, I would probably choose the chemical seam sealer over the wax stick… actually I only just had a thought; I have some real beeswax somewhere, and wonder if this would actually work better?  It’s quite soft naturally and so might prove easier to massage into the seams….  something to think about trying next time!

Pattern; is my own.  I’ve made this up three times previously, my first go is here, my second, also for Cassie! is here, my third is here.  I’ve added little improvements and modifications each time I’ve made it up; this one is, dare I say, the nicest yet… although it’s always had the most awesomely practical and deep pockets, if I do say so myself!  I gave this one a big upgrade when I lined it fully with golden beige polyactate lining fabric.  This makes it quite delicious to wear, and makes me wish I’d properly lined my own raincoats with something more traditionally “dressmaker-y” like this.  I lined my first and second raincoats with a soft mesh, which is very nice, but the lining fabric is definitely silkier and far more luxurious against the skin.  Again… next time!

o hey you gorgeous thing!  fluffy photo bombers are always welcome!!


I also gave it an internal pocket, just a simple patch pocket on the left breast; simple but extremely useful.  Yes, ahem; I am realising this raincoat IS most definitely far nicer than my own!  I should have kept it!  jk

.. cheekily wearing it “out” another day!  I wore it to the sewing guild meeting with my dp studio “Eve” dress, my handmade black tights, and the booties Craig bought for my last birthday present…

pinterestmail

some naice new clothes

I’ve been whipping up (k-chaaaaa!) some maternity clothes for Kelly… I’ve been making a lot “for others” lately, all this year in fact, or at least it feels like it! but I’m ok with that; for one thing; it gives me a chance to get that aspirational 30 wears out of my own wardrobe, and for another… well that’s reason enough, I think?  I have lots of nice clothes and I’m enjoying getting the most out of what I have lately  🙂  But I still want to sew! so it’s both fun and enjoyable for me to make clothing for my loved ones instead.  Kelly needs new clothes to fit her fast-changing body and is keen for me to make them, and I am more than happy to make them for her, so it’s a win-win situation for both of us. She recently had a birthday, and we headed out to Homecraft Textiles and Spotlight together and did a bit of shopping; my birthday present to her.

A lovely reader of my blog, Graca sent to me this maternity skirt pattern, Burda 7023, thank you so much Graca!.  First of all, I ran up a little test number, using a soft, grey and white cotton jersey sweat shirting, leftover from this hoodie I made for Sam a few years ago.  The leftover scrap I had was the perfect size for the skirt!  The sizing chart of the Burda pattern was a little weird; Kelly’s hip size put her between a size 20 and 22, the very top of Burda’s size range which seemed quite quite bizarre!  I eyeballed the pattern pieces and decided to size down to 18-20 for Kelly, and of course it fits pretty well so sizing down was a pretty good decision.  Also, of course the skirt is currently huge on her, not surprising given that she is in the very early stages of her pregnancy.  But we both feel it will be a good thing for her to have in the later stages of the pregnancy.

On our shopping trip for the real version we picked up a few very nice fabrics; including a truly gorgeous, creamy/ivory/grey cotton jersey – I bought enough for me to have something too! – and this absolutely drool-worthy rose printed stretch velvet.  I used the Burda 7023 skirt pattern to make the skirt, and “early-maternitised” it a little bit, so it’s more suitable for her to wear during this wintery, early stage of her pregnancy.  I did this by reducing the amount of gathered rise in that front portion of the skirt.  I also installed a drawstring in the front band, so she can pull in some of the extra width now, and let it out gradually as she expands over the coming months.

How?  Firstly; I ironed a square of iron-on interfacing in the centre of the skirt front facing section, and stitched a sort of double buttonhole/figure 8 stitching using a narrow width, short-stitch zig-zag stitching.  I used small shape scissors to cut X-shapes int he square centres of this stitching.  Next, I cut long strips from the ivory jersey I used for the little T-shirt top; these left unheeded naturally roll up in to nice little rolls of fabric.  These I stitched into the side seam stitching of the front/back waistband/facing/casing so the strips are hidden inside, and threaded the ends through my makeshift eyelets.

So, they emerge inside the front waistband of the skirt, and Kelly can pull the waistband in to fit now, and let it out as she grows.  I think this is quite an improvement on the original, which is left to stay big and loose and floppy no matter which stage of the pregnancy you are!

I also made the little top, using the Ebony top pattern I’d bought recently, totally for maternity purposes only of course.  Though I did get an extra one printed out for myself too! ahem…  Kelly has been wearing the striped, raglan-sleeved test version I’d made up, and requested it be streamlined just a little bit, so I brought in the “swing” of the side seams by about 2 inches at each side seam, keeping the side seams straight.  And it still has plenty of swing!  The next request was to bring it in even more next time! though I’m pretty sure the bit of extra room will come in very handy come breastfeeding time.

When making a T-shirt; I like to stitch the shoulder seams down towards the back, and also to stitch the neckline seam allowances down onto the shirt at the back only, like so…. I believe it stabilises this part of a T-shirt which is often subject to the most strain.

This is the regular, set-in sleeve version of the pattern …

btw, when it comes to stitching a hem or an elastic casing in velvet; its pile causes it to become the most annoyingly migratory stuff that slides over itself under the sewing needle, even even when you’re being super vigilant and slow, it just happens!  I found the best way to keep it firmly in place was to pin regularly, like at least every inch! and perpendicular to the seam, with the needle passing through exactly where you’re going to be stitching, and not removing the needle until you’re right upon it.  This seemed to keep everything in place nicely enough…

I already have some other versions in the pipeline, as well as a few as yet unblogged things awaiting in the wings; I need to get cracking and catch up!

pinterestmail

terracotta skirt; 6 different ways

I’ve loved this skirt so much! but it’s been worn and worn and worn and the placky-dack fabric got so crazed and brittle in places towards the end there, I’ve finally been forced, forced I say! to bid it adieu; because my husband was like, that skirt is AWFUL.   And I had to sadly admit; dear, thou speaketh the truth.

I made it two years ago, using a plastic-fantastic polyacetate/vinyl stuff from Spotlight, and the Megan Nielsen Axel skirt pattern.   It most definitely got its magic number of 30 wears… just.  It was fairly shredded towards the end of its life, but it got there!   I’m giving this awesome little terracotta workhorse a little salutary send-off by reminiscing about some of my favourite outfits in which it featured…  Six outfits, to be precise… and everything else I’ve made in the outfits here is linked to its original construction post.

Above; at left; ok, being real here; this is not the most awesome “outfit”, per se; but this OOTD pictures holds a special place in my heart because it was Clara’s first feature on my OOTD blog… LOOK AT THAT LITTLE SCRAP OF PURE CUTENESS!!  SO TINYYYYYYY!! sigh.  If only they could stay so little and cute like that.  But without the puppy-insanity, thanks….  I’m wearing the skirt here with my leather sleeved/wool/silk top, my trusty homemade tights (as always) and my heeled black booties…

At right; I really love this outfit, and wore my caramel suede cardigan with the skirt quite frequently… also with my pink Pattern Magic twist top, ye olde homemade black tights, and my favourite motorcycle boots that I wear practically all winter long…

Both these outfits above were from my spring 10×10 challenge from two years ago, during which the skirt proved its workhorse-ness to me most satisfactorily!  At left; worn with my mustard silk crepe blouse, itself another of my creations using a Megan Nielsen pattern, the Sudley…. and also my own handmade white oxford shoes.

At right; worn with my blue-check hoodie from a Burda pattern, my navy edged white Nettie tee, my black tights and, yet again, the favourite boots….

Above, at left; I love the colour combination of this outfit, so much!! wearing the skirt with my teal-blue Nettie tee, my paprika tie-front cardigan, my mustard raincoat, the homemade black tights and my KronKron shoes that I bought during our holiday in Iceland…

At right; I discovered this outfit combo quite late in the skirt’s life, sadly, because I absolutely love it so much I definitely would have worn it over and over again if the skirt had lived a bit longer!  My wonky apricot striped T-shirt from a Burda pattern, and my olive suede tunic-tee, from another Burda pattern.  Same old black tights, and the little suede booties Craig gave me for my last birthday.  Love these !!

Sooooo, this skirt has been pretty great, so I’m a little sad it died, but you know what? Time to cultivate a new favourite.  What will take its place in my little skirt-loving heart, I wonder?  I can hardly wait to find out  🙂

pinterestmail

black Clementine

Oh my gosh, I am so behind!  I’ve made this new dress … and have worn it and why have I not blogged it?  I used to have quite a strict rule about not wearing something until I have written a blog post for it, but things have been so hectic and complicated lately.

So I received a length of beautifully soft, perforated black suedette fabric from Minerva, and also the Clementine dress pattern, the inaugural pattern from a new pattern company, Forget-Me-not patterns and the marriage of these two items bore the most satisfactory fruit; this delightfully witchy-chic and I think rather elegant little number…  I only had 2m of the suedette fabric which was technically not enough to make the dress I wanted to, but somehow I made it work! with some sneaky patching together here and there.  Specifically, the side front and side back panels have a waist seam, and the back panel has a centre back seam.  Not that you’d ever know that wasn’t completely intentional if I hadn’t pointed it out, right?!

The Clementine is a terrifically versatile pattern, a fit and flare style with princess seams, designed for a stretch knit, and includes a top and dress variations, with either a scoop neck or a cowl neck option.  Also three different sleeve lengths marked too.

I went, very predictably I’m afraid, for the dress option, with the cowl neck, and the three quarter sleeve length…

My suedette, being perforated, is actually a little bit “peekaboo” close-up, so I chose to underline my dress completely with some very thin, beige/greyish-ivory knits I had in my stash already.  Two slightly different fabrics, of an annoying length each of which wasn’t really enough on their own to be useful enough for anything much so I was mighty pleased with myself when it occurred to me I had “just enough” of each combined to cut out my underlining!  I clean cut the suedette and the beige knits using my rotary cutter and left them unhemmed, since the fabrics are all non-frayable and quite stable; however I did opt to hem the sleeve hems since these areas are subject to a bit more stretch and strain.  Each of the underlining pieces was cut to be 5cm shorter than its corresponding outer shell piece.  I stitched each seam, before overlocking the raw edges in a second pass.  The pattern is reeeeally economically designed for minimum fabric wastage, with a 6mm seam allowance.  Highly approve of such thriftiness! although it doesn’t leave any wriggle room, should one wish to indulge in a bit of post-cutting size-fudging/alteration, ahem!  fortunately I went with my recommended size and feel like the sizing is just right.

I am completely in love with that s0ftly draping cowl neckline!  It’s my favourite feature of the dress!

At the back neckline I overlocked the raw edge of the suedette shell self-facing, turned it down over the underlining, and simply topstitched it in place…

I was quite pleased with myself when the front facing/underlining turned out quite clean and neatly done; I cut the front underlining the right length so as to stitch to the lower edge of the front self-facing, right sides together, and then when I stitched the shoulder seam I sandwiched the back shoulder edges in-between the front and its self-facing, so all raw edges are neatly hidden inside.

I liked the idea of the dress being middy length, so lengthened all pieces by 15cm at the lower edges… this is the very maximum I could get out of my metre-age!  I was actually kicking myself I had not ordered more fabric, but was rather chuffed I managed to make it work, yay!

And that swish factor!  I love a dress with a bit of swish!

I have to say; Clara was being so sweet the day I took these pictures!  I was down south alone with her on this particular week, and setting up to take photos of my new dress and she just snuck over and plopped herself down loyally at my feet, without even being asked… I was so touched!  although the little nose touching my hand in the first picture make me suspect she thought a treat might be in the offing; poor girl, it was not!

I am wearing the dress here with my self-made tights – think I might need to make a new batch of these before winter ends!; and the boots Craig gave me for my last birthday.  It’s funny, I didn’t actually think these would get a tonne of wear since I have several pairs of black booties/boots; but I’ve enjoyed wearing them so much this winter.  Maybe even my most worn pair of boots for the year?… maybe?!

pinterestmail

box of socks; the July edition

Dotty socks?  Socks with the pox? Poxy socks? A pox on socks!

Squeaking in under the wire at the very last minute for the month again, I present this month’s pair of socks… kinda fun, huh?  I absolutely love them retroactively.  While I was actually making them, hmmm, not so much!  I really struggled to get into these ones, funnily enough.  I liked the turquoise yarn with colourful flecks very much at first, but it rapidly became quite blah and too subtle to my eyes.   I felt it really lacked a certain necessary “something”, and I discovered some of that something when I laid the ball of bright yellow yarn against it.  Drab to fab in one fell swoop!  I experimented with several different ways of getting the yellow in there somewhere, but (obviously) in the end settled on embroidering random dots of various sizes here and there.  This gave exactly the fun and quirky look I craved, but was surprisingly difficult to get them looking neat, owing I think to the fact that the yarns were of completely different gauge.  This discrepancy can be seen most clearly in the heels and toes, where the yellow looks quite “puffy” and plumped up compared to the much finer turquoise yarn.  Yeah, it’s funny-looking but still, I love it.

I only had time to embroider a sprinkling of the dots around the top few inches of sock; but if I get some more time -which seems very unlikely – I may add some more “pox”…

Pattern; my usual plain Jane favourite, from a Patons 60s pamphlet with my own modifications

Yarns: flecked turquoise is Opal “Relief” sock yarn, colour 9494; with a yellow Piccolo multi-purpose craft yarn, made in Japan.  Both yarns purchased in Japan during our recent holiday there

oh hey there my lovely little photobomber… must be close to dinner time, mmmm?

The box of socks is looking a bit squished, but pretty!

pinterestmail

funsies with onesies

I’ve made another little onesie!  Looks a bit goth, you say??  well, there’s a story…  🙂

The sewcialists blog had this fun, little mini-challenge last weekend; you spun the wheel to get a colour and then you had the weekend to whip up something with your colour.  I spun and got:


I’m sorry to say I felt very uninspired at first, and just left it for a few days.  And yes, it did say you could spin again and again, in fact as many times as you like to get the colour you want! but that’s just not me… I’m a stick-with-what-you’ve-got, kind of a person, and spinning a second time would have felt like cheating.  Stubborn? oh yes, but you know, gotta own what you are!

Then it occurred to me… make something else for the new baby!!  Now if that’s not a fun motivation I don’t know what is!!  So, you know I’ve got a huge bag of the family’s old clothes that are still very good quality fabric, and I fished out this old T-shirt of Tim’s…

I had this idea he might like for his new baby to have a little something of Dad’s when he gets here… pretty cute idea, huh?  Well, I thought so.  🙂  No sooner did I post a picture on instagram, than Tim sent me this one picture of himself wearing the T-shirt.  The grim-looking persona here is all an act, honestly; he’d dressed as a rocker for a dress-up party, haha.

Pattern; I again used the pattern Tim and Kelly had given me; Burda 9434, the 1 month size, except this time I cut the front as one piece, so as to maintain the cool tree/crows motif on the front of the T-shirt; and put 3 snaps in the crotch for closure.

I also made the little ivory beanie; using part of an old dress of Cassie’s.  No picture of that one in its original condition sadly; and it’s already been cut up in the past for a heap for other things; in any case, this is totally a very recycled and eco-friendly outfit for the new bub!

Just some boring construction thoughts:  I did have to cut and piece a little bit near one shoulder, because for some reason the motif had been placed super high on the T-shirt; so close to the neckline edging that you couldn’t possibly cut out the narrow baby onesie piece AND keep the motif intact otherwise.  You’d think the manufacturer’s would consider that people might want to cut out a baby onesie when they print their T-shirts, wouldn’t you; sheesh.  So inconsiderate!  Really, in retrospect I should have pieced BOTH shoulder pieces, which would have centred the motif better, but oh well; you live and learn.  I think it’s super cute, and honestly, I can hardly wait for Tim to be holding his new baby wearing this onesie! seems like full circle, you know?  That is; the baby wearing the onesie, not Tim, obviously!

addendum; aaaaaaaaand, I’ve just finished another shortie onesie… and matching beanie. Reason number one; Kelly and Tim really did buy SO MUCH of this fabric! and reason number two; because I’ve made a salient discovery; you can never actually get tired of making baby onesies.

So, the beanie matches the very first “long-ie” onesie I made, obviously, because it’s from the same fabric; and this onesie also matches the above, ivory beanie; because I used the ivory fabric for the binding… I stitched on miniature sew-on press-studs for the closure on this one because I’ve always had a love-hate relationship with the hammer-in ones, and am currently residing in the hate phase…

pinterestmail

pretty turquoise lingerie set

Oh hai!  So I’m suddenly and frantically trying to blog things I’ve made in a month WITHIN the month.  Something I am lately failing at dismally!

However, not much to say really.  I made a bra and two pairs of matching undies.

Bra pattern is my standby MakeBra pattern 2610, now renamed DL 03; and the two pairs of undies are both my favourite cloth habit Watson briefs.  I used a lovely aqua-turquoise stretch lace from Minerva crafts, and a cream coloured polyester from Spotlight, the latter has been in my stash for yonks – also used for this set, actually.  Pretty pink ribbon and all matching cream elastics from Homecraft Textiles.  Foam for the cups from the MakeBra basic kit I purchased years ago.  Rings and sliders recycled from an old, also made-by-me bra.

I did some slightly different with the cups this time, and instead of piecing the lace to cover the cups, I stretched it over the foam cups that I’d already covered with the cream polyester, pieced in the usual way.  I did this because I didn’t want to break up the pretty design of the lace with obvious seaming.  Always an issue with a pieced bra cup!  When you seee bras in the store they don’t really have this pieced cup thing going on and I wanted to see if I could make it happen with my own homemade bras too.   I had to very slight gather the bottom edge of the lace in order for this to work, but I think it turned out ok.

I didn’t have quite enough of the lace to cut the bra band out in one, single piece, so there is piecing towards the back of the band.  However I think this is subtle enough that it’s not a problem.

Extremely eagle eyed observers might pick up that the hook and eye closure are on the wrong sides here!!  Now this is the reason why I usually haul out an existing bra every single time and check FOR SURE before adding these, because the one time you don’t?!!….  Of course I only discovered this when I went to put the bra on for the first time….. DOH!  I managed to get it on ok at the time, but before wearing it again I unpicked them and swapped them to the correct sides.  My hands are like old dogs, and are not used to learning new bra-wrangling tricks like this anymore!

I made the bra and one pair of knickers to be total lace; but didn’t have enough lace for another entire pair of undies… but well I like to have the undies different from each other anyway.  In fact, I decided I liked the half-lace undies more in the end!  I carefully cut and appliquéd to get them all neat and nice.  After my wedding dress adventures, I now consider myself a lace-applique expert, actually


pinterestmail

dog treats

Recently I made a large batch of dog treats for Clara and she’s completely obsessed!   And I, unlike many bloggers, do not use that word lightly!  She would do absolutely anything for these, and what’s more they cost roughly a third of what we’ve being paying for dog treats up until now… so I thought I’d record my recipe for posterity…

this is her “super attentive and totally focused on me” face…

We’ve gone through a metric tonne, give or take, of dog treats in our quest to train this adorable, but quite feisty little wench… I must say I don’t remember Sienna ever being such a handful but maybe like having babies, you forget.  Anyway,… she had a definite favourite treat, that’s proven quite difficult to lay our hands on because it seems to be perpetually sold out.  This elusive treat is like a rusk; it’s made with real beef, and sometimes has cranberries and rosemary in it too.  It’s also pretty expensive.  Anyway I decided, how hard could it be??

I made up my own recipe and it was staggeringly successful!  I’d googled “dog treat recipes” and the options that came up, well WOOF; and I don’t mean that in a good way.  Most of them didn’t even have meat in them, while still claiming to be a tasty “treat” for your dog.  I mean, Clara likes not-meat things too, but meat is definitely her very favouritest thing in the whole wide world to eat!  In the end, I got inspiration from a baby-rusk recipe, of all things.  This one to be specific; although if you look at it you’ll see it bears zero relation to mine here.

Without further ado!

Dog treats:

500g minced beef
2 cups plain flour
1 large egg

Cook mince in a frying pan, stirring constantly so as to keep it all broken up and no lumps.  If mince is very lean I sometimes start with a little water to keep things moving and avoid the mince sticking to the pan; but usually the meat’s own juices are sufficient…  When cooked let it cool to lukewarm.  Tip mince into a food processor with the flour and blend thoroughly… it should end up with a mealy/breadcrumb-y texture.  When thoroughly “crumb-y” add the egg and pulse again, the mixture should form a good dough-like texture that is not sticky and can be rolled out easily.  If it is a bit sticky, knead in a touch more flour.  Roll out, cut into shapes, and bake at 180C for 15-20 minutes or until golden brown and quite hard.  The length of cooking time depends on how thick you’ve rolled it… I rolled to about 4mm, and this yielded a HUGE quantity of bikkies.

Obviously you don’t need to cut fancy shapes, because this is the time-consuming bit really; you could just cut into a grid of squares and separate them for baking.  Also, this is quite a basic recipe; I just wanted to sound her out to see how it all worked out before getting into gourmet territory.  For the next batch I plan to try some variations:

To be added at the same time as the flour and blended in::

1/4 cup of dried fruit, such as apples or cranberries,

and/or 1tsp dried herbs, such as rosemary, sage or parsley

My only regret? That I do not have a dog-bone shaped cutter.  I do though, plan to address this awful travesty…

obedience!!!!

pinterestmail
Switch to mobile version
↓