Tag Archives: Daily Outfit

blue Blair jacket

Hello!  I made a new thing.  It’s sort of a jacket, sort of a coat.  What’s the difference between those two things anyway, I wonder?  I always thought a jacket was short, like maybe no longer than hip length max, and a coat is longer, like anything past the hip.  This pattern is marketed as a jacket, but also as potentially a shirt-dress, and the two variations are called duster and blazer respectively; so I guess you can take your pick!  A multi-faceted design, to be sure!Whichever, it’s unlined so a very simple and quick thing to make as far as jackets go, and the boxy unfitted shape makes for an undemanding fitting process too.  Oh, maybe I should mention the name of the pattern; this is the new Blair jacket pattern by Homer and Howell, and I made the duster length.

I really enjoyed making this! you normally think of jackets/coats/dusters as being quite involved but this was really easy.  Even considering that I chose to bind all the raw edges inside with HongKong binding, which is a process that when you’re about to embark on it you think; oh this is going to take FOREVER… But since I figured the seam allowances were going to show every single time the coat blew open I wanted everything to look neat and tidy inside.  And whenever I do get going with HongKong seaming I invariably love it, end up thinking, oh this is FAB!! and why don’t I do this for ALL the things I make, hmmm??

My fabric is a wool-blend suiting that I’ve had in my stash for years and years; so long I cannot even remember who gave it to me.  Because, yes; it was donated to me from someone else’s stash once upon a time.  I think maybe my grandmother’s?  It’s beautiful quality, but I’d always shied away from using it because I thought the colour was absolutely terrible for me.

However right now I’m trying to be more resourceful and use le stash, stay in my house and avoid shopping as much as possible.  You know, isolation and all that … so decided what the heck.  That’s why dyes were invented, right?  I knew the fabric wasn’t 100%wool, but it was worth a try.  Sploonch! it went, straight into a navy blue dye-bath.

This actually worked out pretty well… it’s now a lovely shade of …  bruise?? ok maybe I’d describe it as smokey blue, or even light teal.. anyway it’s a richly smudge-y sort of a colour that I really like and a big improvement on the original light sky-blue.  For the HongKong seaming I used an olive green poplin from my stash too.

Buttons! well obviously I had nothing that matched in size or colour AT ALL and normally I’d pop off to the shops to search for something.  But see I’d made up my mind to work from my stash, and giving in on the buttons would be such a fail… so fresh on the heels of making my tea-cup for the bridal shower hat, I thought I’d try to make some from modelling clay.  I think they worked out really well!

I don’t think I’ll be tossing the coat in the washing machine any time soon, just in case, although I’m sure they would probably survive fine.  Maybe just a gentle hand-wash.  But look at them!  I LOVE them!  I especially love how slightly wonky they are.  Of course any and all wonkiness was completely intentional  😉

I’m just going to briefly mention the changes I made to the pattern:

I switched the orientation of the box pleat in the back to be an “innie” rather than an “outie”

I added a hanging loop inside the collar/yoke seam

I put in BIG inseam pockets into the side seams.  Yes, there are now pockets in the Blair pattern, but I was a tester for this pattern and they weren’t in the original design.  I NEED pockets in a coat! so I actually went in with the seam ripper and added some in after I’d finished the coat completely.

Here’s a little video on the making of this coat, now up on my YouTube channel… I’d like to say that the quality of my videos is improving, but I still haven’t worked out how to even add music.  I feel like such a youtube failure!  but it’s such a lot to even get this out.  I’m trying to improve!

Anyway, blogging/vlogging fails aside; the final verdict is that I’m going to love wearing this… coats are not an awfully common sight here in Perth, we’re so ridiculously casual here, to a fault! But I really love coats, both the making and the wearing of them; and I really love looking at pictures of Northern hemisphere bloggers wearing coats regularly that I’m going to just do it anyway.  This is one of those things that is kinda un-Perth, even though I’m deeply Perth in just about every way.  This is weird, but it’s just the way it is  🙂


Details:

Coat; the blair jacket pattern byHomer and Howells, in a wool mix suiting
Dress; the Cissy dress pattern by Homer and Howells in a rust coloured lace, underlined with pink/rust dyed cotton, details here
Tights; my own design, black stretch stuff, details here
Black shoes; my own design and made by me, details here
Floral dress; based upon Simplicity 8658, floral cotton gauze, details here
White shoes; designed and made by me, details here

pinterestmail

paper-bag waist

I’ve just made these ridiculously comfy trousers!  perfect for lounging around while you do your work-from-home thing in these newly strange and scary times.  I adore them unreservedly.  Well, it’s the paper-bag waist, have had a soft spot for them since the 80’s… incidentally, you know how they say that if you remember a trend the first time around then you should scrupulously avoid it the second time around?  Well, what a load of tosh!  There’d be no trends left for us if we followed that crazy advice!

Because yes indeedy, this is actually a familiar little style that pops its head up pretty frequently to the joy of us who do love for our trousers to be comfortable but at the same time have an abiding aversion to an elastic waist.  Personally, I reckon the paper-bag waist isn’t so much of a “trend” any more but can rightfully claim the classic tag.

I made them using this really gorgeous, quite thin, bottle green cotton corduroy from Minerva Crafts… it’s absolutely beautiful stuff. Then again I’ve always been a huge corduroy fan, it’s one of my favourite fabrics of all time actually, for winter things I mean.  It’s like velvet, but better; easier to sew and wear, and to care for too.  I ordered quite a lot of this colour way and I have enough leftover for a simple little dress or a tunic or something.  Hmmm. brain clogs a whirling!!

The pattern is the Jasmin trousers, by Fibremood.  Fibremood releases a great little range of patterns each season for women and children, I really look forward to their releases and love checking them out.  Each issue caters to a range of sewing levels, usually featuring some easy-wearing basics and styles that are both chic and comfortable, and a nice scattering of surprises with every issue.  I thought this style was one of the surprises, but I just found myself homing in on it straight away!  🙂

These ones have very up-to-the-minute, turned-up cuffs on cropped legs, a good amount of room in the seat without being excessively baggy – remember these?  although I ended up adoring those too, once I’d taken them in a bit!!  The Jasmin trousers are easy and straightforward to make and I thought the fly front very well explained.  I often find it helpful to draw and cut out a stitching guide for the topstitching of the fly front curve if a pattern does not provide it, and this one doesn’t; however it’s a simple matter to draw one up.

The pockets are nice and and roomy enough.  I hand stitched the top edge of mine to the waistband facing edge.

I love how the paper bag waist is cinched in with a big wide self-belt to define the waist.  Acting on instinct I cut my belt out for the biggest size with a plan to shorten it later if it proved too long.  It may or may not be ok, partly because I don’t have the required D-rings of the right width to finish it, and I didn’t really want to head out to Spotlight during these isolation times, just for D-rings; so I’ve had to resort to just tying the belt in a knot.  I might shorten it still but just going to see how it goes for a little while.

I happened to have a perfectly matching zip in my stash! which is super lucky because I meant I didn’t need to go out for that either.  🙂  This is one I inherited from Mum yonks ago, and it had a real vintage tag.  Sometimes I worry about truly vintage zips, that they’re going to break straight away, from being rusty, or brittle.  It seems fine so far, and it doesn’t have to take any strain so I’ve got my fingers crossed!

wow… I can assure you that all that random fluff is actually quite invisible to the naked eye!

I just couldn’t resist the Paper Bag Shot!  It’s a pretty rare thing where I have ever had to stand or walk with a covering over my head like this and actually I found it quite difficult to keep my balance!  Was very disorienting, and made me wonder about learning to balance without the visual cues of your surroundings…

Anyway; I LOVE my new trousers, and they’re wonderful for comfortable working from home on the couch.  My own work has dropped off a little lately, but I have taken up learning a language to fill in some of my extra time.  I’m using the Duolingo app on my phone, a free one; it’s a great little system, sending me daily reminders so I have to keep up the pace.  What language, do I hear you ask… I’ll give you one guess…

🇯🇵

Well, of course, Japanese!  It’s super difficult.  I think the only thing I’m going to learn to say with any real competency is “Professor Maria can speak Japanese and English”  This should stand me in good stead for the future, a future in which I hope I can go over there for fabric shopping again!  Let’s think positively!


Details:

Trousers; the Jasmin trousers by Fibremood, in green corduroy from Minerva Crafts
White top; the nettie, but Closet Case patterns, details here
Beige shoes; designed and made by me! details here
old favourite mustard top; the Sudley blouse, by Megan Nielsen patterns, in a silk crepe from Tessuti, details here
Sandals; from an oppy, many yonks ago

Note; was even harder to paper-bag balance in heels!

out in ze wilde….

pinterestmail

mother of the bride

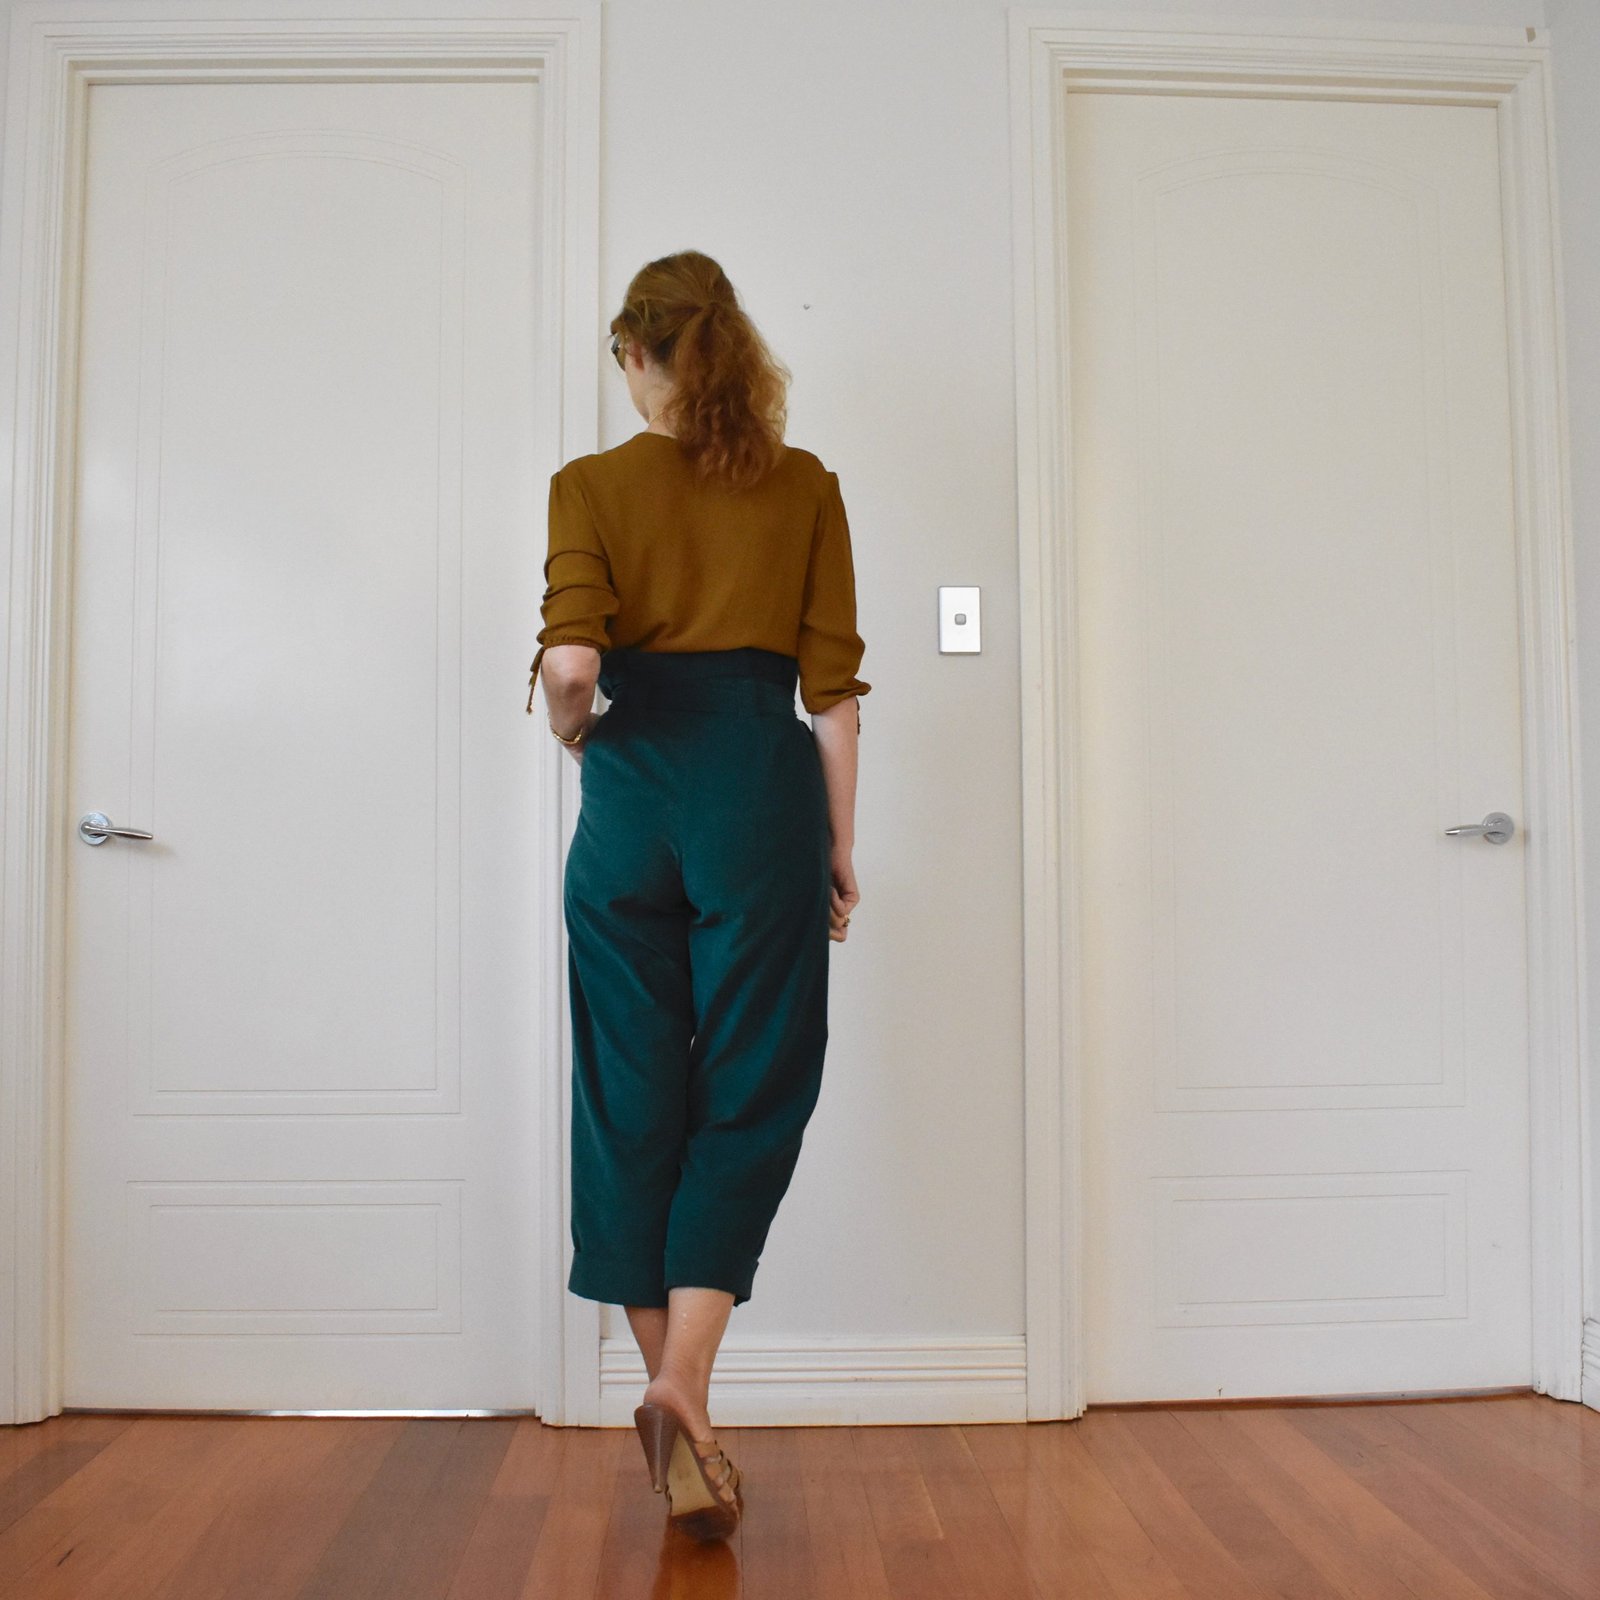
So, I made this beautiful (I think) dress for Cassie’s wedding.

I had early settled upon the beautiful bohemian Carole dress by Fibre Mood … for several reasons.  Firstly;  I already have the pattern printed out AND had made it up previously too and so knew I didn’t need to do any more special fittings of the pattern to myself.  Time-saver!  And secondly, I thought it was a gorgeous style too, of course!

I found the beautiful floral print in Fabulous Fabrics.  It is a silk/cotton and the most divinely luxurious stuff to sew and to wear.  It is also just about completely see-through, so my dress is underlined fully with soft ivory lining fabric.

I basted underlining and outer shell pieces together along the seamlines first, then overlocked the raw edges together before stitching the seams

The underlining is cut 4cm shorter than the dress with a machine-finished hem, but the outer shell hem is stitched in a narrow hem with tiny fell-stitches.  I hand basted the facings to the underlining with tiny invisible stitches at both the front fold and the overlocked edge to the inside too.

My label!

Side view… I absolutely adore the gentle high-low nature of this beautifully twirly hem!

So I actually made this dress back in January, when I had a bit of spare time in between bridesmaids and bridesmaid fittings, and I’m so glad I did.  The last little bit leading into the wedding was SUPER stressful…

this counts as my make-nine-but-actually-twelve thing for March…

and OH! I almost forgot! just like I did for Tim’s wedding outfit, I quickly whipped up a matching bra and undies for this outfit too…

Well… it sorta? matches?!  I think it’s close enough, anyway.  It was actually damn difficult to find fabric even vaguely matching in either colour or design!

I used my favourite pattern the Watson by cloth habit, and cotton jersey from Spotlight.  The red ribbons were saved from an old, also me-made, lingerie set, and I made my usual two pairs of matching knickers…


Details:

Dress; the Carole pattern by FibreMood, silk/cotton from Fabulous Fabrics
Lingerie; the Cloth Habit Watson
Shoes; Zomp, from the Zomp boutique

I took these pictures back in mid-January, so this is the happy face of a woman who has not even heard of the novel corona virus… so hard to remember those innocent times now!

I’m a bit torn here; I’ve either finished saying everything I need to say about the dress, OR I can address the obvious elephant in the room.

As mentioned, I actually made the dress way back in January, when I hadn’t fully got revved up with the more … maybe important? shall we say? wedding sewing, and decided to just run mine up in a quiet week, in between bride and bridesmaids’ fittings, and before things got more hectic.  And, oh my gosh, but did they get more hectic.  I was making Cassies’, very involved, wedding dress, and her three bridesmaids’ dresses, this dress here, and I also ended up making my Mum’s dress too, when she was getting overwhelmed at the thought of it.  It’s been … a lot… emotionally as well as workload-wise.  As well of course as we all know; approaching like an invisible tsunami from the other side of the globe was Covid-19; and none of us had any concept just how much the world was going to change in the following few months.  I really really appreciate that we are so extremely lucky here in Perth to be so isolated, that the situation here is far far less severe than in other countries, and that our government is right on top of things and has shut down the country in, hopefully, good time.

So yes, Cassie’s wedding did indeed go ahead; with good fortune the date was set for the very last weekend before restrictions started to really ramp up here in Perth, Western Australia.  When I say ramped up, well the number of people allowed at a gathering have been reduced, and reduced and reduced!  specifically, first it was 500, which went quite rapidly down to 100, then to 10, then 5, then 2!  At the time of the wedding, the number was 100.  Let me say; I’m not complaining, and I am most definitely very pro-lockdown to control the spread of the virus, but at the same time I have to admit to being so very retrospectively glad that the timing of our wedding meant we were able to go ahead as planned.  We were worrying right up until the night before, when we got the legal go ahead with very few adjustments needed.  We were fortunate that our numbers were already small, we had no guests that were coming in from out of the country or even the state, our venues were big enough to comply with the (at the time) 4 square metres per person rule, and we had already made preparations to protect our elderly relatives, like face masks and hand sanitiser – purchased at great expense! was available at each venue.  We also pro-actively made a no contact rule; absolutely no hand-shaking, hugging or kissing.  It is so so strange to lay out these guidelines for a wedding, but these are very strange and scary times and such rules helped put everyone’s mind at peace.  Everything went off as planned, and a couple of weeks later everyone is still healthy and well, for which we are so enormously relieved that I can hardly find the words for it.

It’s almost impossible for me to reconcile this time when we were fully allowed to gather together to celebrate our darling daughter’s wedding as a family; with now, a few weeks later, when we are not seeing anyone in our family AT ALL.

Anyway, that’s the story.  Small things to worry about really, at a terrible and terrifying time like this.  I sincerely hope everyone who reads this is safe and healthy, and continues to be so, and that you and your loved ones are able to access good health care if you should need it.

pinterestmail

delicious Delice

Hello!  I know I said wedding sewing would be the next thing I posted here but I’m not quite ready to write about that yet.  However yes, we had the wedding, it was wonderful and all is well.  In the meantime I’m just quickly jumping in with a new little something, a fun number I finished probably two to three weeks ago now but haven’t really worn it much because the weather has simply been too hot for it.

And now it’s not; et voila…

This pattern is the Delice dress/blouse pattern by Super Bison cousou main; a new-to-me pattern company, and can I just say right now, even apart from anything else like some really nice patterns the name of the company is practically irresistible!  Super Bison!  So cute!  I’m just getting this mental image of a bison with a cape zooming superman-like from out off the prairie grasses and into the sky and it’s giving me a much needed laugh…  🙂

no capes!

My fabric is beautiful, a purpley-chocolate/burnt-orange/raspberry-red/blue brushed cotton plaid… I LOVE the colours here.  I bought this fabric from the Fabric Store in Melbourne on a trip over there with Mum and Cassie, several years ago.

The pattern has three sleeve variations, and I did want to make the long sleeved version but in what is probably the story of my sewing life, I did not have enough fabric…  doh!  I made the sleeves as long as I possible could, and then I even managed to cut another strip to add onto the bottom to make it look like the sleeves have a sort of faux cuff extension too.  It’s a bit of a random feature but I really love it!

Ah plaids; of course I absolutely adore plaids but they come with their own plaid-specific issues and let’s just say it; there is very little plaid matching accomplished here, just the barest of essential areas like the side seams. I simply didn’t have enough fabric for such extravagance.  It’s funny actually kinda serendipitous; when I’d cut out the front bodice, to get all the pieces cut out the front plaid had to be off-centre.  I thought this would bother me but in the end I’m glad actually.  I think it turned out a better look than if everything was perfectly centred and lined up.

I absolutely love this little dress, it’s cosy and comfortable, quite fun to wear, and I think it looks pretty cute as well.   The colours are quite autumnally scrumptious! and in winter I’m going to try it with a long sleeved wooled T-shirt underneath too.

The one little downer sort of a thing is, it must be said, the sad absence of pockets.  I did attempt to put inseam pockets in the side seams but they just did not work actually, and I had to take them out and repair the side seams.  It’s ok, I haven’t quite given up all hope yet though… I still have the pocket bags and just enough fabric to fashion some welts for welt pockets.  I’m going to give it a crack pretty soon, but just wanted to write this blog post anyway; while the spirit was willing, so to speak.

I’m so glad to get this long-petted fabric out from the fabric room and into … um, well into a different room in the house?!  The wardrobe!  😀

Later edit; I added the pockets! so much better now  🙂

wearing it here with my me-made tights, raincoat, scarf and cardigan, and rtw boots


I’m really only including this next picture because of The Eye.

Details:

Dress; the Delice pattern by Super Bison cousin main, brushed cotton plaid from the Fabric Store in Melbourne
white shoes; designed and made by me, details here

pinterestmail

garden tea party hat

Short and sweet; I made a hat!!  Well, by “made”; more accurately; I compiled a hat.  I bunged a whole lot of pretty things onto a hat.   Oh I did make that little tea cup, so I guess I can lay claim to a little bit of it….

The green felt hat is a “St Patrick’s Day” hat from Spotlight and all the fake roses and ivy are also from Spotlight.  I made the little tea cup from modelling clay, also originally from Spotlight, and painted it using craft paints from…  guess where?!!  I used green Gutermann’s upholstery thread to stitch everything securely to the hat.

So my 3 nieces/Cassie’s bridesmaids had planned her kitchen tea/bridal shower to be a Mad Hatter’s Tea party, and we all had to wear some sort of over-the-top headgear.  I wasn’t quite sure how crazy to go, and genuinely thought my hat was going to be TOO much, but it ended up being quite subdued by comparison to many of the other fabulously lovely creations at the party!

The theme of the part was a surprise for Cassie, and the girls had made her hat for her, to both match hers and to be bridal at the same time.  Aren’t they the most gorgeous bunch of girls?!!

We had a low-key hat competition at the end, and Cassie won of course.  The funniest thing of all was the prize; a roll of toilet paper!  We all roared with laughter!

Let me explain… with the new corona virus scare currently going on; Australians have reacted predictably, by cleaning out the shops of any and all supplies of toilet paper.  I know, right?  So Australian… Seriously, the toilet roll shelves are empty, all of the time.  You have to get in fast to pick up one of the occasional restocks when they happen! and there are even rumours of people selling vastly inflated toilet paper on eBay.  I haven’t seen any ads myself, but that’s just an indication of the general level of panic.  And so normally, one of the games you’d have at a bridal shower is a toilet roll wedding dress competition.  And such a thing was obviously out of the question with the current toilet roll situation.   So my sister-in-law spared one toilet roll – ONE! which was awarded as first prize for the hat comp.  SO FUNNY!

Here are some of the other gorgeous hats at the party:

Mum made her stunning colourful hat of felt lined with old X-ray film…

Cassie’s friend E cleverly made a very chic and sculptural, royal hat/ruffled collar ensemble, using paper:

L looked super pretty in her floral/gumnut hat…

Arthur very briefly wore his yoda beanie; but he’s not a fan, poor little lad!  A man of discerning fashion taste!

Lots of gorgeous hats!!!

In closing; a few in-progress shots of making my hat… just because well, that’s what I do here.

I made four button-like holes in the bottom of the tea cup to make it easy to stitch onto the hat.  In fact, you could just think of it as a glorified button, to be honest!

Coming up soon… the wedding itself!!!!!  #eeeeeeeeeeeeekkkkk!!!!!!!!

pinterestmail

floral frikka with matching skirt

… so here are a few things I made earlier! like; along with everything else that’s been going on I can barely remember when I made them.  Honestly, I’m really missing writing for my blog lately, and “engaging” with other sewing folks on instagram – please note correct use of appropriate buzzword – with all the wedding sewing I’m doing it’s all I can do to keep up with just my daily outfit blog … and keep the pantry stocked … and some sort of food on the table each night… wait.  Actually that is rarely happening nowadays, whoops…

Also, a pre-warning, after the wedding there’s going to be a veritable avalanche of sewn items popping up here.  An avalanche I tell you!!

Anyway!! I’m just gonna go with stream of consciousness blogging again and see how we go.

This is the new Frikka hoodie pattern by Fibremood… funny thing; when the catalogue came out I immediately homed in on the Becky dress and was like, YES!  that’s the one for me!! at that point noticed that it was for child’s size 2-14 … womp womp.  So I chose the adult sized Frikka hoodie obviously.  As it turned out, I had just enough fabric to cut out a little matching skirt, and so I’m pretty chuffed I ended up with a sort- Becky look after all.  Win!

pseudo-Becky

My fabric is a surprisingly cosy cotton double gauze from Minerva.  Suprising, because you wouldn’t ordinarily think cotton gauze would be warm.  In my experience, it’s a lot warmer than you think!  And so soft and cuddly, mmm.

note to self; wearing the hoodie up with a pony tail looks, um weird….

Some sewing notes; I added a kangaroo pocket on the front…  #pocketho

I stitched the sleeve hem quite deep hem on the sleeves, a. because I really love a three quarter length sleeve, and b. so when cuffed/rolled up the right side of the fabric shows.

I didn’t have a matching cord on hand for a drawstring in the lower casing, and may not even bother actually.  I think it’s fine just the way it is.

I really like the hood construction on this thing.  It’s fully self-lined, in a very innovative (to me) yet intuitive and simple to construct way; with the two sides being cut on a fold, opening edge on the fold.  Very clean and easy.

With the matching skirt; I didn’t have enough fabric for the waistband as well, so cut one from an old pair of jeans.  The colour is a perfect match, and also denim is probably a better fabric for a waistband anyway.

I stitched on a, in retrospect rather insane daisy button, because it seemed appropriately fun and random at the time, but I may switch it out at some point.  The petals are really knobbly so it’s kinda tricky pushing it through the buttonhole…


I also fully lined the skirt with ivory/grey polyacetate lining fabric, because the gauze is naturally quite “sticky” and I do plan on wearing it in winter, with tights.


Note to self; 40 minutes for a blog post.. not too bad!  Now to get back to the wedding sewing!!


Details:

Hoodie; the Fibremood Frikka hoodie, made in this cotton double gauze
Skirt; kinda based upon Vogue 1247, except with no pockets or horizontal seams, same fabric, and lined
Poppy dress (only the skirt seen); Vogue 1351, poppy print silk chiffon, details here
Pink twist top; the Pattern Magic 1 twist top, thin pink stretch stuff, details here
Shoes; made by me and my own design, detail here

pinterestmail

rusty lace Cissy dress (Homer and Howells)

I’ve made this rather awesome new dress, if I say so myself!!   Paprika!!  Rust!!  Kinda… burnt orange/dark red/burgundy/wine!!!  It has a strongly autumnal-flavour in colour and feel, but actually it’s beautifully cool and breezy enough for summer too.  I wore it today and it was super comfortable in spite of the 38C heat.  Phew!

The pattern is the Cissy dress pattern by new company Homer and Howells; I discovered and started following them on instagram a few months ago and was thrilled when they asked if I would like to try out this particular design… because I knew it would make a lovely summer frock  🙂

I had this glorious richly-coloured lace that’s been languishing in my stash for hmmm goodness knows how long … I can barely remember its purchase!  I’m pretty sure I bought it at Tessuti’s in Melbourne on one of my holidays over there with Mum and Cassie.  Like about 95% sure.  #youknowthingsarebadwhen…  It’s one of those fabrics I’ve taken out and petted every now and then, even laid out pattern pieces on it before having second thoughts, but finally I felt this particular project was just the right thing.

The pattern is an exceptionally easy thing to make.  It does have pockets, beautiful great big pockets too, absolutely perfect; but in the spur of the moment I just couldn’t think of a way of inserting them nicely or invisibly enough into my underlined lace dress, so left them out this time.  Who even am III????!! but really.  I’m a little ashamed I didn’t think a bit harder, because right now I can think of two separate ways I could have made it work, hmmm.  But I’m feeling too stressed out to unpick all that overlocking to put some in right now.  Maybe later.  After the wedding…  🙂

Of course I needed to underline, because it’s lace, and therefore completely see-through.  I had a length of white cotton in my stash too, inherited from Mum’s stash; that was just the right sized piece, and I thought the white underneath would be really cool.

But you know what? it wasn’t … when the dress was finished, I decided the white cotton was actually really awful; just too harsh of a contrast.  So I dunked the completed dress into a dyepot of mixed orange/red/brown/hot pink dyes.  And now I think it’s lovely!  the underlining is almost the same colour now, just a shade lighter than the lace, and I think absolutely perfect.  I’m really going to enjoy wearing this chic thing!!

Notes; I shortened the sleeves by about 9cm, and the dress by about 17cm from the top edge.  At full length, the dress was just a little too “granny-ish”, and yes I know I AM now an actual granny! but there’s granny-chic which is cool; and then there’s just “granny” but not in a chic way.  The lace that I chose, combined with the long skirt tipped the original look into the latter but I do really love it at this slightly shorter length!  I actually do have fabric in mind for this pattern at the designed-for longer length, but that will probably not happen until after Cassie and D’s wedding… ha!  I have so much to do!!!  #notevenlaughing  #cryingjustabit #ineedaholiday

I managed to incorporate the natural scalloped lace edge into the hemline, which I think is super pretty! but sadly didn’t have enough lace do the same for the sleeves.  They’re just hemmed.

Details:

Dress; Homer & Howells Cissy dress pattern, lace with dyed cotton underlining
Shoes; caramel/ivory clogs are made by me, and my own design, all details here. White shoes are also made by me, at a shoe camaraderie workshop, all details here

pinterestmail

rusty drapey dress

I made a new dress!  The pattern is Vogue 1343, a Tracy Reese design; and I used this beautifully thin and slightly crisp georgette from Minerva in colour Rust…

The fabric is gorgeous, yes?  I really really love the deep rich smoked-paprika colour, definitely my colour, and just enough sophisticated black, grey and off-white thrown into the print to keep everything looking sharp.

I bought the pattern ages ago, and have wanted to make it for even longer!  obviously, haha…  I really like the multitude of details it has; it’s not your average little shift dress at all.  To be honest, halfway through I wasn’t liking it very much; there were a few little problems so I’d gone off it a bit, and had pretty much decided I was NEVER going to make the pattern up ever again.  But once it was finished and I tried it on and was like… hmmm, ok I get it now!  I think it ended up way cuter than I expected!

The first problem was that front neckline drape.  It’s beautiful isn’t it?! but SUPER low cut in its original format.  I did actually make it up as is to start with, but it was so crazy low almost the full bridge on my bra was on show.  Ridiculous!!

And it’s pretty difficult to remove width from the cowl once it’s been cut and you’ve folded and sewn all those pleats etc… so I pulled up the drape by opening up the shoulder seams and removed 1 1/4″ in height from the neckline edge of the front shoulder yokes instead, tapering to nothing at the armhole edge.  I kept the height at the armhole the same, because the armholes on this design are not huge already and you don’t want them tightened up more!  The back yokes are unchanged.

You still get masses of drape, but a little less scandalously so, and at least I’ve got complete bra coverage now!

This picture also shows how the armhole edges are finished with bias cut strips.  The back neckline edge is finished the same way.


The next problem was finishing the hemline.  The pattern includes separate facing pieces for the hemline; which are attached, under stitched, and hand-stitched to the dress.  I had doubts this was going to work for georgette but trialled one and of course it looked terrible.  So I did what I should’ve in the first place; stitched up the side seams with French seams and just finished the hem in one go with a narrow hand-rolled and -fell stitched hem.  Much nicer!

Oh yes! French seams!  The pattern stipulates them and of course they are the perfect method for this fine and floaty fabric anyway.

I do love how the folds give this lovely soft fall of fabric in the skirt

The last problem… not really a problem but just a little annoying? according to the pattern you stitch the skirt to the bodice, matching side seams etc… well there is no way the side seams can be matched in this design so I think this is a mistake in the pattern…

this is the bodice back and the skirt back pieces… you can see the notches are way off, for a start.  It’s almost like there’s a missing seam allowance on the skirt back?!

It’s ok though in the end, because you can actually fit the whole bodice into the skirt without any dramas.  Just let go previously held notions of notches and side seams aligning, match up the centre fronts and backs obviously, and bob’s your uncle!

I didn’t have any matching buttons, but wait a minute, what do I have here? but a small handful of leftover ivory-crepe covered buttons leftover from when I made 100 of ’em for Kelly’s wedding dress!  I’d covered lots of extras; partly because some of my earlier ones weren’t up to scratch, and also just because I wasn’t sure how many I’d need.  I painted some with leftover acrylic “blackboard” paint, and they’re perfect!

My rouleau straps turned out super skinny!! 3mm… rather chuffed with this!  It’s all thanks to quality of this super fine fabric, I think  🙂

This is used for the button loops and the belt loops too; the latter will probably not be used because my favourite belt doesn’t really fit through them!  Yes, this is a design greatly improved by a belt, I think.  Partially because the waist is elasticated, and I looooooooathe elasticated waistbands with the fieriest of fiery passions!  This one is hidden nicely under my old, super-wide belt… which also hides those super skinny belt loops.  Ehhh…

And… this is my first thing out of my “make nine/twelve” for this year!  Here is my updated mud-map….

I may have had my doubts while I was making it, but I’m very happy with the outcome in the end!!  I love the rich colours of the fabric, the design is quite unlike anything I’ve used before; in fact that goes for the style of the dress too!  Well a change is always a good thing for the system and I plan to wear this both on cool days of summer, and warmer days in winter too.  Who knows, I may even make up the pattern again one day!  🙂

Details:

Dress; Vogue 1343, in a fine paisley georgette
Belt; super old, emu leather
Shoes; Zomp, from Zomp boutique

pinterestmail
Switch to mobile version
↓