Tag Archives: Daily Outfit

cool new top

oh hey! I made a new top.

This is the Harmony pattern by FibreMood; and I really loved it upon first sight; the interesting, sailor-inspired bib collar and slightly old-fashioned sleeves with a wide, buttoned cuff.  I think it has a vaguely Edwardian air about it and I am totally on board with this idea!

I used a beautiful silk/linen mix that I bought from Fabulous Fabrics ages ago… btw, I’m on a use-my-stash-only kick, since out move when I realised just how much fabric I have.  Spoiler alert; it’s a LOT and I seriously want to get my supplies down to a much more manageable level.   Like, to about a quarter of what I have now!  Yes, very embarrassing, I know! but there it is and I’m making good headway, believe it or not!  Yes, I know I haven’t posted much here lately, but I’m making a lot of toiles for Cassie’s and my new pattern and I’ve managed to harvest/cull quite a bit in the process.  But, I’m getting sidetracked here… back to my top!

You’re supposed to gather the bodice into the bib, and also gather the sleeves into the cuffs; instead I carefully measured and folded mini pleats in these areas which I think suits my quite crisp fabric a lot better.  I really love doing pleats in lieu of gathers, actually and have done it in quite a few garments in my time.  I won’t call it “age-appropriate”, because I’ve become wary of that divisive term in recent years so I will just describe it instead as “personal-style appropriate”.  That’s better!

The design actually uses an unexpected lot of fabric, and I didn’t actually have enough… I solved this problem by cutting the bib facings on the selvedge, and joined them in the middle.  This enabled a much more efficient layout of the pattern pieces and of course you can’t even see the facings anyway!

The pattern advises you to put buttonholes on the shoulder closure; I did stitch them on during the making but I unpicked them when I realised buttoning and unbuttoning up on my shoulder like that was going to be pretty darned awkward; and I installed pretty pearl-headed press studs there instead.  The sleeves have self-fabric looped button closure too, but they are wide enough I can easily slip my hands through without having to fiddle with those, and the cuffs can stay firmly and securely buttoned the whole time.  I used pearl look-alike buttons here.  Yes; all of of this from my stash!  I’m so glad I could finally “marry” all of these items together into one pretty garment!


Details:

Top, the harmony blouse pattern by FibreMood, ivory silk/linen
Trousers; the Sasha trousers pattern by ClosetCore patterns, stretchy cotton denim, more details here
Shoes; made by me using a Shoe Camaraderie kit, details here

pinterestmail

progress on wardrobe capsule…

I’ve made some more things to add to my little make12/capsule wardrobe….

I think I got this rather smallish scrap of  very nice damask upholstery fabric from my friend N when she cleared out her stash… I fell in love with the pretty ocean-blue colour immediately and the scrolling curls in the damask reminded me of seam foam…  I thought there might be enough for a little skirt. And there was… JUST!!  as in, I literally had the smallest quarter handful of scraps leftover after I’d finished with it!

I started out by cutting my skirt block as well I could.  This left me with a micro-mini that would barely cover my knickers in wearing, so I put my university level mathematics to good use, calucating the exact width I could cut the side pieces into in order that they could fit around the entire hemline of the mini evenly and making maximum use of the very limited area.  And I think I did it!  I found that I could have a little bit of extra width on the last pieces to be cut, and I used these at the centre back, where I think it’s nice to have a little bit of extra length anyway.  So there is a very subtle high-low hemline going on at the back too, as well as a slight curving out of the centre-back seam which give the skirt a little “kick” at the back.

With a basically finished skirt, I realised I had a small rectangle leftover that I thought would be big enough for a pocket facing, so I slipped a little pocket in the horizontal skirt seam.

It has the aqua damask at the back of the pocket, for a nice uniform look when you peek into the pocket on the outside, and the remainder of the pocket is made of the cream coloured gingham I used for my recent little top, which I’ve just now realised I haven’t blogged yet  Whoops!  I will get to it!  it’s a prototype for Cassie’s and my newest pattern which we are working really hard on getting out very soon, I hope.  Anyway, the pocket lining is from the scraps from that.

Due to lack of fabric, I finished the hemline and the waistline of the skirt using a bias bound finish… this was cut from an old shirt of Craig’s.  So really, the only thing I had to buy new for this project was the zip!  I hand stitched the bias bound hemline but the waistband I topstitched on my machine.  The pocket is handstitched on the inside to the skirt.  I love both my labels; this green one is Japanese, organised for me by my friend Yoshimi.

pocket in action… and boy do I miss my white wall in the old house!!  I had to borrow this one from Cassie  😀

Next up!

I’ve had this too-big-to-throw away scrap of yellow cotton jersey leftover from when I made last year’s mini-skirt and I thought I’d be able to get a little T-shirt out of it.  However I was too optimistic! and no matter how creatively I arranged it, even a little top was not going to happen. Well, maybe it could, but not without horizontal seams like I did in the skirt and in my opinion, in a jersey this is just not a good look.

Anyway, obviously I turned to my favourite old standby for smallish cuts of jersey fabric and made a set of underwear… I used my old favourite the Watson pattern by cloth habit, and managed to get two pairs of undies for one bra, which is my preferred ratio.

 I did my usual adjustments to the pattern, like fully lining the bra as outlined in more detail in this post here.  Also, I always cut the front of the briefs to be one piece to incorporate the outer crotch, so as to avoid that awkward horizontal seam at the front.  All elastics and bits and pieces were already in my stash, and the little white bows were recycled from an old, also me-made, set from the past.  I always recycle the bits that I can!

These are the second and third things in my make 12/capsule wardrobe that I proposed for myself, using all fabrics/notions from my stash.  I kind still kinda wish I’d had enough of the golden-yellow fabric to make a top, because I really like the idea of a yellow top in this particular capsule, but I suppose I can still make a top at some stage in the future.  Obviously I’m going to wear the underwear a lot, so it’s all good really.  I’m super happy with the little skirt too, it’s exactly the kind of thing I will wear both winter and summer.  I’m pretty happy it has a pocket too!

Details:

Top; from Burda 4/2014/115, details here
Skirt; my own design, old leftover damask from a friend
Shoes; made by me, details here

Underwear; the Watson pattern by cloth habit, leftover yellow jersey

pinterestmail

embroidered white top

hello!

so, short side note; but I didn’t post any yearly resolutions/intentions here previously.  I did on instagram though.  Whoops!  Anyway, I did actually make a little resolution, and here’s the lowdown…

at the beginning of the year I was thinking about how I really enjoyed doing my “make 12” last year so I decided to do it again but this time with a little more flexibility ; I chose the above 12 textiles from my stash with the idea I’d make a sort of unplanned mini capsule wardrobe of 12 things.  Early on I optimistically thought I’d be able to do one thing per month but of course moving house, well, moving two houses as it turned out! and our new pattern were all pretty major and stressful events that ended up taking every ounce I had… and before I even knew it it’s March already!

spot the paw… ^

Anywhoo!  For patterns/designs I’m just gonna decide as I go …!  My 12 fabrics are a hopefully interesting and eclectic mix, including wool, corduroy, damask, drill, jersey, heavily embroidered something, and even some precious fish leather that I bought during our trip to Iceland years ago…

And I made my first thing!

also… paw

This particular fabric is a piece given to me by Mum years ago when she cleaned out her stash, a heavily embroidered and appliquéd cotton that is absolutely beautiful and absolutely my cup of tea!  As it turned out, it was not one piece of fabric, but several already cut out into shirt pieces.  Mum had obviously planned to make a shirt and already cut out a back and two fronts, but I decided to switch them around, and have the one back piece at the front; and the two front pieces at the back!

…she’s been quite needy today; came and plonked herself up against me so hard and close, it was so very sweet!  This furry love was just so comforting and I needed it today too   🙂

Apart from that it’s all fairly standard, I left the selvedges at the bottom of each piece because I thought it looked so weird in a way that I really like… and I attached selvedges pieces to the ends of the sleeves too to get the same effect here.  I stitched the button plackets on the (old) fronts simply down onto each other, and cut a new neckline into the (old) back so I could wear it comfortably as a front.  The neckline is finished with a bias binding, that I cut from an old cream coloured business skirt of Craig’s.

love a good bias binding  🙂

You know how sometimes you make something and you just put it on straight away and don’t want to take it off?  Well, that is how I feel about this new top!  I absolutely love it!

Details:

Top; own design, from embroidered appliquéd cotton
Skirt; from my block, cotton double gauze, details here
Shoes; made by me also, details here

pinterestmail

limoncello

I originally bought this fabric simply because it reminded me of limoncello; specifically limoncello partaken after a long day hiking thr0ugh the delightfully bucolic Italian countryside… yes of course it is indeed that most wonderful variety of fabric; souvenir fabric!  I bought it in Rome, in the famous Fratelli Basetti Tessuti back in 2012, after our hiking holiday… it is a most gorgeously crisp linen in a sharp, warm, citrusy yellow with the skinniest white pinstripes.  I have used a small piece of it previously to make one of my Perth dresses, and so I have learnt that this gorgeous colour unfortunately runs like the the wind!  My Perth dress started out yellow and ended up basically beige eventually.  Sad, but true.  It’s ok though because I’m perfectly fine with giving it a refreshing new dye-bath when the time comes.

The pattern is the FibreMood Feliz.  I have to admit I was a little suspicious of how very long the skirt is! and was initially dead set on shortening it just about immediately, but actually? I kind of like it like this.  The Feliz has some nice features, specifically I like the curved back yoke and the flat, narrow collar; and I love how the workman-like vibe of those rolled up sleeves clashes stylistically with an almost impractically long skirt.  Not that the skirt is really “impractical” in a real life sense but you know what I mean.  I’m going to give it a good fair go before thinking about shortening it anyway.

Changes; just a few very minor tiny things.. Because the sleeves are worn rolled up most of the time, I decided to do a flat-felled seam finish on the sleeve seams,  The seam allowances are only 1cm so this was a tiny bit tricky! but definitely worth it.

So, here’s a slightly funny thing…. see how the back bodice of my dress pictured below curves down to the side seams? well the pattern piece, below right, is most definitely shaped just to do just this, however, the line drawings of the dress do not show this downward curve.  Mmmm…

I made the back yoke double layered and utilised the burrito method to get a perfectly neat finish on the inside.  This meant I could also add one of my labels without visible stitching showing on the outside, which is nice  🙂

The slimline, stamped brass buttons are so lovely, I got these from Fabulous Fabrics.  I’ve actually used these twice before, for this olive shirt, and this blue shirtdress, now a shirt too.  I know I shouldn’t ever be using the same buttons, you should find different ones.  But you know when you’re perusing the button selection and you see they still have that super cute button you’ve used before… and you know you’re being predictable and unadventurous but basically one knows a good thing when one sees it and in the end why fight it.

Details:

Dress, Fibre Mood Feliz, in lemon-yellow pinstriped linen from Italy
Tights, made by me here
Booties;  nylon from Zomp shoes

pinterestmail

Cap Ferrat and Myosotis

The funny thing was; I knew I was going to like this dress because the fabric is just so utterly divine, the pattern that I was a little hmmm about…?  but I’m completely in love with the end result so all’s well that ends very very well!

So, fabric first… this is a cotton lawn from Storrs of London.  It is described as a 100% Egyptian Superfine cotton lawn, and it is, as already mentioned; DIVINE.  It has the exact same feel and hand, and gentle light crispness as Liberty… although diehard Liberty aficionados might come for me, but that’s just my honest opinion!  This particular design is Cap Ferrat, and I honestly struggled to choose just one because there are so many breathtakingly lovely colours and prints to peruse.  I absolutely have to get some more for a shirt for Craig… or maybe just another piece for myself hmmm  hehe…

The pattern, this is the popular Deer and Doe Myosotis dress, of which I’ve seen more lovely versions than I can mention!  I actually bought the pattern two years ago, and it’s taken me this long to finally get around to it, which is a little embarrassing, huh.  I dunno, I’ve just been busy. #weddings Anyway, I’ve always liked the style and thought this gorgeous print would look nice in the style.  And it does!

So like I said, I did have reservations about it though… as I shall now address.  The bust darts on this thing are FIERCE.  I think it really is intended for a far more busty lady than myself, to be honest and was quite worried I was going to end up with the dreaded deflated balloon look on my chest.  I debated whether to tone them down, perhaps to redraft the front to be a more gentle princess seam or something.  Eventually I did reduce the darts a bit but still went for the double darted style as designed, and while the front is still a wee bit flooffy on me I don’t think it’s too bad.  For a future version I will definitely tone them down even more though.

Everything else about the style I love, though.  The sleeves are super lovely, and I completely adore the gently V neckline too, and even the gathered skirts are beautifully proportioned and look very on-trend to my eyes.

It does feel quite short on me! and I even made the hem a teensy bit longer, and hemmed as narrow as I could.  Probably best to avoid touching my toes in public… but I do think the style is super cute though, so I’m happy.  Cute and flirty and fun and perfect for summer.  Everyone needs a sweet little red dress for summer!  🙂


Normally I find gathering to be a pain in the neck, but this crisp, very lightweight cotton took to it beautifully.  Yes, I can’t believe I’m saying this, but the gathering was actually a dream.  You know how some fabrics are just a delight to work with, from the very beginning of a project to the end?  Well that’s exactly what this stuff is.  Just pure joy.  In case it wasn’t obvious, I can highly recommend!

I also whipped up a quick mask!  Haha,  I felt extremely self conscious wearing this! even though I was all by myself taking these photos, apart from Clara; see, we are extremely lucky so far here in Western Australia that our hard border closure has ensured we have no community cases of covid-19, so basically no one is wearing masks yet; but I think we’re not kidding themselves that we will never get cases here.  I think it’s inevitable, eventually.  Anyway, I do carry one of my masks around in my bag all the time, and I thought it would be fun to whip up a matching one for this dress … I’ve seen so many cute matching masks from other makers on instagram!  I lined it with red poplin, leftover from one I’d made for Craig’s Mum, and cut strips off an already partially cut-up old free Wildcats T-shirt for the straps.

So, funny story… I know it’s not obvious in my pictures here, but… did you notice my footwear?!!  SO I got dressed in the morning, in a hurry, because my days are packed solid at the moment and I just grabbed my thongs, shoved them on my feet and was off.  I took some photos of my new dress for my blog here, did some work, and then at lunchtime took myself and Clara off to the beach for our walk.  And only much later did I suddenly noticed my feet.  LOL!

Details:

Dress; Deer and Doe Myosotis, in Storrs Egyptian cotton lawn, col. Cap Ferrat
Hat; Vogue 8844, white corduroy, recycled from old jeans, details here
Mask; made using the Makers Habitat free YT pattern and tutorial here
Thongs; fipper, bought in Bali on out holiday 2 yrs ago

also, actual photo from my photo shoot today

pinterestmail

Tjilkamala Rockhole

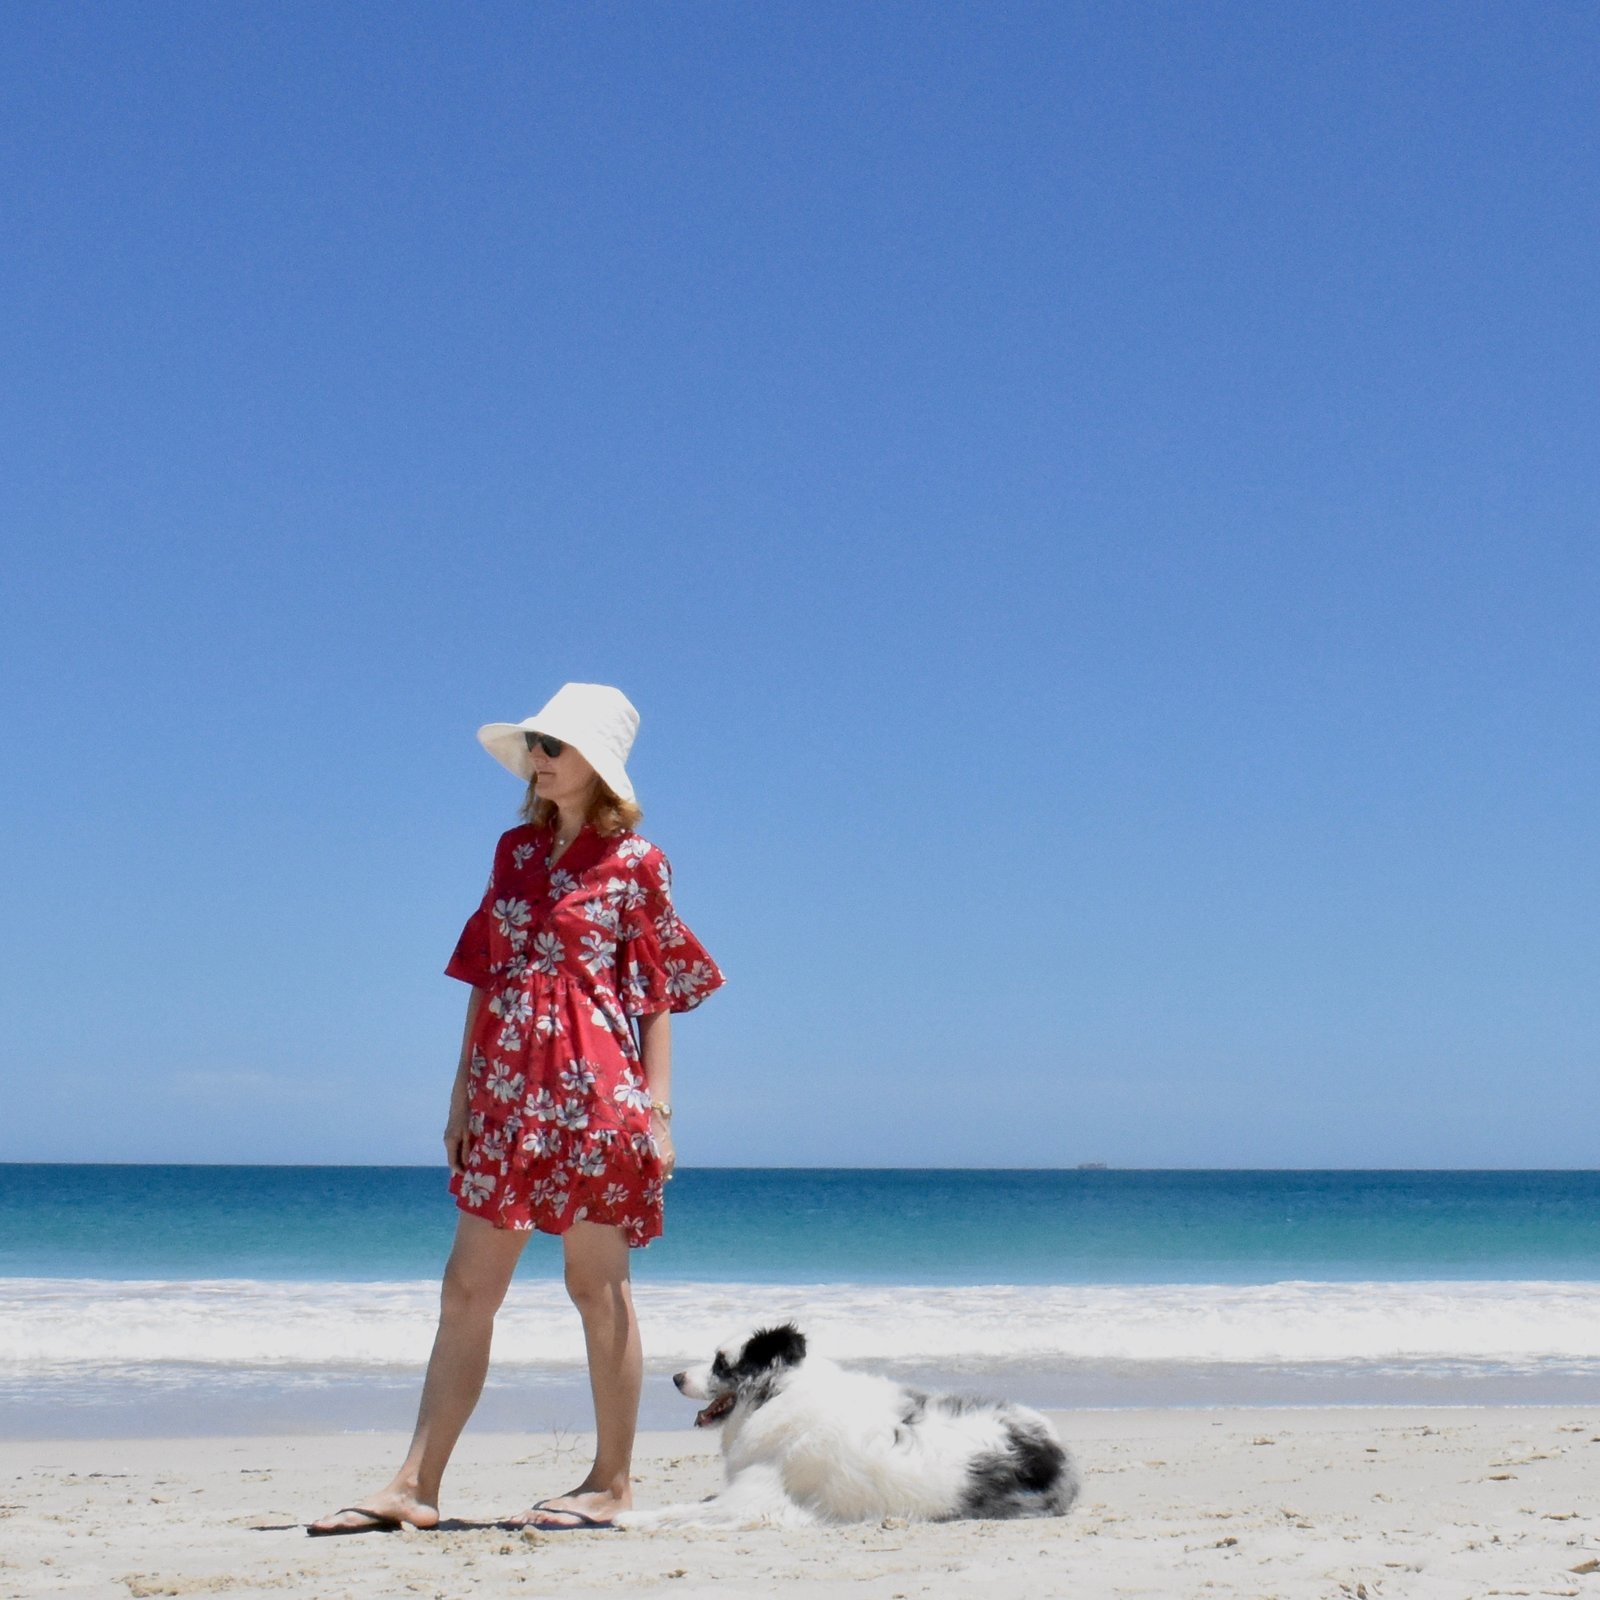
I’ve made up the first of my indigenous fabrics that I bought back in … June? I think, and I posted about it here… 

this stunning print is Tjilkamala Rockhole, designed by Alice Nampitjinpa; it was produced by Ikuntji Artists and I bought it through FlyingFox Fabrics

I decided upon a simple little dress with matching hat ensemble, inspired by this Marimekko outfit I’d seen many years ago…  btw I had to search and search and search to find this image!!  Note to self; always “pin” your favourite pictures!

I picked one of my favourite “simple” little shift dress patterns, the Named Inari tee dress, and Vogue 8844 for my matching hat.  These are both patterns I’ve used many times before, and I love them both.  I did my usual modification for the Inari dress by putting inseam pockets into those elegantly swooping side seams.  Oh, and I also widened the sleeve at the hem edge with a big big wedge insertion, as described here.  This adjustment enables you to lift your arms over your head without the dress riding up so much as to expose your knickers underneath.  Truth!  It does make quite a difference to the wearability of this dress, particularly in a non-stretch fabric.

For the neckline facings, I used a deep chocolate brown cotton voile, bought originally from Fabulous Fabrics.  I also cut the artist’s name and that of the print from the selvedge, and stitched them to the back facing.  I like doing this for special fabrics, and this is surely a very special fabric!

I did a search to find out which way up the print was supposed to go.  To the best of my knowledge, this is correct  🙂

I’ve made the Inari so many times before I don’t have much else to add … oh, except I did do something a bit different with the hem!

wait; what’s this?  WHERE’S THE HEM?!!


So the hemline for the Inari has side splits and a high/low hemline, so you can see the underside of the fabric quite clearly when you’re wearing the dress, especially when sitting down… and the wrong side of this fabric is the solid, deep chocolate brown that is the background of the print.  I decided I didn’t like the idea of seeing the print of the hem visible inside the dress and only wanted to see plain chocolate brown fabric.


So; to “camouflage” those hems I cut wide bias cut strips of same chocolate brown voile that I used  for the neckline facings and attached these along the fold line for the hem.  I then folded the top edge over and inside the raw edge of the hem, to hide the print and machine stitched close to the edge.  Finally, I hand stitched the hem to the dress as normal.  So yes, the full 3cm hem of the dress is there, and essentially the chocolate brown voile is acting like a “mask” over the top of it, hiding the print.  The side splits were also “masked” under bias cut strips in the same way.

All side splits and hems were hand-stitched, so as to avoid any visible stitching on the outside of the garment that would besmirch the purity of that beautiful print.

The hat: I LOVE the hat! even though if I’m realistic I know I’m probably going to get more wear out of the dress, but I still love it!  Serendipitous thing; when I dug out the pattern, I found to my great joy that past me had cut an extra brim interfacing, once upon a time. It was neatly folded up in with the pattern pieces.   I’d completely forgotten about it, but I guess the last time I’d made the pattern I must have thought I needed two.  Yay, past me!  Making the hat is simple enough… you can read my review of this terrific pattern here…  I used the same chocolate brown cotton to line it as for the inner bits of the dress.  I did put my own label in the hat!  I also put in a hanging ribbon in under the grosgrain ribbon just a small scrap from my sewing basket.  A hanging loop is not part of the pattern, and not an essential thing either, but it’s also something I think comes in very handy when you do have one in the hat.  I’m really glad of the one in my khaki hat and many times I’ve thought about putting one in my white hat.  I think I’m just going to get on and do that right now…

I bought the chocolate brown grosgrain ribbon from Spotlight.  You can see here a patched bit in the brim lining… I didn’t do this because I didn’t have enough fabric, I have plenty!  I actually have enough leftover for a little skirt sometime down the track too, but only if I was a bit devious with my cutting out here.  I decided a small patch in the brim lining was a small sacrifice to pay to leave myself enough fabric for that future skirt!

my labels are from the Dutch Label Shop

So, obviously I’m pretty happy with my new ensemble!!  It feels super special. I love how it’s such a visually exciting and eye-catching print, but most of all I love how it’s also so completely Australian.  It’s just beautiful.  I am particularly happy and thrilled to have found places to buy indigenous fabrics, to be able to support indigenous artists, and of course I am most certainly going to purchase more in the future, once I’ve finished making up the other print I bought in June.  I already have my eye on a few more!


Details:

Dress; the Inari tee dress, pattern by Named, in Tjilkamala Rockhole print cotton, designed by Alice Nampitjinpa
Hat; Vogue 8844, in Tjilkamala Rockhole print cotton, designed by Alice Nampitjinpa
Sandshoes; Trenery

location; Winjee Sam, Yallingup

pinterestmail

a blanca flight suit with a difference

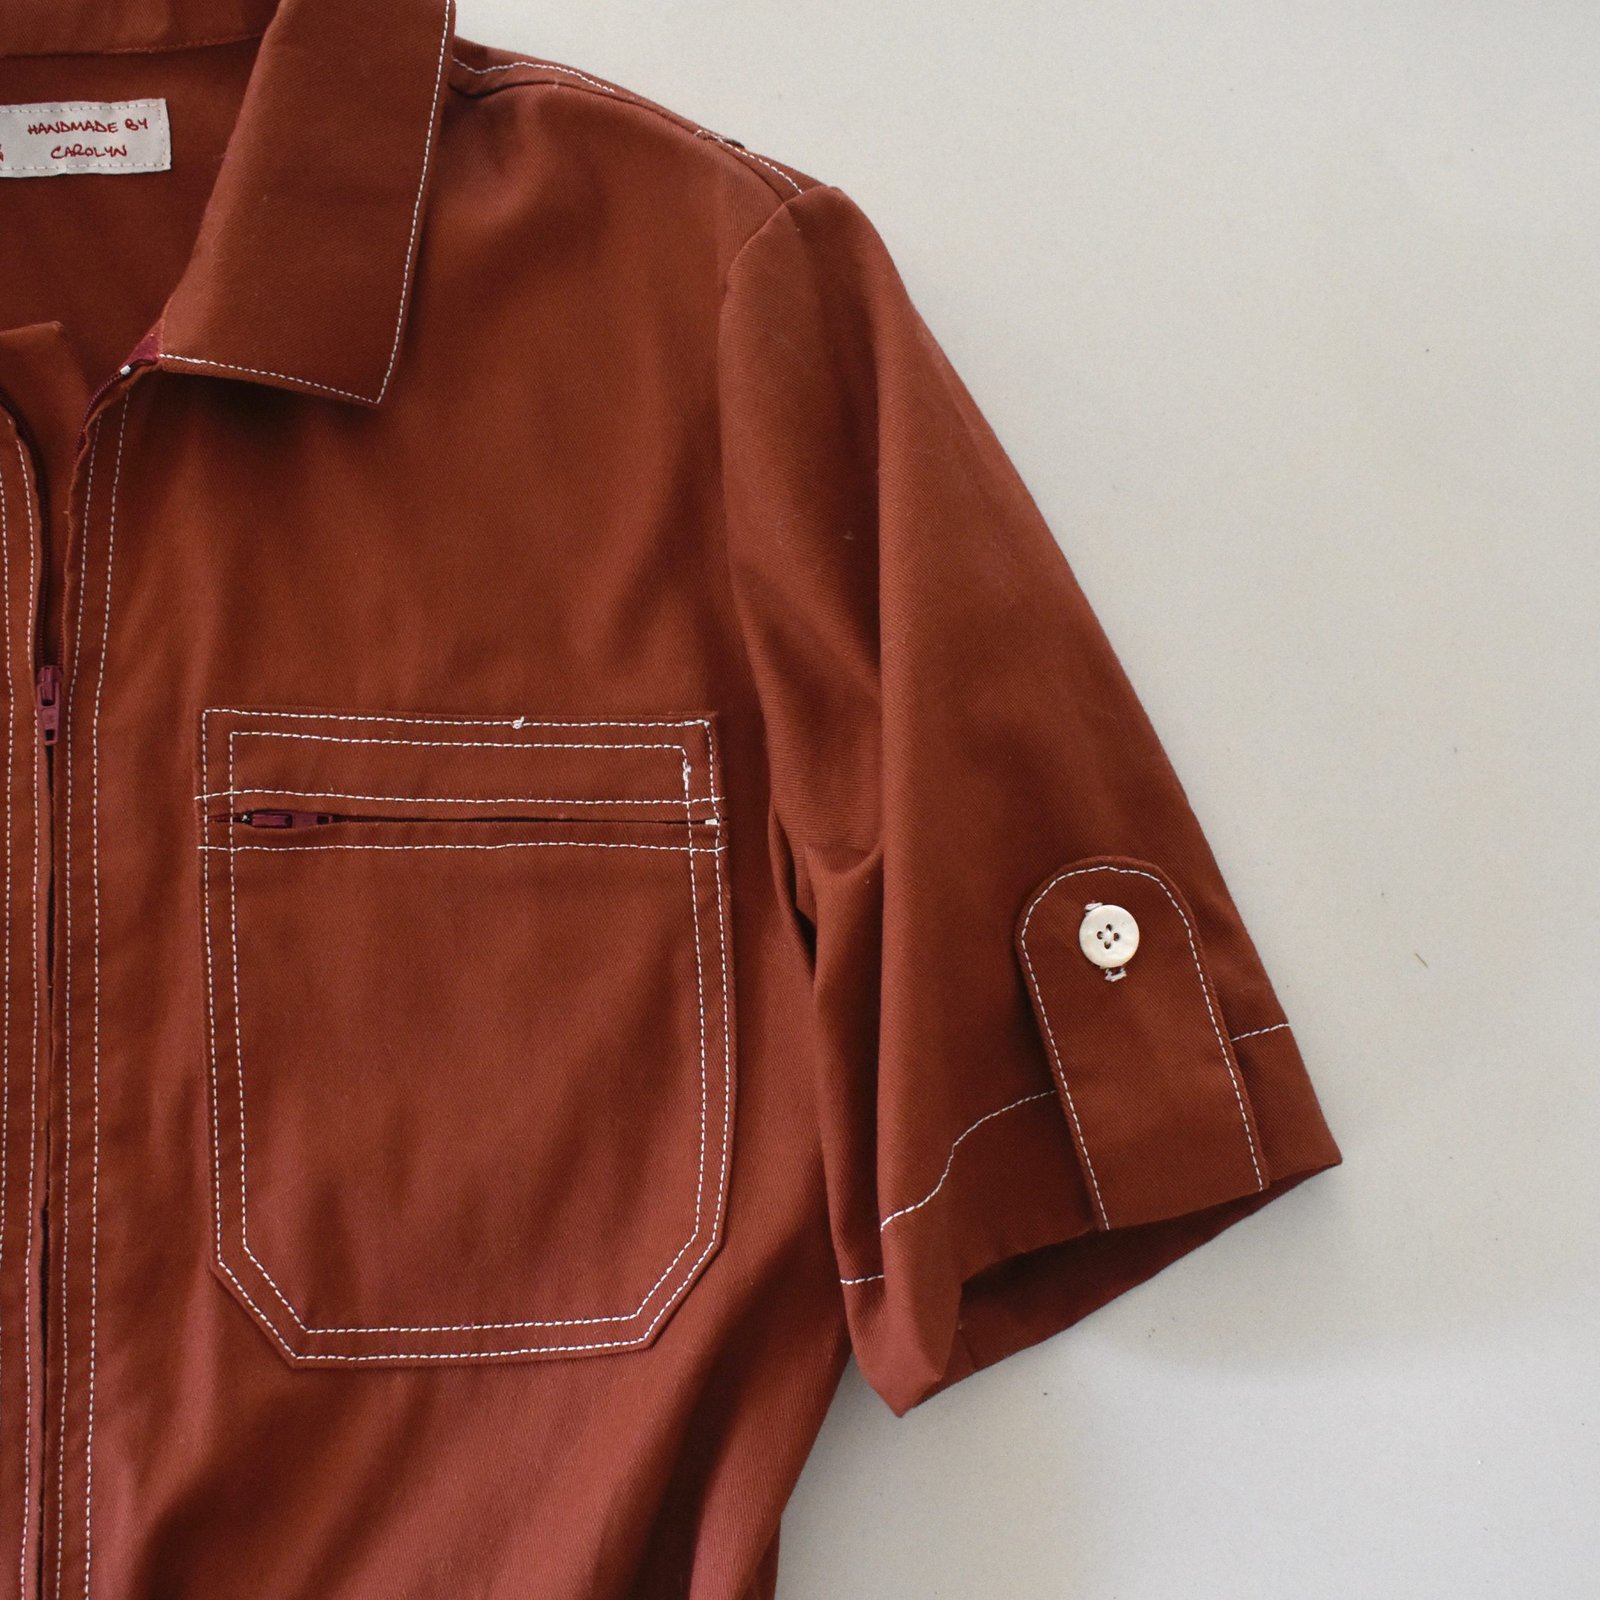
I really loved the industrial-chic vibe of the Closet Core patterns Blanca flight suit pattern as soon as it came out… loved the zippered breast pockets, the front opening zip, the front hip pockets, the er.. bottom? pockets; sorry have momentarily forgotten the technical term for those things.  Anyway…  such a plethora of fabulous topstitching possibilities!  I actually love top-stitching, it’s one of those calming zen activities that pleases my inner love for well-ordered neatness…  and just the pure and simple visual joy of looking at that evenly dotty line marching its way across cloth.  *happy sigh*

I think though, that I’ve long come to terms with the fact that I want only a limited number of trousers/pants in my wardrobe.  I have some nice ones that I enjoy wearing but the thing is that I really really love dresses and skirts the most.  And jumpsuits, I’m even more happy to have none!  But of course, how easy is it to make the Blanca pattern as a dress?  Super easy!  I didn’t take any pictures, but you just simply cut the pants pieces in a skirt shape instead.  I think I added a squidge more width to the hip area too… just in case, with a view to removing it if I needed to.  I didnt  #pearfromwayback

I also added a walking vent to the skirt back in the centre seam… It’s not really necessary for walking, I put it in mostly for visual purposes because I thought the back skirt would look a tad bland without something there.  I’m really glad I did think of it, because I think it does add a touch of interest.

Want to see something funny/annoying?  I originally cut the vent to a certain length which I thought would look visually nice.  Then I hemmed the skirt and of course the vent became too short!  So I had to carefully unpick it, and splice in a little wedge of fabric neatly to fill the gap, and redo it.  Was this easy?  NO!  Ha!  I think it looks neat enough, and since it’s hidden inside the vent away from view you can’t really see it at all.  I’m pretty happy with how almost-invisible it turned out though, even if you’re looking!

Note to self though; if you’re putting in a walking vent ad hoc, cut it way way too long to start with.  You can always cut the top down if it’s too long, and if it’s not?  This simple precaution will save you a heck of a struggle later on.

Those tabs are supposed to be down near the trouser hems in the original pattern, I put mine on the sleeves instead.  The buttons are pretty marbled ones from my stash.  Oh, fabric… I bought this rusty coloured cotton twill from Spotlight stores, fun fact: this is actually the very last piece of fabric I bought before lockdown commenced.  I bought the wine coloured zips at the same time, and I already had the ivory topstitching thread in my stash.

Look at this perfect belt buckle!!  I bought this from Closet Core patterns too… it’s the absolute perfect finishing touch.  I had to wait a whole month for it to show up, but I’m so thrilled with it!

I had a small scrap of striped linen, leftover from this Perth top I made for my sister-in-law S, which I managed to cut the lining for the front pockets.  I love this little Beetlejuice touch peeping out!

Back belt loops, back pockets.  Any excuse to indulge in a bit more top-stitching…

Who says you can’t fly in a dress?  Up up and away!!

pinterestmail

heaven…

Heaven by name, heavenly by nature?  Well, I think it’s a pretty nice dress, at least!

🍓
this is the new Heaven dress pattern by @fibremood; an unusual design with a chic, wide trapezoidal neckline and an interesting combined sleeve/yoke arrangement that I’ve only ever seen in a few Japanese patterns before now.

I’ve learned to overlook the awfully unflatteringly “puffy” line drawings featured in all the fibre mood patterns, because the finished products are invariably not at all like that! anyway I was quite intrigued by the lines of this design…  initially, while perusing the promotional photos… see below! I did worry that the sleeve/bodice corner junction at the neckline looked like it might be a little on the tight side… however when you’re wearing it, it’s more like nicely “firm” rather than tight and I think that structure is necessary to keep the neckline in place and also from gaping open.  The dress is actually very comfortable and I really enjoyed wearing it!  I even got down on the floor and had a play with Arthur in it, and was perfectly fine!

🍓 I also feel like it turned out to be pretty cute too  🙂  I bought the lovely cotton/linen mix fabric from the upholstery section in @spotlightstores … I just fell in love with the gorgeous deeply, dusky-raspberry pink colour and HAD to have it!

🍓This dress really was a fun thing to make, very quick and easy… I like the way the elegant and unique sleeves are set off against a sleek, just slightly fitted body section.  I like the sleeves pushed up, but they do look very elegant let down to the wrists as well, I think.

sleeves down

🍓 closure is by invisible zip in the L side seam.

🍓I didn’t line it but to be honest I think it would be better lined, particularly for an “autumn” dress, which it is definitely designed to be. I might even have a go and add a lining somehow, when I get a bit more time… I will update here when I do!

another bonus; all that ugly overlocking will be covered up if I line it!

It has to be lined, a petticoat will not do.  I did try it with a few of my petticoats and they all show at that wide wide neckline.  Yes, my bra strap shows at the neckline in a few of the pictures here, which I know is such a no-no.  However I felt a bit better about this when I noticed that even the model’s bra strap shows too.  I’m in good company!

🍓 btw, I did NOT shorten mine, this the length of the pattern.  I honestly think they must have added length to the above one modelled for the magazine!  Actually, I prefer it as that little bit shorter than knee length… it feels more like an autumn-al length, if that makes sense.

Details:

Dress; the FibreMood Heaven pattern, upholstery linen mix from Spotlight
Shoes; asics, from the Foot Locker

pinterestmail
Switch to mobile version
↓