Tag Archives: Daily Outfit

Inside Out

Today is Fashion Revolution Day; where we are supposed to reflect upon the question; who made my clothes?  And yes, I am wearing everything inside out too even though I have no labels.
You can find out more about how to get involved here 

Details:
Dress and petticoat; Vogue 1160, brown chiffon and silk charmeuse, details here and petticoat here.  It was a little difficult to get the zip on the dress done up inside out!! so it’s only partway up  😉 but the evidence is covered up with my cardigan so that’s ok
Cardigan; Audrey in Unst, knitted by me from wool I bought in Paris (Renaissance dyeing 4 ply poll dorset), details here
Sandals; la soffitada Gilde, from Zomp shoes

Now, on another note; I have been updating my daily outfit blog for the last year and a third and although I will continue to do so I have decided to make that blog private, for the time being at least.  There’s no sudden or dramatic reason for this decision, just call it a dawning self-awareness, if you like.  I guess I’m starting to feel a little self conscious about it, like publicising it is a bit silly.  And that maybe I prefer to maintain a higher standard for the material I am dumping out there, for public perusal, on the poor ol’ world wide web, since few my daily outfits are particularly exciting.
Except um, haha, *blush* I’ve just remembered that I’ve signed up for me-made May 2015! But I’ll be posting those on the Flickr group, just like everyone else  🙂
Thank you so very much to everyone who “liked” my posts  *mwah* and probably I’ll still do a 6-different ways post here periodically, to round up some of my favourites.  I’ll see how it goes  🙂

pinterestmail

fractal

I’ve made a weird patched dress using twelve old Tshirts of my boys’.  I know it’s bizarre and crazy and probably a little bit ugly but I totally love it!
I’m constantly pinning patchwork-y and randomly asymmetric things.  I’m actually very inspired by and crave to wear stuff like this A LOT in reality, even though I also make and wear a lot of plain things.  I think I have a very non-cohesive brain, wardrobe-wise.  It plods along all plain and quiet and unobtrusive for a while, “fitting in” with the norm *yawn* and then will suddenly have the urge to zoom off into arty, thrown-together-land.  Making something kinda weird and wild like this makes me feel quite exhilarated; sorta free and unconstrained and satisfied and happy.  I don’t think I act upon this often enough.  Clearly, I need a little more such craziness in my life!
Anyway, the new dress.  I was inspired by this dress credited to Jurgen Lehl.    
I used one of my oldies, Vogue 7795 with some adjustments; namely with the front bodice tucks and back bodice darts removed and the waterfall skirt drape transformed into an asymmetric box pleat.  Also I made the back bodice and back skirt as one piece each, with the CB seam removed from both.  In my memory this is a very drop waisted design, so I also shortened the bodice pieces by about 4cm.

I’ve made this pattern up a couple of times before; both many years ago, my first version in white swiss dotted voile is pictured here looking tres touristy with a gelato and at the Fontana di Trevi in Rome, and my second version was pink, although I can’t find any pictures of that one.

When you’re making a large scale, randomly patchworked design like this one, I’ve found it’s a good idea to draw out the adjusted pieces full scale and lay them out as a guide for the patchworking.  That way, you can see how the design is looking on the scale of the dress as the piecing progresses.

I selected twelve Tshirts, all old, some very old, cast-offs from my boys.  This is one of the things I love the most about it actually, in that I am so familiar with each and every one of these shirts, having watched my boys run around playing in them a zillion times, also of course I’ve washed them all, hung them on the line, folded them and tucked them away into their dressers about a zillion times each also.  
A sentimental dress then, in a way  🙂

There’s also one “new” fabric, harvested from a recent Absolute Fail… *sad face* IG’ed here.  
I cut all the fabric into varied width strips and then just got creative.  

In a super random design like this one it’s good to install some order to the thing somewhere, and in this case I stuck to the same order in the colour arrangement.   I finished the neckline and armscyes as simply as possible with strips of black Tshirt, stitched on right sides together, then folded to the inside and topstitched.

So, my dress is fulfilling several intentions; firstly to satisfy that creative urge, and my desire for a bit more crazy in my life as outlined above.  Tick!
Secondly, I made it as a kind of a muslin for another project that I’m planning right now.  Then I had the patching idea, was distracted and got  a bit carried away.  I may or may not go ahead with that original plan, but I’m very happy with this particular result! I’m pleased to say  🙂

And lastly, I recently received an email from Charlotte regarding the sew solidarity challenge run by the charity TRAID.  Essentially it’s this: to commemorate the Rana Plaza garment factory collapse you select an old, not new! mass-produced garment, possibly from Bangladesh although I didn’t restrict my options country-of-origin-wise, re-fashion it fit for a new life and then you’re supposed to wear it on 24th April.  Last year I joined in the same-aimed Fashion Revolution movement by wearing my self-made clothes inside out.  Theoretically this year I could do either of these commemorative activities… option 1, wear this dress as per the Sew Solidarity challenge; option 2, like last year wear something else I’ve made inside out as per the Fashion revolution challenge; OR option 3, combine the two challenges and wear this dress inside out.  The only problem with option 3 is that I’m pretty sure my insides might be kinda too ugly for me to get away with this in my very conservative suburb!  The insides are a gridlock of overlocked seams, and because I used some fabric pieces wrong side out, the prints are then on the inside of the dress; so it’s a bit of an unholy mess in there.  But I guess the option is there, should I choose to look irredeemably ridiculous.

Details:
Dress; modified Vogue 7795, made from old Tshirts
Shoes; Zomp, from Zomp shoe boutique

pinterestmail

two sea change tops and a little blue skirt

I absolutely adored the new Lily Sage & Co Sea Change top when Debbie debuted it on instagram and rushed with unseemly haste to sign up when she called for testers.  My love has not diminished upon making up a few either.

The top can be made in either a stretch or a woven, and I elected to make up one in each.
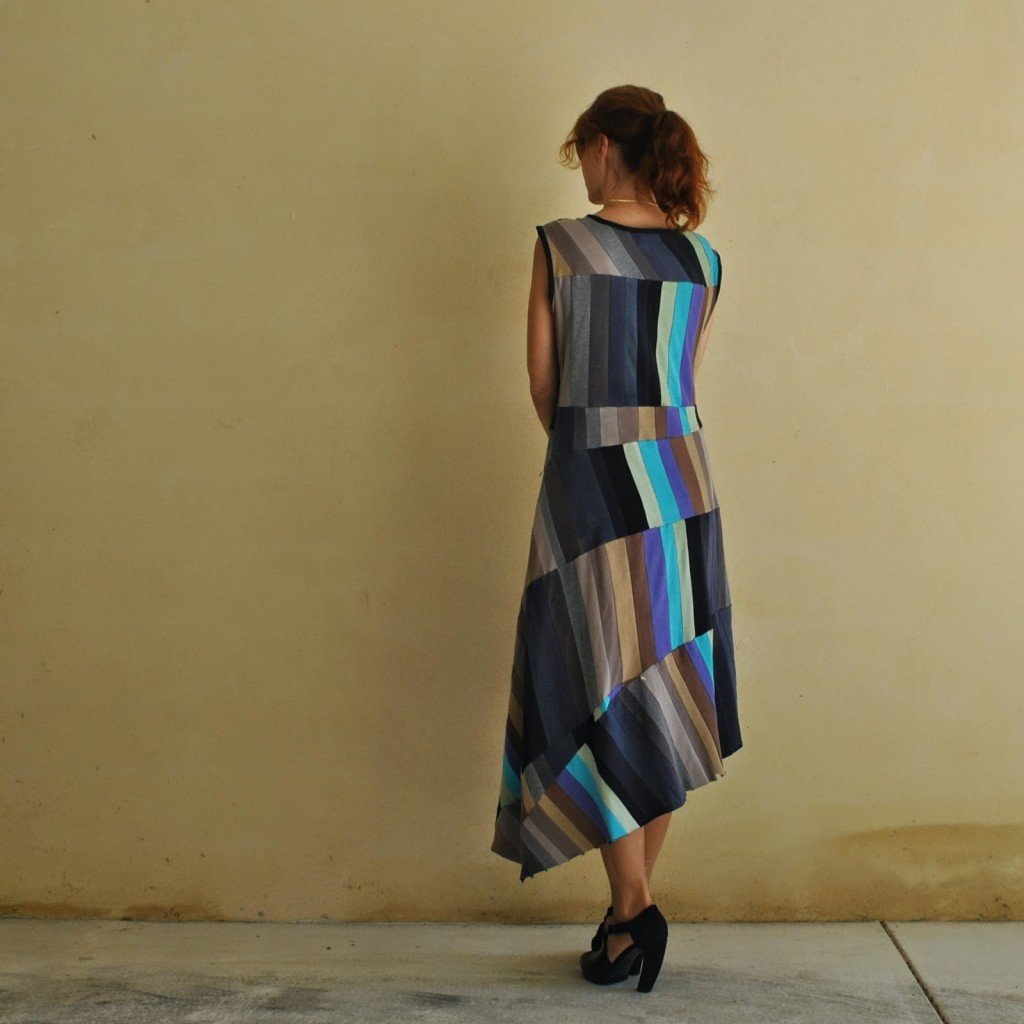
Exhibit A is in a deep blue stretch panne velvet, from the leftovers from Sam’s Magicka robe here.  Basically, it’s a big, roomy, cropped, oversized velvet Tshirt.  Ha! I know that sounds weird and like the kind of thing that has potential to be hideous, but I think it turned out absolutely not.  I love it, unequivocally.

The Sea Change is a gorgeous design; modern and stylish, comfortably roomy, chicly oversized and tres elegant.  It is also a super easy, quick and simple project; a “can be started the night before to wear the next day”, kind of a project.  My measurements fell on the upper side of Small, lower side of Medium, so I elected to go Medium.  This feels fine, but the top is quite unfitted and intentionally roomy so I would have been equally comfortable in the Small too, I think.

So, that’s top numero uno.
And theeeeeeeen…
Having done a little cleanout recently I realised that I had very few skirts that matched my lovely new top… the horror!  I raced to rectify this terrible situation.
I unearthed from le stash a few smallish pieces of bright blue cotton corduroy, the leftovers from my dyed blue ray dress here.  I had just exactly enough to eke out the pieces of Vogue 1247… o joy!  It’s bordering on embarrassing how many of these skirts I have made by now.  It’s such a fantabulous little pattern; a. on its own merits, nothing else considered; and also b. for using up a pile of awkwardly too-big-to-throw-away leftover scraps, and also c. it’s hard to have too many of these classic little A-line skirts in winter.

The brightness of the blue is borderline OK/not-OK for me.  I’m humming and haa-ing about it a bit.  I’ve been entertaining very tempting thoughts of dyeing it a deeper darker dirtier blue; a colour which I think will blend in a lot better with my current colours hanging in the wardrobe.  But for now I’m just going to live with it for a while and see how it goes…
I bound the inner seam allowances of the skirt with some pretty pink and white polycotton gingham, itself the leftovers from a lemon-butter bottling project, and also used for this nightie.  I have now used up every.  Single.  Last.  Weeny.  Scrap, of this stuff.  Hurrah!
The only thing I had to buy new for this entire outfit was the invisible zip for the skirt… and then this is a whole new outfit ALL from leftovers! So it feels kinda free, in a way.  Double hurrah!

But wait, there’s more…
Exhibit B.

My second Sea Change top is made from a very lightweight and drapey crepe from Fabulous Fabrics.  All new fabric for this baby!  It is a rather divine and heavenly pale pink in colour, and sheer enough that I decided to underline totally in a slightly deeper pink, poly chiffon.  By “underline” I actually sewed all shoulder and side seams, the sewed the two different tops together around the neckline, right sides together, turned the chiffon top to the inside and under stitched and top stitched around the neckline… then, from then on, treated the two layers as one.  So, that’s not really the same as underlining, but I have no other, more accurate word for that process.  All seams are concealed away within the layers of the top and bands.

I embroidered a tiny “x” to mark the back…

The armbands are the same stuff, in a garish lime-y greeny yellow that I was drawn to immediately.  While I was petting it another lady in the store remarked, “that is your colour!”
*cue immediate purchase*
I bought enough for a matching skirt too.  I’m rather excited about the skirt; which I have to confess is already made, finished and hanging in the wardrobe but not yet worn or documented, whoops!! anyway I’m excited about wearing it because I think it will go very nicely with both of these tops, and a whole lot of my current existing tops too.  In fact, I’m quite looking forward to mixing and matching all these things in with my new and existing winter wardrobe.


Details:
Tops; the Sea Change top by Lily Sage & Co, (1) dark blue stretch velvet, and  (2) pink and green poly crepe lined with pink chiffon
Skirts; Vogue 1247 lengthened, (1) blue cotton corduroy, and (2) yellow cotton corduroy, details here and my review of this pattern here

Update: it’s been great, but nearly two years of use later and I got a bit bored with the vivid bright blue-ness of that little blue skirt, so I’ve over dyed it with some brown dye.  Now it’s a lovely deep navy/teal colour.  Like having a new skirt!
Wearing it with my paprika Nettie bodysuit and my suedette MN Dove blouse that’s a pretty good colour match, yay!

SaveSave

pinterestmail

jumper of triangles

I’ve knitted a jumper  🙂
I’ve knitted jumpers before but this one felt different because I didn’t feel like I was knitting an actual real entire jumper, a process that can sometimes feel a bit never-ending while you’re so engaged… this rather unusual and innovative design is essentially a patchwork comprised entirely of plain and identical triangles.   So all you’re doing is knitting is a whole bunch of very quick and simple triangles, separately, one by one… you knit a triangle, toss it on the pile, knit another, whenever.  The triangle itself is a super quick n’ easy pattern that you’ve memorised after the first couple.  Making it a fairly mindless and terrifically painless project.  Once you have enough you stitch them together into a jumper shape.  So really it’s like, the jumper to knit when you don’t want to knit a jumper!
I bought the pattern pamphlet from Spotlight, thinking about the awkward quantity of fiddly diddly leftovers in my collection that were not enough to do anything with on their own but that were too much to throw away.  Mission: Use Up Leftovers; and I think I’ve accomplished that quite successfully, ahem *smug self back pat*  I used several different shades of grey, chocolate, beige, black, navy blue, mustard, natural and white; various Patons 8 ply and Rowan tweeds and several others too, basically a small collection of disparate leftovers I’ve held on to for forever.  I also had to buy some new, don’t you always?! I bought some of the recommended Cleckheaton Country Naturals 8 ply from Spotlight.   Which is where I bought the pattern pamphlet too 🙂
The pattern can quite easily look like a, er, regular jumper too if you aren’t keen on the multi-coloured harlequin look; you can always just use one colour for all your triangles.  In the pamphlet there’s also pictured another, rather chic and stylish version made up in deep flecked charcoal which looks quite classic and mainstream and normal, and not patchwork-y at all! 
But, as an interesting way to make good use of little bits and bobs I reckon this is a pretty good design idea, and is a nice and easy project for beginners too  🙂
Details:
Jumper; knitted by me from various 8ply yarns, a Nikki Gabriel design for Cleckheaton
Shorts; Burda 7723, made from an old charcoal gabardine skirt, details here
pinterestmail

top; wonky apricot stripes

So, I bought this piece of very nice, thin, cotton jersey from the Fabric Store in Melbourne, during Mum, Cassie’s and my trip there late last year.  It is elegantly drapey, feels deliciously soft, and the ivory, pale yellow and apricot stripes went perfectly with my apricot skirt fabric.  I bought them together, planning a nice little skirt/top set.  Which of course explains why I am not wearing them together right now! ha! the logic, I lack it; clearly.
Anywayz, I chose and bought the fabric, washed it, pegged it up and only then! noticed a horrific thing, the stripes were printed on the fabric terrifically off-grain, which in itself would not be too much of a disaster except that it had been cut in the store for me as though the stripes were on-grain.  I had only planned a little top, so had only asked for a little piece.  So I had this rather smallish and off rhombus with which to somehow wrangle a top.  Great.
So although my plan was for something very simple, it didn’t seem like it was going to be simple at all.  I agonised and pondered for a bit.  Finally I was just like, oh to heck with it! I’ve got to just make something.  Anything!  

I decided to embrace the wonkiness, and make a wonky, off, little top from out of my wonky, off, little piece of fabric.   This is Burda 04-2014 111, and is the second version of this pattern that I have made; my first version is here.  
Because I am rather obsessive about corralling at least some sense of order to my wonkiness, I cut my top on-grain and very carefully measured, cut and sewed my body piece so that the stripes matched up as perfectly as I could get them at the one side seam.  So the stripes have become one stripe, rotating around and gently down my body like that on a barber shop pole, and because of the twist of the top are slightly more horizontal on the back.  

the side seam

The inner seams are finished with the overlocker, but I didn’t want any overlocking “on show”.  So I flat-felled the seam in the cowl part of the neckline, so it looks nice and neat if you happen to catch sight of the inside.  In this design, a very probable occurrence.  The shoulder seams are also flat-felled for strength.

I left the raw edges of cowl and sleeves raw, because the jersey is very stable and does’t really need finishing. The edge naturally curls up quite nicely and I like how this looks  🙂

To get as much length to the top as I could I added a wedge of fabric onto part of the bottom edge.  The lower edge is simply overlocked, turned under once and stitched using a twin needle.  One thread is white, the other ivory, but I’m just fine with that.  Didn’t want to wind another bobbin for just one little hemline.  For what should have been a nothing-much top, I reckoned I’d expended enough thought on this thing already!

 Details:
Top; Burdastyle magazine 04/2014, 111, jersey stripe
Skirt; Vogue 1247 lined, ivory curtaining fabric, details here and my review of this pattern here
Sandals; 2 baia vista, from Zomp shoe boutique

stripe ever-so-slightly more horizontal on the back
pinterestmail

watercolour silk dress

I’ve made a new dress  🙂
Every year, my friends give me a Fabulous Fabrics voucher for my birthday; aaaah! they know me so well…!  🙂
and last year I spent it on this gorgeous, water-colour-y silk charmeuse.  And have made it into dress 35 from Patrones 7; this magazine was itself a gift to me from Merche Martinez from a few years ago.  This is the second time I have used this same dress pattern, my first version is here.
So, I have worn it a scant handful of times so far; for dinners during our recent holiday, and I’m wearing it today as well to show it off to my gorgeous gal-pals who gave the voucher to me… and I have to say I’m quite besotted with my dress already.  Honestly, bias cut silk, there’s just nothing quite so lovely to wear.  It’s a beautiful gift from you to your skin.  Seriously, my skin is thanking me every single second I spend in this dress.  It’s pure and utter heaven.  *dreamy sigh*    
To go the whole nine yards silk-wise, I fully lined the dress with creamy-coloured silk habutai.  Pinky-purple lining seemed at first to be a better colour match; but upon checking how the fabrics looked when layered together I found any colour just very subtly dulled those large white-ish feathery-floral areas, whereas a lighter creamier-coloured backing really enhanced the colours of the charmeuse and gave them a beautiful inner glow that I preferred.   Something to bear in mind when choosing a lining for lightweight, patterned fabrics; hold lining underneath the fashion fabric to check how it affects the colours before making a final decision.  Sometimes an unexpected colour choice will look better.

The dress lines are quite simple and feminine, with a slight a-line curve, small cap sleeves and I lengthened the neck-tie to extend right around the length of and beyond the v-neckline, so it is both a tie and also a sort of “collar” that finishes the neckline.  The skirt is cut flatteringly on the bias and I gave careful thought to the colour placement over the body.  I wanted the darker, moodier colours to feature mostly and aimed for the splashes of those big abstract feathery flowers to appear over one shoulder and to bloom down the side and hem of the dress, front to back.  ie. not on my tummy or right boom on the derriere.  The dress closes with a burgundy invisible zip in the left bodice side seam, and I hand-rolled a narrow hem on the sleeves and lower hemline.  All seams in both dress and lining are French seamed.

I altered the bodice pattern piece substantially from my first version because ultimately I decided that that dress incorporated an excessive degree of blousiness for my particular shape, or lack thereof, ahem.  I pinned out about 3cm width from the lower edge and curved the lower edge up as marked in red, cutting out up to 5cm in height at CF, this removed a tonne of blousiness and so is only about a thousand times more flattering on me, rough estimate there.  In lieu of lightly gathering the bodice evenly along most of its width into the skirt, instead I folded the width into four little folds, evenly distributed just out from either side of CF, treating the lining as underlining and folding them together.  These folds can be seen more clearly from the inside of the dress.

I also added about 4cm in length to the skirt at the lower edge.  I’m slightly doubtful about this added length, I don’t hate it but also am not bowled over with love for the length right now either.  I may just live with it for a while but that extra 4cm may or may not just get lopped off at some point.  I’ll just have to see how I go; weighing up the pros, such as would it look more chic if it was a bit shorter? against the cons; the main one being that I would have to re-do that hand-rolled hem.  Hmmm…

Now, on another note: anyone who follows me on IG would know already about our recent, most utterly paradisiacal holiday ever!  yep, I took my pictures on the beach during our holiday in the Maldives.  And I thought I would show one example of my set-up for taking my own pictures when away, an activity at which I now consider myself an expert!  I’m a big fan of packing as light as possible and saving myself any packing and carrying around bulky camera equipment.  Just cannot be bothered with all that.  Yeah, lazy, I know 🙂 
When travelling, I just take my small travel camera and nothing else.  And I look out for and take full advantage of any flat surface that I may come across, although if nothing presents itself I can at a pinch just sit the camera on its own little soft case.  This is not completely ideal, but it’s doable if no other handy flat surface is around.   Good flat surfaces include, but are not limited to: park benches, curbs, low walls, a level spot on a rise in a path.  Rocks sometimes too, though rocks can be tricky and it’s imperative to check carefully that the camera is sitting perfectly stable and isn’t going to topple over and smash.  
In the case of our last holiday, our cabin was on the beach and I used a flat-bottomed cup from our room.  My camera sat up, safe and clean, up off the sand as pictured.

Anyway, whatever flat surface is at hand; I just set the timer function on my camera, pop the camera up on said flat surface, push the button and then race out in front.  Voila.  Does the job, and requires no big bulky camera equipment.  Win!

Details:
Dress; Patrones 35-7 modified slightly, silk charmeuse
Location: Valessaru, the Maldives

pinterestmail

dress of plastic splattered linen

I’ve made a summery little dress for myself.
This is dress F from the Japanese pattern book Stylish Dress Book, by Yoshiko Tsukiori.   I’ve made this pattern up once before here, and that polka dot dress is still in my wardrobe and remains one of my perennial favourites.  I don’t know if this new one is going to topple its big sister from my favourites list, but anyway, it’ll still be a goodie and bound to get worn a lot in this long, loooong, very hot summer we’re having!
I made a couple of teeny changes, adding inseam side pockets and also leaving off the sleeve ties.  Instead the sleeve opening has a button sewn on to close.  Still looks quite cute and meant I didn’t have to try to sew and turn out those skinny-binny sleeve ties in this lovely but rather challenging fabric.
I know… it doesn’t look particularly challenging in my pictures; it appears from a distance to be a quite ordinary duck-egg blue, handkerchief linen.  Only closer inspection reveals random dots of what appears to be clear plastic, splattered all over it.  This has the happy side effect that in the sunlight it appears to sparkle like diamonds, *squeals, oooh pretty!* and the less than happy side effect that it was quite difficult to actually sew the splatters and they don’t fold well at all; also it, how shall I say this? presents an Ironing Challenge, to say the very least.

 See, obviously linen requires the hottest setting on your iron but the plastic splatters turn into soft and sticky, glue-y spots that stick to your iron and everything else when they’re subjected to heat.  I’ve pondered it for four years; four! since I bought this lovely stuff from the Fabric Store in Melbourne! wondering what I could make with it that would do it justice, finally hit upon this.  Also, reflected all over again upon how super silly it is to leave lovely fabric languishing in le stash when I bought it for the fun of making it up and wearing it, what the heck.
Happily, I think it did work out!  🙂

sleeves finished with buttons in lieu of the ties; and pockets
I finished the neckline with a bias-cut strip, but it was nearly impossible to attain neat looking top stitching over the splatters! so I ended up unpicking all attempts and just hand-stitched it down with invisible fell stitches along both fronts.  I kept the double row of machine stitching on the back neckline, where it miraculously turned out kinda neat-looking.

During construction I pressed either using my ironing cloth or on the wrong side of the fabric, and had to peel it off the cloth or the ironing board each time! and wondered if the splatter dot situation, while a cool concept and I visually I loved it! was in practice going to be a massive pain to iron.
Well I’ve washed and ironed it once now and fortunately I don’t think the dots are going to be a problem.  I ironed the dress inside out and even though it does stick together it’s no biggie to just peel the layers apart while turning it right side out again.  And the plastic does cool and dry hard again pretty quickly. Thank goodness.

The hem line has a tuck around the bottom.  This is actually a crafty fix of a cutting booboo.  You see, when I made my first dress F I had screenprinted my own fabric and I forgot to note that I had actually lengthened the pattern pieces to fit my print.  Actually I find it good practice to add by default like, at least 10cm in length to any dress from a Japanese pattern book.  Anyway, this time I carefreely cut out the pattern as is… result; scandalously short dress.  Darnit.
Fortunately I had enough fabric to cut extra lengthening bits and sewed them on to the bottom, hiding the joining seam up inside this tuck.  You can’t see the join on the inside because I turned up the hem long enough to enclose everything.  The hem is hand-stitched using invisible fell-stitching, and I caught the upper fold of the tuck in the same stitching to secure all the layers together.
Problem solved!
In fact, I have to say that this is a very simple dress which belies its unexpected difficulty-factors! but I am so pleased that it all came together quite happily and satisfactorily in the end.  🙂

Details:
Dress; dress F from the Stylish Dress book, by Yoshiko Tsukiori, plastic splattered linen
Hat; Vogue 8844, ivory corduroy, details and my review of this pattern here

pinterestmail

red gingham

… new dress!
I feel like I’ve been wearing the same little summer dresses over and over and over.  Not that there’s anything wrong with that! because I like them all   🙂  but a few of my standbys are getting on their last legs and the wardrobe needed new blood.  And there’s still a lot of summer to go.
I’ve been eyeing off dress E from the Stylish Dress book by Yoshiko Tsukiori ever since I got the book, in fact it was my Sew Bossy dress of choice for Reana Louise!  I loved hers and alway wanted to make one for myself too… one day.  The book is chokka with patterns for cute and practical little summer dresses that are absolutely perfect for our hot Australian summers, and this pattern is yet another goodie although I ended up making quite a few little changes.  Some due to my fabric;  a red/cream cotton gingham with a very slightly crinkly, seersucker-y texture, from Spotlight.
The front of dress F has five box pleats in the bodice and I was determined for the gingham pattern to match perfectly on the front.
Please excuse and/or feel free to skip the following; where I boast obnoxiously about my perfect pattern matching.  Yes, there are five box pleats up there *insert smug self back-patting*

There’s only one way to pattern match to that degree, and that’s to pin the flippin’ heck out of it.  I pinned at each and every check intersection, basted each pleat and inspected for flaws obsessively before the final sew.  I’m pretty pleased, even to my eyes I can’t see the joins at all.  And I’m pretty fussy  😛

Matching the pleats into the gingham weave like that necessitated cutting the front piece to a different width from the pattern piece.
It’s not hard to work out how to do this, the only criteria is that the front fits onto the front facing piece once pleated.  A little quality time with the tape measure and some mental calculations to exercise the ol’ brain cells a bit.  Each box pleat is 6 checks wide, with 4 checks in between each one and it turned out that the overall width of my front piece is slightly narrower than the pattern piece.

Other changes:  gathering looked terrible in this bouncily textured fabric, so I cut the back skirt straight, eliminating gathering into the bodice.  The sides were slimmed down considerably, tapering out to 10cm off each side at the hem, I added in-seam side pockets instead of patch pockets.  I did put the little cap sleeves in to start with but they just felt a bit too “busy” in gingham, so I unpicked them off and finished the armholes with a bias-cut strip inside instead.  The pattern is quite short so I lengthened my dress by 10cm, with a little tuck at the original hemline, just for fun  🙂

So yeah, I have nothing much more to say!
I’ve made a cool and breezy, simple and uncomplicated little summer dress.  I love it already  🙂

this one made me laugh… hmm; terrific maternity dress! 

Oh, and Gabrielle and I are twinsies today!  I had nearly finished this dress and was amazed when Gabrielle posted a picture of her red gingham dress on instagram!  great minds thinking alike, of course  🙂  check out Gabrielle’s gorgeous gingham dress here

Dress; dress E from the Stylish Dress book by Yoshiki Tsukiori, red cotton gingham
Thongs; Havaianas

pinterestmail
Switch to mobile version
↓