Tag Archives: Pattern Review

Caramel suede cardigan/jacket

o hello  🙂
I’ve made a suede cardigan for myself, or is it a jacket?  The pattern says “jacket” but I tend to think of jackets as being kinda involved, time-consuming things to make, with lining and so forth.  While cardigans are unstructured, unlined things one can whizz up in a blink of an eye.  Which actually describes this thing pretty well.
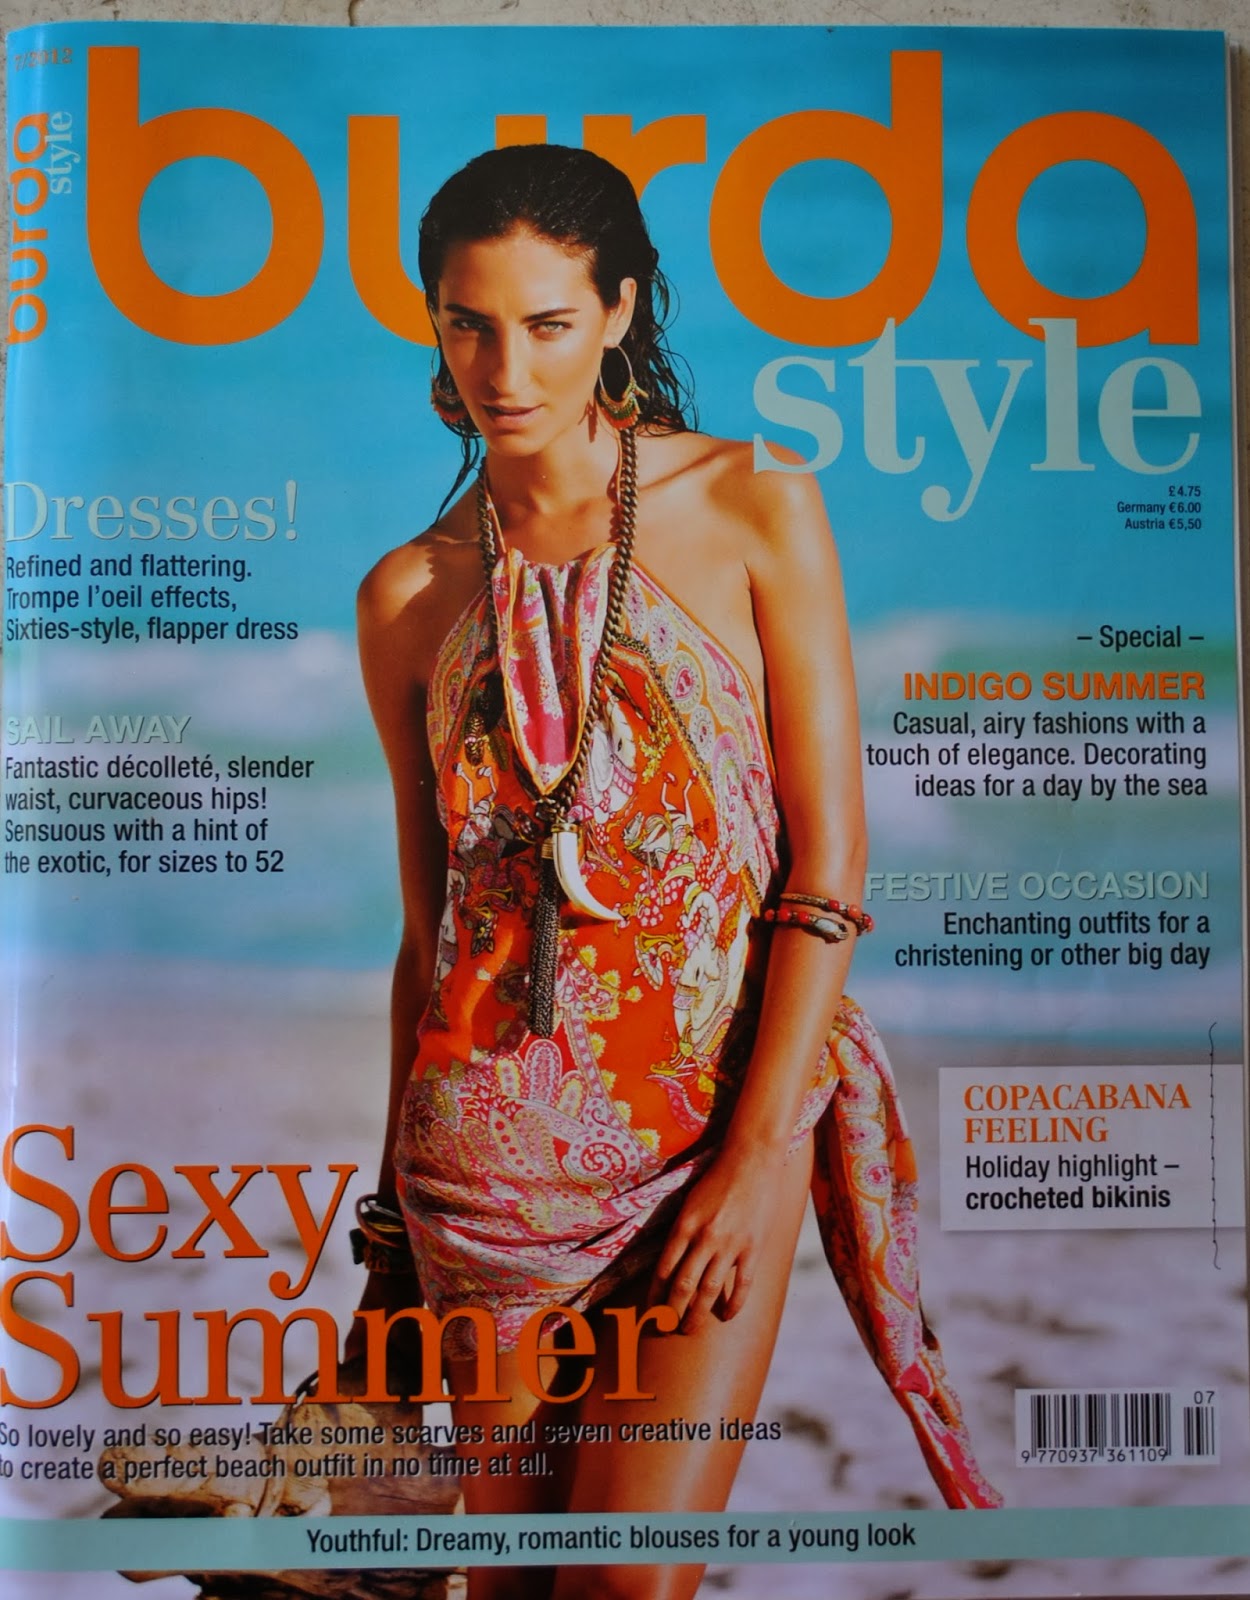
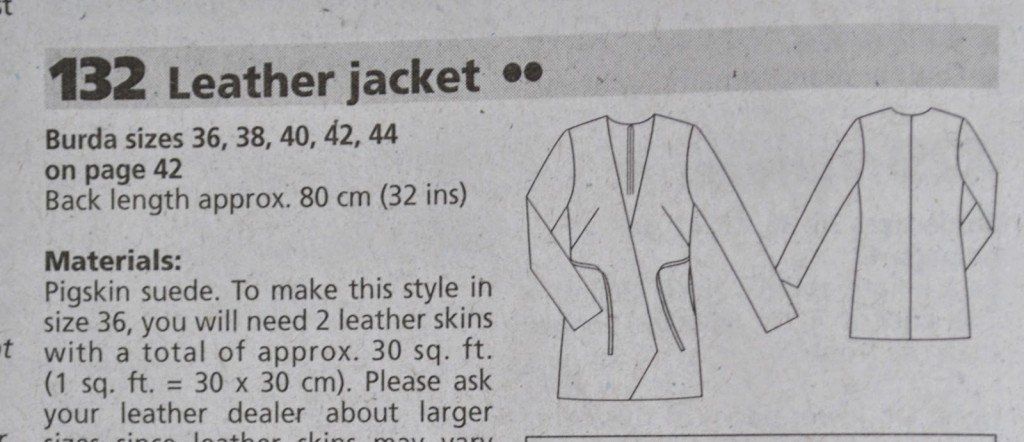
The pattern is jacket 132 from Burda style magazine 11/2012, which Philippa sent to me in a giveaway, thank you so much Philippa!  I lurve Burda magazines, the designs are usually both interesting and stylish, the cost per pattern is very very low, and still not bad even if you do only make a few things in an issue.  I reckon they deserve to be a heckuvva lot more popular than they are.  You don’t need every issue but I generally get maybe one magazine in a year and manage to make several things in each one.  This design caught my eye straight away, and was firmly in my mind when I bought my leather.  I actually made a muslin for it, which is only worth mentioning because it’s such a rare thing for me to do.  Well my leather was kinda precious and I did not want to stuff it up!  I did a minor sway back adjustment and shortened the bust darts by a few inches.
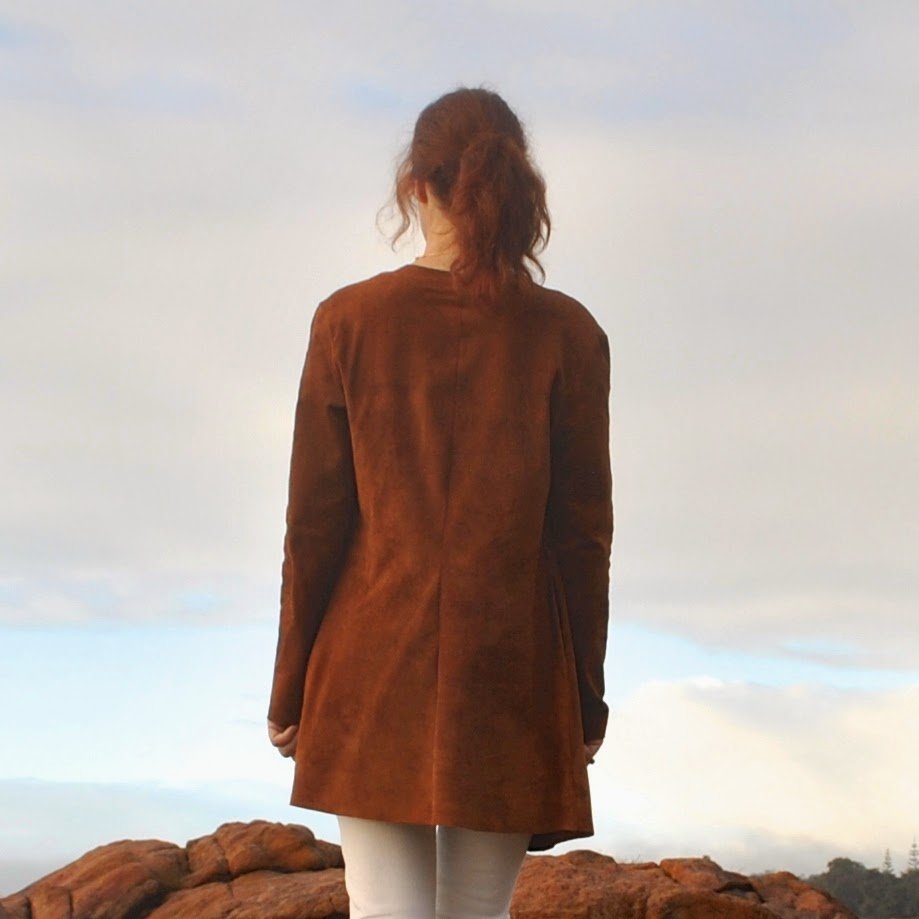
I used my two pieces of caramel brown pigskin, bought in Copenhagen on our trip.  I liked both sides; the smoother, leather-y side has some interesting brand marks, but the suede side has the most glorious, rich caramel colour.  Colour trumped brand marks.

The cardigan is quite long in the body with wide-ish front flaps so it took some layout wizardry to get the pattern pieces out!  I re-laid the pieces down over and over and over again, trying to fit them all in and cut it with the skinniest little 5mm seam allowances.  I did have to do just one little fill-in piecing on the left back back, but I managed to position this at the very top, centre back, so it’s as un-noticeable as I think it could possibly be!

The pattern has pockets; which I cut to be nice and huge, to accommodate my nice huge hands, hehe.  Burda magazine patterns have the teeniest tiniest child-sized pockets of all, I swear.  Very cute, but seriously?!  Maybe it’s just me; I like to plunge my hands right down deep into my pockets  🙂  I used chocolate brown silk charmeuse, which I fortuitously just happened to have in my stash already,  hanging around, in the perfect colour, you know, as you do  😉  Hopefully cutting those pockets out of it won’t mean I now don’t have enough for it to fulfil its original destiny.

below left; I have no idea why the colour is so off in this picture here, but… pocket! 

The pattern called for a waist tie, to be sewn in the side seams.  I preferred the idea of a separate belt that I could wear or not wear, whichever I wanted, however whim and whimsy struck, and not to have the ties dangling uselessly and annoyingly at my sides whenever I was wearing the cardigan loose.  So I put little belt loops in the side seams, seen at top left in the picture above, and made a very long skinny belt as a separate thing.  This has tonnes of mad bias-cut piecing  all along it, as I was dealing with mere scraps of leather by the time I had cut out the main pieces of the jacket.  But I don’t think that matters much, you can barely see all the joins when it’s on. This is simply folded in two lengthwise and topstitched.

I think worn loose, as at top, it looks quite modern, and with the waist tied up it looks a little bit boho 70’s, yes?

I am very happy with, and am very much going to enjoy wearing my Copenhagen souvenir!

Later edit: some technical details on sewing with leather, and thank you so much to Erica for asking  🙂
 This is the first leather thing I have made so I learned a few things… I used a denim needle and regular polyester all-purpose thread, and used paper clips to hold edges together in lieu of pins. Lots of experimenting to get the tension right, I ended up with a medium-loose tension and a long stitch. The leather didn’t move through my machine very easily, so I used strips of tissue paper while stitching the seams, which helped a lot. Fortunately, this jacket had few seams! I used tissue paper both top and bottom, and did this by folding a wide, single strip and wrapping it closely around the edges before clipping it all together with paper clips, then sewed the seam; which was easier to hold in place than I imagine two separate strips would be, and also made it easier to follow an even seam allowance while stitching too.  
For short seams, like piecing the belt pieces together; I started stitching from halfway along and ended at the edge, then turned the piece over and stitched the other half of the seam from the same halfway point to the other edge, because my machine didn’t like “starting” on an edge, and behaved badly on these. If I was to do more sewing with leather I think it would probably be very well worth getting a teflon foot for my machine, which will enable the leather to glide through more smoothly.

 Details:
Cardigan; Burdastyle magazine 11/2012-132, caramel pigskin suede
Jeans, Burda 7863, white denim, details here and my review of this pattern here
Tshirt; self-drafted, white cotton jersey, details here
Socks; hand-knitted by me, details here
Shoes; Francesco Morichetti, from Zomp shoes

pinterestmail

Magicka robe

Have you heard of Magicka?
That’s OK, I hadn’t either until less than a week ago.  Now I consider myself an expert, at least on the attire. 
This weekend is Supanova weekend in Perth and Sam wanted a Magicka robe.  Fortunately he had done some research and found a very helpful little pattern so you can make one for yourself.  And it’s free! available here.

You might be wondering about the sausage on a stick.  Please know this is an integral motif in the game, and everyone knows about that bit.  Jeez.

I enjoyed making this!  It is actually a pretty good pattern and you end up with a rather excellent wizard’s robe I reckon.  The robe is a complete garment in itself under that hood, with an integrated chest plate piece that is joined inside the right front and snaps closed at the left shoulder seam: the hood does cover up the chest but the chest plate piece is a nice detail in that it does completely remove any slight risk that your undershirt might show.  

The hood is separate, and rather mega-bucks cool, non?!  I actually kinda love it.  When I saw the pattern piece I was like no way, but it sewed up to be perfectly draped and mysterious and magic-y looking.
It was designed and the instructions written by someone who does know what they are talking about, like the hood and sleeves are fully lined.  For some reason the sleeves are called “arms” in this pattern.  The instructions are aimed at the beginner.  I’m basing that assumption on directions like  “Hint! Fold the fabric in two, so you can cut two of each piece in one go!”
At the same time, my view is that some of the steps are not explained in full enough detail for a complete beginner, for example the instructions for inserting the contrasting edging strip in the hood opening would be a little confusing for a beginner, and some of the illustrations are in the wrong spot to go with the accompanying sewing directions.  Also, when drawing up your pattern pieces a few measurements are missing.  No biggie, you can still work it out, it’s not rocket science.  But just saying.
At first I thought it might be designed for a small person, like a kid, as a Halloween costume or something; and it might not fit my six foot two son.  So did a few quick measurements, and yes indeedy this is a wizarding robe designed to fit a full sized, and tall, adult man.  O-kaayy!
I used panne velvet, navy blue polyacetate for the hood and sleeve lining and gold satin for the edging, all fabrics from Spotlight.

Actually, the panne velvet was in absolutely shocking condition, the absolute worst I have ever seen for a brand new fabric.
After rolling out the first 2.5m we saw the fabric was sliced completely off from selvedge to selvedge, and had been joined together again with multiple little plastic joiner ties.   Yep I’m talking full price, untouched on the roll, straight from the factory, fabric here.  We’re not talking about a remnant.   I knew I could easily cut the big skirt pieces from that first bit so I told the girl I would still take that as part of my whole …. “are you sure?” she asked, clearly horrified, but I assured her it would be ok.  She continued rolling out and next thing we came across huge holes in the fabric.  Holes.  Like big holes, easily 2 inches across and boom! right in the middle.  The first one she said, oh, I’ll just give you that bit, but by the next one, she was looking doubtful again, and I was starting to think twice too. After the third hole popped up she just offered to give me the entire roll, for the price of 6m; the quantity I had asked for.  So far I’ve only just seen those three holes, spaced about a metre apart from each other.
I’m not dissing Spotlight here, after all they can’t check all their rolls of fabric and the staff at Spotlight are always very good about giving you extra and/or discounts when there are imperfections in the fabrics.  But damn! that fabric was in a bad way!
And I now have masses of ultramarine blue panne velvet.  Yay.  I have zero idea what I’m going to do with it.  Sheets?  haha.

pinterestmail

white linen Olive blouse

Hi peeps; new blouse!
Amity of Lolita patterns emailed me a few months ago asking if I would like to test their new blouse pattern, the Olive. Thank you so much Amity!  I lurve trying out new patterns!  I finished it a little while ago and have been sitting on it; awaiting the go ahead to Reveal.  And ta da!  Apparently I’m part of a “blog tour”.  This is a new thing for me.  No, I hadn’t heard of a blog tour before either.  It’s kinda exciting  🙂
The Olive blouse is a fitted blouse with a waistband, pleated peplum and elbow length sleeves.  It has two variations; view A has a draped chiffon overlay, vertically aligned flounce and a rolled chiffon flower on the front, also with or without a little gathered frill on the sleeves too.  View B is, literally, the no frills version.  Closure for both versions is by invisible zip in the side seam.

So, I did make view A, with the overlay and flounce.  Although I left off the flower and the sleeve frills. The sleeve cap is pleated into the arm scye with six teensy little pleats.  Tres cute, non?!

My measurements put me at a size 6, however a quick recce of the pattern pieces decided me to size up to an 8, and I am glad I did.  It is quite close-fitting.  Linen is a fairly unforgiving fabric with zero give to it however, so I reckon if I was using something like a stretch sateen then the given size would probably be fine.

OK, so that’s what my blouse used to look like!  It can be seen from the very top picture that it looks a little bit different now.  It’s been de-flounced.  Sadly I’ve realised I’m not a flounce kinduvva person.  I de-overlayed it too.  To replace the flounce I made shaped button- and buttonhole-bands for the left bodice seam.  This is fully functional and fully button-and-unbuttonable but since I still use the invisible zip to get it on and off the button band is effectively decorative.

I really like mine with the button band, sort of casual and therefore more suited to my fabric choice; a fine-grade white linen from Fabulous Fabrics, the same fabric I used for my patchwork Zsalya dress, with white buttons also from Fabulous Fabrics.  I think it’s still quite feminine looking with the sleeve length and the pleated peplum. but has a certain something else to it now, I don’t know what.  Dentist?  A rumpled one, after a long hard day at the drill.  Yes.  OK, I’m totally on board with that.  A little known fact is that I do actually have dentist blood running through my veins.
Anyway, whatever it is, I do think it turned out very “me”!
But I jest.  Seriously now the blouse is a classic style and so therefore quite versatile  and would work with lots of fabrics.  The jazzy style A in satin or silk would be a very pretty evening blouse and the plainer style B in sateen or crepe would make a very smart option for work.
Since I acknowledge that I do have about a zillion white shirts I am toying with the idea of dyeing it.  Or maybe not.  I’m dithering.

Details:
Blouse; modified Olive blouse by Lolita patterns, white linen
Skirt;skirt “m” from shape shape by Natsuno Hiraiwa, dusky pink linen/cotton, details here
Thongs; Havaianas

pinterestmail

White linen Zsalya dress with patchwork

Hello!  I’m wearing a new dress. The cool fingers of winter are tickling at the edges of our days so obviously I had to make a light and fluttery, floaty white linen thing for myself.  It was only logical  * 😀
Actually, the truth is that I made it a while ago now!  when we were still getting very hot weather and I have worn it several times already.  The pattern is the Zsalya from Kate & Rose patterns.  Kati emailed me to ask if I would like to test one of their lovely new range; thank you so much for the opportunity Kati!  It was so hard to choose just one!  The Zsalya is a dress or top pattern with two sleeve variations, and I made the dress with short sleeves.
I knew straight away I would love this design.  It has no closure, you just slip it on over your head and it is easy breezy, and as cool as.  In all senses of the word.  🙂
The sleeves are quite cute.  I like how they are tightly gathered in at the top which lends them a sweetly pert and boxy shape, and they have a pretty petal-shaped hemline.

The neckline is so clever.  I think it’s my favourite feature of the dress.  When I first looked at how open it was I considered putting in a little rouleau loop and button closure, but you know what? there is absolutely no need.  Gape-age just doesn’t happen, thanks to the clever design.  The crossover yoke is open so you can get your head through quite easily, but once the dress is on it all sits nicely flat and closed with a safe and demurely high neckline.  Clever!
I edged the neckline with a patchworked strip of bias cut cotton scraps; this was simply sandwiched between the yoke and yoke facing before stitching them together.

I made my dress in a handkerchief grade linen from Fabulous Fabrics, and the patchwork border is comprised of various scraps from previous projects.  I was inspired by this image. About once in a blue moon I actually find a need for those bitsy odds and sods of leftover cottons that are pretty much good for nothing, that I hoard like a crazy old fabric-obsessed miser.  This was one of those rare occasions.  Vindication!
The patchwork panel is backed with a white linen facing to stabilise it.

I added in-seam side pockets  🙂

Really, even though it looks blustery as all get-out in these pictures and it was, it was also quite insanely hot and muggy on the day I took them.  So a loose little linen number was actually just what the Fremantle doctor ordered!  I was getting bored with all my summer dresses so it was nice to have an excuse to make a new one.  Summer dresses are such fun, both to make and to wear.  And even this late in the season it’s always nice to have a fresh and new-ish summer dress waiting in the wings of the wardrobe over winter  🙂

* Mr Spock, of course

Details:
Dress; the Kate & Rose Zsalya dress, white linen with patchwork details
Thongs, Havaianas

pinterestmail

Nettie; by seven

The very clever Heather of Closet Case Files has released another pattern, this one is a must-have basic, the bodysuit, available here.  Named Nettie, after the totally gorgeous Nettie of Sown Brooklyn.
Of course, I say “must-have” and I didn’t actually have any.  But I’m rectifying that now since everyone knows that bodysuits are super useful and way superior to a tucked in tee when it comes to winter warmth.  So good to have that thermal layer underneath everything else.  I used to have a few bodysuits years ago which did hard duty all winter long but I don’t know if they’ve gone out of fashion favour? or what; because they are pretty darn hard to come by nowadays.  Even patterns for bodysuits are pretty few and far in-between.
Thank you so much Heather, for asking me to test the pattern, and for filling this gap in the sewing pattern world!  🙂

Hmmm, seven Netties… seems excessive for one person? well they’re not all for me.  Occasionally I make things for other people.  Occasionally  😉
The instructions stipulate to size up if you are tall or if you think your fabric is a little firm; and yes indeedy; this.  My first version was in a mystery black knit with just a medium stretch, bought in the Morrison remnant sale, and it turned out a little er, bottie-baring for me!   Fortunately I have a petite daughter who can absorb into her wardrobe everything that is too small for me.  🙂  And then I went up a size for me. 

The red, orange, green, pale taupe and white coloured Netties are all in a super stretchy viscose/rayon knit from Fabulous Fabrics; and for this stretchier fabric I didn’t need to lengthen although I did cut the sleeves at the size up.  The fit is snug and fabulously comfy.   

The white long sleeved tee is for my niece; her measurements matched the smallest size on the size chart and so I just ran it up quickly to test the fit.  It was on the tight side for her too; so when starting out I do recommend erring on the side of too big, just to start with.  You can always shave a bit off!
For the crotch closure I used strips of black snap tape; leftover from my Issey Miyake tucked dress.  Obviously it would be every bit as quick to hammer in a coupla snaps though.  Really, the Nettie is a wonderfully quick and easy project, the kind of thing you can run up to wear an hour later.  The hardest part of making the body suits is finding scraps of woven for the crotch bit to match your fabric!  I had nothing matching my green so used self fabric stiffened and stabilised with fusible interfacing.

I did something a bit different with the sleeves on my green one; I made them super long and put in a little thumb hole, finished with a band just like the neckline.  Built-in hand warmers!

The pattern comes with multiple variations; a high, mid and low back neckline, and a high and low scoop front neckline, and with long, elbow-length and short sleeves, and a body-con dress.  And obviously you can slice it off at hip level too and just have a tee.  So much choice!  If I’d had the dress option earlier I totally would have made one of these too…   
I made some with elbow length sleeves and some with long sleeves, and some high neck and some scoop.   I made them all with a high back neckline just because winter is around the next corner here, but I think a high front neck/low scooped-back neck Nettie would be an absolutely stunning summer evening option; worn with a huge oversized flouncy skirt, hair up in a bun.  Imagine!
Also, I reckon if you made it with a closed crotch and a scoop neckline wide enough to allow you to step into it then the Nettie would work beautifully as a dance or workout leotard too.  The sides are quite low-cut  allowing for full bottom coverage and minimal chance of a wedgie wardrobe malfunction.

OK, I’m now baulking at posting a picture of myself in the pale taupe one sans outer layers; with my skin tone the overall effect is just a bit too er, nude?!  but I have worn here it in a daily outfit already  🙂
Thank you for a fantastic pattern Heather!
pinterestmail

Cocoa Tao

Hello!  I’m wearing a new blouse.
It is the Tao, by Tamanegi-Kobo.  I’ve seen lots of lovely Tamanegi-Kobo designs made by Yoshimi, and then during me-made May saw even more worn by Japanese ladies, including the adorable and very talented designer Miho.  And since I loooove Japanese designs I just had to try one out!
On a crazy spontaneous whim I added a funny little swoosh-shaped welt pocket.   I had finished sewing the blouse, tried it on and just thought; hmmm, pocket…  I had some scraps left over, the bobbin still had some of the pale grey thread wound on.  I had recently pinned this dinky little welt pocket.  Snap decision.  I just decided to go for it.  I think it turned out quite cute!

The Tao really is a very lovely style, loose and artistic, comfortable and still very feminine and flattering.  I’m still getting used to pdf patterns, I don’t mind them as long as there aren’t hundreds of pages to tape together.  The Tao is 24 pages, which is do-able.  The collar is a petite little thing,  stylistically matching the boxy cropped feel of the blouse, and I think it looks equally sweet buttoned right up.   Normally I don’t button my blouses right up to the collar stand, ‘cos I’m a laid-back Aussie beach bum, but I like this one both ways.

I made the blouse out of, believe it or not, a stark, optic white linen/silk mix from Fabulous Fabris, the leftover piece from after I had cut out the collars, cuffs and button bands for the boys’ Christmas shirts.  But since I’ve made two white shirts in hot succession recently, this one was always going to get a dye-job.  I stitched it up using a pale grey/brown thread, and once I’d finished sewing it and prior to chickening out, quickly gave it a light wash in a very weak dye solution of Brown iDye.  Giving it this subtle and rather delicate shade of pale pinky/cocoa brown.  I think this is a colour quite flattering to my skin tone.  🙂

Details:
Top; Tamanegi-Kobo Tao, white linen/silk mix dyed with a teeny amount of Brown iDye
Shorts; Burda 7723, white linen, details and my review of this pattern here

My review for this blouse pattern is below….

Pattern
Description:

The Tao is a loose-fitting, button-front
blouse; with two collar variations, wrist cuffs and a continuous
sleeve vent, cut-on sleeves and a long wrist-to-wrist yoke.
Pattern
Sizing:
Size 36-42.  I made a straight size 38.
Did
it look like the photo/drawing on the pattern envelope once you had finished
sewing it?
Yes.
Were
the instructions easy to follow?
I
could not follow the Japanese written instructions, but the illustrations are quite
clear and helpful.  The seam allowances
are clearly marked.
The
notches that you need for piecing and pleating points can be seen clearly and
easily, but I did think the Japanese character markings looked a little
chaotic, repeated for each of the sizes and heaped on top of each other. There
are two collar pieces: one the under- and the other the upper collar; if you’ve
made a collared shirt before and so know that the under-collar is supposed to
be a touch smaller then you should have no trouble working out which piece is
which.
What
did you particularly like or dislike about the pattern?
It
looks so pretty in the photographs on the website, and I like the loose
artistic shape.  The style is really
pretty and a very nice feminine alternative to the traditional style of
button-front shirt; and easier too, in fact, since you don’t have to insert the
sleeves!  The prim little collar looks
sweet, both unbuttoned and also when buttoned up all the way to the top.
It is
a pdf pattern, which I am slooowly getting used to, old-fashioned thing that I
am  😉
Fabric
Used:
Silk/linen
mix
Pattern
alterations or any design changes you made:
I added
a little asymmetrical swoosh-shaped welt pocket 
😉
Would
you sew it again? Would you recommend it to others?
Definitely!
and yes  🙂
Conclusion:
Oh, I
love it!  I’ve used Japanese pattern
books before and this is the first time I’ve made a “regular” Japanese
pattern.  I’ve made it in a summer-weight
linen/silk mix but I think it would be equally appropriate and just as
cute in a soft comfy flannelette for winter.
pinterestmail

Chequered Elisalex

Hello!
A little while ago Liz contacted me to generously send her copy of the By Hand London Elisalex pattern to me.  Thank you so much Liz!  Obviously I leapt at the chance to try out this deservedly popular pattern  🙂
One of the most wonderful things about being part of this online sewing community is how we all openly and honestly share our love of sewing and our sewing experiences.  I’ve believe the sewing community to be such a friendly group of generous, upbeat and helpful women: so I really want to spread the love and pay it forward and all that, and in turn offer this pattern up to another… a giveaway!  Maybe this is a sorta blogging anniversary giveaway, since I have been blogging for four years as of last Friday, but really all the thanks and credit is due to Liz  🙂
As recommended in the pattern instructions, I traced my size onto white plastic table-clothing, which means that the original pattern is still in immaculate condition.  I refolded it carefully back into its factory folds;  I’m pretty expert at that, if I say so myself.  Years of pattern control-freak practice  😀  Anyway, it is all nicely and perfectly intact.  And the pattern packaging is exquisite, truly a thing of great beauty, with two nesting envelopes of high quality blue cardboard bearing elegant drawings of the three variations.  Seriously, this is a gorgeous thing!  So, if you would like this copy of the very popular Elisalex pattern  then please leave a comment saying so.  I will randomly pick a recipient this Thursday, 17th October.  
(Later edit: a commenter has pointed out that my giving away this pattern is morally “iffy” … obviously this is the very last thing I want! so I have decided to withdraw the offer.  My sincerest apologies to all, and my thanks for your kind comments and I will rustling up something different for a blogging anniversary giveaway very soon… please stay tuned  🙂  )

I bought this piece of black-and-ivory patchworked silk taffeta from Homecraft Textiles a while back, thinking about those Louis Vuitton shift dresses, and then had second thoughts since the silk is very thin and slightly floaty and so was really too light to work well in a structured shift dress design.  Shift dresses need a fabric with a bit of oomph.  

Louis Vuitton S/S 2013 RTW, source

I put the idea of a shift dress on ice, but as soon as I saw the big pouffy skirt on the Elisalex the silk leapt to my mind again.  The piece was wide but I only had 1.5m so pattern matching was the biggest challenge.  Also a lot of the squares were not exactly square but are slightly bigger and smaller here and there, and the corners don’t always match up perfectly.  I’m pretty pleased with how I managed to get the dress out of my small piece and got my squares, princess seams, corners and box pleats matching up not too badly.  The only area I am disappointed with is the junction between the skirt and bodice at the centre back, where the two ivory squares and two black squares are adjacent with each other and so there is one ivory and one black rectangle instead of squares and the chessboard effect falls into a heap! … but I think I can live with that little quirk.  Well, I have to because I wasn’t going to go out and buy more fabric just for that.  Although I will admit that I considered it  😉  I have the smallest mere scraps leftover, so I did make very good use of my piece.

My dress is fully lined with cream-coloured polyacetate lining fabric.  The pattern does not mention lining the skirt, so I cut the skirt pieces out as narrower versions of the skirt pattern pieces without the extra “pouffe” at the side edges.  I also chose to add huge inseam side pockets, because well duh!  Sorry to sound like a broken record on the subject, but in my view this design was just screaming out for pockets!! For the pockets I used a lightweight ivory swiss dotted cotton voile.

Details:
Dress: By Hand London Elisalex dress, patchwork silk
Tights; self-drafted, black wool, details here
Shoes; Misano, from Labels boutique

Pattern
Description:

An elegant dress with a princess seamed, fully lined bodice, box pleated tulip skirt and exposed zip at centre back.  There are three sleeve variations and the bodice is designed with very little ease to enhance a cinched waist.
Pattern
Sizing:
UK 2-16; US 6-20,  Based on my bust and waist measurements I made the size 6/10 and it fits perfectly
Did
it look like the photo/drawing on the pattern envelope once you had finished
sewing it?
Yes.
Were
the instructions easy to follow?
The instructions are warm, encouraging and friendly and would put the beginner seamstress immediately at ease.  There is some idle chit-chat; I’m not criticising, just observing… for example; “Find a quiet room and a big table.  A girl’s gotta concentrate, especially when getting ready to cut out”  (this particular girl cut out on the living room floor while watching the telly, but then I’ve always been a rebel) … But at the same time some key little sewing steps are missing; tips that I believe are really necessary to get a good finish in your garment and that a beginner wouldn’t “just know”.  For example; to fit the bodice curve in the princess seam, you really should ease stitch the side bodice pieces.  And under-stitching the seam allowances of the armholes and neckline is always a good idea too.
Step 8; very wordy with no pictures, opening with “this is a little fiddly and unfortunately impossible to clarify with a drawing …” really? Vogue manages to illustrate this step with a drawing in their instructions for this very same technique.  Vogue also mentions and illustrates ease stitching and under-stitching in their instructions too.  Just saying.
The “what you need” section is a little baffling, commencing somewhat hilariously with “your fabric” and then going on to list such things like pins, zipper foot and tape measure.  The actual fabric quantities you need are printed elsewhere; down at the bottom left in an inconspicuous little table.
What
did you particularly like or dislike about the pattern?
Likes: The whole design is absolutely lovely.  The size of the skirt pattern pieces gave me pause at first, but when I had basted them together and tried it on I was enchanted with the gorgeous feminine silhouette it gave.  The bodice is a beautiful fit and looks really elegant both front and back views, too.
The pattern itself is beautifully packaged; this is an exceptionally high quality product.
Dislikes: There are NO metric measurements, whatsoever.  This is just about inexcusable in a modern pattern.
I was
surprised that the pattern didn’t have pockets considering that the big pouffy skirt could so easily accommodate them.  Fortunately it is super easy to put them in yourself.
Considering that the skirt has a tulip silhouette curving in towards the hemline, one would normally measure the desired length of the skirt before cutting out, in order to plan and accordingly cut the side edges so the hem allowance juts out; so that it can be turned under to sit flat against those angled side seams.  The pattern piece doesn’t allow for this and it isn’t mentioned in the instructions, so I sure hope a novice seamster wouldn’t think it is their mistake when they end up with a hem allowance too narrow to turn under smooth and flat…
Fabric
Used:
Patch-worked silk taffeta
Pattern
alterations or any design changes you made:
Pockets  🙂  
My dress is fully lined; I cut the skirt lining as a narrower version of the pattern pieces removing some of the pouffe and folding narrower box pleats in the same spots.
I chose to insert an invisible zip rather than use an exposed zip, as it suited the style of dress I had in mind.
Would
you sew it again? Would you recommend it to others?
Yes, I will definitely sew this again!  A really beautiful and classic design.  For winter I would sew this in a rich tapestry or an upholstery type of fabric, with the sleeves.  This is a sure thing in my future.
And
yes  🙂
Conclusion:
Technically, the absence of metric measurements is quite annoying, and the instructions could do with more finishing tips and details to help beginners.  
Design-wise; it is an absolutely beautiful and classic design, and I am very pleased with how mine turned out.  
Packaging: exquisitely packed, and of very high quality and eco-friendly materials.   For the connoisseur of really beautiful patterns.
pinterestmail

Sandy top with gold bits

OK, so I’ve made a top.  Simple, fairly plain, unexciting even? but I’m totally happy with it anyway.  Hard to see in the photo above, but the front and back neckbands have little golden swirls, twirling and tumbling sinuously around it.  Screen-printed by me!
The neckbands are of pale grey silk/linen from Fabulous Fabrics, and the remainder of the top is made using a pale sand-coloured cotton-linen from Spotlight,  the leftovers from after I cut out the pieces for my giant polka-dot dress.
I used the pattern for top 136B from Burdastyle magazine 07/12.  Sam gave this mag to me for Christmas last year, but this is the very first thing I’ve made from it  (oops!)  No matter, I reckon Burdastyle patterns never really go outta style  🙂  When planning my top I knew exactly what I wanted; a pull-over loose top with a big wide neckband for screen-printing, and either a wrap-front or something to define the waist.  I searched through, only like every single one of my patterns, the lines of this one leapt out as pretty close to the vision I had in my head.

Technical blah-dy blah: I have to confess that while stylistically the design was perfect, technically it was far from a perfect fabric/pattern match: the pattern was designed to be tight for stretch knits and came graded for Plus sizes 44-52 only; and I wanted “loose” in a woven and I generally go with a 38.  But I reckoned it could work; those factors have the opposite effect to each other so it’s like they cancel each other out right?  It was worth a try, anyway.  I’ve never let fabric inappropriateness get in the way of my creative vision! and was pretty sure it would be OK.  
I traced a size 44 and just cut my pieces with quite big seams allowances, plus a touch extra at three areas just in case: the underarm points on the front and back, around the widest part of the sleeves, and with extra width at the hips; essentially, the places where you might expect extra ease would be required.  Basted the pieces together and tried it on, ensuring the raglan seams matched the notches on the neckband pieces as a set-in-stone point of reference and just made a few little adjustments in and out and here and there to some seams.  I reckon it turned out OK!
The waist ties are meant to be attached inside the centre neckband seam, from the top to the bottom of the seam, which means that not only would it have covered up part of my print, but when you wrap it around your waist it would have dragged the V-neck right down, thus rendering it a very cleavage-tastic top indeed.  How it is, is quite cleavage-y enough for me already, thanks!  Burdastyle’s coy description is “Impossible to ignore!”   Ahem, so I sewed mine on further down, only just covering the very lowest tip of the neckband.

The neckline is a flatteringly wide portrait neckline, which means that my bra straps are showing.  But I’m cool with that, since I just happen to have a bra with straps that just about perfectly colour-match this top.  Now is that good wardrobe planning, or what?!  I reckon they just look like little camisole straps.

And; I have a pair of new flat sandals for summer!  these gorgeous cheerful bright coral sandals are going to pep up my wardrobe so nicely!  They are practically neon!

Details:
Top; Burdastyle magazine 07/2012, 136B modified, with neckband screen-printed by me here
Skirt; Vogue 1247 modified, ivory curtaining fabric, details here and my review of this pattern here
Sandals; c/o Misano

pinterestmail
Switch to mobile version
↓