Tag Archives: Tutorial

Lapped flat-felled split side seam

Florencia and Jana (by email) both asked about the lapped, flat-felled split side seam, thank you for asking!  Since I finished all my Christmas sewing today… and, can I just say; Whoopeeeeeeeeeee!!!!   I had time to get out some scraps and  show how I did them…
Bear in mind that a tiny bit of the wrong side of the fabric will show in this technique, so it is best confined to fabrics where this doesn’t matter.
To have this feature, you have to plan ahead and cut an extra little extension, or tab, on the outer edge of either front or back; about 11.5cm in height for a 10cm split.  I randomly chose for the front edge to have the tab so as to flat-fell the seams towards the back as my own convention; but it looks equally fine either way.

Stitch the side seams to level with the top edge of the tab.

Press the side seam open above the split, at the same time press down the seam allowance on the un-tabbed side and leave the tab un-pressed.  Snip the untabbed seam allowance to the endpoint of the previous stitching.

Fold under and press the untabbed seam allowance below the snip, and stitch.

Trim the remainder of the untabbed seam allowance to half its width, along the entire length of the seam.

Press the tabbed seam allowance over the trimmed seam allowance, and wrap the raw edge around the trimmed edge of the other side to enclose it, the entire length of the seam.  At the same time, press the tab under along the same line to the lower edge.  Pin in place.

Stitch the flat-felled seam, stopping at the top edge of the split.

If necessary, trim the tab; then turn under the raw edge and press.  Stitch.

To strengthen, stitch a short row of horizontal back and forth over the top of the split.  Alternatively bar-tacking, or narrow, closely spaced zig-zagging can be used at this point.

Hem the lower edges.  Remember:  the underside split is hemmed facing out, so mind you don’t accidentally stitch the hem on the outside on this side!  I almost got caught here the first time!
Finished views: below left, the inside; and at right, the outside view

pinterestmail

In-seam pockets

An in-seam side pocket is a pretty simple, basic and close-to invisible pocket, and is a modification I make to a heckuvva lot of my own sewing projects.  It can be added to most garments that are loose enough to allow you to comfortably have your hands shoved inside  ie. not anything tight and close-fitting like a pencil skirt.
If you have a good-size-for-you pocket piece already, use this, otherwise just lay your hand down on the fabric and draw around it.  Give yourself a 1cm seam allowance, and allow a plenty wide opening straight edge at least the width of the very widest part of your hand… otherwise you may have trouble getting your hands into your pockets!  Yup, I learnt that one the hard way once….

Cut 4 pocket pieces with the straight opening edge on the grain.  If you don’t have enough fabric for 4 pieces, you can just cut 2 mirror image pocket pieces from the fashion fabric, and then cut the other two pocket facings from another, tonally unobtrusive fabric OR if your fabric is bulky, you can optionally cut the pocket facing pieces from a lightweight, thinner fabric to reduce the fabric bulk in your garment.
Decide where on your garment you want the pockets to sit.  Pin the pocket pieces (fashion fabric) to the back piece, and the corresponding pocket facings to the front piece and stitch together in a narrow 1cm (3/8″) seam allowance.
Finish the edge with overlocking or HongKong seaming, if desired, and press the pocket and pocket facing pieces out.

Pin front and back right sides together, aligning the pocket seams exactly.

Now sew the side seams of the garment in a regular 1.5cm (5/8″) seam allowance, to a point just a couple of stitches below the the junction of the side seam and where the pocket bag seam will start.  Back sew those few stitches to the start of the pocket bag seam, turn and continue sewing around the pocket bag.  Do the same back sew for a couple of stitches up in to the pocket opening at the lower edge of the pocket bag seam, and then continue sewing the remainder of the side seam.  The seam junctions, with the narrower pocket SA within the side SA, will look like so:

Finish the seam allowances with either overlocking or HongKong seaming, if desired.

Press the pocket bag and all seam allowances towards the garment front.  To keep the pocket bag permanently sitting frontwards, stitch all the seam allowances to the garment front, in a short row of stitches at the upper and lower pocket opening of the pocket.  Stitch from the right side of the garment, and just go forward and reverse a few times.

E finito!
Optional; I also stitched the lower edges of my pockets to the lower hem allowance of this top to give them an extra tethering point but you wouldn’t ordinarily do any more stitching.  I just lucked out with the size and space there!

pinterestmail

Gunmetal linen trousers to jacket-y thing

So new top…  well, new? not really, this funky little jacket was until recently a pair of menswear-inspired, wide-legged, linen trousers, that have been sitting in my re-fashioning bag for a coupla years now.  True!  I took them out to wear as fancy dress last year, but they went straight back into the bag afterwards!
I originally made these trousers back in 2009 using Burda 7944, and they have been good trousers.  I wore them a lot and even featured them in a 6 different ways post forever ago. 

 But eventually they got to the stage where they looked like a dishrag practically as soon as they went on and got “knees” in them instantly.  That’s linen for ya; I love it to bits but if it’s not a quality weave it does tend to lose its integrity quickly.  This linen was not particularly fine-grade in the first place.  Some linen trousers can get away with the dish-raggy look but not a tailored design like this one. 
I’ve re-made them into a loose-sleeved jacket thingy.  I’ve done this very same re-fashion once before, making a boxy little jacket out of a pair of Mum’s old cast-off three-quarter pants, but these trousers started out with quite a different shape to those pants so have ended up as quite a different shaped jacket.  The waistband is close-fitted, not loose, and those long wide legs with a satisfyingly deep cuff have resulted in long wide sleeves, still with that satisfyingly deep cuff on the ends.  You put it on with unzipped fly, and then zip it up down! and do up the buttons, just like when it was trousers but upside down.  Cool huh?  I really like it in it’s new identity.  Making something like this is deeply satisfying to me.  Taking something old, unwanted and un-chic and making it into something different; and I use the term different as in the kind of thing you rarely see a pattern for.  It’s hardly mainstream, is it?  This is why I sew; to make things for myself that are individual and unusual.

A quick run-down on the procedure…
Firstly, you cut off the legs to give a “body” section, and cut open the inner leg seam from one inner leg to the other.

as my son says; ironing is for the weak!!!

Re-stitch both the front and back crotch seams to be straight lines from the waistband(back)/bottom of zip(front) to the old-crotch/new-neckline opening,  Cut off excess fabric (the old-crotch curves).

My trousers had pockets; stitch the opening closed and trim off the pocket bags inside.  I know I know, it’s slightly painful to remove pockets, even useless ones, but they just do not work in this design.  I also switched the old plastic, colour-matched buttons I had used previously for nacre buttons sewn on upside down with the mottley-brown underneath showing, just because.

Stitch up the shoulder seams and cut armhole curve on the body section, and a sleevecap curve at the top of the cut-off legs, now sleeves.  If you have a great fitting shirt pattern then use this as a guide.  I just tried it on a few times, pinned it and winged it, being sure to keep both sides symmetrical.
Set the sleeves into the body section.

Fold in a hem around the neckline and stitch it down however you choose, I used a short bias cut strip of silk, leftovers from this top, invisibly fell-stitched.

Don’t know if it’s obvious or not, but it was crazy windy while I was taking these photos.  My tripod actually blew over once!  Goodness knows why I pick the absolute blasting-est days to get out and photograph my makes.  I must be some kind of freaking masochist.  Hair; styled by gale-force winds.  Lovely, not.  But, seize the moment, and all that.  After all, this is what I actually look like here.  Keeping it real.  Man, I’m a loon.
This one gave me a laugh when I saw it!

Details:
Jacket; refashioned from a pair of Burda 7944 trousers, gunmetal linen
Shorts; Burda 7723, themselves refashioned from an old skirt, details here, and see my review of this shorts pattern here
Tshirt (underneath); self-drafted, white cotton jersey, details here
Sandals; c/o Misano

pinterestmail

One way to sew a flat-felled and split seam

A split side seam is a nice feature that adds a bit of visual interest as well as some wearing ease to a straight-hemmed garment, and flat-felling is a smooth and clean finishing technique for seams; but how to manage the awkward joining point between the two?
Marie Coffin and knj09705 both asked about the transition between the flat-felled seam and the split side seam on Sam’s shirt…  thanks for showing an interest!  and since I happened to making another shirt hot on the heels of the previous one I snapped a few pictures to demonstrate how I did it…
btw: I’ve checked out some of the better rtw menswear shirts and there’s a choice of finishing methods.  So the following is not the only way to construct this feature, but this is the way I chose this time.  I wonder… is there even a “right” way?
Stitch the seam down to the point at which the slit is to start.  I left an unfinished length of 10cm for the side seam splits on both of these shirts…

Press the seam open, and and the seam allowances of the split.

So in this case, the flat felled seam of this shirt is continuing from the split, right up the side seam and continuing right down the length of the sleeve to the wrist opening.  The rather weird picture below is attempting to show the side seam and sleeve seam allowances pressed open all in one continuous length; correspondingly, the seam allowance will be flat-felled all the way along this seam as one continuous length.

Decide which side of the seam allowance the seam will be flat-felled onto; again, after checking out rtw menswear shirts I’ve noticed there doesn’t seem to be an accepted convention here.  I’ve randomly decided for the seam allowances to lie against the shirt back.  
Trim this seam allowance to half its current width, with the trimming tapering off for the last couple of centimetres to the level of the slit.  Also, snip into the seam allowance of the other side to the endpoint of the side seam (pictured below).  Leave both slit seam allowances untrimmed.  

Now press the untrimmed seam allowance back over the trimmed seam allowance.
Turn the top allowance under, tucking it below the trimmed seam allowance underneath to encase it, and press.  Also, turn under the seam allowances of the split seam on both sides, and press.  Pin.
Stitch the seam allowances down, close to the pressed edge.  Stitch the short split seam allowance down separately.  
For flat-felling the sleeve seam allowance: while stitching longitudinally along a tube-like structure such as a sleeve; ALWAYS stitch from INSIDE the tube.  This eliminates the possibility of inadvertently catching down the other side of the tube by mistake.  And yes, with my machine I always have to stitch a tube seam in two stages, from the middle, out to each end!
Lastly, stitch across the top of the split seam to stabilise and strengthen the top of the split.  You could stitch a bar tack by narrow zig-zagging, or alternatively run a few forward-and-reverse passes of stitching.
Attempting to show the finished flat-felled sleeve and side seam in entirety.  Not much to see at all, really … but that’s the whole idea!  Nice and neat and tidy  ðŸ™‚

pinterestmail

A self-rolling edge finish for knits

This is a sweet and pretty finish to apply to the edges of casual knit garments… and a more neatly-finished-on-the-inside edging, if slightly more involved, than a similar one I wrote previously.  This is the edging technique used for this dress.
Firstly; the fabric has to be that sort that when left alone; rolls up at the edges all by itself.  Generally, this will only be a reasonably lightweight, single knitted jersey.

Cut a cross-grain strip (that is, with the stretch running along the long edge of the strip) that is as long as the aperture being edged, minus 10% and rounded to the nearest full or half centimetre, for ease of working.  
So, for example, if your neckline is 32cm, cut a strip that is 32cm – 3.2cm = 30cm.  Or if your armhole is 125cm, cut a strip to be 125cm – 12.5cm = 113cm
The width of my strip here is 4cm (or 1 1/2″)

Stitch together the short sides of the strip right sides together, in a 1cm seam.  Then pin the right side of the strip to the wrong side of the garment.  Your strip is now a bit more than 10% shorter than the armhole/neckline; apply the most stretch when attaching it to the most curved sections of the garment edge, such as the sharpest points of the underarm curve, and the centre front of the neckline.

Stitch in a 1cm (3/8″) seam.  If the area is not expected to cope with any stretch during wear then a straight stitch is fine; otherwise use a shallow zig-zag, a stretch stitch, or double-stitch with a twin needle.

Trim the seam allowances just a bit, by about 3mm.  
Why do we do this, and not just stitch the seam with a narrower seam allowance in the first place? because stitching a narrow seam allowance on a fine flimsy knit is not easy even on the best of sewing machines.  Most domestic sewing machines will tend to chew up the edges of a lightweight fabric if you try sewing very close to the edge, meaning you’ll end up with an uneven ugly line of stitching.  Stitching in a wider seam allowance just means the fabric glides through machine more easily, and stitches up far more smoothly, and then you can trim away the excess width afterwards.

Turn the strip up, and press up…

… then flip the strip over and onto the right side of the garment, encasing the seam allowances and press it in place.  Don’t worry if you are pressing some of the curl out of the fabric at this point, it will come back!
From the wrong side, pin the strip in place.

With the wrong side of the garment facing up, stitch in the ditch of the seamline between garment and strip.  Again, if you are stitching a garment in which has to cope with a bit of stretching then it is probably wise to use a stretch stitch, or a double stitch with a twin needle here….

Give your garment a dunk in a bucket of water and if necessary, if it isn’t curling up on its own; ease that curl back into place… it will stay there as it dries, and forever after that.  Just don’t iron it down!

Voila! cute curly seam, that looks a bit like piping  ðŸ™‚

Oh, and that strip joint…? (hehe, strip joint, (smirk)) …. be sure to situate that in an unobtrusive place, like the underarm seam, or just behind the underarm seam if bulk is an issue.  (sorry; I forgot to take a picture of this “during”)  Here the strip seam is about 1cm to the left of the side seam, with the strip seam allowances both pressed to the left and trimmed on the diagonal close to the stitching just prior to the final stitching-in-the-ditch step.

pinterestmail

Keeping the lace pure and undarted in a fitted skirt

My lace design has regular repeating rows of curlicues, scrolls and flower motifs that I felt would have been spoiled by waist shaping darts; also the lace fabric is quite thick and darts would not have sat nice and flat on the inside.  Plus, they would have been visible through the wide holes in the lace.  
SO, I aimed to eliminate the darts from my skirt and maintain the integrity of the rows of repeating motifs in the design.

Thank you so much to Robyn and Sharon who asked  ðŸ™‚
And I should mention straight off that I learnt this process from using Tomoko Nakamichi’s Pattern Magic books of course…the point of which is to learn how to manipulate a sloper and fabrics in order to achieve a desired effect.  I probably say that each and every time I mention the books, so please forgive me for repeating myself.  I guess I just love this sort of thing since I am a bonafide maths and fashion and sewing nerd; three, not-irreconcilable passions that are wrapped up together and catered to in one neat package.  Working through the exercises has taught me loads about pattern manipulation.
Anyhow, without further ado…

I chose the skirt pattern Vogue 1247 as a starting point because:
a.  I have used it a few times already and am happy with the fit.
b.  It has only one shaping dart on each side of the front and the back, and obviously one dart is way easier to eliminate than two.
c.  It has a high straight waistband that I could transform into a yoke fairly easily.  A waistband or yoke was an essential component to stabilise the lace at the top of the skirt.
d.  It is a reasonably straight little skirt, enabling me to easily match up the lace motifs down each side seam as well.

I am showing the process using the front pattern piece only… exactly the same process applies to the back piece.
I usually use old newspaper to make up my pattern modifications, but just in honour of taking photos today I have used some nice plain brown paper instead.  Yah I know, so classy  ðŸ˜‰

Draw the pattern piece with the dart marked.

Mark a horizontal line from the point of the dart extending out to the side edge.

Cut along the outside edge of the dart.

Cut along the horizontal line from the side edge to the point of the dart.

Rotate the top side edge into the centre to close the dart, and tape it closed.

Just to visually simplify the next step I’ve traced off a new paper piece from this new, dartless skirt front piece….

Now, my lace had straight, horizontal straight rows of motifs.. to indicate how this appears on my paper pattern piece I have marked some horizontal straight rows in red…. Now, see how the sides of the skirt curve up quite dramatically from the centre front?    The visual effect of the curving row of lace, even though it is apparent curving and not actual curving; is rather unflattering imo and would look messy and chaotic.  So, I wanted the top of the skirt to be cut in a straight horizontal line, to preserve the straight line of the lace design.

Cut off that top side curve.

The lower skirt piece remaining is your new skirt front piece.  The curved piece cut off the top is used to create the waistband/yoke section as below…

The waistband of Vogue 1247 is a straight waistband; trace a new waistband including seam allowances.  

Transfer the top side curve markings to it.. this will be the new curved side seam of the waistband/yoke.

Extend the curve up to the top of the desired yoke/waistband height; then freehand draw it a bit higher and then curve it down to join onto the waistband top, to square off that top corner.

This process results in a dartless skirt with a straight top edge that preserves the horizontal rows in the lace… and with a straight waistband shaped into the side edges.
pinterestmail

HongKong seams and the hemline

Hong Kong seams are a tidy and very handsome way to finish raw edges… but what happens at the hemline?  The seam gets folded up on itself twice, and if you are working with a flimsy fabric and especially if you are planning a narrow hem you will end up with a hem that is thick and blobby with extra fabric; not very attractive.
The solution is to cease the HongKong seaming inside the hem, at a spot before the fabric is folded up into the hem.
With this dress, I had such minimal fabric I couldn’t have a deep hem and needed to sew as narrow a hem as pssible.  The side seams are French seams which go fine into a narrow hem, but the centre back seam with the zip in it cannot be sewn with French seams obviously, so I opted to finish the raw edges with HongKong seaming…  and I took a few photos to show how I dealt with the HongKong seaming into the hem…
The bias strip for the HongKong seaming is sewn to the raw fabric edge, down to roughly 15cm from the lower edge.  Then fold the edge of the bias strip over the raw edge, press and stitch in the ditch from the right side to about 10cm short of the first stitching, allowing plenty of tail.  I’ve left the thread ends long and un-snipped to show where I’ve finished the stitching.

Now insert the zip.

Complete sewing the centre back seam down to the bottom edge.

At this stage, measure and pin the hem, and press it in place.  Unpin and unfold the lower hem at the seam.

Trim the bias strip to be just short of the hem fold.

Finish stitching the HongKong binding in place.

Fold up the hem, pin and finish stitching the hem in place.

Voila!  The raw edges are all neatly finished, and the hem looks nice and flat with no added bulk too!

pinterestmail

Facings; some inner workings

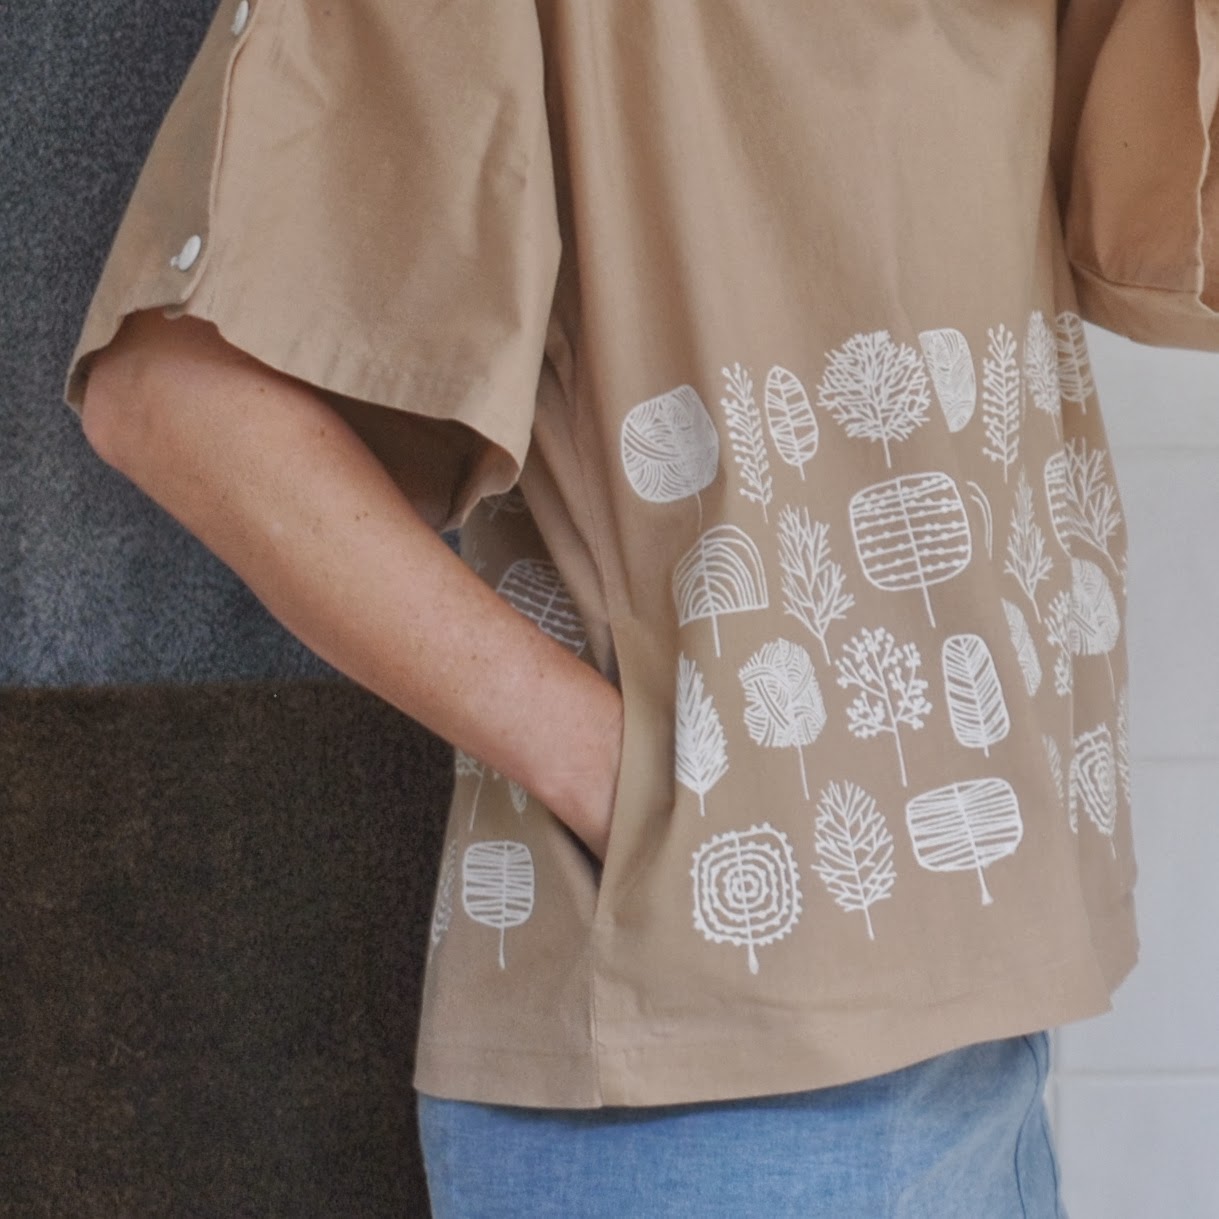
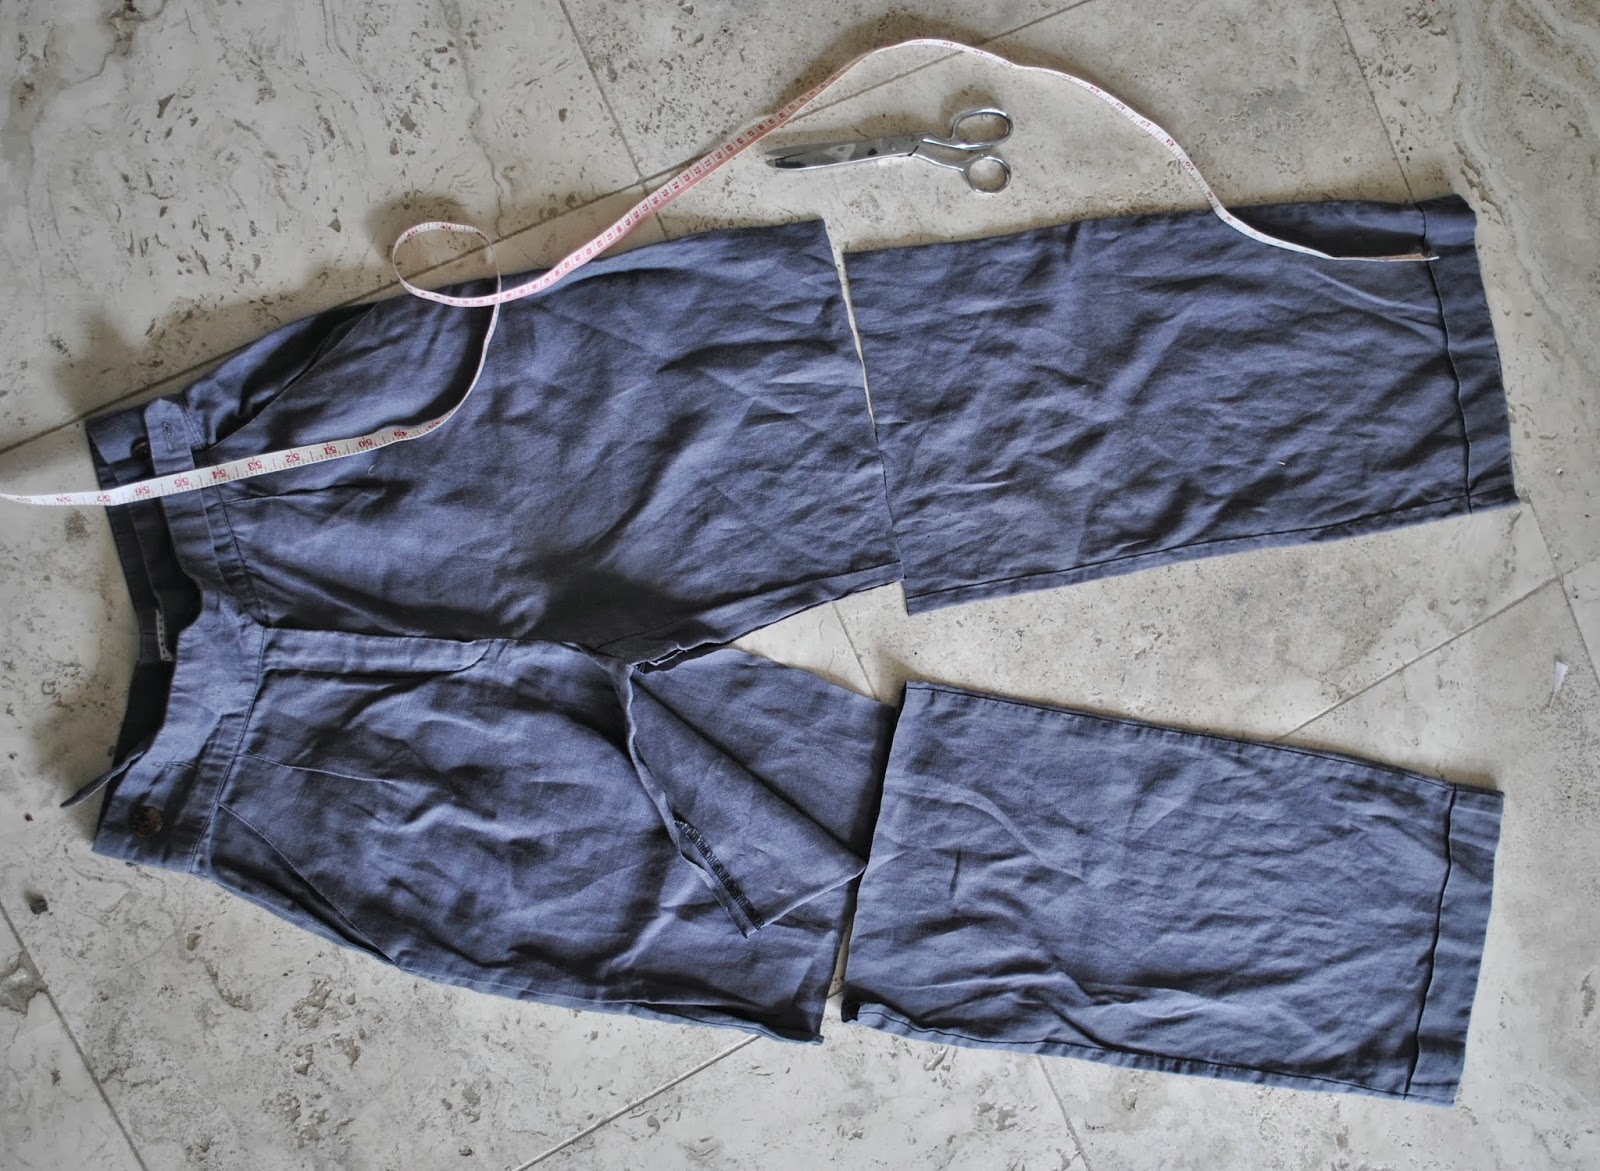
I took a few photos while constructing the waistband of my new capri pants to illustrate a few of my own finishing methods, but first…
Online sewing tutorials.
Since starting my blog I have penned a few of my own sewing tutorials; snapping photos and writing happily and freely about my methods… but lately hesitation has crept in…
why? because scathing criticisms of online amateur sewing tutorials have popped up in the previously harmonious bloggy sewing world.  Some people out there loathe and detest them….  on the other hand, some people find satisfaction in seeing the inner workings of other people’s sewing projects.  Personally I do too… when they are done well.  I don’t enjoy seeing close-ups of snafu’s or obvious stuff ups.  If I have made a glaring mistake I prefer to unpick it, take it apart or do whatever possible to fix it up, not take a photo and show it off!
But I do really enjoy seeing beautiful finishes and inner workings; I strive to make my own the best I can and I like reading about how others achieve the same.
So.  
Finishing a facing, on an edge with an invisible zip closure.

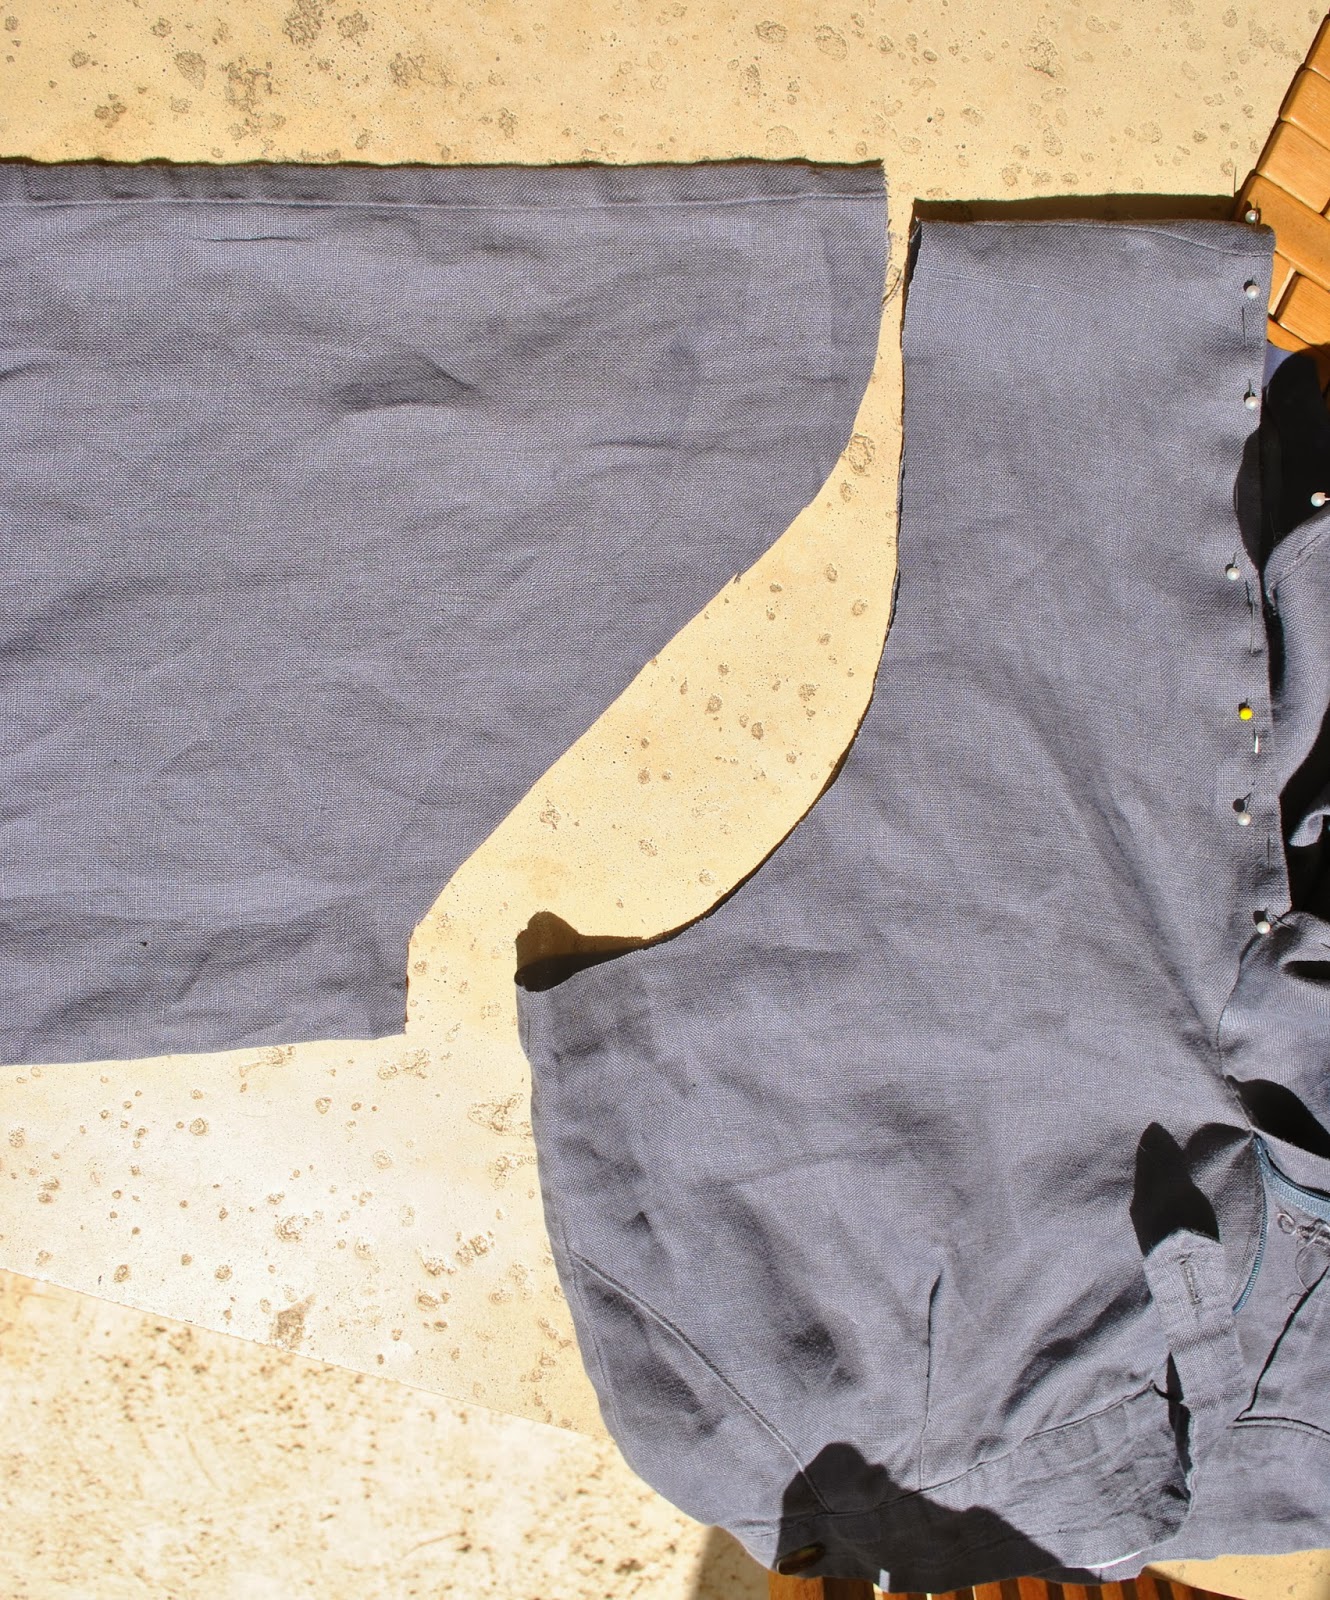
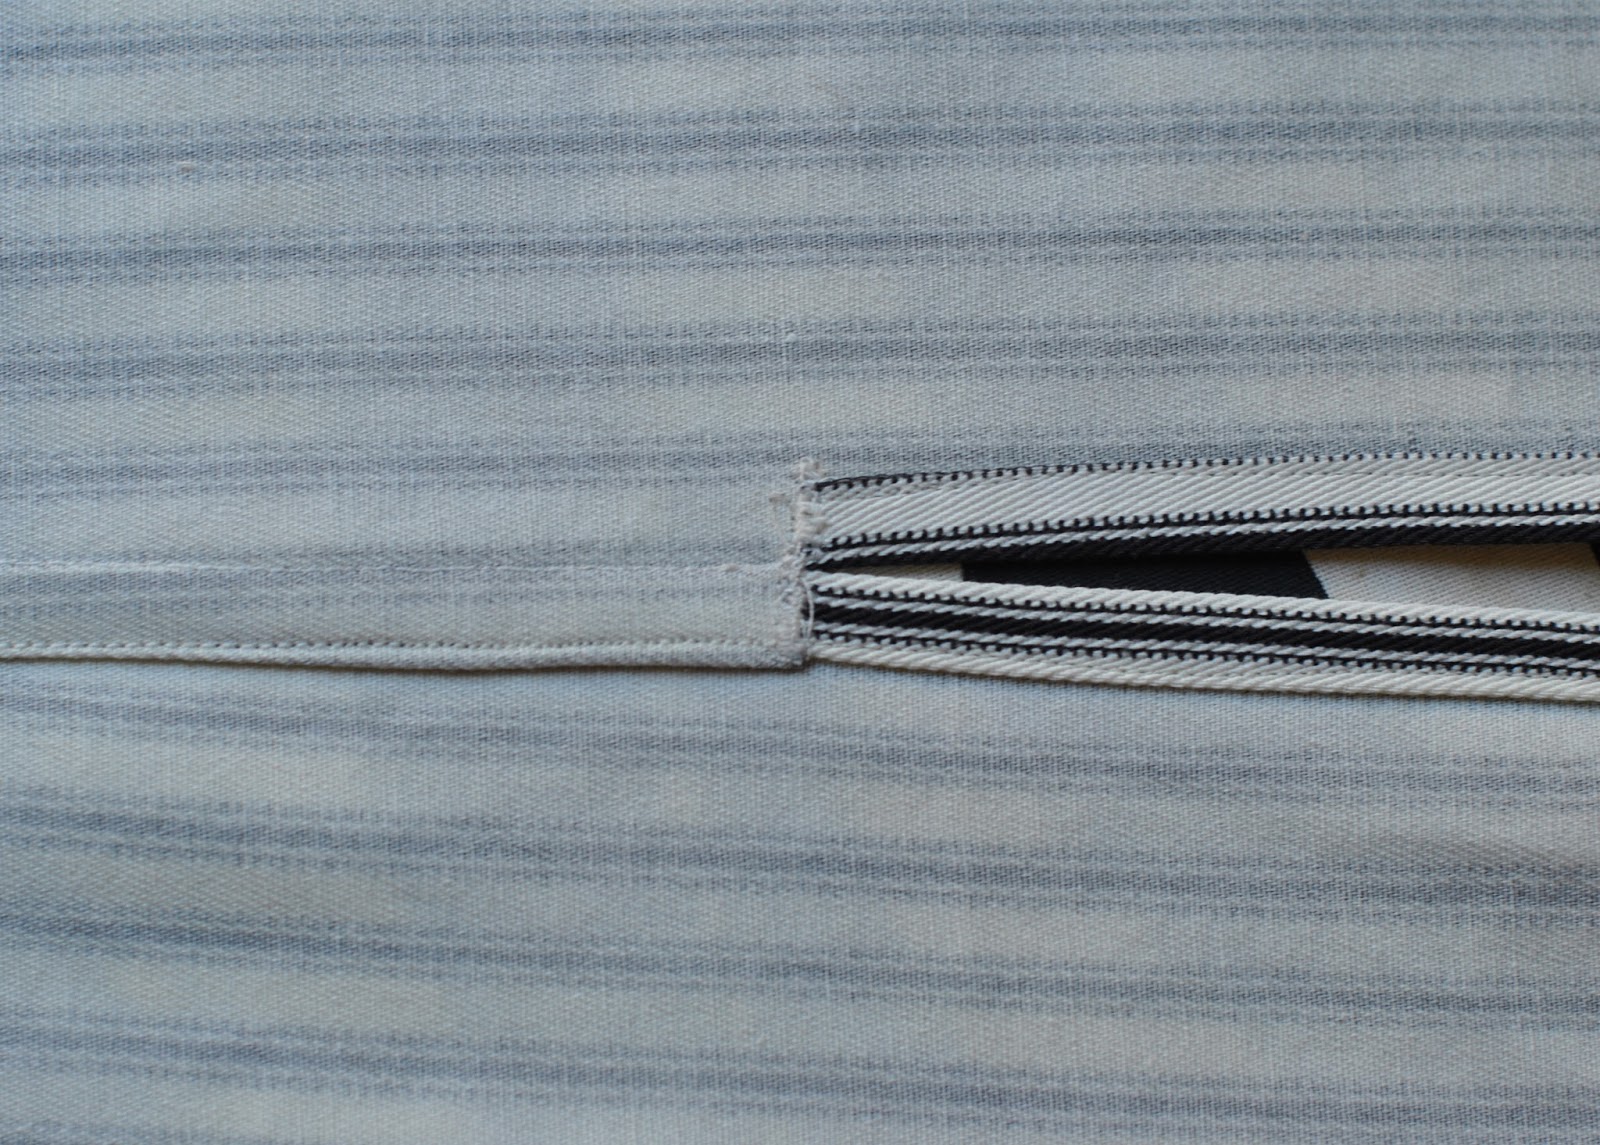
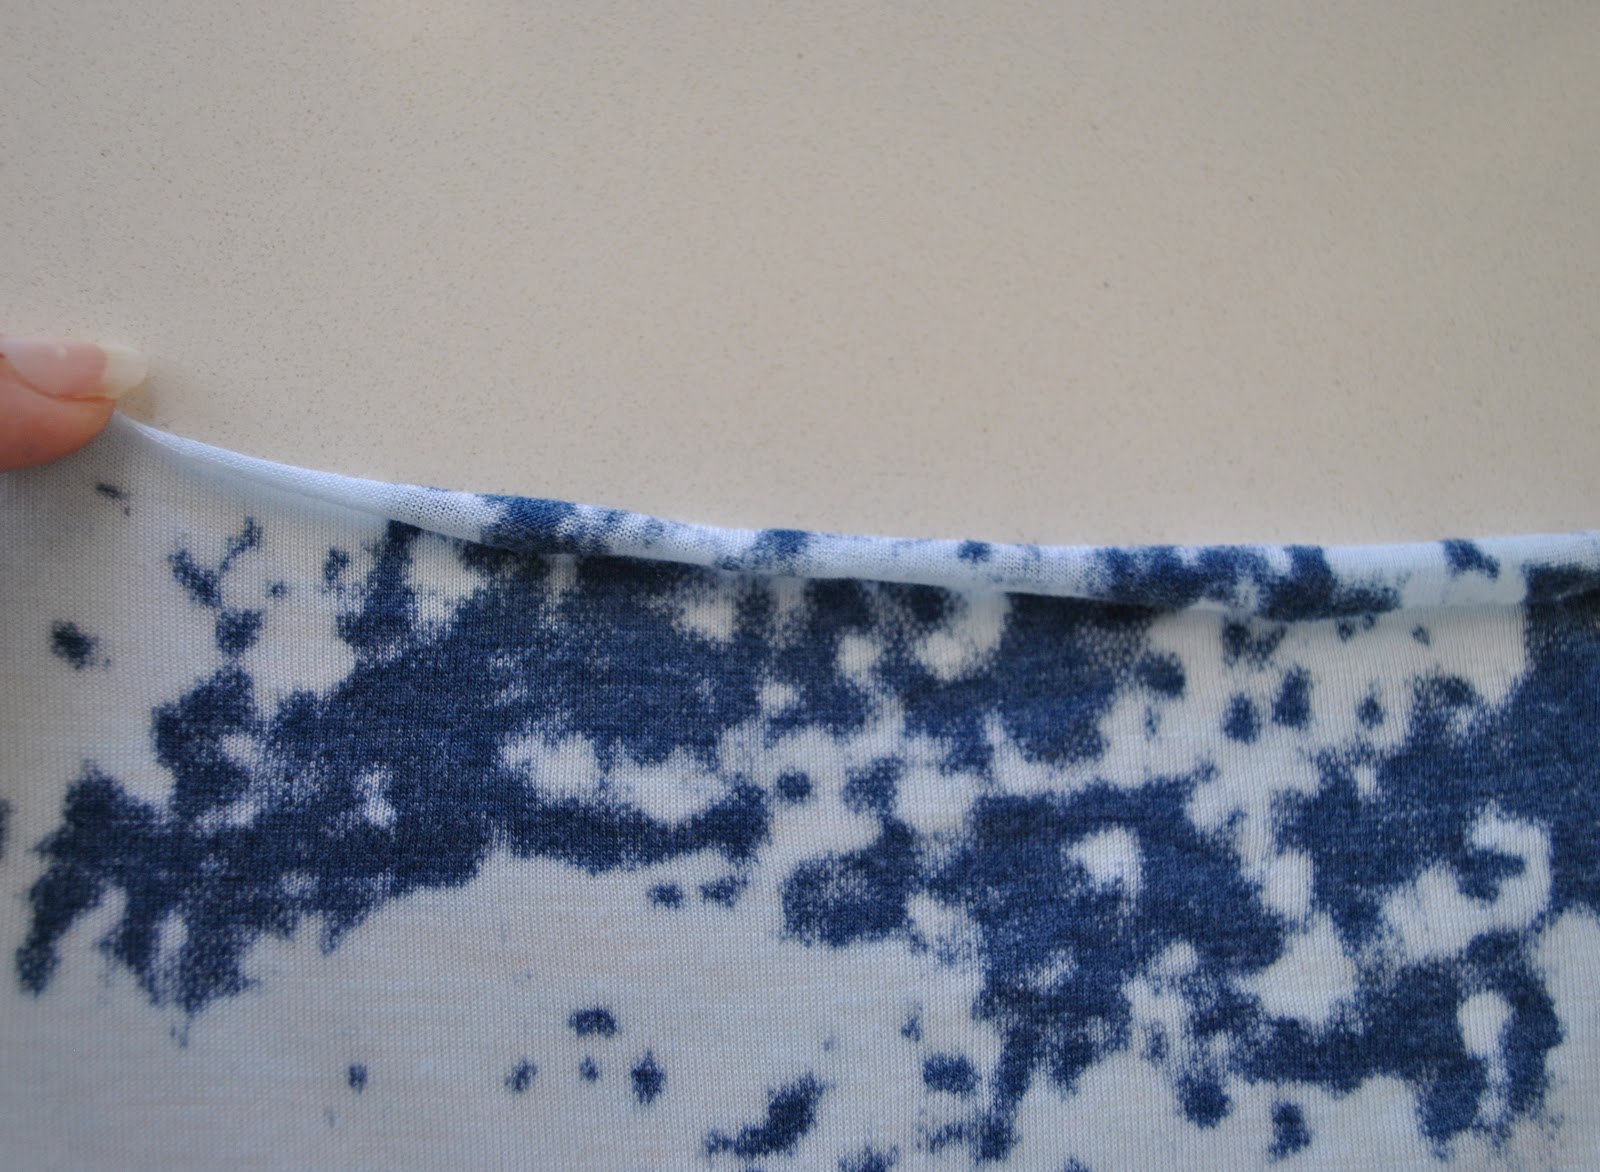
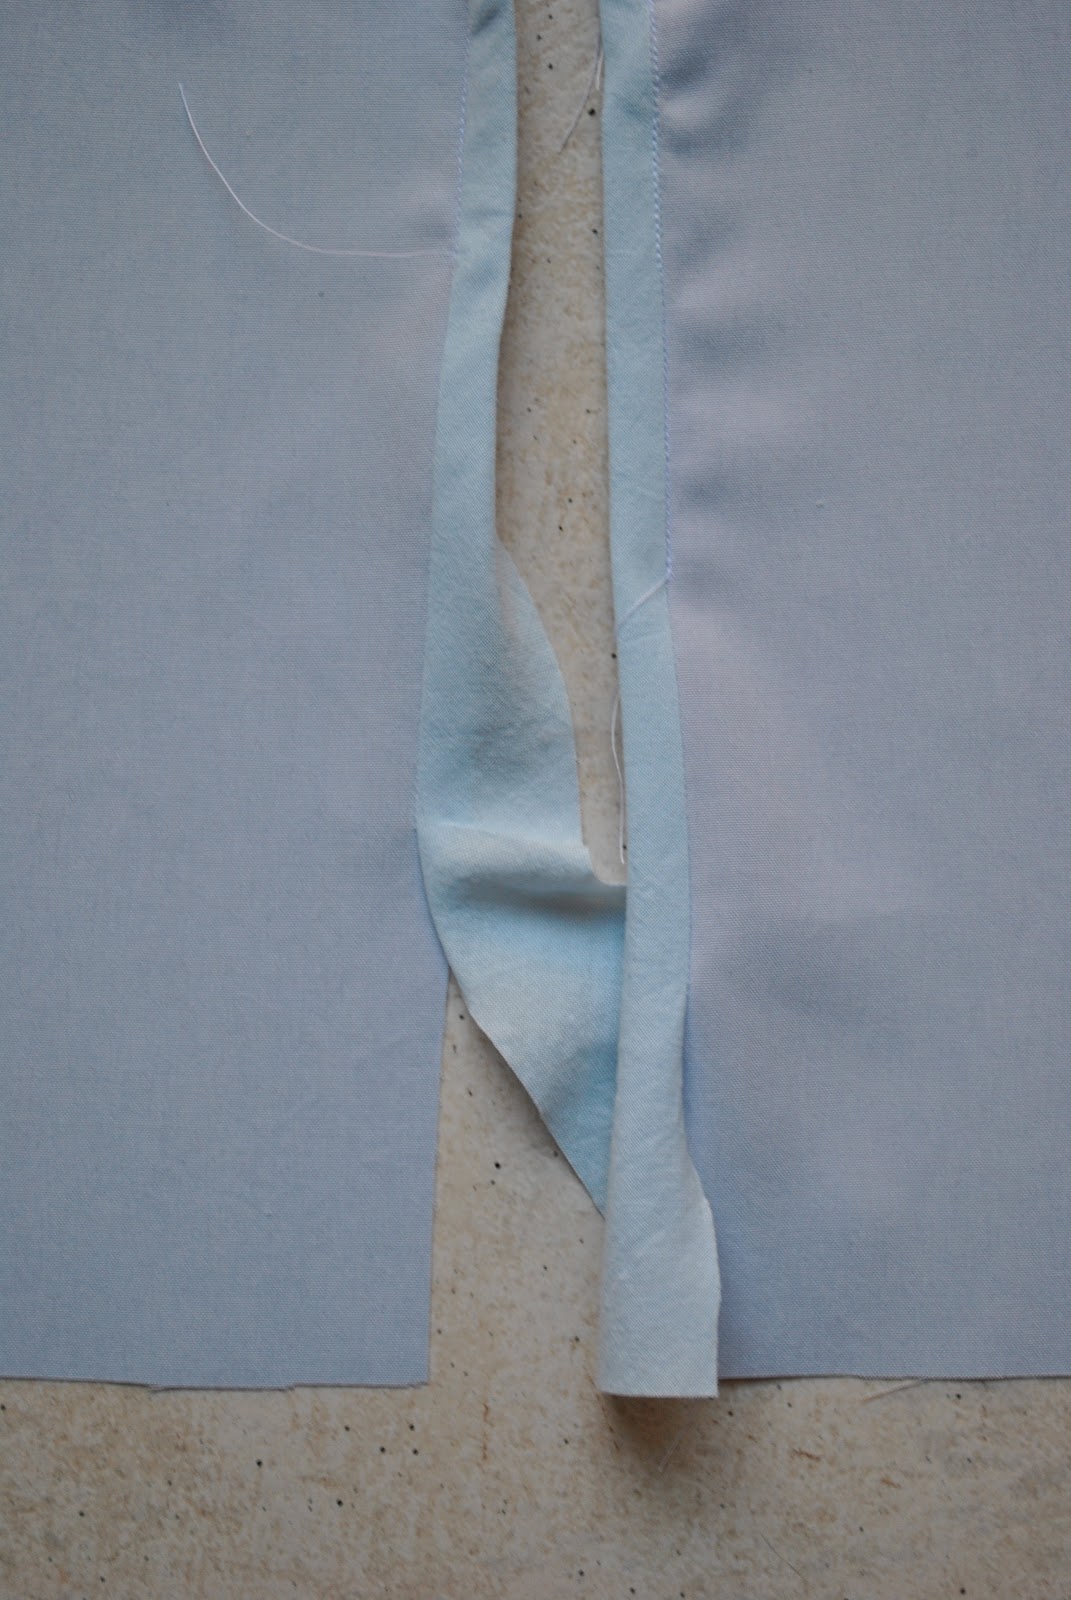
The zip is in, and I’ve attached the interfaced waistband facing.
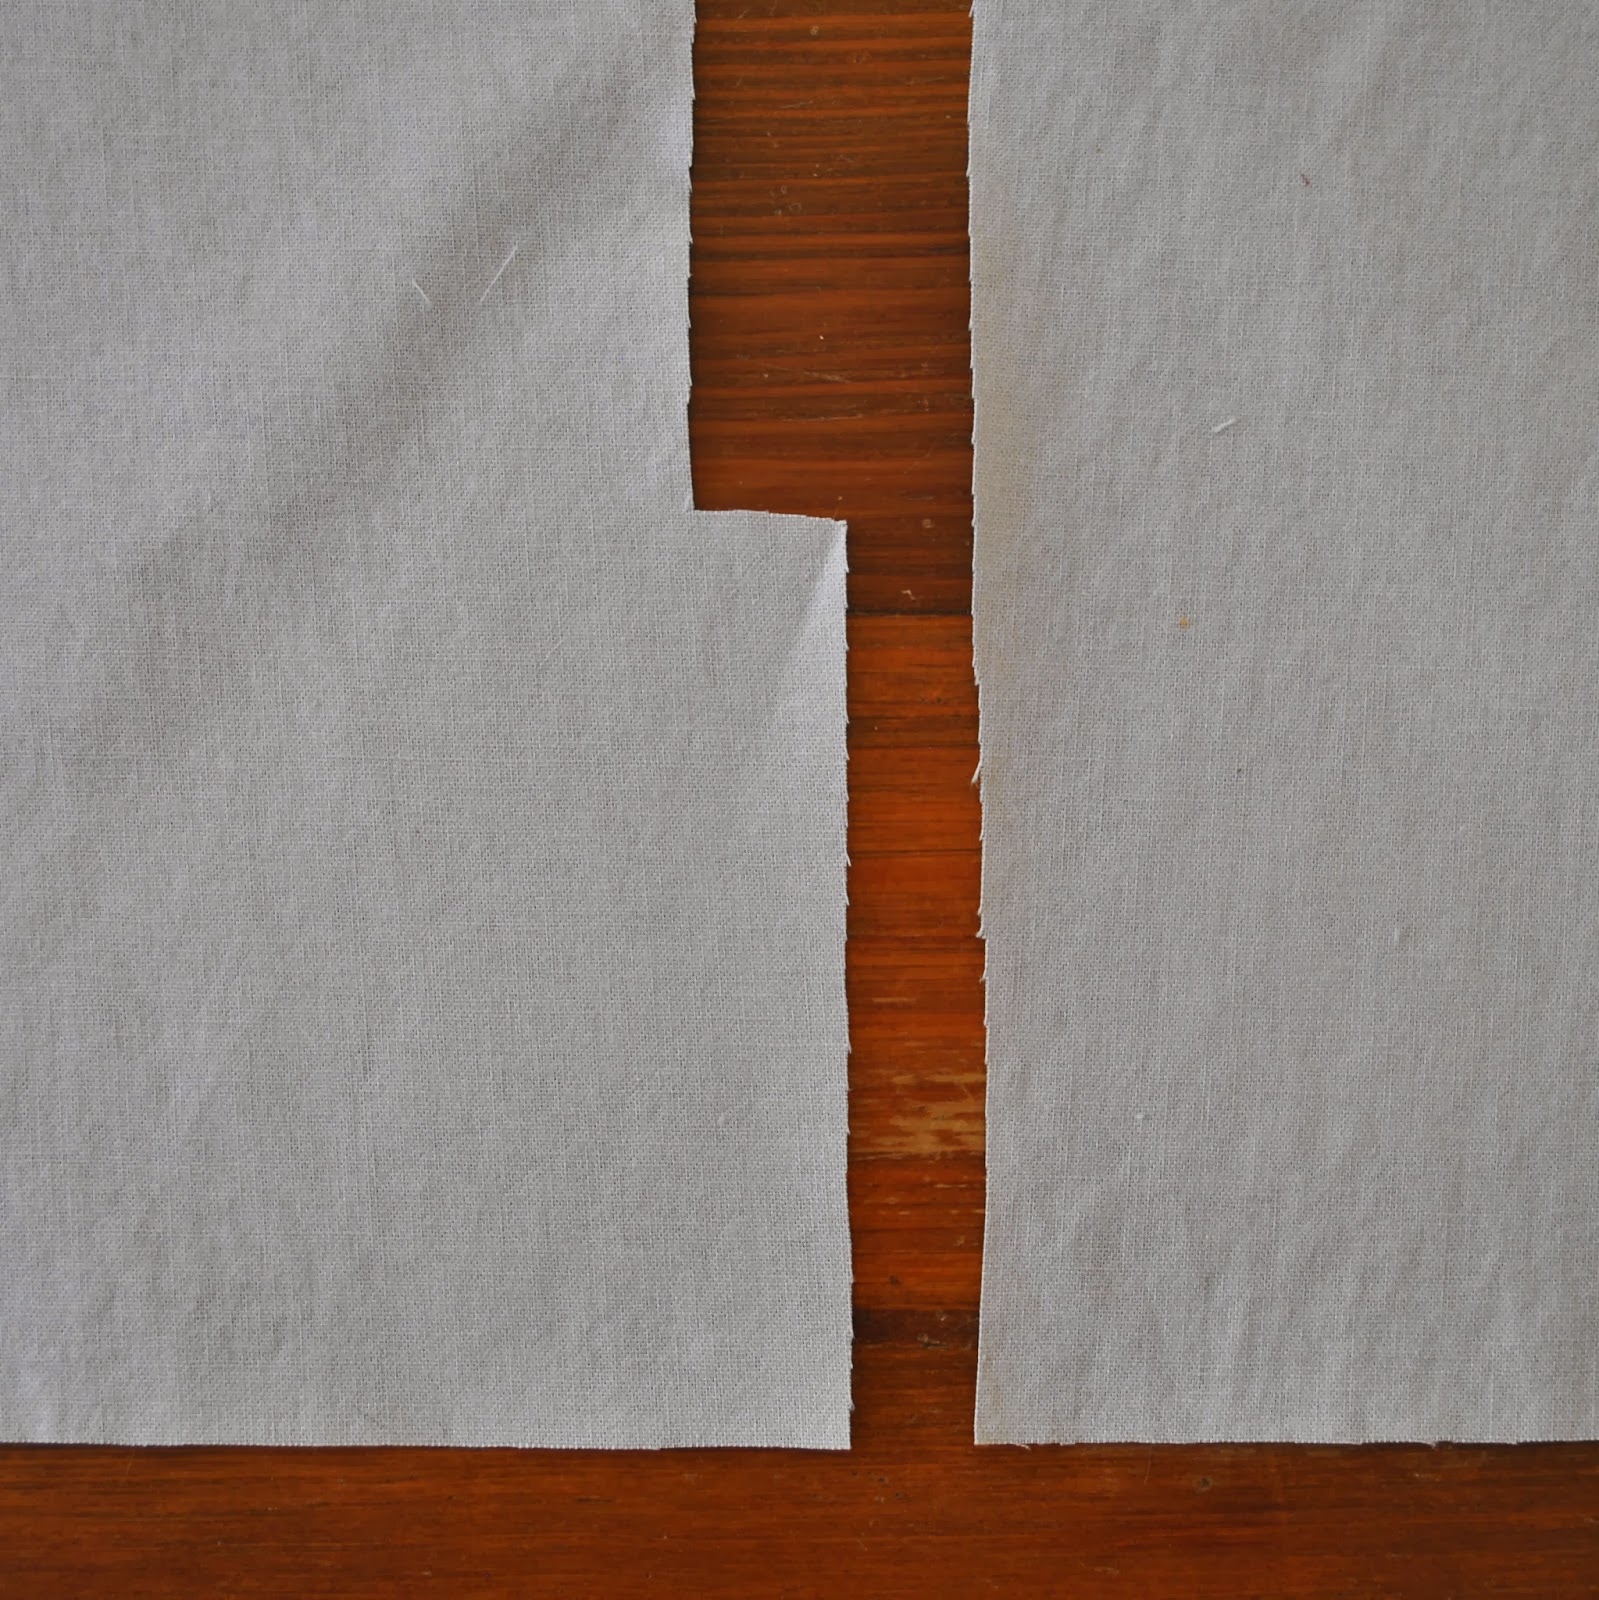
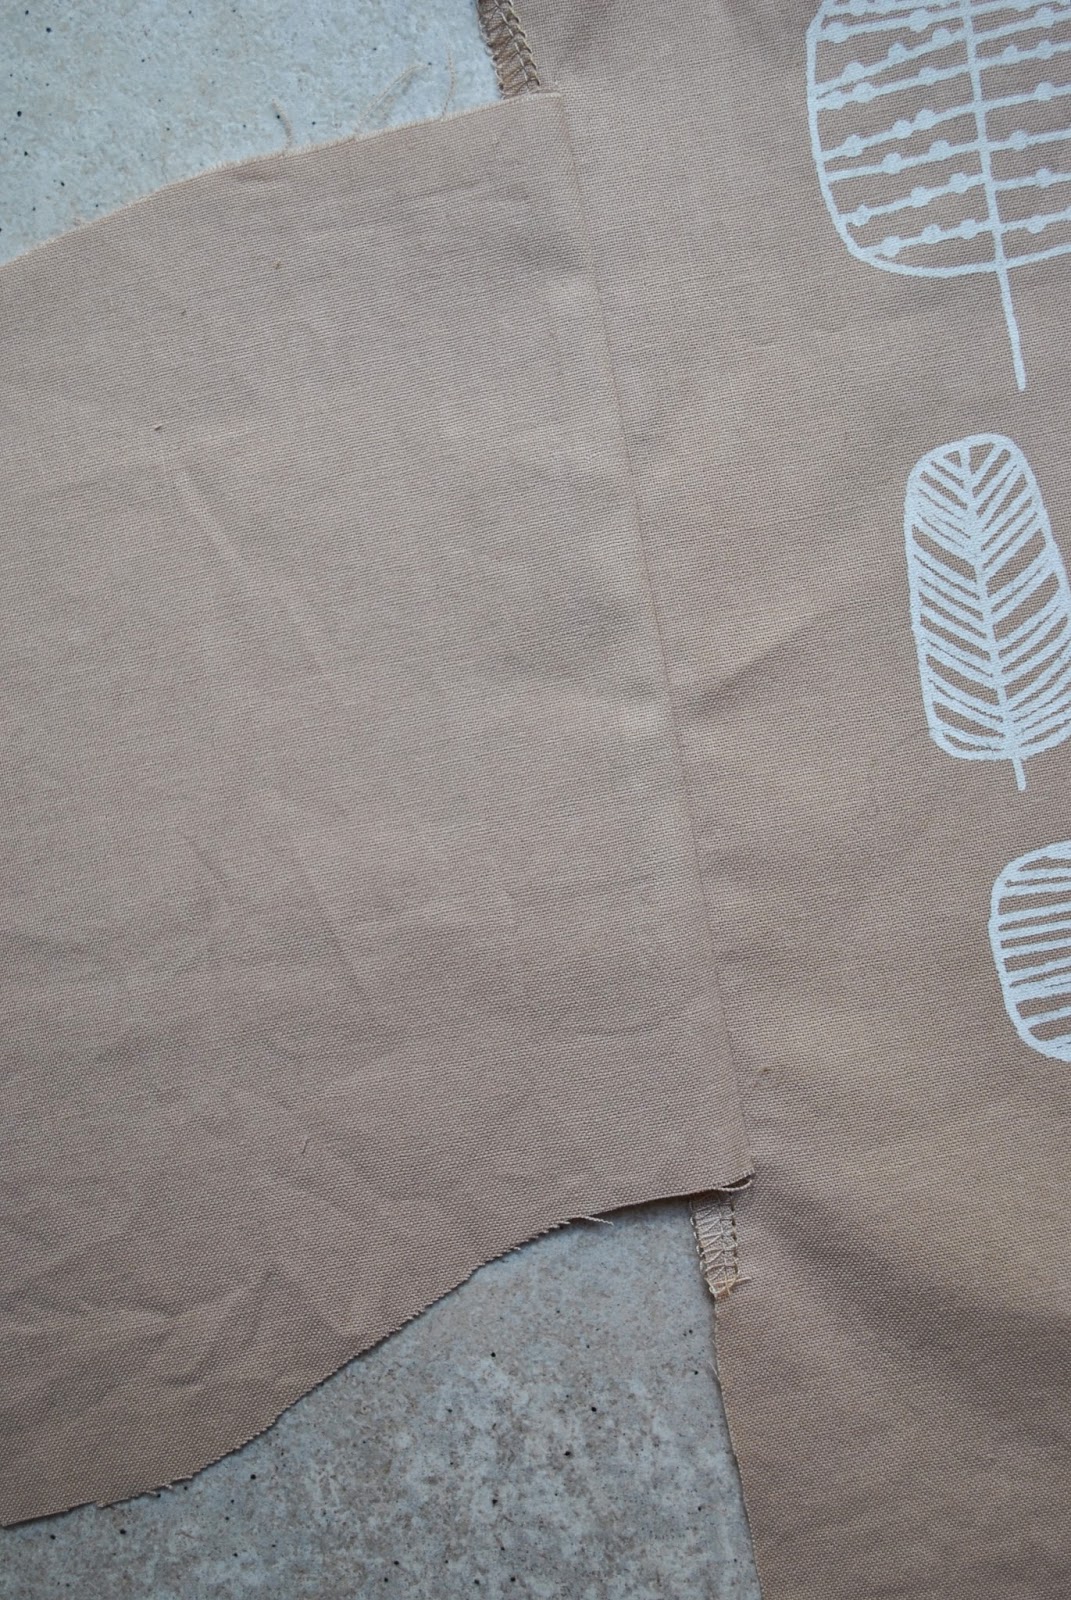
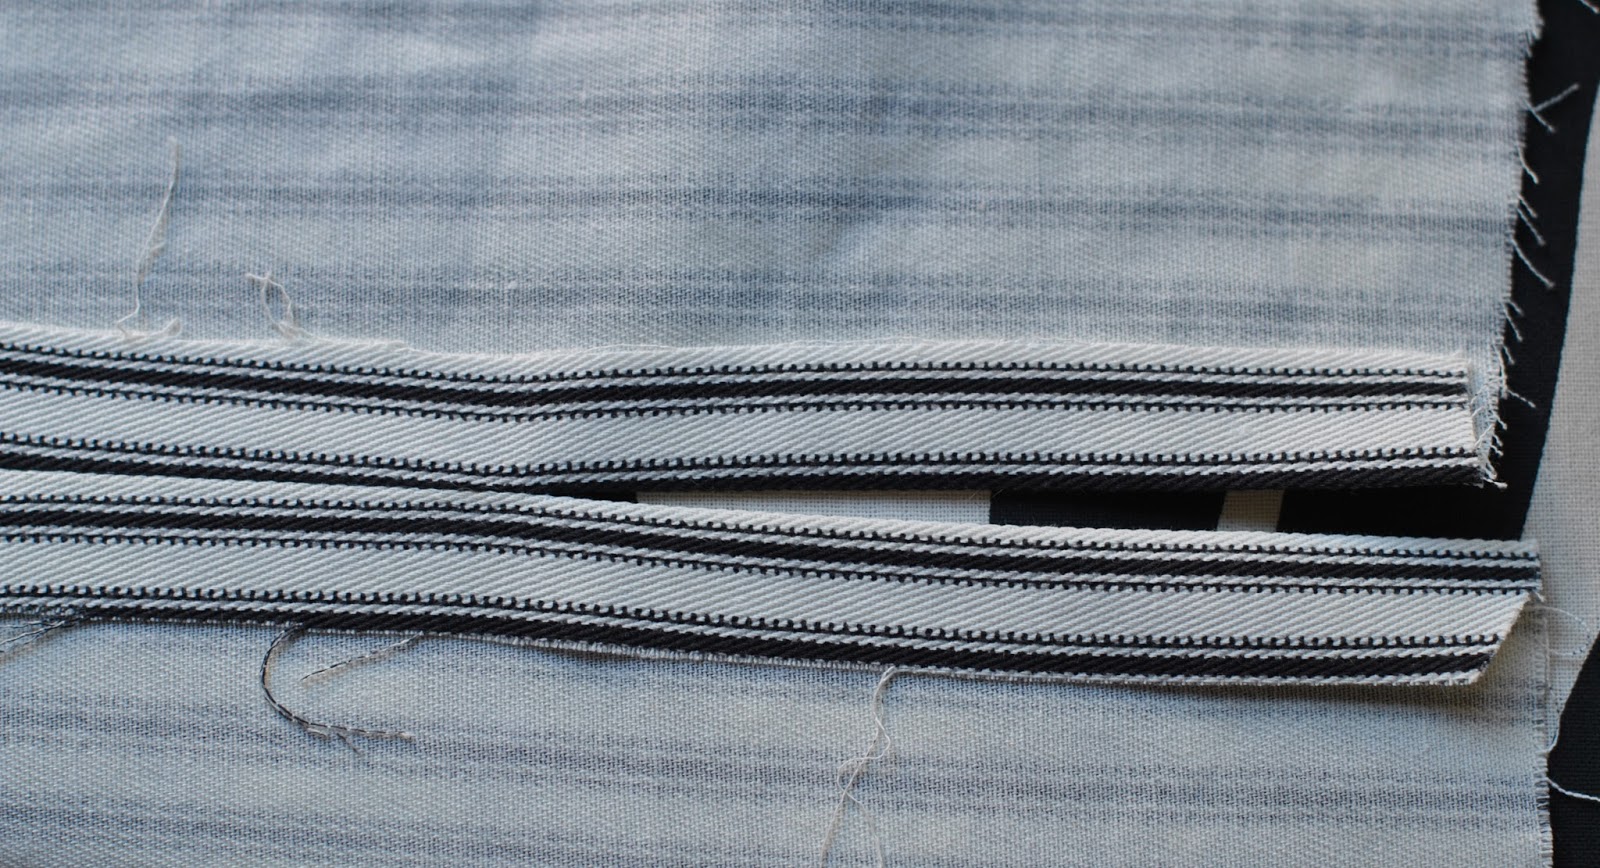
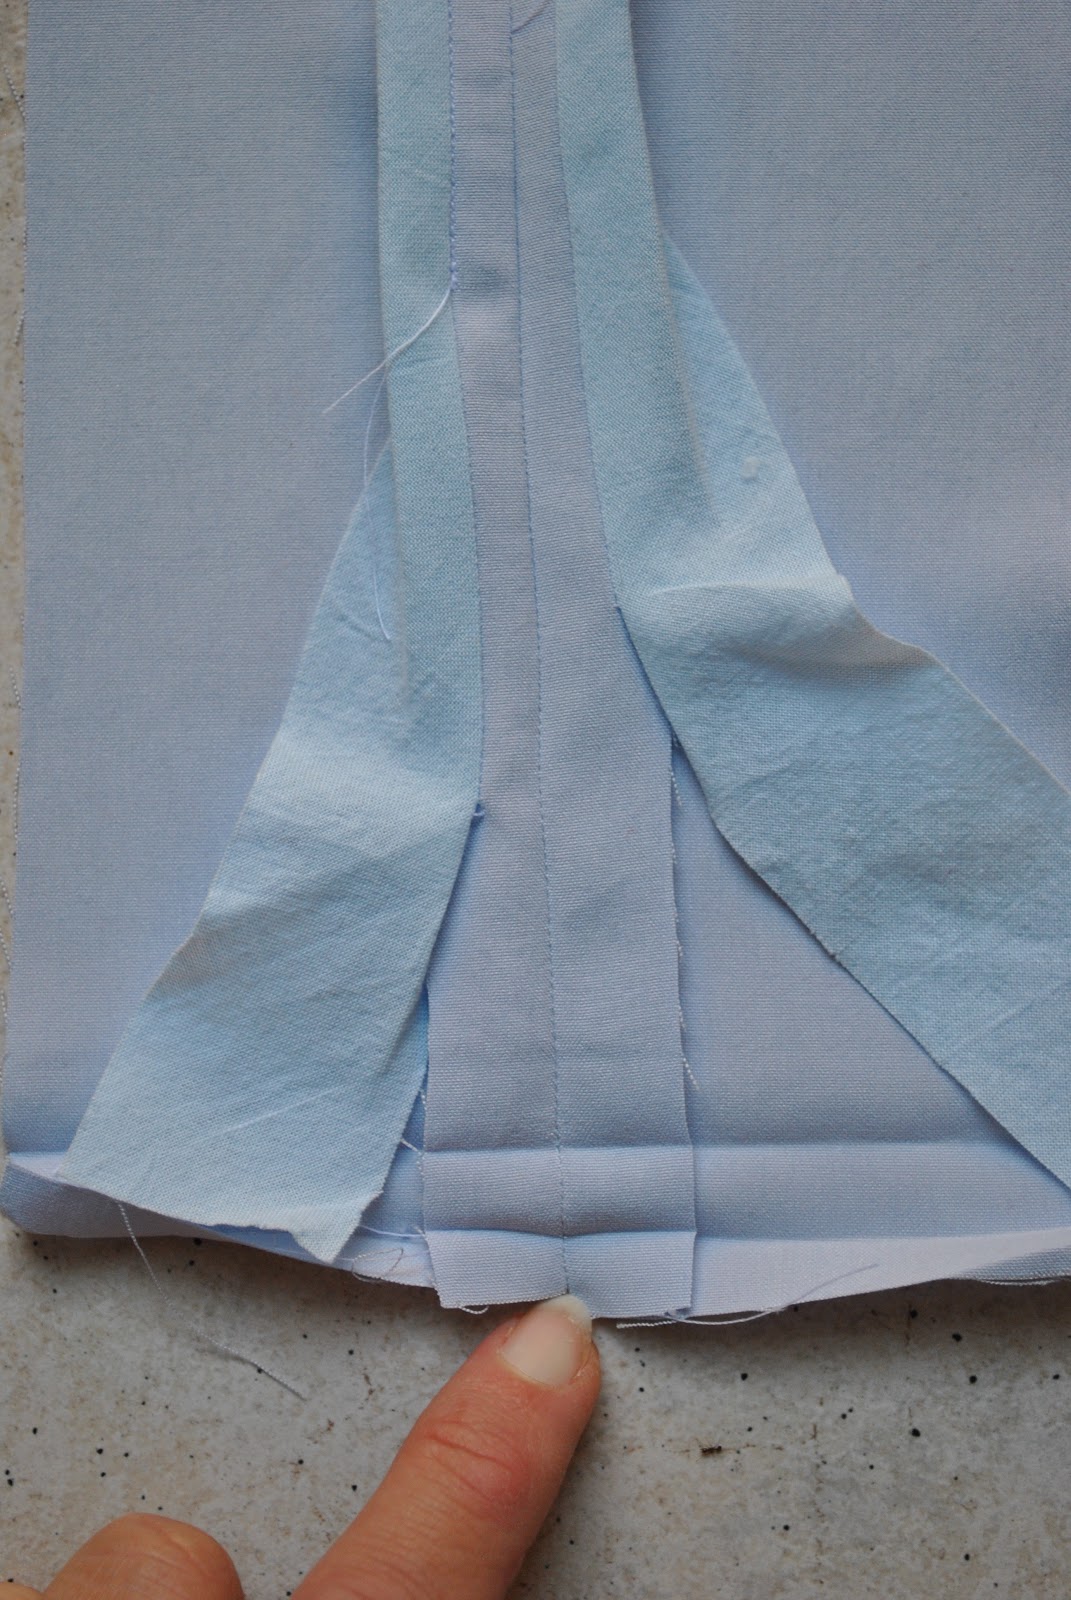
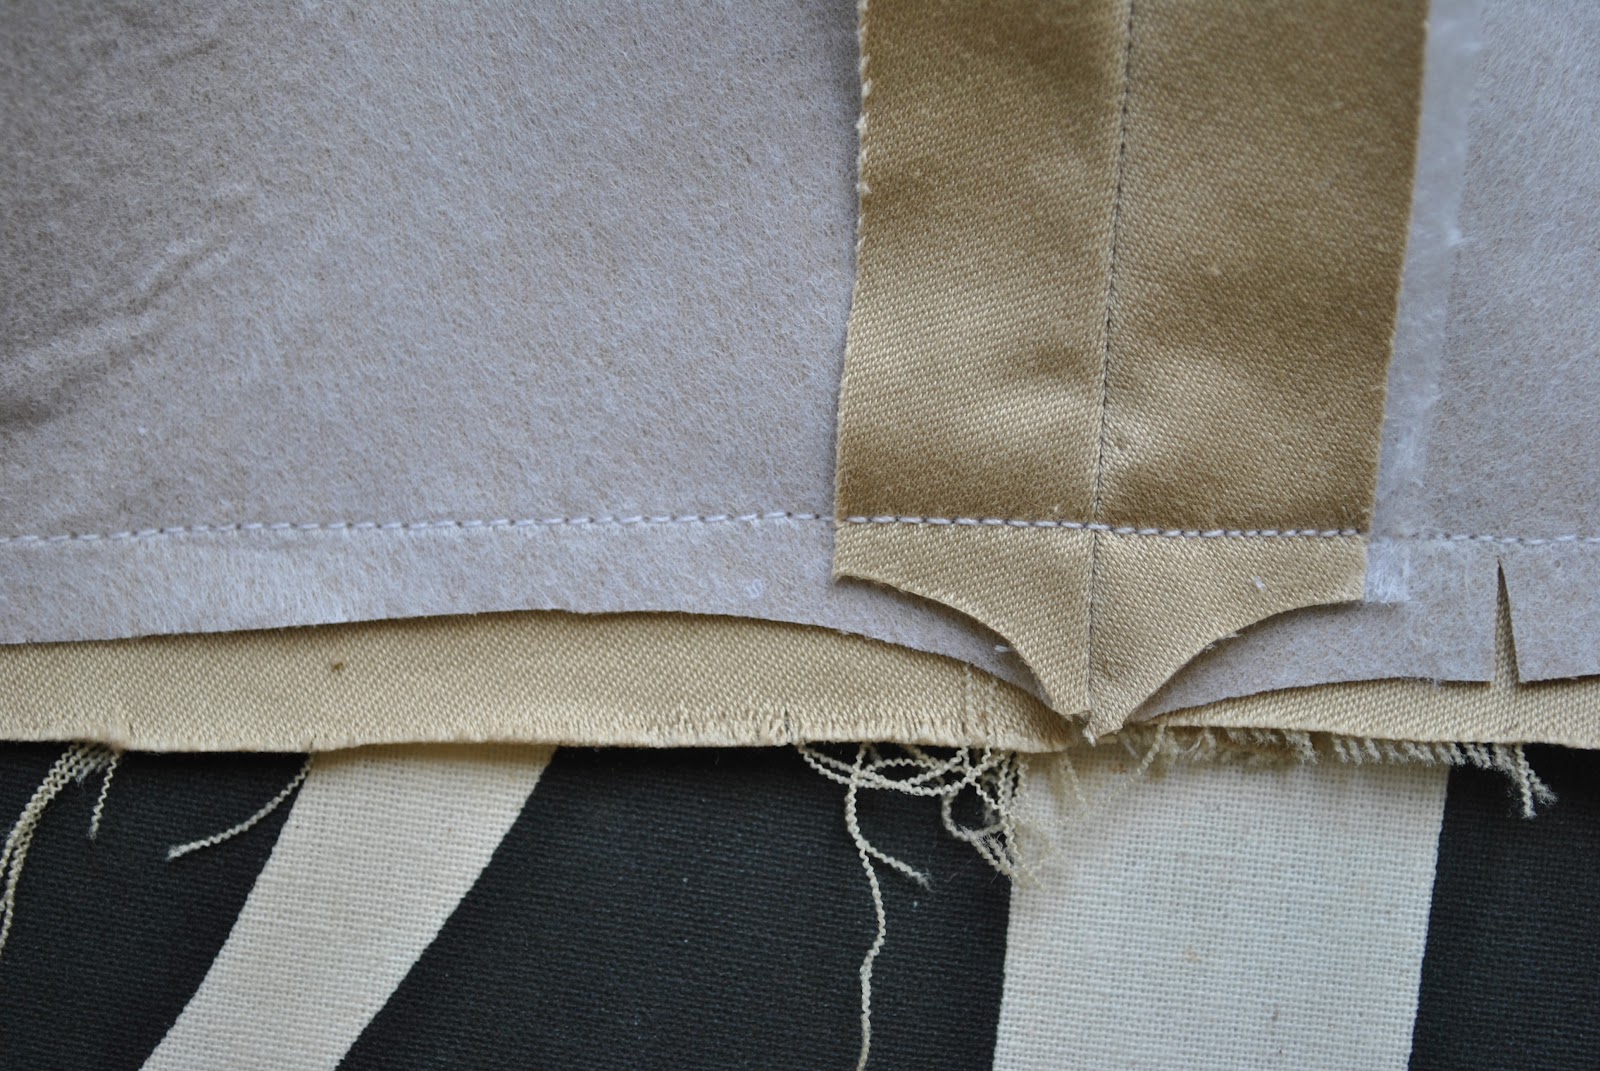
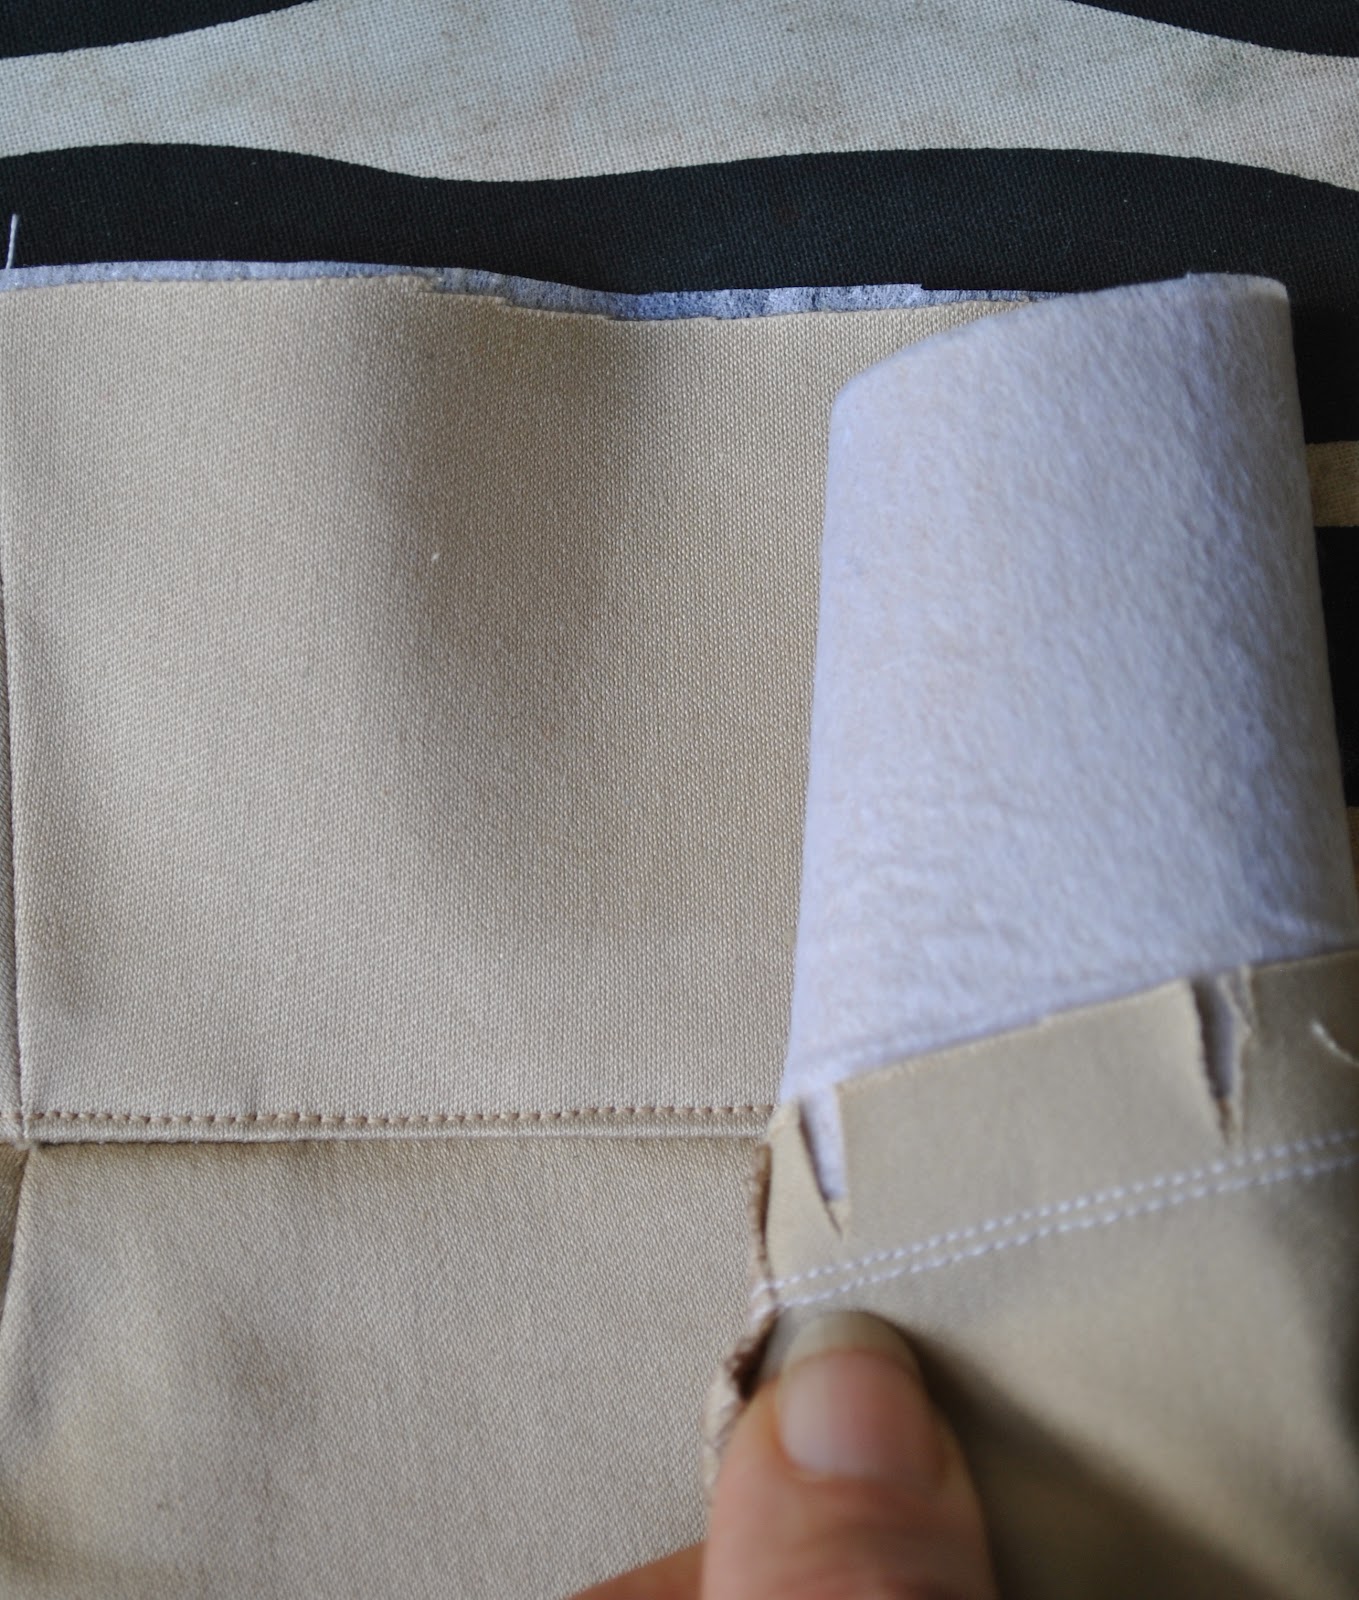
The next step is to trim and clip the seam allowances.  My own approach to trimming the seam allowances I have been doing for years, with no concrete memory of where I learnt it: the layers closest to the inside, or closest to your skin are trimmed away the most, graduating from a narrowest layer out to the wider-most layer closest to the outside of the garment, which are trimmed the least.  So, the wider allowances are always against the outside of the garment, the narrower ones to the inside.
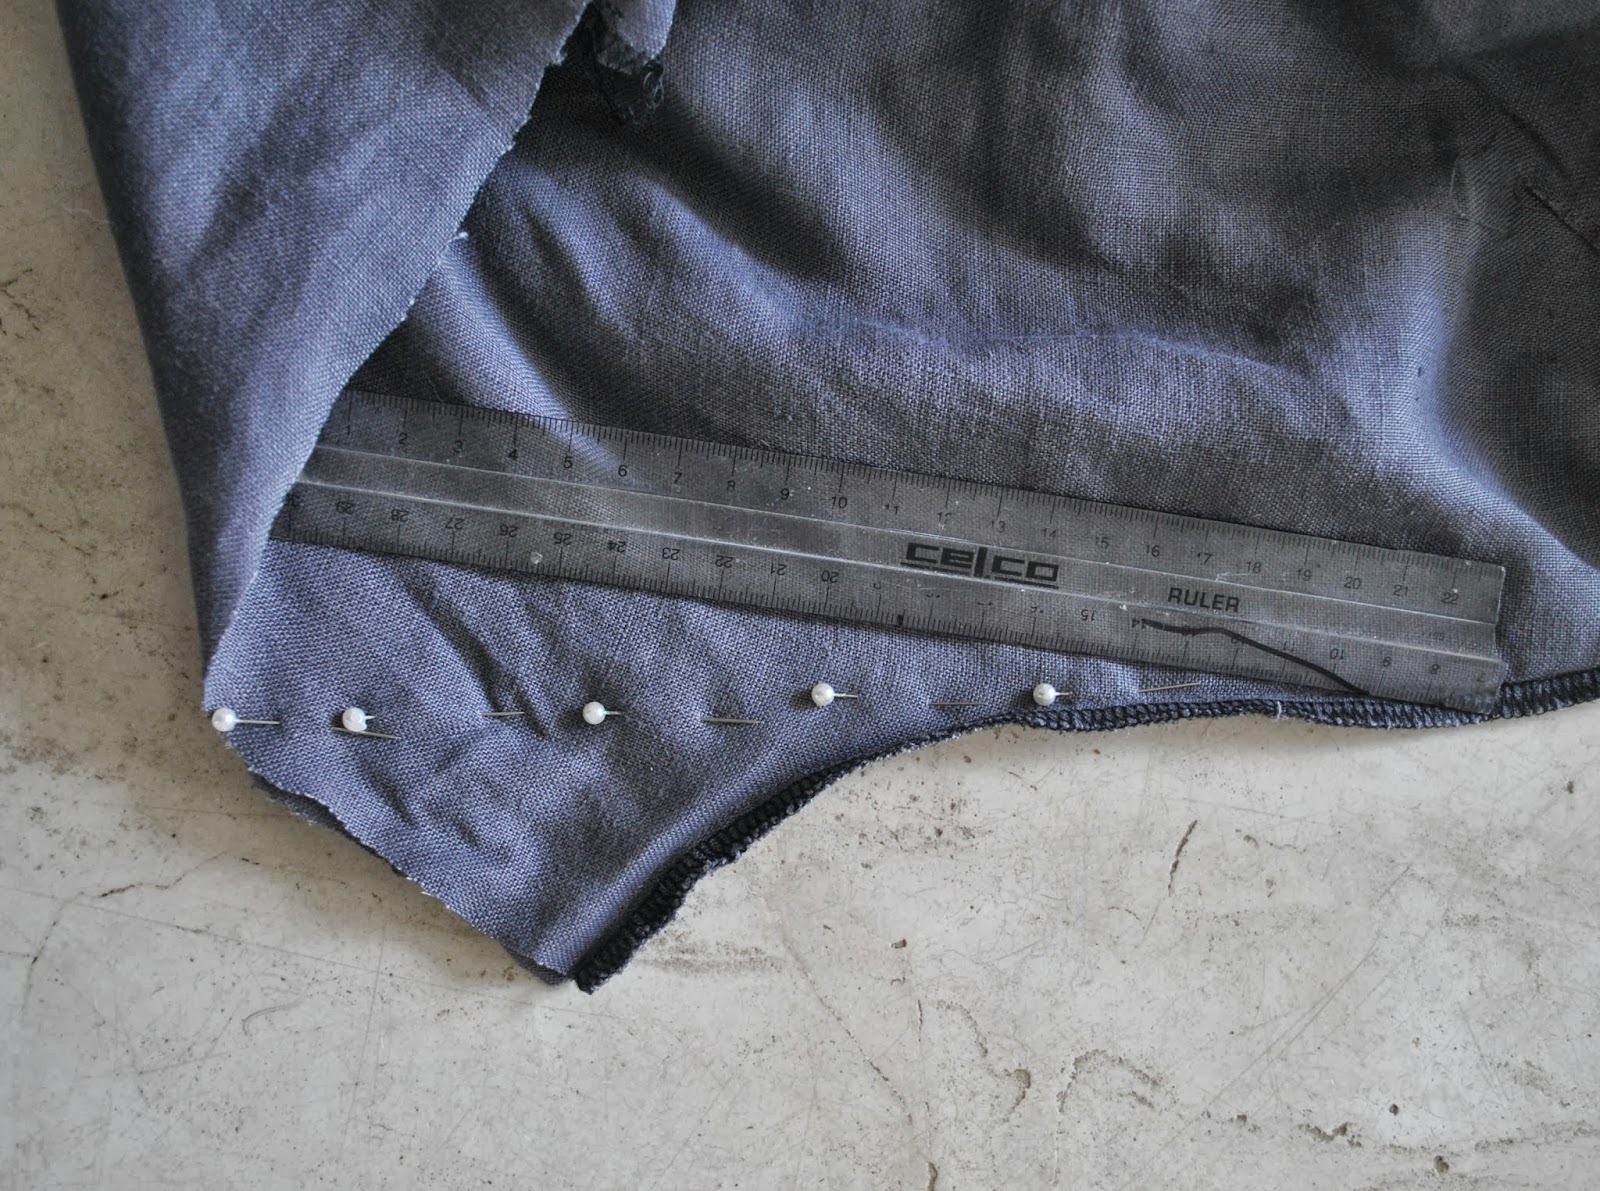
I rarely trim the stitching of the seam itself away, but trim out to the edge, so as to preserve intact the backwards/forwards securing stitches at the beginning of the seam.

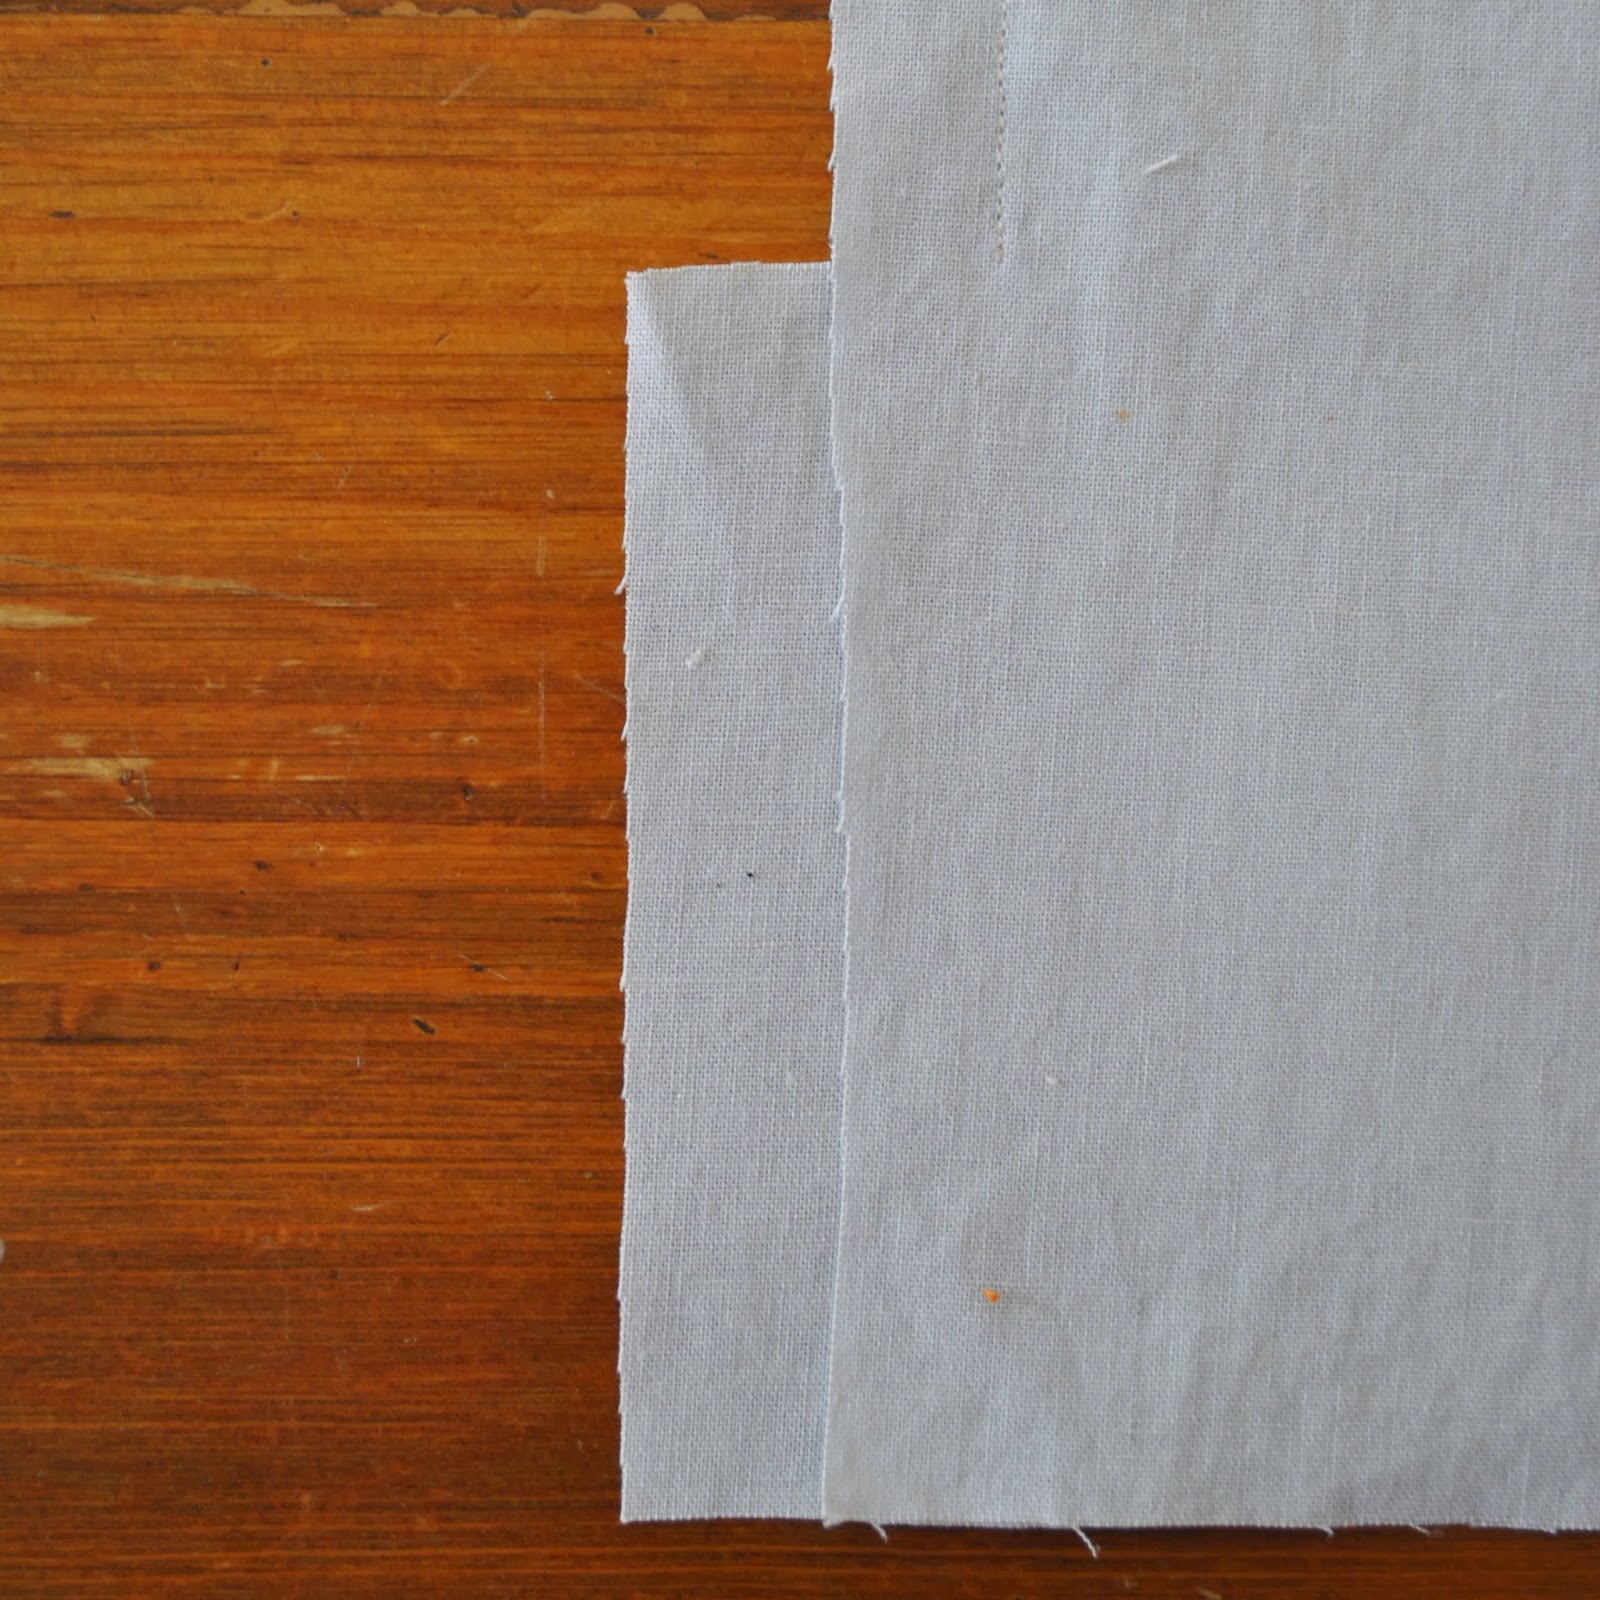
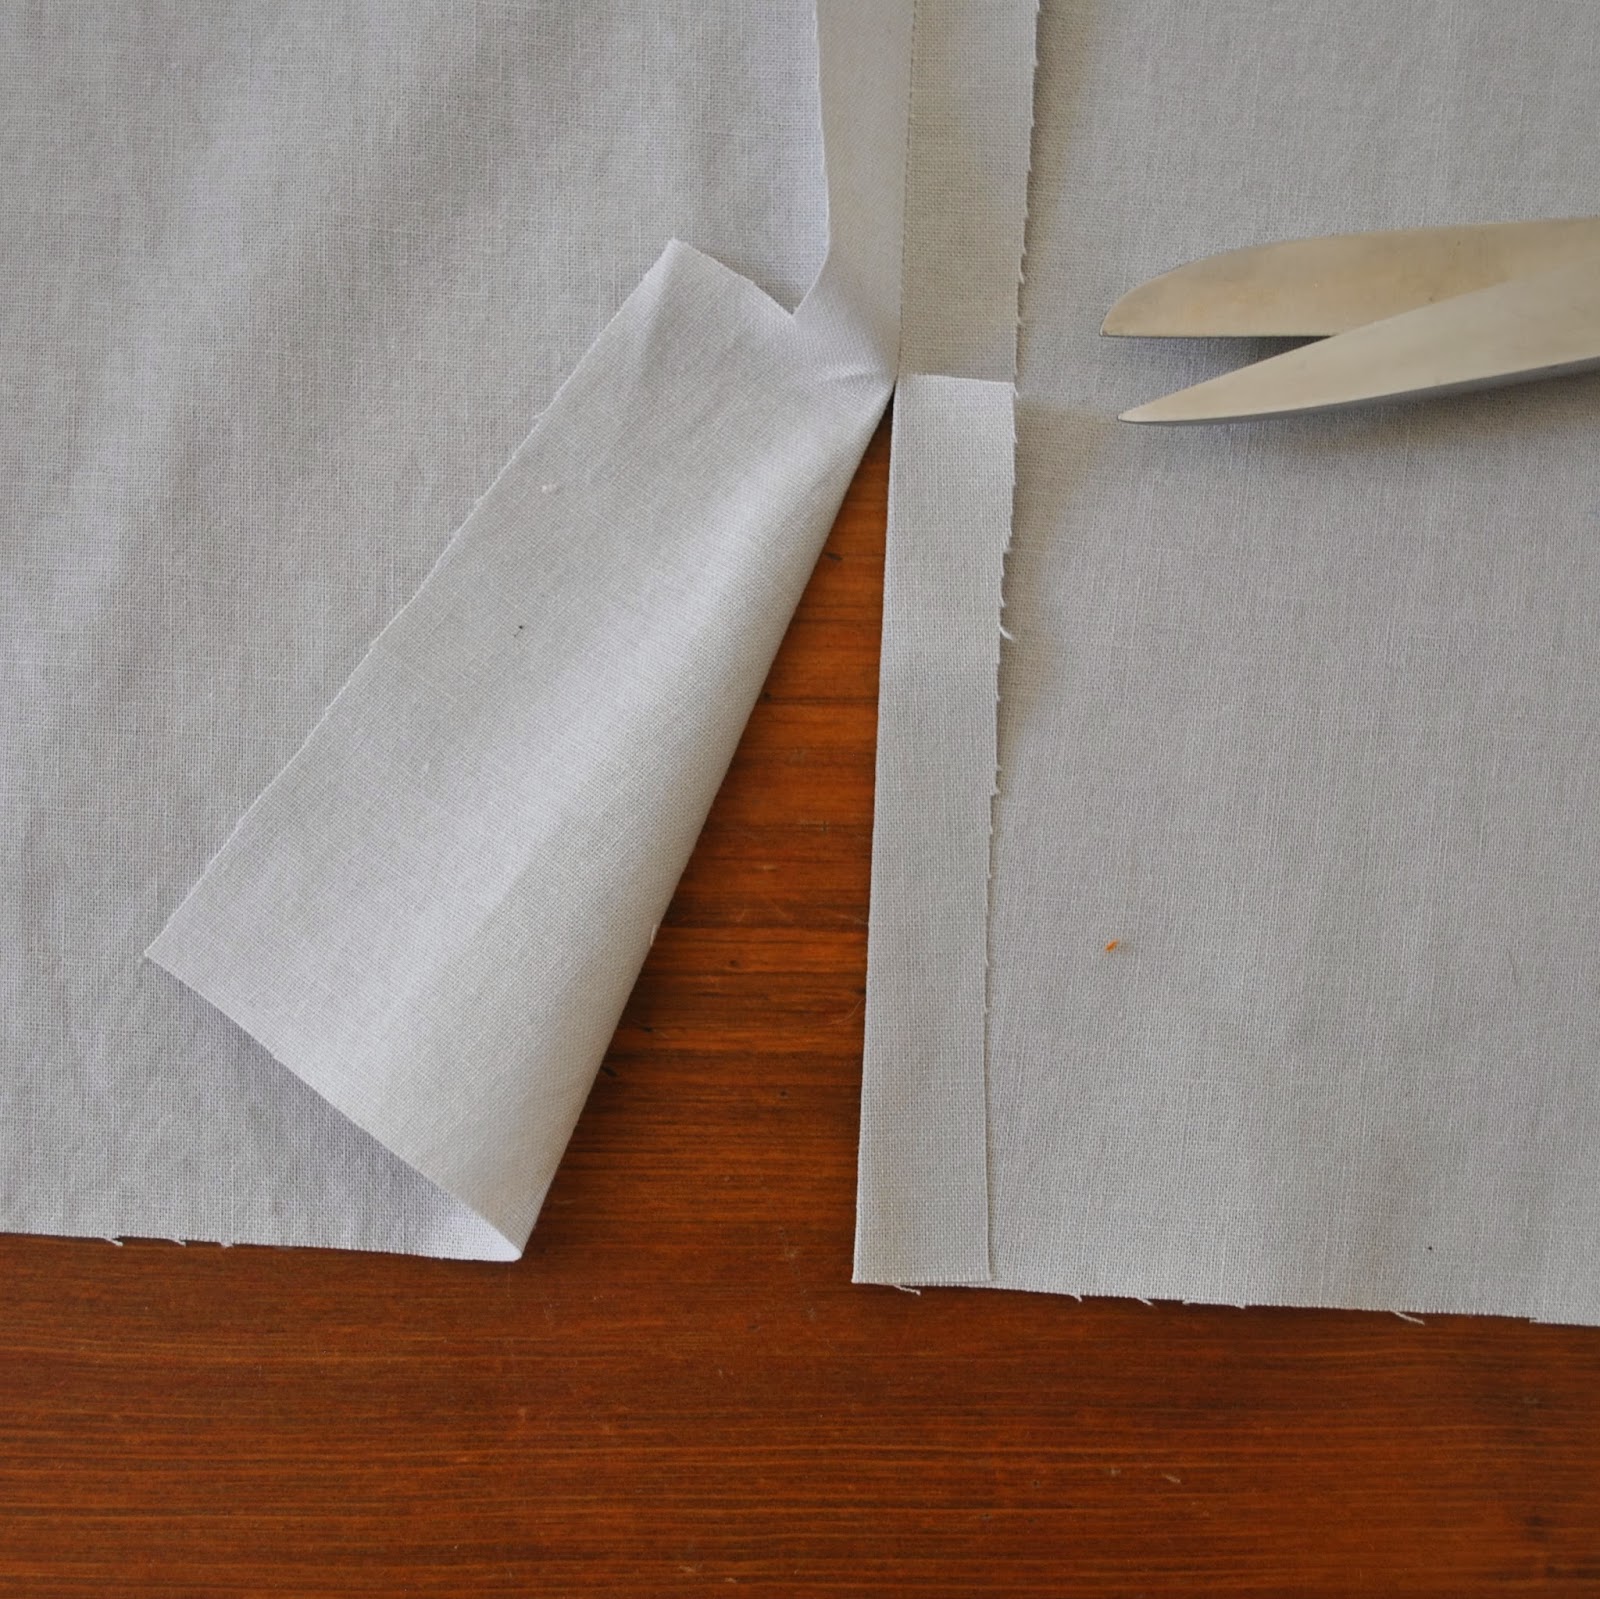
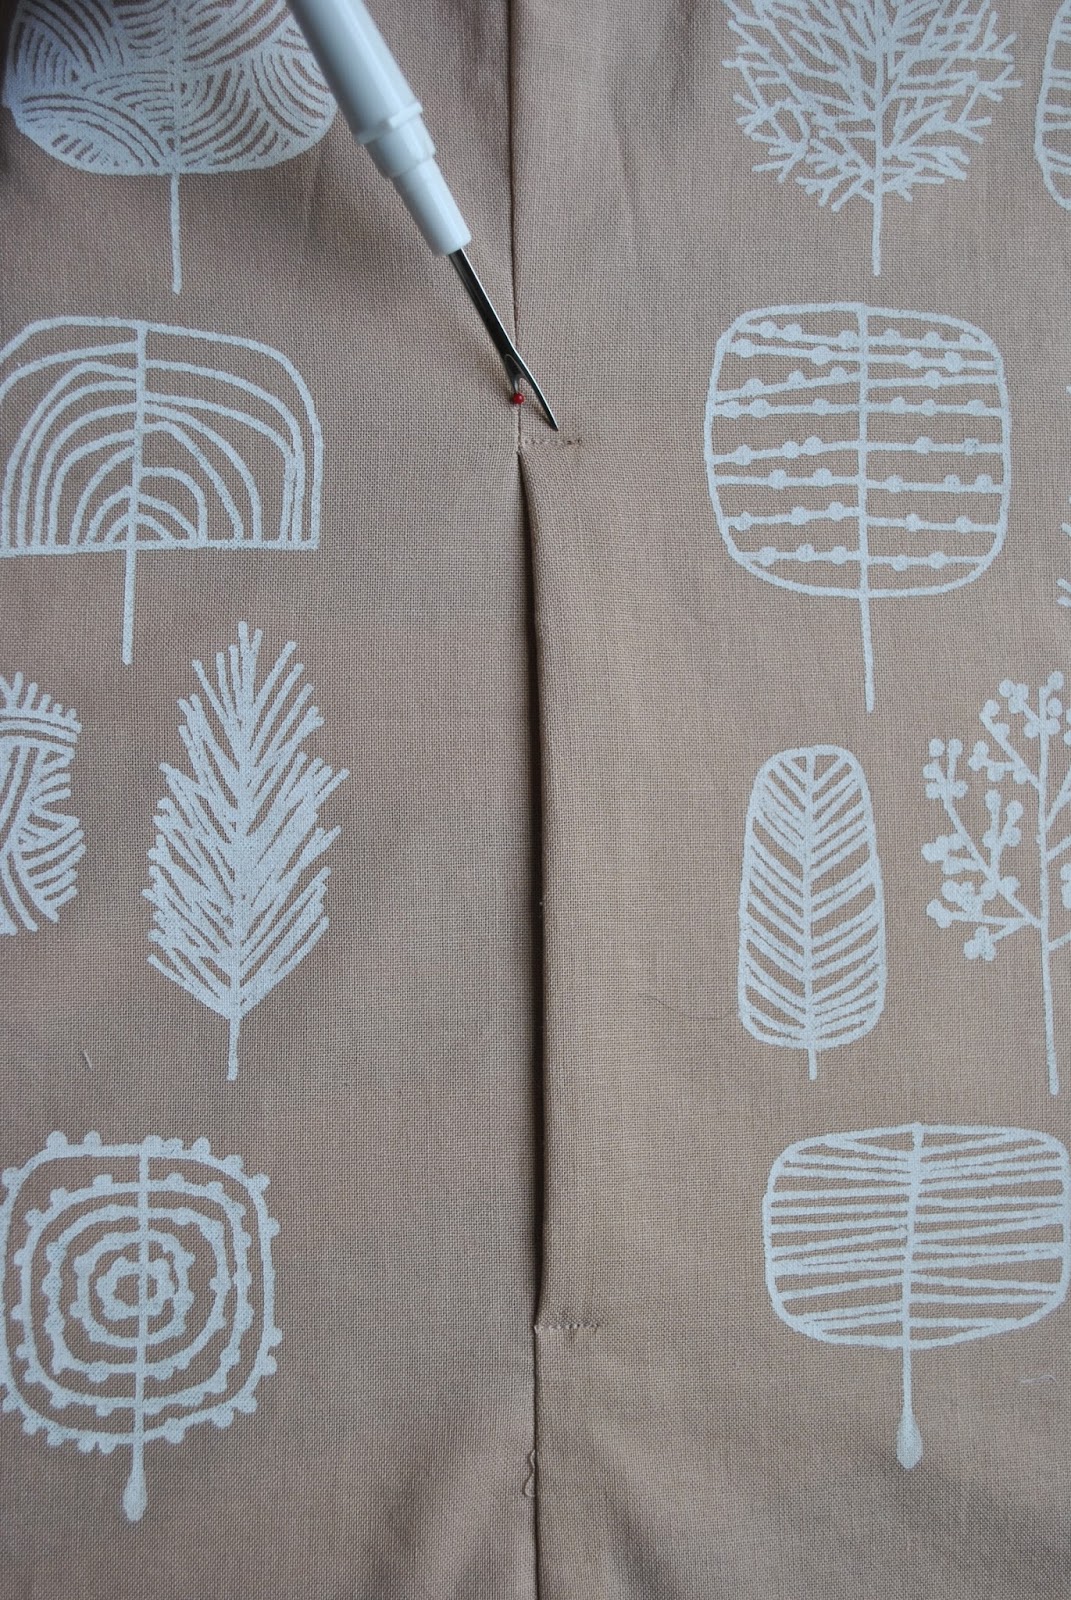
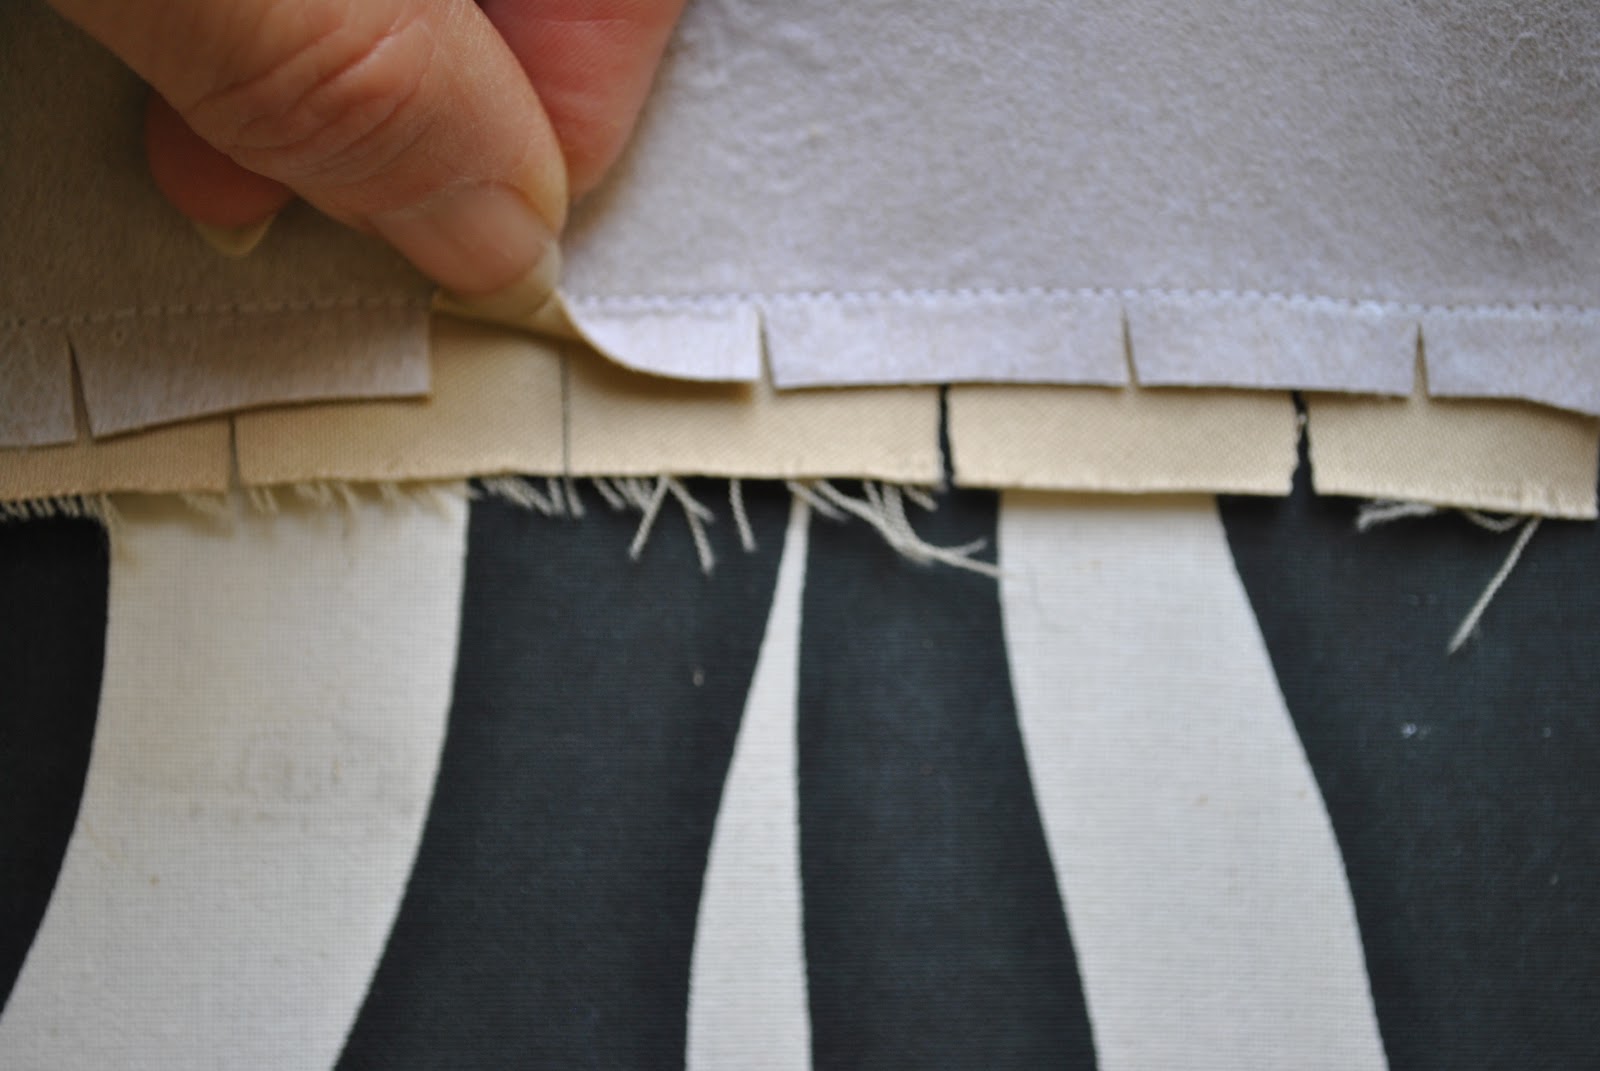
When clipping curves, and especially if the fabric is thick, I sometimes take the precaution of clipping in an offset pattern of clips, like so.  This lessens the likelihood of the seam allowances showing up like a little row of “teeth” in embossed shadows around the edge after pressing.

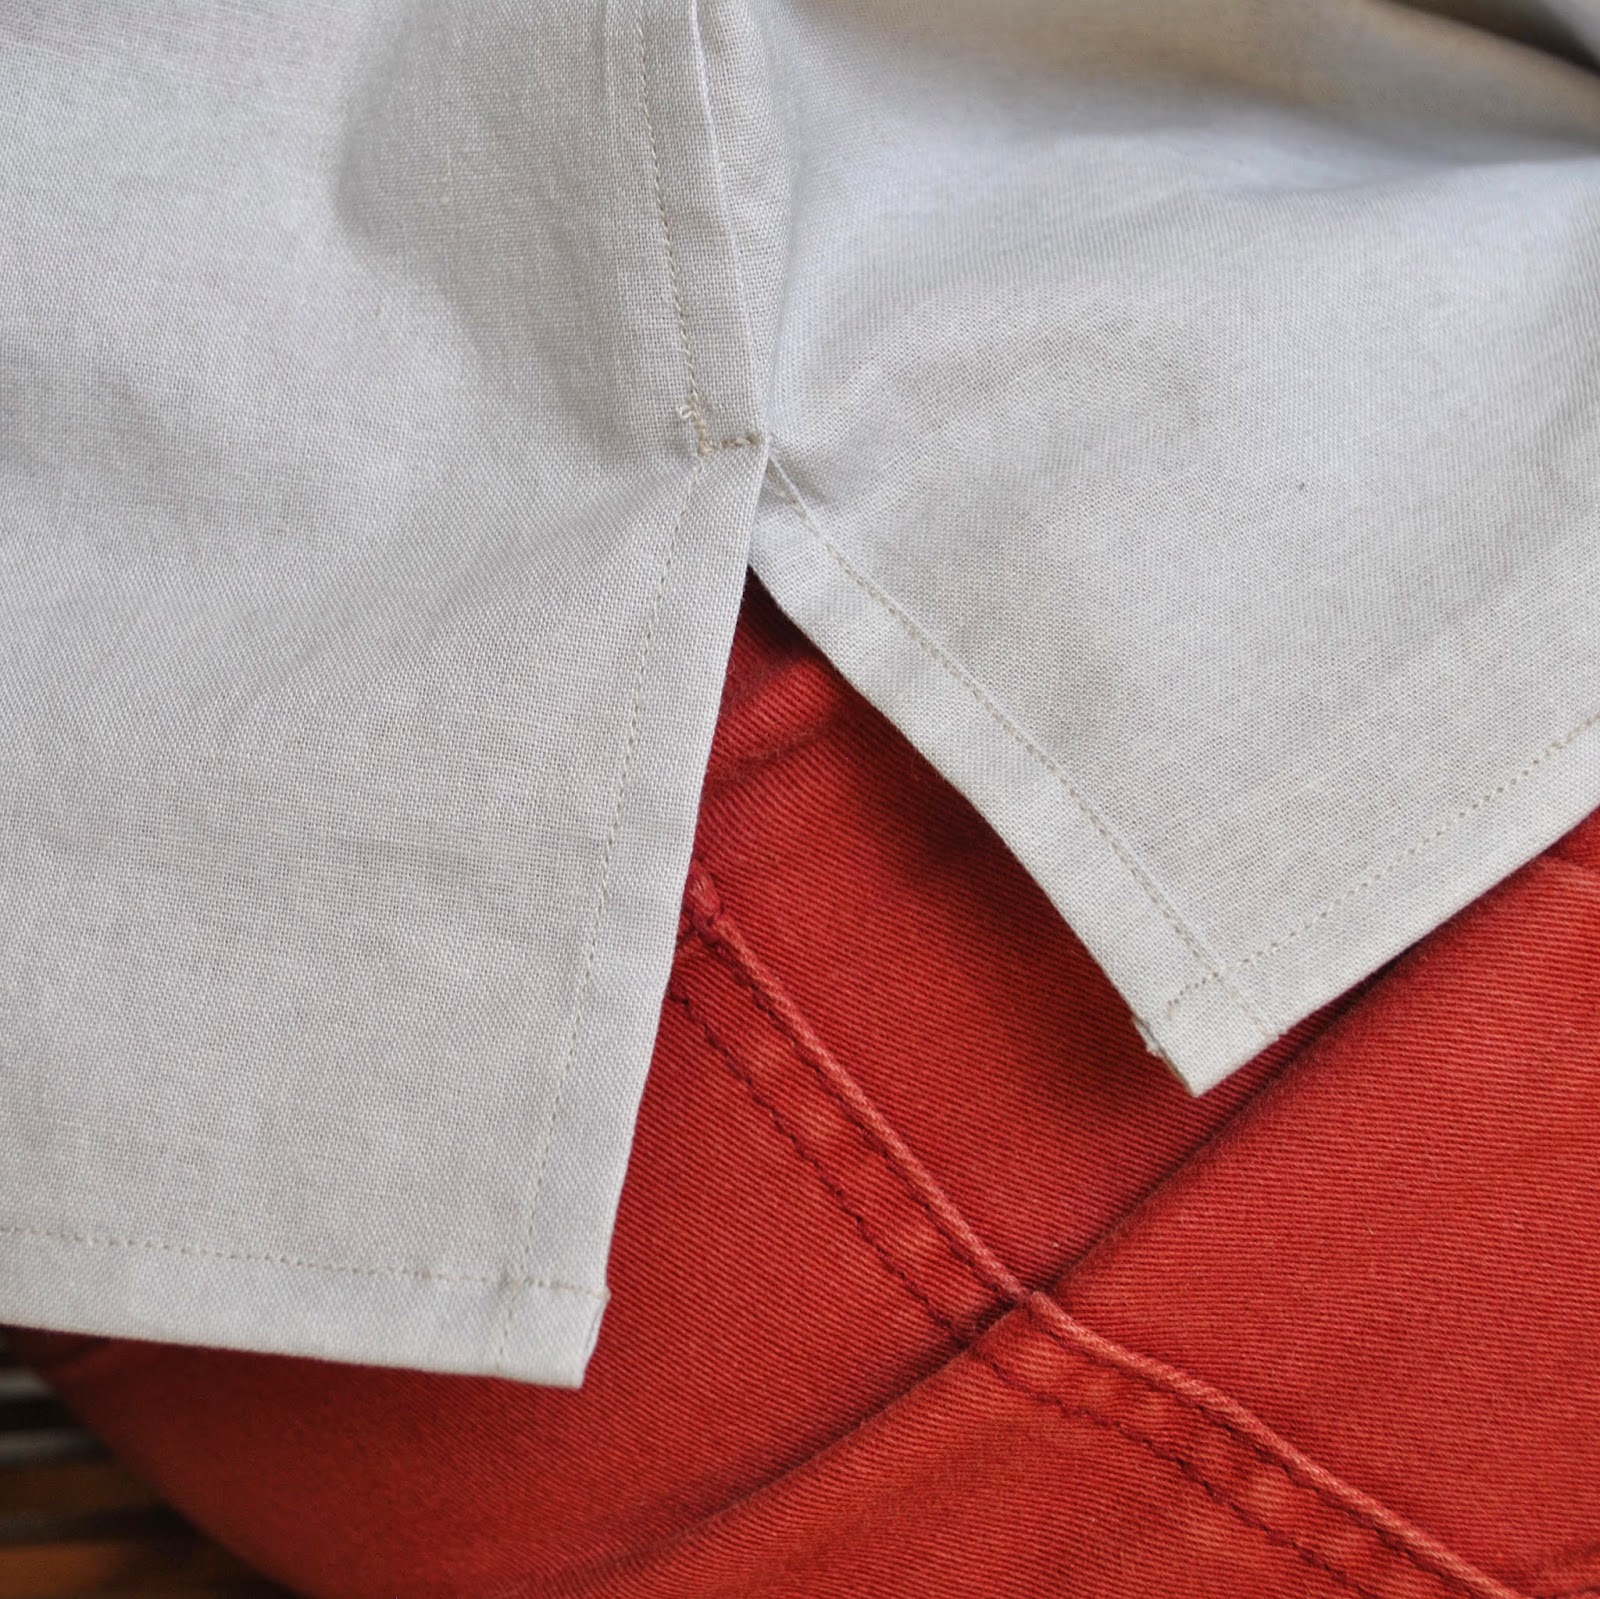
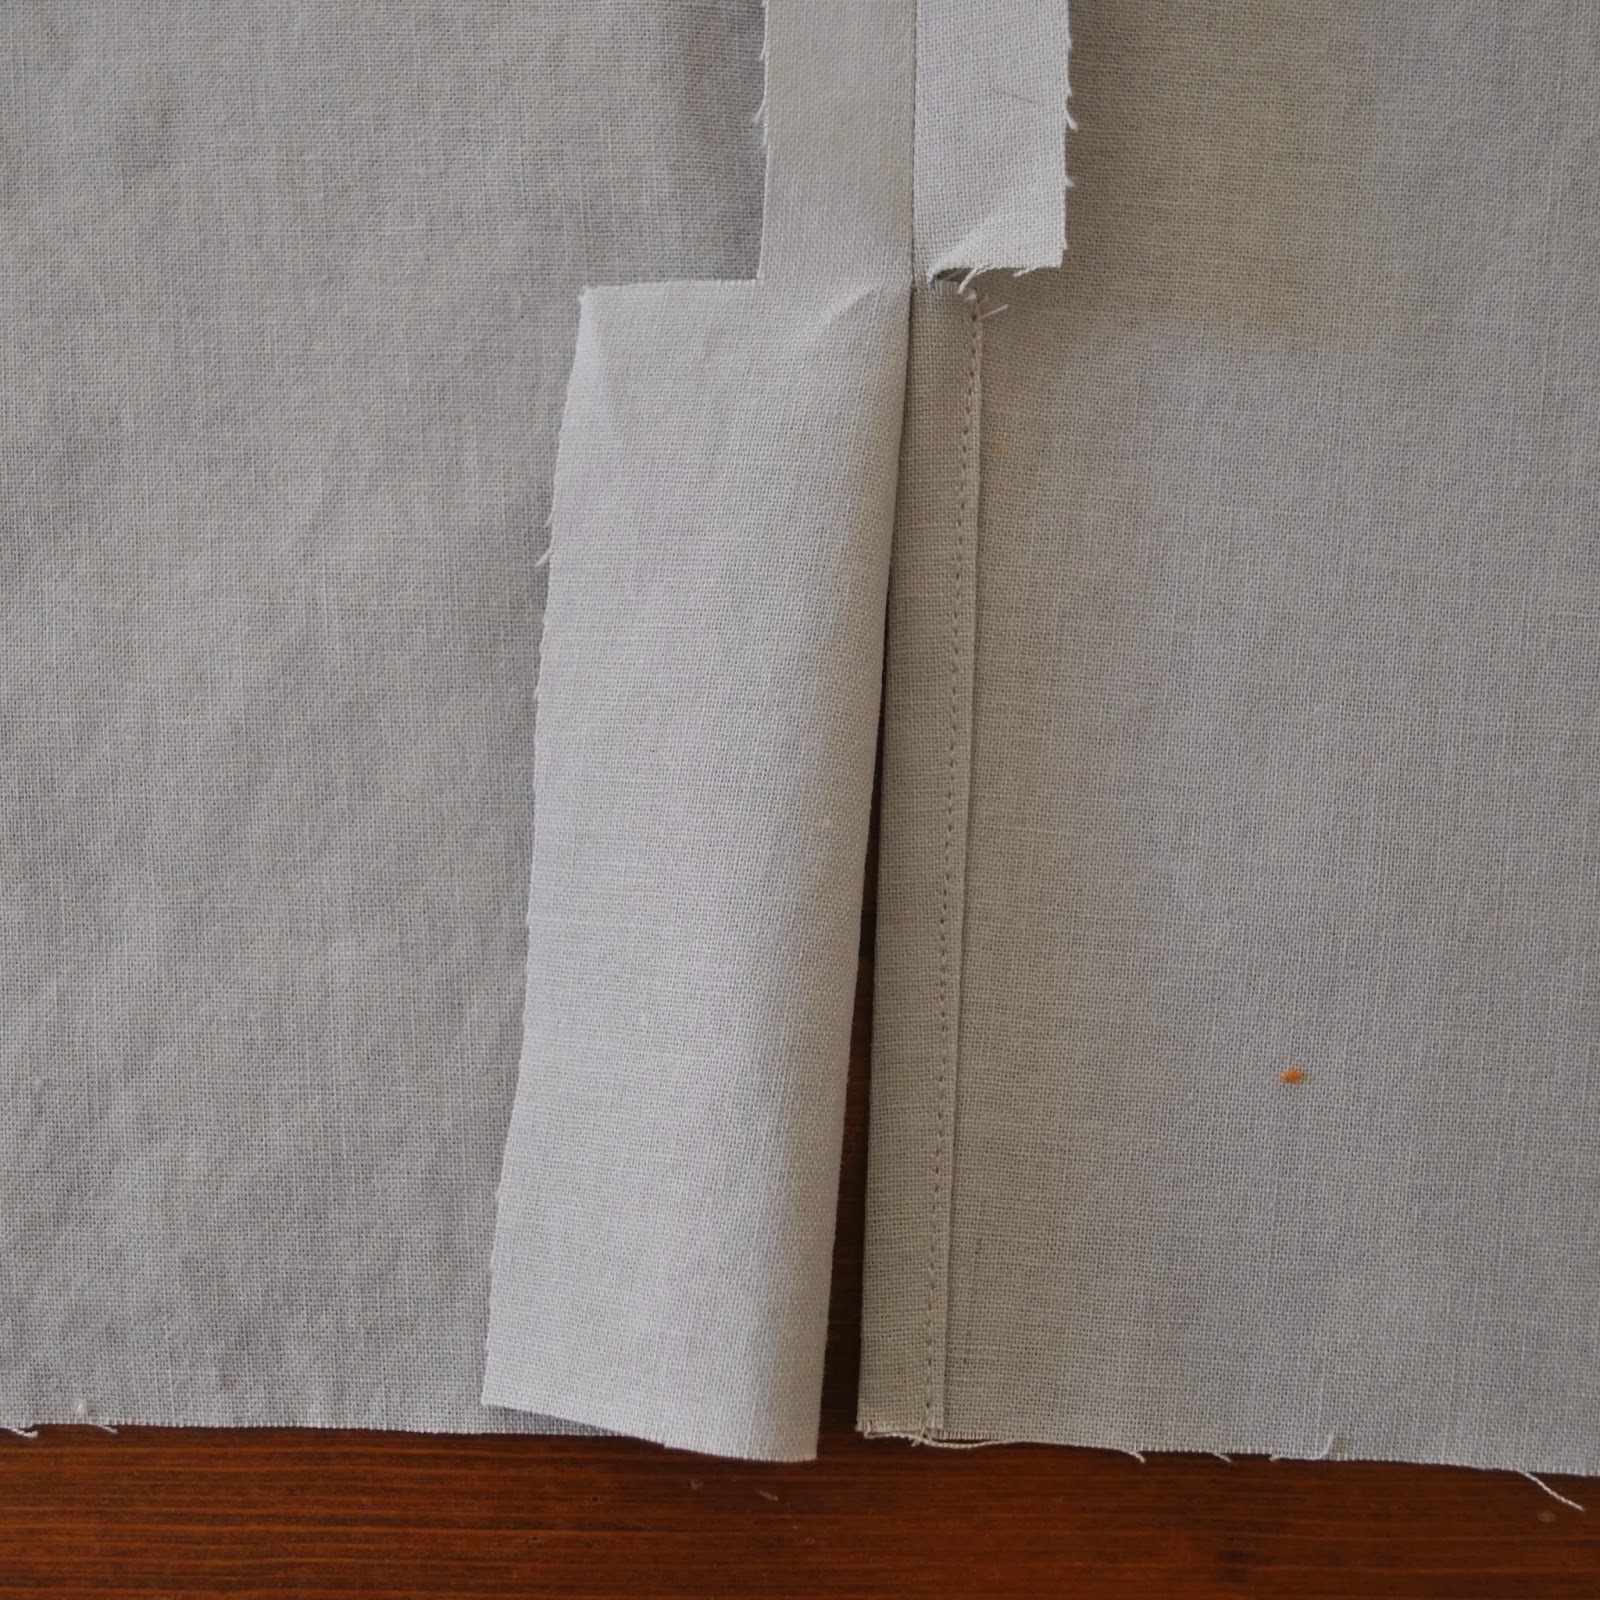
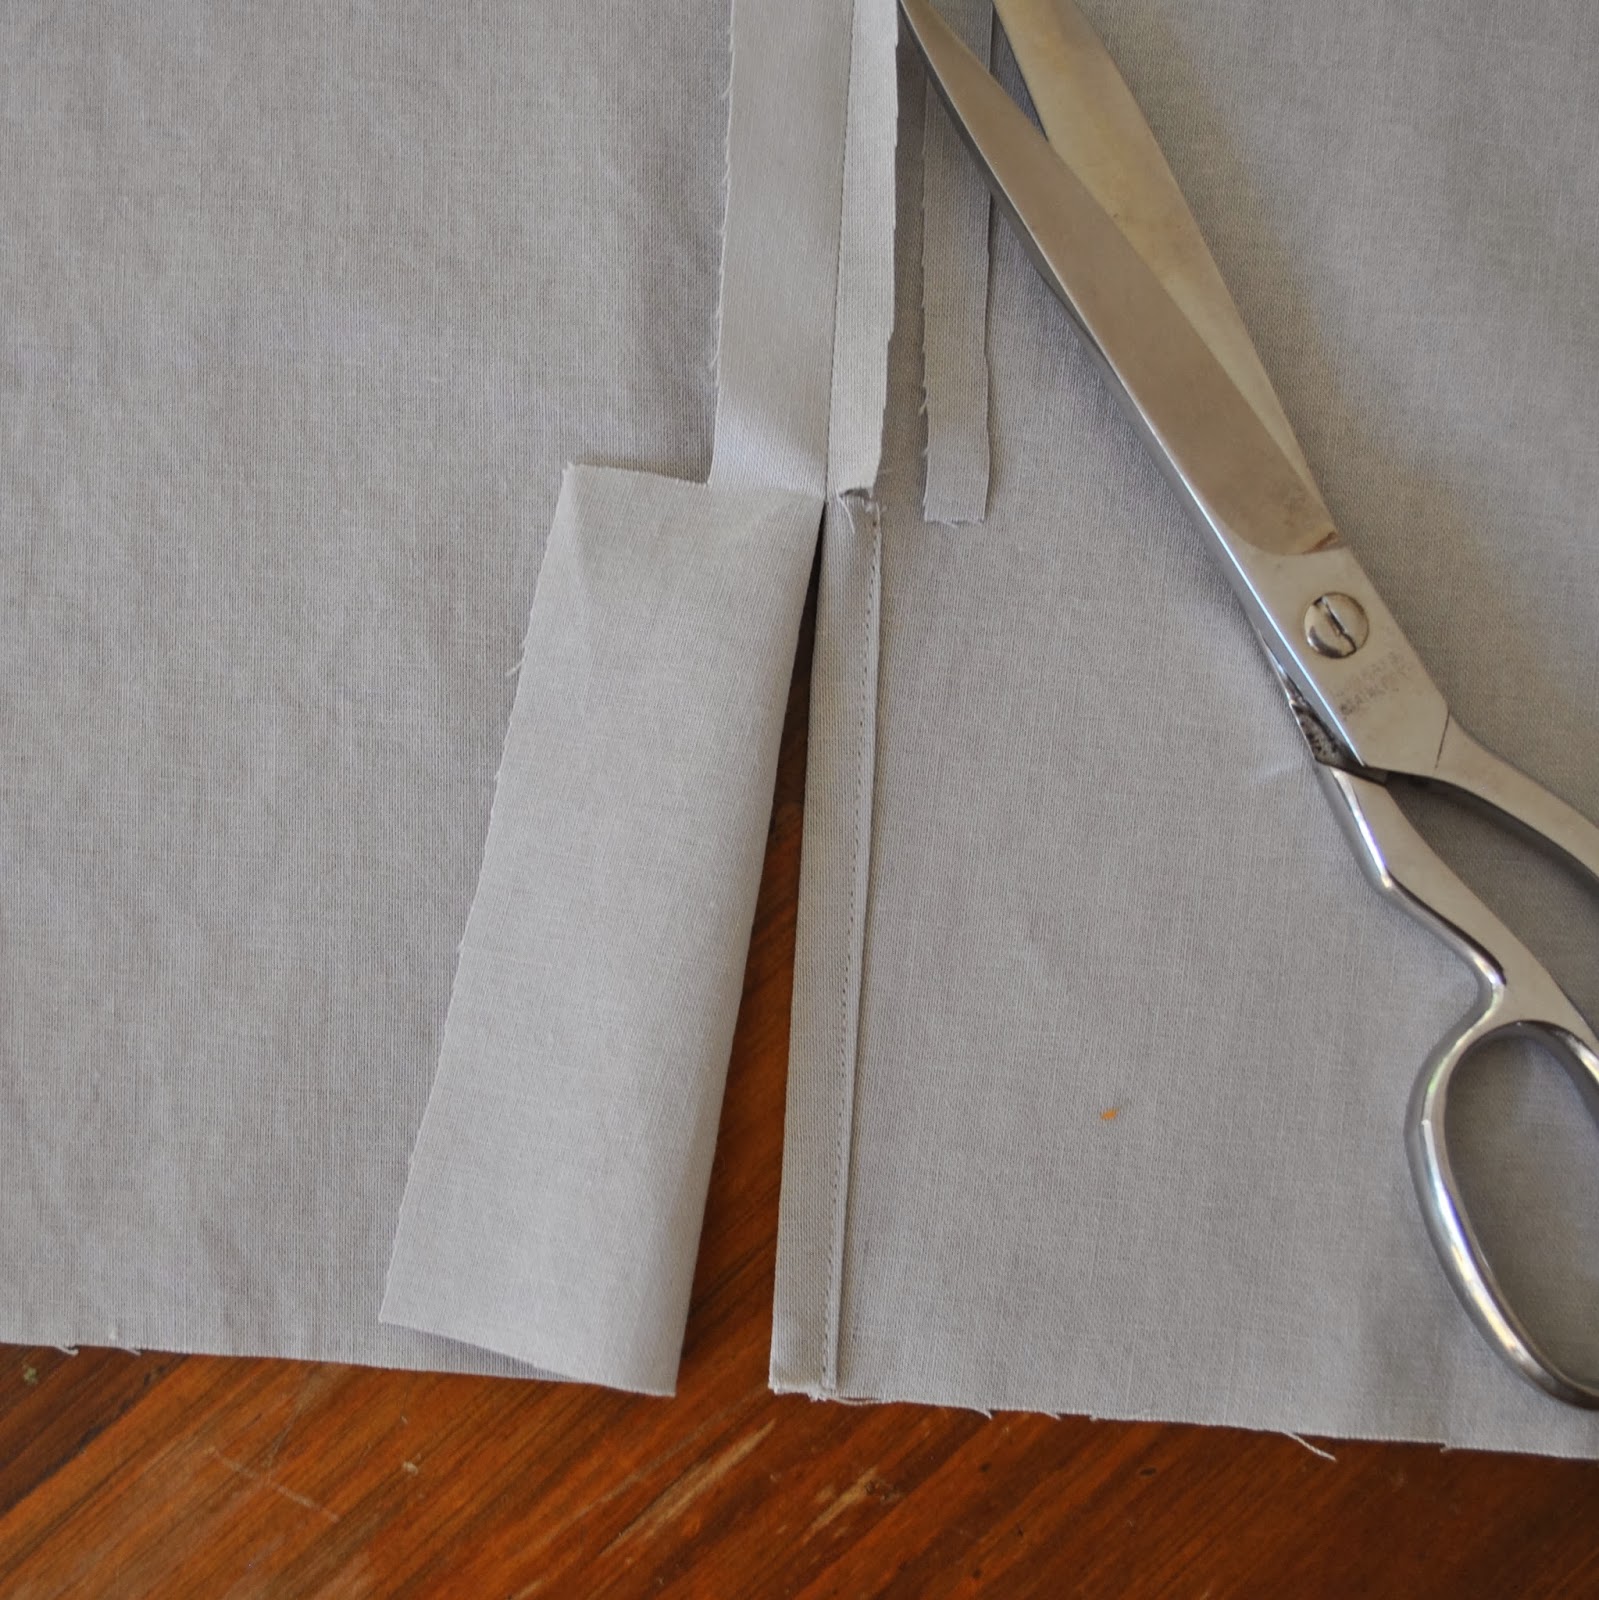
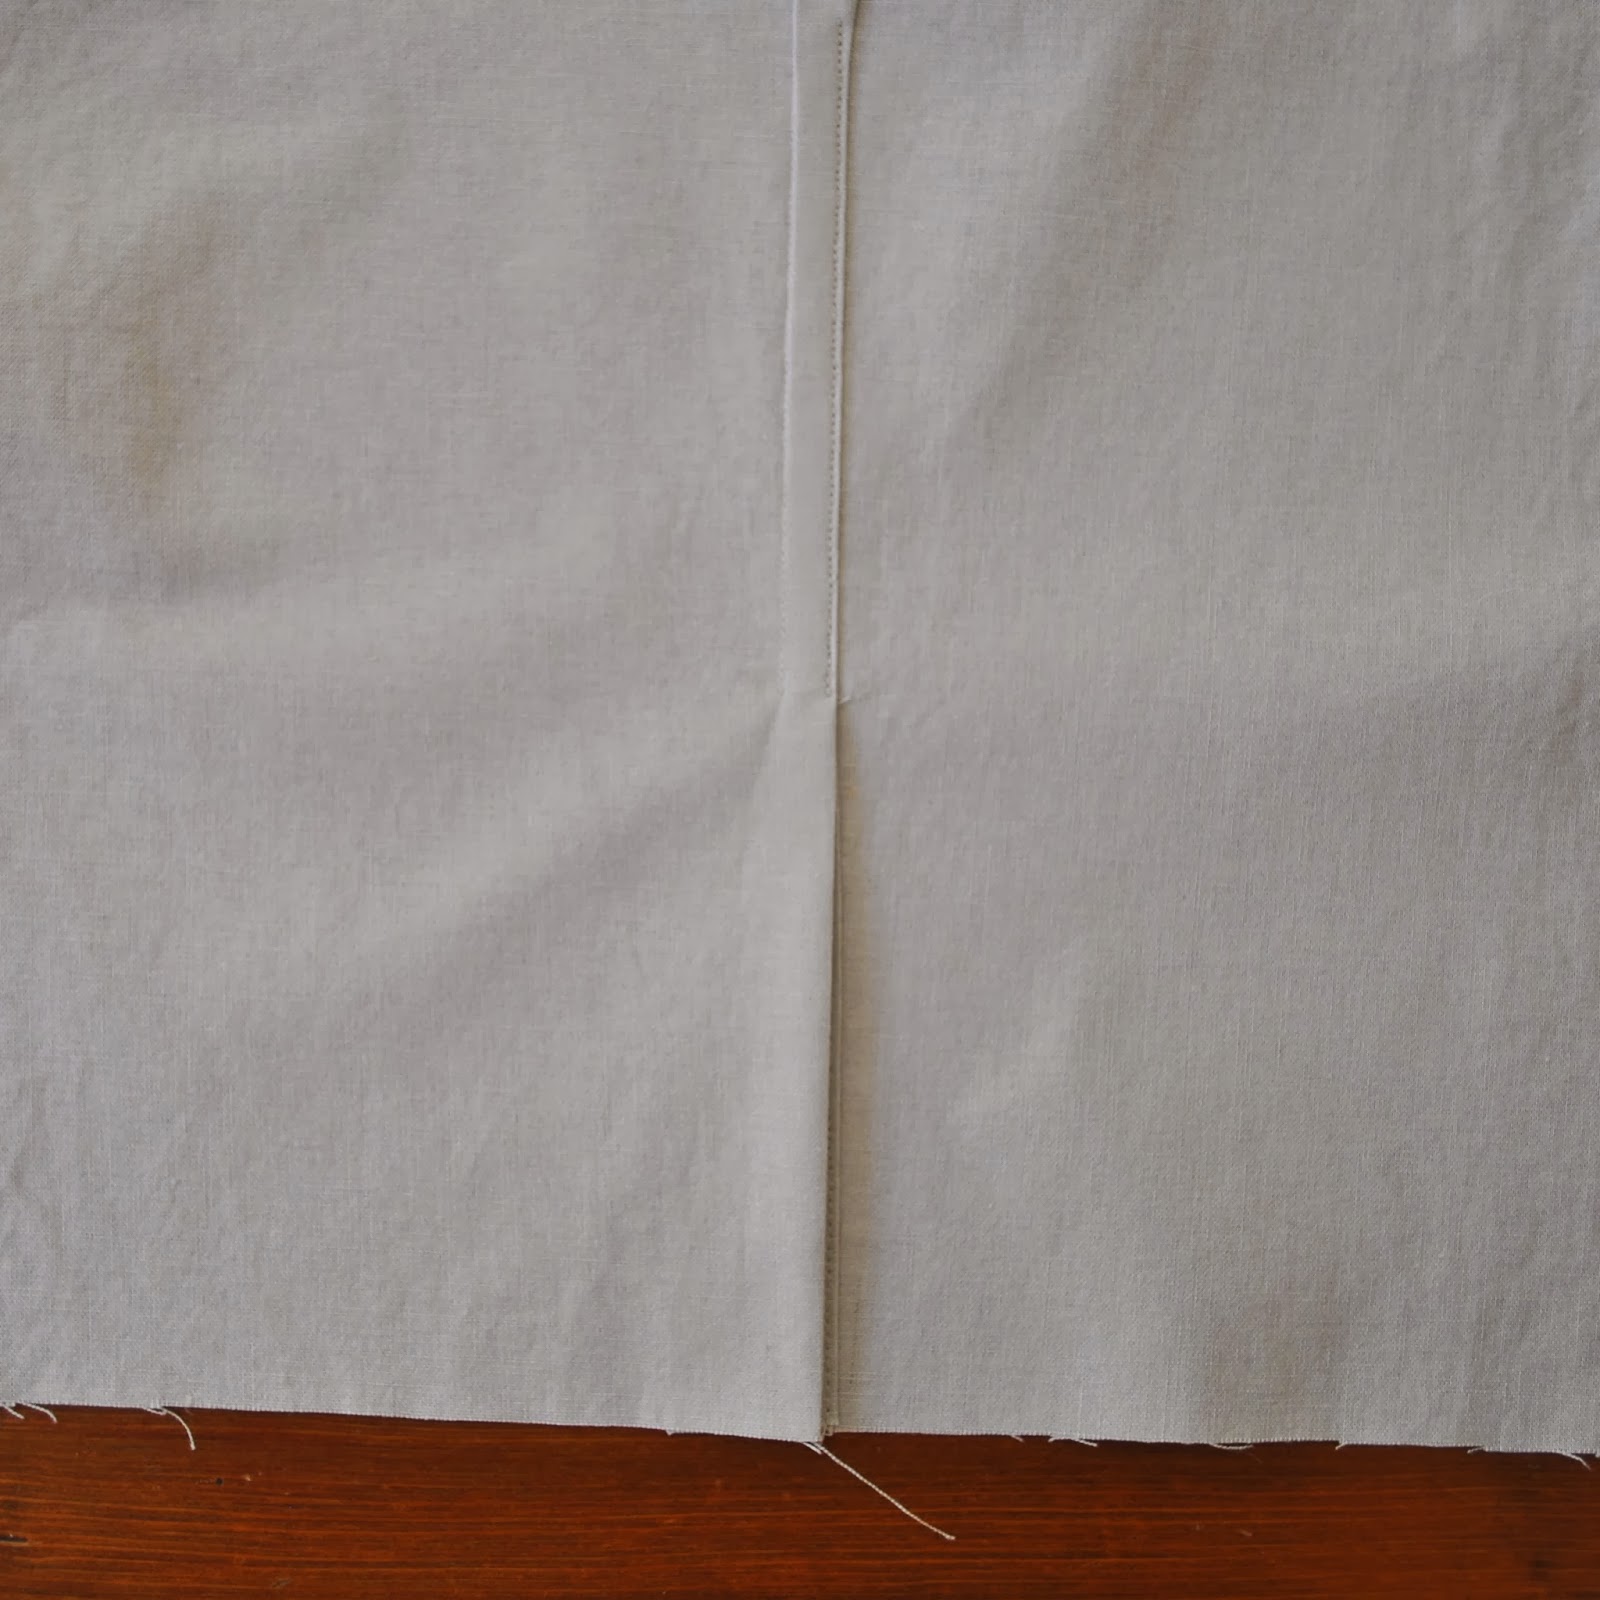
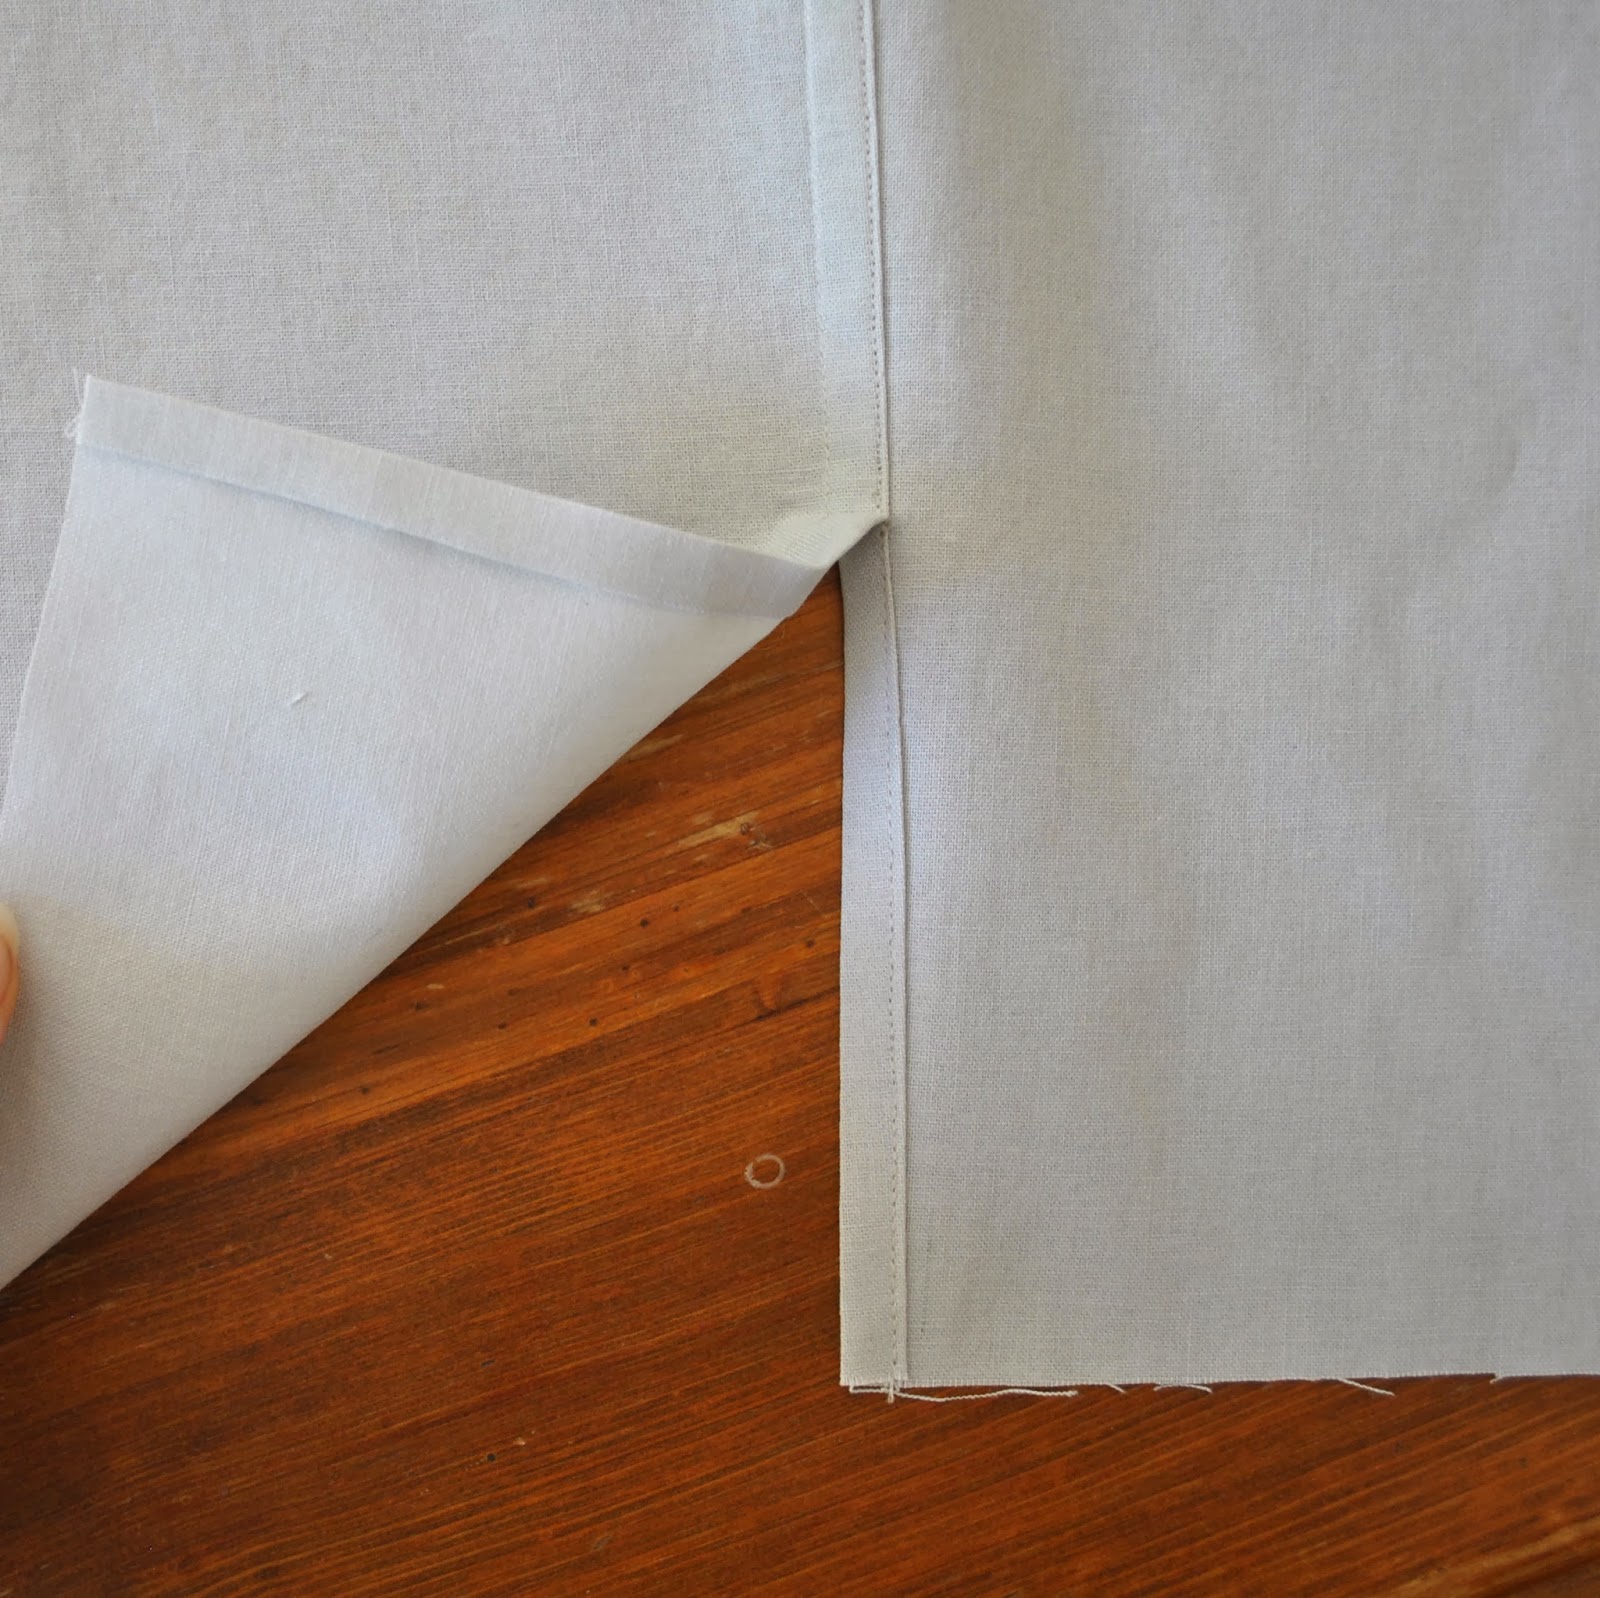
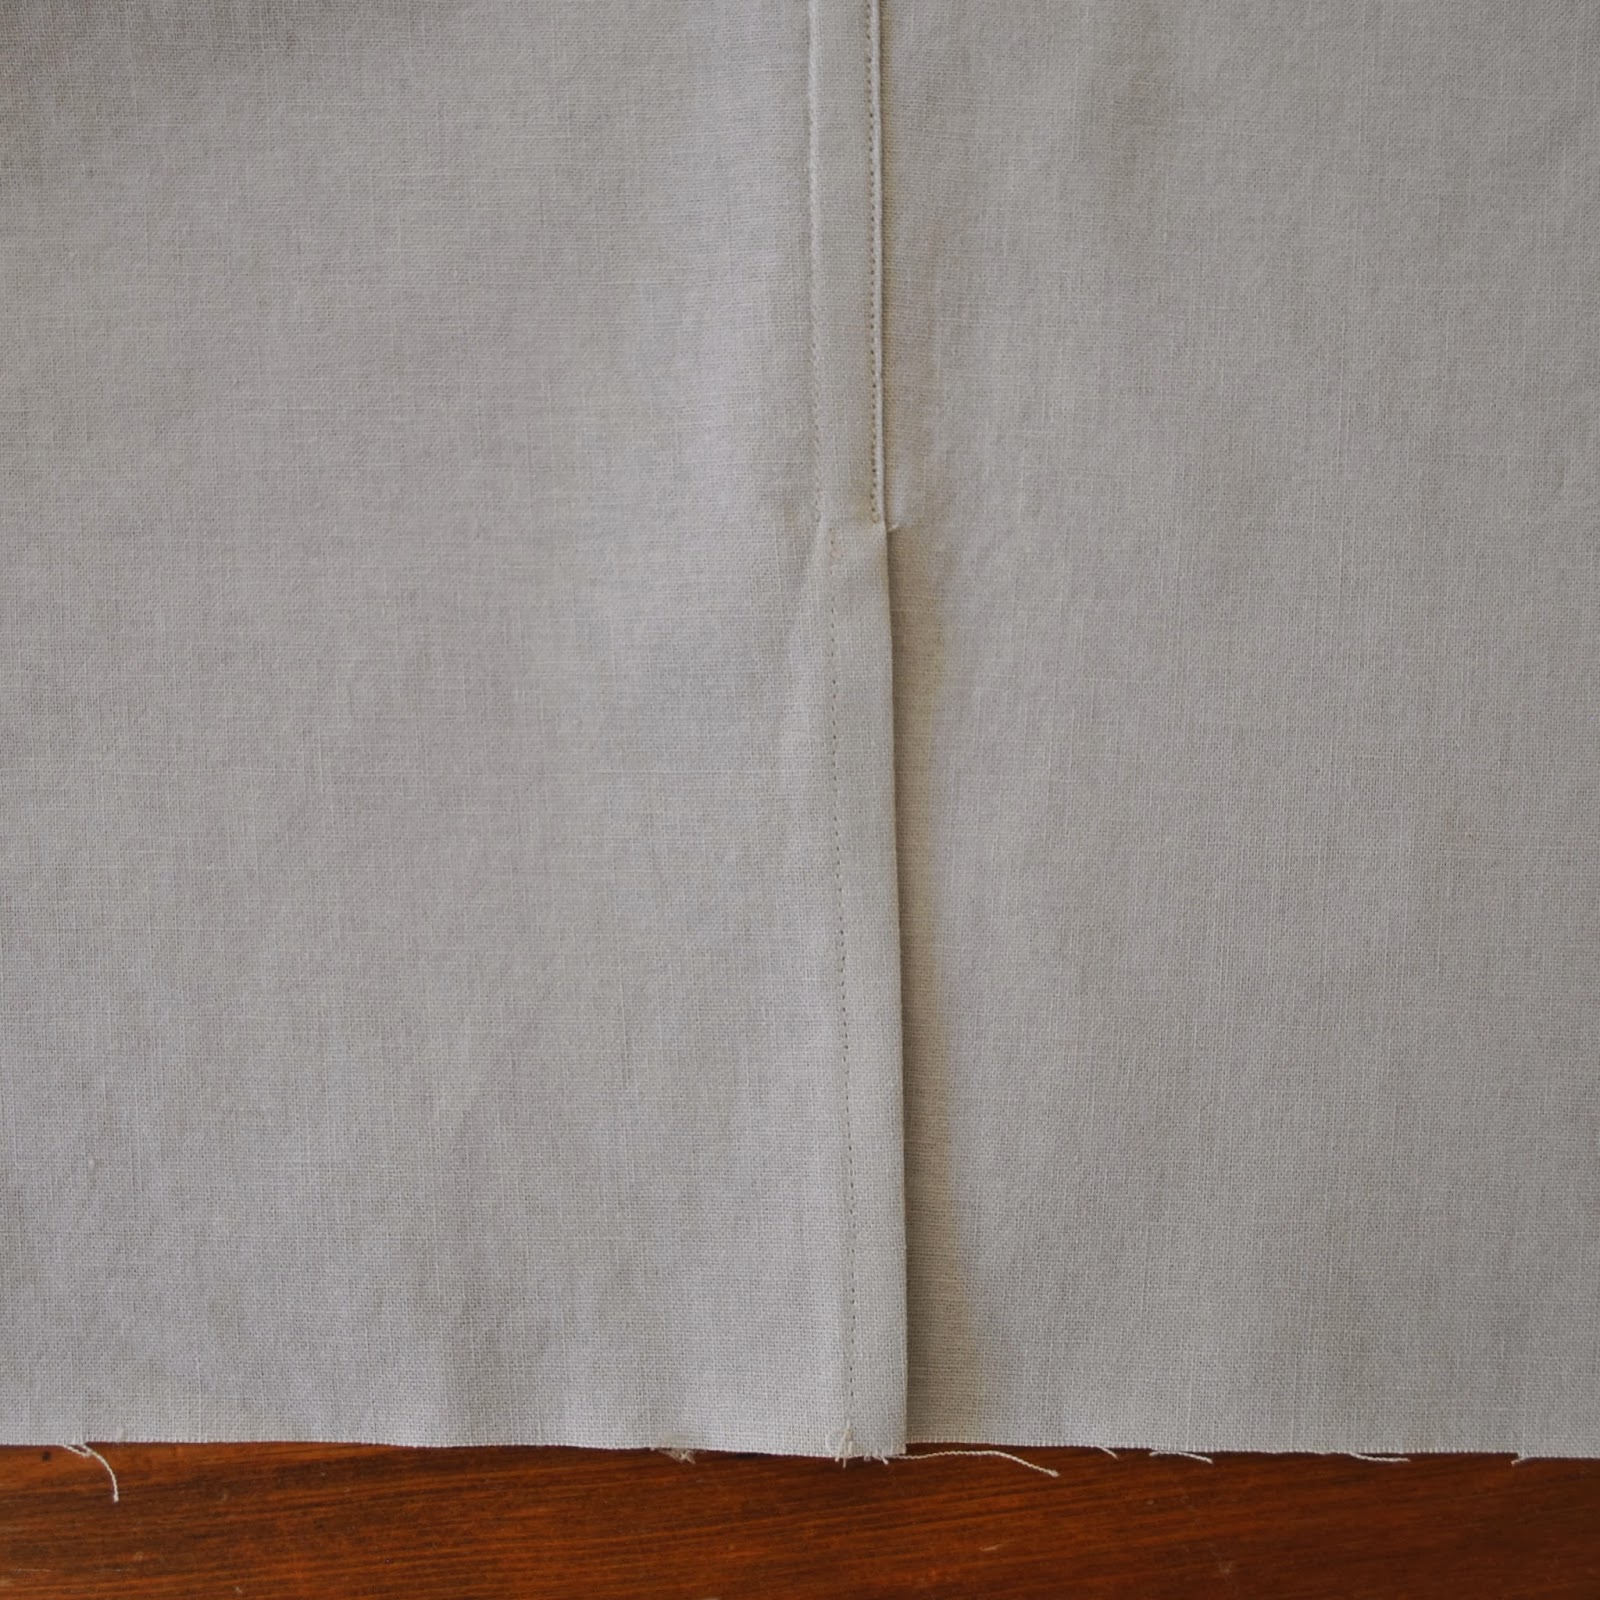
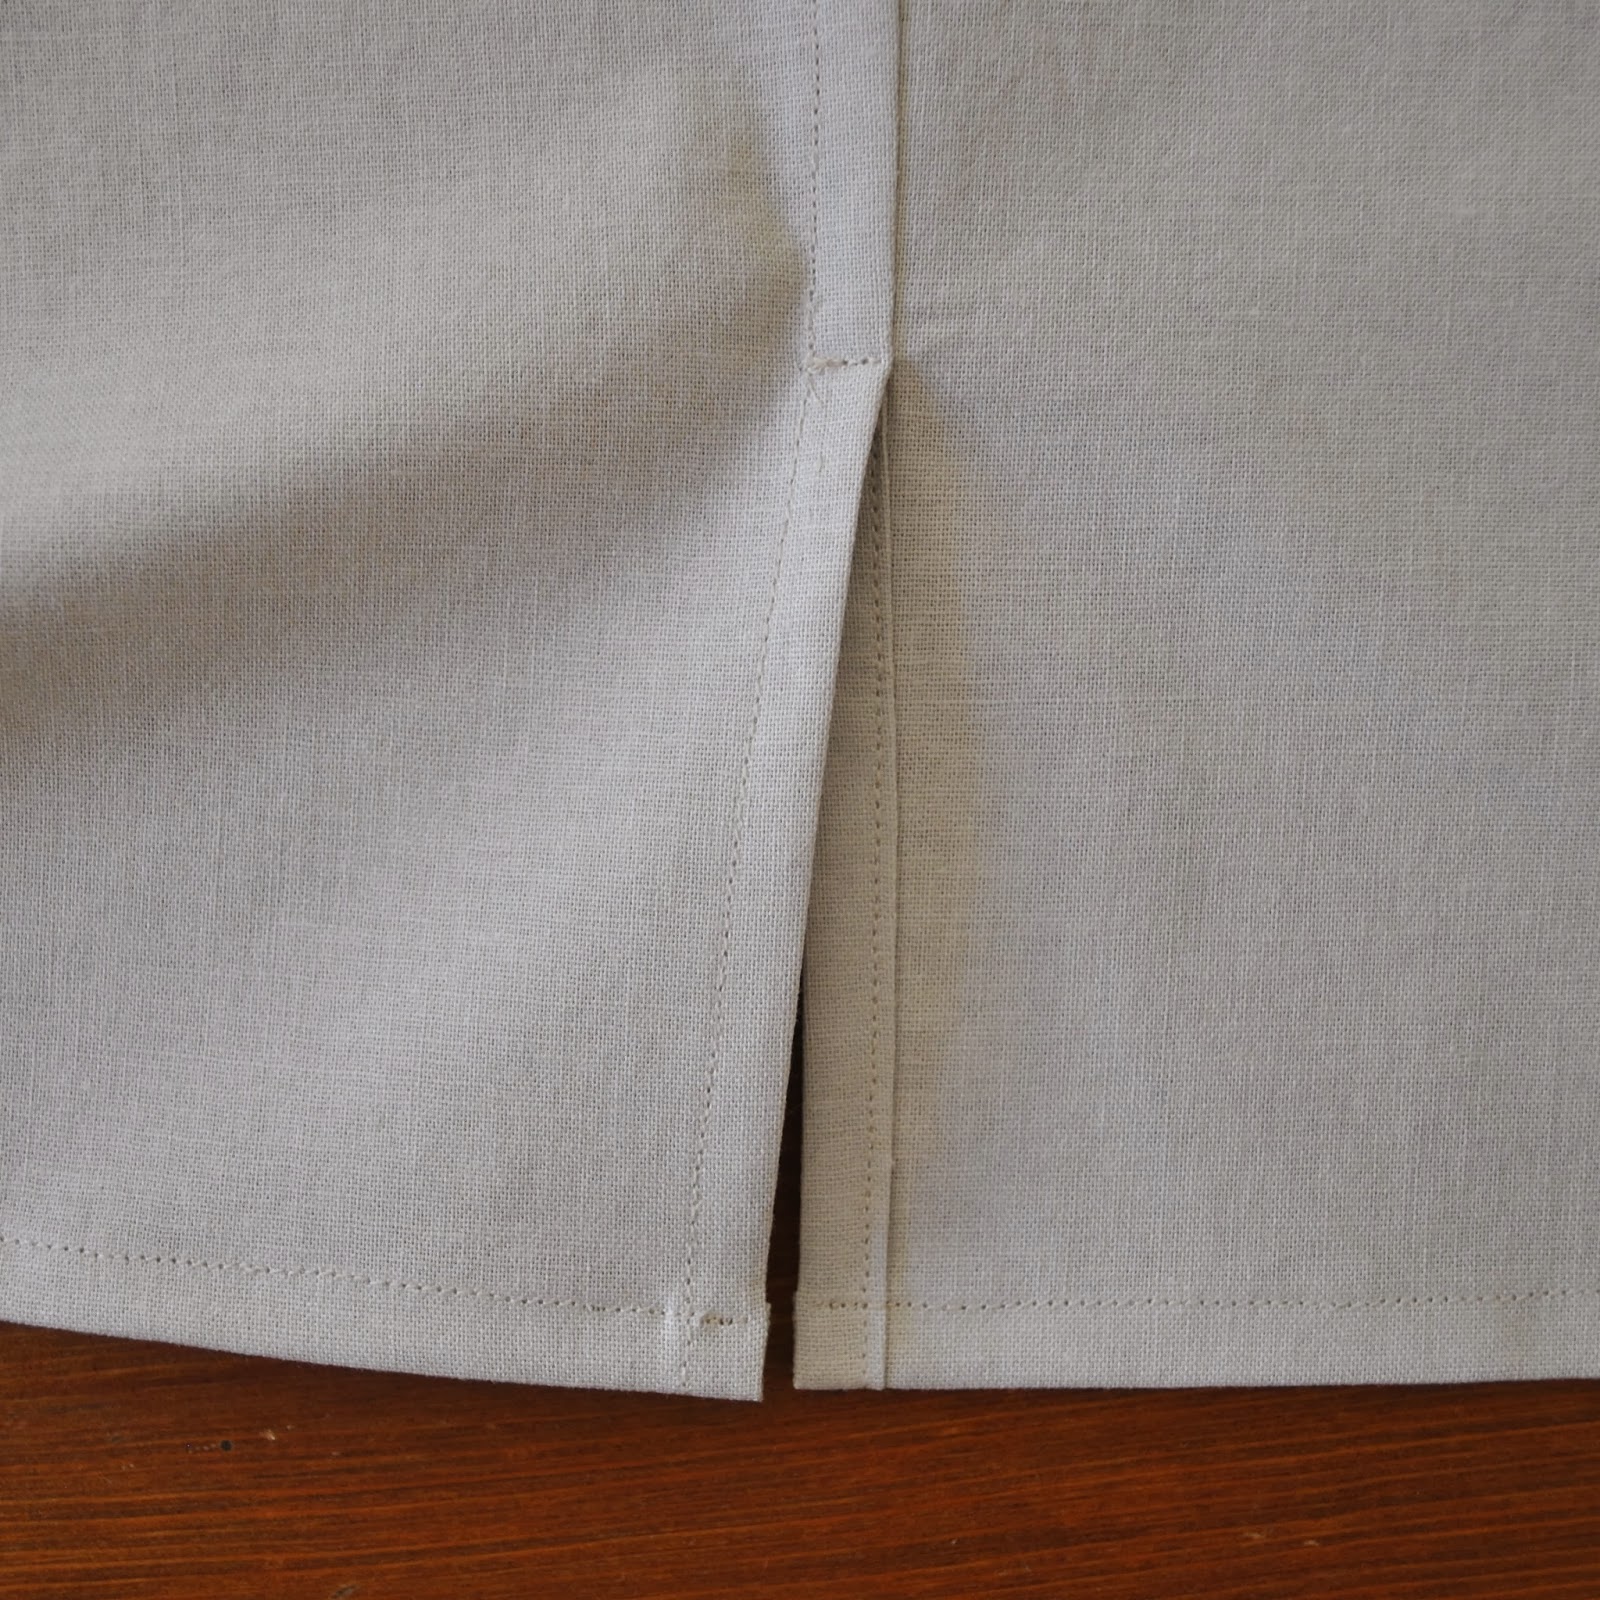
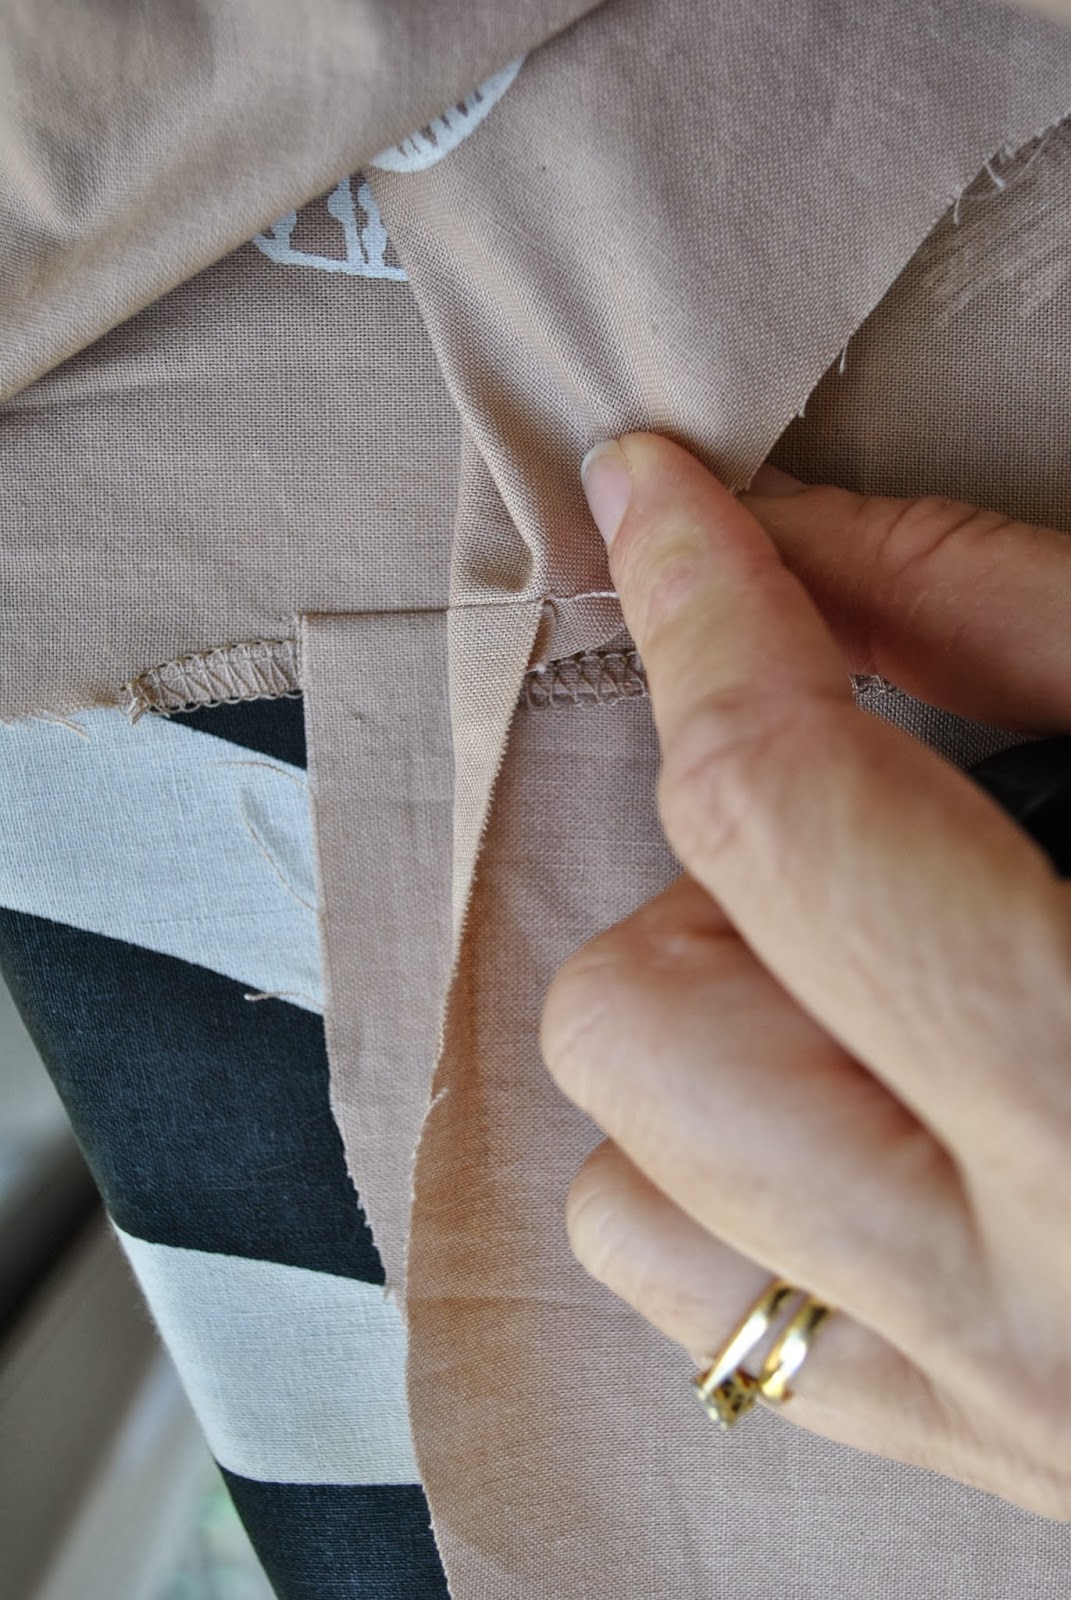
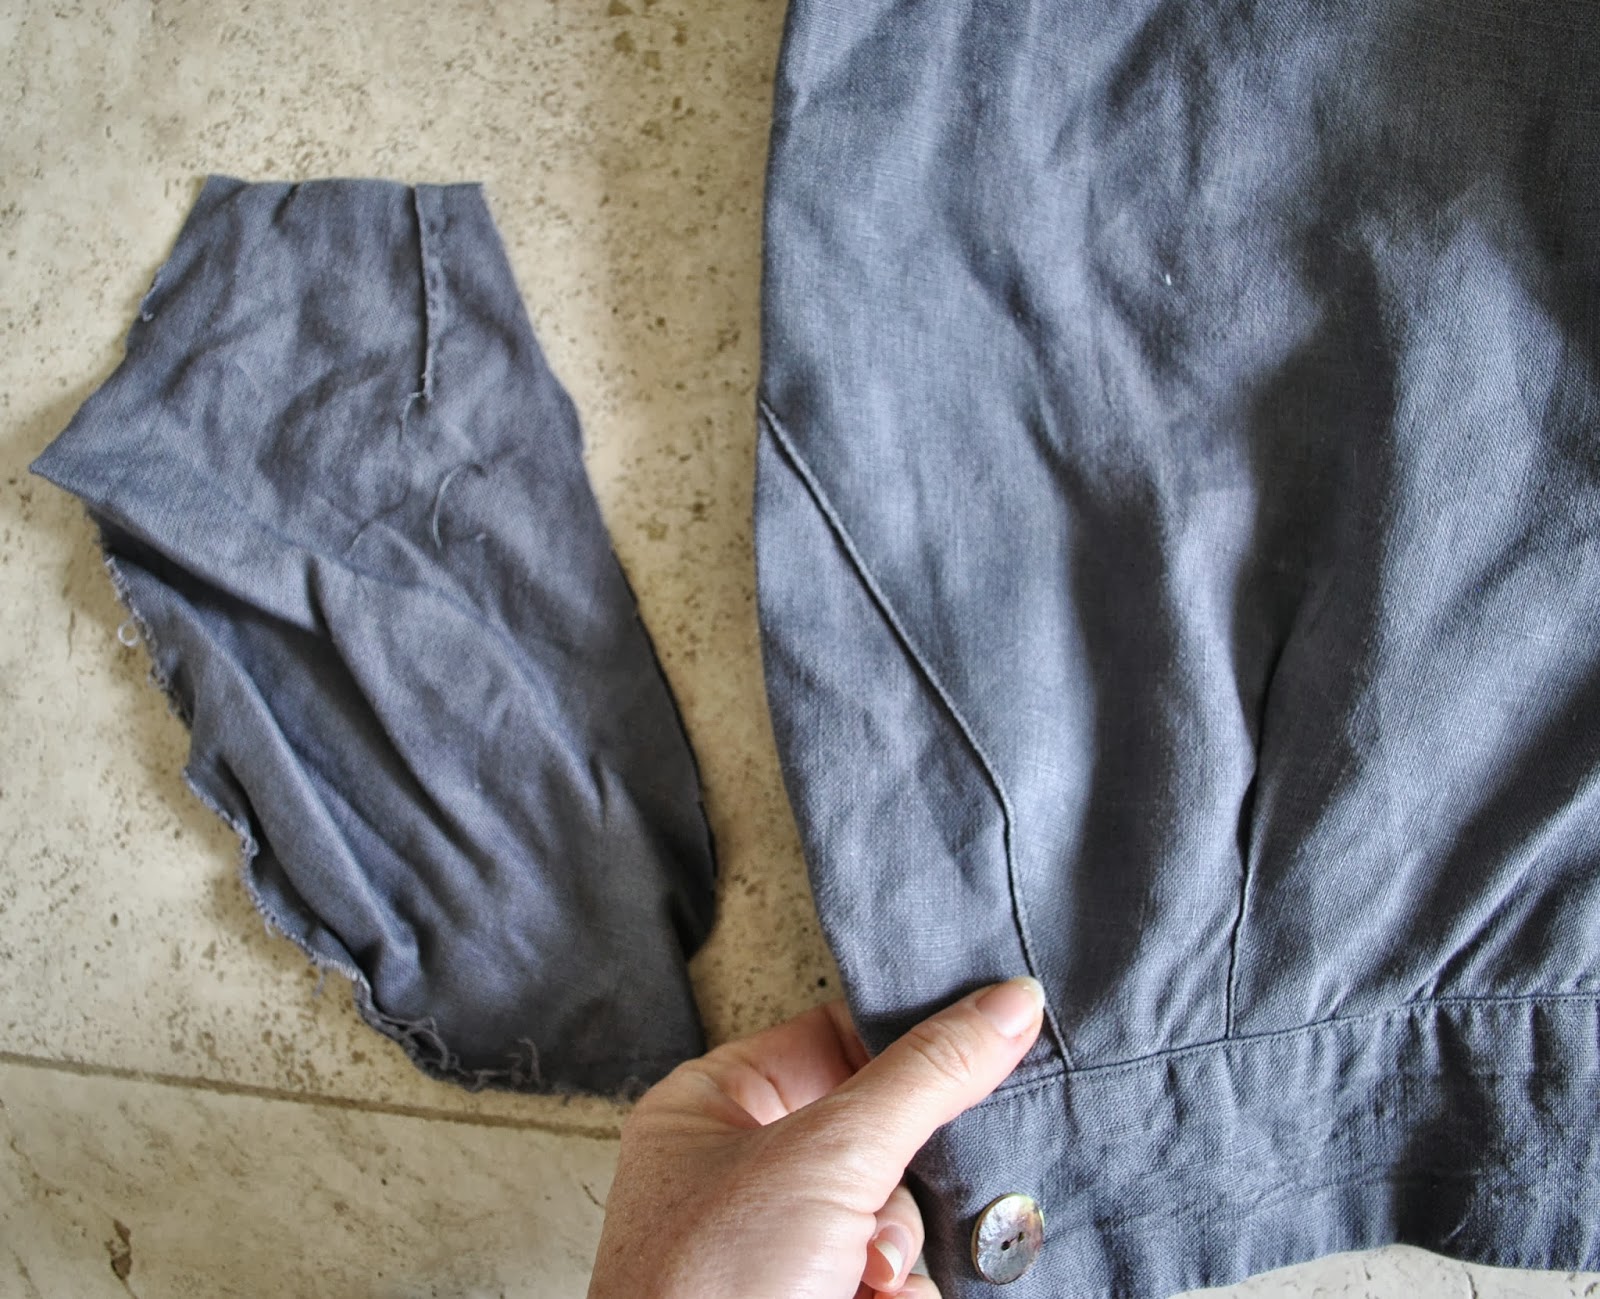
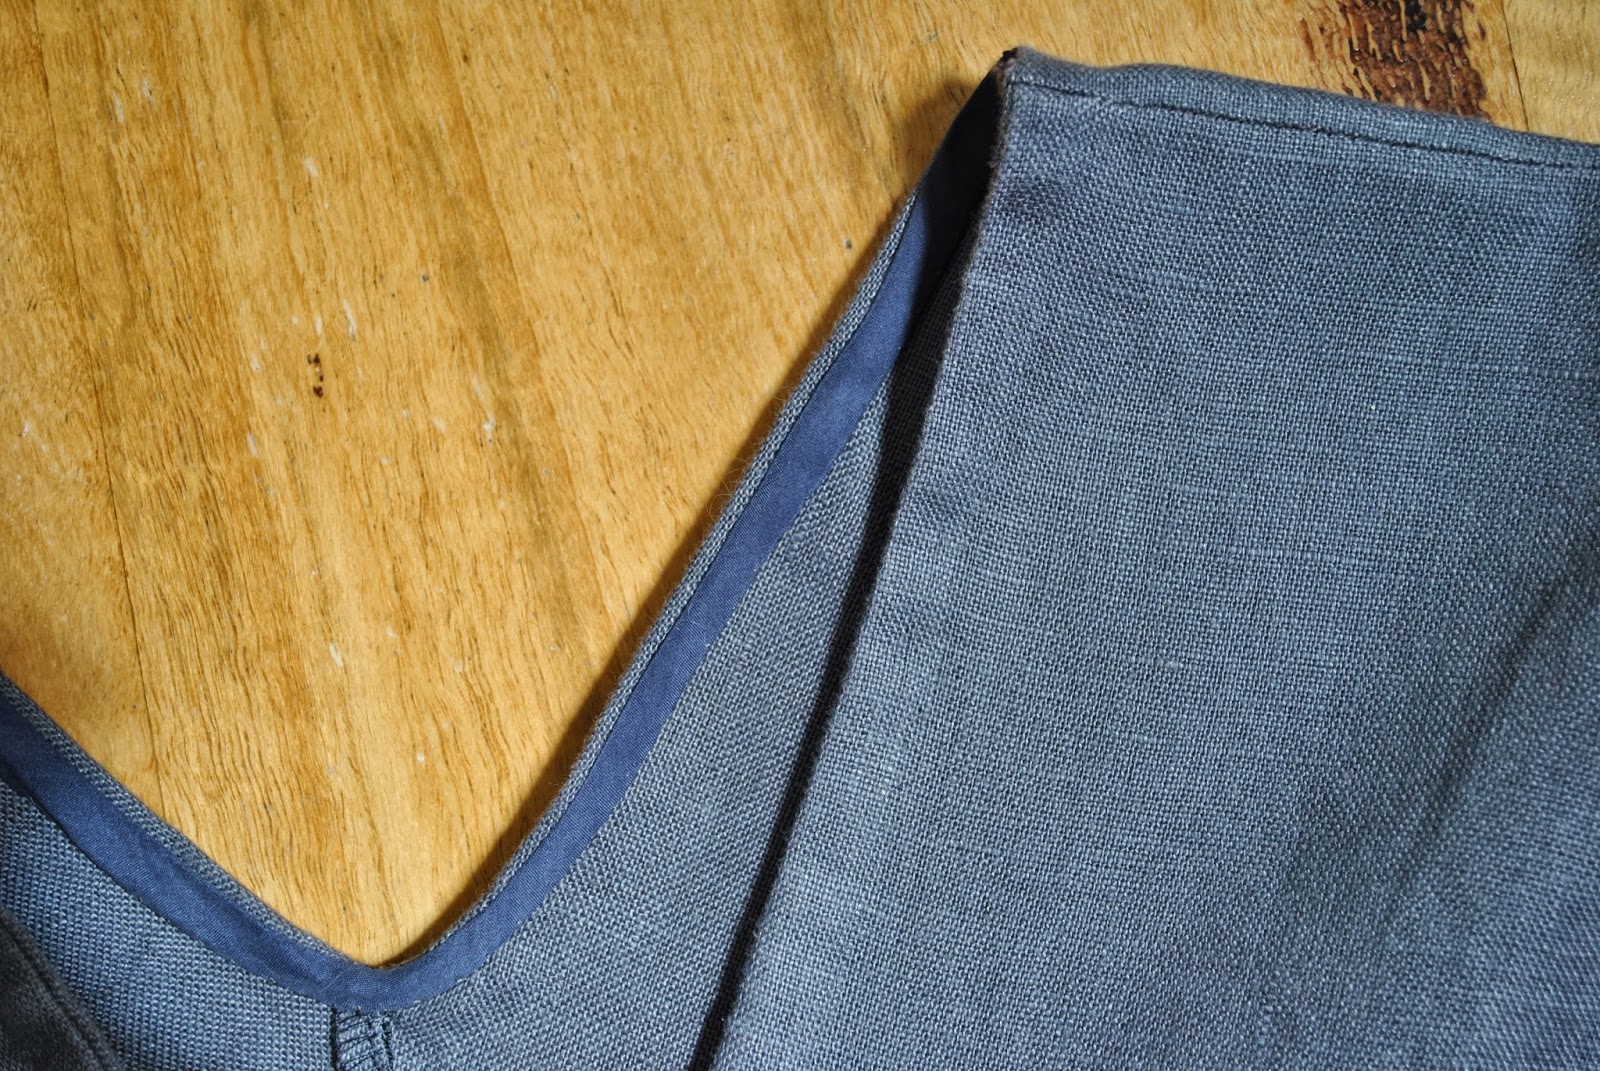
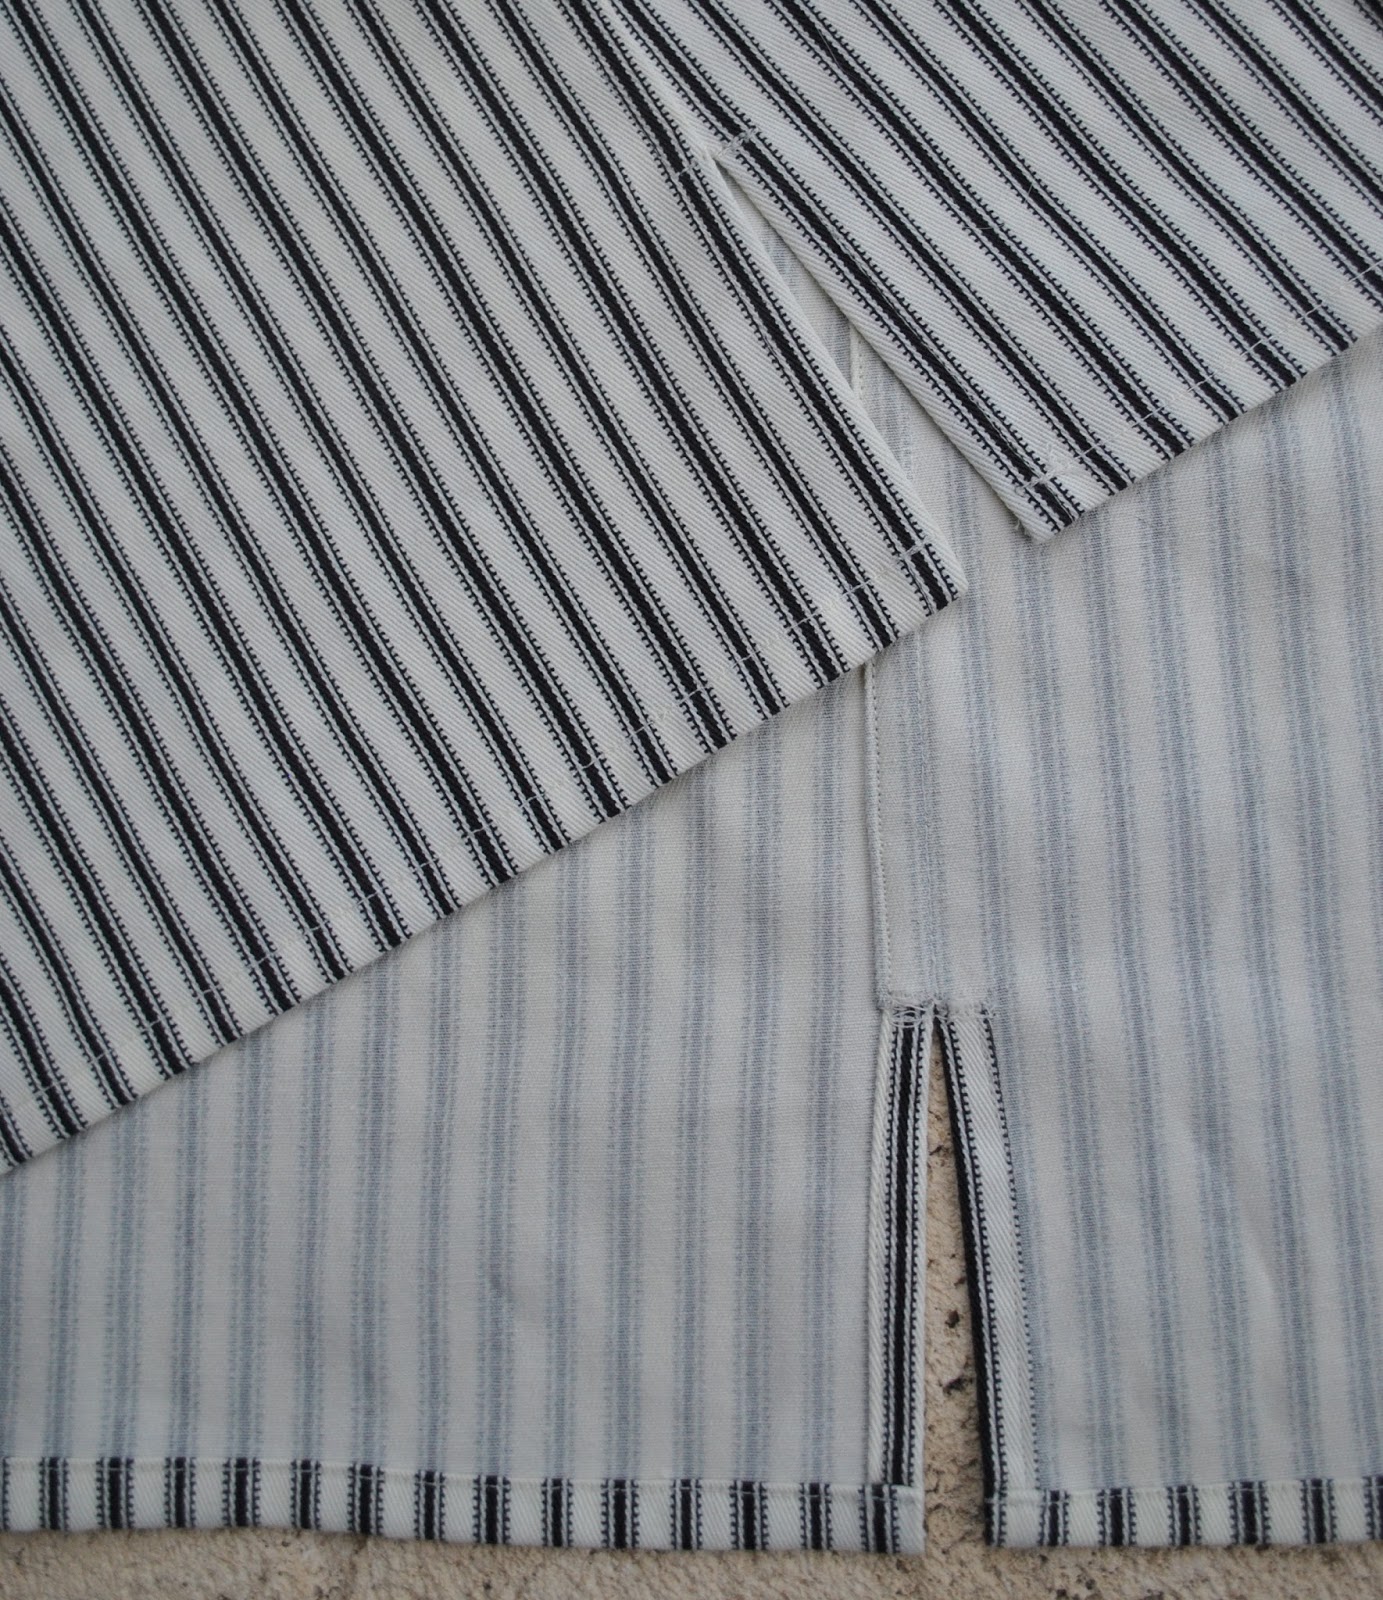
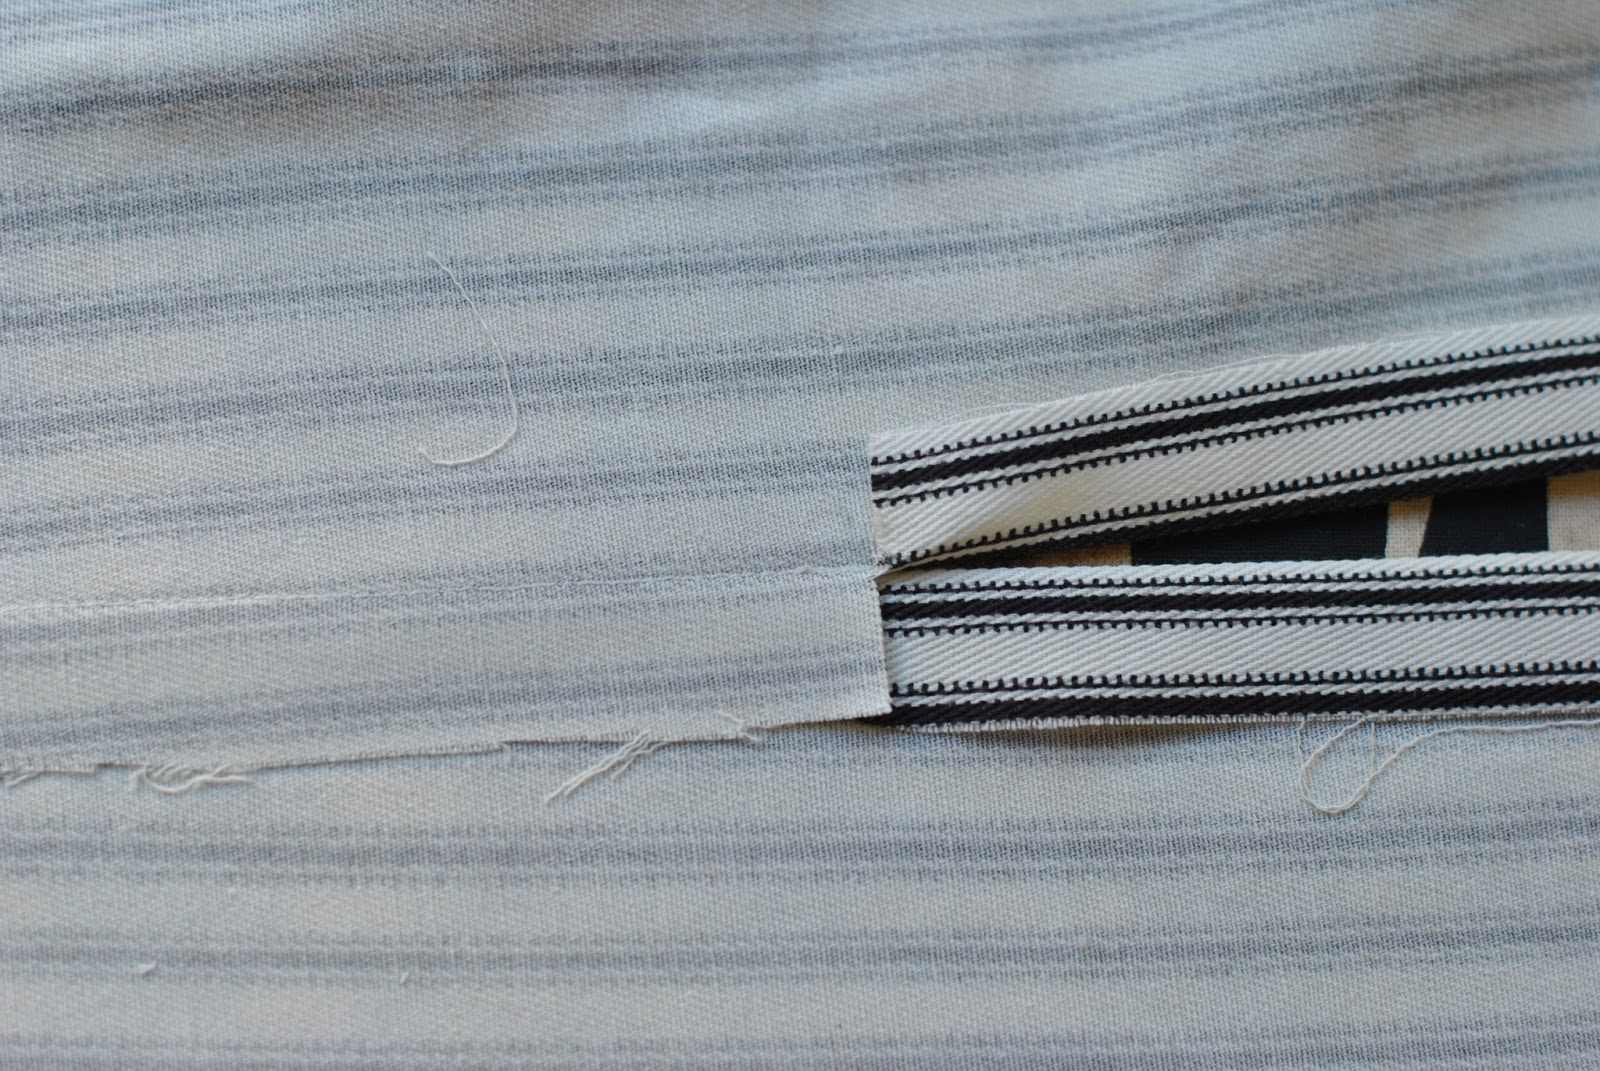
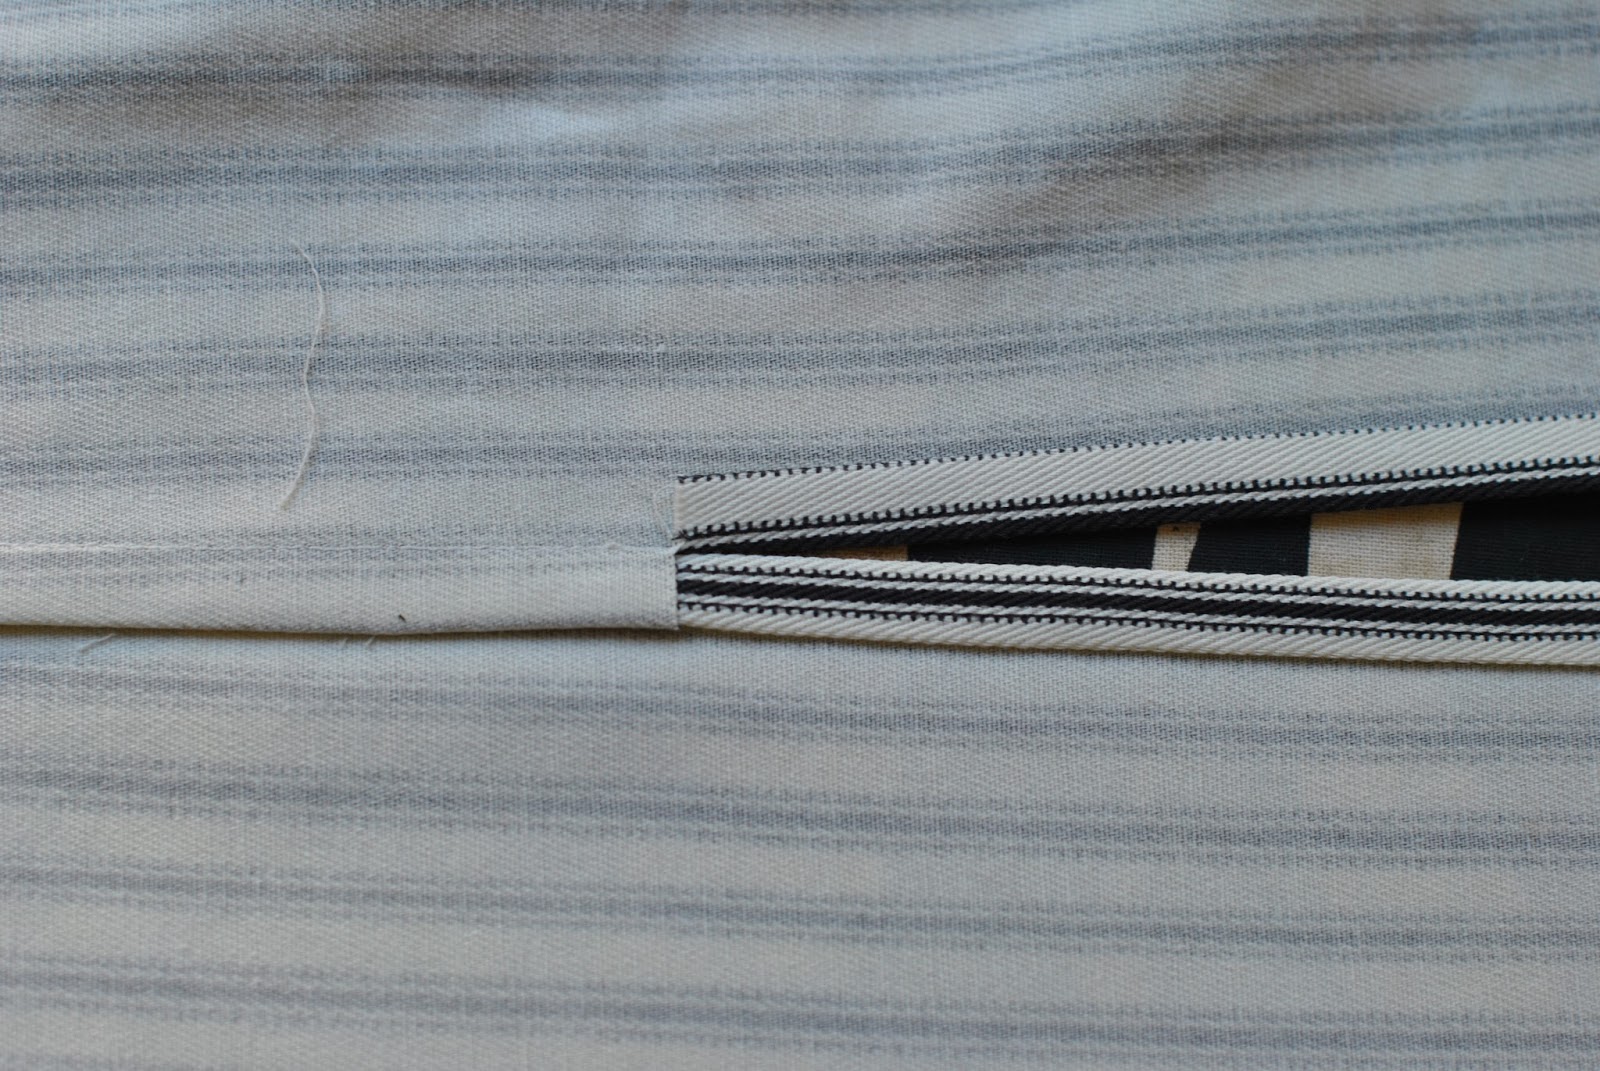
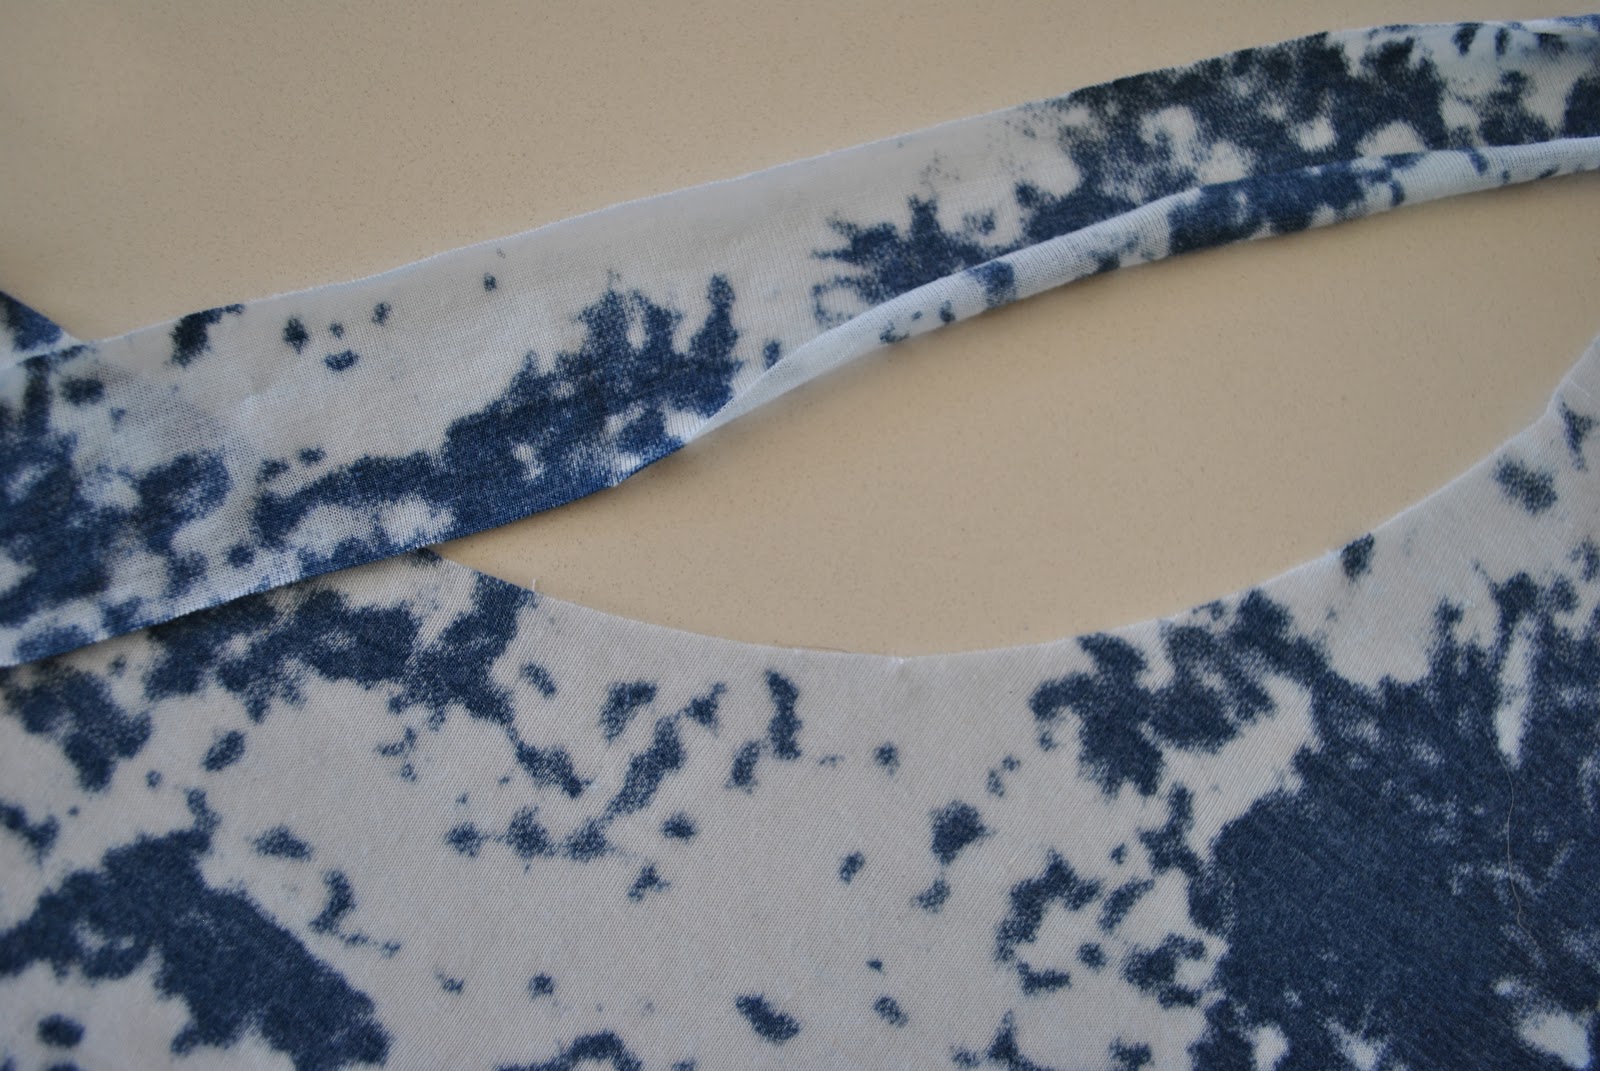
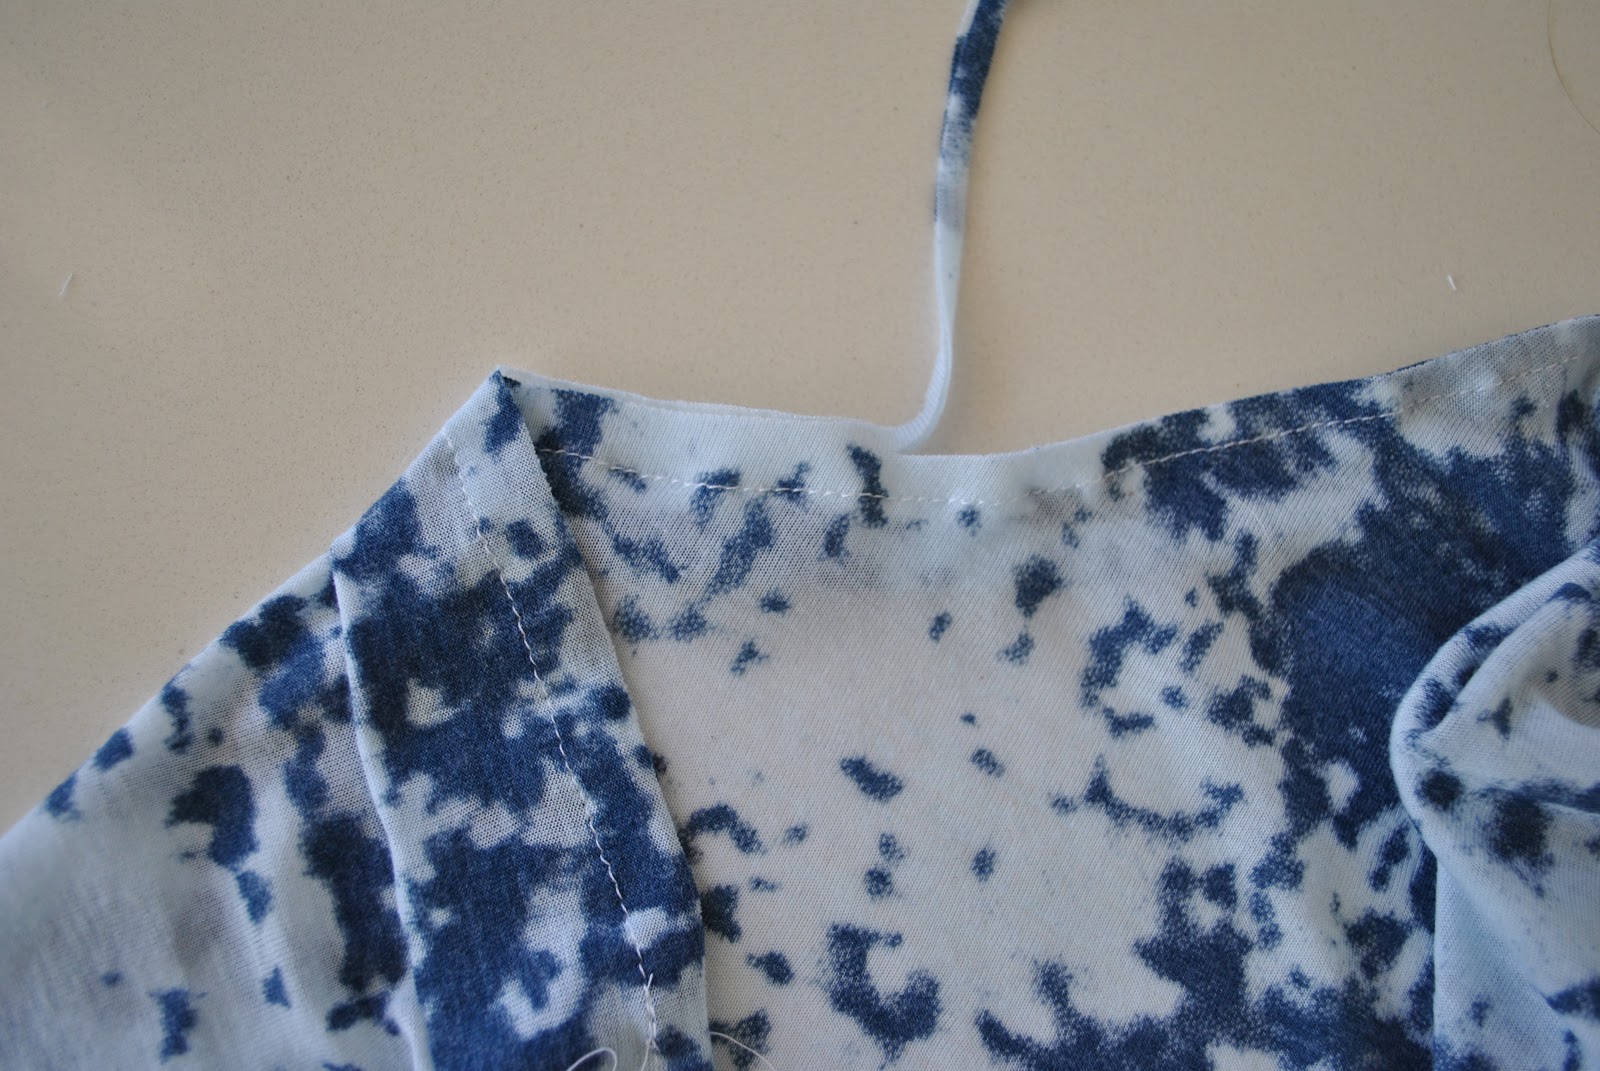
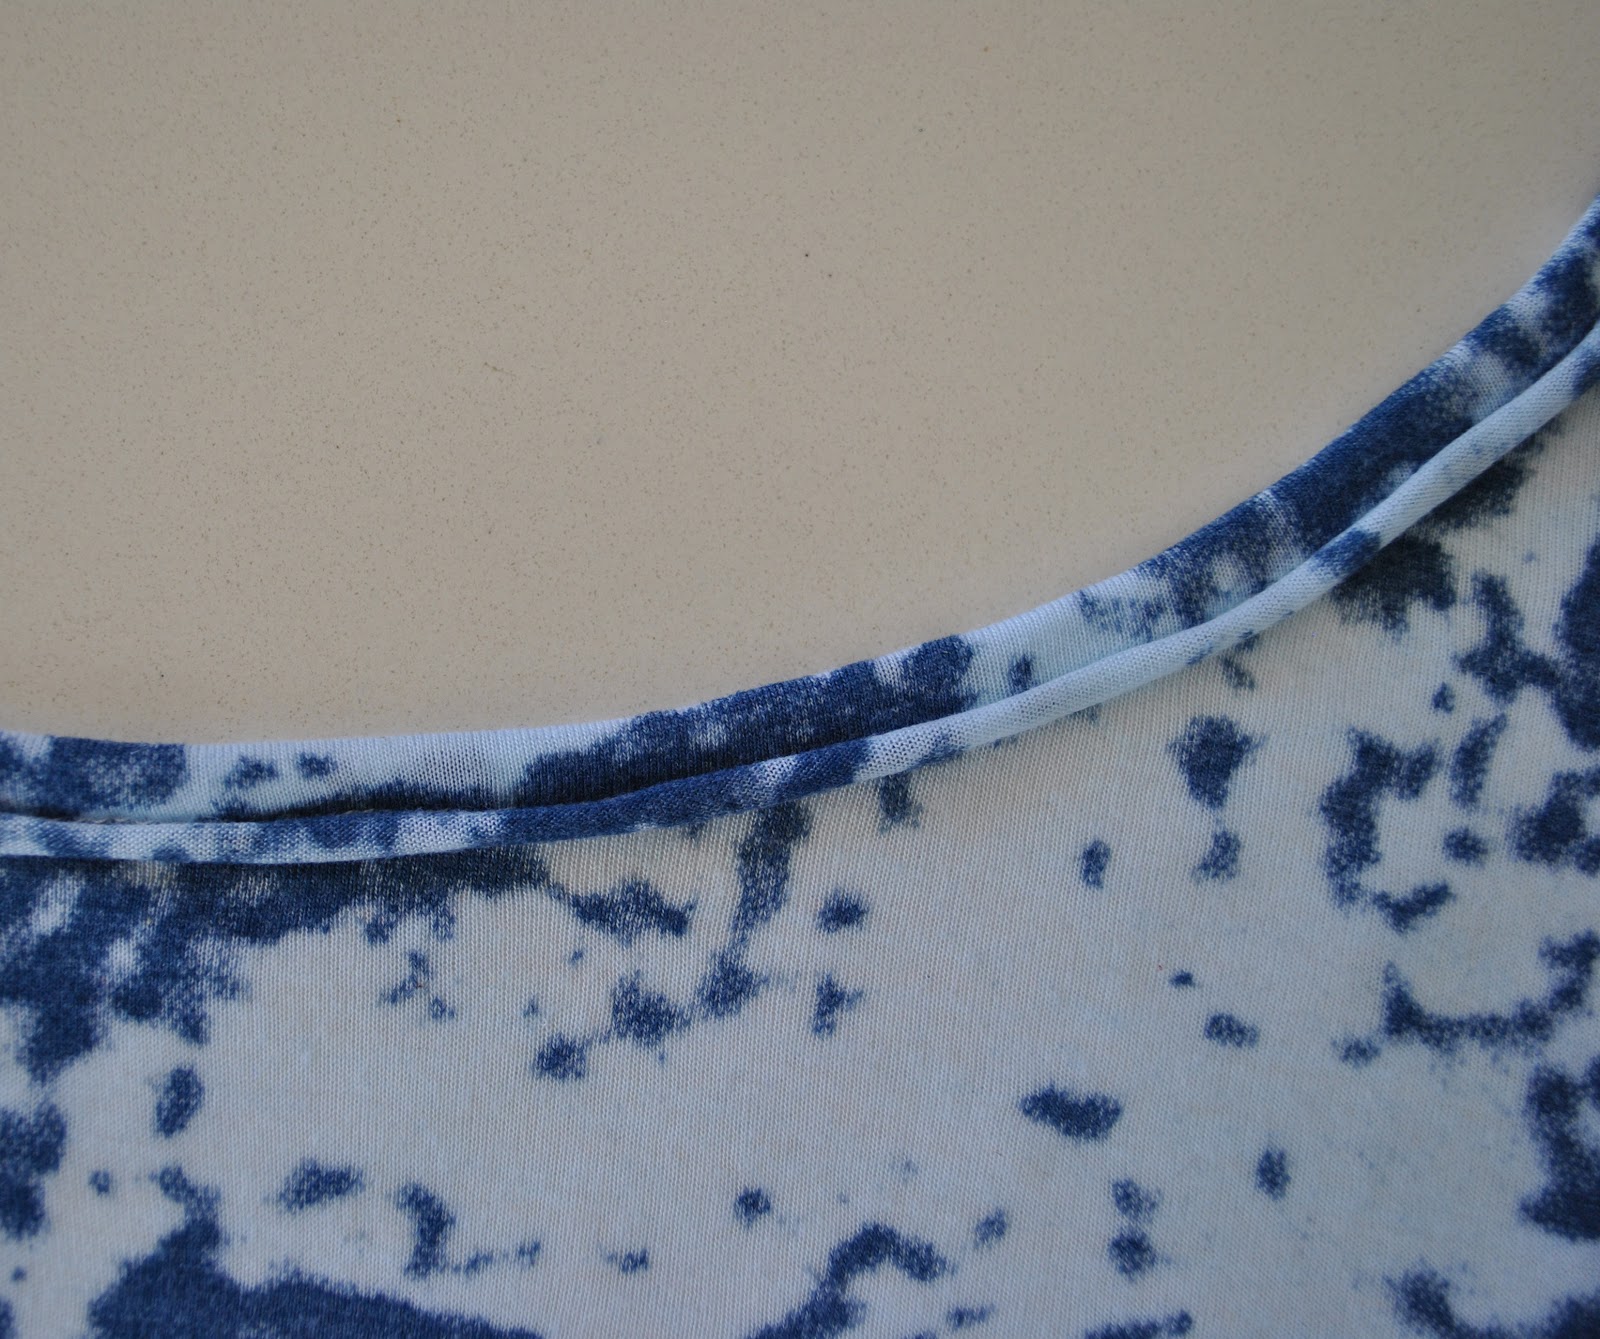
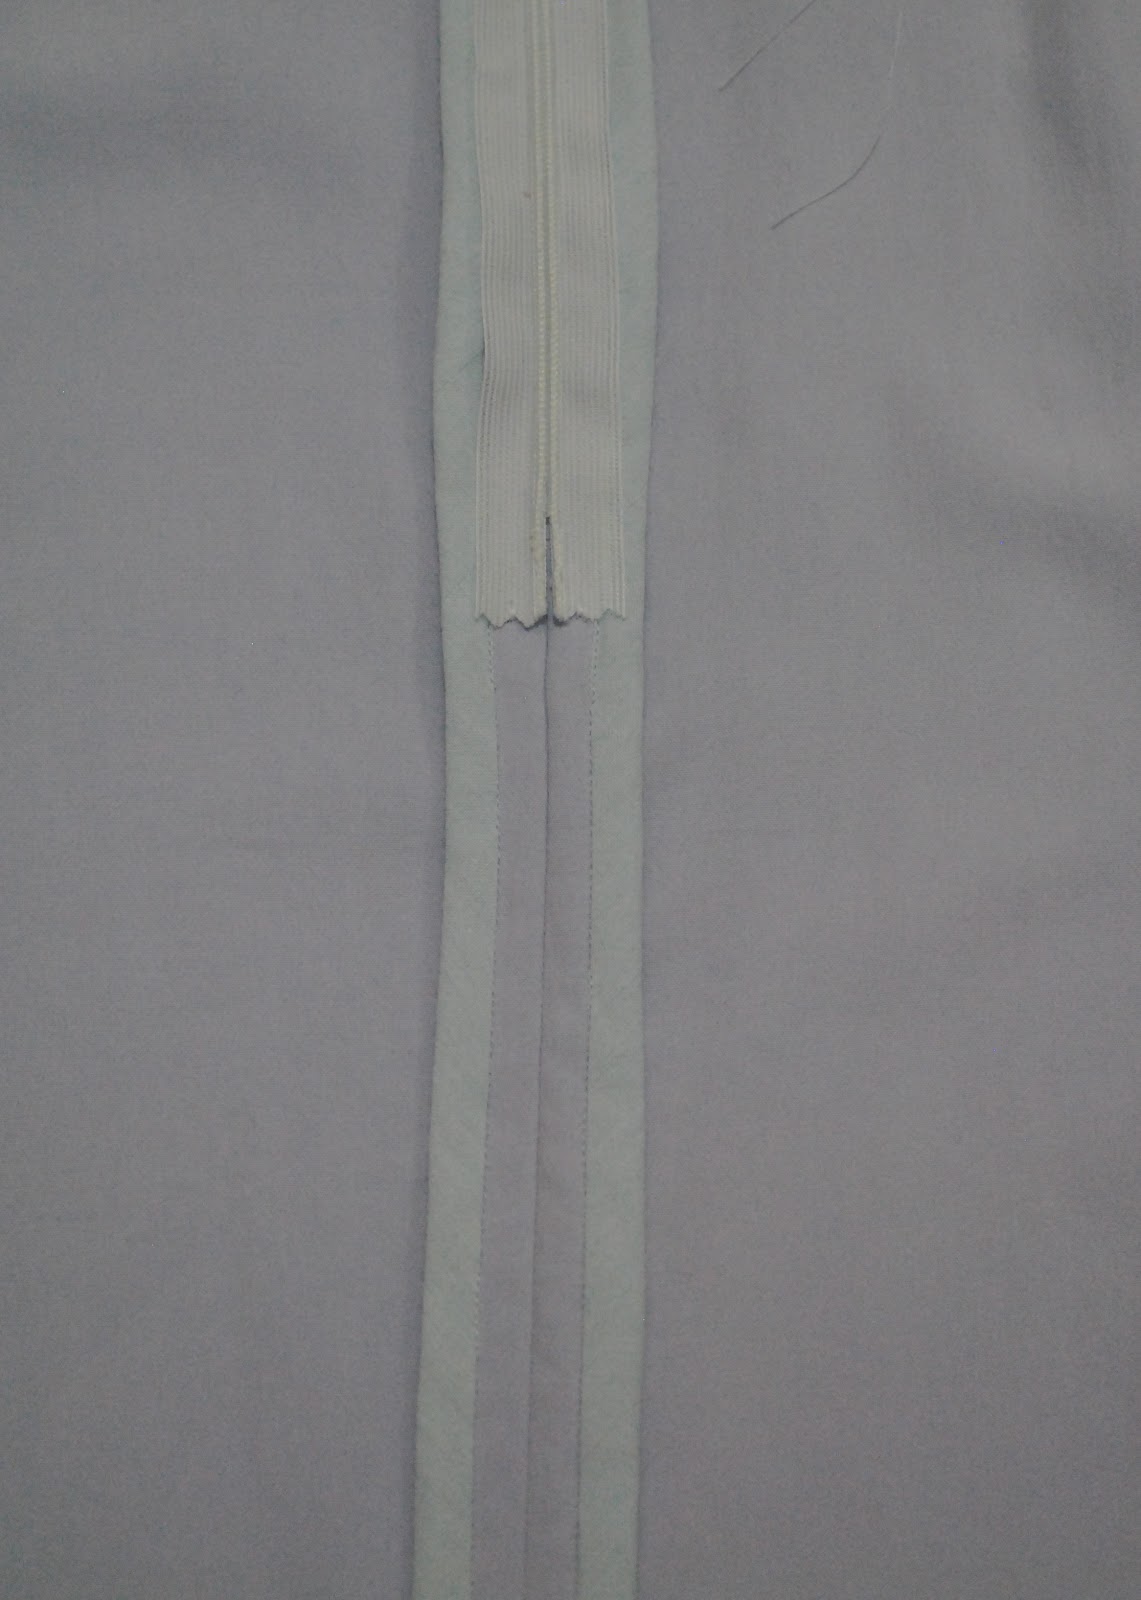
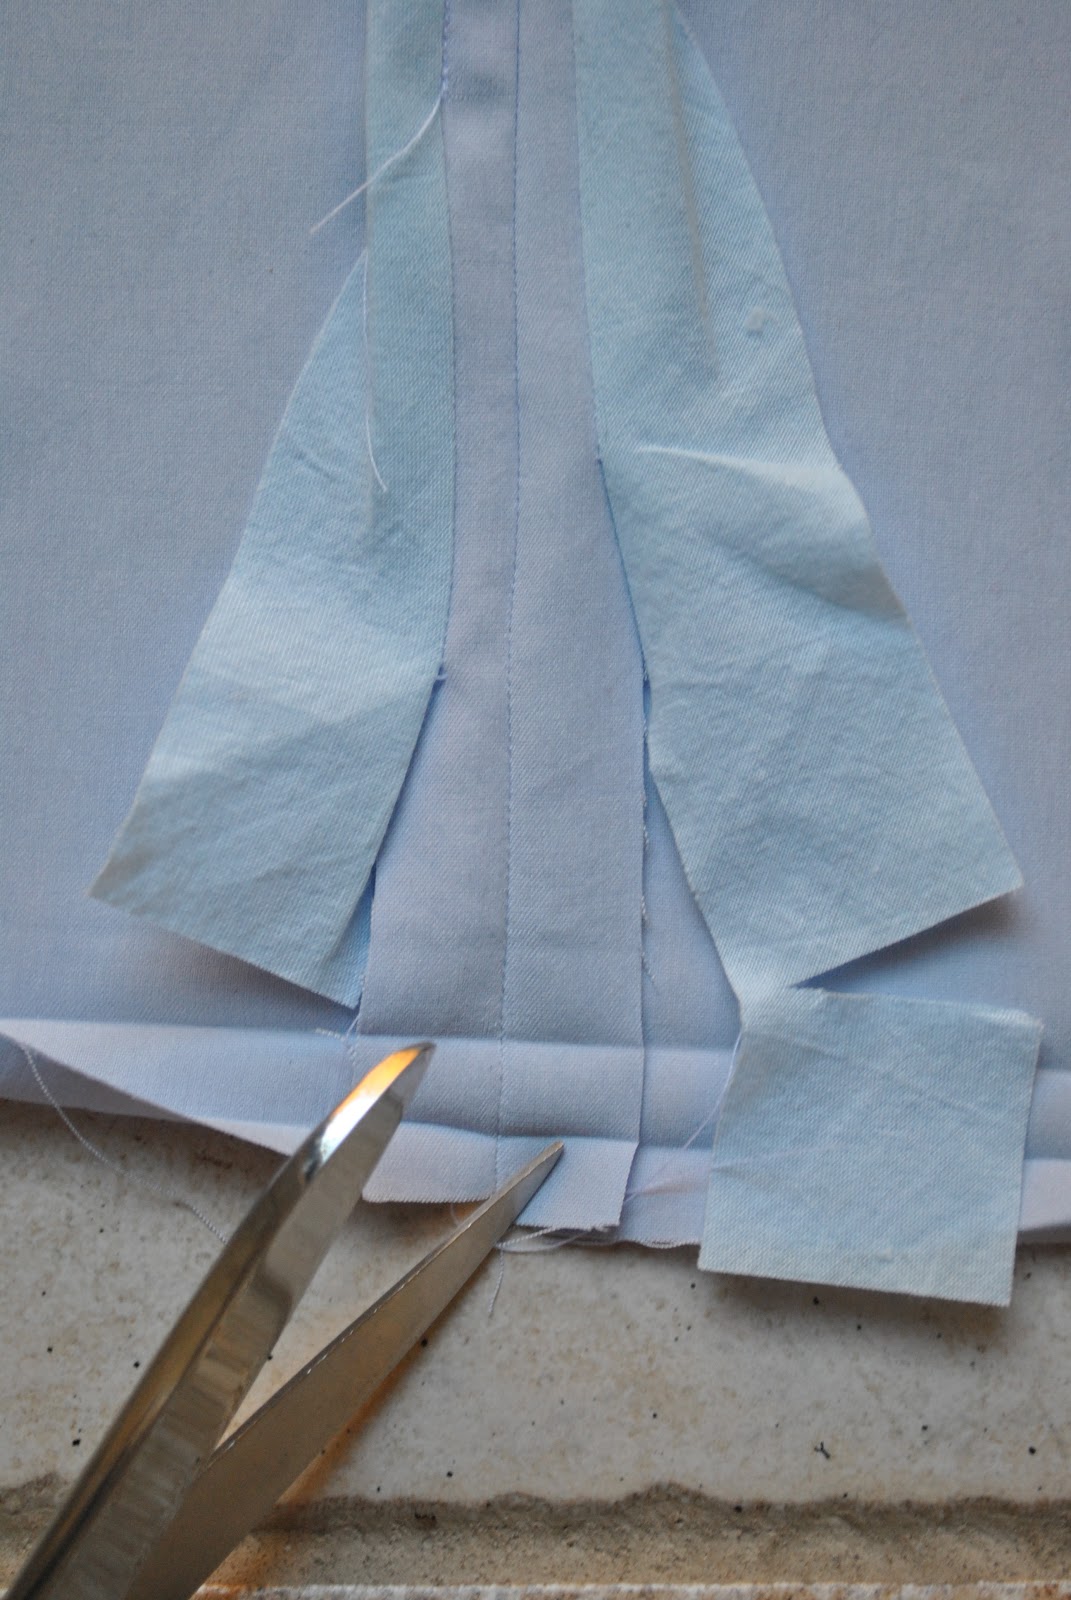
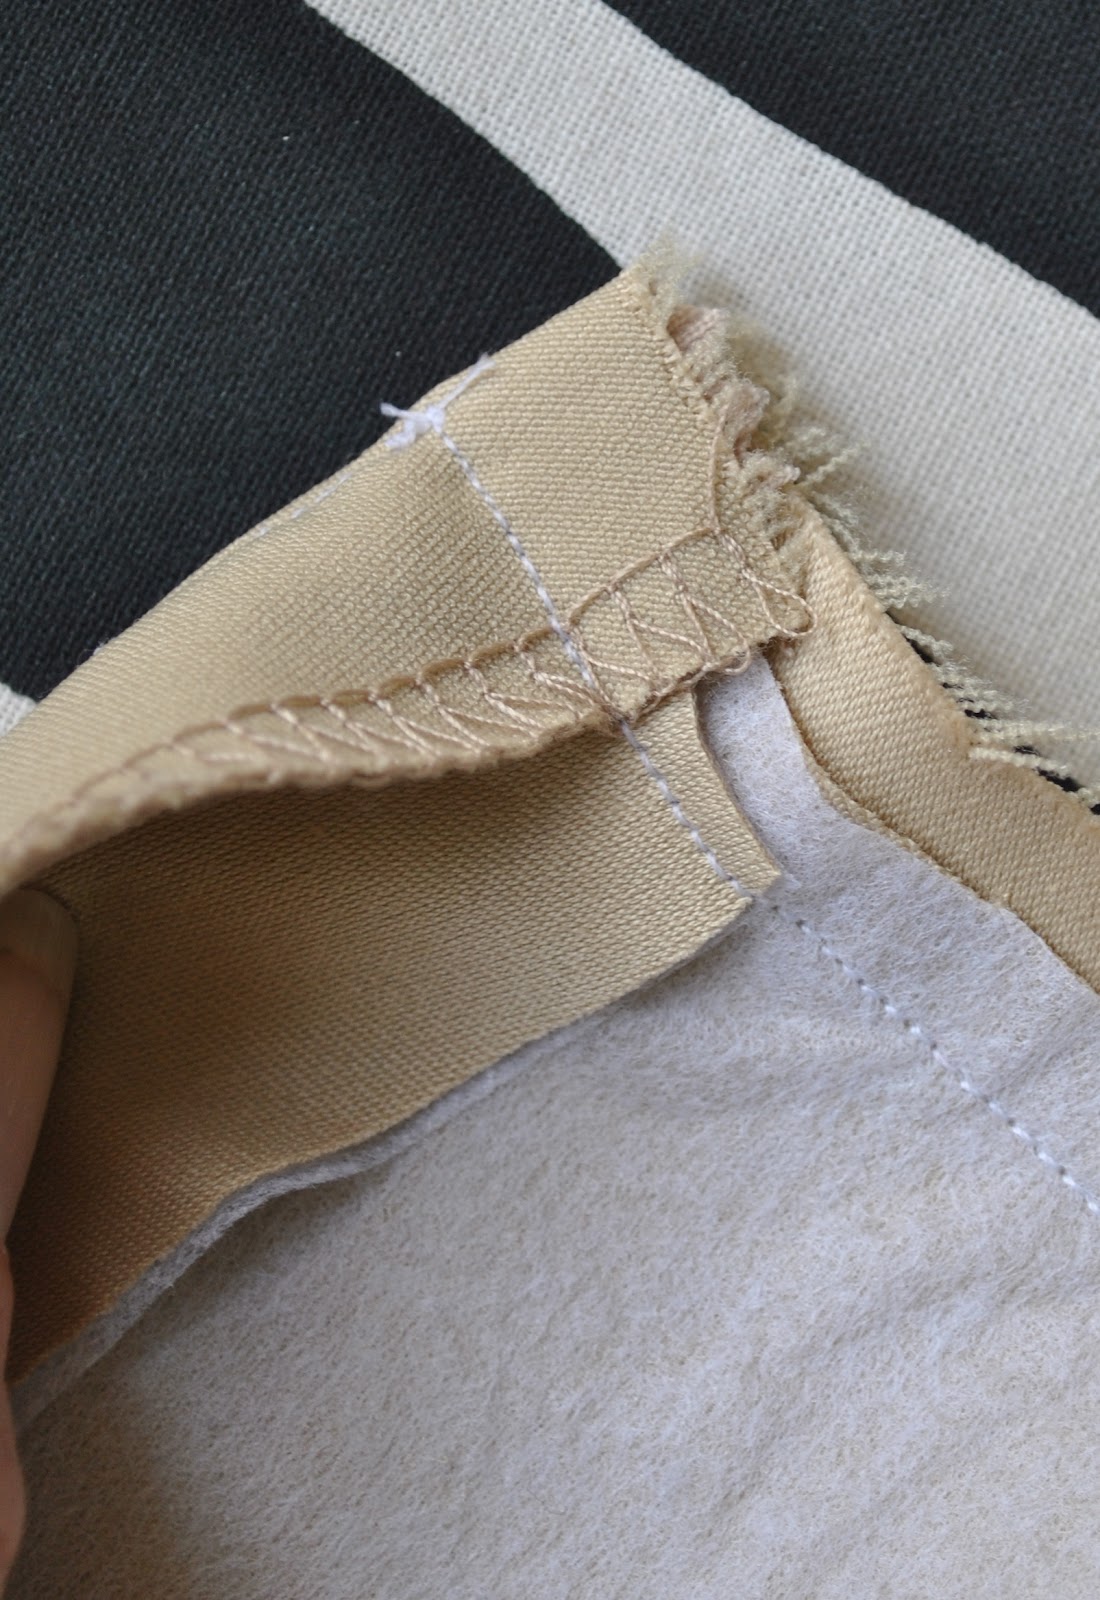
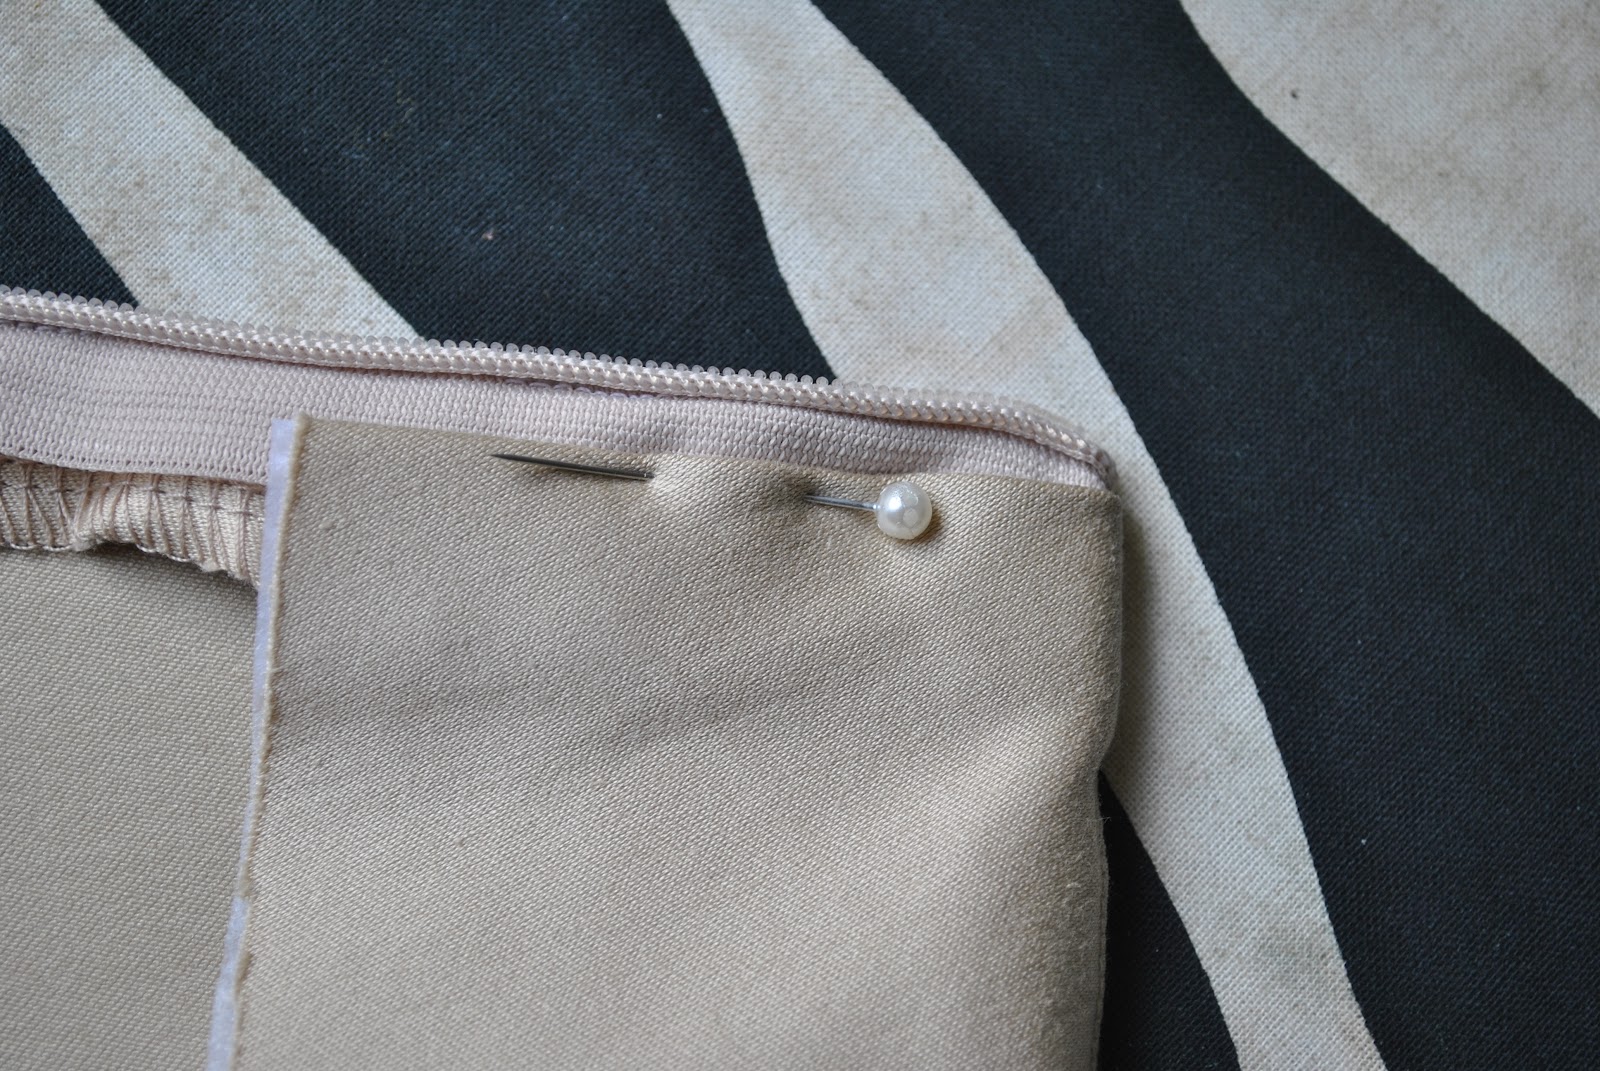
Below is the opening edge, with the facing folded back on itself (wrong sides together), and the zip edge with the garment seam allowance (with overlocked raw edge) folded over it, right sides together; and stitched.  I never ever ever (ever ever) diagonally clip away the corner of that fold, but leave it intact, just like this.  With care, when you turn it out you should be able to get a nice square point at the corner of facing/waistband just like below right.  If the corner does seem a tad too bulky with layers of fabric, turn it back out wrong side out and right on the very corner, just inside the seam allowance at the starting point of that stitching, give it a few good sharp whacks with a heavy wooden spoon to flatten it; then try turning it out again.  I promise you, this does work!!  Just be super careful not to whack the top of the zip….  This is an old “couture” trick which I read in the Vogue 8333 instructions.

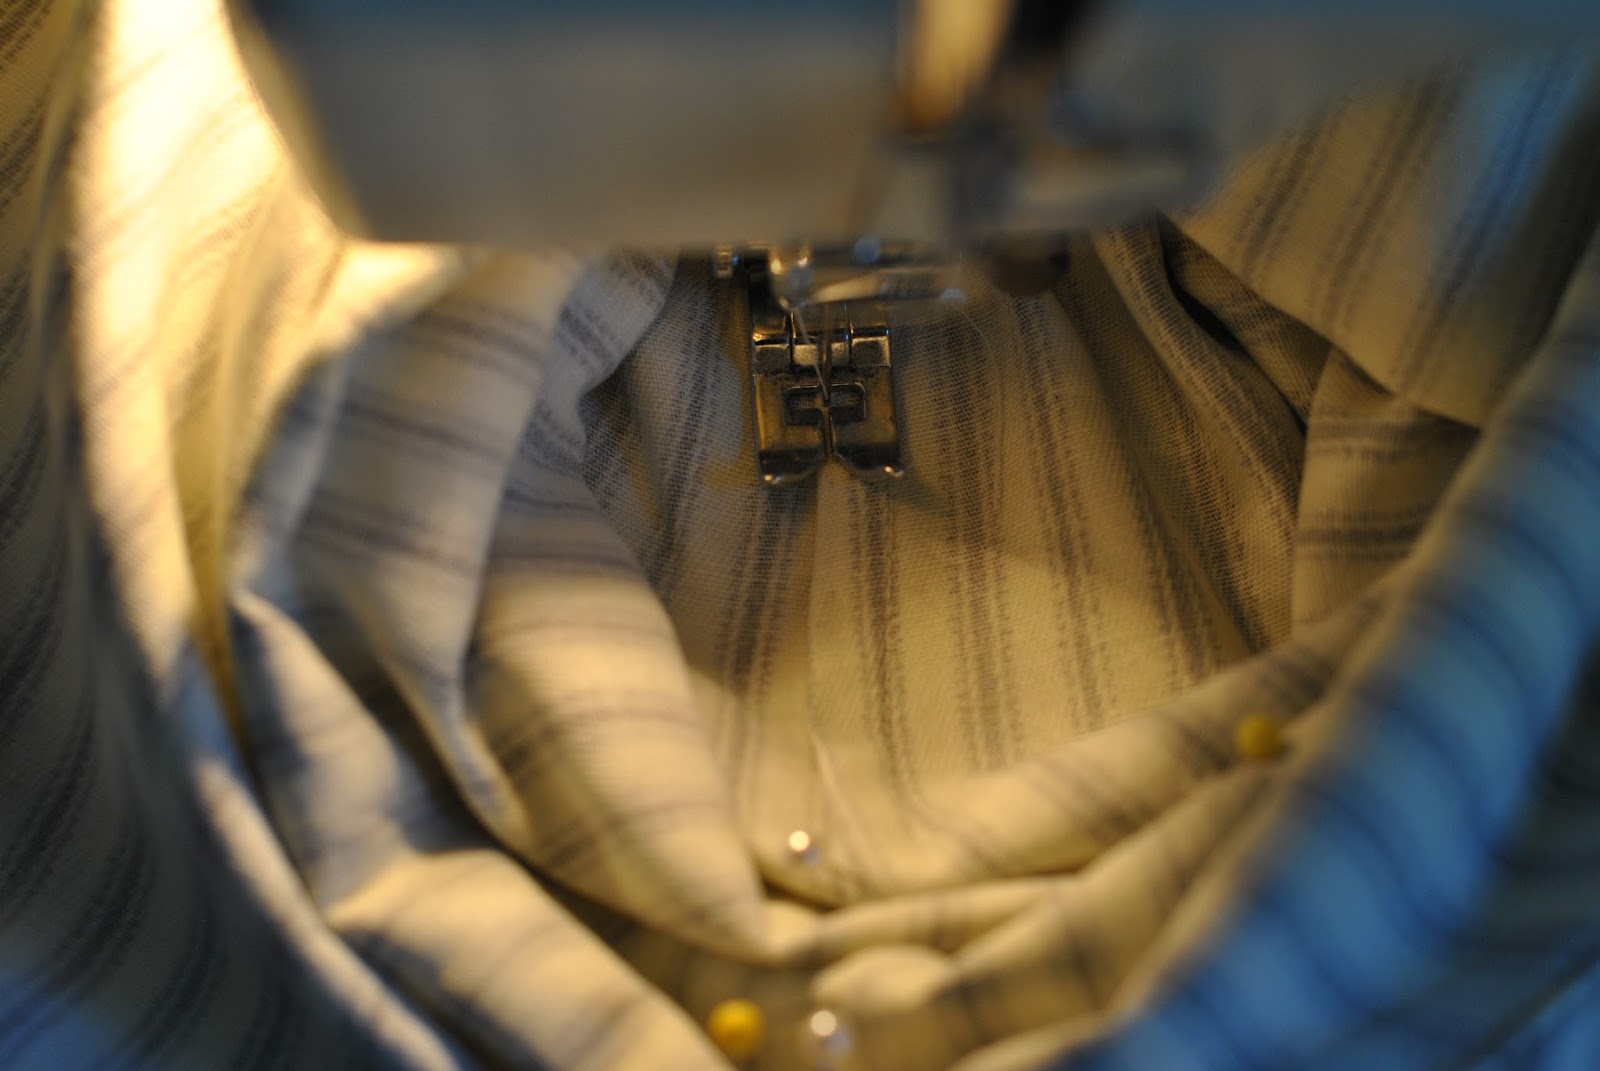
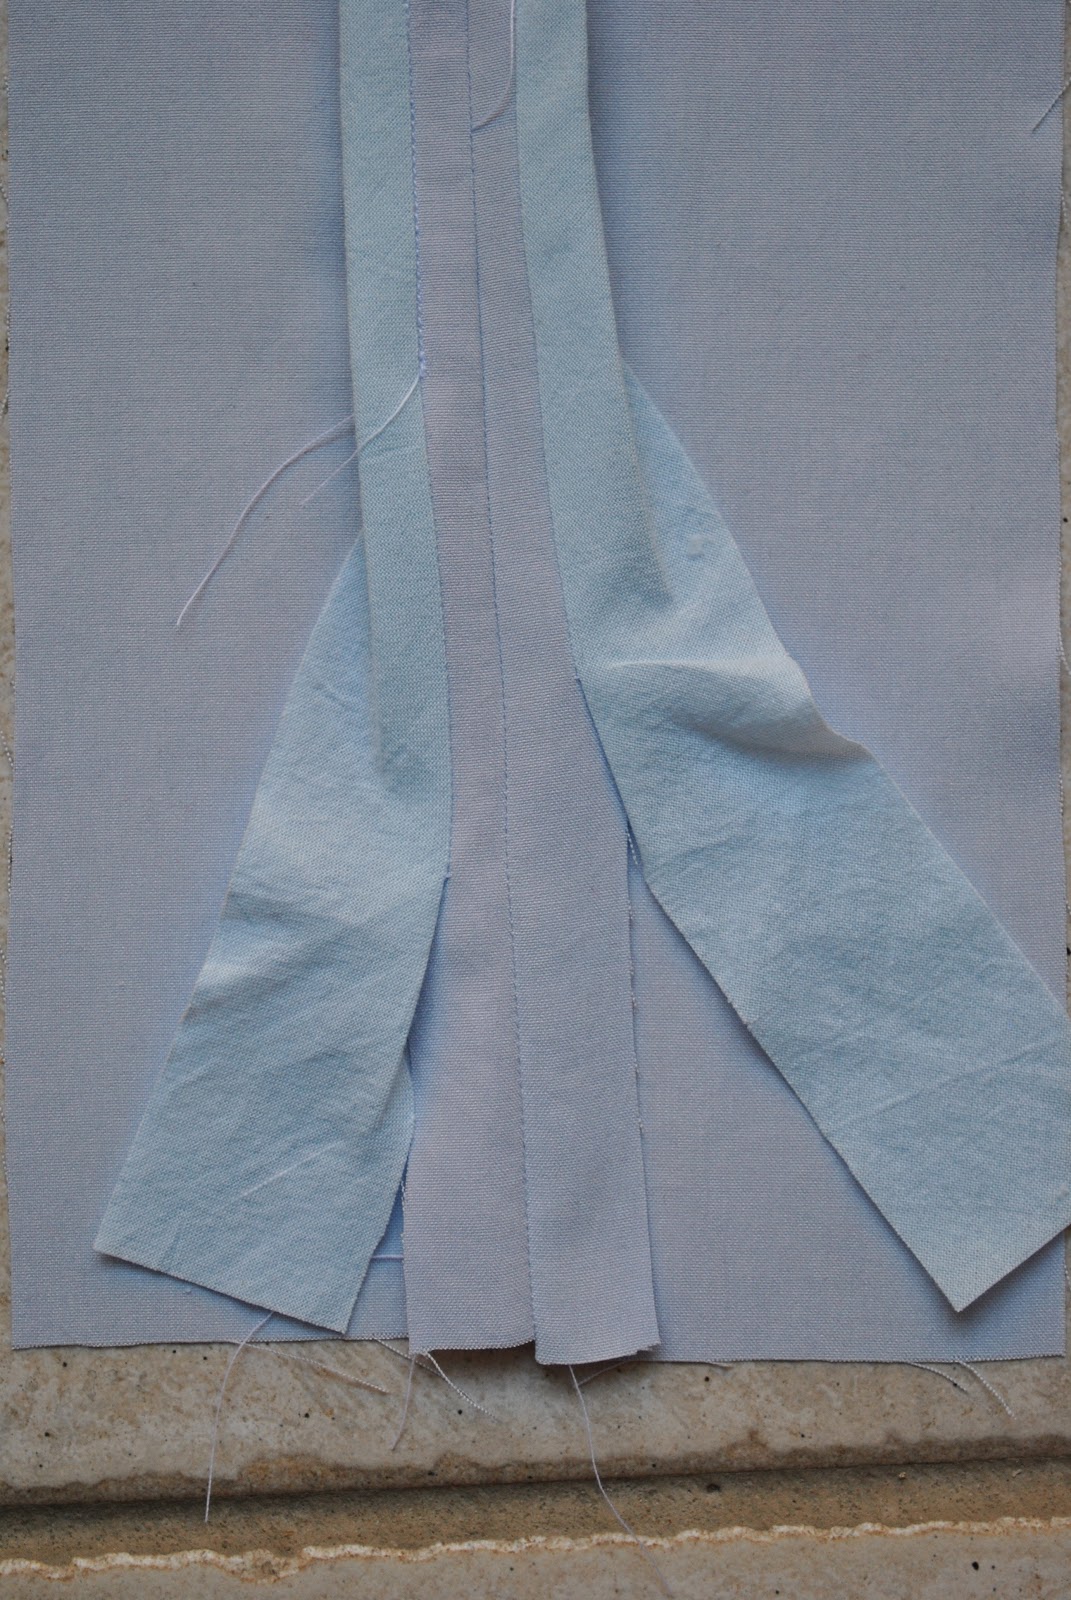
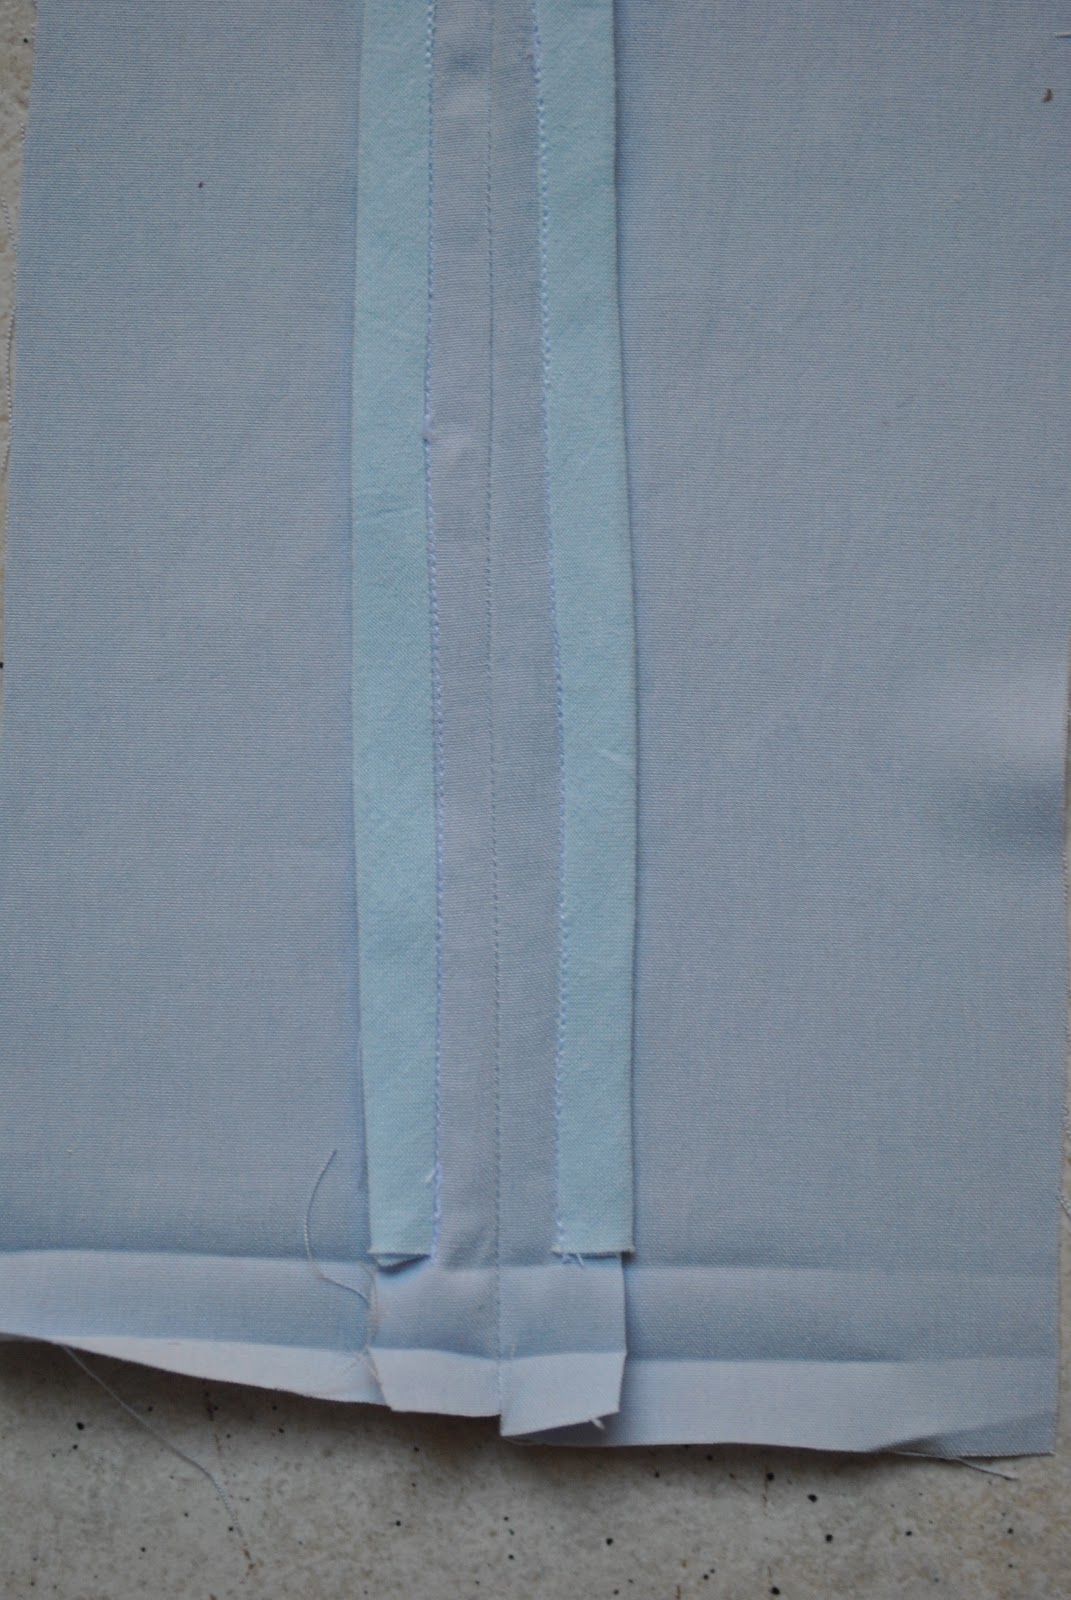
Under-stitching.  When I was a younger slapdash thing I sometimes used to lazily skip this step.  So foolish!  It makes all the difference to a neatly turned faced edge.  Do it!

btw, a note on the different coloured threads I have used in this project…
this is not a tip really, but an economical thing; I save my matching coloured thread for any stitching that is going to be visible either inside or outside the garment.  I use either black or white whichever is the closest in shade, in this case white, for any stitching that is hidden away inside the folds of fabric.  This is because I buy matching colour threads for a project in the smaller and more expensive 100m reels; and I buy black and white thread in the cheaper 1000m reels.  I have a black and a white bobbin permanently threaded up, and wind a bobbin in my matching thread before a project, as well as the reels for the top of the machine in white/black and my matching thread: and interchange them depending on whether the thread is going to be visible or not.  I know this means extra fiddling about and is not a tip everyone wants to bother with, but it does save money, which can be spent on other things  ðŸ™‚  This is why you can see some stitching, the visible stitching, is in the matching beige thread, and some stitching is in white.  I’m Ok with that because the white stitching is in the hidden spots, and will invisible both inside and outside of the finished garment.

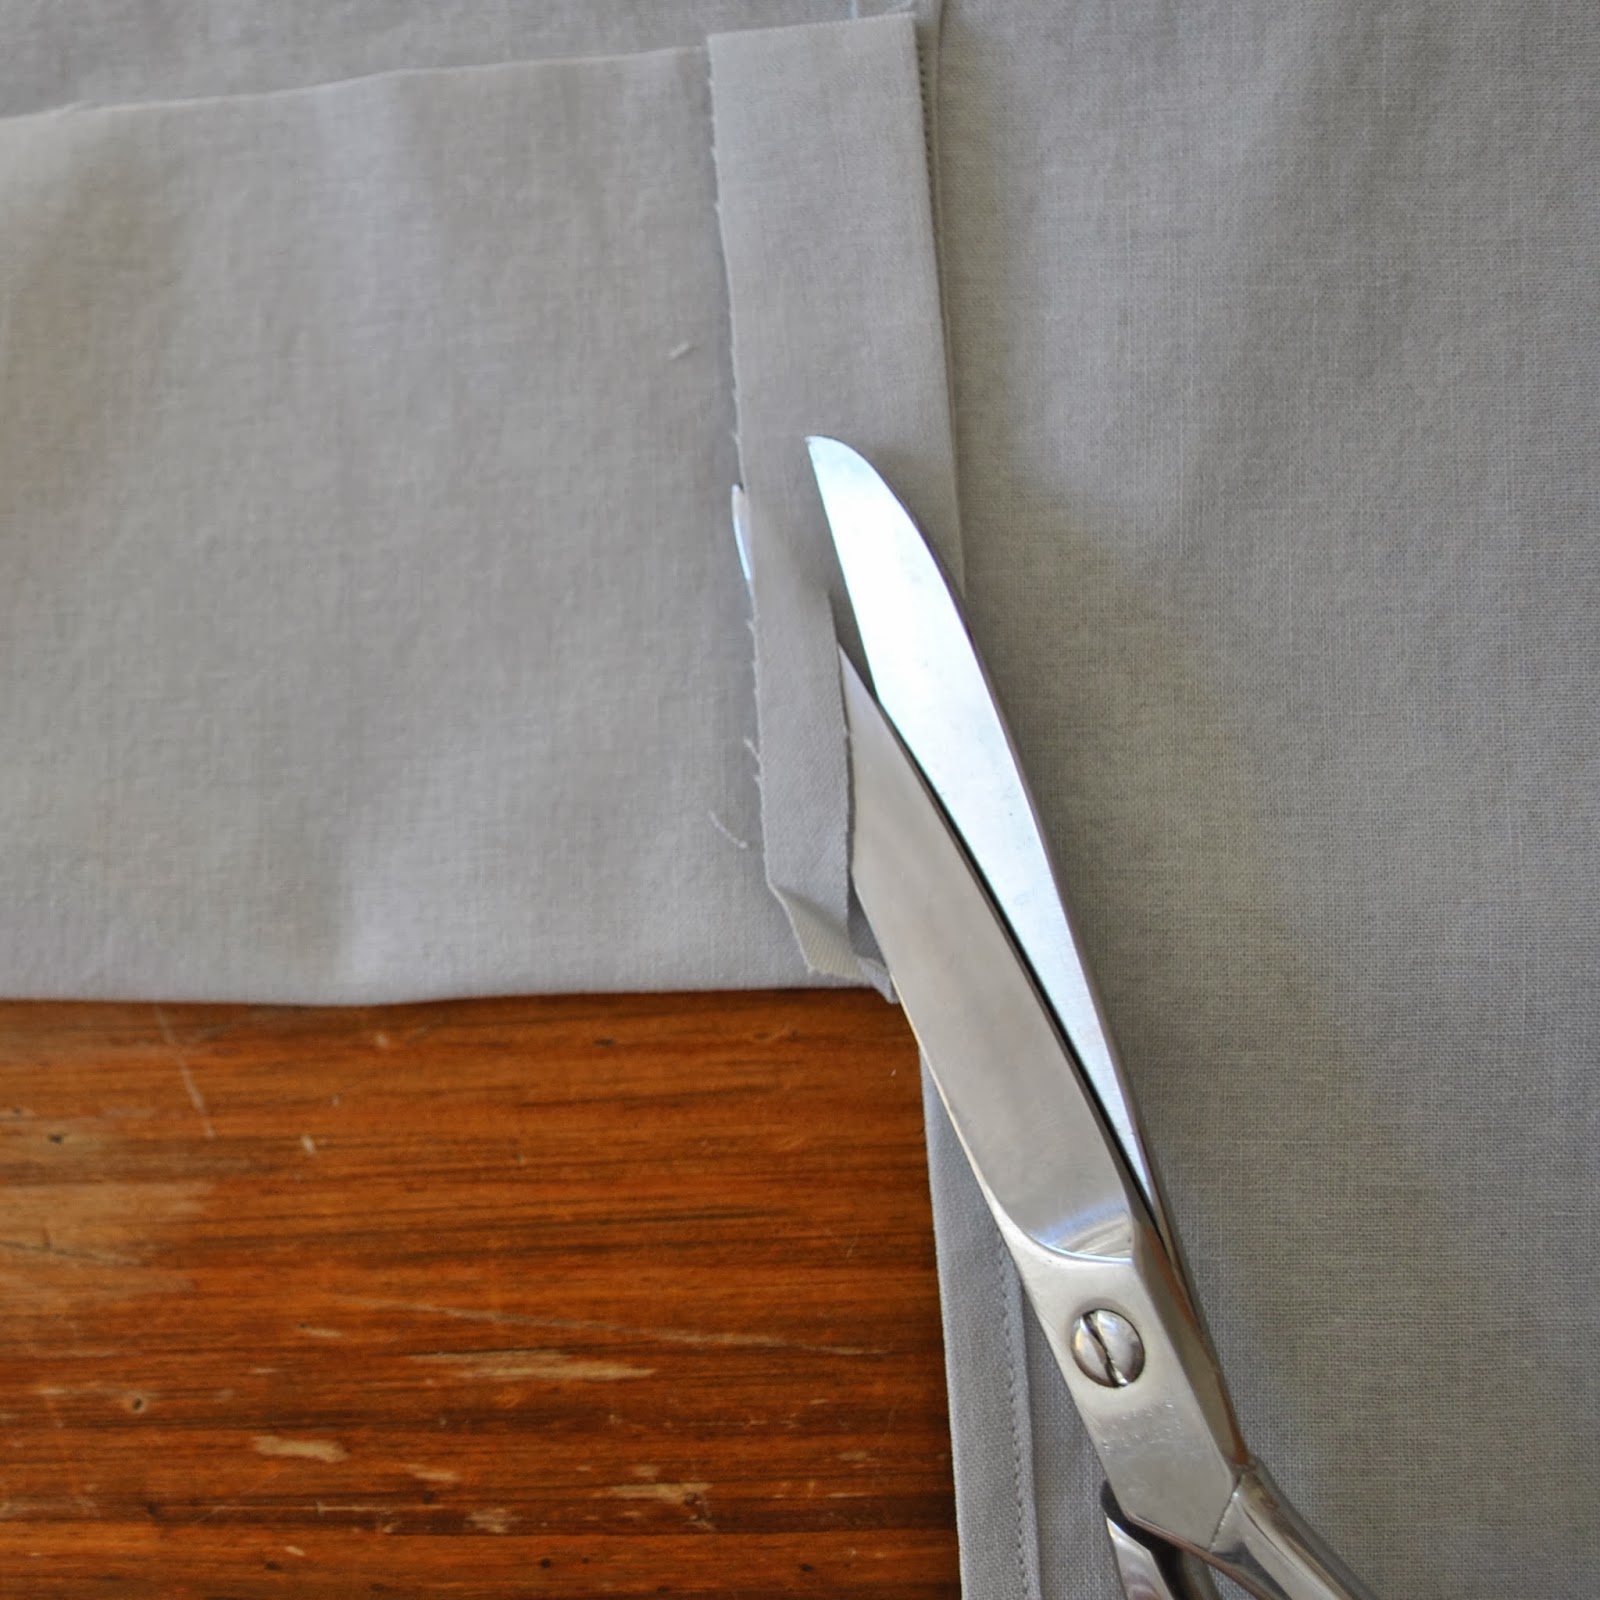
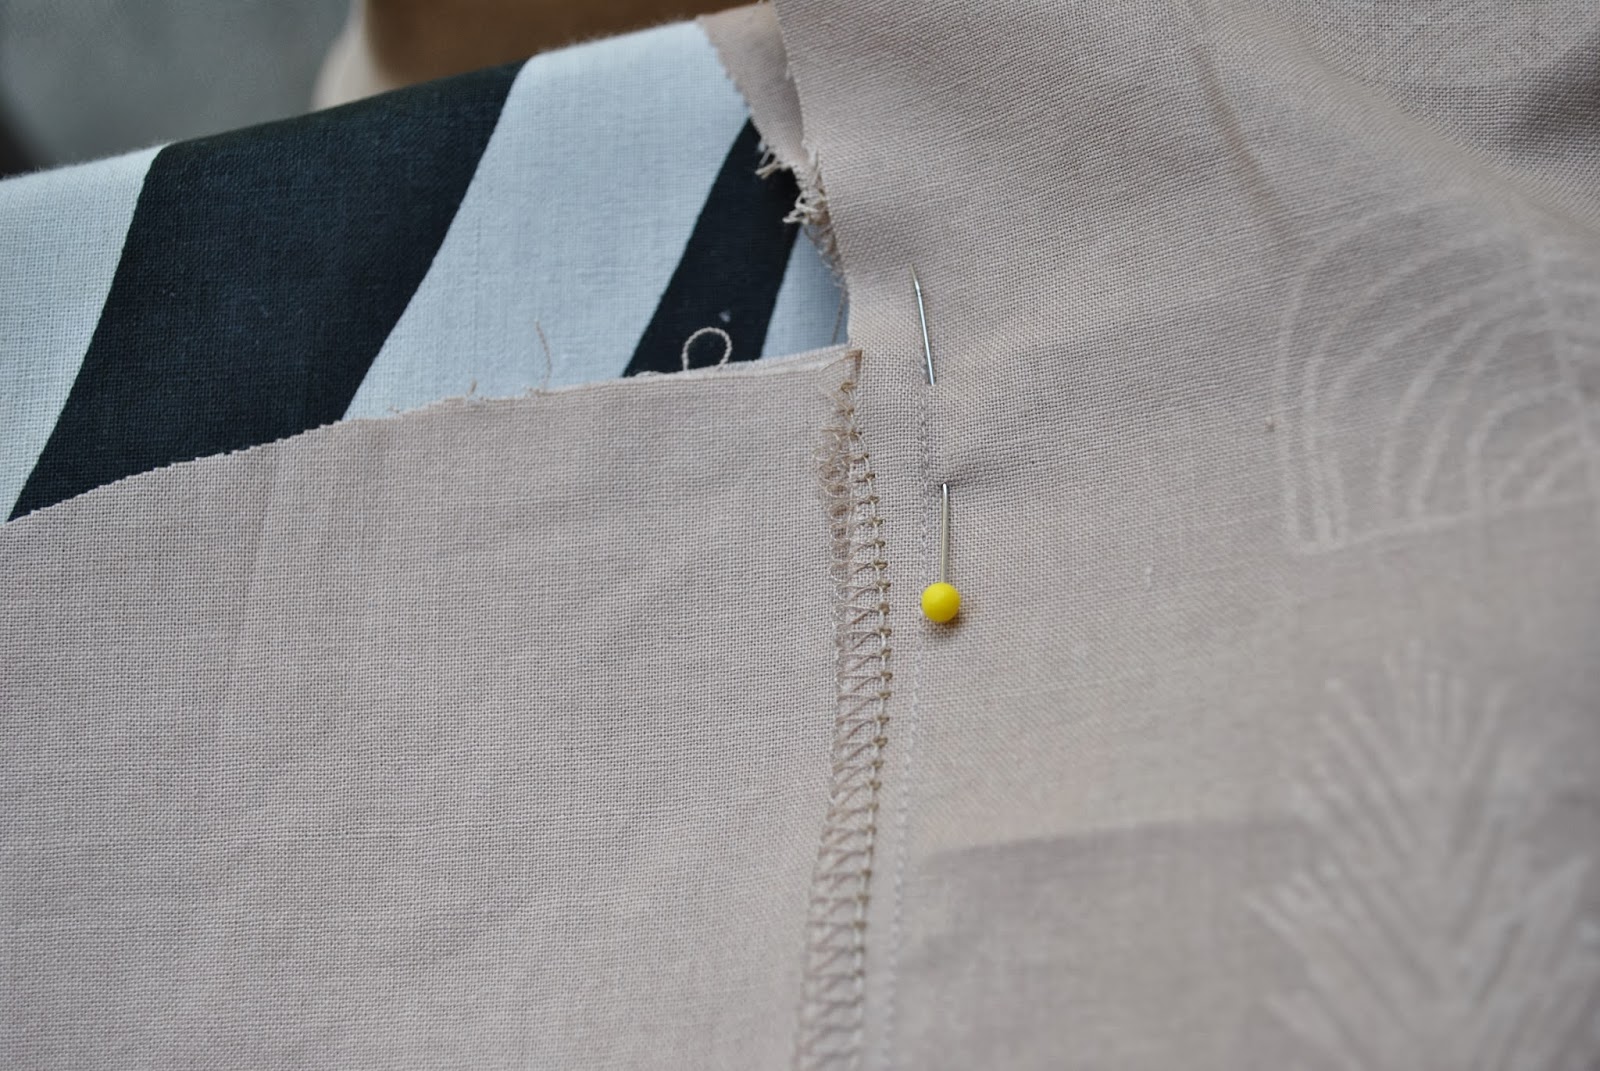
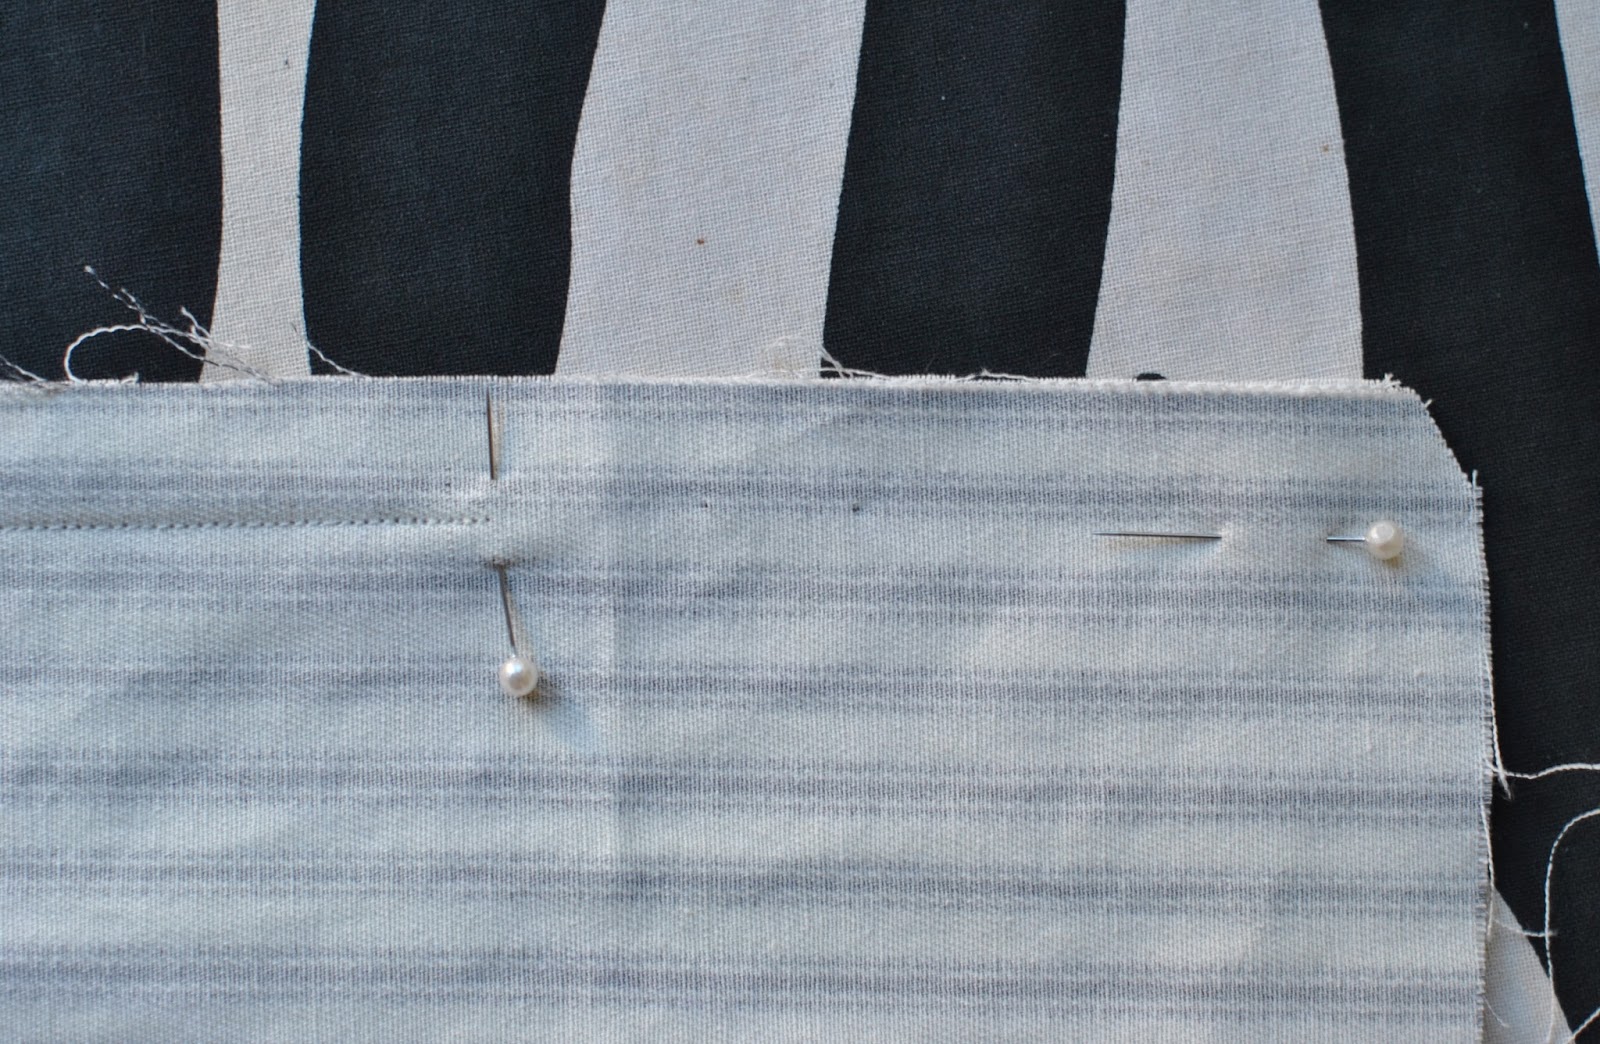
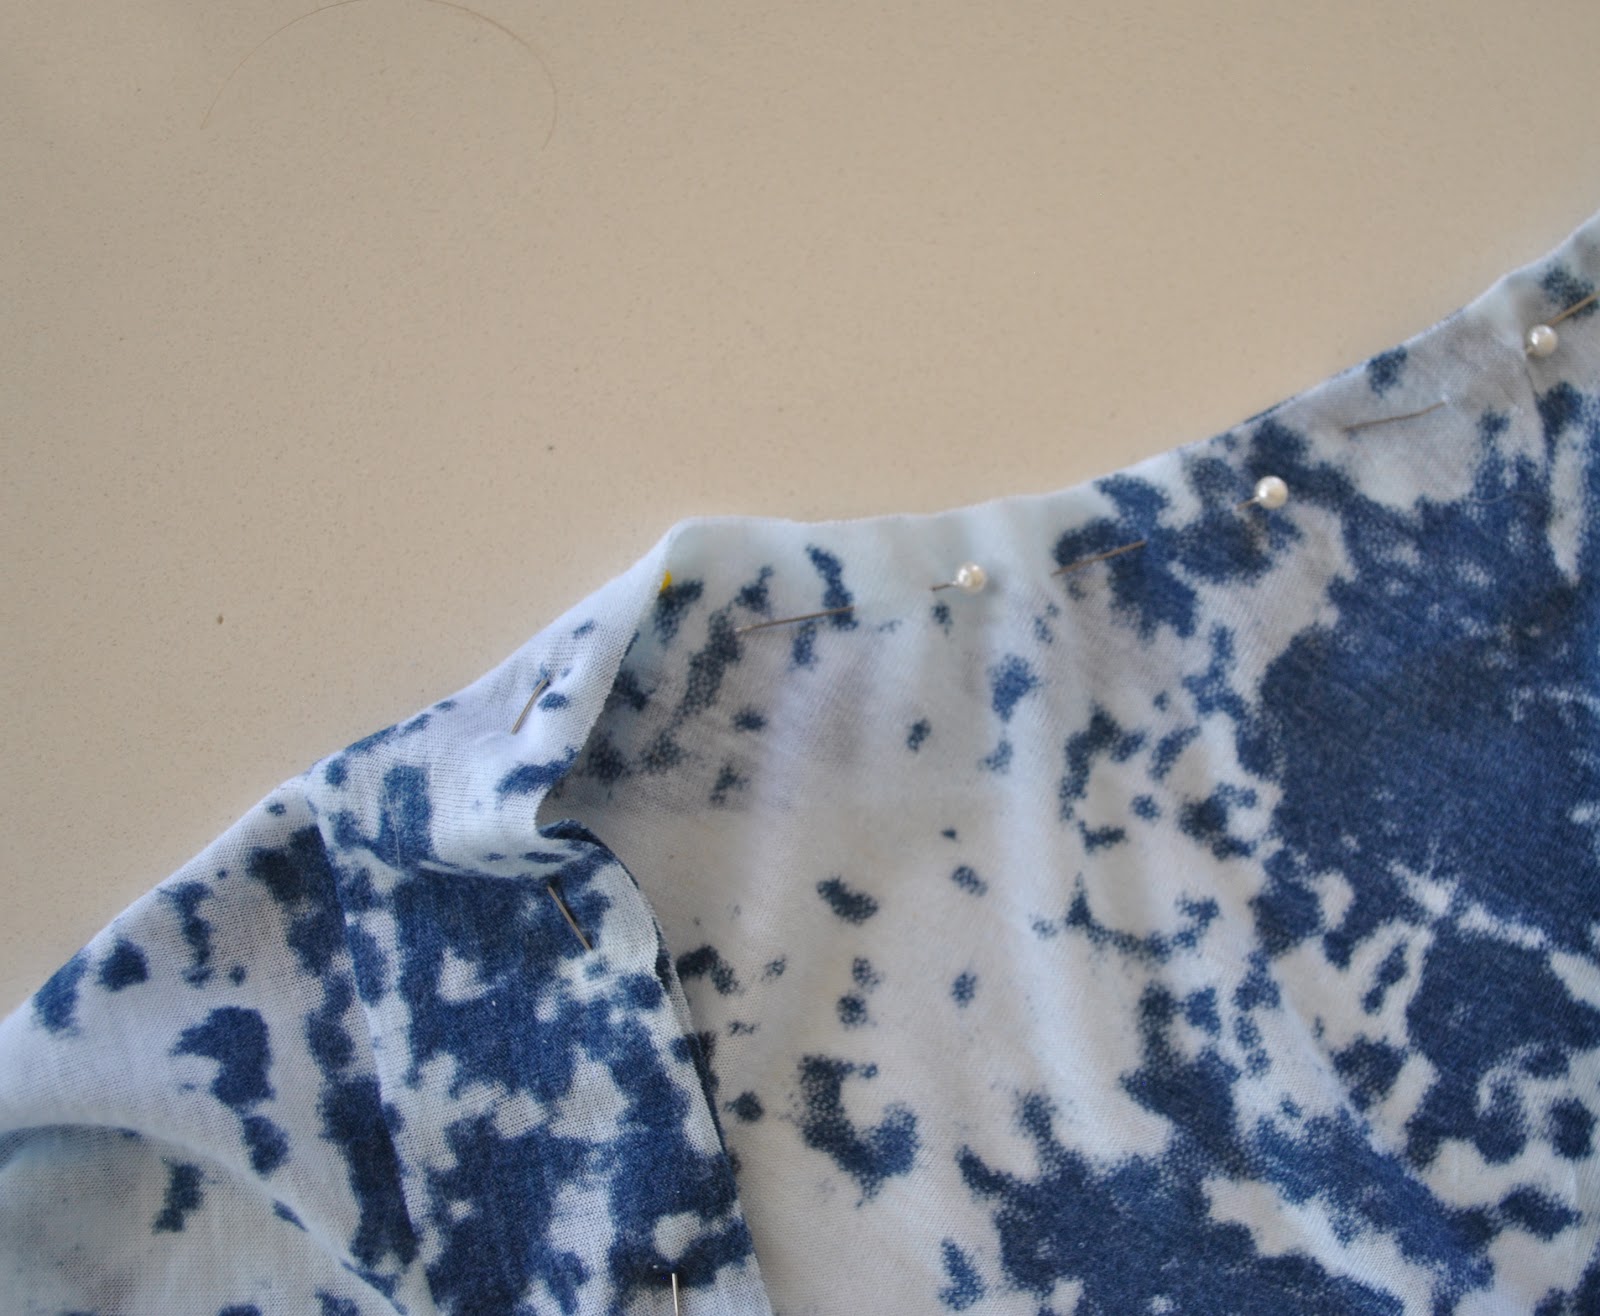
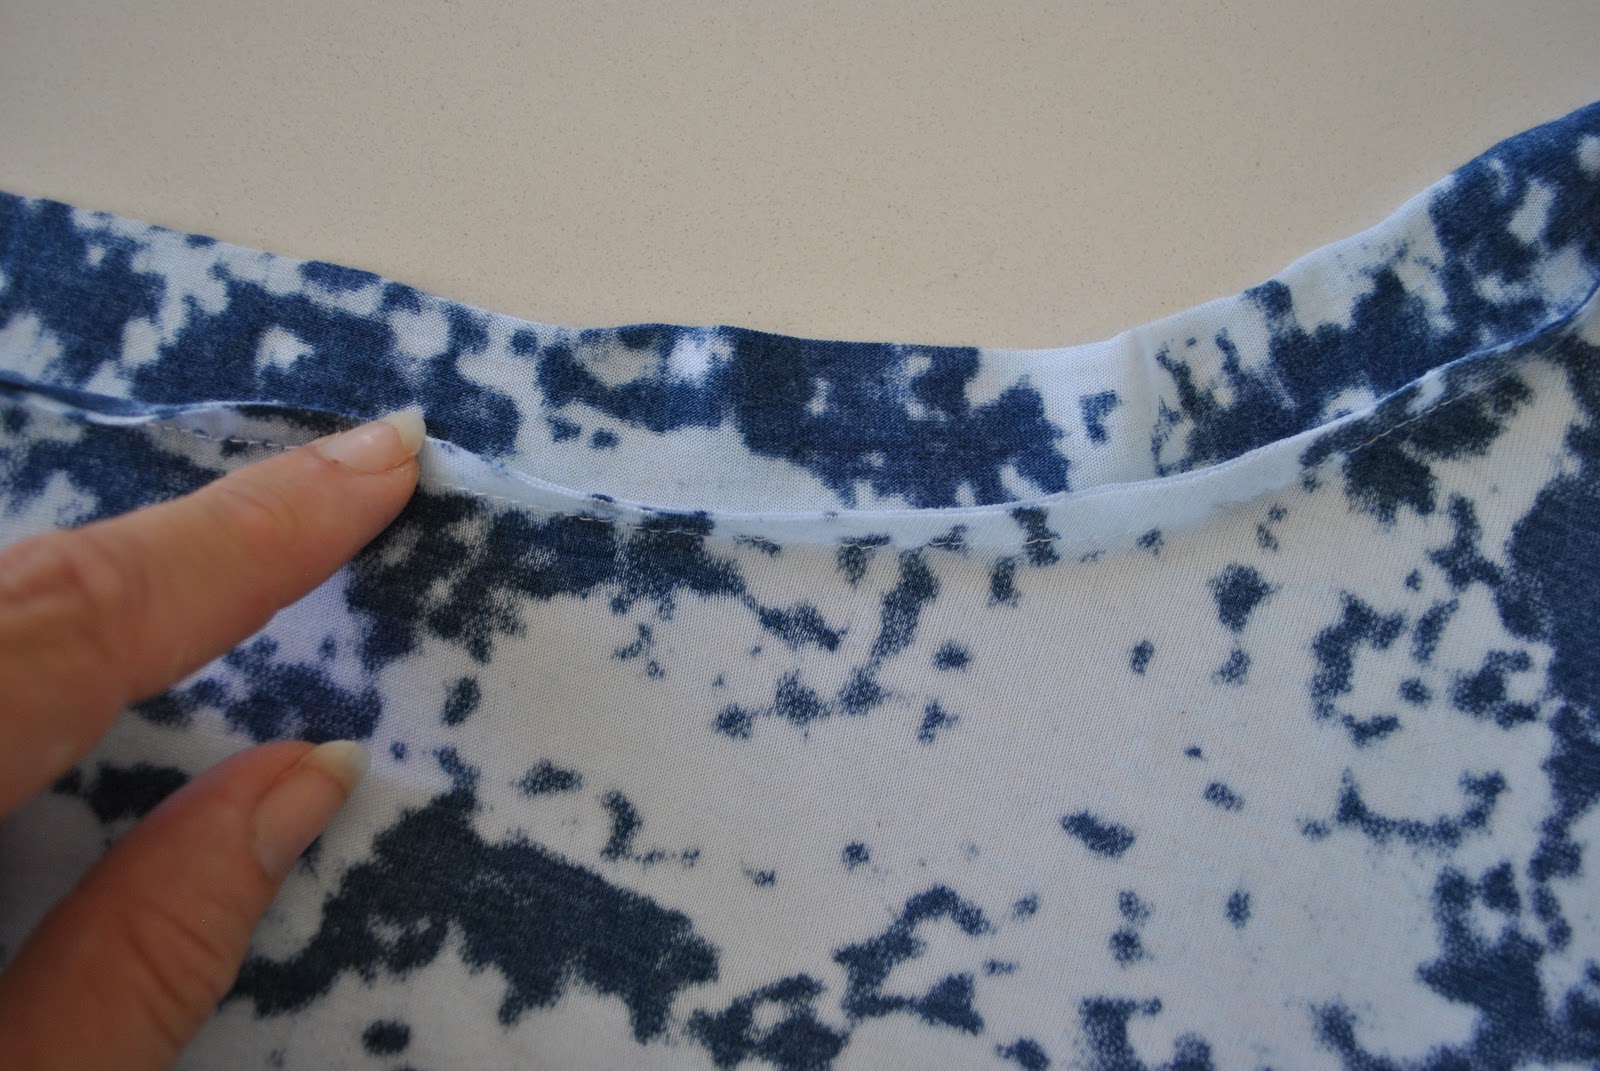
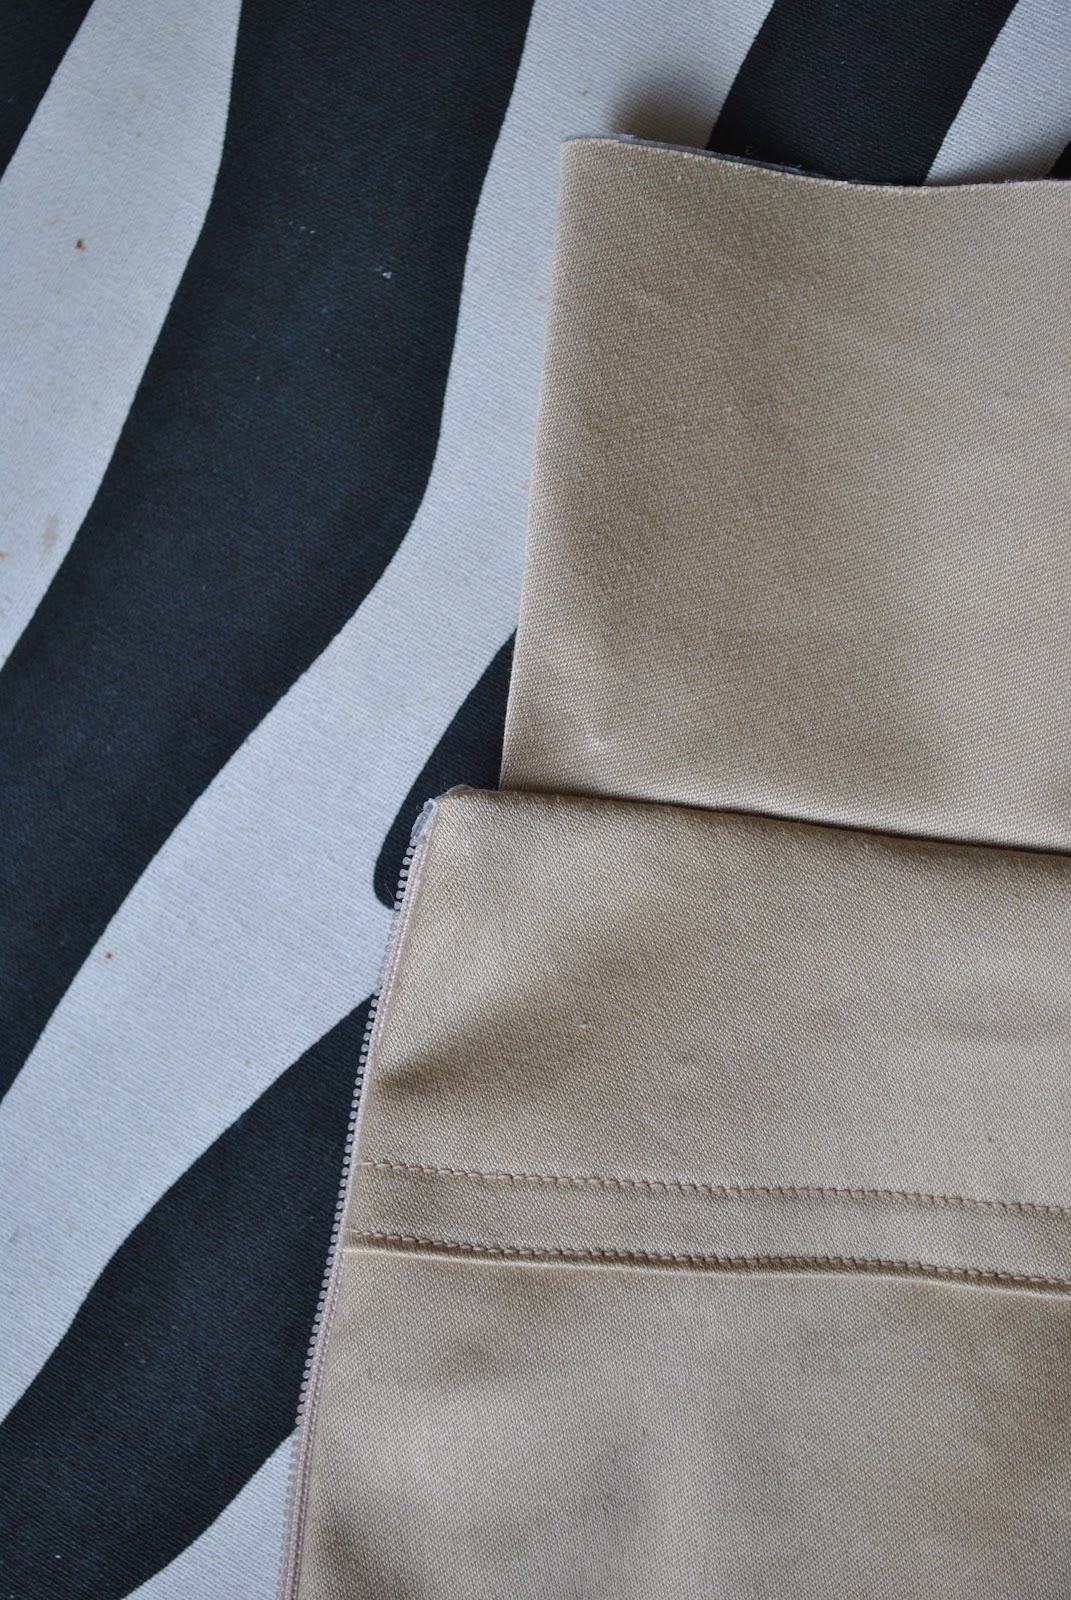
Fold the facing opening edge in smoothly to an even width against the zip tape.  I nearly always have to adjust my waistbands, so it is not a given that this will be the same as the allowance dictated by the pattern piece.

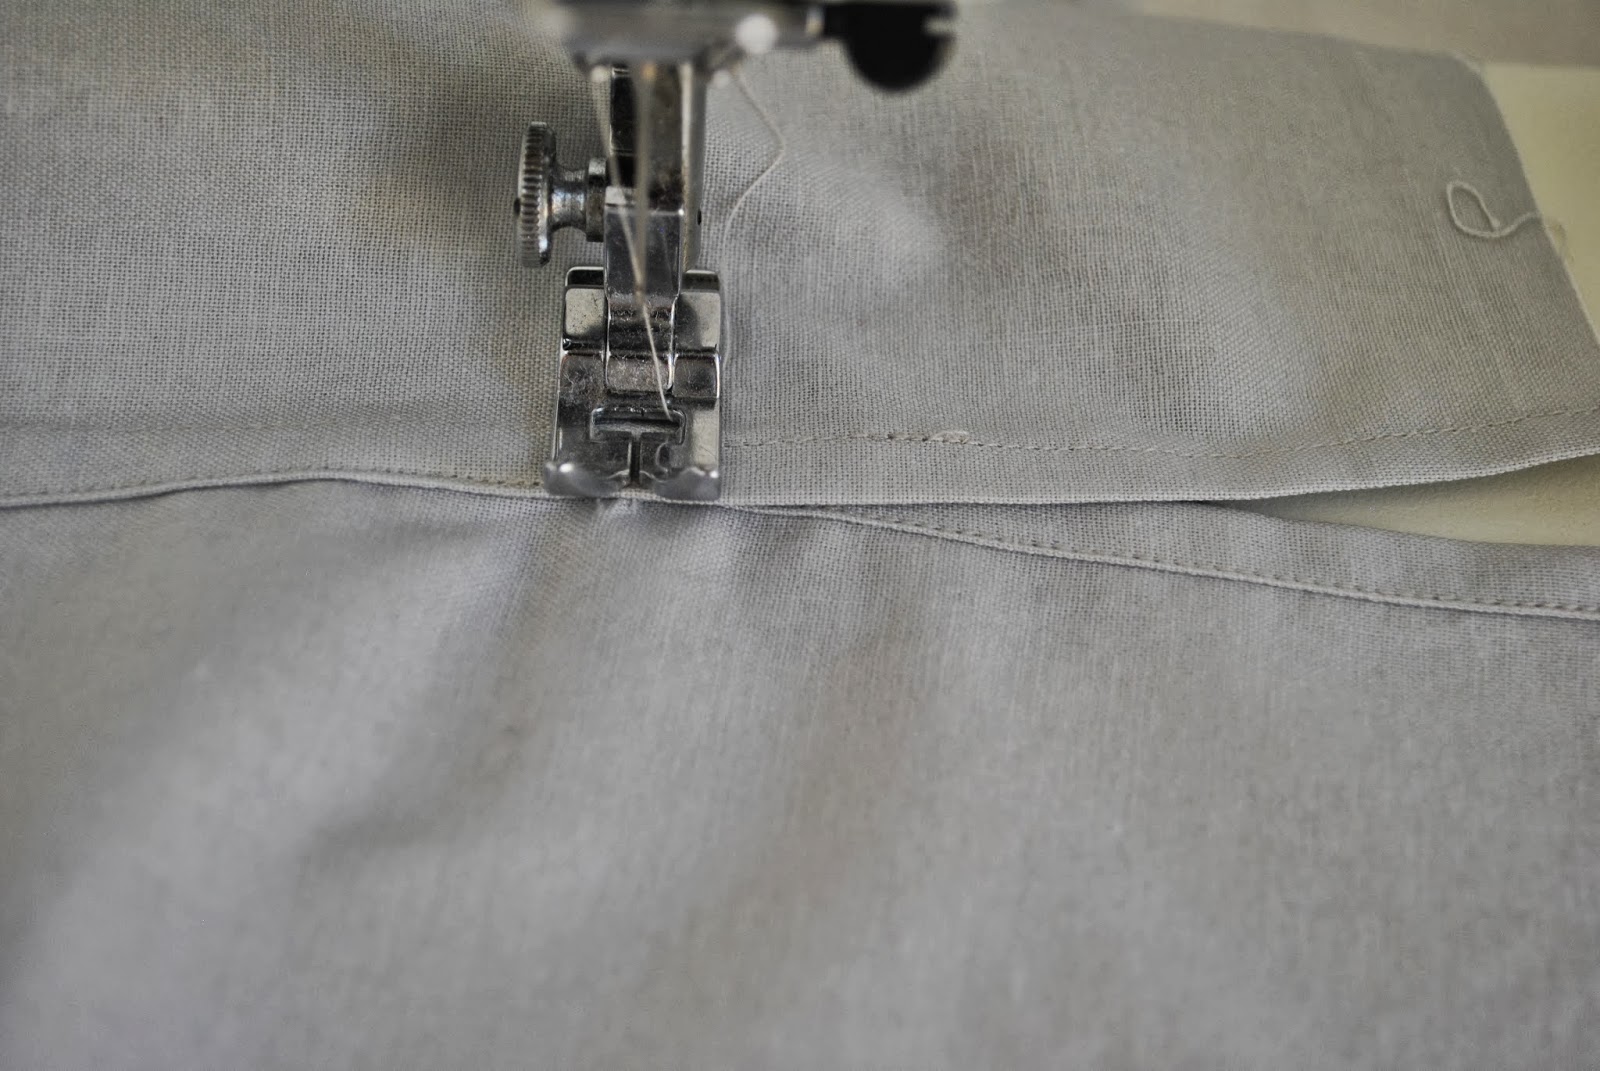
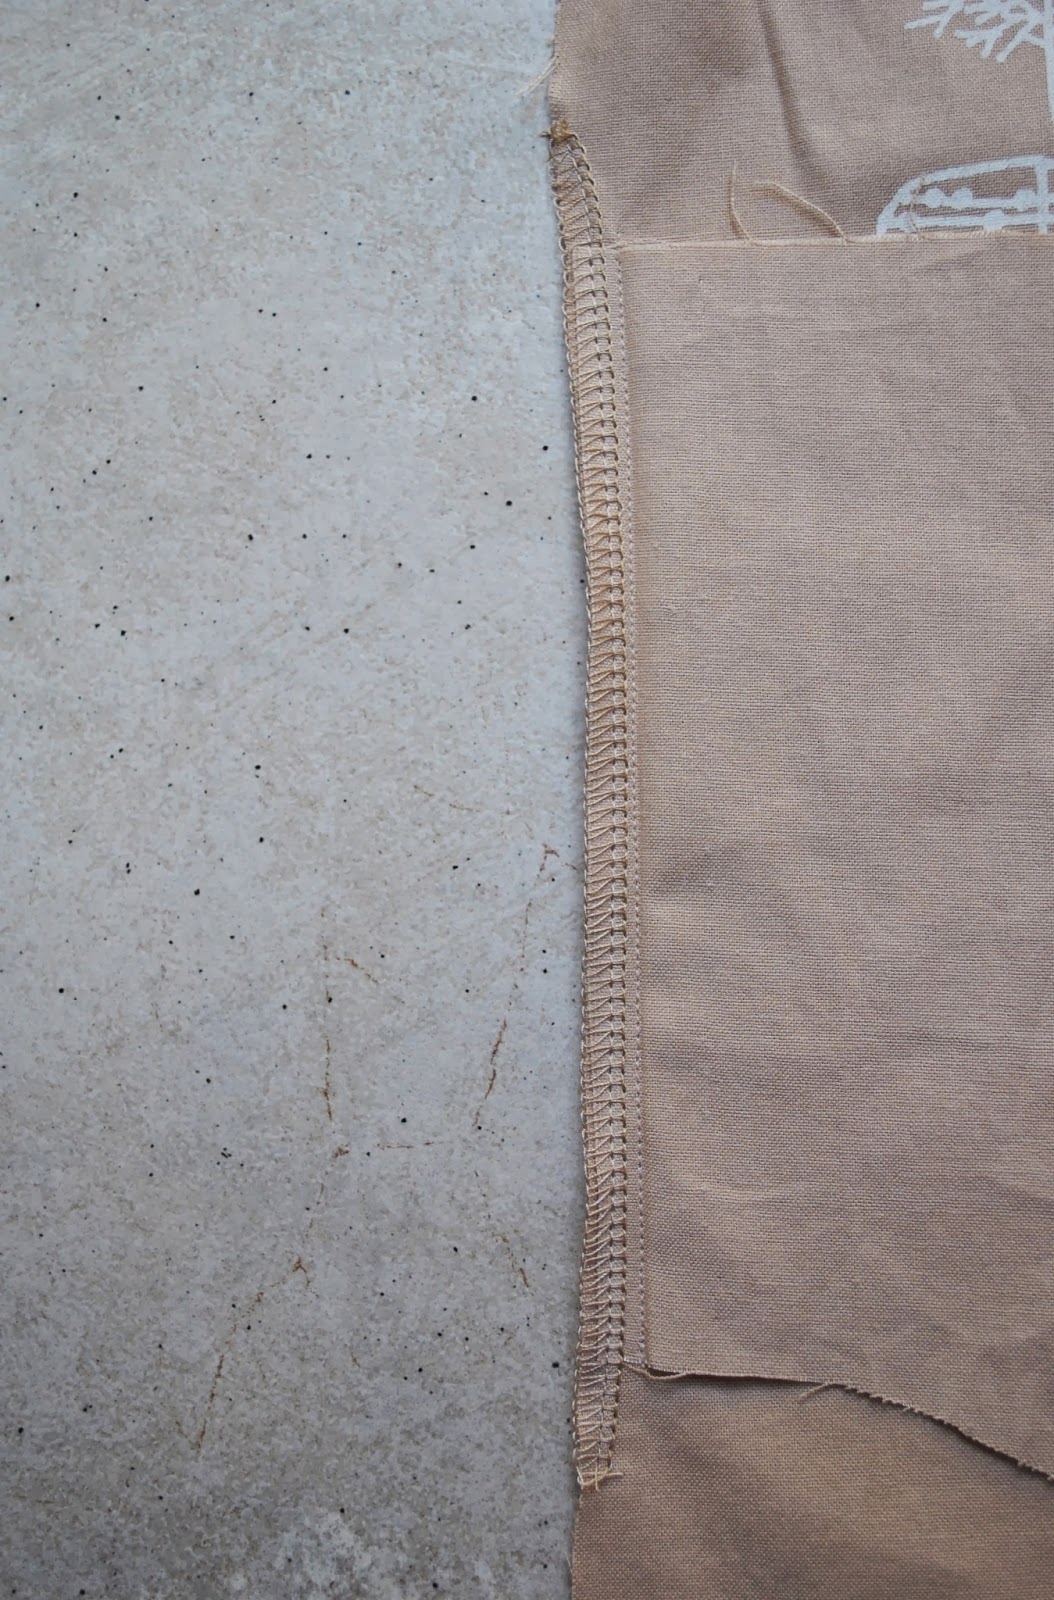
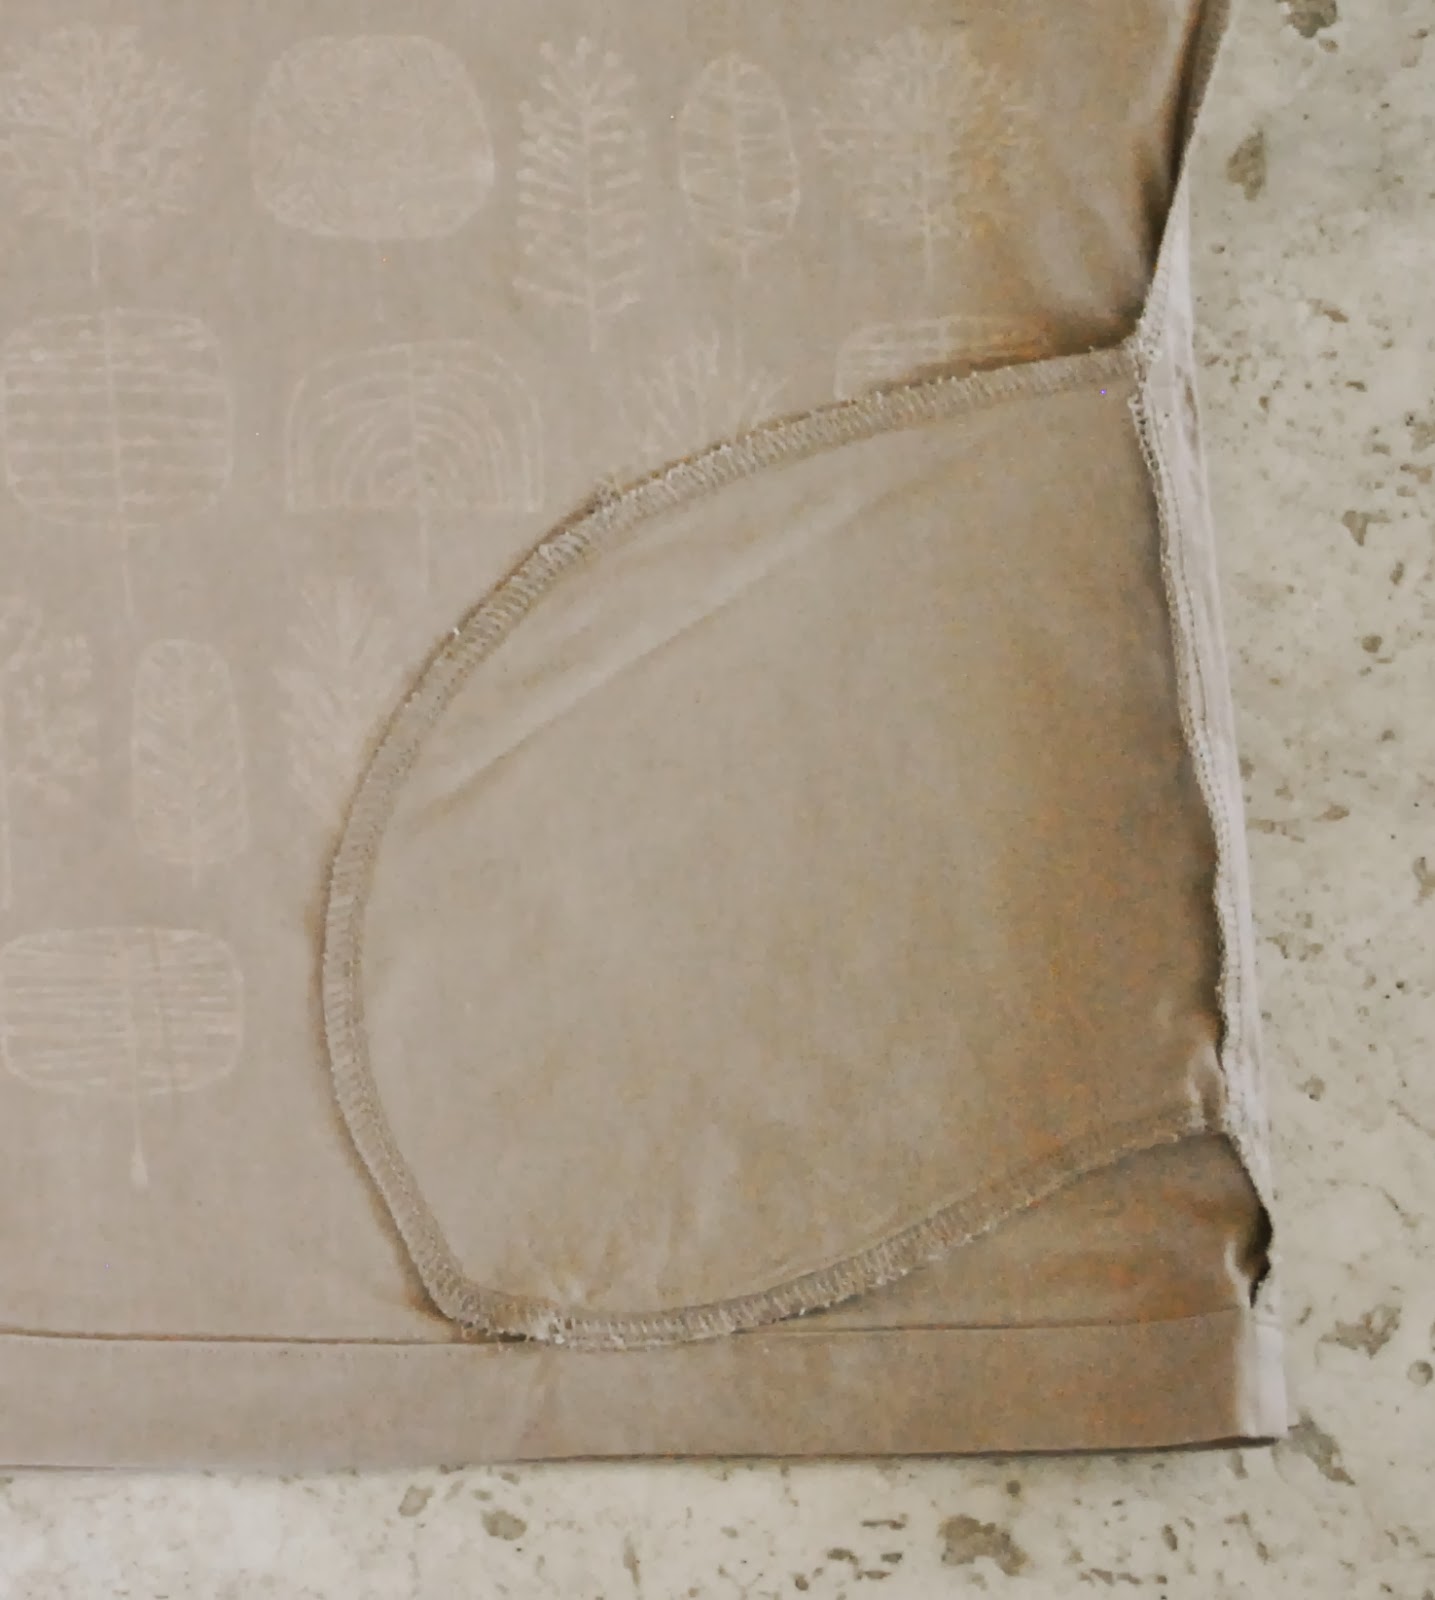
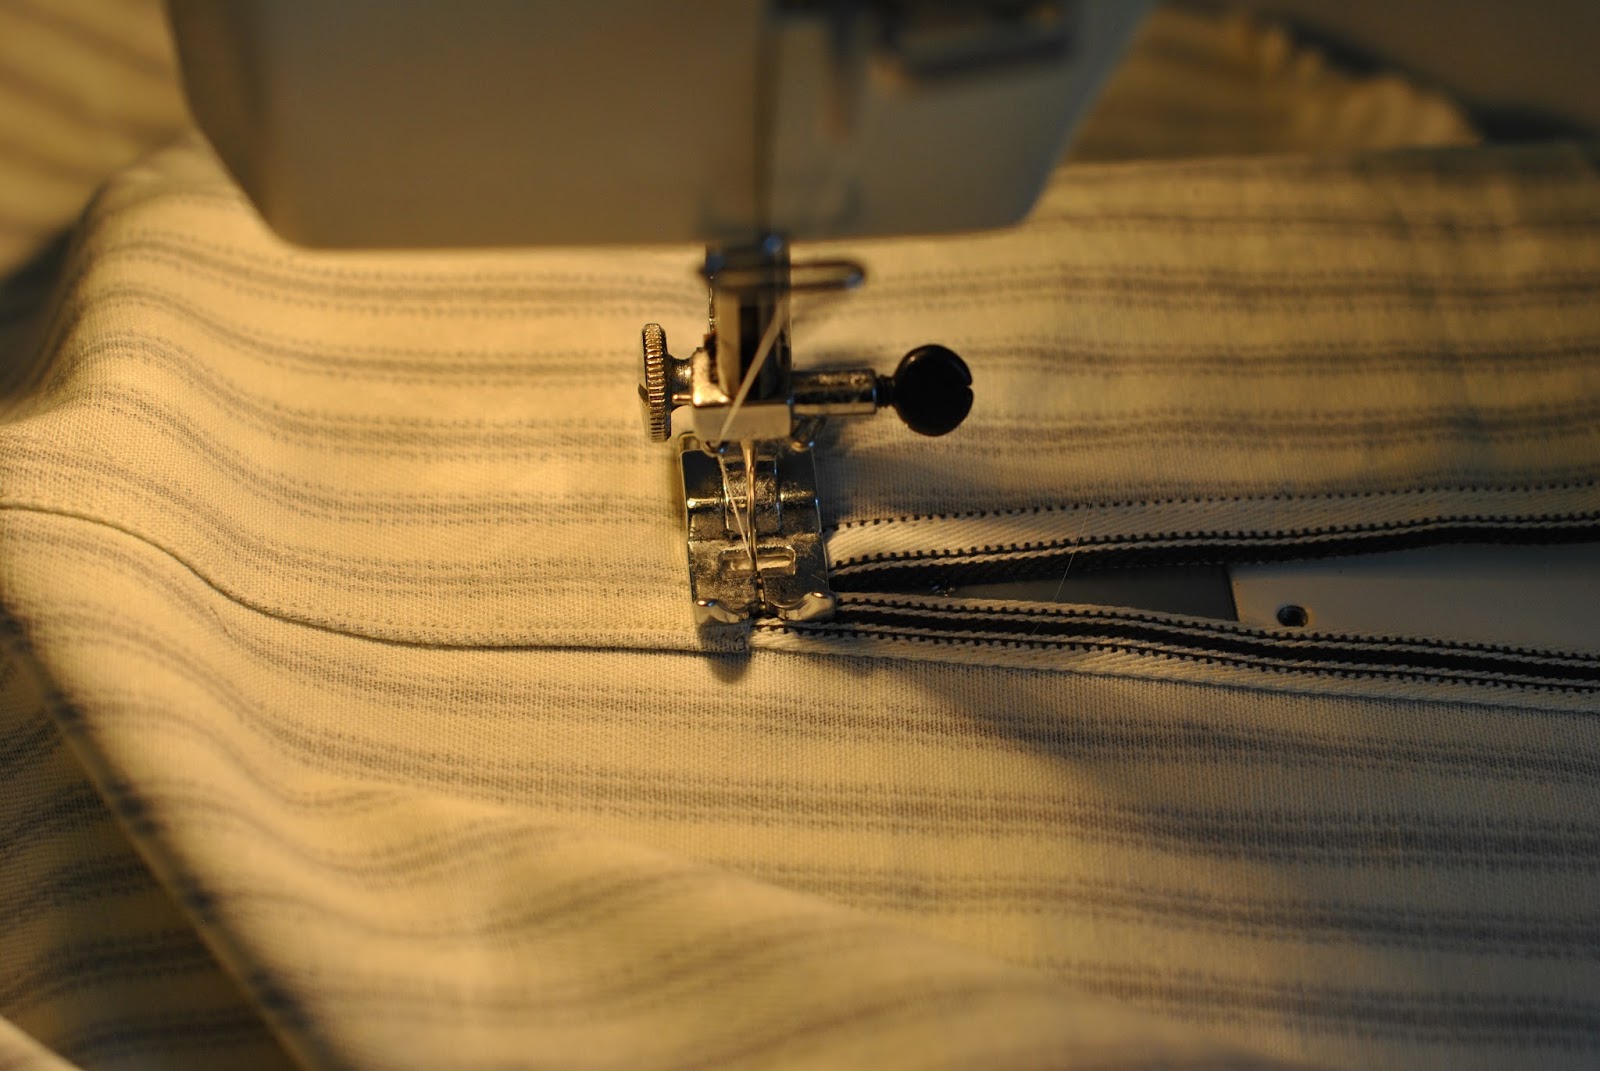
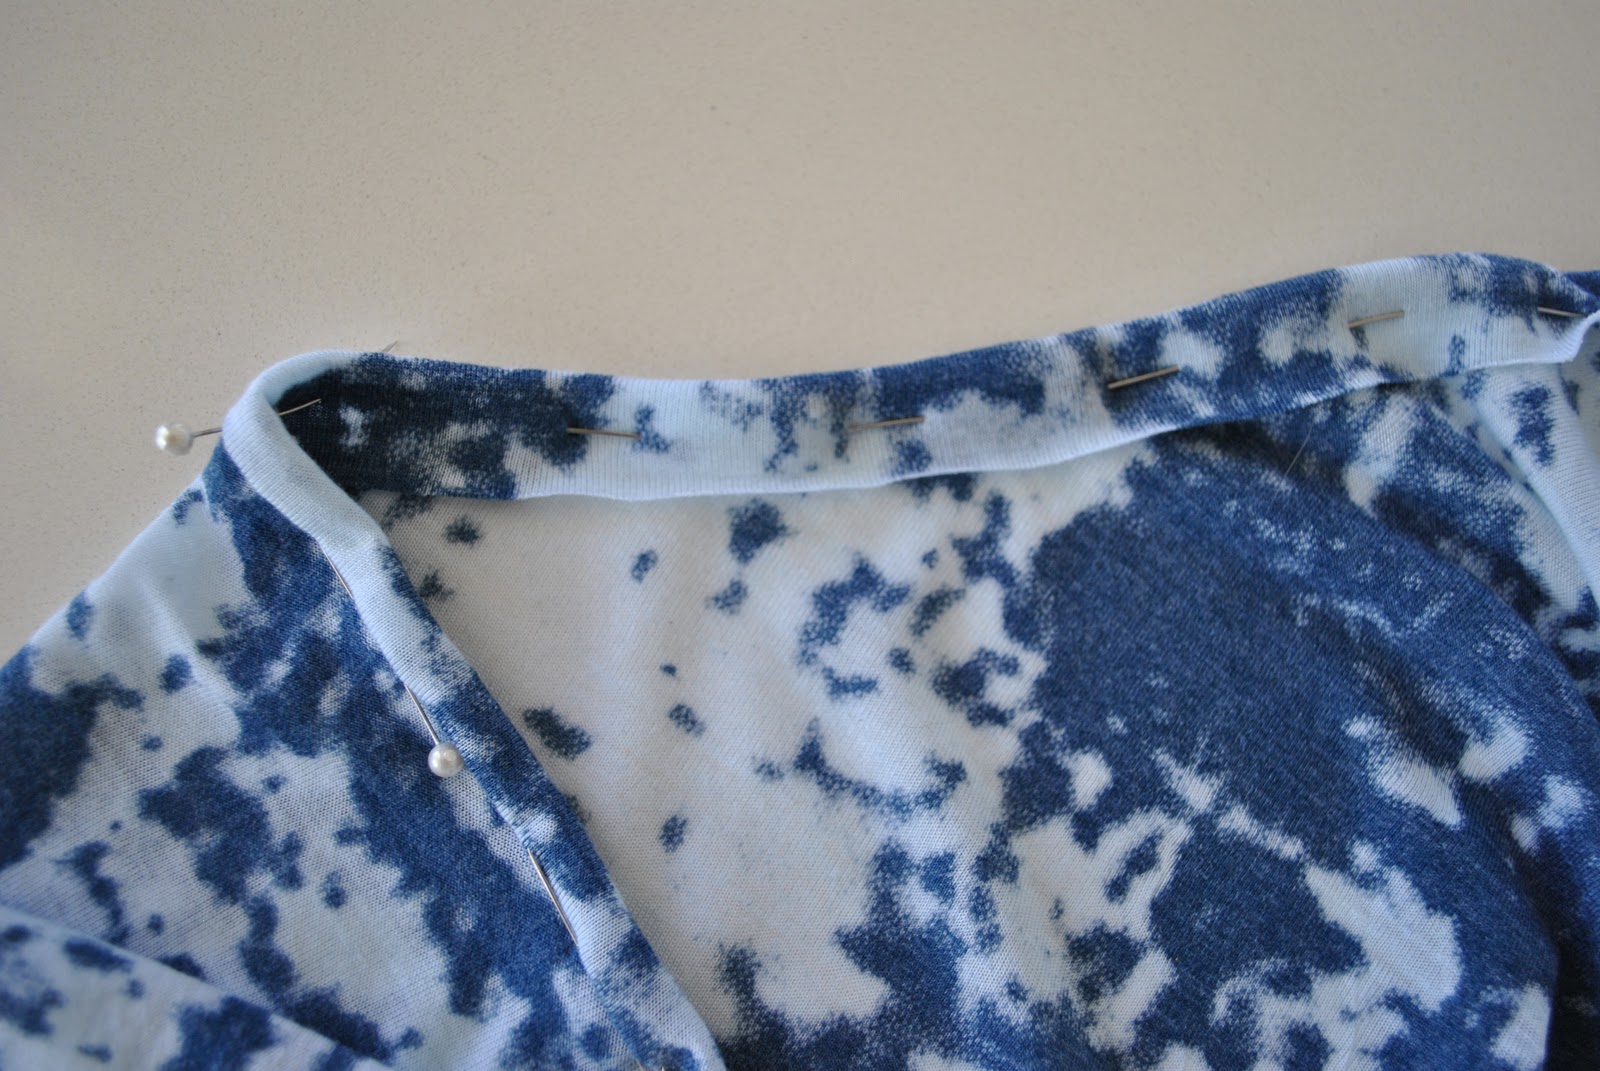
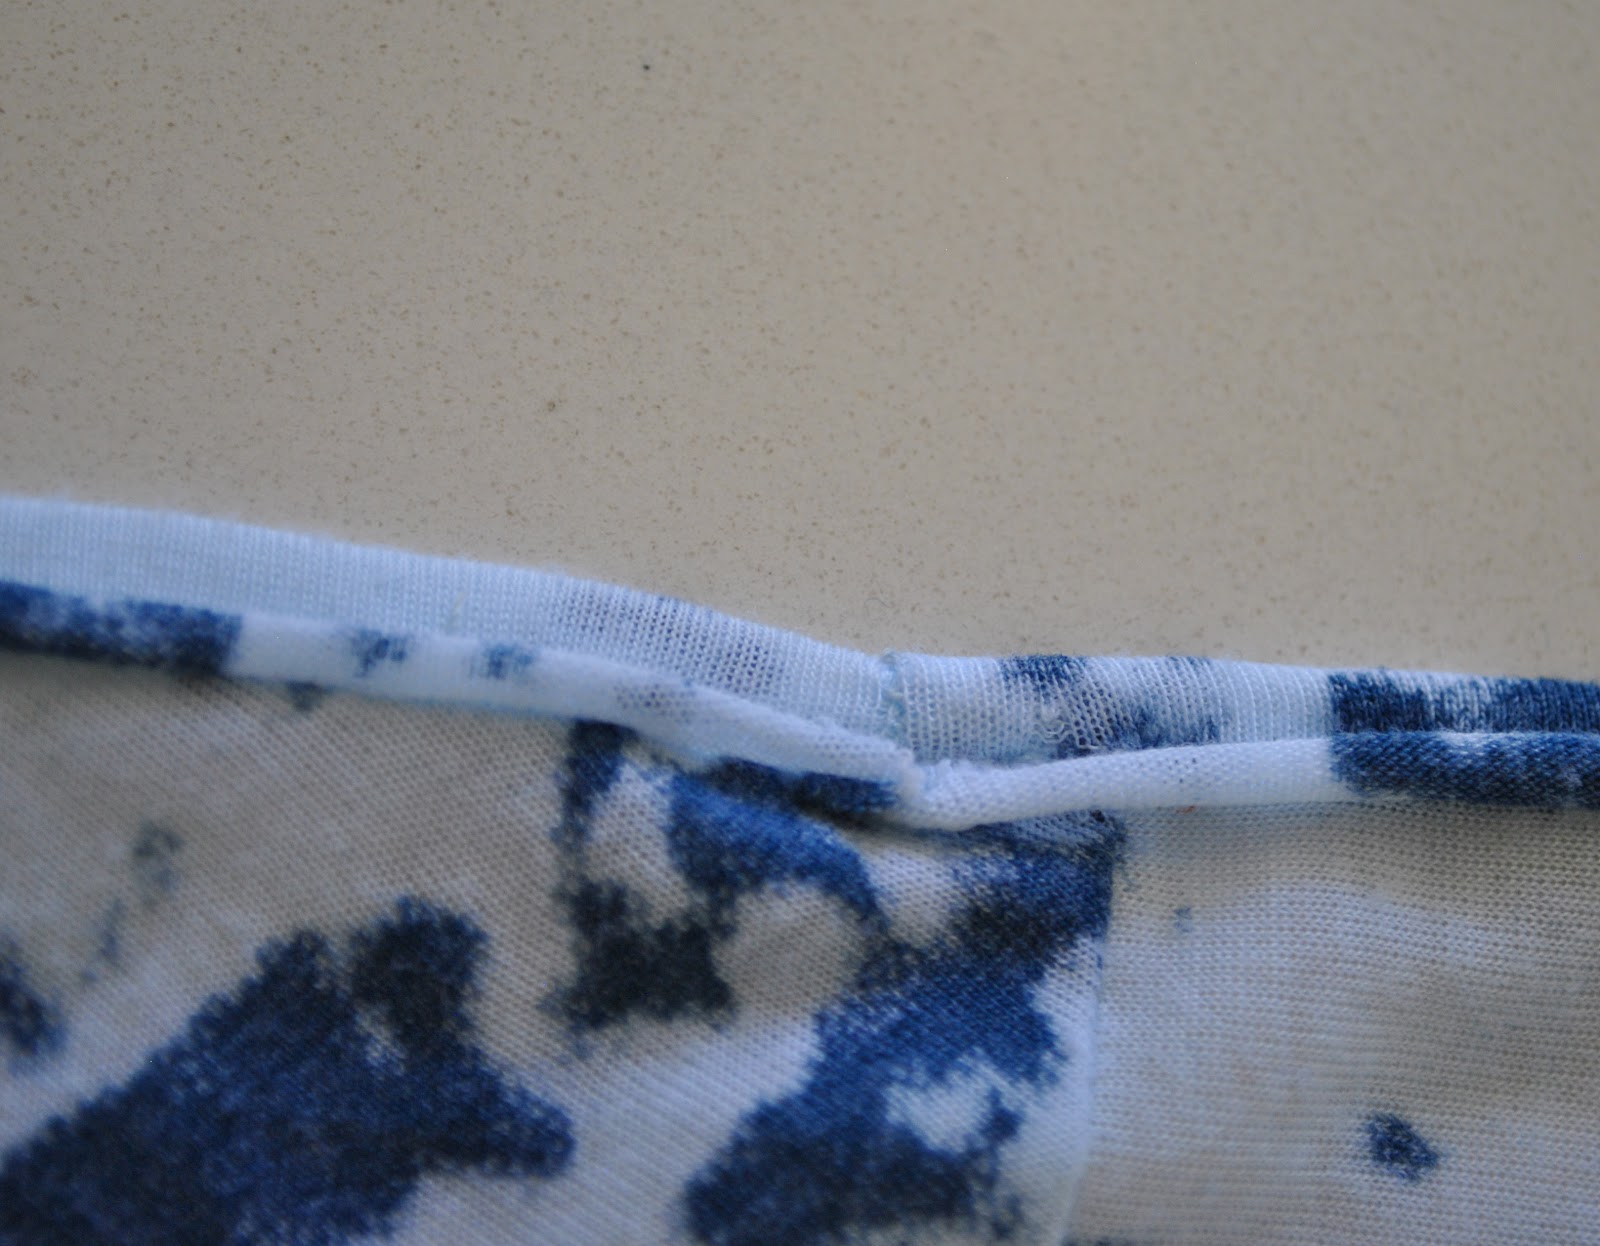
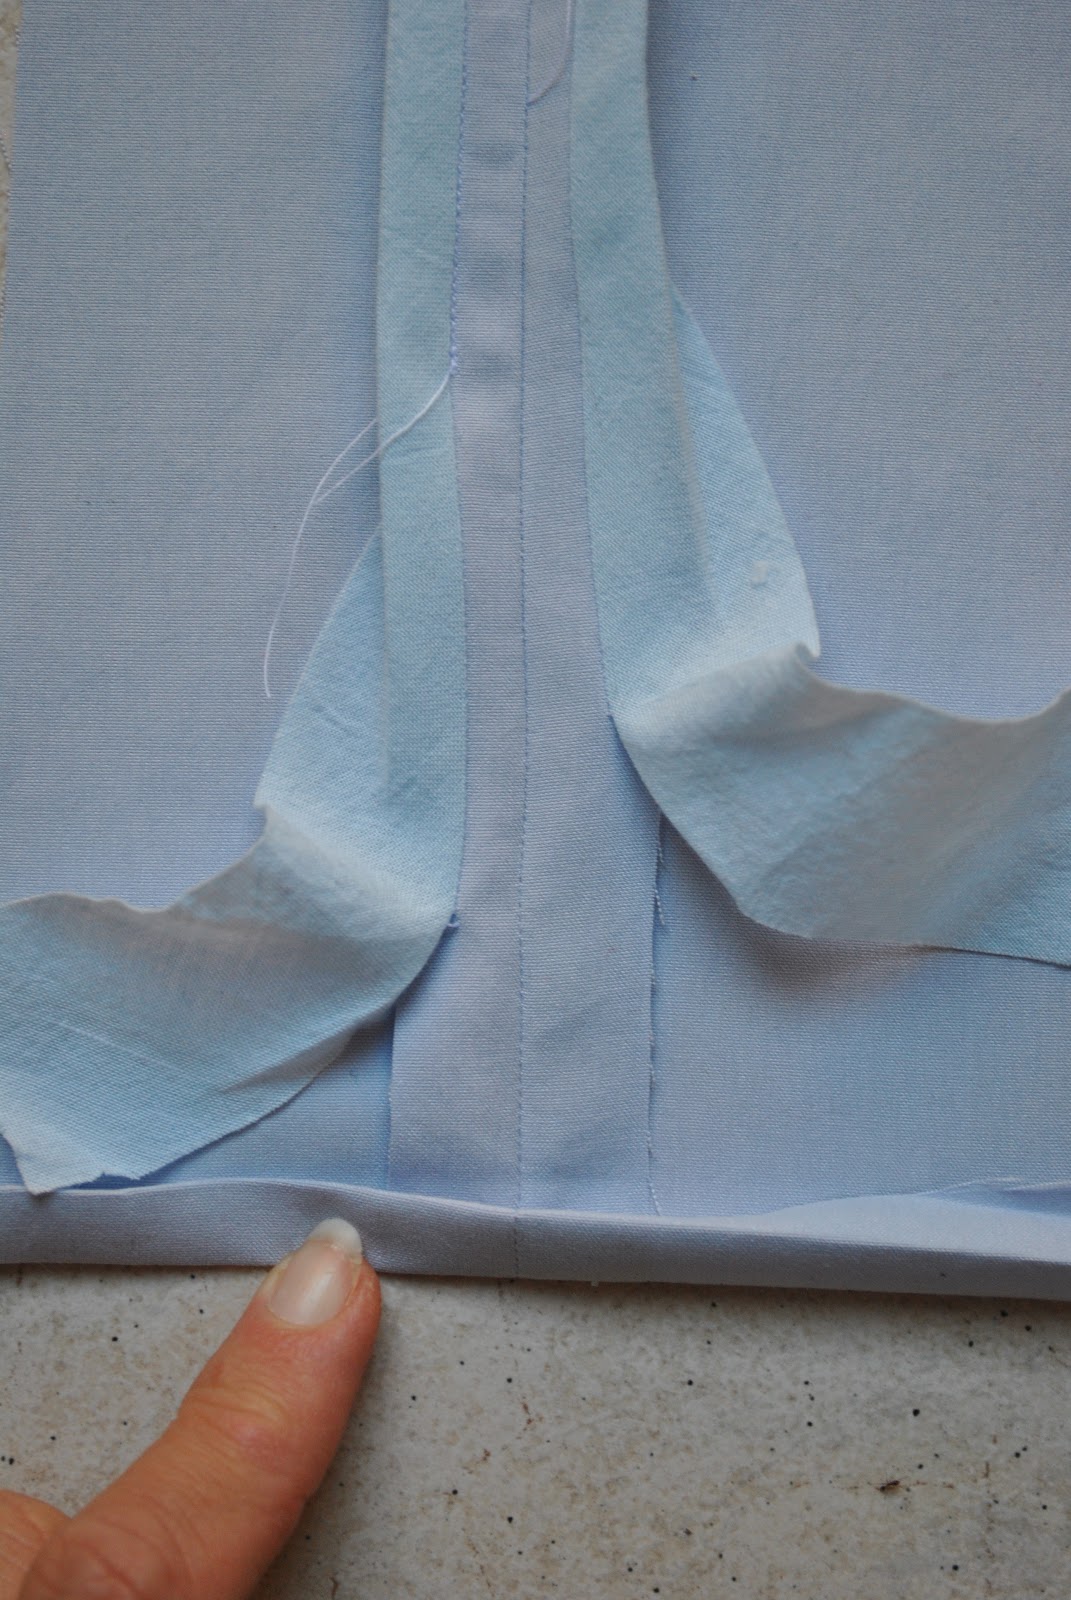
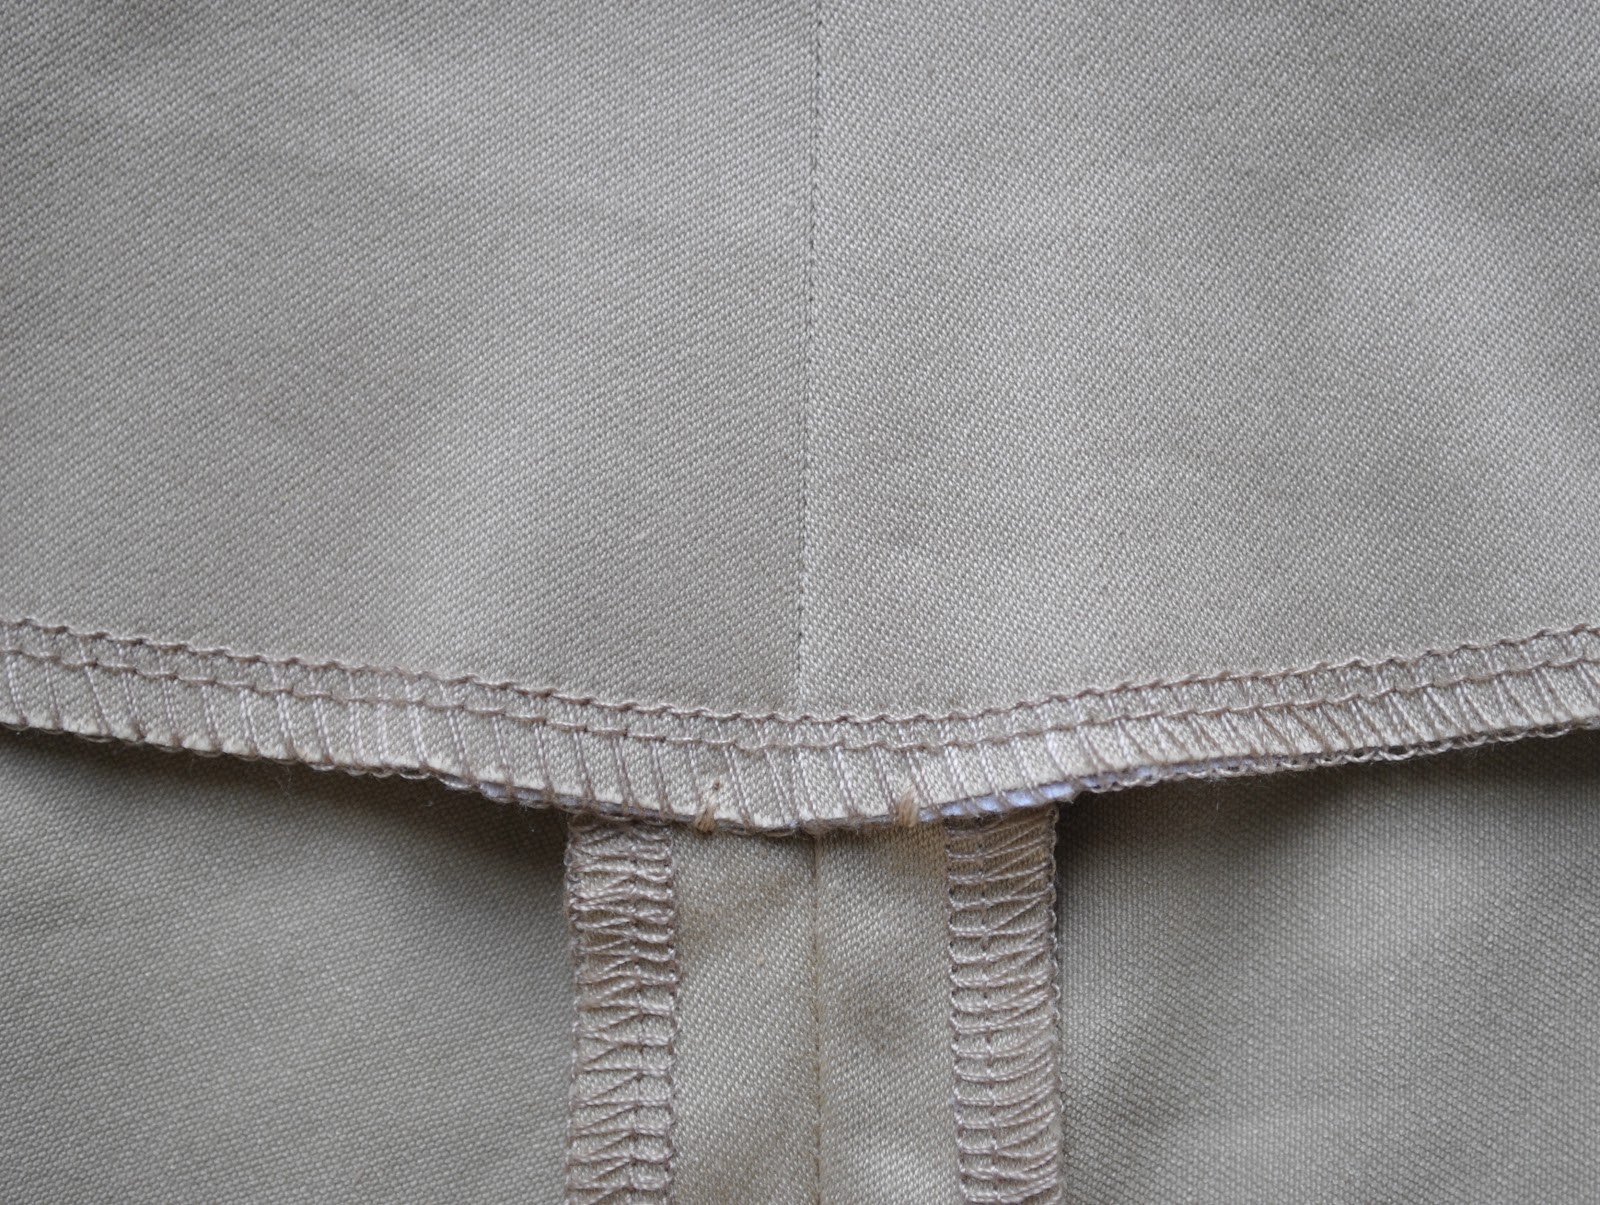
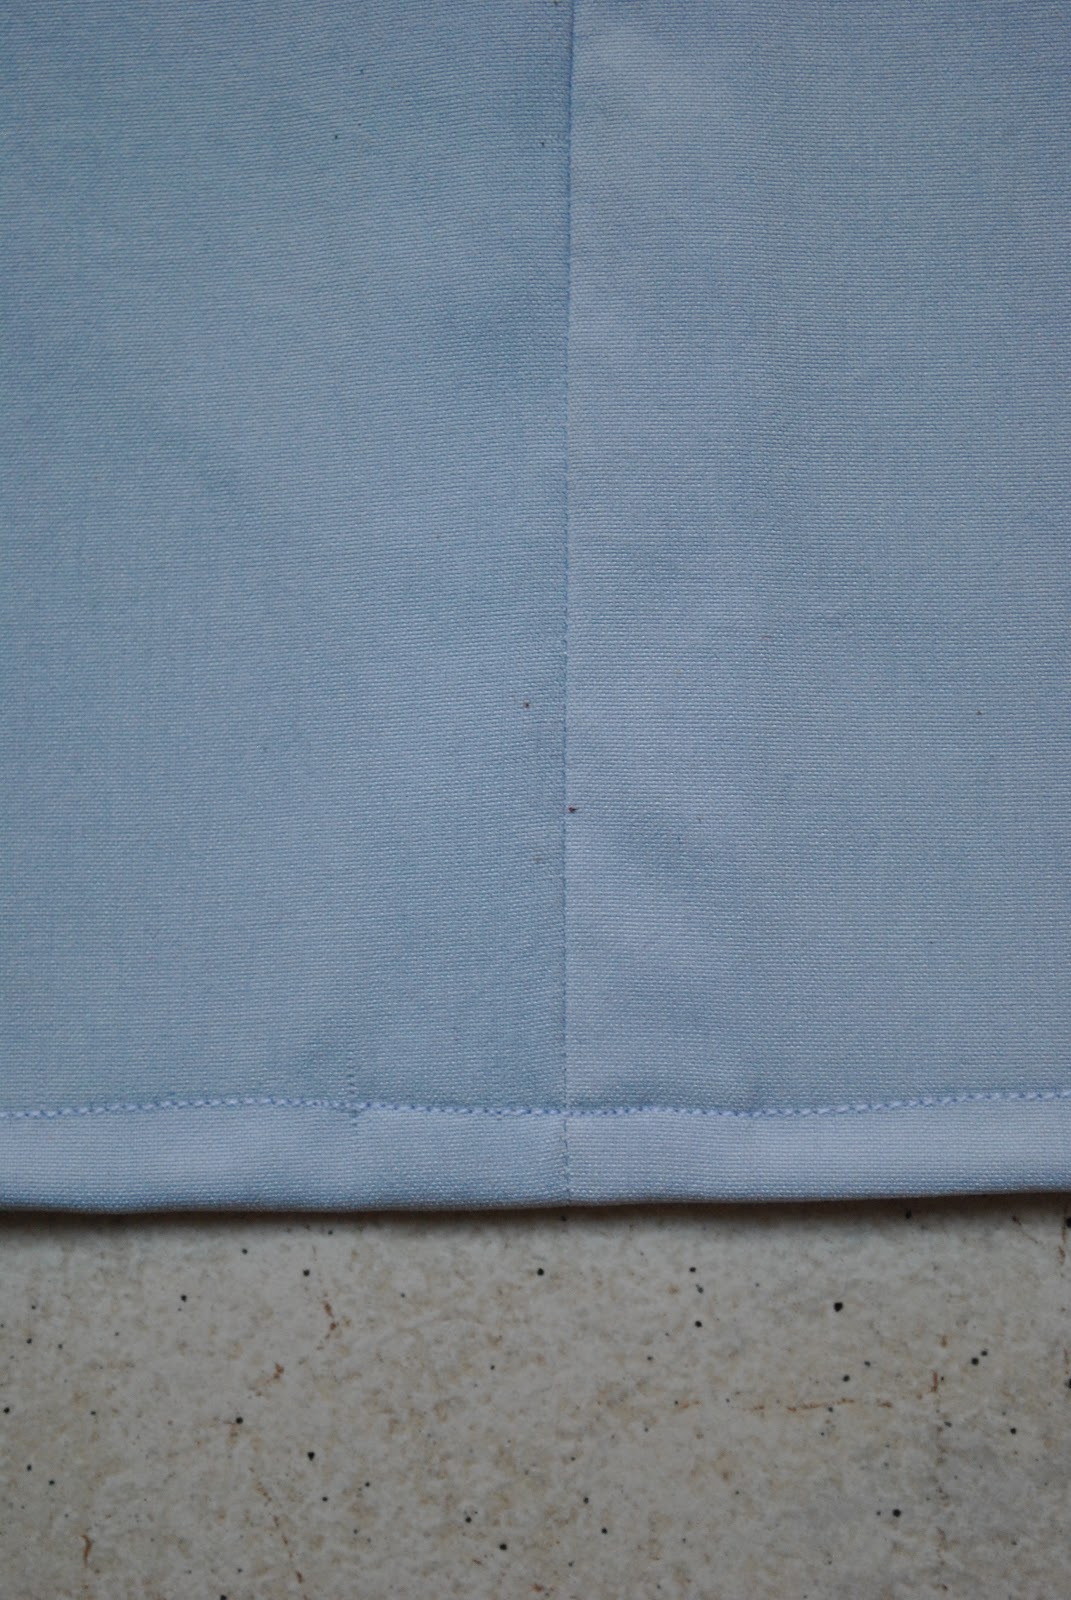
It is only at this point that I finish the lower edge of the facing, all in one go.  This time I opted to use the overlocker for a flatter finish, but HongKong seams look real nice. I overlock the opening edge fold down in place as they are pinned above, and also the facing seam allowances down to the facing at this point.  Neat and tidy!

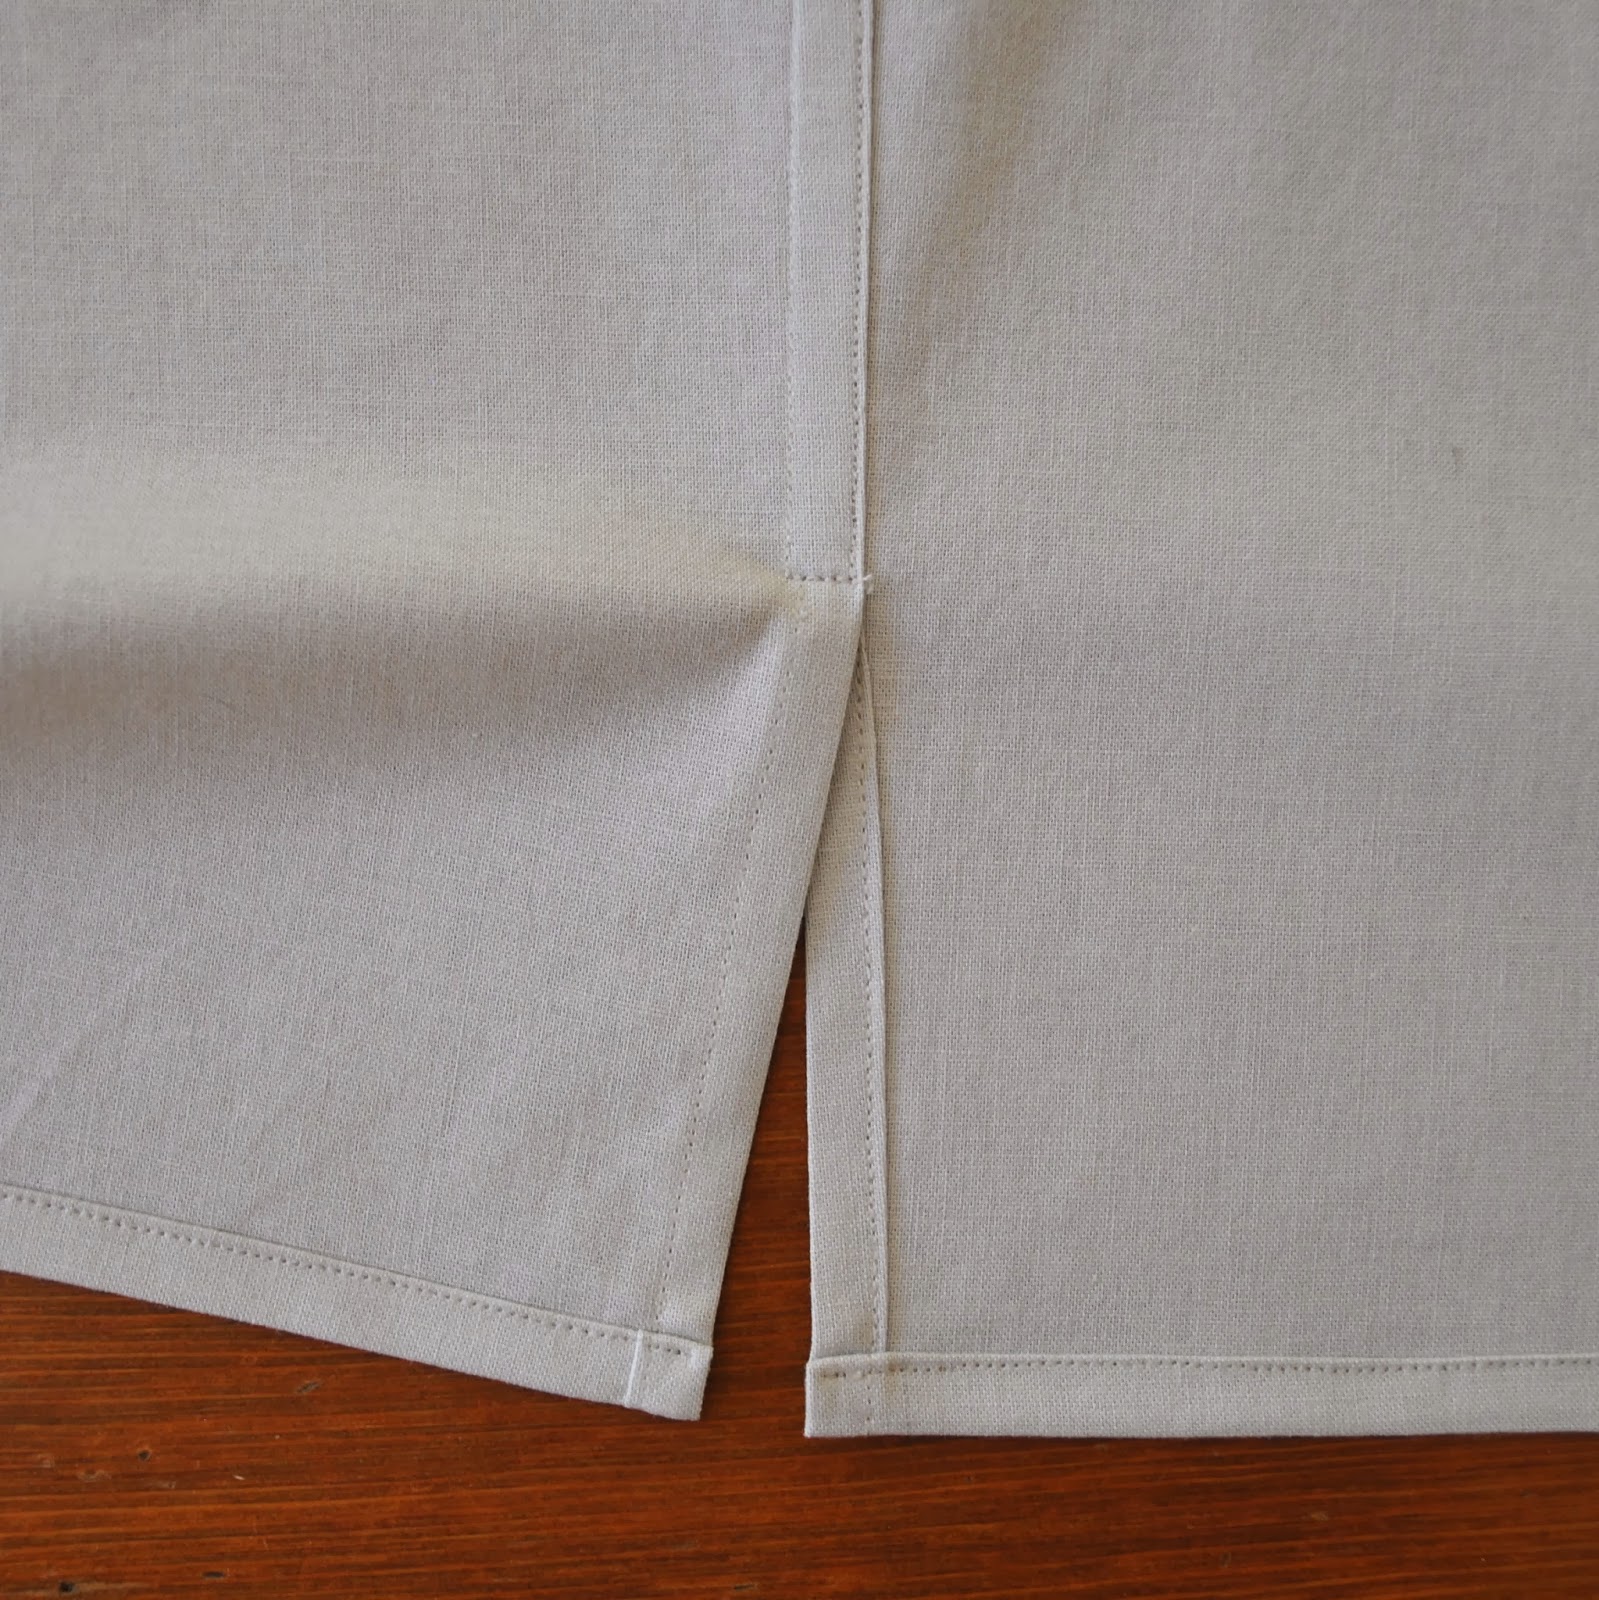
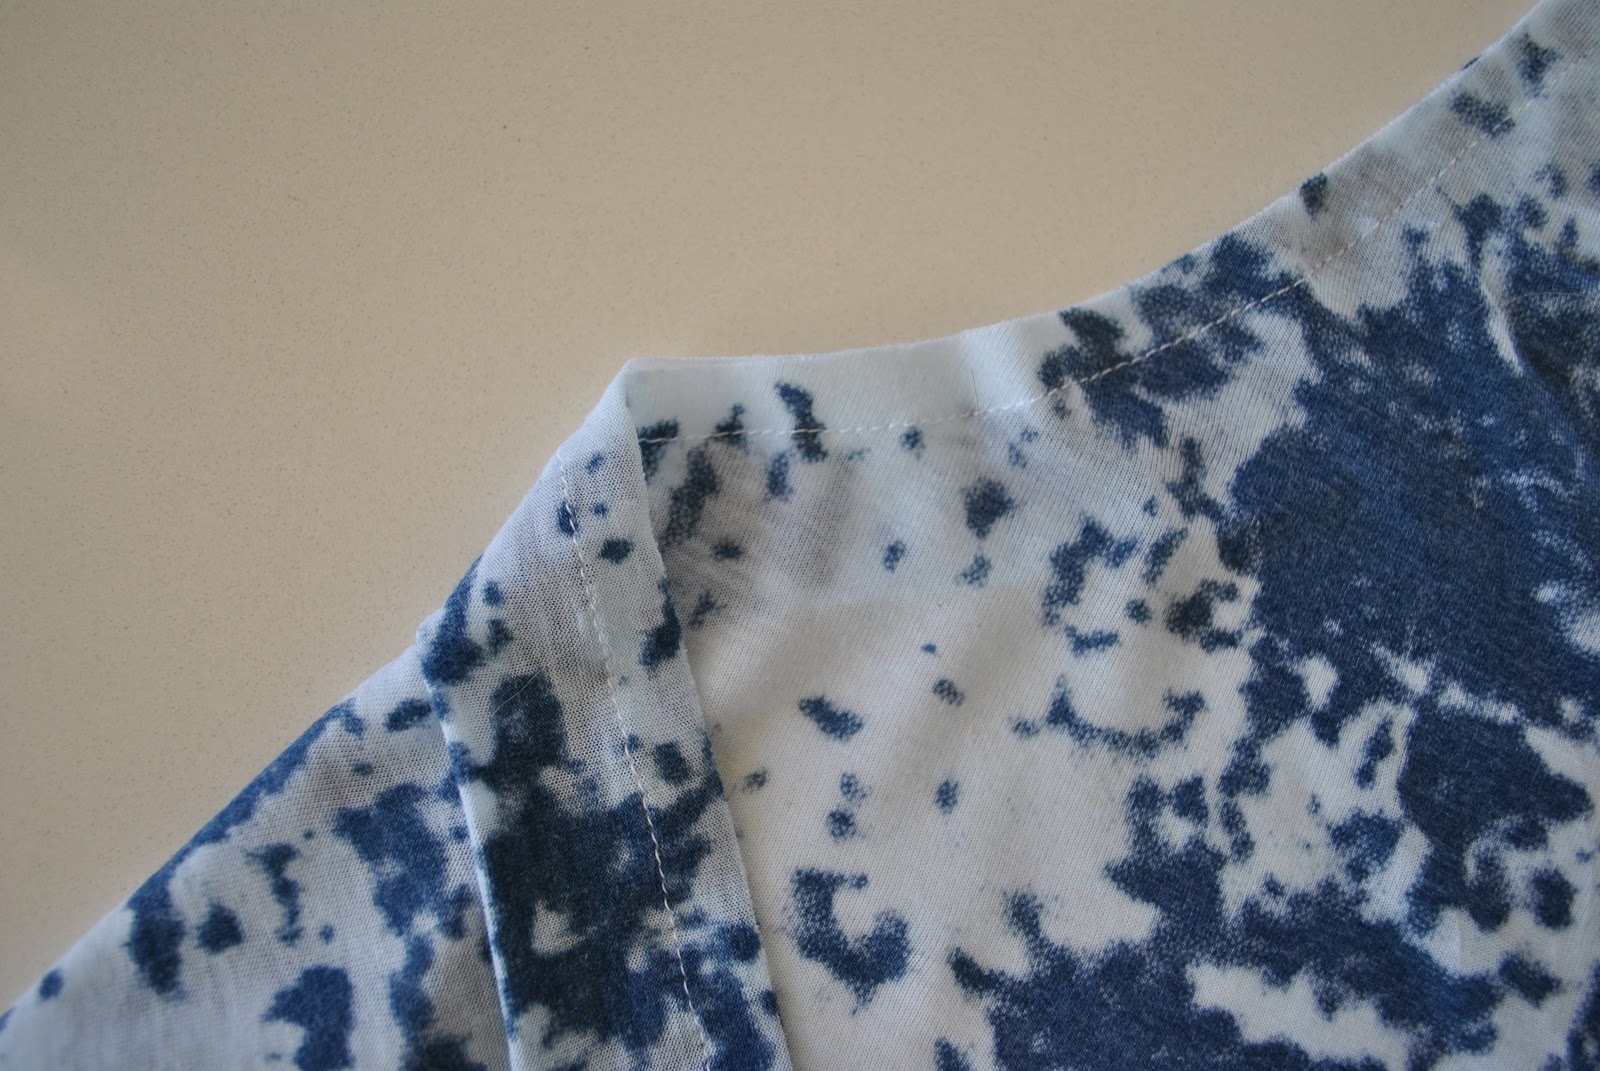
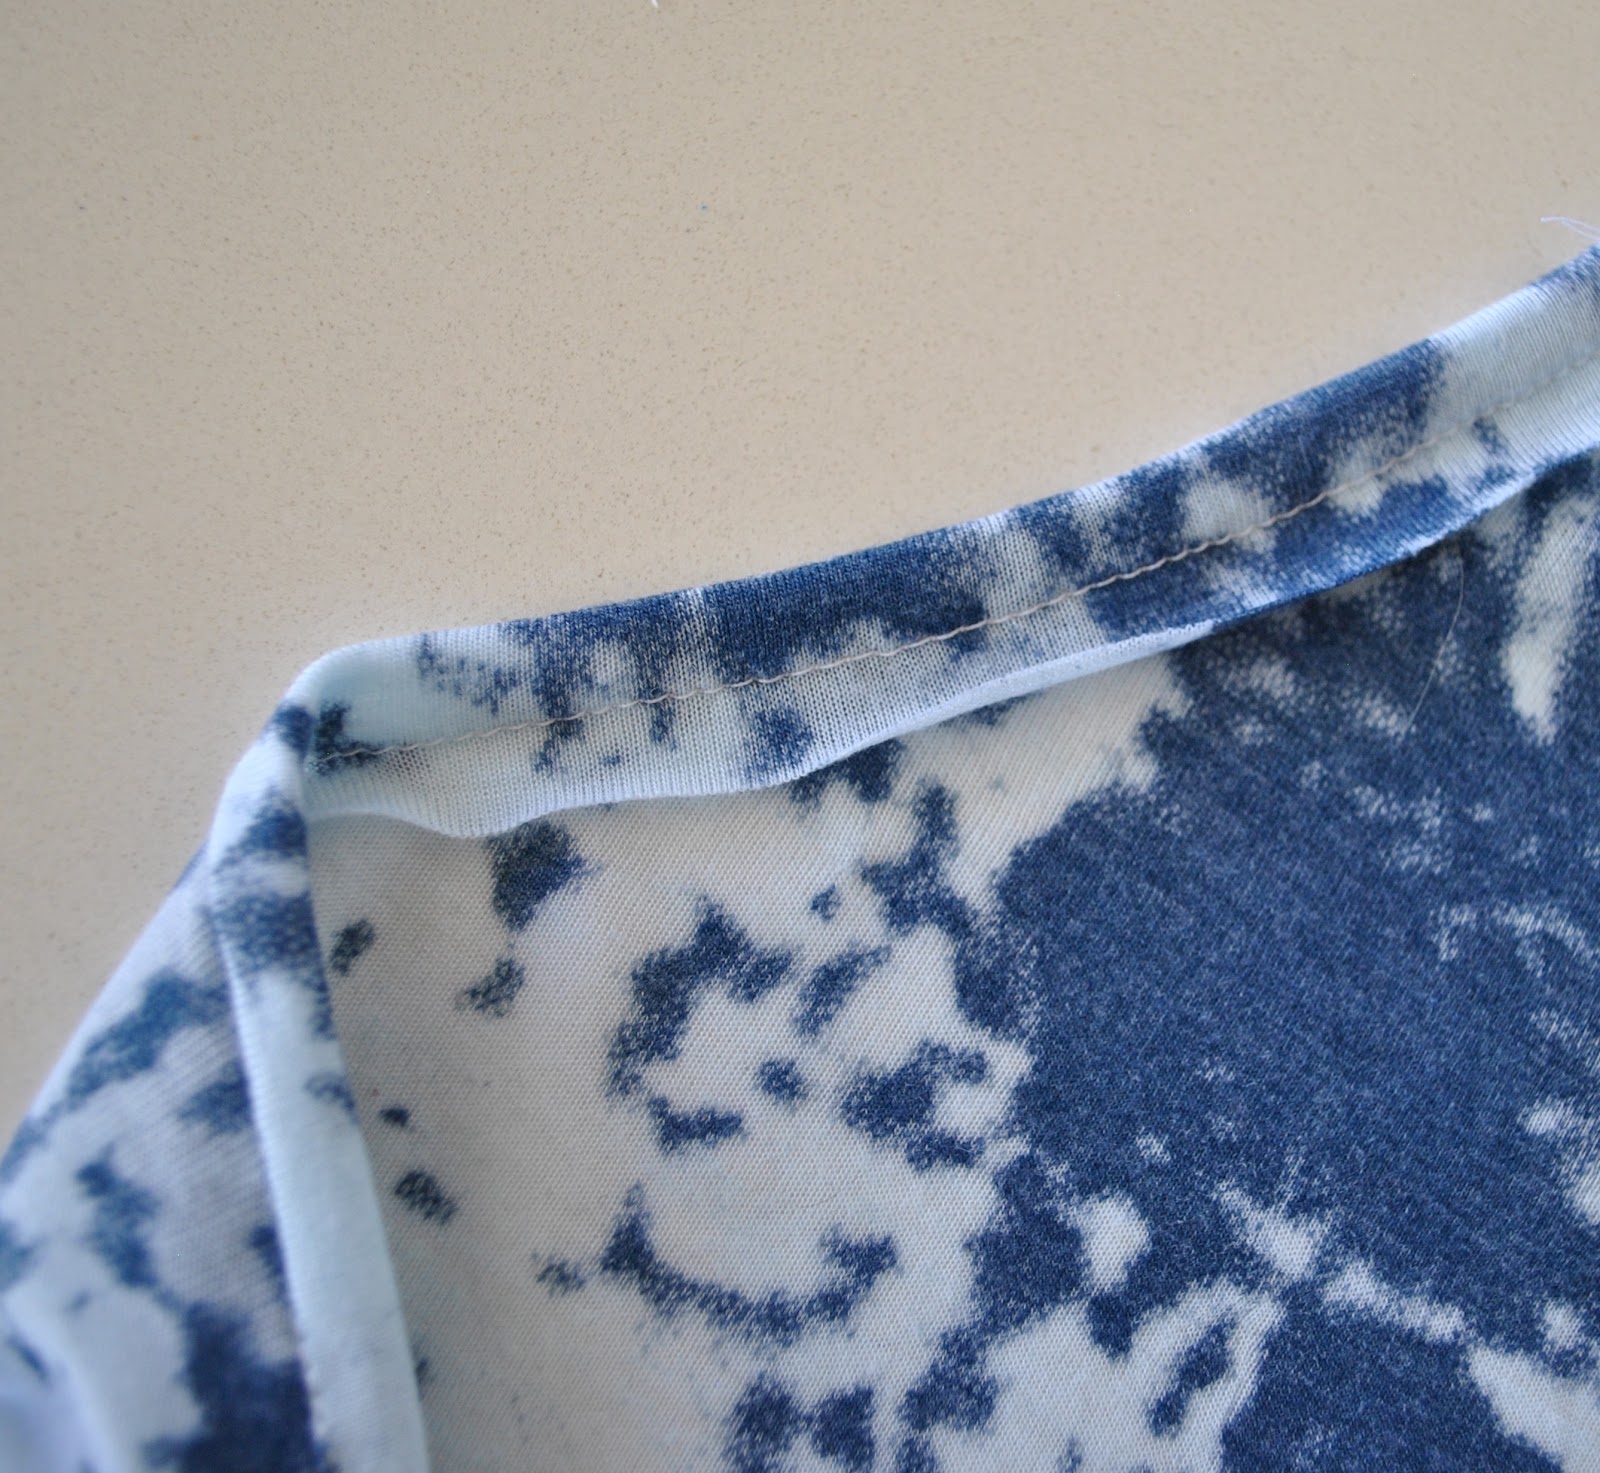
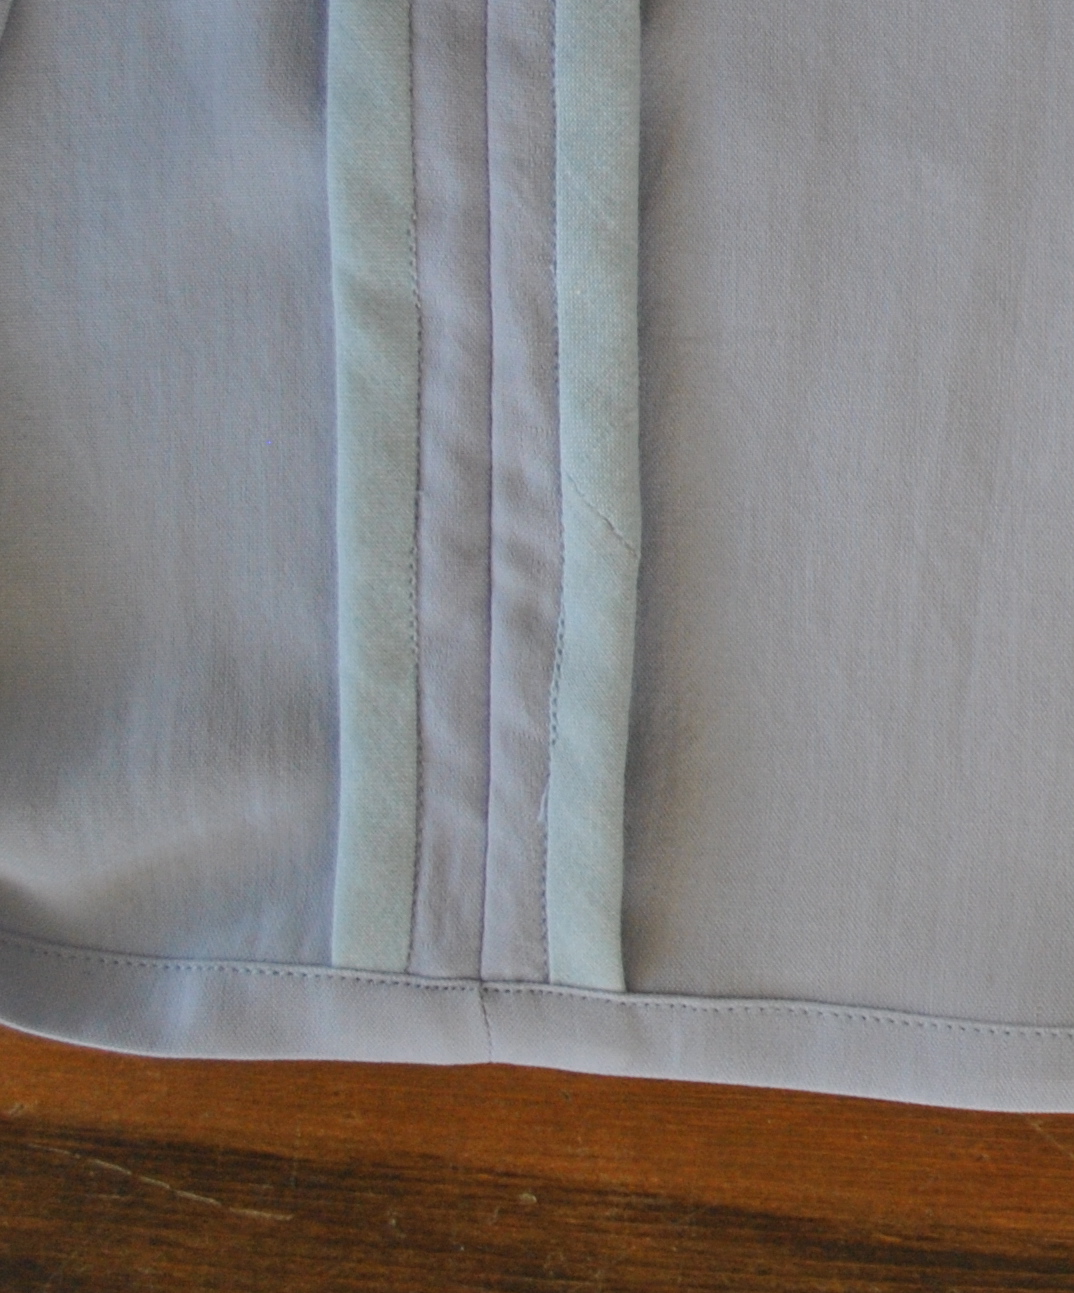
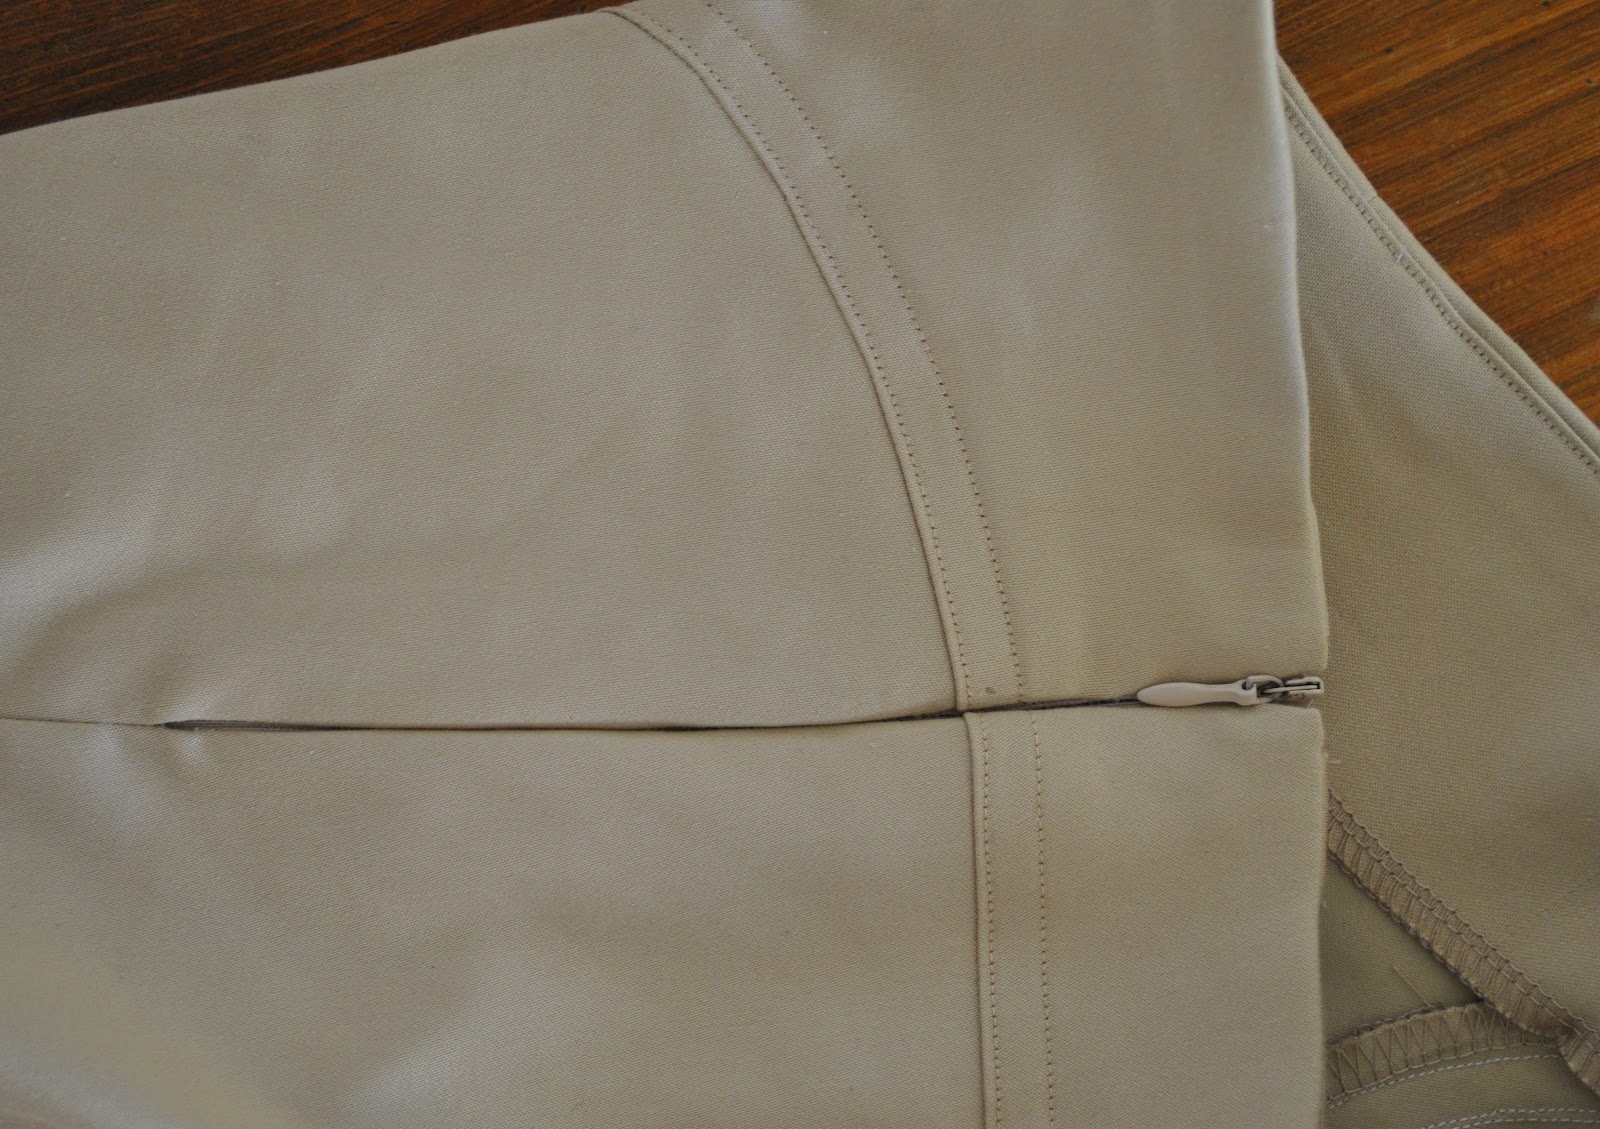
The facing edge is hand stitched to the zip tape using fell stitches.
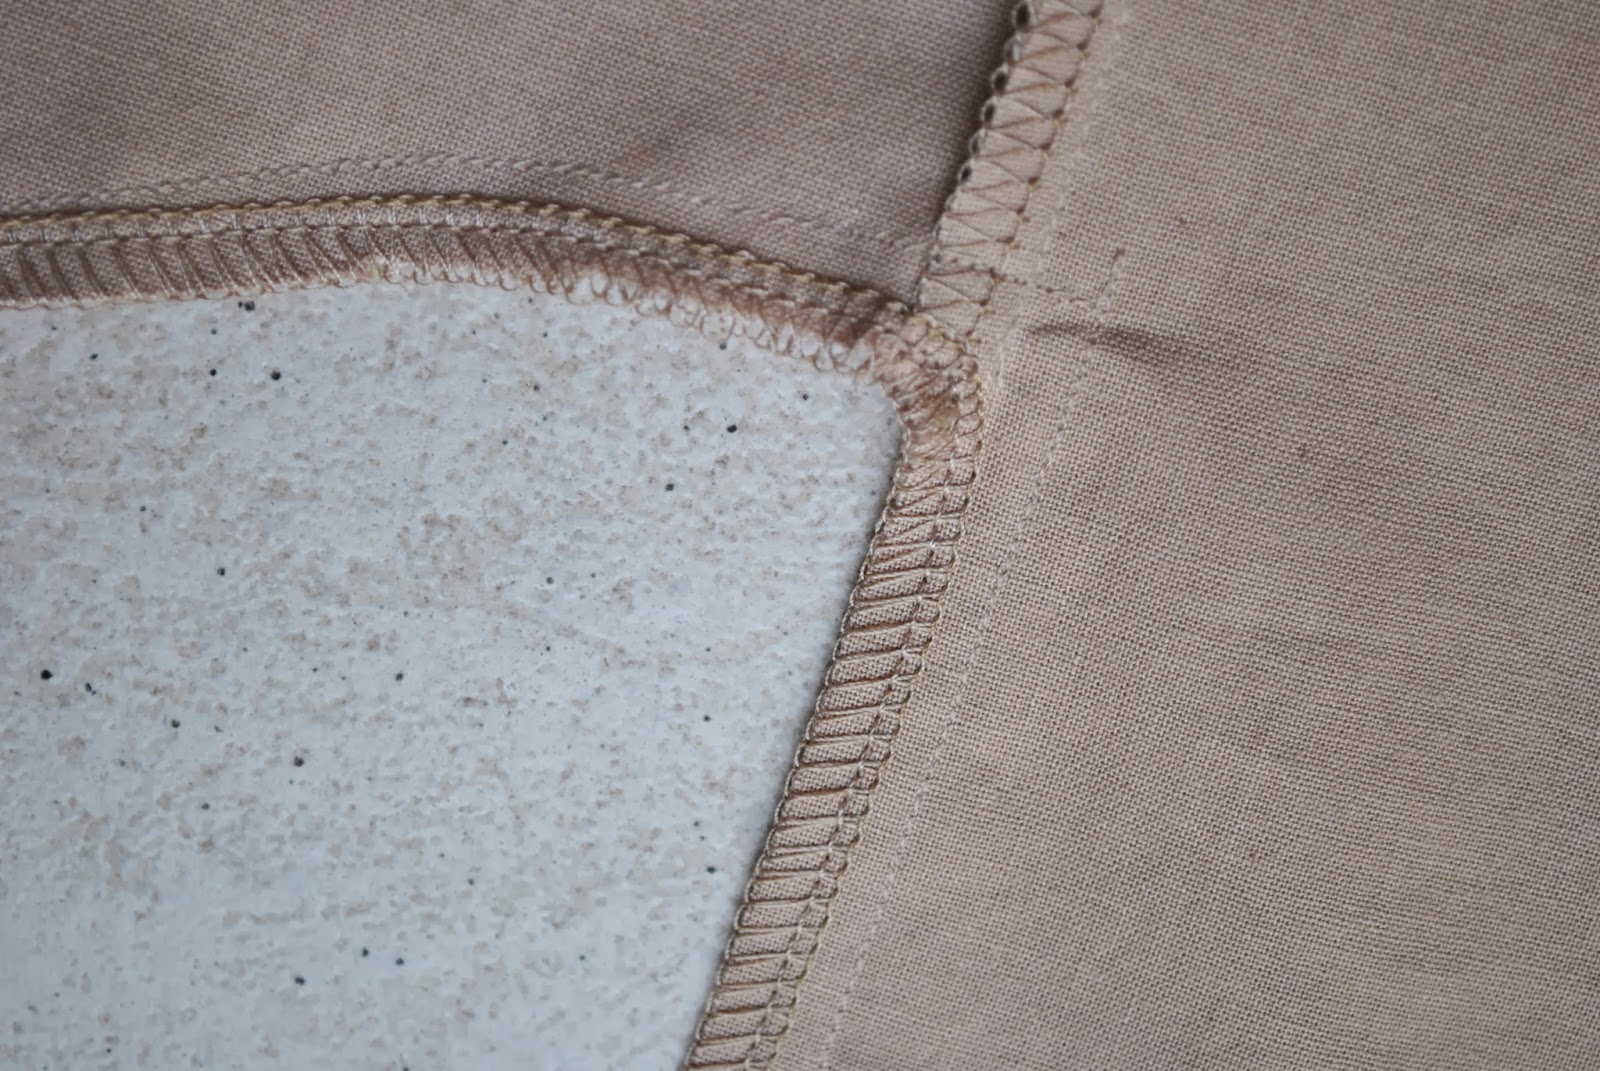
The facing at the centre back and the other side seam is stitched to the seam allowances.  It can be seen clearly here how the seam allowances of the facing have been overlocked down to the the facing in just one pass of the overlocker.
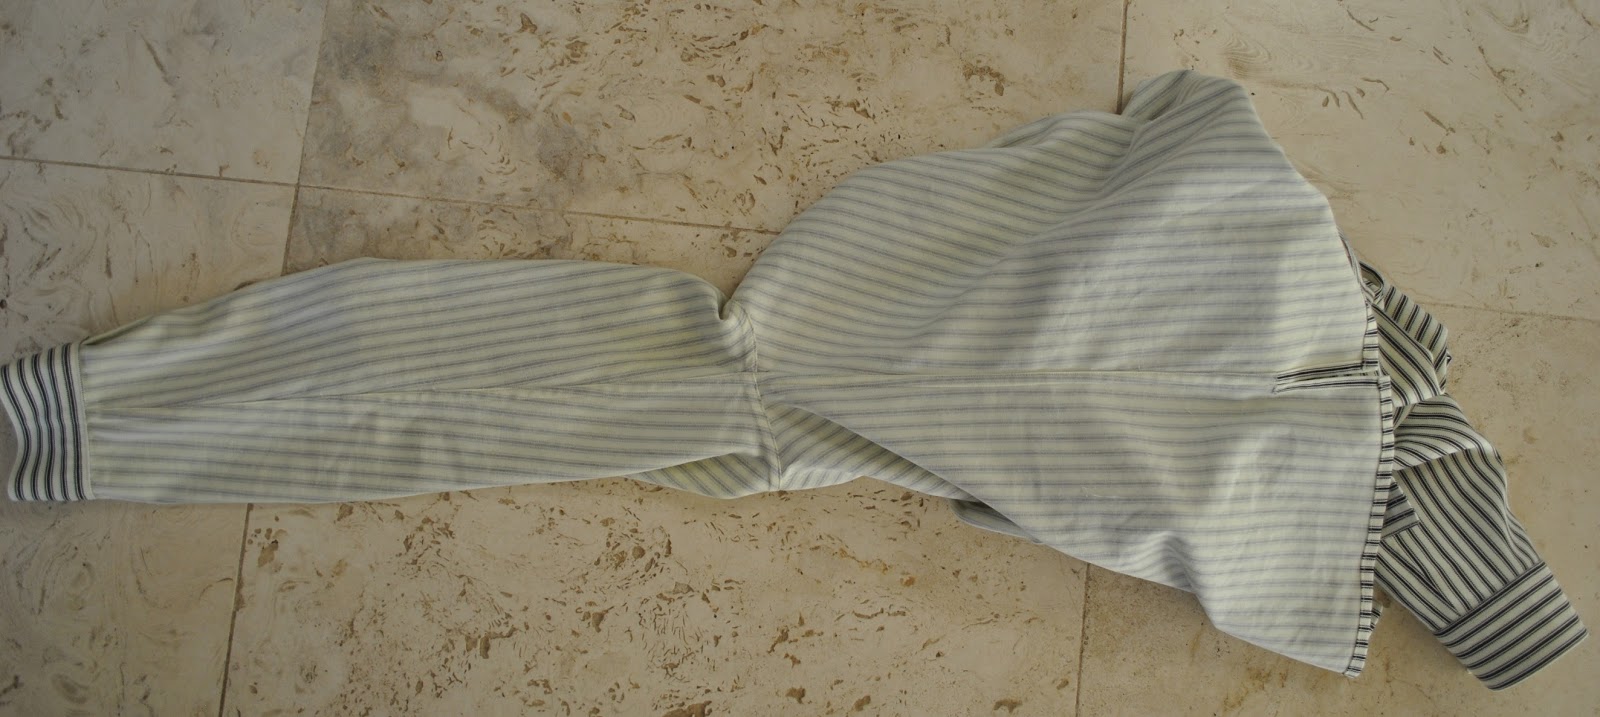
Finito!
pinterestmail
Switch to mobile version
↓