Category Archives: Uncategorized

Yallingup, with sleeves!

Hello!   Just a quick post today… for those of you who wished our Yallingup pattern had sleeves, well Cassie has designed one!  We’ve made it available as a free add-on to the pattern currently in the shop… if you’ve already bought the pattern and are unable to access the add-on through your Etsy download then please feel free to get it here from my blog as well.

CAROLYN_CASSIE_Yallingup_sleeve_addon

SuperMum mode; activated!!  I love these pictures of her!

Cassie used superhero cotton fabric from Spotlight; it’s pretty cute, eh?!

pinterestmail

made some stuff…

thank you so much everyone; all your kind words about Sophie mean so much more to me than I can say…


just a few more pictures:

Now:

I really should blog about these few things that got made, in some cases, weeks ago!… and just for something a little bit different I’m just going to go with short and sweet, bullet point kind of blogging.  Ready set go!

Item 1!

  • a new raspberry pink skirt…
  • piece 9 in my #make12 capsule wardrobe from my stash challenge that I proposed at the beginning of the year, hurrah!
  • self-drafted
  • upholstery fabric from Spotlight stores, and the leftovers from my fibremood Heaven dress that I made previously here
  • I bought absolutely zero new things for this skirt!
  • huge pockets
  • fully lined!
  • added a nice bias bound finish to the bottom edge before hemming
  • used the same wine-coloured cotton to line the waistband
  • actually very pleased with the lining to invisible zip attachment this time
  • LOVE IT and already worn it several times
  • am thinking of making this into a pattern and writing an accompanying tute for how to do the zip this nicely!

Item 2!

new onesie for little Theo!

  • own design, the same one as this one
  • cute sloth cotton jersey from Piermont fabrics in San Francisco… I bought this when I was out shopping with Shams, Beth and Yoshimi, during Yoshimi’s and my joint trip to USA together.  Wow, I wonder if we will EVER travel overseas, ever again?!
  • I did the back opening a little differently from the last time, and it is not as good.  Definitely sticking to the way I previously from now on
  • nonetheless this is a HUGE success and both he and I (and Cassie) all love it!

Items 3 & 4

little T-shirt and pants for Arthur…

I used some of Tim’s old trousers for the pants… I actually love doing this recycling old clothes/fabrics sort of thing and really want to get back to doing this more again.

  • self-drafted pattern, using a pair of his rtw leggings to gauge the size needed
  • I added pockets! so cute …
  • to line the pockets and make a kind of facing for the faux fly, I cut pieces from an old purple shirt of Tims… recycling/reusing for the win, or what
  • T-shirt based on one of his currently well-fitting T-shirts.
  • white cotton jersey thrown out from Mum’s stash, when she did her big cleanout
  • I bought absolutely zero new things for this cute little outfit too!

That’s it for now!  I’ll be more talkative next time, I promise!  🙂


pinterestmail

Sophie

It’s the last day of the month and even though I have several recently made things to write about, it’s all kind of paling into insignificance for me right now since we lost our dear Sophie earlier this week…

We’ve had this lovely girl the longest out of all our pets so far; she lived to be nearly 18… oh it’s so easy to fall into a trap of thinking she’s going to be with us forever.  I know I certainly did.

I can vividly remember my first sight of her; a friend of Tim’s had a litter of kittens they were giving away, Tim happened to go over for a sleepover and convinced us the next day to go over and check them out.  We were NOT in the market for a new kitten, however as soon as we laid eyes on this adorable little grey ball of fluff with huge green eyes she came home with us pretty much straightaway.

Right from the start we were all head over heels for this wonderful sweet lady… she’s always been the sweetest and most good natured and placid of cats imaginable: even tempered, calm, loving, always up for a spot of purring curled up on your lap.  We would often joke about how much she loved her food, and was sometimes called (meanly) the Fat Cushion; but actually she was quite a little cat really, she just had lots of fluff.  And of course as she got older and slowly started losing condition I would have given anything for her to regain some of that lovely soft plumpness.

She would follow me around the house and just “be” with me while I was doing whatever, often sneakily trying to insert herself onto my lap if I happened to sit on the couch for a bit, and especially if I was sitting out in the sun.  Her solid purring presence was always such a joy.  I remember after losing Sienna I would often seek out Sophie and cuddle her, and the warm fluffy weight of her was such a huge comfort.  We always used to say in the family that cuddling Sophie was an instant tonic to feeling sad because just holding her brought peace.

Some favourite pictures of when Sophie decided to “help” me with my blog:

pinterestmail

check out the checks!

Hello!  I’ve made a cool new outfit!  At least, I think it’s pretty cool, anyway.  I think it’s got a strong 80’s vibe; it reminds me vaguely of what the dancers were wearing in Spandeau Ballet’s “To Cut a Long Story Short” video.  Oh boy, that takes me back, it was such a favourite of mine.

The fabric is a beautiful wool mix boucle from Minerva…it’s lovely and soft, with a nice, slightly bubbly texture to it, and I love the strong red and green check on a black background.  So cool! It did fray like mad, so my first step was to finish all the raw edges on my overlocker

For the skirt; I used an old pattern from the actual 80’s, Vogue 1834, and partially lined it with black silk, from my stash.  I’ve made this skirt once before … it can be seen here

The top is the In The Folds Collins top pattern, which I’ve made twice before; here and here.  I cut this from the scraps from the skirt, and only just managed to squeak out the pieces! thus the complete lack of pattern matching.  This does annoy me a little bit, but actually I had no choice at the time.

When styling it, I decided I like the ensemble best when the top is tucked into the skirt, because otherwise the wide flared top overwhelmed the skirt, and you can’t see any details of it.  And this is such a beautiful and unique skirt design! it really demands to be seen.  I mean, the top is pretty cool too, but for me this outfit is all about the skirt.

Having said that, though;  the top is still pretty cool too, and I really like it worn out over a mini skirt, like here.  This is a simple little mini that I made a few years ago, using a tartan wool that I bought in Tokyo during our last holiday there… you know, back when we were allowed to travel  *sob*

The beautiful wool fabric is stable and pliable, and was great to sew up but it did fray like mad, so my first step was to finish all the newly cut, raw edges on my overlocker… I also finished some of the raw edges inside the garments such as the bottom edge of the waistband, and the neckline of the top; using bright red, bias cut cotton… this was leftover from my own Yallingup dress that I made for myself here…  Want to see a fun video on the making process of this ensemble?  If so then that’s great! because I made one! and it can be seen here on my YouTube channel.  🙂  It also includes footage of me leaping about like a loon, so there’s that too…

pinterestmail

Cassie’s gum leaves

I’m so happy with this new dress!  The fabric is actually very special… Cassie gave it to me last year, the print is one of a suite of designs she created for her wedding stationery and other wedding paraphernalia…  she has the designs up in her Spoonflower shop, and she gave some fabric of a different design to Mum (her Granny, obviously)

My piece is cotton denim; Cassie thought I could make a skirt from it, and yes I could have done that, but the piece was big enough that there would have been lots of leftovers.  So I wondered if I might be able to get a little dress out of it.  And I did!  Just!

It always feels like such a hugely satisfying achievement when I lay the pattern pieces down on a piece of fabric and they only just barely fit, so you have basically no leftovers at all.  Honestly, one of THE MOST satisfying things about making a thing, when you can manage it!

of course I had to keep this little piece of the selvedge and stitch it inside!!

This pattern is Burda style, 07/2018; 118; one I’ve made before here.  This is another great little pattern from Burda, they have long dry spells with boring patterns, but you get such a lot of good ones in there too so I always find it worth perusing the magazine when I see it.  Both of my versions of the dress do not have a lining.

I even made a little video of the making of it, just for fun; for myYouTube channel… the link is here if you’d like to watch it  🙂

https://www.youtube.com/watch?v=10PmRka94GU


We even had a beautiful day of 25C last week, so I got to wear it for …   this picture is seated for “fashion-on-the-sofa Friday”

This is the 8th thing in my “use 12” challenge…  I’m really so please with how it’s all coming together  🙂

pinterestmail

sherbie pink top

Hello!  This is the latest thing in my little “use 12” challenge… a little top using this very small remnant given to me by my friend N when she cleaned out her stash.  I really loved the colour of this scrap and was determined to save it… the colour reminds me of Sherbies which was one of my favourite lollies when I was growing up.

Sherbies are more pink and not quite as orange as their wrapping… I couldn’t find any pictures of an unwrapped Sherbie to show it so I’ll go out and buy some, take a pic and replace this picture when I do!    this is my own picture… check out that gorgeous coral pink colour… mmmm

But the piece was tiny; quite narrow and only about 70cm long….  Honestly, this seems to be the story of my life lately; squeezing things out of the tiniest pieces of fabric… there’s a challenge going on at the moment where you’re supposed to use up 30m of your stash.  I think I could do this because it sounds like fun! however if I’m only going to be using up 70cm of fabric with each thing that I make it’s going to take me forever!!

cat for scale

So, as usual I really didn’t have enough fabric to cut out even a small top… because the pokey out bits on the sides of all the pieces that enable your armpits to be covered actually use up such a lot of the width of your fabric, and if you cut out the pieces as is you end up with a lot of long skinny pieces of wastage.  Eventually however, I discovered that you could fold back the said pokey out bits of your pattern pieces, and cut a gusset out of that bit at the top between the armscyes on each piece.  Here’s a very rough drawing to illustrate:

You put the gusset in the underarm area to make up the shortfall from where you folded back the pokey-out bits, like so:

Yes.. it’s not very elegant and looks bit funny maybe, but it works and I’m happy.  It’s pretty close to a zero waste design, which is such a buzz-word at the moment but is one I’ve always aspired to really, so that’s a good thing!

Not enough fabric for bindings… I finished all the edges using bias binding cut from leftover poplin from masks/mask lining I made for the family…

Seven down, five to go!  I’m so please with my little capsule wardrobe and how it’s coming along… I can’t wait to see all the pieces together in one lovely collection once I’ve finished them all!


pinterestmail

the Fridgetown hand warmers

I’ve made a new pattern! along with the help of my beautiful partner in crime of course, Cassie… it’s for a pair of handwarmers, yes it is quite a simple pattern, which is why we’re debuting it for free, however the “twist”, if you like, or maybe the beauty of it is all in the construction, because you end up with a nice pair of double layered hand warmers with all the seam allowances and raw edges hidden neatly inside.  It was a little bit of puzzle working out how to do this, but I think it works out really well and I’m quite pleased with the process!

The pattern is available for free here.

CAROLYN_CASSIE_Fridgetown_Handwarmers_A4_letter

For this one, I did not do illustrations to accompany the instructions, instead I did a youtube video tutorial which I think illustrates the process much better.  It can be viewed below or on my youtube channel.  Jacqui commented asking about how to find my channel, the direct link is up above in the top right hand side bar of this here blog, if you’re interested..x 🙂

To make the hand warmers, you need a piece of stretch fabric, at least 80cm (32″) in length by 50cm (20″) in width, with the stretch going in the widthwise or 50cm direction.  For all three pairs that I have made, I used merino knit, that I bought from the Fabric Store, one pair in colour Vanilla, two pairs in colour Ochre.  This is all leftover from various Nettie winter tees that I have made recently.  It’s actually the ideal fabric for this design in my opinion, thin and lightweight, deliciously warm and cosy, and of course, beautiful quality.

The name? haha, well the name is our little joke… my parents live in Bridgetown, which regularly gets the lowest temperatures in Western Australia.  So a few winters ago this installation gave me a laugh… and it was the first thing that popped into my head when i was thinking of a name!

The pattern is free here, however it’s also available for a very small fee in our Etsy shop… unfortunately you cannot put up free things in Etsy which is why a small charge had to be added on to it.  We wanted to put it in our shop too, just for the sake of consistency and to have all our patterns represented in one place…

Anyway.  We hope you enjoy the pattern!

pinterestmail

pretty green ebony, bibs, masks

I’ve made lots of Closet Core patterns’ Ebony tees and dresses for others and this is the first one for me!  I finally used this absolutely beautiful, delicate grey/green wool knit that I bought in Tokyo, one of of our trips over there.  It’s beautiful stuff, with an almost lace-like texture to it, but unfortunately it had developed a few little moth holes over the years since I bought it.

So I fixed these up with some carefully invisible mending.  Yes, I know visible mending is all the rage nowadays but personally I like my mending to be of the other sort if possible.

See my ghost-like hand up there?! The knit is very sheer, so I fully lined my Ebony tee using the leftovers from my recent Forest Nettie, from two posts ago… I had just enough to squeeze the Ebony pieces on for a lining!

 I stitched the outer and lining together around the neckline, and under stitched using a wide, shallow zigzag stitch.  I also handstitched them together at the underarm points, just to anchor the lining inside secretly.

This is the latest thing in my use-12 challenge for the year, where I’m making a little capsule wardrobe from 12 pieces selected from my stash.

I’m also wearing this skirt from Vogue 8363, drastically modified, and self drafted tights

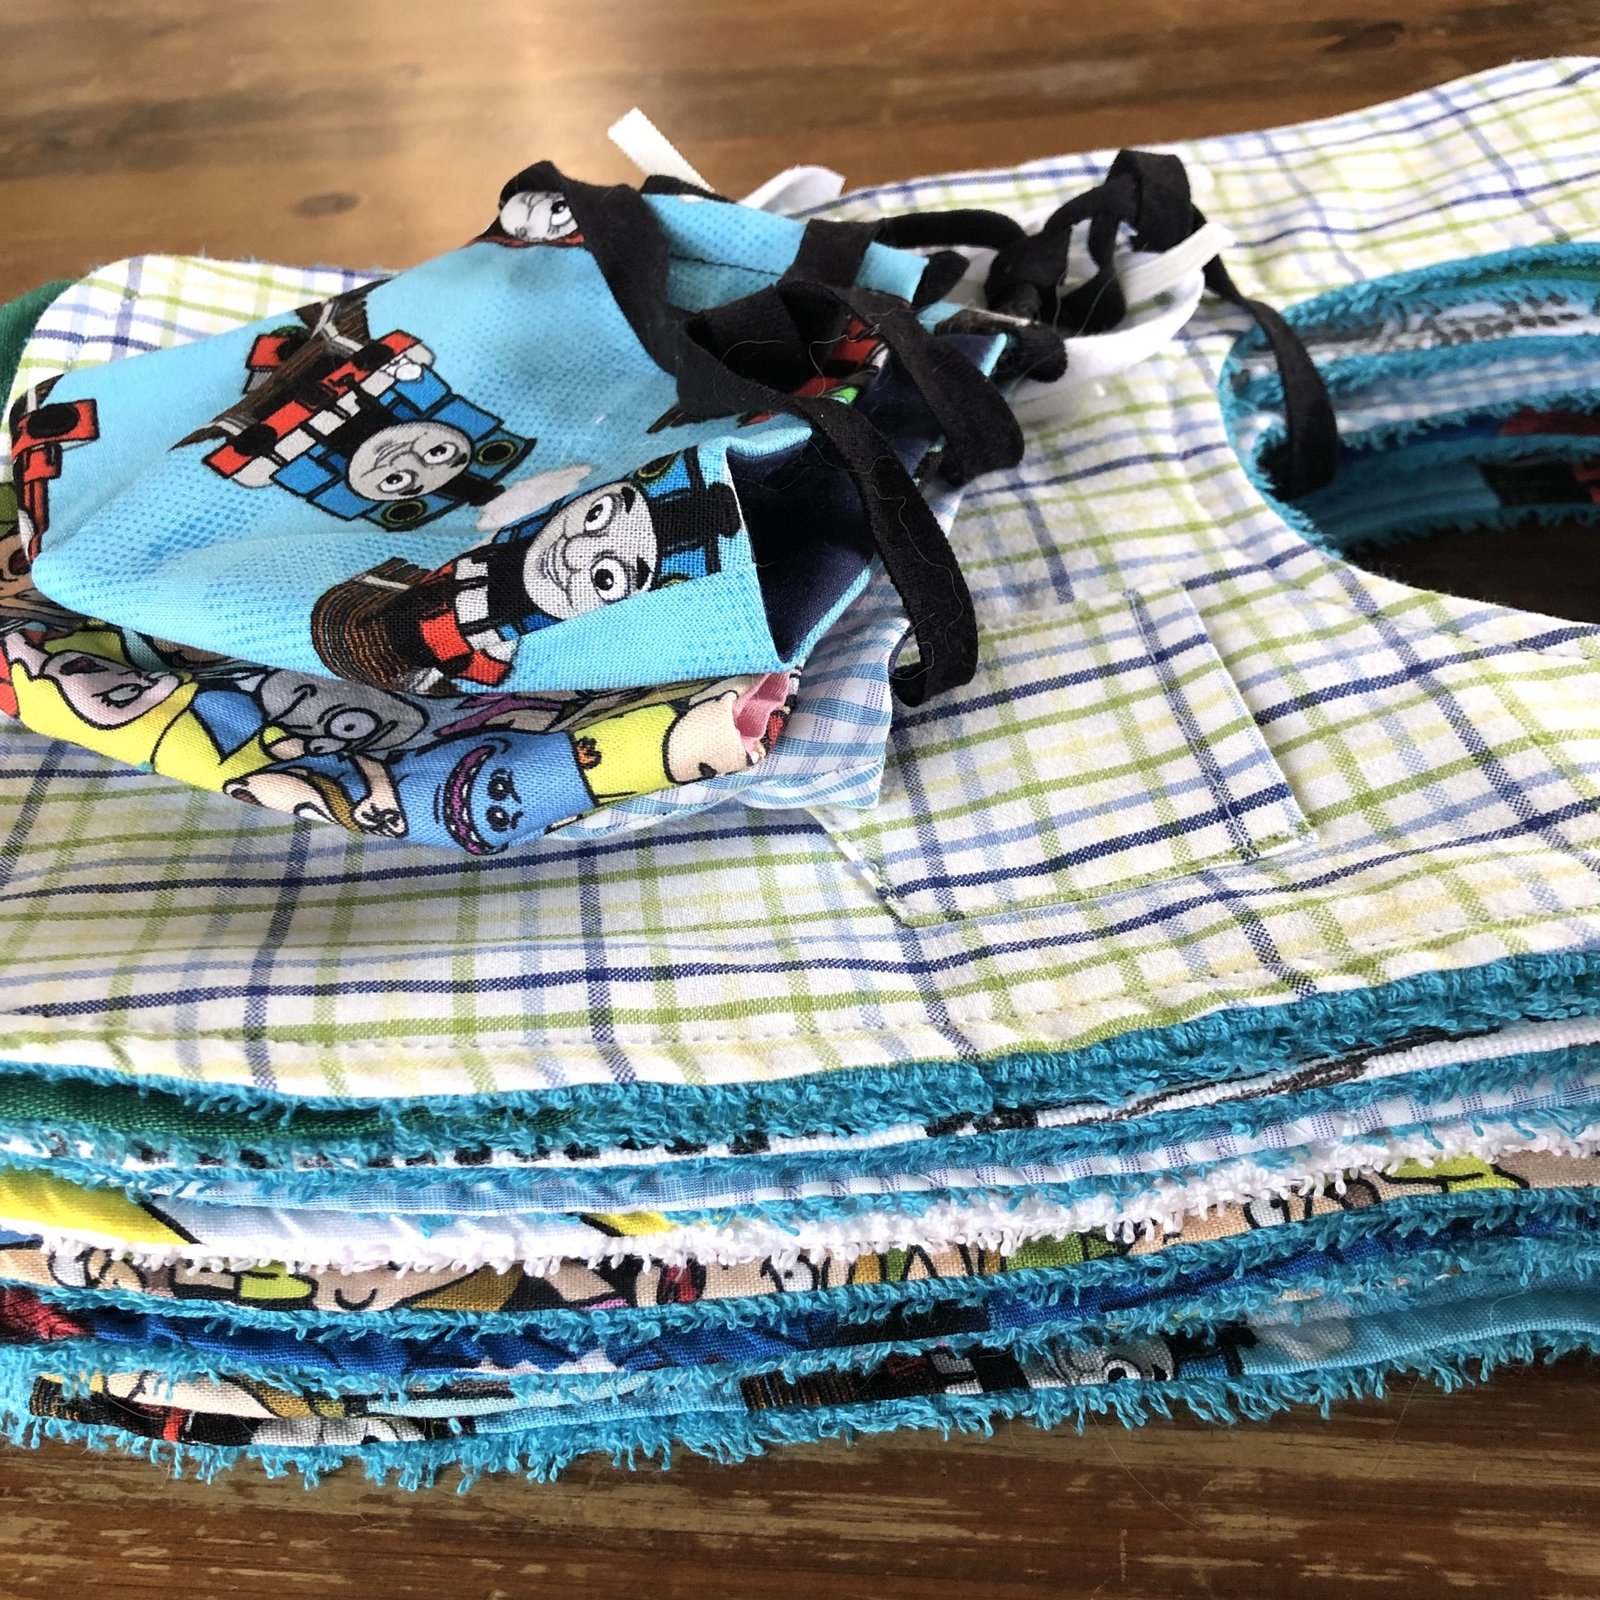
In the last week we had another mini lockdown, and I kept myself busy by making some much needed things for Theo…. bibs!

These are made using the piece from Butterick 5583, and the fabrics are all scraps and leftovers from other projects.  One of them is from one of Cassie’s old skirts, another two are from Craig’s old shirts, and one of the boys’.  The other cute prints are all from the leftovers from Craig’s surgical caps, fabric originally from Spotlight.  The backing is thin cotton towelling, that I already had in my stash too.

Some of them have completely useless, but also completely adorable little pockets.  What can I say, I couldn’t resist!

I made 10 in the end, and I also made a few masks for Cassie, just in case she wants to match her baby.  Masks are newly compulsory here again, after a few months without them, so it’s becoming more necessary to have a little supply on hand…

I’d made a few more for myself as well during me-made May, which fell on the tail end of our last period of compulsory masks; here are some of my favourites.  These are also from out of those cute surgical cap leftovers.  I have successfully and completely used up all these fabrics now, yay!  The pattern is from Trend Patterns…

pinterestmail
Switch to mobile version
↓