Tag Archives: Daily Outfit

red striped Inari tee dress

Heya’all.  I’ve made this new dress.  Actually, I made it ages ago.  named-inariAnd took most of these photos ages ago too.  Bad lazy blogger!

I wore it recently as my “travelling dress” when we holidayed in Broome, and it was the most AWESOME travelling dress… why? well it’s a loose-fitting, baggy, dress made in a comfy fluffy fleece, so just about the most amazingly comfortable thing EVER! pretty much like wearing a blankie.  At the same time, there’s something about the curved, slightly cocoon-y lines of the dress that I think makes it quite smart, chic and pulled-together.  This is actually my wearable trial of the pattern and I absolutely love it.  I might almost love it more than my “real” version.  Almost.  I actually love that one a bunch too.  To appear here very soon.
inari-back

Pattern: So, yeah; the Inari tee dress by Named patterns.  SUCH a popular pattern, and as I now appreciate, for an excellent reason.  It’s terrific.  Simple, yes; and basic, and bordering on a boiled-down-to-the-bare-bones kind of a pattern with just a few very subtle features like that slight cocoon shape, the side seams drifting gently frontwards, the split hem and an up-down front and back hem.  And I love it.  I’m normally attracted to a more complex design for a dress, but this one just hits all the right buttons for me right now.

Fabric; a red and white stripe mid-weight fluffy fleece from Spotlight.  This is the same fabric I used for Tim’s Christmas hoodie and for Kelly’s hoodie too.  Yep, I bought quite a lot! there was a sale… um, yeah *awkward self-justifying of excessive fabric acquisition*   Well, at least I’ve used it all now.  This has been kicking around in the stash since pre-Christmas, since I’d decided it didn’t really suit anyone else in the family.  I think it suits me though!

stripe-matching

My stripes are matched up as perfectly as my obsessive little soul could manage.  I’m smugly and complacently satisfied with how well they turned out…  the only way I know how to achieve this level of stripe matching is to pin each and every junction and go nice and slow.  Tedious but failsafe, and all my stripes here match any which way and everywhere.      *primly pats self on back*

sewuthinkucan asked me on instagram whether I found the high slim sleeves on the design to cause the dress to ride up when you lift your arms up as above: not that I pull this pose all that often and probably will be careful now I’ve seen these pictures! but it does a little.  Not enough to stop me from wearing it!  I think the effect is not too bad because of my fabric being a little stretchy.  However, in my next, “real” version of the pattern, I altered the sleeve so as to successfully fix the problem… and will post details on that in my next Inari post.

inari-side

Alterations;  the most obvious one is inseam side pockets!  Well, of course.  It’s baggy enough and the side hems curve forward slightly to the front, an even more comfortable position for your hands than the true sideline of your body; making inseam pockets an almost foregone conclusion.

inari-neckline

My neckline has neither facings nor bindings; partly because my fabric has too much fluff and loft for bulky extras with incorporated double seam allowances etc, and also because this is basically my wearable muslin for the pattern and I just didn’t want to fuss around with it.  I overlocked the raw edge and simply turned it in once, topstitching in a single line of stitching from the right side.  My fabric is all of thick enough, stretchy enough and stable enough for this to be totally fine.  I did do the sleeve cuffs though.

Details:

Dress; Inari tee dress by Named Clothing, red striped fleece
Shoes; designed and made by me, details here

taken after a plane trip, a week rolled up in a suitcase, another plane trip, and precisely zero ironing.  LOVE.

inari1

pinterestmail

the year of handmade, 7

yoh7

I’m seven months into my Year of 100% Handmade; just five short months to go!! above is a selection of my favourite outfits in the last month, the whole kit and caboodle can be seen in my Year of Handmade flickr album here

Yeah, so I’m still really enjoying the challenge, and of course I absolutely love wearing all my own clothes and shoes.  Although, I am looking forward to warmer weather so I can start wearing some of my newer, spring-y shoes!  I picked a really bad year to be doing this thing though…  we’re officially having the coldest and wettest winter in like thirty years or something. Obviously I’m excited about wearing my own shoes… but when it’s bucketing down with rain?!  which it’s been doing a LOT?!  eeeeek!  It’s a little heart-wrenching, to be honest!  I’m sometimes tempted to whip off my precious handmade babies shoes and just slosh through the puddles and mud in my stockinged feet, shoes clutched protectively to my chest.  I don’t, though.  I stay normally shod, like a regular person, albeit sobbing on the inside and hoping like mad that my dinkie little handmade shoes-ies are going to come out of it ok.

Fortunately, they do.  Surprisingly, everything is holding together just fine.  My trusty winter boots are not just warm but completely waterproof, so yay for that!  So chuffed about those things.  Some of my casual walking shoes… not quite so waterproof, ahem, but shoes do dry out.  I’m still wearing them all!  My paisley oxfords are my go-to, casual “walking shoes”.  They’ve done miles and miles and miles, they’ve been rain-drenched and subsequently dried… they then started to wear quite thin under the balls of my feet.  I just glued new soles onto the bottom.  If I can say one good thing about being forced to wear my shoes in the worst of worst weather; then it is that it’s proved to me that my shoes can take it, and are tougher and not quite so flimsy-whimsy as I feared.  Confidence-boosting stuff  🙂

New soles.  ‘Nother month of milessoles

pinterestmail

a tart for tartan

tartan

Och aye! I’ve made this big, swirly tartan dress, and I absolutely LOVE it! I know itv1147‘s kinda crazy and huge-skirted and possibly a bit over the top, but you know what? it’s also extremely comfortable and cosy, and so swirly and swishy.  The instant I finished it and put it on I immediately felt simultaneously relaxed, like I had put on a warm comfy dressing gown or something; but also a bit chic as well.  The big feminine skirt with a nipped-in waist does that, but I really like how the volume below is balanced out by the mannish style shirt top with cargo pockets and flaps, and a notched collar.
tartan-bodice

Hehe, actually while I was making it I did worry a little bit that it was going to look exactly like a dressing gown! but once I put it on I was instead happily reminded of 80’s Ralph Lauren, and even Spandau Ballet.  Remember To Cut a Long Story Short? big big fan here.  HUGE fan.  I still know all the words off by heart; and that film clip transports me right back into breathless, happy teenagehood all over again, and wearing this dress totally reminds me of that clip and that joyful time in my life; the over-the-top, big, blowsy, romantic 80’s era.  So I”m very happy.  And, can I say? there’s something about a big wide dramatic skirt that really brings out the poses in a person.  Not to mention twirling… put a big skirt on a girl and just watch; you just can’t help it but break out into a coupla twirls.

dsc_0087#awkward!!  Yes, well; obviously most of us don’t actually twirl very often.  Twirling is something of a fashion blogger contrivance…  although if I do want to get in a bit of highland flinging I am all set.  😉

More realistically, it still looks pretty awesome when you’re striding briskly along the street too, and this? I do a LOT.

tartan-striding

When making this I had an image in my head of an actual dress like this from an 80’s or maybe 90’s editorial, I swear it was a Ralph Lauren… so of course I wasted many hours searching and searching and searching to link to it, and do  you think I can find a picture anywhere of that maybe-Ralph Lauren dress???  NO.  The closest thing I could find is this maxi-dress, which isn’t it.

tartan-side

Anyway:  Fabric; soft, cotton flannelette, tartan shirting from Spotlight.  The same stuff I used to line my Tosti jacket, in a different colourway.   One side is slightly fluffy, the other side is smooth and flat.  I put the fluffy side inside.  This is the opposite of how I used it for my Tosti jacket, which has the fluffy side out!  Or… since it’s the lining, is the fluffy side therefore in? hmmm, that’s a puzzle!  Navy blue buttons from Fabulous Fabrics.

Pattern: Mum had given me some of her old patterns, including this great Vogue 1147 shirtdress with multiple variations, from 1993.  I thought it perfect for that vision of the big skirted, maybe-Ralph Lauren, maybe-not dress in my head.  It’s not in my size, but the three nested sizes made it fairly easy to downsize a bit.  I made view B, at far left.

The skirt pieces, bodice pockets and flaps are all cut on the bias; bodice and sleeves on the grain.  As much as possible, I matched the tartan.   #madpatternmatcher  This was easy in the bodice and sleeves,  and the pockets which please note, are exact mirror images… however! That skirt.…!  I love how the centre seams in the skirt have a nice, fairly even row of white diamonds and am fairly happy with how the lines join up at the side seams… this took some careful pinning and only a wee bit of fudging…  😉  Those side edges did not have the same profiles and combine that with an asymmetric tartan…! *hair-pulling stuff*   Anyway, the matching turned out pretty good, spot on where it counts, and so is reasonably satisfying  🙂

dsc_0072

I cut the sleeves long, then stitched an ultra-wide wide hem.  This is then turned up once in a wide cuff, and secured with invisible hand stitching 1cm inside the fold.  I did it this way because the underside of the fabric is different from the right side, quite fluffy! and I wanted the smooth side to be on the outside of the turned-up cuffs.

Because the skirt is on the bias, I let it hang up for a week to let the bias drop a bit, and it did! by quite a lot in some places.  The hem is hand stitched.

tartan-belt

I also made a sort of belt… this helps to pull the waist in.   I only made this actually because of my year of totally handmade, meaning I can’t grab one of my nice leather ready-to-wear belts, and I really think the design NEEDS a belt.  But now I’ve made it I LOVE how it blends invisibly into the dress so perfectly!  It’s basically just an interfaced waistband, with an inside button and two buttonholes.  One buttonhole is for the start of the evening, before dinner.  The outer one is for when you decide you do want to have dessert after all.  Comfort dressing, at its finest!

Details:

Dress; Vogue 1147 from 1993, tartan flannelette shirting
Tights; my own pattern black stretch, details here and my tutorial for making your own custom fit tights pattern is here
Shoes; made by me, details here

pinterestmail

blue roses *

v1247
* … Tennessee Williams…

Hello! I’ve made a new skirt. Hehe, hot on the heels of writing that I was a wee smidgeon tired of making Vogue 1247 skirts; what should I do? but immediately vogue1247make another one!!  Doh!!  Clearly there’s something terribly wrong with me… #madvogue1247addict

But wait, there is a perfectly good reason…. I’m doing One Week One Pattern again, and of course chose to use this pattern, well I’ve got so many of them!! lotsa skirts and I was kinda hoping that we would get at least ONE day warmish enough for me to wear the one top I have from it… but it’s been so freaking cold; officially the coldest and wettest winter and early spring we’ve have in like thirty years or something like that!  I’m getting to the end of the week, no motivation whatsoever to wear that thin little summery top, and only have 6 pocketed V1247 skirts.  Which are what I consider to be the only true V1247’s, all my ones without the pockets are kinda pretenders to that crown, and even though I love them all too I ruthlessly omitted them all from the line-up.  So what can a girl do? but get cracking and make for herself another true V1247, obviously, so I have a nice 7 to round the week off.  Yeah, I know; a normal person would have worn one of her existing ones, twice; but see I already had the fabric earmarked for the pattern anyway; and just decided go for it; whip it up, make it happen.

side

Fabric; pale teal denim, just very slightly stretchy, with a reverse print of smudgy roses.  This was a remnant given to me by my friend LW, who was cleaning out her stash.  Something funny/miraculous; the remnant was kinda oddly and awkwardly shaped, yet it was absolutely perfect for the pattern pieces! like it was cut just perfectly to fit them all on with the smallest of scraps leftover.  I freakingLOVE when this happens! it’s like the planets aligned for a pattern/fabric match made in heaven  🙂  Even if I was feeling a bit meh about V1247 to start with, when I laid out the pattern pieces and saw how perfect it was it totally galvanised me into excited pattern-love all over again.  I managed to cut my skirt about 10cm longer than the pattern, and I cut the pocket linings and waistband facing from a small piece of nani Iro quilting cotton, from the little bundle of pieces that Mum gave to me for my birthday, for my rag-doll Sally.  I used it for her tote bag.

waistband-facing

obligatory “waitress” pocket pic

pocketsaaaaaand, my week of exclusively wearing Vogue 1247 skirts, in a nutshell…!

owop16v1247

Back very soon, with something that is NOT Vogue 1247… I promise!!

Details:

Skirt; Vogue 1247, lengthened by about 10cm, teal denim
Top; Nettie, by closet case patterns with my own collar variation, ivory knit; details here
Cardigan; knitted by me, Audrey in Unst, wool bought in Paris as a souvenir, details here
Tights, my own pattern, black stretch, details here and my tutorial for making your own custom fit tights pattern is here
Socks (not seen); hand knit by me, details here
Boots; made by me, details here

back

pinterestmail

sage skirt, sage skirt, ivory top, orange hand warmers


Hello!  I’ve got a small handful of new stuff to show off present … four things to be precise!

DSC_0006Firstly, two sage green/pale coffee, checked tweed skirts.  I inherited this beautiful quality piece of wool tweed from my grandmother’s stash after she passed away.  Although I earmarked it straight away as two skirts for Cassie and myself I just hadn’t got around to it and have sat on it all this time.  It was one of those fabrics I couldn’t bring myself to cut into… you know, inherited from Granny, plus exceptionally good quality, equals inevitable thoughts of sewing tragedy followed by eternal self-damnation…. but I’m making myself get over that nonsense nowadays.  Make it!  Enjoy it!  Live dangerously!  So, finally…  it helps too that I think Cassie has now grown into fabric of this calibre  😉 not that she didn’t deserve high quality fabrics before, but you know what I mean!  it’s very much a grown-up fabric and makes a very smart little work skirt for her now that she has a serious and professional career. The fabric really is beautiful stuff… fine and evenly woven, and there are flecks of all sorts of colours in with the sage green/coffee check… blue, red and gold, caramel brown, forest green, and a hint of purple and black.  It has no identifier on it but it wouldn’t surprise me if it was a fully English tweed.  My grandmother was very much into that sort of thing  🙂
Also, this is possibly the first time that my fabulously neutral garage wall has failed me in showing up a garment nicely!!  it blends in way too much here!  Maybe the gorgeous fabric shows up better in Cassie’s picture, below.  Here, she is wearing her skirt with this caramel coloured merino tee that I made for her previously.

DSC_0009IMG_8989

Both skirts are pretty much identical, apart from the size, of course!!  Both made using Vogue 8363; the waistbands and pocket linings are cut from cotton calico, and the lining is a beige polyacetate.  Ivory/beige invisible zips in both skirts, closure by a wide hook and eye, and I cut the linings big and eased the extra fullness into the waistband with big pleats, for some wearing ease.  As always, I like to hand-stitch the waistband facings and lining down on the inside, much neater I think and the fabric deserved a really nice finish  🙂

skirt innards


IMG_5691

Next up, a little top for Cassie!  we bought this ivory/grey cotton French terry while we were in Japan recently… and can I just say… OmigawdthisfabricisthemostGORGEOUSstuff and I would sob with pitiful happiness if only I knew I could go back to Japan again… *sigh*  When Caspatternmagic3sie moved out of home she left this fabric behind and I almost started to factor it into my own plans mwahahahahaha… but of course she hadn’t forgotten it, o no!  The reason she had deviously left it behind was so that I could make something for her with it!  HA!  She chose the wings top from Pattern Magic 3, modified so as to have the wings gone; I’ve made this for myself once previously too, and I like Cassie’s new one so much I’m now wondering why I threw mine away!  I left the lower edge raw so it curls up nicely, and the sleeve edges and neckline I overlocked the raw edge, turned it under once and did a nice discreet little zig-zag to finish it.  It looks quite nice, I think.

DSC_0004
Item number four, and actually this is nothing to write home about really… I refashioned the fabric from an old woollen jumper of Craig’s into cosy new hand warmers for me.  I have my nice sheen green knitted hand warmers, that I’ve been wearing all winter, but! It’s still cold, I’m bored to tears with all my winter clothes and I just really fancied a new colour.  And the jumper was such a divinely rich tangerine-y colour and going begging because it had developed a large moth hole in the front.  Also, it had felted and shrunk a little bit when some careless person had accidentally tossed it in with too hot of a wash, tut tut *whistles innocently* and I have NO IDEA who that could have been, hum de hum!!!  Anyway!!  I cut open the whole jumper, assessed for holes, and cut out two rectangles, carefully avoiding said holes and a few stains.  I kept the ribbing intact for the bottom edge, and cut holes for my thumbs, overstitched those all nice and secure, and sewed the long side up.  I put them so the seams are on the outside because I liked the bobbly look of them, then sewed a little casing in the top edge and inserted a ring of elastic so they stay up my arm.  Bam! and bob’s your uncle.  New hand warmers, and making use of an old thing that would have otherwise been tossed out.  WIN!

Details:

Item 1)

Top; Burdastyle 04/2014-111, white bobbly stuff, details here
Skirt; Vogue 8363, sage green/coffee check wool tweed
Tights; my own pattern, black stretch stuff, details here and my tute for making your own custom-fit tights pattern is here
Boots; made by me, my own design, details here

item 2)

Top; drafted by me, caramel coloured merino wool, details here
Skirt; Vogue 8363, sage green/coffee check wool tweed

item 3)

Top; the wings top from Pattern Magic 3, ivory French terry cotton knit

item 4)

Handwarmers: made from an old jumper
Tshirt; self-drafted, dyed black cotton jersey, details here
Skirt; Vogue 1247, dyed purple denim, details and my review of this pattern here
Cardigan; Miette knitted by me, details here
Cowl; knitted by me to my own design, details and my original pattern is here
Tights; my own pattern, black stretch stuff, details here and my tute for making your own custom-fit tights pattern is here
Boots; made by me, my own design, details here

orange hand warmers

pinterestmail

Marimekko dress

marimekkowhat’s with the ballet pose? I have no idea.  Anyway… I have a Marimekko dress.  *pinches self*  *sits in reverent silence for a minute*

marimekko fabric

See, to have a Marimekko dress is something I’ve kinda lusted after for a long long time…  I grew up in a Scandinavian style house decorated in modern Scandinavian decor by my everything-Scandinavian-loving parents.  White walls, those white Danish “UFO” light fittings; lots of pared-back wood and leather, with simple lines, naif flowers sprouting upon our white bathroom tiles and so I’ve been trained to have an affinity for it from a very early age …  When we went to Scandinavia I was quite disappointed to not find any Marimekko fabric during our time there, although to be honest it was a gamble since we didn’t actually manage to get to Finland, the home of Marimekko.   All through Sweden, Denmark, Norway and Iceland I harboured vain hopes and searched and searched, obviously coming up empty handed, sob.  And I’ve never ever seen any for sale here in Perth; so it’s proven to be pretty elusive stuff!   But no more!  you CAN get Marimekko fabric in Australia!  🙂

marimekkoside

Fabric; Marimekko Pieni Unikko 2 in blue/yellow,  and is actually from an Australian fabric store, Yulki’s Home Decor in Hobart, Tasmania, believe it or not!  I’m a wee bit sad the brick-and-mortar store is not next door to me! but only a wee bit because the store does (obviously) have online sales.  Thank goodness for that!    It’s a little price-y but well worth it because it really is absolutely beautiful quality, thick and strong, happily not too thick for clothing, and the colours and prints are of course instantly recognisable, modern day classics, so vibrant and optimistic and happy.  There’s a pretty good reason why they are perennially popular and still in production after fifty years… everyone loves a happy vibrant print, and I’m pretty sure I will not be able to resist buying more either *blush*.   The currently available range can be viewed here.  I’m rather excited to see it comes in oilcloth too… mmmmm, raincoat? *plotting plotting*

marimekko selvedgeI’ve kept the selvedge from off the fabric, and have sewn these inside one of the pockets! just because I love information like this… namely: this design is by prominent Finnish designer Maija Isola, and was created in 1964!  out by a year but definitely still of my era, haha.  “Pieni unikko” translates literally to “little poppy”  I’m not sure what KI 2009 means yet, but I’m investigating….  Also, how cool is it that the laundering info is printed on the selvedge?! so classy and very considerate really, it’s been along long time since I’ve seen such consideration in a fabric.  That information’s the kind of thing I usually forget the very minute I swan out of the shop with my new fabric tucked under my wing.

marimekko label

I also sewed this: “The Label”  inside my dress… half of me wanted to sew it on the outside, haha! but of course Marimekko is instantly recognisable so there’s probably no need.

hehe, I’ve just asked my husband, and he had no idea! so maybe I should amend that, ahem… instantly recognisable to design and fabric afficianadoes, then!

burda 04:2014dress 108,04:2014

Pattern; I used dress 108, the cover dress from the Burda 04/2014 issue, also known as the Wings Dress.  It’s an interesting design; looks simple but has quite a lot of seaming which I chose to highlight with inset strips of acid-yellow cotton voile, bought from Calico House.  My method for framing pieces with contrasting inset strips like this is here…  and my method for edging those pocket openings as part of the side seam inset strip is here…  I also edged the neckline, armholes and the lower hem and edges of the overskirt in yellow cotton as well.  The dress closes with a long navy blue invisible zip in the centre back.  I agonised a bit over the colour to use here, the contrasts in the colours of the print are all pretty extreme! yellow? blue? black? white?  aaagh, so hard.  The navy blue turned out not too bad, I reckon.


pocket

The bodice has princess seams and tiny additional bust darts in the centre front piece that I believe are called a Dior dart.  This is the very first time I’ve come across one of these! it just adds a little more nuance to the “shape” in the bodice.    Although there is all that shaping by seaming, the design is actually little boxy, believe it or not.  I shaped mine a bit more throughout those seaming lines, bringing it in at the waist more and giving a bit more width at my hips.  The princess seams in the bodice visually connect to the gore lines in the skirt, which itself has an interesting overskirt feature with the pockets in it.  I think it looks quite interesting and pretty and lends the whole dress a slightly sporty “wraparound” feel to it, a bit like a sports or tennis dress.

marimekko bodice

I finished the raw pocket edges inside the front overlays all with HongKong seaming, because they have a tendency to flap open and show!  So, I had to make sure the insides here look as lovely as possible.  Binding the seams visually ties the inside with the inset strips on the outside;  all those yellow edges everywhere just keeps it all nicely harmonious.  Well, I reckon it does…

marimekko skirtThe loose front pieces also allows you to have these big loose comfortable pockets that you can shove your hands in, while still maintaing quite a slimline dress overall.  As a result, the pattern uses very little fabric.  I managed to squeeze my pattern pieces out of 1.5m, which is not too bad, not too bad at all, I think *preens oneself on an exceptionally economic layout*  I had the merest of scraps left after cutting out my pieces, scraps, I tell you!  The pattern has you line the dress, and after a bit of um-ing and aah-ing, I decided to not.  Reason? summers here are very hot and I think the breeziness of this lovely cotton fabric is going to be perfect just as it is.

So that’s it! I love it paired up like here with my new white shoes.  A little bit sporty, a little bit flower child, a LOT summer;  my little bit of Marimekko loveliness is just awaiting to dazzle with ultra mod 60’s chic.  Right on.  🙂

Details:

Dress; Burdastyle 108;04/2014 in Marimekko cotton with cotton voile contrast
Shoes; my own design and made by me, details here

Pictured below on Cable Beach, Broome…   along with my hat and my new sandals

pinterestmail

khaki Tosti jacket

sidewaffle tostiHello!
For ages I’ve wanted to replace my old beloved khaki ripstop army-style jacket… I LOVED that thing and even did a 6 different ways post on it once.  At some point I decided I’d made the sleeves just a smidgeon too short so with some sadness passed it on to Cassie.  Who loves it equally, and wears it often… and I found myself pining for it all over again whenever I saw her wearing it!

Finally I’ve got around to making another one for ME!

tosti frontI just adore jackets with tonnes of hardware and detailing, like zips and lots of different bits and bobs and interesting pockets.  So set about planning for this one to be chockablock with loads of that sort of thing.  I considered using the same Burda pattern I used for the previous one, but I had to make lots of additions/adjustments to that in order to make it the complex, feature-laden army-style jacket that I wanted, which is fine! but since making that one, lots of great patterns have popped up with all those features already incorporated into the pattern.  Eventually I settled upon the Tosti utility coat pattern by Yuki of Waffle Patterns, it had the detachable hood, the belt, tabs, the front zip placket for a separating zip, multitudes of pockets, in fact: everything I wanted.  I was really attracted to the variety of different pockets it had and was pretty determined to use each and every one of them in my jacket.  There are six different types of pockets!   an inner breast pocket, a sleeve pocket, two options for breast pockets and two options for hip pockets, and I used ’em all.  Cassie thought I was loopy putting four different pockets on the front of the jacket, but I stubbornly ploughed ahead because I love that mishmash look…   I know you’re not supposed to do ALL of them with the pattern, but I just wanted it!

Beware; pocket overload approaching…


Breast pockets:(L) inner welt pocket with flap; and (R) inner pocket with exposed zip closure

tosti pocketAtosti pocketB

Hip pockets; (L) bellows pocket with patch flap; and (R) patch pocket with exposed zip closure

tosti pocketC tosti pocketD

(left) patched sleeve pocket with exposed zip closure; and (right) inner breast pocket with double welt

tostipocketE tostipocketF

The fabrics: the khaki cotton ripstop was from some online fabric store in the US; and I can’t remember its name, sorry!  My neighbour Meggipeg and I went in together with a joint order.  The fabric was priced reasonably, but postage was horrendously and shockingly expensive… the trap!!… but at least I got the ripstop so that’s ok.  One of the saddest things ever is when Spotlight ceased stocking this stuff  *sob*

The plaid cotton flannelette I used for lining and all zips were from Spotlight, and I had to visit two stores to find them all! and the copper press studs were from both KnitWit and Spotlight  Yes, I had to visit a coupla stores to get enough of those too!  The belt buckle was harvested from an old belt.  Originally, I had decided I would put thin black fleece interlining in my jacket for some warmth, but once I had the lining made up I realised I wouldn’t need it.  The jacket is pretty warm enough already, and truthfully, if it was any warmer it actually wouldn’t be all that useful in our climate.

front tosti

back tosti
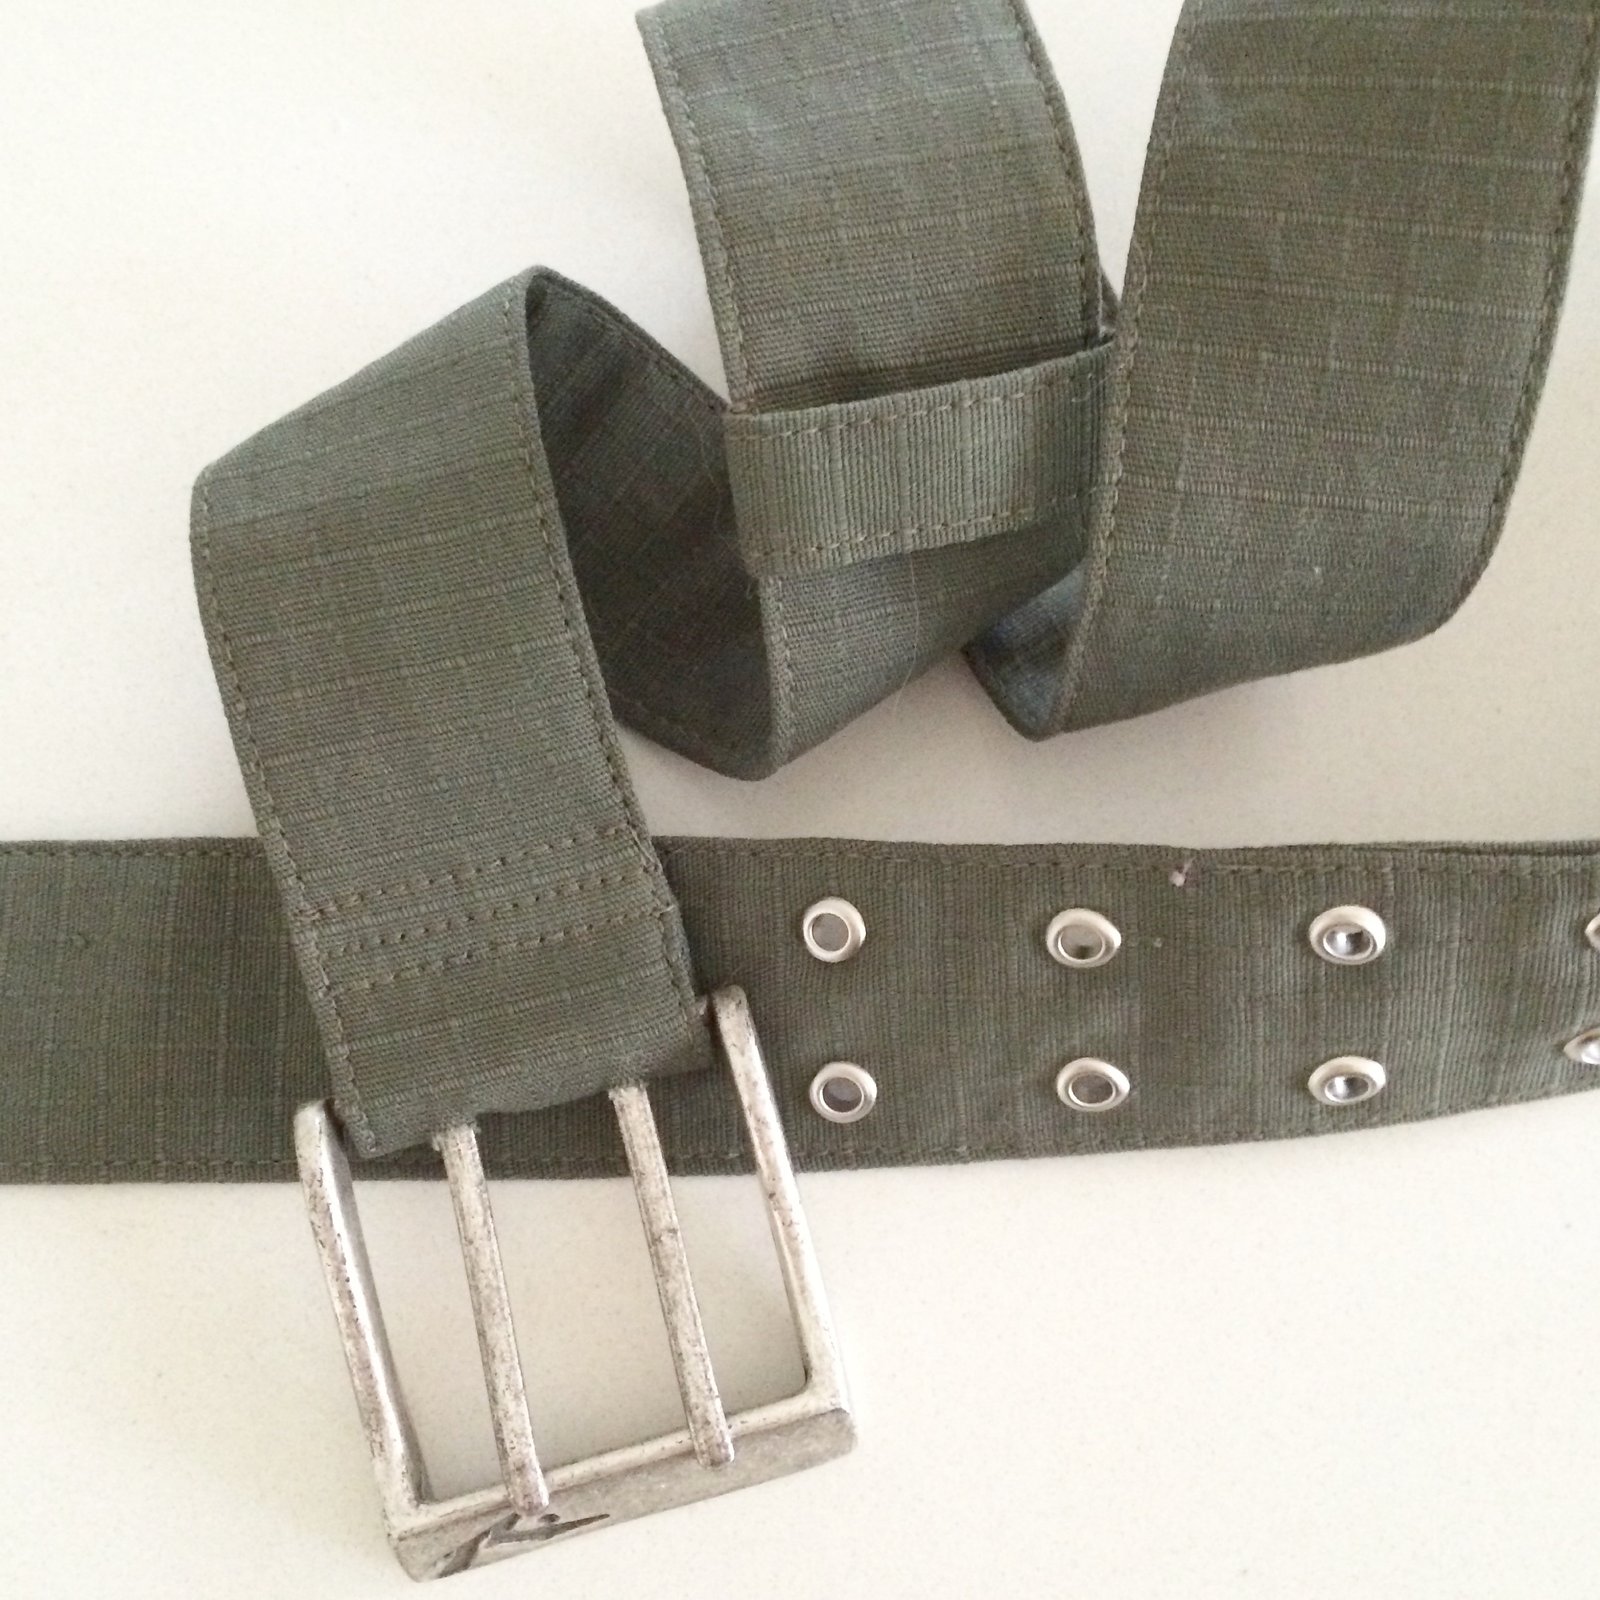
There is tonnes of topstitching all over, so satisfied that part of me that adores precision sewing.  I’m that weirdo that LOVES topstitching! and am pretty much totally and blissfully happy when I’m hunched over the machine, chugging along; churning out lines upon lines of precise, neatly and evenly spaced, stitching.  The wonderful thing about this ripstop is that the little squares in the weave of the fabric make precision stitching and lining up pieces to be perfectly square very very easy.

(L) belt loop; (R) shoulder tab.  Press studs from kits bought in KnitWit and Spotlight

tosti belt loop shoulder tabs

(L) collar with press studs for hood, (R) wrist tabs

tosti collar wrist tabs

No one  will ever see or notice this but me, but the plaid lining matches up all the way around #patternmatchingfreak

The lining appears a bit “blowsy” in this picture, due extra ease in the lining… many of the lining/shell seams have you make folds/pleats in the lining when stitching the lining to the shell, to account for the extra length.

lining

I’d cut a plaid lining for the hood too but decided upon a self-lined hood.  Less jarring in appearance when the hood is worn down.  Which, let’s face it, it most usually is!

Opening zip, and placket with press studs; (below) self-lined hood

tosti zip plackethood1

hood

I also made the belt, using a buckle harvested from off an old belt of Tim’s, and eyelets from a kit from Spotlight

belt

I posted lots of these progress pictures on instagram also, so I’m sorry for the doubling up.  But; you know instagram; it’s fabulous and I love it, but stuff gets “lost” in no time there since it’s not that easy going back to see things you posted a year ago…so I’m reproducing all those pictures here.  I know a lot of us seamsters have migrated pretty solidly to instagram now; in fact it seems fewer and fewer people are reading blogs and it could be that blogging like this is dead or at least heading towards comatose.  I mean, let’s be honest, how many people actually click over when you see the words “on the blog now, link in profile”?   Precious few… and that’s just the way of things, times change, people now are of the moment and often are only interested in one quick visual; and that’s all absolutely fine and ok and completely understandable.   I think though that I will still keep on with writing this blog anyway, just for my own benefit.  I want to keep going for the same reasons I started it; as a record of all my sewing projects, because I can search for and look up older things up here, and you can’t really do that over on instagram all that easily.

Hmmm, well that was a bit of a diversion there, sorry!  I’m writing a review of this pattern, but no point in reading it really.  It’s pretty glowing, because I absolutely LOVE this pattern; I thoroughly enjoyed making my jacket, and am totally enamoured of the final product.  Fair dinkum; I’m going to wear this to rags.

back1

Fun fact; after a week of FREEZING cold weather.. today, the day after I finished this jacket and wanted to wear it for the first time; of course today was then an unseasonably warm day.  Naturally!!  But you know what? I wore it anyway, mwahahaha.  Unco-operative weather! pfffft!  see what I care!  I wore it, and I roasted.  And I loved every minute of it!!

Details:

Jacket; the Tosti utility jacket by Waffle patterns, khaki cotton ripstop with plaid, brushed cotton lining
striped Tshirt; self drafted, details here
Skirt; Vogue 1247, cotton corduroy, originally yellow and dyed brown, details here
Tights, self-drafted, black stretch, details here
Shoes; made by me, details here

ootd

pinterestmail

Purple-y top

purple
Here I am, waiting for the ferry to head off into town, and so I took a quick, in-the-wild photo of my new top.  Thanks, random bench! for being a good little makeshift tripod, and I don’t mind at all that you snuck into my photo!

OK.  Remember how I said I had enough of the purple-y, wine-coloured silk/linen knit leftover after making this skirt for a little matching top? except with contrasting sleeves? well ok yeah; that explains the whole project, actually.  Probably no need for me to babble on any longer!

Well, maybe just the bare details…

Fabric; silk/linen knit from KnitWit.  Black pleather for the sleeves from Spotlight, leftover from some of my shoes and my moto jacket.

Pattern; the epaulette cut and sewn, pattern 4 from “she has a mannish style” by Yuko Takada.  I just wanted a loose-ish, boxy kind of a plain Tshirt, fairly featureless.  I have a pretty good, tried and true, woven Tshirt pattern that I tend to use, NewLook 6483; but I really wanted something with no bust shaping darts.   I really really like the Named Inari tee pattern, which is super popular in the sewing community right now; for a good reason of course! however since I had this book already I thought I’d give the epaulette tee a whirl as a possible Inari tee stand-in.  So I traced it up and boom…. done.  Super easy.  And I really like it! and will no doubt use the same pattern again.   🙂

The only variation I made was to leave off the eponymous epaulettes, haha.  Maybe next time…

Finishing nitty gritty: 1) I left off the facings, and just overlocked the raw edge then stitched down a simple seam allowance inside the neckline.  Simple, neat, and not bulky at all.   neckline

2) Pleather sleeve edges were clean cut using my rotary cutter and left raw.  sleeve edge

3) Lower hemline; turned under twice in a deep hem and hand stitched;

hemline

So that’s it!  Simple easy, unexciting, but then again the most useful things often are.  Leftovers and scraps, so basically “free”… yay!  I really like the sleeves, and hopefully they do add just some little bit of je nais se quois…  and don’t just look like a random add-on because, you know; not enough fabric.
epaulettemannish stylepaprika jade skirt

Details:

Top; top 4, the epaulette tee, from She Has a Mannish Style  by Yuko Takada.  The English translation re-named this book She Wears the Pants, and I’ve previously ranted here on my blog about what a bad, bad, or at least awfully misleading title this is; since the book contains very few patterns for any actual pants.  grrr
Skirt; the Jade skirt by Paprika Patterns, same purple knit, details here
Bodysuit (under) the Nettie by Closet Case patterns, black stretch, details here
Gloves; hand knitted by me using a 60’s pattern, charcoal merino, details here
Tights; my own design, black stretch, details here and my tutorial for making your own custom-fit tights pattern is here
Boots; made by me, details here

purple back

pinterestmail
Switch to mobile version
↓